> For the complete documentation index, see [llms.txt](https://docs.bdb.ai/data-pipeline-2/llms.txt). Markdown versions of documentation pages are available by appending `.md` to page URLs; this page is available as [Markdown](https://docs.bdb.ai/data-pipeline-2/getting-started/homepage/create/creating-a-new-job/job-editor-page.md).

# Job Editor Page

The Job Editor Page provides the user with all the necessary options and components to add a task and eventually create a Job workflow.

## **Adding a Task to the Job Workflow**

*Once the Job gets saved in the Job list, the user can add a Task to the canvas. The user can drag the required tasks to the canvas and configure it to create a **Job workflow** or **dataflow**.*

The ***Job Editor*** appears displaying the ***Task Pallet*** containing various components mentioned as **Tasks**.&#x20;

<details>

<summary>Task Pallet</summary>

The ***Task Pallet*** is situated on the left side of the User Interface. It has a ***Task*** tab listing the various tasks.

The tasks are displayed in the below-given image:

![](https://content.gitbook.com/content/q2i9CKCFbySxr6jRoJfA/blobs/o0NAy05rYbJA2lJUGrhw/image.png)

</details>

<details>

<summary>Task Components</summary>

The components used under the ***Task Pallet*** are broadly classified into:

* [x] **Readers**: Your repository of data can be a reader for you. It could be a database, a file, or a SaaS application.
* [x] **Writers**: The databases or data warehouses to which the data is loaded by the Jobs.
* [x] **Transforms**: The series of transformation tasks that help to cleanse, enrich, and prepare data for smooth analytics.

*<mark style="color:green;">Please Note:</mark> Refer to the* [***Task Components*** ](/data-pipeline-2/getting-started/homepage/create/creating-a-new-job/task-components.md)*page for the more details.*

</details>

<details>

<summary>Searching a Task</summary>

* There is a ***Search Task*** space provided on the ***Task Panel***.

&#x20;     ![](https://content.gitbook.com/content/q2i9CKCFbySxr6jRoJfA/blobs/HbhA1OZlFcICdkL37PfM/image.png)

* The user can search for a task by typing in the given space, the related Tasks will appear as suggestions.

&#x20;     ![](https://content.gitbook.com/content/q2i9CKCFbySxr6jRoJfA/blobs/zxH0uQblNkzYleCLEp1G/image.png)

* Select a suggestion for search and the ***Task Panel*** will display the customised view based on the searched task.

&#x20;     ![](https://content.gitbook.com/content/q2i9CKCFbySxr6jRoJfA/blobs/F42lUfPmtTKpxqWVcrYt/image.png)

</details>

## Steps to create a Job Workflow

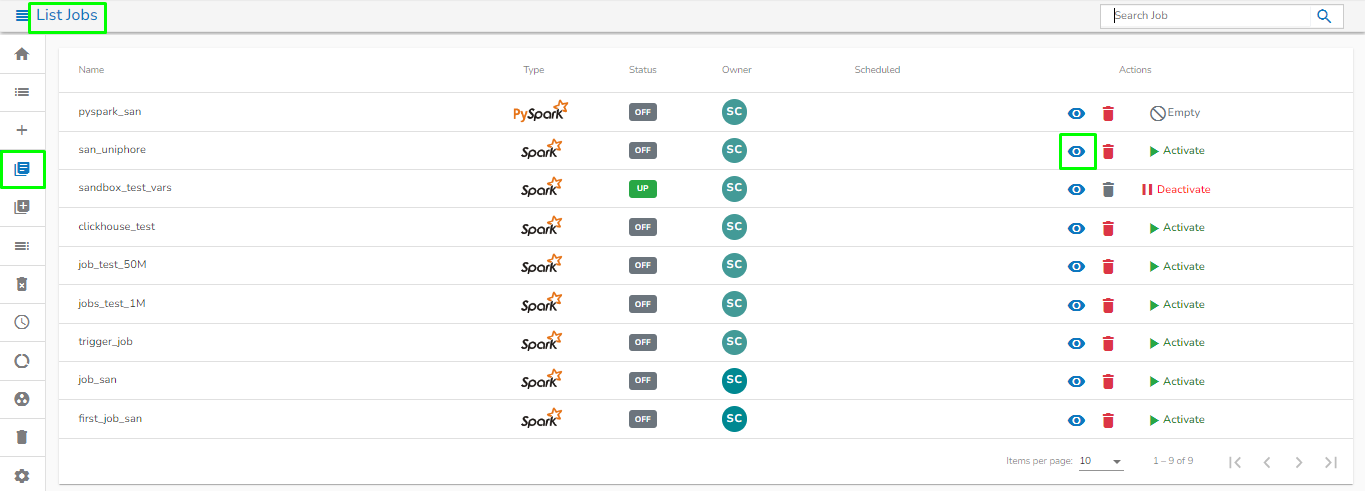
* Navigate to the ***Job List*** page.&#x20;
* It will list all the jobs and also it will show the type of the Job whether it is **Spark** Job or **PySpark** Job in the type column.
* Select a ***Job*** from the displayed list.
* Click the ***View*** icon for the Job.     &#x20;

<figure><img src="https://content.gitbook.com/content/q2i9CKCFbySxr6jRoJfA/blobs/Ocqfcrv10OItV5JZomBS/image.png" alt=""><figcaption></figcaption></figure>

{% hint style="info" %}
*<mark style="color:green;">Please Note:</mark> Generally, the user can perform this step-in continuation to the **Job** creation, but in case the user has come out of the **Job Editor** the above steps can help to access it again.*
{% endhint %}

* The ***Job Editor*** opens for the selected Job.
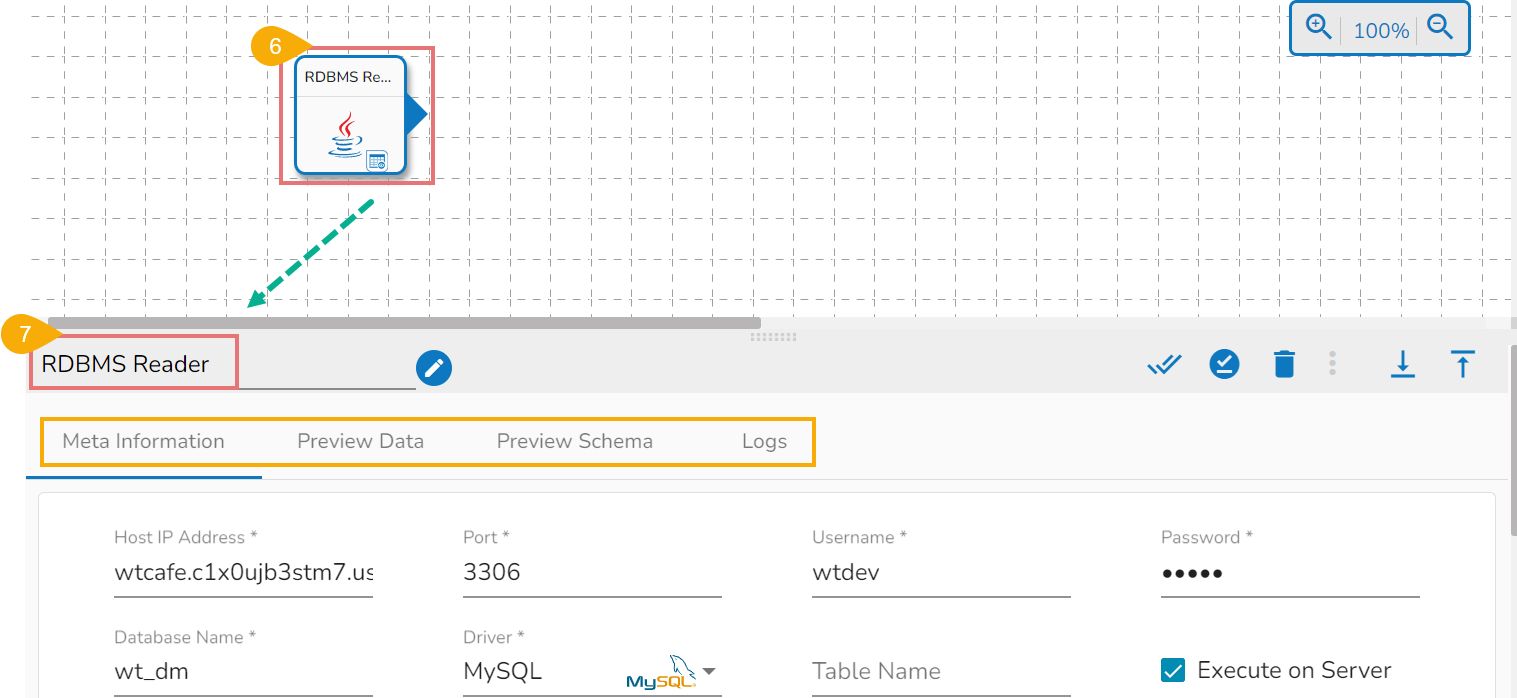
* Drag and drop the new required task or make changes in the existing task’s meta information or change the task configuration as the requirement. (E.g., the DB Reader is dragged to the workspace in the below-given image):

&#x20;        ![](https://content.gitbook.com/content/q2i9CKCFbySxr6jRoJfA/blobs/H6d0khvd7Hze9waKHplw/image.png)

* Click on the dragged task icon.
* The task-specific fields open asking the meta-information about the dragged component.

<figure><img src="https://content.gitbook.com/content/q2i9CKCFbySxr6jRoJfA/blobs/ApRMbiZtlM4dPWkKeOJN/image.png" alt=""><figcaption></figcaption></figure>

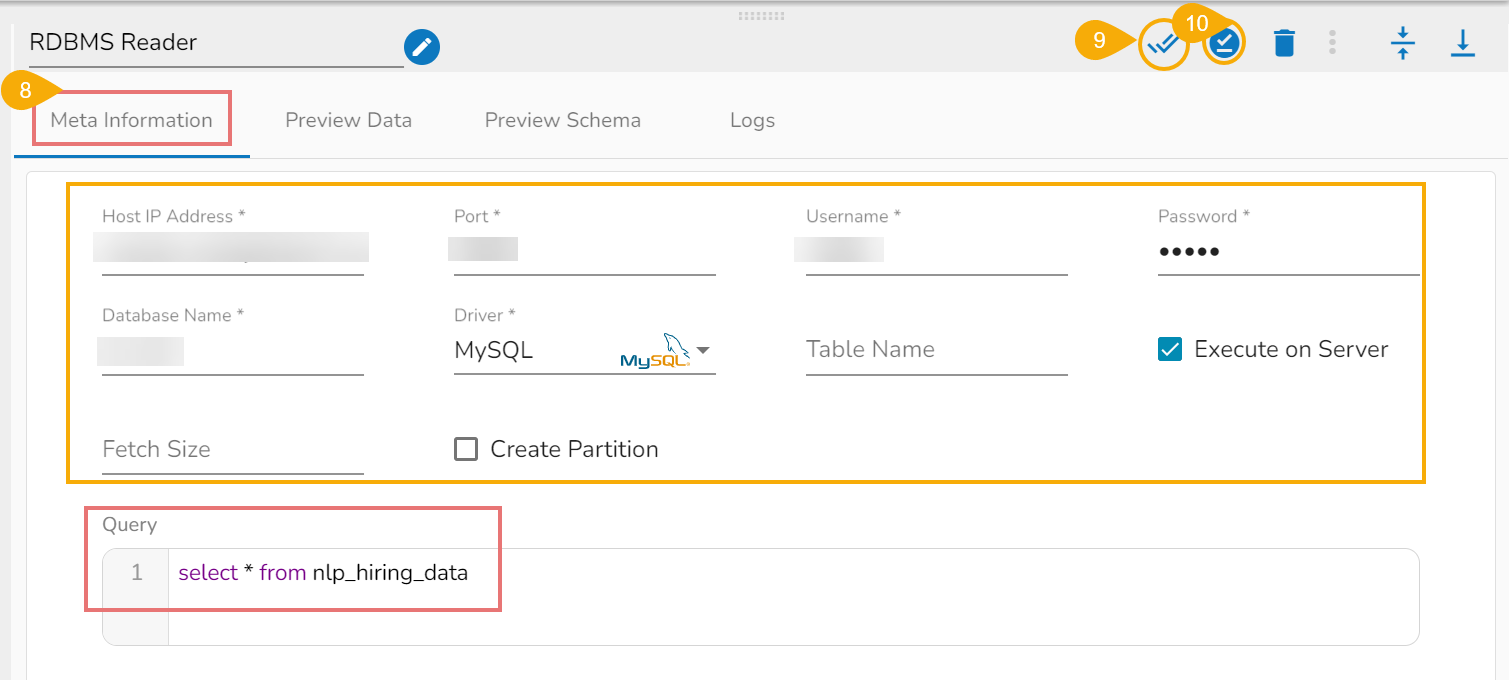
* Open the Meta Information tab and configure the required information for the dragged component.
  * Host IP Address
  * Port number
  * Username
  * Password
  * Database Name
  * Driver- Select from the drop-down menu
  * Table Name
  * Query
  * Fetch size
* Click the given icon to validate the connection.&#x20;
* Click the ***Save Task in Storage*** icon.

&#x20;     &#x20;

<figure><img src="https://content.gitbook.com/content/q2i9CKCFbySxr6jRoJfA/blobs/8pOyUHxDxx6DPmltuFiY/image.png" alt=""><figcaption></figcaption></figure>

* A notification message appears.

&#x20;     ![](https://content.gitbook.com/content/q2i9CKCFbySxr6jRoJfA/blobs/LuRzcyLuTjDm8TTefaJK/image.png)

* Click the ***Activate Job*** <img src="https://content.gitbook.com/content/q2i9CKCFbySxr6jRoJfA/blobs/gUMZjmUxvt9JcSaxanMo/image.png" alt="" data-size="line"> icon to activate the job(It appears only after the newly created job gets successfully updated).

&#x20;      ![](https://content.gitbook.com/content/q2i9CKCFbySxr6jRoJfA/blobs/YujTrLQA3N1i3O14XQWK/image.png)

* A dialog window opens to confirm the action of job activation.
* Click the ***YES*** option to activate the job.

&#x20;       ![](https://content.gitbook.com/content/q2i9CKCFbySxr6jRoJfA/blobs/tXgD8IV3a33maDxq3tHs/image.png)

* A success message appears confirming the activation of the job.

&#x20;     ![](https://content.gitbook.com/content/q2i9CKCFbySxr6jRoJfA/blobs/5VgYjRYR1z6favtGG06Q/image.png)

* The Development mode opens for the selected Job.

{% hint style="info" %}
*<mark style="color:green;">**Please Note:**</mark>*&#x20;

* *Jobs can be run in the **Development mode*** ![](https://content.gitbook.com/content/q2i9CKCFbySxr6jRoJfA/blobs/Rxwzy1vcEcxlNKHgu5GU/image.png) *as well. The user can preview only **10** records in the **preview** tab of the task if the job is running in the **Development mode** and if any writer task is used in the job then it will write only **10** records in the table of given database.*

* *If the job is not running in Development mode, there will be no any data in the preview tab of tasks.*
  {% endhint %}

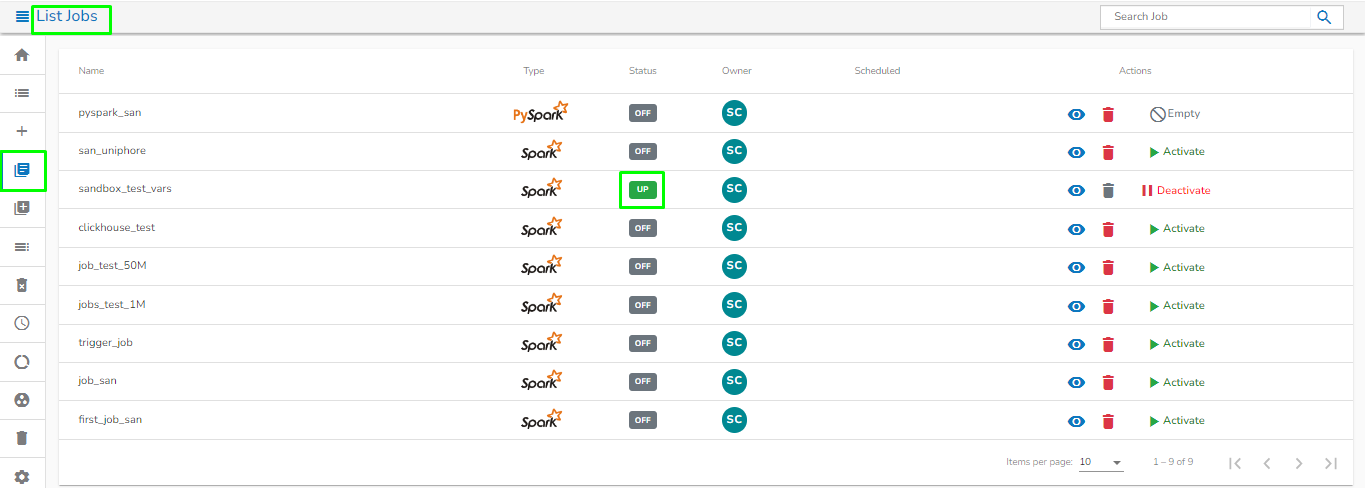
* The ***Status*** for the Job gets changed on the job List page when they are running in the Development mode or it is activated.
<figure><img src="https://content.gitbook.com/content/q2i9CKCFbySxr6jRoJfA/blobs/vxQnNfJpai7w06P7Pqo4/image.png" alt=""><figcaption></figcaption></figure>

{% hint style="info" %} <mark style="color:green;">Please Note:</mark> *Click the **Delete*** ![](https://content.gitbook.com/content/q2i9CKCFbySxr6jRoJfA/blobs/36MHsZpEiJbxBLMuEpBM/18.png) *icon from the Job Editor page to delete the selected job. The deleted job gets removed from the Job list.*
{% endhint %}

## **Toggle Log Panel**

The Toggle Log Panel displays the Logs and Advanced Logs tabs for the Job Workflows.

* Navigate to the ***Job Editor*** page.
* Click the ***Toggle Log Panel*** icon on the header.

![](https://content.gitbook.com/content/q2i9CKCFbySxr6jRoJfA/blobs/jsmaeKvnGFO8cZz3KZ2p/19.png)

* A panel ***Toggles*** displaying the collective logs of the job under the ***Logs*** tab.

&#x20;      ![](https://content.gitbook.com/content/q2i9CKCFbySxr6jRoJfA/blobs/Dfgo0VrwOe8QBubvISsr/image.png)

* Select the ***Advanced Logs*** tab to display the pod status of the complete Job.

&#x20;     ![](https://content.gitbook.com/content/q2i9CKCFbySxr6jRoJfA/blobs/3HAtJNq0fRYMAPX61c00/image.png)

{% hint style="info" %}
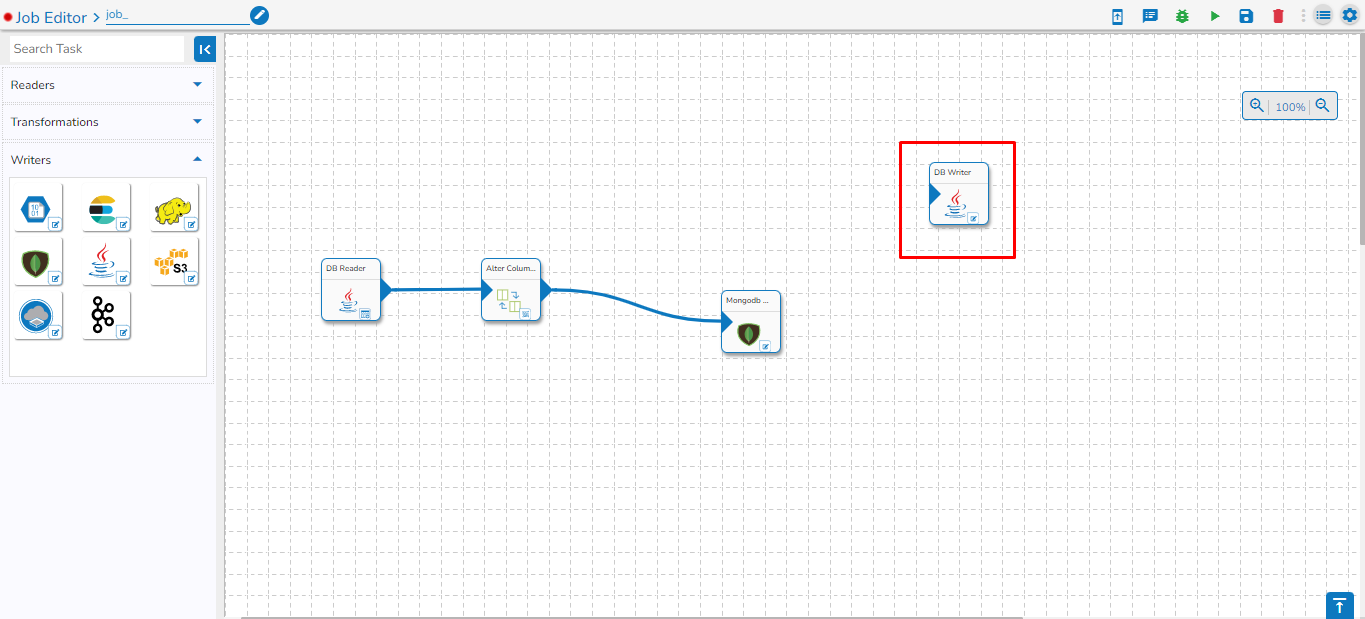
*<mark style="color:green;">**Please Note:**</mark> If any orphan task is used in the **Job Editor Workspace** which is not in use, it will cause failure for the entire Job. So, avoid using any orphan task in the Job. Please see the below given image for the reference. In the below given image, the highlighted DB writer task is an orphan task and if the Job is activated, then this Job will get failed because the orphan DB writer task is not getting any input.*&#x20;

*So, it is recommended to avoid using an orphan task inside the Job Editor workspace.*
{% endhint %}

<figure><img src="https://content.gitbook.com/content/q2i9CKCFbySxr6jRoJfA/blobs/3YeR06dTiVwheBJq9lEU/image.png" alt=""><figcaption><p><em><strong>Using an Orphan task inside a Job Workspace</strong></em></p></figcaption></figure>

### **Icons on the Header panel of the Job Editor Page**

<table><thead><tr><th width="126.33333333333331">Icon</th><th>Name</th><th>Action</th></tr></thead><tbody><tr><td><img src="https://content.gitbook.com/content/q2i9CKCFbySxr6jRoJfA/blobs/g7S4ZnIxtp2OCdGfmcWK/image.png" alt=""></td><td>Job Version details</td><td>Displays the latest versions for the Jobs upgrade.</td></tr><tr><td><img src="https://content.gitbook.com/content/q2i9CKCFbySxr6jRoJfA/blobs/5H2nicoou51YW2mMyowv/image.png" alt="" data-size="line"></td><td>Log Panel</td><td>Displays Jobs logs.</td></tr><tr><td><img src="https://content.gitbook.com/content/q2i9CKCFbySxr6jRoJfA/blobs/seLbgBlusJPjRvoobeDD/image.png" alt="" data-size="line"></td><td>Preview Mode</td><td>The Job can be previewed, and 10 records will be displayed.</td></tr><tr><td><img src="https://content.gitbook.com/content/q2i9CKCFbySxr6jRoJfA/blobs/nNJ0DzPsGAqWQlq0a2vg/image.png" alt="" data-size="line"></td><td>Activate Job</td><td>Activates the current  Job.</td></tr><tr><td><img src="https://content.gitbook.com/content/q2i9CKCFbySxr6jRoJfA/blobs/rCFOUyBoMLUfhHEpBjxw/image.png" alt="" data-size="line"></td><td>Update Job</td><td>Updates the current Job.</td></tr><tr><td><img src="https://content.gitbook.com/content/q2i9CKCFbySxr6jRoJfA/blobs/j6J2hIcJ1lOpVtrcMAZF/image.png" alt="" data-size="line"></td><td>Edit Job</td><td>To edit the job name/ configurations.</td></tr><tr><td><img src="https://content.gitbook.com/content/q2i9CKCFbySxr6jRoJfA/blobs/TcCXmoOxRLvj5ZSFfvf5/image.png" alt="" data-size="line"></td><td>Delete Job</td><td>Deletes the current Job.</td></tr><tr><td><img src="https://content.gitbook.com/content/q2i9CKCFbySxr6jRoJfA/blobs/sfAzHDZwoZiOoizvFXrq/image.png" alt="" data-size="line"></td><td>List Job</td><td>Redirects to the <em><strong>List Job</strong></em> page.</td></tr><tr><td><img src="https://content.gitbook.com/content/q2i9CKCFbySxr6jRoJfA/blobs/udpK2Z7FY9Wr8NnEdFnB/image.png" alt="" data-size="line"></td><td>Settings</td><td>Redirects to the <em><strong>Settings</strong></em> page.</td></tr></tbody></table>
