
Python Job(On demand)
The on-demand python job functionality allows you to initiate a python job based on a payload using an API call at a desirable time.
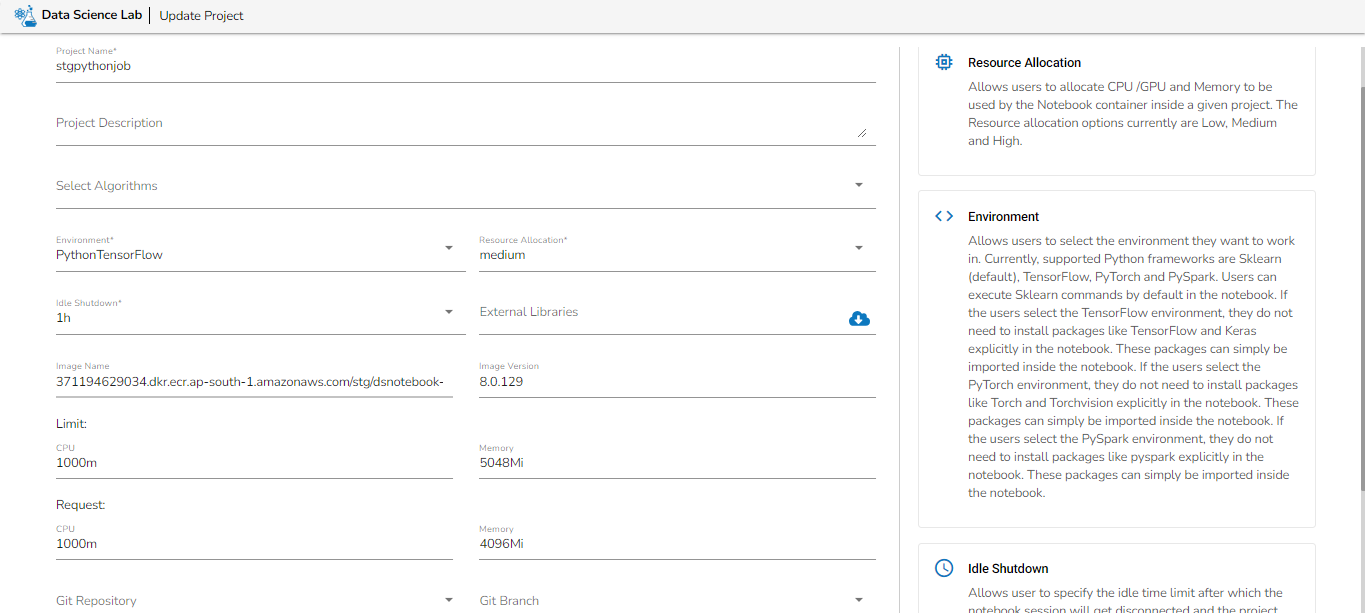
Before creating the Python (On demand) Job, the user has to create a project in the Data Science Lab module under Python Environment. Please refer the below image for reference:
Please follow the below given steps to configure Python Job(On-demand):
Navigate to the Data Pipeline homepage.
Click on the Create Job icon.
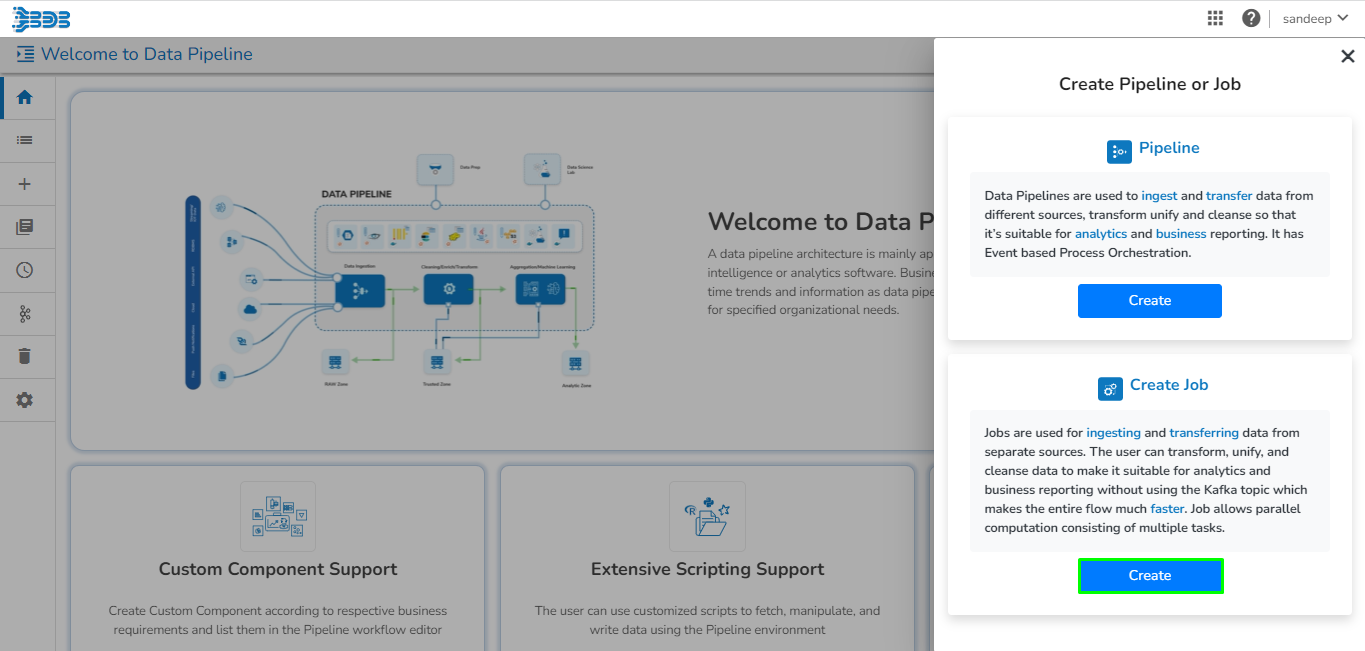
The New Job dialog box appears redirecting the user to create a new Job.
Enter a name for the new Job.
Describe the Job(Optional).
Job Baseinfo: In this field, there are three options:
Spark Job
PySpark Job
Python Job
Select the Python Job option from Job Baseinfo.
Check-in On demand option as shown in the below image.
Docker Configuration: Select a resource allocation option using the radio button. The given choices are:
Low
Medium
High
Provide the resources required to run the python Job in the limit and Request section.
Limit: Enter max CPU and Memory required for the Python Job.
Request: Enter the CPU and Memory required for the job at the start.
Instances: Enter the number of instances for the Python Job.

The payload field will appear once the "On Demand" option is checked. Enter the payload in the form of a JSON array containing JSON objects.
Trigger By: There are 2 options for triggering a job on success or failure of a job:
Success Job: On successful execution of the selected job the current job will be triggered.
Failure Job: On failure of the selected job the current job will be triggered.
Click the Save option to create the job.
A success message appears to confirm the creation of a new job.
The Job Editor page opens for the newly created job.
Based on the given number of instances, topics will be created, and the payload will be distributed across these topics. The logic for distributing the payload among the topics is as follows:
The number of data on each topic can be calculated as the ceiling value of the ratio between the payload size and the number of instances.
For example:
Payload Size: 10
Number of Topics=Number of Instances: 3
The number of data on each topic is calculated as Payload Size divided by Number of Topics:

In this case, each topic will hold the following number of data:
Topic 1: 4
Topic 2: 4
Topic 3: 2 (As there are only 2 records left)
Naming convention of Topics in On Job demand
In the On-Demand Job system, the naming convention for topics is based on the Job_Id, followed by an underscore (_) symbol, and successive numbers starting from 0. The numbers in the topic names will start from 0 and go up to n-1, where n is the number of instances. For clarity, consider the following example:
Job_ID: job_13464363406493
Number of instances: 3
In this scenario, three topics will be created, and their names will follow the pattern:
Please Note:
When writing a script in DsLab Notebook for an On-Demand Job, the first argument of the function in the script is expected to represent the payload when running the Python On-Demand Job. Please refer to the provided sample code.
job_payload is the payload provided when creating the job or sent from an API call or ingested from the Job trigger component from the pipeline.
Configuring the Meta Information of Python Job(On demand)
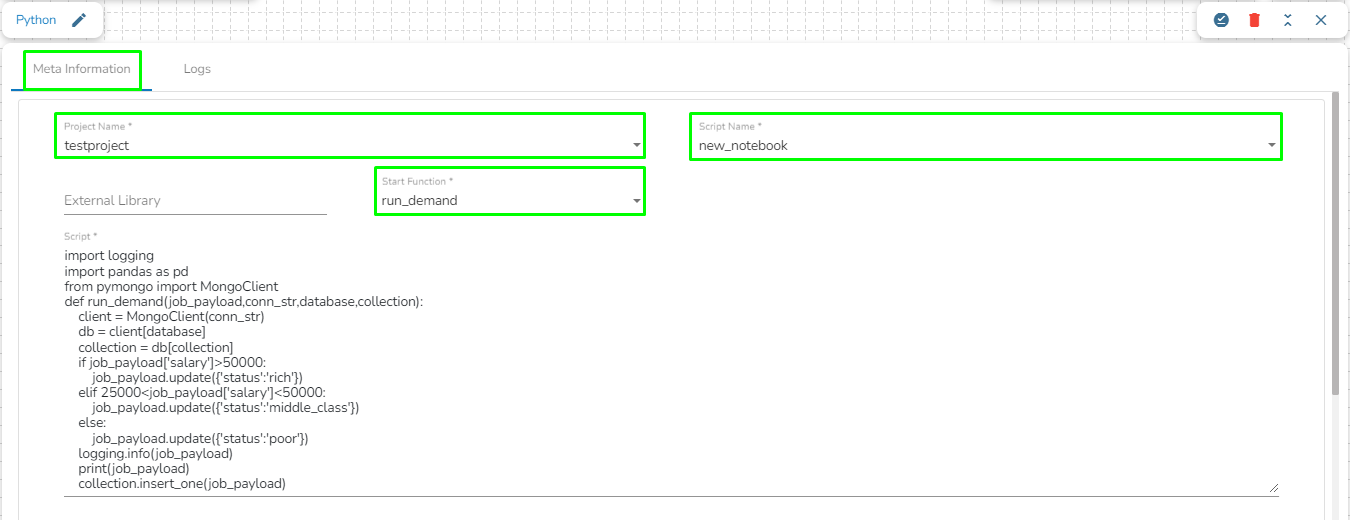
Once the Python (On demand) Job is created, follow the below given steps to configure the Meta Information tab of the Python Job:
Project Name: Select the same Project using the drop-down menu where the Notebook has been created.
Script Name: This field will list the exported Notebook names which are exported from the Data Science Lab module to Data Pipeline.
External Library: If any external libraries are used in the script the user can mention it here. The user can mention multiple libraries by giving comma (,) in between the names.
Start Function: Here, all the function names used in the script will be listed. Select the start function name to execute the python script.
Script: The Exported script appears under this space.
Input Data: If any parameter has been given in the function, then the name of the parameter is provided as Key, and value of the parameters has to be provided as value in this field.
Activation of Python (On demand) Job
Python (On demand) Job can be activated in the following ways:
Activating from UI
Activating from Job trigger component
Activating from UI
For activating Python (On demand) job from UI, it is mandatory for the user to enter the payload in the Payload section. Payload has to be given in the form of a JSON Array containing JSON objects as shown in the below given image.

Once the user configure the Python (On demand) job, the job can be activated using the activate icon on the job editor page.
Please go through the below given walk-through which will provide a step-by-step guide to facilitate the activation of the Python (On demand) Job as per user preferences.
Sample payload for Python Job (On demand):
Activating from Job Trigger component
The Python (On demand) job can be activated using the Job Trigger component in the pipeline. To configure this, the user has to set up their Python (On demand) job in the meta-information component within the pipeline. The in-event data of the Job Trigger component will then be utilized as a payload in the Python (On demand) Job.
Please go through the below given walk-through which will provide a step-by-step guide to facilitate the activation of the Python (On demand) Job through Job trigger component.
Please follow the below given steps to configure Job trigger component to activate the Python (On demand) job:
Create a pipeline that generates meaningful data to be sent to the out event, which will serve as the payload for the Python (On demand) job.
Connect the Job Trigger component to the event that holds the data to be used as payload in the Python (On demand) job.
Open the meta-information of the Job Trigger component and select the job from the drop-down menu that needs to be activated by the Job Trigger component.

The data from the previously connected event will be passed as JSON objects within a JSON Array and used as the payload for the Python (On demand) job. Please refer to the image below for reference:

In the provided image, the event contains a column named "output" with four different values: "jobs/ApportionedIdentifiers.csv", "jobs/accounnts.csv", "jobs/gluue.csv", and "jobs/census_2011.csv". The payload will be passed to the Python (On demand) job in the JSON format given below.
Last updated