> For the complete documentation index, see [llms.txt](https://docs.bdb.ai/data-science-lab-6/llms.txt). Markdown versions of documentation pages are available by appending `.md` to page URLs; this page is available as [Markdown](https://docs.bdb.ai/data-science-lab-6/tabs-for-a-dsl-project/data/data-list-page.md).

# Data List Page

This section of the document describes the actions attributed to the added data inside a Data Science Lab project.

## Preview

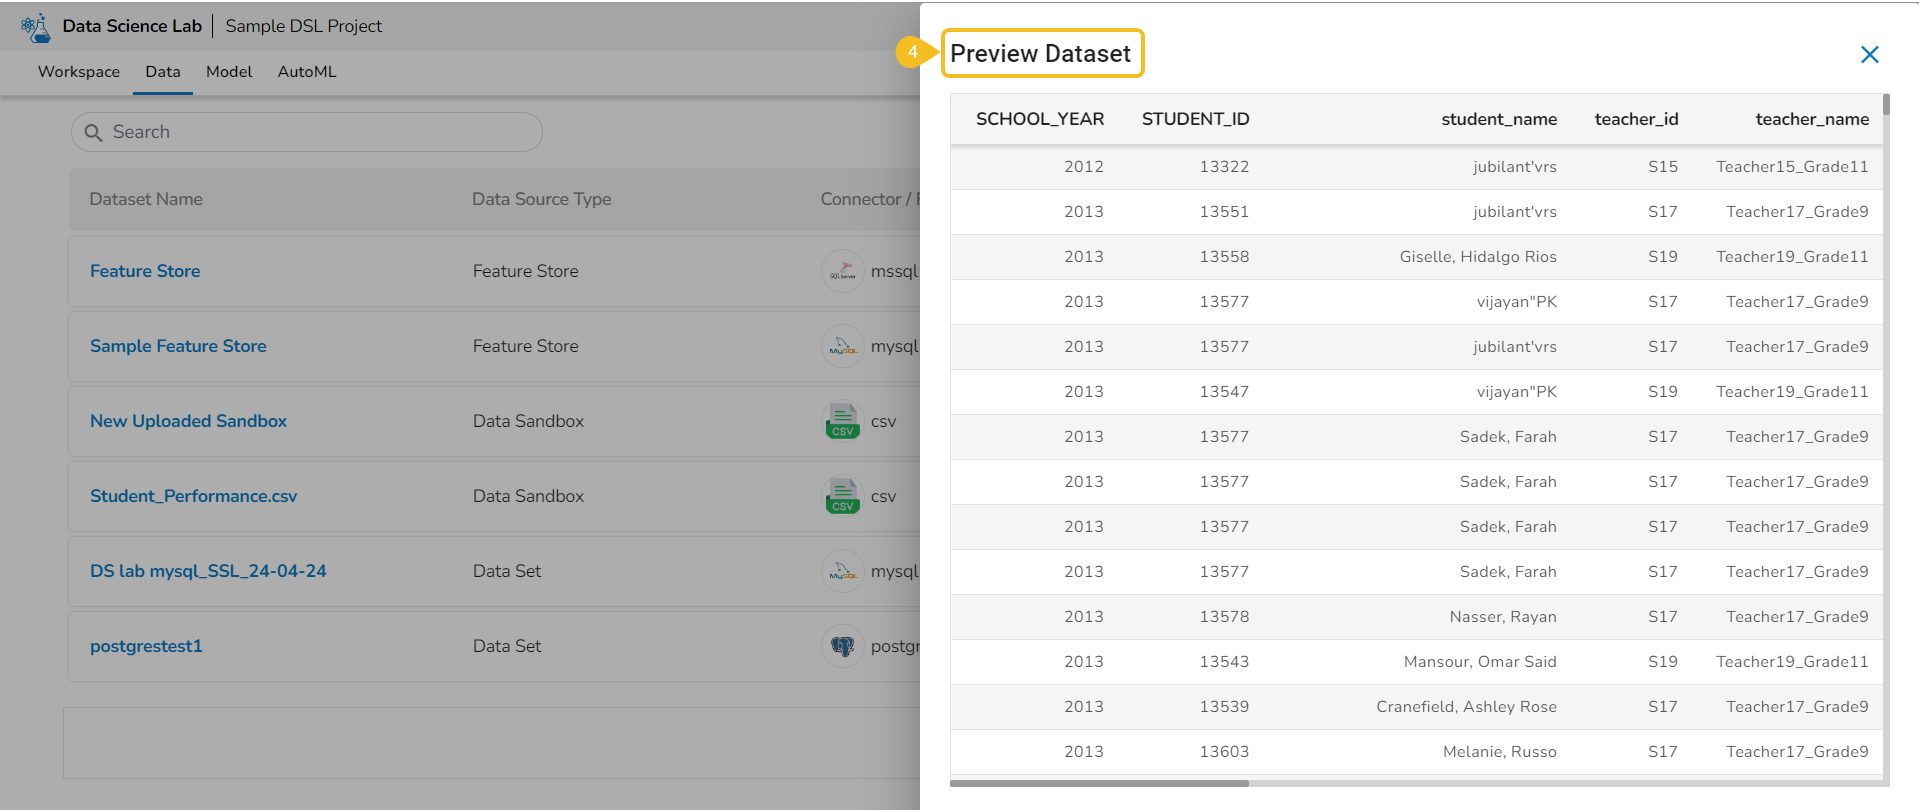
The Data Preview option displays a sample of the actual data for the user to understand the data values in a better way.

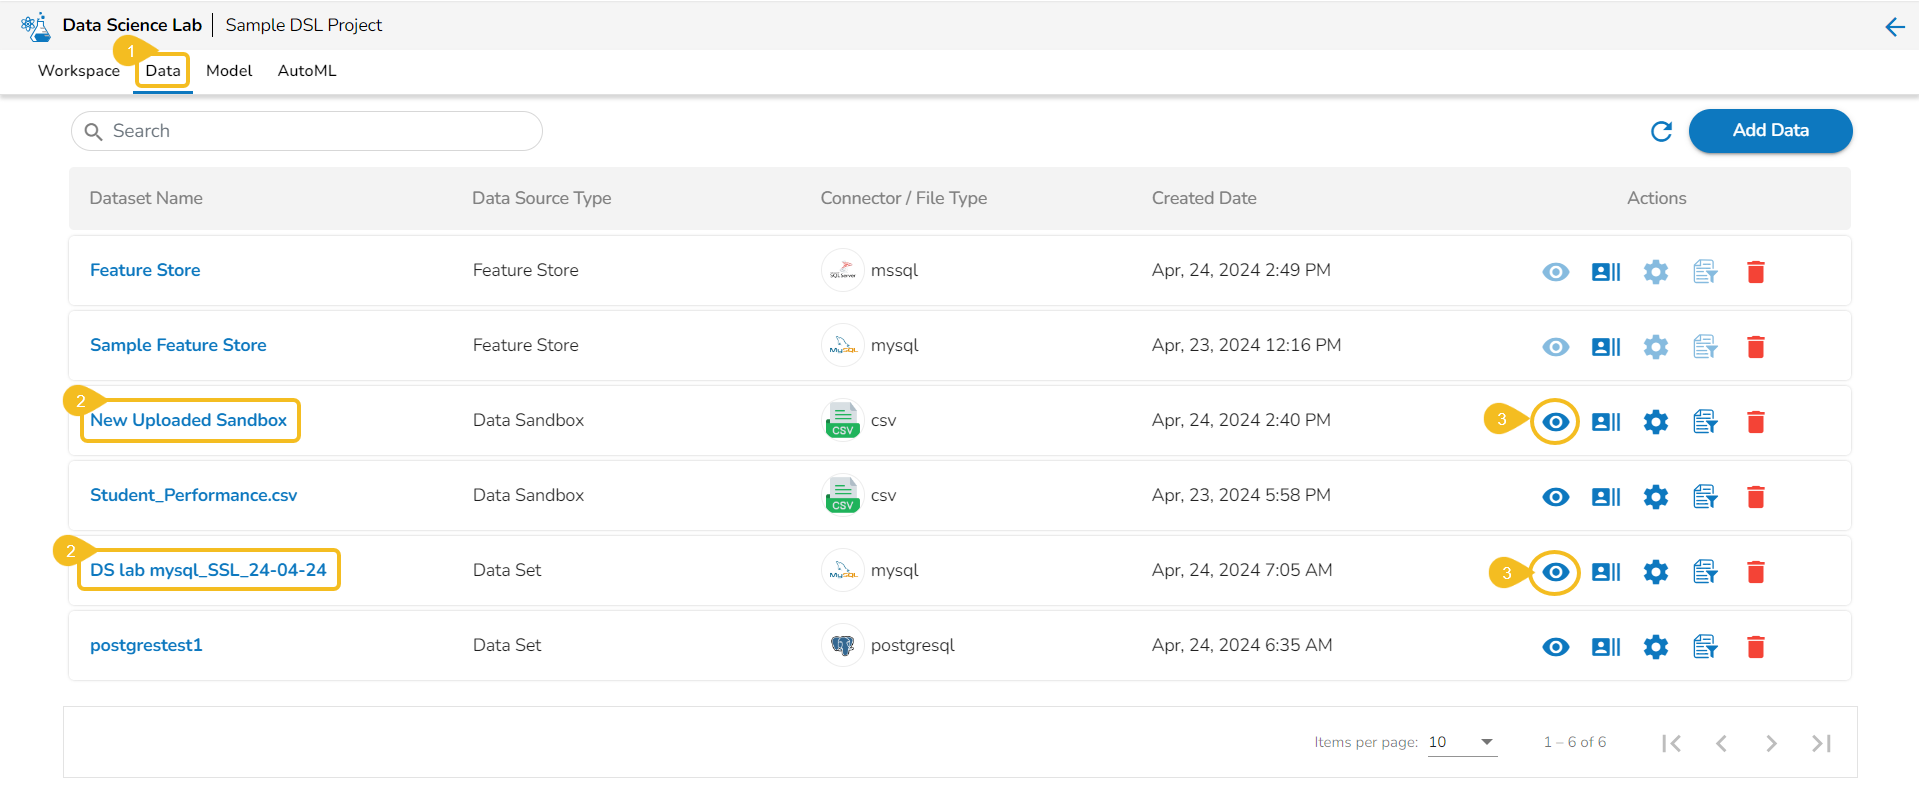
* Navigate to the ***Dataset*** list inside a Project.
* Select either a Data Sandbox or Dataset from the displayed list.&#x20;
* Click the ***Preview*** icon for the selected data entity.&#x20;

<figure><img src="https://content.gitbook.com/content/28ipFzCz8EMtVtHrBFLx/blobs/VDgKfHwo7ICubcPSNJ7Y/image.png" alt=""><figcaption></figcaption></figure>

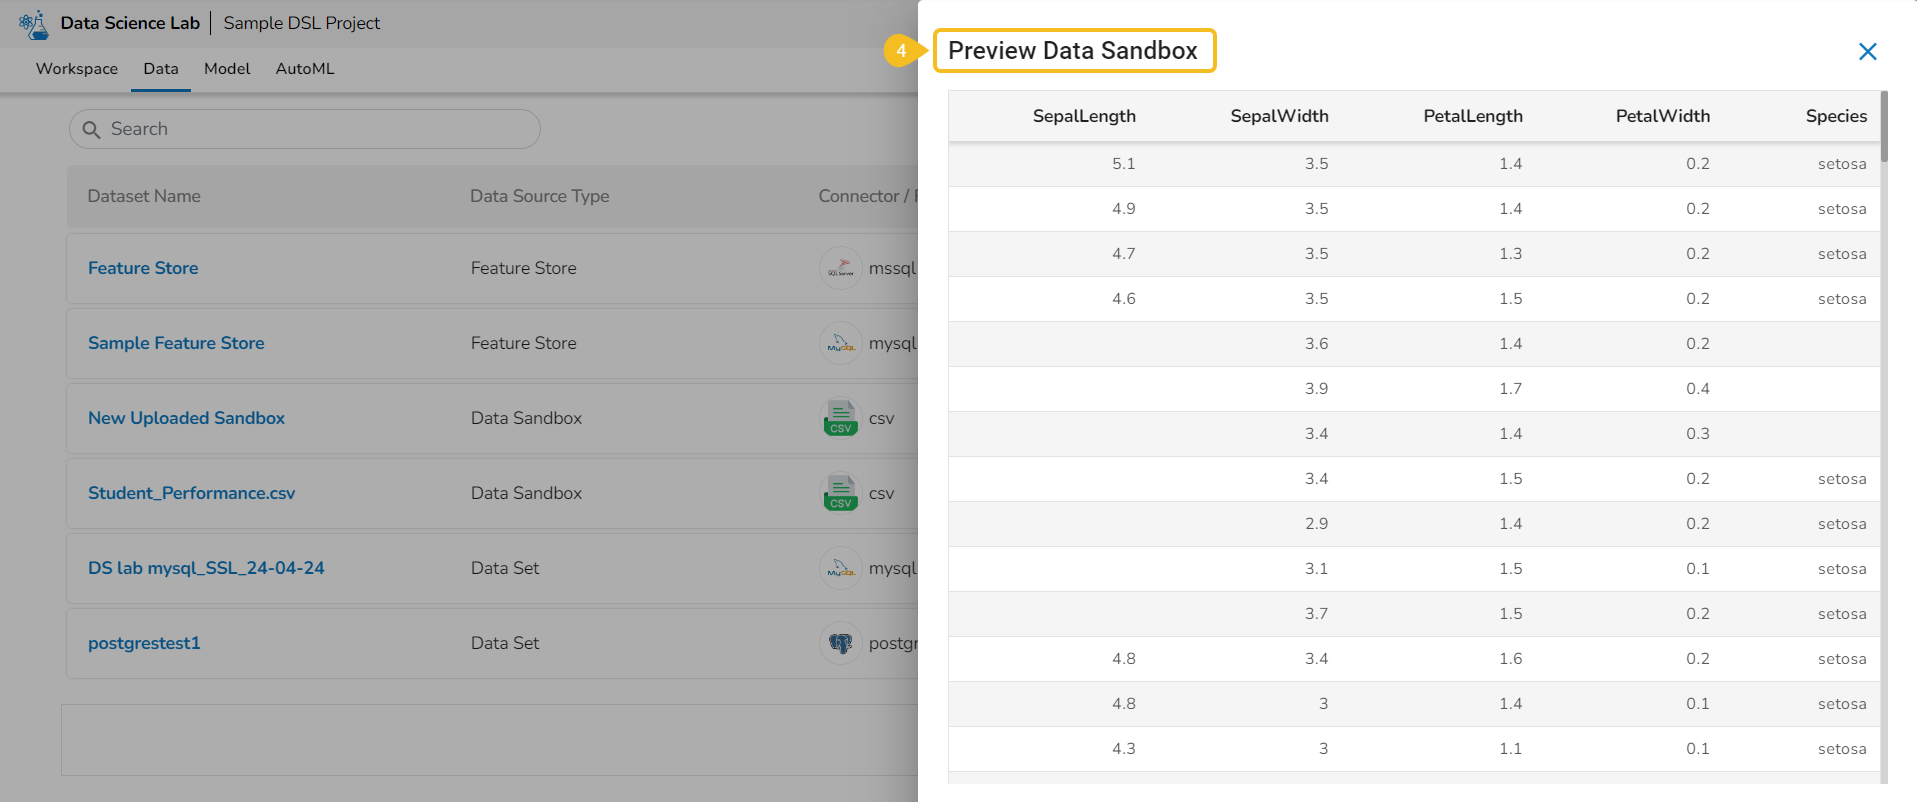
* The ***Preview Data Sandbox*** or Preview Dataset page opens based on the selected data.

<figure><img src="https://content.gitbook.com/content/28ipFzCz8EMtVtHrBFLx/blobs/y7LtQiuzjVssYcVDuD93/image.png" alt=""><figcaption><p><em><strong>Preview of a Data Sandbox</strong></em></p></figcaption></figure>

<figure><img src="https://content.gitbook.com/content/28ipFzCz8EMtVtHrBFLx/blobs/5Y69CyJ5mFnbN1ShVckH/image.png" alt=""><figcaption><p><em><strong>Preview of a Dataset</strong></em></p></figcaption></figure>

{% embed url="<https://files.gitbook.com/v0/b/gitbook-x-prod.appspot.com/o/spaces%2FhFEvs46BuaaHAKNDSR6T%2Fuploads%2FEukcZDgPpxYBMbDbg5wV%2FPreview%20data.mp4?alt=media&token=7f3a0380-98ad-47f4-9667-f97f34412af7>" %}
***Preview Data for multiple sheets Excel File***
{% endembed %}

## Data Profile

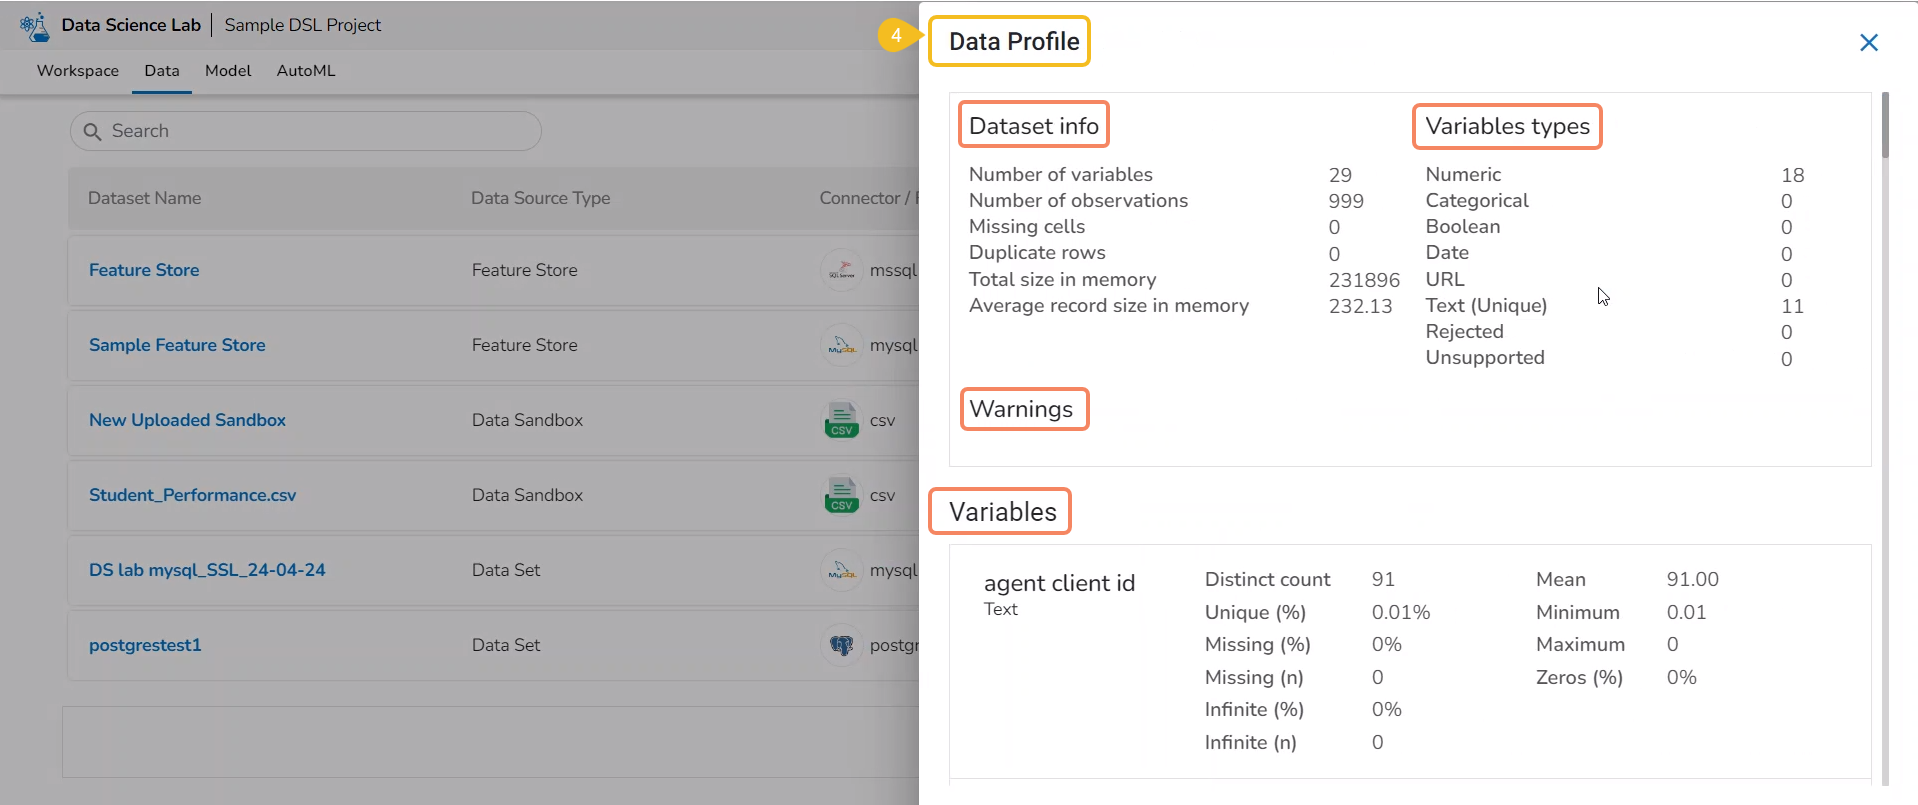
This action helps users to visualize the detailed profile of data to know about data quality, structure, and consistency. A data profile is a summary of the characteristics of a dataset. It is created as a preliminary step in data analysis to better understand the data before performing an in-depth analysis.

{% hint style="success" %}
*Check out the illustration provided at the beginning to get the full view of the Data Profile page.*
{% endhint %}

{% embed url="<https://files.gitbook.com/v0/b/gitbook-x-prod.appspot.com/o/spaces%2Fz33KQNYQvBTgQKJBgwTz%2Fuploads%2F0NFyixcP82ELwvzSGvPn%2FData%20Profile.mp4?alt=media&token=f2105b39-54b6-41e3-ac86-30e1e1899e12>" %}
***Displaying Data Profile for an added Feature Store*** &#x20;
{% endembed %}

{% embed url="<https://files.gitbook.com/v0/b/gitbook-x-prod.appspot.com/o/spaces%2FhFEvs46BuaaHAKNDSR6T%2Fuploads%2FIdbCMISzDe4NRMOQ53xm%2FData%20Profiling.mp4?alt=media&token=7b0c8a77-be80-4bc8-b25e-3b867a08485c>" %}
***Data Profile for a multiple sheets Excel File***
{% endembed %}

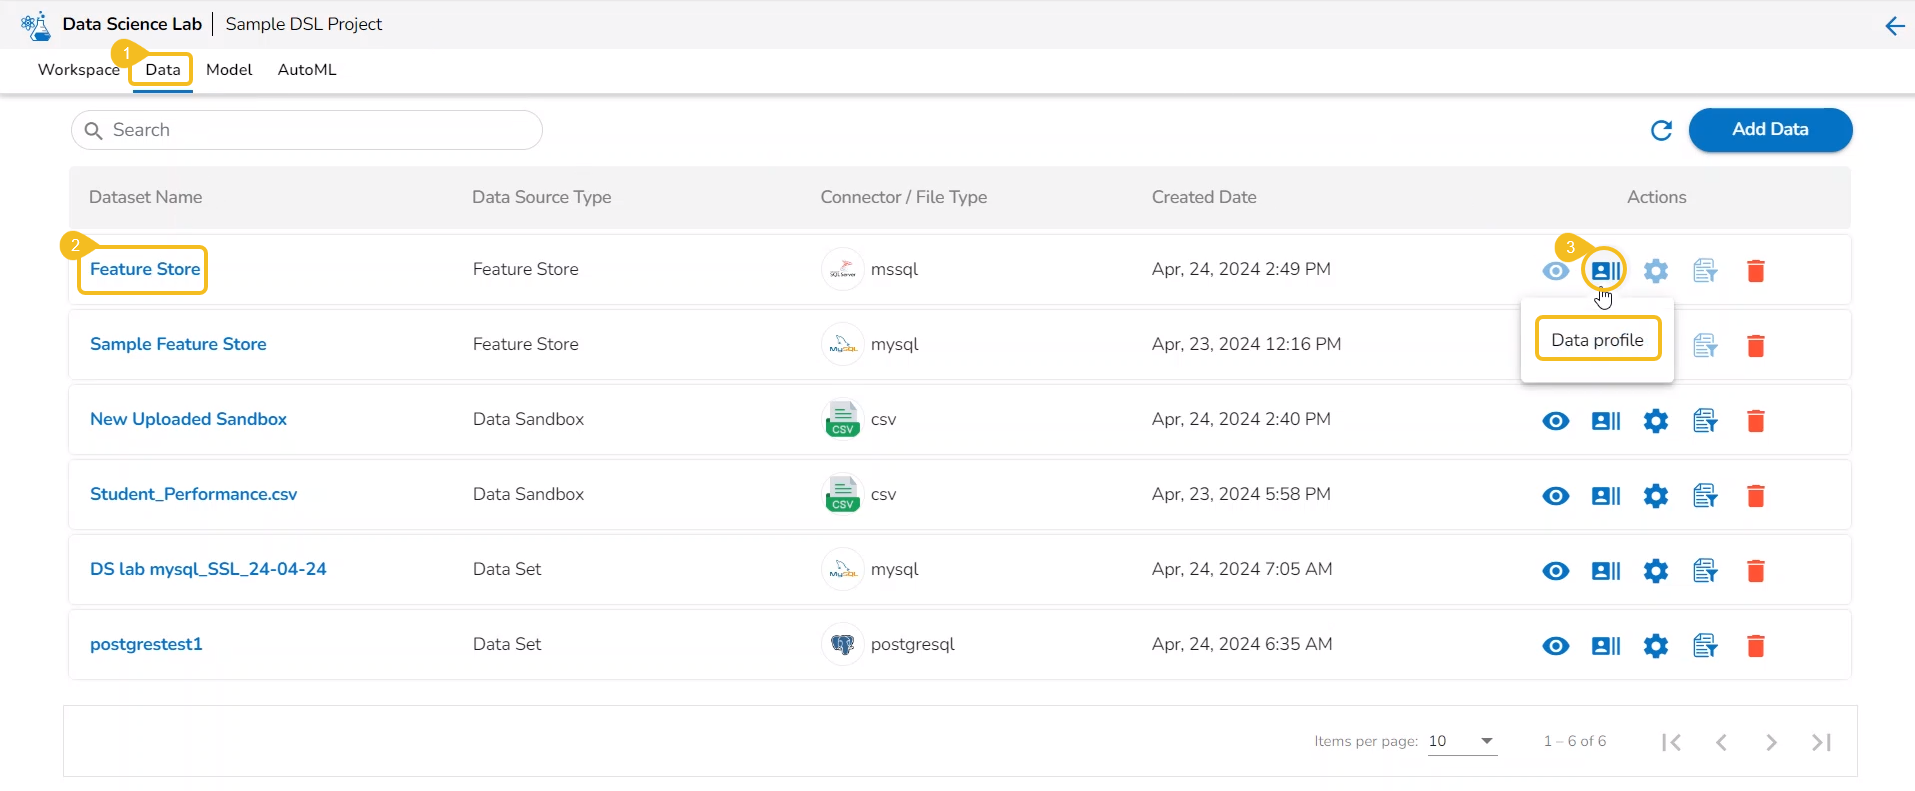
* Navigate to the Data list page.
* Select a Dataset from the list. It can be anything from a Dataset, Data Sandbox file, or Feature Store.&#x20;
* Click the ***Data Profile*** icon.

<figure><img src="https://content.gitbook.com/content/28ipFzCz8EMtVtHrBFLx/blobs/SCXYWUXj5d91Q4Lkg7Js/image.png" alt=""><figcaption><p><em><strong>Accessing Data Profile icon</strong></em> </p></figcaption></figure>

* The ***Data Profile*** drawer opens displaying the Data Set information, Variable Types, Warnings, Variables, Correlation chart, missing values, and sample.

<figure><img src="https://content.gitbook.com/content/28ipFzCz8EMtVtHrBFLx/blobs/umZO2tHBg3gVkcAAyd87/image.png" alt=""><figcaption><p><em><strong>Displaying the Data Profile for the selected Data</strong></em> </p></figcaption></figure>

## Create Experiment

&#x20;The *users can create a supervised learning (Auto ML) experiment using the **Create Experiment** option.*

{% hint style="success" %}
*Check out the illustration to create an auto ML experiment.*
{% endhint %}

{% embed url="<https://files.gitbook.com/v0/b/gitbook-x-prod.appspot.com/o/spaces%2Fz33KQNYQvBTgQKJBgwTz%2Fuploads%2FRiXW1dtdBNhEao7bMZ8a%2FCreating%20an%20Experiment.mp4?alt=media&token=6ede6b83-25ac-4cc2-b911-7a1d762ad06d>" %}
***Creating an Experiment***
{% endembed %}

{% embed url="<https://files.gitbook.com/v0/b/gitbook-x-prod.appspot.com/o/spaces%2FhFEvs46BuaaHAKNDSR6T%2Fuploads%2F4c8HImBazI9SA7yhOgJT%2FCreate%20experiment.mp4?alt=media&token=7d88db53-1b25-46c2-a3fa-34027cf201da>" %}
***Creating an Experiment using Excel file with Multiple Sheets***&#x20;
{% endembed %}

* Navigate to the **Dataset List** page.
* Select a ***Dataset*** from the list.
* Click the ***Create Experiment*** icon.

{% hint style="info" %}
*<mark style="color:green;">Please Note:</mark> An experiment contains two steps:*

* ***Configure**: Enter the Experiment name, Description, and Target column.*

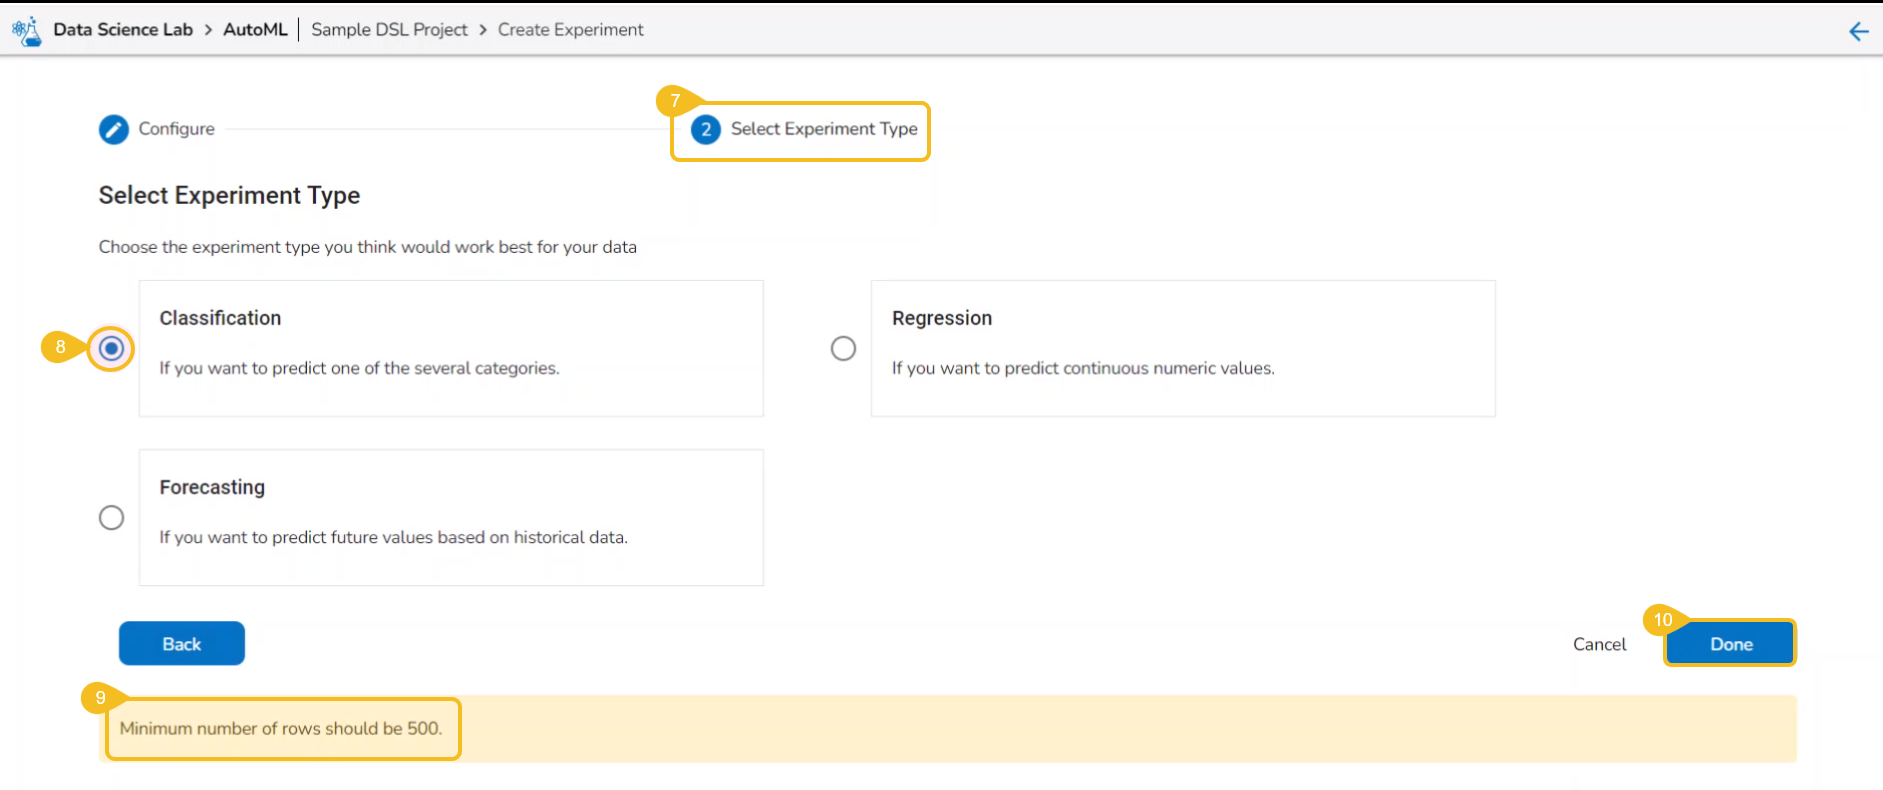
* ***Select Experiment Typ**e: Select an algorithm type from the drop-down menu.*
  * A ***Classification*** experiment can be created for discrete data when the user wants to predict one of the several categories.
  * A ***Regression*** experiment can be created for continuous numeric values.
  * A ***Forecasting*** experiment can be created to predict future values based on historical data.
    {% endhint %}

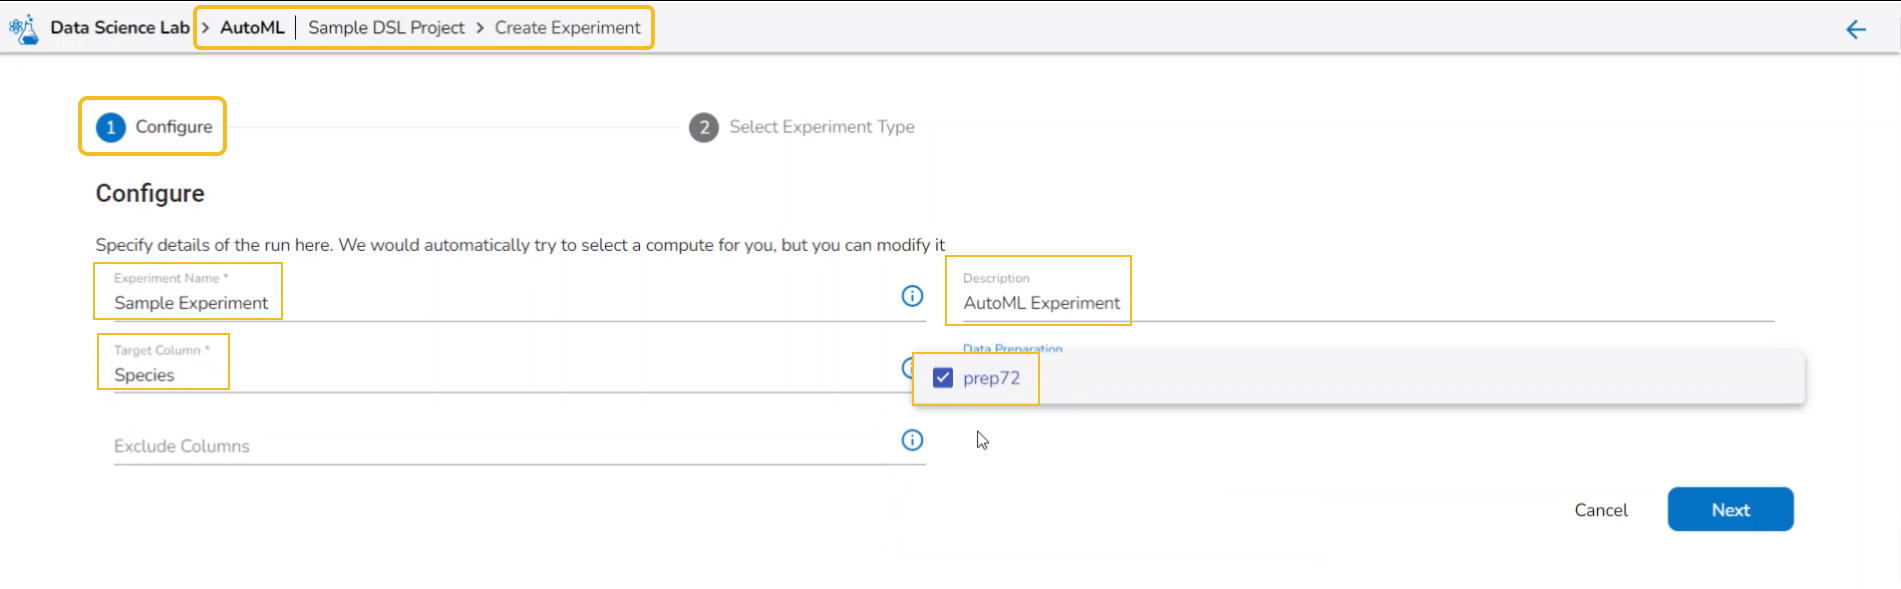
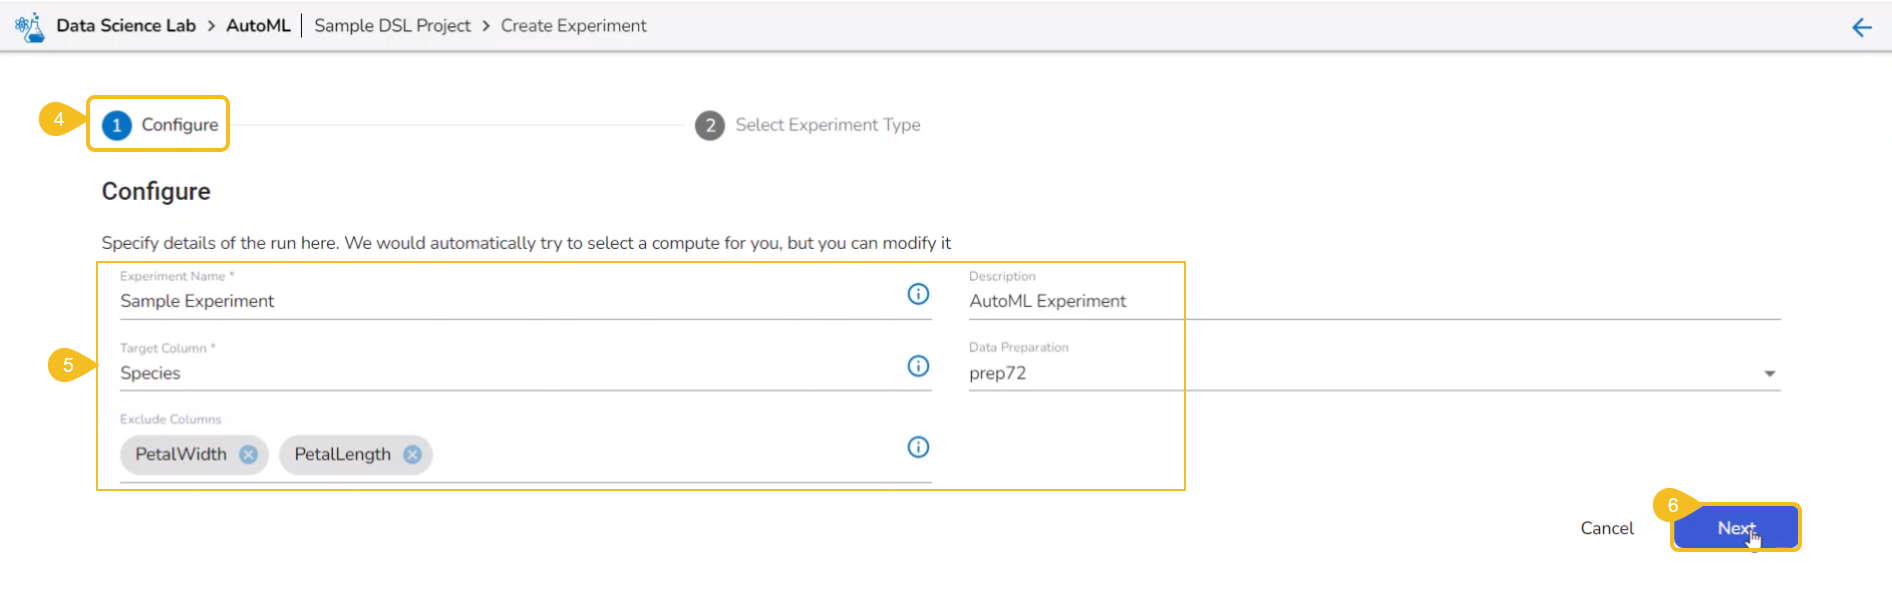
* The ***Configure*** tab opens (by default) while opening the ***Create Experiment*** form.

* Provide the following information:
  * Provide a name for the experiment.
  * Provide ***Description*** (optional).
  * Select a ***Target Column***.
  * Select a ***Data Preparation*** from the drop-down menu.

    * Use the checkbox to select a Data Preparation from the displayed drop-down.

    <figure><img src="https://content.gitbook.com/content/28ipFzCz8EMtVtHrBFLx/blobs/dxlKmLhFikesKwMaBApe/image.png" alt=""><figcaption><p><em><strong>Selecting Data Preparation from the dropdown menu</strong></em></p></figcaption></figure>
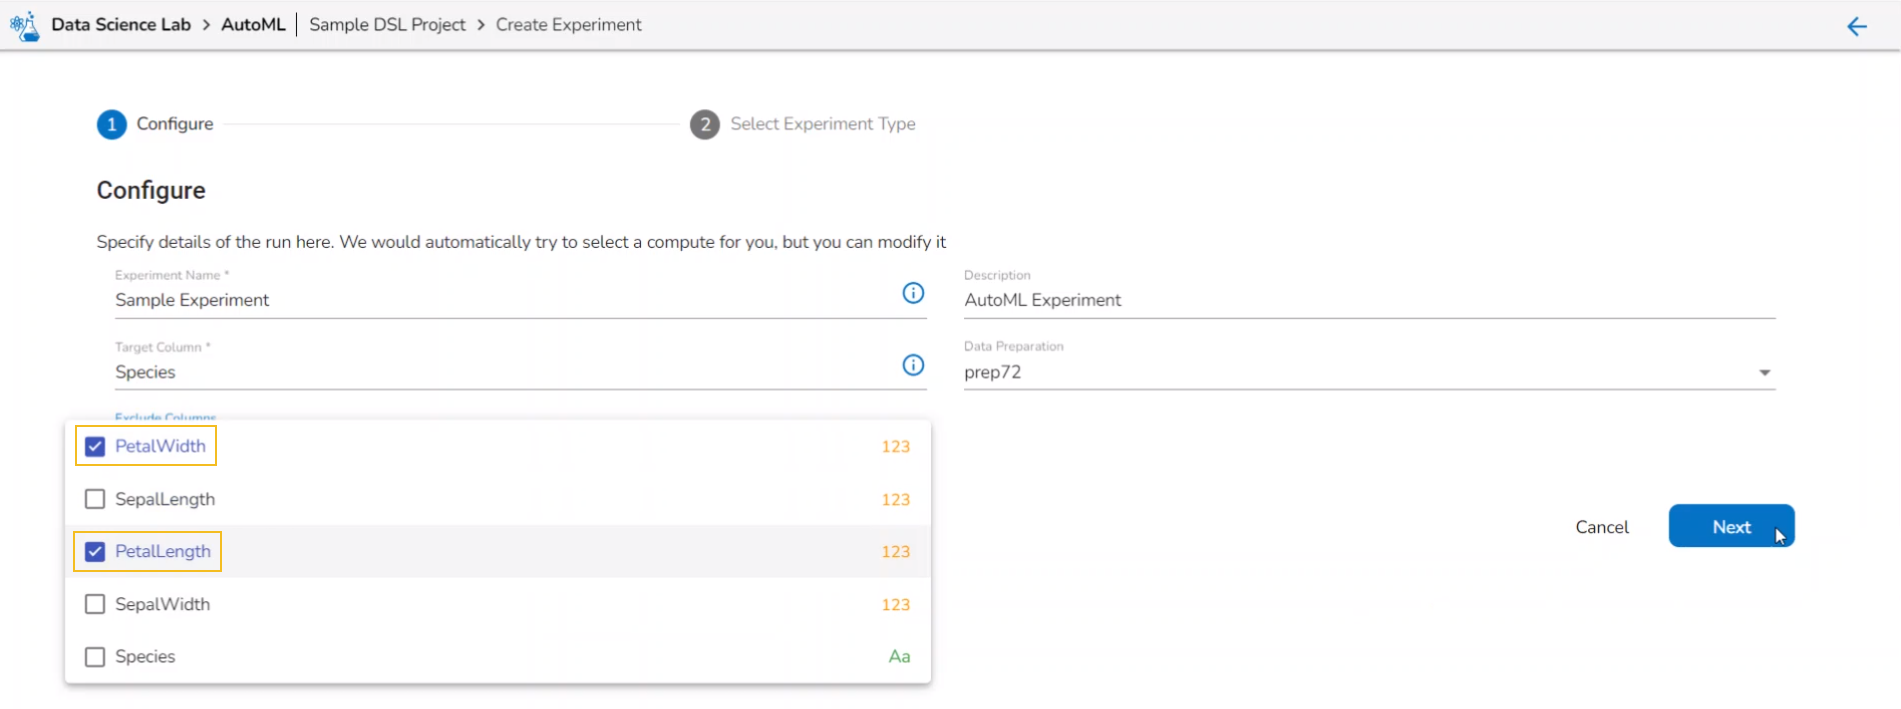
  * Select columns that need to be excluded from the experiment.
    * Use the checkbox to select a field to be excluded from the experiment.

{% hint style="info" %}
*<mark style="color:green;">Please Note:</mark> The selected fields will not be considered while training the Auto ML model experiment.*
{% endhint %}

<figure><img src="https://content.gitbook.com/content/28ipFzCz8EMtVtHrBFLx/blobs/HUFK48BOFuiKiR0DEaHd/image.png" alt=""><figcaption><p><em><strong>Selecting Columns to be excluded from the model training</strong></em></p></figcaption></figure>

* Click the ***Next*** option.             &#x20;

<figure><img src="https://content.gitbook.com/content/28ipFzCz8EMtVtHrBFLx/blobs/HX1mehdPqIuwEbaHfdQ1/image.png" alt=""><figcaption><p><em><strong>Configure tab with selected Data Preparations and excluded fields</strong></em></p></figcaption></figure>

* The user gets redirected to the ***Select Experiment Type*** tab.
* Select a prediction model using the checkbox.
* *Based on the selected experiment type a validation notification message appears.*
* Click the ***Done*** option.

<figure><img src="https://content.gitbook.com/content/28ipFzCz8EMtVtHrBFLx/blobs/5vNRmDNBEsLOIWr0eKhe/image.png" alt=""><figcaption><p><em><strong>Selecting Experiment Type</strong></em></p></figcaption></figure>

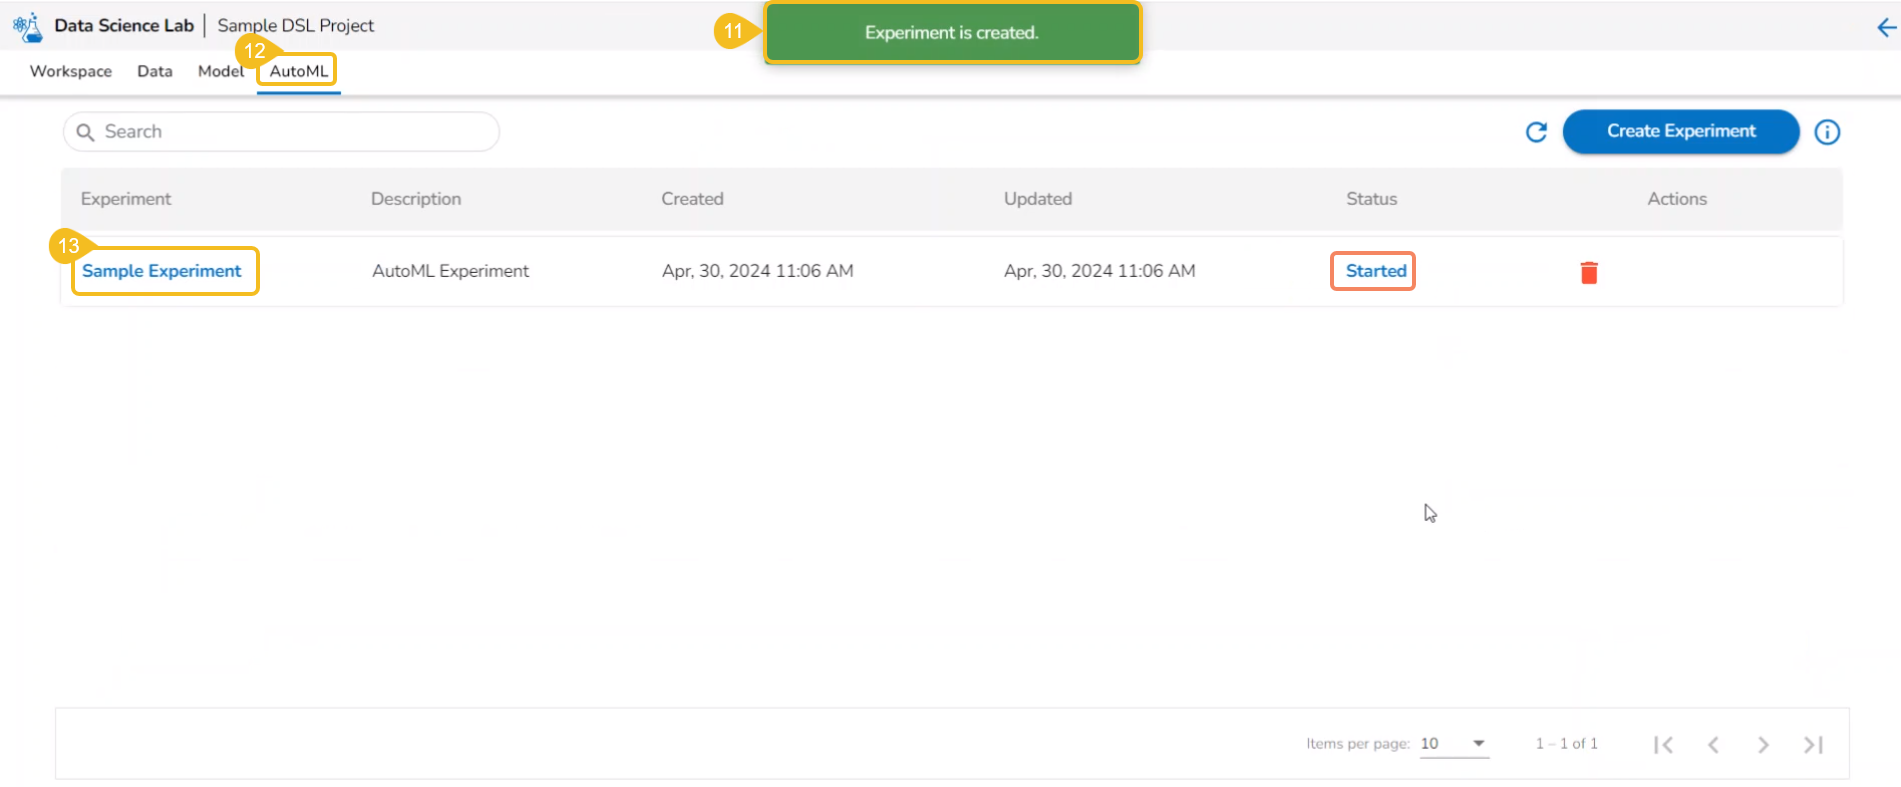
* A notification message appears.
* The user gets redirected to the ***Auto ML list*** page.
* The newly created experiment gets added to the list with the ***Status*** mentioned as ***Started***.

<figure><img src="https://content.gitbook.com/content/28ipFzCz8EMtVtHrBFLx/blobs/YuQSSgleN5vWOUDQcPe9/image.png" alt=""><figcaption></figcaption></figure>

## Data Preparation

Data Preparation involves gathering, refining, and converting raw data into refined data. It is a critical step in data analysis and machine learning, as the quality and accuracy of the data used directly impact the accuracy and reliability of the results. The data preparation ensures that the data is accurate, complete, consistent, and relevant to the analysis.  The data scientist can make more informed decisions, extract valuable insights, and unveil concealed trends and patterns within the raw data with the help of the Data Preparation option.

{% embed url="<https://files.gitbook.com/v0/b/gitbook-x-prod.appspot.com/o/spaces%2FhFEvs46BuaaHAKNDSR6T%2Fuploads%2F40PaVtF5mfGcVgkZ0r6K%2FData%20preparation.mp4?alt=media&token=be672eee-9868-4484-b577-64e12442273d>" %}

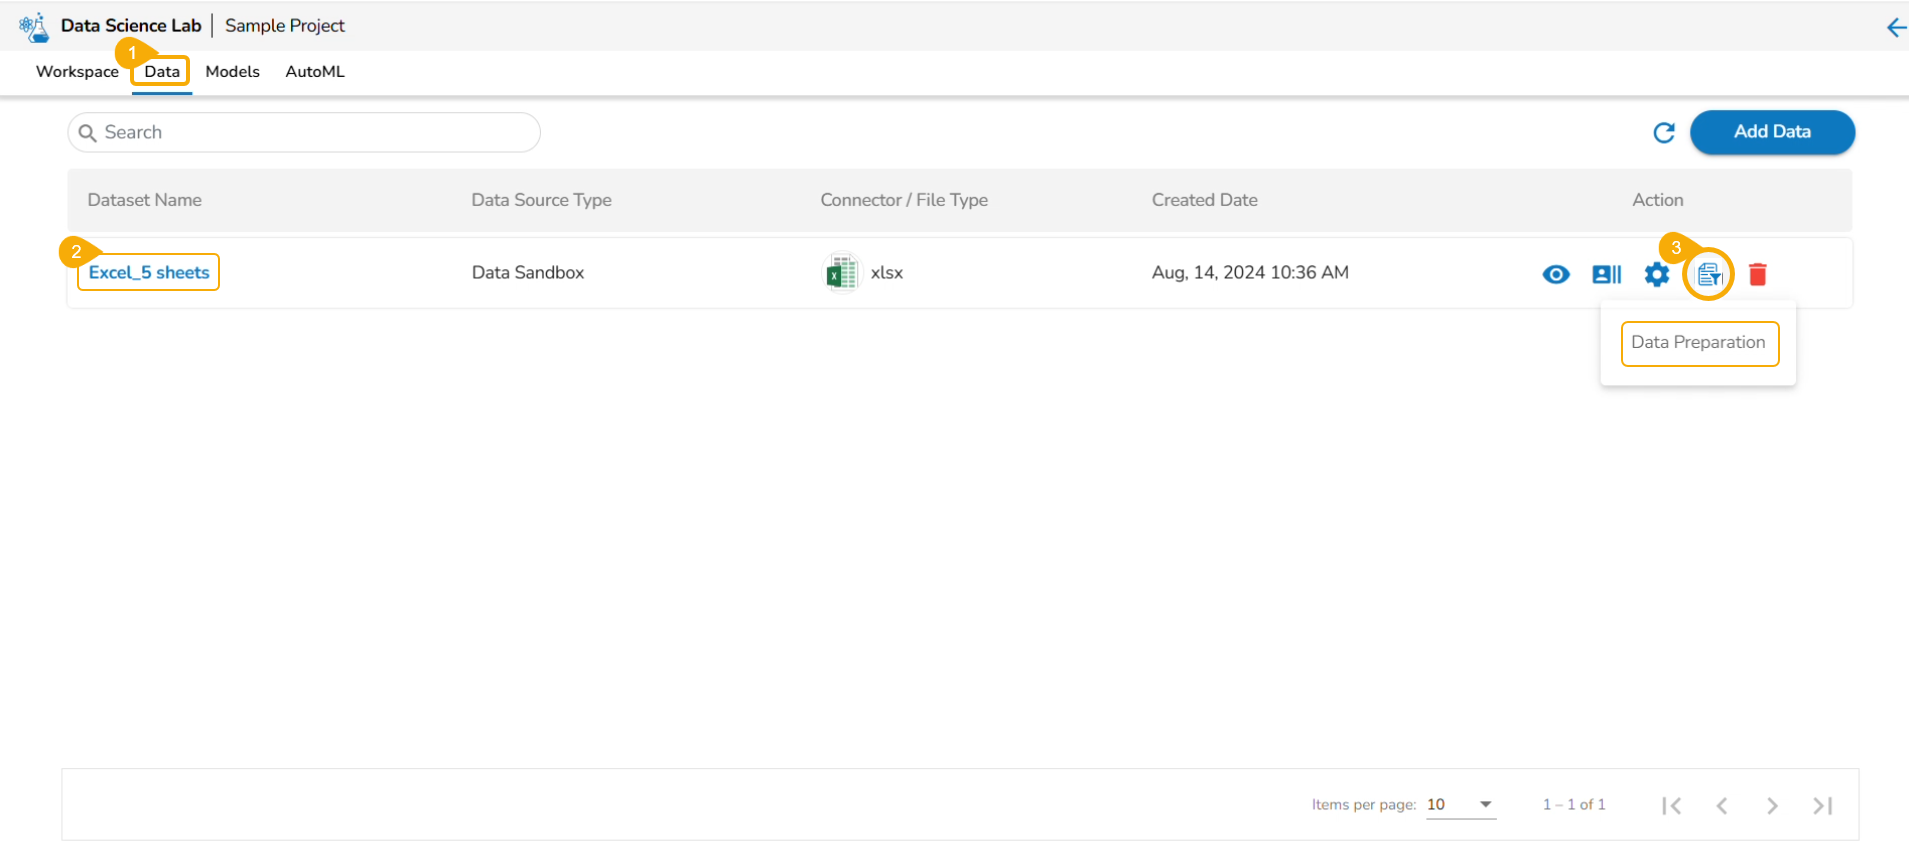
* Navigate to the ***Data*** tab.
* Select a Dataset from the list.
* Click the ***Data Preparation*** icon.

<figure><img src="https://content.gitbook.com/content/28ipFzCz8EMtVtHrBFLx/blobs/Kv3OGDvZ7Qme27dvKKZ3/image.png" alt=""><figcaption></figcaption></figure>

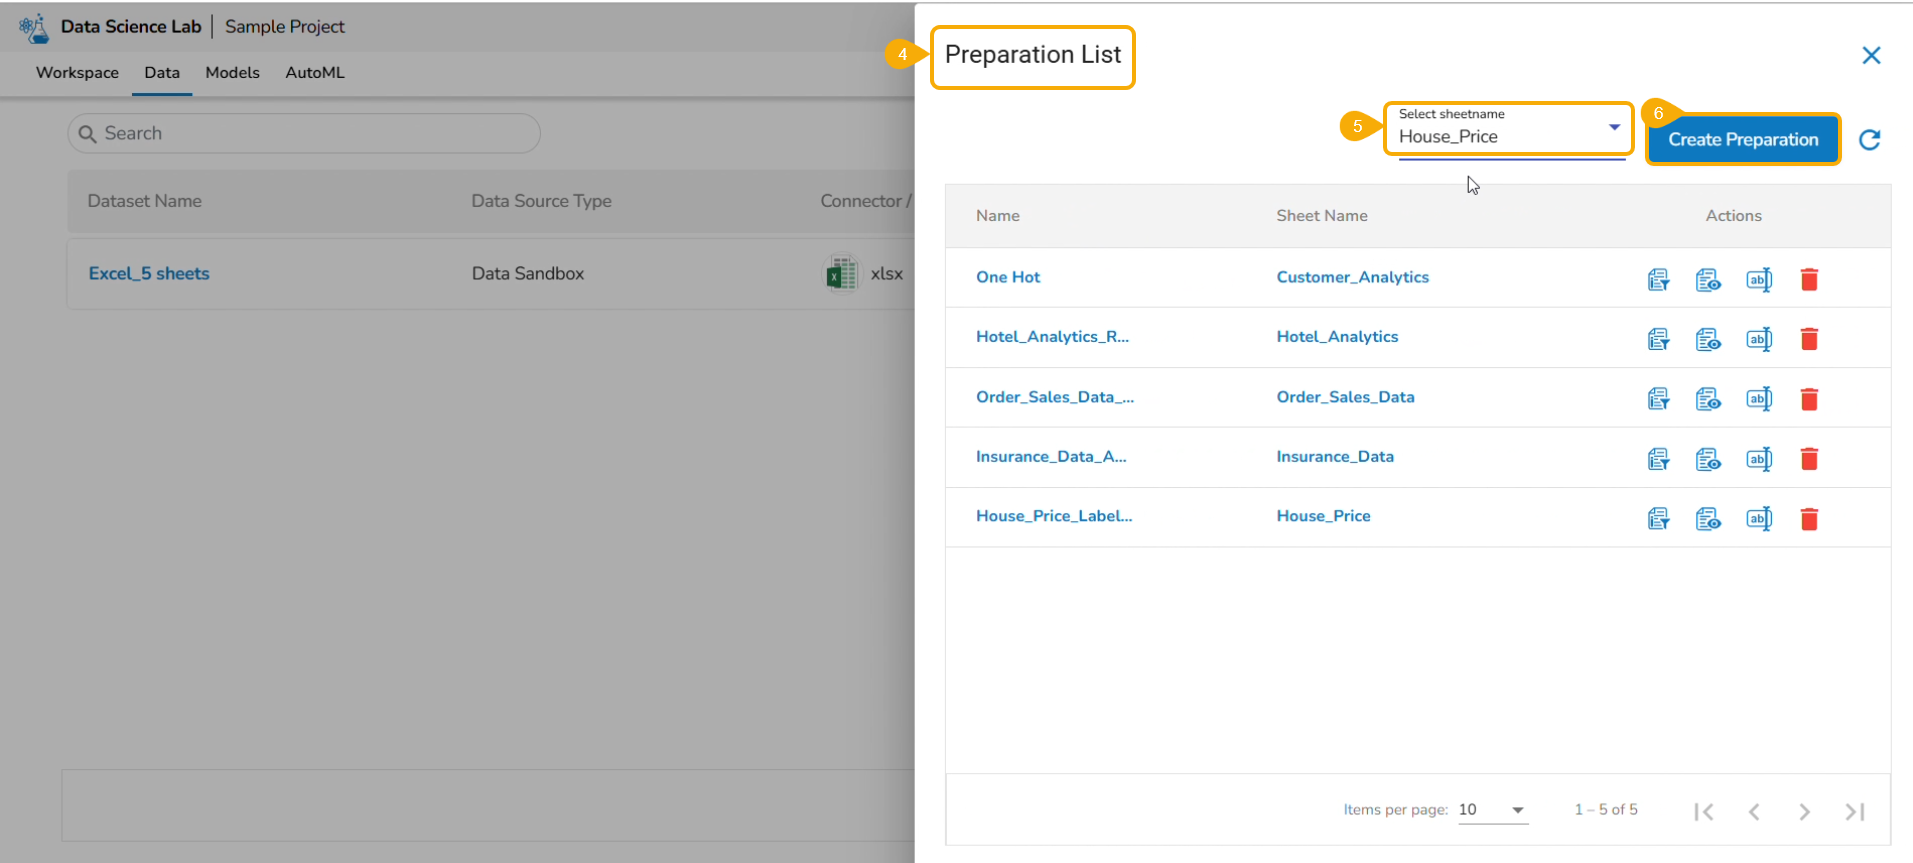
* The ***Preparation List*** window displays the preparation based on the selected Excel file.  The user may use any of the displayed data preparation from the list.
* The user can select a sheet name from the given drop-down menu.
* Click the ***Data Preparation*** option to create a new preparation.

  <figure><img src="https://content.gitbook.com/content/28ipFzCz8EMtVtHrBFLx/blobs/Tv4IdbM9nBPtaBPzHmlE/image.png" alt=""><figcaption></figcaption></figure>
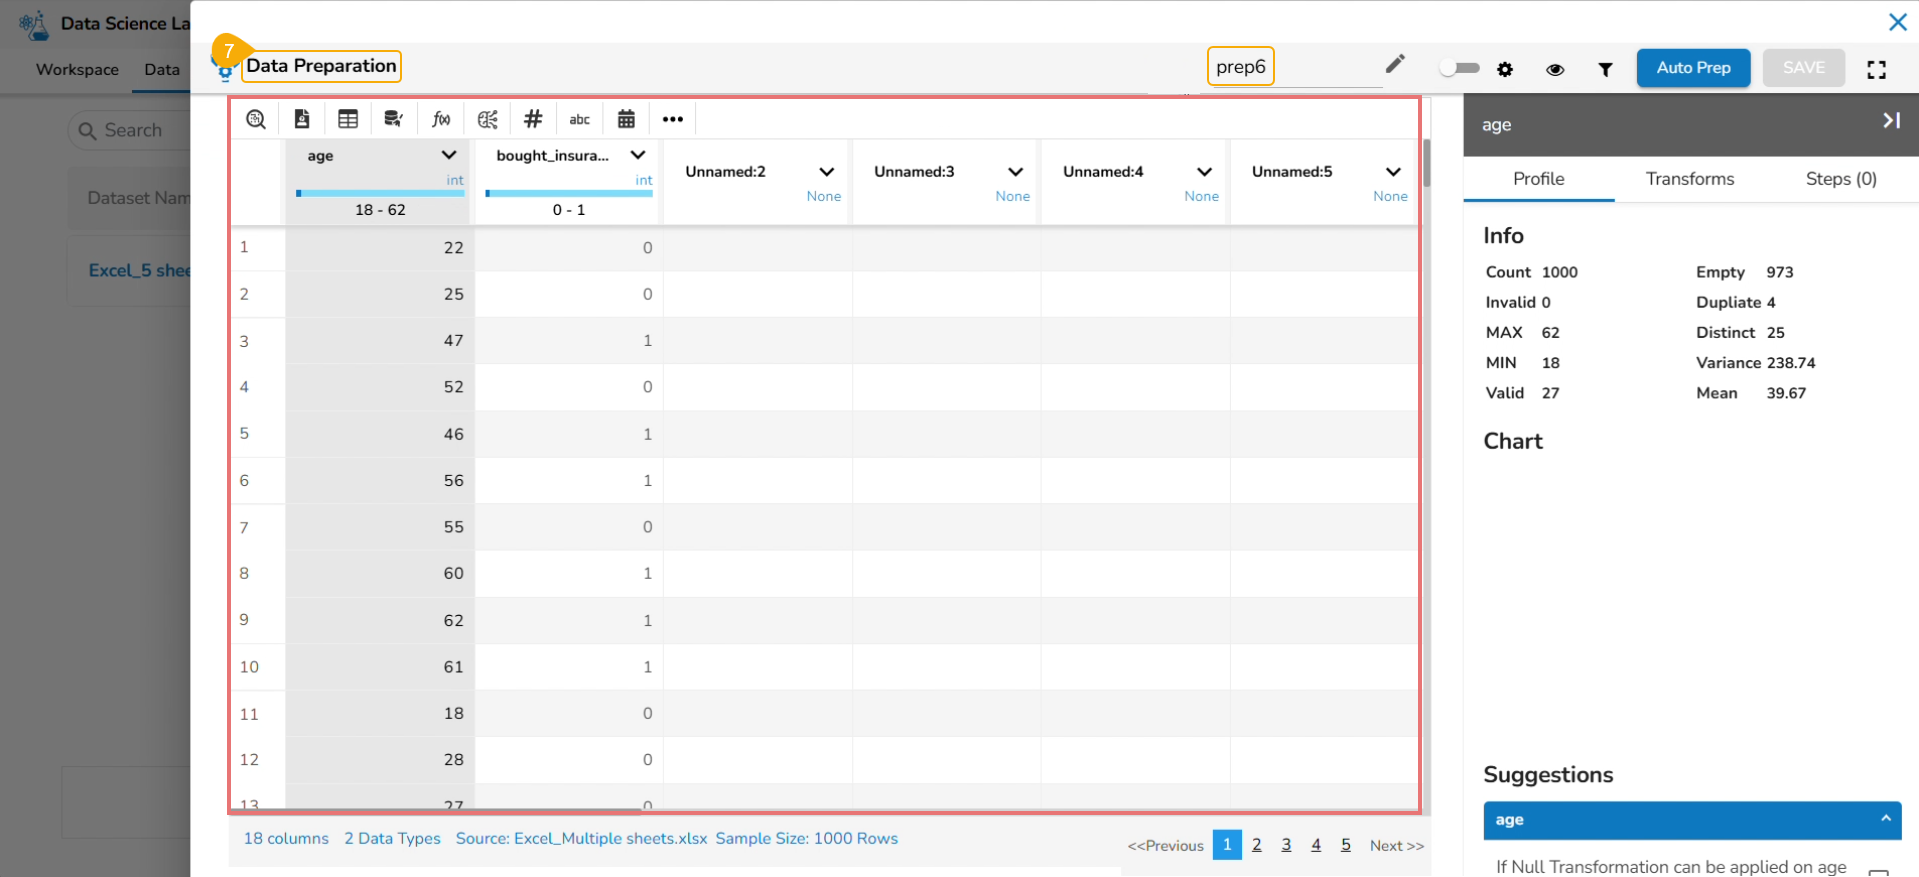
* The ***Data Preparation*** page opens displaying the dataset in the grid format.&#x20;

  <figure><img src="https://content.gitbook.com/content/28ipFzCz8EMtVtHrBFLx/blobs/cjoLu45FQX4InbEKEUZ4/image.png" alt=""><figcaption></figcaption></figure>
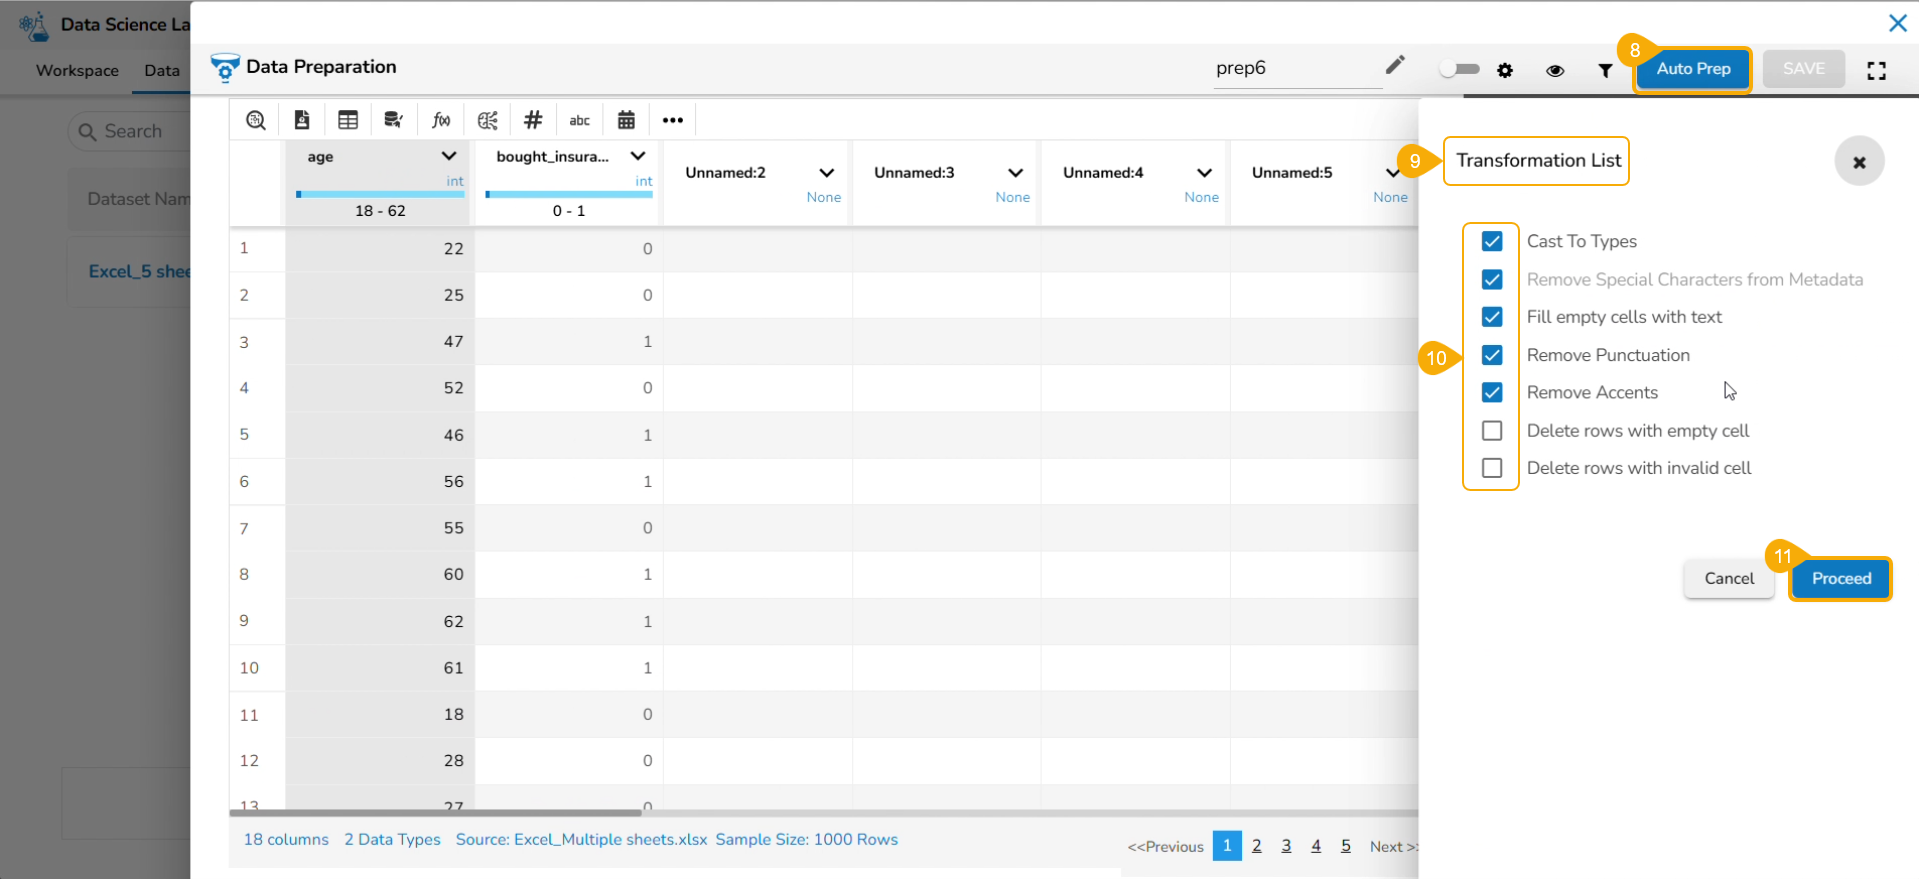
* Click the ***Auto Prep*** option to apply the default set of transforms under the Auto Prep.&#x20;
* The ***Transformation List*** window opens.
* Select or dis-select the transforms using the given checkboxes.
* Click the ***Proceed*** option.

<figure><img src="https://content.gitbook.com/content/28ipFzCz8EMtVtHrBFLx/blobs/SKGzHtYSJwgATcStsotJ/image.png" alt=""><figcaption></figcaption></figure>

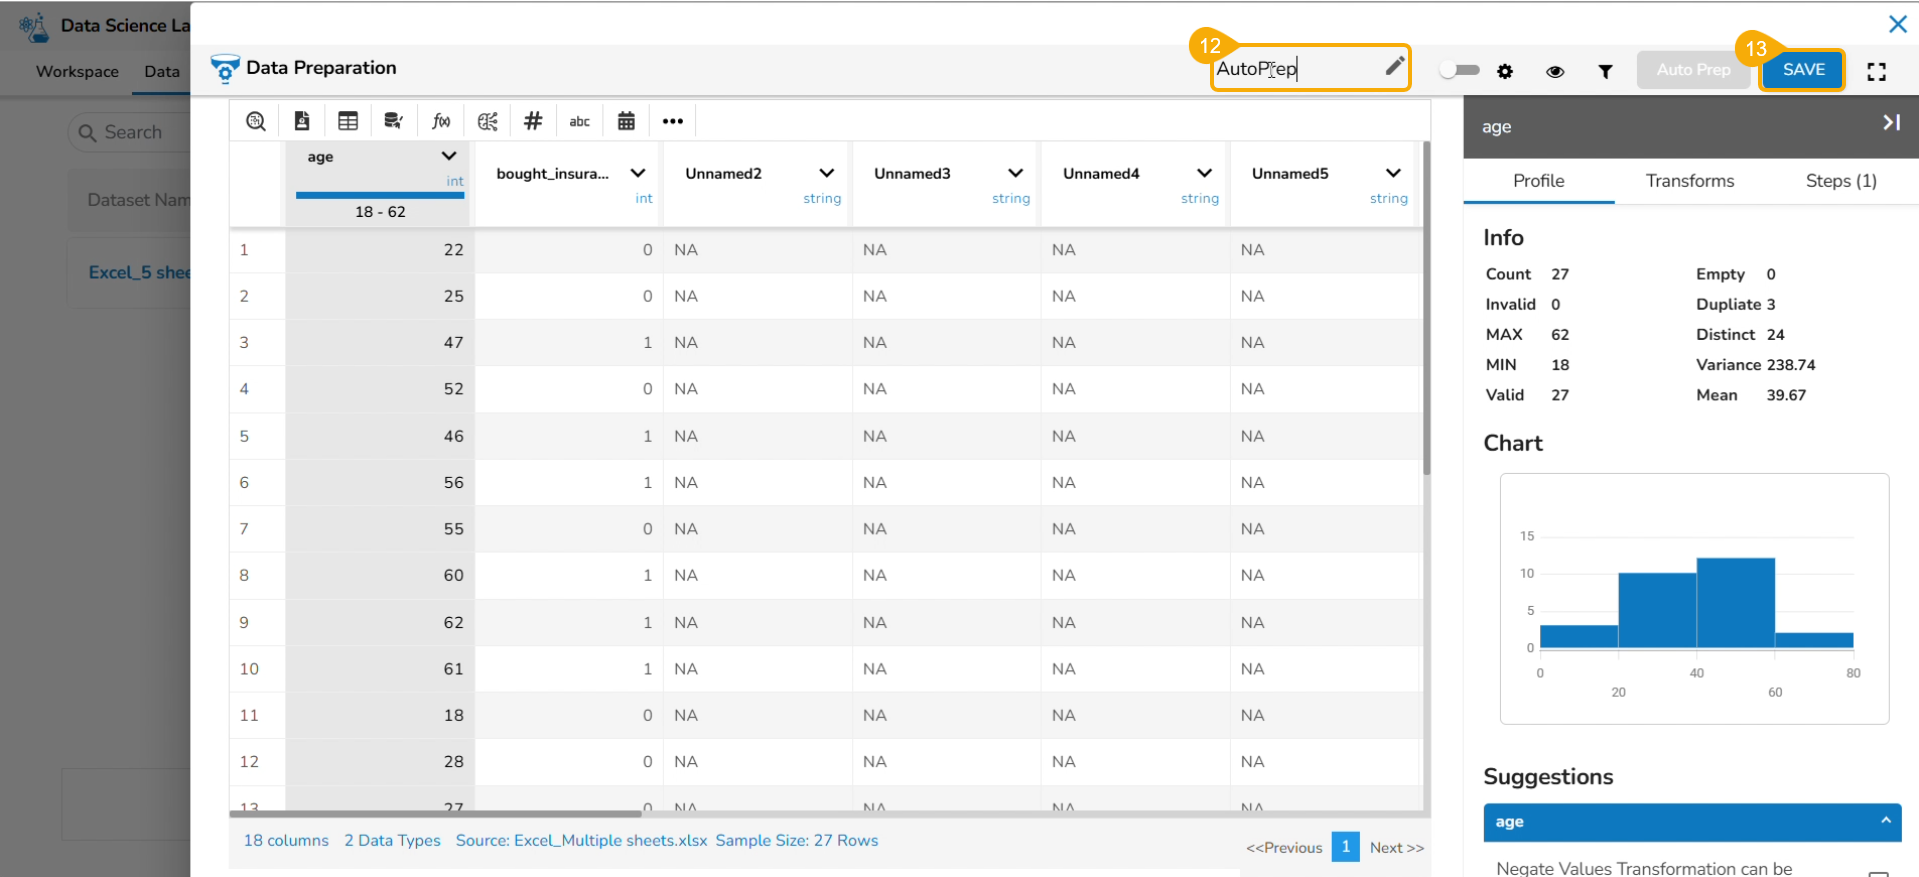
* The selected ***AutoPrep*** transforms are applied to the dataset. Provide a name for the Data Preparation.
* Click the ***SAVE*** option.&#x20;

  <figure><img src="https://content.gitbook.com/content/28ipFzCz8EMtVtHrBFLx/blobs/w2Ynux28jpt7fbMjlAY8/image.png" alt=""><figcaption></figcaption></figure>
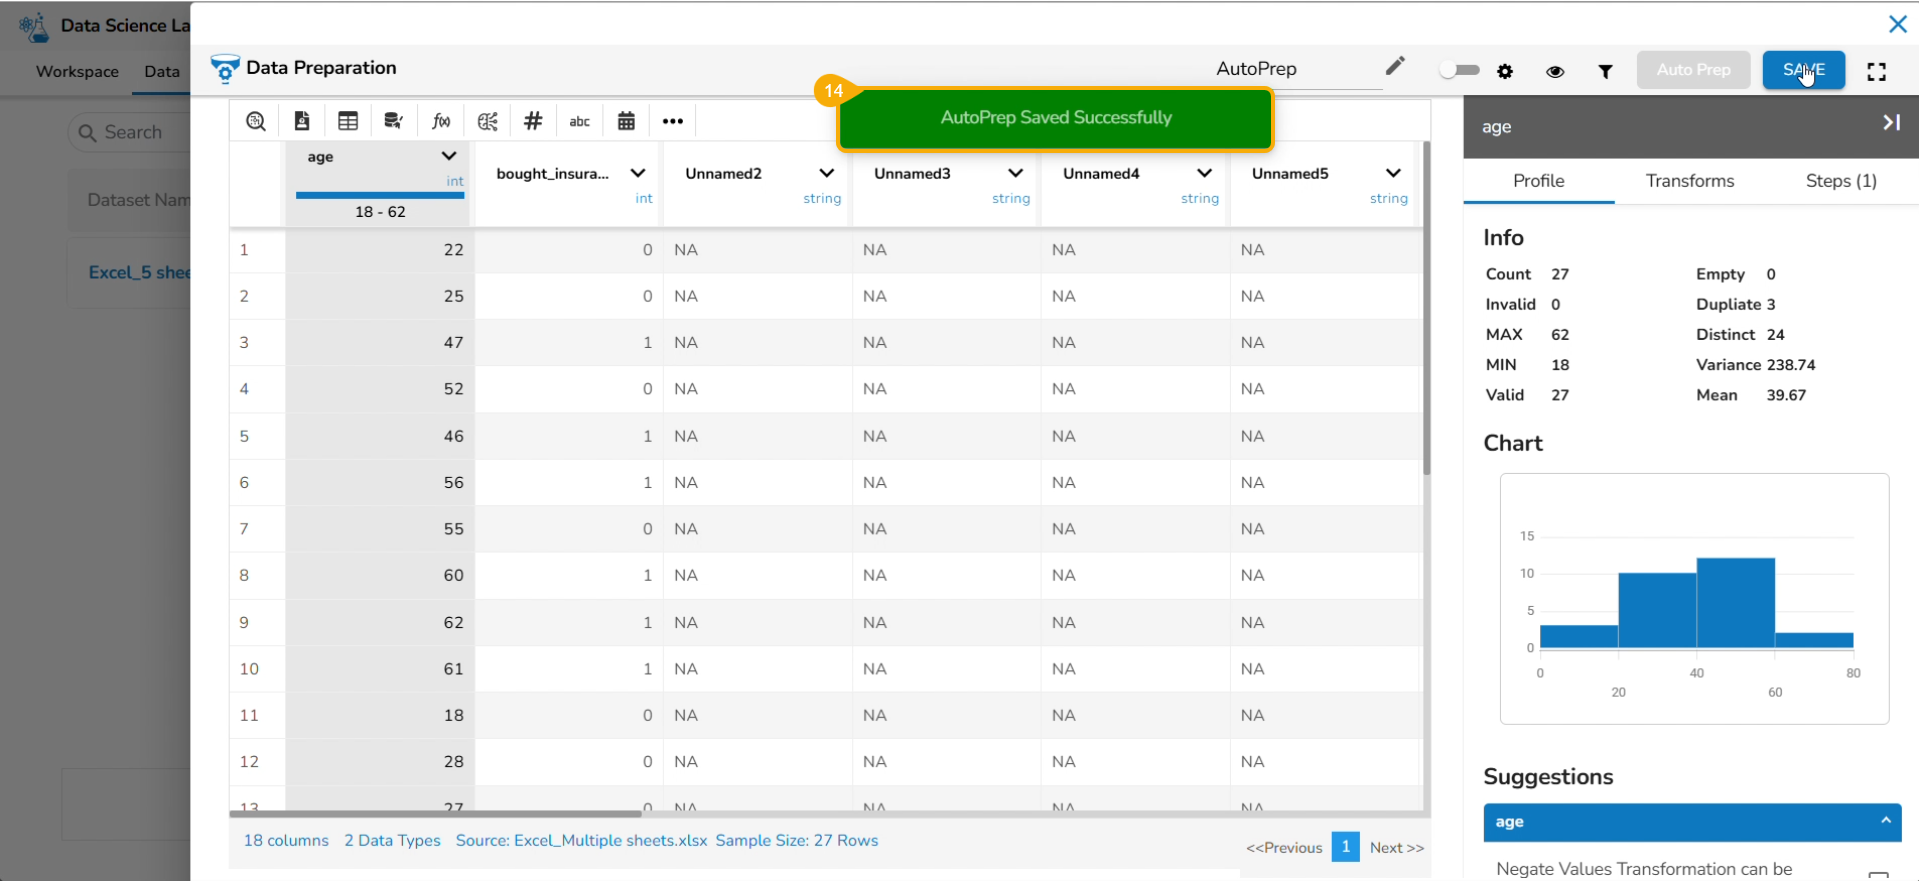
* A notification message informs the users that the data preparation has been saved.

<figure><img src="https://content.gitbook.com/content/28ipFzCz8EMtVtHrBFLx/blobs/Jdh4L7Bw6Q0H1f10BBF7/image.png" alt=""><figcaption></figcaption></figure>

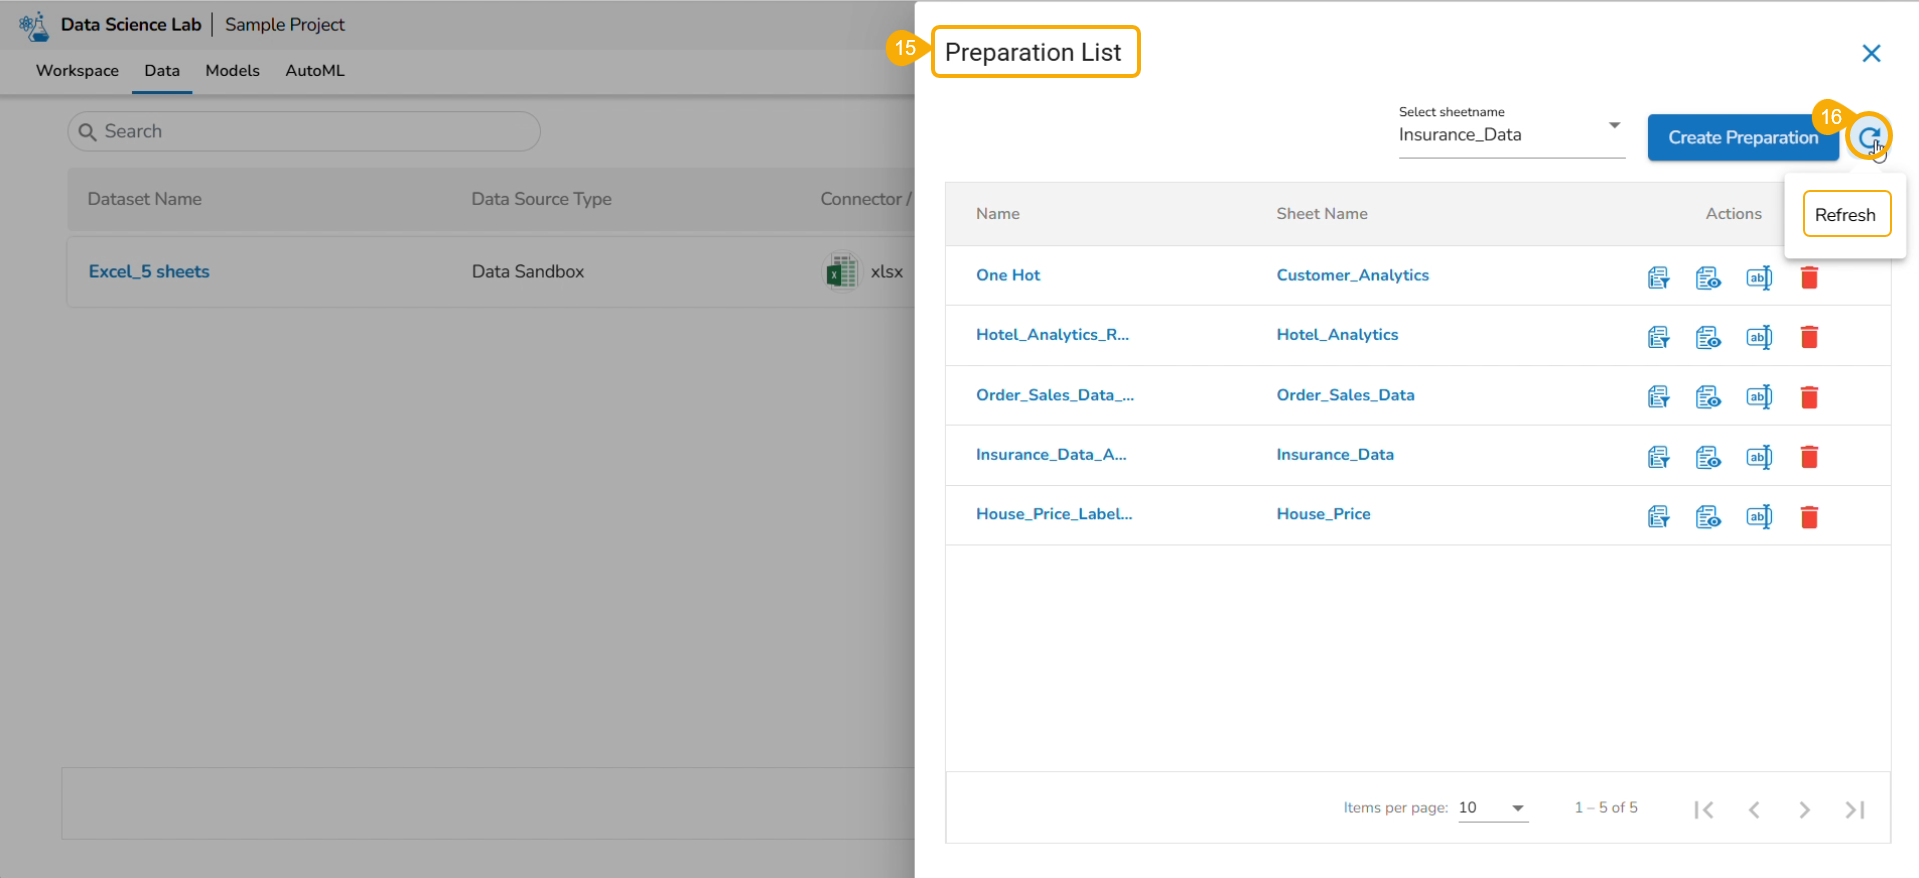
* The user gets redirected to the ***Preparation List*** window.

* Click the ***Refresh*** icon.&#x20;

  <figure><img src="https://content.gitbook.com/content/28ipFzCz8EMtVtHrBFLx/blobs/kGgsGnjQlOSjaZGOD8QZ/image.png" alt=""><figcaption></figcaption></figure>

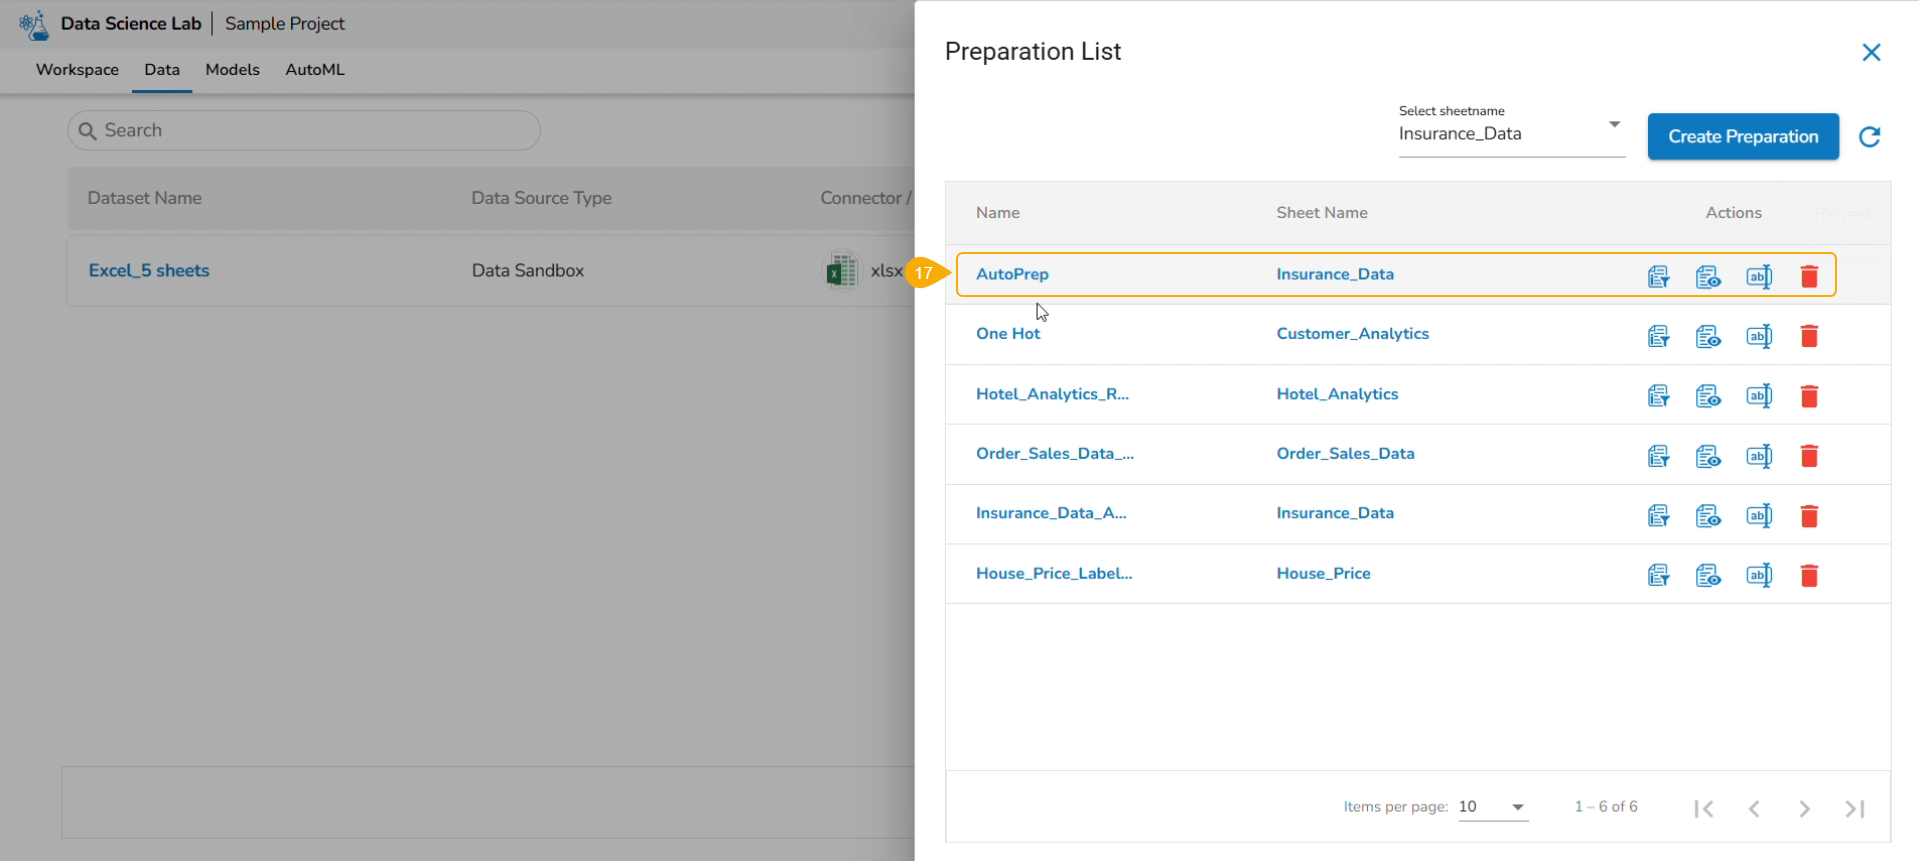
* The newly created Data Preparation gets added to the ***Preparation List***.&#x20;

  <figure><img src="https://content.gitbook.com/content/28ipFzCz8EMtVtHrBFLx/blobs/sL2vghl6RsUSLSOvOavo/image.png" alt=""><figcaption></figcaption></figure>

{% hint style="info" %}
*<mark style="color:green;">Please Note:</mark> Refer to the* [***Data Preparation***](https://docs.bdb.ai/data-center-6/data-center/data-preparation) *section of the* [***Data Center***](https://docs.bdb.ai/data-center-5/) *module for more details.*
{% endhint %}

## Delete

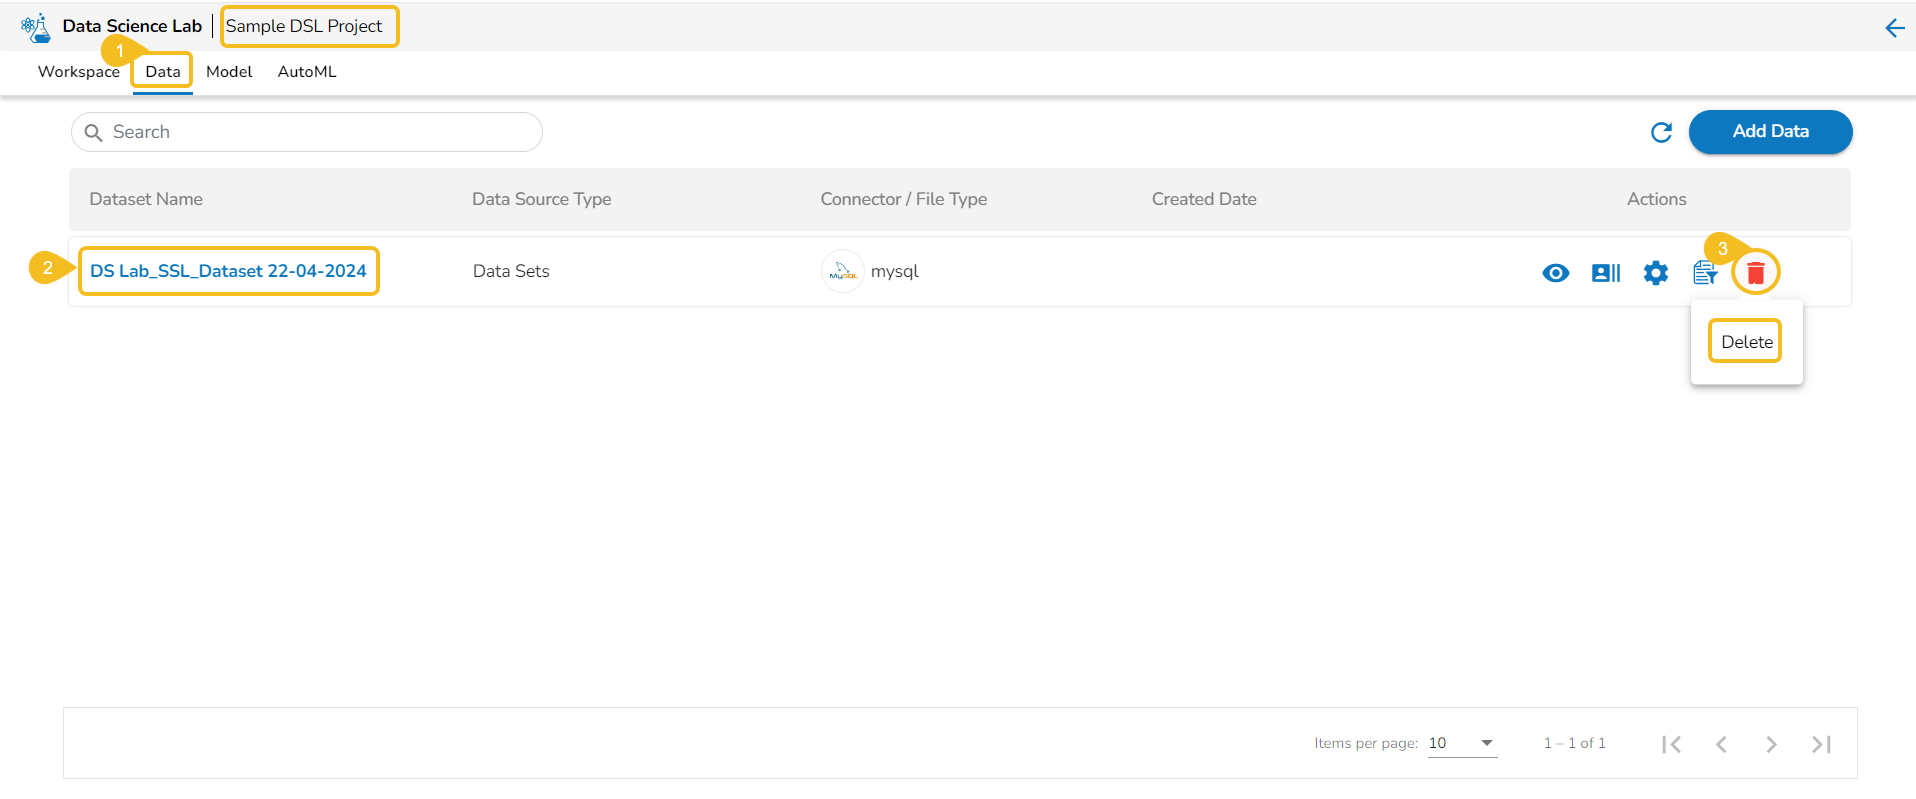
* Navigate to the ***Data*** tab.
* Select a Dataset from the list.
* Click the ***Delete*** icon.

<figure><img src="https://content.gitbook.com/content/28ipFzCz8EMtVtHrBFLx/blobs/Iv07jl5va4ntKTa2bb04/image.png" alt=""><figcaption><p><em><strong>Accessing Delete icon for a Dataset</strong></em></p></figcaption></figure>

* A dialog box opens to ensure the deletion.
* Click the ***Yes*** option.

&#x20;       ![](https://content.gitbook.com/content/28ipFzCz8EMtVtHrBFLx/blobs/cDpmqLa0IxGipWjyMpMs/image.png)​

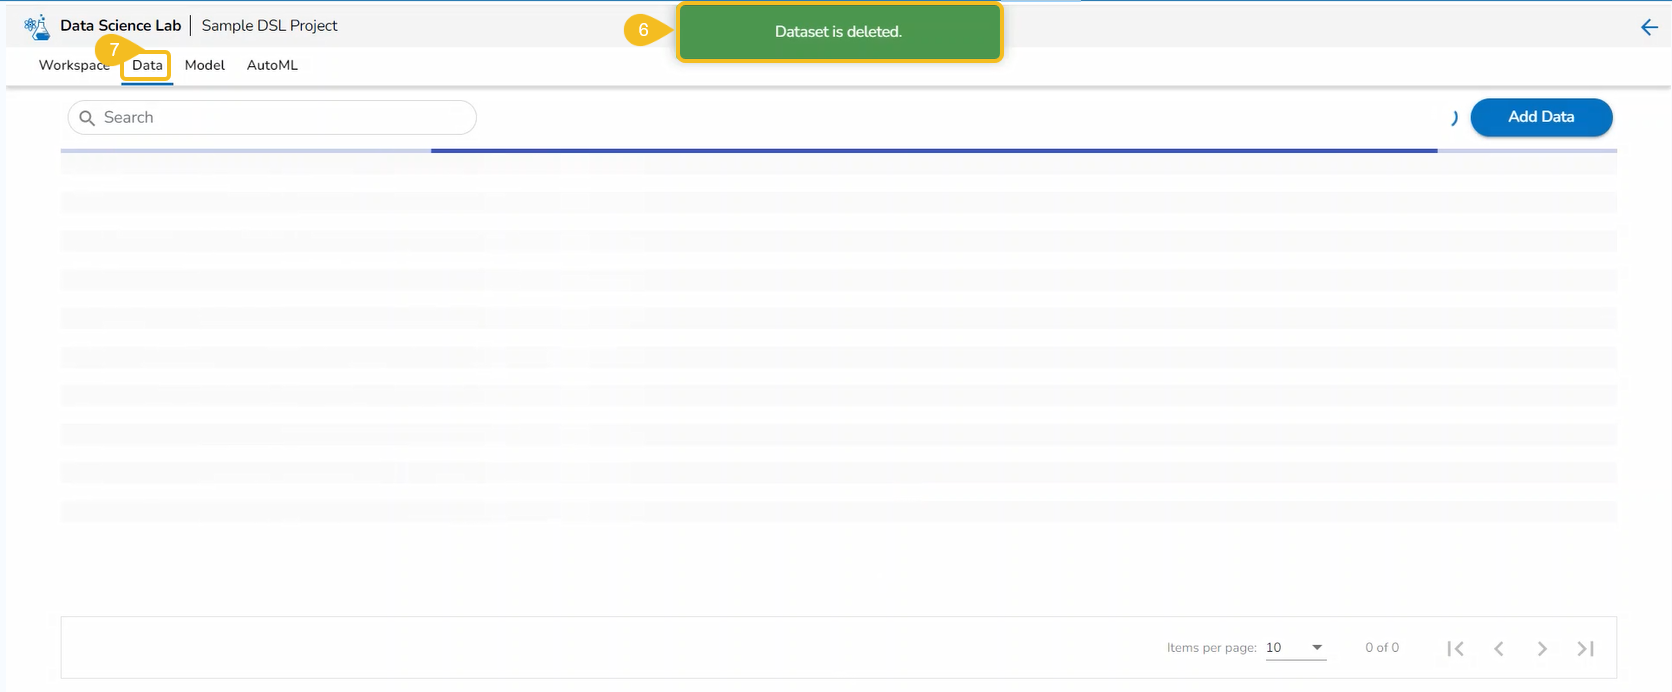
* A notification message appears to assure about the completion of the deletion action.
* The concerned Data set will be removed from the list. &#x20;

<figure><img src="https://content.gitbook.com/content/28ipFzCz8EMtVtHrBFLx/blobs/VYAy5he6UxVhQcC58Jxf/image.png" alt=""><figcaption></figcaption></figure>

{% hint style="info" %}
*<mark style="color:green;">Please Note:</mark> The Preview, Create Experiment, and Data Preparation Actions are not supported for the Datasets based on a Feature Store.*
{% endhint %}