All the created Data Science Lab projects by the logged-in user get listed under this page with various Actions to be applied to them.
The Projects page displays a list of all the existing projects for a logged-in user. The user can use the List Project icon to access the Projects page.
Click on a project from the displayed list to display more details about the project such as Project Details, Project Configurations, and External Libraries below the Project entry.
Details of a Project
Please Note: This section of the documentation focuses on describing all the Actions applicable to a DSL Project.
Viewing a Project
The user can modify the selected Project.
Check out the given illustration to understand the steps to View a selected Project.
Viewing a Project
Navigate to the Project List page.
Select a Project from the displayed list.
Click the View icon.
The user gets redirected to the Workspace tab of the selected Project.
Please Note:
The Workspace tab opens by default for a Data Science Lab project while opening any project.
Viewing a Project after activating it is recommended to avail all the functionalities available for a project.
Migrating a Project
The Repo Sync Projects can be migrated to the Git Hub or Git Lab using this functionality.
Pre-requisite:
The administrator must configure the Version controlsettings for the DS Lab plugin before you use this functionality.
The user-level token must be configured to the target account before using the Git Migration functionality for a Repo Sync Project.
Check out the given illustration to understand the steps to migrate a Repo Sync project by exporting and importing it from one user to another user.
Exporting a Repo Sync Project
Importing a Repo Sync Project
Please Note: Make sure all the changes made in your local system to a Repo Sync Project should be committed and pushed to the selected remote Git branch before initiating the Migration process.
Exporting a Project
The user can migrate or do Git export for a Repo Sync Project.
Login to the BDB Platform using registered credentials.
Select a space out of the multiple spaces available for the logged-in user.
Select the DS Lab module using the Apps menu.
The Projects list page opens.
Select a Repo Sync Project from the displayed list.
Click the Push into VCS icon for the Project.
The Push into Version Controlling System drawer appears.
Select the Git Export/ Migration option using the given checkbox.
Provide a Commit Message in the given space.
Click the Push option.
A notification message appears to ensure that the selected project is migrated.
Importing a Project
The user can import an exported repo Sync project from a different space by following the given set of steps.
Navigate to the Login page of the BDB platform and use registered credentials to access the Platform homepage (select a space other than the one from where you migrated the project).
Choose the Admin module from the Apps menu.
The user will get redirected to the Admin module.
Select the Git Migration option using the menu bar.
Select the Import File option from the Git Migration context menu.
Click the Import option from the Import Document page.
The Migration DocumentImport page opens.
The New VCS option comes pre-selected (it the default option).
Choose the Dslabs module using the drop-down menu.
The Project, Notebook, and Modules menus appear with the drop-down icon under the Migration- Document Import page.
Click the Project menu from the Migration- Document Import drop-down menu.
Use the Search bar to search for a specific Project from the displayed list.
Choose a Project from the displayed list.
Available versions of the selected Project appears on the right side of the page.
Please Note: The DS Lab module appears as Dslabs to import document. Use the search bar to Search for a specific Project from the displayed list. Click the Project from the list. Available versions of the selected Project appear on the right side of the page.
Select a version of the Project by putting a checkmark in the given checkbox.
The Project name and Project URL will be displayed below.
Select a branch using the Branch drop-down option.
Click the Migrate option.
A notification message appears to ensure that the file is migrated successfully.
Navigate to the Projects page of the Data Science Lab module.
The migrated Project gets added at the top of the Projects list.
Keep Multiple Versions of a Project
Pre-requisite: Make sure that the Version control settings for the DSL plugin are configured by your administrator before you use this functionality.
Pushing a Project to the VCS
Check out the given illustration on how to Push a Project to the VCS.
Pushing a Project to VCS
Navigate to the Projects page of the DS Lab plugin.
Select a Project.
Click the Push into VCS icon for the Project.
The Push into Version Controlling System dialog box appears.
Provide a Commit Message.
Click the Push option.
The DSL Project version gets pushed into the Version Controlling System, a notification message appears to inform the same.
Pulling a Project from the VCS
Check out the given illustration on how to Pull a Project from the VCS.
Pulling a Project from the VCS
Navigate to the Projects page of the DS Lab plugin.
Select a Project.
Click the Pull from VCS icon for the project.
The Pull from Version Controlling System dialog box opens.
Select the version that you wish to pull by using the checkbox.
Click the Pull option.
The pulled version of the selected Project gets updated in the Project list.
A notification message appears to inform the same.
Sharing a Project
Check out the given illustration on how to share a Project.
Sharing a Project
Navigate to the Projects page of the DS Lab module.
Select a project from the list.
Click the Share icon.
Share icon provided for Project
The Share Projectpage opens.
Select a tab out of USER, USER GROUP, and EXCLUDE USER tabs.
Search for a specific user or user group to share the Project.
Select a User from the USER tab (as displayed in the given image).
Use the single arrow mark to move the user. (Selecting the icon containing both the arrows will move all the users).
The selected user will appear in the right side box.
Click the Save option.
Please Note:
If the project is shared with a user group, then all the users under that group appear under the right-side box.
If the EXCLUDE USER tab is selected the user gets excluded from the rights to access the project.
A notification message appears indicating the completion of the Share Project function.
Accessing a Shared Project
Check out the given illustration on how to access a shared Project.
Accessing a Shared Project
Login to the user account where the Project is shared.
Navigate to the Project list inside the DS Lab module.
The Shared Project gets listed under the Projects list. The Shared Project is indicated as shared.
The user to whom the Project gets shared does not get permission to Share,Edit, Delete the Project. The Push to VCS and Pull from VCS Actions will also be disabled for a shared project.
Accessing a Shared DSL Project from the Selected User Account
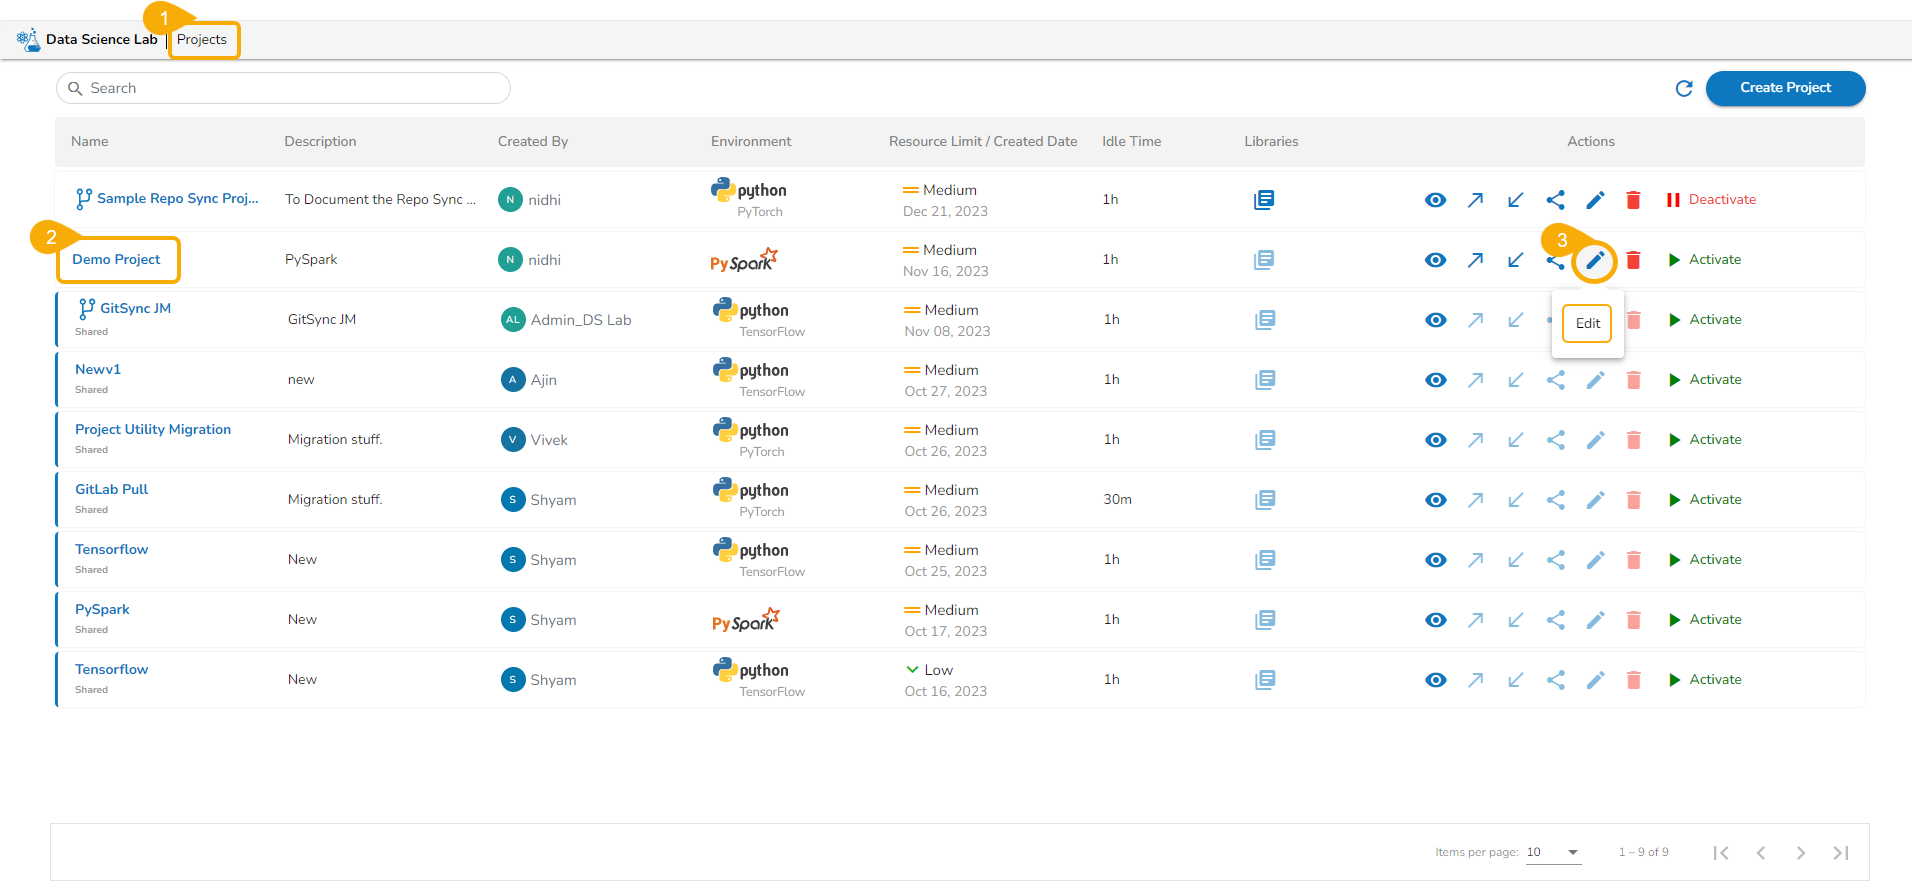
Editing a Project
Navigate to the Projects page of the DS Lab module.
Select a project from the list.
Click the Edit icon.
Edit option of a DSL Project
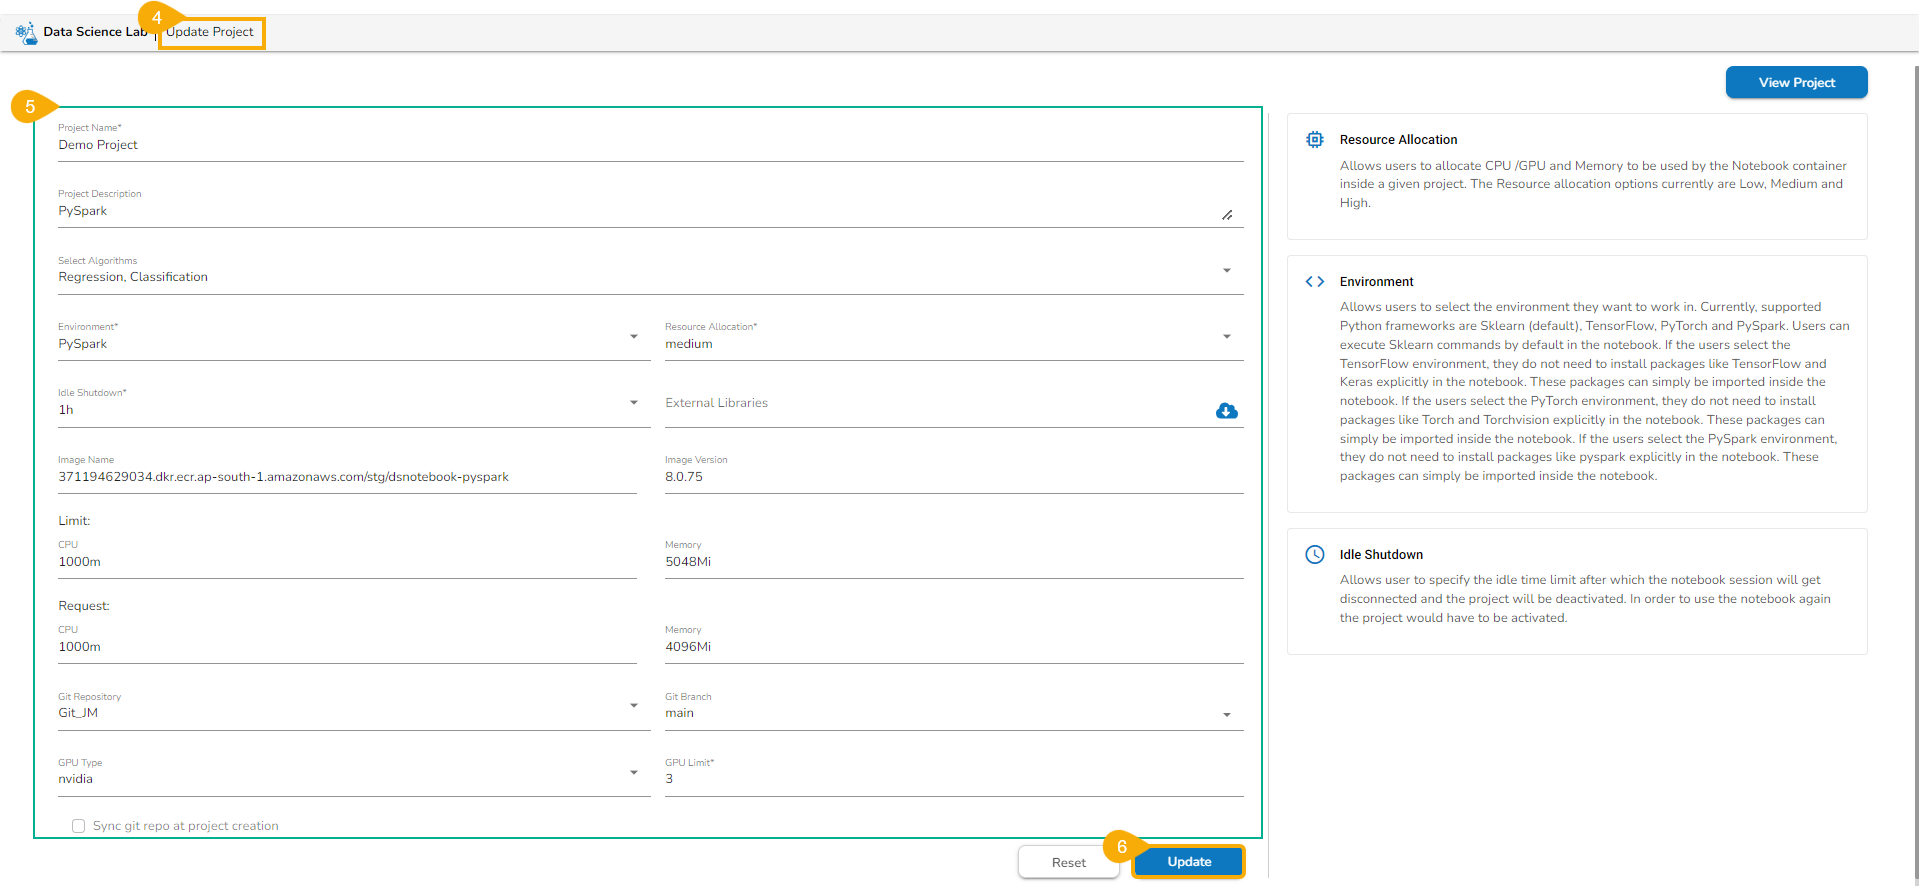
The Update Project page opens.
Edit or modify the given details.
Click the Update option.
Update Project option for a DSL Project
The users get redirected to the Projects page (the modified information gets saved for the project).
A notification message appears to convey the completion of the Editaction.
Notification message after a Project gets updated
Activating a Project
Check out the given illustration on how to activate a Project.
Activating a Project
Navigate to the Projects page.
Select a project from the list.
Click the Activate option.
Activate option for a DSL Project
A dialog window appears to confirm the Activation.
Click the Yesoption.
The project gets activated and a notification message appears to communicate the completion of the action.
The Activation option gets changed into the Deactivateoption for the concerned project.
The selected Project gets activated
Please Note: The user canPreviewan existing workspace without activating a Project.
Deactivating a Project
Check out the given illustration on how to deactivate a Project.
Deactivating a Project
Navigate to the Projects page.
Select a project that you would wish to deactivate.
Click the Deactivate option to deactivate the desired project.
Deactivate option for a DSL Project
A dialogue box opens to assure the action.
Click the Yes option.
The concerned project gets deactivated, and a notification message appears to inform the same.
After the project gets deactivated the Activate option appears for the project name.
The selected Project gets Deactivated
Disclaimer: The user won’t be able to edit the Workspace created under a project if the project status is Deactivated.
Deleting a Project
Check out the given illustration on how to delete a project.
Deleting a Project
Navigate to the Projects Listpage.
Select a Project from the list that you wish to delete.
Click the Delete icon.
Accessing the Delete option for the DSL Project
The Delete Project dialog box appears.
Click the Yes option.
A notification message appears to inform about the deletion of the selected Project.
The Project gets removed from the list.
The deleted project can be seen under the Trash page. The user can restore it or delete it permanently from this page.