
String
Add Prefix
The Add Prefix transform allows you to effortlessly incorporate custom text at the outset of each value. The seamless integration of personalized text at the beginning of each value empowers you to enhance and customize your data in a user-friendly manner.
Check out the given illustration on how to user Add Prefix transform.
Steps to perform the Add Prefix transformation:
Select a column from the Data Grid display of the dataset.
Select the Transforms tab.
Open the Add Prefix transform from the Column category.
Provide the following information:
Enable the Create new column option to add a new column with the transformed values.
Pass the prefix value that is needed.
Select one or multiple columns where the prefix needs to be added.
Click the Submit option.

Result will come as a new column or on the same column by adding the prefix value on the selected columns.

Add Suffix
The implementation of the Add Suffix transform enables the effortless inclusion of custom text at the end of every value. This transformative technique offers a user-friendly approach to enrich and modify the original data, allowing for the seamless integration of personalized text at the end of each value. By leveraging the flexibility of the Add Suffix transform, you can tailor and enhance your data with ease, ensuring it aligns perfectly with your specific requirements and desired outcomes.
Steps to perform the Add Suffix transformation:
Navigate to the Transforms tab.
Select the Add Suffix transform from the String transform category.
Provide the following information:
Enable the Create new Column (Optional) to add a new column with the result data.
Pass the suffix value that is needed.
Select one or multiple columns where the suffix needs to be added.
Click the Submit option.

Result will come as a new column (as in the current scenario) or on the same column by adding the suffix value on the selected columns.

Change to Lowercase
The Change to Lowercase transform converts the values from the selected column into lowercase. This transform can either replace the existing column value entirely or be added as a new column alongside the original data. This flexibility allows for seamless integration and customization of the transformed values within your dataset, giving you the option to either update the existing column or introduce a new column with the lowercase representation of the data.
Check out the given walk-through on how to use the Change to Lowercase transform.
Select a column from the dataset inside the Data Preparation framework.
Select the Transforms tab.
Click the Change to lower case transform.
Select the Create new column option.
Click the Submit option.

A new column gets added with the transformed values:

Change to Title Case
The Change to Title Case transform converts the selected column value into title case, resulting in a transformed value where the first letter of each word is capitalized. This transformed value can either replace the existing column value or be added as a new column within the dataset. This flexibility empowers you to smoothly incorporate the title case representation of the data, allowing for enhanced readability and consistency.
Check out the given illustration on how to use the Change to Title Case transform.
Steps to use the Change to Title Case transform:
Select a column from the Dataset that has been opened in the Data Preparation framework.
Open the Transforms tab.
Select the Change to Title Case transform.
Select the Create new column option.
Click the Submit option.

The selected column values get changed into the title case. In this case, the selected column is the name2 column.

Change to Upper Case
The Change to Upper Case transform is a data manipulation operation that converts the selected column value to capital letters. This transformation can be applied in two ways: by replacing the existing column value or by adding the transformed value as a new column.
Check out the given illustration on how to use the Change Upper Case column.
Steps on how to use the Change to Upper Case transform:
Select a column from the Dataset that has been opened in the Data Preparation framework.
Open the Transforms tab.
Select the Change to Upper Case transform.
Select the Create new column to display the result.
Click the Select option.

A new column gets created with the values mentioned in Upper case:

Convert Values To Column
Each unique value in the original column will be represented by a separate column, and the presence or absence of that value will be indicated by a binary value (0 or 1) in the corresponding column.
Check out the given illustration on how to use the Convert Values To Column transform.
Steps to perform the Convert Values to Column transformation:
Select a Column from the Data Grid that contains multiple values.
Navigate to the Transforms tab.
Select the Convert Values To Column transform and click on it.

As a result, multiple columns get added based on the various values of the original column.

Please Note: It is advisable to use columns with Categorical variables/ with String data type to apply the Convert Values to Column transform.
Ends with
The Ends with transform is ideal for matching value based on patterns for the String data type.
It returns true if the rightmost set of characters of a column of values matches a pattern.
The source value can be a String data type, and the pattern can be a Pattern, regular expression, or a string.
Check out the given illustrations on how to use the Ends with transform.
Steps to perform the Ends with transform:
Select a String column using the Data Grid.
Navigate to the Transforms tab.
Open the Columns transforms.
Select the Ends with transform.
Mode: Select a Mode by using the drop-down icon. The given choices for Mode are: REGEX and String.
If the selected Mode is REGEX then pass a specific values in the Value field by following the suggested patterns:
In Regex mode for a single column using single value for example, “MimiTolkin” → the user should pass '*kin$' (In the below-given image, it is passed as '.*ope$' for "Europe")
In Regex mode for a single column and using multiple values like “MimiTolkin” & “Burger” respectively then → .*(kin|ger)$
If the selected Mode is String then pass a specific value from the selected column. [E.g., "Mimitolkin"] (In the below-given image, it is passed as "Europe")
The Ignore Case option can be used to make string comparison case-insensitive.
Click the Submit option.


Result will come as True or False for a single column by checking the words in the column that ends with the given pattern (E.g., All the values that ends with the 'bad' pattern will display True in the newly added column with the REGEX mode. It will also display True for the rows with the "Ahmedabad" value with the String mode).

Extract Substring at Position
The Extract Substring at Position transform allows you to extract a portion of a selected column based on the starting position and the length of the substring to be extracted. The transformed value can replace the existing column value or be added as a new column.
Here's how the transform works based on the provided parameters:
Position: The starting position of the substring. It can be a positive or negative number.
If the position is positive, the substring extraction starts from the beginning of the string. For example, if the position is 2, the extraction will begin from the second character.
If the position is negative, the substring extraction starts from the end of the string. For example, if the position is -3, the extraction will begin from the third-to-last character.
Length: (Optional) The number of characters to extract from the string. If omitted, the whole string starting from the given position will be returned.
Let's see an example to better understand the transformation:
Suppose you have a column named "Text" with the value "Hello, World!".
If you apply the substring extraction transform by replacing the existing column value and setting the position to 2, the transformed value will be "ello, World!" because it starts from the second character onward.
If you apply the substring extraction transform by adding a new column and setting the position to -6 and the length to 5, the transformed value in the new column will be "World" because it starts from the third-to-last character and extracts 5 characters.
Keep in mind that the exact implementation of this transformation may vary depending on the data manipulation tool or programming language you are using.
Check out the given illustration on how to use the Extract Substring at Position.
The Extract Substring at Position transform is applied to the name2 column with the 3 position and 2 as length value in the below-given image:

It returns a new column expected_joining_date_extract_substring_1 with the first 7 positions as the split string value is 0.

Extract Substring before Delimiter
The Extract Substring before Delimiter transform allows you to extract a substring from a selected column based on the count of occurrences of a delimiter. It creates a new column that contains the extracted substring.
Check out the given illustration on how to use the Extract Substring before Delimiter transform.
Delimiter: The character or sequence of characters that separates the substrings in the selected column.
Count: The count of occurrences of the delimiter before which the extraction should happen. This value is mandatory.
Let's look at an example to understand the transformation:
Suppose you have a column named expected_joining_date with values like 2018-06-12. You want to extract only the year from this column.
To achieve this, you can use the Extract Substring Before Delimiter transform with the following parameters:
Delimiter: "-"
Count: 1
By applying this transform, a new column named expected_joining_date_extract_substring_before_delimiter1 will be created. It will contain only the first substring (year) extracted from the original column.
The below given example displays how the Extract Substring before Delimiter transform extracts the first string from the expected_joining_date column and creates a new column.
As a result, the expected_joining_date_extract_substring_before_delimiter1 gets added to the Data Grid displaying only the first string (only the year) value before the first delimiter of the selected column.
Steps on how the transform works based on the provided parameters:
Select a column from the Data Grid display of the Dataset.
Navigate to the Transforms tab.
Select the Extract Substring before Delimiter transform.
Provide the following information:
Enable the Create new column option.
Specify the Delimiter.
Provide a digit to Count.
Click the Submit option.

The result column will be added to the Dataset with the Substring value before Delimiter.

Get Domain
To extract the domain from a valid URL, you can use the Get Domain transform. This transform allows you to retrieve the domain portion of a URL and can be used to replace the existing column value or add the extracted domain as a new column.
Check out the given illustration on how to use the Get Domain transform.
Here's how the Get Domain transform works:
Input: The selected column containing the URLs from which you want to extract the domain.
Output: The transformed value will be the extracted domain, which can replace the existing column value or be added as a new column.
Let's see an example to better understand how this transformation works:
E.g., For the URL: https://www.google.com the extracted Domain value is google.
Steps to use the Get Domain transform:
Select a column containing URL addresses.
Navigate to the Transforms tab.
Search and click the Get Domain transform.

A new column gets added with the extracted Domain from the concerned URLs.

Get Host
The Get Host transform is designed to extract the host name from a URL, including the subdomains but excluding the path and query parameters. It helps to isolate the host from the complete URL.
Here's an example to demonstrate how the Get Host transform works:
E.g., For the URL: https://www.google.com the extracted Host value is www.google.com.
Check out the given walk-through on how to user the Get Host transform.
Steps to use the Get Host transform:
Select a column containing URL addresses.
Navigate to the Transforms tab.
Search and click the Get Host transform.

A new column gets added with the extracted Host ids from the concerned URLs.

Get Subdomain Name
To extract the subdomain name from a valid URL, you can use the Get Subdomain Name transform. This transform specifically focuses on extracting the subdomain portion from a URL.
Here's an example to demonstrate how the Get Subdomain Name transform works:
E.g., For the URL: https://www.google.com the extracted Sub-domain Value is www.
Check out the given illustration on how to use the Get Subdomain Name Transform.
Steps to use the Get Subdomain Name transform:
Select a column containing URL addresses.
Navigate to the Transforms tab.
Search and click the Get Subdomain Name transform.

A new column gets added to the Data Grid with the subdomain names.

Insert Character
The Insert Character transform allows you to insert a specified character after a specified position in a cell value. This transformation can either replace the existing column value or add the modified value as a new column.
Here's how the Insert Character transform works based on the provided parameters:
Position: The position(s) in the cell value after which the character should be inserted. You can specify a single position or multiple positions as comma-separated values.
Character: The character that should be inserted after the specified positions.
Let's see an example to understand the transformation better:
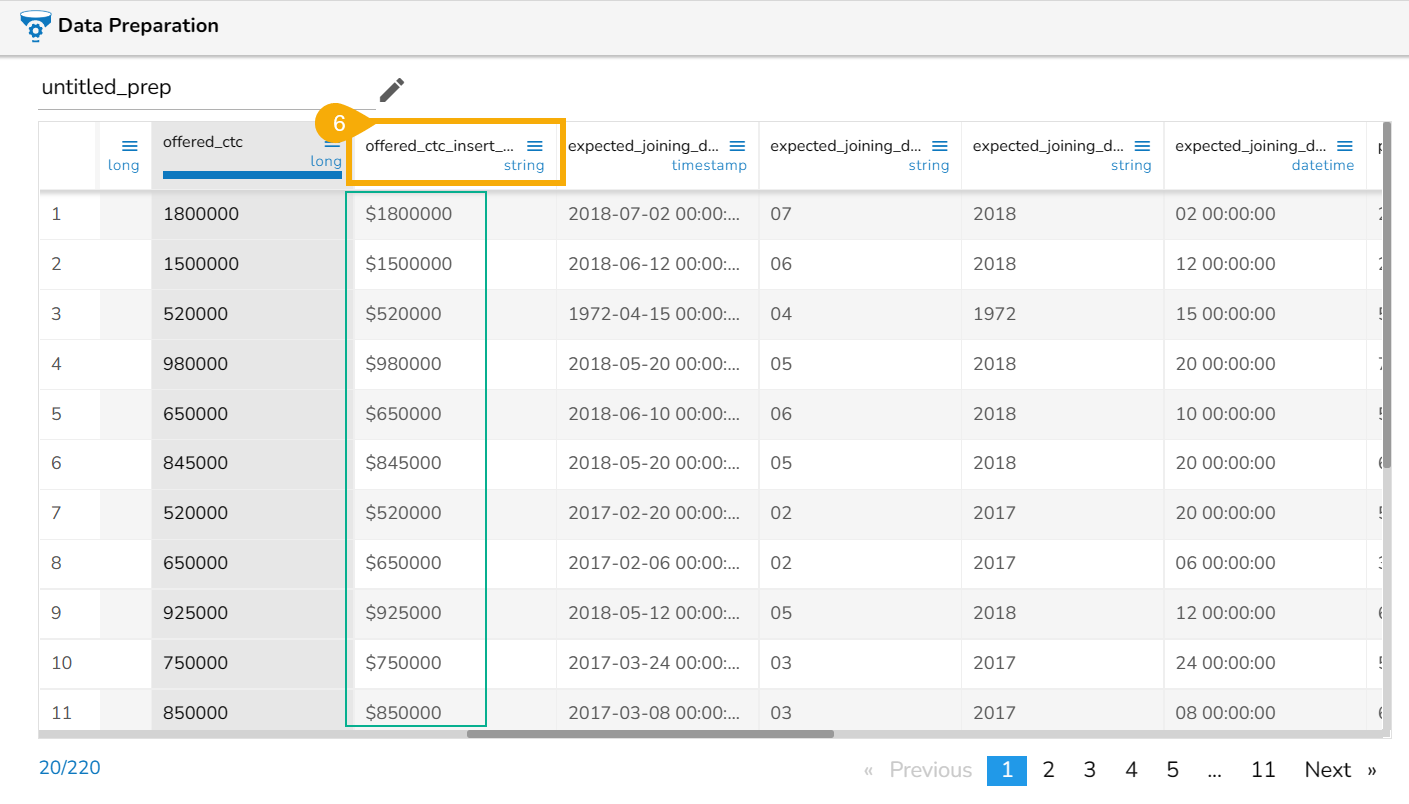
The Insert Character transform has been applied in the below-given column to the offered_ctc column. The selected position is 0 and character to be added is $:

A new column gets added in this case to the dataset with the set configuration for the Insert Character transform:
Negate Boolean Value
The Negate Boolean Value transform is a data manipulation operation that returns the opposite value of a given Boolean value. It negates or flips the Boolean value from True to False or from False to True.
Please Note: It supports the Boolean column where True/ False values are mentioned.
Steps to perform the Negate Boolean Value transformation:
Select a Boolean column where values are mentioned as True/ False.
Select the Negate Boolean Value transform.
Result will get on the same column where the output is the opposite of the source value.
E.g., if a value was True in Source -> then after applying the Negate Boolean Value transform it would get changed to False and vice versa.

Remove Accents
The Remove Accents transform is a data manipulation operation that helps clean text by removing accented characters. Accented characters are special characters that appear above or below a letter, modifying its pronunciation or meaning in some languages. Removing accents can be useful for tasks such as text normalization or language processing.
Steps to perform the Remove Accents transformation:
Select the transform.
Select the Create a New Column.
Select one or multiple columns where the accents need to be cleaned.
Result will come as a new column by cleaning all the accented characters.

Remove Consecutive Characters
The Remove Consecutive Characters transform is a data manipulation operation that removes repeated whitespace or characters from a selected column. It modifies the selected source column by removing the repetition or adds the modified result as a new column.
Here's how the Remove Consecutive Characters transform works based on the provided parameters:
Separator: This parameter specifies whether the transform should search for repeated whitespace or other characters. If "whitespace" is selected, the transform searches for multiple consecutive whitespace characters and returns a single-spaced value. If "other" is selected, the transform allows you to specify a custom repeated character.
Custom Repeated Character: This parameter is applicable only when "other" is selected as the separator. It allows you to specify the character whose consecutive occurrence must be searched and removed.
Submit: Click the Submit option to apply the transform specification to the selected column.
The Remove consecutive characters transform is applied to the current_status column in the below-given image:

The consecutive character 'r' gets removed from the cells that contain the value 'Transferred'. It returns a new column auto-named as current_status_remove_consecutive_character_1 column as shown below:

Remove Part of Text
The Remove Part of Text transform is a data manipulation operation that matches and removes a specific part or the entire value from a selected column based on a given condition. This transformation can be used to replace the existing column value or add the modified value as a new column.
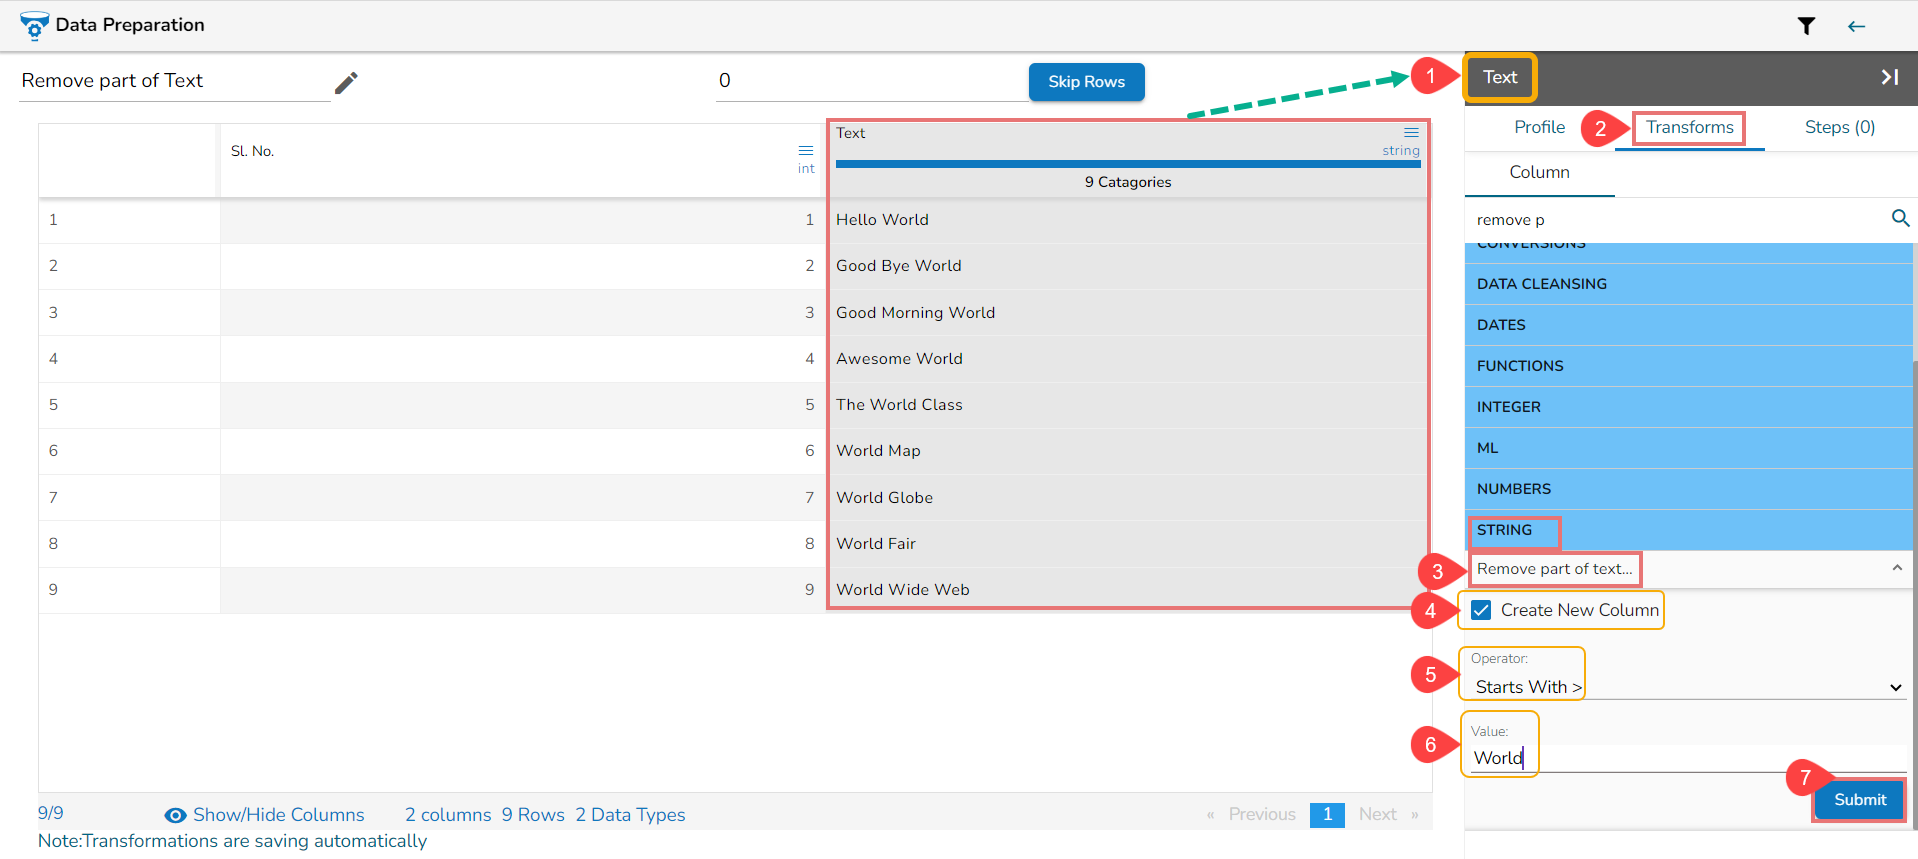
Select a column containing some text in the Dataset.
Open the Transforms tab.
Search and Select the Remove Part of Text.
Create New Column: Enable this option to create a new column.
Operator: Select the operator required for matching the text from the list. The supported operators are contains, equals, starts with, ends with, regex.
Value: The value or pattern to be searched for in the selected text/ string column.
Submit: Click the Submit option to apply the transform.
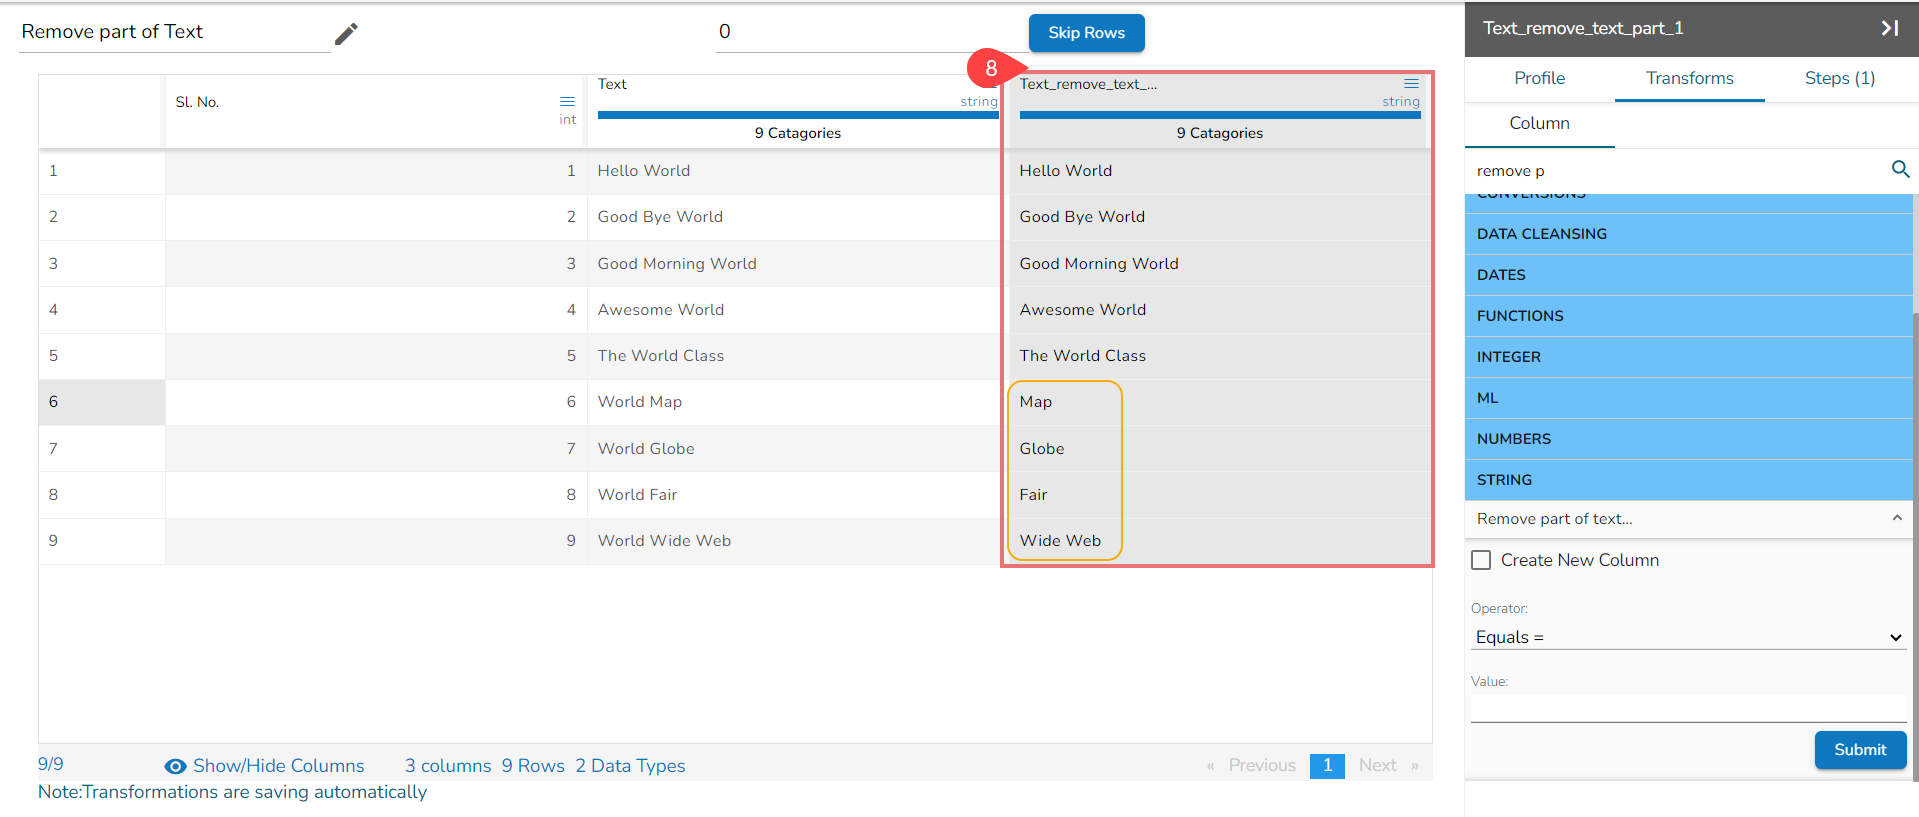
Based on the selected value the part of the text will get removed in the newly added column.
Remove Trailing and Leading Characters
The Remove Trailing and Leading Characters transform is a data manipulation operation that removes leading and trailing characters from a selected column. This transformation can replace the existing column value or add the modified value as a new column.
Here's how the Remove Leading and Trailing Characters transform works based on the provided parameters:
Padding Character: This parameter allows you to specify whether to remove whitespace or another character from the leading and trailing positions of the column values. You can choose the desired option from the drop-down menu.
Custom Padding Character: This parameter is applicable only when other is selected as the padding character. It allows you to specify the specific character to be removed from the leading and trailing positions.
Submit: Click the Submit option after providing the required fields.
By applying the transform and specifying the desired parameters, the leading and trailing characters, including whitespace or a custom character, are removed from the selected column, or the modified data gets added as a new column.
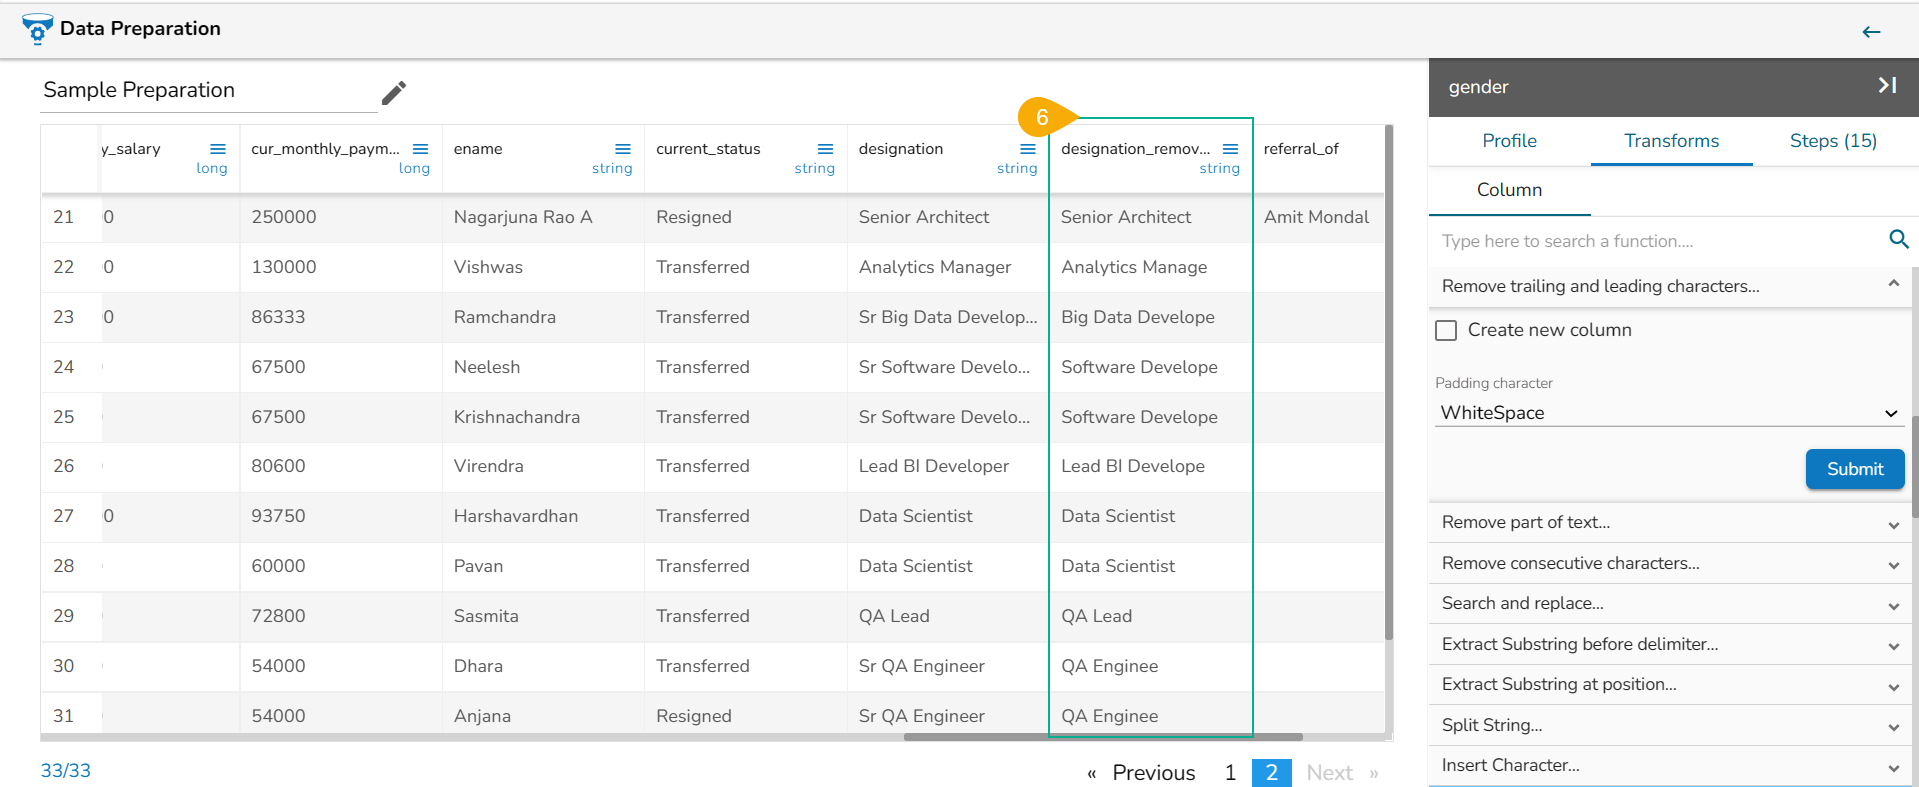
The Remove Trailing and Leading Characters transform is applied on the designation column where the preface 'Sr' custom padding is set to be removed from the new column,

A new column with designation values gets added without the 'Sr' prefix:
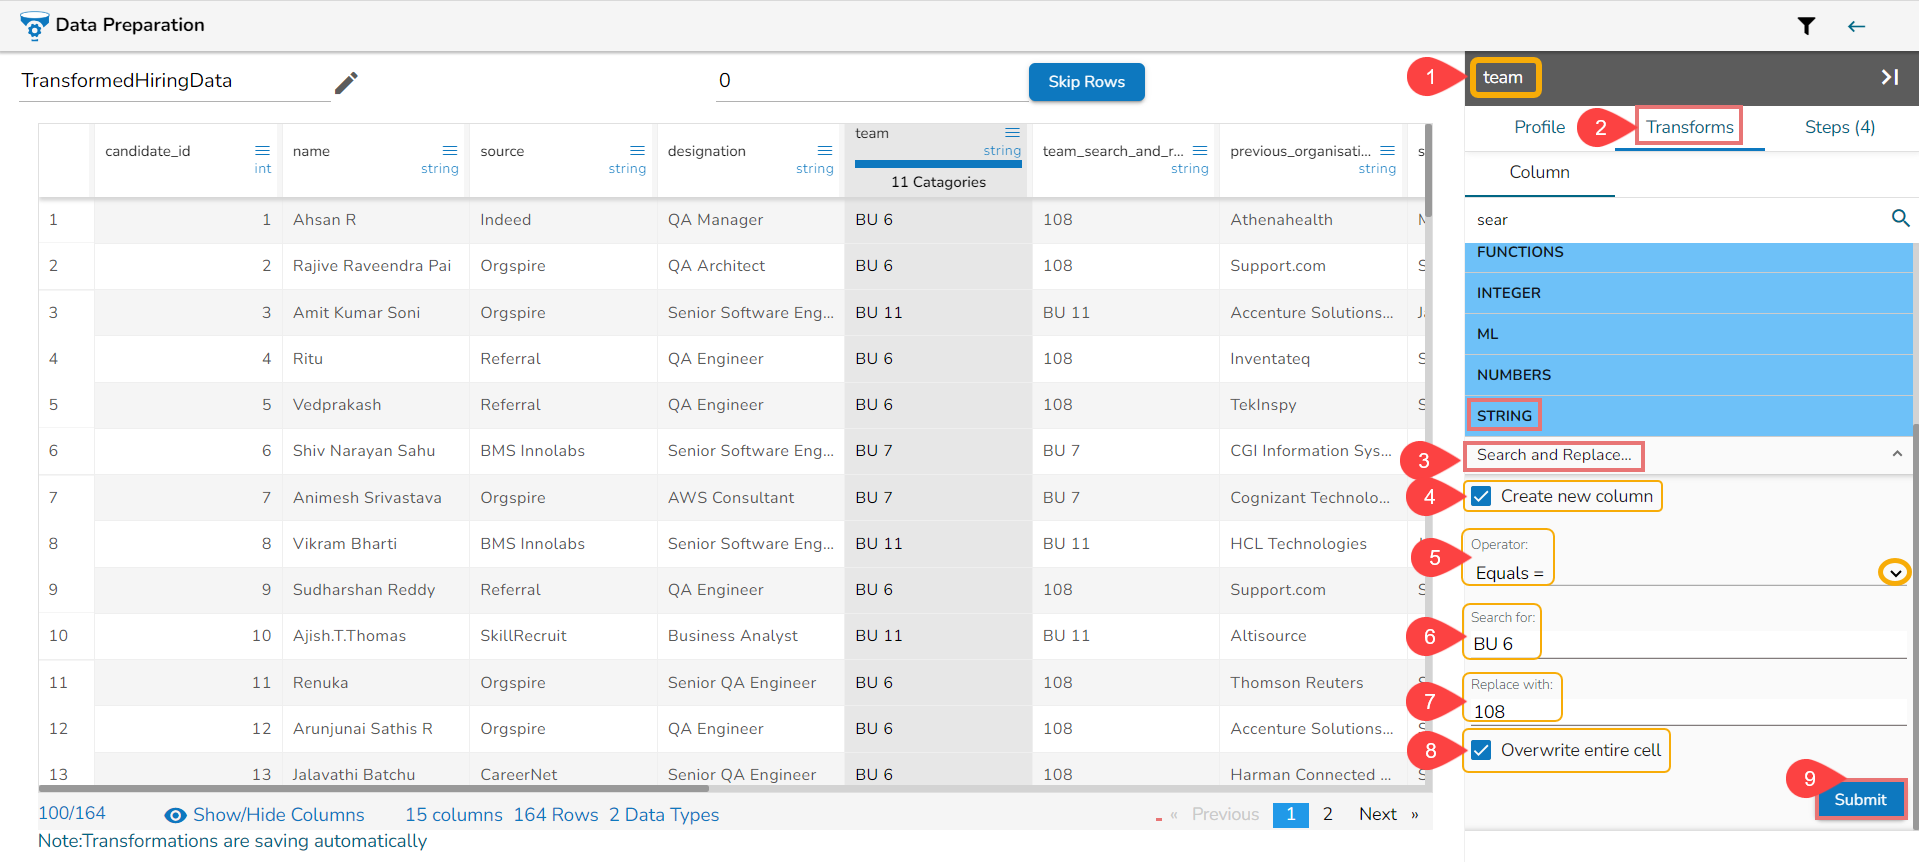
Search and Replace
The Search and Replace transform is a data manipulation operation that searches for a matching part or the entire value in a selected column and replaces it based on the chosen option. This transformation can replace the existing column value or add the modified value as a new column.
Here's how the Search and Replace transform works based on the provided parameters:
Operator: Select the operator required for matching from the provided list. The available operators typically include "contains," "equals," "starts with," "ends with," and "regex match." Each operator determines the matching criteria for the search.
Value: Specify the value or pattern to be searched for in the selected column. The value you provide will be used in conjunction with the selected operator to identify the matching part or value.
By applying the transform and providing the necessary parameters, the matching part or the entire value will be replaced in the selected column or added as a new column.
Steps to apply Search and Replace transform:
Select a column from the displayed Dataset using the Data Preparation grid.
Open the Transforms tab.
Select Search and Replace transform from the STRINGS category.
Use the checkmark to create a new column.
Select an operator using the drop-down icon.
Provide a specific value to be Searched for from the selected column.
Provide a specific value to be replaced with for the searched value.
Use the checkbox to enable overwrite entire cell option.
Click the Submit option.
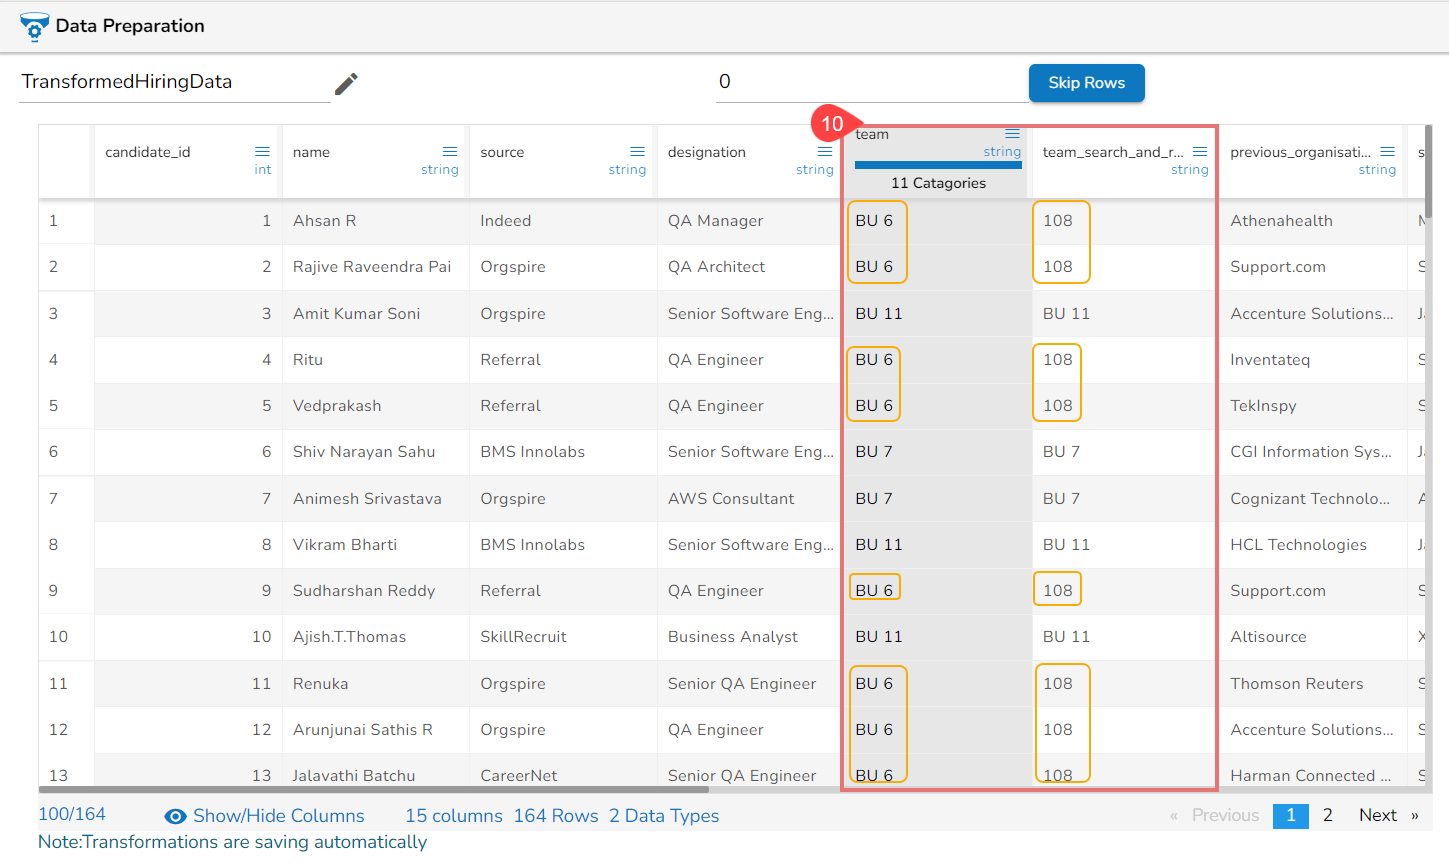
The Search and Replace transform gets applied to the provided value and a new column gets added with the modified data as per the selected Replace with value.
Split String
The Split String transform is a data manipulation operation that splits a string based on a specified condition. It creates new columns based on the number of occurrences of the delimiter or at a specific position.
Here's how the Split String transform works based on the provided parameters:
Use With: This parameter allows you to specify whether the split should happen using a delimiter or at a specific position.
Delimiter: If you select "Delimiter" as the option for "Use With," you need to specify the separator on which the split should occur. The string will be split into multiple parts whenever the delimiter is encountered.
Position: If you select "Position" as the option for "Use With," you need to specify the position after which the split should occur. The string will be split into two parts, with the split happening at the specified position.
By applying the transform and providing the necessary parameters, the string will be split based on the chosen condition, resulting in new columns based on the number of delimiter occurrences or at a specific position.
Here splitting of the column is done based on Delimiter. The applied Separator is '-' and the selected splitting rule is first 3 no. of fields.
Select a column from the Data Preparation grid view.
Open the Transform tab.
Select the Split String transform from the String category.
Provide the required parameters:
Use With: Select Delimiter or Position as an option. Please note that based on the selected option, the next field will appear.
Click the Submit option.

The values from the expected_joining_date get splitted in 3 columns as displayed below:

Starts with
The STARTS WITH function is ideal for matching based on patterns for a String data type. It returns true if the leftmost set of characters of a column of values matches a pattern. The source value can be a String data type, and the pattern can be a Pattern, regular expression, or a string.
Check out the given illustration on how to use the Starts with transform.
Steps to perform the transformation:
Select a column from the displayed dataset.
Select the Starts with transform from the String category.
Select a Mode using the drop-down menu. The given choices are: REGEX and String.
Provide name for the new column.
Provide value in the proper format (if the selected option is REGEX option).
Please Note:
Pass the values in the below-given format for the REGEX mode
for single value ^(value),
for multiple values ^(value1|value2)
The user can use the value without any format while using the String mode. E.g., Pass only abc to get the result for the columns starting with the abc letters.
Use checkbox to enable Ignore Case to make string comparison case-insensitive.
Click the Submit option.


Result will come as True or False for a single column after checking whether the configured words come in the beginning of the concerned row of the selected column.

Check out the below given walk-through on the Starts with transform.
Last updated