
Dates
Add Duration
The transform adds two-time values. It can either add the selected column with a time value or time from another column.
Please Note: The transform supports adding time into ‘hh:mm:ss.mmm’ and ‘hh:mm:ss’ formats.
Use with: Specify whether to fill with a value or another column value
Column/ Value: The value with which the column must be added, or the column with which the selected column value must be added.
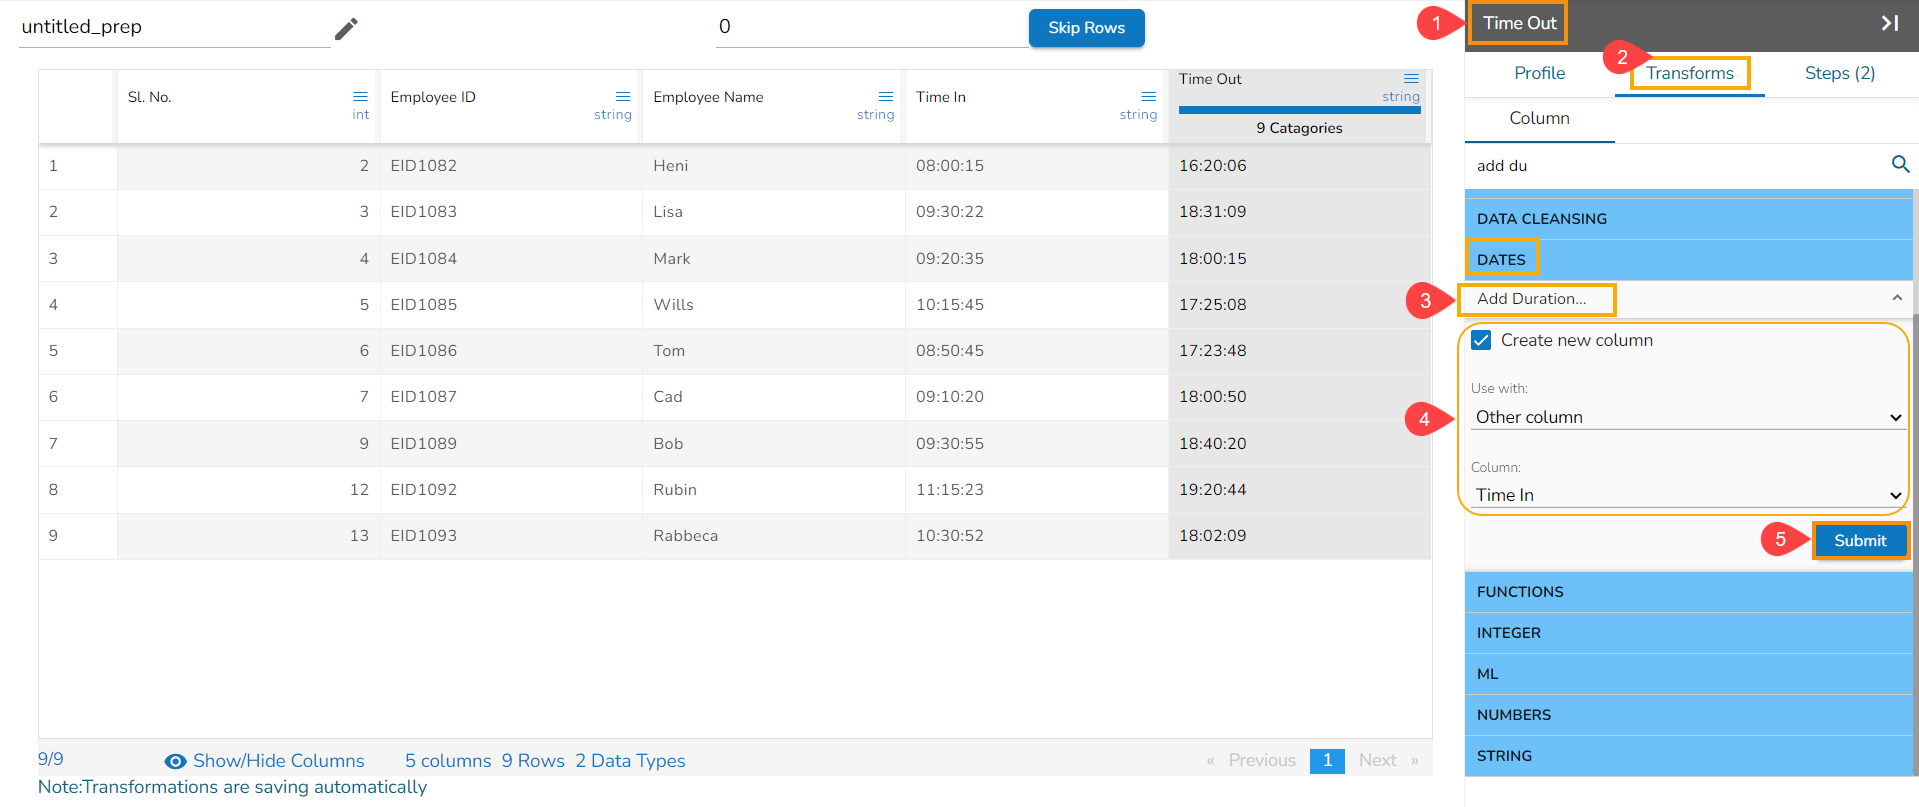
Transform Configuration with Other Column
The Add Duration transform is applied to the timecol2, and the selected other column is timecol3 to configure the transform:
Select a column with the time values (In this case, the selected column is Time Out).
Open the Transforms tab.
Select the Add Duration transform from the Date transform category.
Enable the Create new column option, if you wish to display the transformed data in a new column.
Select the Other Column option from the drop-down option.
Select another column using the drop-down option from where the duration values are to be counted (In this case, the selected column is Time In column).
Click the Submit option.
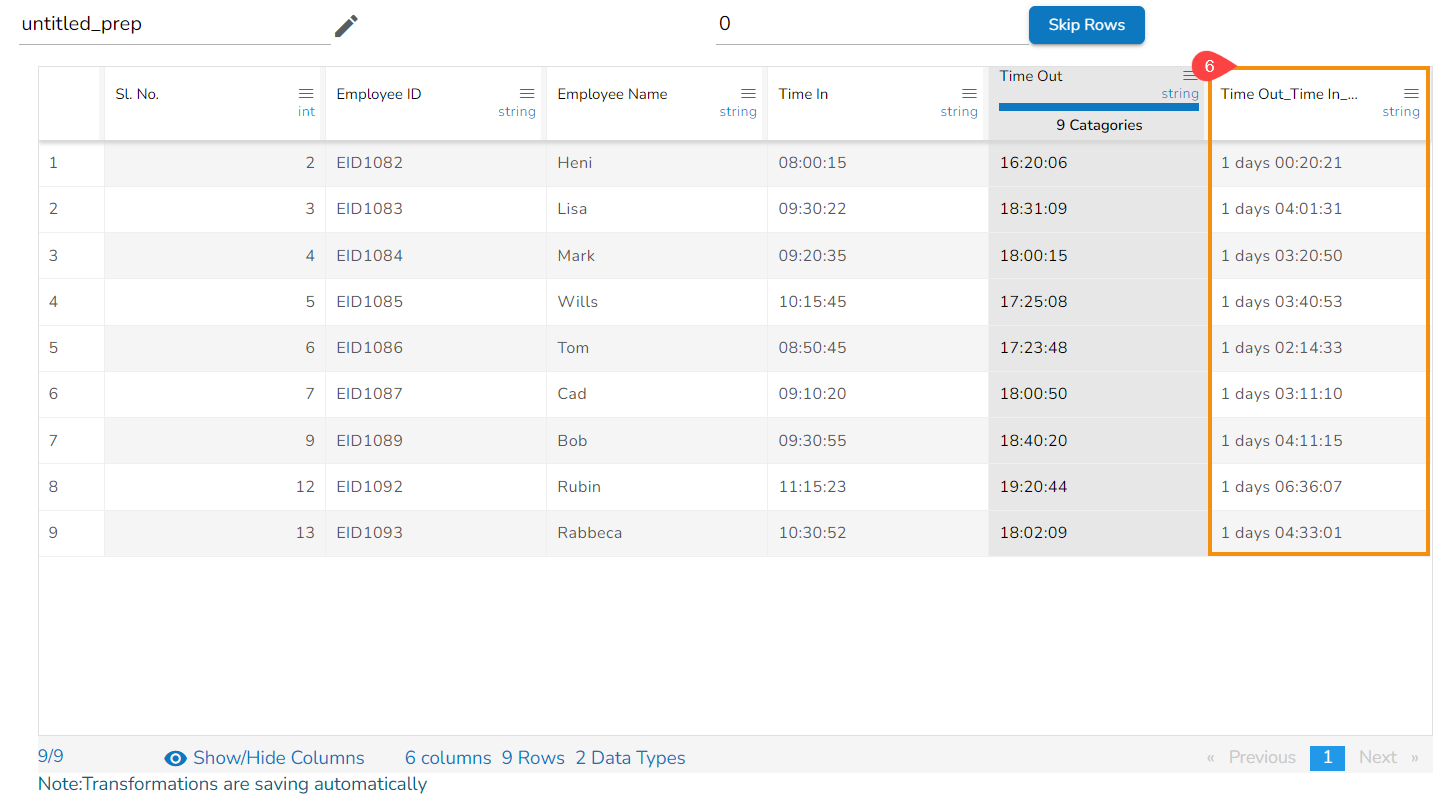
A new column gets created displaying the duration values as displayed below:
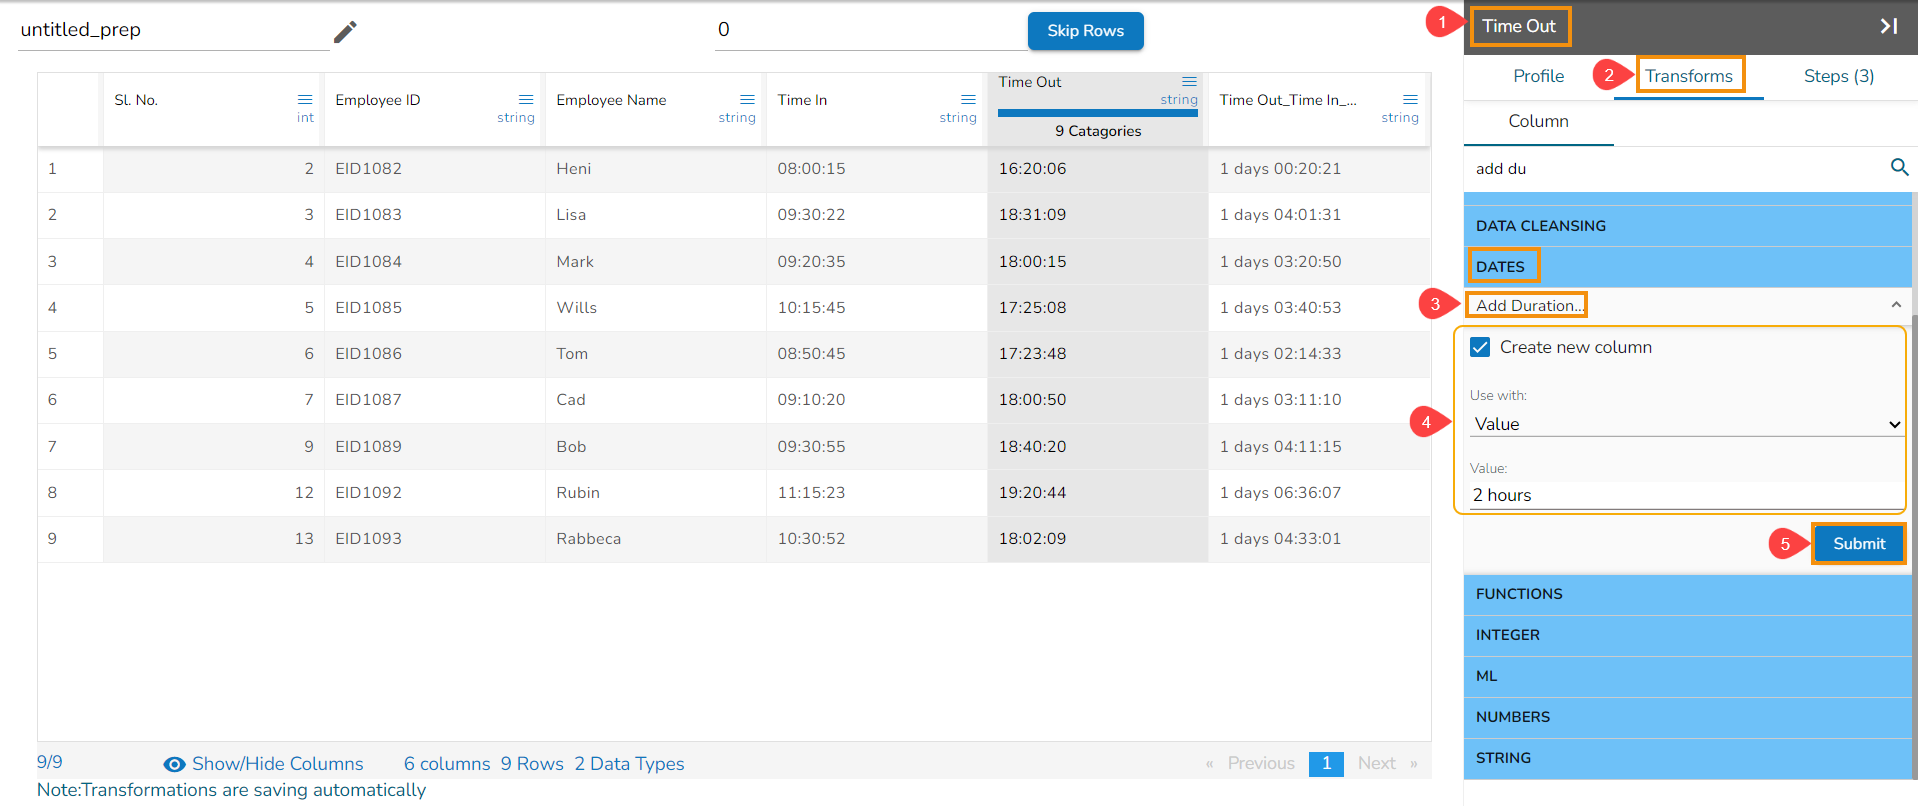
Transform Configuration with Value
The Add Duration transform has been applied to the Time Out column with Value option where in the set value is 2 hours.
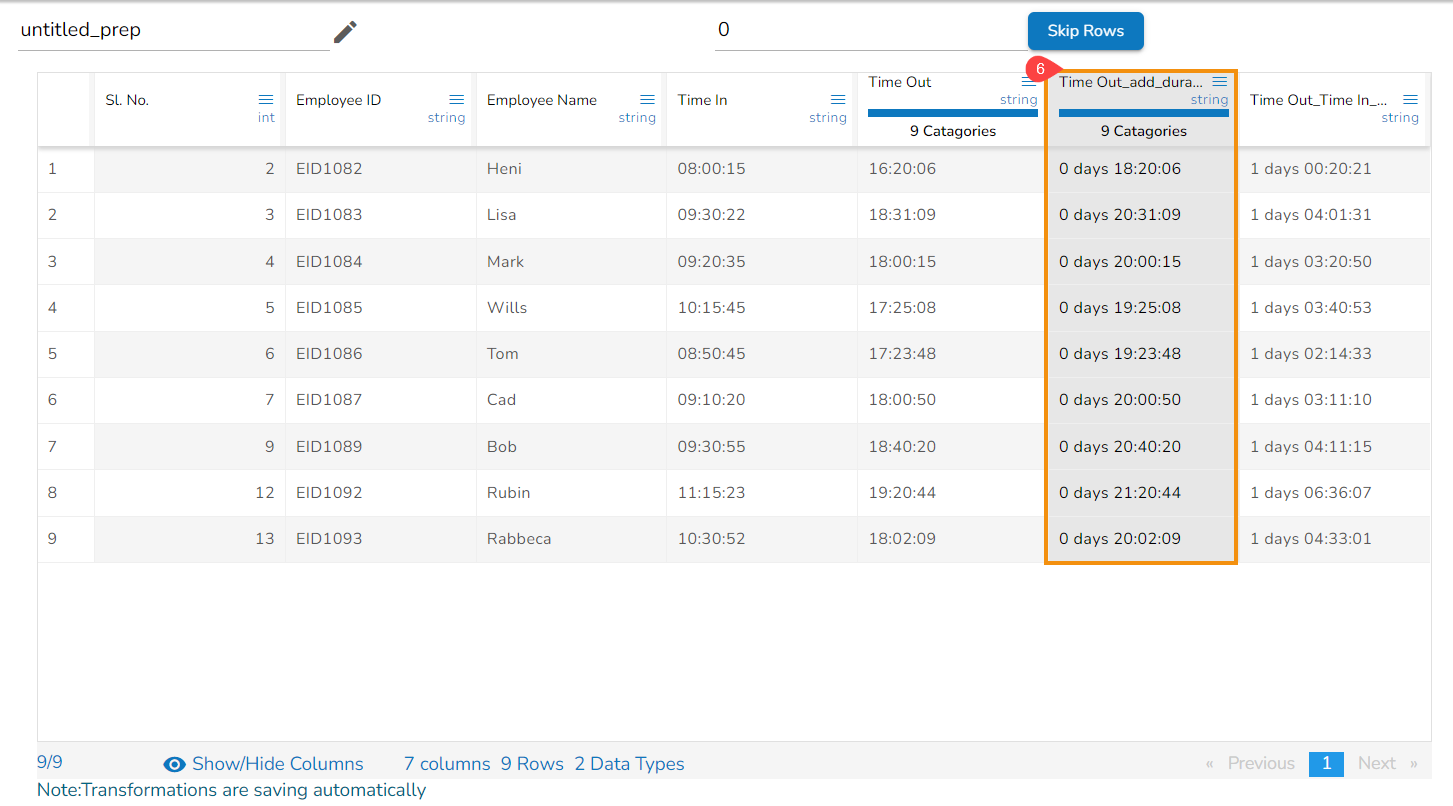
A new column gets added to the Data Grid displaying duration based on the set value as shown in the below-given image:
Add Interval to Date
It adds the time duration specified to the selected datetime column.
Check out the given walk-through on how to use the Add Interval to Date transform.
Select a column with Date values from the data grid.
Open the Transforms tab.
Select the Add Interval to Date transform from the Dates category.
Enable the Create new column option to create a new column with the transform result.
Input Format: It is used to specify the format of the selected Date column format. It can have values ‘Year first’, ‘Month first’, and ‘Day first.’
Value Type: It specifies the type of duration which acts as the operand for the addition. The value type can be years, months, days, weeks, hours, minutes or milliseconds
Value: The value or the operand that must be added with the selected column
Click the Submit option.
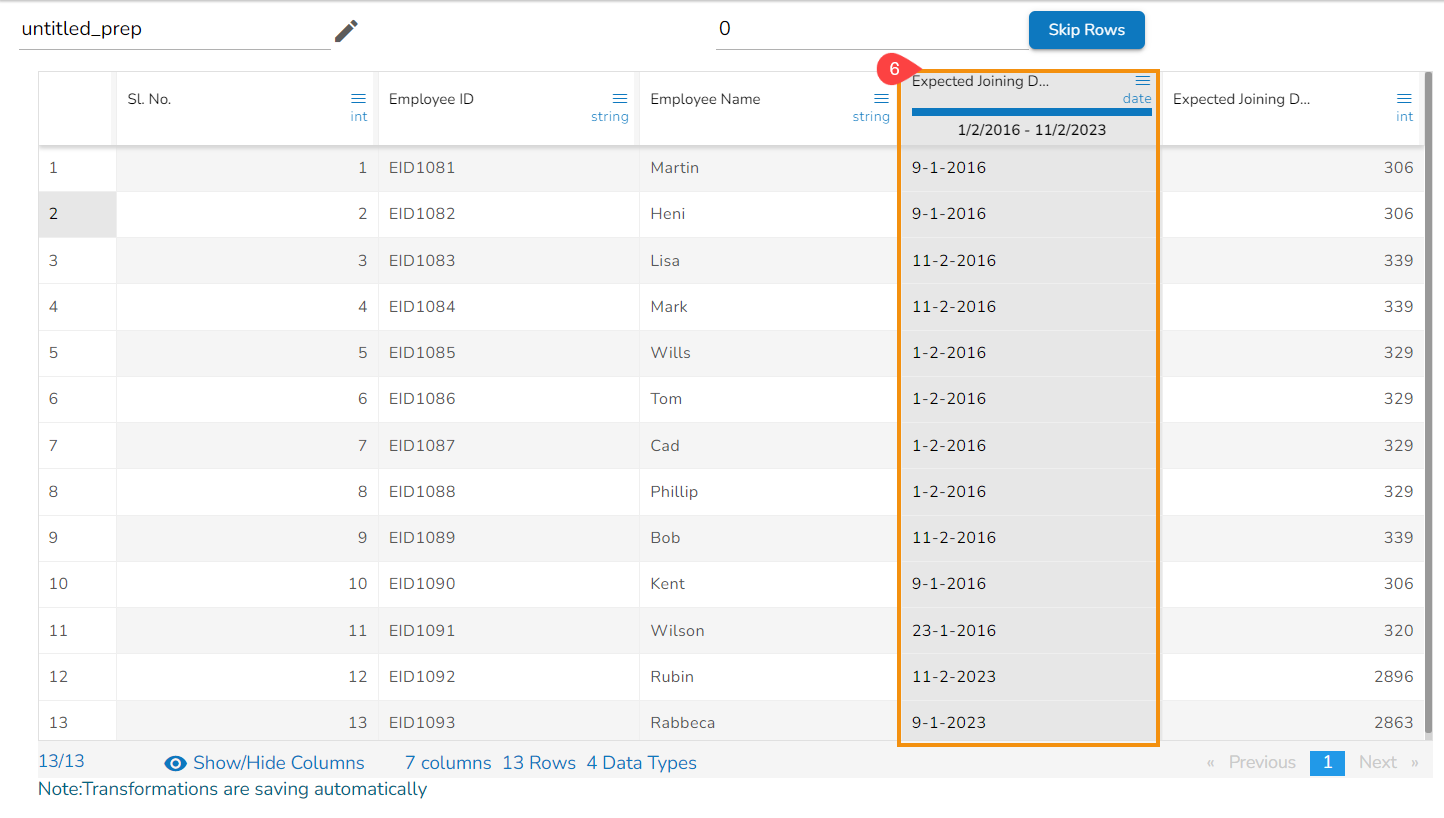
E.g., The Add Interval to Date transform has been applied to the Date column with the selected value of 3 months,

As a result, a new column gets added to the Data Grid reflecting the transformed data as per the set value.

Please Note: The transform supports the datetime column of ‘yyyy-mm-dd’ into the ‘hh:mm:ss’ format.
Convert From UTC
Converts the DateTime value to the corresponding value of the specified time zone. Input can be a column of Datetime values and it’s assumed to be in the UTC time zone.
Please Note: Inputs with time zone offsets are invalid.
Check out the walk-around on the Convert From UTC transform.

Steps to perform the transformation:
Select a DateTime column from the Dataset.
Navigate to the Transforms tab.
Select the Covert From UTC transform from the Dates category
Pass new column name.
Pass the Target Time zone in which the date to be converted.
Click the Submit option.
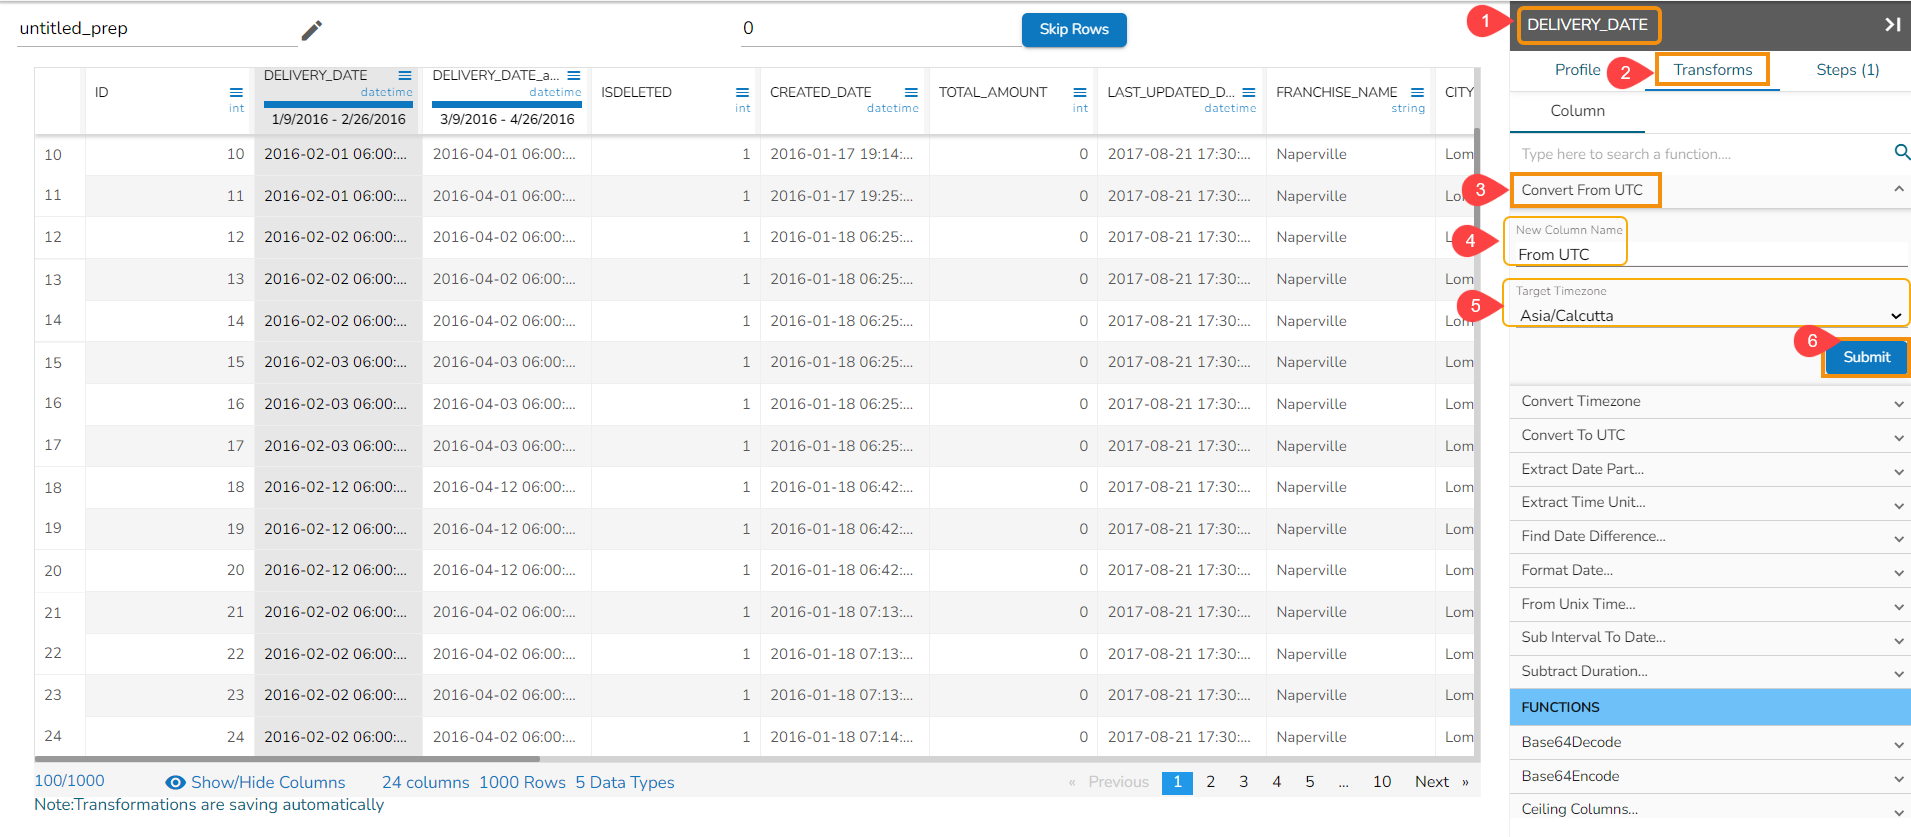
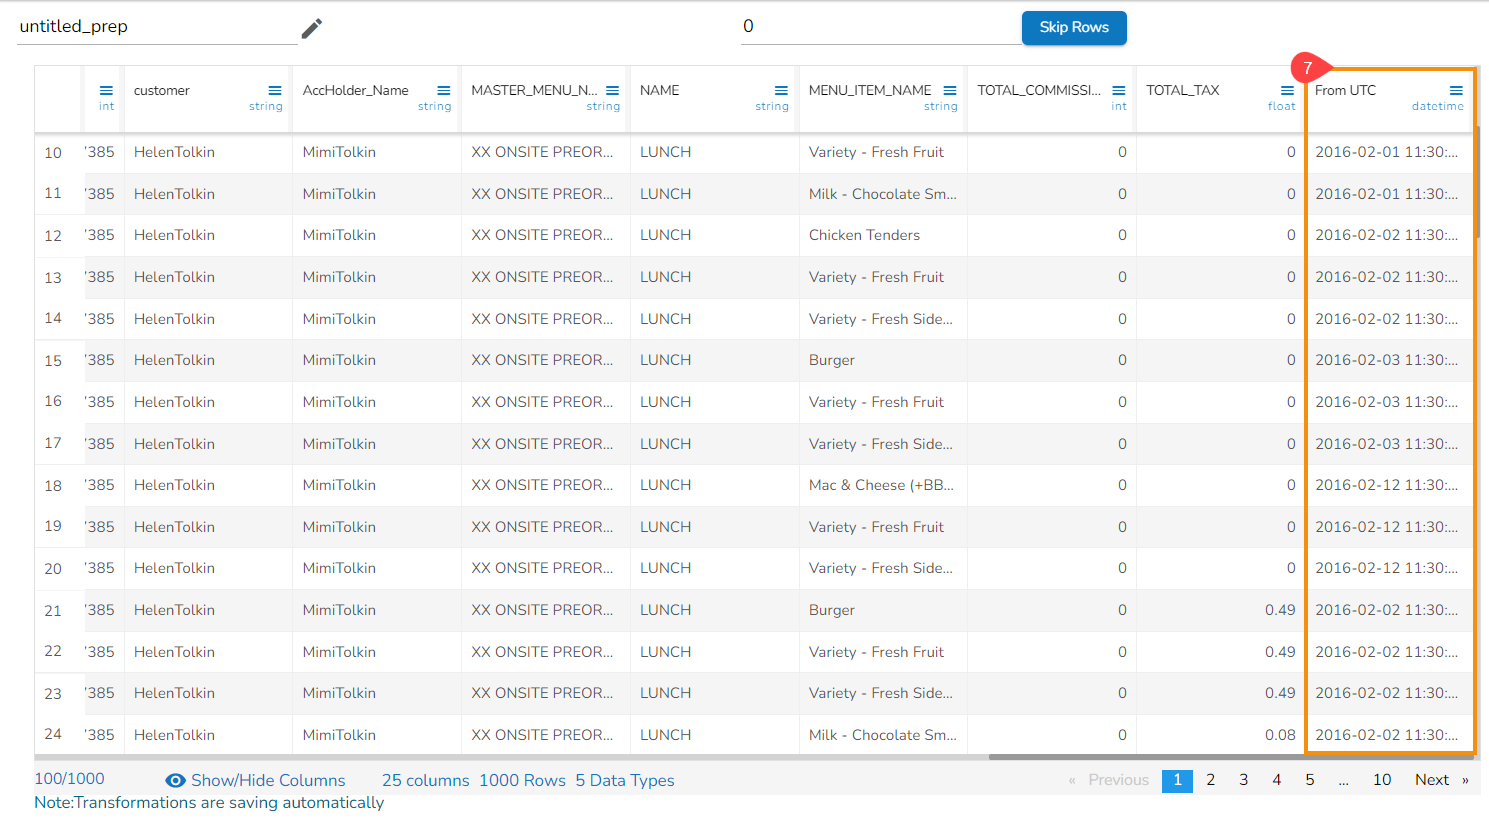
Result will come in a new column with the converted time zone present in it.
Convert Timezone
The Convert Timezone transformation converts Datetime value in a specified time zone to corresponding value second specified time zone.
Please Note: Inputs with time zone offsets are invalid.
Steps to perform the transformation:
Select a DateTime column from the Data Grid.
Navigate to the Dates transforms category.
Select the Convert Timezone transform.
Pass new column name.
Pass the Source Time zone for the selected date column.
Pass the Target Time zone in which the date to be converted.
Click the Submit option.
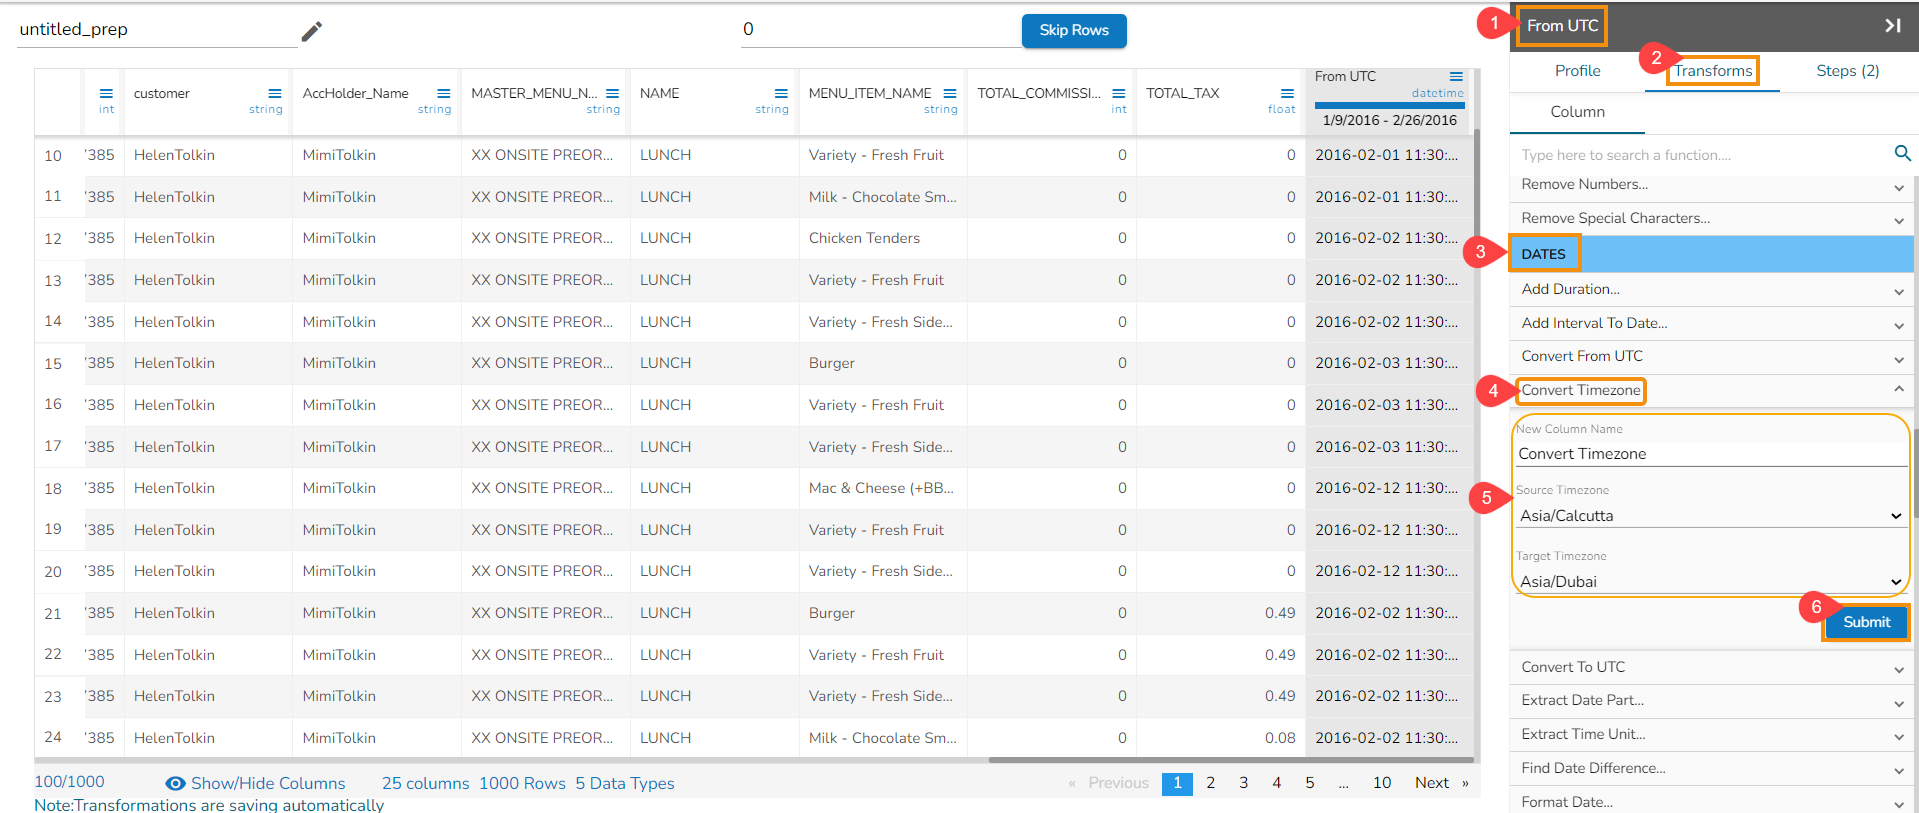
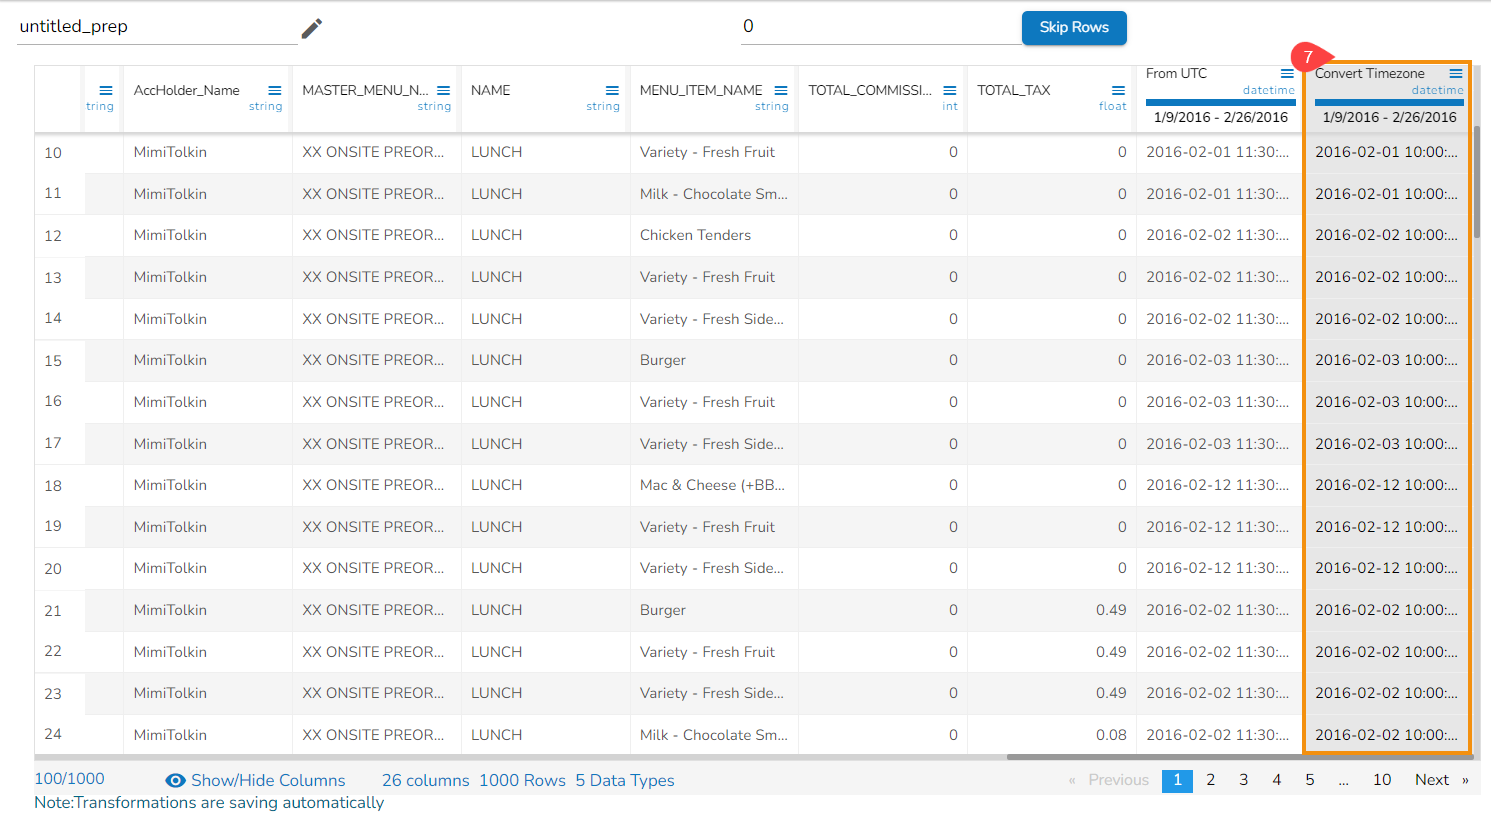
Result will come in a new column with the converted time zone.
Convert To UTC
The Convert To UTC transform converts the DateTime value in a specified time zone to the corresponding value in the UTC time zone. Input can be a column of DateTime values.
Check out the given walk-through on how to Convert to UTC.

Please Note: Inputs with time zone offsets are invalid.
Steps to perform the transformation:
Select a DateTime column from the Data Grid.
Open the Transforms tab.
Navigate to the Dates transforms category.
Select the Convert To UTC transform.
Pass new column name.
Pass Source Time zone from which the date is to be converted to UTC.
Click the Submit option.
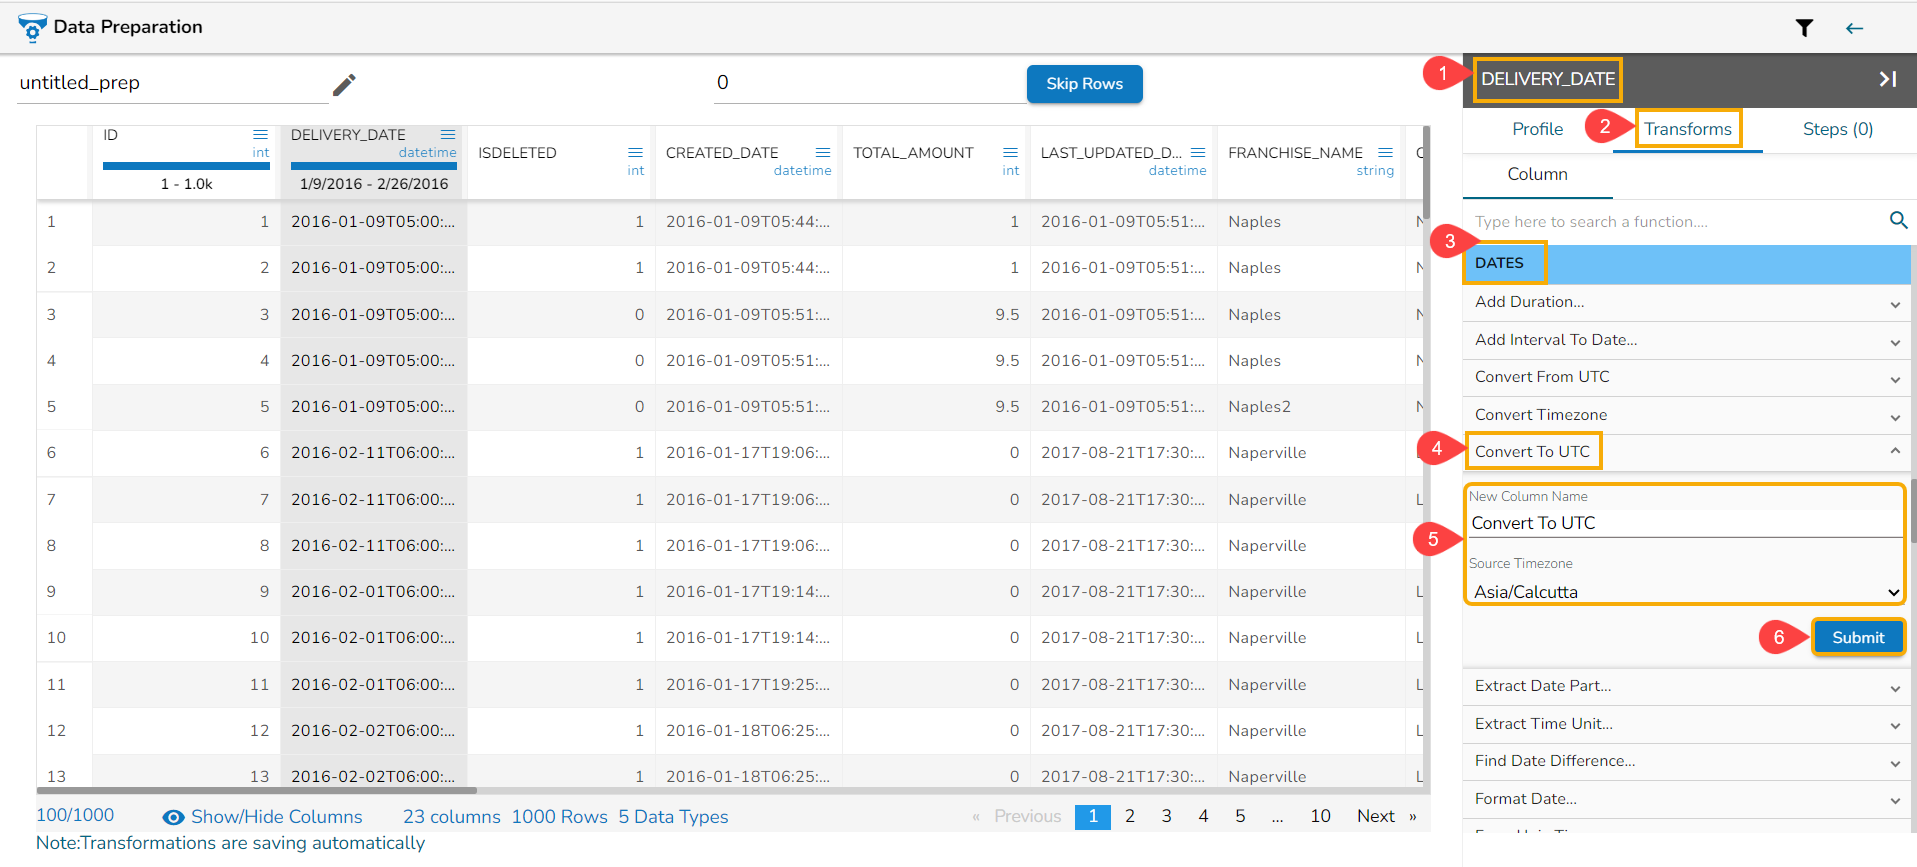
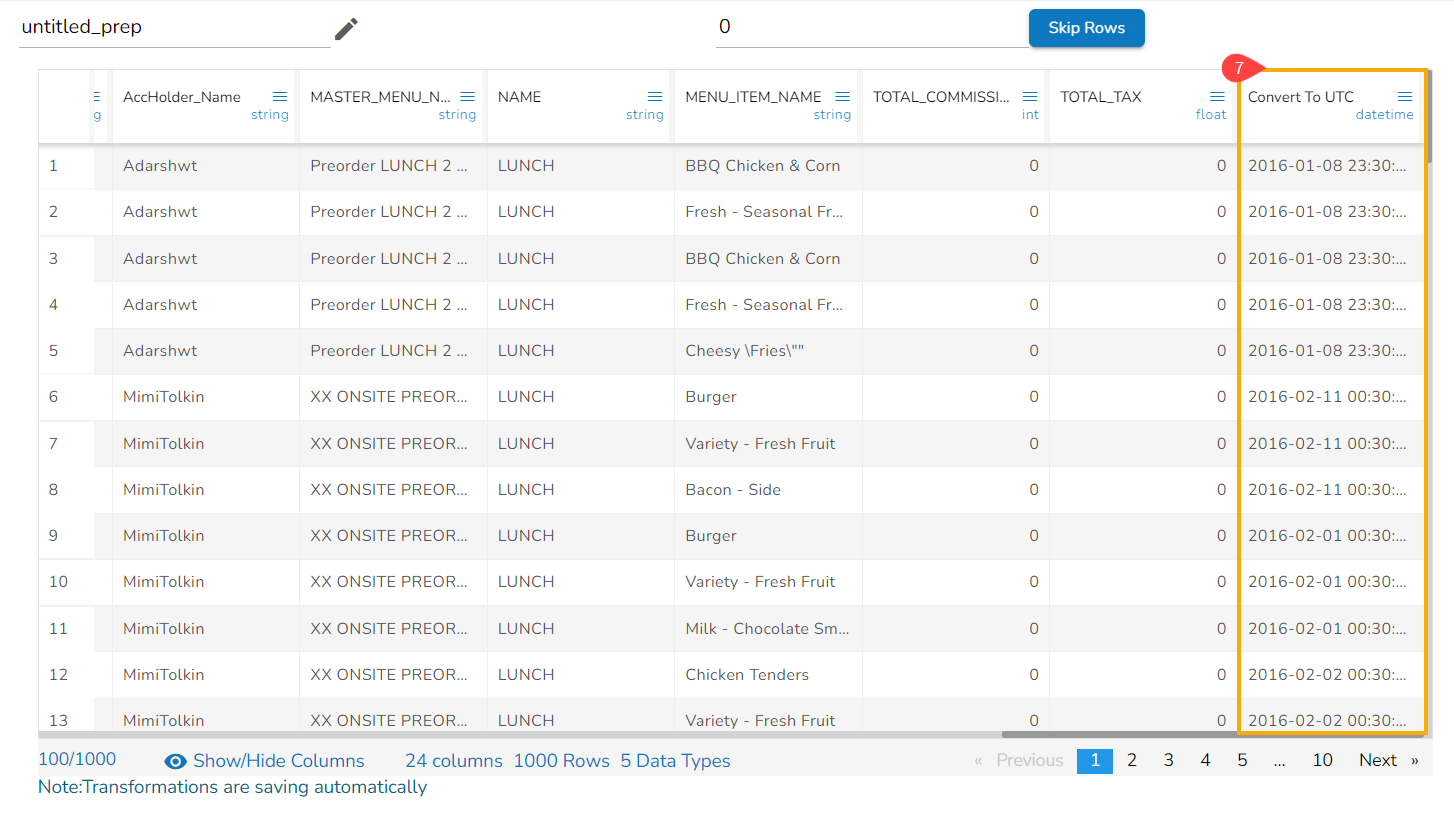
Result will come in a new column containing the converted UTC format.
Extract Date Part
It extracts the date part from a selected column with a date value. The date parts that can be extracted include day, month, year, the day of the week, the day of the year and the week of the year.
Check out the given illustration on how to use the Extract Date Part transform.
Select a Datetime column from the Data Grid.
Open the Transforms tab.
Select the Extract Date Part transform from the Dates transforms category.
Select an Input Format based on the selected column.
Day: It extracts day from a date
Month: It extracts the month from a date/datetime. We can specify the pattern in which the month value has to be returned. Month pattern can be 0-12, Jan - Dec or January - December
Year: It extracts the year from a date. We can specify the pattern in which the year has to be returned. The year pattern can be in the ‘yy’ or ‘yyyy’ format.
Day of Week: It returns the day of the week for the selected date. Day of week pattern can also be specified. The pattern can be 1-7, Sun-Sat or Sunday-Saturday
Day of Year: It returns a number between 1 and 365, which indicates the sequential day number starting with day one on January 1st.
Week of Year: It replaces a number between 1 and 53, which indicates the sequential week number beginning with 1 for the week January 1st falls.
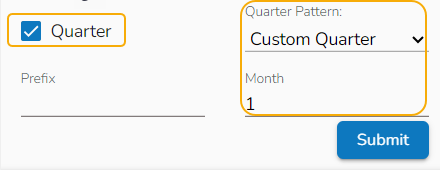
Quarter: It displays the date value based on the quarter, select a quarter pattern using the drop-down option. The supported options are Normal Quarter, Financial Quarter, and Custom Quarter (the user can define the month value for the custom quarter option).
Click the Submit option after selecting all the Date Parts that you wish to extract from the targeted column.
E.g., This transform is applied on the Date column by selecting the Day, Month (Jan-Dec format), Year (in yy pattern), Day of Week (Sunday- Saturday), Day of year, Quarter as a part to be extracted from the selected column values.

As a result, it creates a new columns displaying all the selected transform values.

Please Note: The transform supports Date and DateTimes format (date hh:mm:ss).
Extract Time Unit
Extract the time units from a selected column with a time value. The time units that get extracted include hours, minutes, seconds, milliseconds, and time to milliseconds.
Select a Datetime column from the Data Grid.
Open the Transforms tab.
Select the Extract Time Unit transform from the Dates transforms category.
Hours: Extracts hours from a time
Minutes: Extracts minutes from a time
Seconds: Extracts seconds from a time
Milliseconds: Extracts milliseconds from a time
Time to Milliseconds: Converts the time given to milliseconds
Click the Submit option.
The Extract Time Unit transform is applied to the DELIVERY_DATE column selecting all the available format types:
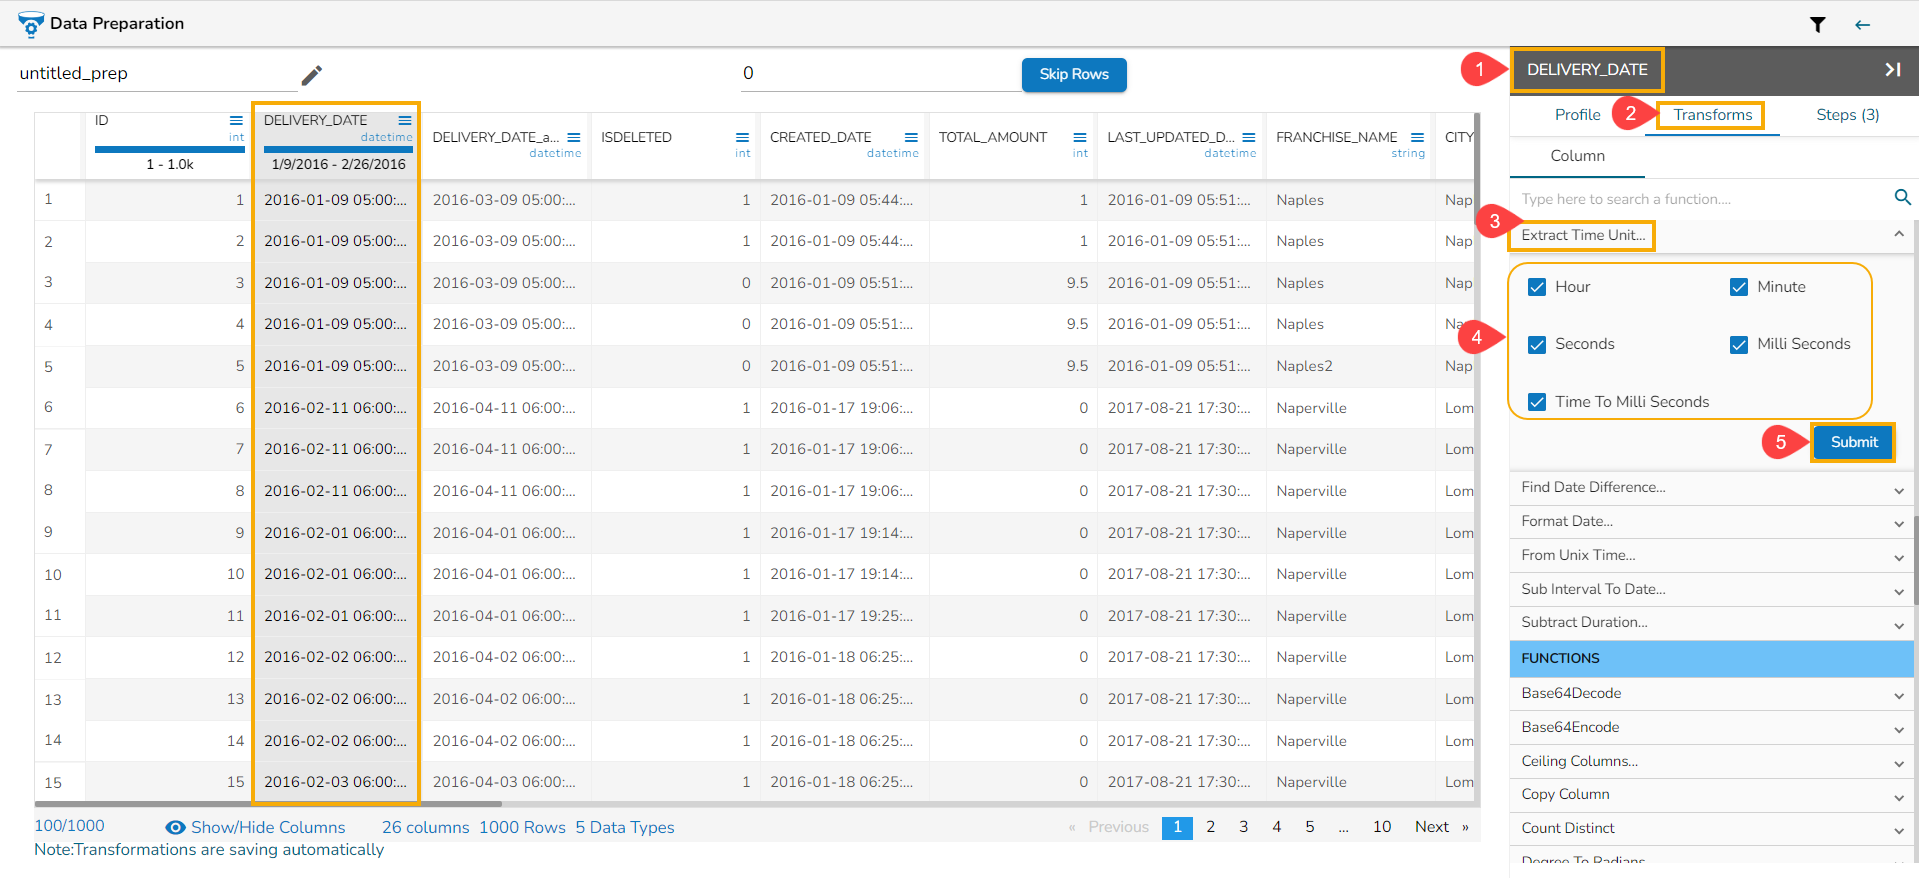
As a result, the time gets extracted in the set time units and no. of columns get added based on the selected time unit options. E.g., In this case, 5 new columns get added to the Data Grid displaying the extracted time values.
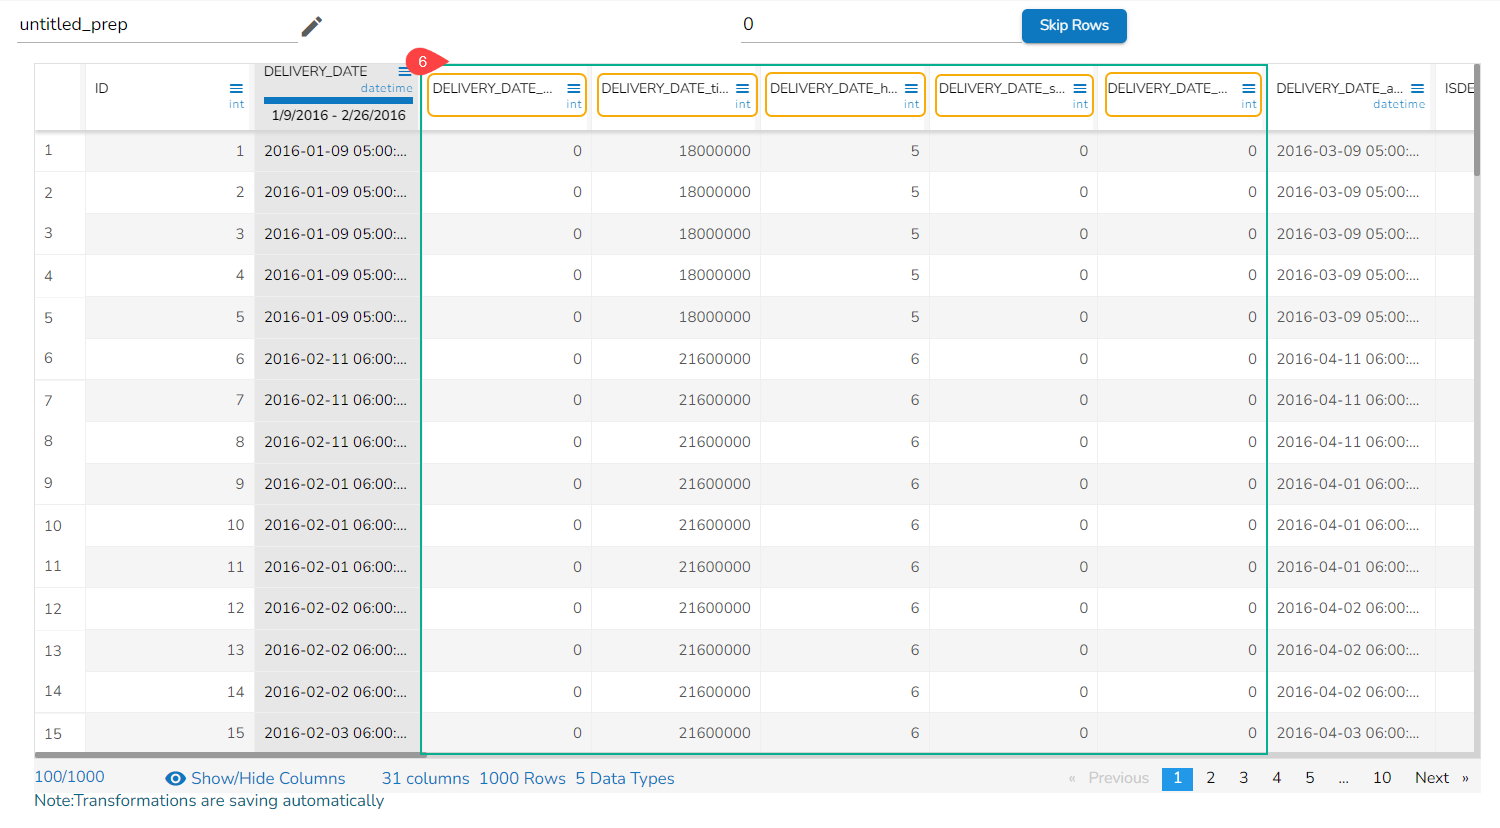
Please Note: The transform supports time format like- hh:mm:ss:mmm, hh:mm:ss, hh:mm
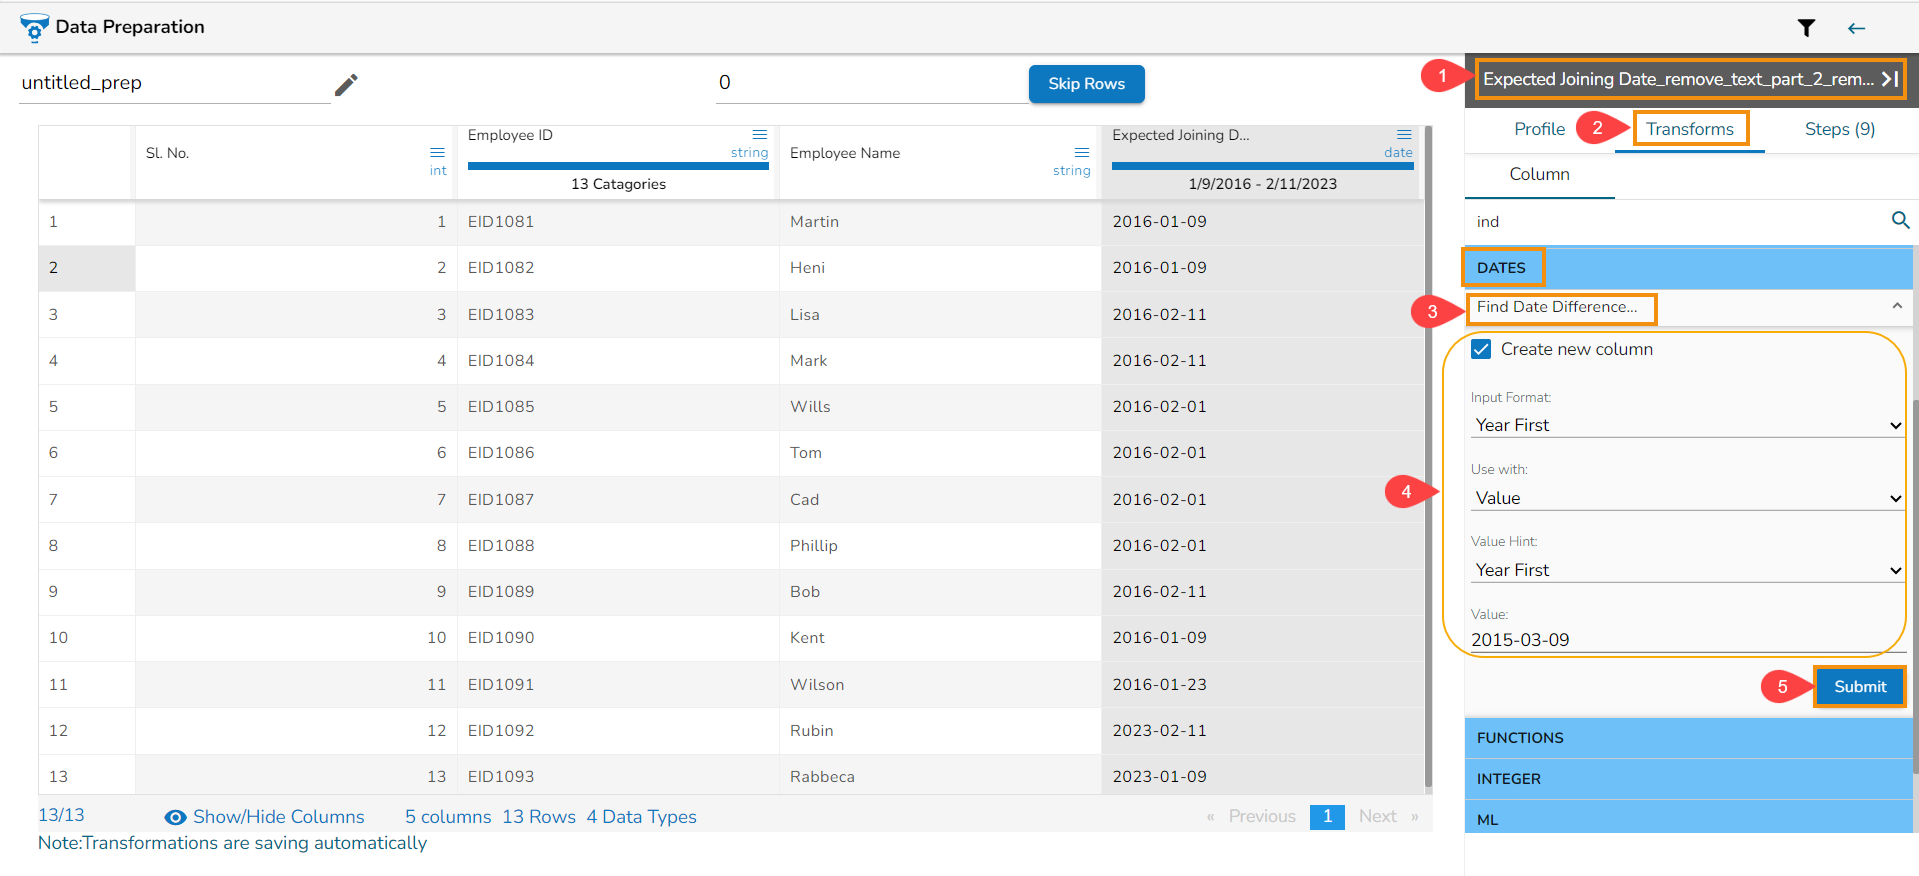
Find Date Difference
The transform finds the difference between two date values. It can either subtract the selected column with a date value or date from another column. The transformed value can replace the existing column value or can be added as a new column.
Select a Date column from the Data Grid.
Open the Transforms tab.
Select the Find Date Difference transform from the Dates transforms category.
Enable the Create new column option to create a new column with the transformed data.
Input Format: Specifies the format of the given date column.
Use with: Specify whether to fill with a value or another column value.
Value Hint: Specify format of value from which you want to find the difference.
Value: Pass the date value from where you want to find the date difference.
Click the Submit option.
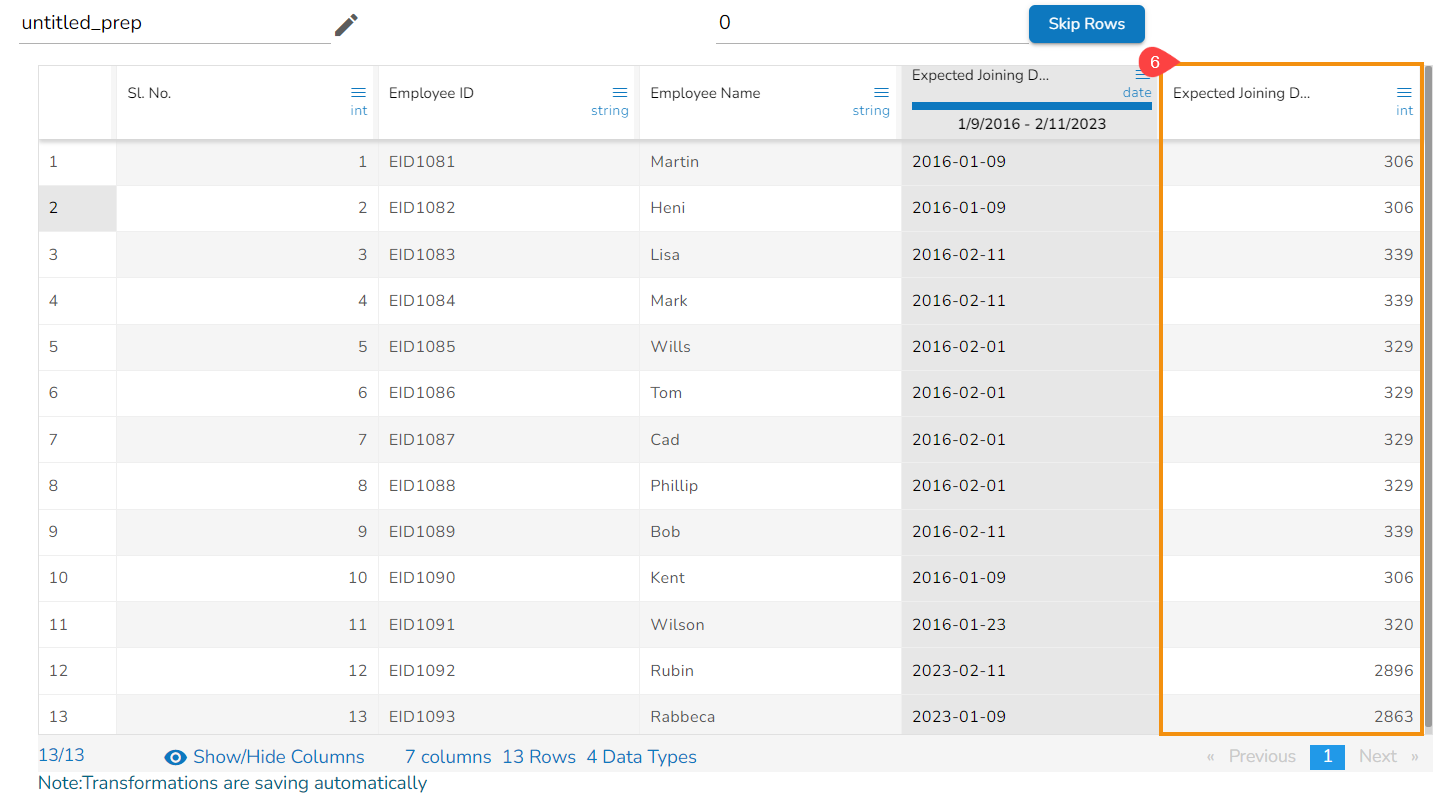
In this case, the Find Date Duration transform has been used with the value 2015-03-09.
As a result, a new column gets created with the set Date Duration value.
Format Date
The users can change the format of a date column by using this transform.
Select a Date column from the Data Grid.
Open the Transforms tab.
Select the Format Date transform from the Dates transforms category.
Source Format Hint: Specifies the current format of the date column.
Target Format: Specifies what we want first (Year, Month, Day) in our output format of the date column.
Year Pattern: Specifies the format of the year (yyyy or yy) in the output date column.
Month Pattern: It specifies the format of the month (number, Jan-Dec, January-December) in the output date column.
Delimiter: Specifies Delimiter (like- slash, a hyphen, comma, full stop, space) for the output date column.
Include Timestamp: It adds a timestamp to the current date format if enabled with a tick mark.
Click the Submit option.
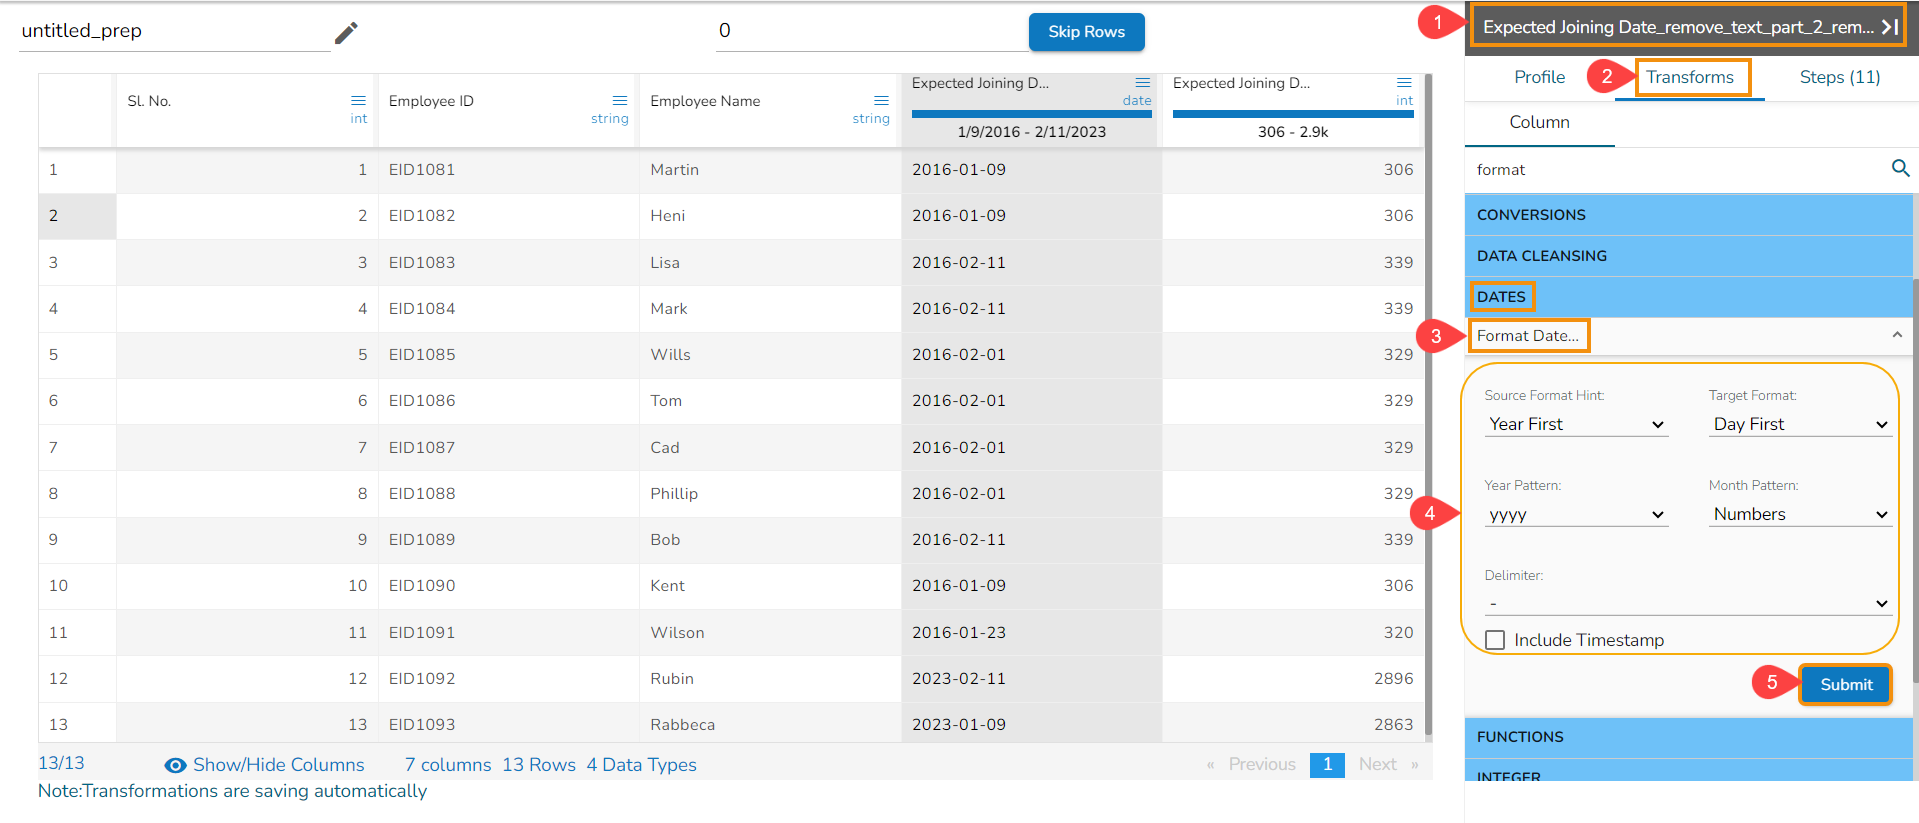
As a result, it displays the values of the selected column as per the set transform format of Date:
From Unix Time
The From Unix Time transform converts the Unix time into a specified format. The From Unix Time transform has been applied on the Date column that contains the values in the Unix format.
Check out the given illustration on how to user From Unix Time transform.
Select a Date column from the Data Grid that contains data in the Unix time.
Open the Transforms tab.
Select the From Unix Time transform from the Dates transforms category.
Enable the Create new column option to create a new column with the transformed data values.
Provide the Output Format in which you want to get the result data.
Click the Submit option.

As a result, a new column gets added to the Data Grid in the set Date format with the converted Unix values:

Sub Interval to Date
The Sub Interval to Date transform subtracts specified value(interval) from the given date column. The transformed value can replace the existing column value or can be added as a new column.
Check out the given illustration on how to use Sub Interval to Date.
Select a Date column from the Data Grid.
Open the Transforms tab.
Select the Sub Interval to Date transform from the Dates transforms category.
Provide the following information to apply the transform:
Enable the Crate new column option to create a new column with the transformed values.
Input Format: Format of date column(given) should be specified here.
Value Type: It specifies what we want to subtract like years, months, days, weeks, etc.
Value: It specifies how many years/months/days (value type) we want to subtract.
Click the Submit option.
E.g., The Sub Interval to Date transform is applied on the Date column with the 4 days as value to get Sub Interval to the given date.

As a result, a new column gets created with the set sub interval values:

Subtract Duration
The transform ‘Subtract Duration’ deducts the time values in two ways. It can either subtract the selected column with a time value or time from another column. The transform supports subtracting time into ‘hh:mm:ss.mmm’,‘ hh:mm:ss’, and 'hh:mm’ formats. The transformed value can replace the existing column value or can be added as a new column.
Select a column with the time values from the dataset.
Navigate to the Transforms tab.
Select the Subtract Duration transform from the Dates category.
Enable the Create new column option, if you wish to create a new column with the result data.
Use with: Specify whether to fill with a value or another column value
Column/ Value: The value with which the column must be subtracted, or the column with which the selected column value must be subtracted.
Click the Submit option.
The result will get displayed based on your Use with selection as described below:
Transform Configuration with Other Column
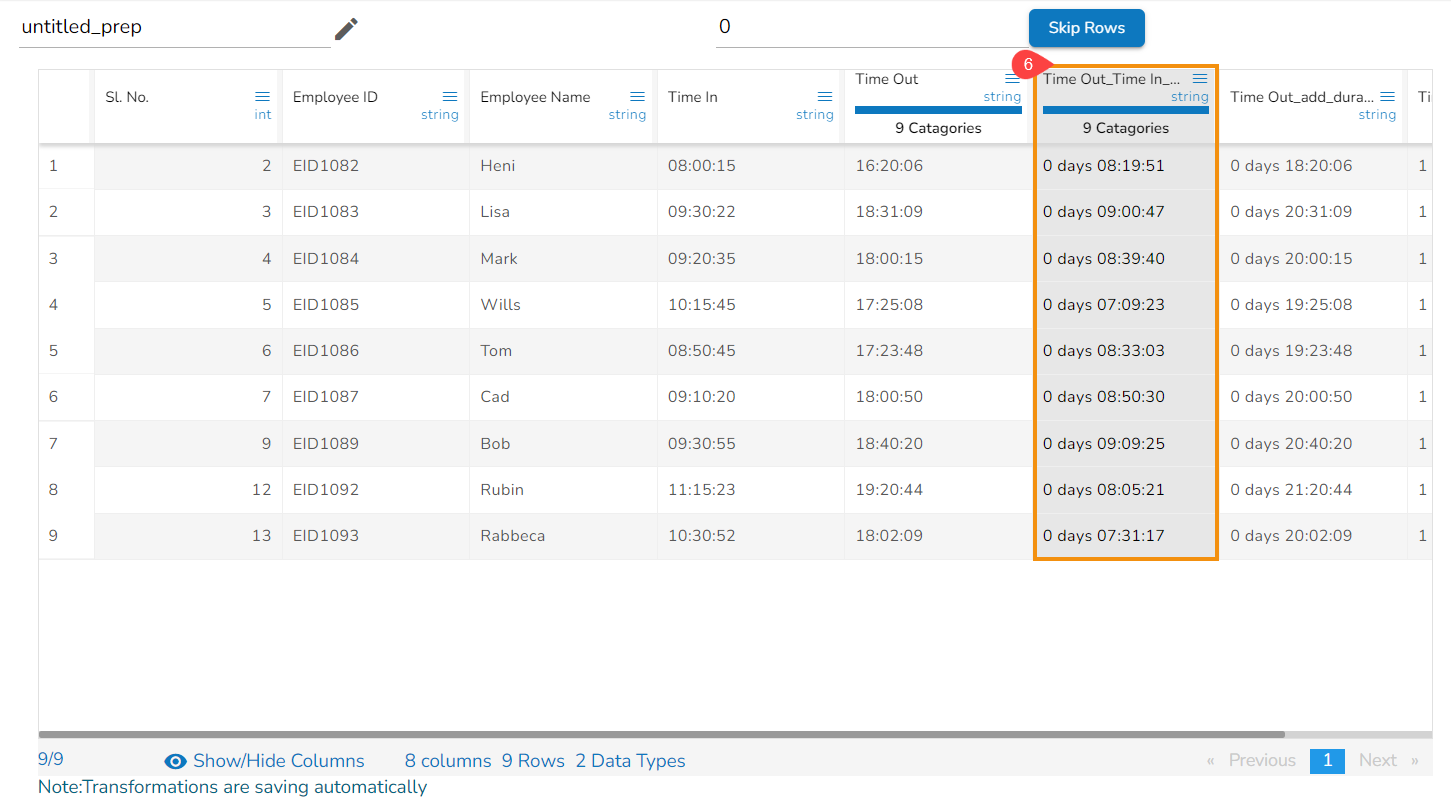
The Subtract Duration transform has been applied to the Time Out column, the selected other column is Time In,

As a result, a new column gets added to the Data Grid with the subtracted duration out of the selected columns:
Transform Configuration with Value
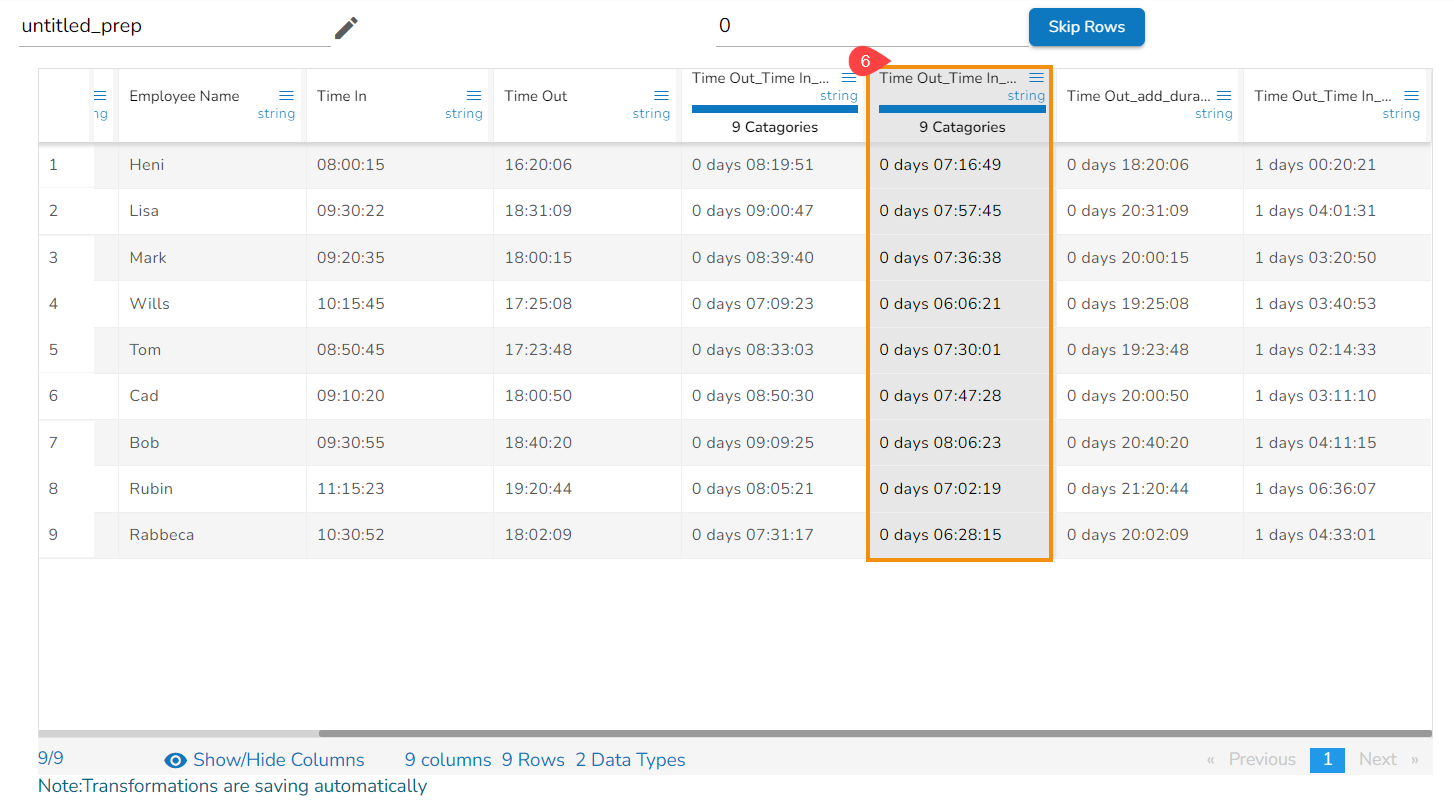
The Subtract Duration transform has been applied to the Time Out_Time In_sub_duration_1, the selected value is 01:03:02,
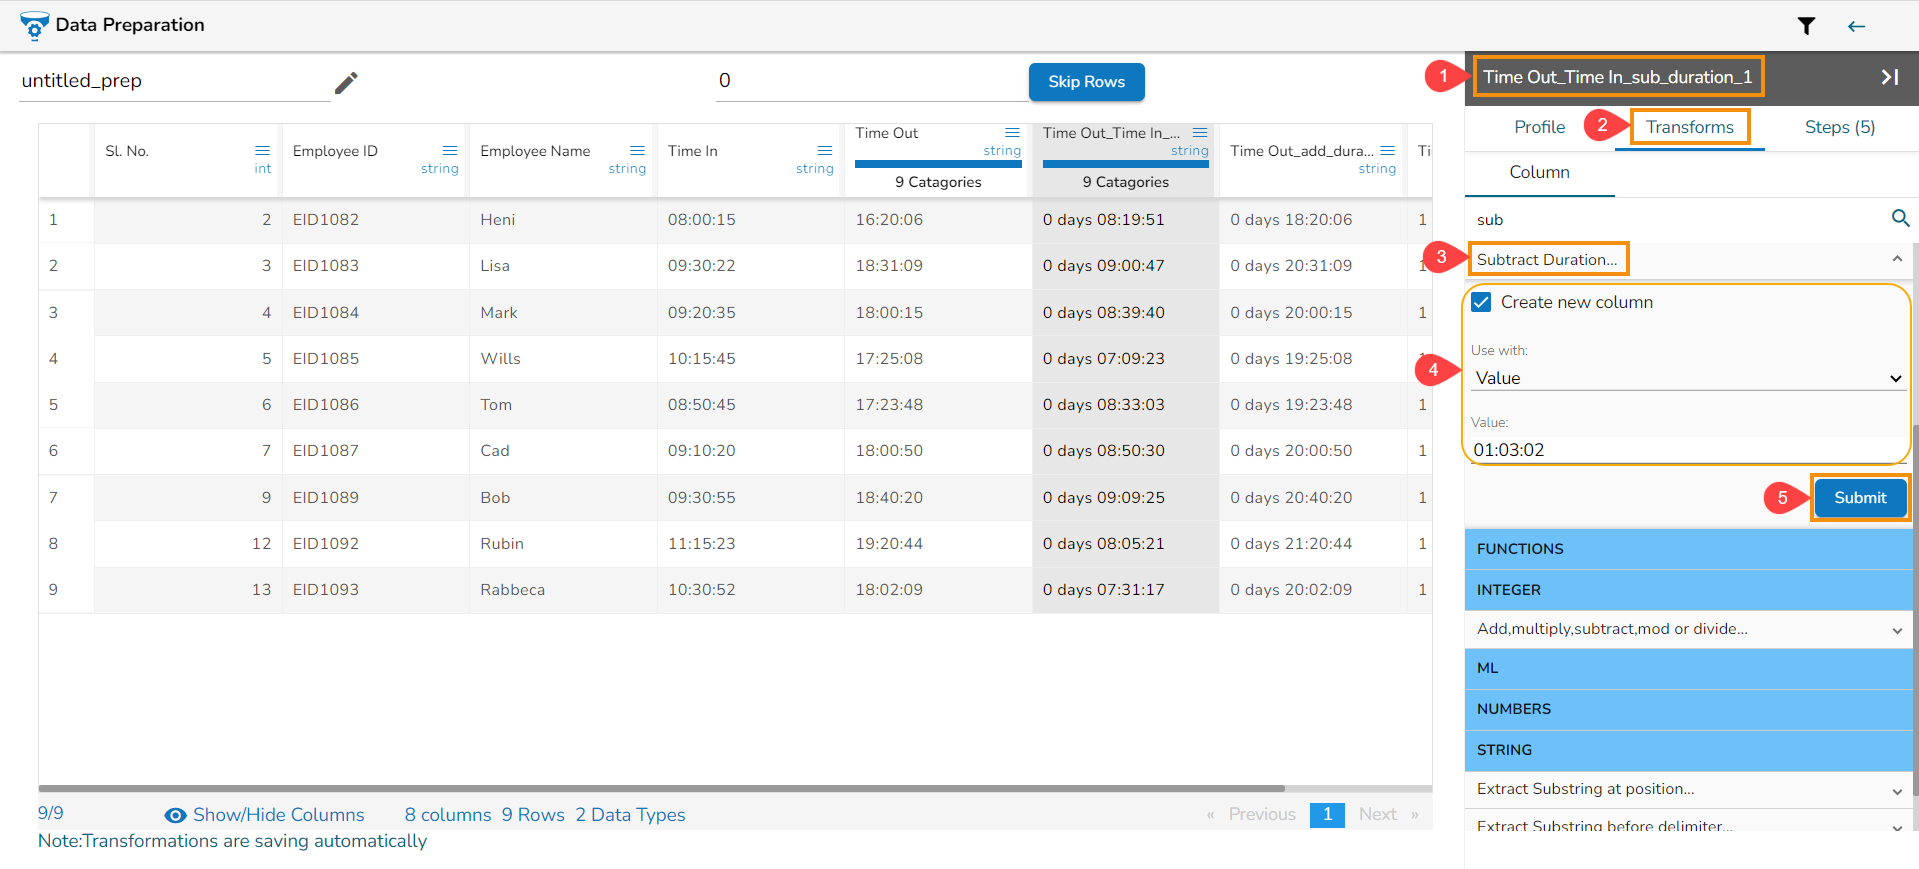
As a result, a new column gets added to the Data Grid with the remaining values after subtracting the set values from the targeted column:
Last updated