# Elastic (Beta Release)

{% hint style="info" %}
*Check out the given walk-through to understand the configuration steps for the Elastic Data Connector.*
{% endhint %}

<figure><img src="https://859511478-files.gitbook.io/~/files/v0/b/gitbook-x-prod.appspot.com/o/spaces%2FGDmsjfjJBNqow7Fo97cO%2Fuploads%2Fmp0Mu3bwt3nyFnDjauYy%2Felastic%20dataconnector.gif?alt=media&#x26;token=558d1da0-c1a1-4369-8efd-6db2d1ca1347" alt=""><figcaption></figcaption></figure>

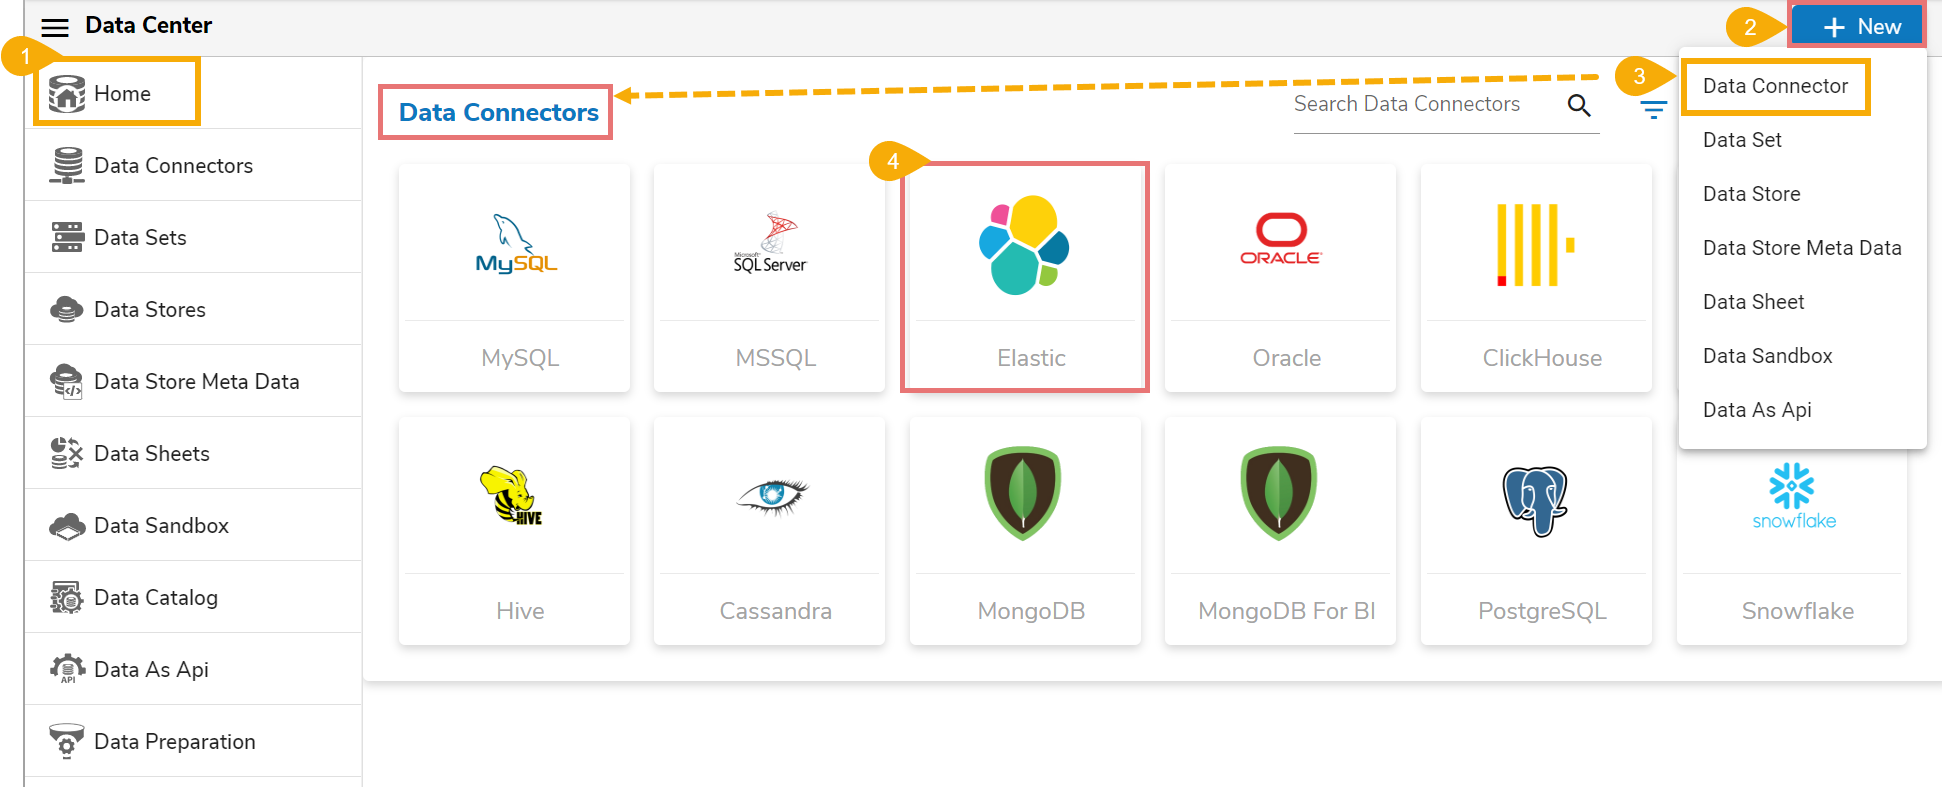
* Navigate to the ***Data Center homepage***.
* Click the ***New*** menu option.
* Click on the Data Connector option from the ***New*** menu.
* Click on the ***Elastic*** connector icon.

<figure><img src="https://859511478-files.gitbook.io/~/files/v0/b/gitbook-x-prod.appspot.com/o/spaces%2FGDmsjfjJBNqow7Fo97cO%2Fuploads%2FVKG5yCRW0qR92bkr87D8%2Fimage.png?alt=media&#x26;token=48a88538-c960-4400-9077-c6eaa0e530ce" alt=""><figcaption></figcaption></figure>

* The ***Elastic Connector*** configuration page opens.
* Provide the following information to create an ***Elastic Data Connector***:
  * **Data Connector Name**: Provide a user-defined name to identify the data connector.
  * **Description**: Provide connection details (Optional)**.**
  * **Authentication Type**: Select either ***Required*** or ***Not Required***.

<figure><img src="https://859511478-files.gitbook.io/~/files/v0/b/gitbook-x-prod.appspot.com/o/spaces%2FGDmsjfjJBNqow7Fo97cO%2Fuploads%2FIr1G78CJfqpVkKbzJHTY%2Fimage.png?alt=media&#x26;token=23d9ca6b-02a1-42f5-b05c-caa2f54cda82" alt=""><figcaption><p>Elastic Connector configuration form with the basic fields</p></figcaption></figure>

{% hint style="info" %}
*<mark style="color:green;">Please Note:</mark> Based on the selected Authentication Type the rest of the configuration fields appear.*
{% endhint %}

* **Required:** This authentication type suggests secured elastic connection with Username and Password.
  * **Username**: Enter a Username (it should be the same as given in the connection server.)
  * **Password**: Enter the Password (it should be the same as provided in the connection server.)
* **IP/HOST**: Enter server details (from where the user wants to fetch data).
* **Port**: Provide the server port number. (HTTP port)
* **Index Id** (optional): Enter the Index.
* Click the ***Save*** option.

<figure><img src="https://859511478-files.gitbook.io/~/files/v0/b/gitbook-x-prod.appspot.com/o/spaces%2FGDmsjfjJBNqow7Fo97cO%2Fuploads%2Fn21hbEkymc9UwCyzYxOS%2Fimage.png?alt=media&#x26;token=8d6f0a83-d468-48e1-9cd8-95531d834a1a" alt=""><figcaption><p>Configuration fields with <em><strong>Required</strong></em> Authentication option</p></figcaption></figure>

<figure><img src="https://859511478-files.gitbook.io/~/files/v0/b/gitbook-x-prod.appspot.com/o/spaces%2FGDmsjfjJBNqow7Fo97cO%2Fuploads%2FBf3ViengD9T5vUla7hPB%2Fimage.png?alt=media&#x26;token=865c7e8a-9400-402b-9b46-cc56a60b47cb" alt=""><figcaption><p>Configuration fields with <em><strong>Not</strong></em> <em><strong>Required</strong></em> Authentication option</p></figcaption></figure>

* A success message appears confirming the connection.

<figure><img src="https://859511478-files.gitbook.io/~/files/v0/b/gitbook-x-prod.appspot.com/o/spaces%2FGDmsjfjJBNqow7Fo97cO%2Fuploads%2FXoyGvAafBAMor47NH7lh%2Fimage.png?alt=media&#x26;token=0d660ae4-272e-4373-99b0-0942487ebfcd" alt=""><figcaption></figcaption></figure>

* Another success message appears confirming the creation of the Data Connector.

![](https://859511478-files.gitbook.io/~/files/v0/b/gitbook-x-prod.appspot.com/o/spaces%2FGDmsjfjJBNqow7Fo97cO%2Fuploads%2FMEKwktKZmA7wBBq8efTX%2Fimage.png?alt=media\&token=bda5e598-702f-4bd7-87fa-45952ab40ae4)​

* The newly created Elastic data connector gets added to the Data Connectors list.

{% hint style="info" %}
*<mark style="color:green;">Please Note:</mark>* *The user can use the following Environment Variables instead of the actual Username and Password to create the Elastic data connector.*

* Username: @ENV.ELASTICUSERNAME
* Password: @ENV.ELASTICPASSWORD
  {% endhint %}
