
Columns
Pay Attention: The Delete Columns Except transform is renamed as Keep Column.
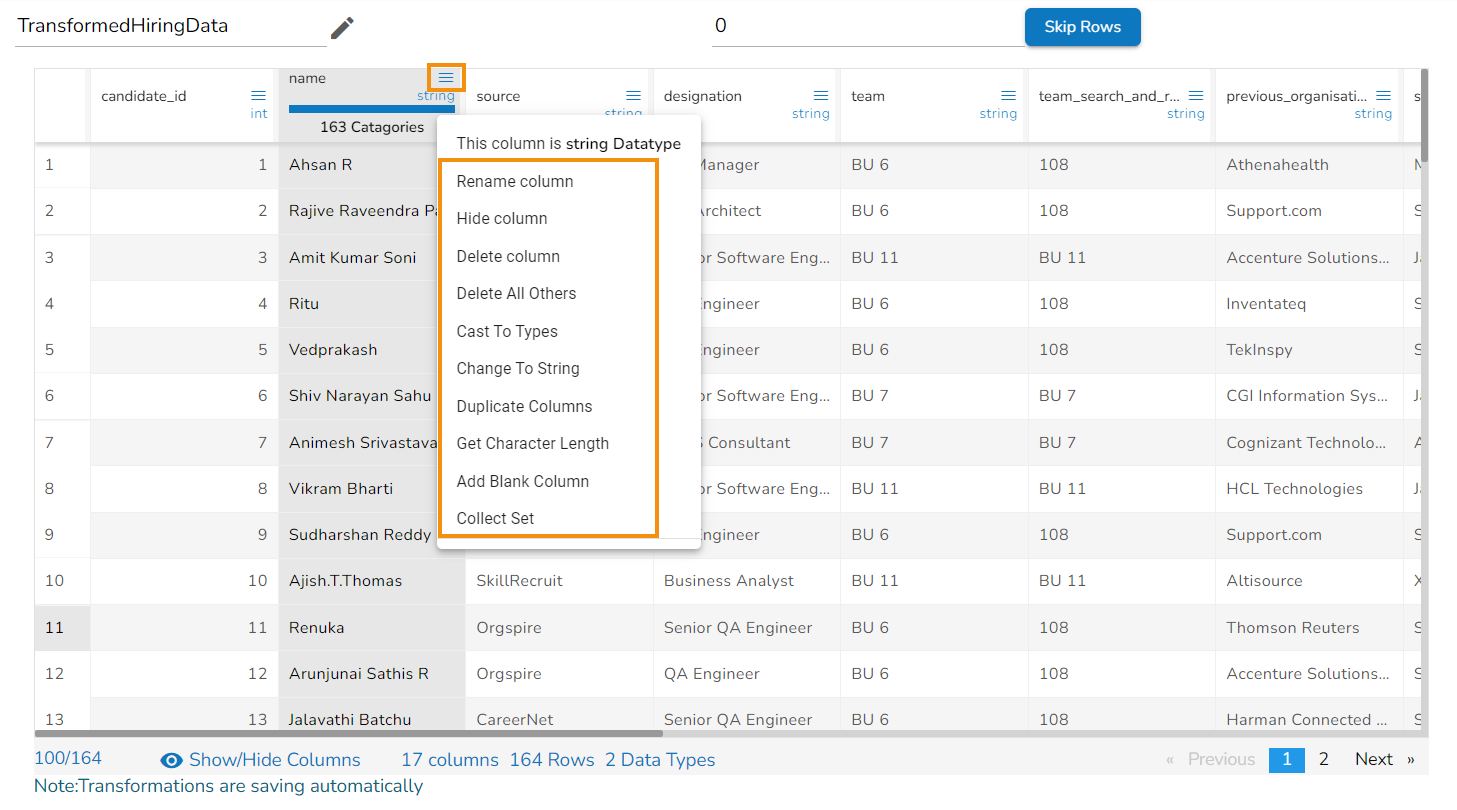
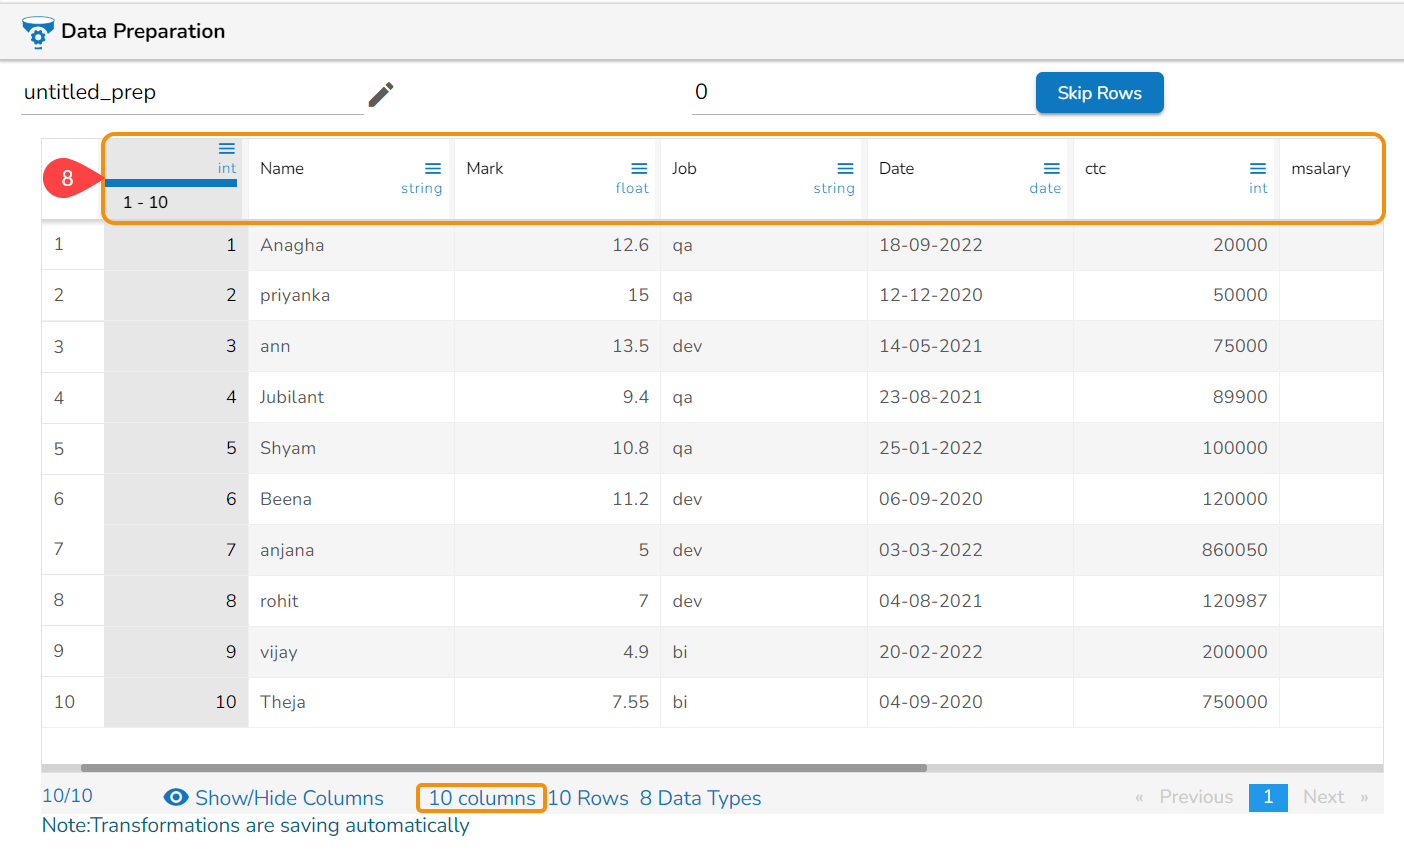
Some of the Column transforms can be accessed by using the Menu ![]() icon provided for each column in the Data Grid display of the dataset.
icon provided for each column in the Data Grid display of the dataset.
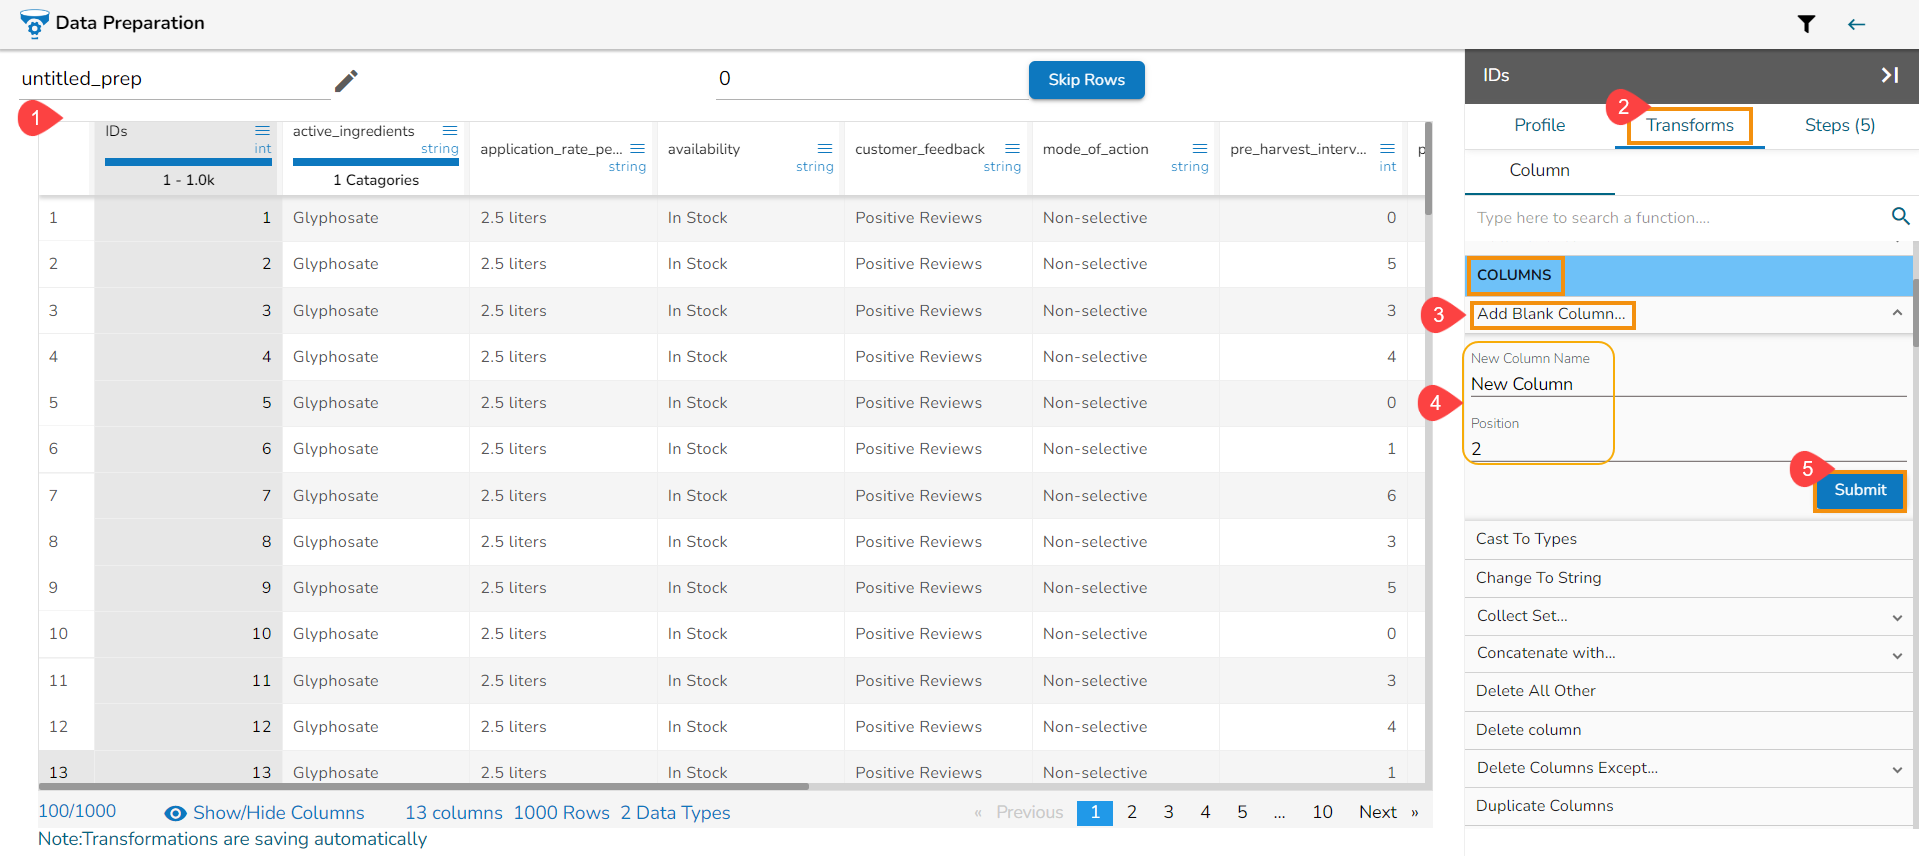
Add Blank Column
This transform will create a new blank column in the selected data set. The datatype for the newly added blank column will be as None.

Navigate to the Data Preparation page displaying data grid.
Open the Transforms tab.
Select the Add Blank Column transform from the Column transforms type.
Provide the required details:
New Column Name
Position (of the blank column)
Click the Submit option.
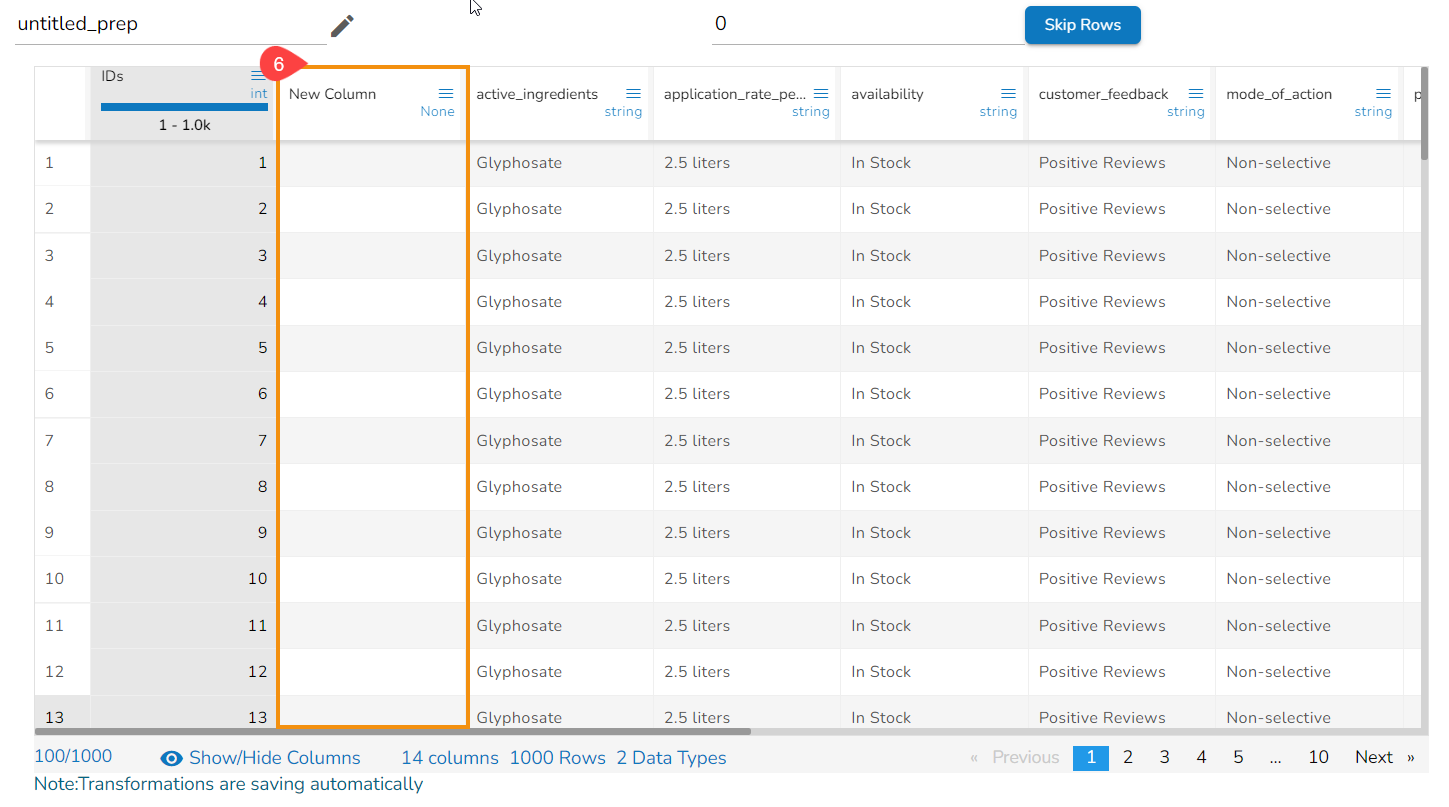
The empty column gets added in the dataset (at the selected position with the provided name).
Please Note:
The user can update values in this column by using the transforms like Fill empty, Search & Replace.
The Add Blank Column transform can also be accessed by using the menu icon provided for the each column in the Data Grid display of the dataset.
Array to Column
The Array to Column data transform returns the array data separated in multiple columns.
Check out the given walk-through on how to use the Array to Column transform.
Select a column with array data from the dataset within the Data Preparation framework.
Open the Transforms tab.
Select the Array to Columns transform from the COLUMNS category.

As a result the array data will be separated in the multiple columns (based on the available data the no. of the columns will be added).

Please Note:
Based on the maximum count of values given in the array format the no. of result columns will be added.
E.g., The above-given example contains two data values in the array format, so there are 2 columns created as the result.
The names of the result columns will be auto-generated. E.g., Column_1, Column_2
Cast to Types
It is a table-based operation. The profiling of a column is done based on the data type present in the majority.
Let’s say in column A; there are four integer values and one string value, then the data type of the column gets profiled as the integer despite one string value present in it.
The Cast to Types transform removes the value with the invalid data type. In this case, it converts data with a string data type to the null value.
Navigate to the Data Preparation displaying data grid.
Select the field that has some invalid values in string data type.
Open the Transforms tab.
Click on the Cast to Types transform from the COLUMNS category of transforms.
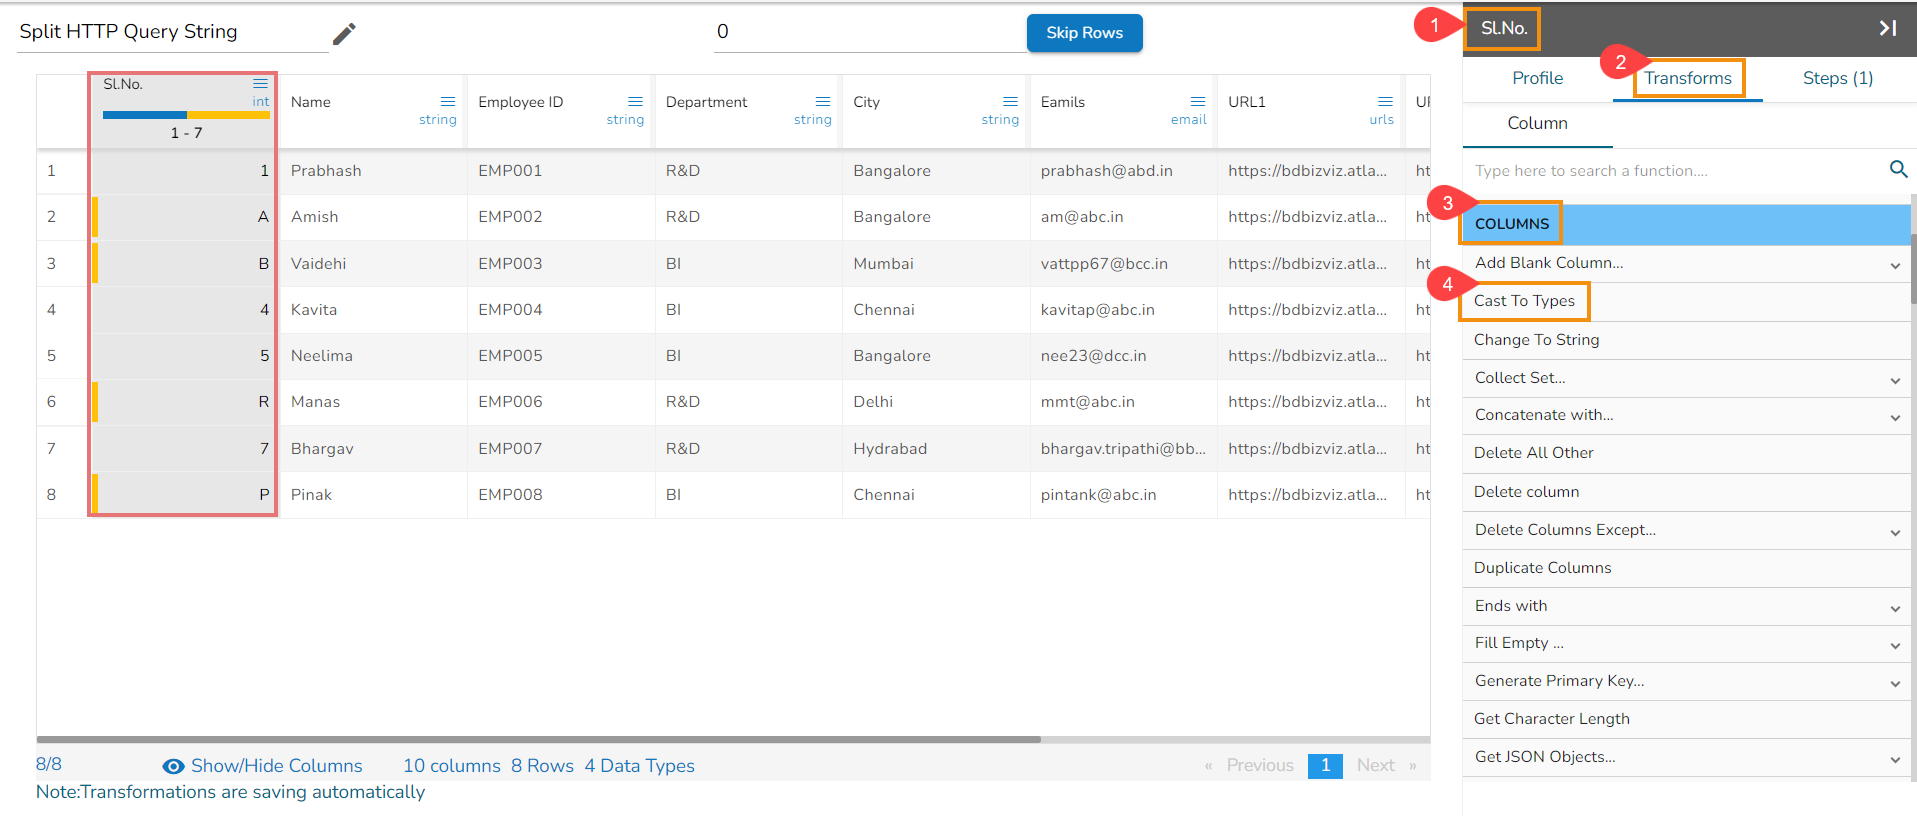
The invalid values from the selected column gets removed.
Please Note:
There is a possibility of some data loss while applying this transform to any dataset.
The Cast to Types transform can also be accessed by using the menu icon provided for the each column in the Data Grid display of the dataset.
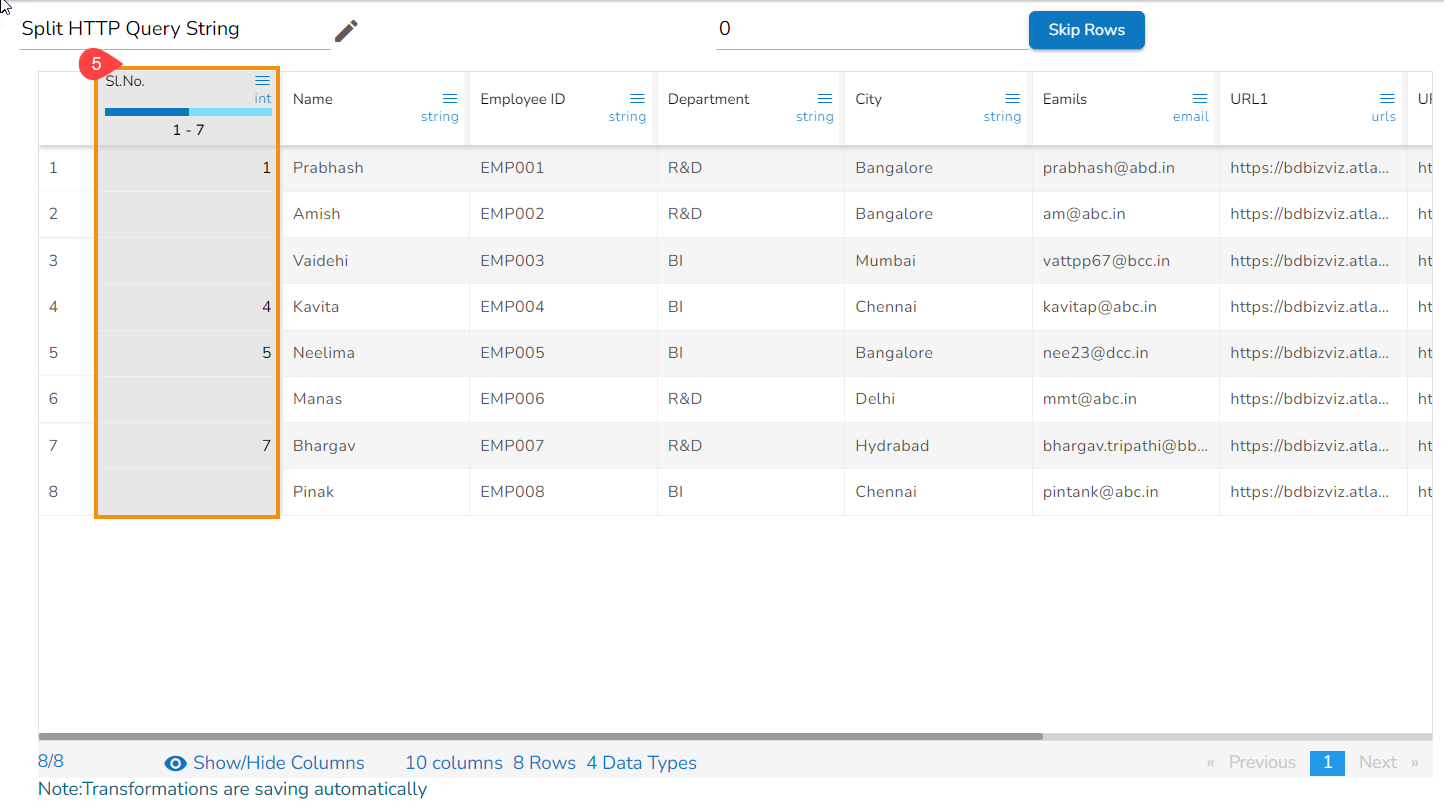
Change To String
This transformation helps to change the datatype of a selected column into a String.

Navigate to the Data Preparation displaying data grid.
Select the field that has some invalid values in string data type.
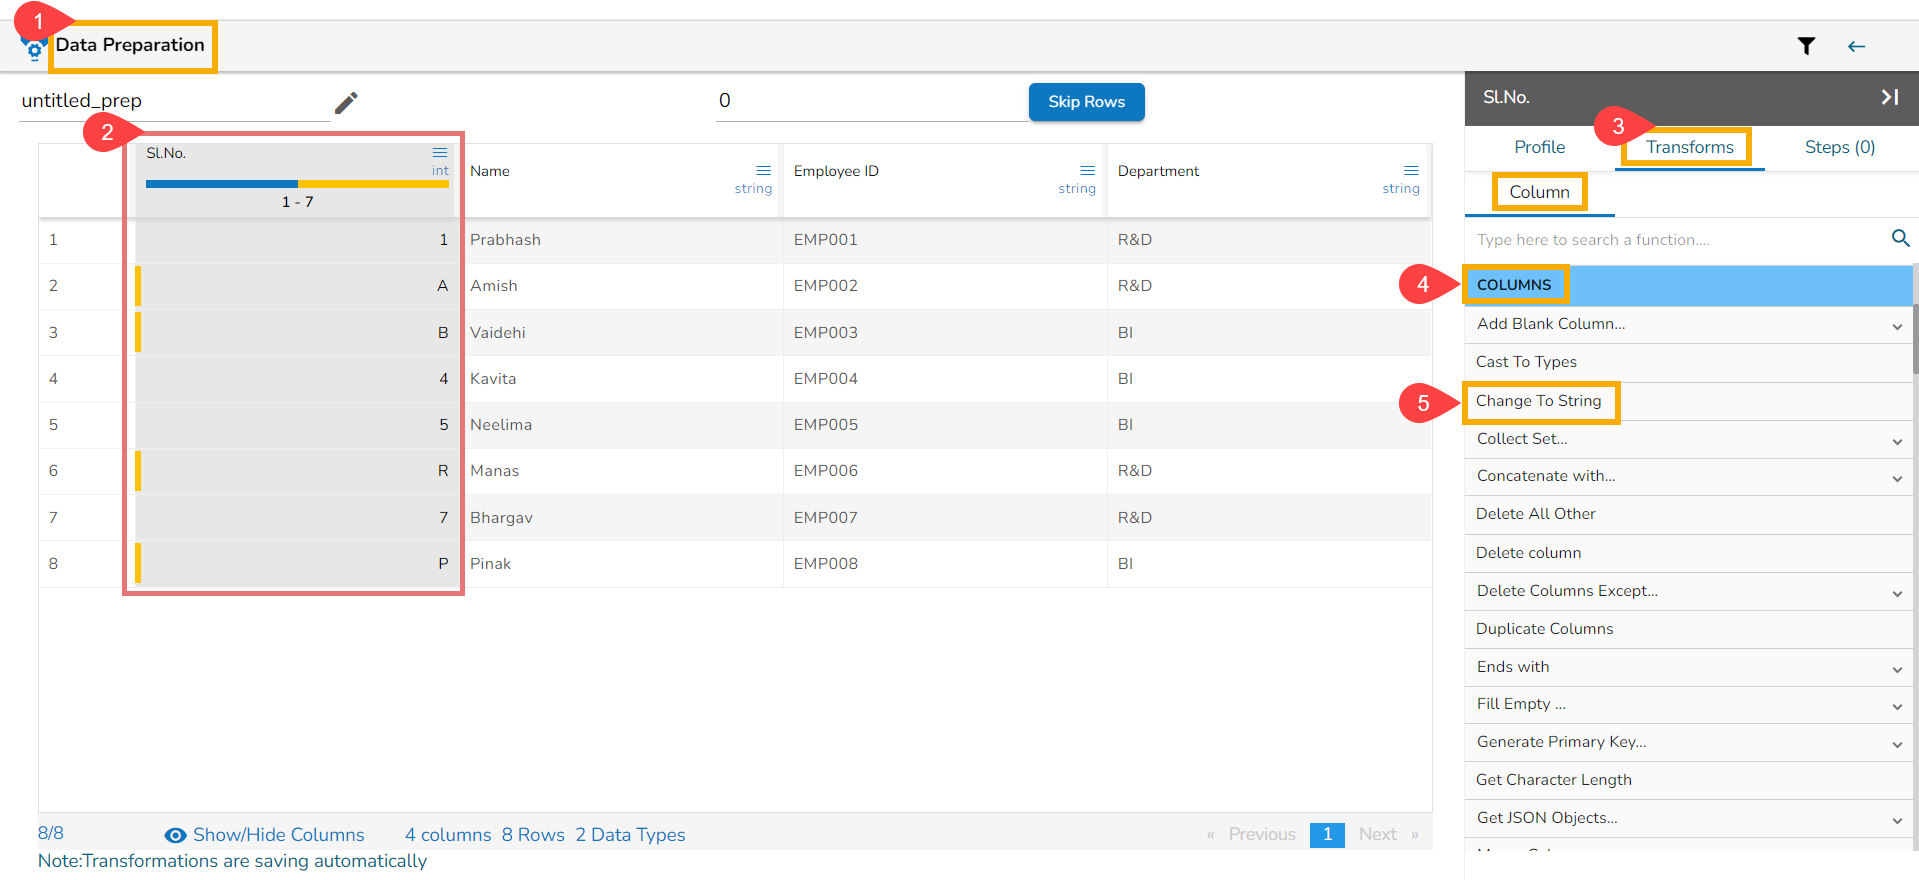
Open the Transform tab.
Navigate to the Columns type of transforms.
Click on the Change to String transform.
The data type of the selected column gets changed into String.
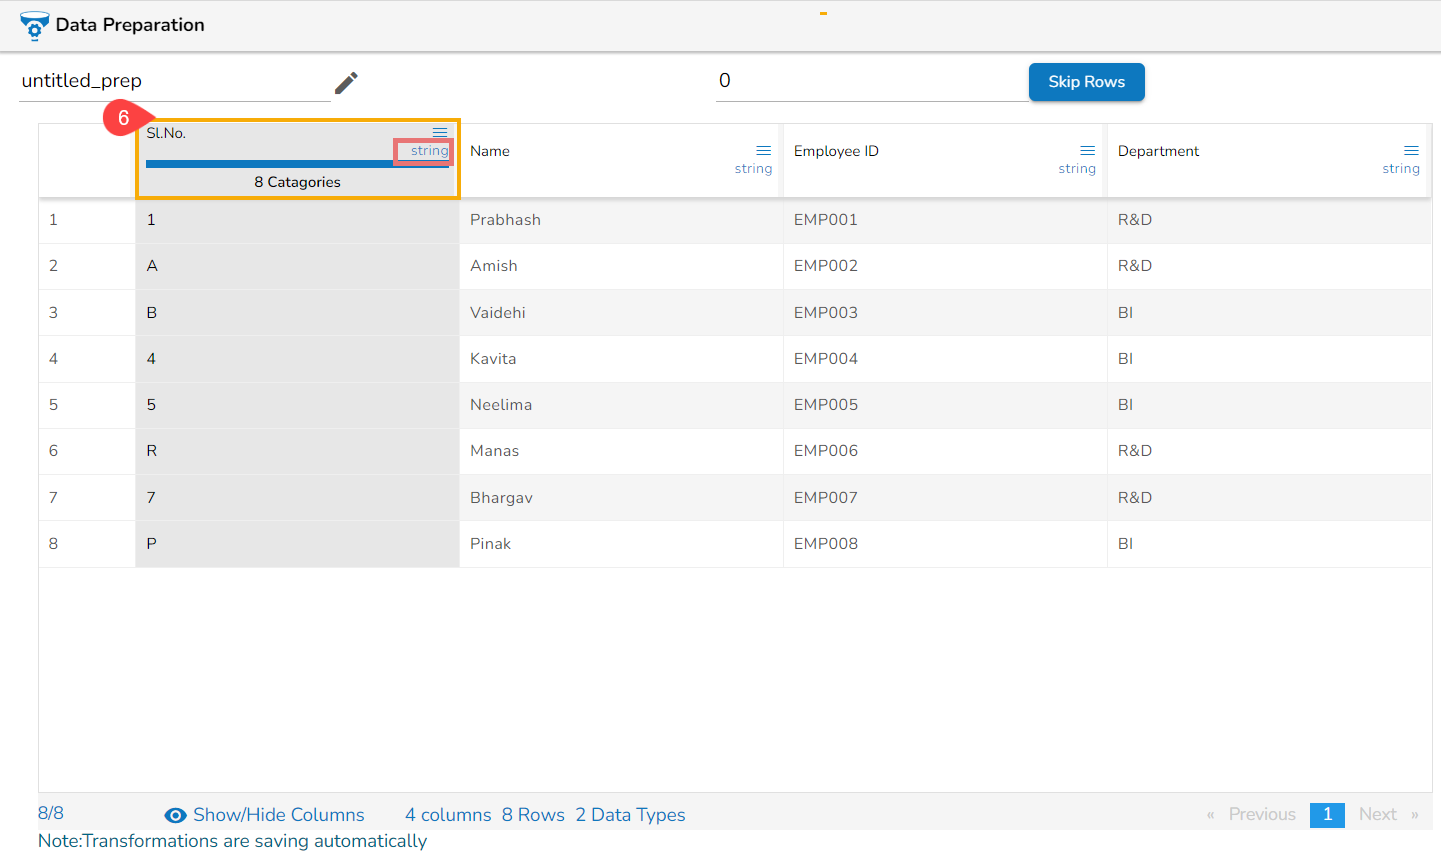
Please Note:
It will not support Date columns to change into String.
The Change To String transform can also be accessed by using the menu icon provided for the each column in the Data Grid display of the dataset.
Collect Set
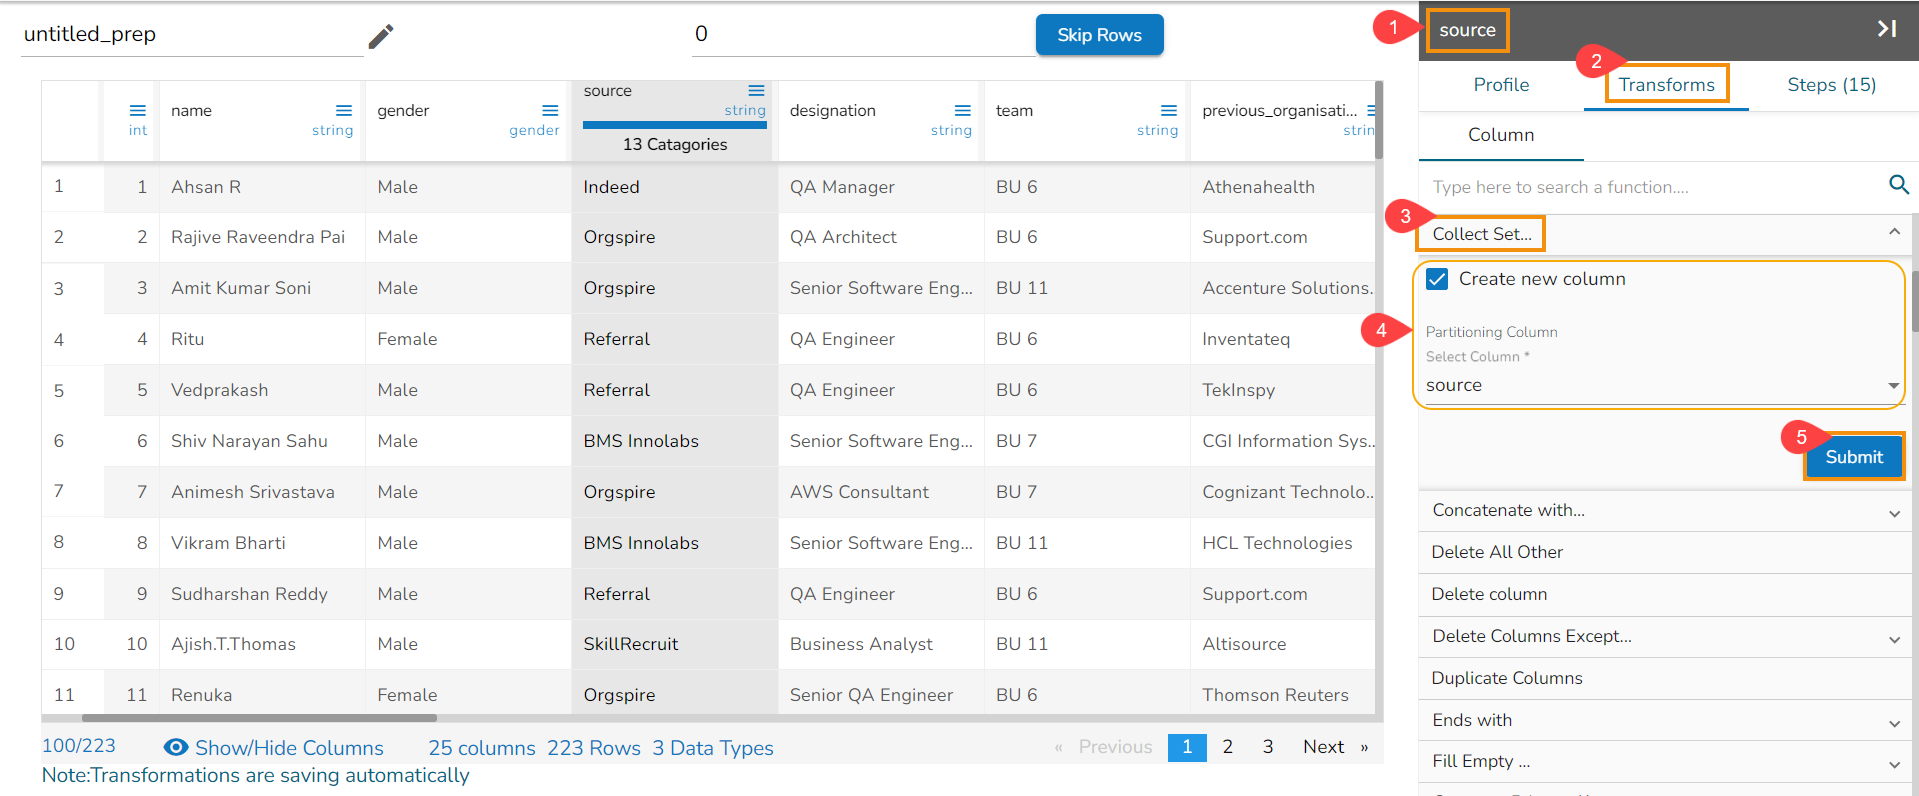
The Collect Set transform generates the list of all the unique values of the column based on the selected column. It performs group concatenation.
Select a column from the dataset within the Data Preparation framework.
Navigate to the Transforms tab.
Select the Collect Set transform from the COLUMNS transforms.
Enable the Create new column to create a new column with the result of the transformation.
Select a Partitioning column using the drop-down menu. E.g., The selected Column is source.
Click the Submit option.
It generates a list of all unique values under the source_collect_set_1 as displayed in the below image:
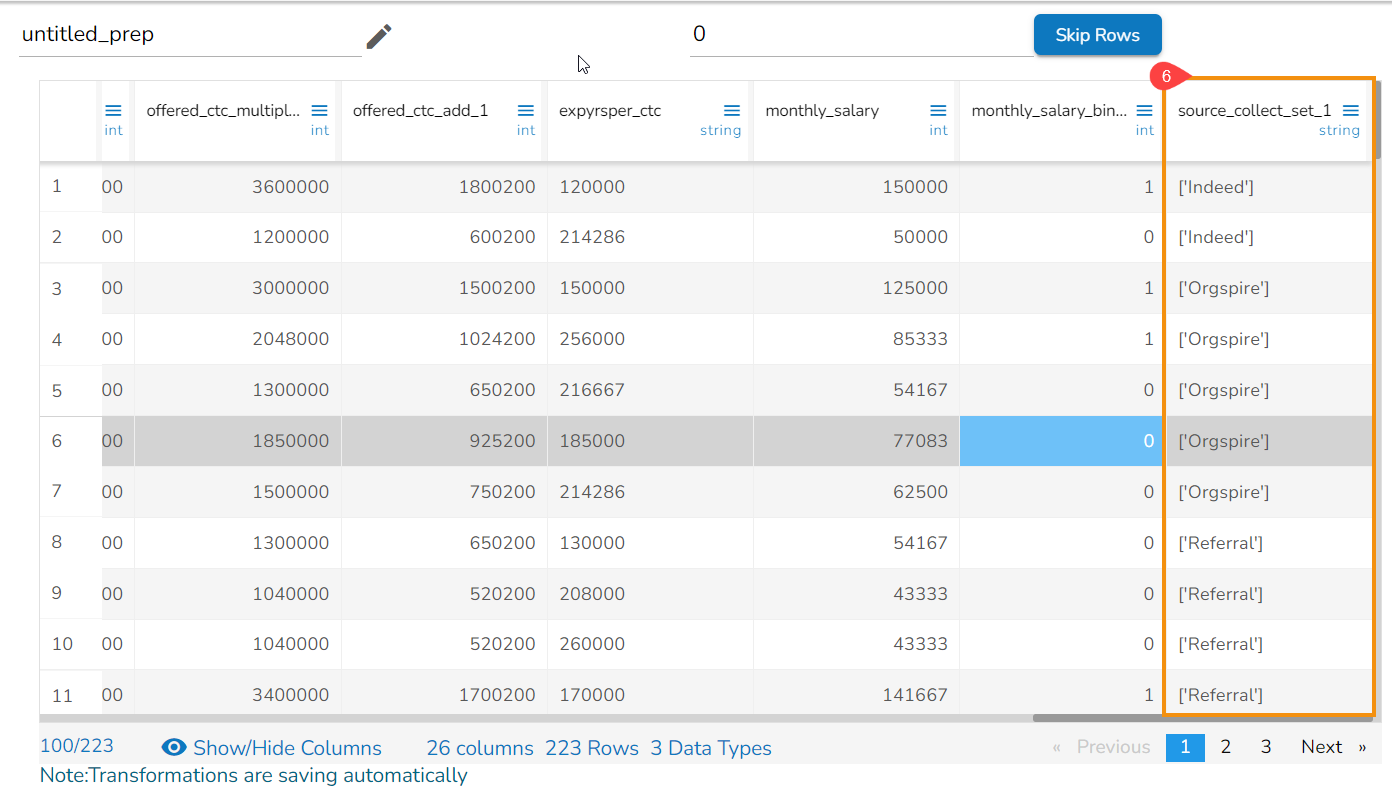
Please Note: The Collect Set Transform option can also be accessed from menu icon provided for each column in the Data Grid display of the dataset.
Concatenate Arrays
Concatenating arrays means combining two or more arrays to create a single, larger array.
Check out the given video on Concatenate Array transform.
Open a dataset within the Data Preparation framework.
Open the Transforms tab.
Navigate to the Concatenate Arrays transform from the COLUMNS category.
Provide a name for the New Column Name that will get added with the output.
Select the columns with array (list datatype) data. using the Select Column drop-down menu.
Click the Submit option.

The result will appear displaying the concatenated arrays in a new column with the same name that has been provided by the user.
E.g.,
Array1
Array2
Result Array
[1,2]
[3, 4]
[1,2,3,4]

Please Note: The Concatenate Arrays works only upon the List data type columns.
Concatenate with
The users can concatenate a column value with some other column or with some prefix/suffix. To perform the transform, select the column to which data must be concatenated and select the Concatenate with transform. The available options are:
Select a column from the Data set.
Open the Transforms tab.
Select the Concatenate with transform from the COLUMNS category.
Prefix: Specify the value to be prefixed to the selected column value
Use with:
Select the Value to add a Prefix/Suffix
Select the Other column to concatenate two columns
Separator: Provide a separator to separate the targeted prefix or suffix from the original column values.
Add Separator: Select an option either Always or Both values not empty when you want to add separator.
Suffix: Provide a value to be used as a suffix to the selected column value.
Click the Submit option.
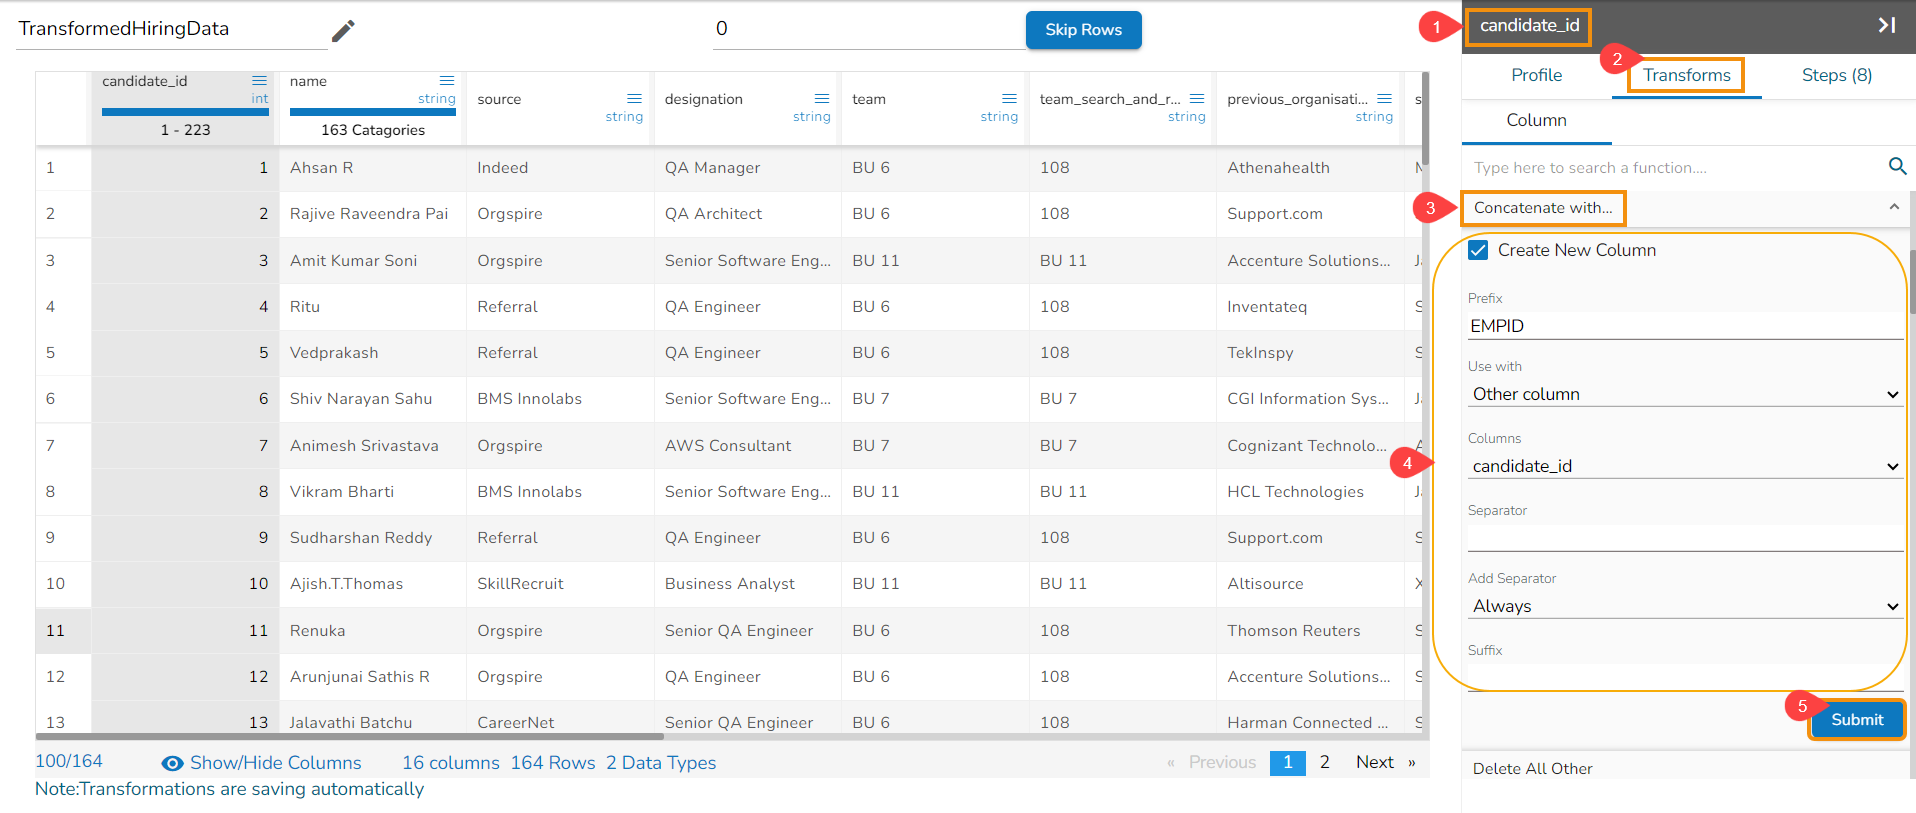
A new column gets added based on the configured details.
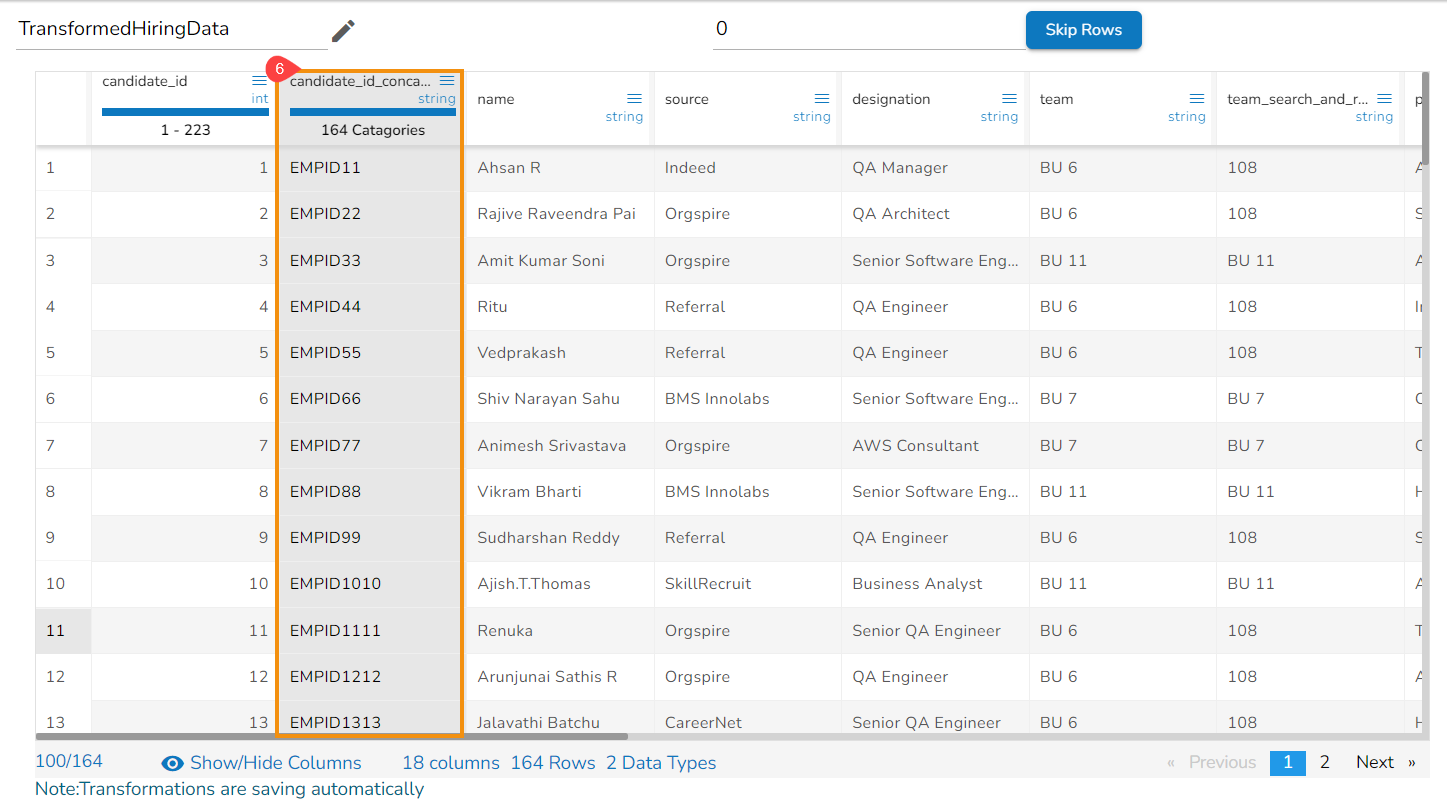
Please Note: The users must select the Use with Other Column option to concatenate a value with another column and select the Use with Value option to add prefix/suffix.
Copy Column
This transformation helps to duplicate the content of a column into another one.
Steps to perform the transformation:
Select a source column from the dataset.
Open the Transforms tab.
Select the Copy Column transform from the FUNCTIONS tab.
Provide name for the new column.
Click the Submit option.
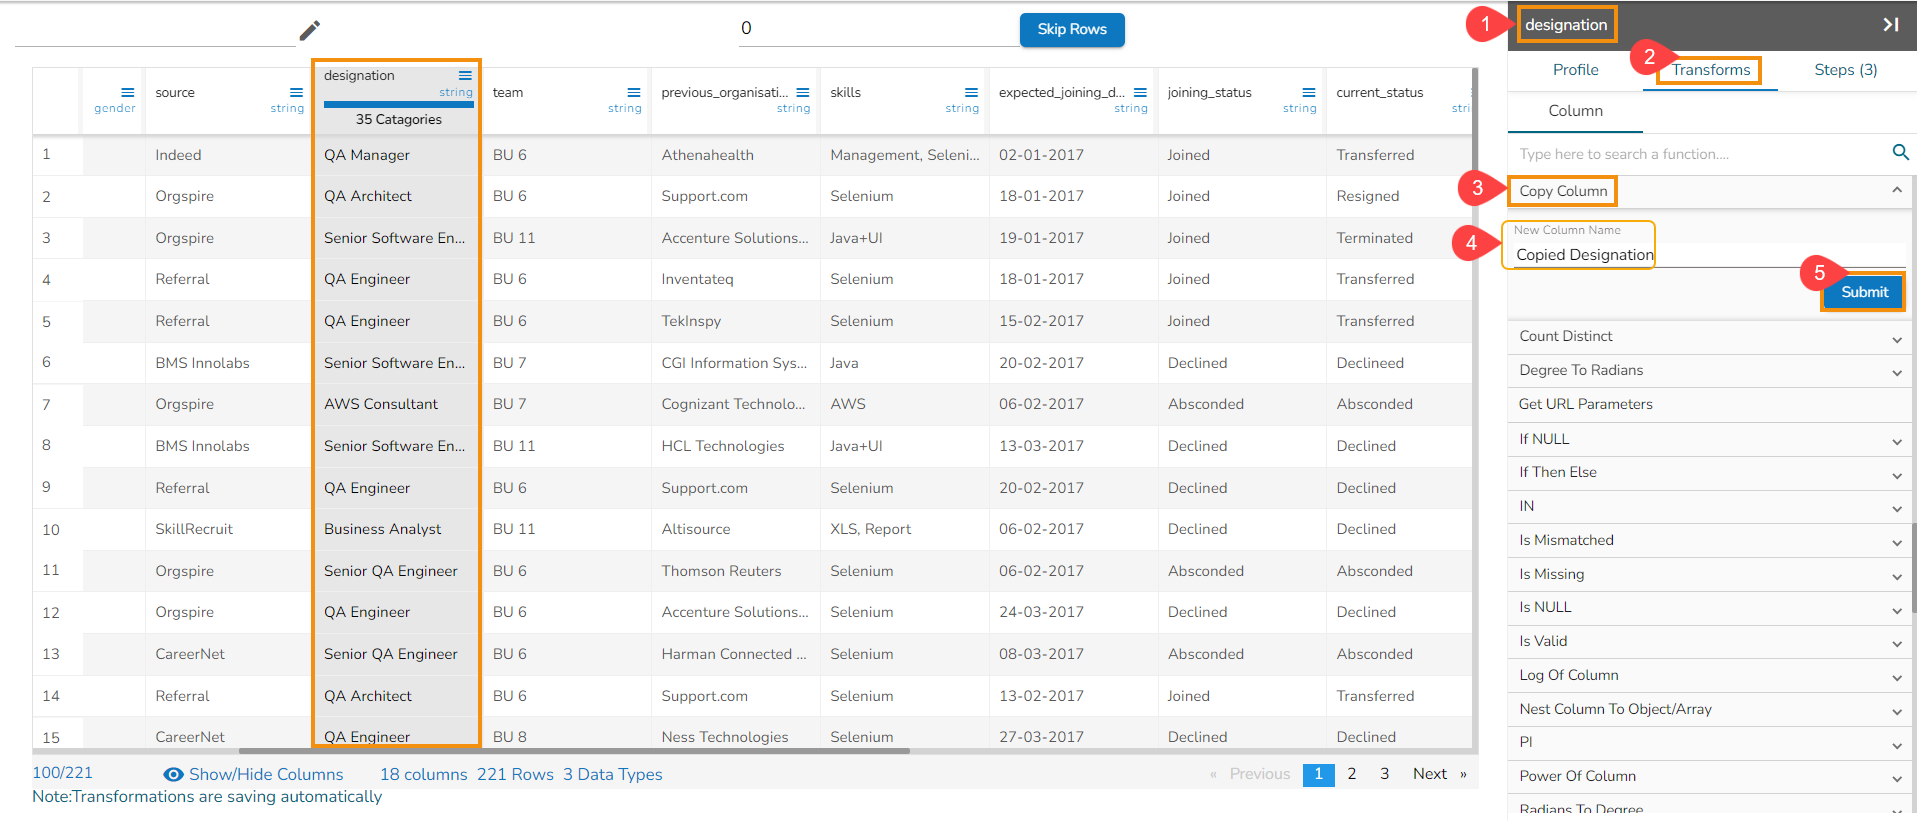
Result will get displayed where the content is duplicated into a new one with a new column name.
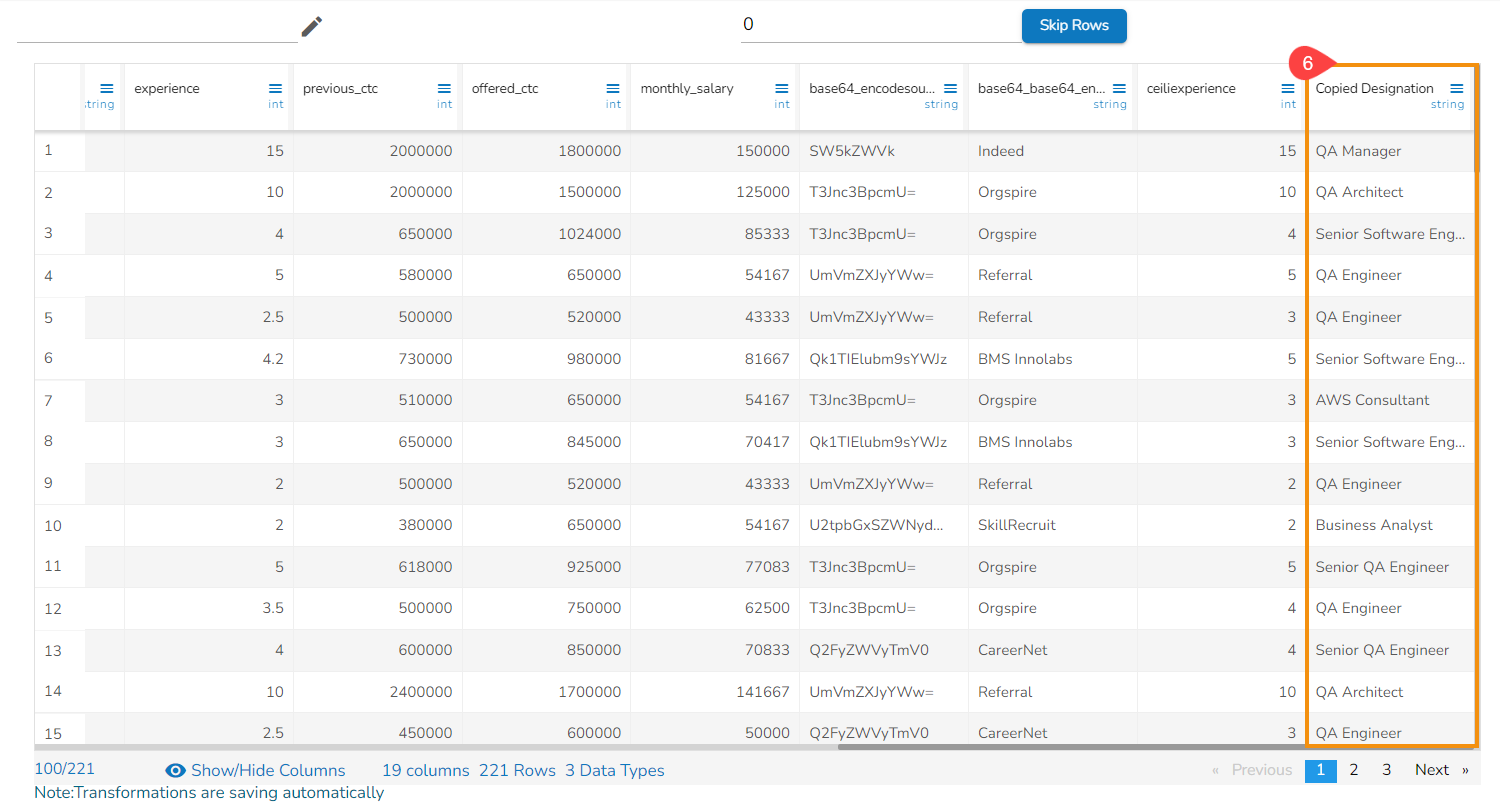
Check out the given walk-through on how to use the Copy Column transform.

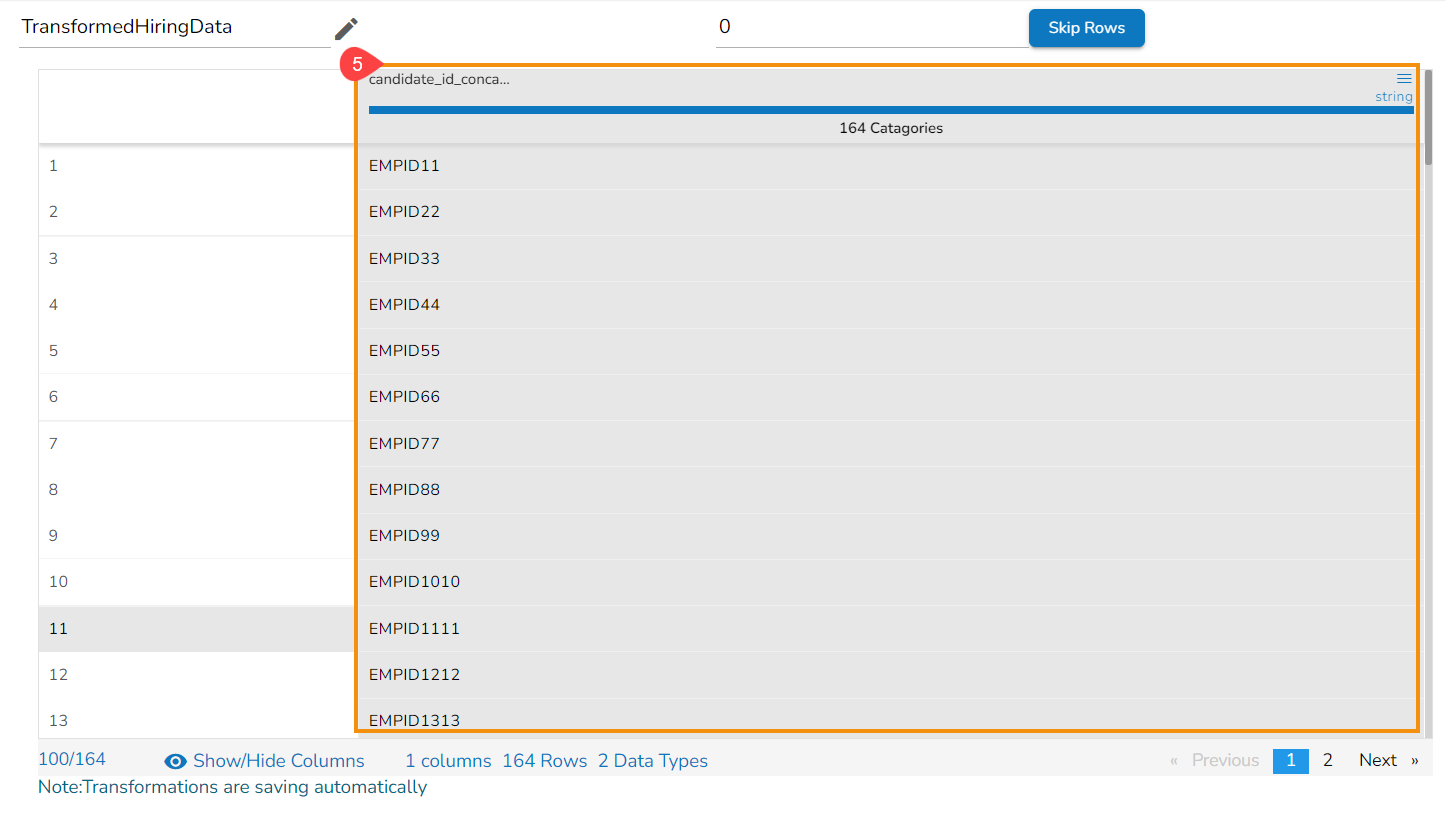
Delete All Other
The Delete All Other transform is used to delete all other columns than the selected column.

Select a column from the Data Grid.
Open the Transforms tab.
Open the COLUMNS transform category.
Select the Delete All Other transform.
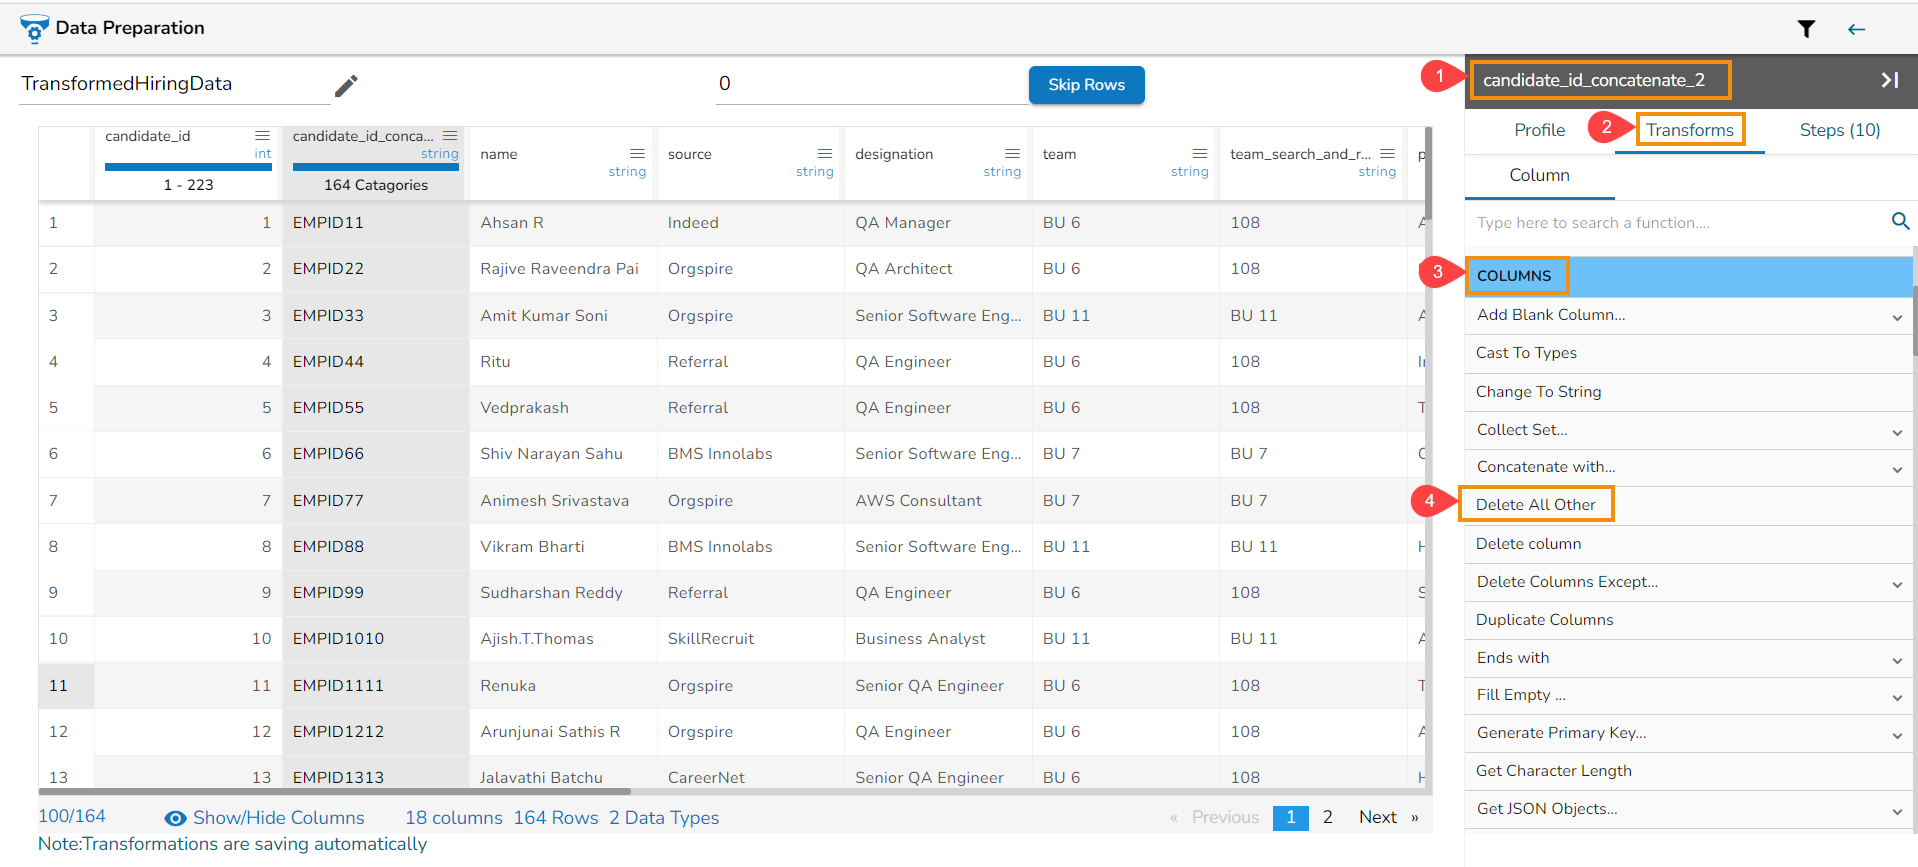
All the other columns except the selected column get deleted.
Please Note: The Delete All Other transform can also be accessed by using the menu icon provided for the each column in the Data Grid display of the dataset.
Delete Column
The Delete Column deletes any selected column from the dataset.
Select a column from the dataset within the Data Preparation framework.
Navigate to the Transforms tab.
Select and click on the Delete Column transform from the COLUMNS transform category.
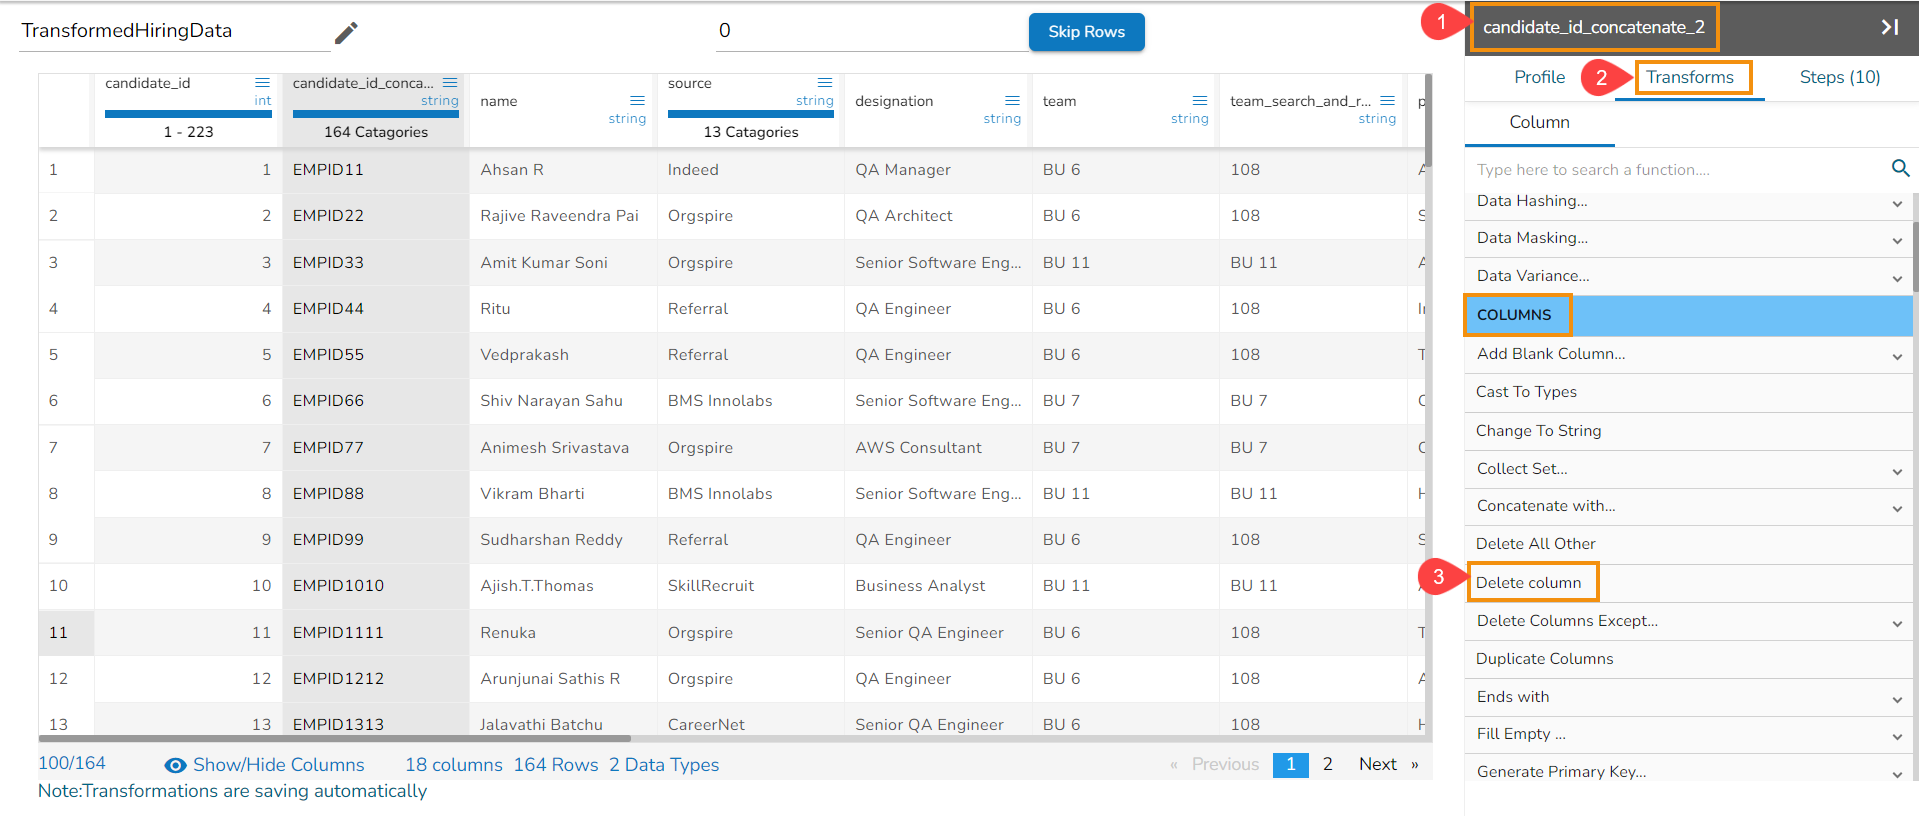
The selected column gets deleted from the dataset.

Please Note: The Delete Column transform can also be accessed by using the menu icon provided for the each column in the Data Grid display of the dataset.
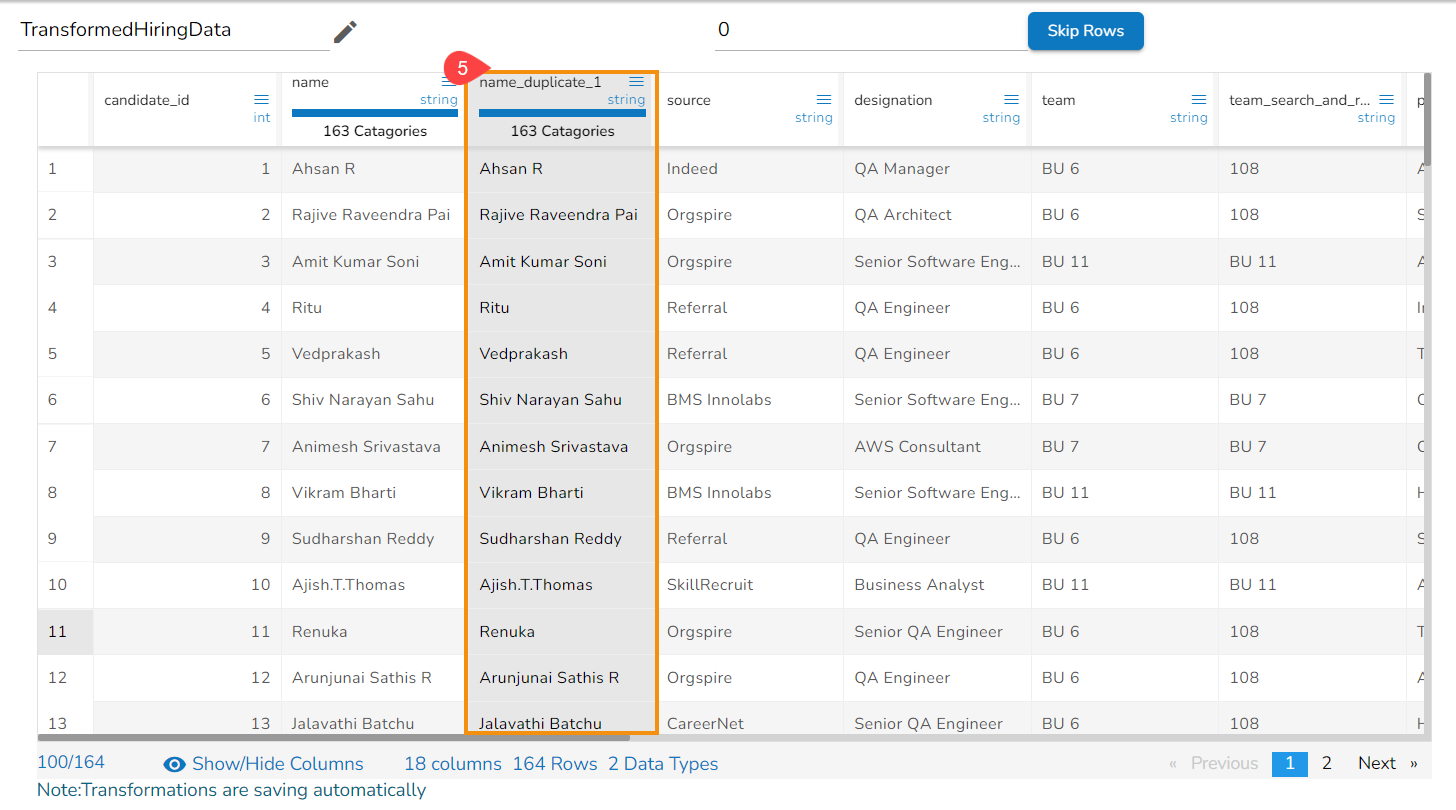
Duplicate Column
The Duplicate Columns transform creates another column containing the duplicate data of the selected column.
Select a column from the Dataset in the Data Preparation framework.
Open the Transforms tab.
Select and click the Duplicate transform from the COLUMNS category.
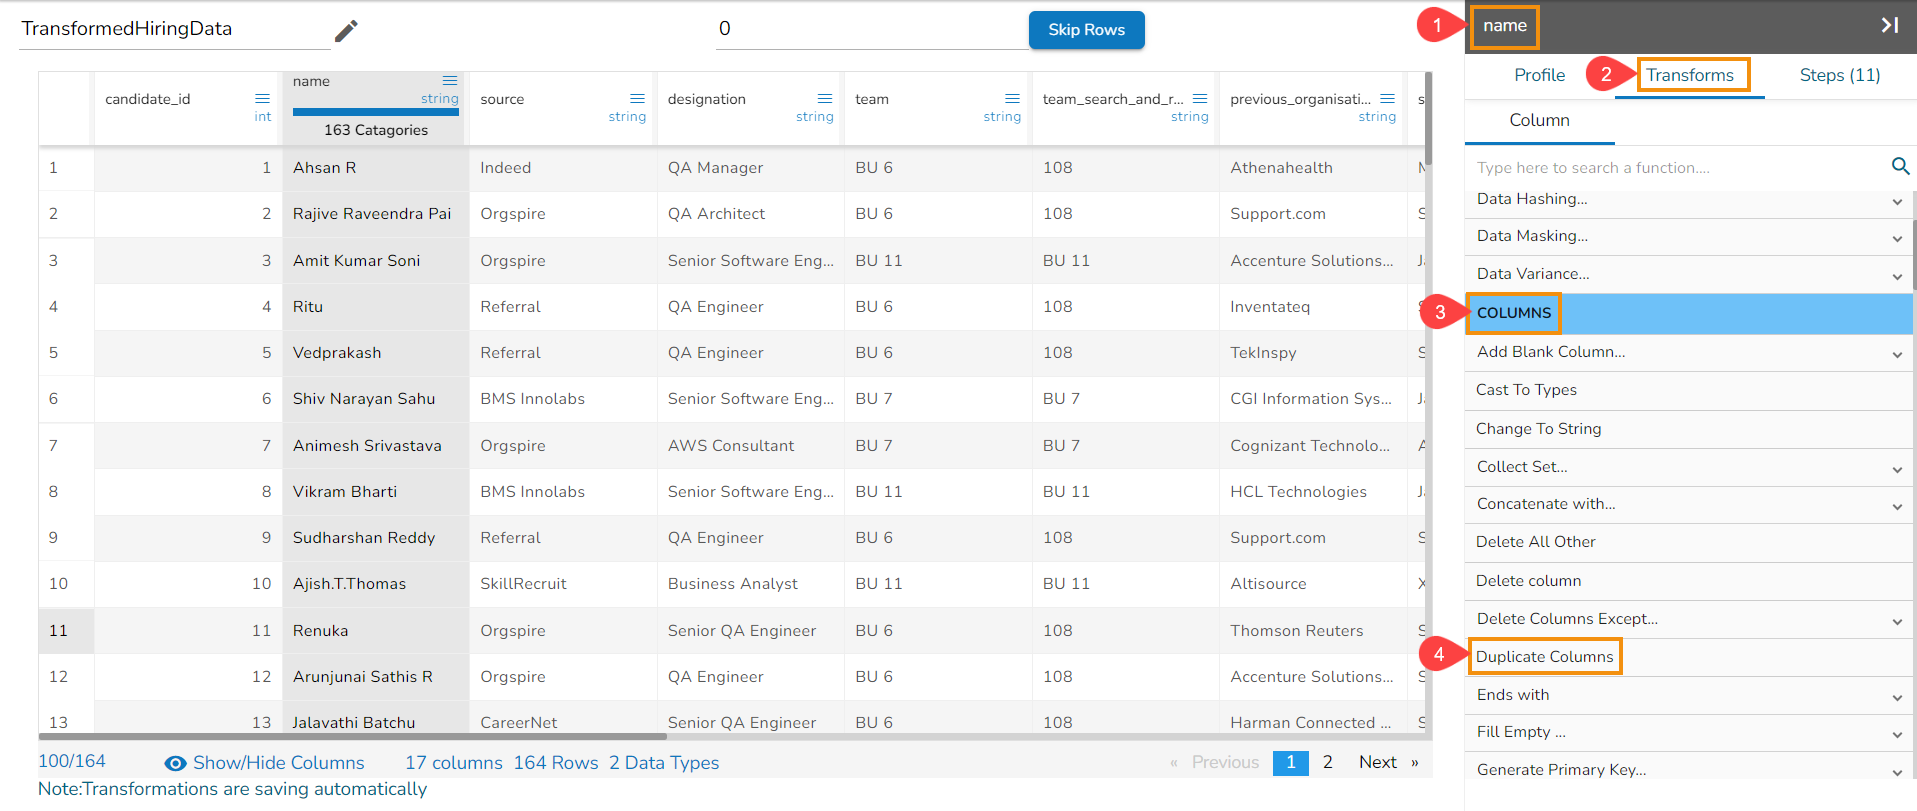
It duplicates the selected column data and inserts it in the dataset.
Please Note: The Duplicate Columns transform can also be accessed by using the menu icon provided for the each column in the Data Grid display of the dataset.
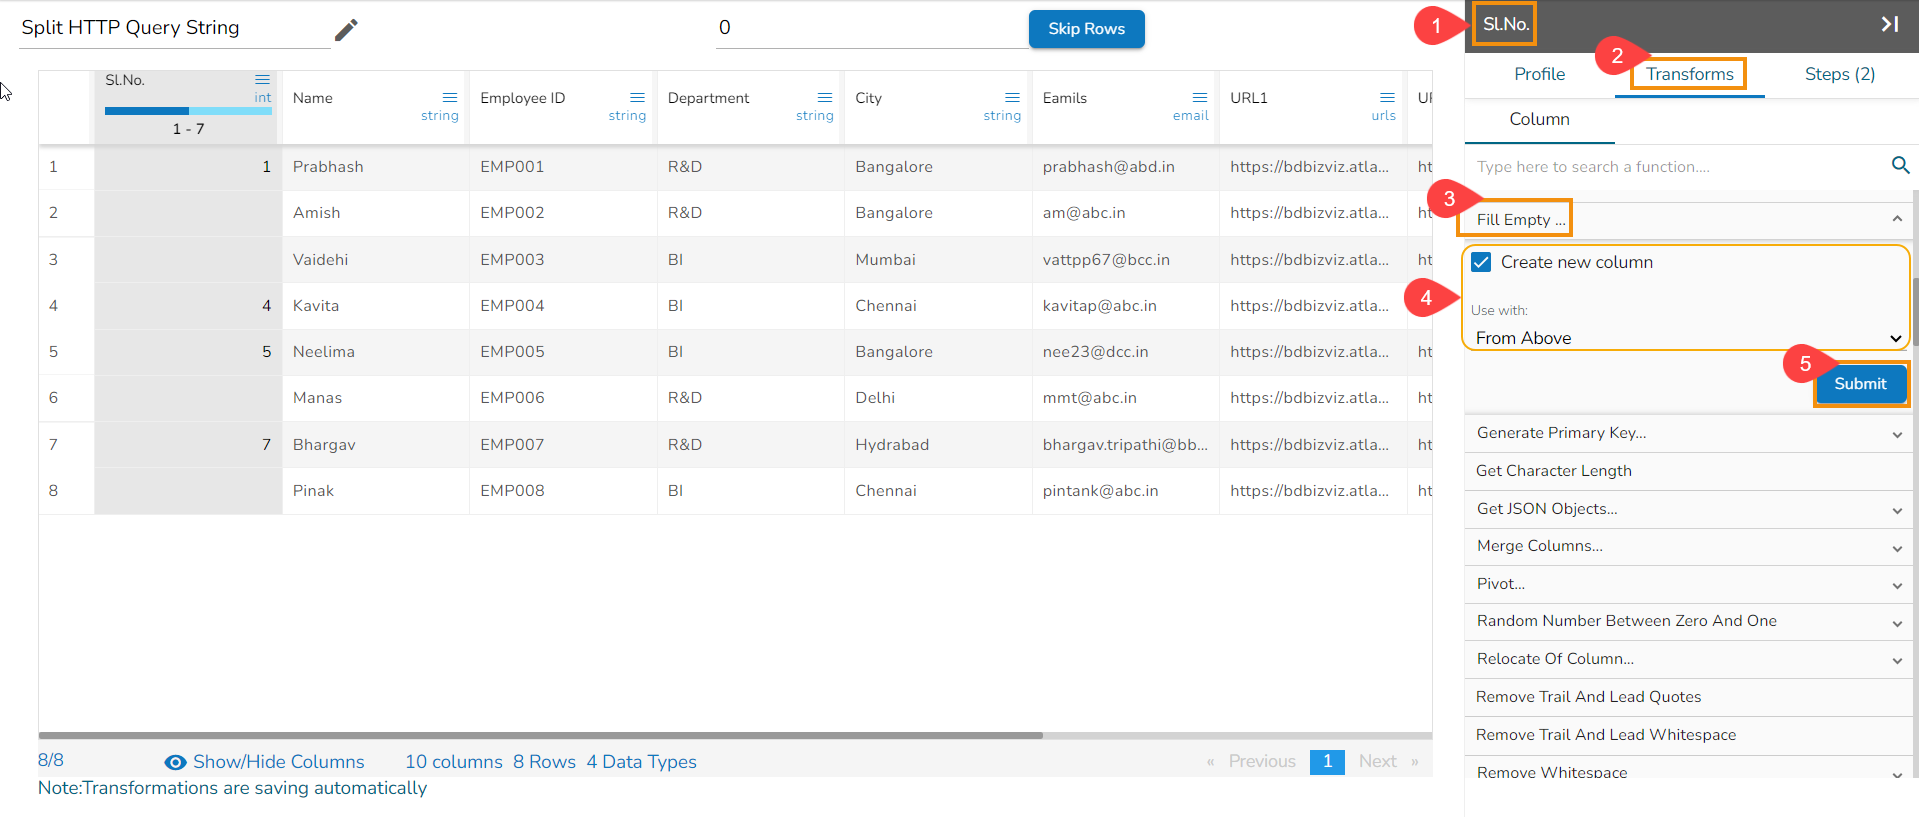
Fill Empty
The Fill Empty transform is used to fill the null/empty value of cell using either above or below values available in the column.
Select a column with empty rows from the dataset within the Data Preparation framework.
Open the Transforms tab.
Configure the Fill Empty transform from the COLUMNS category:
Create new column- Click the checkbox to create a new column or else the currently selected column gets updated.
Use with-The user can use either of the options from the provided choices:
From Above: To fill the empty cells and replace them by the value of the cells given above the empty cells.
From Below: To fill the empty cells and replace them by the value of the cells given below the empty cells.
The Fill Empty transform has been applied to the Gender column by filling the empty cells with the values of the immediate below cells.
As a result, a new column gets created with some of the empty cells filled by the values of the immediate below given cells as shown in the below image:
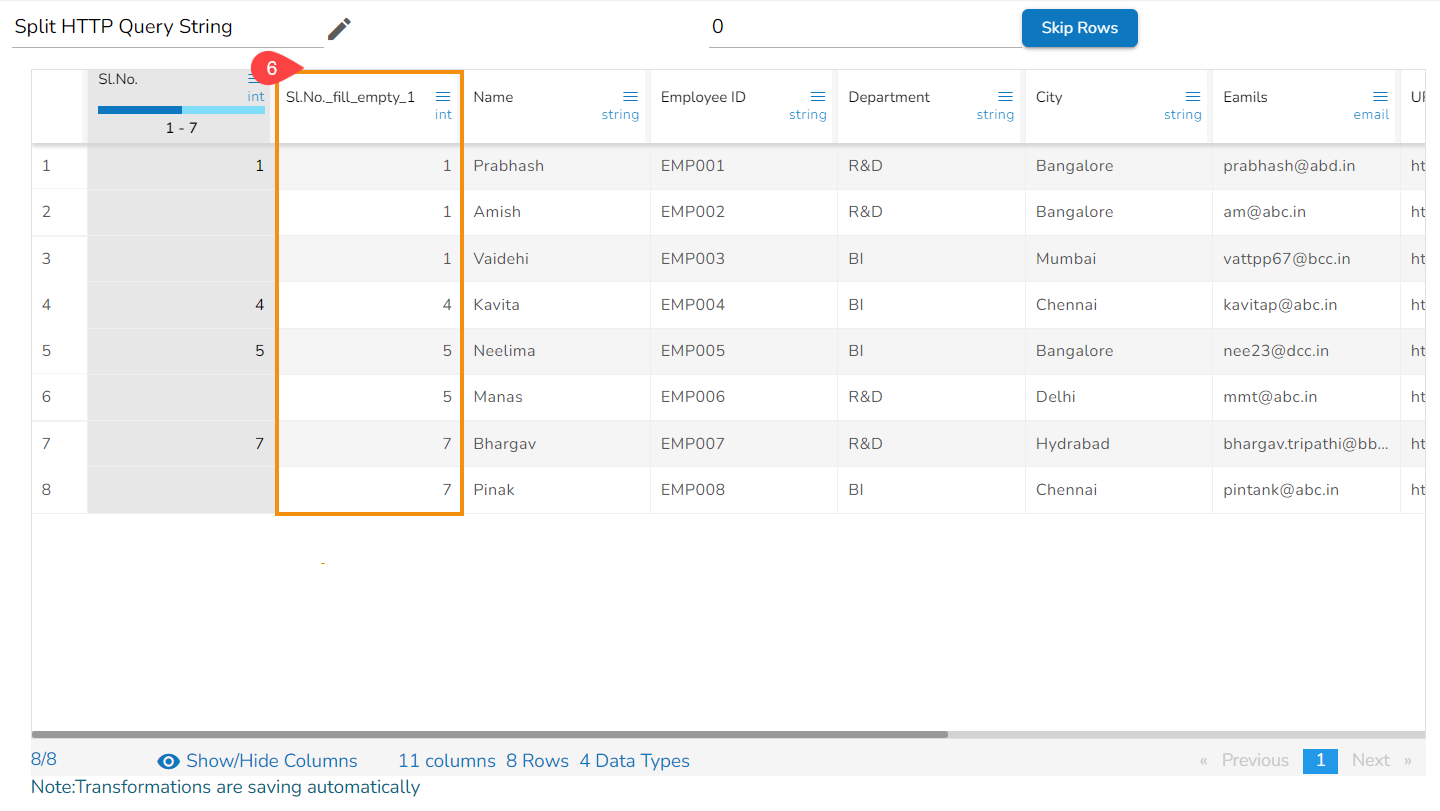
Please Note: The Fill Empty transform fills the immediate empty cell with either above or below cell's values. It does not fill the cells for which both above and below cells are empty.
Generate Primary Key
It generates the primary key for the table. The user can see the Primary_column added as the first column in the selected Dataset.
Please Note: Generate Primary Key is a table-based operation.
Navigate to the dataset in the Data Preparation format.
Select the first column from the displayed dataset.
Open the Transforms tab.
Select the Generate Primary Key transform from the COLUMNS category.
Use with: The user gets two options to generate the primary key:
Contiguous- It generates the auto-incremented value starting from 1.
Non_contiguous- It generates a unique and random integer value.
Click the Submit option.
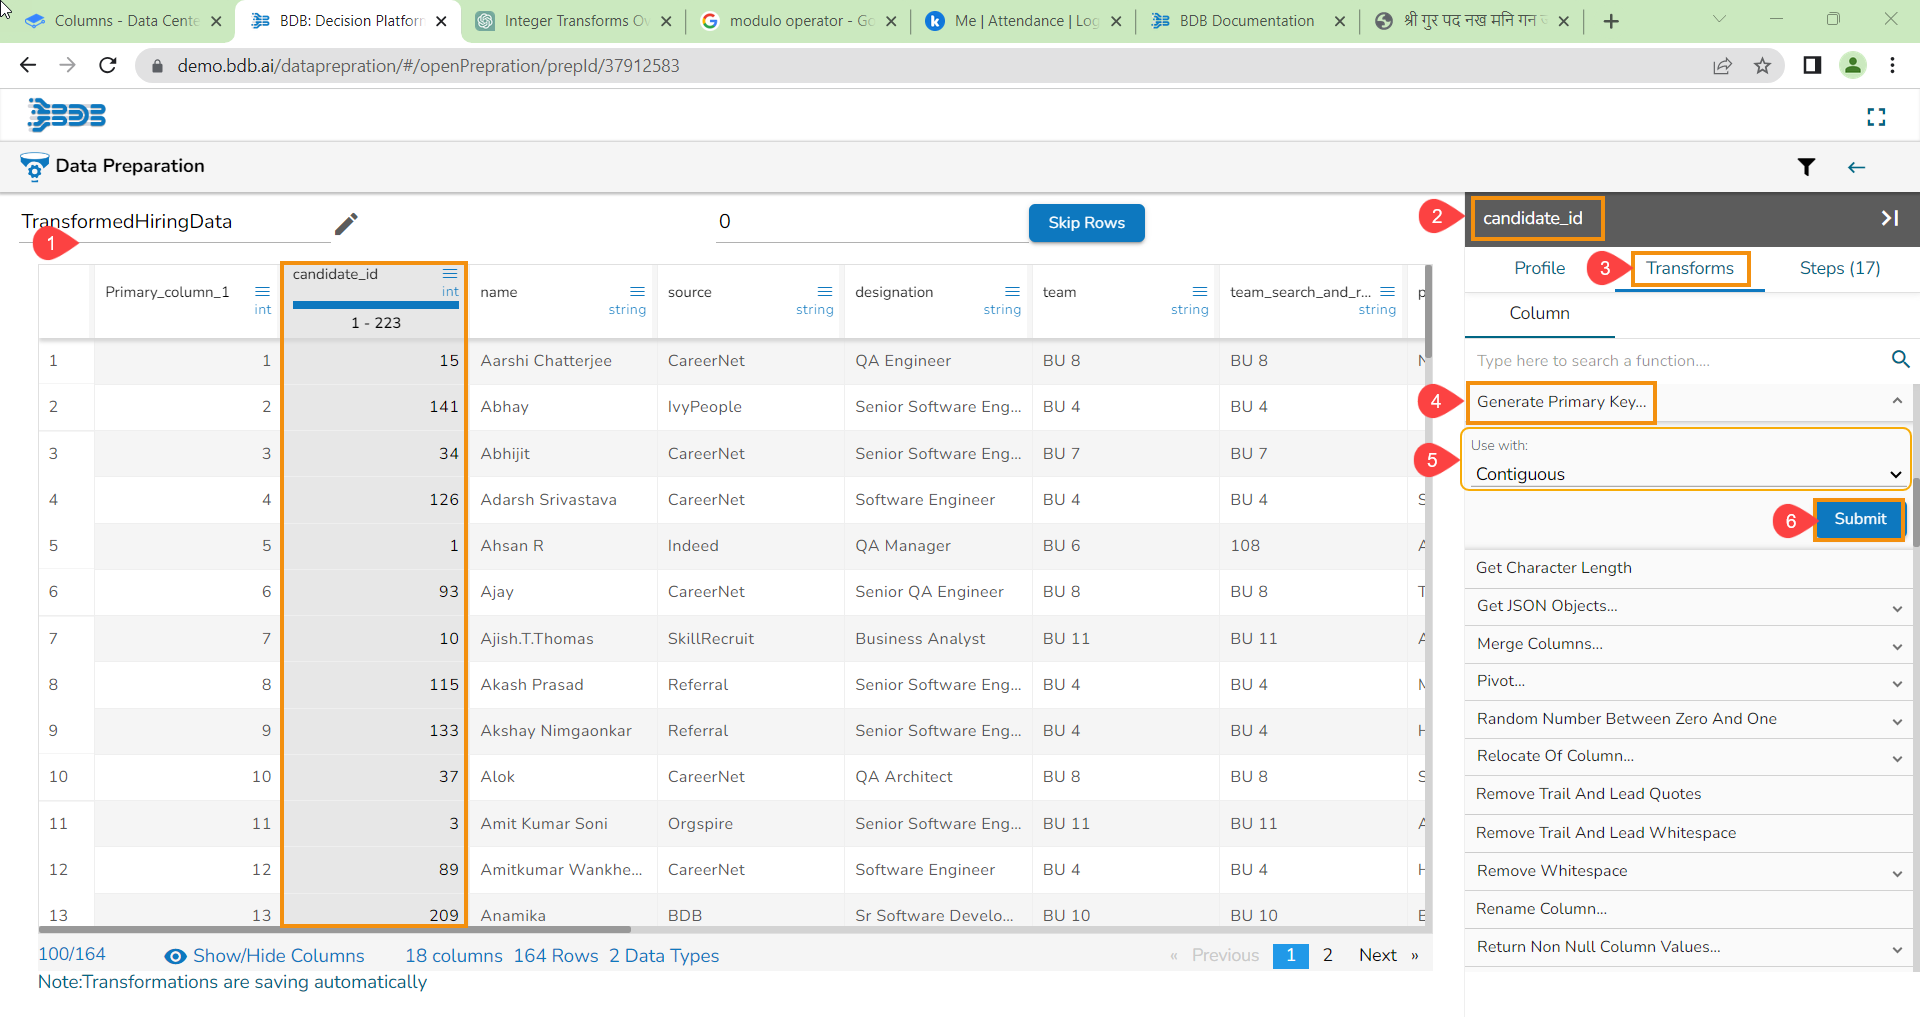
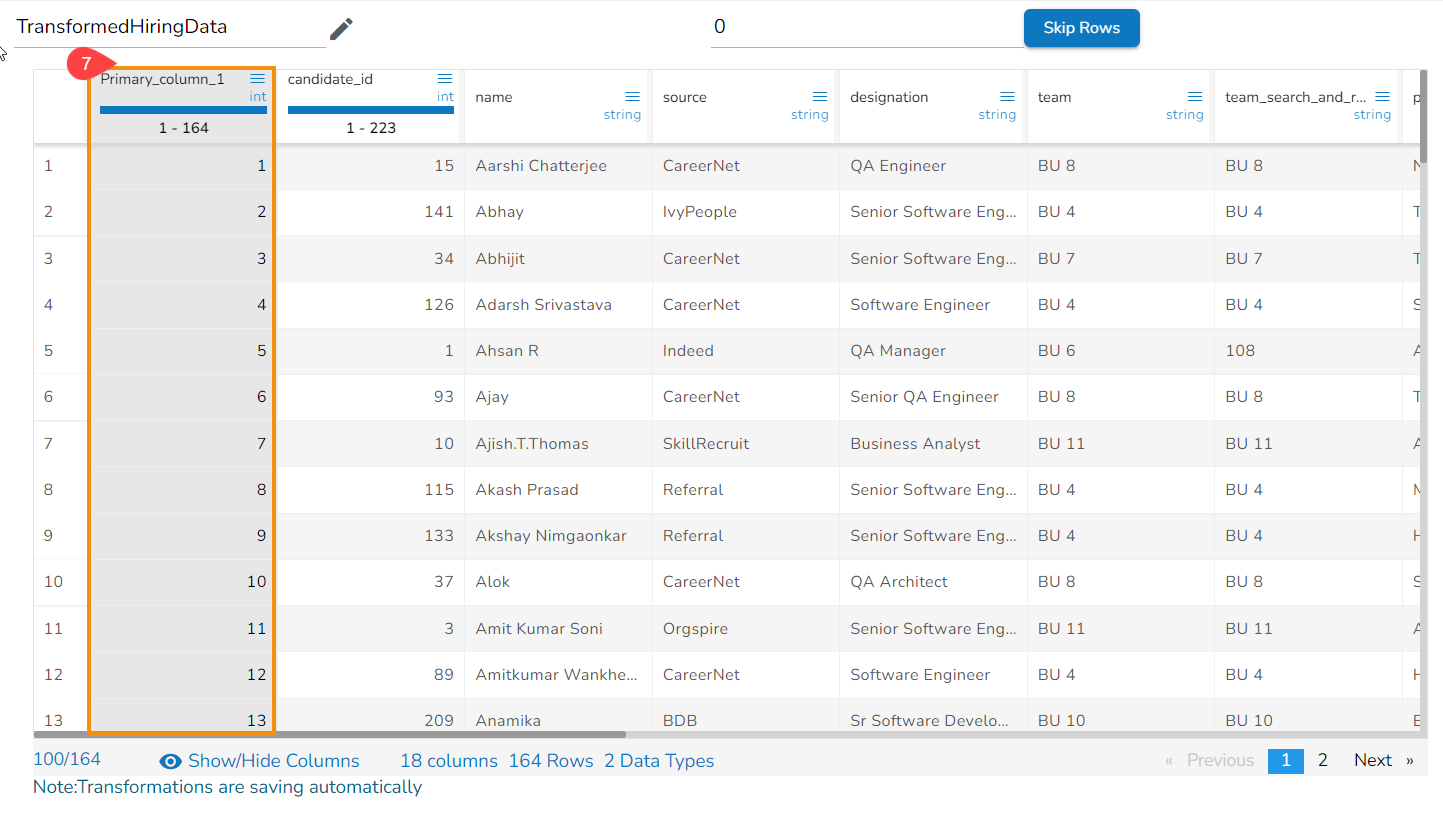
A new column with primary values gets added to the data grid.
Get Character Length
The transform Get Character Length when applied adds a new column with numbers displaying the length of character present in that cell.
Check out the given Walk-through on how to use the Get Character Length Transform.
Select a column from the dataset.
Navigate to the Transforms tab.
Click the Get Character Length transform from the COLUMNS category. E.g., The Get Character Length transform has been applied to the designation column.

As a result, a new column gets added next to the selected column displaying the character length of each cell value as displayed below:

Please Note:
This transform counts the space provided between two words as a character. So, to get the exact count of the character length the cell should not have any space between two words.
The empty cells are kept as it is in the column.
The Get Character Length transform can also be accessed by using the menu icon provided for the each column in the Data Grid display of the dataset.
Get JSON Objects
The Get JSON Objects transform extracts any parameter from a given column with JSON data. When the parameter in the JSON is specified, the transform extracts all parameter values as columns into a tabular format.
Check out the given illustration on how to use Get JSON Objects.
Please Note: To extract the nested JSON the ‘,’ mark can be used to specify the multiple values.
Select a column from the dataset within the Data Preparation framework.
Open the Transforms tab.
Select the GET JSON Object transform from the COLUMNS category.
Provide Parameters to be extracted from the selected column.
Click the Submit option.

The given parameters are extracted into tabular structure as displayed-below:

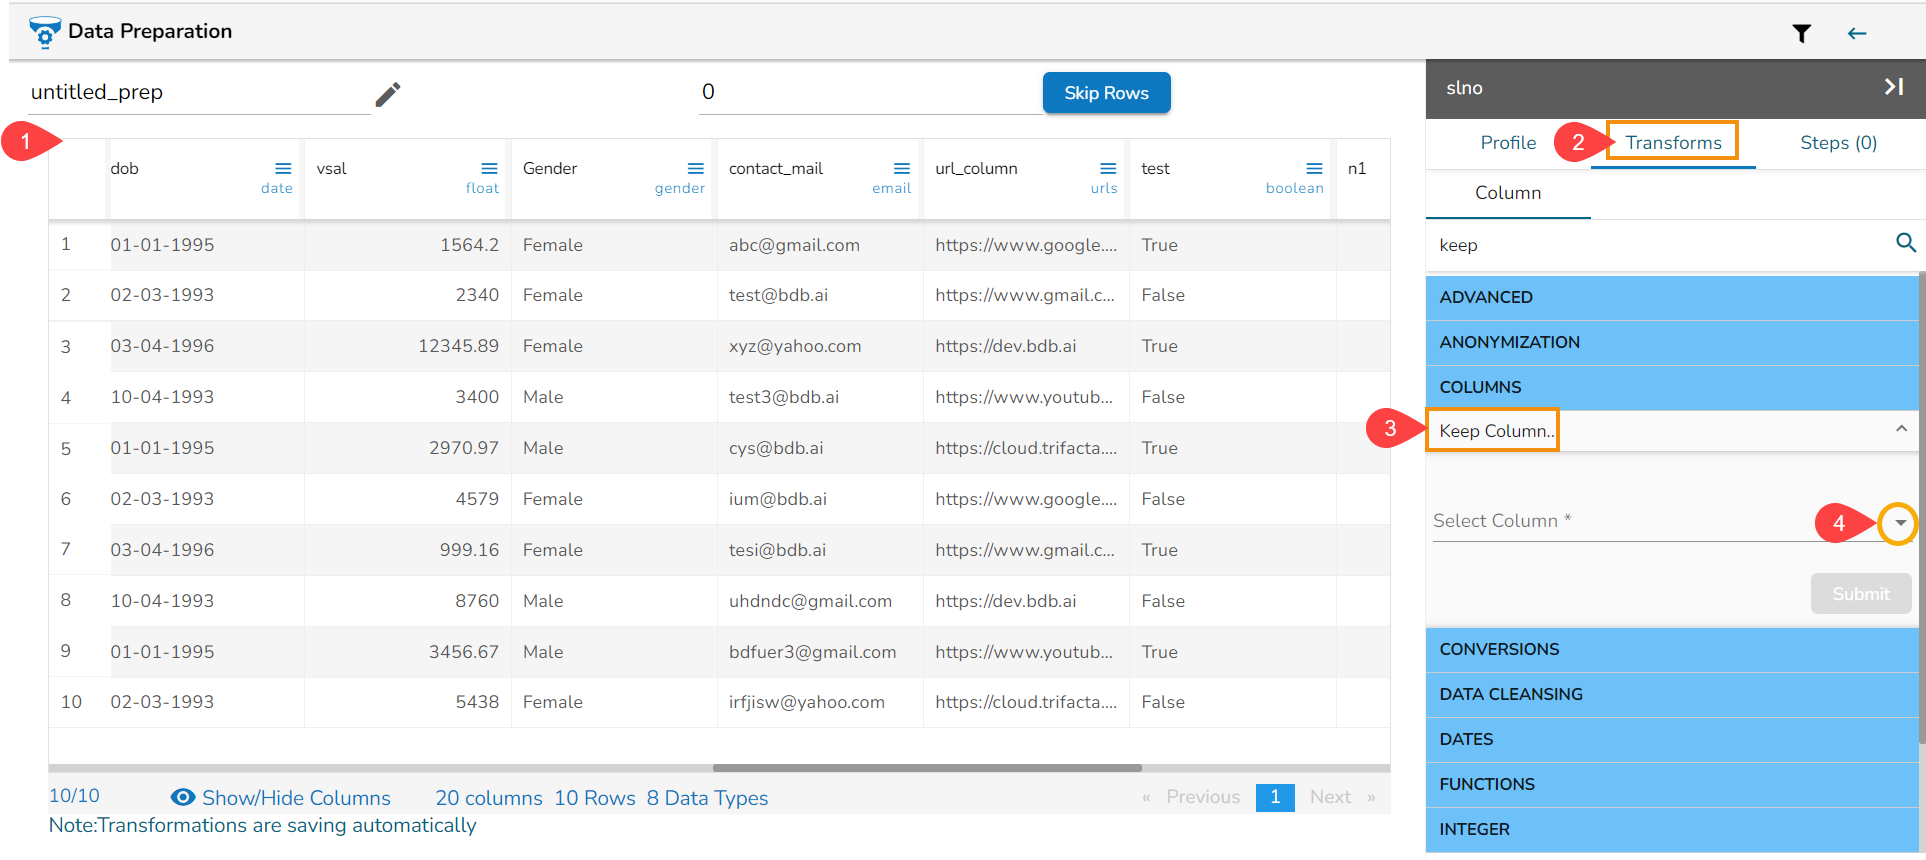
Keep Column
This transform helps the users to keep the selected columns and as a result it deletes all the other columns from the dataset.
Navigate to a dataset in the Grid format within the Data Preparation framework.
Open the Transforms tab.
Select the Keep Column transform from the COLUMNS category.
Click the drop-down icon provided to select columns.
Use check boxes provided next to the column names to select the columns that you want to keep (You can select multiple columns).

The selected columns appear.
Click the Submit option to apply the transform.
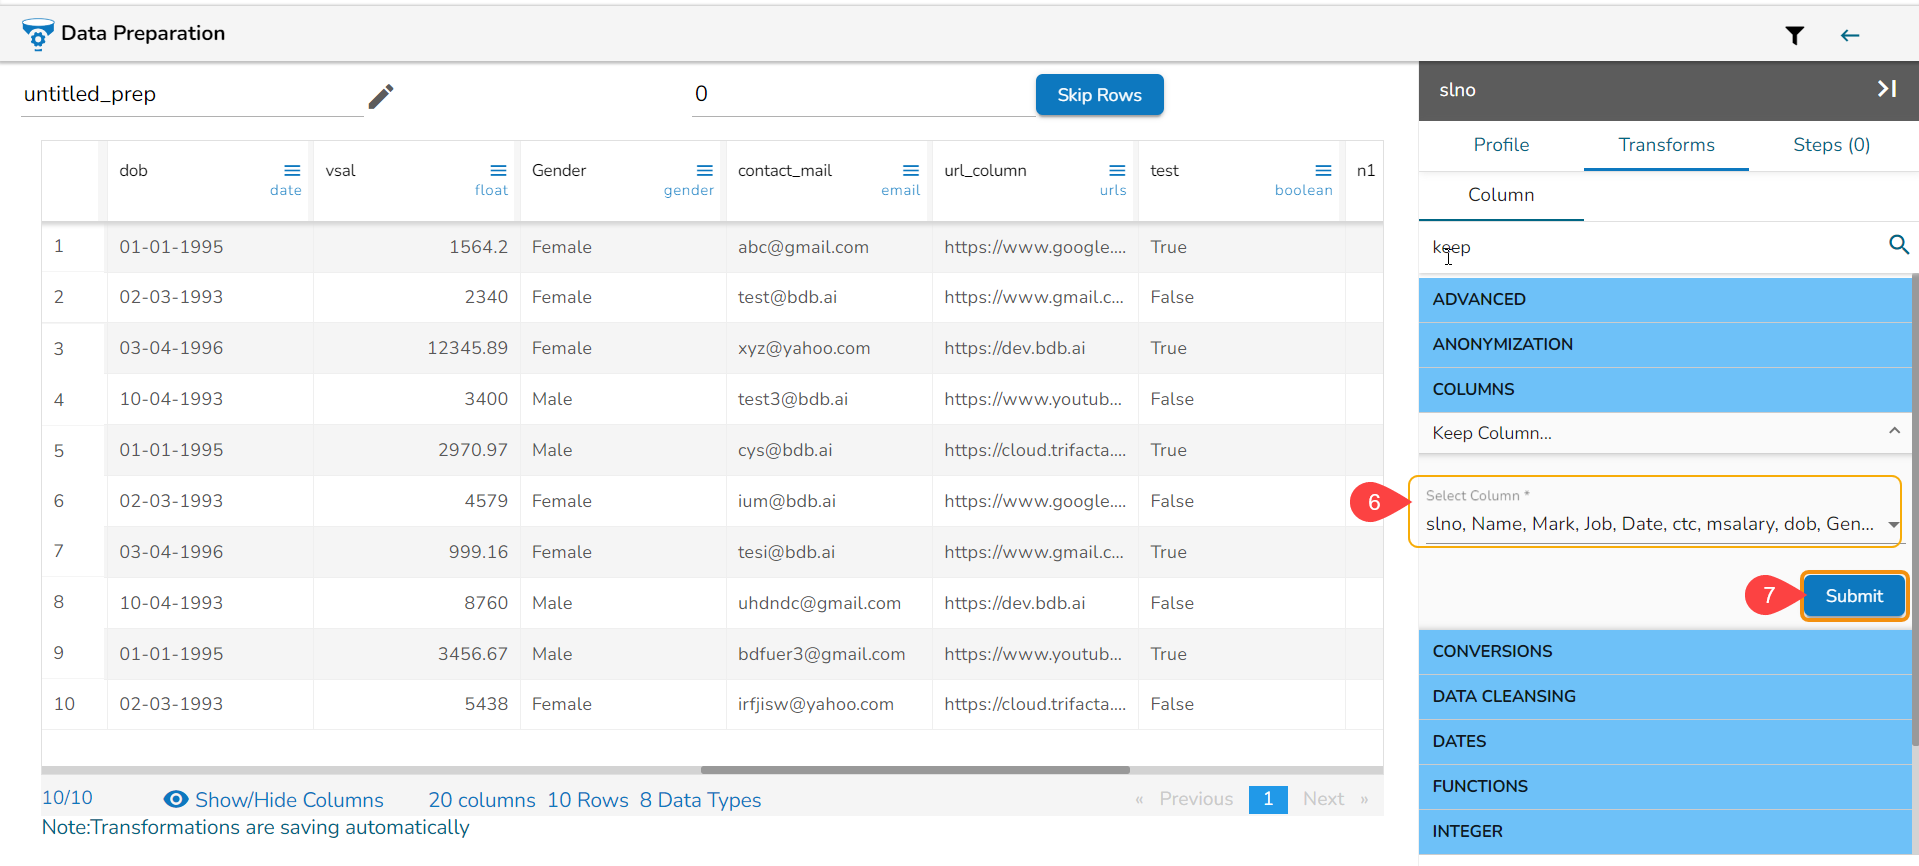
The columns except the selected columns get removed from the Dataset.
Merge Columns
This transformation helps to merge one or more columns and create a new column. By using a separator the values will be separated. E.g., In the following examples the used Separator is '_' (underscore).
Name
Job
Gender
MergedColumn
Ram
Teacher
Male
Ram_Teacher_Male

Navigate to the Data Preparation grid page.
Navigate to the Transforms tab.
Open the Columns transform type.
Select the Merge Columns transform.
Select the Columns using the Select Columns drop-down menu.
Select a separator.
Provide name for the New Column.
Click the Submit option.
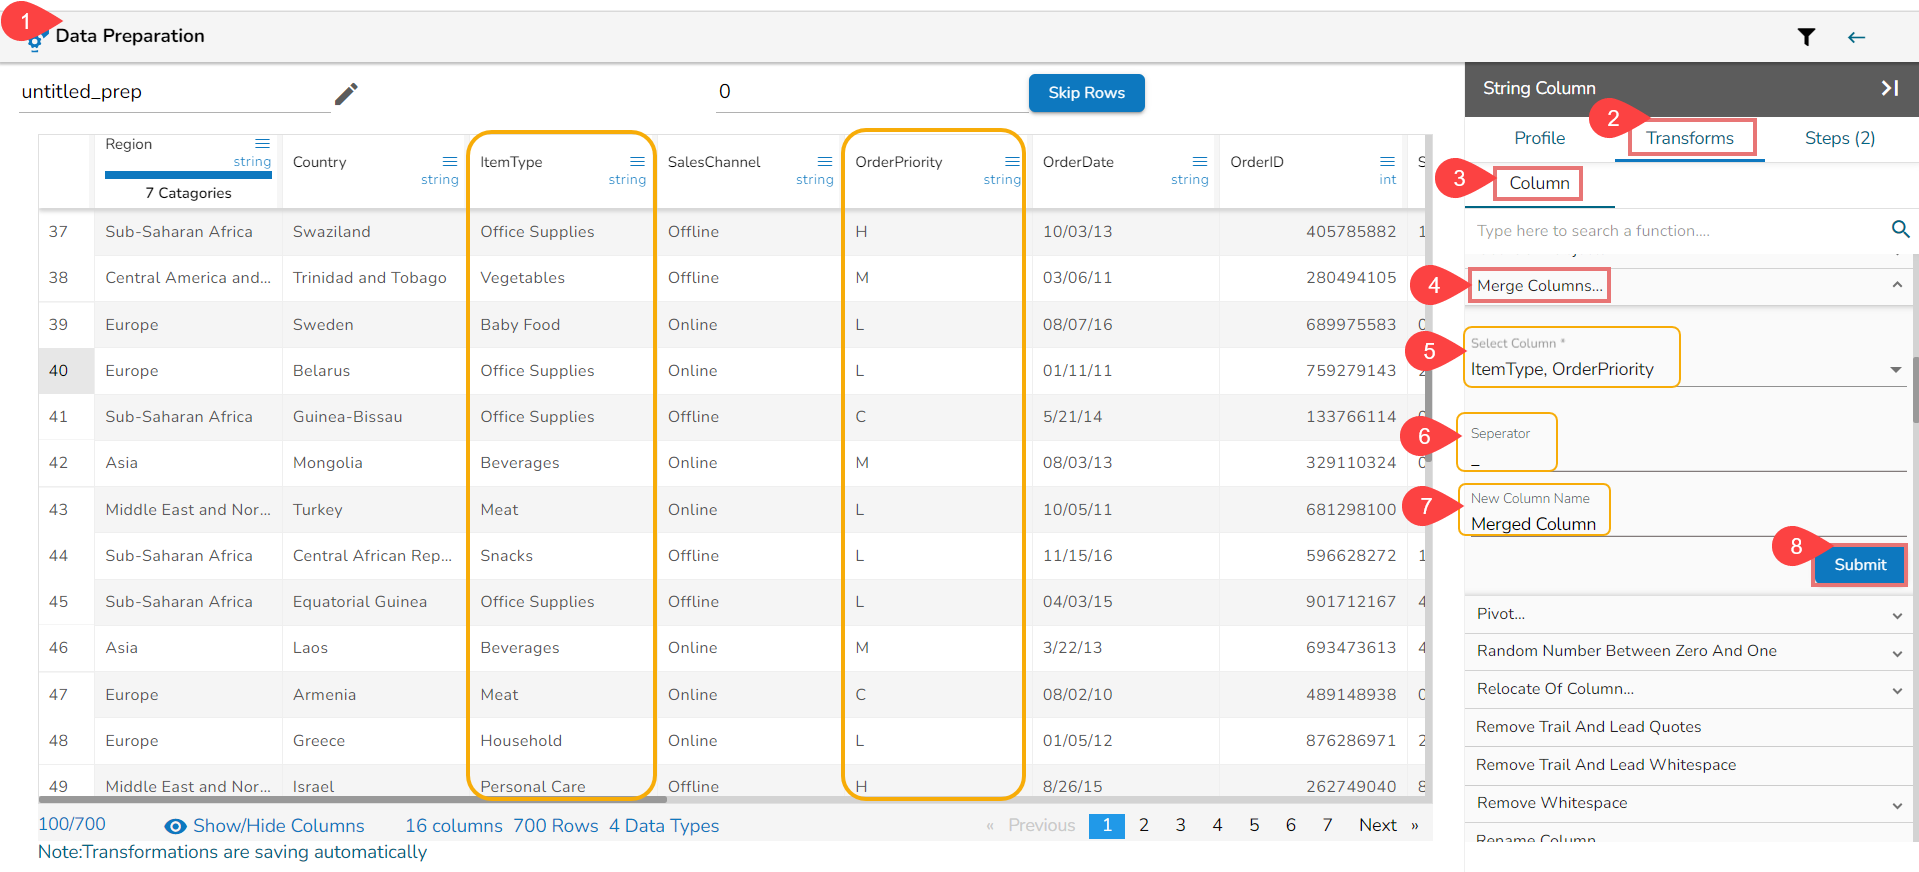
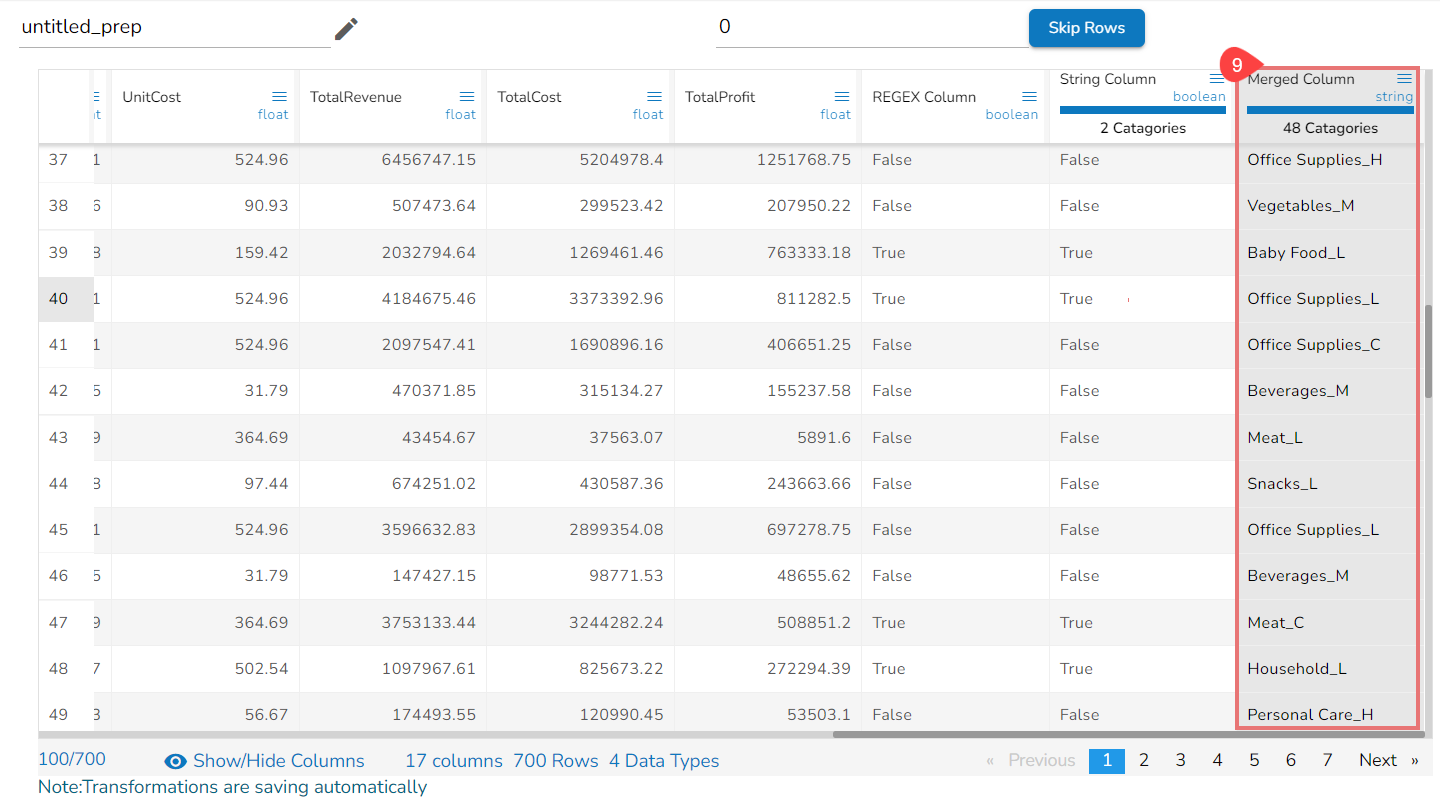
As a result, a new column gets added to the data grid with the merged values of the selected columns.
Nest Column To Object/ Array
This is nesting one or more columns into an Array or Object column.
Col1
Col2
Result as Array
Result as Object
Val1
Val2
Val1,Val2
{‘Col1’:’Val1’,’Col2’:’Val2’}
Steps to perform the transformation:
Navigate to the Transforms tab.
Select the Nest Column to Object/ Array transform.
Provide the following information:
Provide a name for the new column. It will be the result column.
Select one or multiple columns (The given example displays multiple columns selected).
Select the Nest Column to option as an Object or Array. In the given image, the selected option is Object.
Click the Submit.


Please Note: Based on the selected Nest Column to option, the result will appear:
Array option displays comma separated values in the result column.
Object option displays values within the curly brackets.
The following images display the result column that appears respectively with the Object and Array as selected option:
Nest Column to Array

Nest Column to Object

Please Note: The result of the Nest column to Array transformation comes as list datatype & this datatype is not supported while loading the data in the datastore.
Pivot
When applied, the Pivot transform converts the data into a Pivot table based on the selected Pivot Column and Group of the selected columns.
The pivot data transform is a data manipulation operation used to reshape a dataset, primarily in the context of data analysis and data visualization. It involves converting data from a "long" format to a "wide" format, or vice versa, based on the structure of the original dataset.
Navigate to the Data Preparation page with a dataset.
Open the Transforms tab.
Select the Pivot transform from the COLUMNS category of transforms.
Select a column to be used for Group By function (It supports String datatype).
Select a Pivot column (It supports String datatype).
Choose an aggregation operation out of Avg, Count, Max, Min, and Sum options with an integer column.
Click the Submit option.
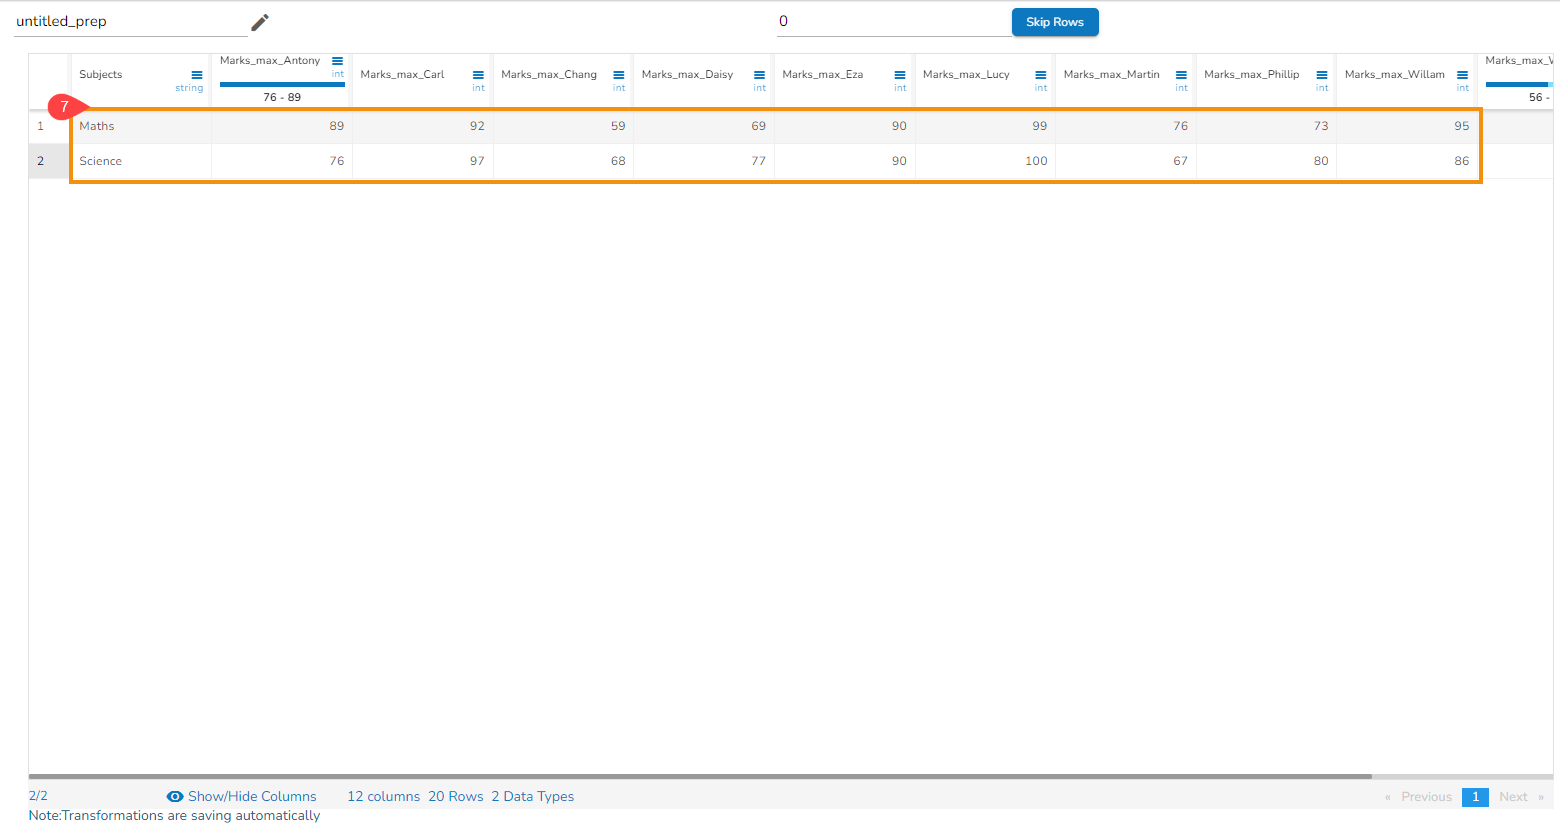
Transform Selection: In the given sample data, the Students Names is selected as the Pivot Column, and Max aggregation is selected for the Marks column. The selected Group by column is Subjects.
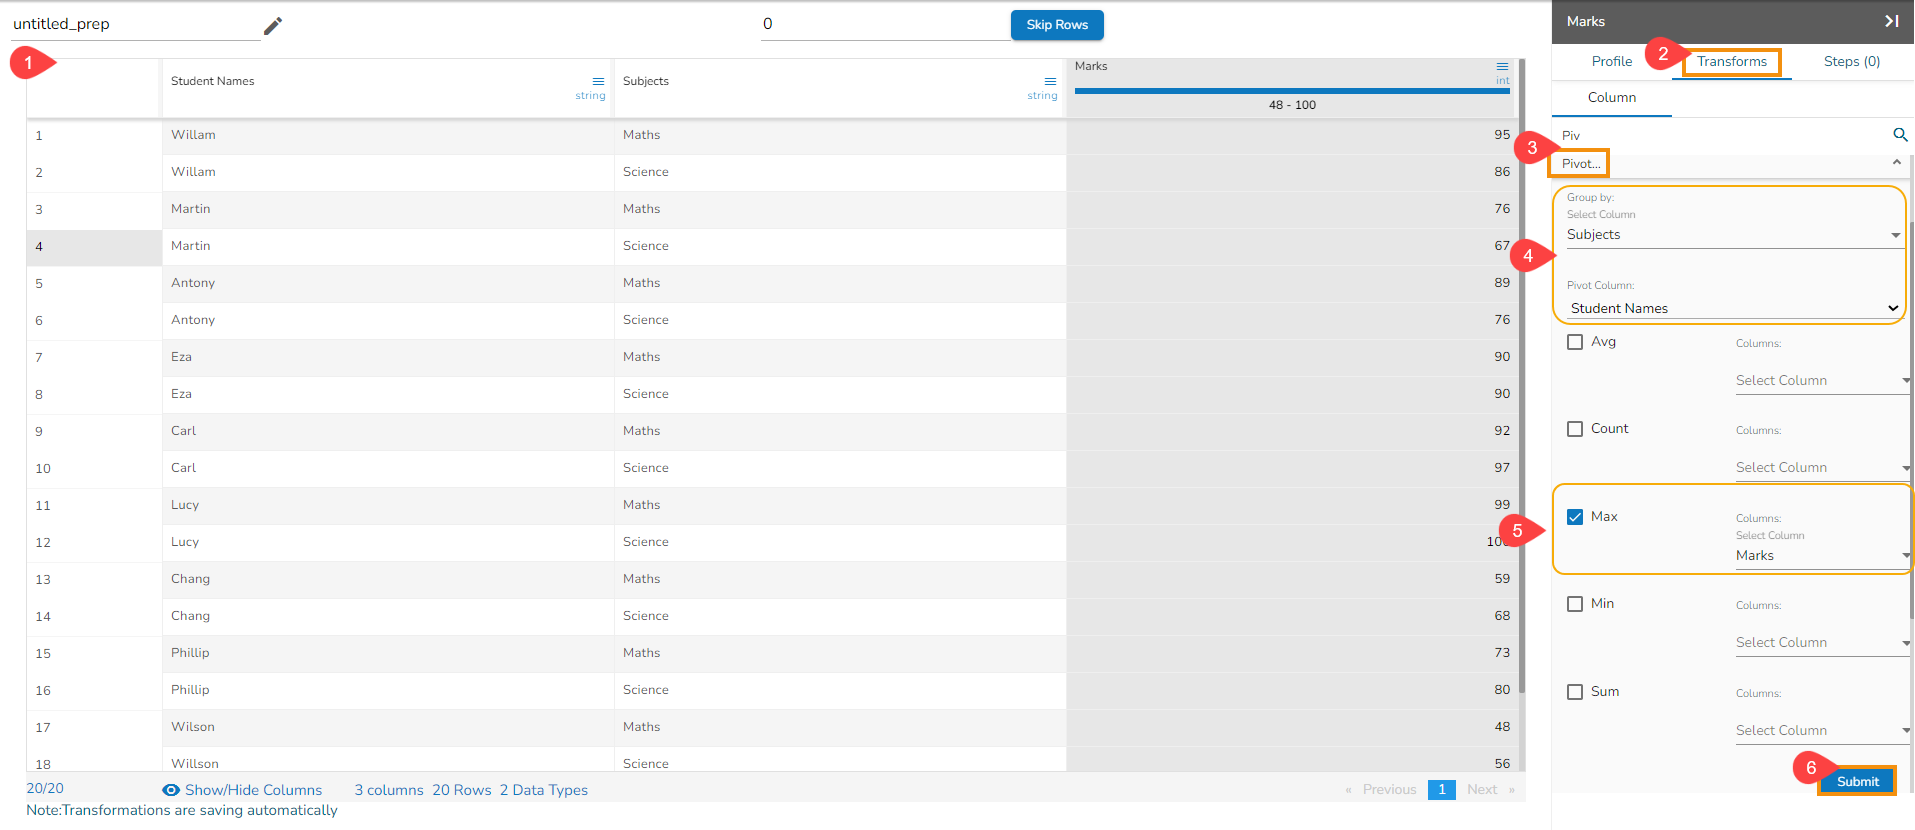
As a result, it returns the Max Marks for both the subjects get displayed for each Student in the following manner.
Please Note: The user can change the data display by interchanging the selected columns used for Group by and Pivot.
Random Number Between Zero and One
The RAND transform generates a random real number between 0 and 1.
The function accepts an optional integer parameter (seed value), which causes the same set of random numbers to be generated with each execution. When the browser is refreshed, the random numbers remain consistent when the seed value is present.
This function generates values of Decimal type with fifteen digits of precision after the decimal point.

Steps to perform the Random Number between Zero and One transform:
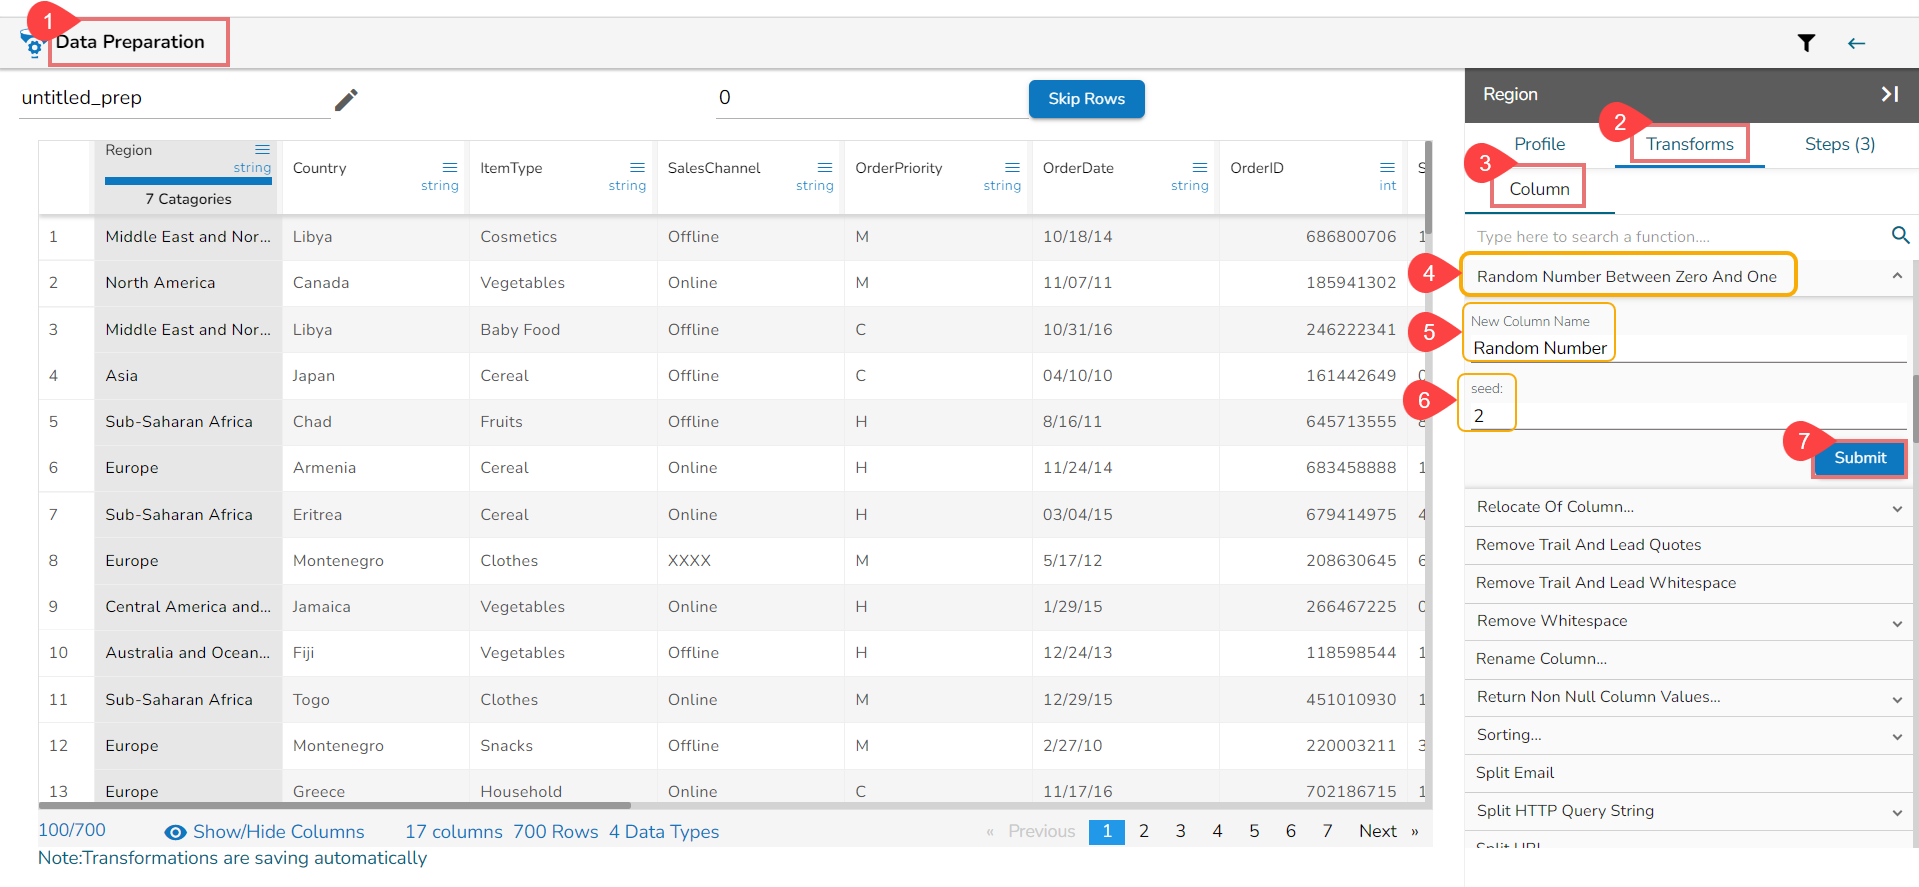
Navigate to the Data Preparation landing page with a dataset.
Open the Transforms tab.
Select the COLUMNS category of transforms.
Select the Random Number between Zero and One transform .
Provide the New Column Name.
Provide seed value (use any integer parameter).
The output will generate random numbers between 0 & 1 in the new column.
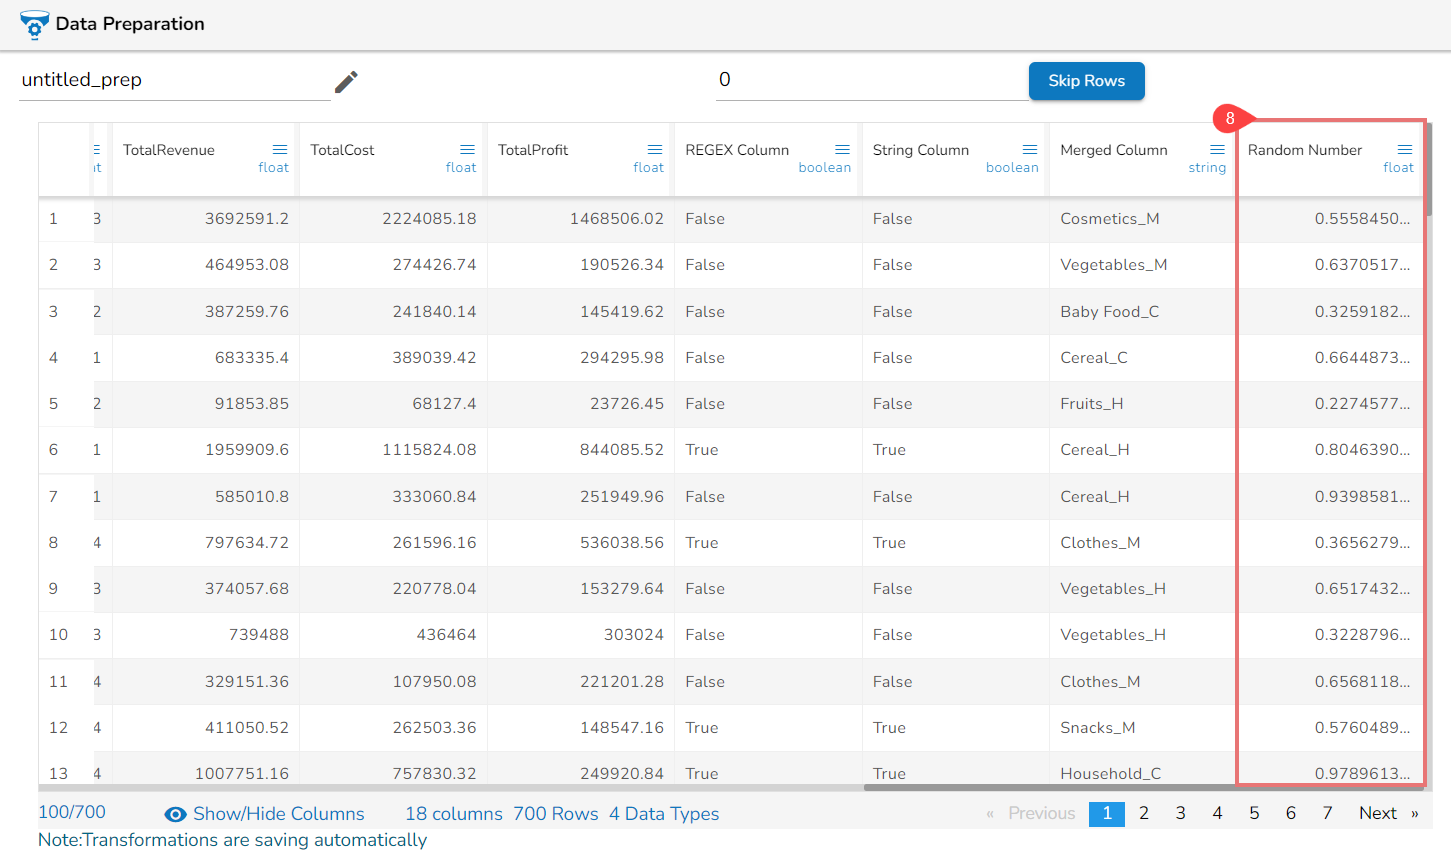
Please Note: If none is provided, a seed is generated based on the system timestamp.
Relocate of Column
This transform helps to relocate/ change of the position of a column in the data preparation. It will be helpful to the user when there are more columns and the user can change the position as per the given options:
At End
At Start
After Column
Before Column

Steps to perform the Relocate of Column transform:
Navigate to the Data Preparation landing page with a dataset.
Open the Transforms tab.
Select the COLUMNS category of transforms.
Select the Relocate of Column transform .
Select a Position option using the drop-down icon.
The supported positions are: At End, At Start, After Column, Before Column
Click the Submit option.

As per the selected position the column gets displayed in the Data Grid.
Rename Column
The Rename Column transform allows the user to rename the selected column.
Select a column from the data grid that needs to be renamed.
Open the Transforms tab.
Choose the Rename Column transform.
Or
Select a column from the data grid that needs to be renamed
Click the Menu icon provided next to the Column name.
Select the Rename Column option from the context menu.
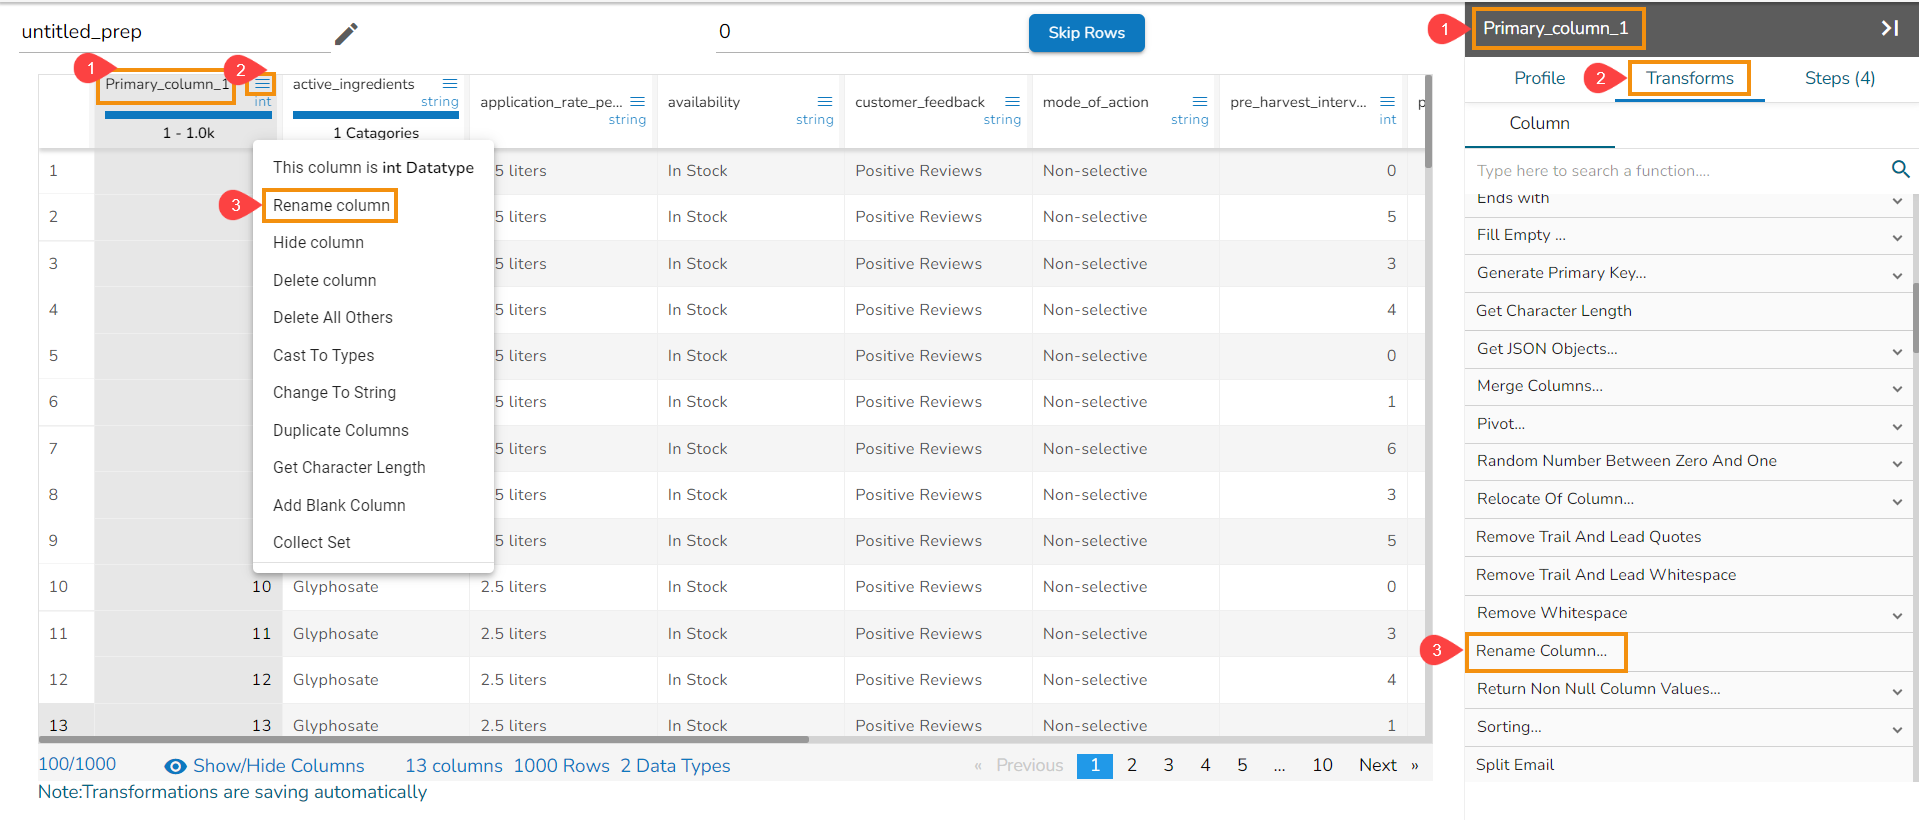
The Rename Column dialog box opens (In both the scenarios).
Provide a name that you wish to use as a rename for the selected column.
Click the Submit option.
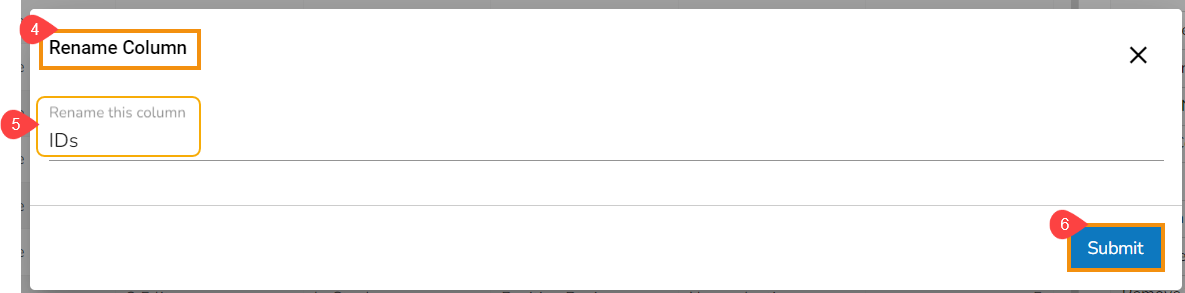
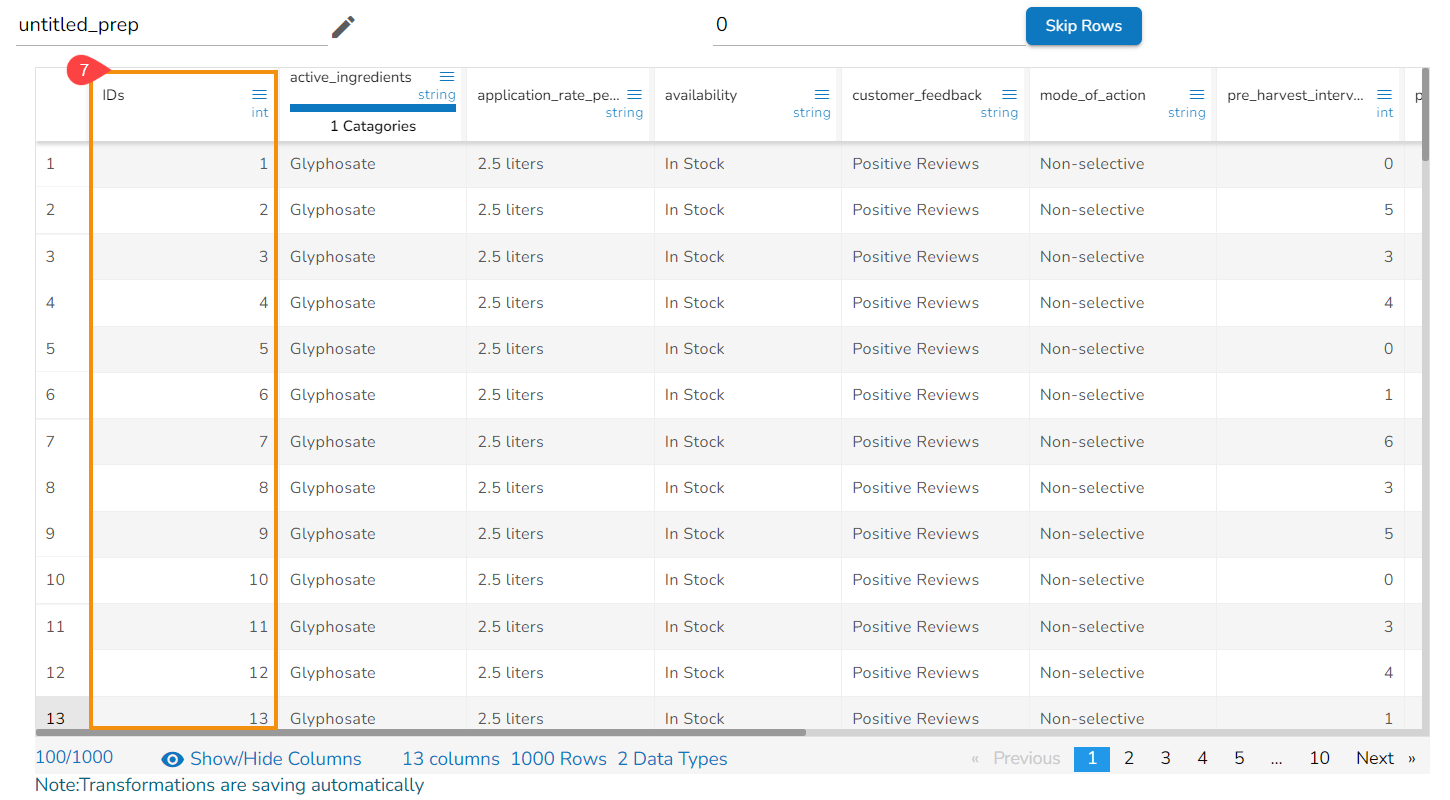
The column gets renamed.
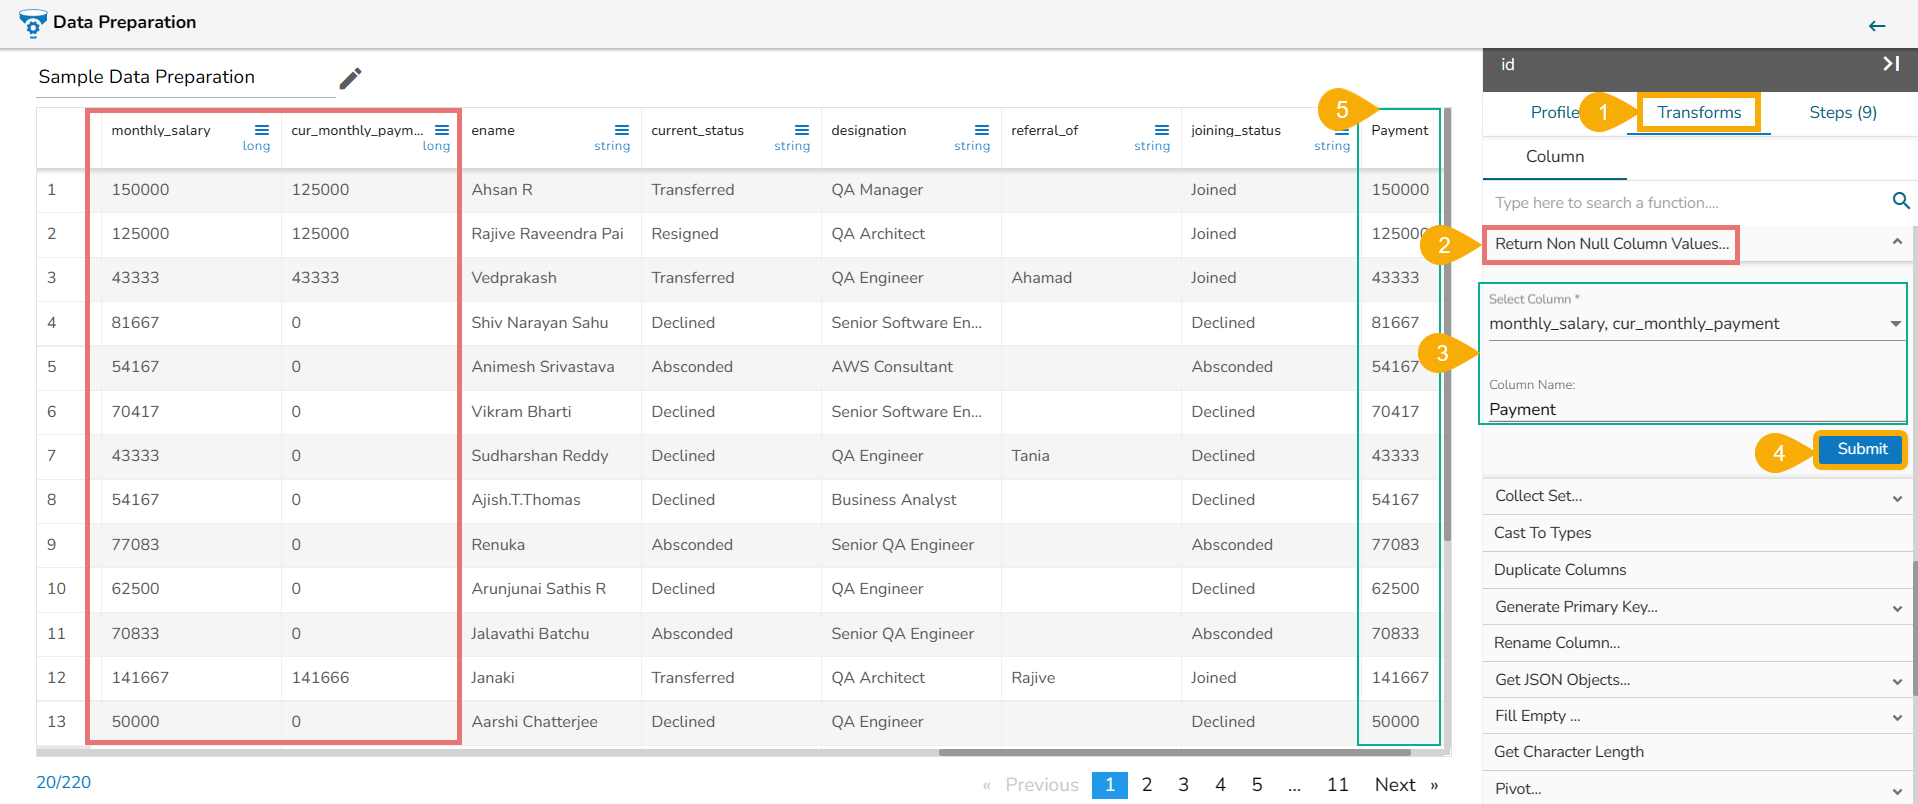
Return Non-Null Column Values
The transform returns the first non-null value from the list of columns specified to a new column. To perform the transform, select the columns which must be checked for null and specify a column name for the result.
Select Column: Select the columns to be checked for null
Column name: The name for the new result column returns
The Return Non Null Column Values transform has been applied to the monthly_salary and cur_monthly_payment columns. As a result, the Payment column gets added to the dataset with the values based on the applied transform.
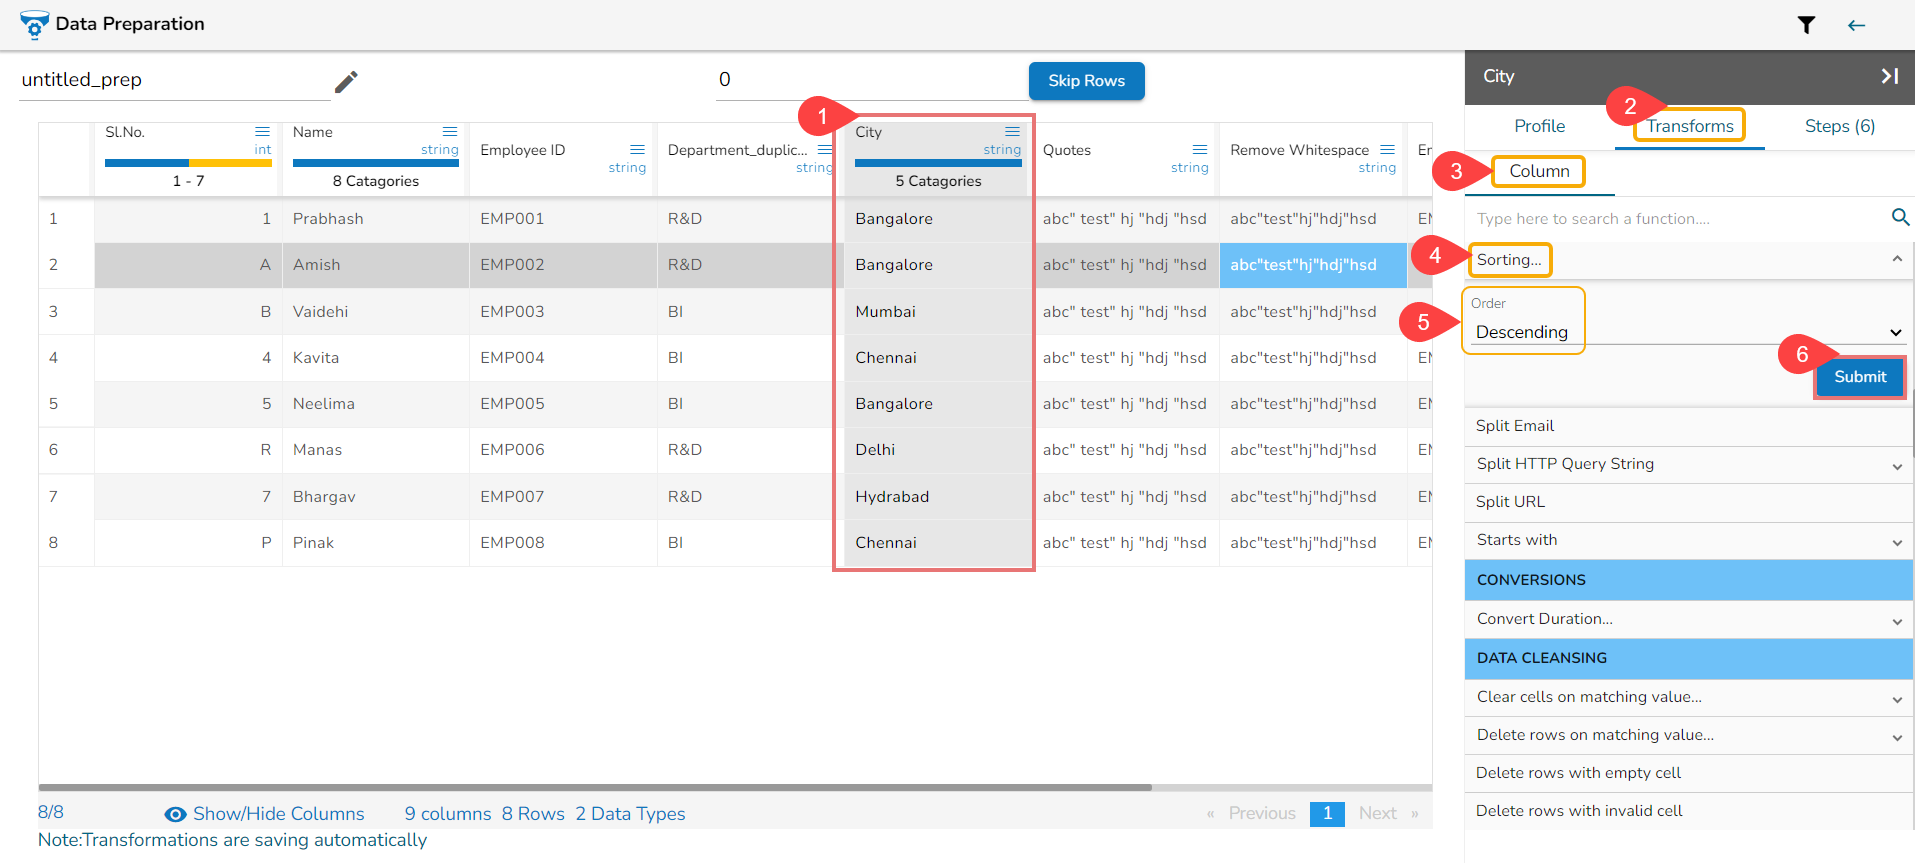
Sorting
The Sorting transformation helps to sort the column in Ascending/ Descending order for the ease of the user in data preparation. There are two options are given:
Ascending
Descending

Steps to use the Sorting transform.
Navigate to a column using the grid view of the Data Preparation.
Open the Transform tab.
Select the Column transform category.
Click on the Sorting transform.
Select order using the drop-down option.
Click the Submit option.
Order of the entire dataset gets changed based on the selected source column.
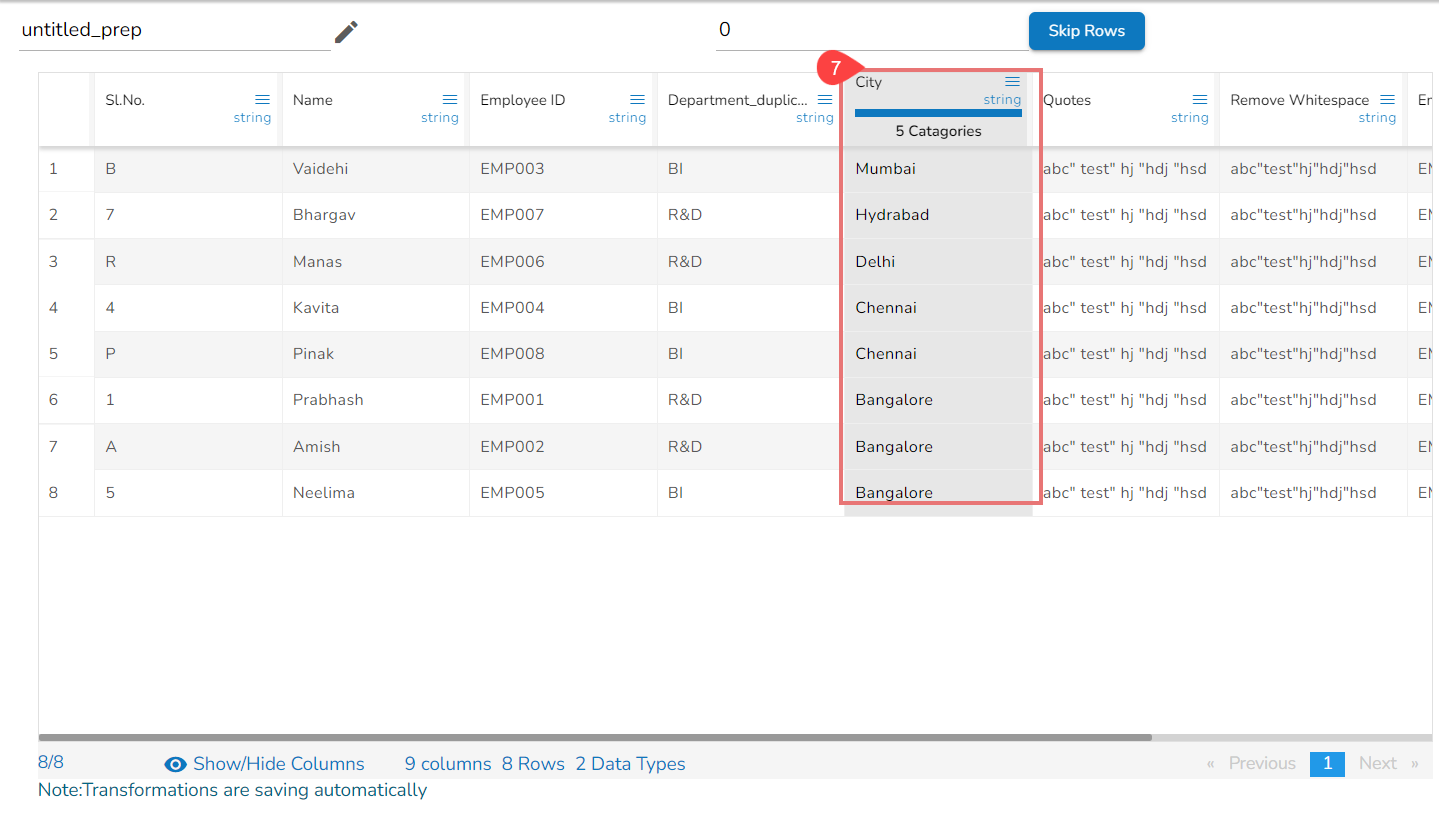
Please Note: If the Sorting transform is used multiple time, the dataset will be ordered based on the last selected sorting order.
Last updated