Data Science Lab
  • What is Data Science Lab?
  • Accessing the Data Science Lab Module
  • Data Science Lab Quick Start Flow
  • Project
    • Environments
    • Creating a Project
    • Project List
      • Keep Multiple Versions of a Project
      • Sharing a Project
      • Editing a Project
      • Activating a Project
      • Deactivating a Project
      • Deleting a Project
    • Tabs for a Data Science Lab Project
      • Tabs for TensorFlow and PyTorch Environment
        • Notebook
          • Ways to Access Notebook
            • Creating a Notebook
            • Uploading a Notebook
          • Notebook Page
            • Preview Notebook
            • Notebook Cells
              • Using a Code Cell
              • Using a Markdown Cell
            • Modifying a Notebook
            • Resource Utilization Graph
            • Notebook Taskbar
            • Notebook Operations
              • Datasets
                • Copy Path (for Sandbox files)
              • Secrets
              • Algorithms
              • Transforms
              • Models
                • Model Explainer
                • Registering & Unregistering a Model
                • Applying Filter
              • Predict
              • Artifacts
              • Files
              • Variable Explorer
              • Find and Replace
          • Notebook List Page
            • Export
              • Export to Pipeline
              • Export to GIT
            • Notebook Version Control
            • Sharing a Notebook
            • Editing a Notebook
            • Deleting a Notebook
        • Dataset
          • Adding Data Sets
            • Data Sets
            • Data Sandbox
          • Dataset List Page
            • Preview
            • Data Profile
            • Create Experiment
            • Data Preparation
            • Delete
        • Utility
        • Model
          • Model Explainer
          • Import Model
          • Export to GIT
          • Register a Model
          • Unregister A Model
          • Register a Model as an API Service
            • Register a Model as an API
            • Register an API Client
            • Pass Model Values in Postman
          • AutoML Models
        • Auto ML
          • Creating Experiments
            • Accessing the Create Experiment Option
              • Configure
              • Select Experiment Type
          • AutoML List Page
            • View Report
              • Details
              • Models
                • View Explanation
                  • Model Summary
                  • Model Interpretation
                    • Classification Model Explainer
                    • Regression Model Explainer
                  • Dataset Explainer
            • Delete
      • Tabs for PySpark Environment
        • Notebook
          • Ways to Access Notebook
            • Creating a Notebook
            • Uploading a Notebook
          • Notebook Page
            • Preview Notebook
            • Notebook Cells
              • Using a Code Cell
              • Using a Markdown Cell
            • Modifying a Notebook
            • Resource Utilization Graph
            • Notebook Taskbar
            • Notebook Operations
              • Datasets
                • Copy Path (for Sandbox files)
              • Secrets
              • Files
              • Variable Explorer
              • Find and Replace
          • Notebook List Page
            • Export
              • Export to Pipeline
              • Export to GIT
            • Notebook Version Control
            • Sharing a Notebook
            • Editing a Notebook
            • Deleting a Notebook
        • Dataset
          • Adding Data Sets
          • Dataset List Page
            • Preview
            • Data Profile
            • Data Preparation
            • Delete
        • Utility
Powered by GitBook
On this page
  • Create a New Project
  • View Project

Was this helpful?

  1. Project

Creating a Project

Create your experimental DS projects within the platform.

PreviousEnvironmentsNextProject List

Last updated 1 year ago

Was this helpful?

Pre-requisite: It is mandatory to configure the option before beginning with the Data Science Project creation. Also, select the Algorithms by using the Algorithms field from the DS Lab Settings section which you wish to use for your DS Lab project.

Check out the walk-through given below on creating a new DSL Project.

Create a New Project

  • Navigate to the Projects Page of the Data Science Lab plugin.

  • Click the Create Project option to create a new project.

  • A form opens to provide the Project-related information.

  • The next screen opens asking for the following details for a new project:

    • Project Name: Give a name to the new project.

    • Project Description: Describe the project.

    • Select Algorithms: Select algorithms using the drop-down menu.

    • Environment: Allows users to select the environment they want to work in. Currently, supported Python frameworks are Sklearn (default), TensorFlow, and PyTorch (The user can execute Sklearn commands by default in the notebook).

      • If the users select the TensorFlow environment, they do not need to install packages like the TensorFlow and Keras explicitly in the notebook. These packages can simply be imported inside the notebook.

      • If the users select the PyTorch environment, they do not need to install packages like the Torch and Torchvision explicitly in the notebook. These packages can simply be imported inside the notebook.

      The user can select an option out of the given choices: 1. Python Tensor Flow, 2. Python PyTorch

    • Resource Allocation: This allows the users to allocate CPU/ GPU and memory to be used by the Notebook container inside a given project. The currently supported Resource Allocation options are Low, Medium, and High.

    • Idle Shutdown: It allows the users to specify the idle time limit after which the notebook session will get disconnected, and the project will be deactivated. To use the notebook again, the project should be activated. The supported Idle Shutdown options are 30m, 1h, and 2h.

    • External Libraries: Mention the names of external libraries (if a specific version is required then mention the library name with version number) that need to be installed for use in your project /notebook. The names of the external libraries should be separated only by commas (without space) for this field.

  • After you fill in the mandatory fields the following modifiable fields appear with pre-selected values:

    • Image Name

    • Image Version

    • Limit

    • Memory

    • Request (CPU)

    • Memory

    • GPU Type: Select GPU type from the drop-down menu (Currently we support nvidia as the GPU Type).

    • GPU Limit: Set the GPU limit using this field (This field appears only after GPU Type option is selected).

  • Click the Save option.

  • The confirmation message appears.

  • The newly created project gets saved, and it appears on the screen.

View Project

The user can open the Project list by clicking the View Project option.

  • Click the View Project option.

  • The user gets redirected to the Project list.

A project gets the Share, Edit, Delete, Activate/Deactivate actions to be applied on it after getting listed under the Project list.

The DSL projects also get Push to VCS and Pull from VCS functionalities, but they only get enabled for the activated DSL projects.

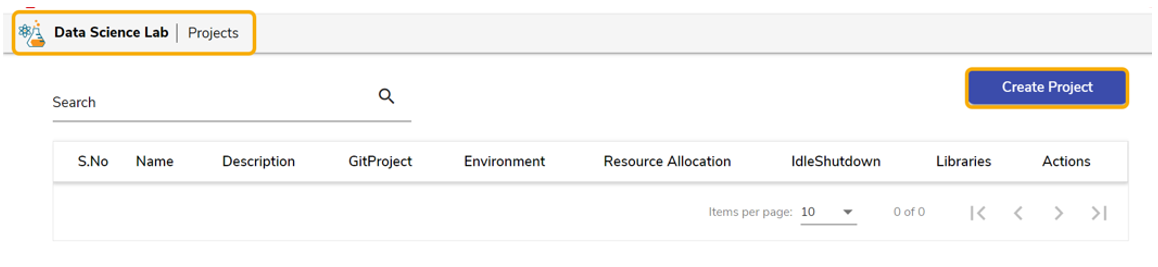
The Create Project option
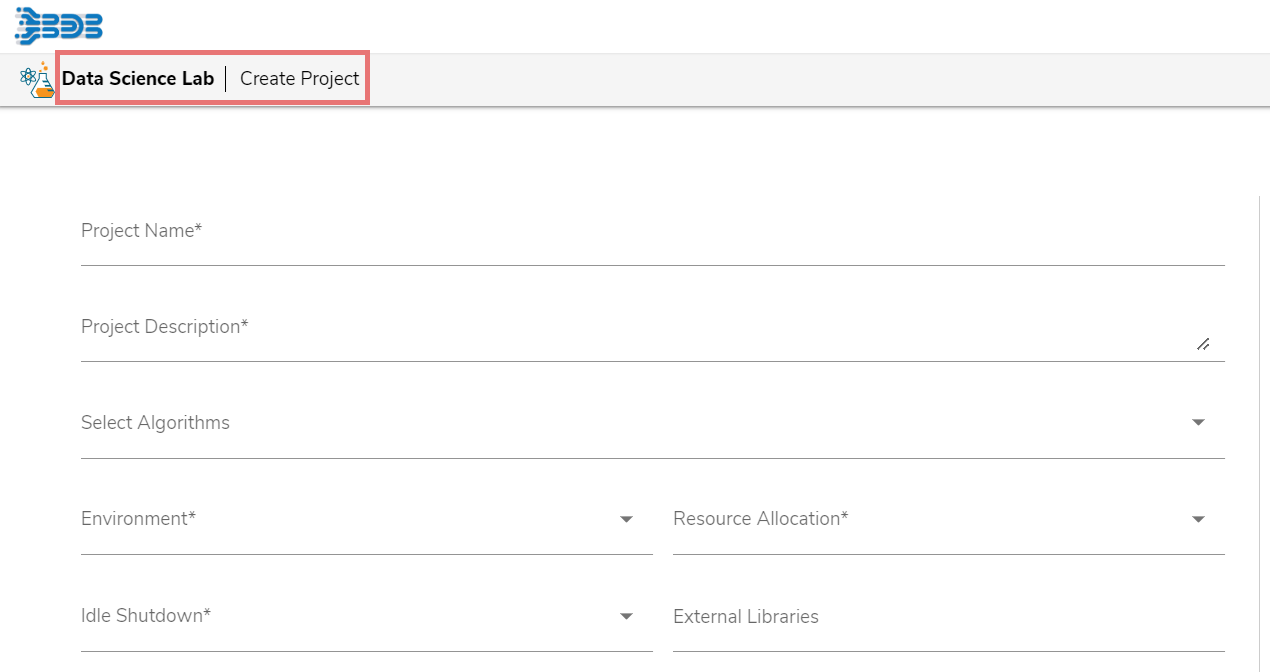
Mandatory fields for Project creation
More fields to create a new Project
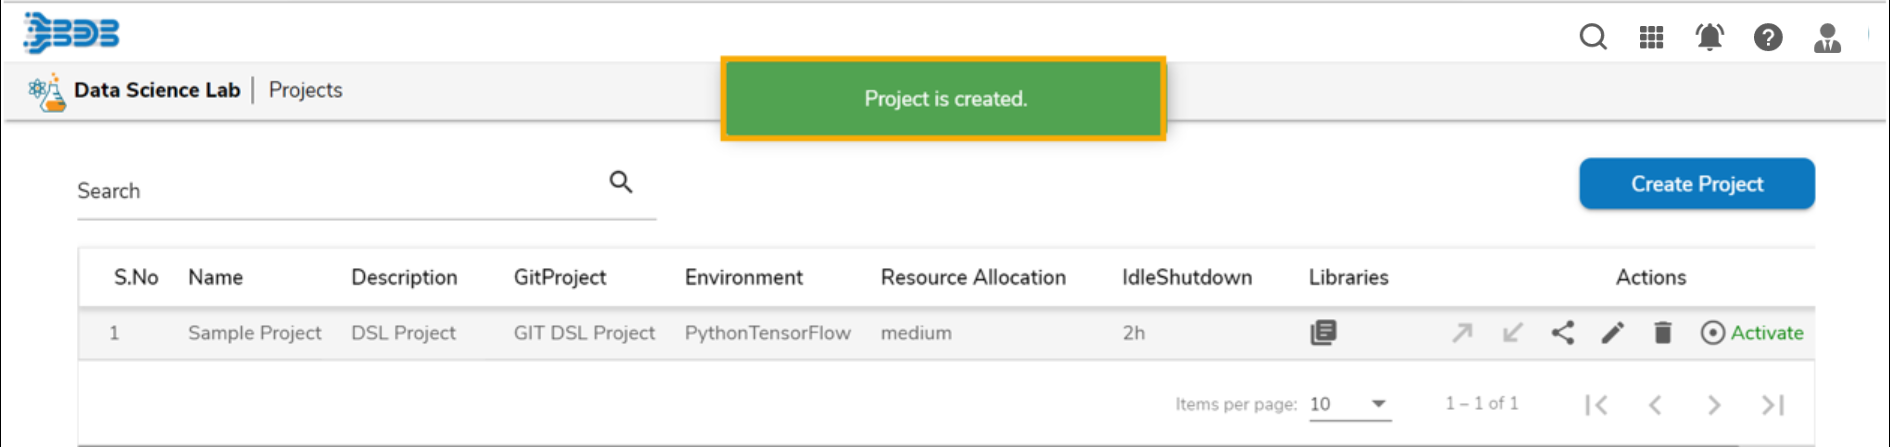
The newly created Project gets listed under the Projects list
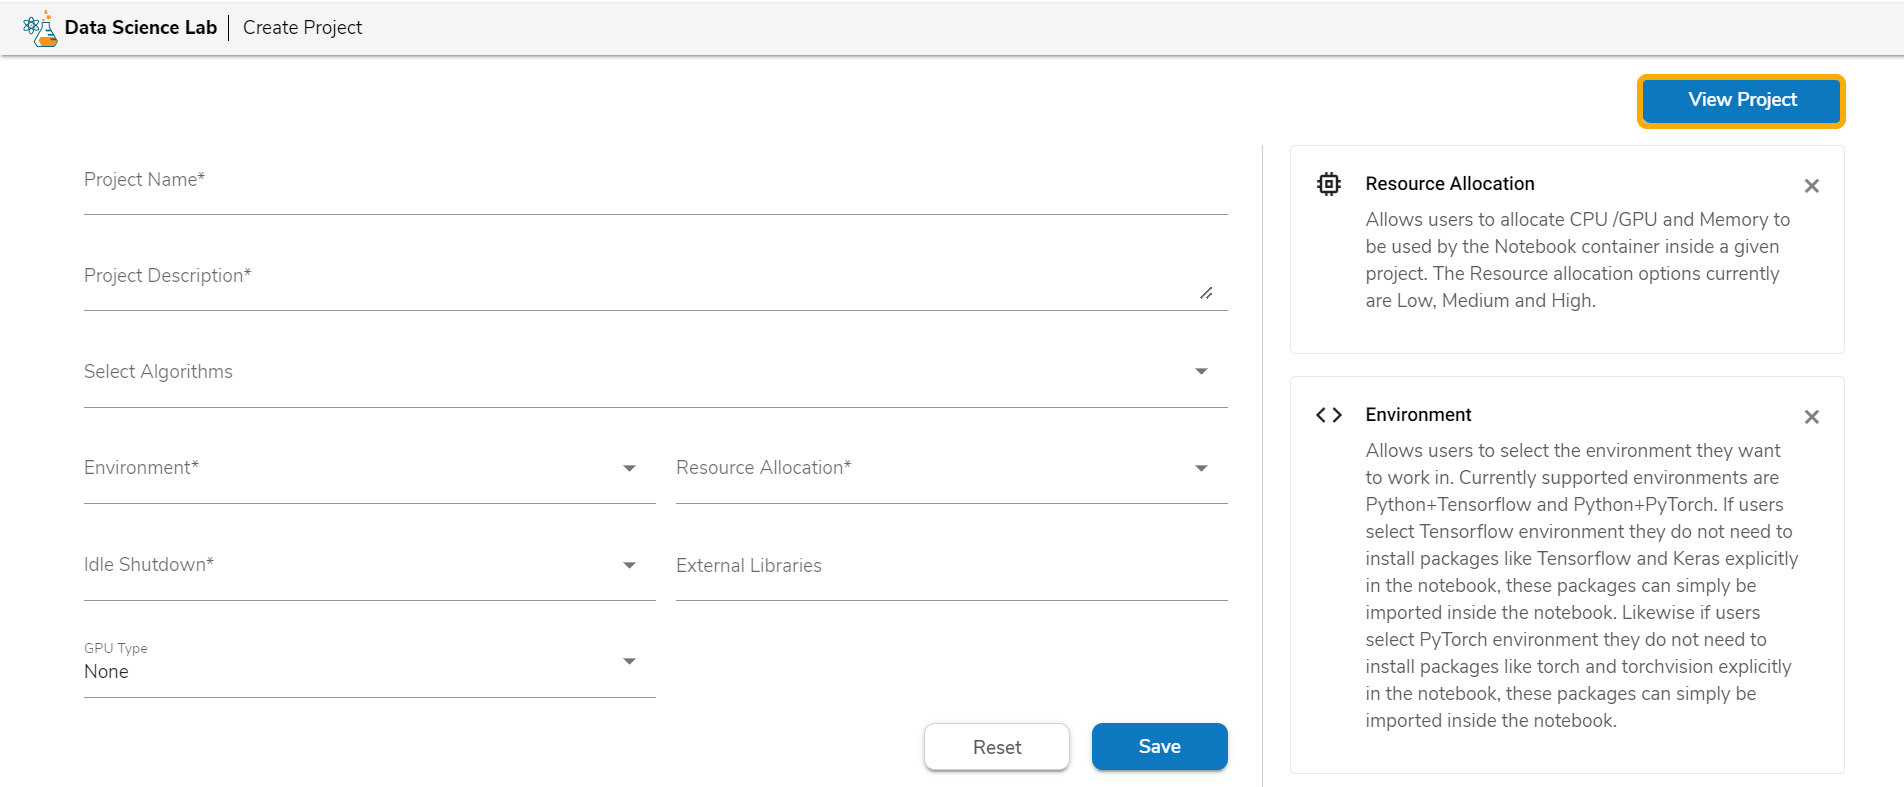
The View Project option
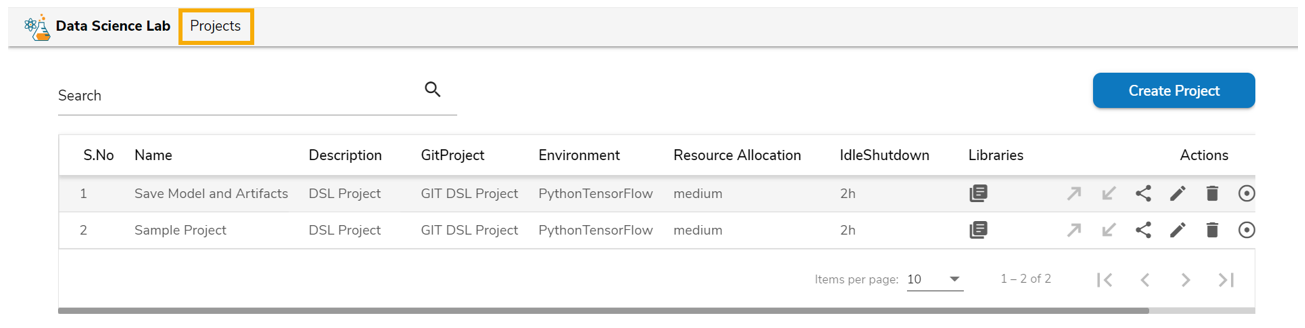
Project List
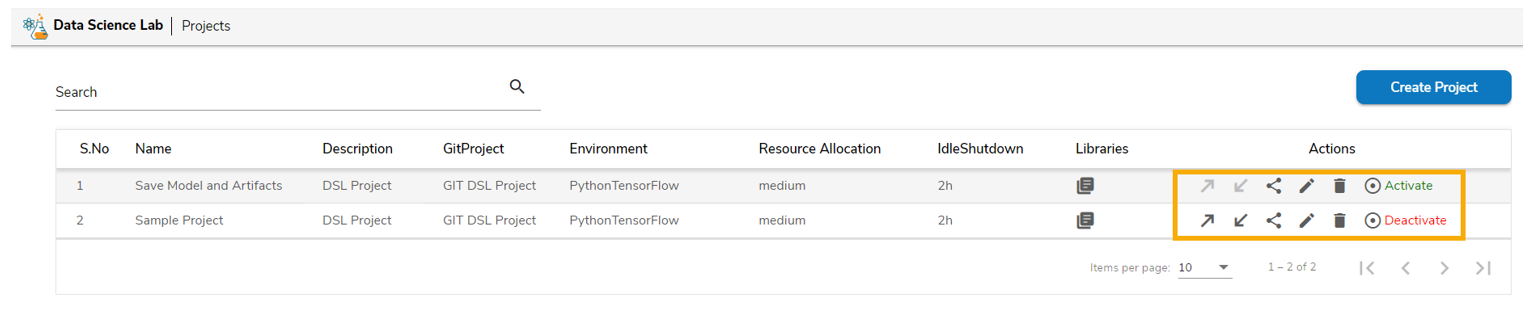
Various Actions provided to a DSL Project

Please Note: Refer the Data Science Lab Quick Start Flow page to get an overview of the Data Science Lab module in nutshell. to get redirected to the quick start flow page.

Click here
DS Lab Settings
Creating a Data Science Lab Project