Loading...
Loading...
Loading...
Loading...
Loading...
Loading...
Loading...
Loading...
Loading...
Loading...
Loading...
Loading...
Loading...
Loading...
Loading...
Loading...
Loading...
Loading...
Loading...
Loading...
Loading...
Loading...
Loading...
Loading...
Loading...
Loading...
Loading...
Loading...
Loading...
Loading...
Loading...
Loading...
Loading...
Loading...
Loading...
Loading...
Loading...
Loading...
Loading...
Loading...
Loading...
Loading...
Loading...
Loading...
Loading...
Loading...
Loading...
Loading...
Loading...
Loading...
Loading...
The administrator can do basic settings for windows AD, CA Clarity, and AWS Cognito accounts by applying the given Authentication settings.
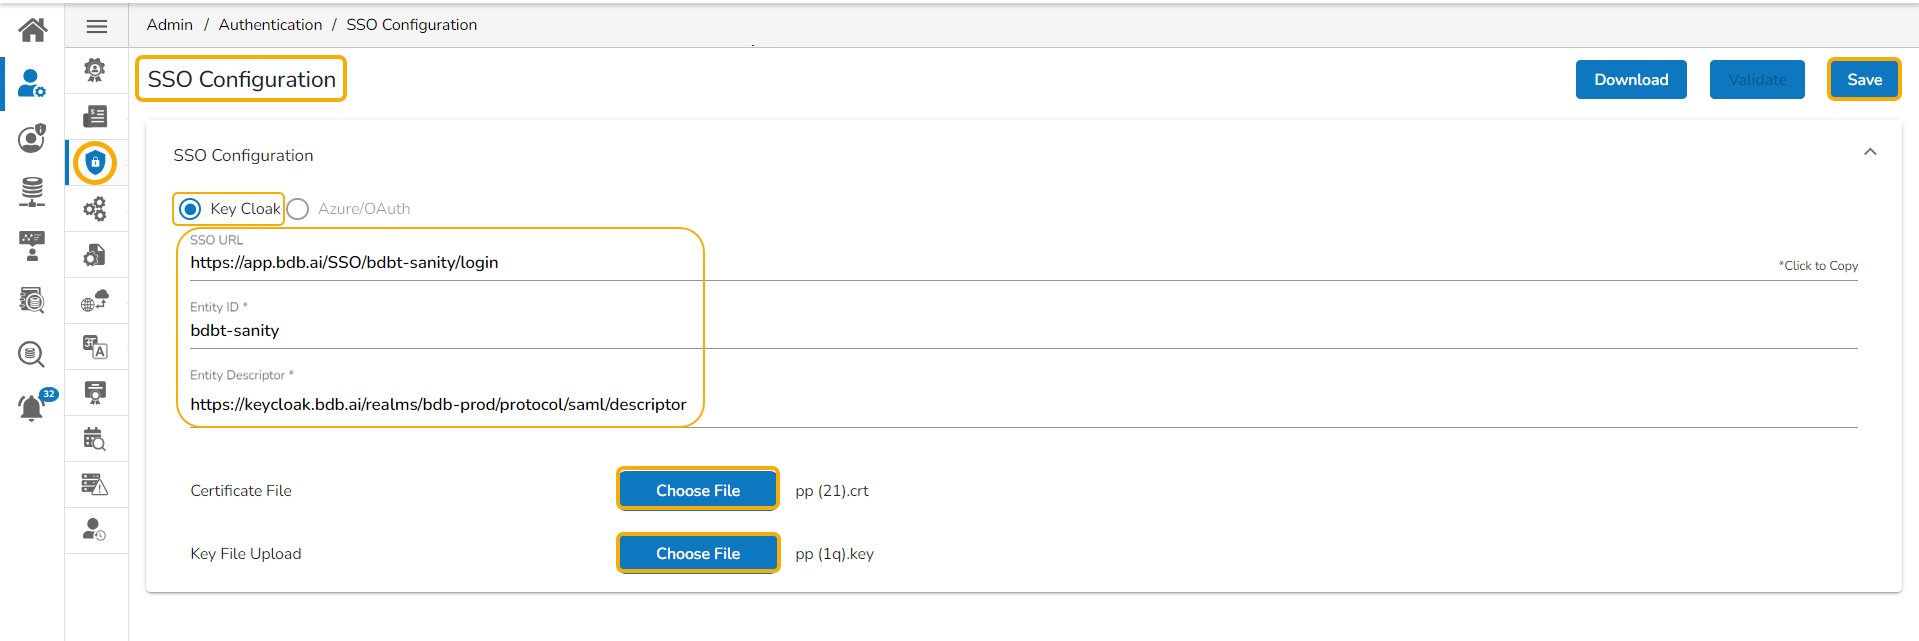
The Platform offers Keycloak and Azure/ OAuth options for SSO Configuration.
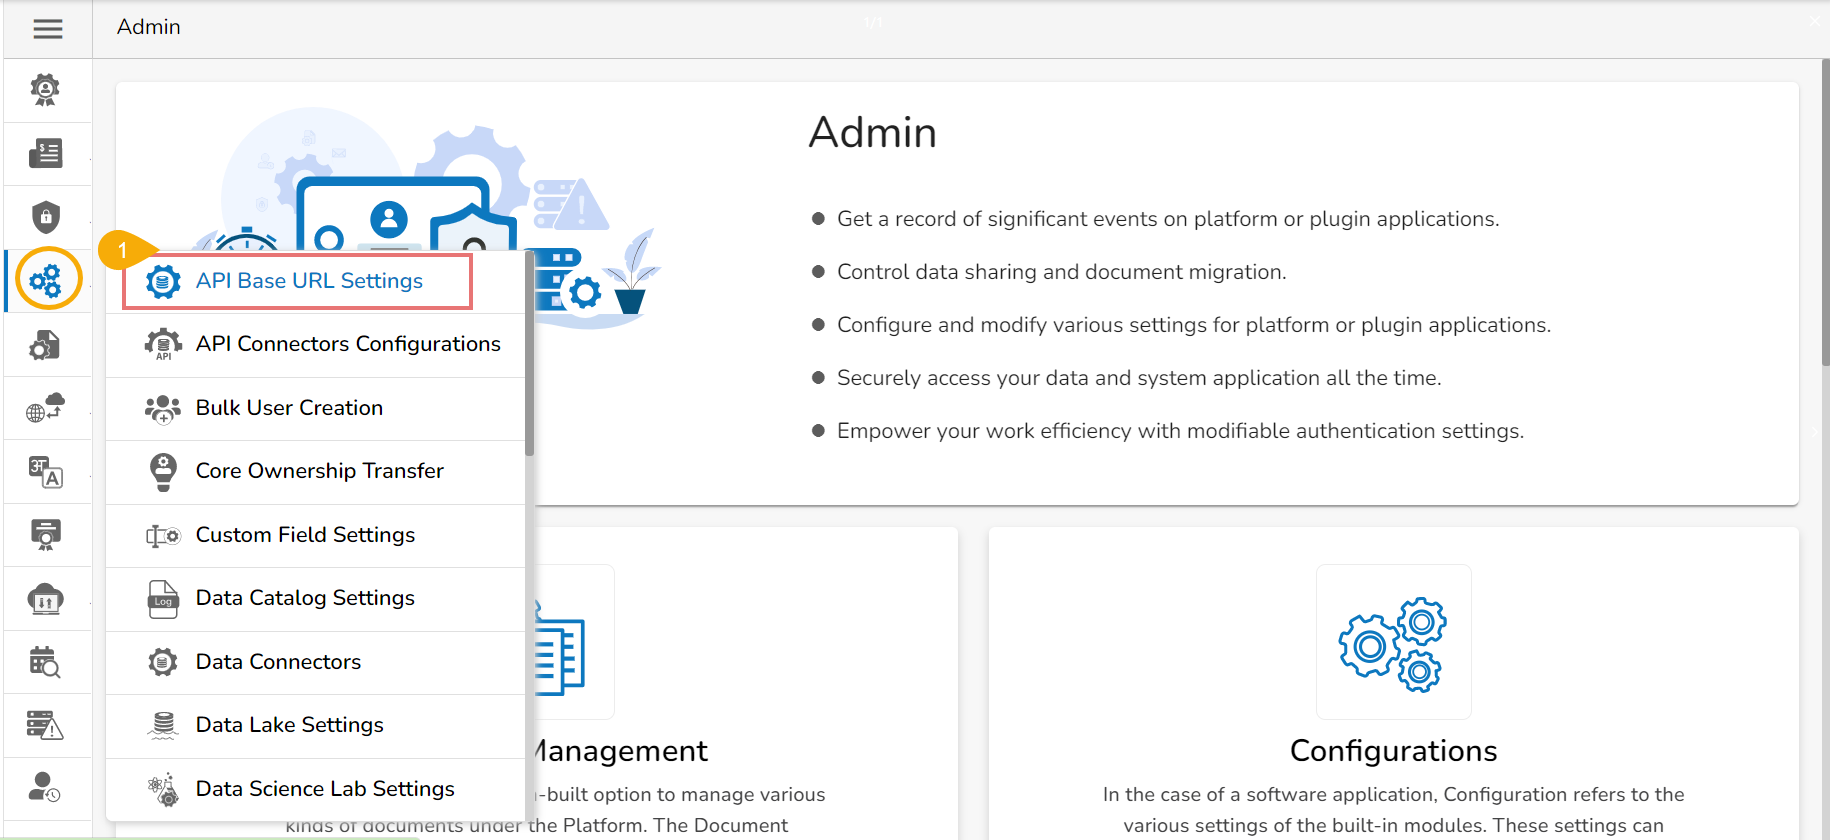
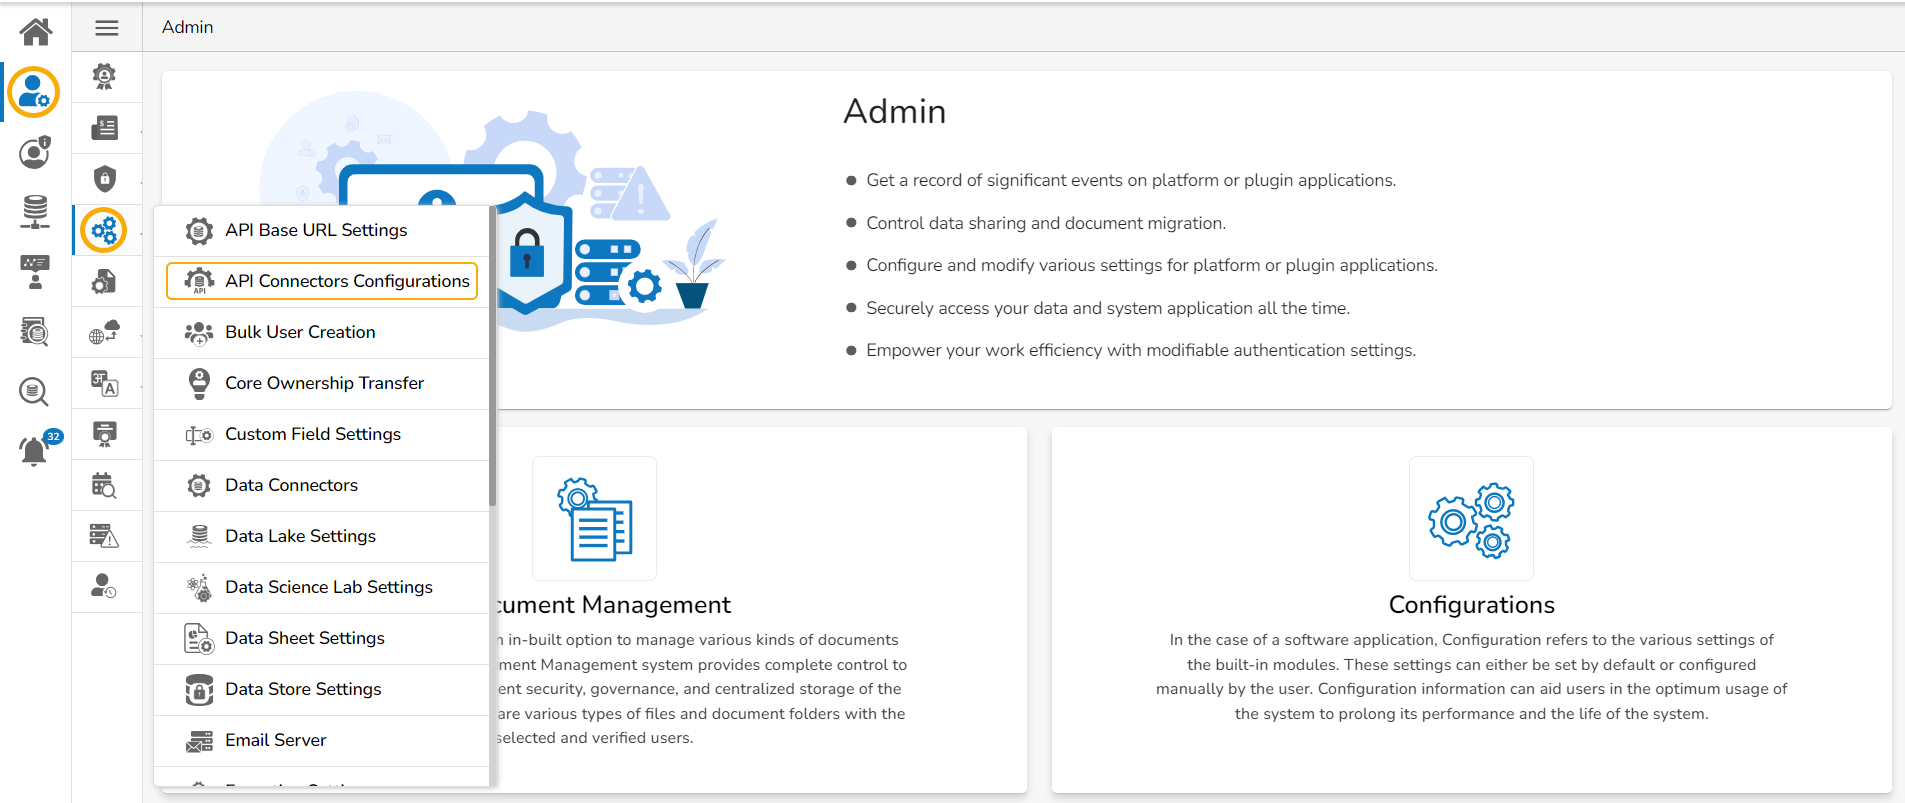
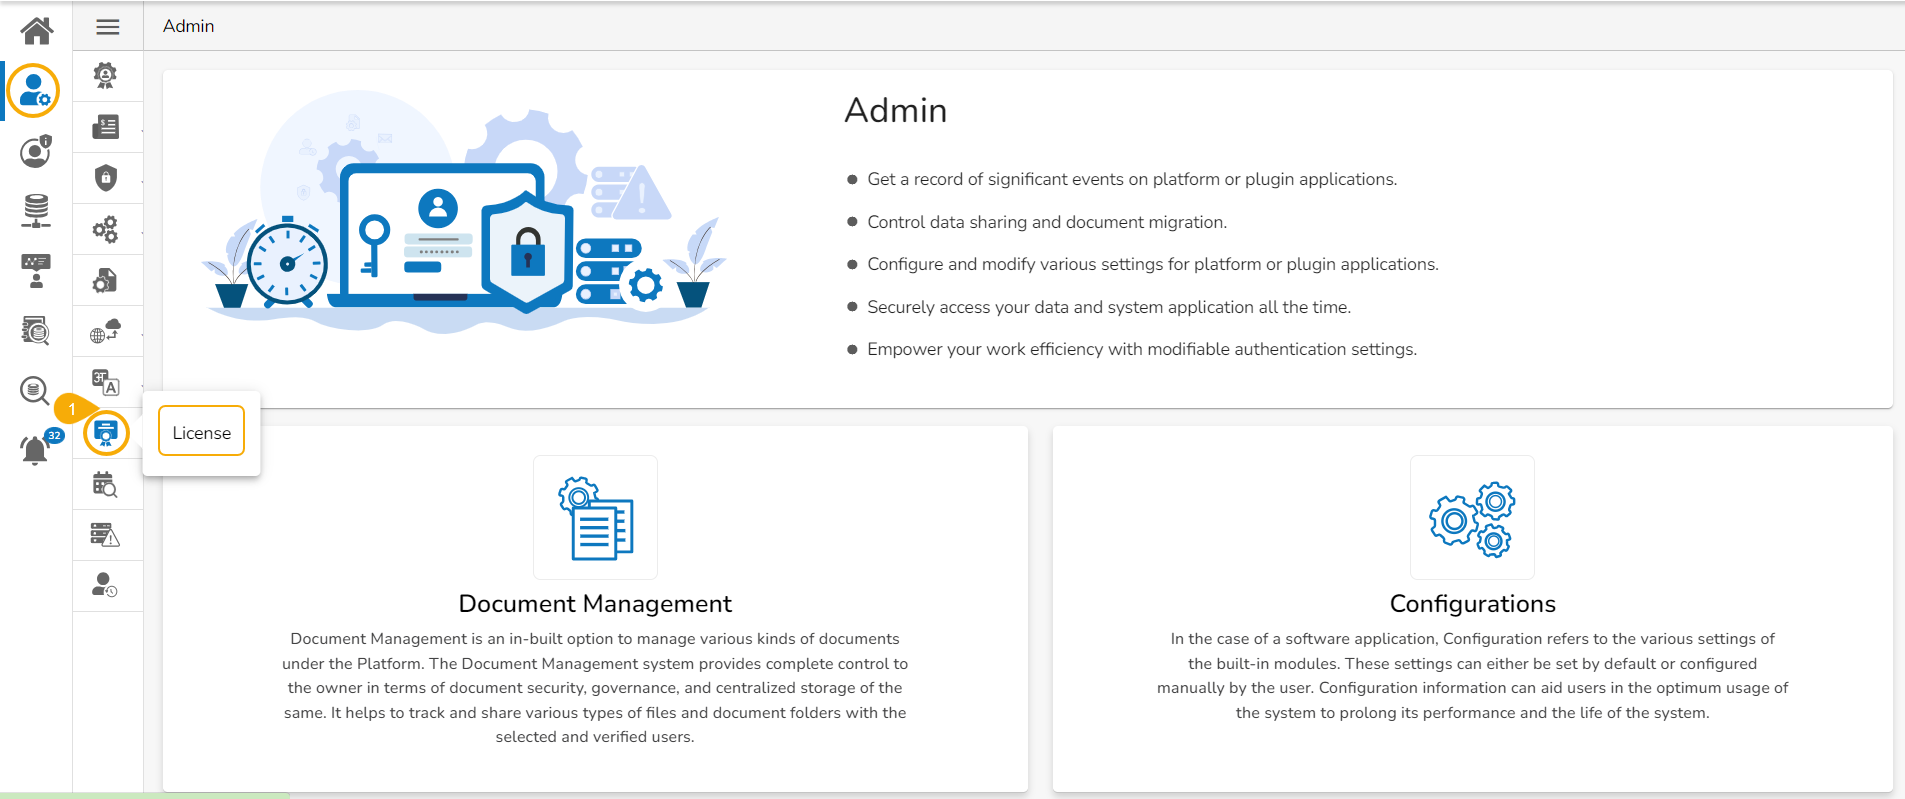
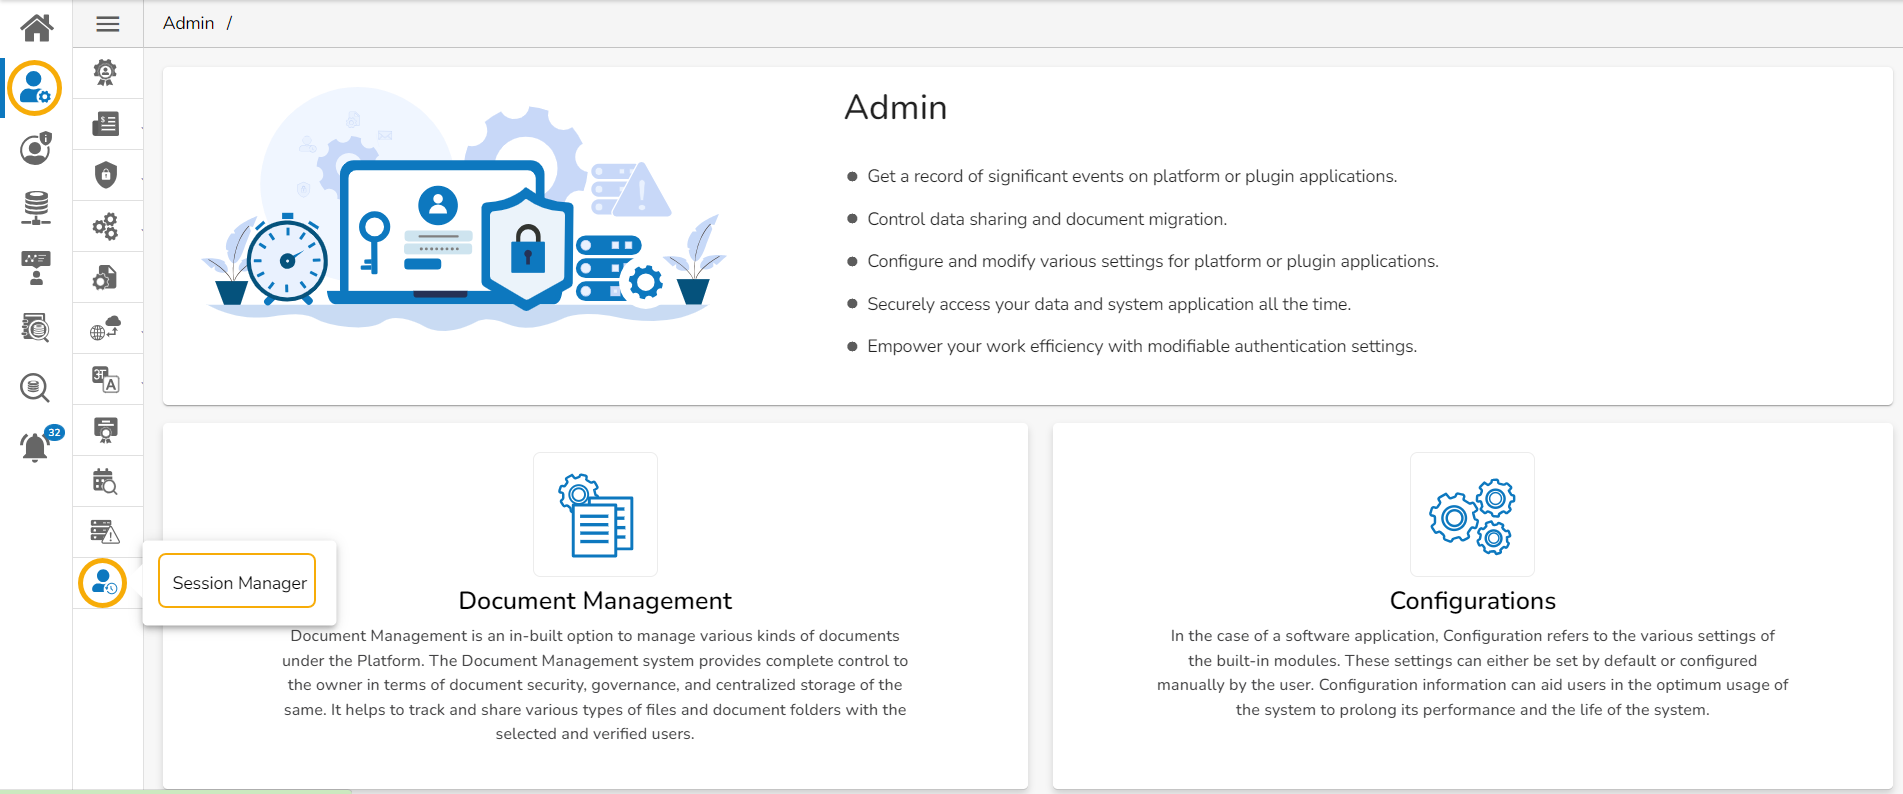
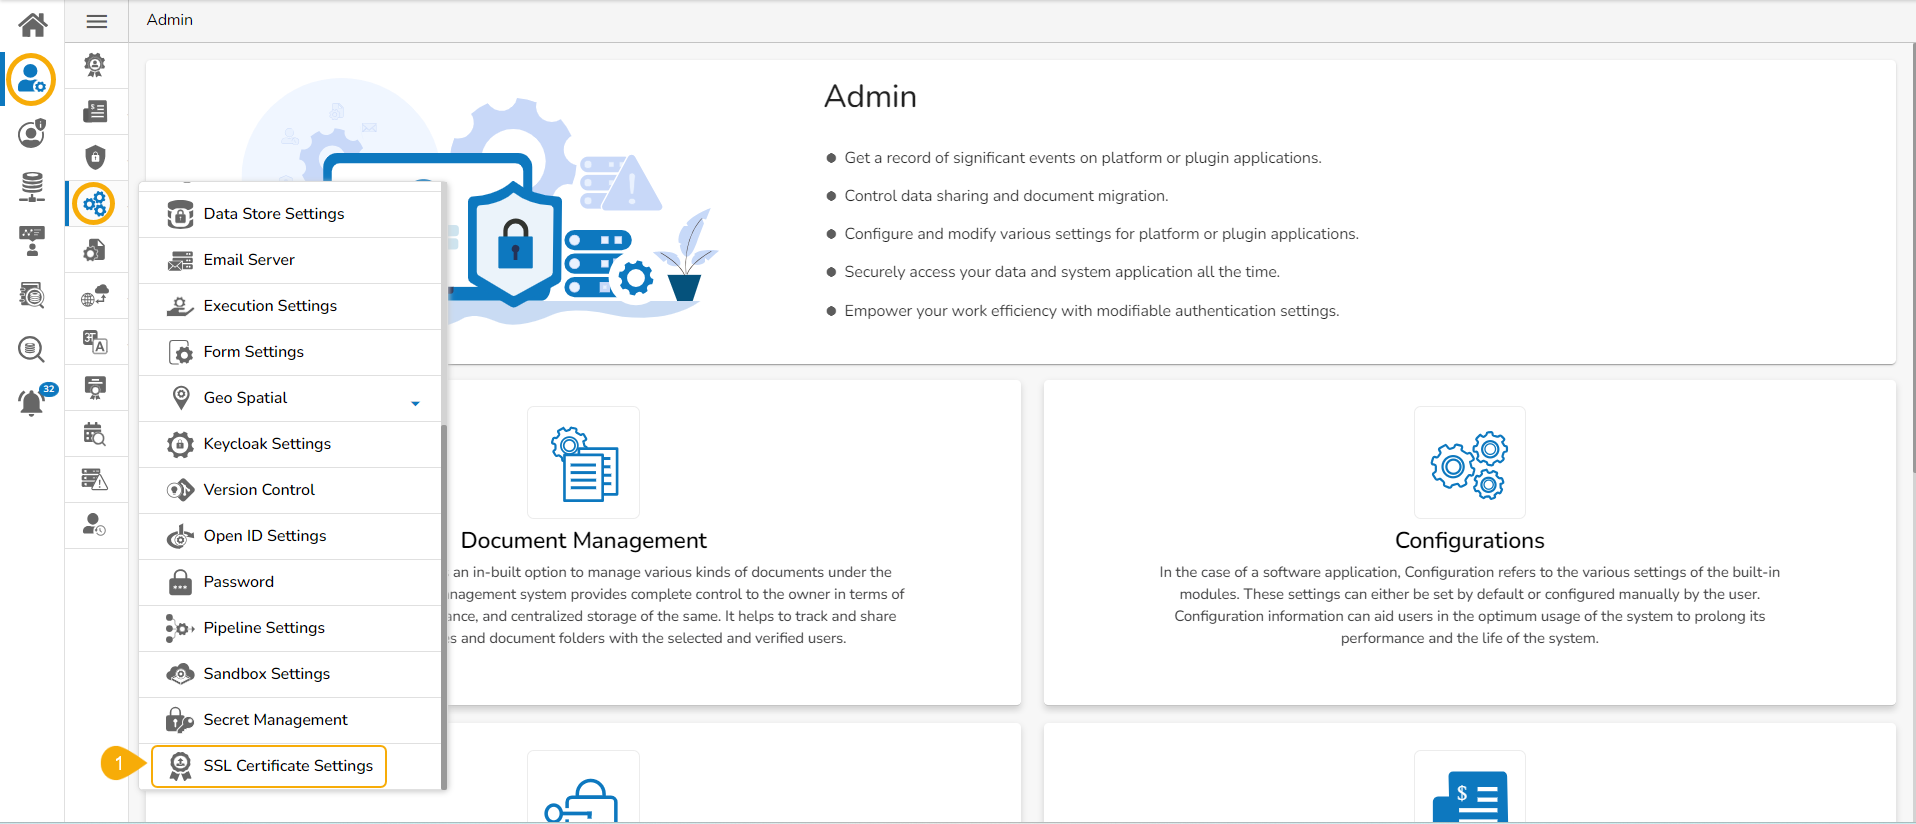
This page explains the steps to access the Admin menu panel by using the Admin module.
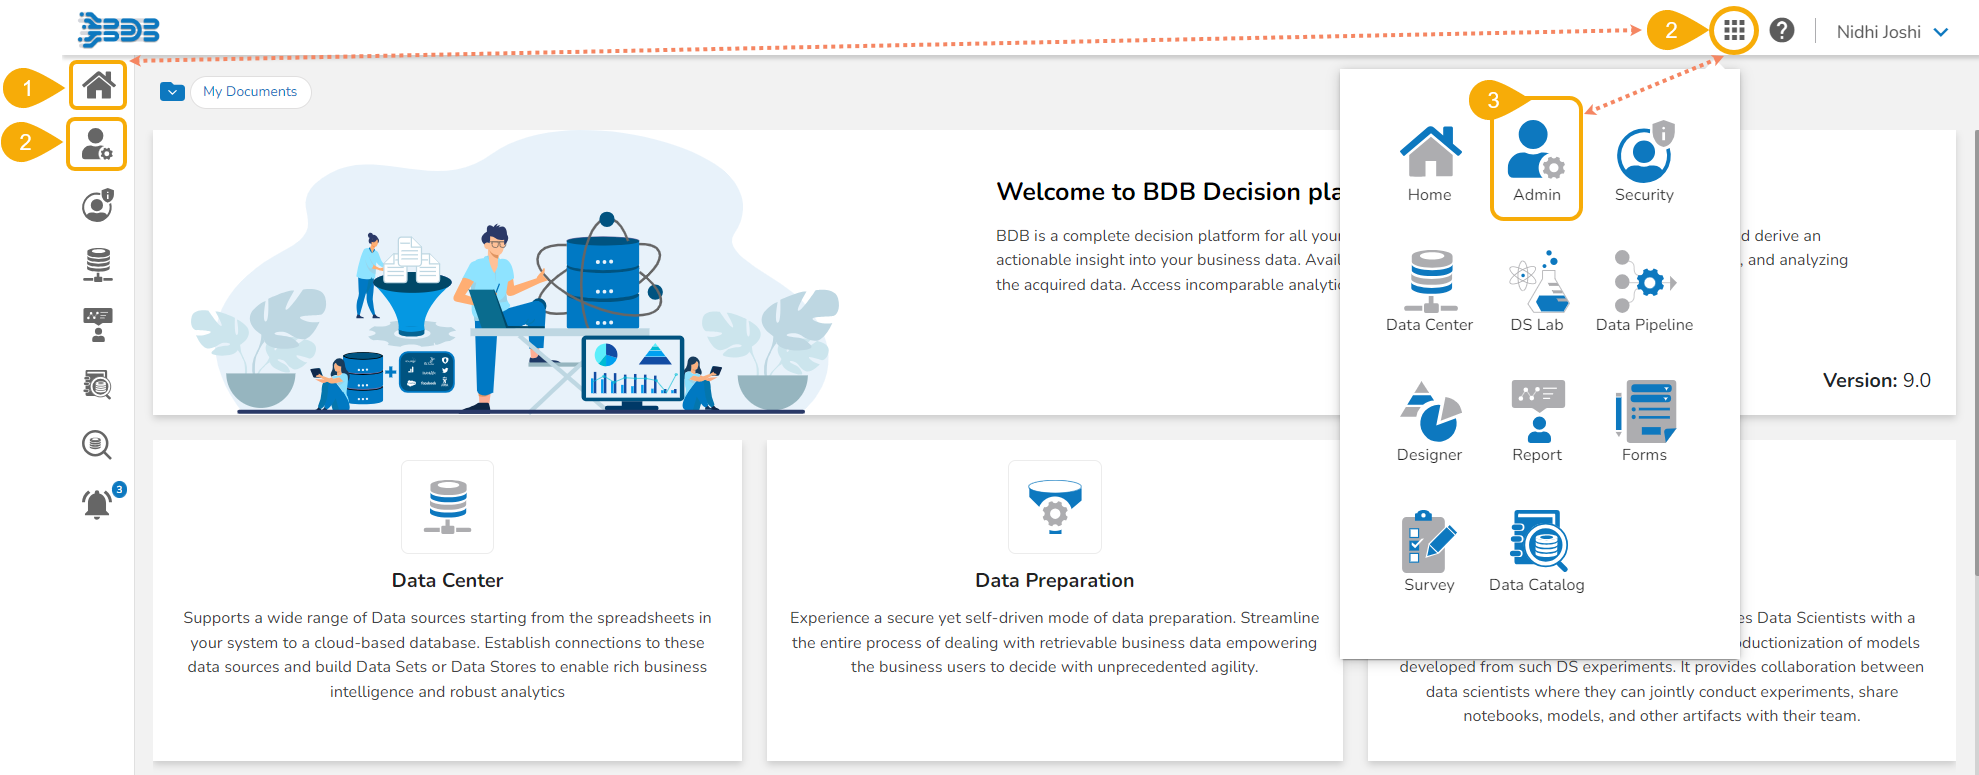
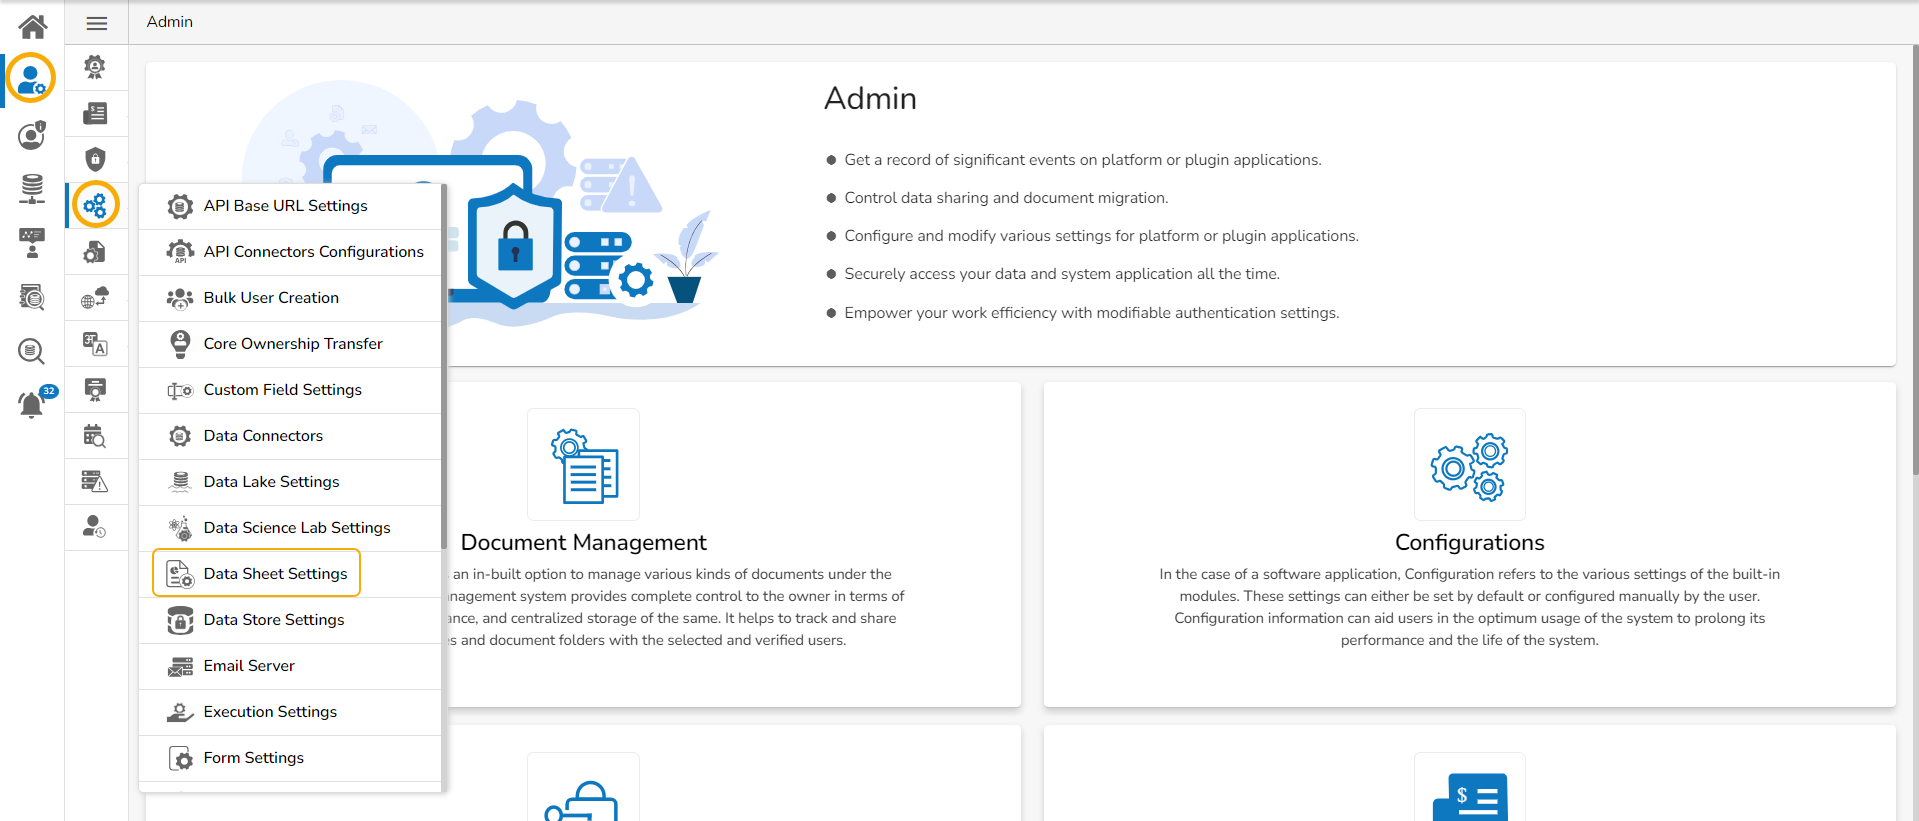
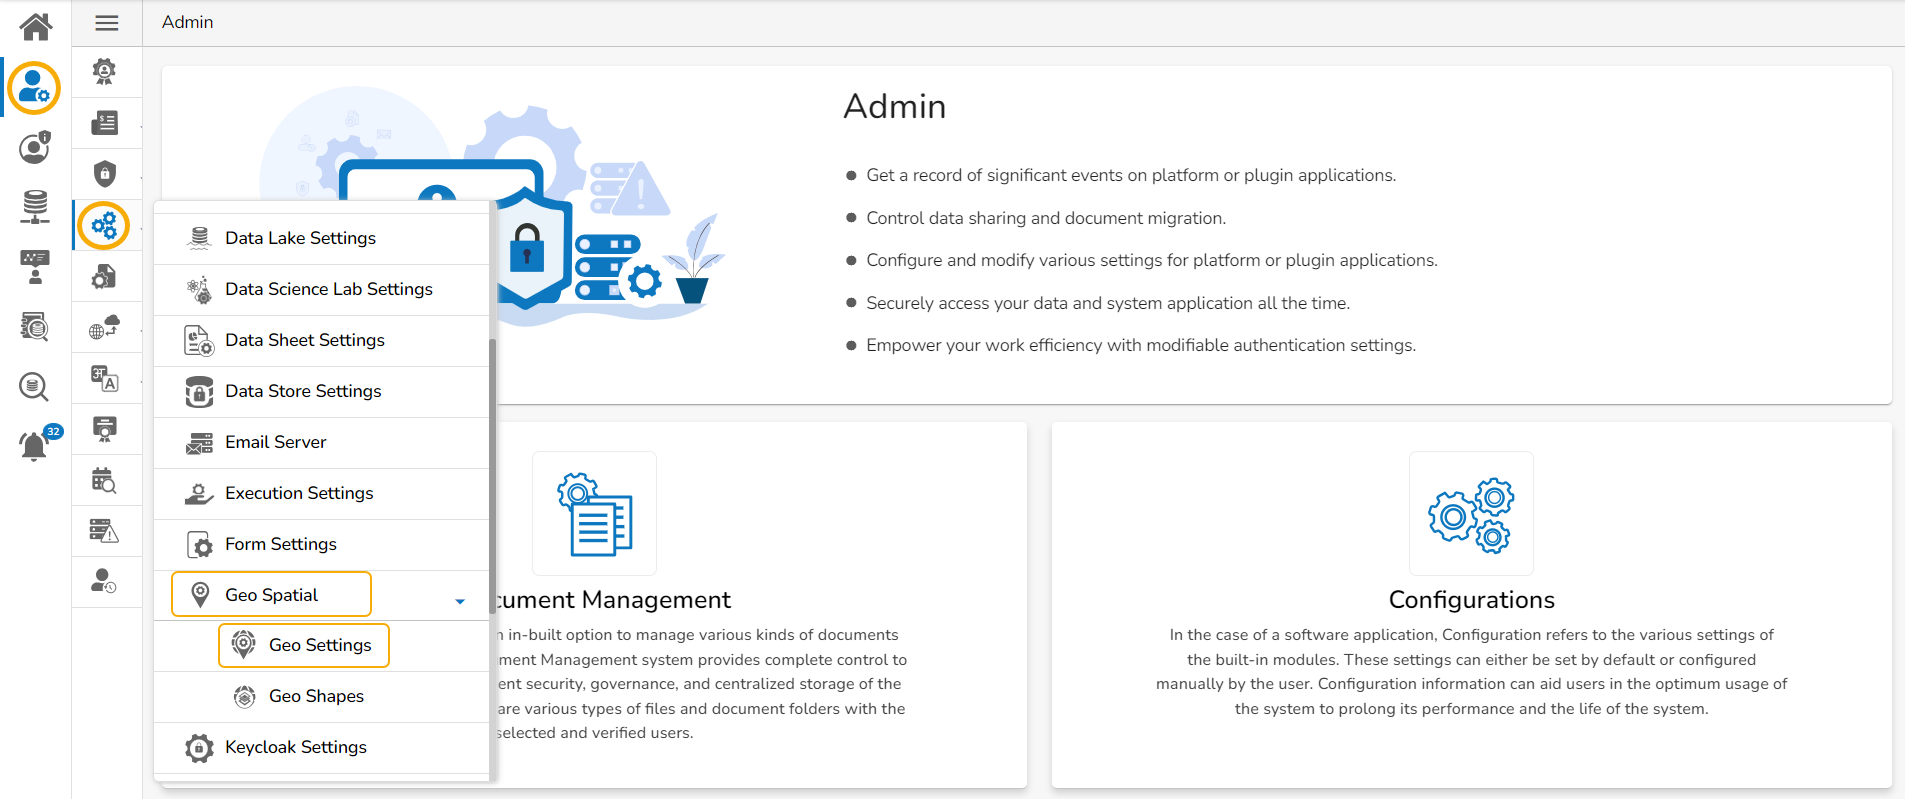
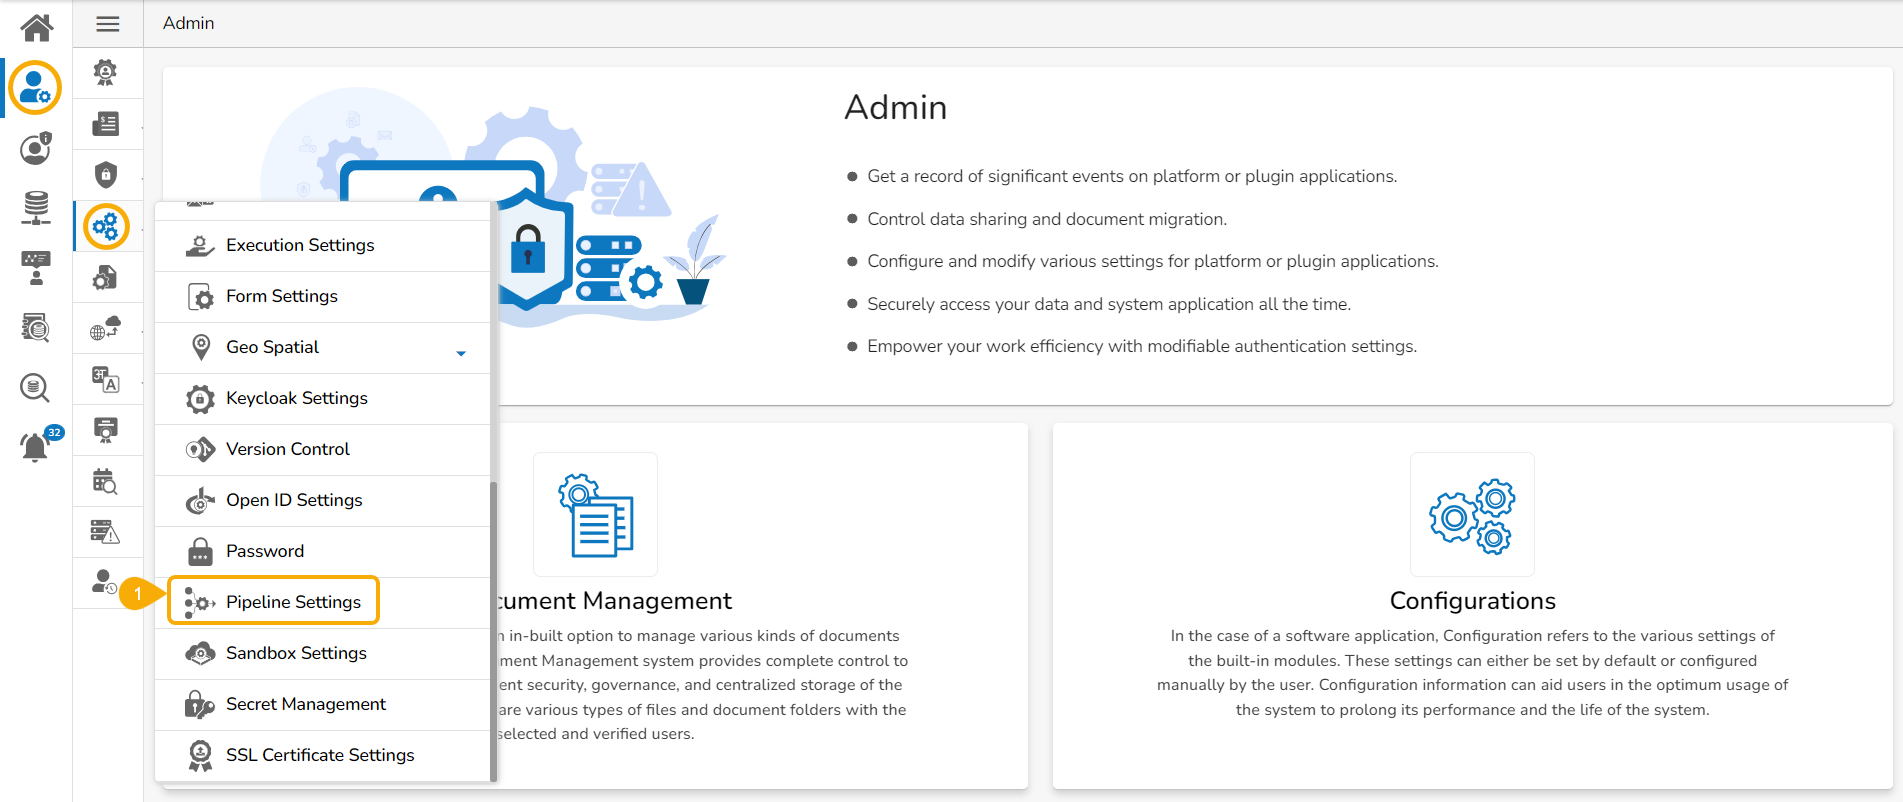
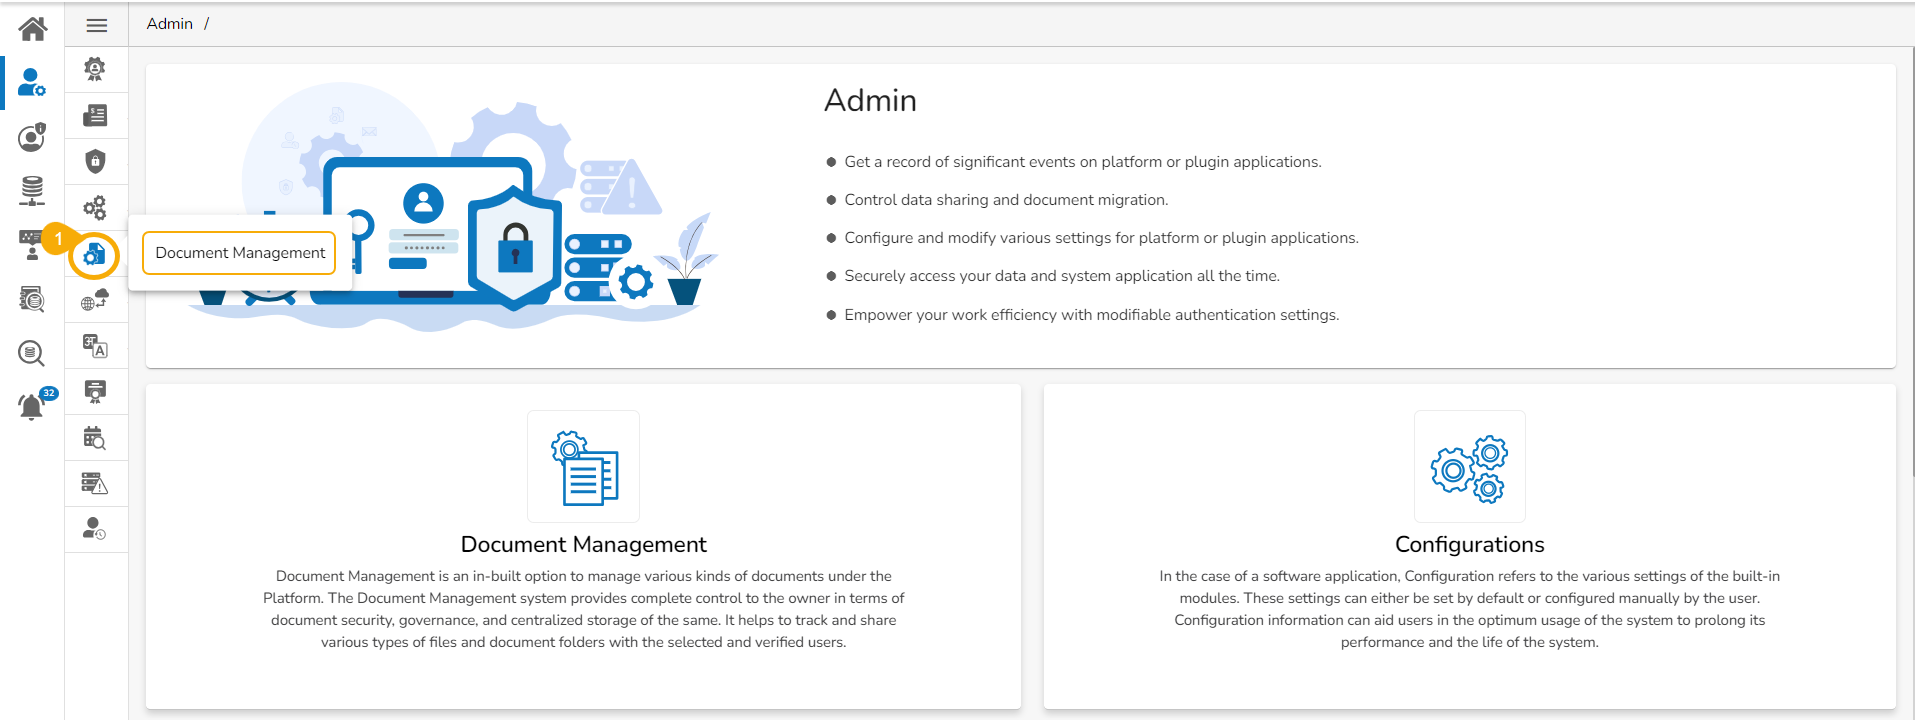
The Admin module of the BDB Platform contains all the required configuration and settings options to administer various platform modules including the core platform. The Admin Menu Bar can be accessed by using the either of the ways:
On the Left side Panel of the Platform Homepage.
From the Apps Menu.
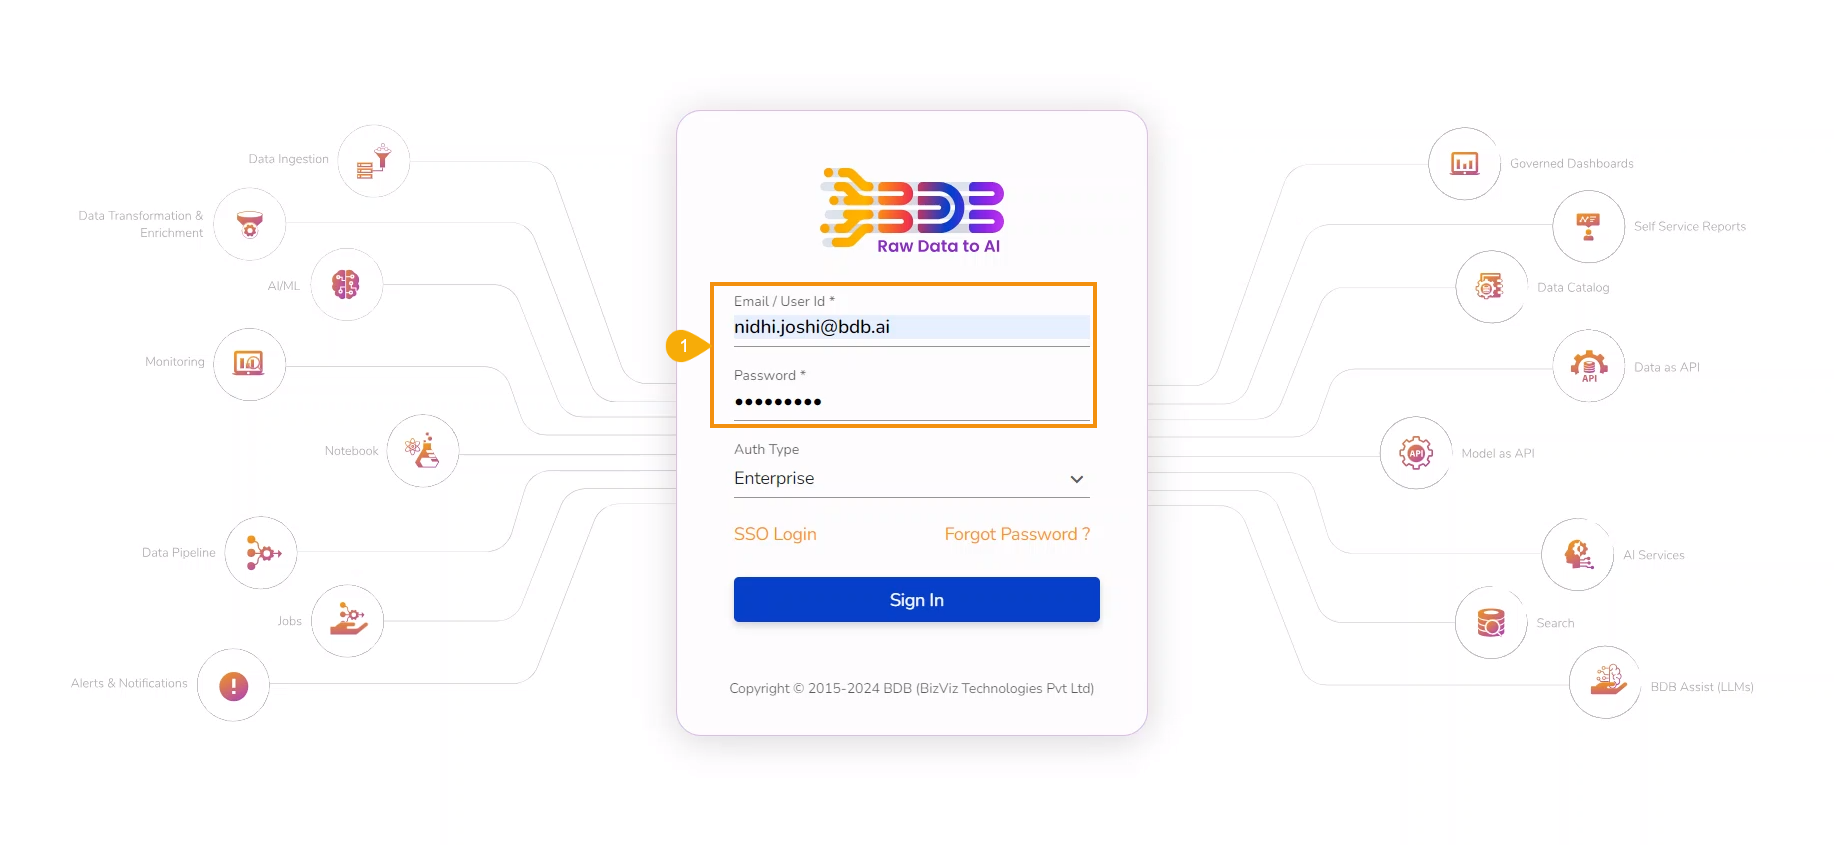
Navigate to the Platform homepage.
Click the Admin icon provided on the left side panel of the Platform homepage.
OR
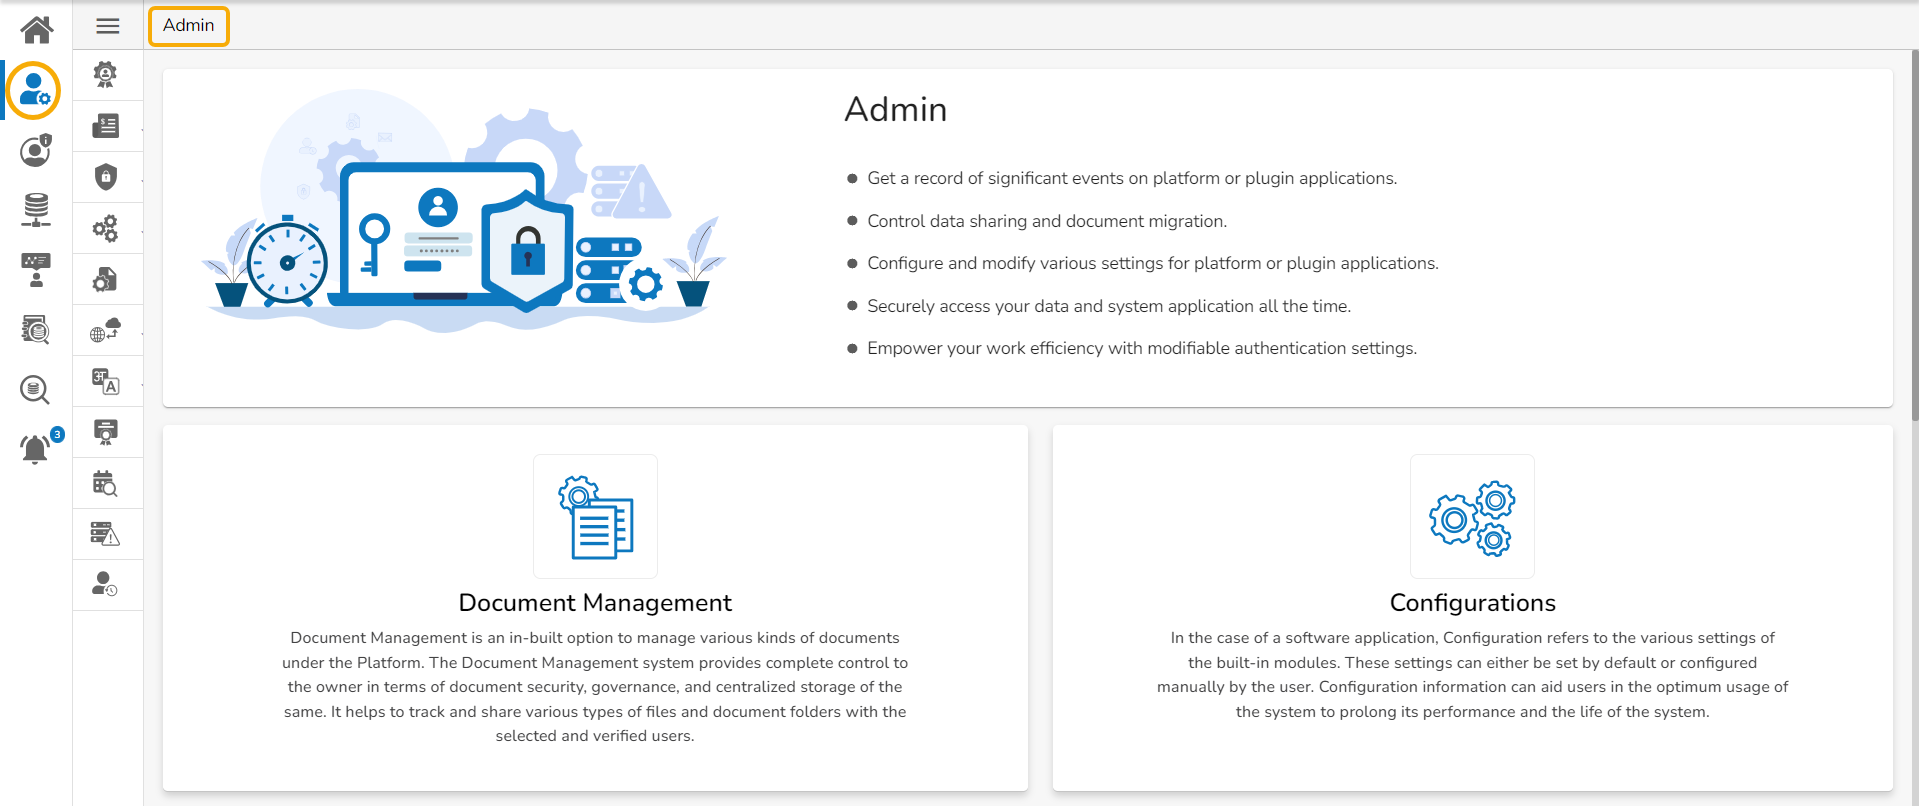
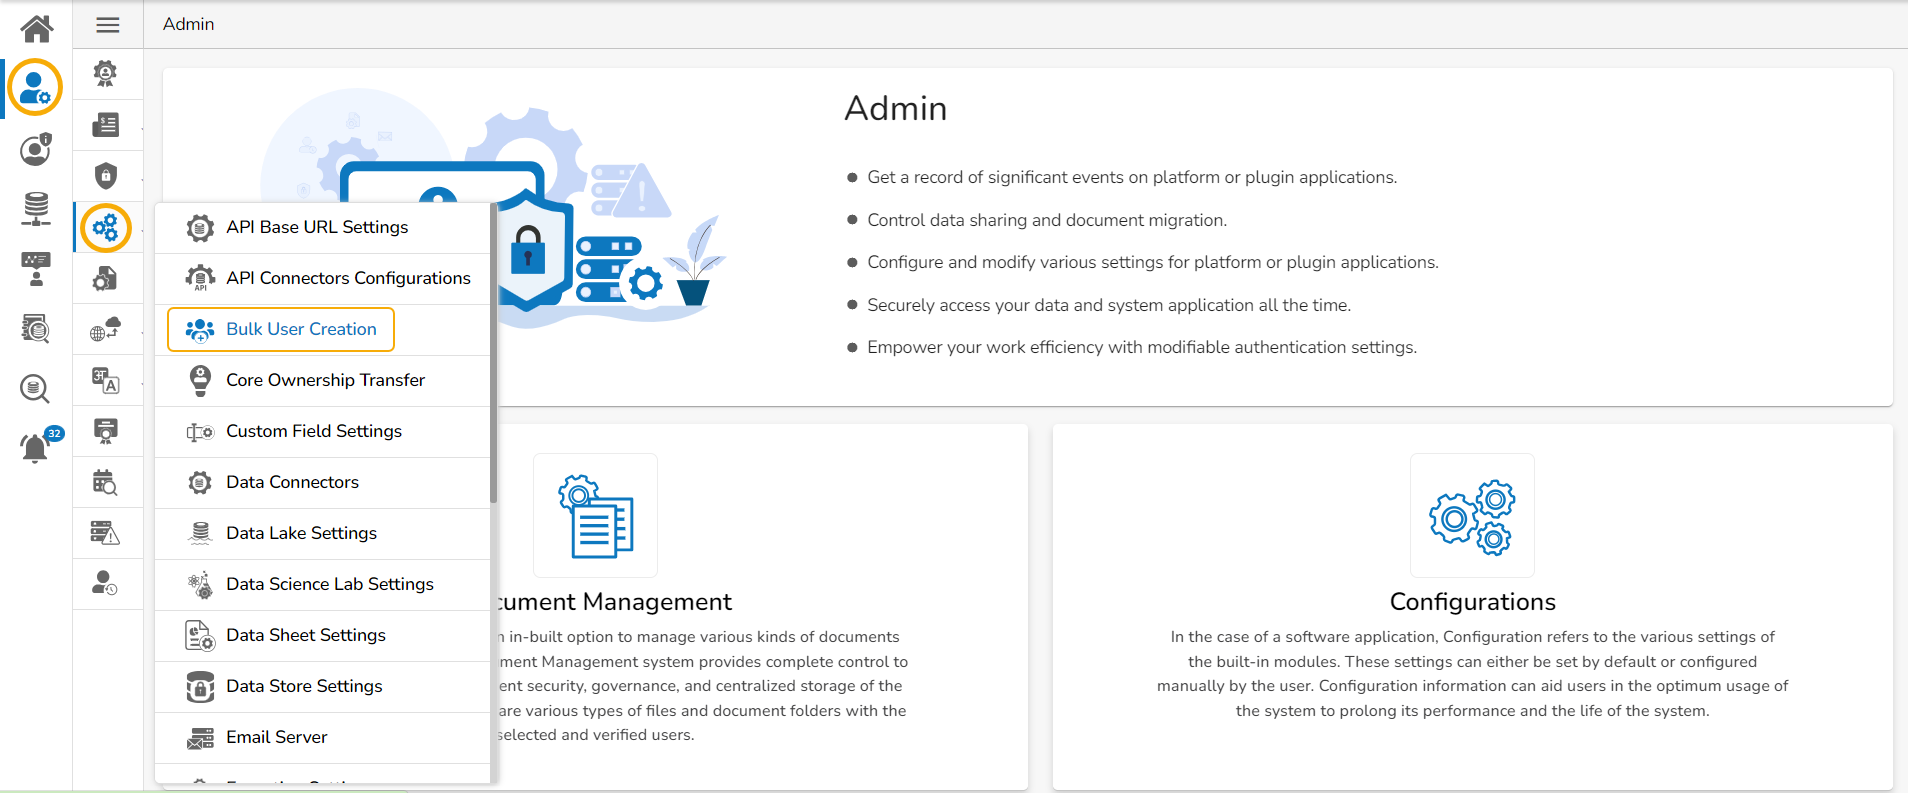
The user gets directed to the Admin Module landing page.
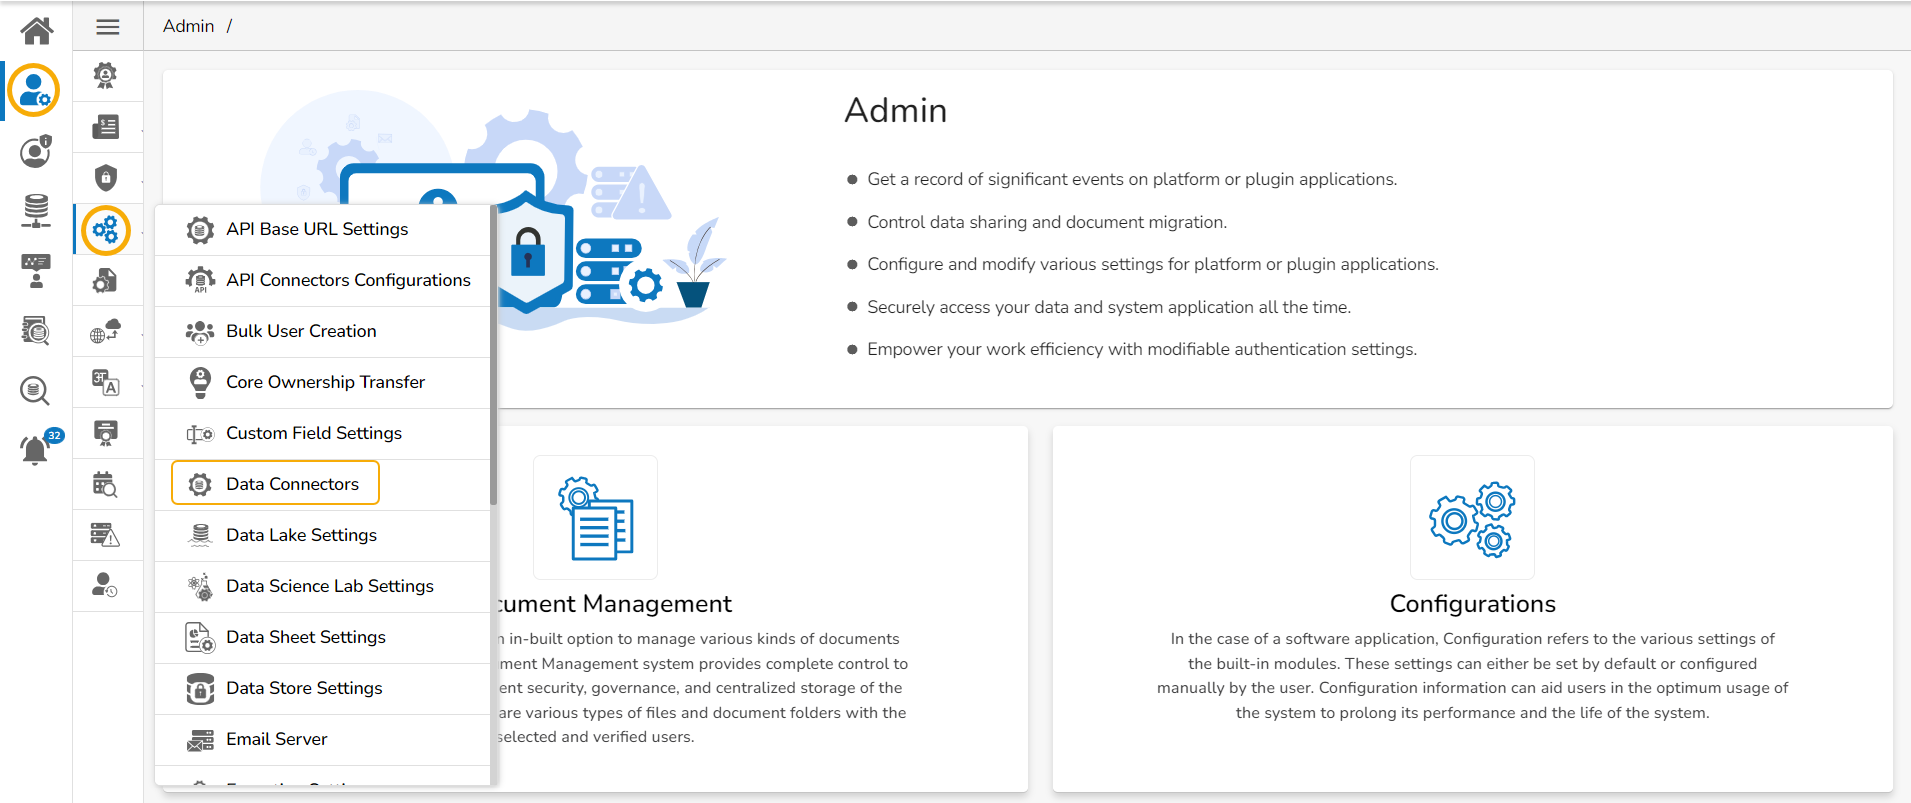
A panel appears with various administration options on the left side of the page.
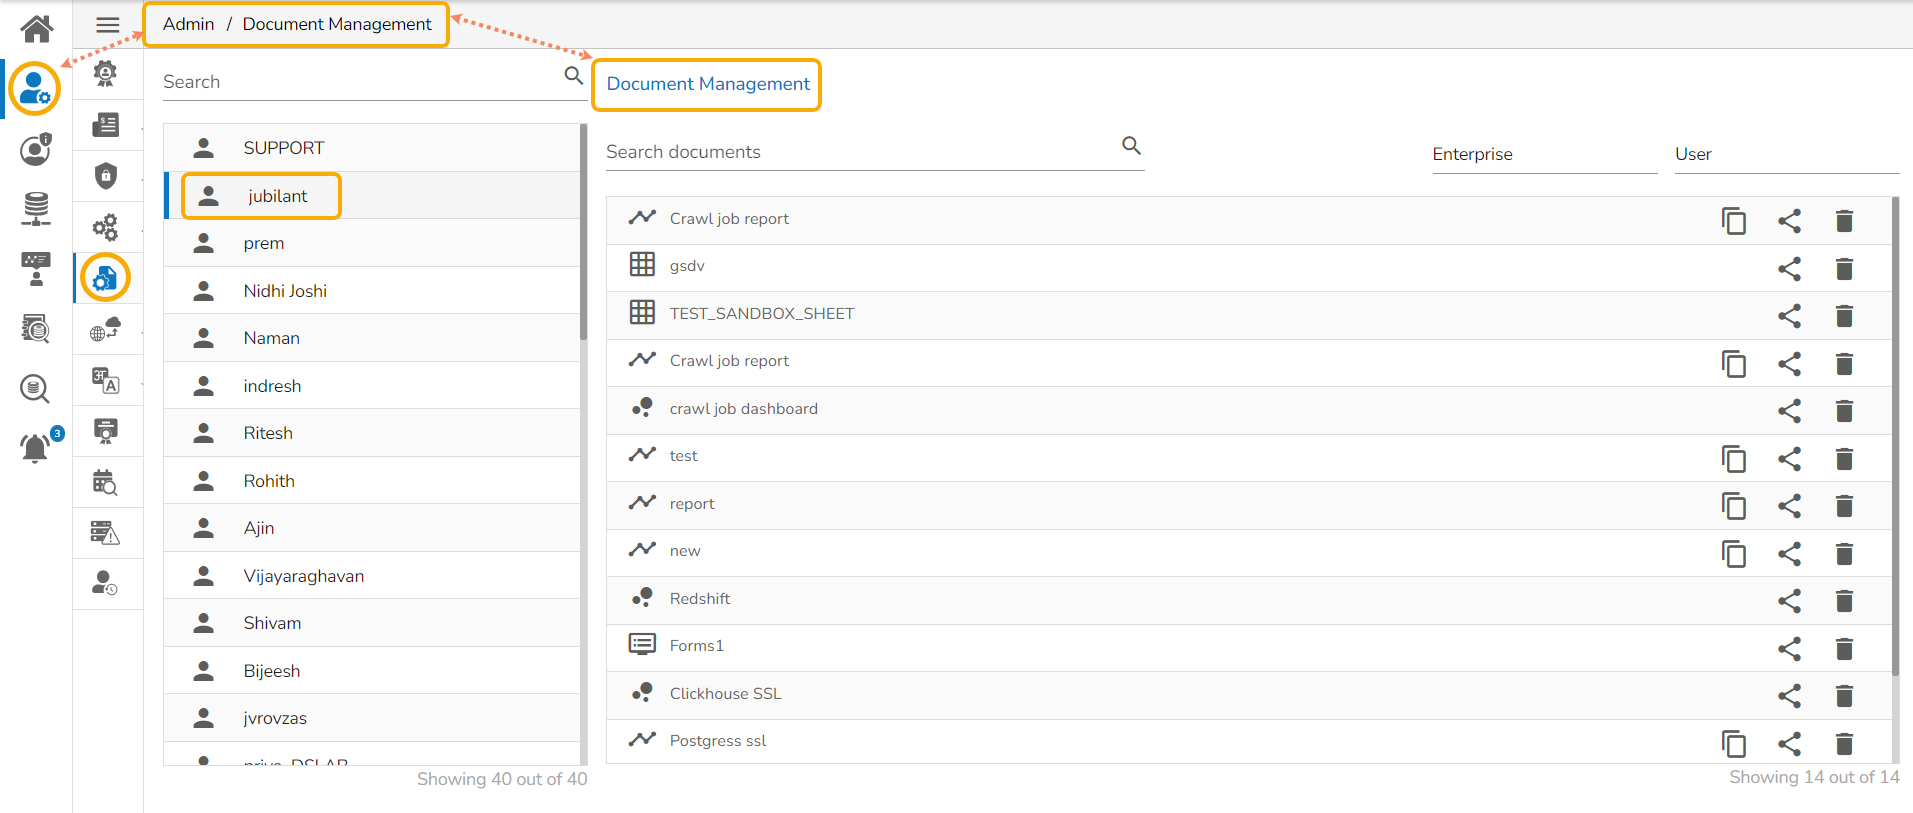
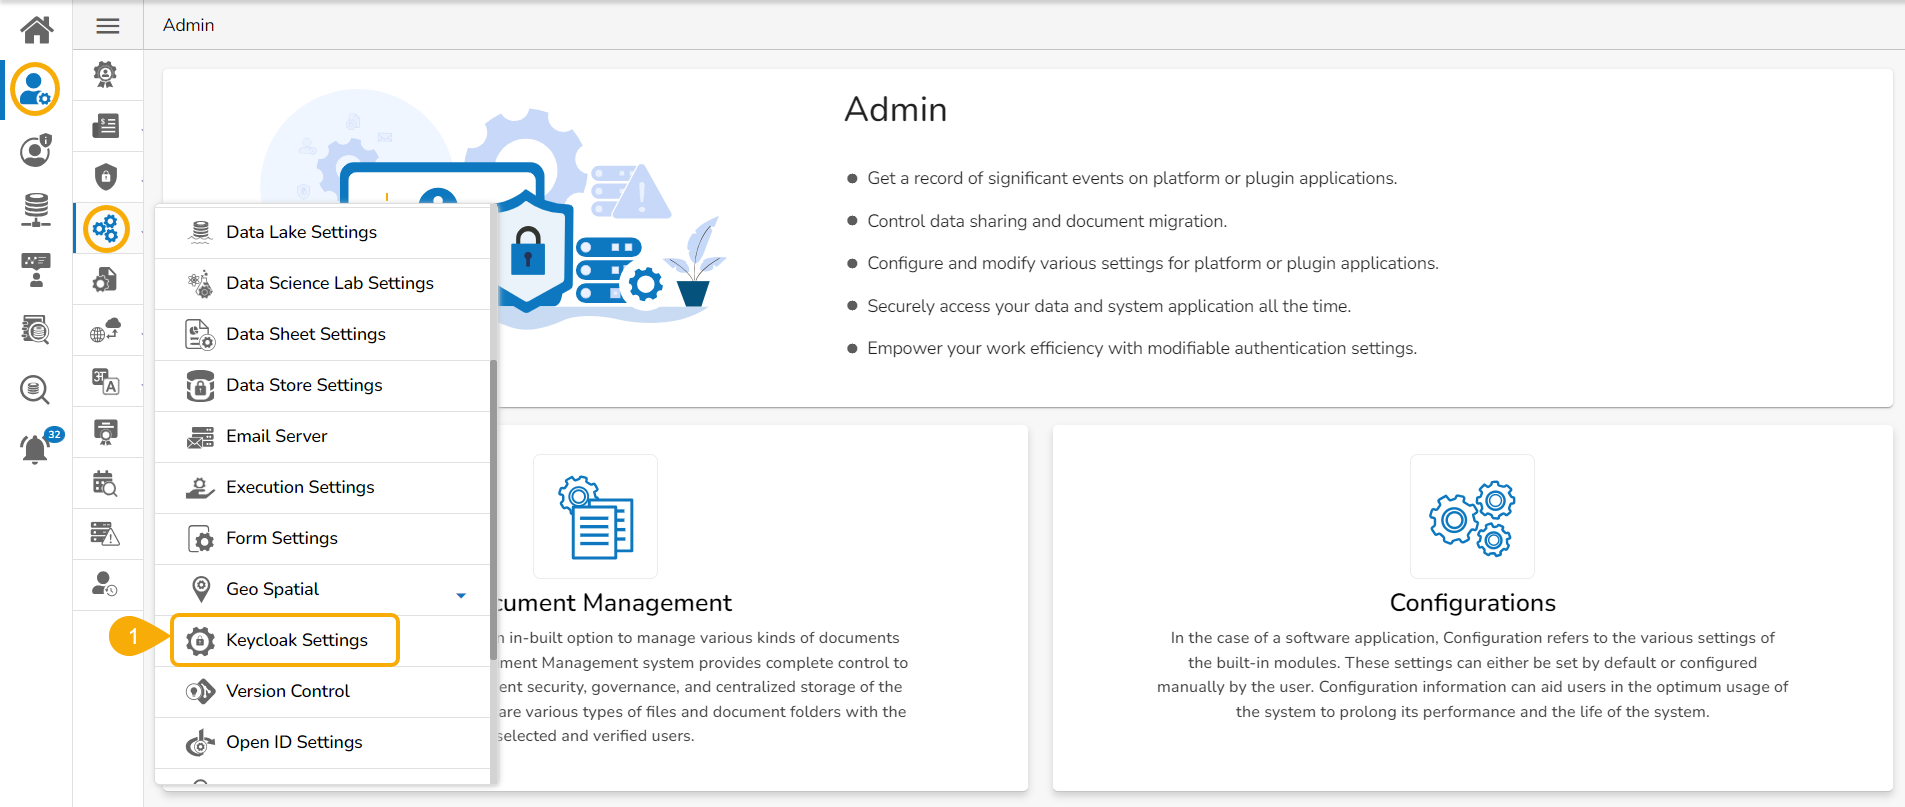
Click on a specific Admin option from the left side panel to open the related page on the right side of the page. For example, Clicking the Document Management icon opens the Document Management page under the Admin module.
Clicking an Admin option opens multiple options next to the Admin Options menu panel.
Clicking an Admin option from the second menu panel that contains multiple options lists all the available options in a context menu (the context menu gets opened next to the second menu panel as shown in the image).
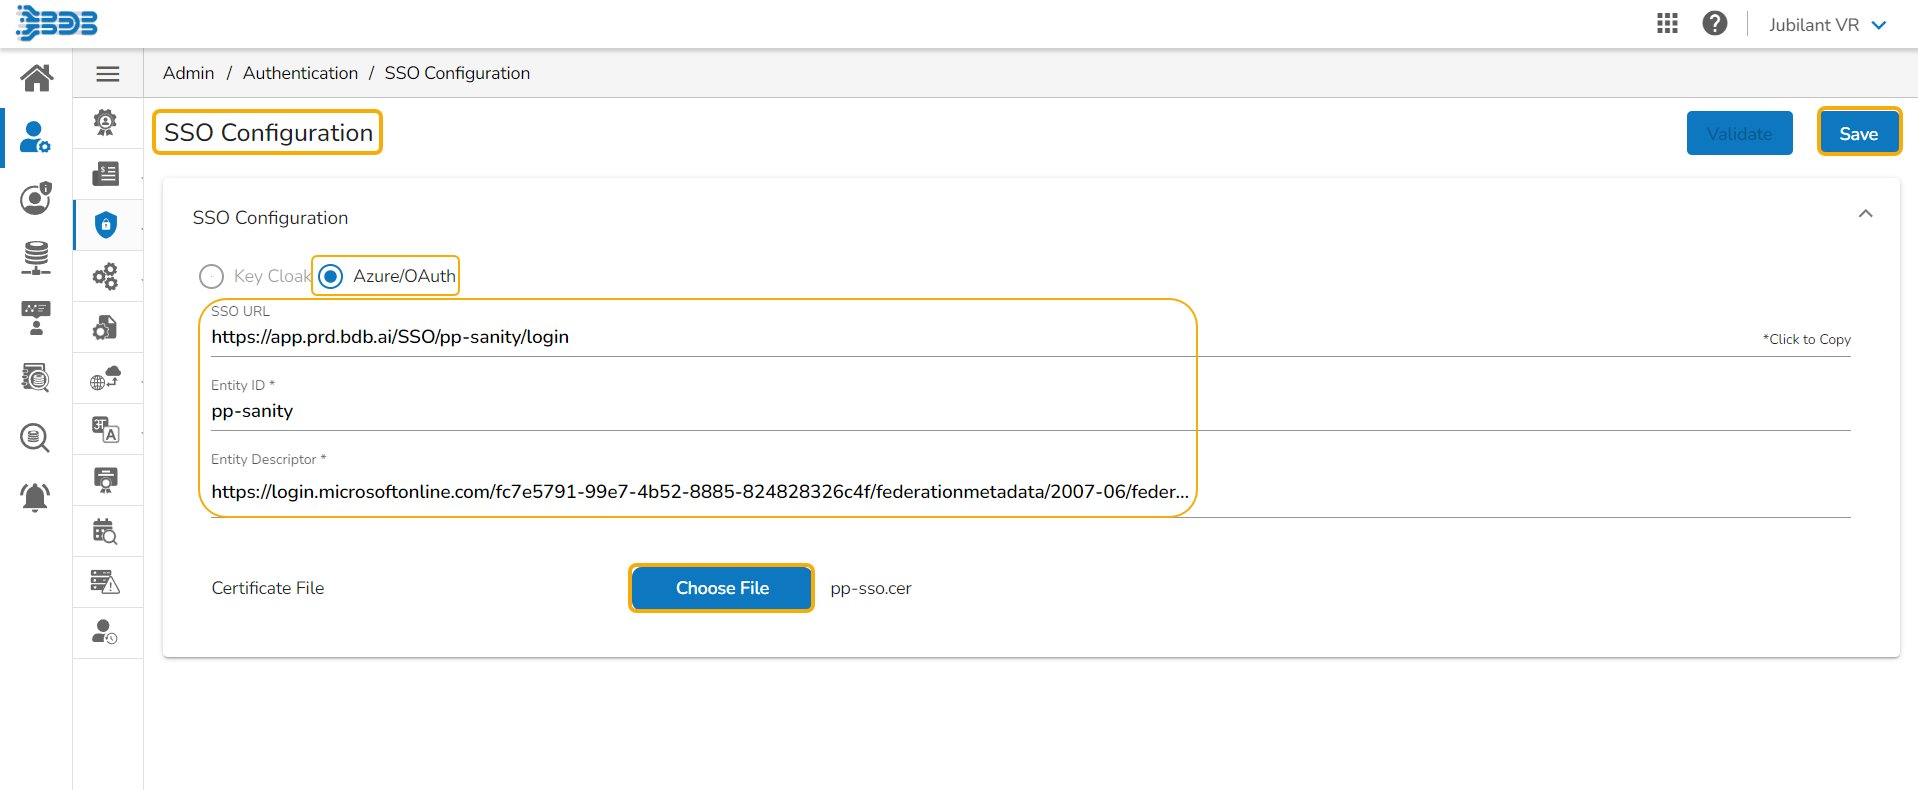
This page describes steps configuring the Azure/ OAuth for SSO configuration.
Navigate to the SSO Configuration admin option using the Authentication options.
Select the Azure/ OAuth option.
Provide the following options:
The admin users or the other users with permission to access Admin module can use the GIT Migration option to import the exported various modules.
Select the Admin module from the Apps menu.
SSO URL
Entity ID
Entity Descriptor
Certificate File: Choose a certificate file.
Key File Upload: Choose a Key File certificate file.
Click the Save option.
A notification appears and the Azure/ OAuth option gets saved.
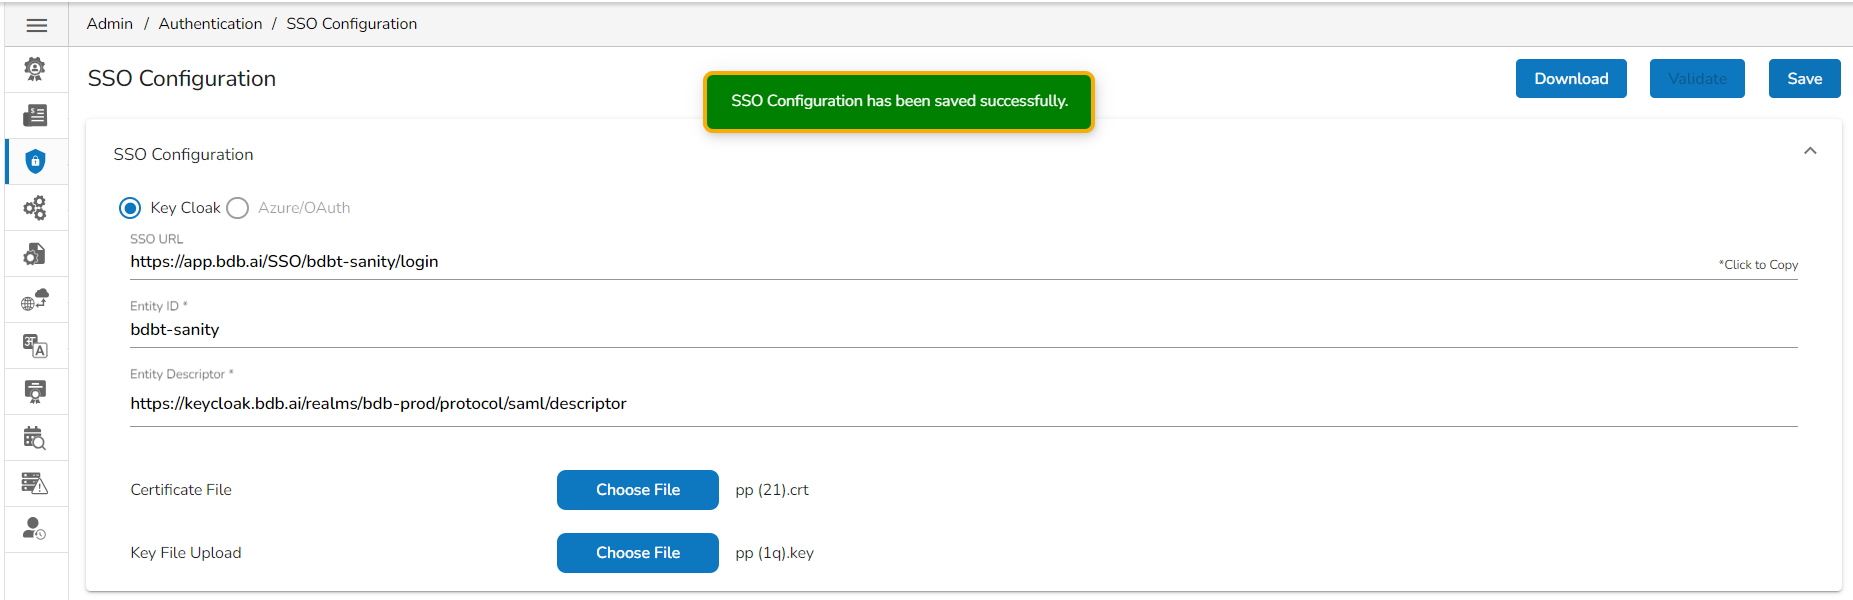
This page describes steps configuring the Keycloak for SSO configuration.
Navigate to the SSO Configuration admin option using the Authentication options.
Select the Keycloak option.
Provide the following options:
SSO URL
Entity ID
Entity Descriptor
Certificate File: Choose a certificate file.
Key File Upload: Choose a Key File certificate file.
Click the Save option.
A notification appears and the Keycloak option gets saved.
Please Note: Please keep the following points in mind while working with Keycloak.
Group Deletion: Groups deleted in Keycloak must also be manually removed from the Platform.
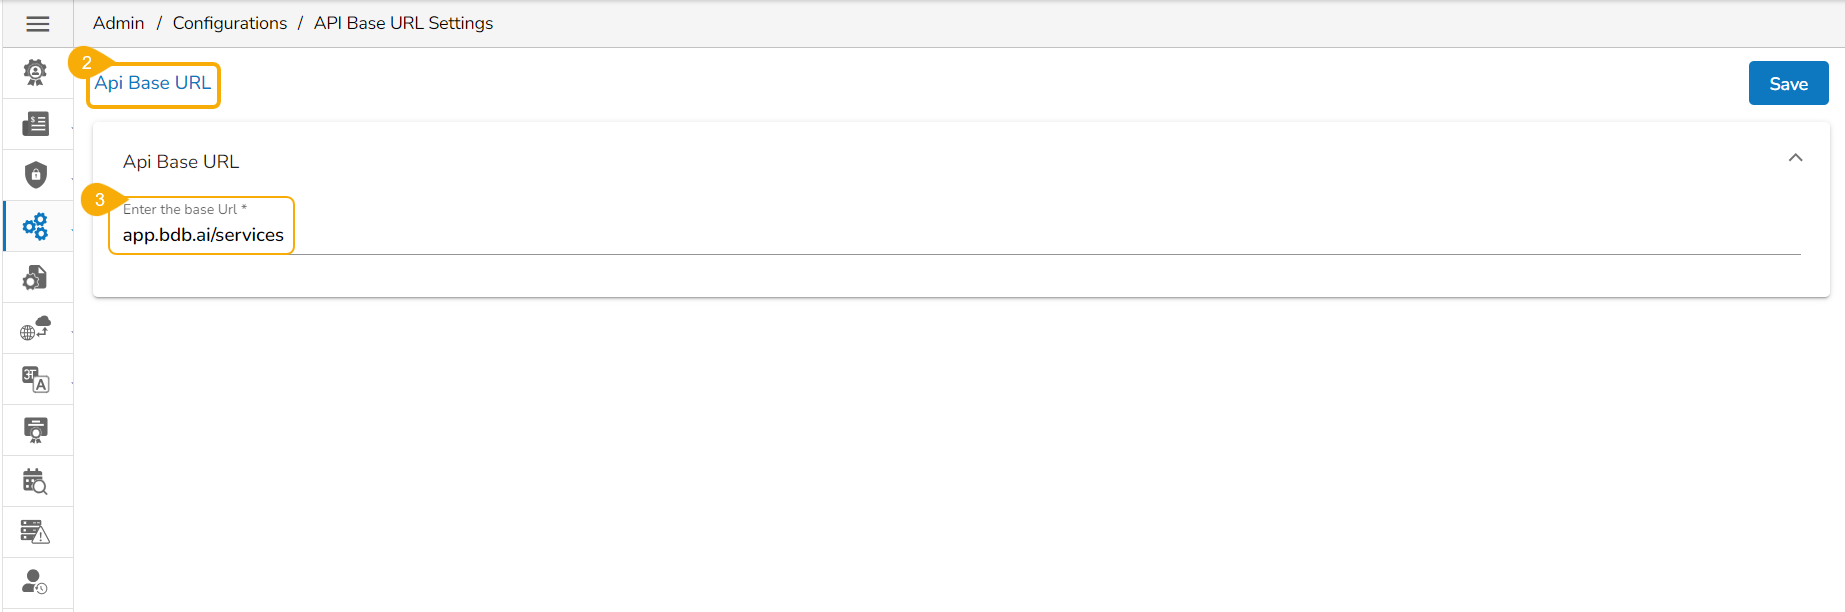
API Base URL settings option allows the user to share the base URLs for the various APIs that can be shared across to call the API service.
The API Base URL Settings helps the end users to get the full URL of any published Data As API without much intervention from the DevOps team.
Navigate to the Admin Panel.
Click the API Base URL configuration option from the Admin Panel.
The API Base URL page opens.
The API Base URL will display the configured URL by the DevOps team.
E.g., the given image displays the app.bdb.ai/services as configured base URL.
Navigate to the option.
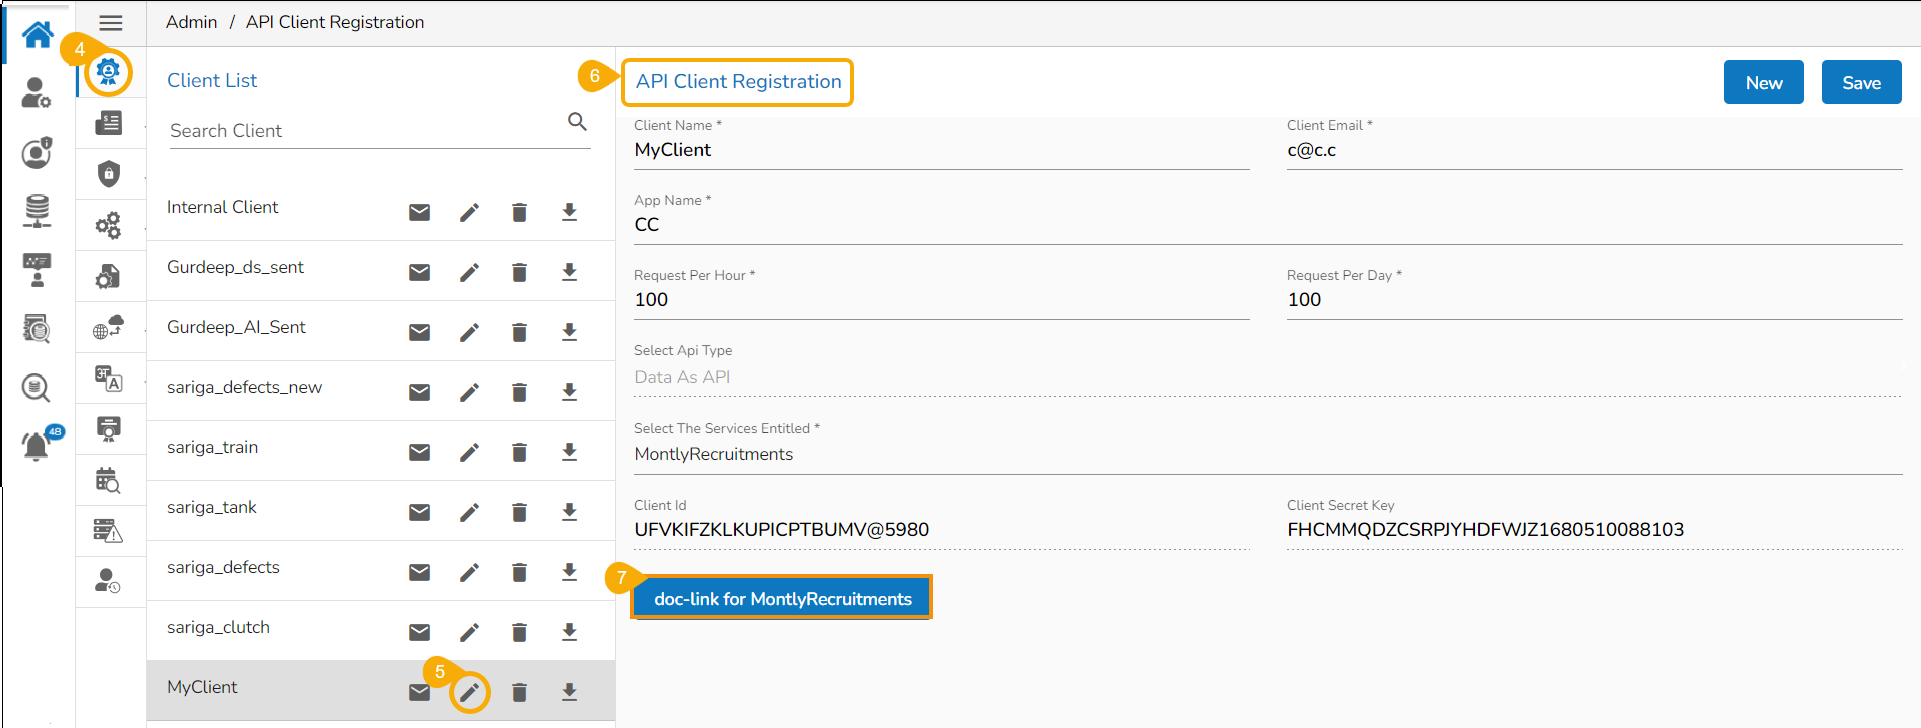
Click the Edit icon for a registered Client.
The API Client Registration details open.
Click on the document link provided on the API Client Registration page.
By clicking the document link from the API Client Registration page, the user gets directed to the below given page providing a URL along with other service details that is required to call the API service.
Please Note: This URL is a combination of API Base URL & Service name which can be shared across.
The Core Ownership Transfer Settings allows to transfer all the components of Data Center, Designer, Security, Home, and Pipeline modules from one user to another user.
Check out the given walk-through to understand the Core Ownership Transfer configuration option.
This Admin configuration option will help the users in the same space to own the variety of components created by another user in case of project handover or role change. Thus, the entire account access can be transferred to the desired user on the same page.
Please Note: This feature is provided to handle situations like when some user leaves the organization, and his work needs to be transferred to another user.
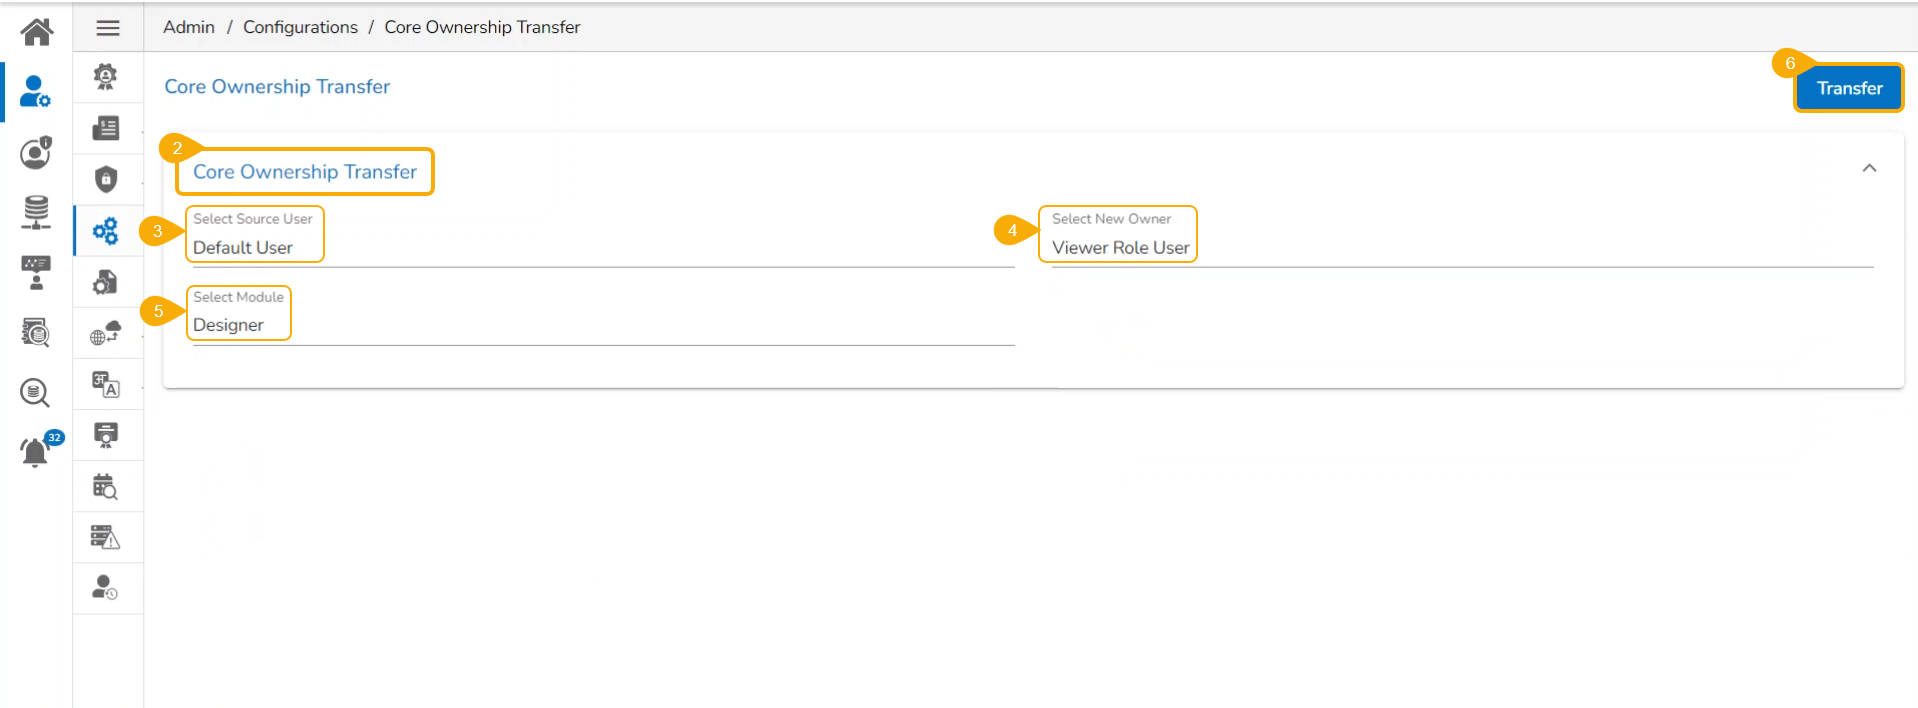
Click on the Core Ownership Transfer option from the Configurations list in the Admin Module.
Then the Core Ownership Transfer page opens.
This section configures the custom field settings for the user groups and the users assigned to those groups.
Click the Custom Field Settings option from the Configurations list.
The Custom Field Settings page opens.
Provide the following information for each custom field:
Key: Provide the key value of the custom field.
Input Type: Select an input option from the drop-down menu.
Click the Save option to save the inserted custom fields.
Please Note:
Click the Add option to add a new custom field.
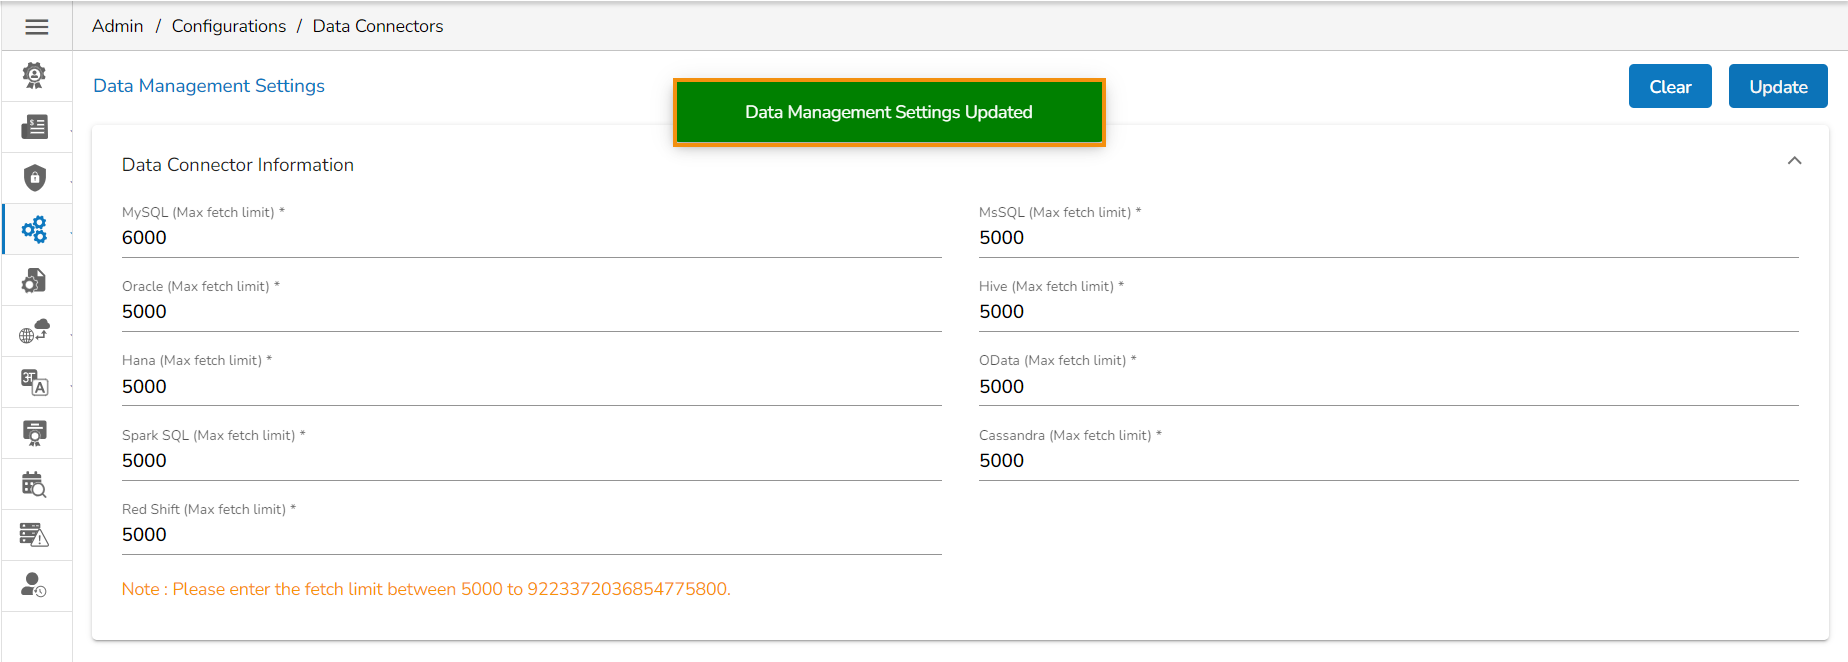
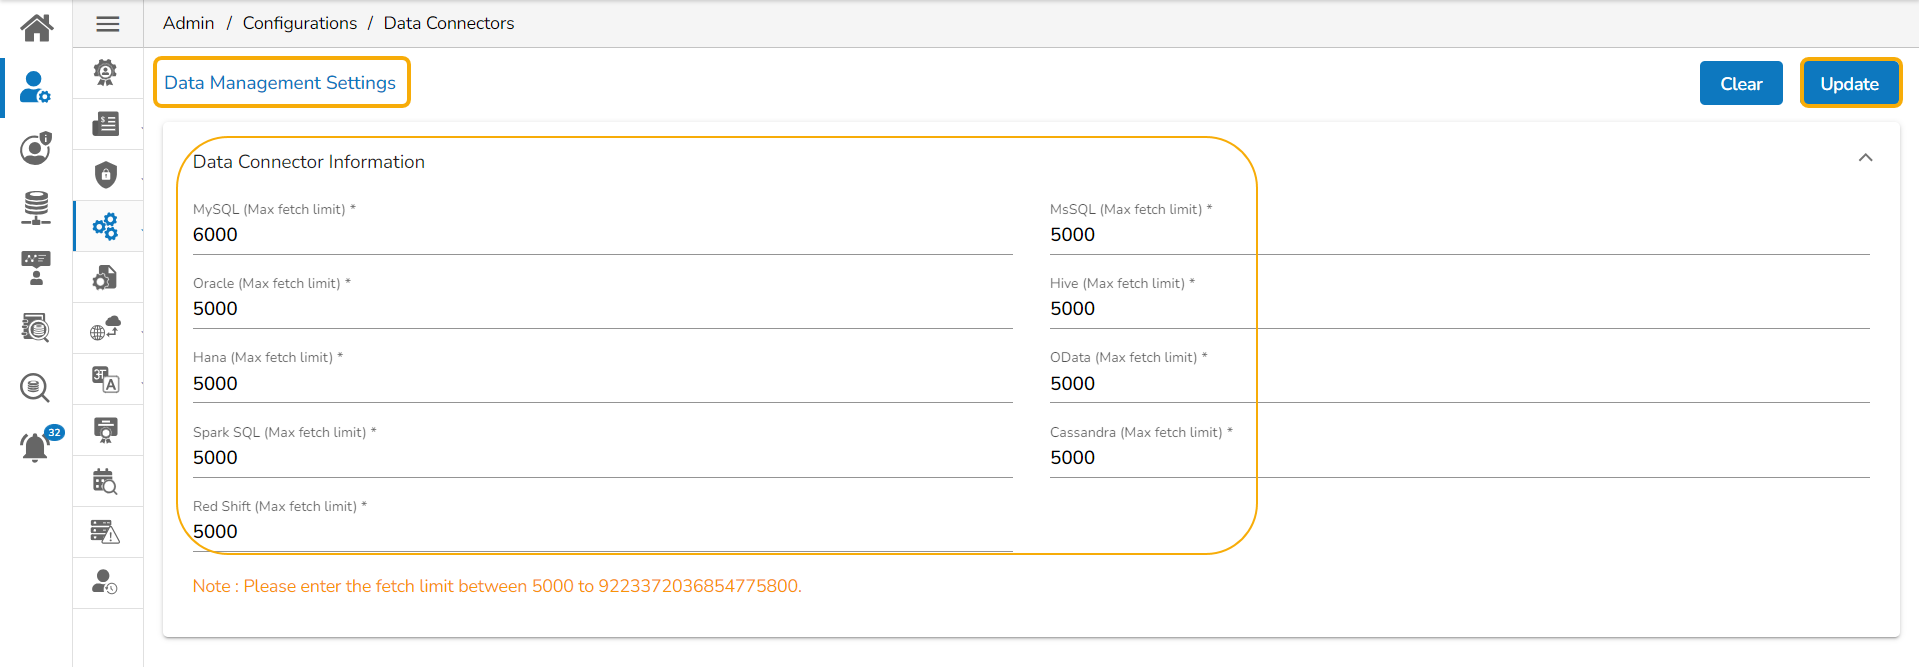
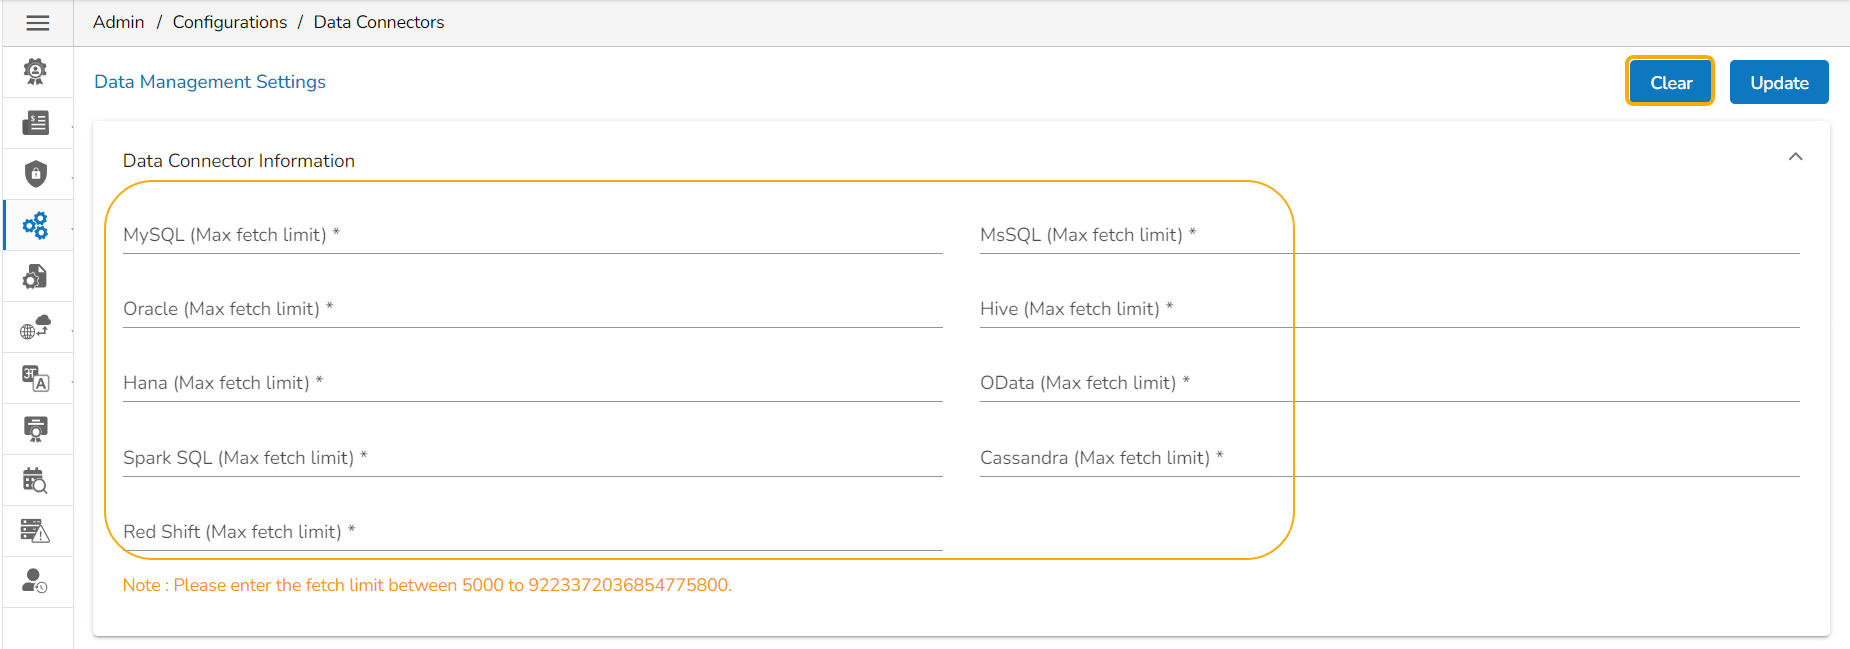
This option allows the users to configure the required server settings for Data Connectors.
Click the Data Connectors option from the Configurations list.
The Data Management Settings page opens.
The users can set the Max Fetch Size for the listed data sources.
Click the Update option to save the entered Max Fetch Size for data.
A notification message appears, and the data gets updated.
Click the Clear option.
The entered Data Connector Information will be erased.
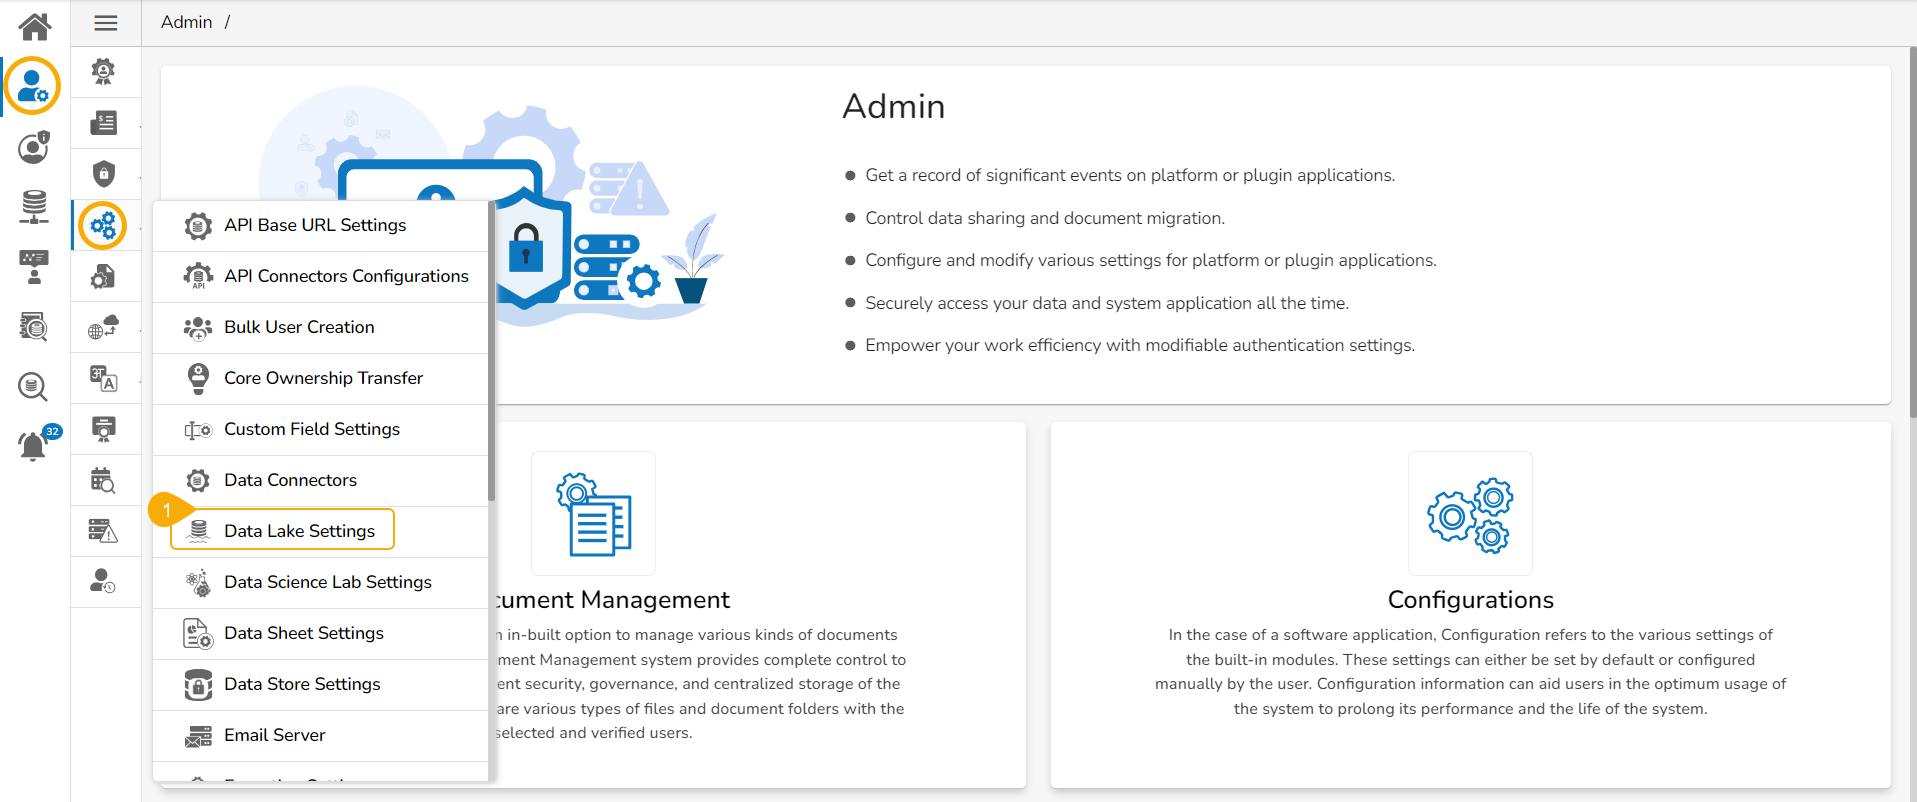
Click the Data Lake Settings from the Configurations admin option.
The Data Lake Settings form opens.
The user needs to enter the following details to save the Data Lake Settings based on the selected server option:
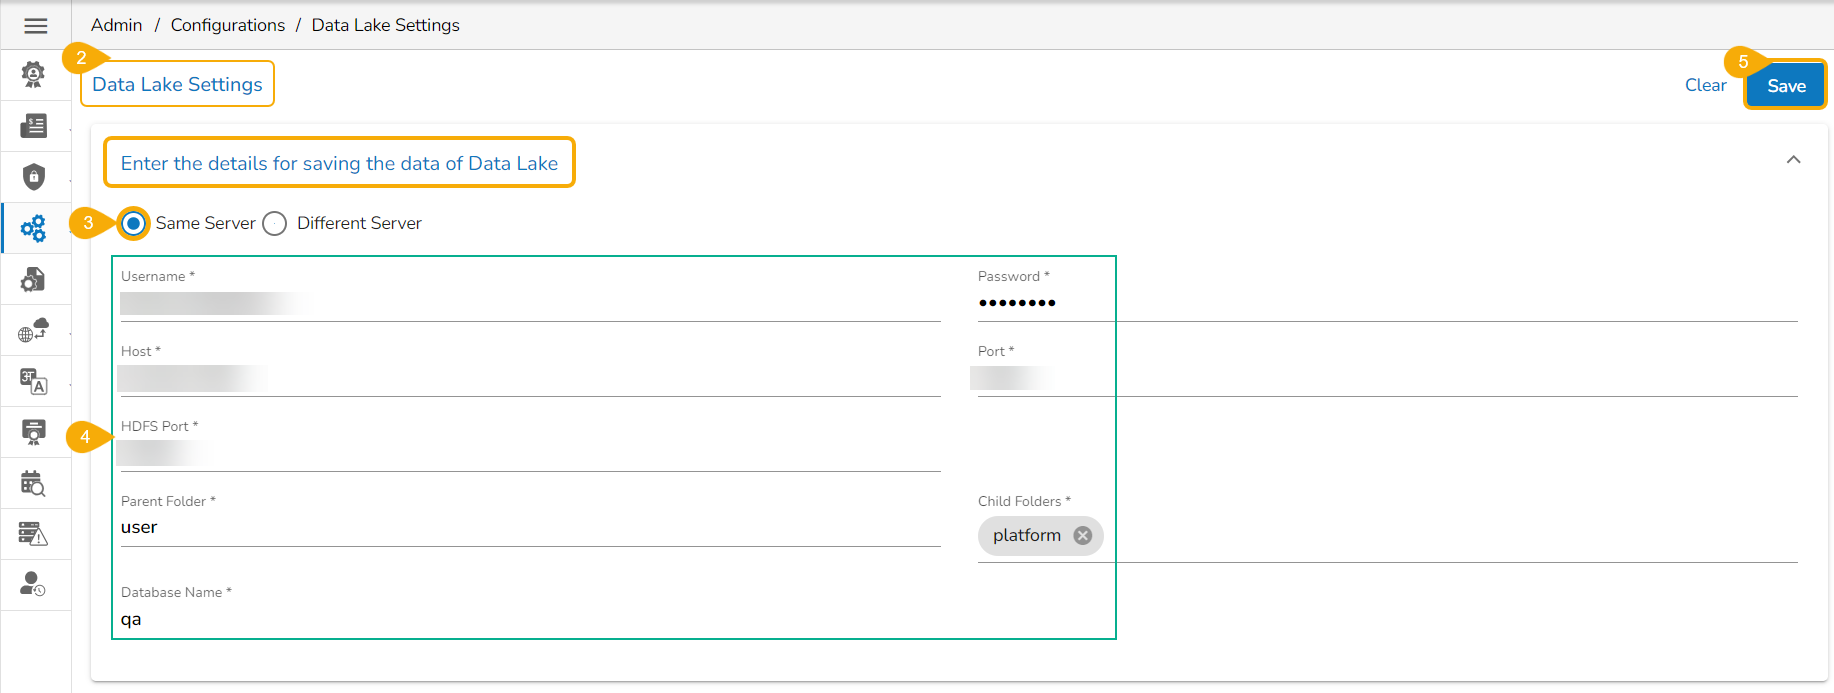
Click the Data Lake Settings from the Configurations admin option.
The Data Lake Settings form opens.
Select the Same Server option.
Click the Data Lake Settings from the Configurations admin option.
The Data Lake Settings form opens.
Select the Different Server option.
A notification message appears and the provided Data Lake Settings will be saved/ registered.
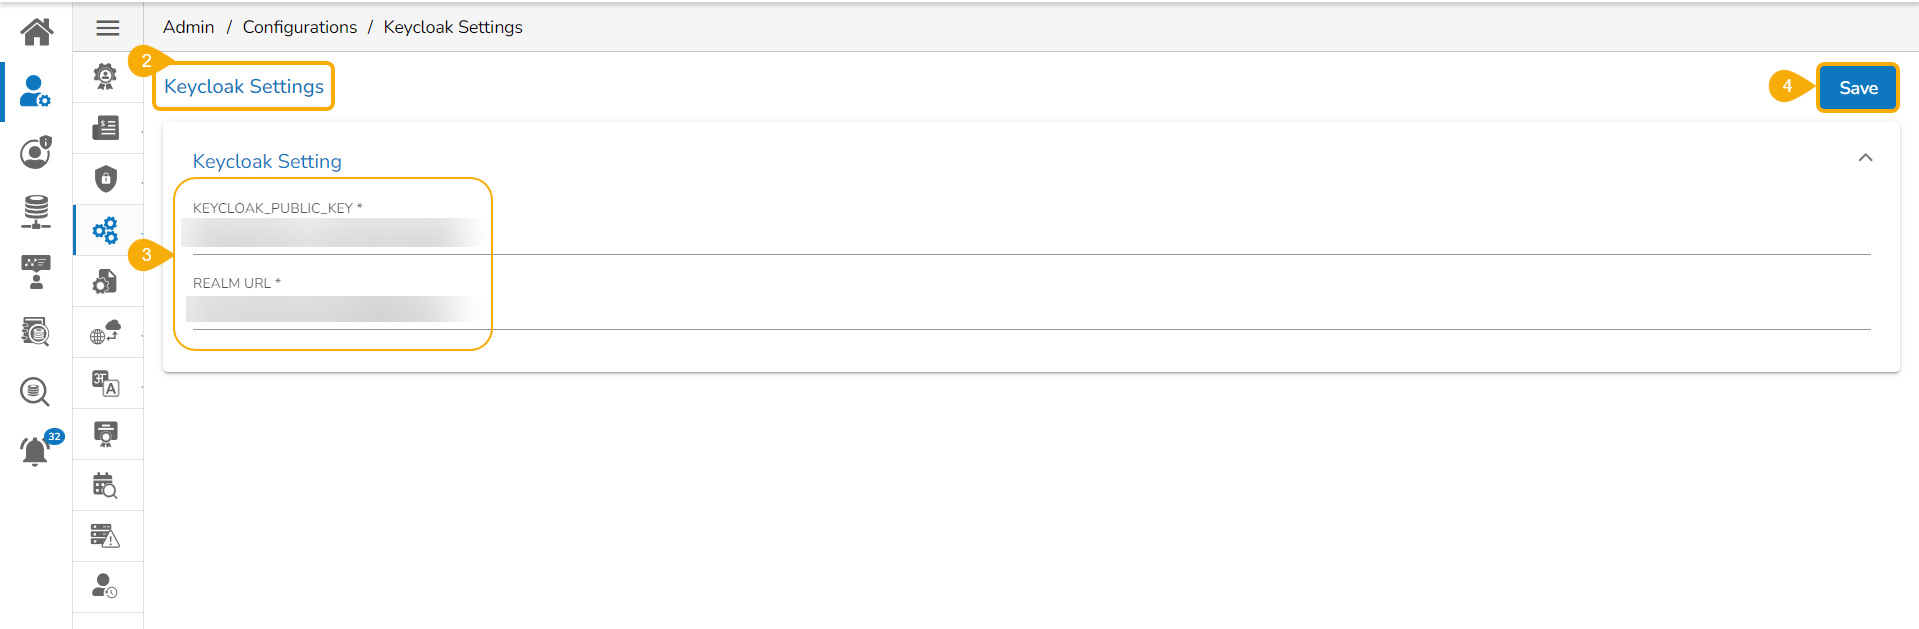
Keycloak settings refer to the configurations that affect the entire Keycloak deployment or multiple realms within the deployment. These settings are typically managed at the server level.
The admin user can configure the Keycloak Settings by using this option.
Click on the Keycloak Settings option from the admin menu panel.
The Keycloak Settings page opens.
Provide the following details:
Keycloak Public Key
Realm URL
Click the Save option.
A notification message appears to ensure the success of the action.
Please Note: Click the Delete icon to remove the added Node Pool details.
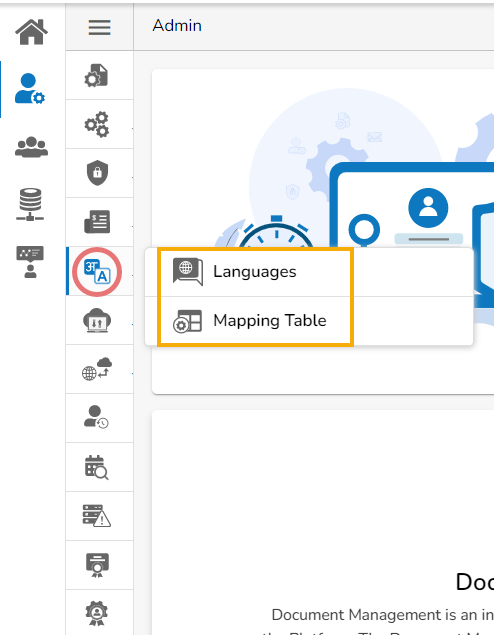
The Language Mapping admin option allows the administrators to choose the language(s) from the supported list and map Key terms from a specific dashboard with the selected languages. This feature supports language mapping for Titles, X and Y-Axis descriptions, Tooltip, and Label of the selected Dashboard. The Language Mapping is completed in two steps which are as mentioned below:
Step-1: Languages
Step-2: Mapping Table
The Admin can track and monitor all activities that occur within the platform, including data access, modifications, and system configuration changes under the Audit Trail admin option.
This section explains how to configure Clarity.
Select the CAPPM Configuration using the Authentication Admin option.
A new page opens with 3 steps mentioned on it.
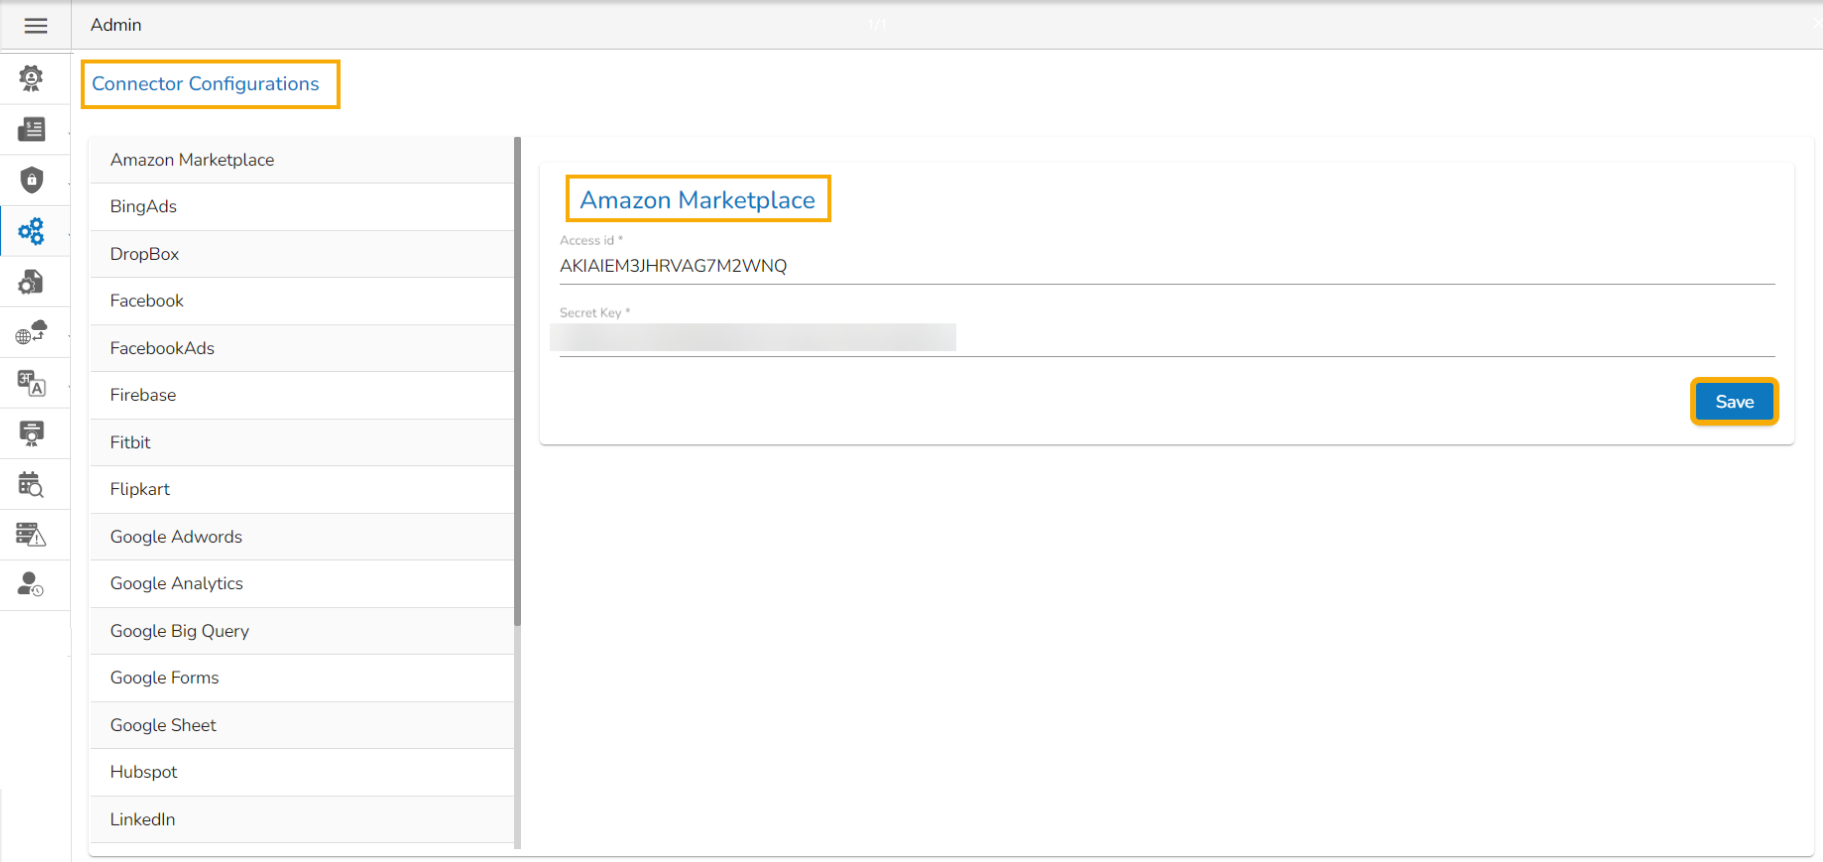
This option allows the users to configure API data connectors.
Click the API Connectors Configurations configuration option from the list of admin options.
The Connector Configurations page opens displaying the list of the API connectors.
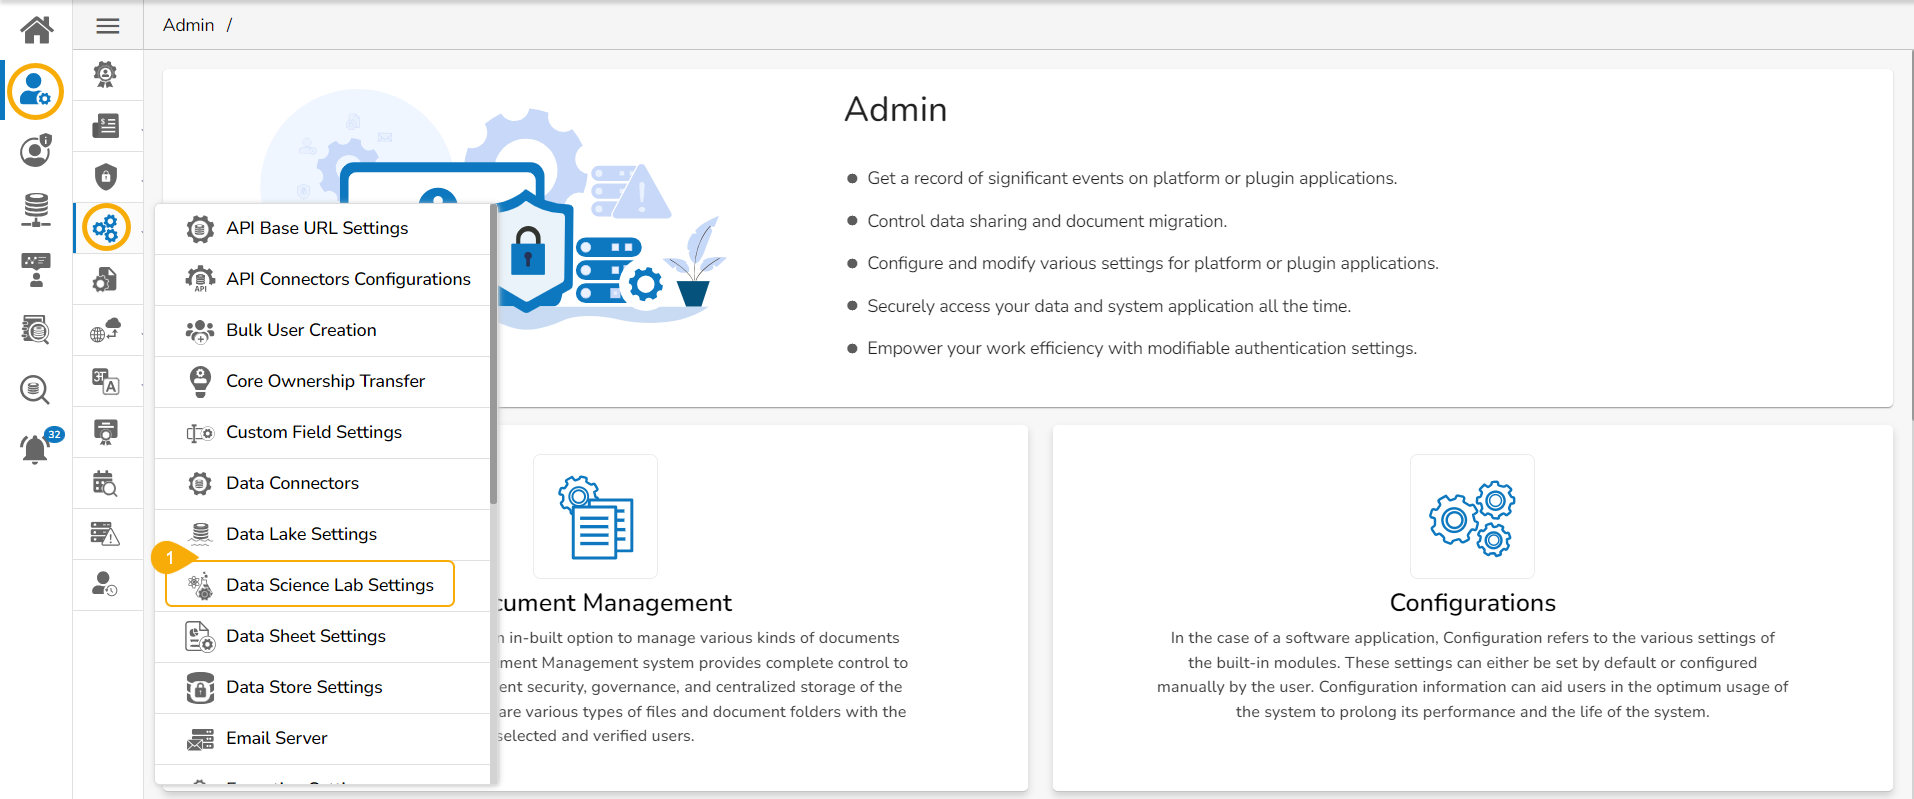
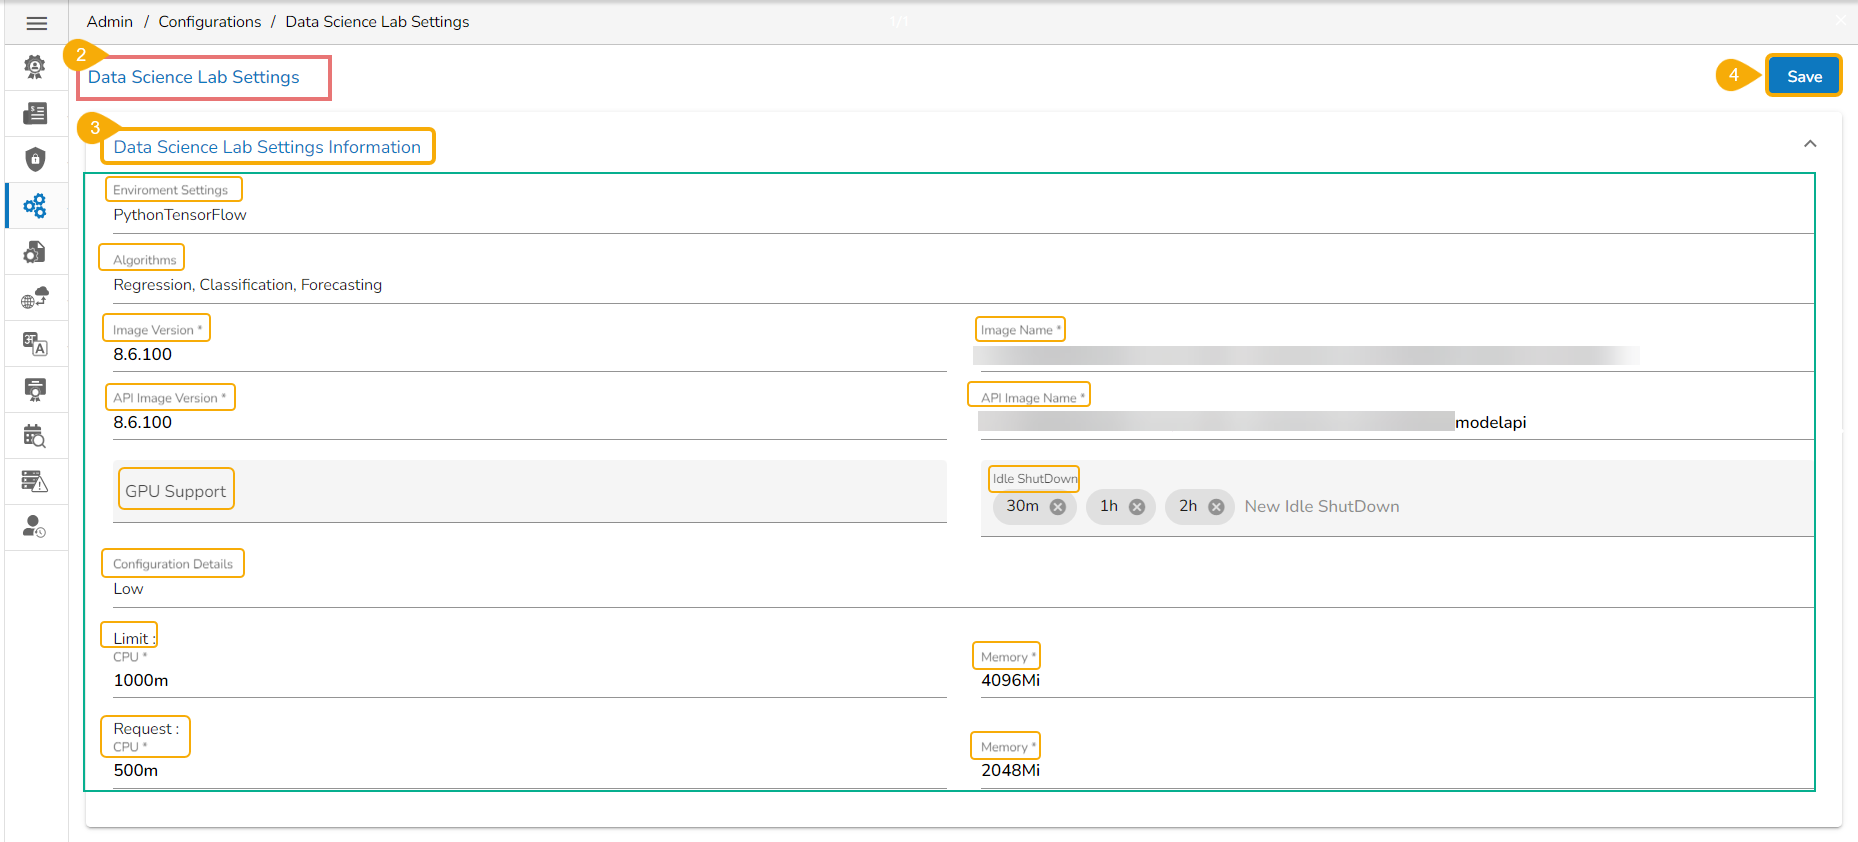
The Notebook Settings for the DS Lab can be configured through this admin option.
Click the Data Science Lab Settings option from the Configurations list in the Admin Module.
The
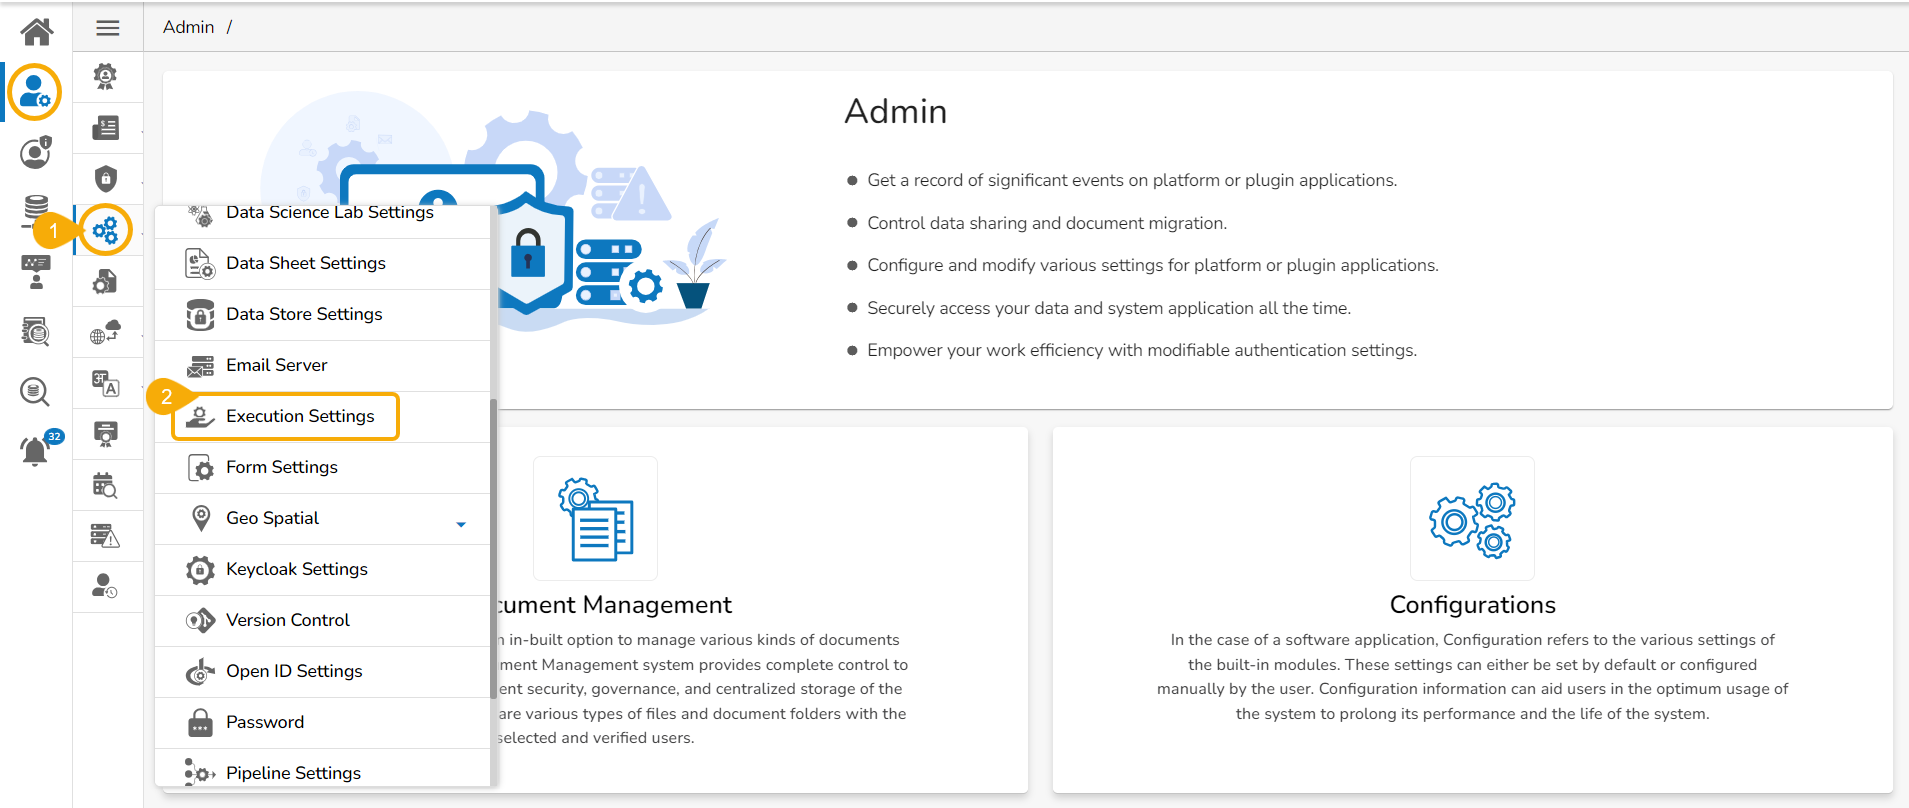
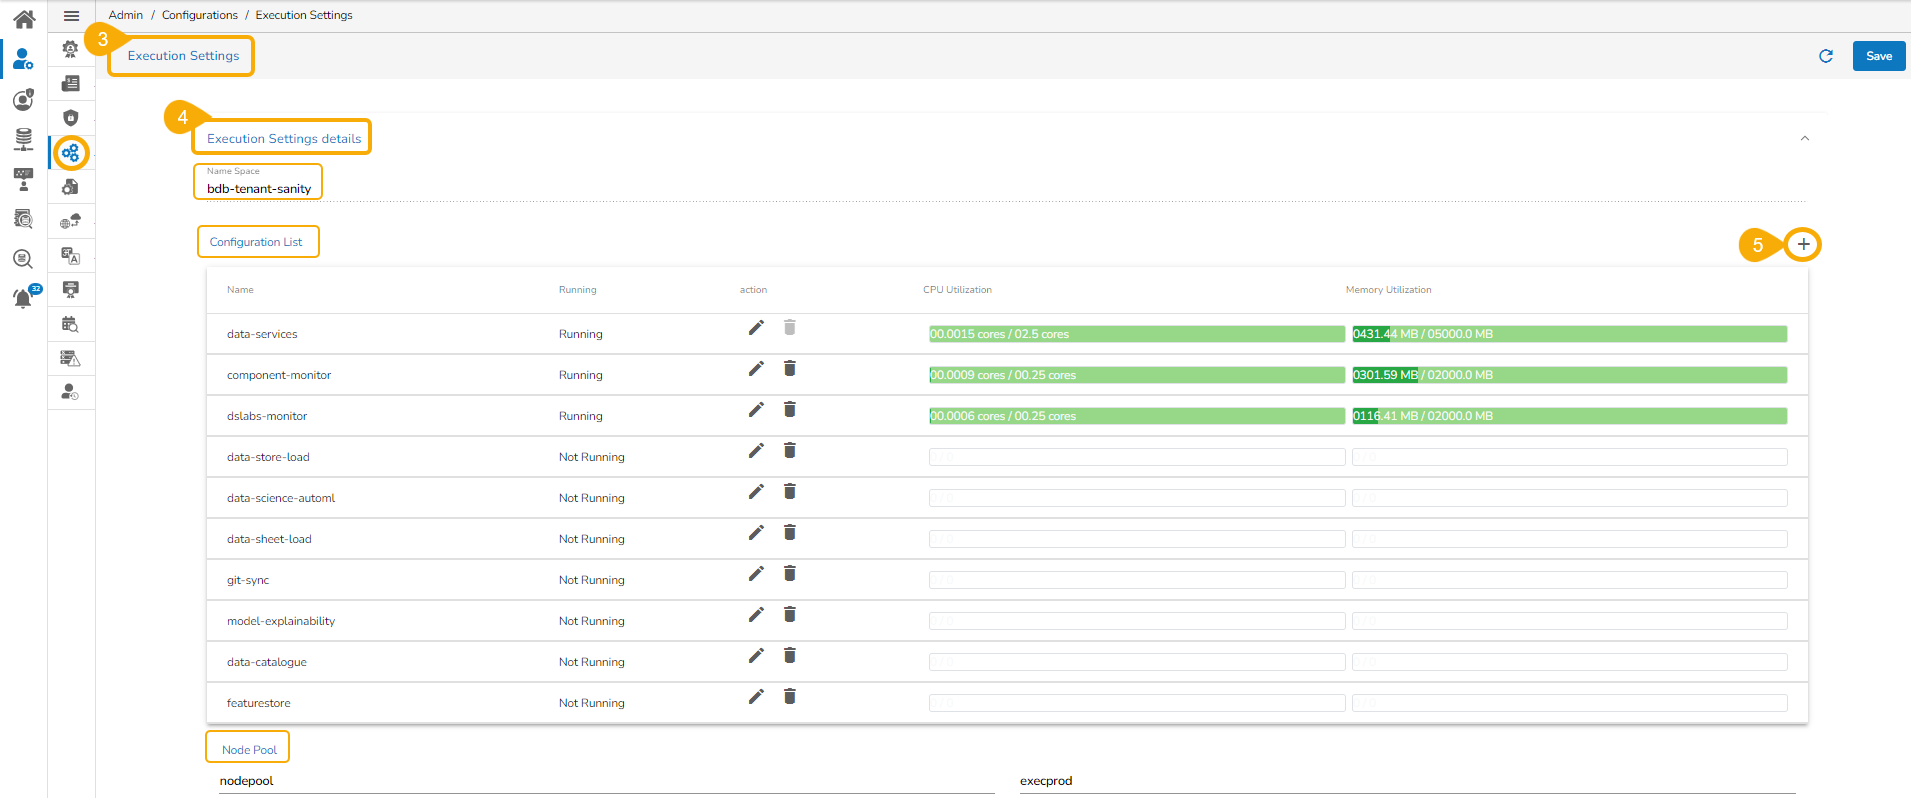
This section provides details of CPU and Memory Utilization to the Admin user.
Navigate to the Configurations admin options.
Click the Execution Settings option from the list.
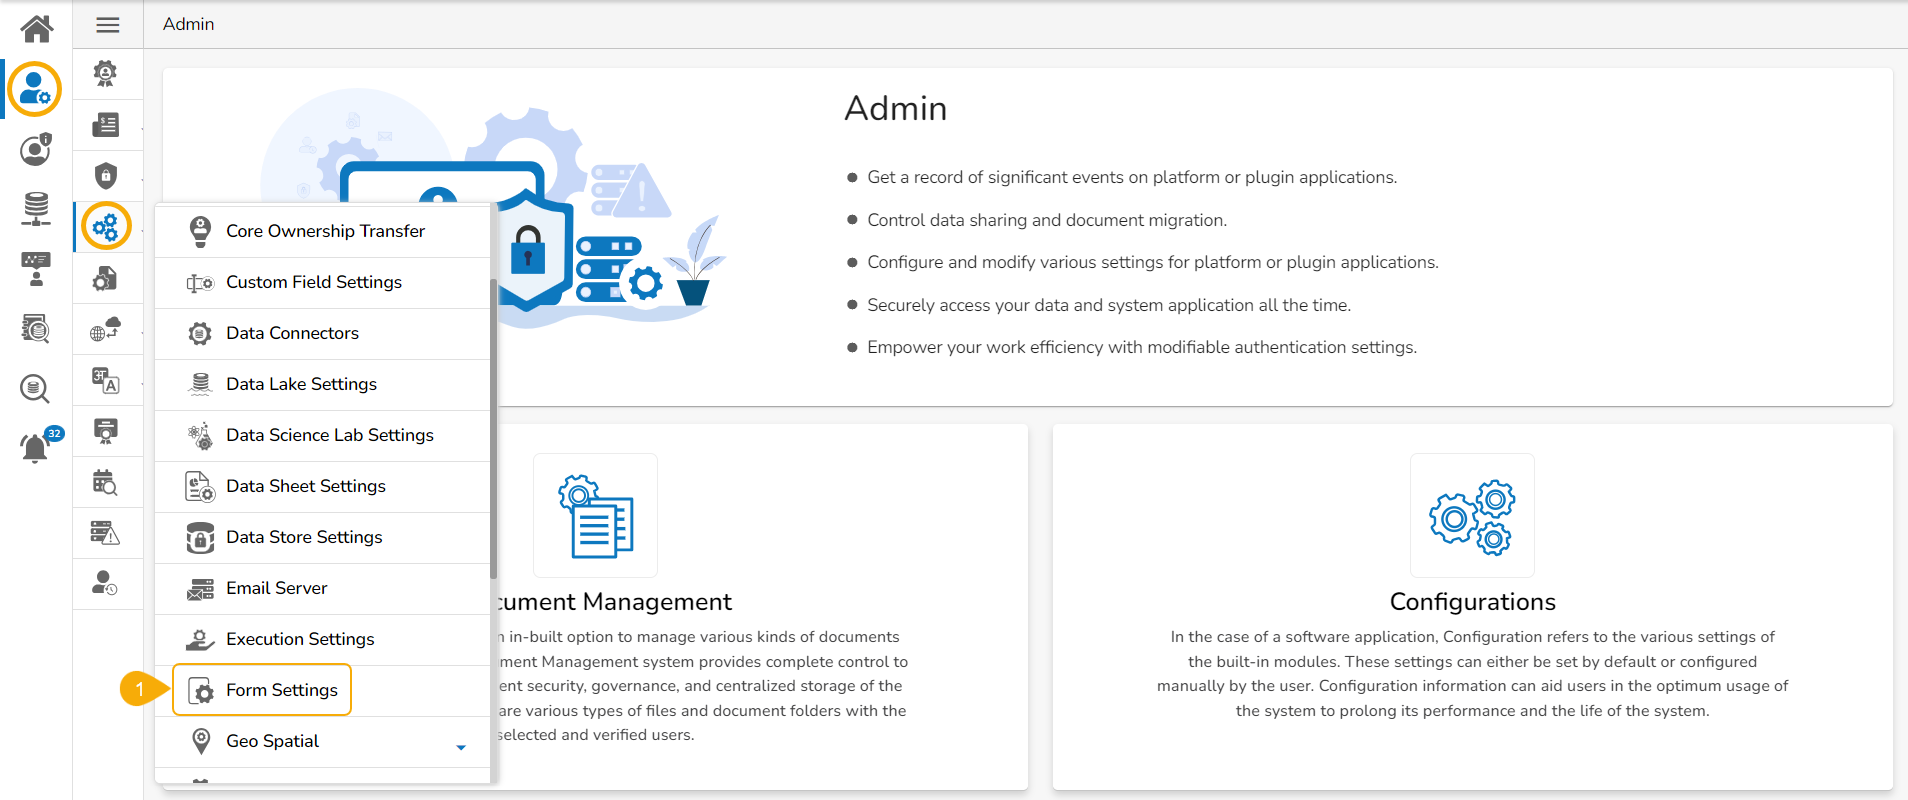
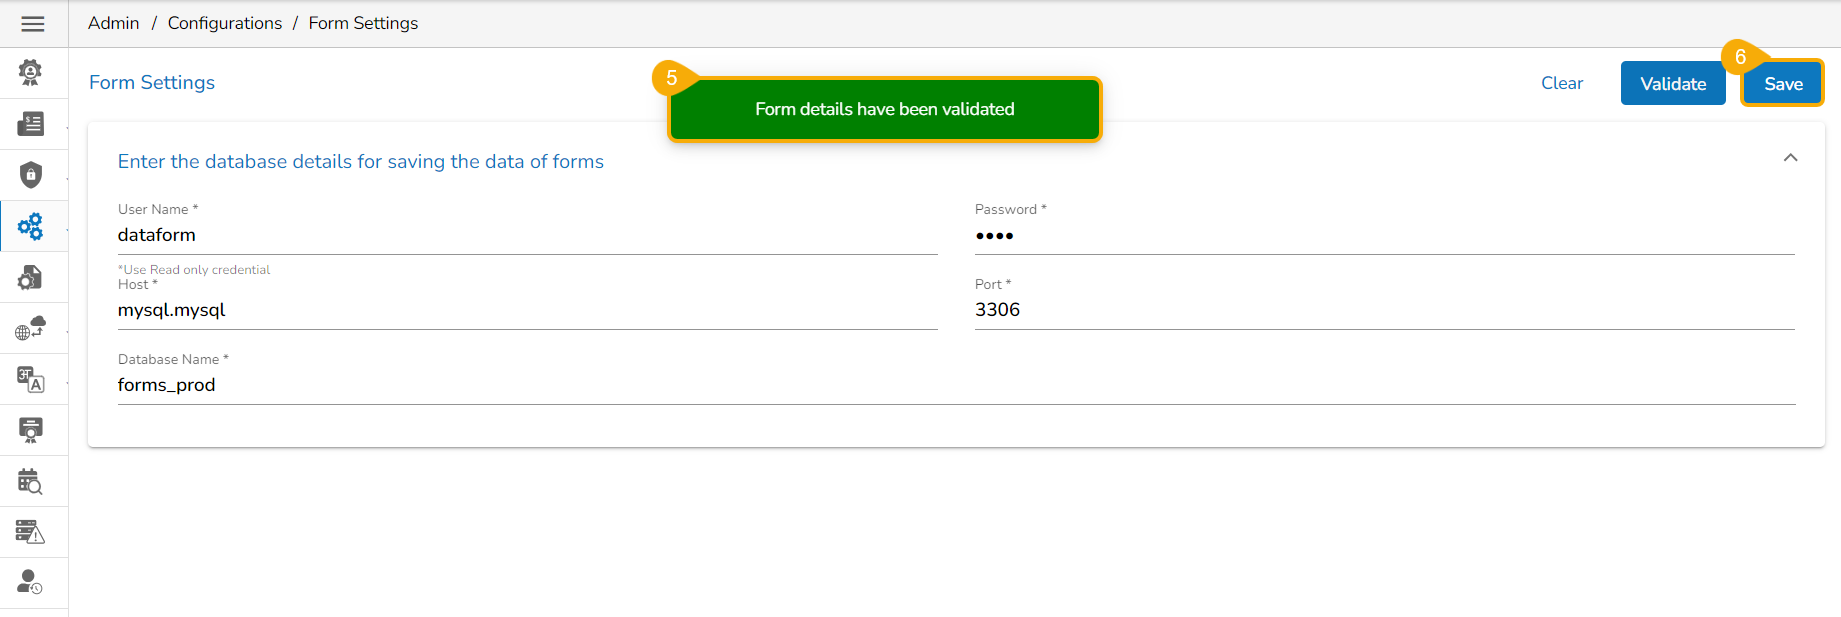
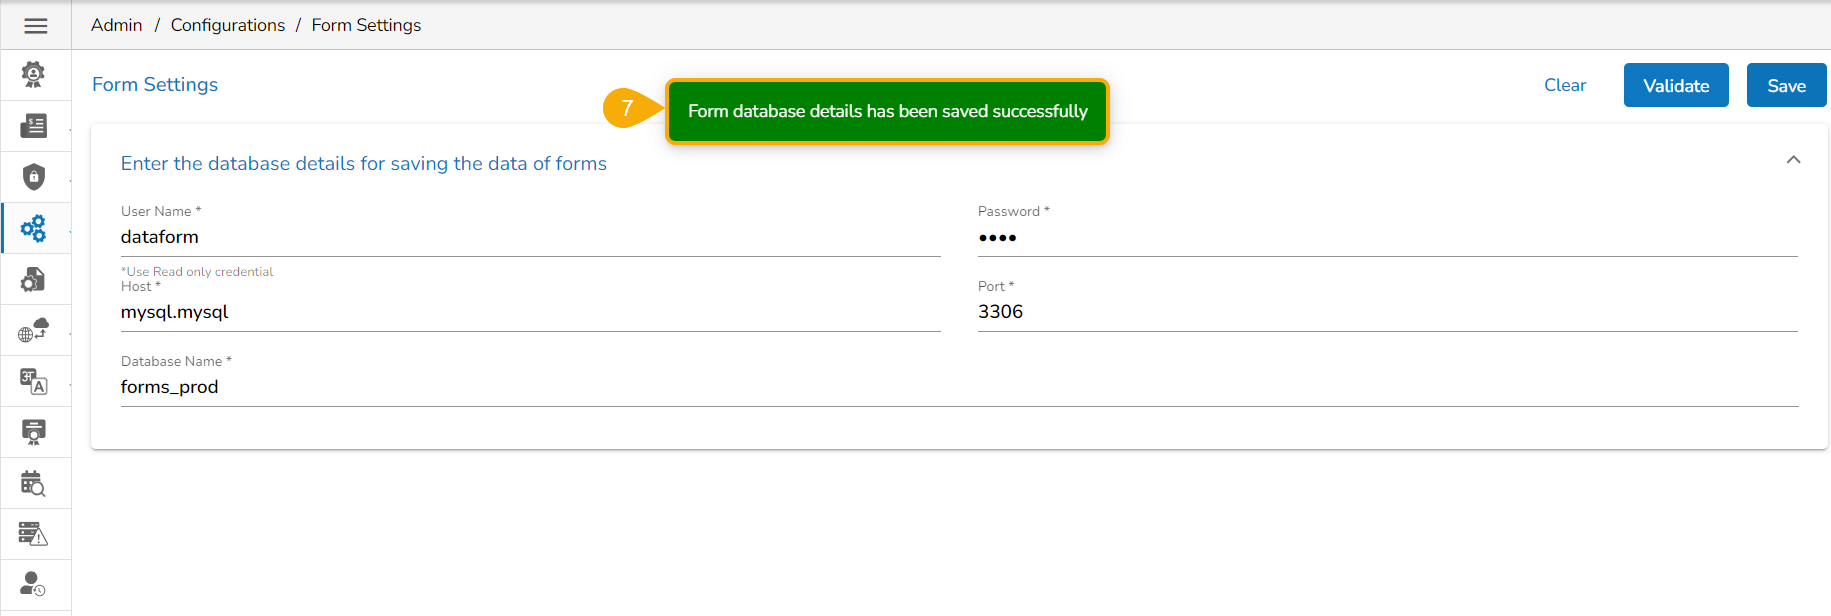
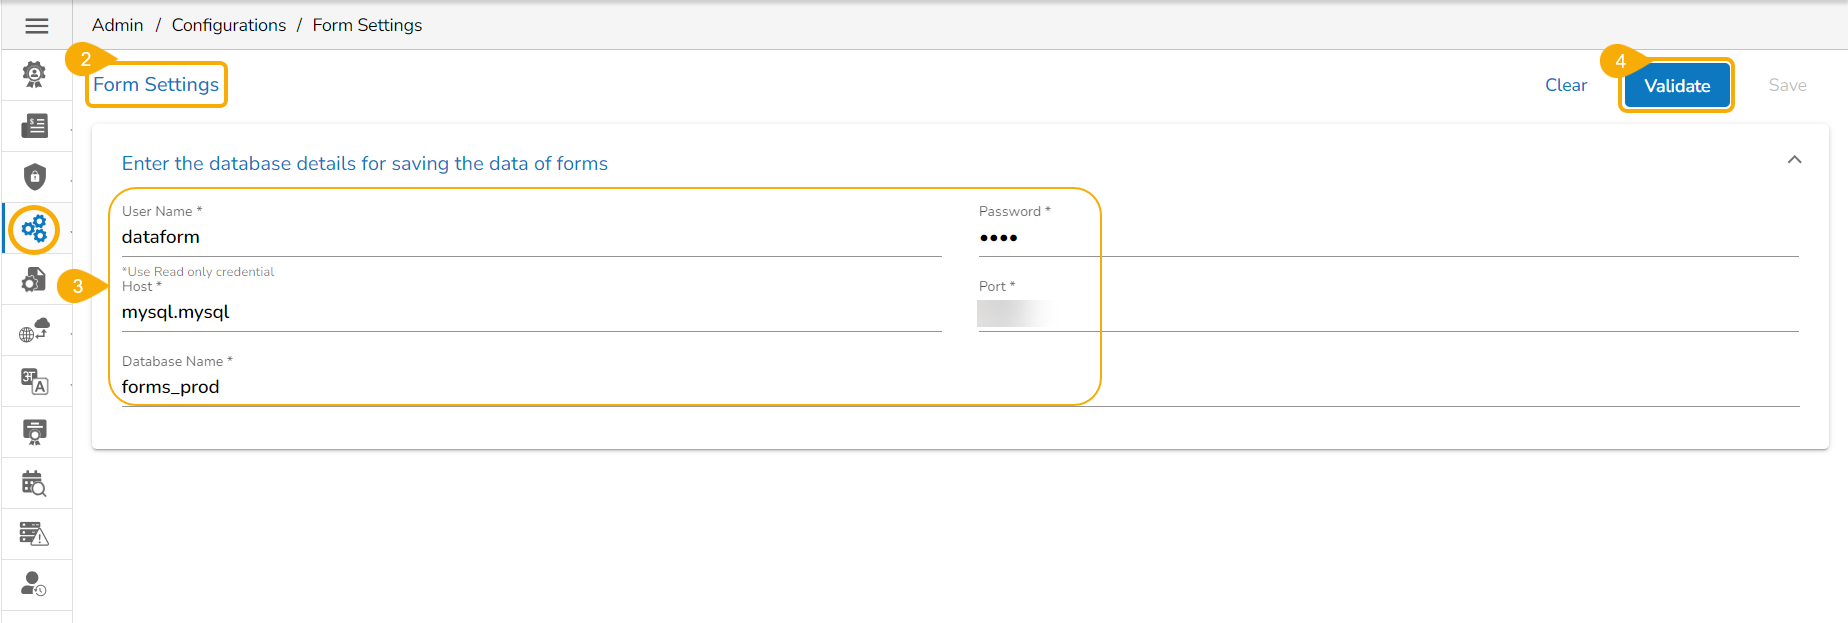
The Form Settings admin option provides database details for saving the data of forms. This configuration option is a prerequisite to use the Forms module.
Click the Form Settings option from the admin options panel.
The Form Settings
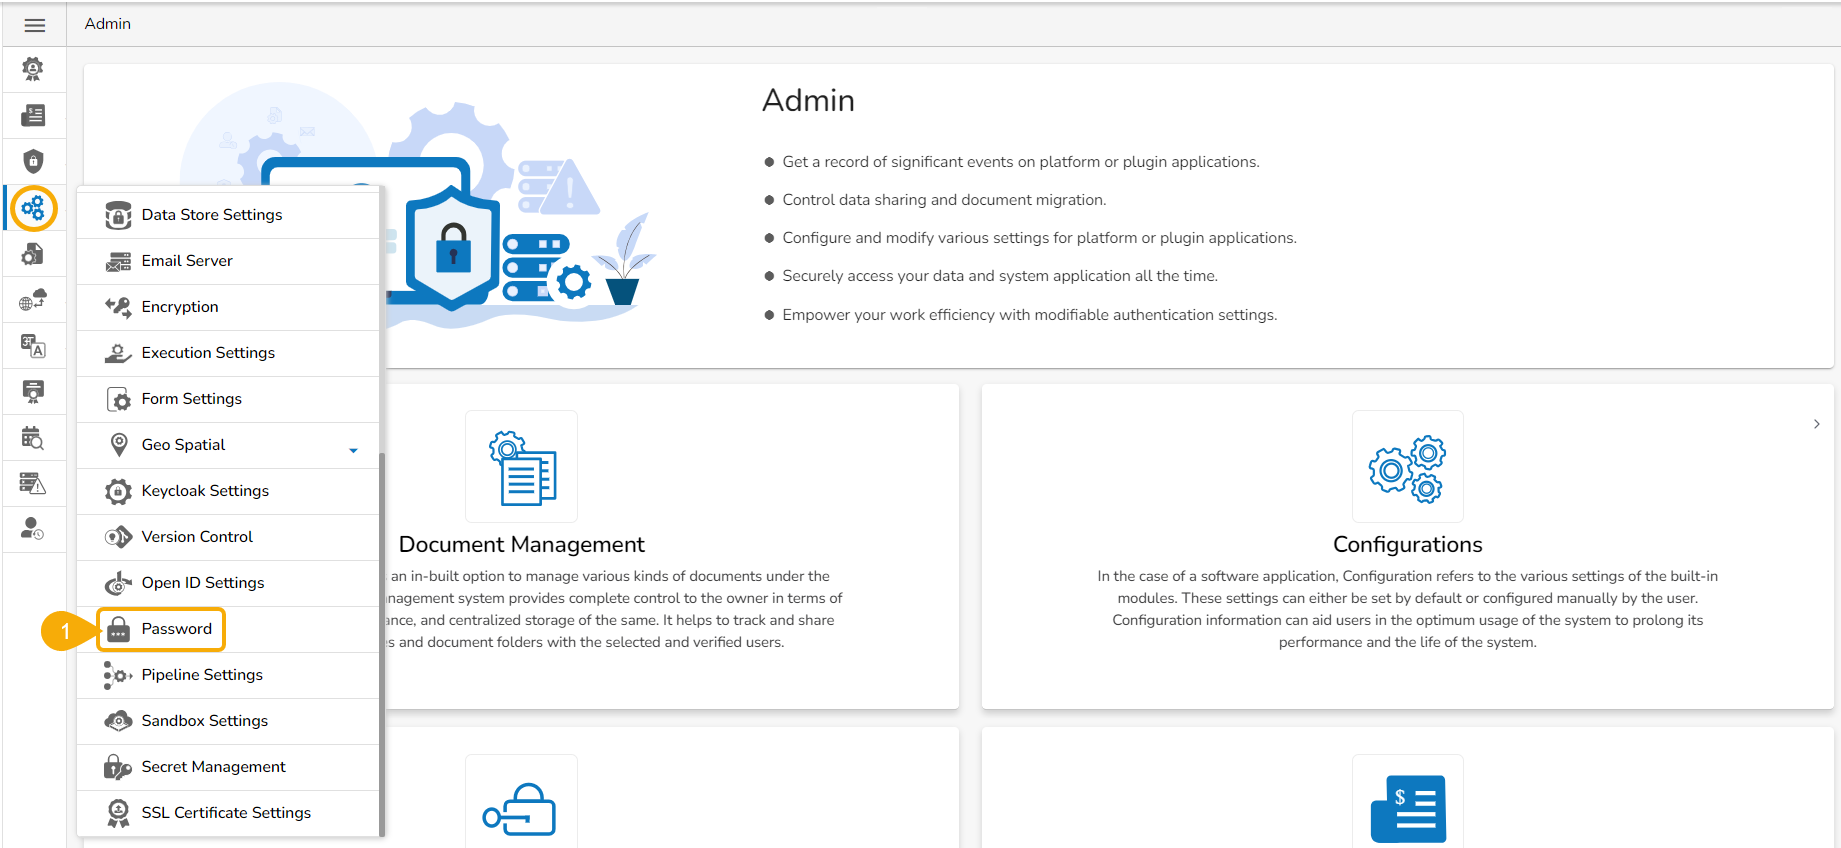
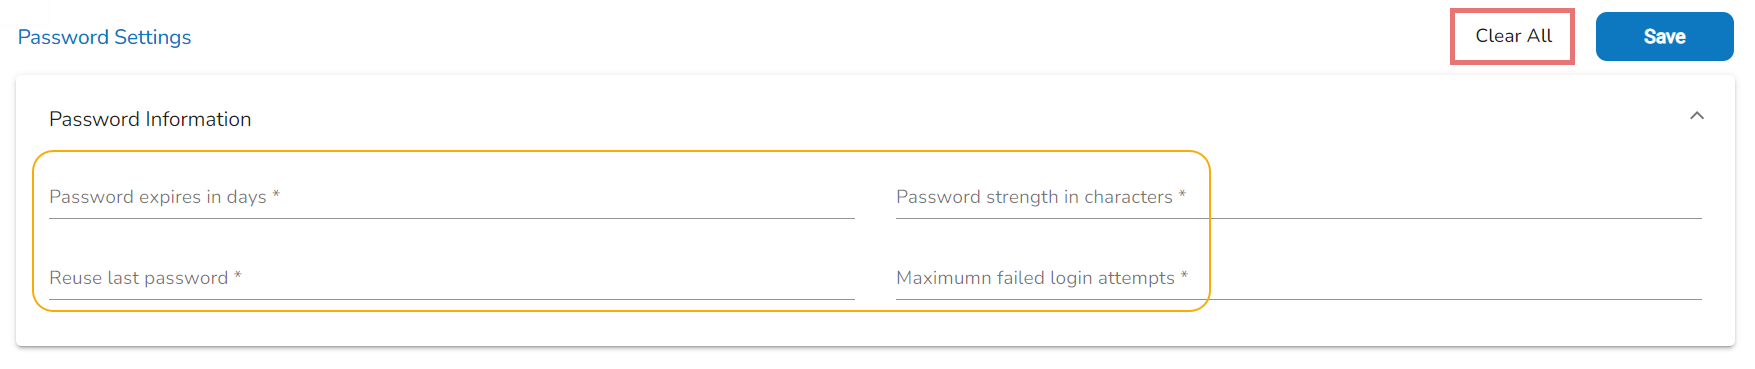
The admin can enforce strong password policies to protect user accounts from unauthorized access by using the Password Settings option.
The administrator can configure the account password information using this option.
Click the Password option from the list of configuration and Settings options.
User Removal from Group: Users must be deleted in Keycloak and the Platform.
Certificate File Download: Only admins have access to download certificate files.
Select Current User: Select a user from the given drop-down list.
Select New Owner: Select a new owner from the given drop-down list.
Select Module/Modules: Select a module or multiple modules to be transferred to the selected new owner (Platform modules can be listed as choices).
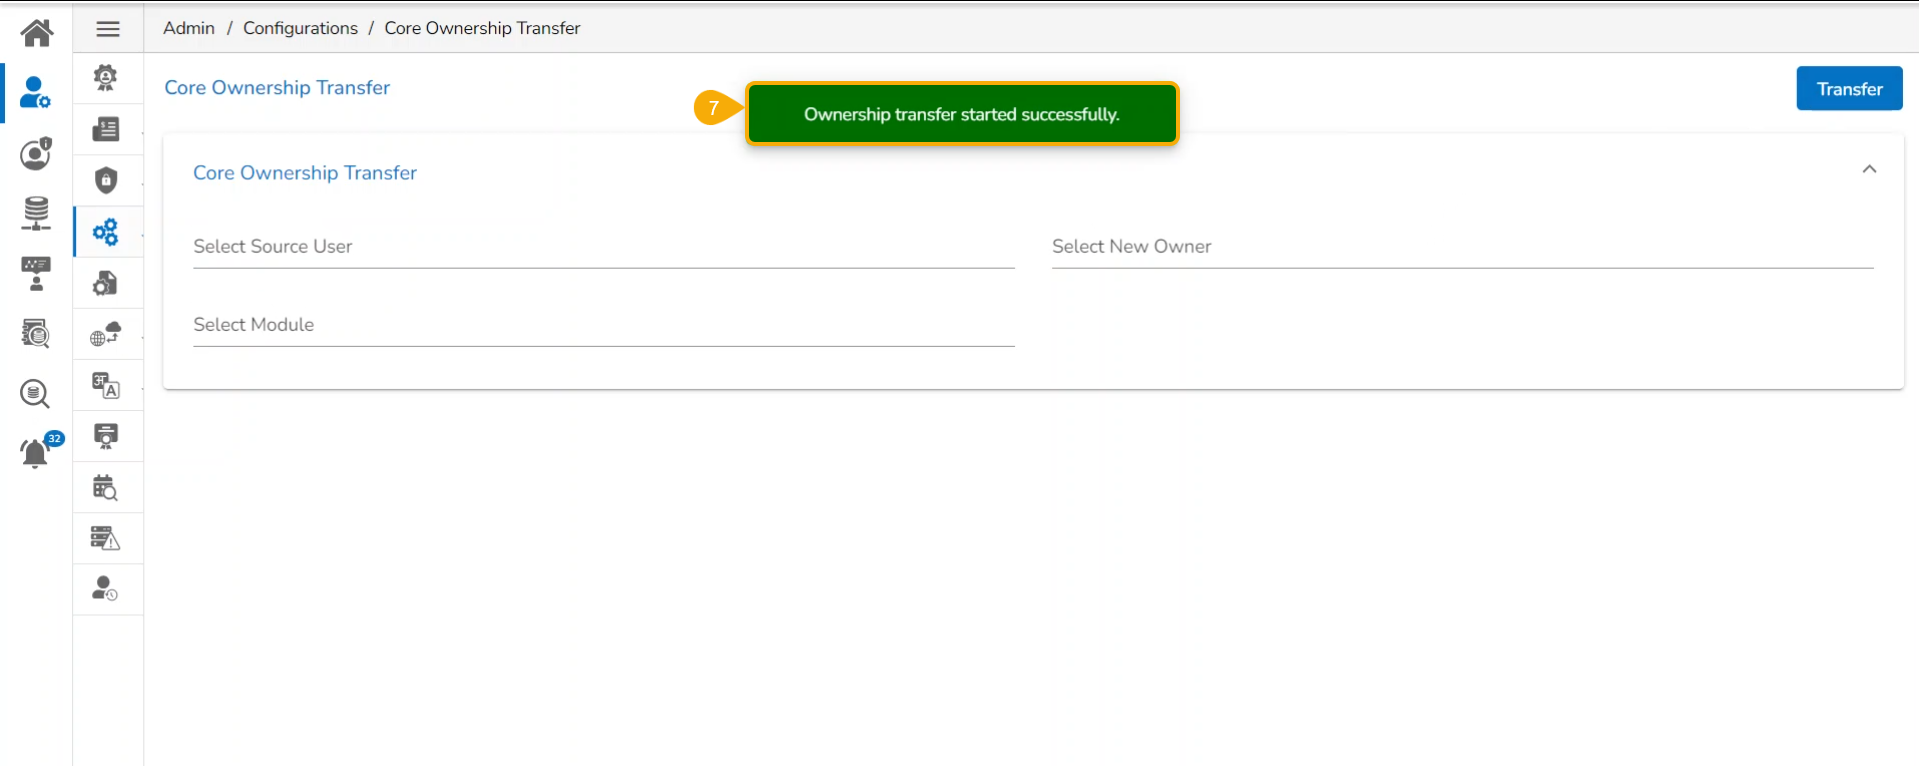
Click the Transfer option.
A success message appears, and the selected modules get transferred to the new owner.
User Lookup: Users need to choose from a drop-down menu.
Description: Describe the inserted key.
Mandatory: Select the 'Yes' option for the given field and make the inserted custom field
mandatory. Selecting the 'No' option for the given field will not make it mandatory custom field for the user.
Click the Delete icon provided next to the added custom field to remove that custom field.
The configured Custom Fields can be accessed inside the Security module to restrict data access of various users.
Provide the username, password, Host, and Port address. If the selected server is Hadoop, then the HDFS Port number is also required.
Click the Save option to save the entered Data Lake Settings.
The user needs to provide Username, Password, Host, and Port address to save their Data into the Hadoop and Hive Data Lakes. (For Hadoop the HDFS Port numbers are also required.
The user need to provide details for the Parent Folder and Child Folders together with the database name.
Click the Save option to save the entered Data Lake Settings.
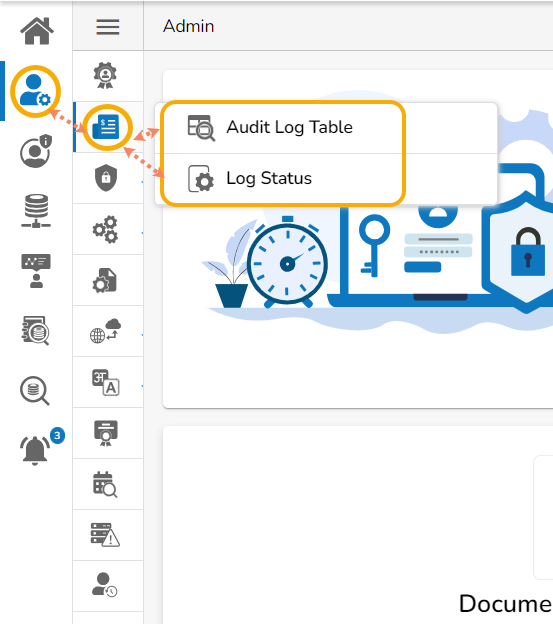
Two options appear under the Audit Trail:
Audit Log Table
Log Status
The platform provides detailed audit logs that capture information such as user ID, date/time stamp, and activity type, enabling organizations to identify any suspicious or unauthorized activities. This helps organizations improve their data governance and compliance efforts by providing an audit trail of all platform activities.
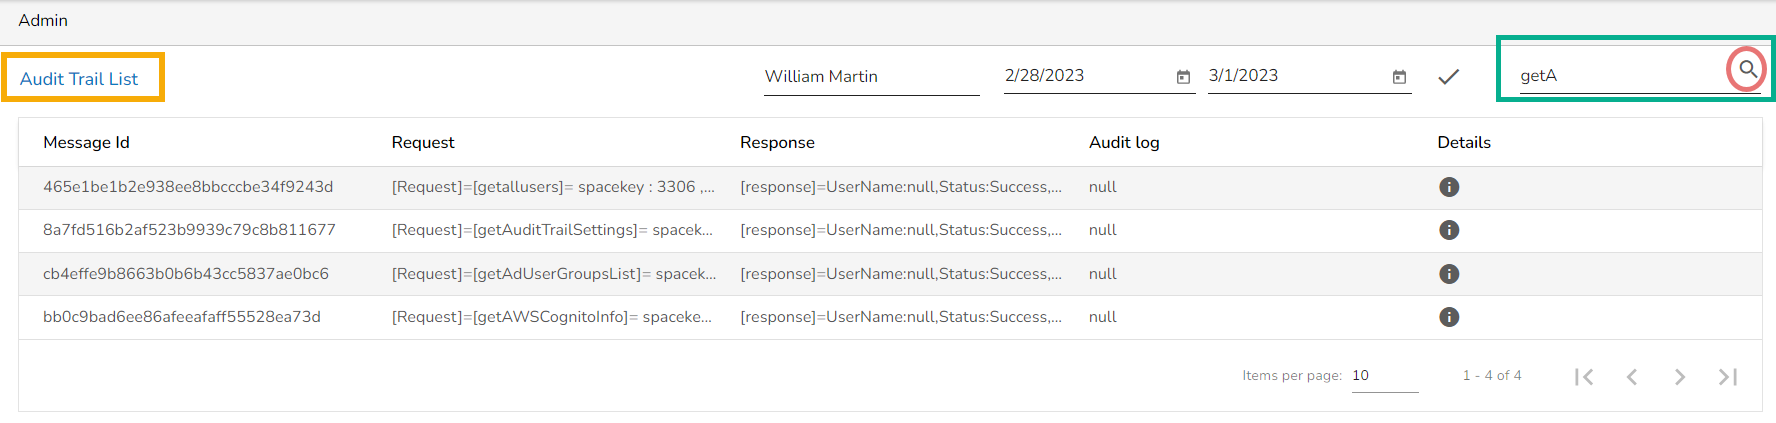
Click the Audit Log Table option.
The Audit Trail List page opens, displaying the audit log details.
Select a User: Select a user from the drop-down list
Enter a Start Date: Select a Start Date using the calendar
Enter an End Date: Select an End Date using the calendar
Click the Apply Filter icon.
Enter a term in the search bar and click the Search icon to display specific log entries in the Audit Trail List.
Click the Log Status option.
The Audit Trail page opens.
The administrator can enable or disable audit trail settings by sliding the given button.
Click the Save icon to save the selected audit trail setting.
A notification message appears and based on the selected option the Audit Trail option gets updated.
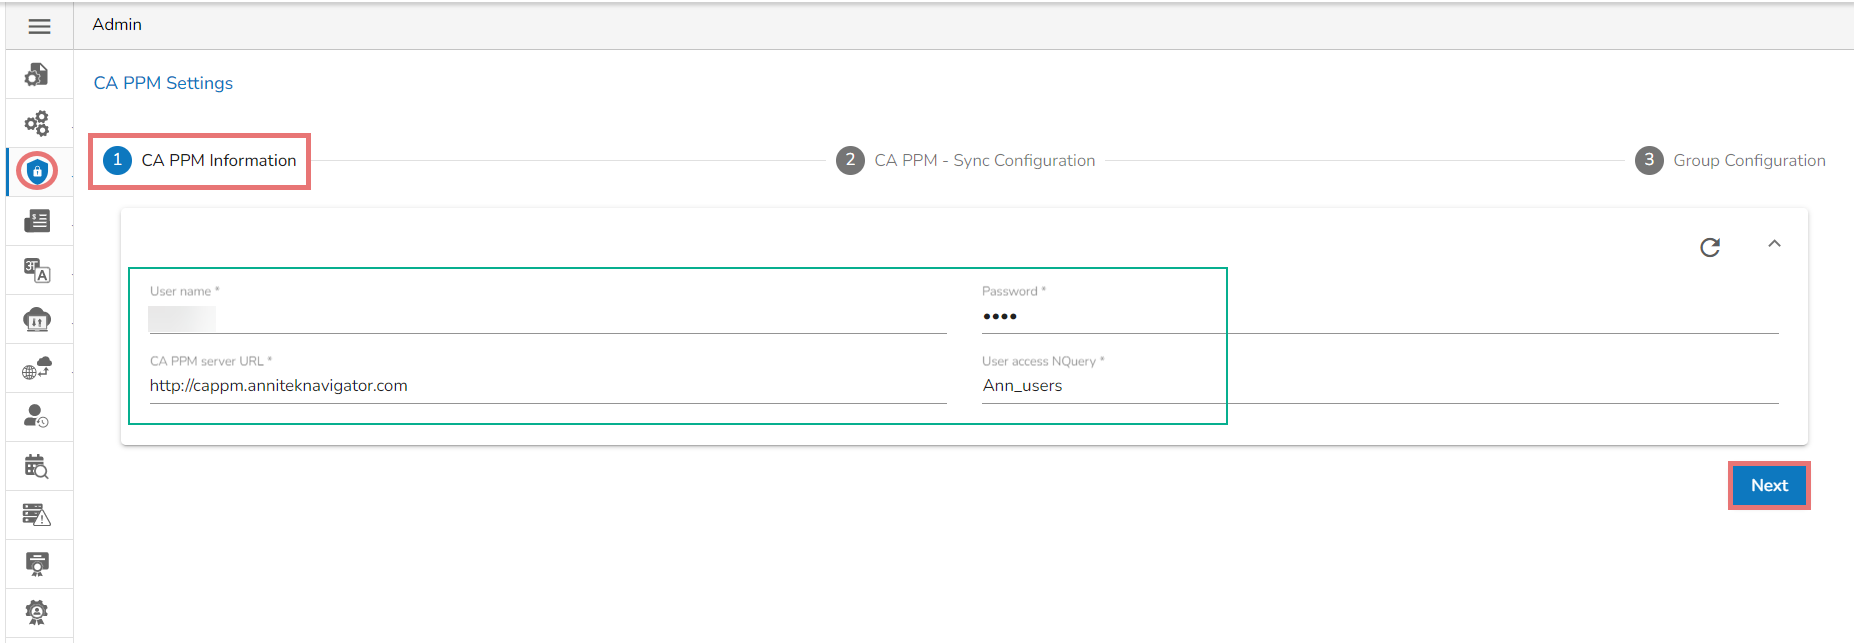
The fields for CA PPM Settings get displayed by default.
Provide a Username of a CAPPM account.
Enter the valid Password for the selected CAPPM account.
Enter the CAPPM server URL.
Provide the query name that fetches a list of the Clarity users in the User access NQuey field.
Click the Next option to proceed.
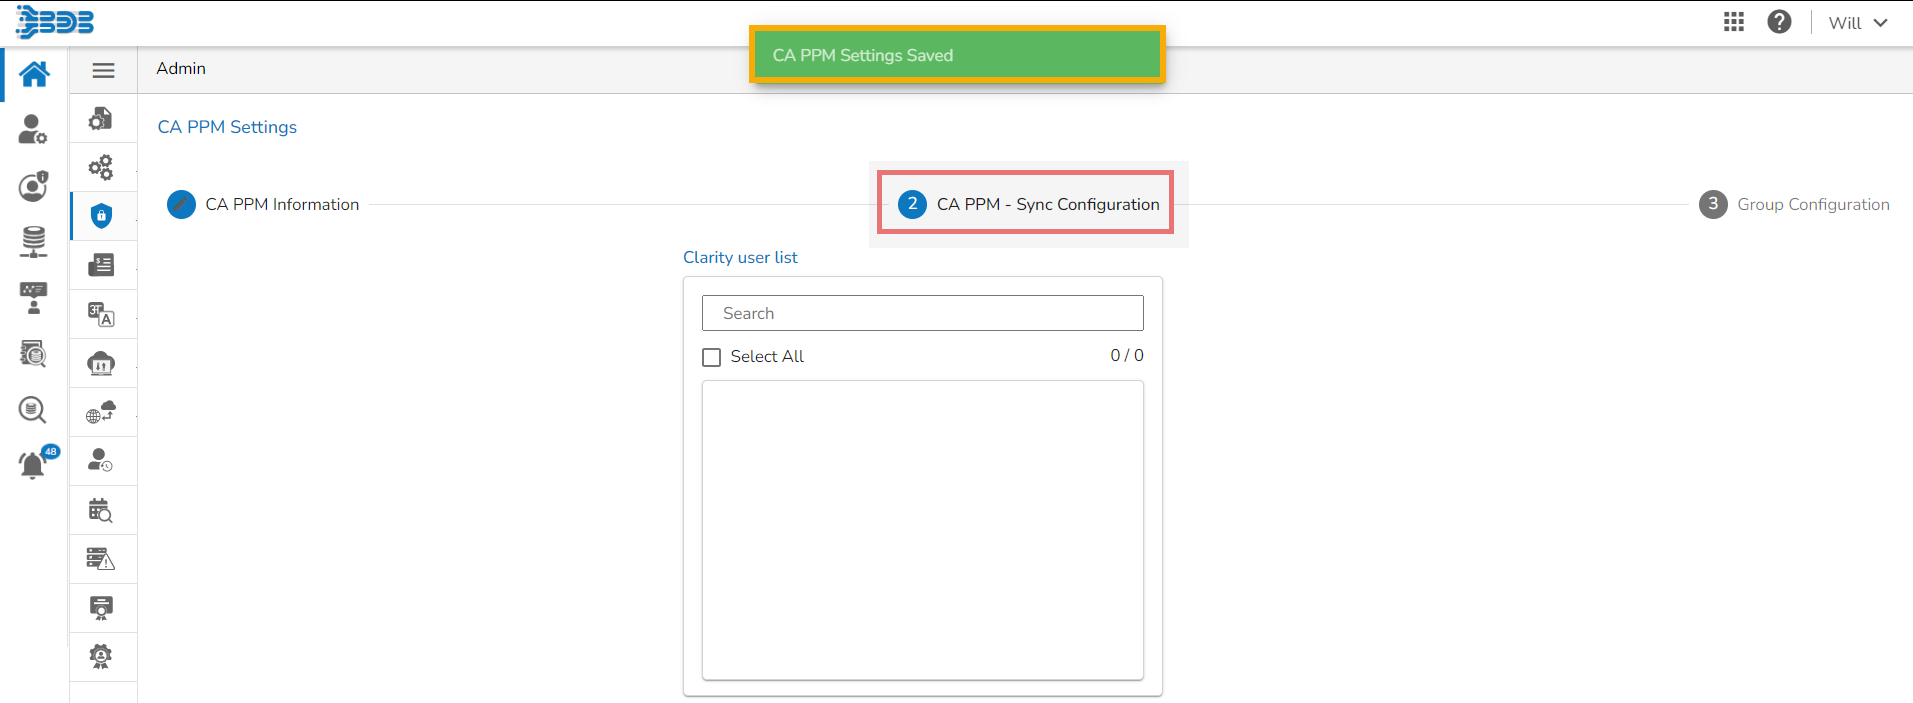
A success message appears, and the administrator gets directed to the CA PPM Sync Configuration tab.
The CA PPM Sync Configuration tab opens, displaying the Clarity User list.
Select a user.
Click the Next option.
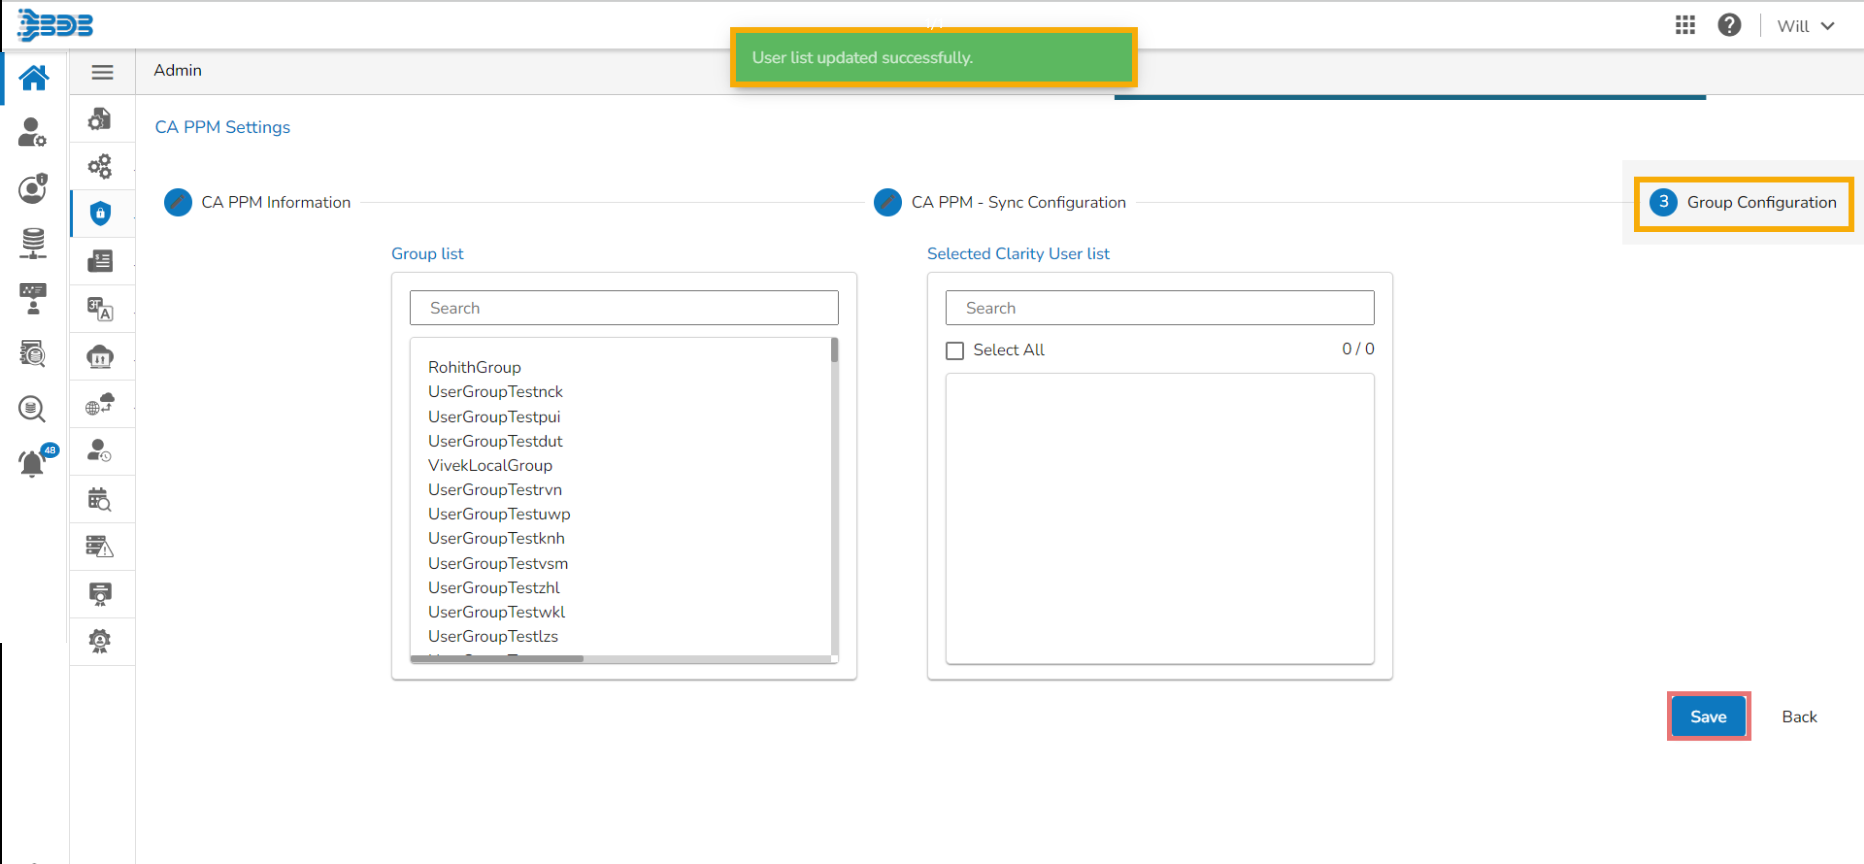
A success message appears to confirm the user list update and the administrator gets directed to the Group Configuration tab.
Select a clarity user from the Group List and add to the Selected Clarity User list.
Select clarity user from the List.
Click the Save option.
Please Note:
Click the Clear all settingicon to erase the entered CA PPM Information.
Click the Back option to go back on the CA PPM Settings page.
Select an API Connector option.
The required configuration details are displayed for the selected API Data Connector.
Click the Save option.
A message appears to confirm the connector configuration.
Please Note: Based on the selected API Connector the configuration fields may vary for each API connector.
Provide the following Data Science Lab Settings Information:
Environment Settings
Algorithms
Image Version
Image Name
API Image Version
API Image Name
GPU Support
Idle Shutdown: Click the Add option to get the field for configuring the Idle Shutdown.
Configuration Details
Limit
Memory
Request
Memory
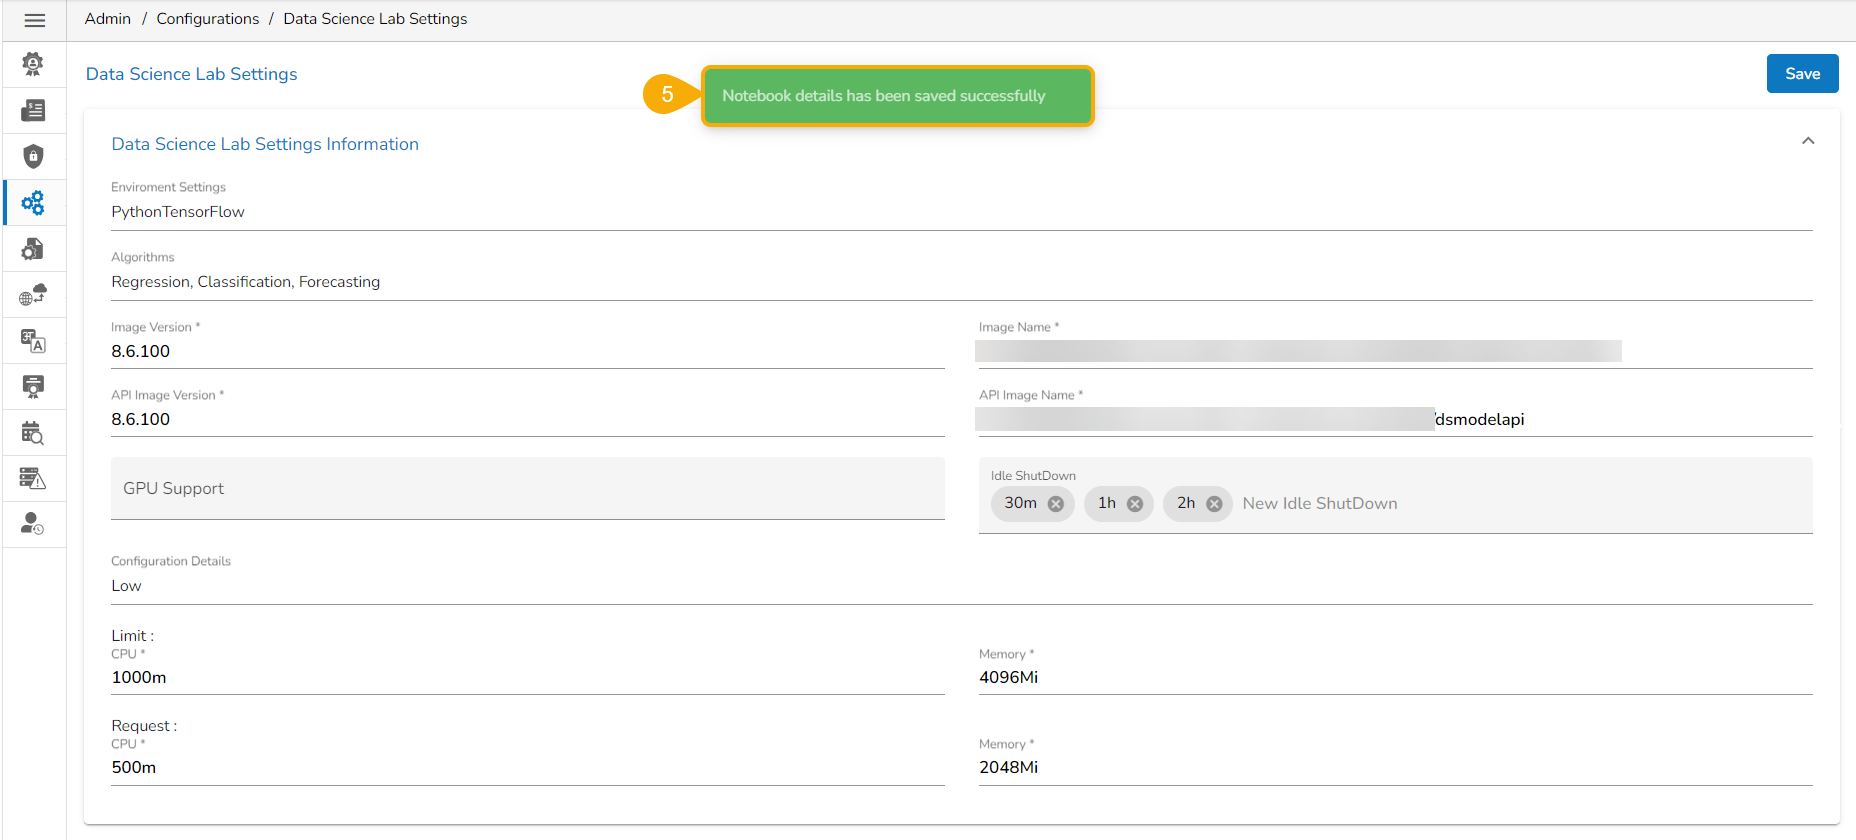
Click the Save option to save the inserted information.
A notification message appears to confirm that the provided configuration for the Notebook Settings has been saved.
Please Note: The user can access the Data Science Lab module of the BDB Platform after configuring this settings option and begin with the Data Science Project creation.
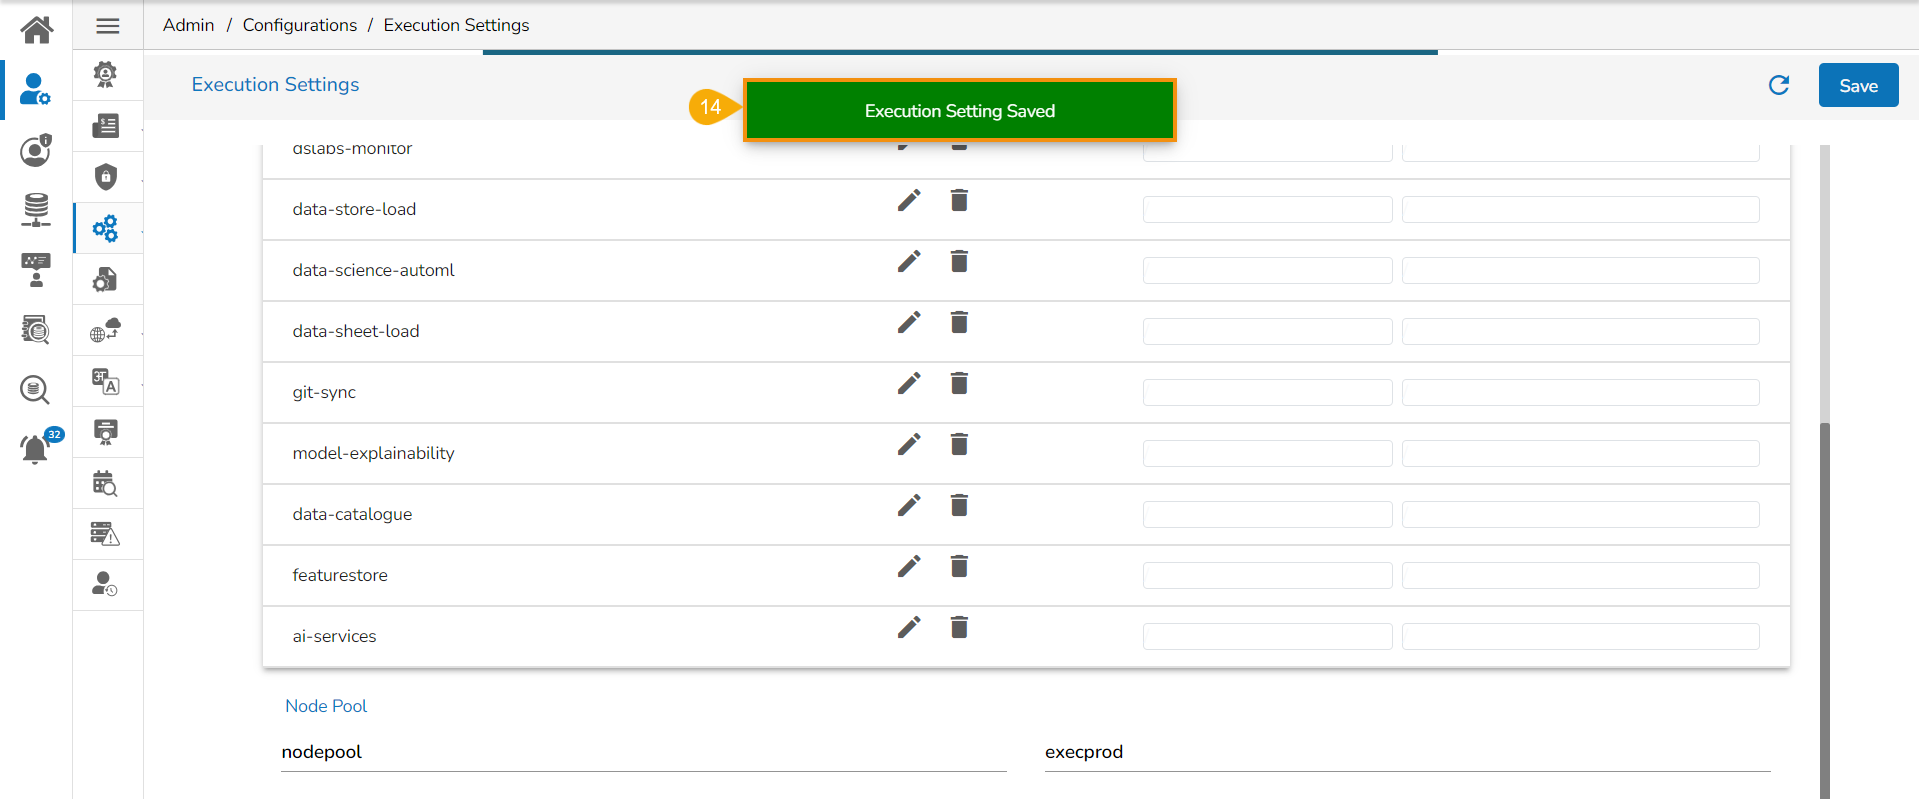
The Execution Settings page opens.
It displays the following Execution Settings details:
Name Space
Configuration List (default list)
Node Pool
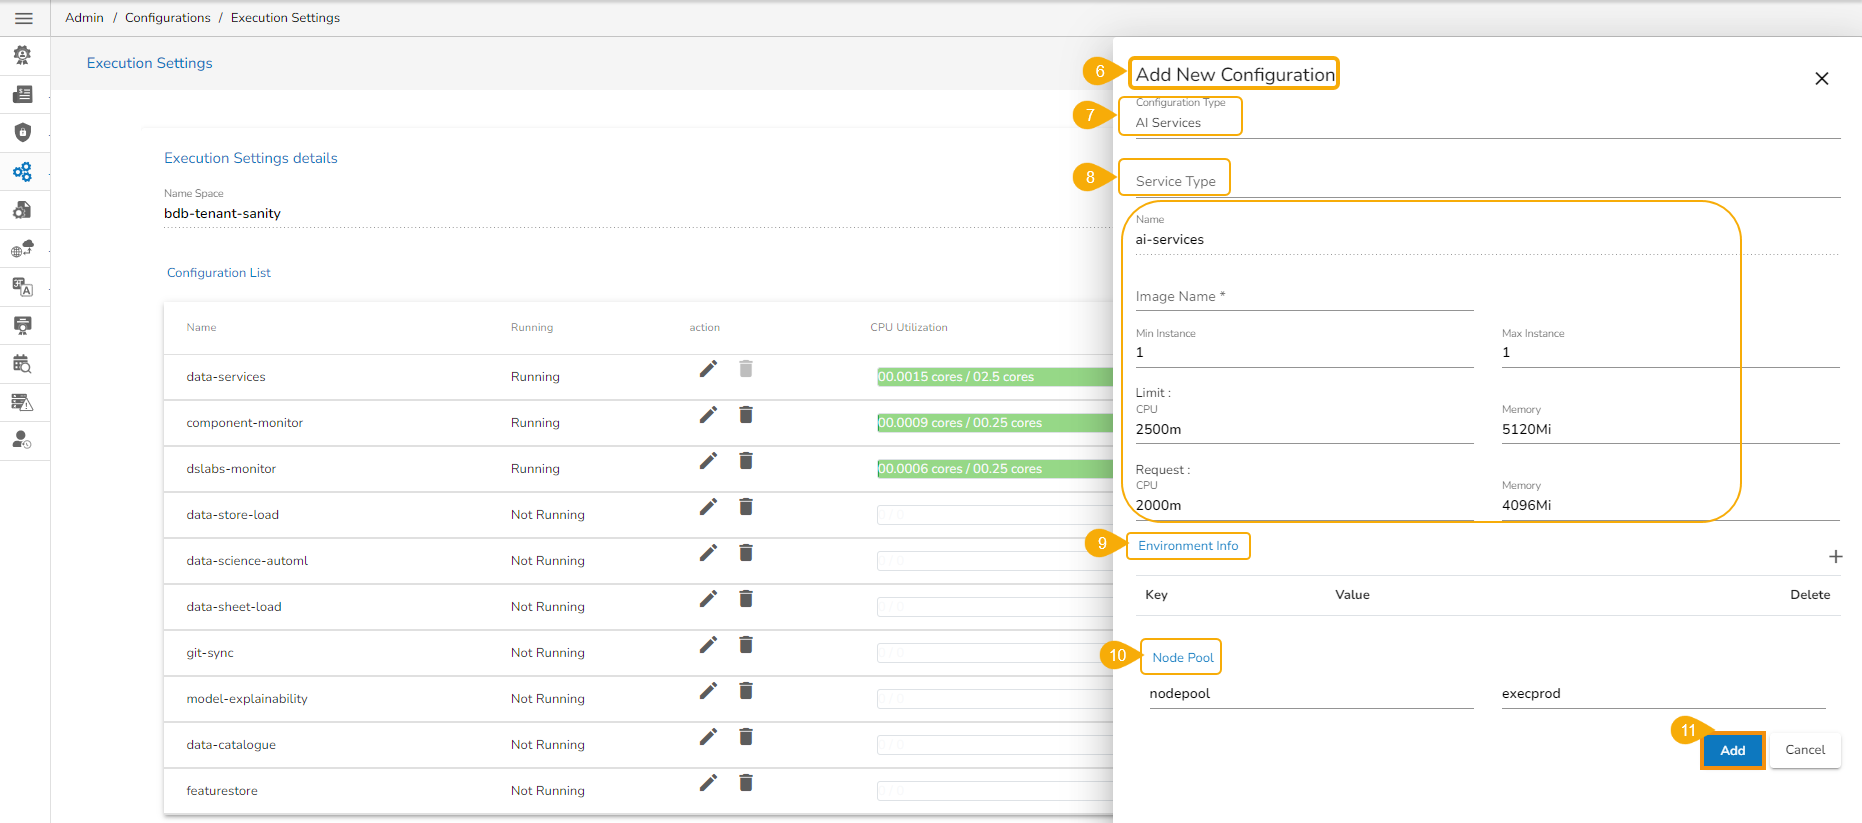
Click the Add new field icon.
The Add New Configuration window opens.
Select an option from the context menu.
Provide the required information for the selected new configuration option.
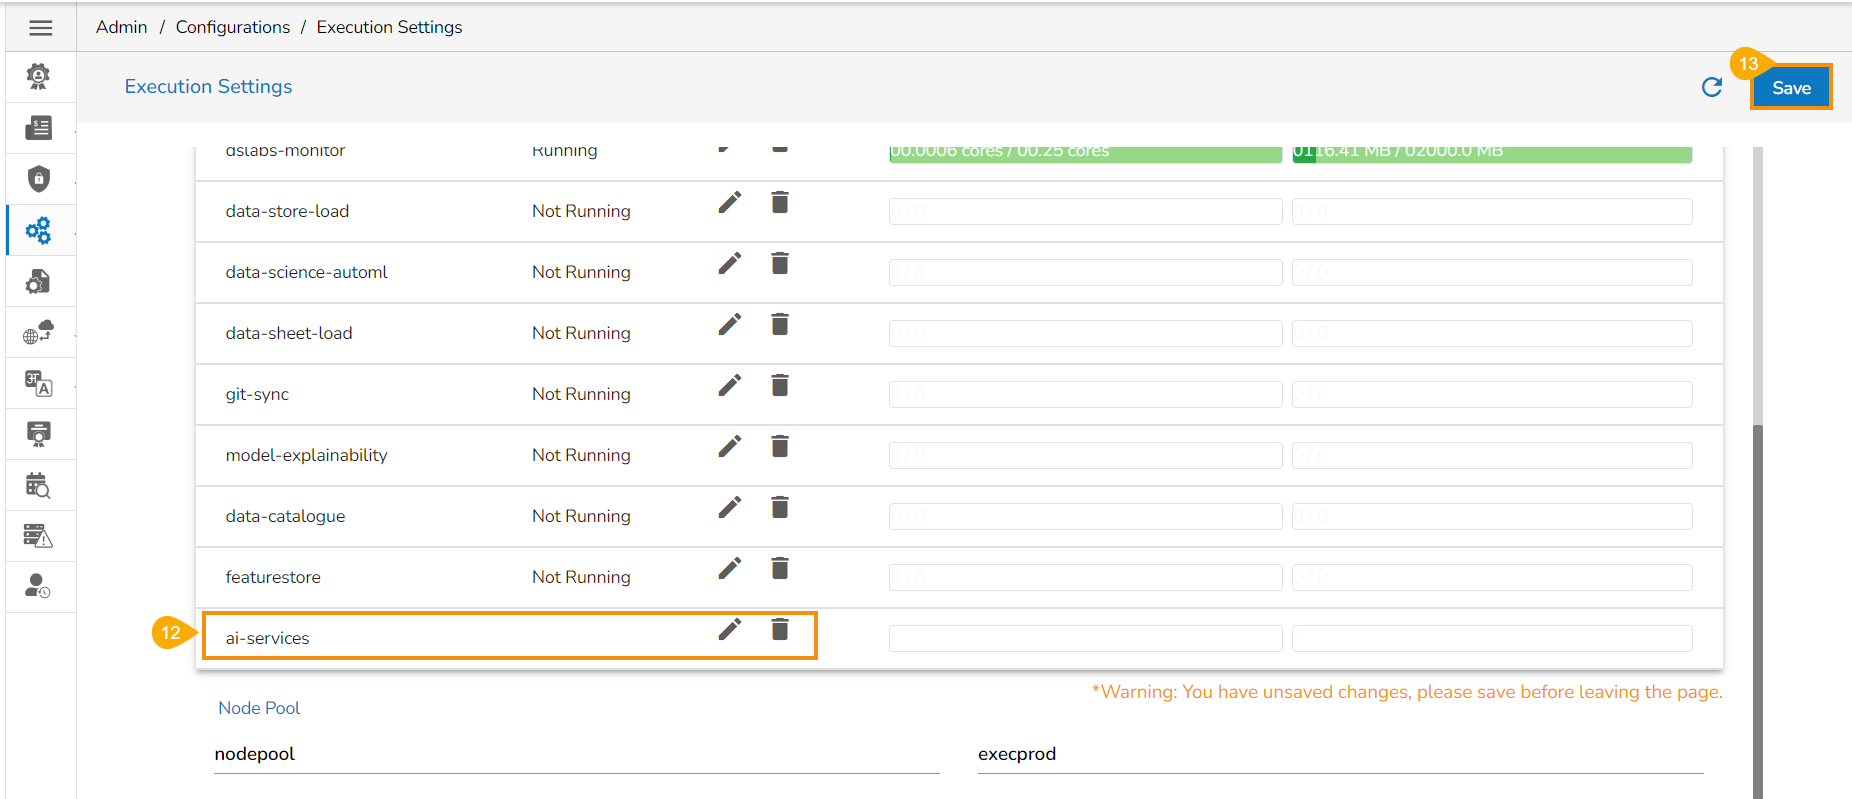
E.g., AI Service is selected in the following image, so the related information it requires are:
Service Type: Select an option from the context menu.
Name: A pre-selected name appears here based on the configuration type selection.
Image Name:
Click the Add option.
The new configuration field gets added to the Configuration List.
Click the Save option for the Execution Settings page.
A notification message appears and the concerned Execution Settings will be saved with the newly added configuration.
Enter the database details to save the form data as mentioned below:
Username: Use read-only credentials
Password: Use a valid password
Host: Provide the Host address
Port: Provide the port number
Database Name: Provide a database name
Click the Validate option to validate the Form Settings.
A notification message appears.
Click the Save option to save the entered settings information.
A confirmation message appears, and the entered Form Settings get saved.
Please Note:
Click the Clear option to erase the entered database settings details.
All the fields for the Form Settings are mandatory.
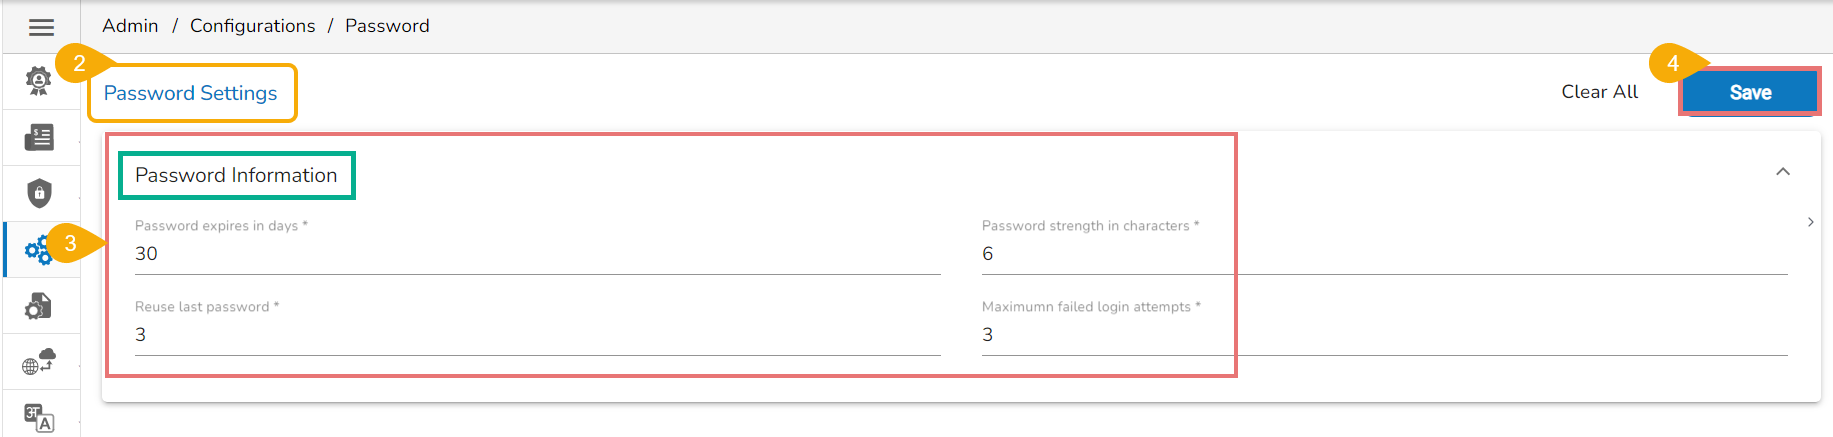
Provide the following information:
Password Expiry (Days): Set password validity (in days)
Password Strength (: Set password length (6 to 16)
Password Reuse: Set a limit to restrict the user from using an old password (the last 3 passwords cannot be reused)
Login Failures (No. of User Login Failure): Set the number of chances provided to the user for logging in with wrong passwords (Maximum 3 login chances are provided to a user. The user account gets blocked if a user enters the wrong password more than 3 times.)
Click the Save option to save the entered password information.
Click the Clear All option to erase the entered password information.
Please Note:
The administrator can block any user who fails to enter the correct password 3 times.
A user can Sign in with the same password only when the administrator enables the user again (The password must be a combination of alphabetical letters, numerical figures, and a unique character E.g., Admin1@).
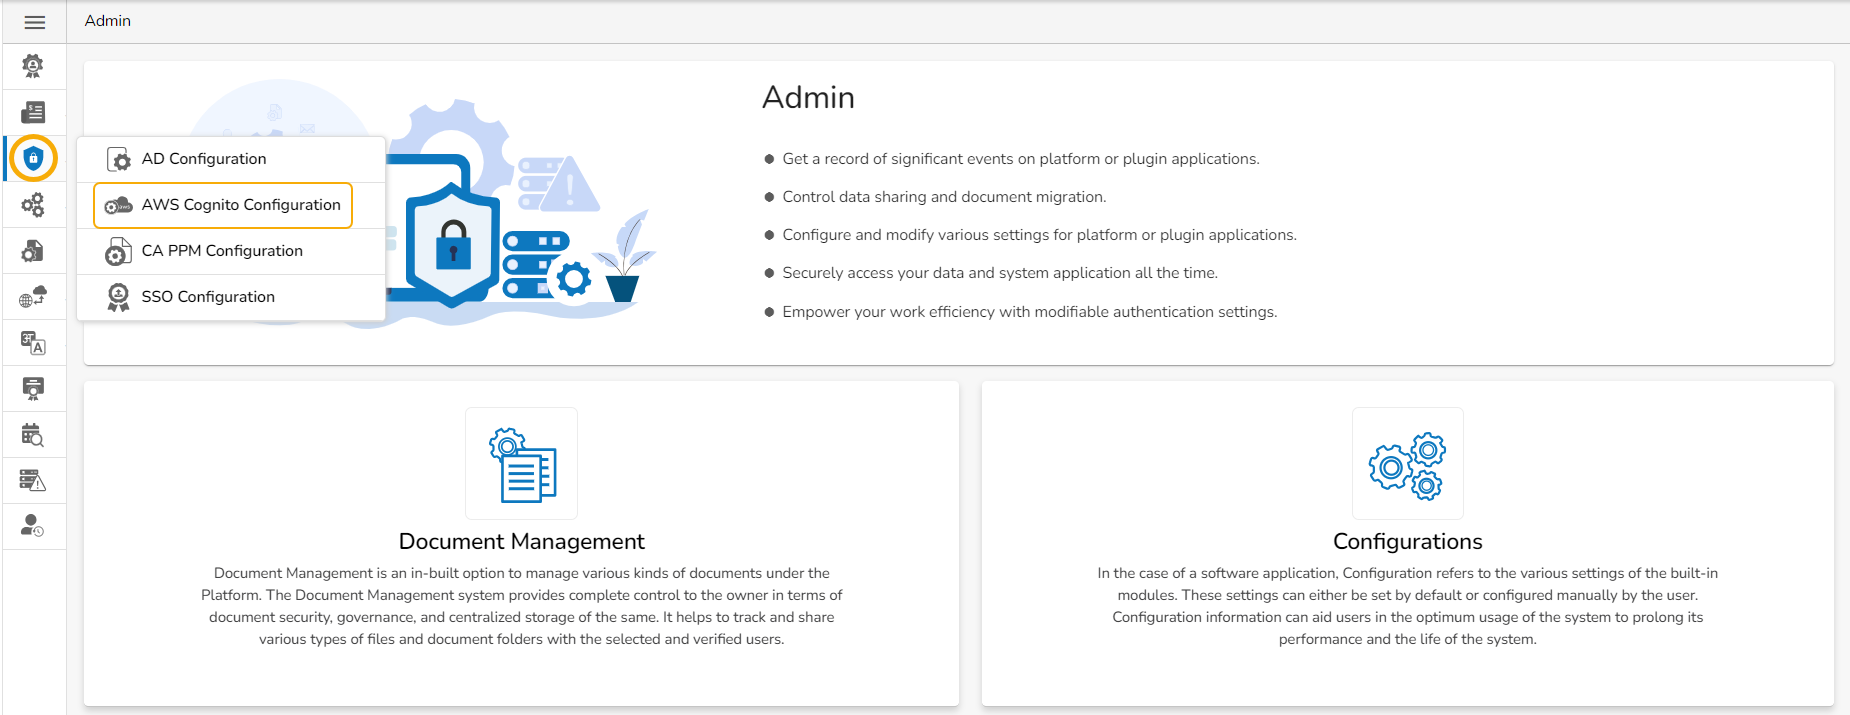
Follow the below-given steps to configure the AWS Cognito settings:
Select the AWS Cognito Configuration option from the Authentication drop-down menu.
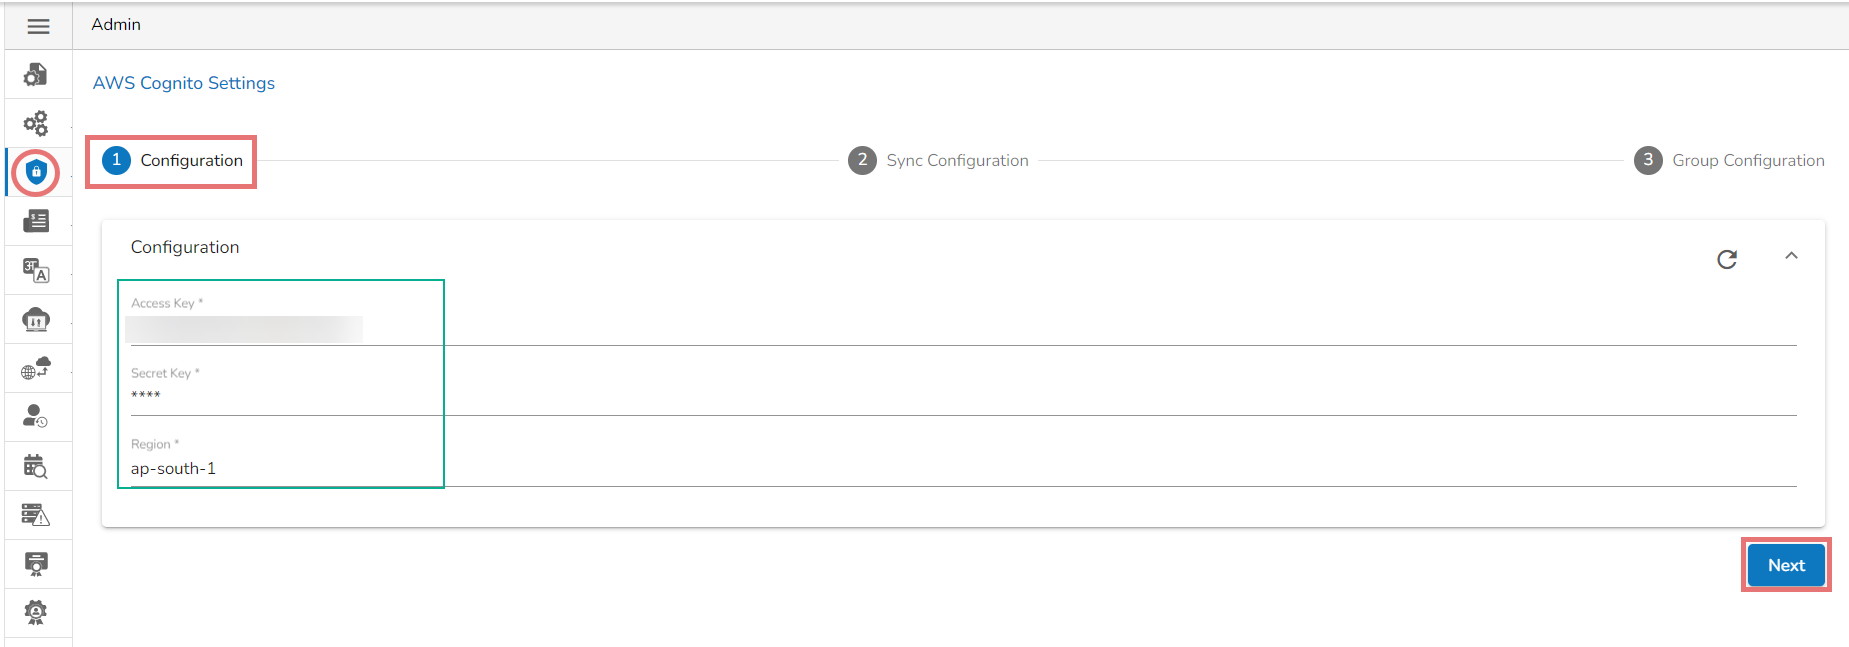
The AWS Cognito Settings page opens displaying the Configuration tab.
Provide the following information to configure the AWS Cognito Settings:
Access Key
Secret Key
Region
Click the Next option.
A success message appears to confirm the action.
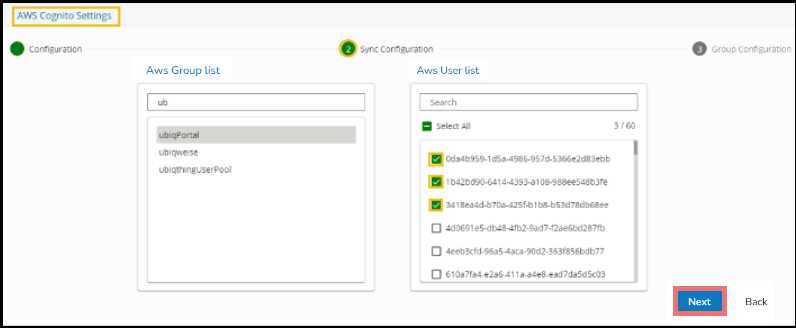
The user gets redirected to the Sync Configuration tab.
Select a user group from the displayed AWS Group list.
Select users from the AWS User list by putting the checkmarks in the boxes given next to the usernames.
Click the Next option to proceed.
A success message appears to confirm that the user list has been updated.
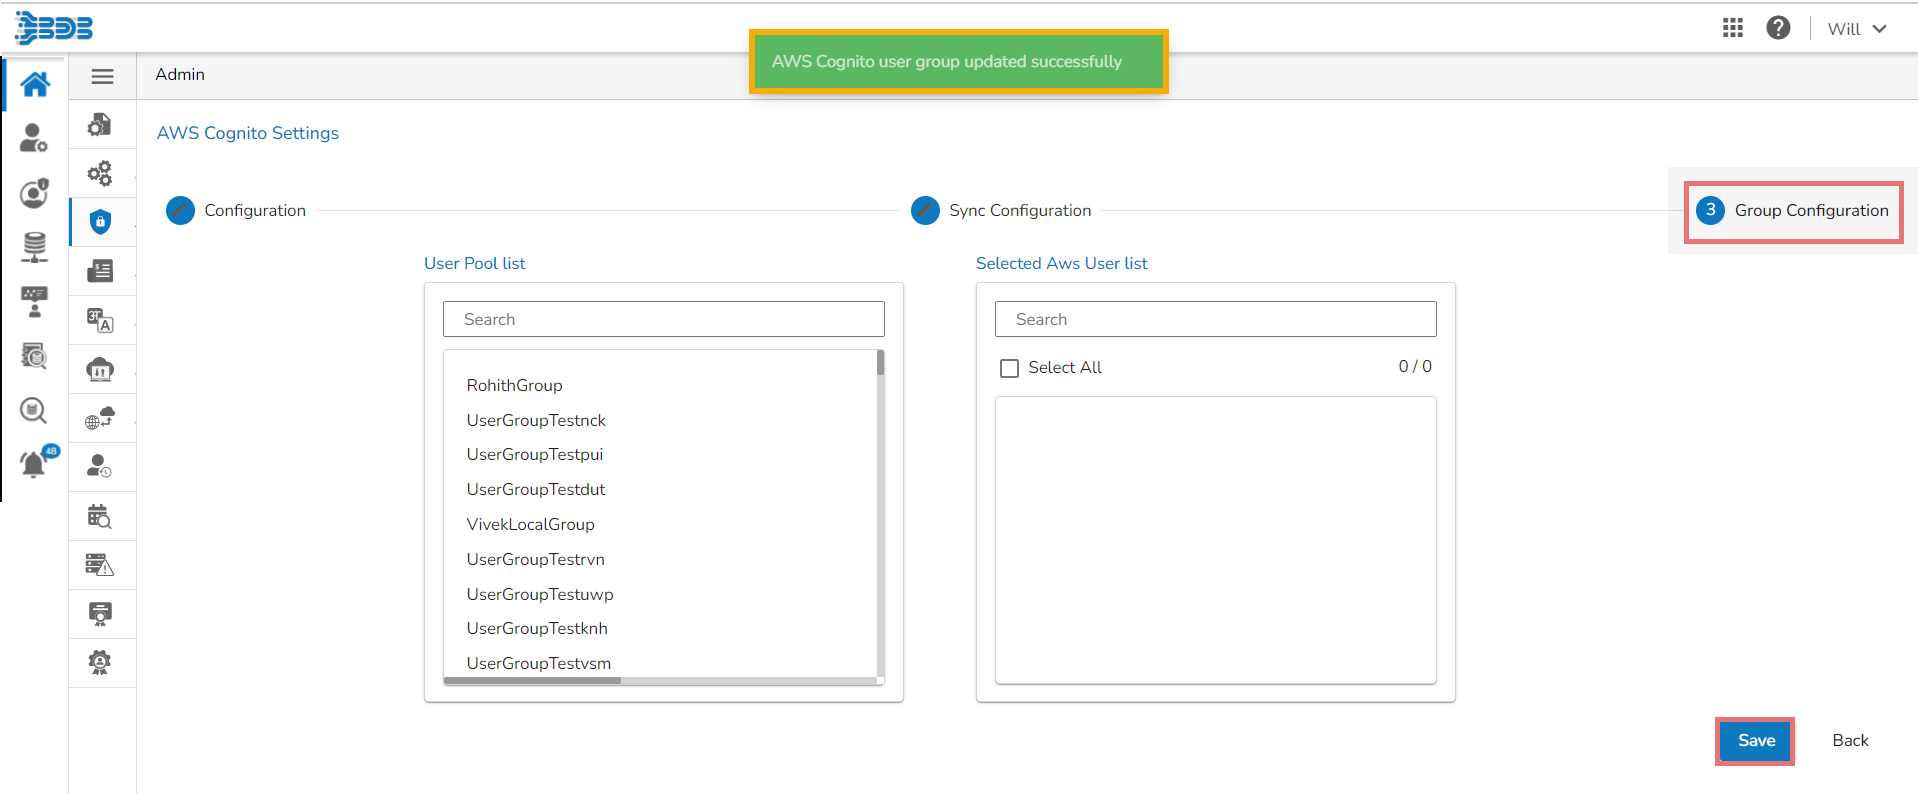
The Group Configuration tab opens.
The User Pool list appears.
Add the user to the Selected AWS user list.
Please Note:
Click the Clear all settingicon to erase the entered AWS Cognito information.
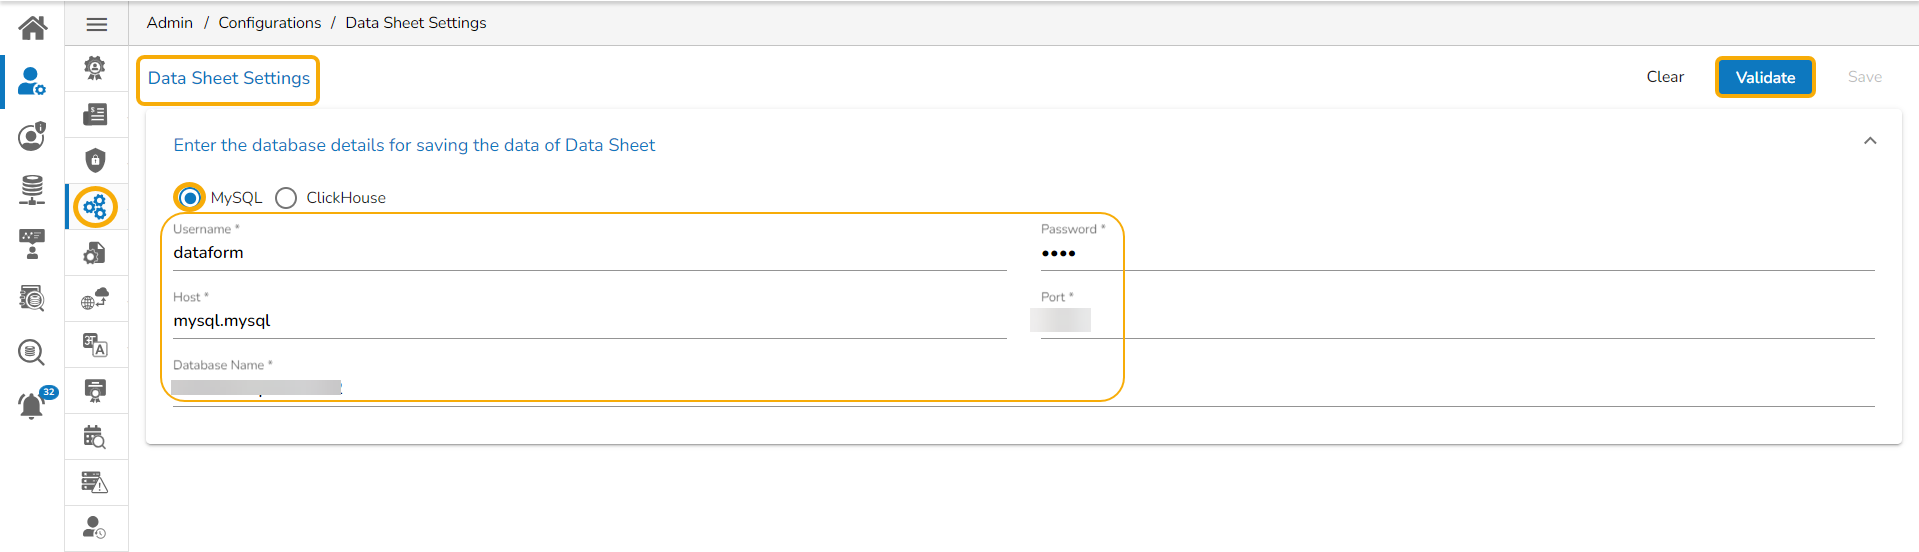
The Data Sheet Settings option helps the administrator to configure the Data Sheets templates.
Click the Data Sheet Settings from the list of Configurations under the Admin module.
The Data Sheet Settings form opens.
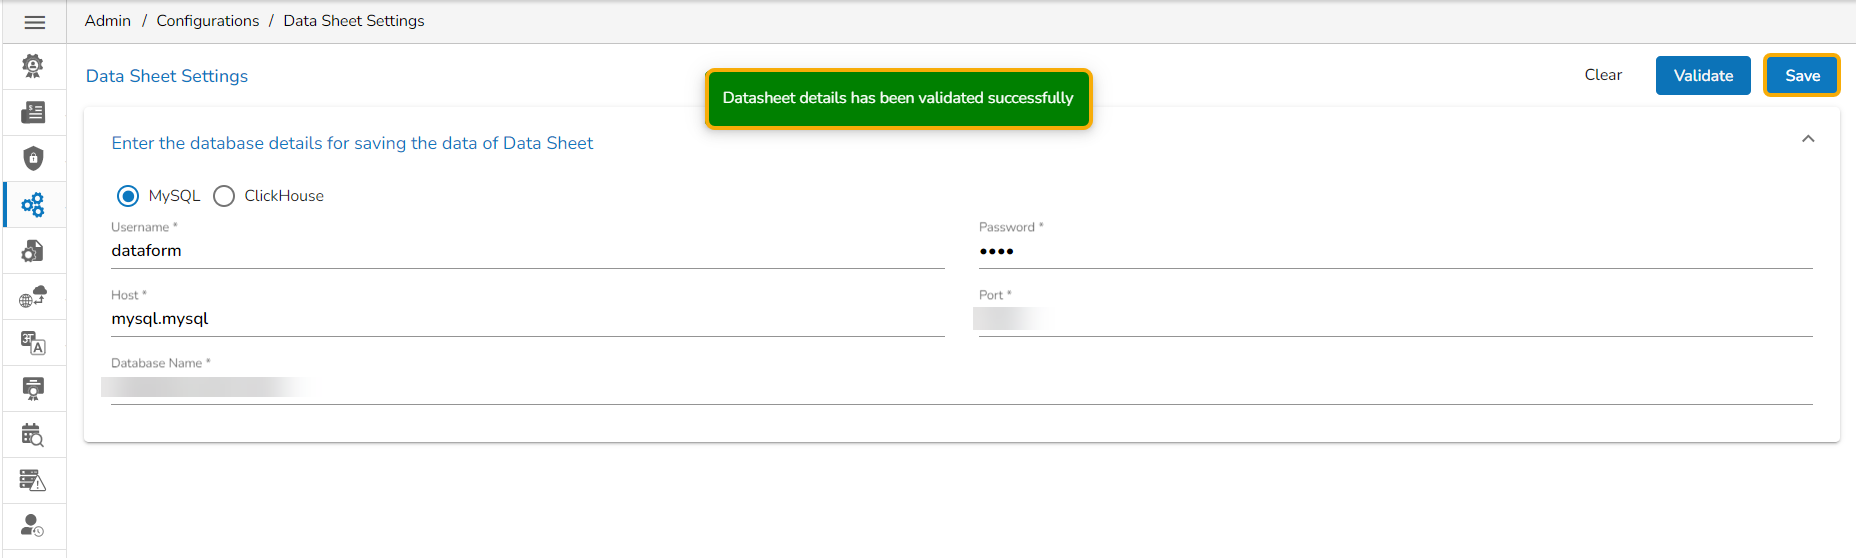
Select MySQL as Database type.
Enter the database details to save the Data Sheet data as mentioned below:
Username: Use read-only credentials
Password: Use a valid password
Click the Validate option to save the entered settings information.
A notification message appears and the provided Data Sheet Settings get registered.
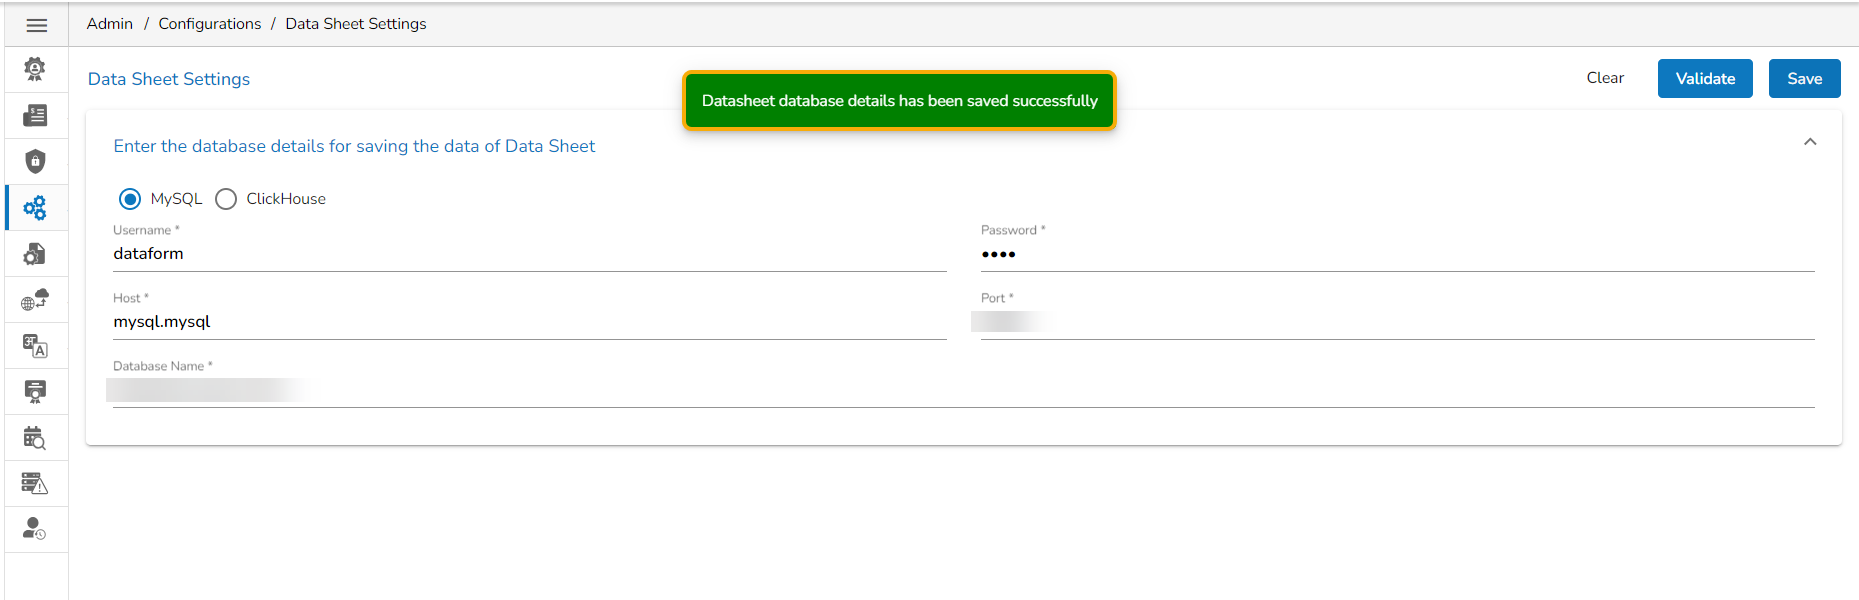
Click the Save option.
A notification message ensures the user that the validated settings are saved for the Data Sheet Settings.
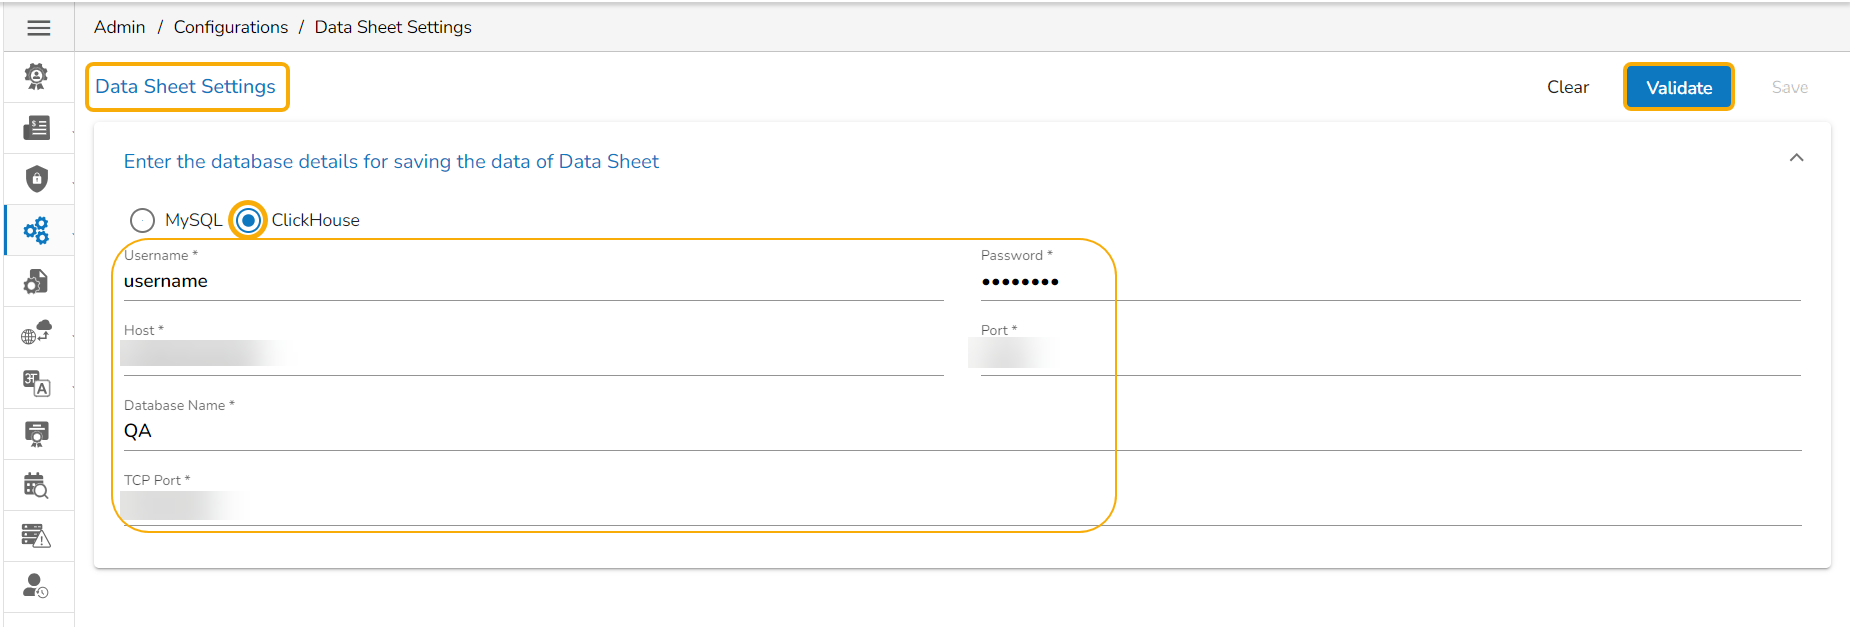
The user can follow the same set of steps to configure the Data Sheet Settings with the ClickHouse option.
Navigate to the Data Sheet Settings form.
Select the ClickHouse as Database type.
Enter the database details to save the form data as mentioned below:
Please Note: The Data Sheet supports MySQL version up to 8.0 at present.
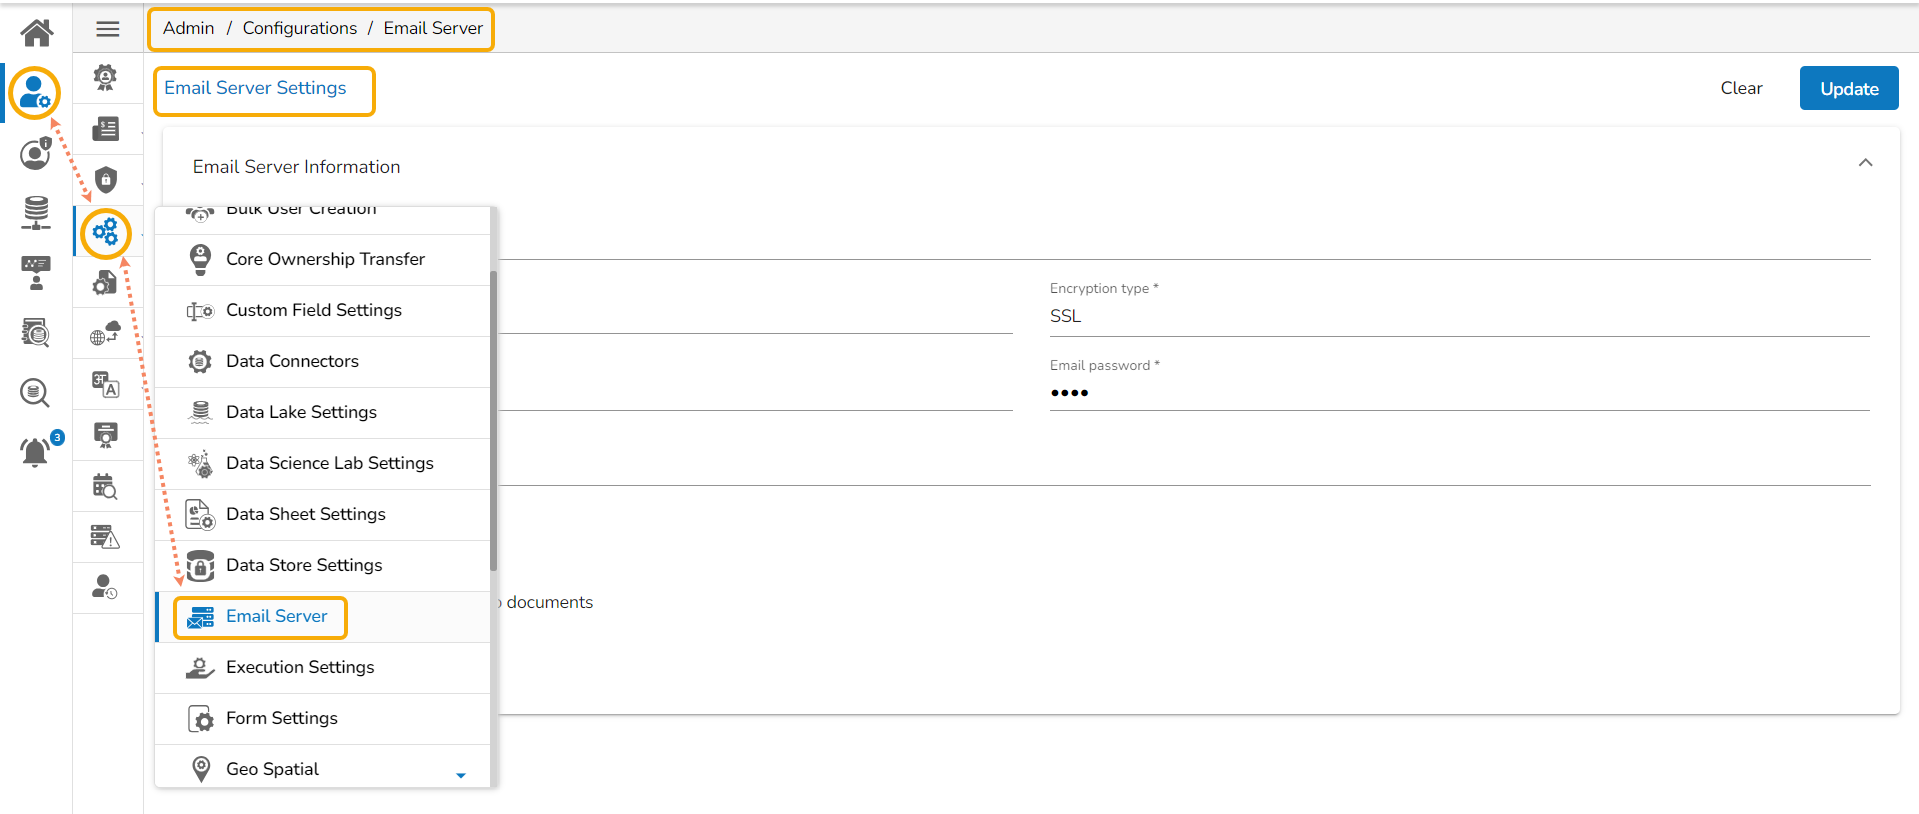
The admin can configure the Email Server to send confirmation mails.
The administrator can configure the email server information using this admin option to get email alerts or stop the email alerts for some of the actions performed on the various Platform documents or while using functionality such as Forgot Password, etc.
Click the Email Server option from the Configurations list.
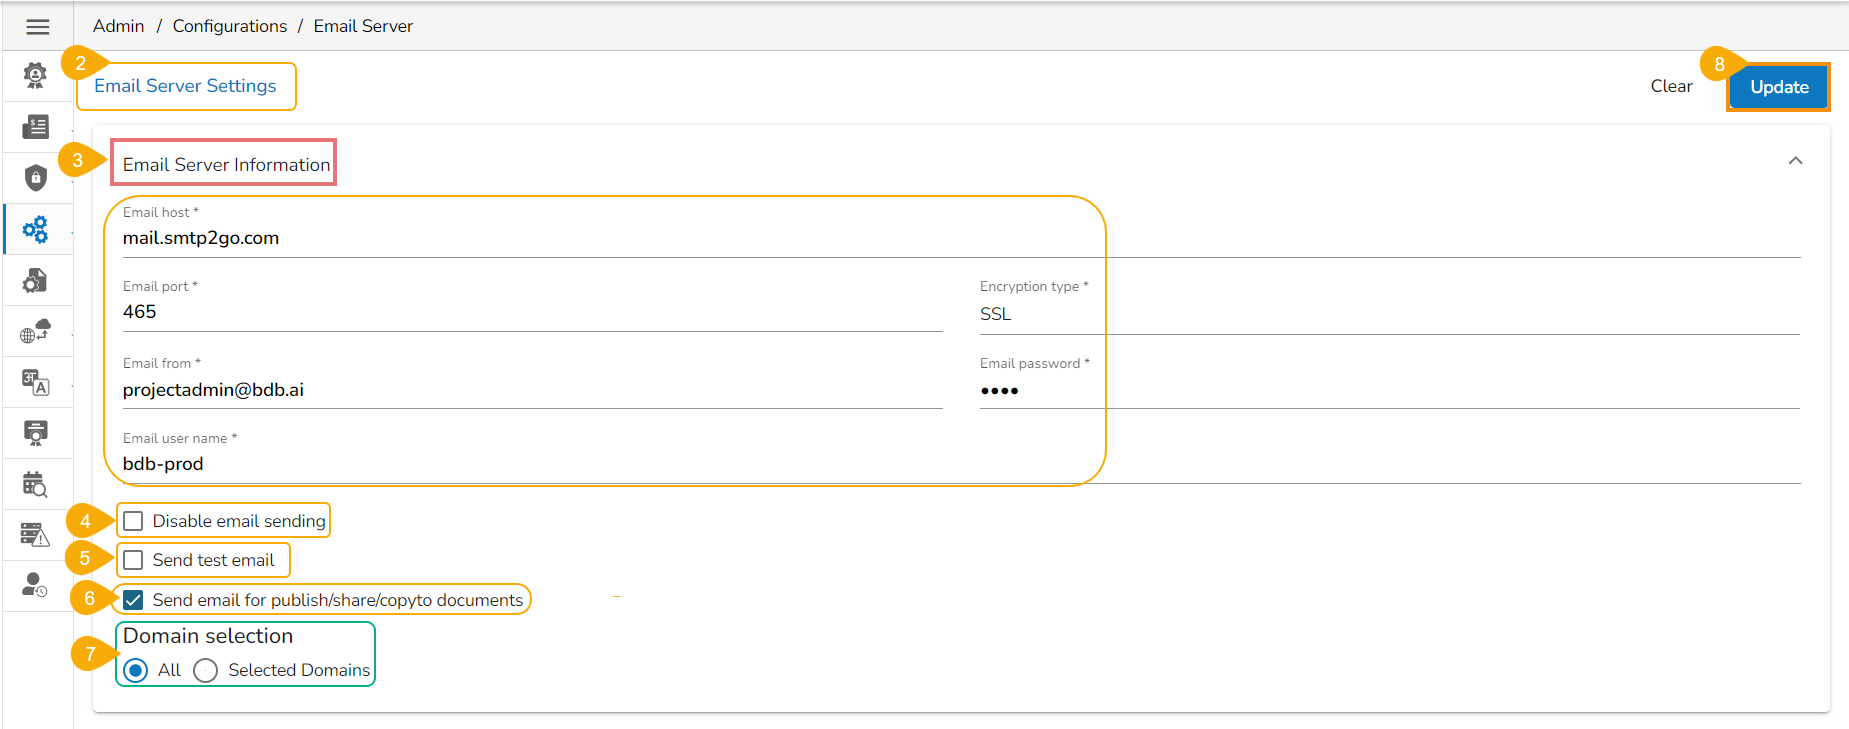
The Email Server Settings page opens.
Provide the following Email Server Information.
Email Host: SMTP host address
Email Port: Port number of SMTP
Configure the following alert options for email by putting checkmarks:
Disable email sending: By selecting this option, the email alert gets disabled.
Send test email: By selecting this option immediately a test mail is sent.
Domain Selection: Select a Domain from the given options (All/Selected Domains).
Click the Update option to update the email server settings information.
A notification message appears to assure that the saved email server details are updated.
Please Note: Click the Clear option to erase the entered configuration details for the Email Server Settings.
This page explains how to configure the Migration option for a module through New Version Control.
Transfer the files from the source location to the target location within a software platform using the Migration option. The user can configure the migration-related settings using the New Version Control admin option.
The supported modules for the migration are listed below:
API Service
Dashboard
DS Lab (Repo Sync Projects, Notebook & Model)
Pipeline
Story (Report)
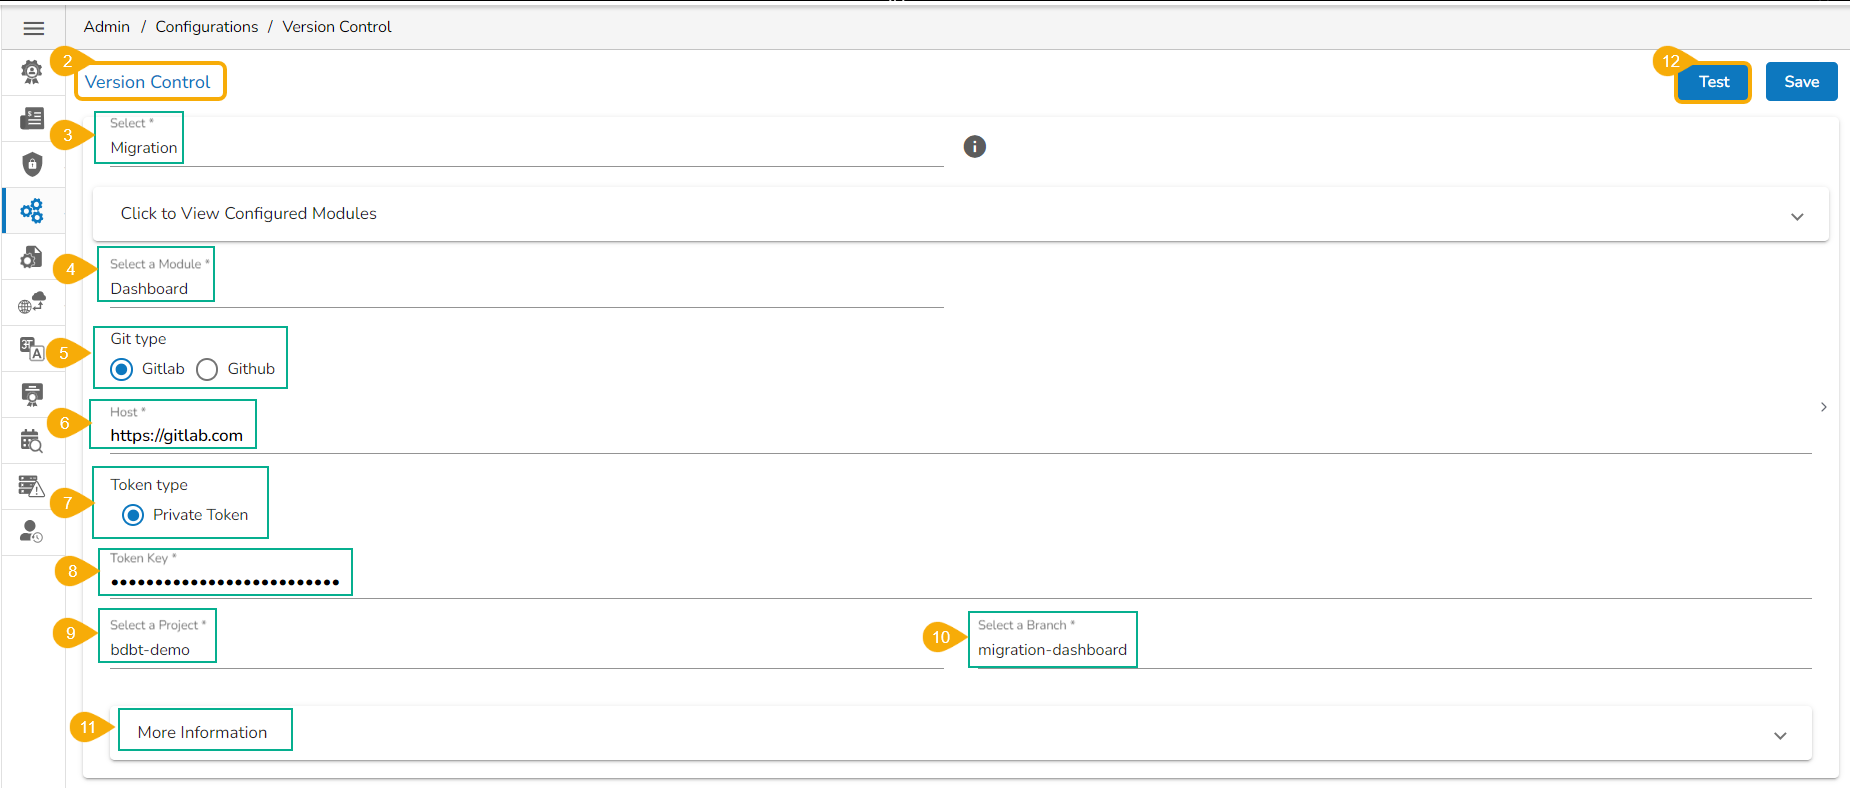
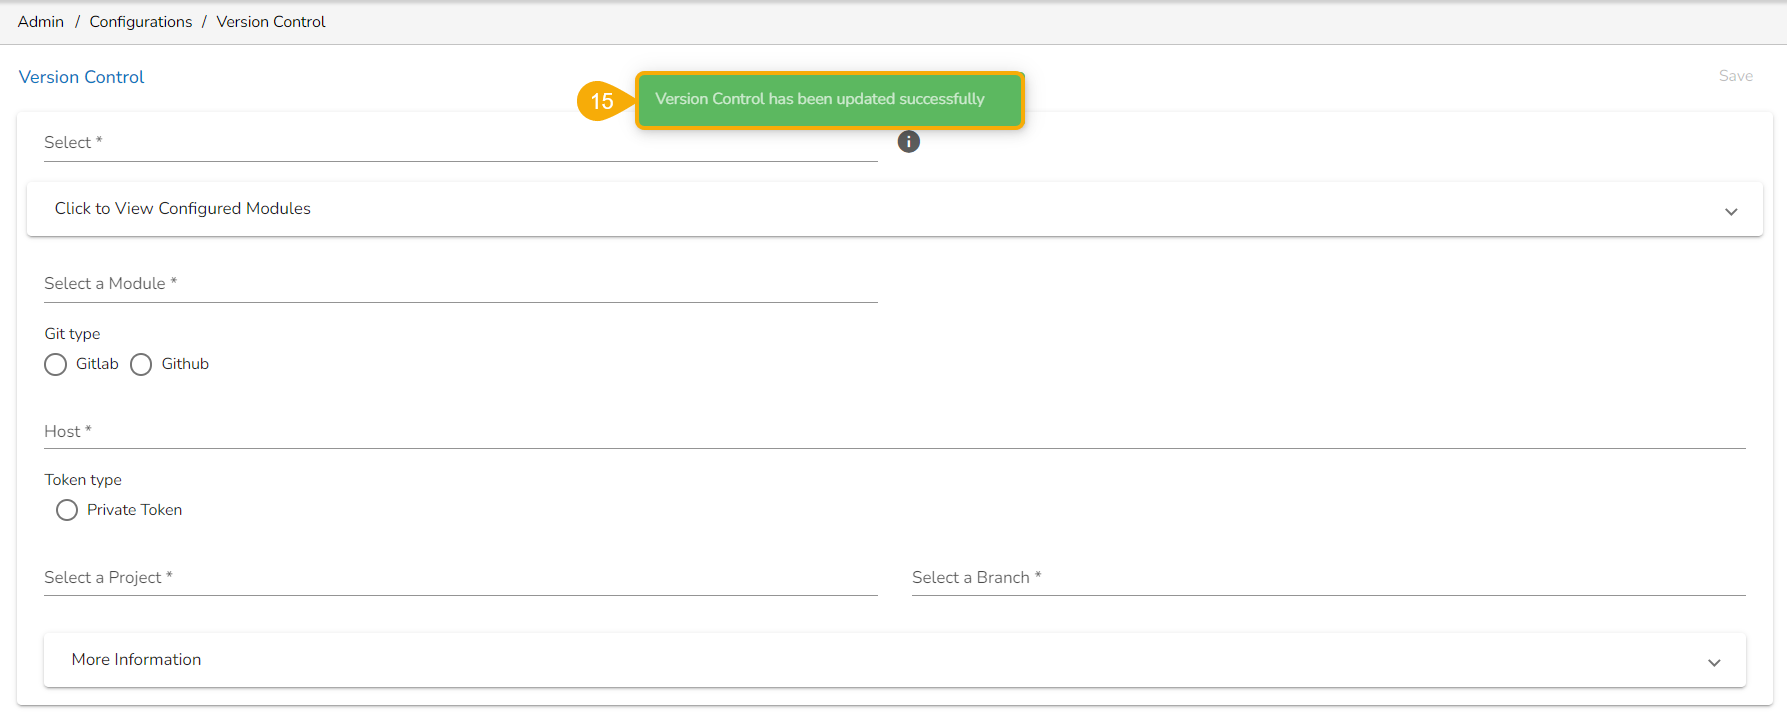
Select the New Version Control option from Configurations under the Admin module.
The Version Control Information form opens.
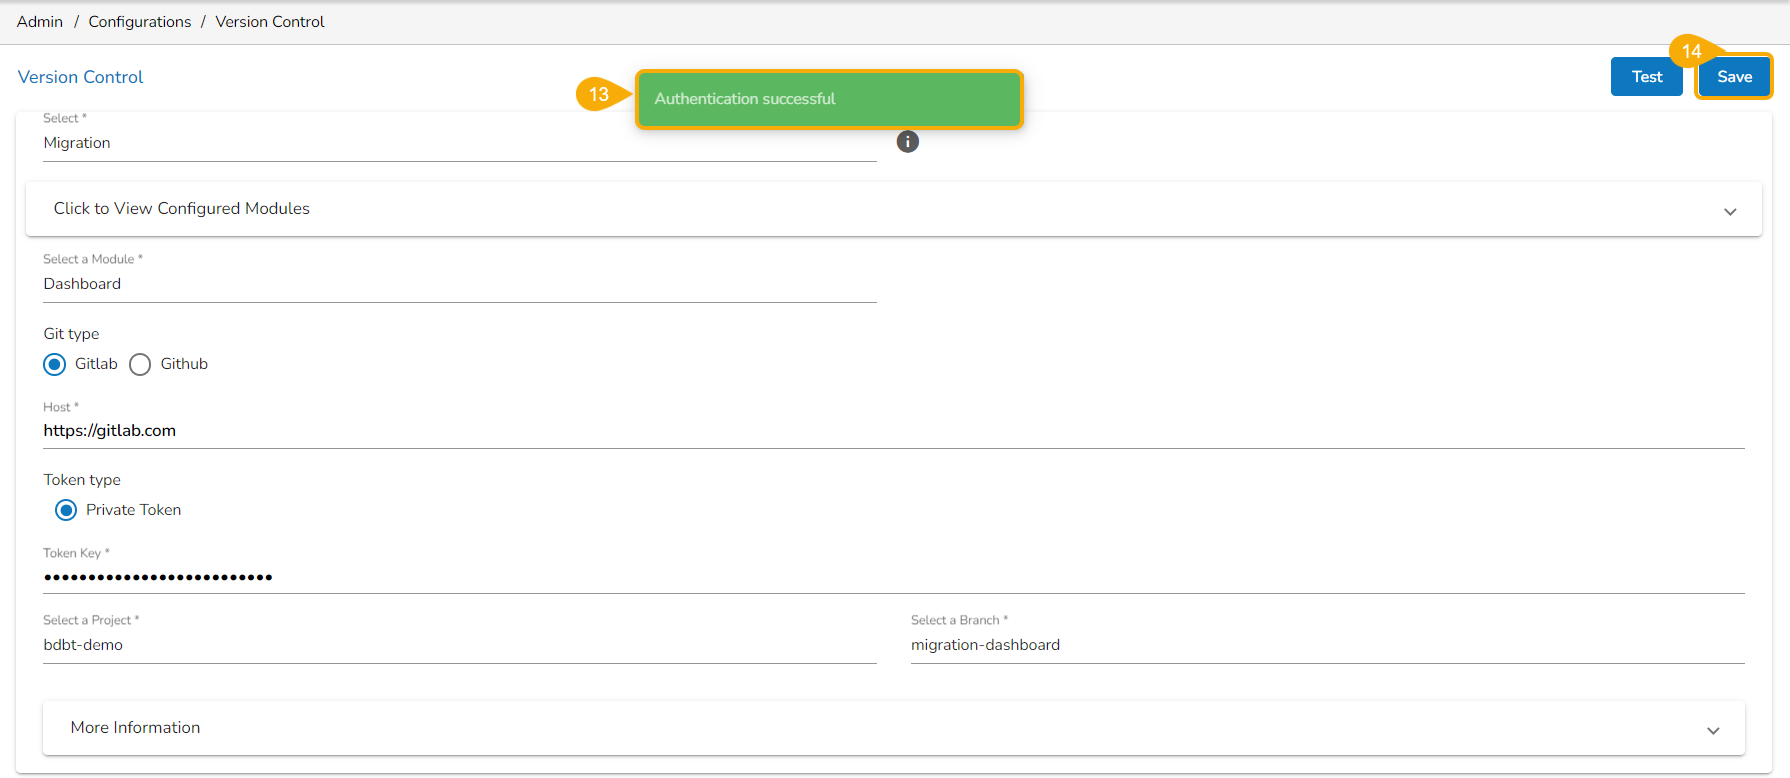
Select the Migration option from the first dropdown.
All supported modules will be listed under the Select a Module drop-down which are supporting the Version Control functionality. (E.g., Dashboard is selected in the given image).
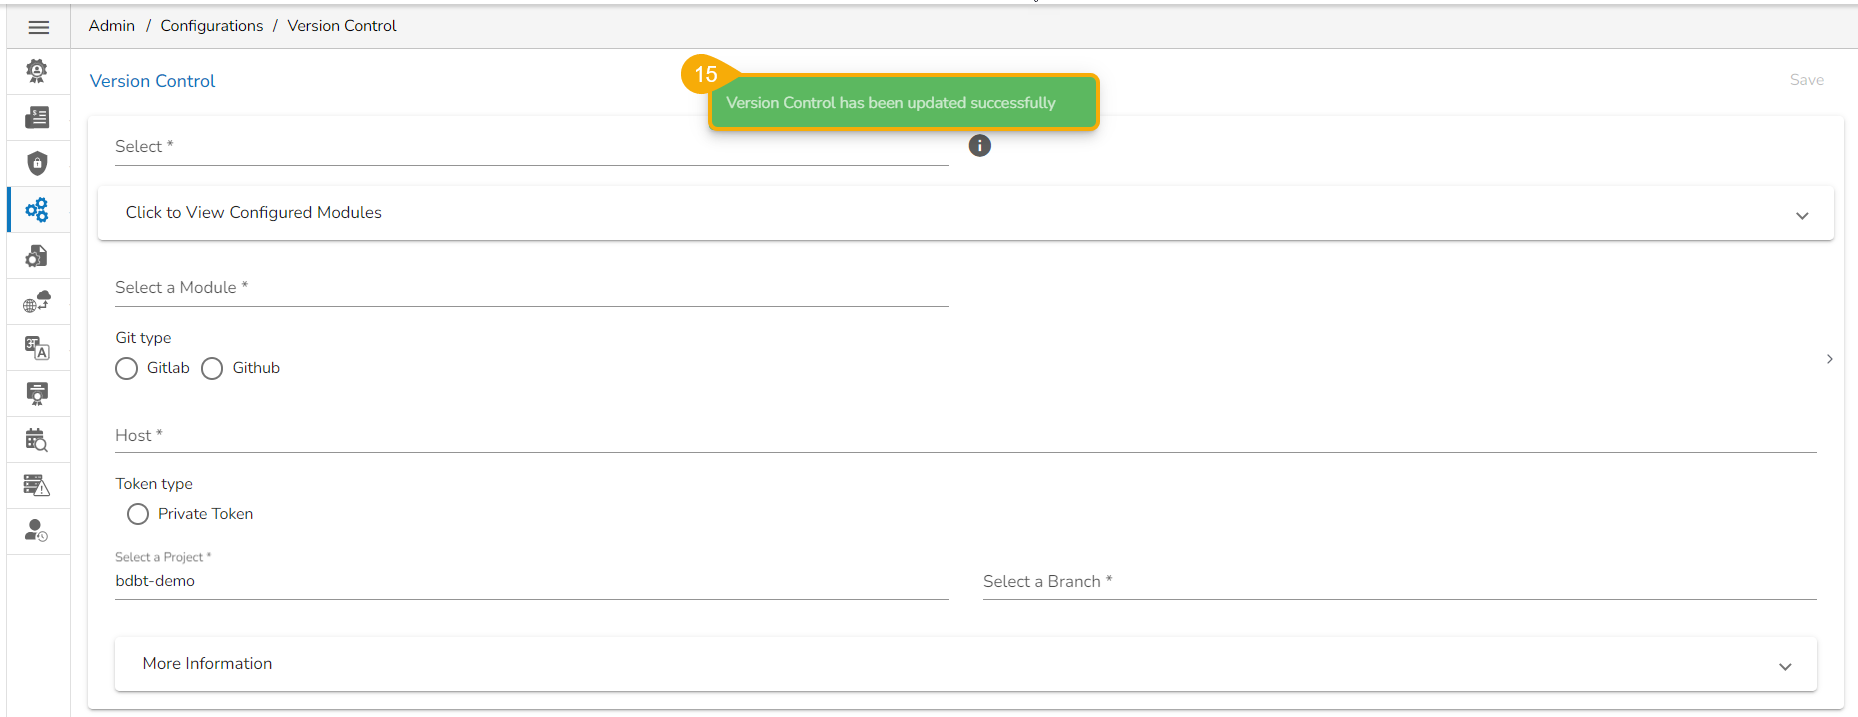
A configuration message appears and the configuration for the New Version Control gets saved.
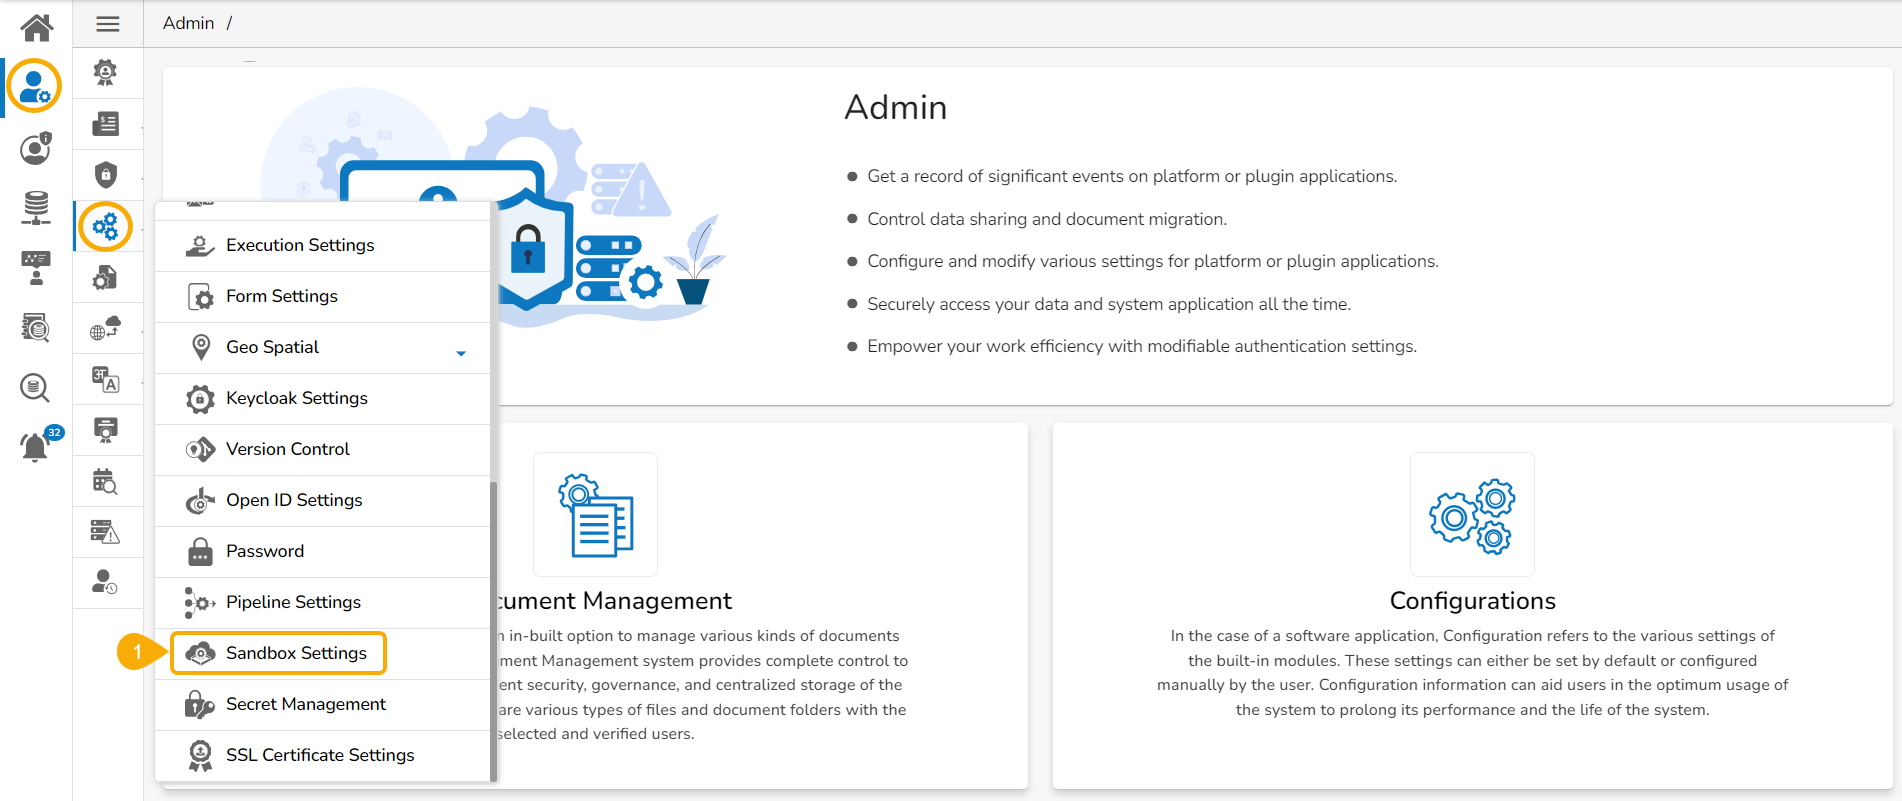
The user can configure the Sandbox settings using this option.
Click the Sandbox Settings option from the list of Configurations option.
The Sandbox Settings page appears.
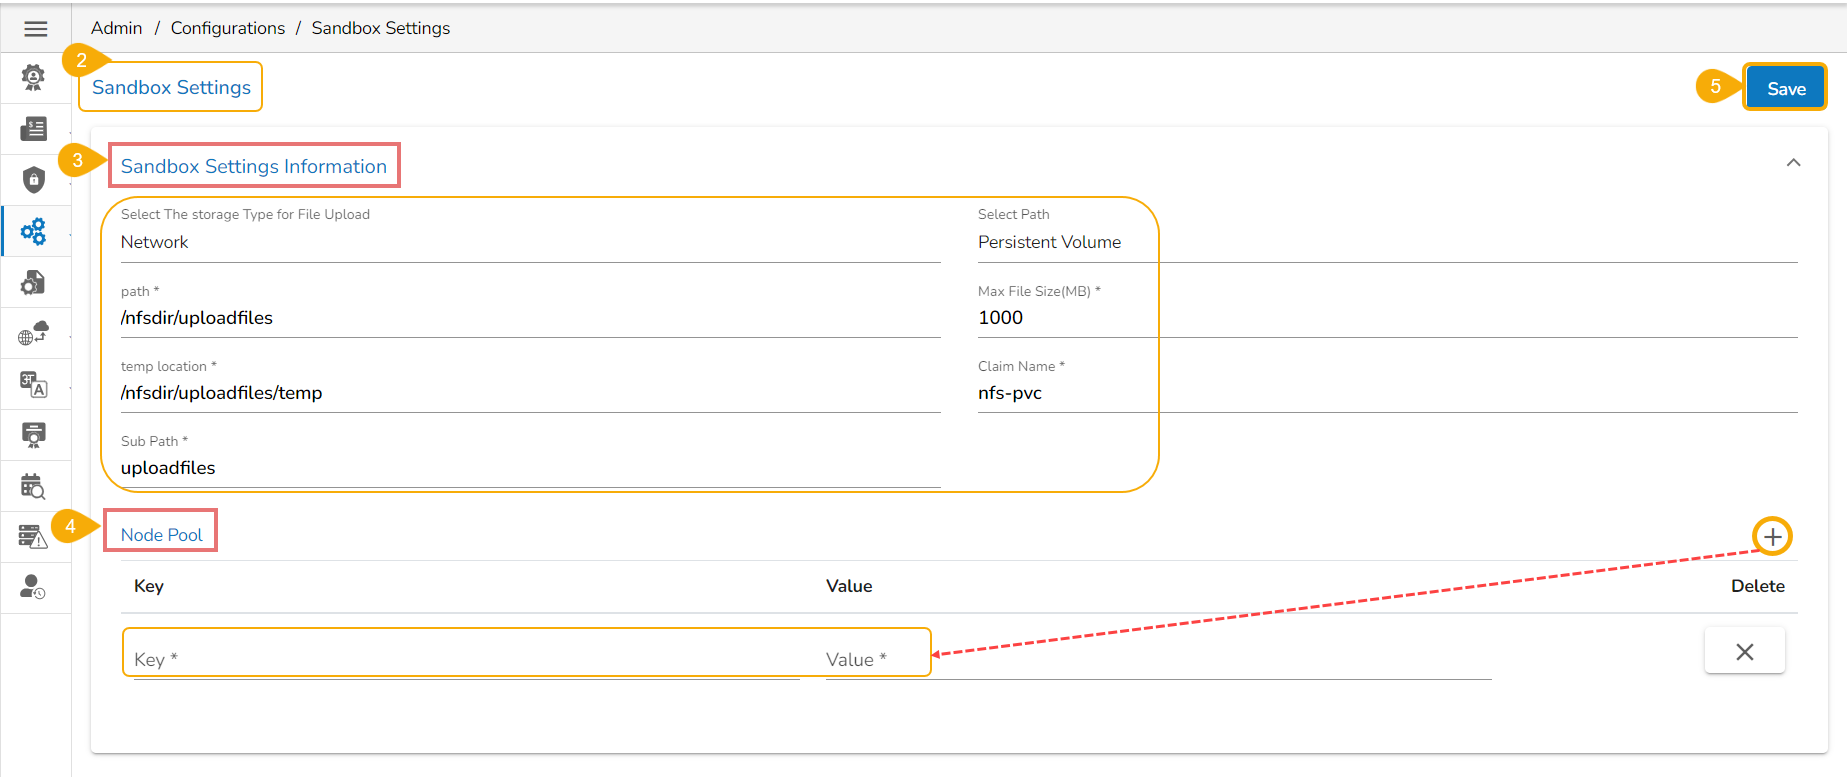
Provide the following information for the Sandbox Settings:
Select the Storage Type for File Upload: Only Network is implemented as the Storage Type which will be selected by default.
Select Path: Choose the base path where all the Sandbox files will be saved. This path acts as the root directory for file storage.
Node Pool: The user can add the Key and Value using the Add new field icon.
Click the Save option to save the inserted information.
A notification message ensures that the provided configuration for the Sandbox Settings has been saved.
Please Note:
All DS Lab Notebooks, Models, Transforms and Artifacts will be saved inside Sandbox location only.
The user can authenticate the Windows AD accounts through this admin option.
Click the Authentication option from the list of admin options.
The following authentication options appear:
This section explains the steps to configure the Geospatial plugin.
The option provides two types of Map settings.
Click the Geo-Spatial from the Configuration and Settings admin option.
The following option appears:
BDB provides Versioning option as a simplified process to track changes for the various modules to ensure efficient development and enhance collaboration for effective code management.
Version control systems like Git provide a robust set of features to ensure efficient and reliable software development. They enhance collaboration, enable effective code management, and simplify the process of tracking changes, thereby contributing to the overall quality and maintainability of the software.
Version Control feature helps the users to maintain a copy of component versions in the Version Control System (Gitlab | GitHub repository). The user can also pull a specific version from the Version Control System after some versions are pushed there. The supported modules for the versioning are as follows:
Dataset
This Admin option allows to migrate Notebooks, Models, and Project (Repo Sync) from the Data Science Lab.
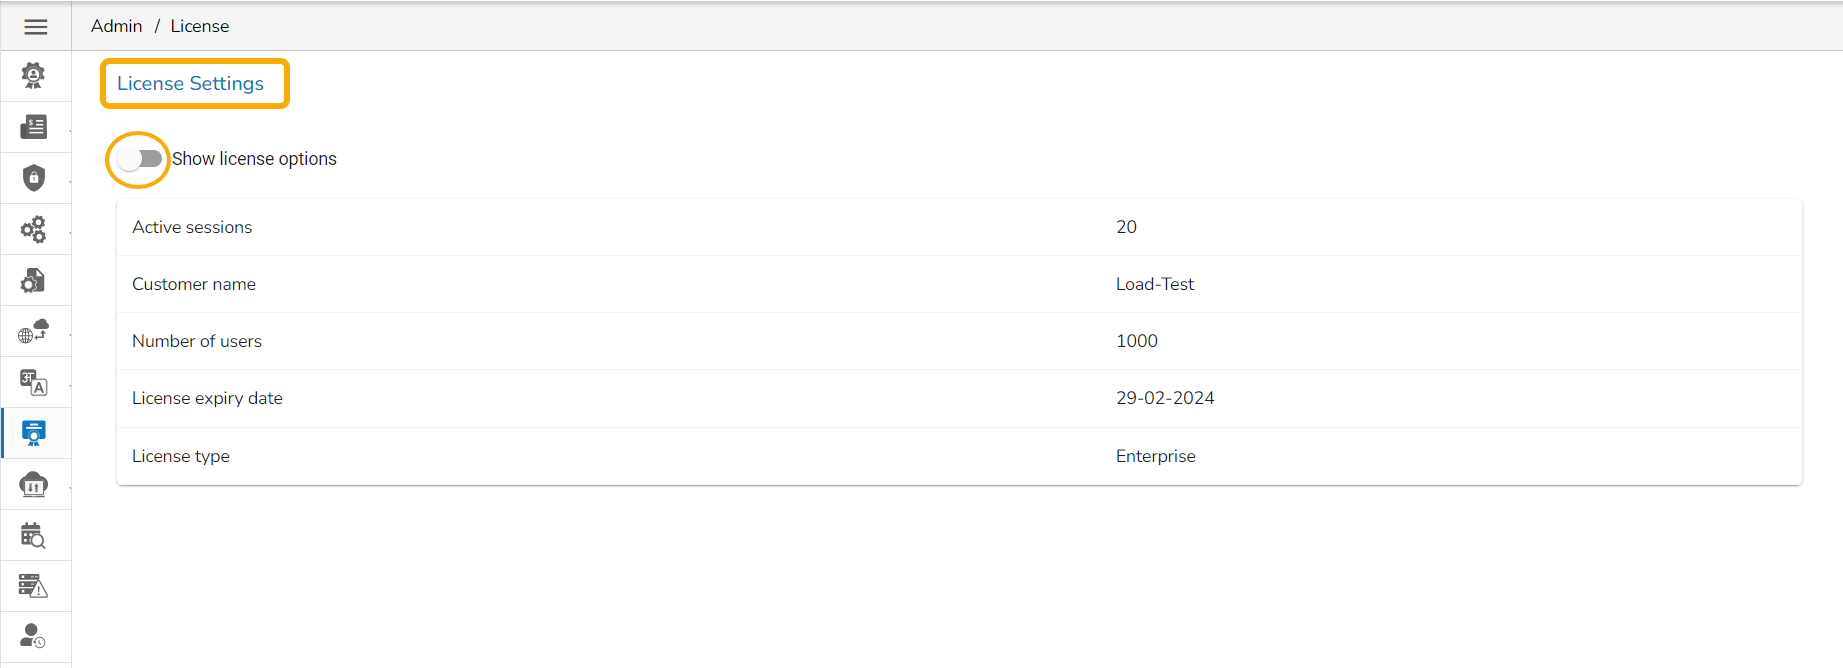
The License admin option provides information about the user license and allows the administrator to perform the License-related settings with the help of the BDB support team.
Access the License admin option using the panel.
The License Settings page opens displaying the active session with customer name and product type.
Some of the pre-defined fields will be displayed as shown below:
Min Instance
Max Instance
Limit
Memory
Provide Environment Info by inserting a new field.
Configure the Node Pool section.
Click the Save option.
A success message appears to confirm the action.
Host: Provide the Host address
Port: Provide the port number
Database Name: Provide the database name
Username: Use read-only credentials
Password: Use a valid password
Host: Provide the Host address
Port: Provide the port number
Database Name: Provide a database name.
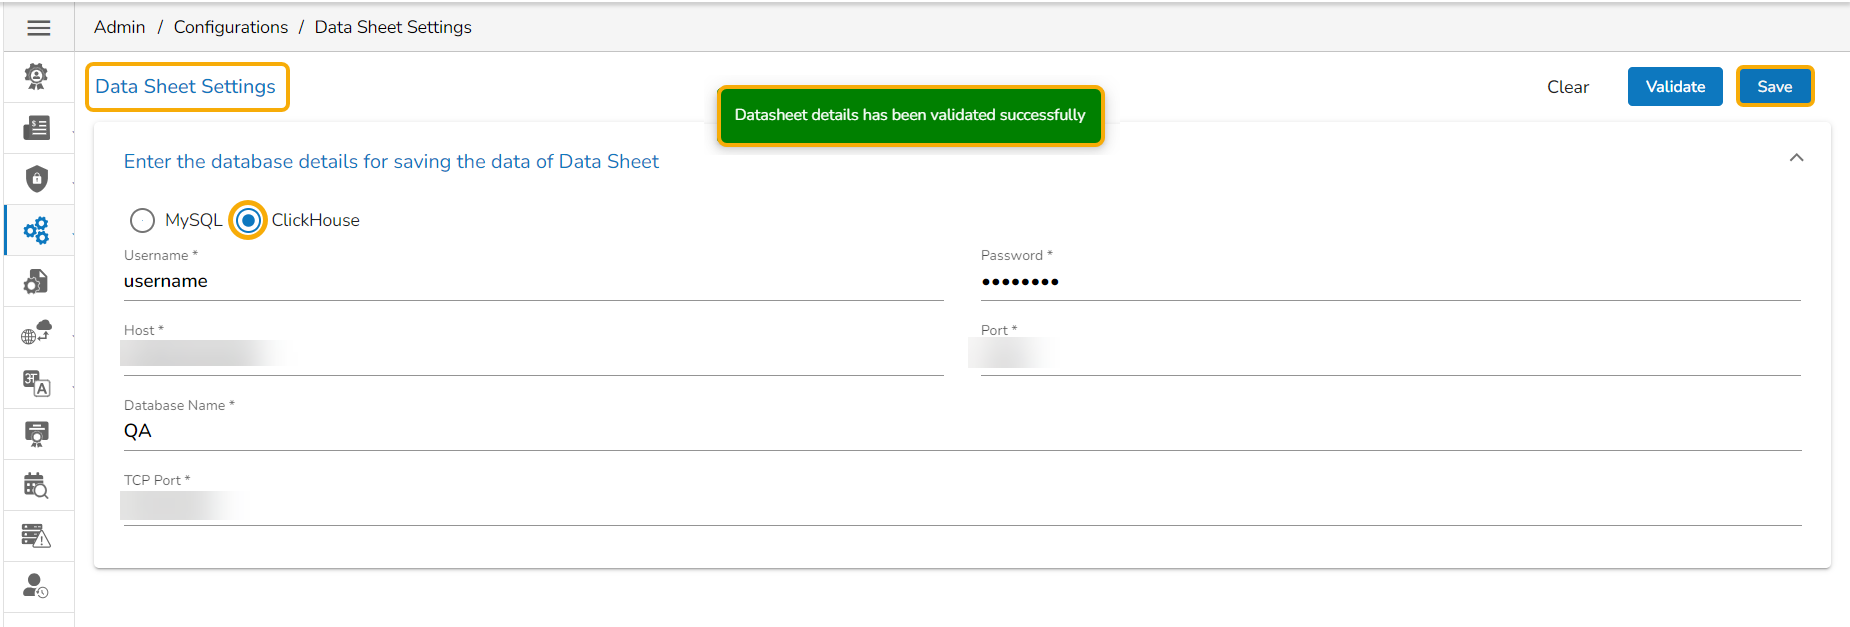
Click the Validate option to save the entered settings information.
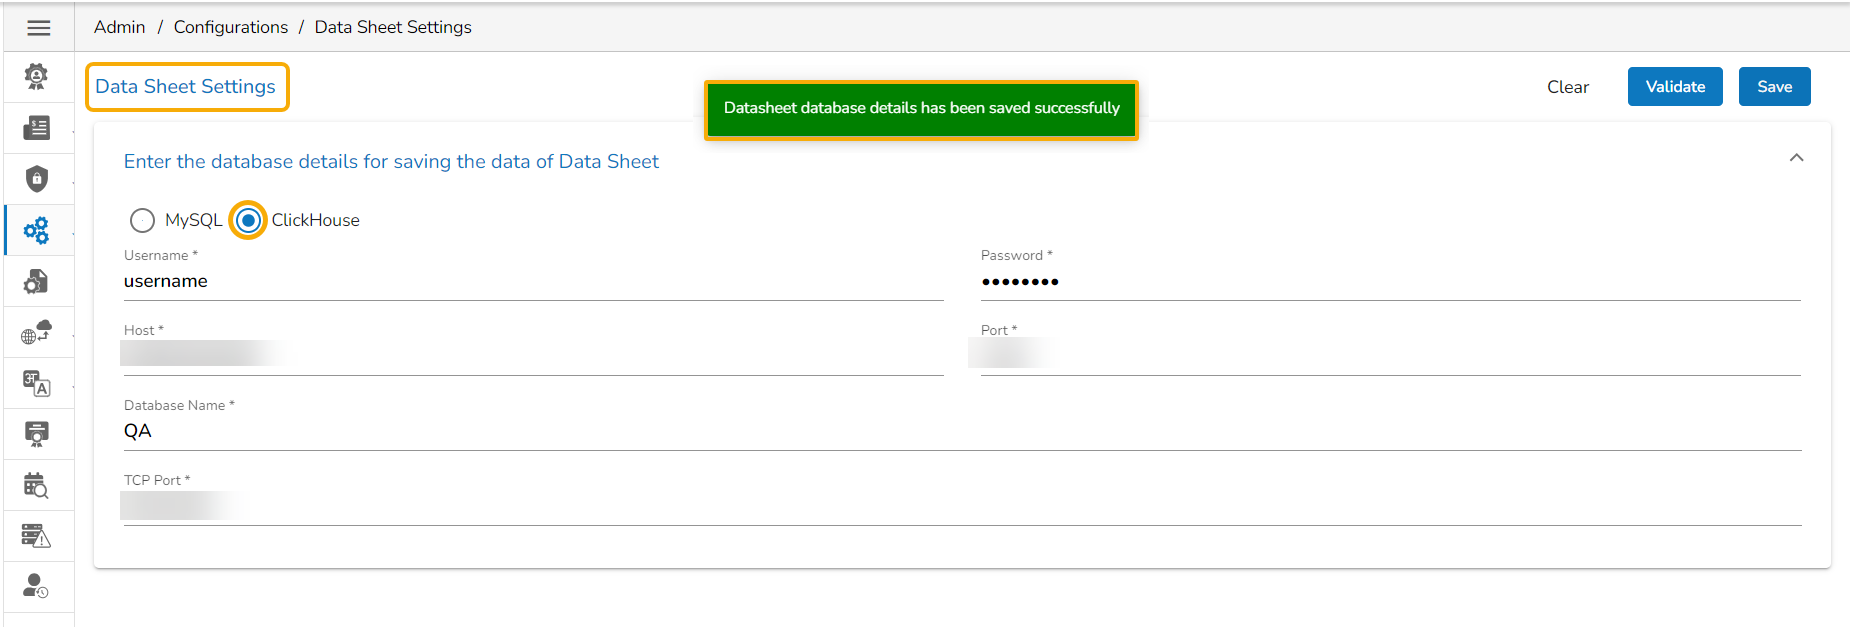
A notification message appears and the provided Data Sheet Settings get registered.
Click the Save option.
A notification message ensures the user that the validated settings are saved for the Data Sheet creation.
Encryption Type: Select an encryption type from the drop-down menu.
Email From: Enter the authenticated credentials of the sender.
Email Password: Provide the password
Email Username: Name that gets displayed to the receivers
Send email for publish/share/copy to documents: By enabling this option email alert gets shared while publishing, sharing, and copying platform documents (files/folders).
Select the Git type as either GitLab or GitHub.
Provide the Host information.
Provide the Token Key.
Click on the Test button.
Select the Project
Select a Branch where files need to be stored on the VCS.
Configure the More Information fields.
Provide the following information:
Entity App
Work Space Name
Entity Extension
Entity Type
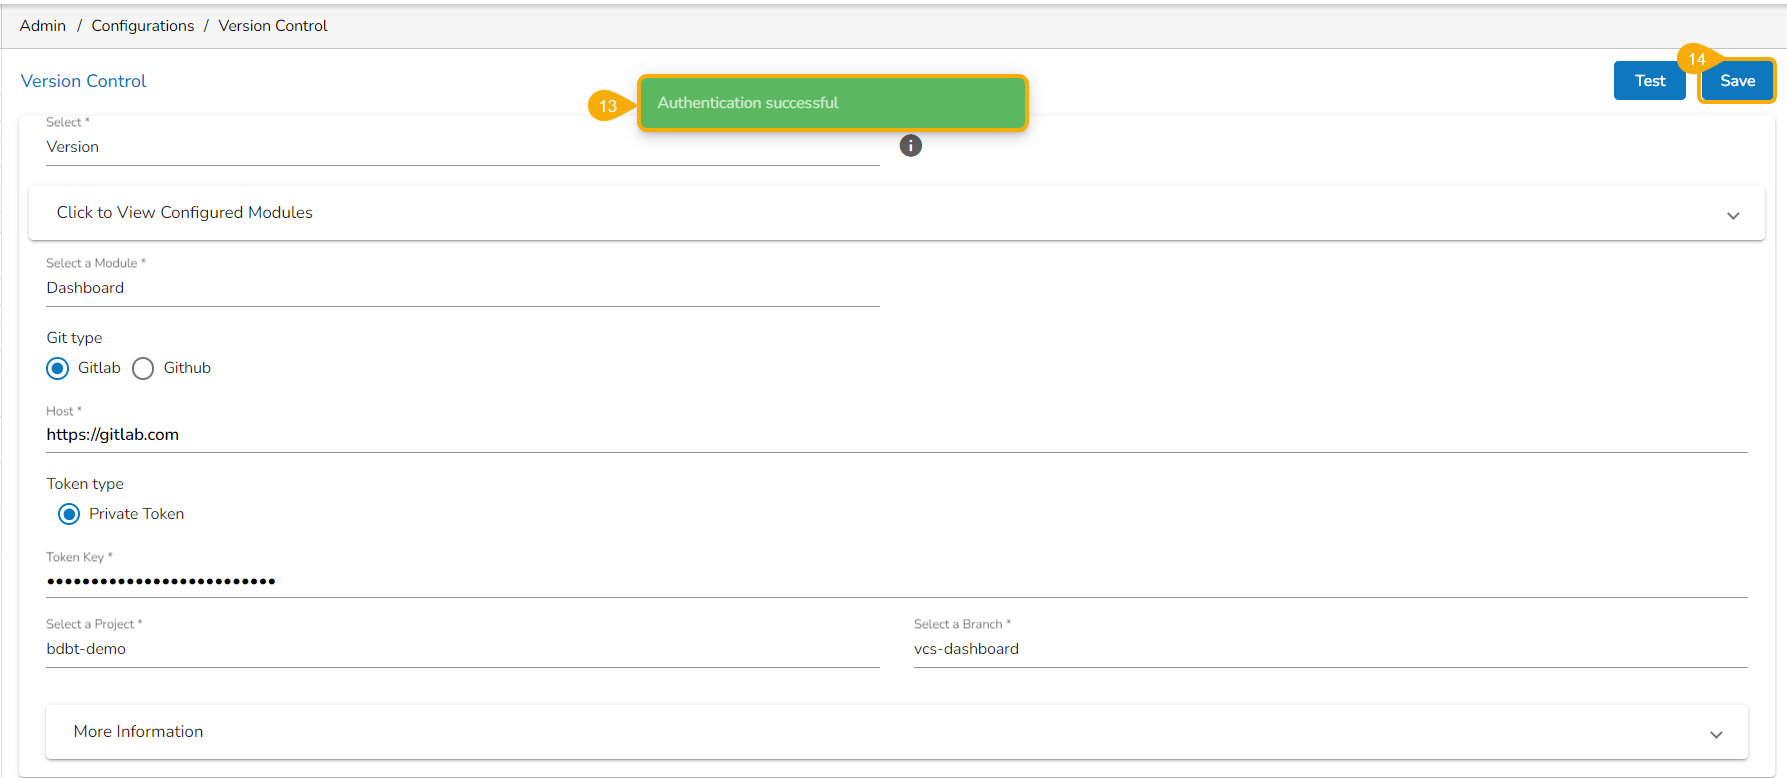
Click the Test option.
A notification message appears to inform about the successful authentication.
The Save option gets enabled. Click the Save option.
Max File Size (MB): This is the maximum file limit that will be uploaded in the sandbox location from the Data Center.
Temp Location: All the files uploaded from the Data Center will be saved in this location.
Claim Name: This specifies the name of the claim used for persistent storage in the sandbox environment.
Sub Path: Define a sub-directory within the selected path. This helps in organizing files within the main storage path.
AD Configuration
CA PPM Configuration
AWS Cognito Configuration
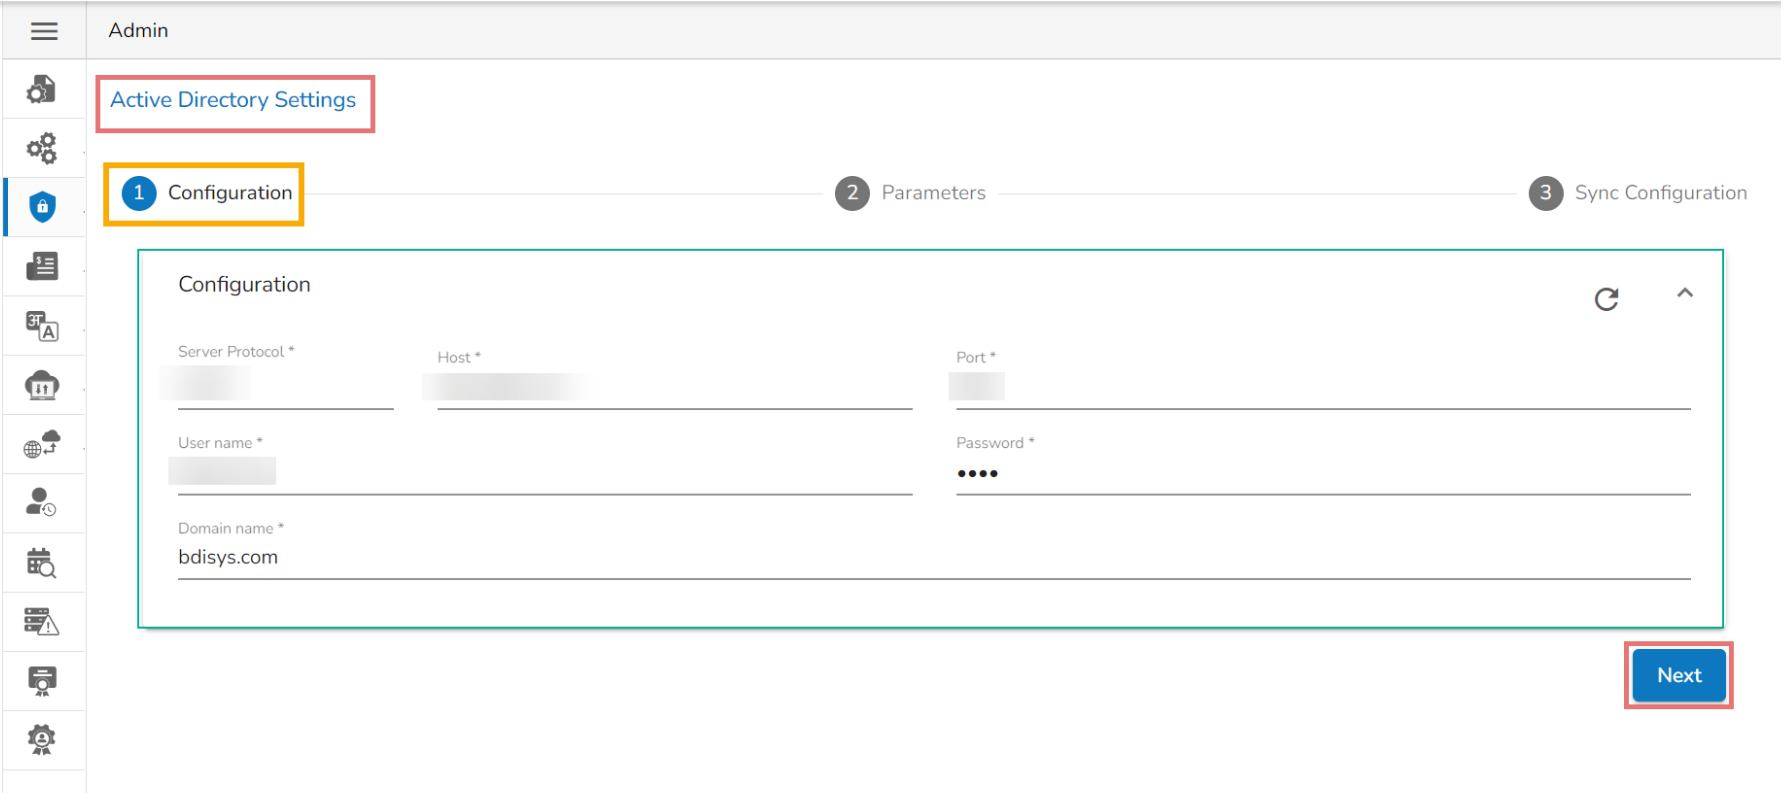
Select the AD Configuration authentication option.
The Active Directory Settings page opens.
The Configuration tab for the Active Directory Settings opens by default.
Provide Server Protocol.
Provide the IP address/Host of the Windows AD server.
Provide the Port number of Windows AD.
Provide the Username of the Windows AD service account.
Enter the secured Password.
Enter the Domain name.
Click the Next option to proceed.
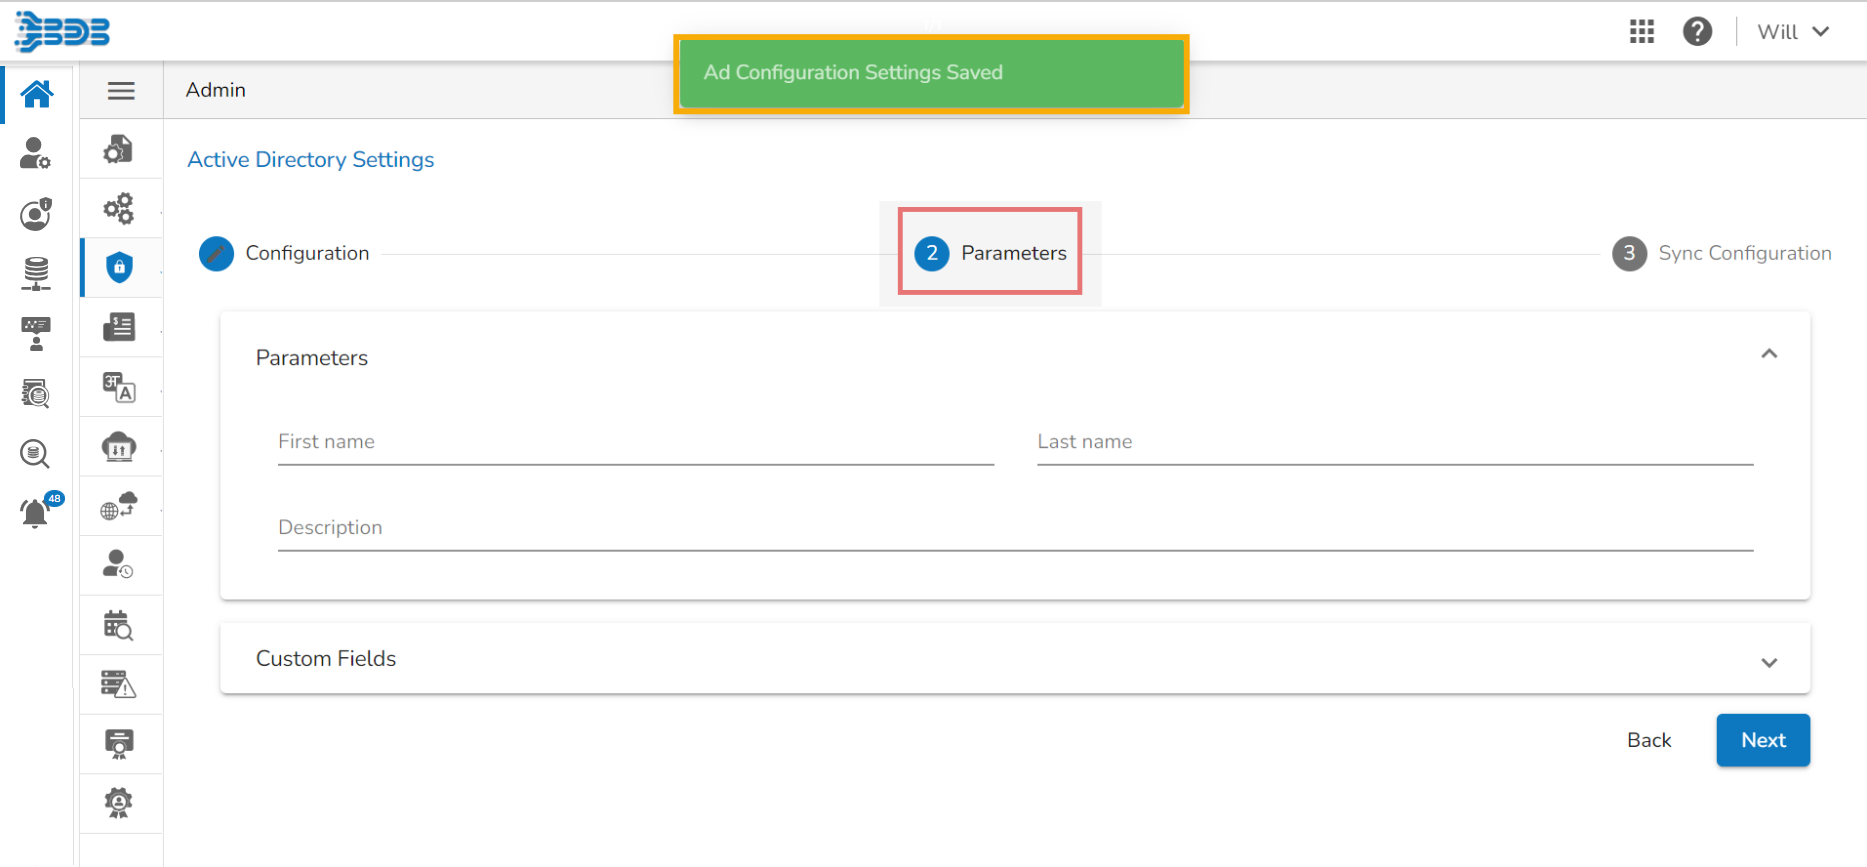
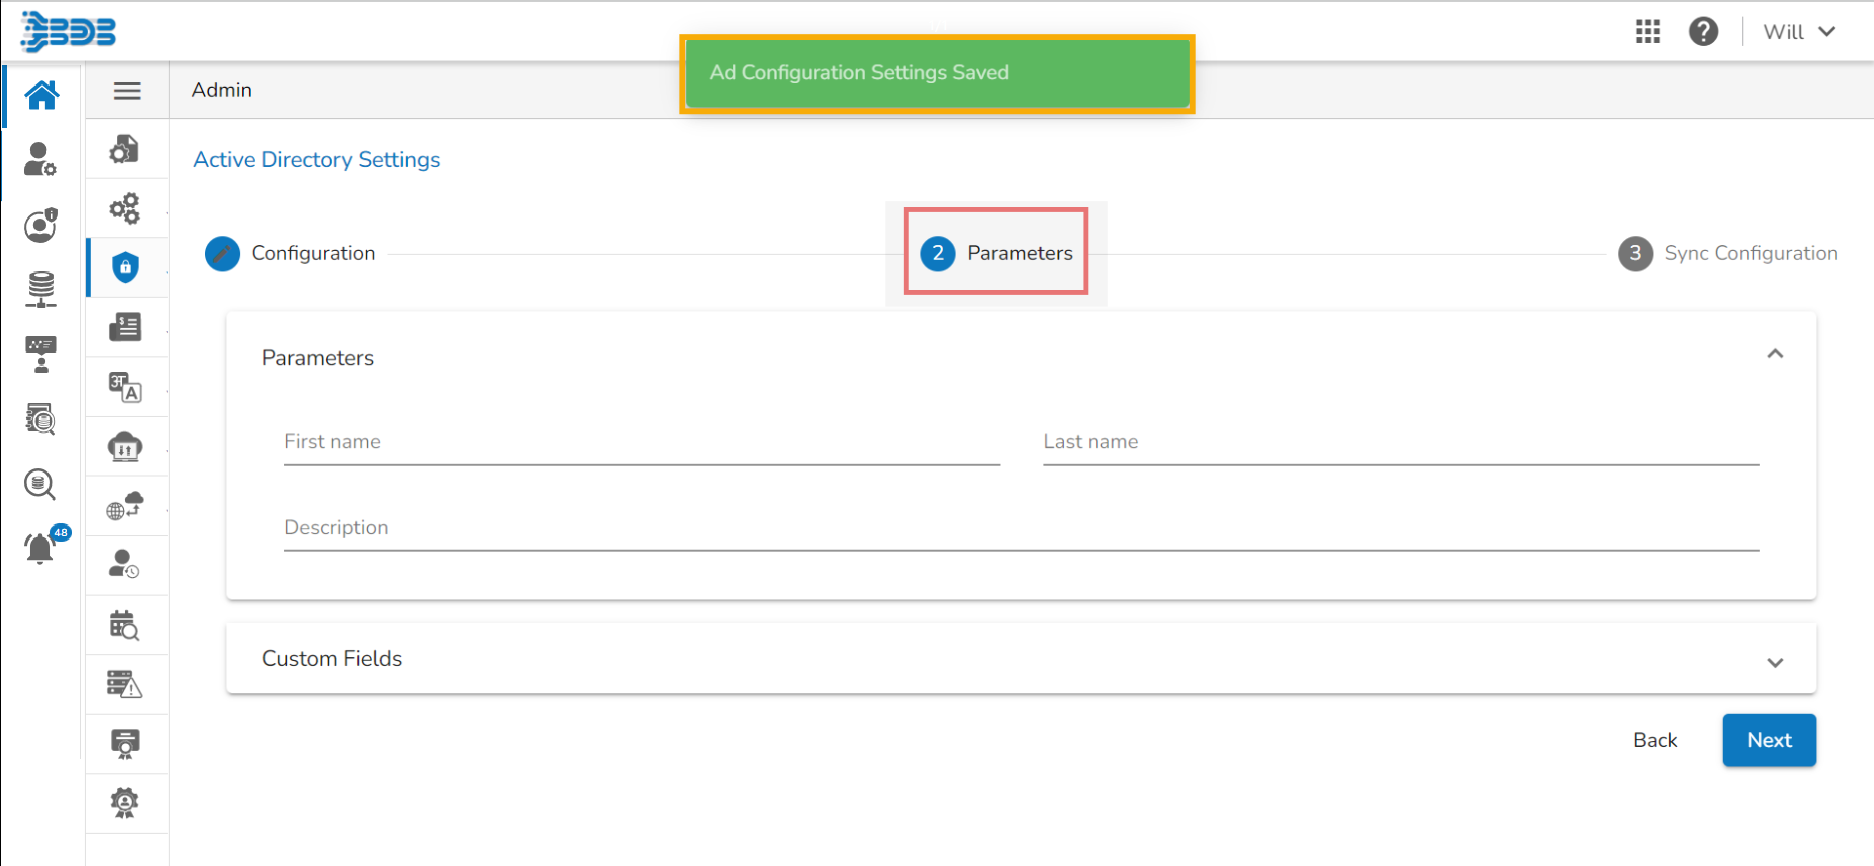
A message appears to confirm the action and leads to the Parameters tab.
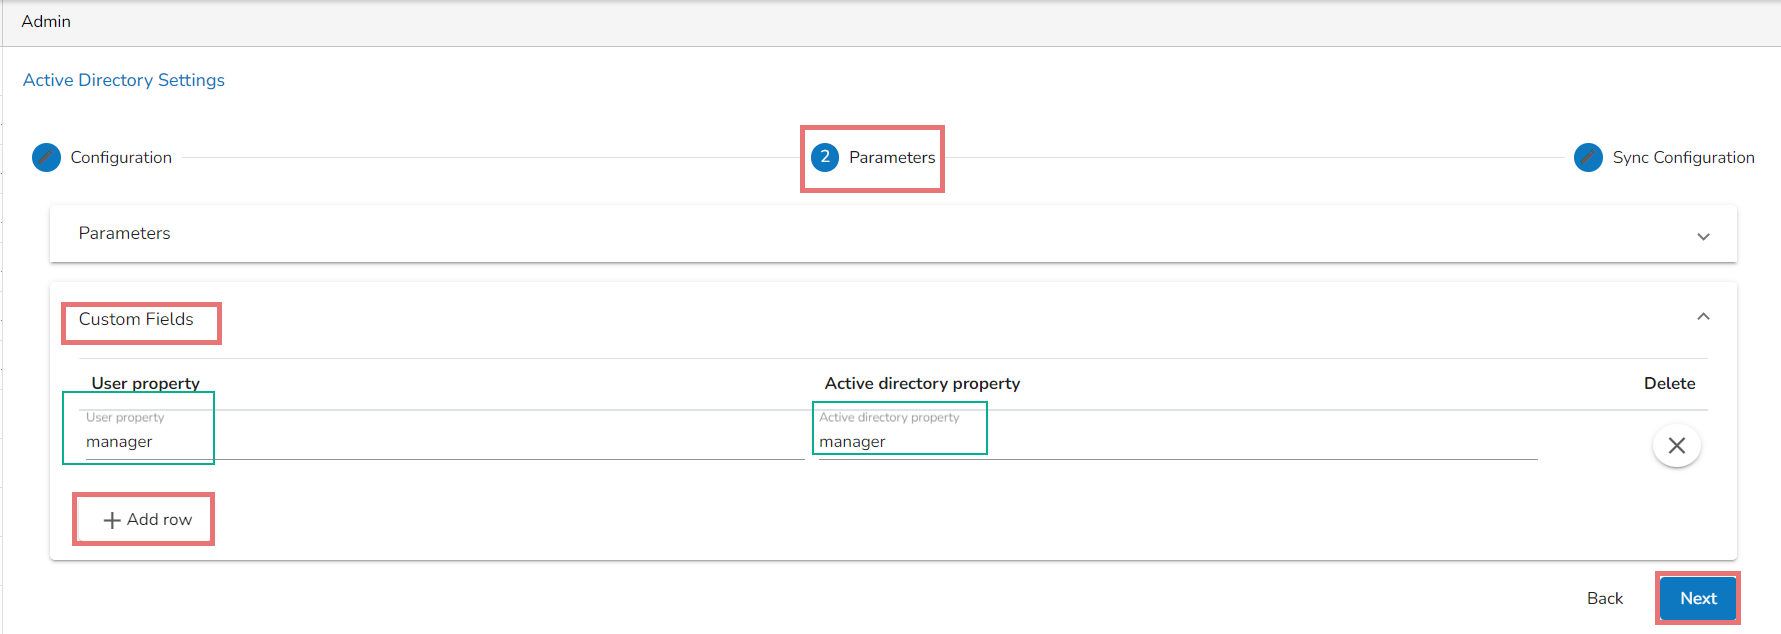
Set the user Parameters by using this tab.
Provide the first name of the user.
Provide the last name of the user.
Add description.
Open the Custom fields from the drop-down menu.
Select an option from the available context menu.
Enter Active Directory Property.
Add a new custom field by clicking the Add row icon.
Click the Next option.
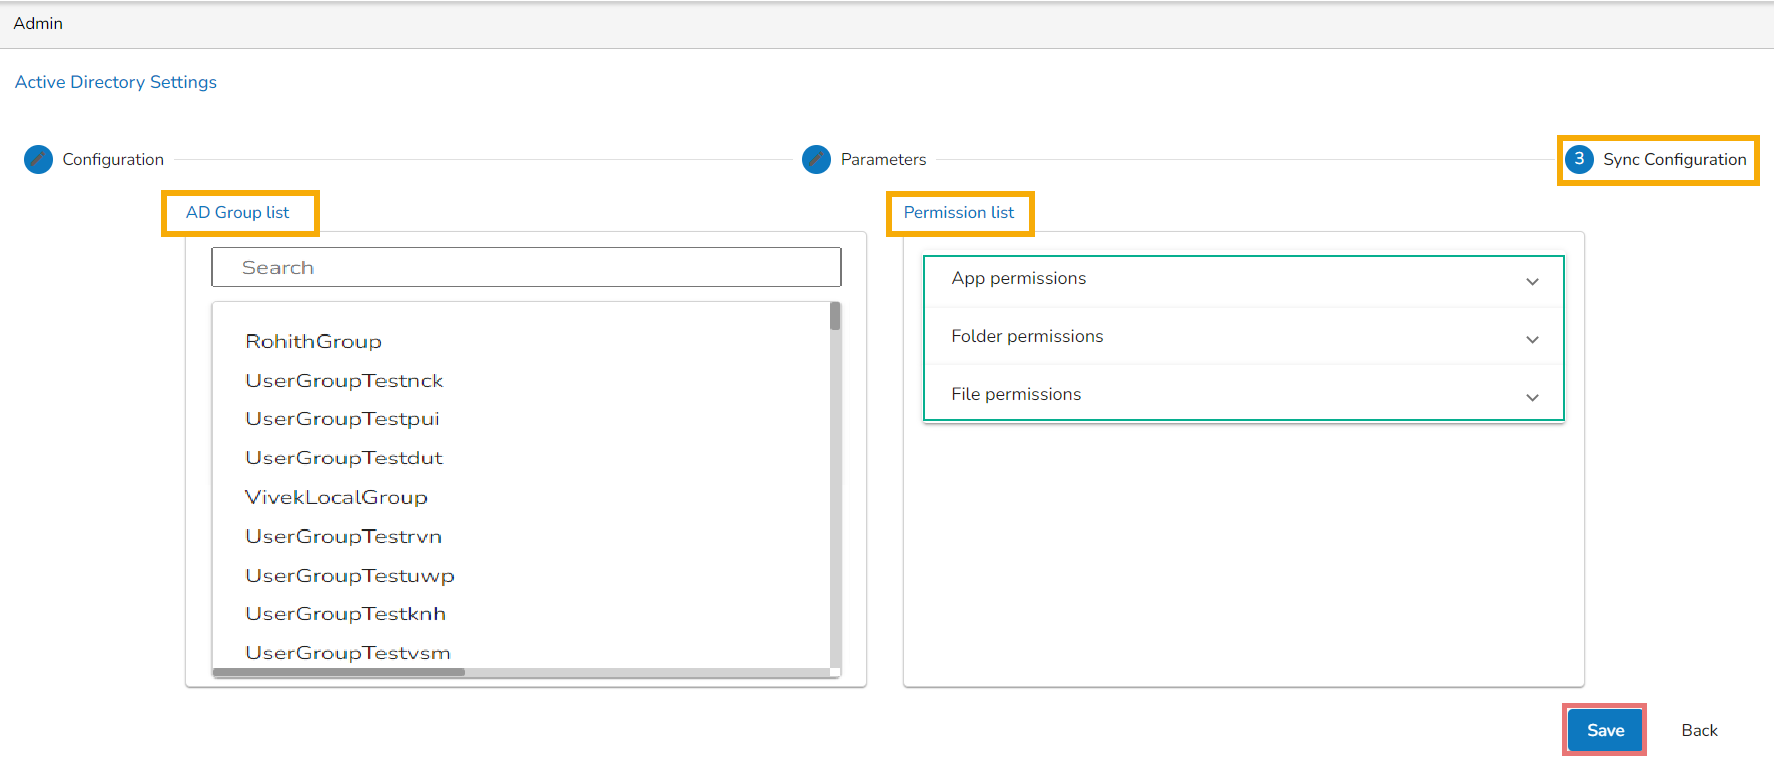
A success message appears to confirm the action and leads to the Sync Configuration tab.
Select a user group using the displayed AD Group list.
Select users from the AD User list by putting the checkmarks in the boxes given next to the usernames.
Click the Next option to proceed.
A success message appears to confirm that the user list has been updated.
The Group Configuration tab opens.
The selected AD user list appears.
Select any user group from the AD Group list.
Click the Save option.
A success message appears confirming that the user group is updated successfully.
Please Note: Open the Security module for the selected AD user the configured group gets listed in the Add Users to Group list.
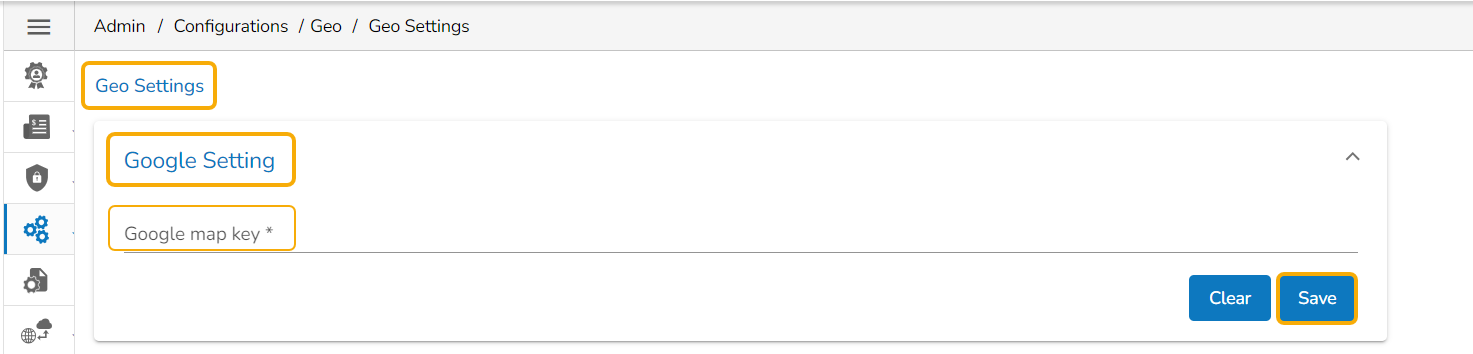
Click the Geo Settings option from the Configurations list.
The Geo Settings page opens displaying the Google Settings and Leaflet Settings options.
Fill in the following information for the Google Map:
Map Key: Enter the map key that has been provided by Google (To be purchased from Google).
Click the Save option.
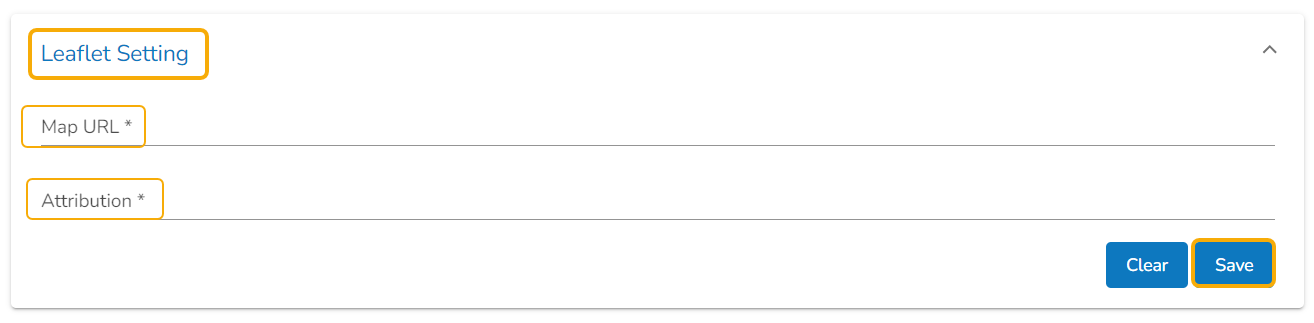
Fill in the following information for the Leaflet Settings:
Map URL: URL of the selected map (provided by the open-source vendors)
Attribution: Configuration parameters for the map (provided by the open-source vendor)
Please Note: Click the Clear option to erase the information.
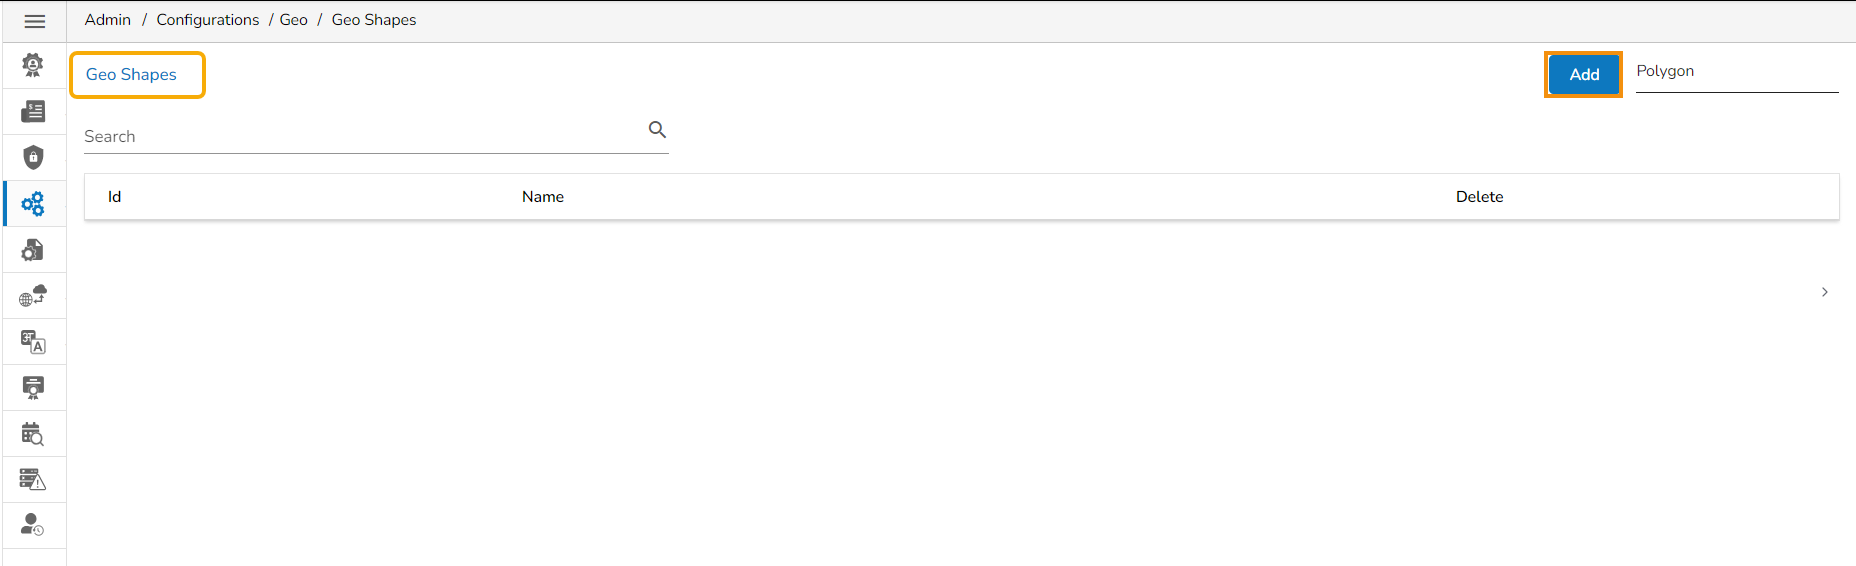
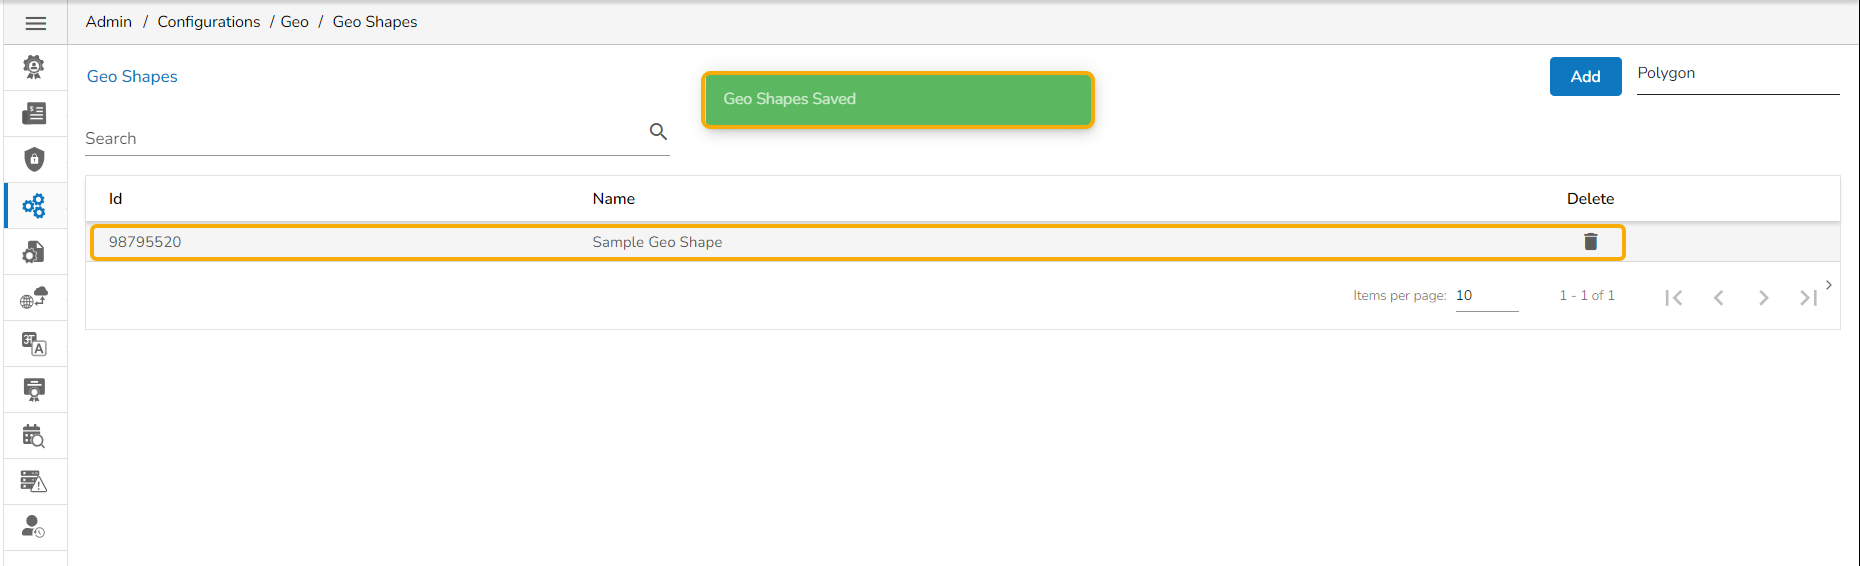
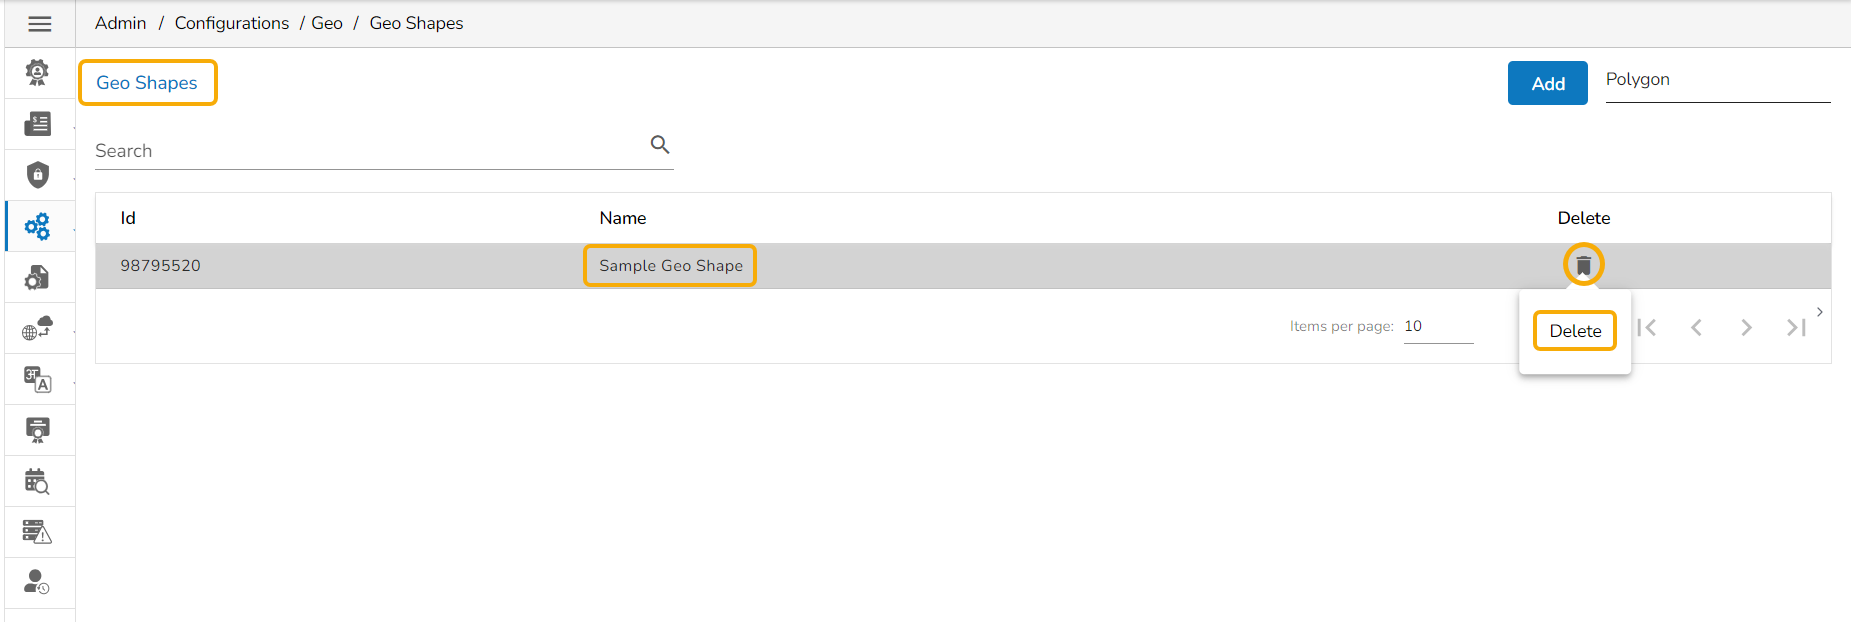
Click the Geo Shapes option from the Geo Settings configuration option.
The Geo Shapes page opens.
Click the Add option from the Geo Shapes page.
The Create New Geo Shapes page opens.
Enter the following information:
Shape Name: Title of the geo shape (map)
Geometry Type: Select any Geometry type from the drop-down menu (out of Polygon or Line)
Click the Save option to save the inserted details.
A message will pop up to ensure that the file has been uploaded.
The uploaded Geo Shapefile is displayed in the list format.
Please Note: Use the Search space to search a Geo Shapefile from the displayed list.
Select an uploaded Geo Shapefile from the list.
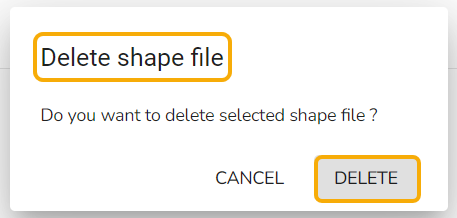
Click the Delete icon provided next to a Geo Shape File.
A new window opens to confirm the deletion.
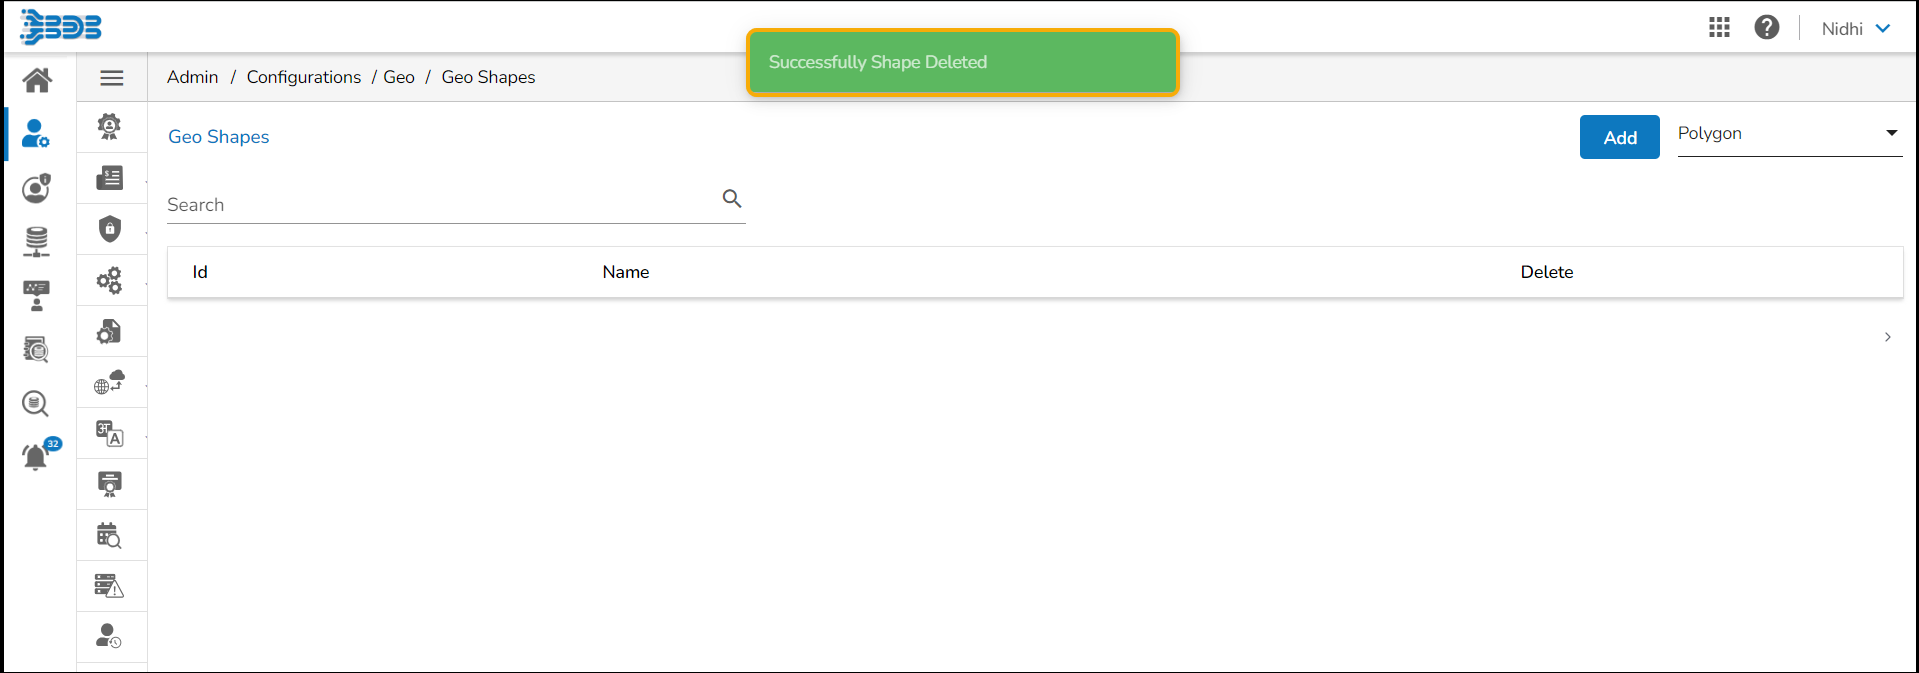
Select the DELETE option.
The selected Geo Shape file gets removed from the list.
Data as API
Data Store
Dashboard
DS Lab ( Project & Notebook)
Pipeline script
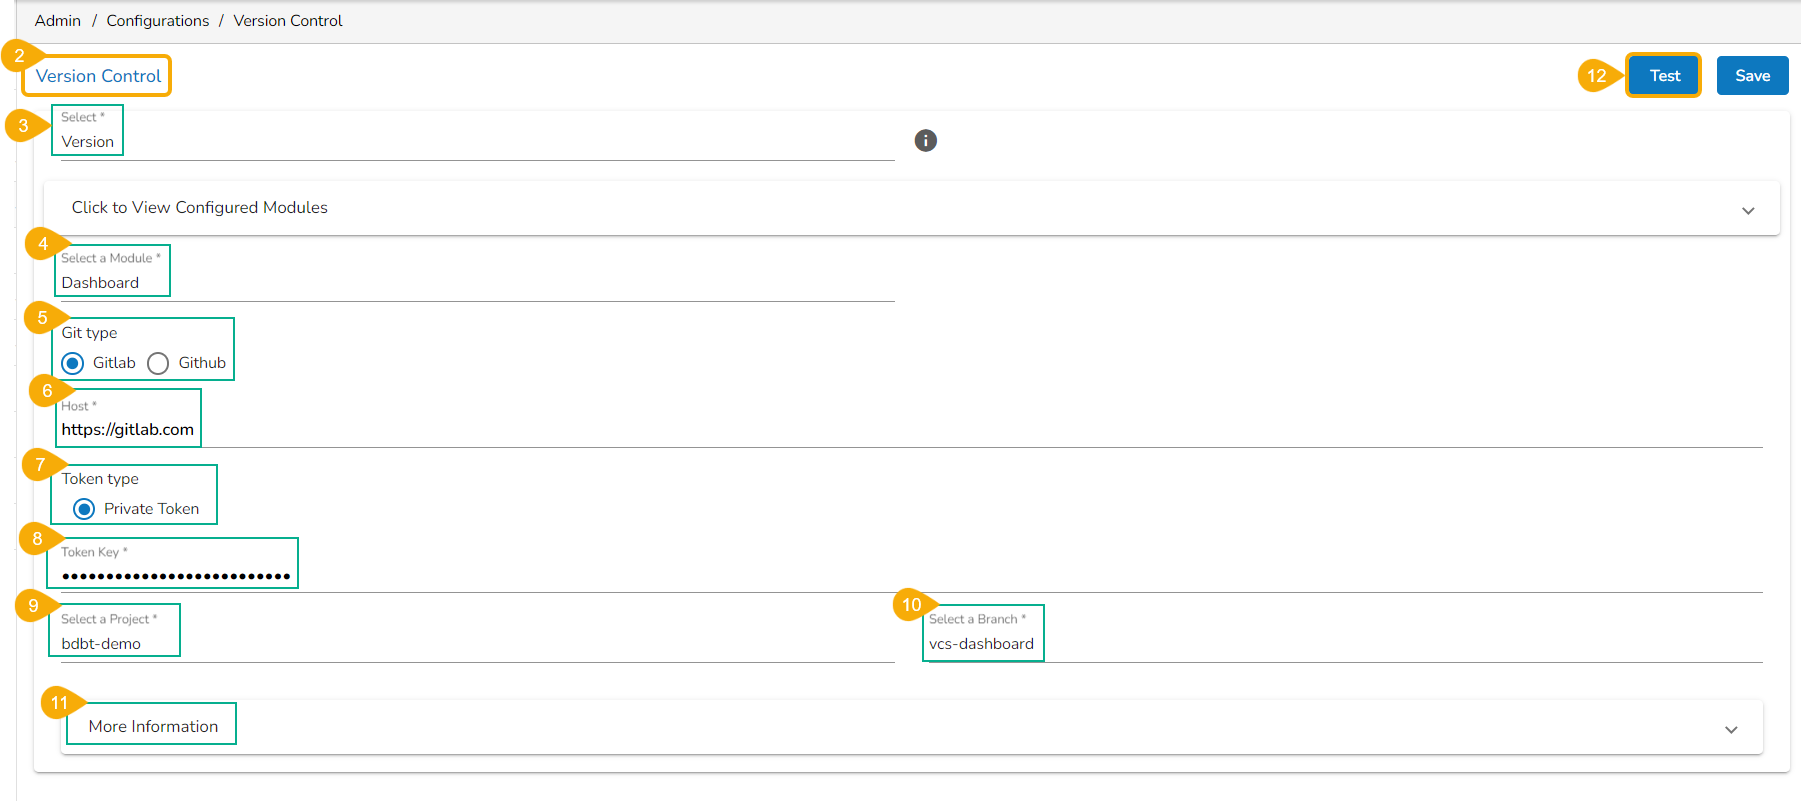
Select the New Version Control option from the Configurations under the Admin module.
The Version Control information form opens.
Select the Version option from the first dropdown.
All supported modules will be listed under the Select a Module drop-down which supports the Version Control functionality. (E.g., Dashboard is selected in the given image).
Select Git type as either GitLab or GitHub.
Provide the Host information.
Provide the Token Key.
Click on the Test button.
Select the Project
Select a Branch where files need to be stored on the VCS.
Configure the More Information fields.
Provide the following information:
Entity App
Click the Test option.
A notification message appears to inform about the successful authentication.
The Save option gets enabled. Click the Save option.
A configuration message appears and the configuration for the Version Control gets saved.
Please Note:
The user needs to set up the associated module configuration for each component.
The configuration fields may vary based on selecting the Select field and the Token Type information.
The user can import an exported repo Sync project from a different space by following the given set of steps:
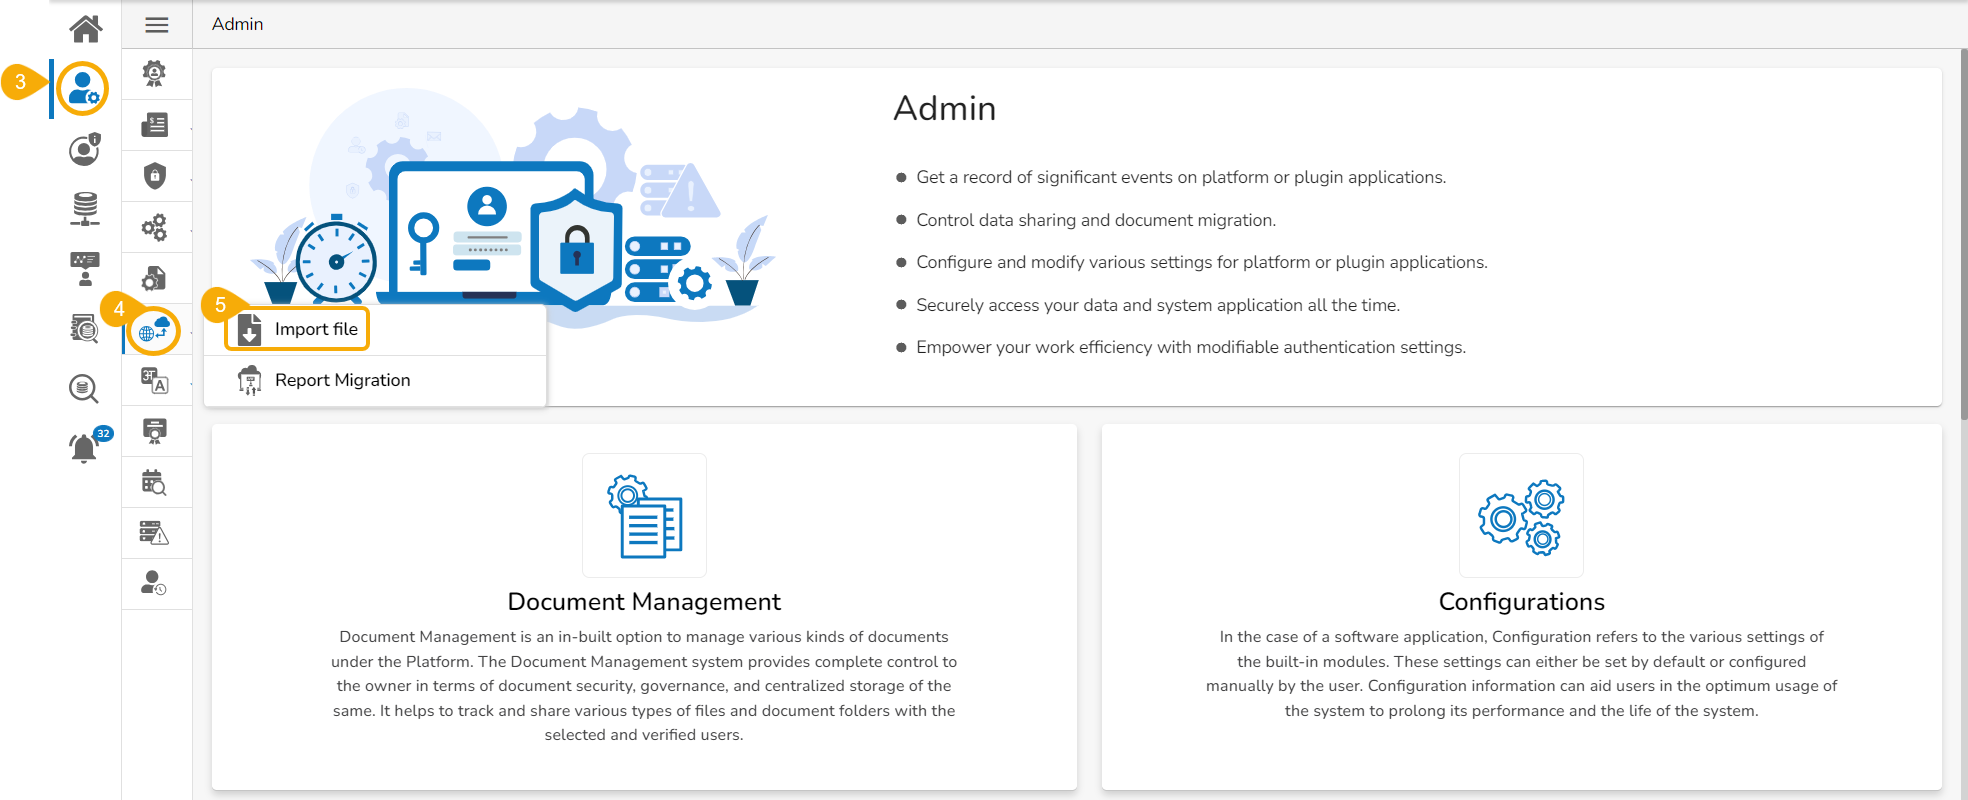
Navigate to the Admin Module.
Click the GIT Migration icon from the side navigation bar.
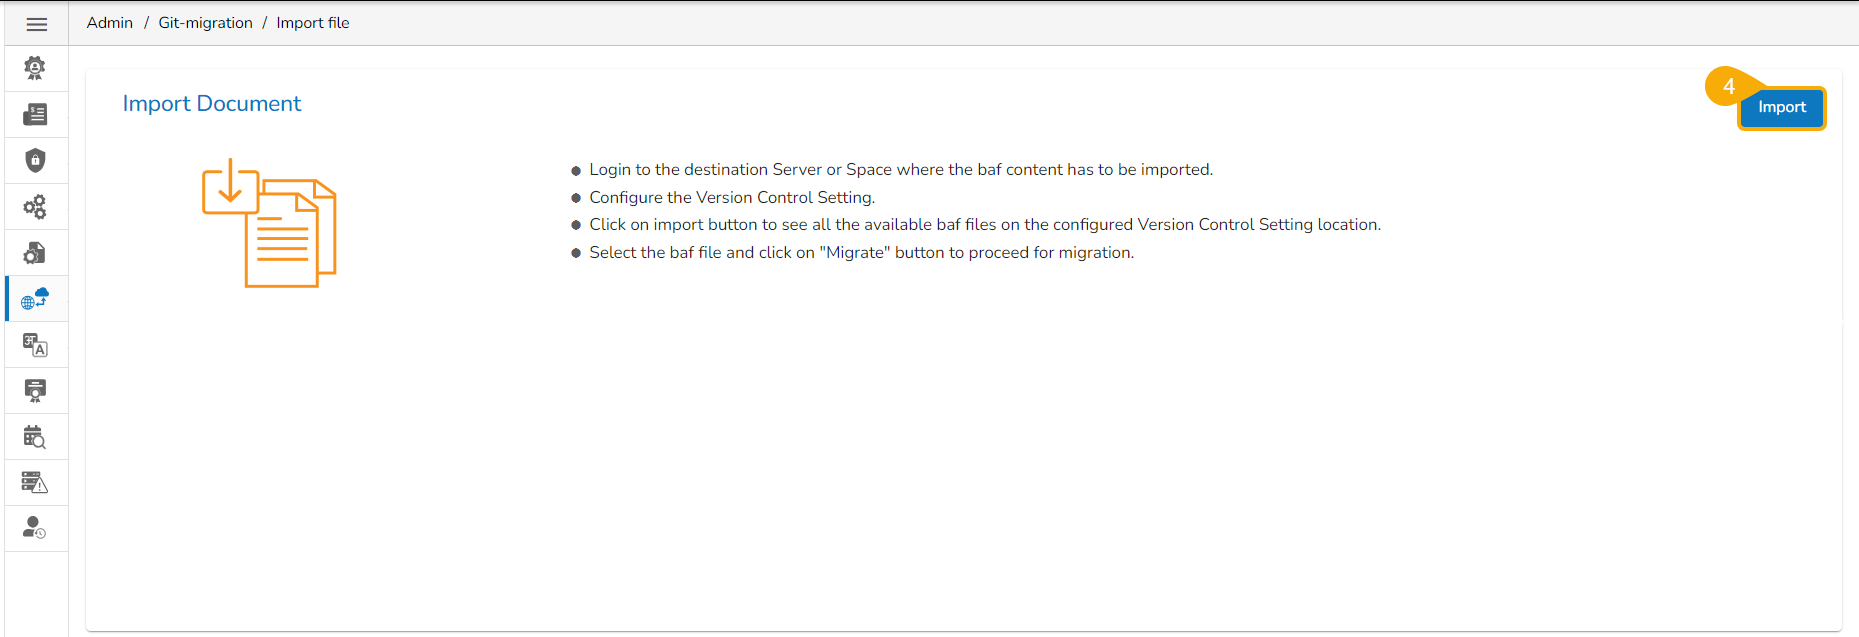
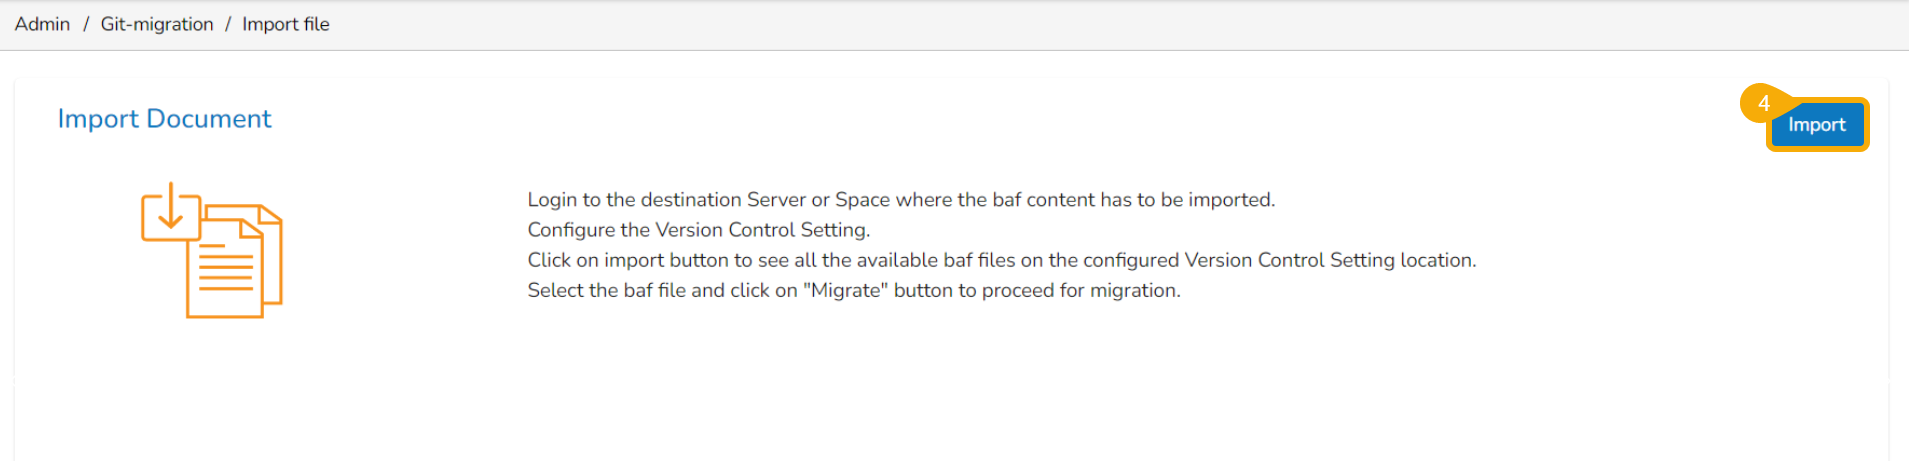
Click the Import file option that appears.
Click the Import option from the Import Document page.
The Document Import page opens.
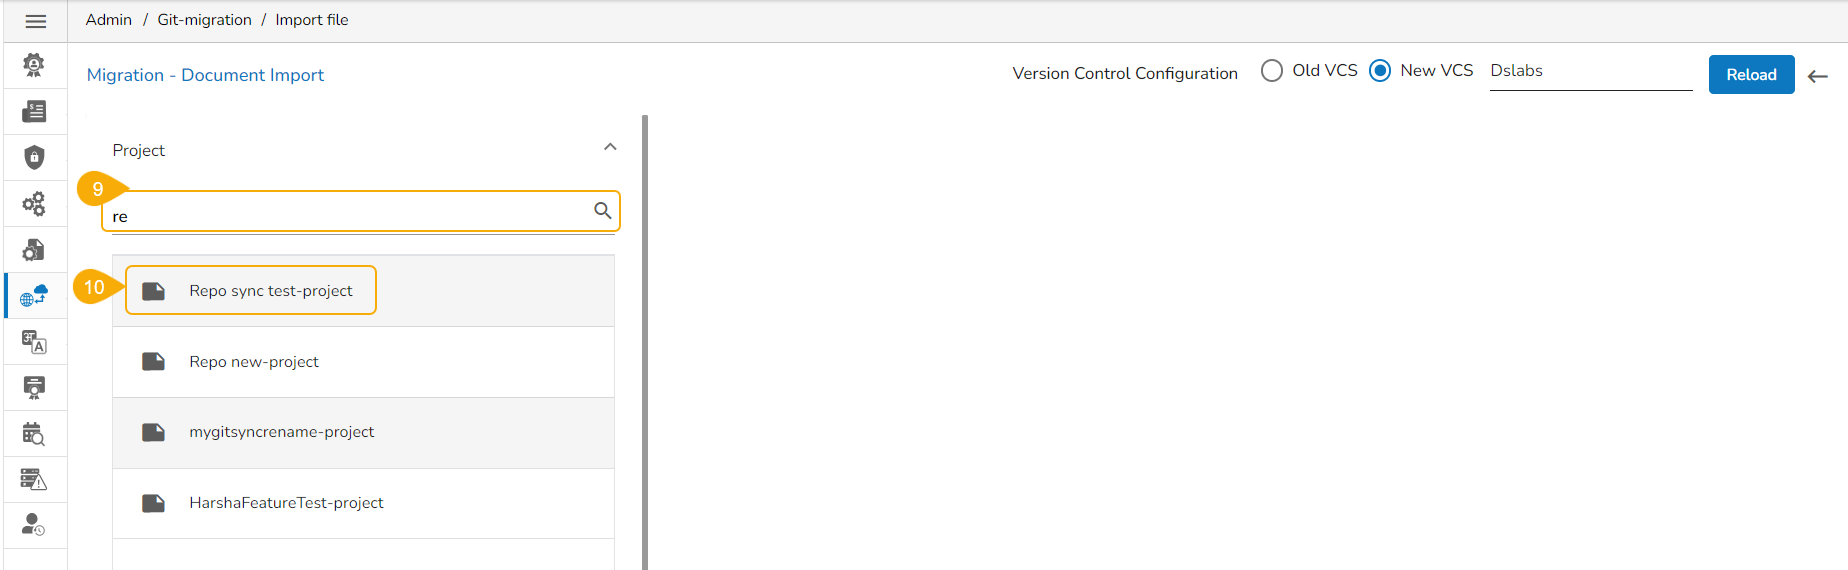
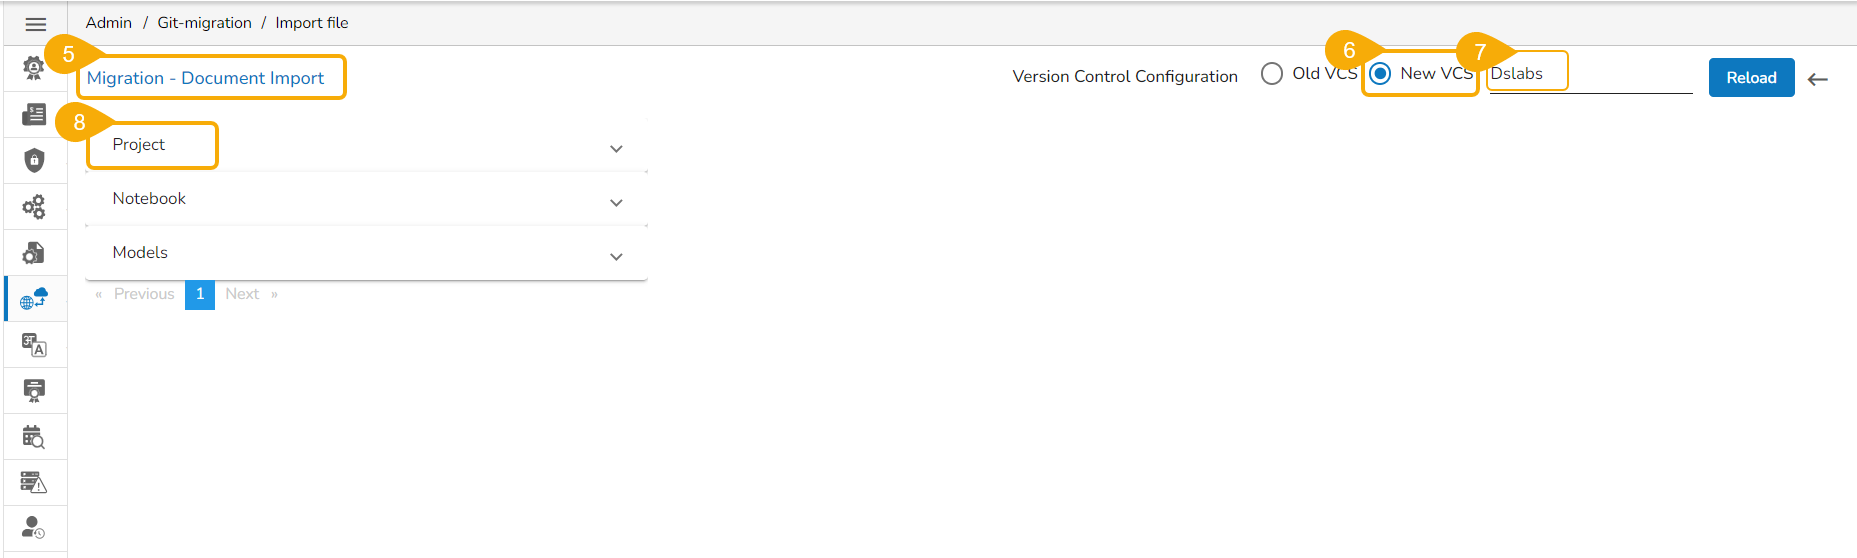
Select the New VCS option.
Choose the Dslabs module.
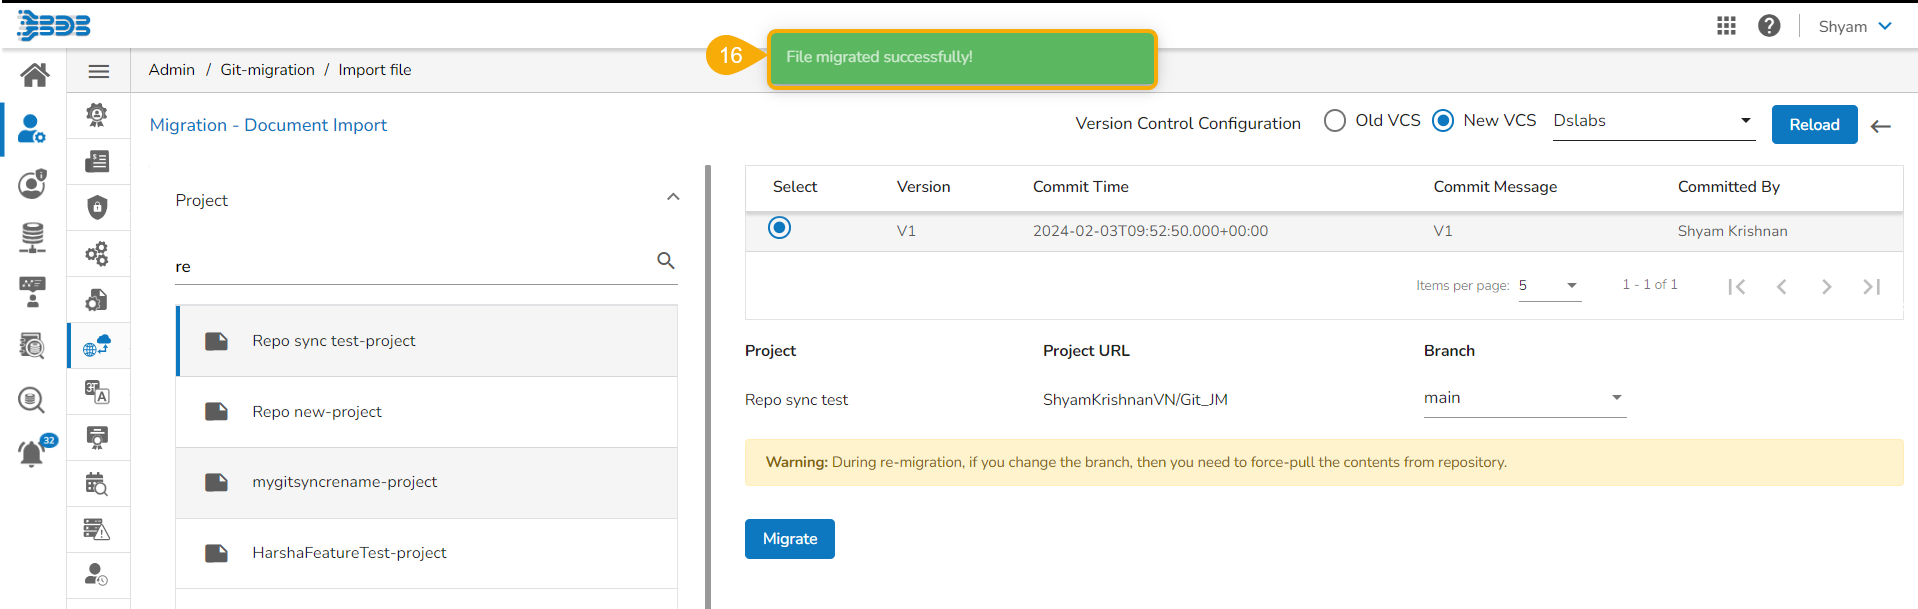
Click the Project from the Migration- Document Import drop-down menu.
Please Note: The DS Lab module appears as Dslabs to import documents.
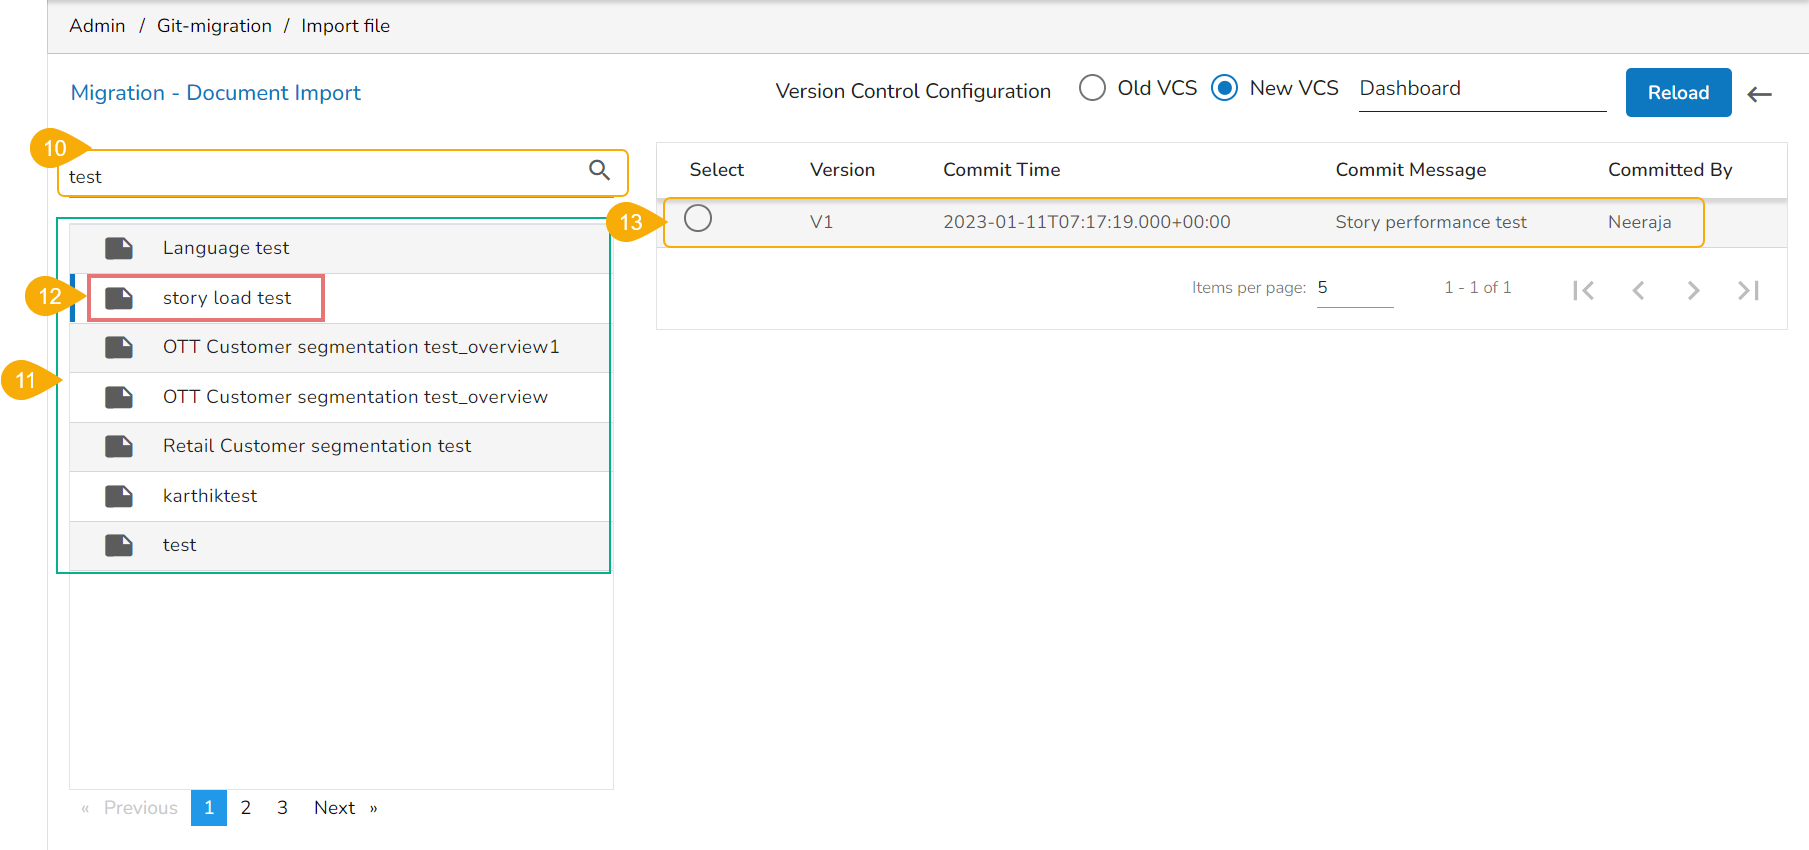
Use the search bar to Search for a specific Project from the displayed list.
Click the Project from the displayed list.
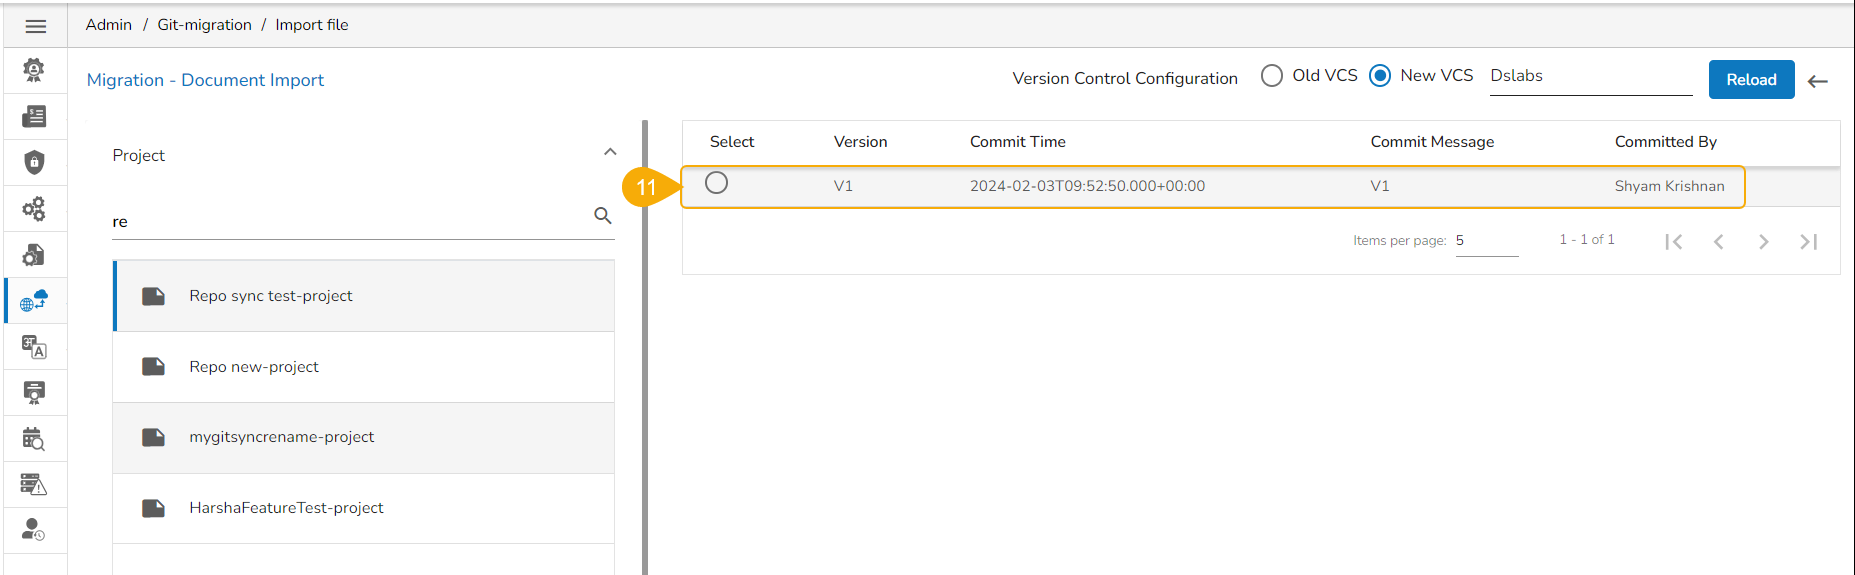
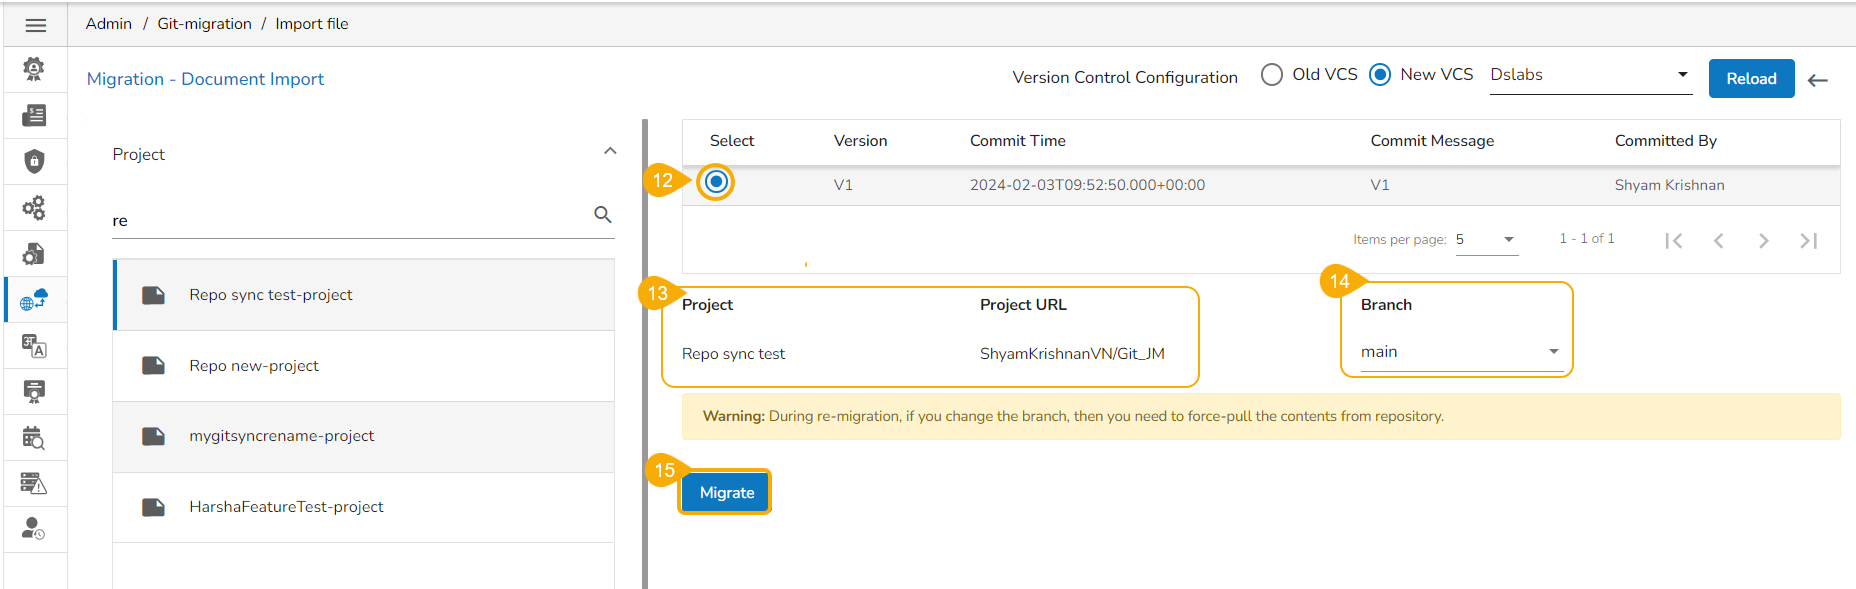
Available versions of the selected Project appears on the right side of the page.
Select a version of the Project by putting a checkmark in the given checkbox.
The Project name and Project URL will be displayed below.
Select a branch using the Branch drop-down option.
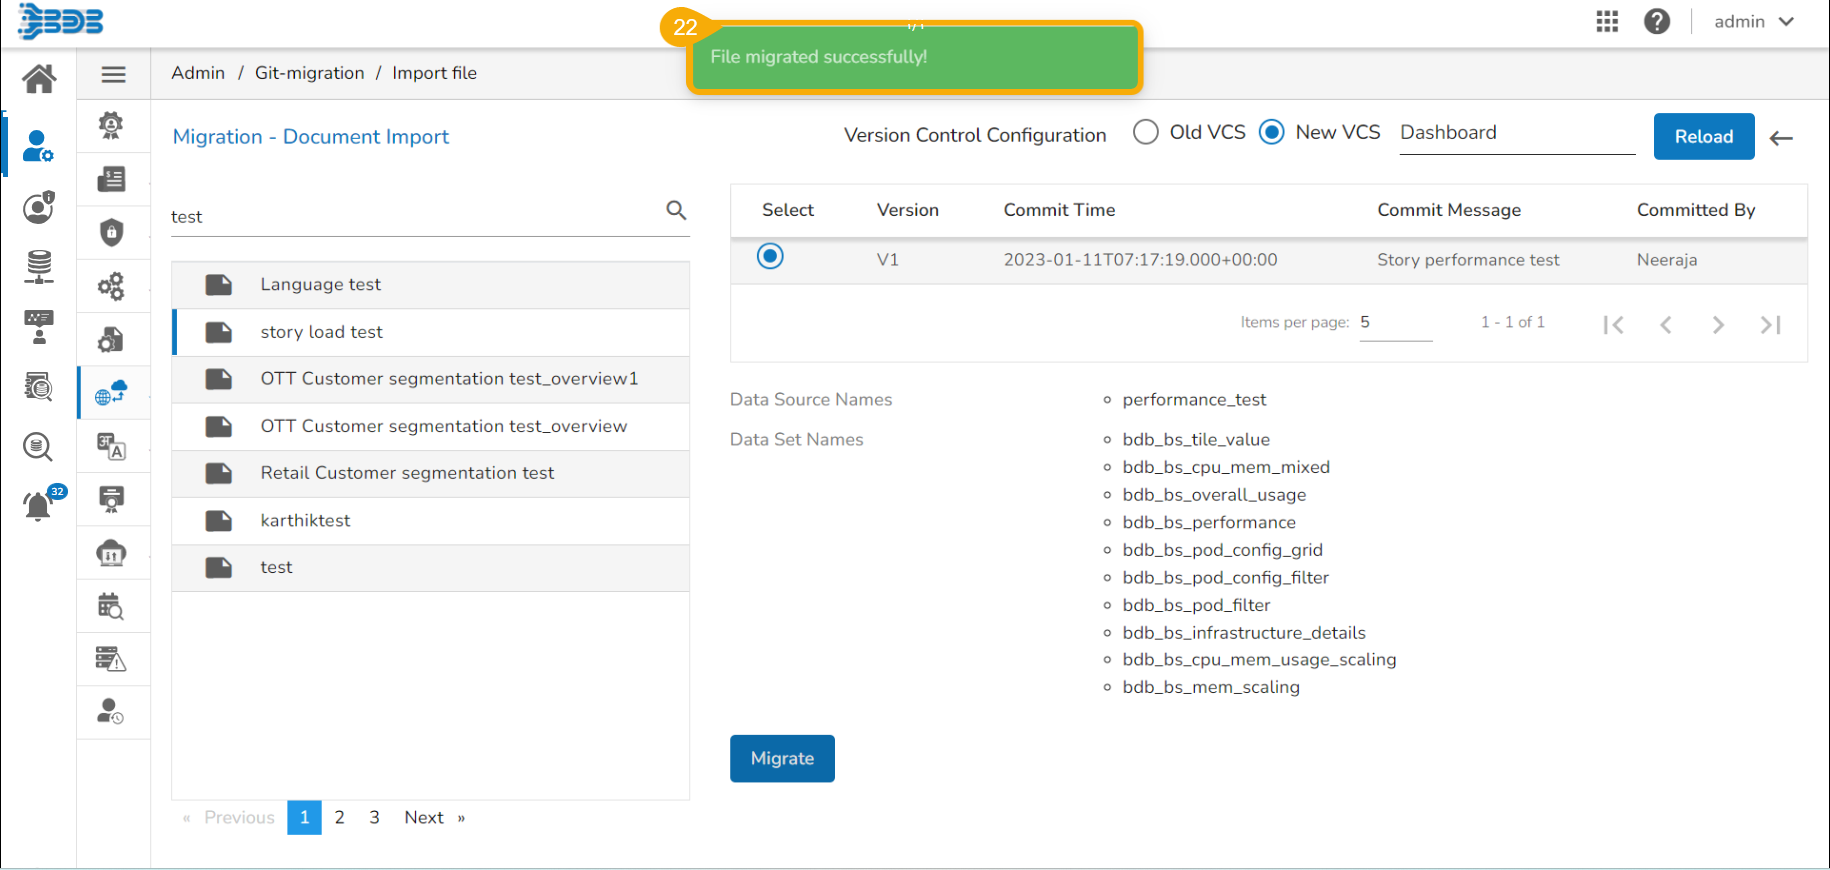
Click the Migrate option.
A notification message appears to ensure that the file is migrated successfully.
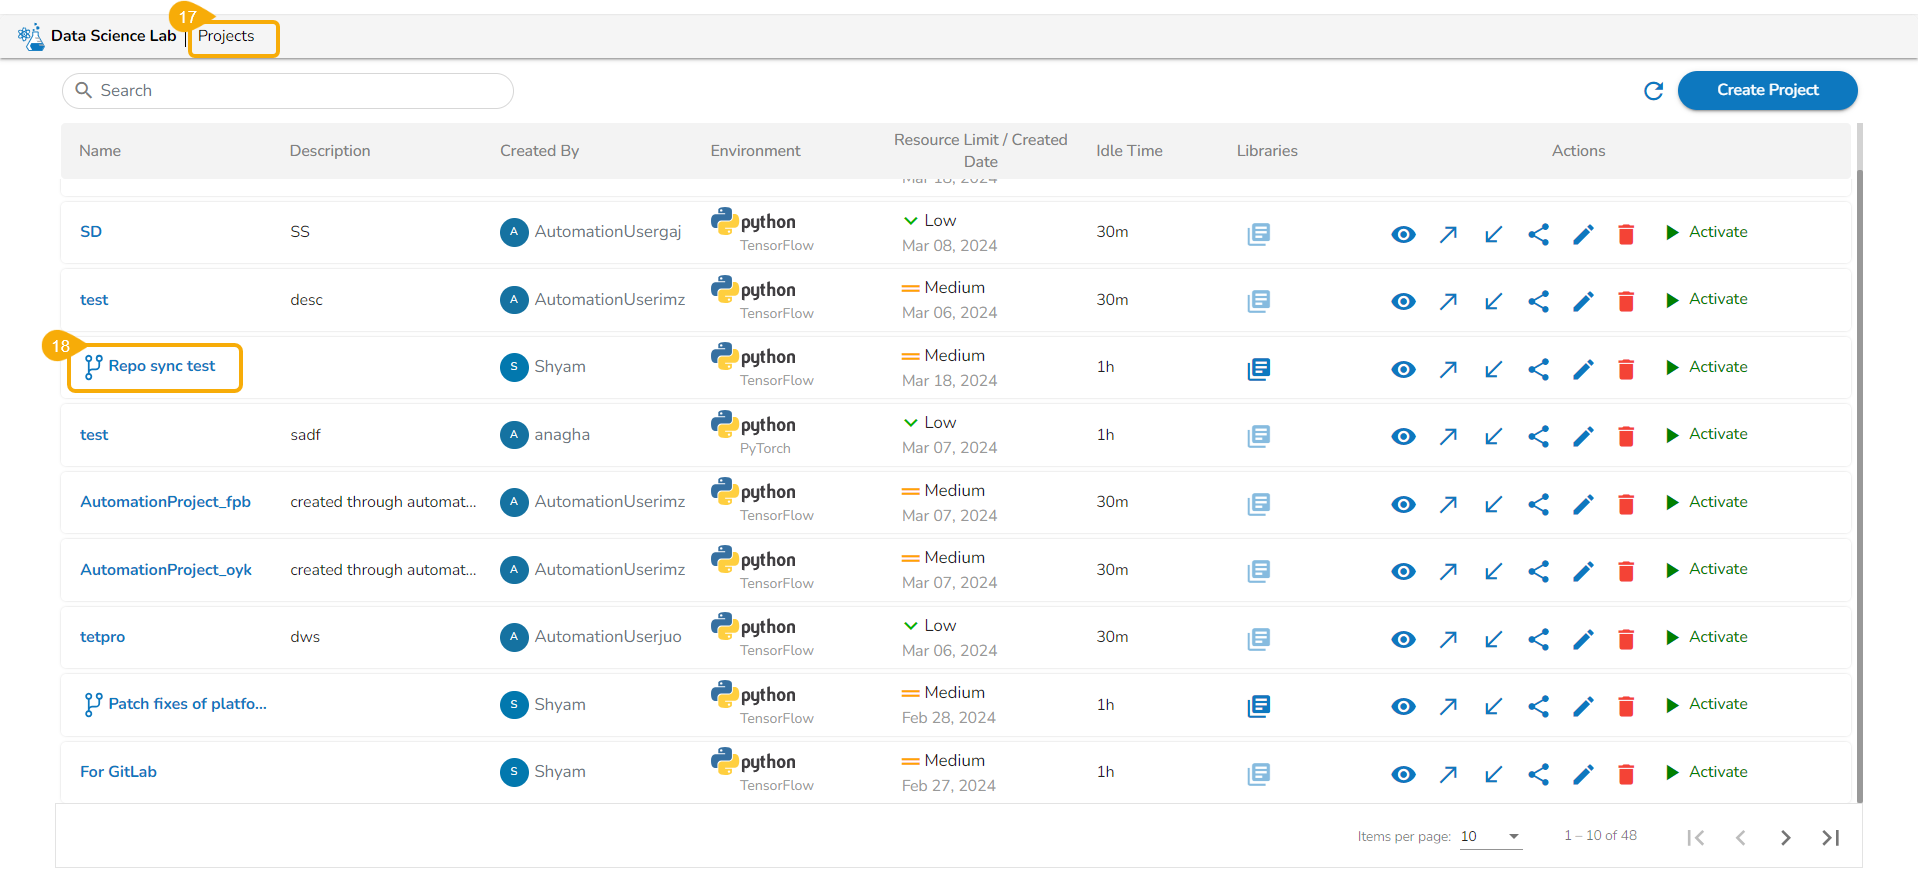
Navigate to the Projects page of the Data Science Lab module.
The migrated Project gets added at the top of the Projects list.
Please Note:
Refer to the Importing a DSL Script from GIT page to understand the steps to import an exported Data Science Lab Notebook/script.
Refer to the section to understand the steps to import an exported Data Science Lab model.
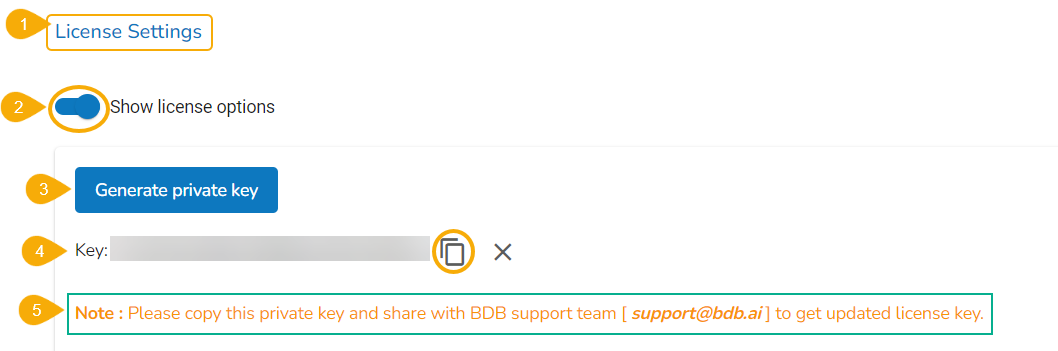
Enable the Show License Options using the radio button to update the License Users.
Please Note: After enabling the License Settings radio button, the following options appear on the page:
Generate private key
Update license key
Follow the below-given steps to configure the displayed License options
Navigate to the License Settings page.
Enable the Show license options by using the radio button.
Click the Generate private key option.
A private key gets generated.
Share the generated Private Key with our support team at to get the updated license key. Use the Copy icon to copy the Private Key.
Please Note: Click the Cancel option to remove the generated private key.
Once the user shares the generated private key with the support team of BDB, the support team will send them a new license key via email.
The user needs to enter the license key in the Update License space.
Click the Update option to update the existing licenses.
Please Note: The same workflow of License option can also be accessed through the BDB Platform Sign In page to facilitate the new users and the (existing) users who wish to renew their expired licenses with BDB.
The user can click the Generate option provided on the Login page to generate a new private key.
The generated private key should be shared with the support team at to receive the License Key.
The users can use the Click Here option if they have the License Key.


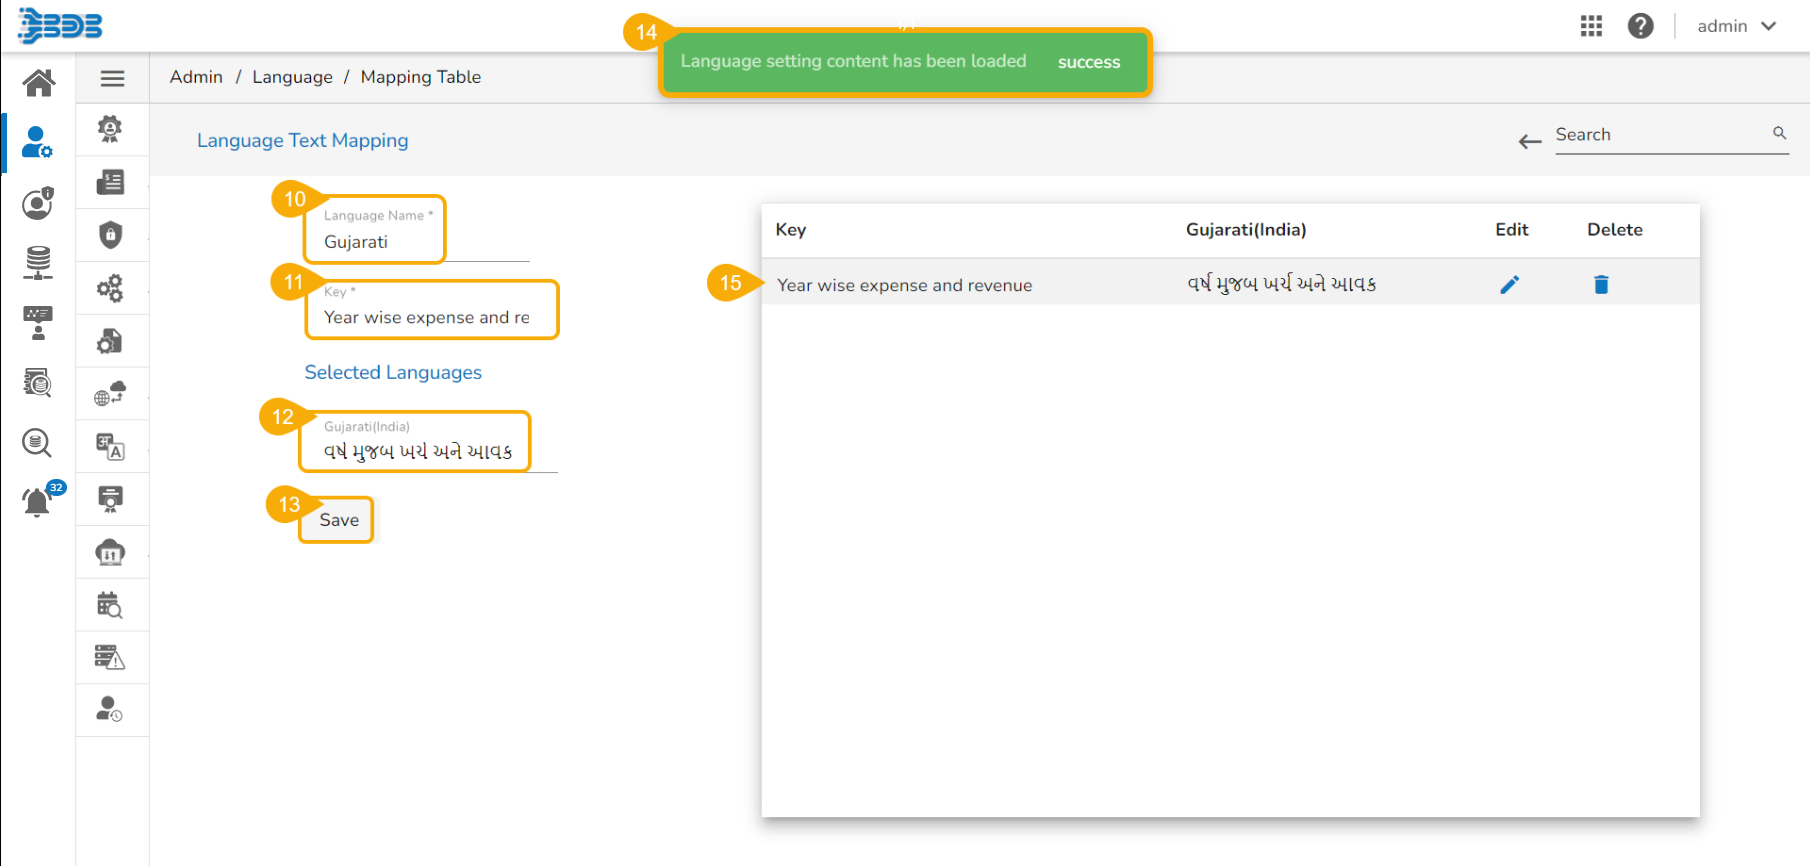
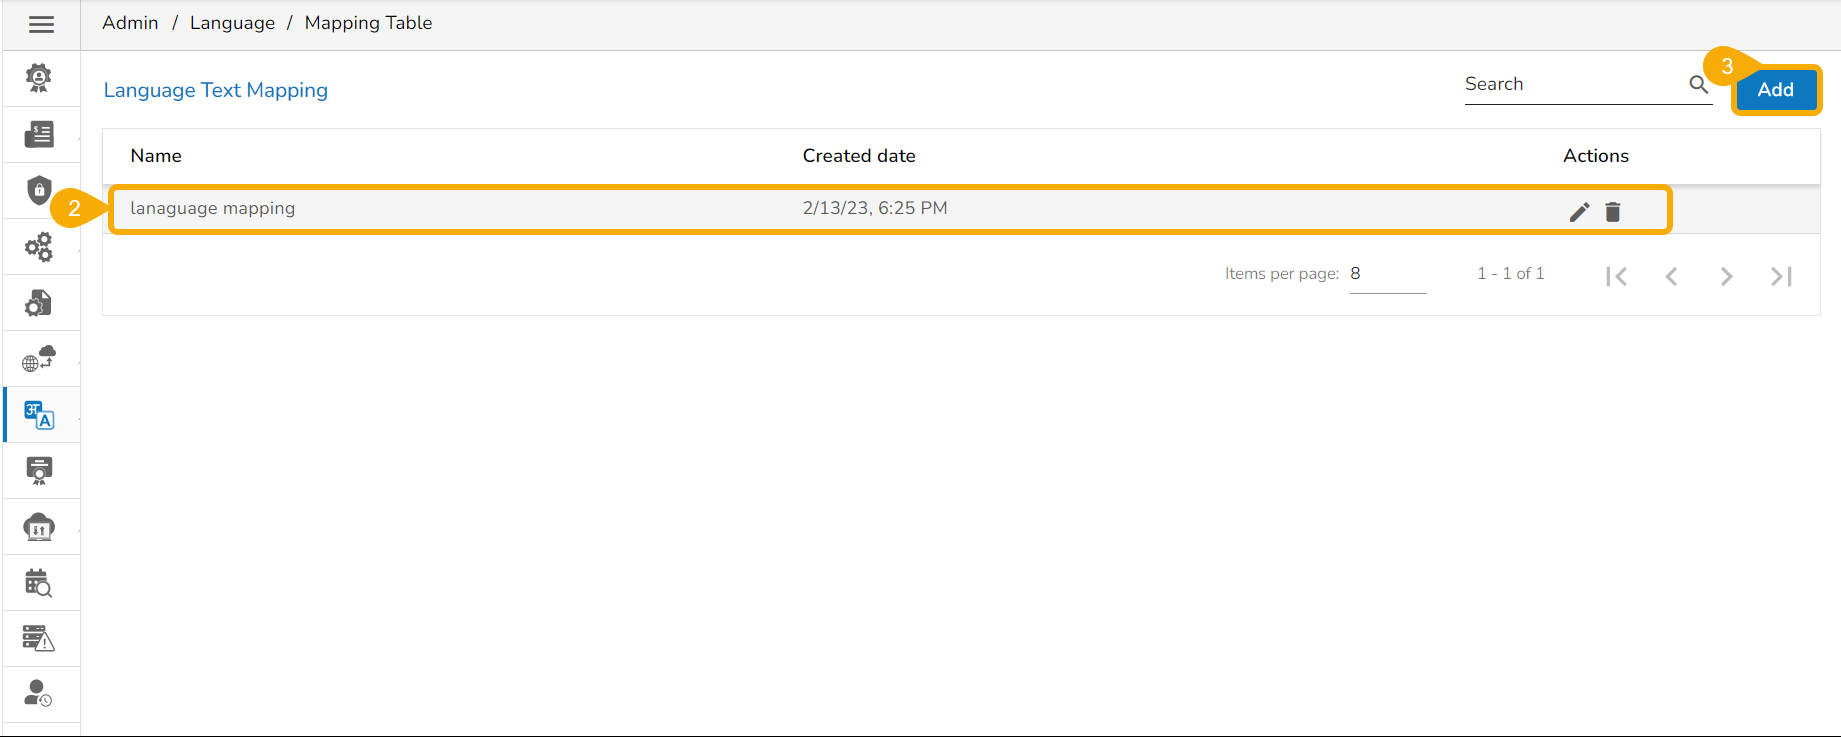
The added languages get mapped to the selected dashboards via this option.
Click the Mapping Table option using the Language Mapping admin option.
The Language Text Mapping page opens with the list of available language mapping options.
Click the Add option to add a new Language Text Mapping.
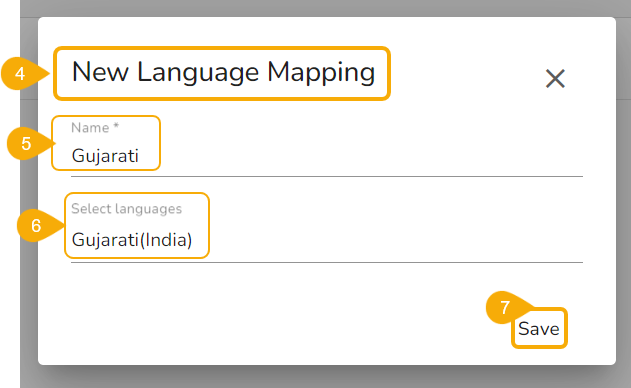
The New Language Mapping window opens.
Provide a name for the new Language Mapping.
Select language(s) or multiple languages using the drop-down menu.
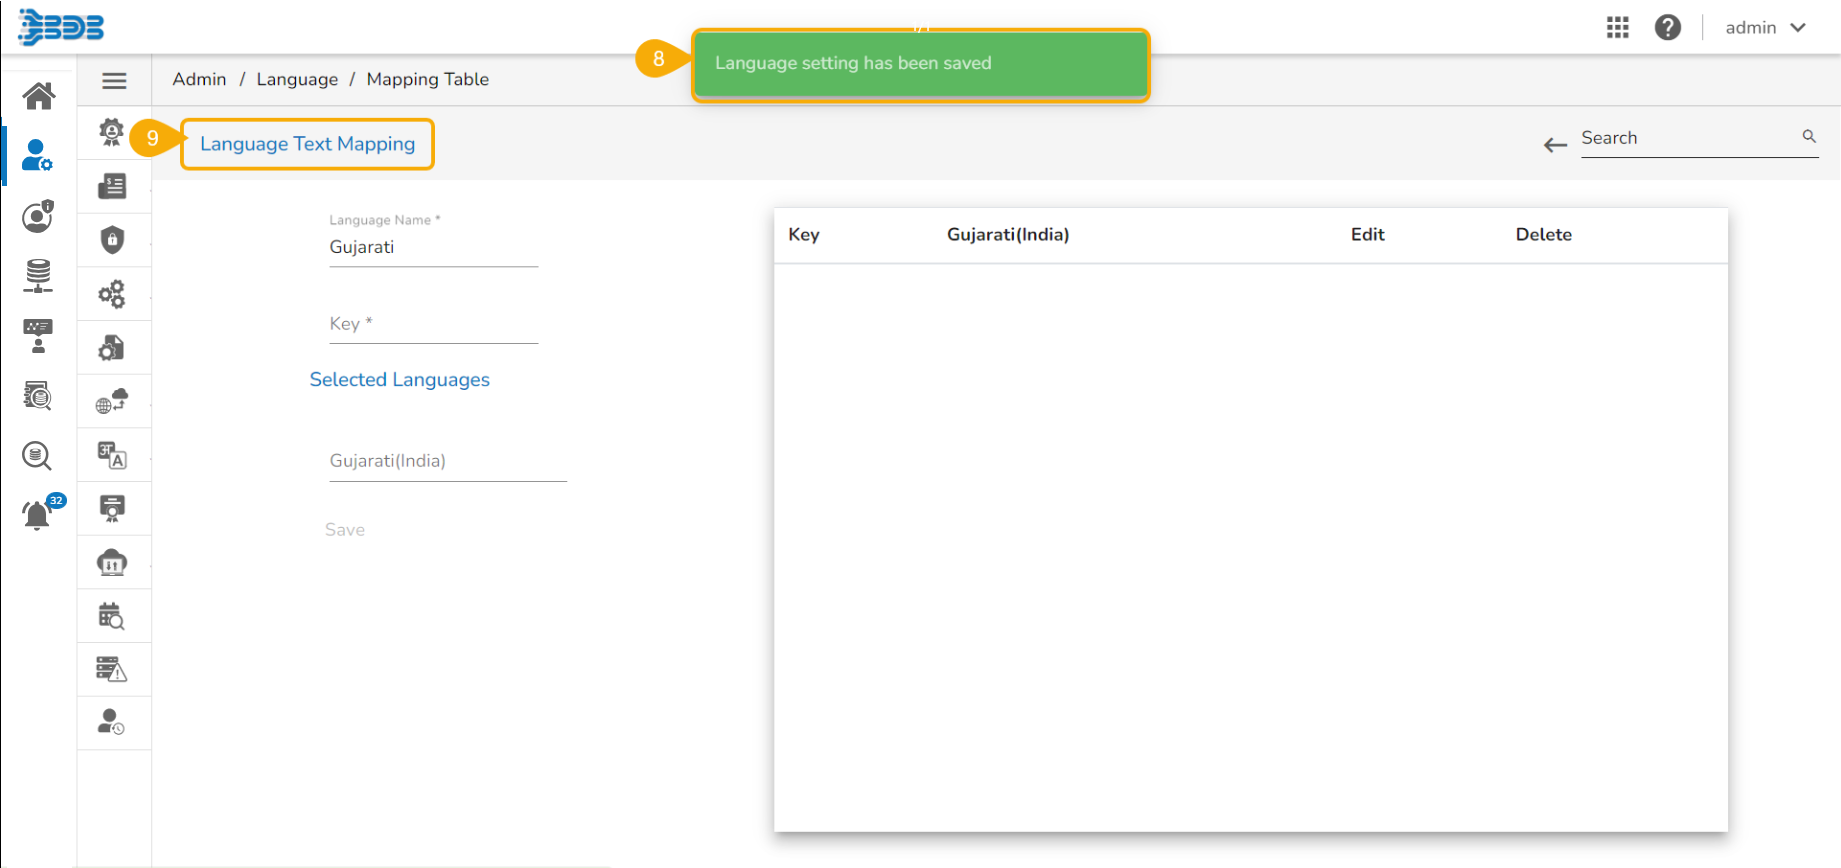
Click the Save option.
A success message appears to assure that the newly added language mapping is saved.
The Language Text Mapping page opens, from where the administrator can add various key terms and their synonyms to the newly created language.
The newly added
Please Note: Refer the section provided under the section of the to understand the Language Mapping inside the Designer module.
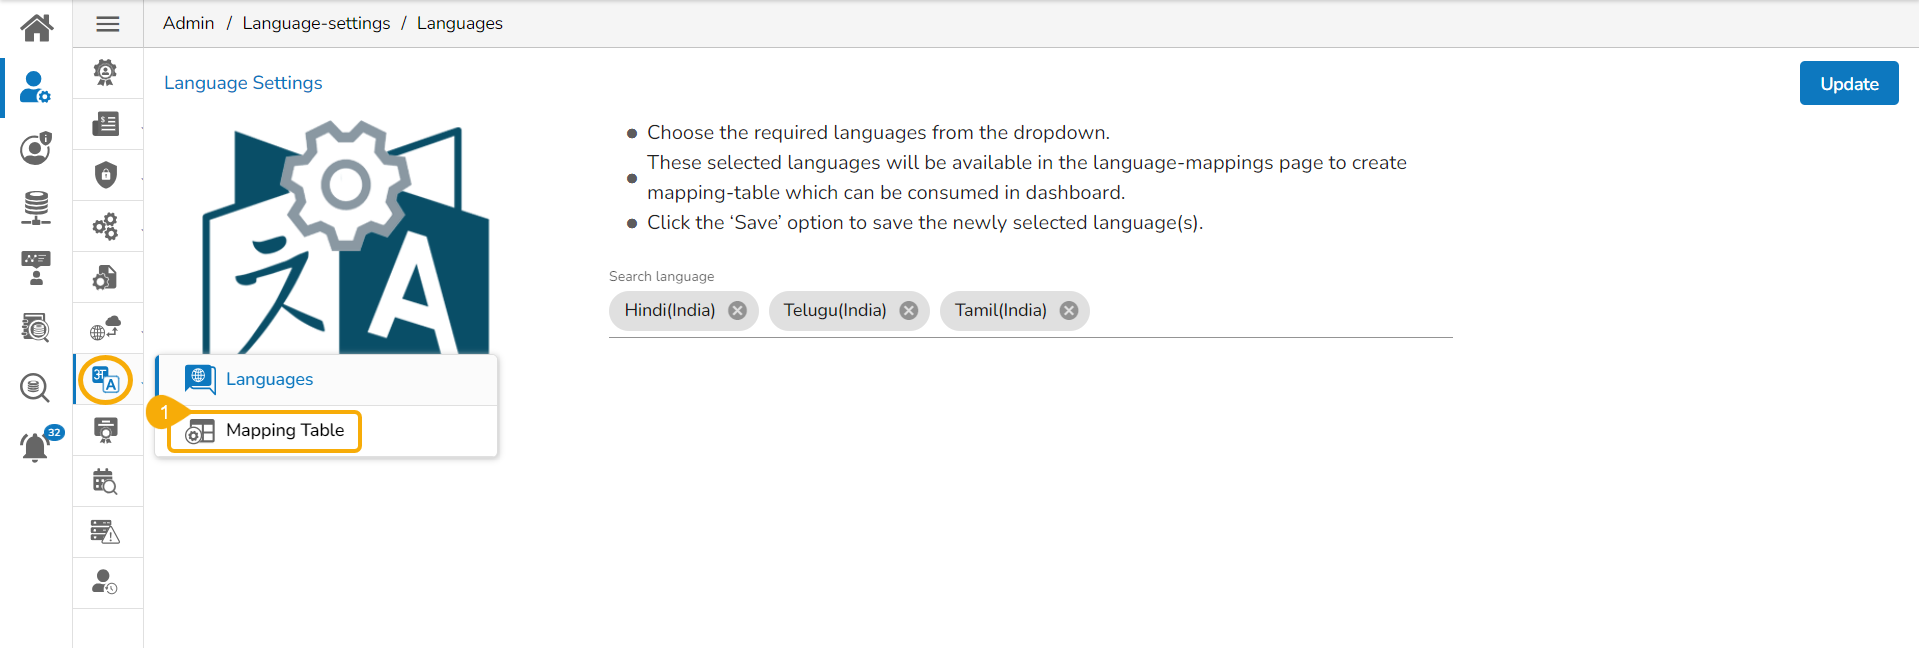
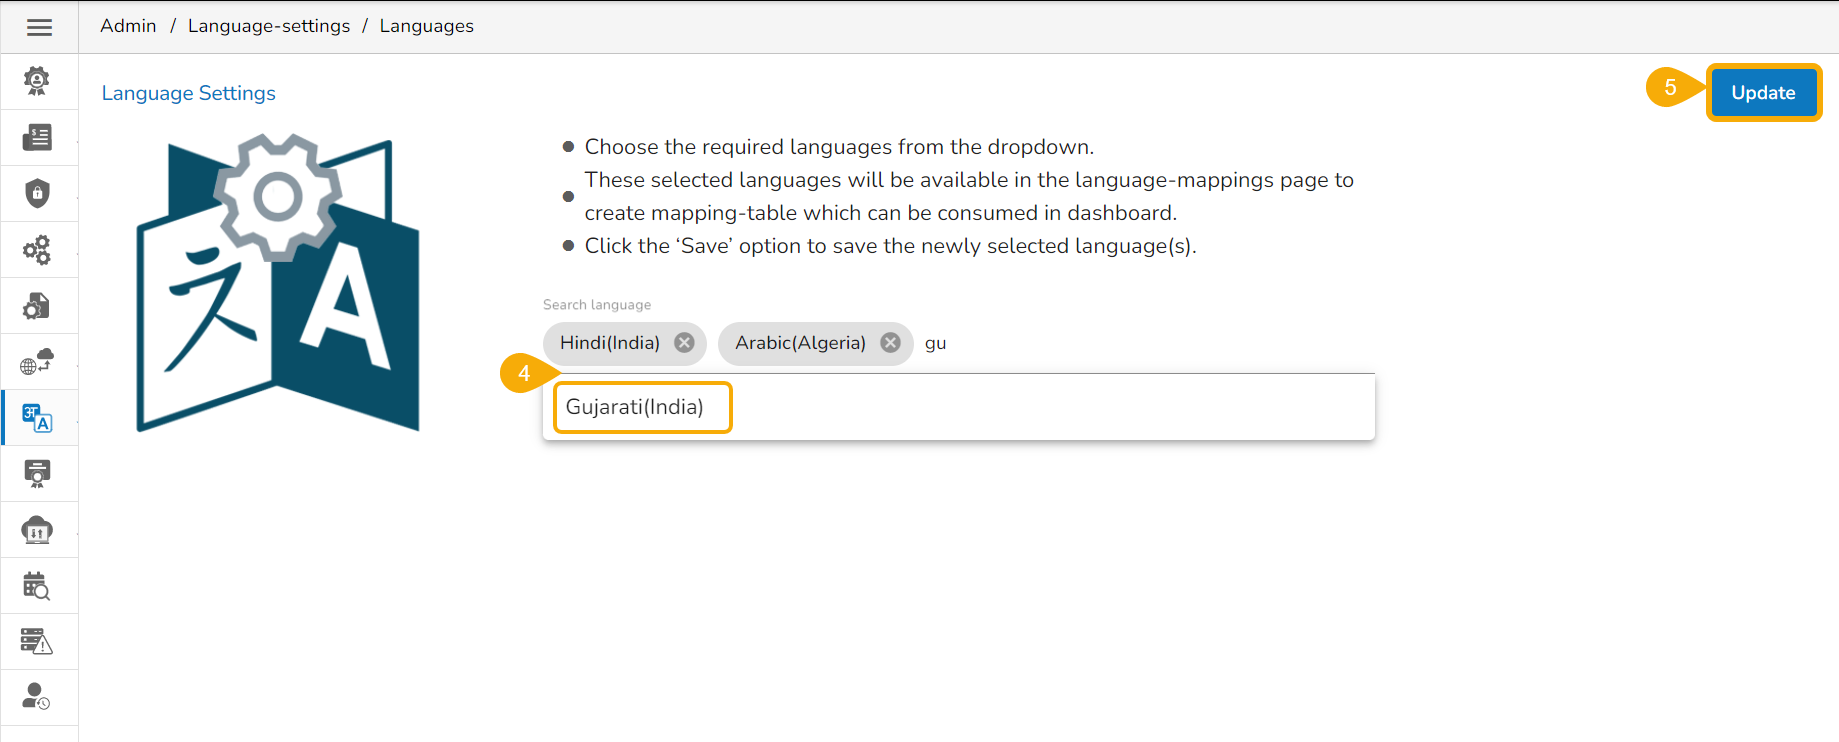
This option allows the addition of multiple languages to map with the dashboard module.
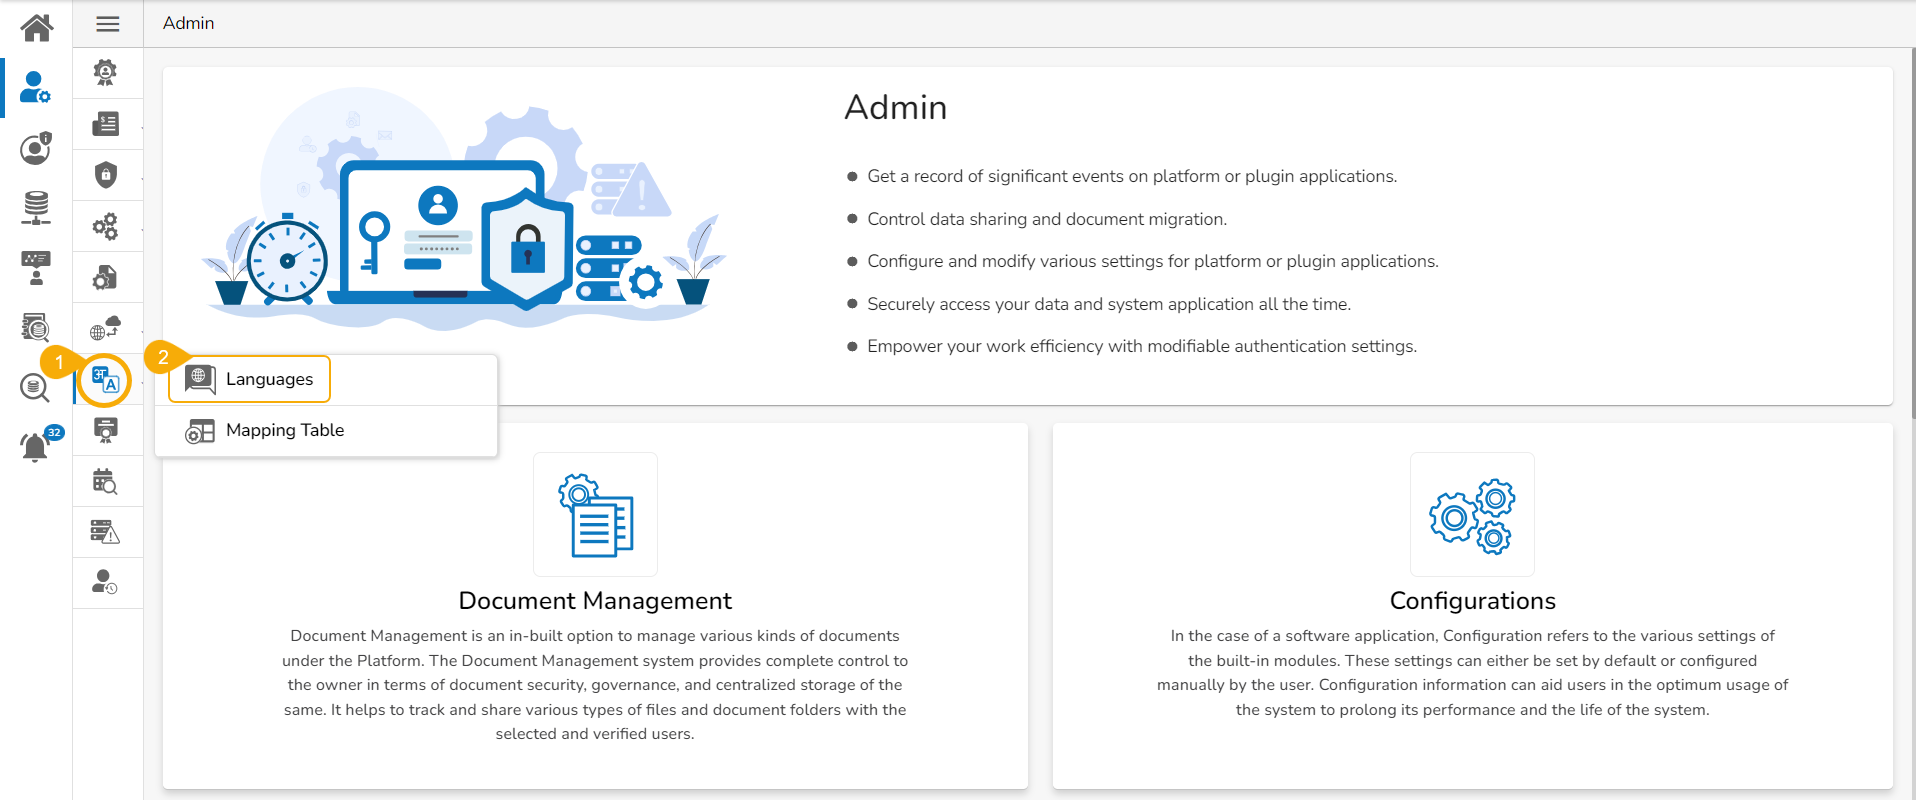
Click the Language Mapping option from the list of Admin options.
Choose the Languages option to add languages.
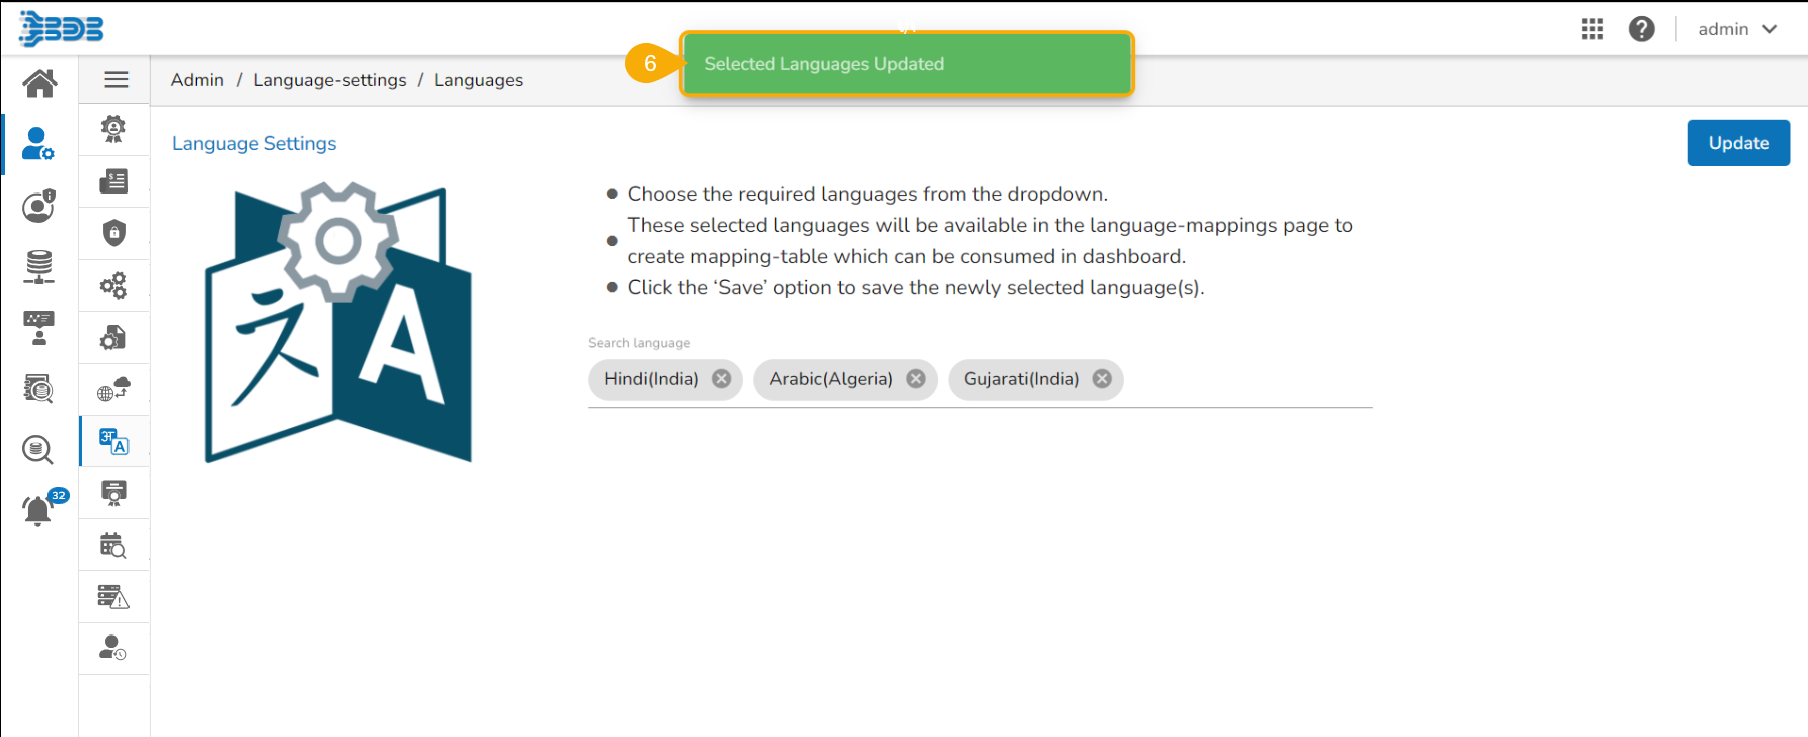
The Language Settings page opens displaying the selected language(s).
The administrator can search and add more languages by using the same Search Language bar.
Click the Update icon to save the recently added languages on the Language Settings page.
The Language Settings gets updated, and a message appears to inform the same.
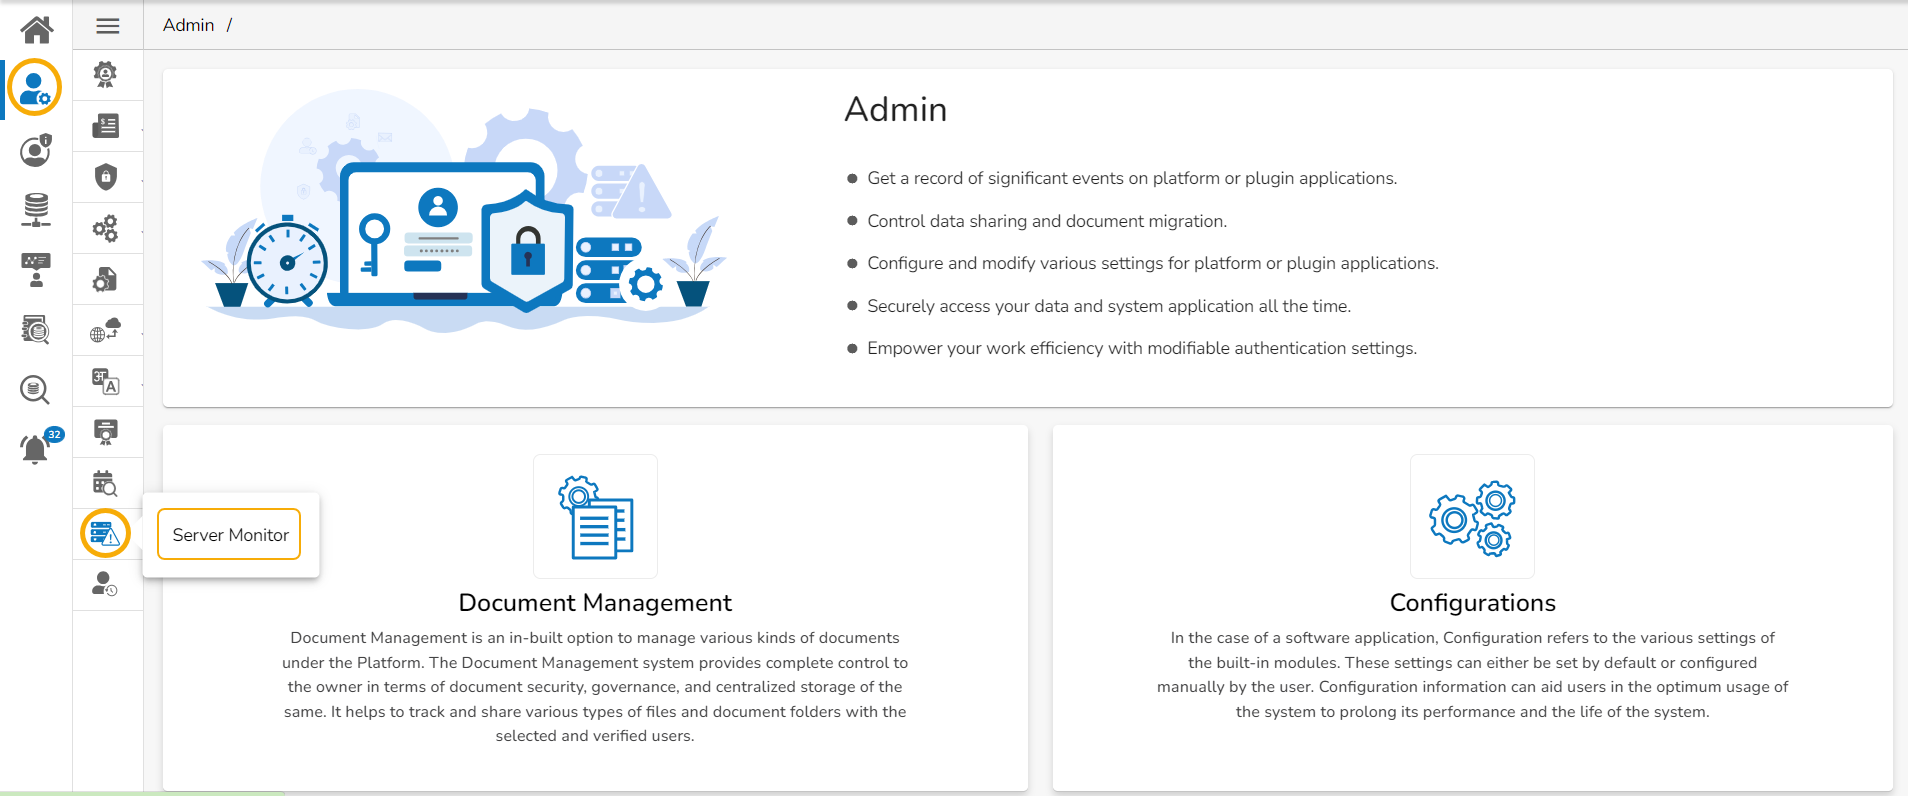
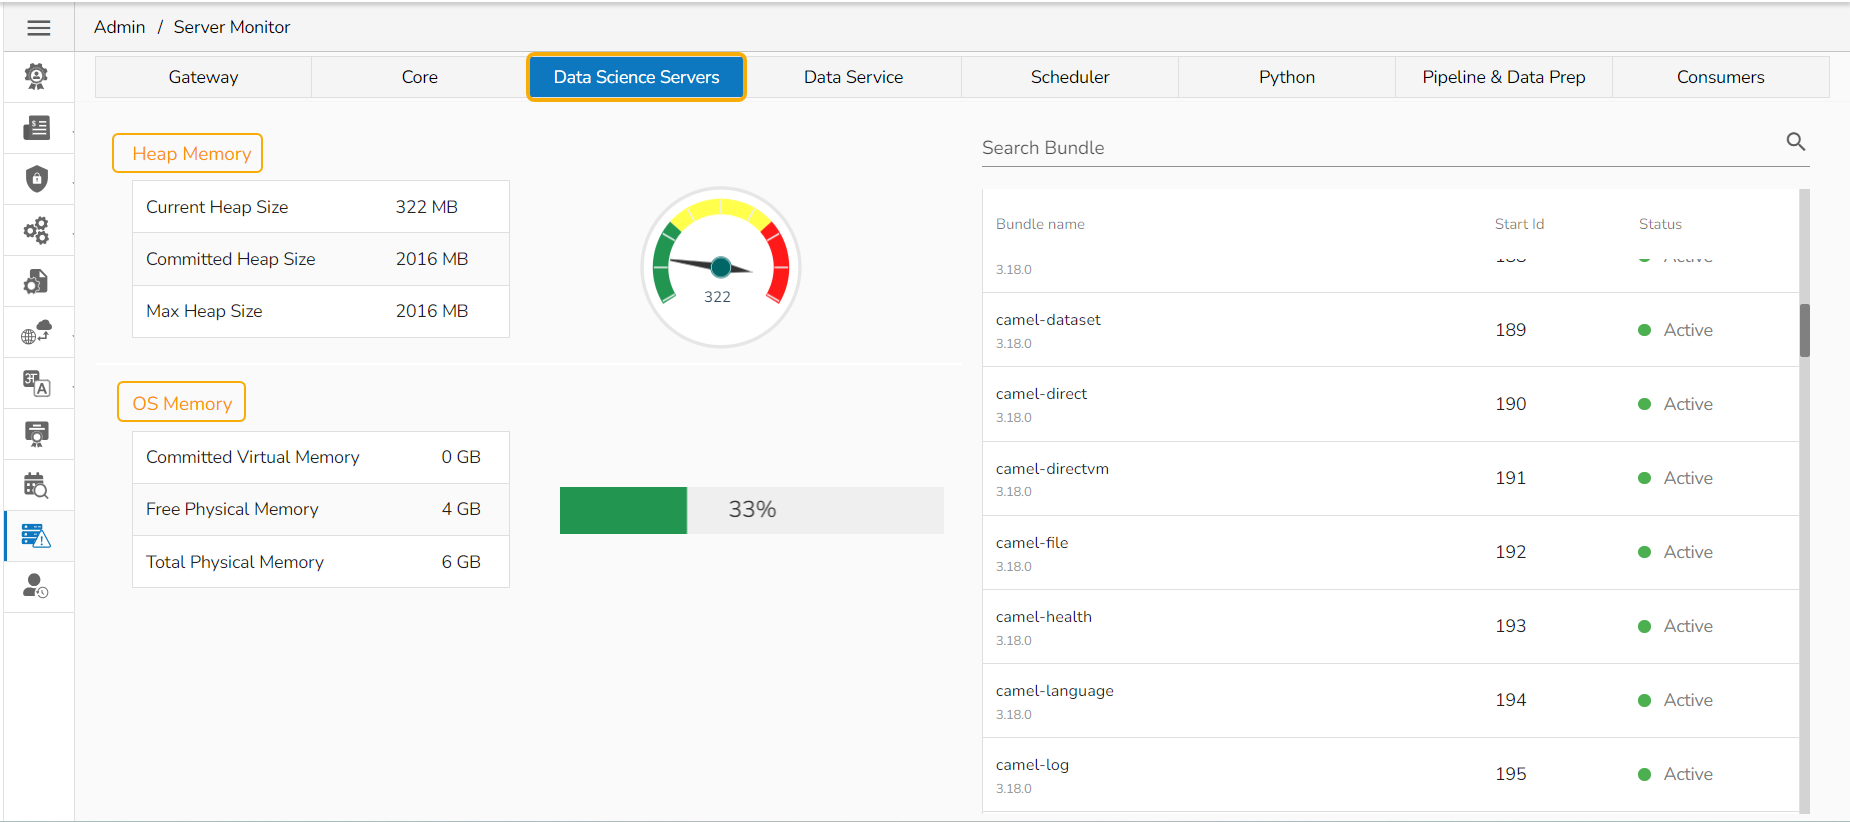
Server monitor reviews and analyzes a server for availability, operations, performance, security, and other operations-related processes. The server administrators perform server monitoring to ensure that the server is performing as expected.
Click the Server Monitoring option from the list of Admin options.
The Server Monitor page appears with various nodes presenting various modules of the BDB Platform.
Select a node to display the node-specific server details. E.g., the Data Science Servers node is selected in the below-given details:
The Secret Management setting gives facility to prevent the database-related or any other sensitive/confidential information from getting exposed. In Secret Management Settings the Admin configures the Key of the Sensitive data but the actual value is saved in Kubernetes as Environmental Variable by the DevOps Team.
The users can import an exported Dashboard using this feature.
Navigate to the Admin Module.
Click the GIT Migration icon from the side navigation bar.
By default, Platform connectors will not perform any verification of the server certificate. It means that someone can pretend to be the server without the client’s awareness. To prevent this kind of impersonation, the client needs to be able to verify the server's identity through a trusted chain of verification.
Pre-requisites: For SSL support to work, the user must have the following:
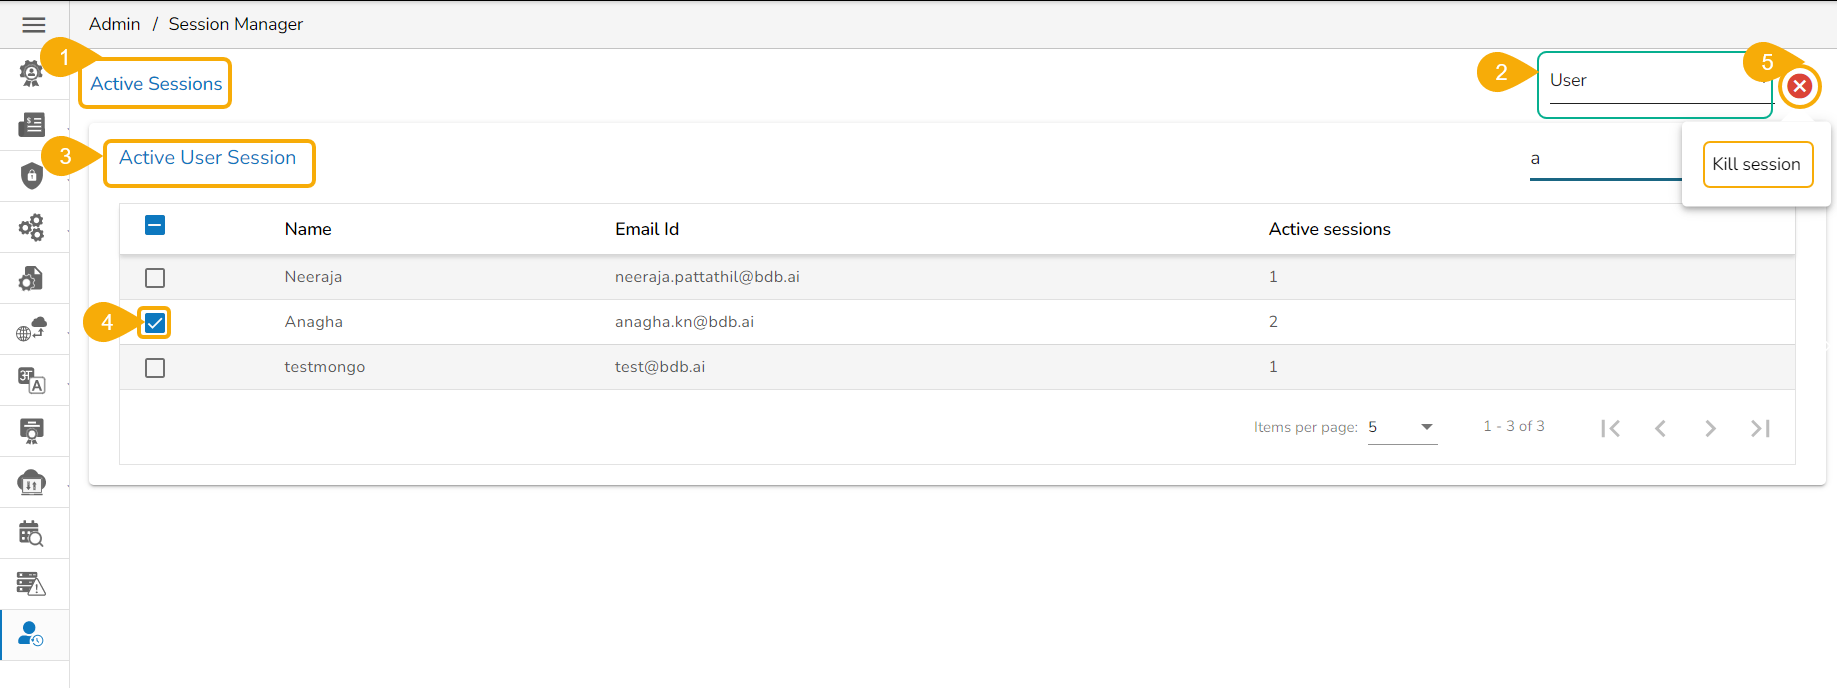
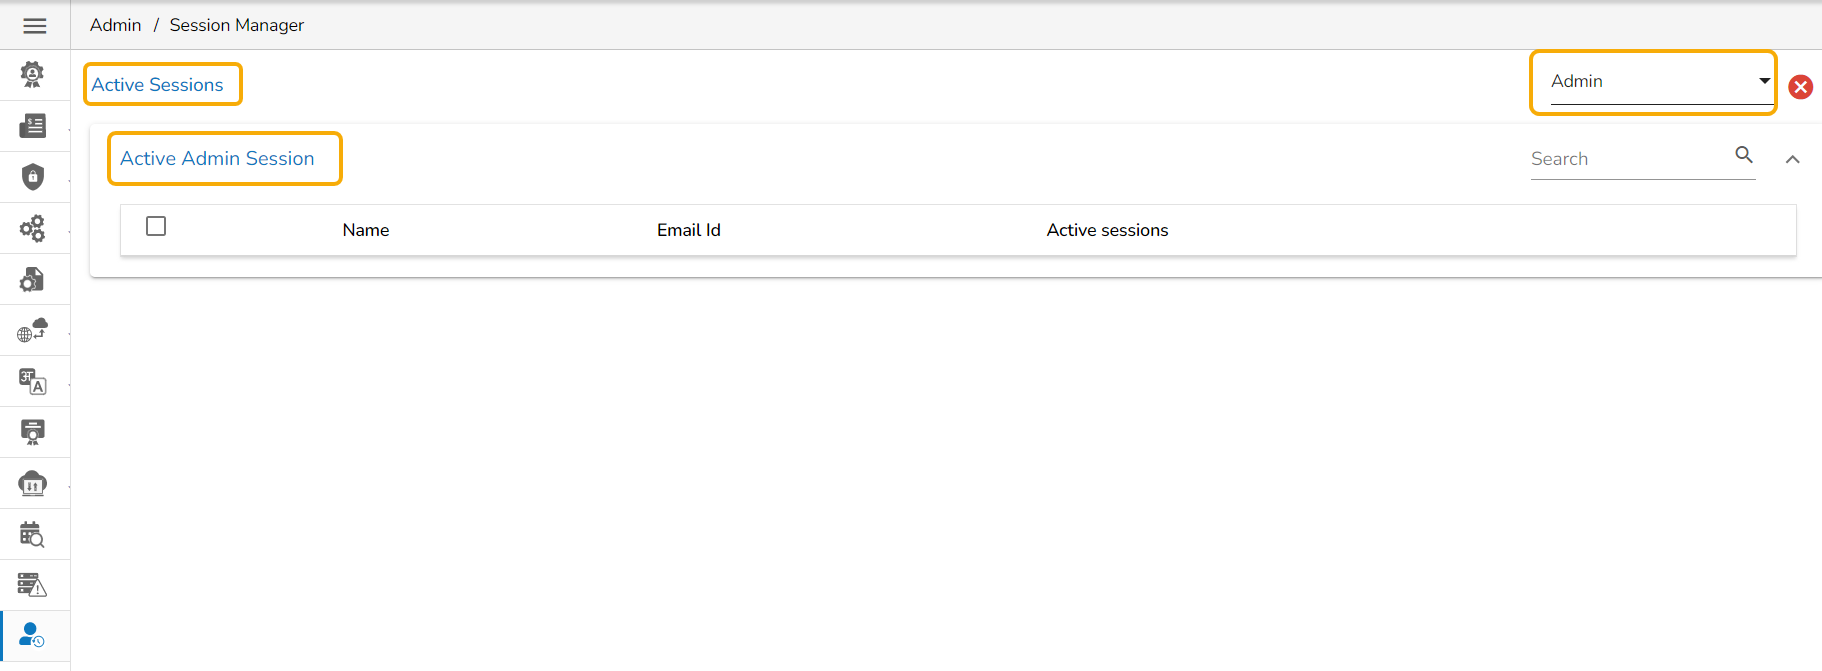
The Session Manager displays the various status of the platform users. The user can kill an active session using this admin option.
Click the Session Manager option from the list of Admin options.
The Active Sessions
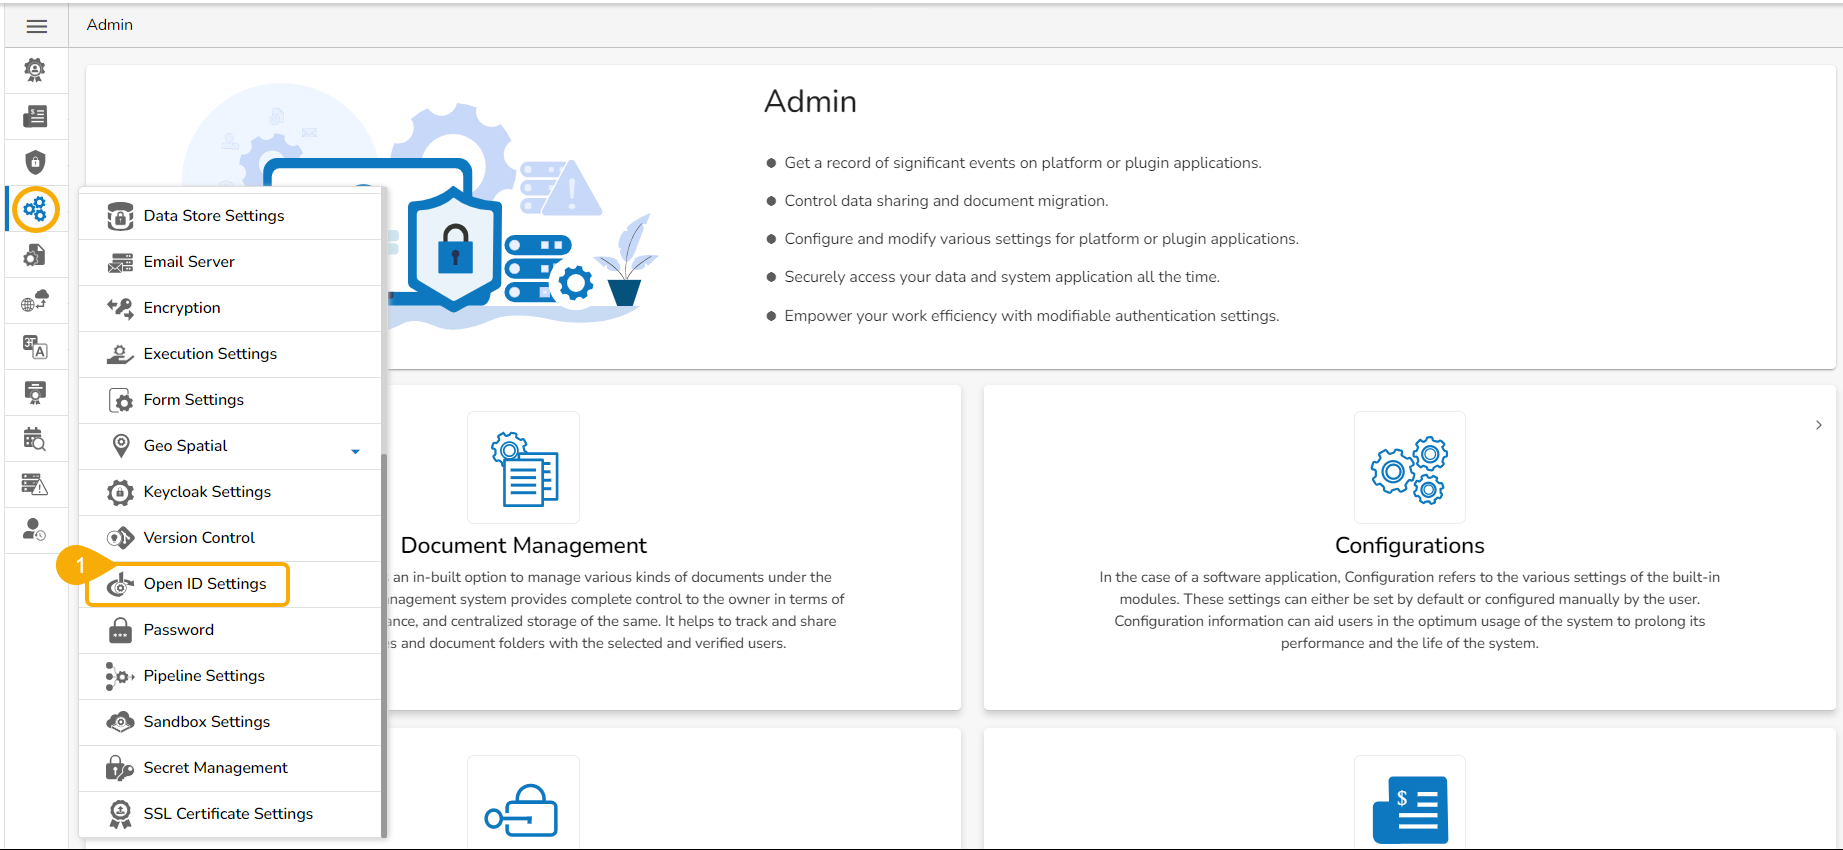
OpenID Settings allows users to authenticate and authorize themselves on different websites or applications using a single set of credentials.
The admin user can enter the database details to save the data of the open ID.
Click the Open ID Settings option from the Configurations options of the admin menu.
The page provides an overview of Machines and Resources used to monitor and optimize Platform performance.
Resource observability is key to maintaining operational efficiency in systems with dynamic and distributed components, like cloud services, containerized environments, and microservices architectures. It is vital for detecting issues, optimizing performance, and ensuring reliability in complex systems, particularly in cloud computing and distributed frameworks.
The Resource Observability page provides a detailed breakdown of the system's resources to help monitor and optimize platform performance. It opens by default on the Machine tab, offering a comprehensive snapshot of key metrics related to machine and resource utilization.
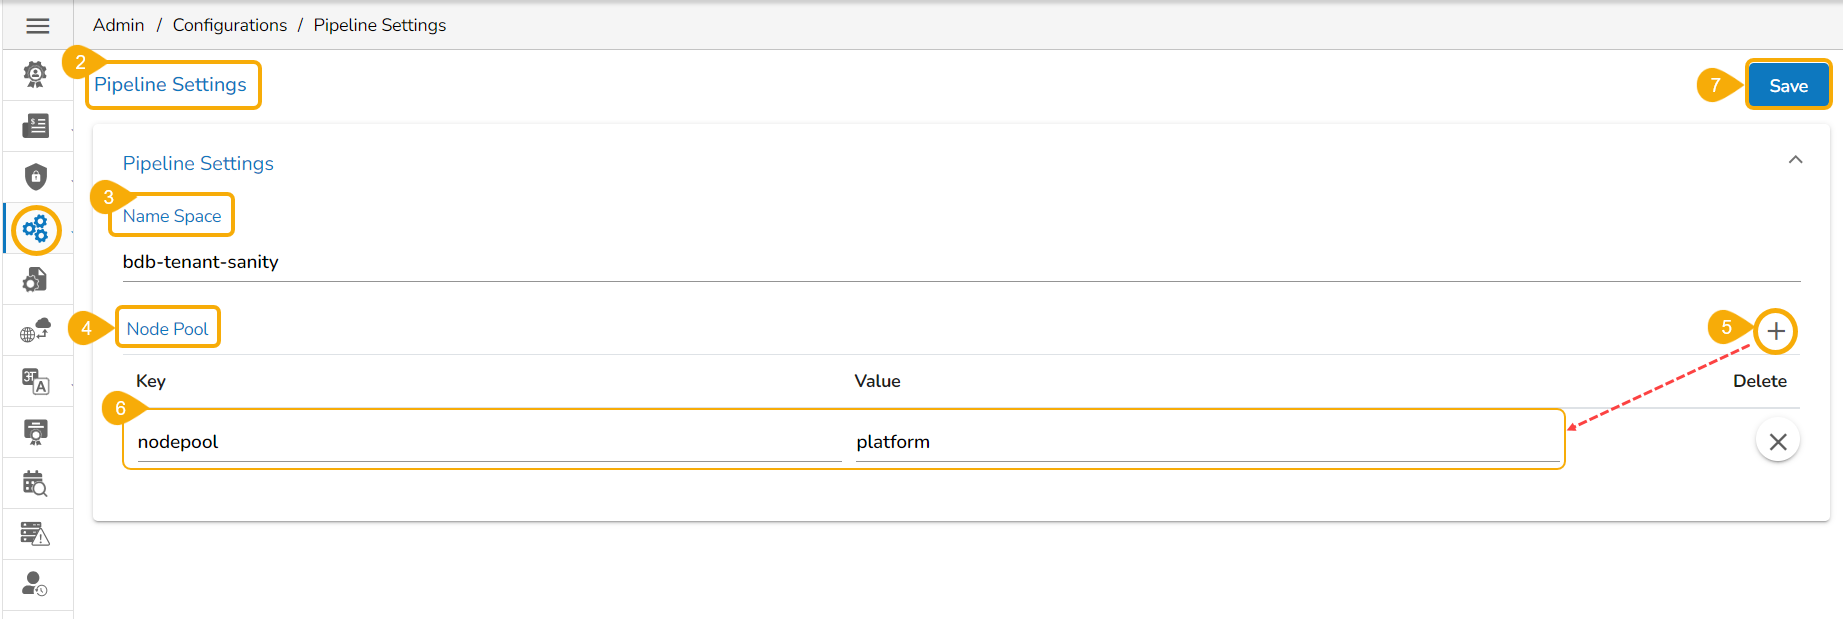
Click the Pipeline Settings option from the Configurations list.
The Pipeline Settings page opens.
Click the Save option.
Area Type: Select an area type using the drop-down menu
Choose File: Browse a shapefile from the system and upload (Only JSON and JS formats are supported)
Work Space Name
Entity Extension
Entity Type
Insert a key from the selected dashboard. (A dashboard must be selected by the Designer to get the key terms)
Provide the translated synonym of the key in the selected language(s).
Click the Save option.
A success message appears to confirm the update in the Language Setting content.
The saved key with its synonym in the selected language(s) gets added to the right-side list.
Save more terms to the newly created language settings using the same set of steps:
The Secret Management page opens.
Click on the New option to add a new secret.
Click the Add New Field icon for the Secret Management option.
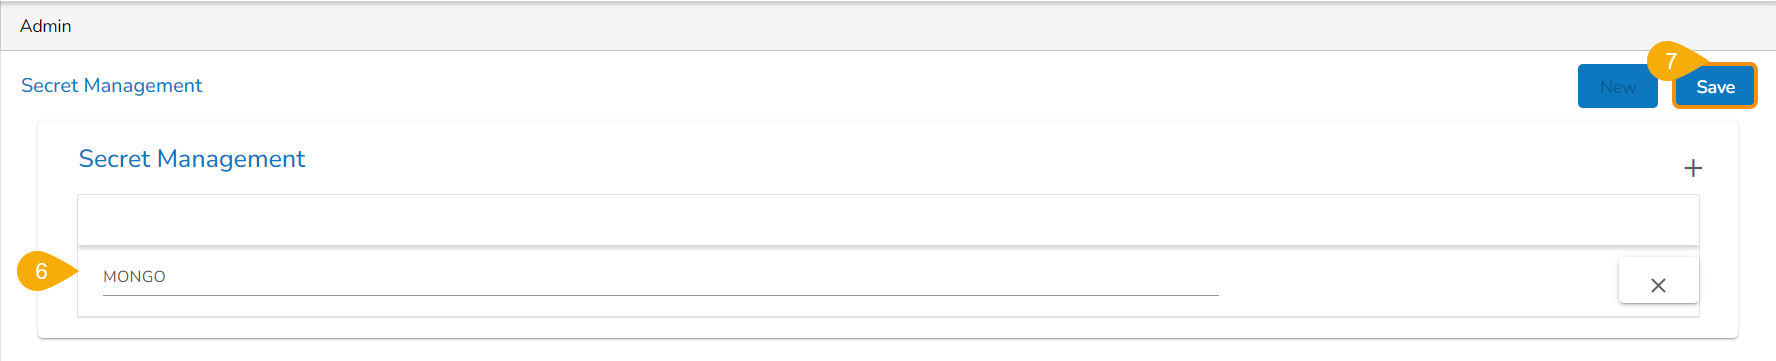
An option to add the Secret Key appears as shown in the below image:
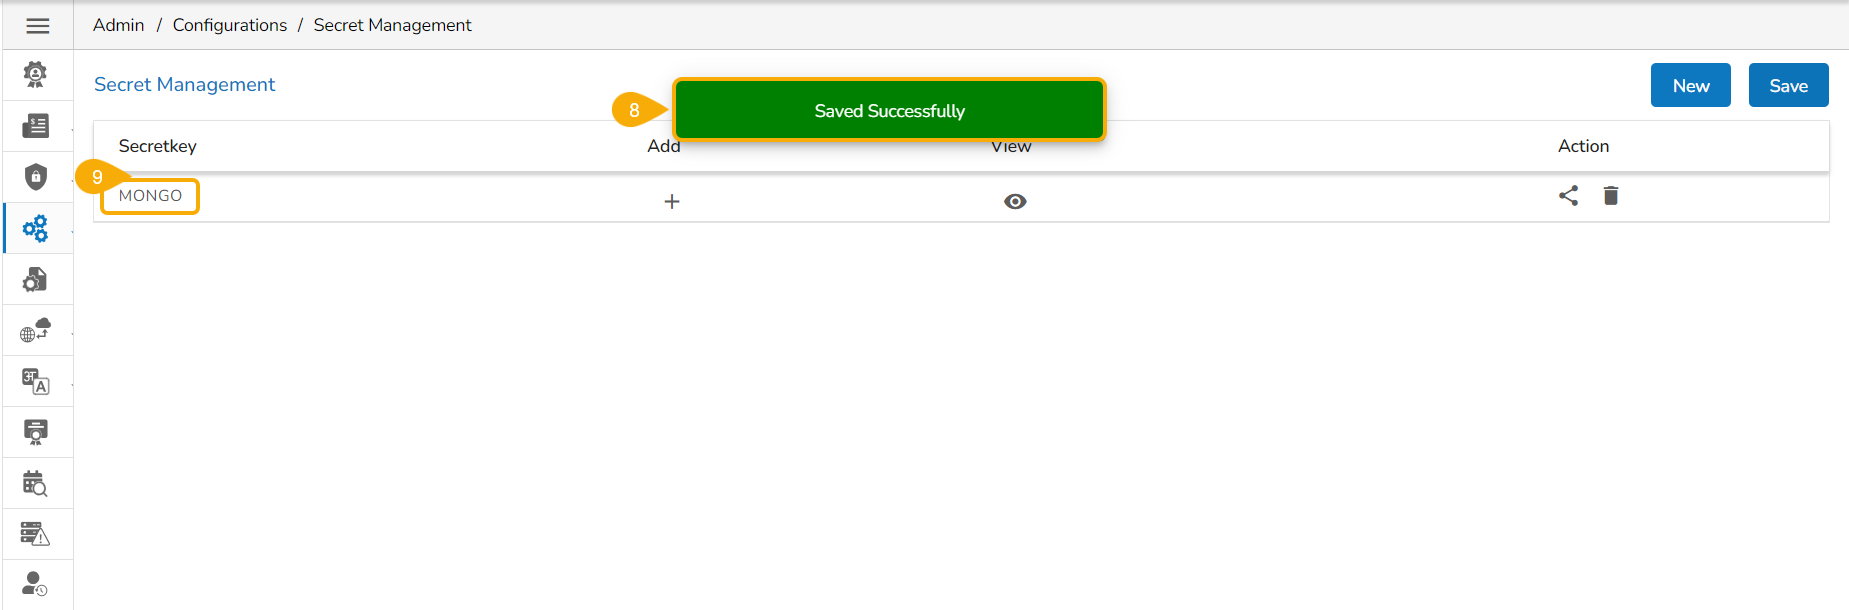
Provide the Secret Key in the given space.
Click the Save option.
A confirmation message appears.
The secret key will be saved and displayed in the list.
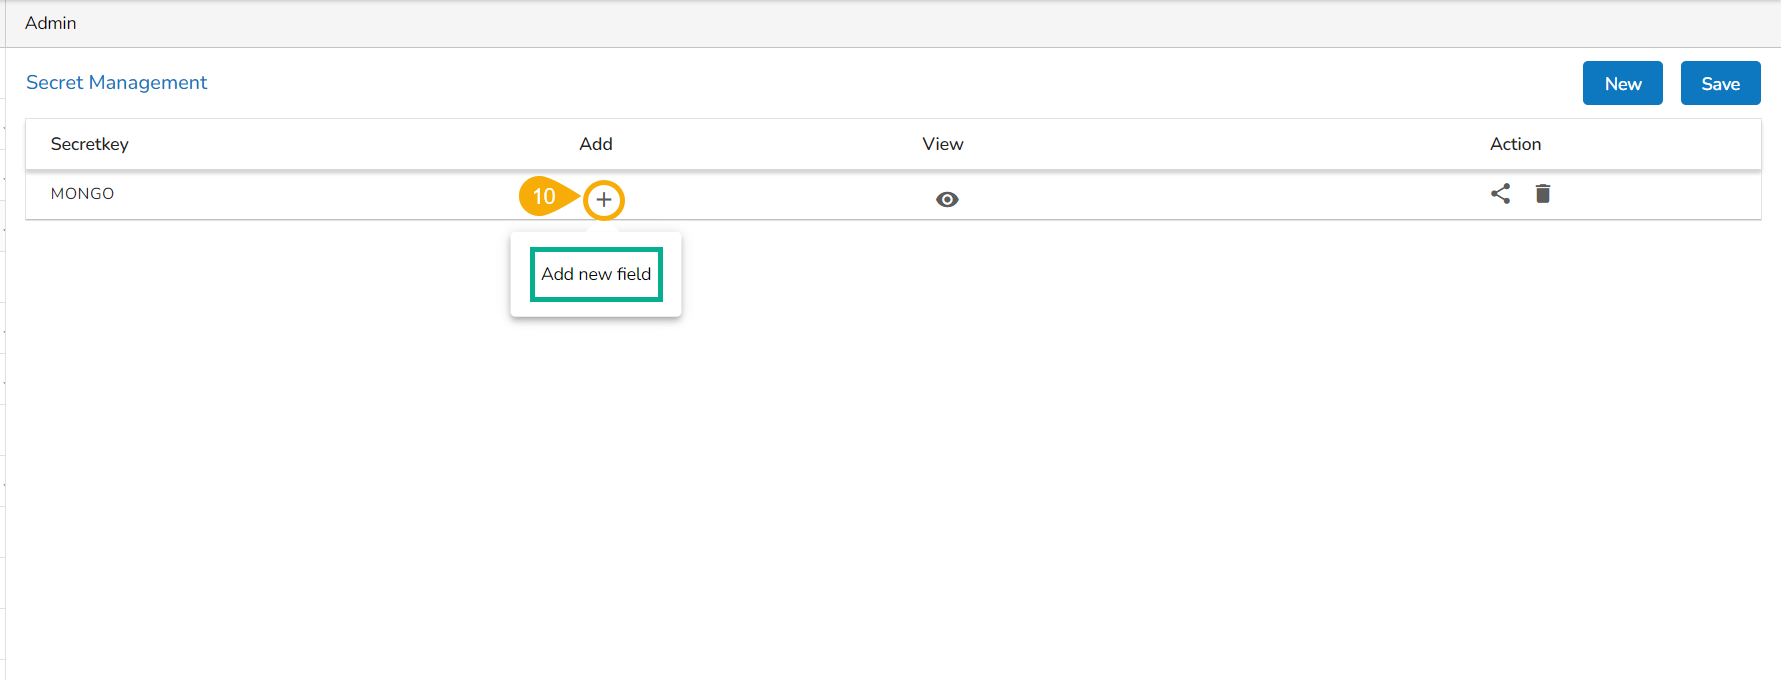
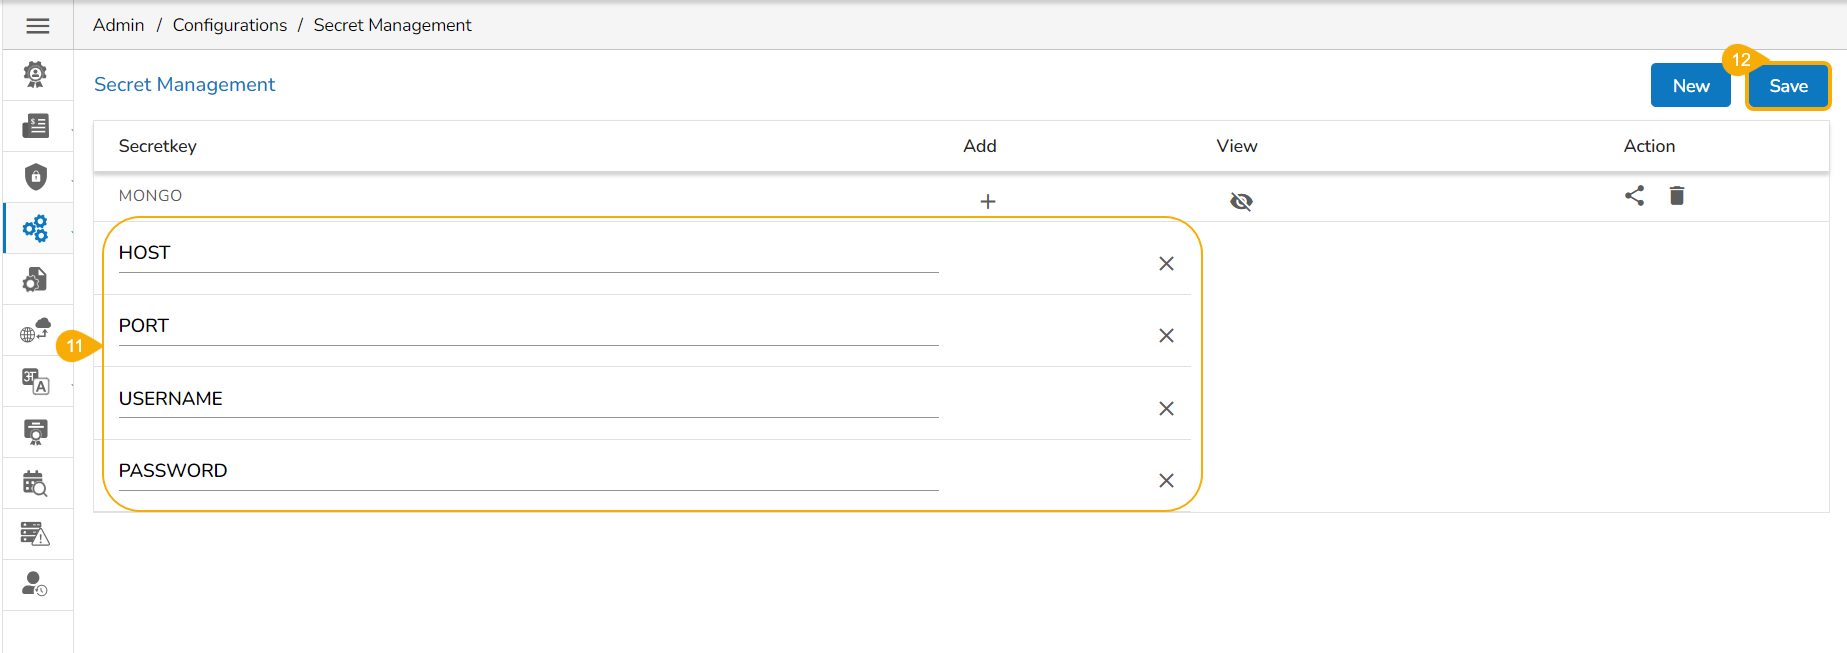
Add a new field to the Secretkey by clicking on the Add new field + icon for the Secret key.
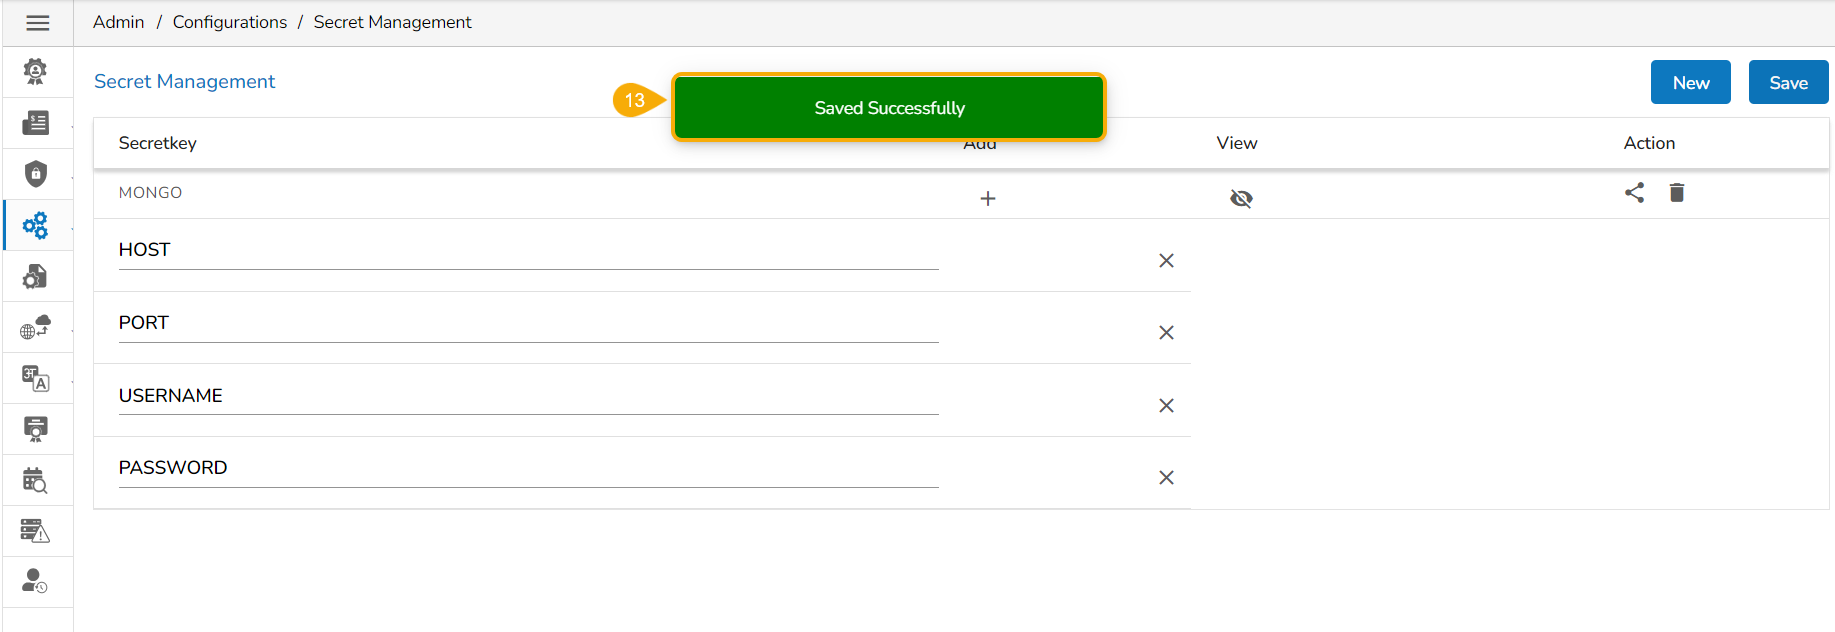
Add multiple fields like Port, Host, Username, Password, etc. depending upon the selected DB.
Once all the required fields are added, click the Save option.
A confirmation message appears to ensure that all the inserted fields are saved.
Please Note:
Click the View icon to display all the added fields.
Click the Delete icon to remove the added Secret key.
Click the Close icon to remove an added field.
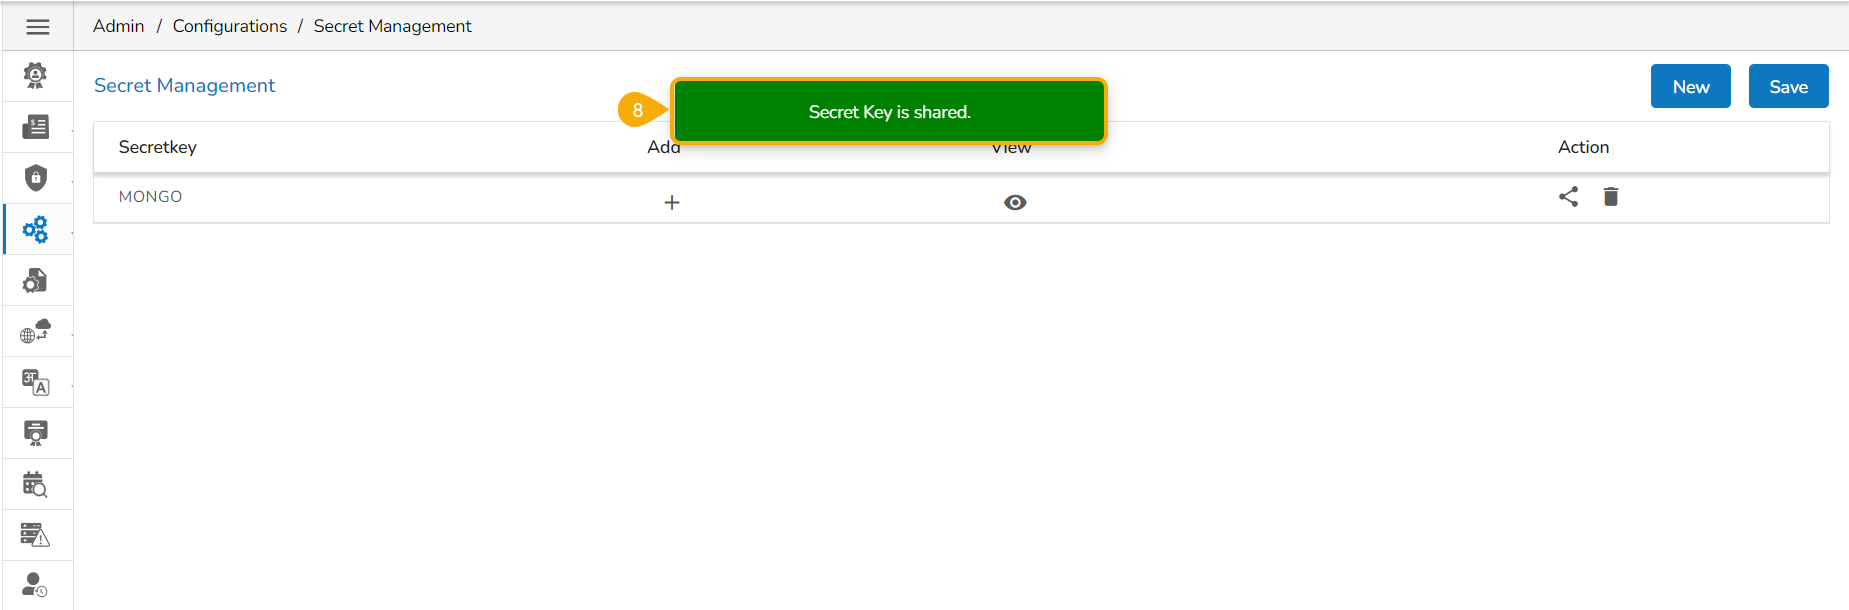
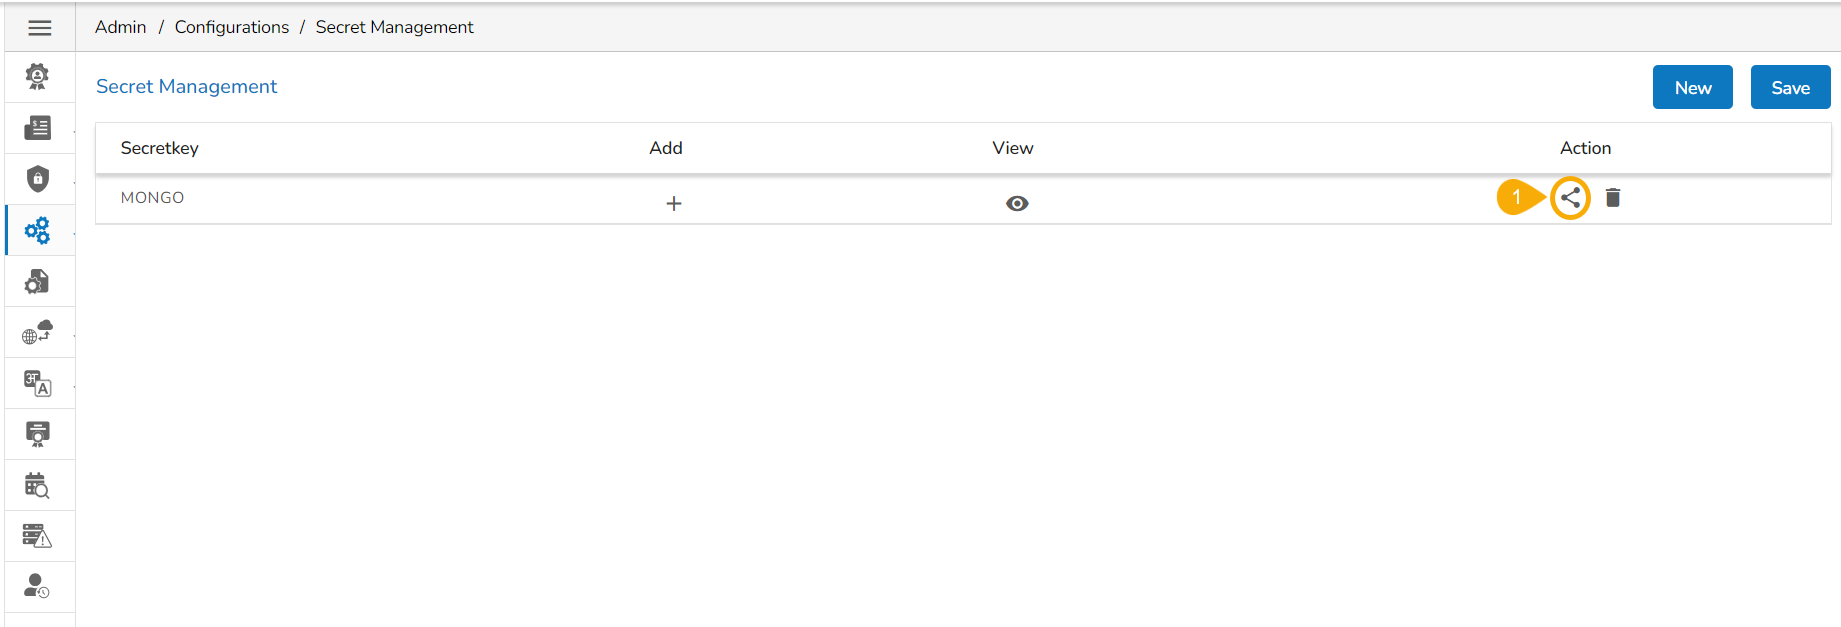
Once Admin has configured the settings, it is possible to share it with a user/user group to use the encrypted secret keys. Click the Share icon to share a Secret Key.
Click the Share icon for a saved Secret Key.
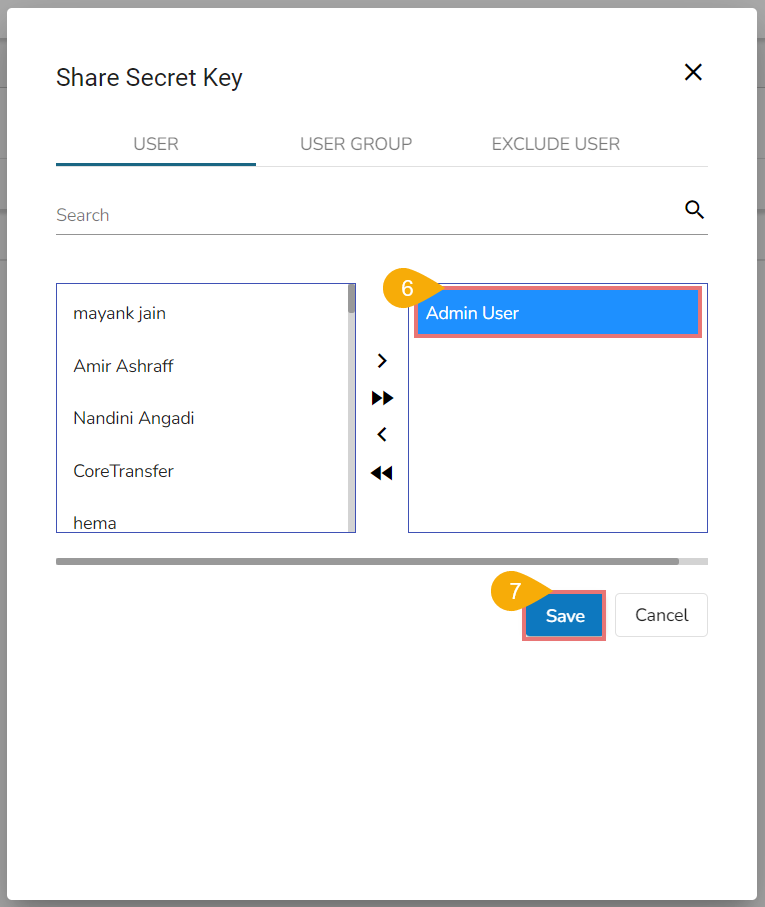
The Share Secret Key window opens.
Select the USER or USER GROUP option to list the users (Use the EXCLUDE USER to exclude the user from the right to access a shared Secret Key).
Select User(s)/User Group(s) from the list.
Use an arrow to move the selected user(s) and user group(s) to the right side box.
Once the selected user(s) and user group(s) appear in the right side box.
Click the Save option.
A confirmation message appears and the Secret Key gets shared with the selected user(s) or user group(s).
Please Note:
Admins must request DevOps to add keys and values in Kubernetes, adhering to Kubernetes naming conventions (Use hyphen or underscore, special characters are restricted).
Admins must share these secret keys with relevant users/user groups for access.
Once configured and shared with respected users and user groups these keys can be utilized across platform modules.
Click the Import option that appears on the next page.
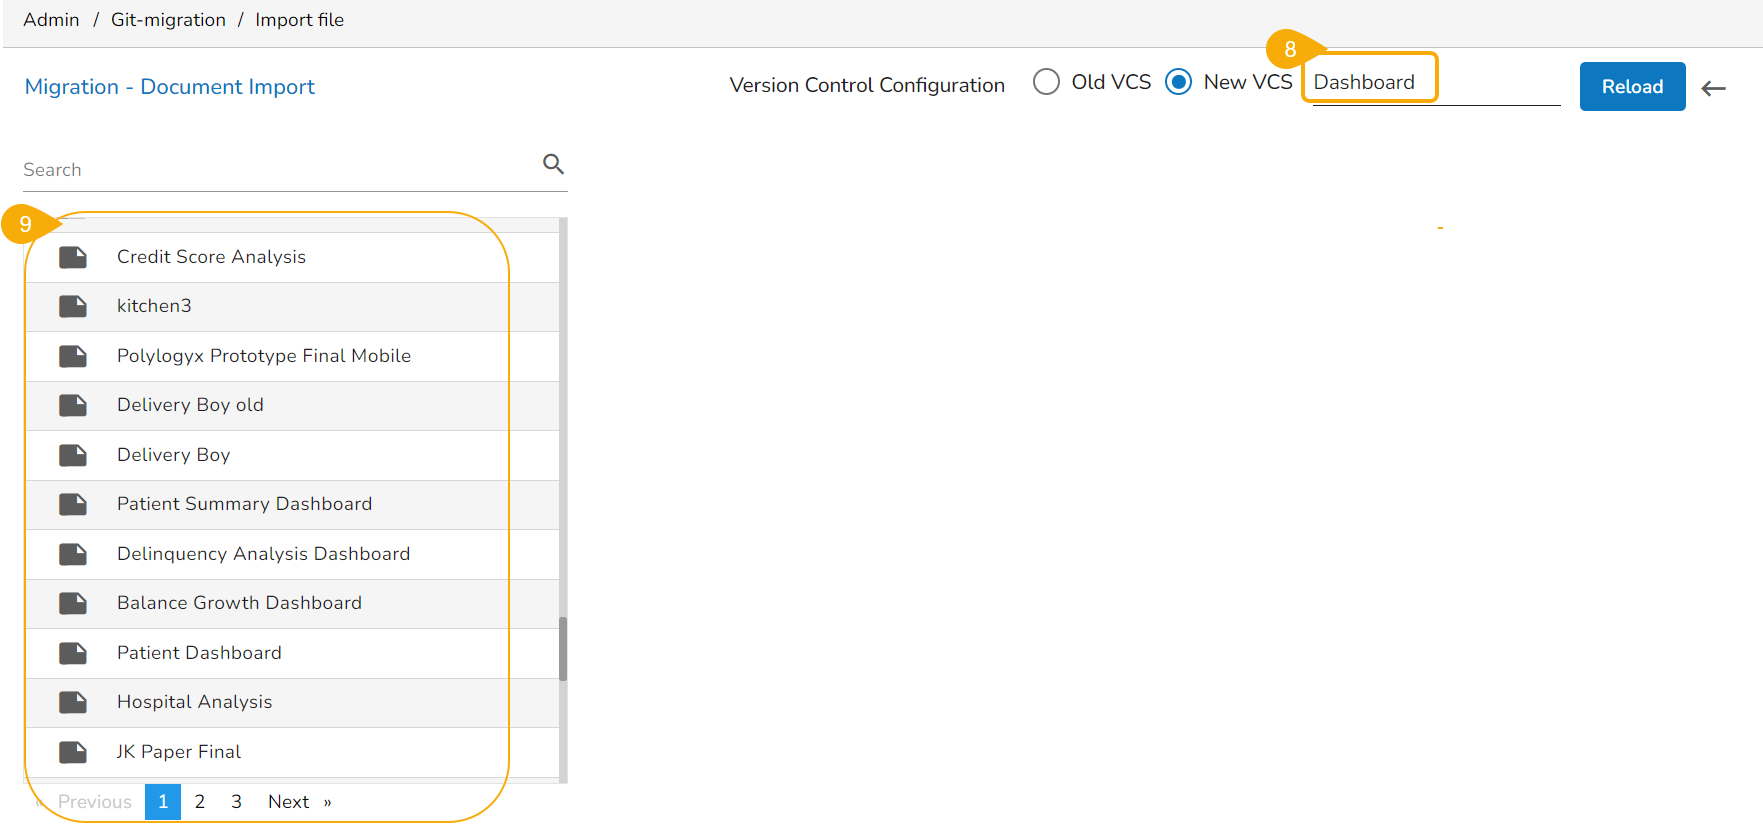
The Migration-Document Import screen appears.
Select the New VCS for the Version Control Configuration.
The Select a Module drop-down menu bar appears at the top-right side of the screen.
Select the Dashboard module.
A list of the exported dashboards appears on the left side of the page.
Use the search bar to search for a dashboard. (Ex. vtestdasdboard)
The customized list appears based on the searched term.
Select a dashboard and click to open the details.
The various versions (if available in the GIT) of the selected dashboard appear.
Select a version using the checkbox.
Some more information about the selected dashboard gets displayed.
Click the Migrate option.
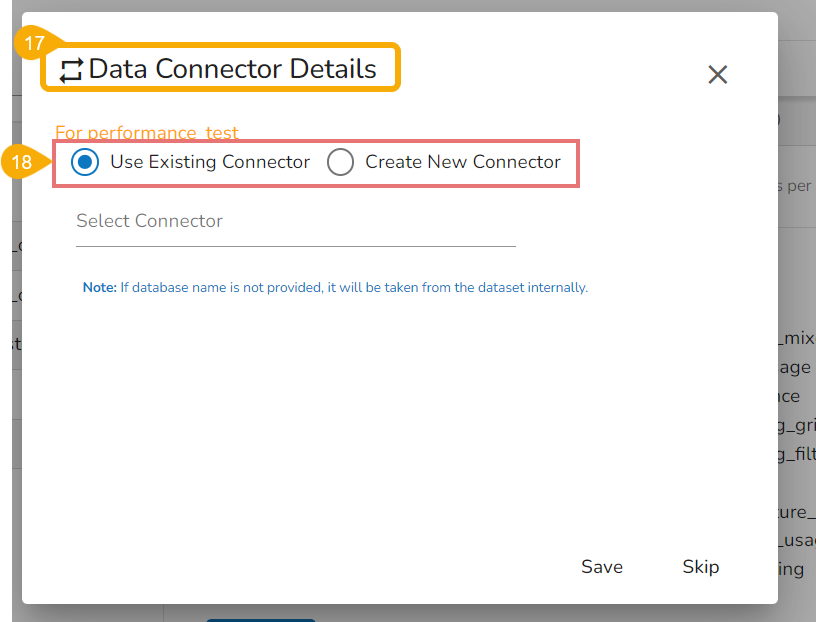
The Data Connector Details dialog window appears to configure a data connector.
The user gets two choices to configure the data connector:
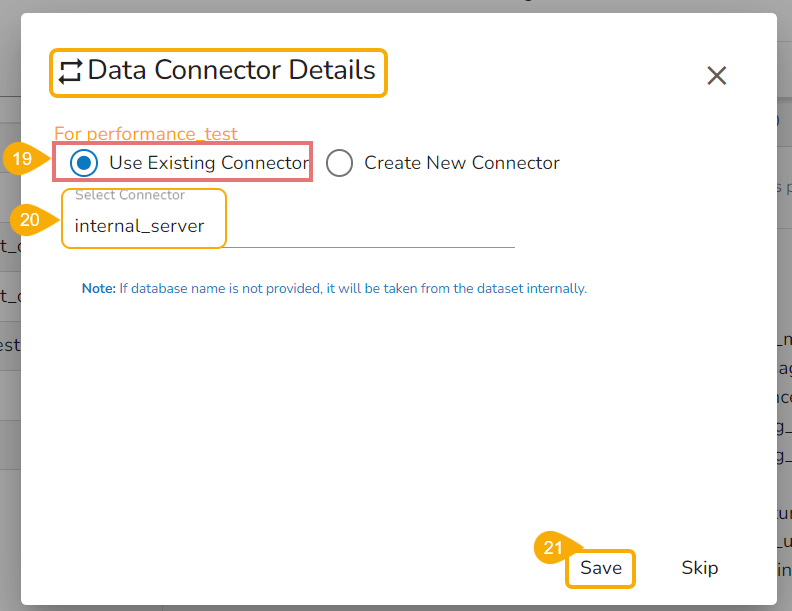
Let the checkmark be in the given checkbox to use an existing connector.
Select a data connector from the drop-down menu.
Click the Save option to save the configured data connector details.
Please Note: When the selected Dashboard displays multiple connectors, the user must select them all with the Use Existing Connector option to load all the charts under the selected Dashboard.
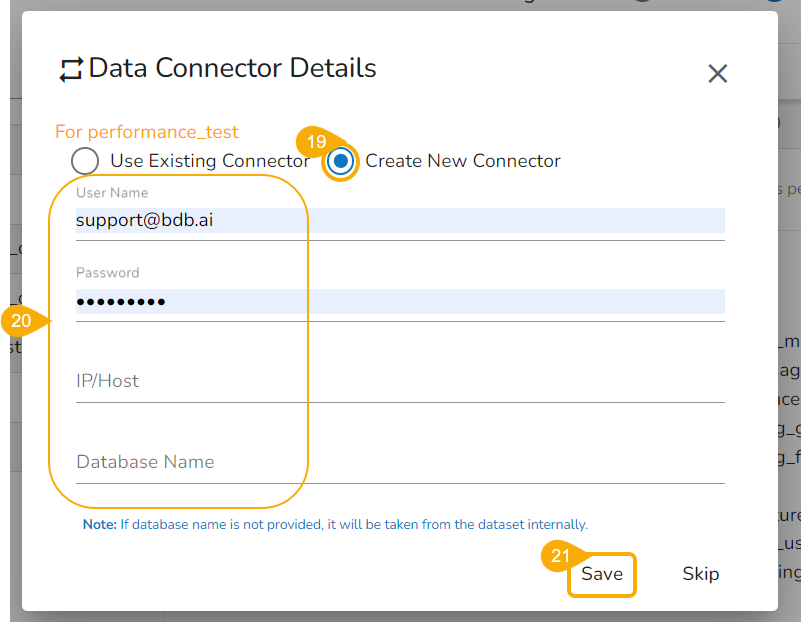
Select the Create New Connector option.
Provide the required details: Username, Password, PI/Host, Database Name
Click the Save option.
A notification message appears, and the selected dashboard gets migrated to the Designer module.
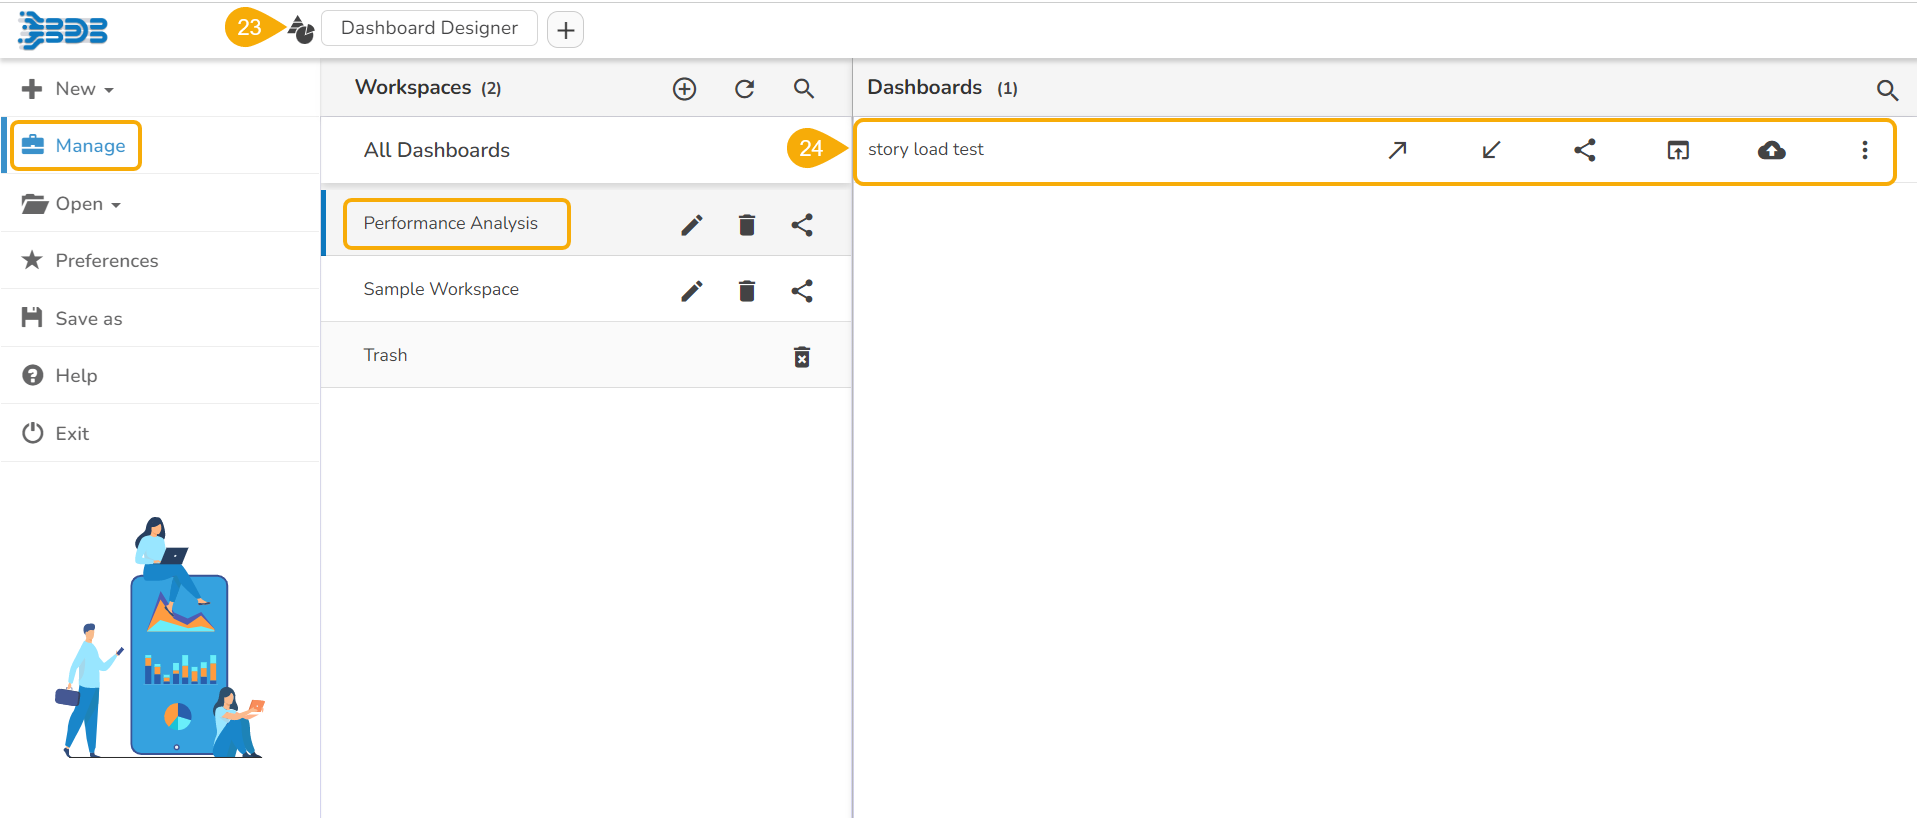
Navigate to the Designer module.
The migrated dashboard gets added to the Manage section.
Please Note: Click the GIT Export icon to export the selected dashboard to GIT. All the exported Dashboards can be imported using the Import File option of the GIT Migration.
A MySQL/ ClickHouse /PostgreSQL server that supports SSL (as currently the SSL implementation has been provided for these data connectors).
A signed client certificate.
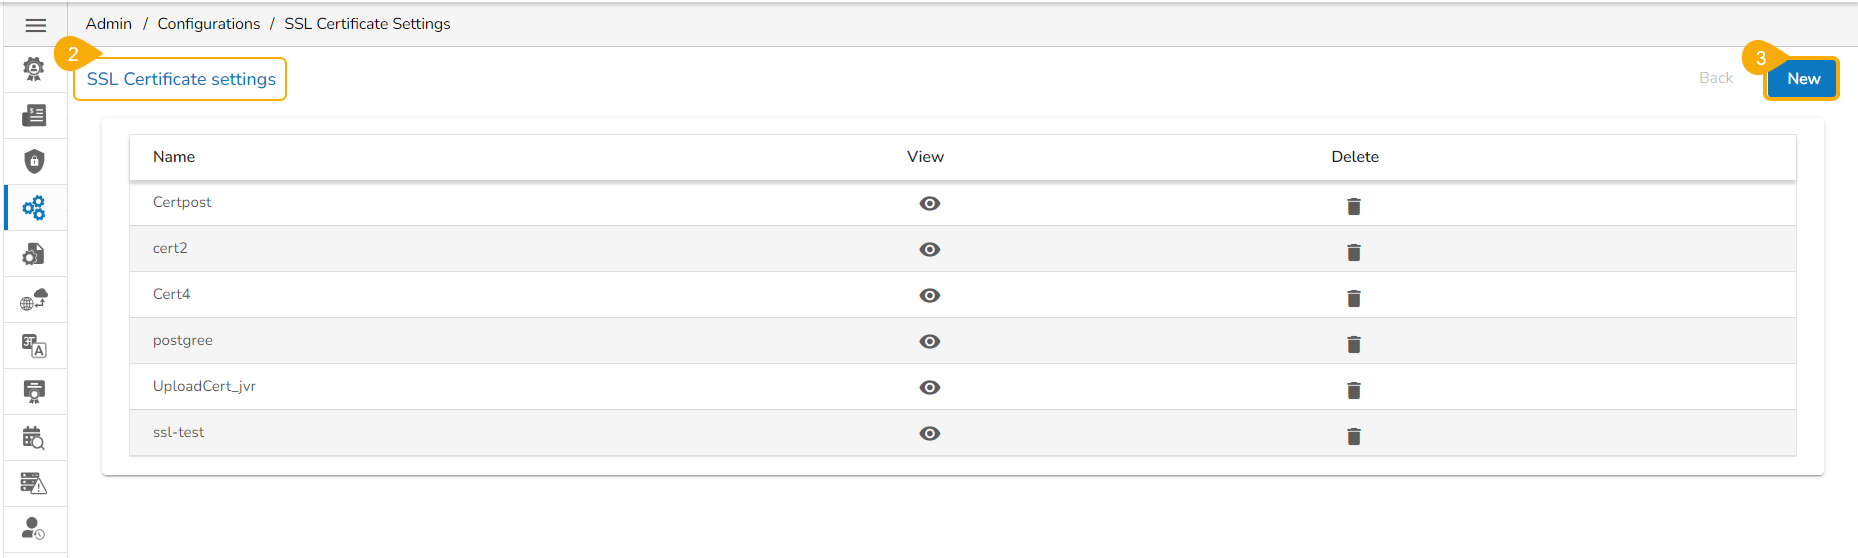
Click the Upload Certificate Settings option from the list of Configurations.
The Upload Certificate Settings page opens (It will be an empty list initially).
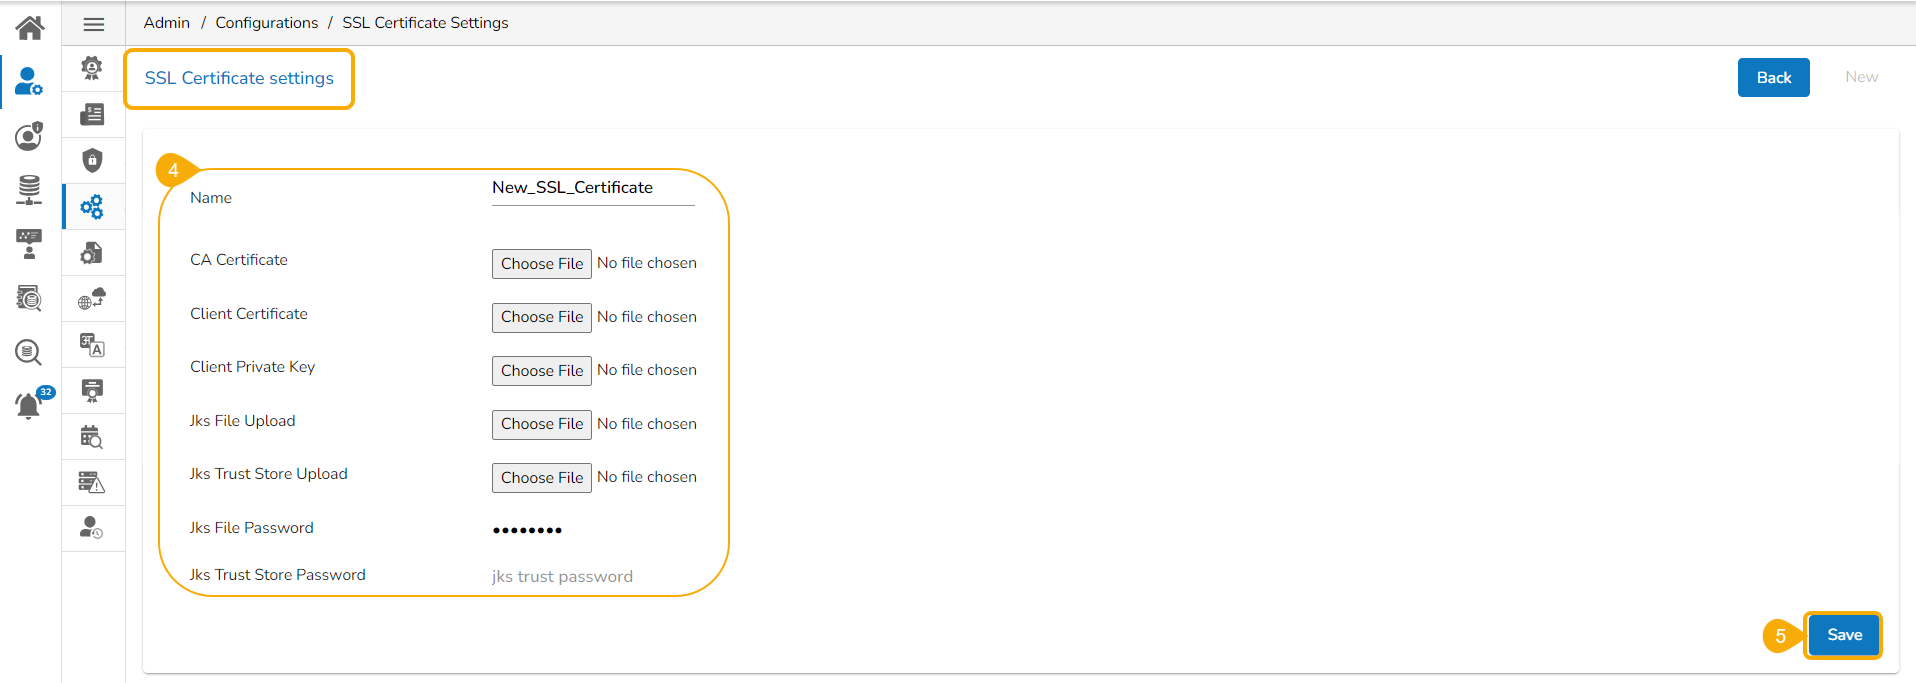
Click the New option to upload settings for a new certificate.
Provide the required details of the SSL Connector.
Name- This name is a key that can be configured for the Respective SSL Connector from the platform.
CA Certificate-Upload a certificate issued by a trusted Certificate Authority that validates the identity of the SSL Connector.
Client Certificate- A Client Certificate is a digital certificate that authenticates the client's identity to the server. It ensures secure and sensitive communications by encrypting data transmitted between the client and the server.
Key File Upload- A small data files that digitally bind a key.
Jks File Upload- It contains the Application Server's trusted certificates.
Jks Trust Store Upload - It contains the Application Server's trusted certificates.
Jks File Password- Password used to protect a JKS file.
Jks Trust Store Password – To protect a JKS file that contains trusted certificates.
After Uploading the required certificates and details click the Save option to save the details.
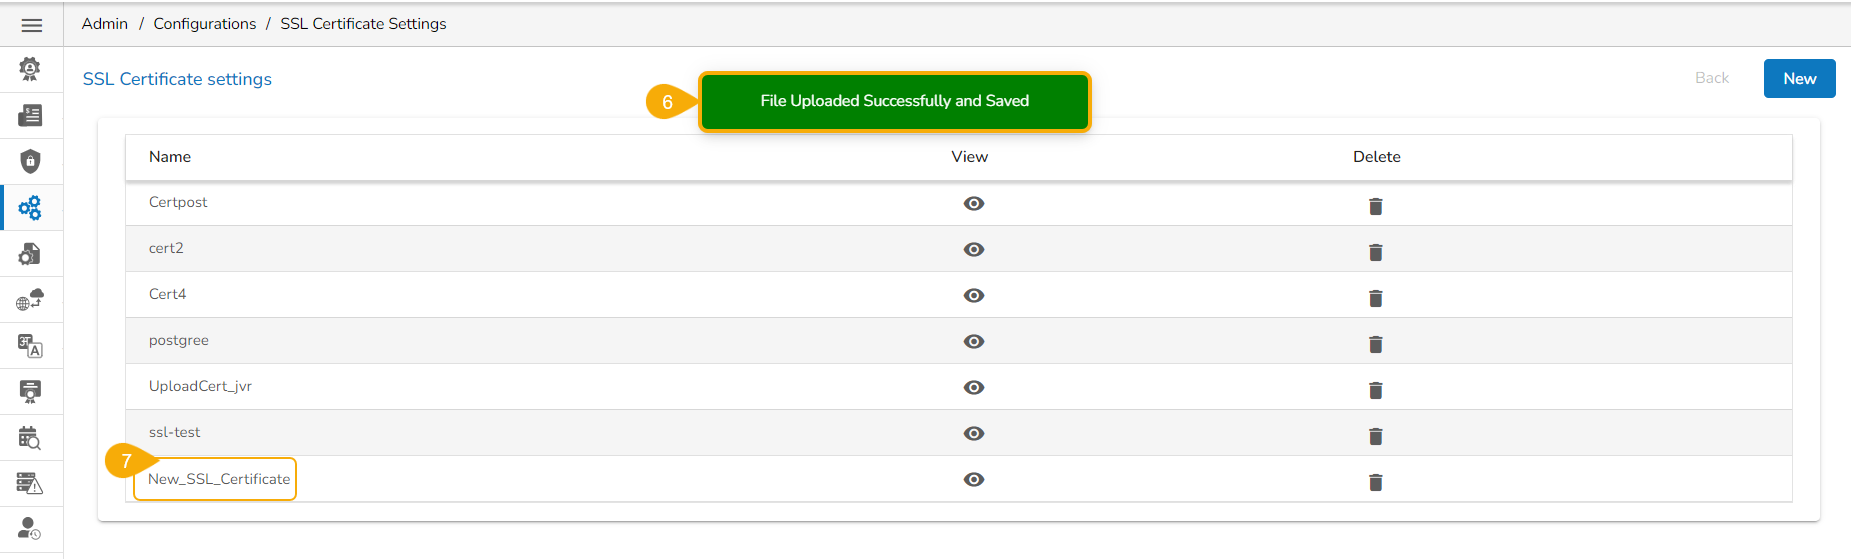
A notification message appears.
The uploaded certificate gets listed on the Certificate List page.
Please Note:
In-between space is not allowed in the Name.
Use the Back option to exit the page.
Navigate to the Upload Certificate Settings page.
Click the View icon for an uploaded certificate entry.
The details of the selected certificate entry are displayed.
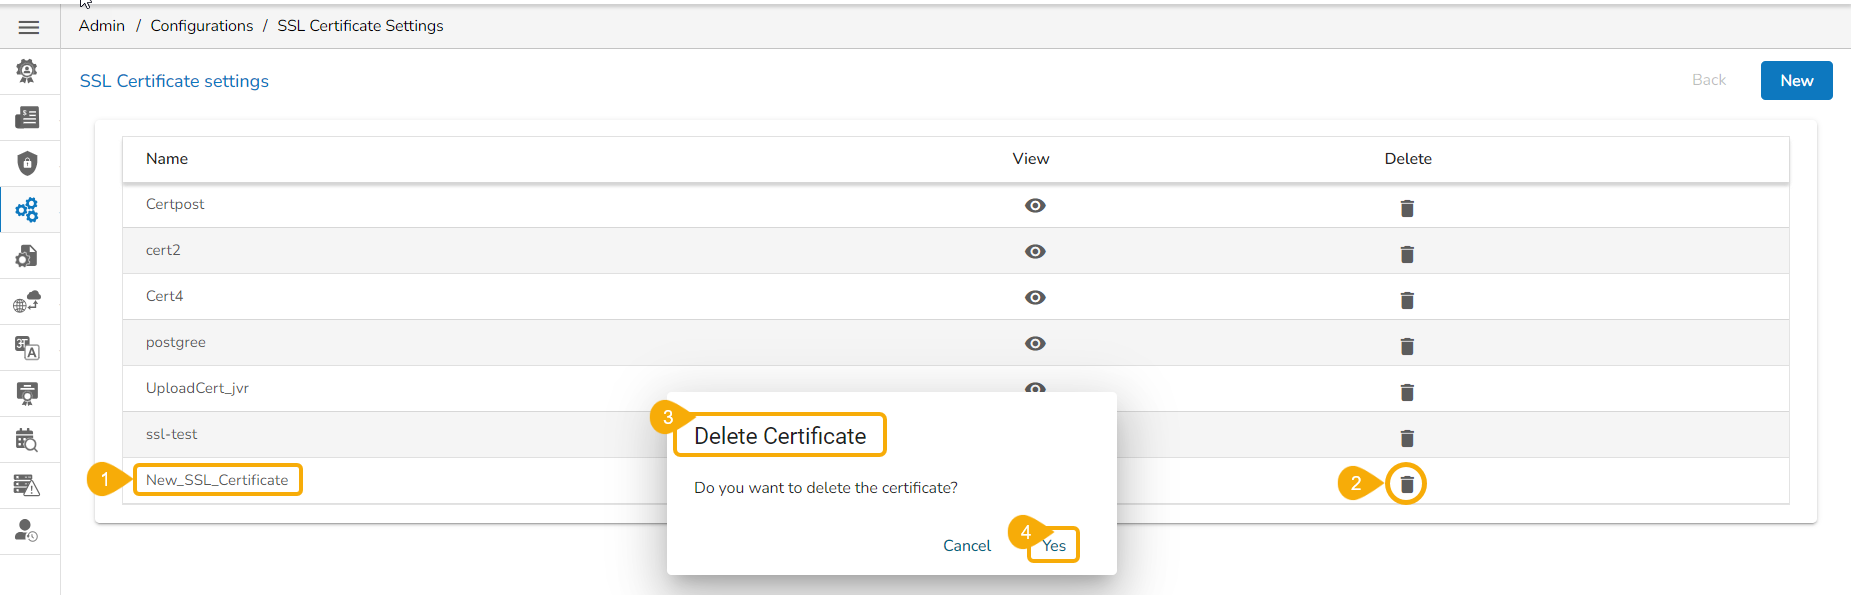
Navigate to the Upload Certificate Settings page.
Click the Delete icon for an uploaded entry.
The Delete Certificate confirmation dialog box appears.
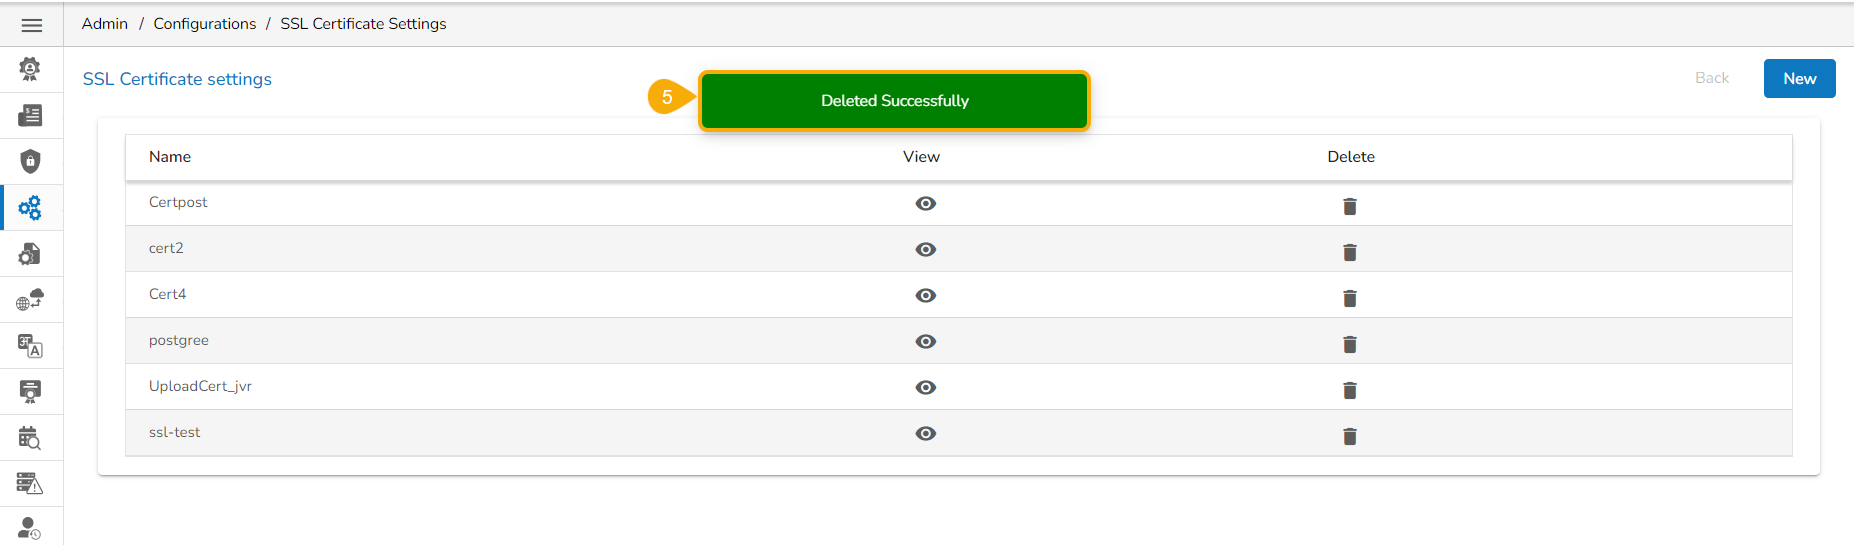
Confirm the deletion by clicking the Yes option.
A notification message appears to confirm the deletion of the SSL configuration, and the selected SSL configuration gets deleted.
Please Note: The Admin can choose the Cancel option to cancel the deletion.
Select an option from the drop-down menu to display either Admin or User list with the active sessions.
Please Note: The Active Admin Sessions get displayed by default. The user can choose User option from the drop-down menu to display the Active User Sessions.
Navigate to the Active Sessions page opens.
Select an option from the drop-down menu to display either Admin or User list with the active sessions.
Based on the selected option, the Active User Session/ Active Admin Session will list.
Select a user by using the checkbox provided next to any username.
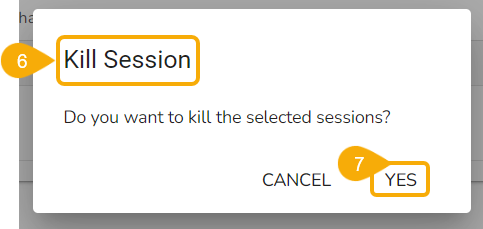
Click the Kill Session icon.
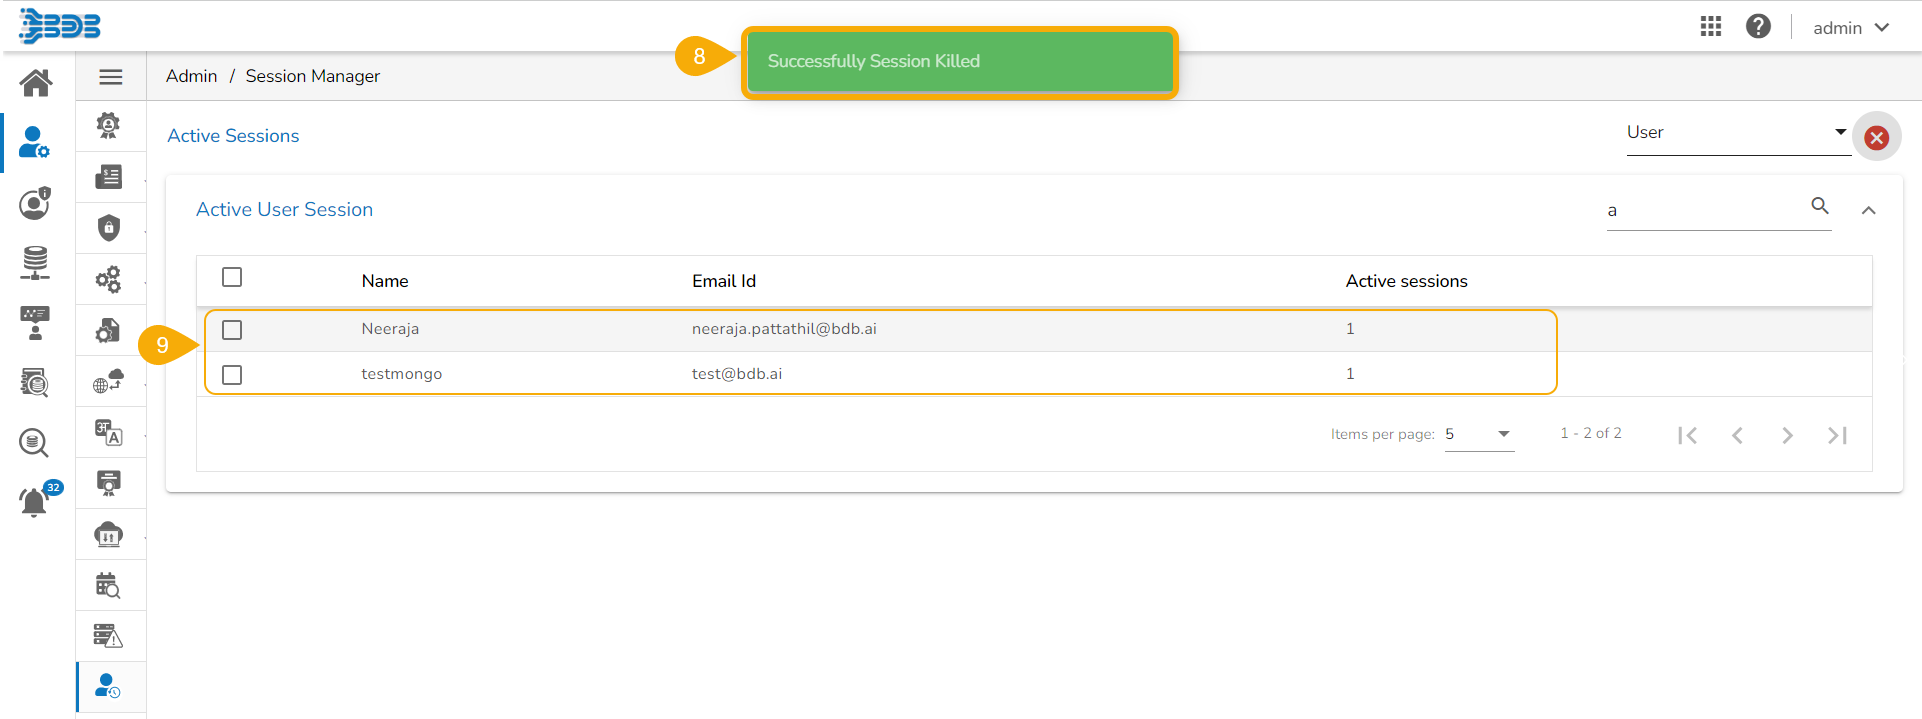
A window appears to confirm the action.
Click the YES option.
The selected user’s session(s) gets killed, and a success message appears to inform the same.
The user gets removed from the Active User Session.
Please Note:
Users to whom the Kill Session option has been applied log out of their sessions without any notification. The users need to log in again to the BDB platform.
Use the drop-down menu to filter the displayed list of the Active Session as per Admin or User as displayed below:
Use the Search bar to search a specific user(s) from the displayed list of Active Sessions.
The user needs to enter the database details to save the data of the open ID.
Use the Select Saved Open ID settings drop-down to access the saved Open ID Settings.
Please Note: Select the saved open ID settings from the Select Saved Open ID settings drop-down menu. If no open ID settings is saved before, it will not list any.
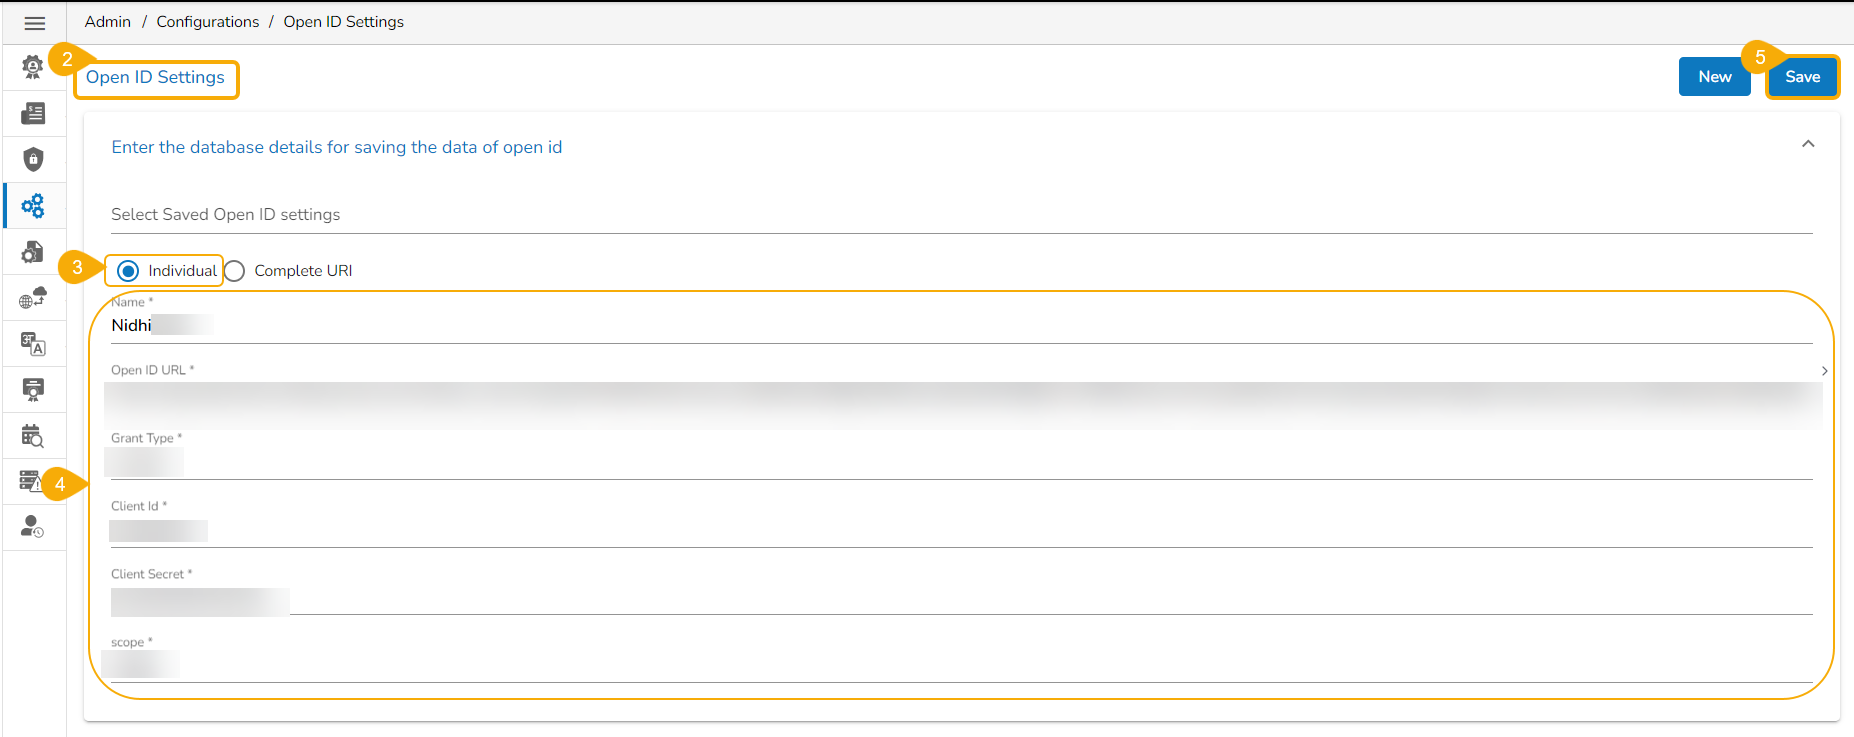
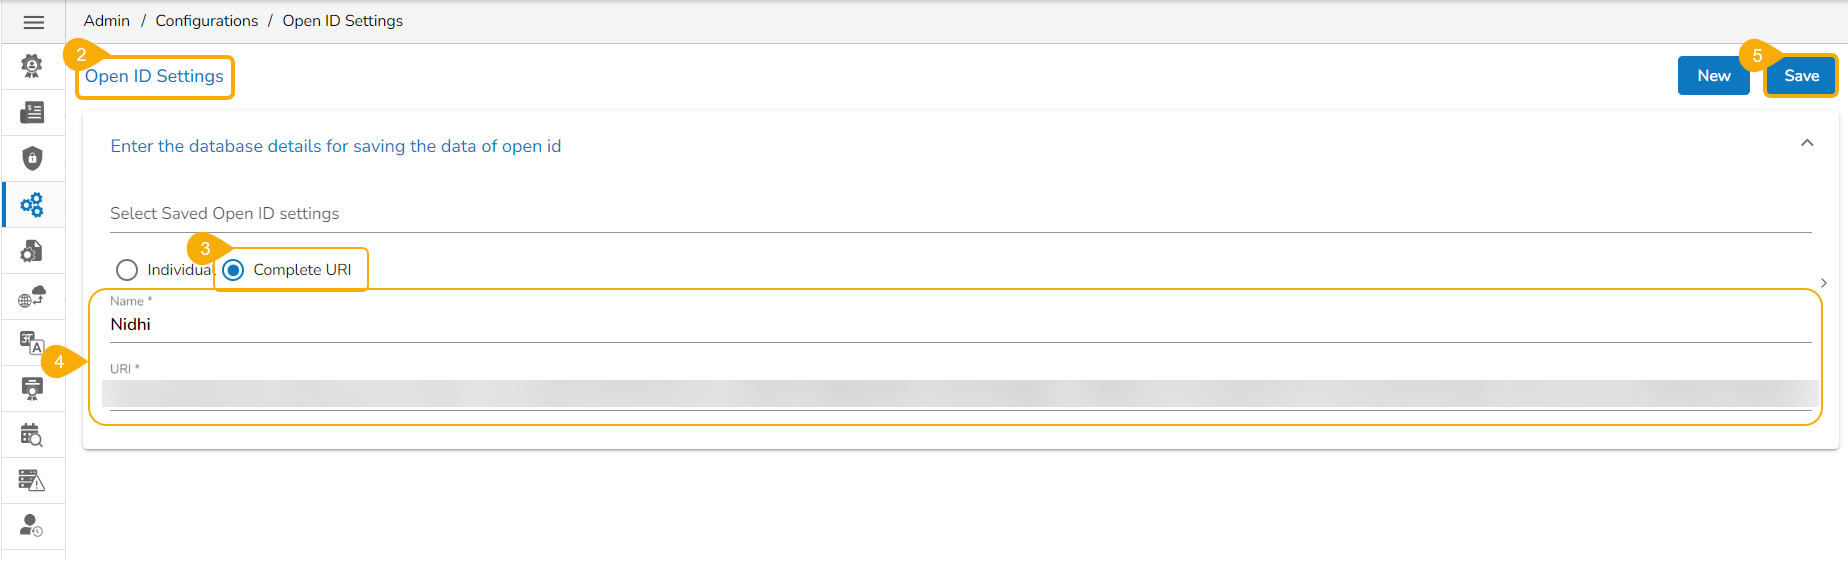
There are two options available to configure the settings under the Open ID Settings page:
Individual
Complete URI
Please Note: The user needs to provide the following required details based on the selected configuration option.
Navigate to the Open ID Settings page.
Select the Individual option.
Provide the relevant information for the following fields:
Name
Open ID URL
Grant Type
Client Id
Client Secret
Scope
Click the Save option.
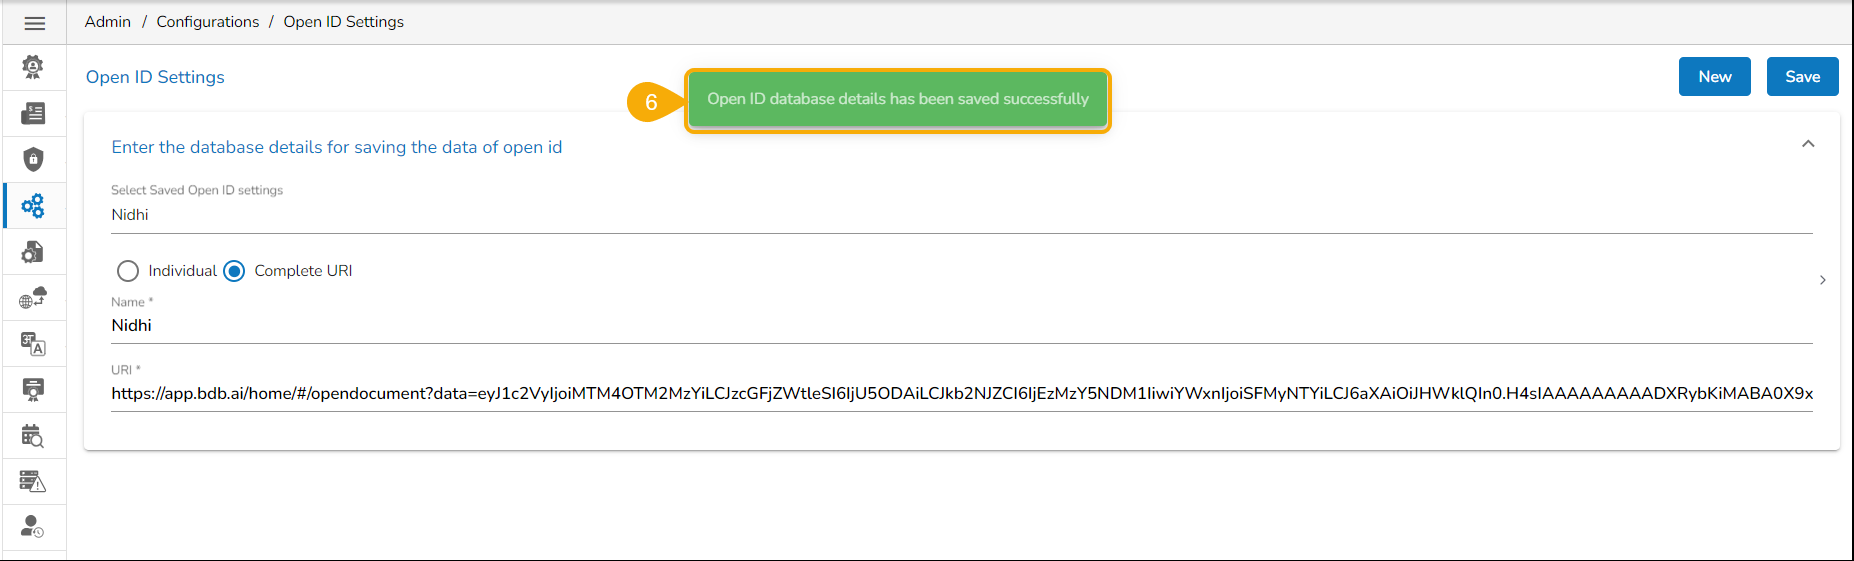
Navigate to the Open ID Settings page.
Select the Complete URI option.
Provide the relevant information for the following fields:
Name
URL
Click the Save option.
A notification message appears (while configuring with any of the given option) to inform that the Open ID Settings have been updated.
The Machine tab delivers real-time metrics about the platform's infrastructure, including:
Active Machines: Displays the total number of operational machines currently running.
CPU Capacity: Displays the system’s processing power, measured in cores, providing a clear picture of total CPU resources.
Memory Capacity: Measured in bytes, this metric gives an accurate assessment of the system’s memory capacity.
Number of Pods: Displays the total number of running pods, reflecting the workload distribution across machines.
In addition to these metrics, the tab also features visual aids such as:
CPU Allocation: Provides a visual representation of how CPU resources are distributed among various processes.
Memory Allocation: Offers insights into how memory is allocated and consumed within the system, helping to identify any potential bottlenecks or imbalances.
The Observability page presents a detailed list of machines and Kubernetes instances, offering a clear status overview and resource breakdown. Key information includes:
IP Address & Instances: Lists the Kubernetes-generated unique names for each platform entity that the user wants to process.
Readiness: Displays whether Kubernetes instances are in a ready state or not.
CPU Requests and Limits: Measured in cores, these metrics highlight the minimum and maximum CPU resources requested and allowed for each instance.
Memory Requests and Limits: Measured in bytes, this shows the requested and maximum memory allocation for each instance.
Percentage of Pods: Provides a percentage of how many pods are currently being utilized in the allocated resources.
Creation Time: Mentions time and date of creation for each instance, offering insights into deployment history.
The user can click on a specific entry to see the graphical presentation of information on the latest CPU Usage, Memory Usage, and Workloads.
The Resource tab offers two key views—Live and All—providing detailed resource information for components or projects as managed by Kubernetes.
Live View: Displays up-to-the-minute resource details for active components, allowing you to monitor performance in real-time.
All View: Displays comprehensive data, including past and present resource usage for a deeper analysis of system behavior over time. Each entry provides essential metrics, including:
Creation Date & Time: Marks when the resource was initiated, giving you a timestamp for tracking purposes.
Age: Indicates how long the resource was operational, offering insight into its lifecycle.
Restarts: Tracks how often a pod or instance has restarted, useful for diagnosing potential stability issues.
CPU and Memory Usage: Aggregates the total CPU and memory consumed, based on request sums, to give a clear picture of resource demand. The CPU and Memory usage is indicated through color-coded bars that change color from green to yellow and finally to red based on the rise in usage.
Search Functionality: Find specific entities by name and easily navigate to them using the Search bar.
Pod Type Filters: Narrow down the results by filtering the list based on pod types, making it easy to focus on the resources that matter most when the user selects the All tab.
These metrics are essential for understanding resource allocation and ensuring optimized performance.
Click the Add new field icon to get the required fields.
Provide Key
Provide Value
Click the Save option.
A notification message appears stating that the saved pipeline settings are updated.
Please Note: Click the Delete icon to remove the added Node Pool details.

This page displays steps to register internal and external API clients and call the API in the Postman framework.
Check out the given illustration to configure a new Internal API Client Registration.
The API Client Registration option helps the user to register and save the specific details of API Clients.
Navigate to the Admin Module.
Click the API Client Registration option from the side navigation bar.
The API Client Registration
The Internal option authentication will happen from the platform side using client ID, client secret, app name, and content type.
Select Internal as the authentication option.
Provide the following information:
Client Name
Please Note: The user can select any one of the given choices for the Select Api Type field. The supported API types are:
Data as API
After selecting one option from the Select API Type, a new field named Select the entitled services appears. You can select multiple entitled services using the checkboxes.
Click the Save option.
Please Note:
The client ID and client secret will be generated while saving the API Client Registration.
The External option does not support Authentication by using the client ID, client secret, and app name. The user needs to authenticate by providing the secret Key and Values/Mapping key. The authentication will be considered only if the selected Validation Type is Validated.
Select the External option.
Provide the following details:
Client Name
Please Note: The Select the Entitled Services drop-down will display the data sets published as services from the Data Center module.
A notification message appears.
The API Client details get saved at the top of the displayed Client List.
Click the Edit option from the saved API Client Registration.
The API Client Registration form reopens.
The user can get the Client ID, Client Secret, and App Name. You can copy them.
Please Note: Users may need to manually enter the Client ID, App Name, Client Secret Key, and Content Type in the Postman to get the response.
Click on the Edit option for the saved External API Client.
The API Client Registration form reopens with the entitled service.
The user can get the following information about the API Service:
The following actions are provided to an API Registration Client:


Click the New option to create a new client registration.
There are two Authentication types (Internal or External) available. Select any one of them to proceed.
Client Email
App Name
Request Per Hour
Request Per Day
Select API Type: Select either of the options: Data as API or Model as API
AI as API
Widget as API
The created API Client gets listed at the top of the displayed Client List.
Both Data as API & Model as API support Internal Authentication. So the user needs to select either one of them in the Select API Type.
Client Email
Select the entitled services from the drop-down menu.
Provide Key, Validation Type, and Value/Mapping Key.
Click the Save option.
A doc link appears at the bottom. Click on it.
Navigate to the Headers section.
You will get the Content type displayed.
Copy the Content type of the service.
Navigate to the Headers tab inside the GET call.
Pass the Client ID, App Name Client Secret Key, and Content Type to get the response.
Key
Validation Type
Value/ Mapping Key
To get the response, pass the mapping key value and content type in the Headers section of the Postman GET/POST call.
The User's tenant/Space name must be mentioned in the URL for the external user.
Send Mail to Client
Edit Client Details
Delete Client
Download


Click the GIT Migration from the side navigation bar.
Click the Import File option that appears.
Click the Import option, that appears on the Import Document page.
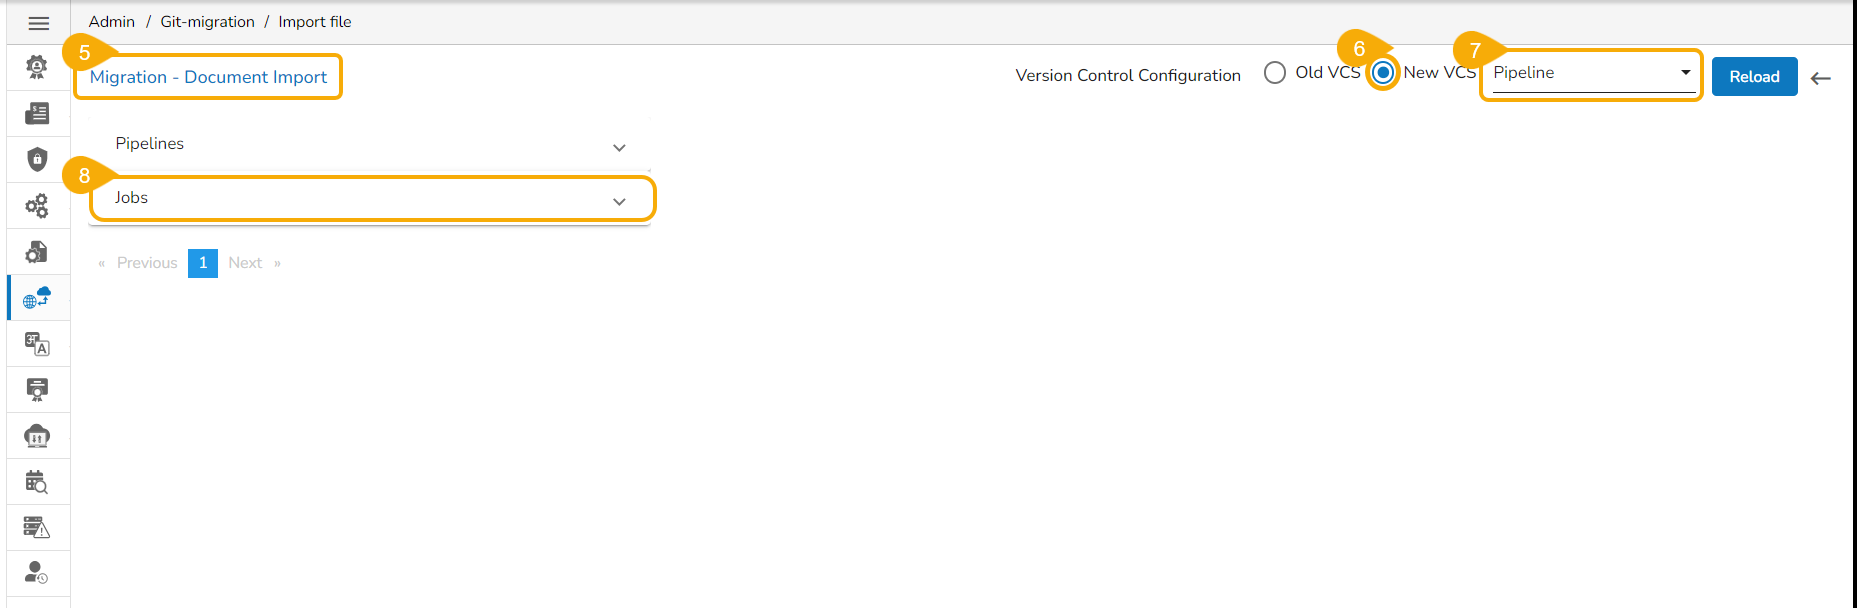
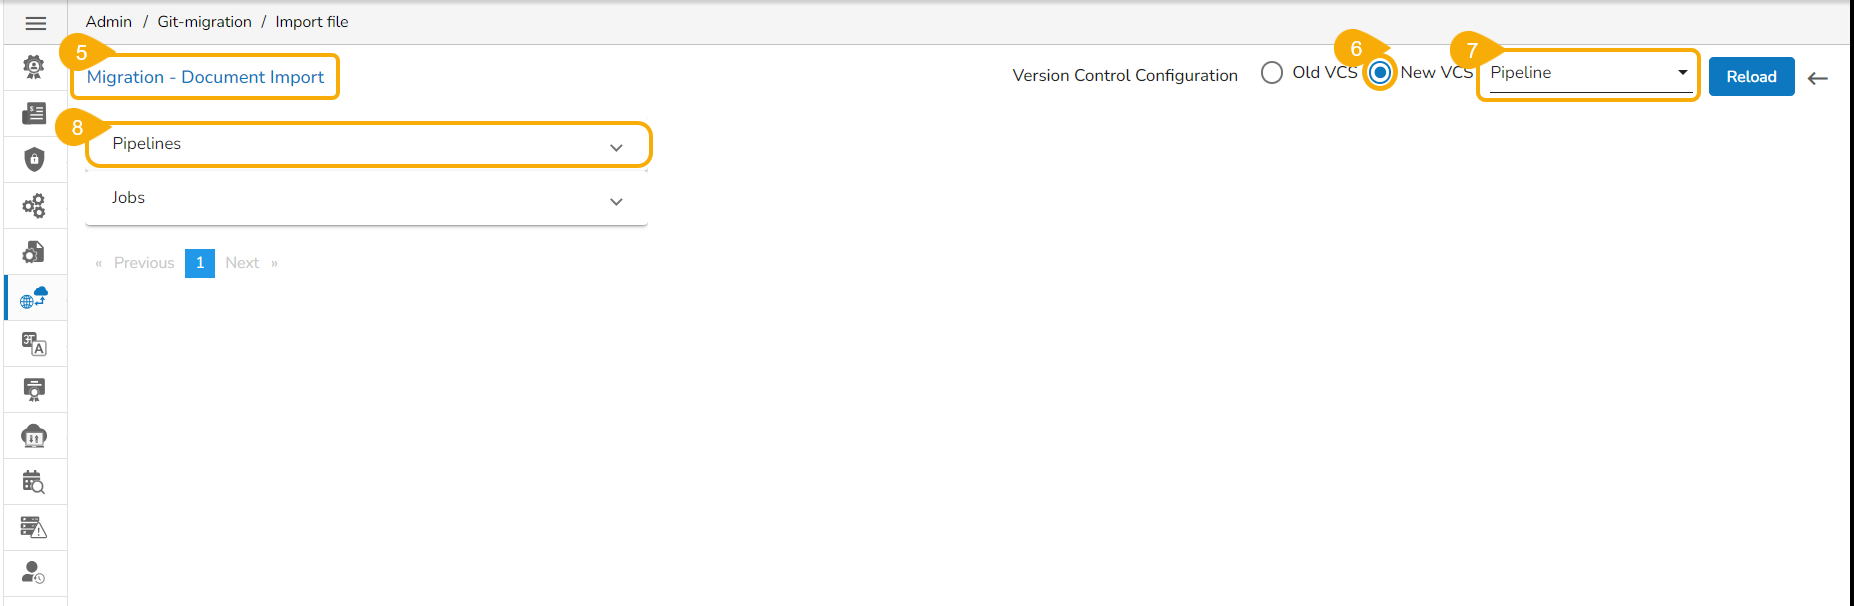
The Migration – Document Import page opens.
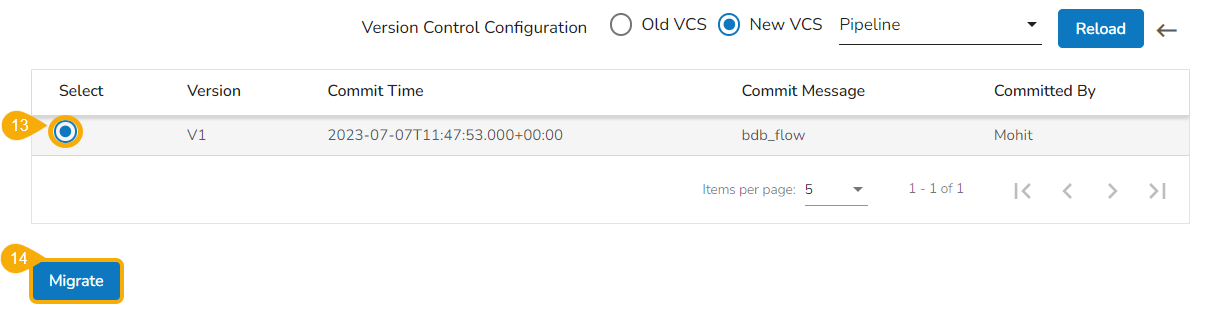
Select the New VCS option for the Version Control Configuration.
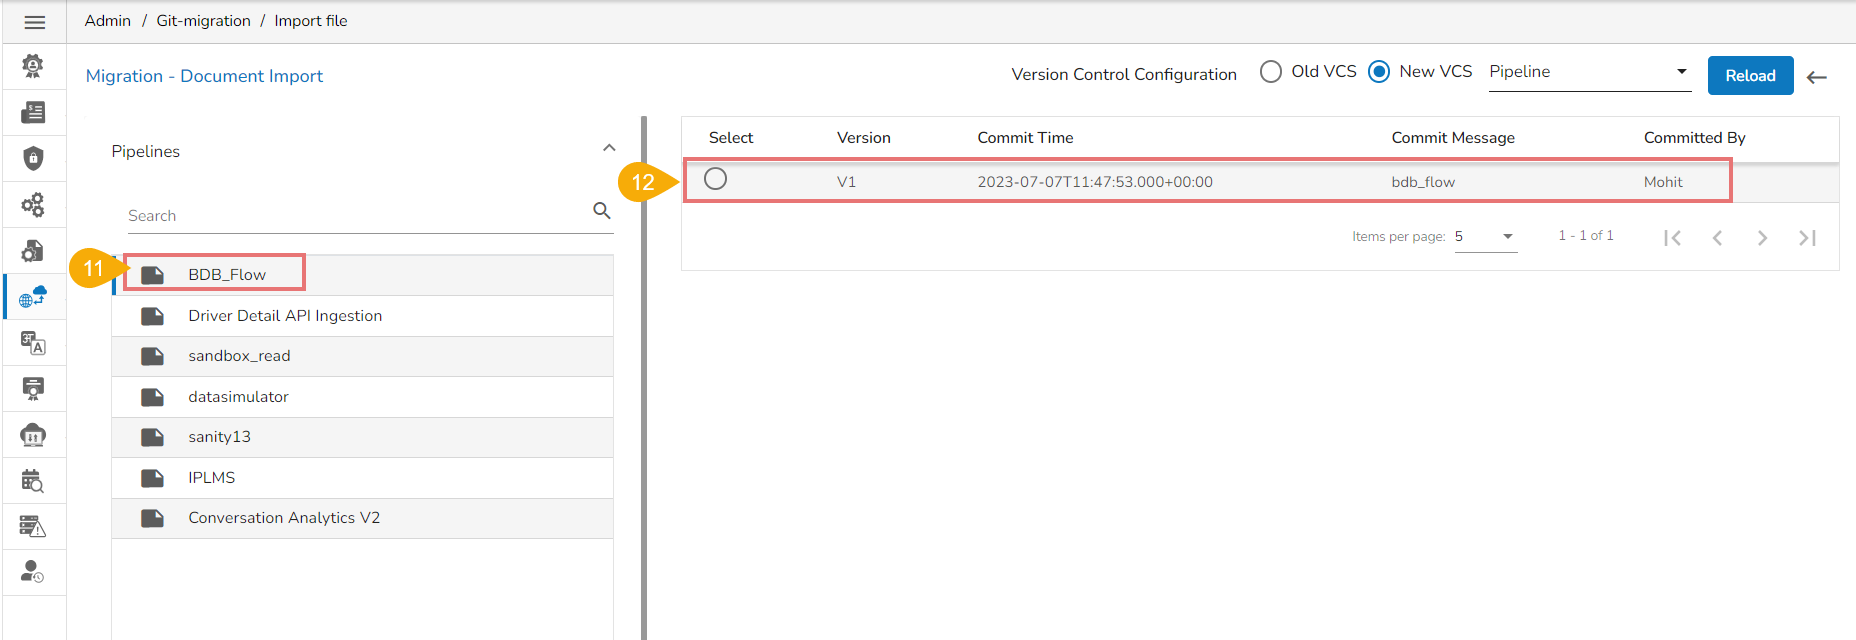
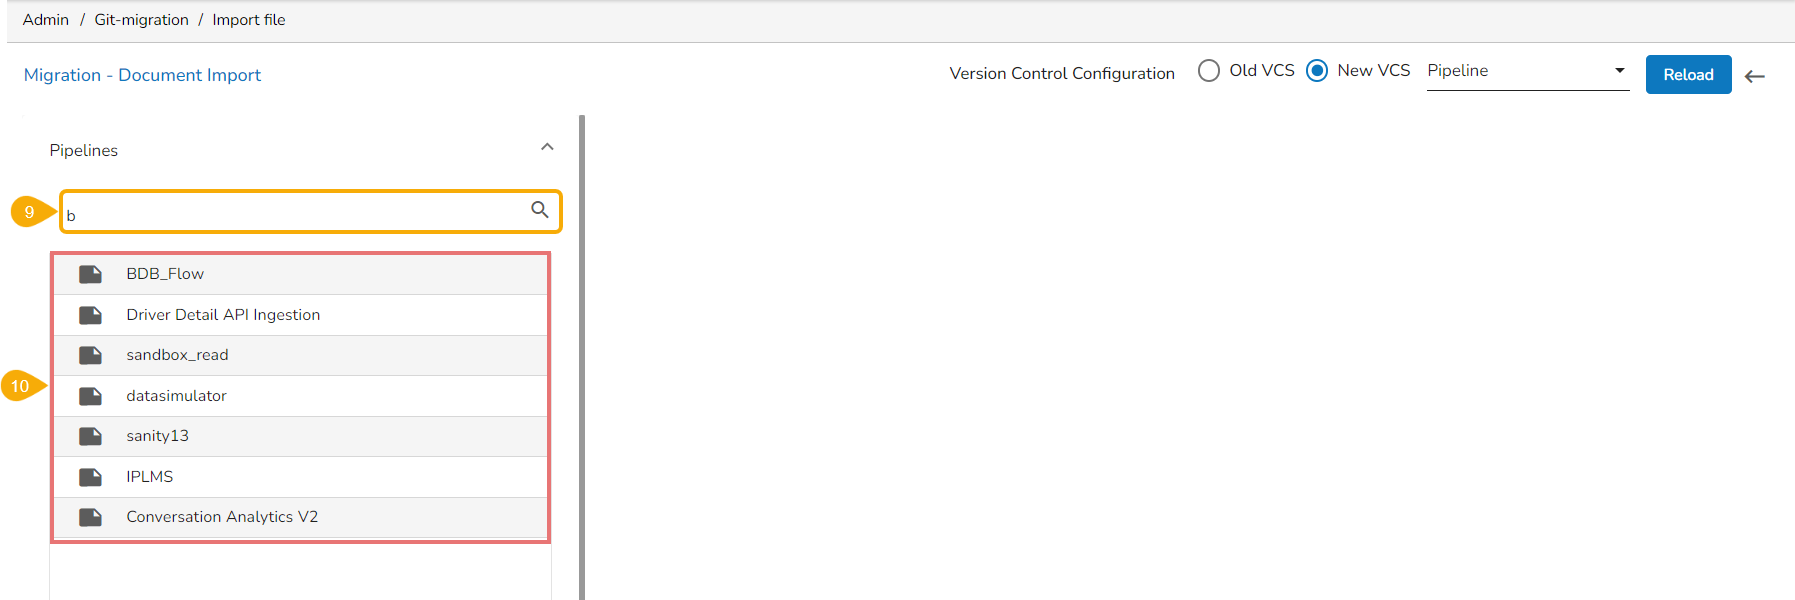
Select the Pipeline module from the Select a Module drop-down menu.
Select the Pipelines option from the another drop-down menu given on the left side of the page.
Search a pipeline name in the given Search bar.
A customised list of the imported pipelines appears.
Select a pipeline from the displayed list.
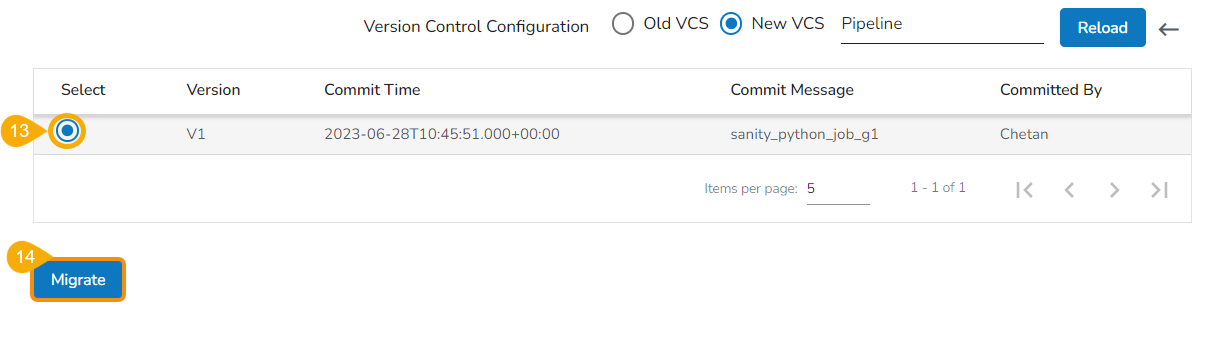
Available versions of the selected pipeline appear.
Select a version using the given checkbox.
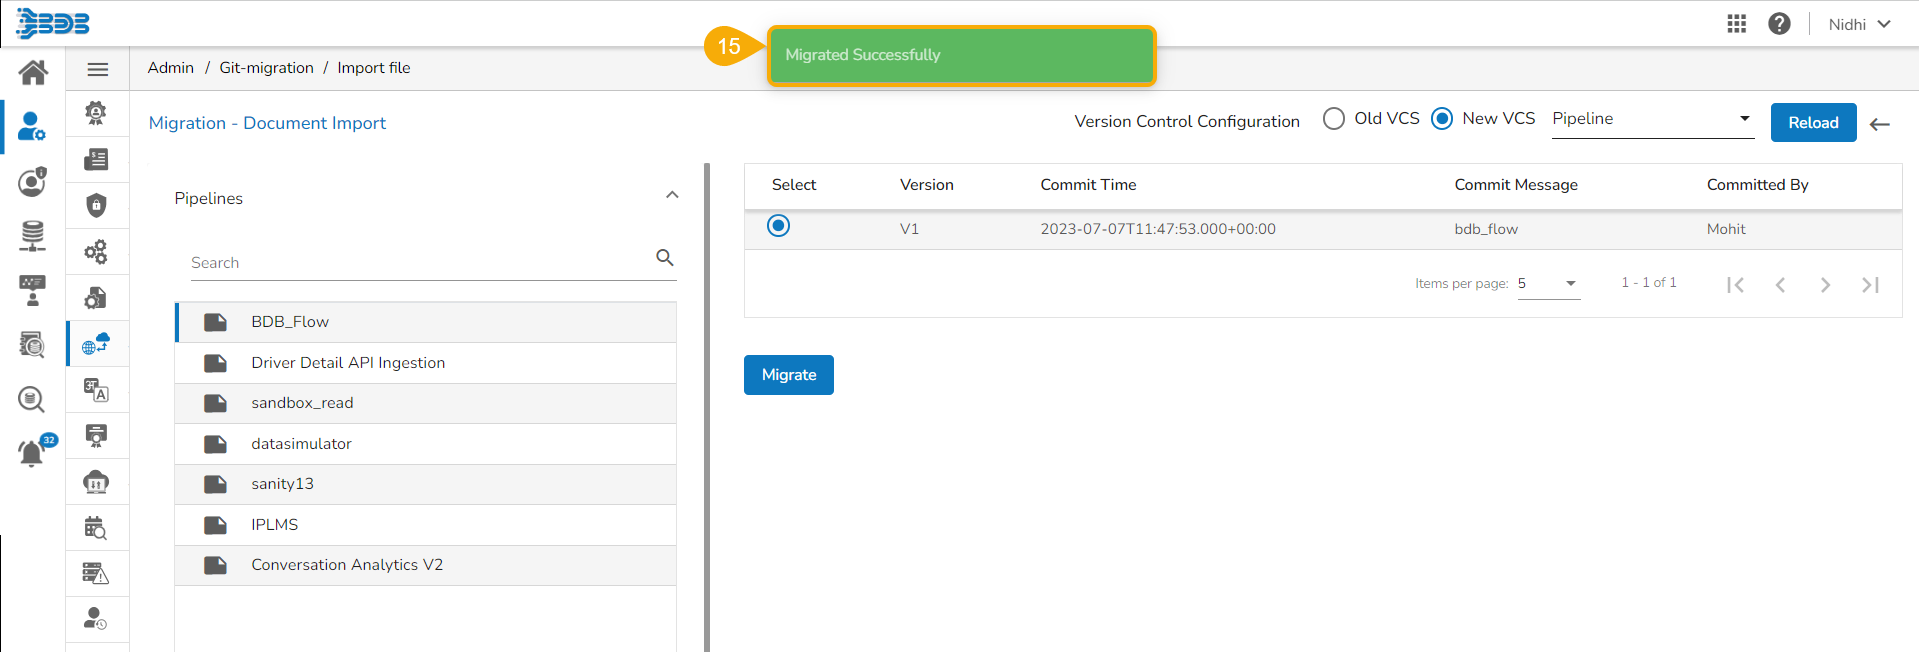
The Migrate option appears below, click it.
A success message appears to confirm the completion of the migration action.
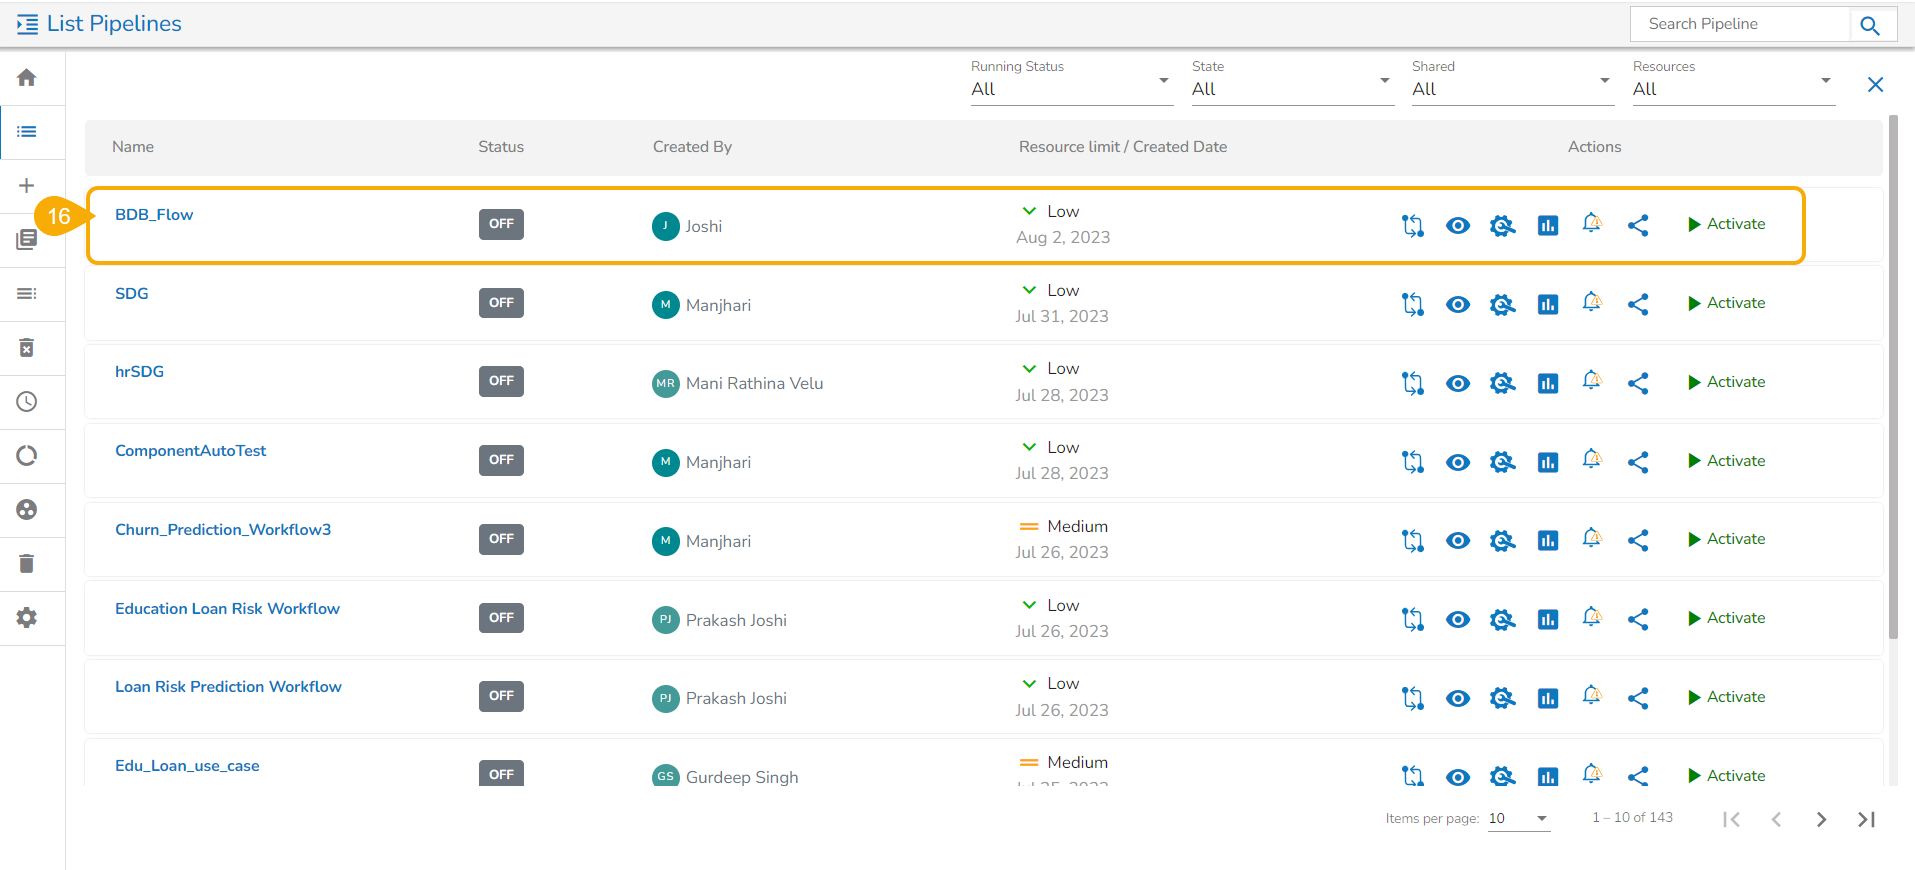
The migrated pipeline can be seen on the List Pipelines page under the Data Pipeline module.
Navigate to Admin Module.
Click the GIT Migration from the side navigation bar.
Click the Import File option that appears.
Click the Import option that appears on the Import Document page.
The Migration – Document Import page opens.
Select the New VCS option for the Version Control Configuration.
Select the Pipeline module from the Select a Module drop-down menu.
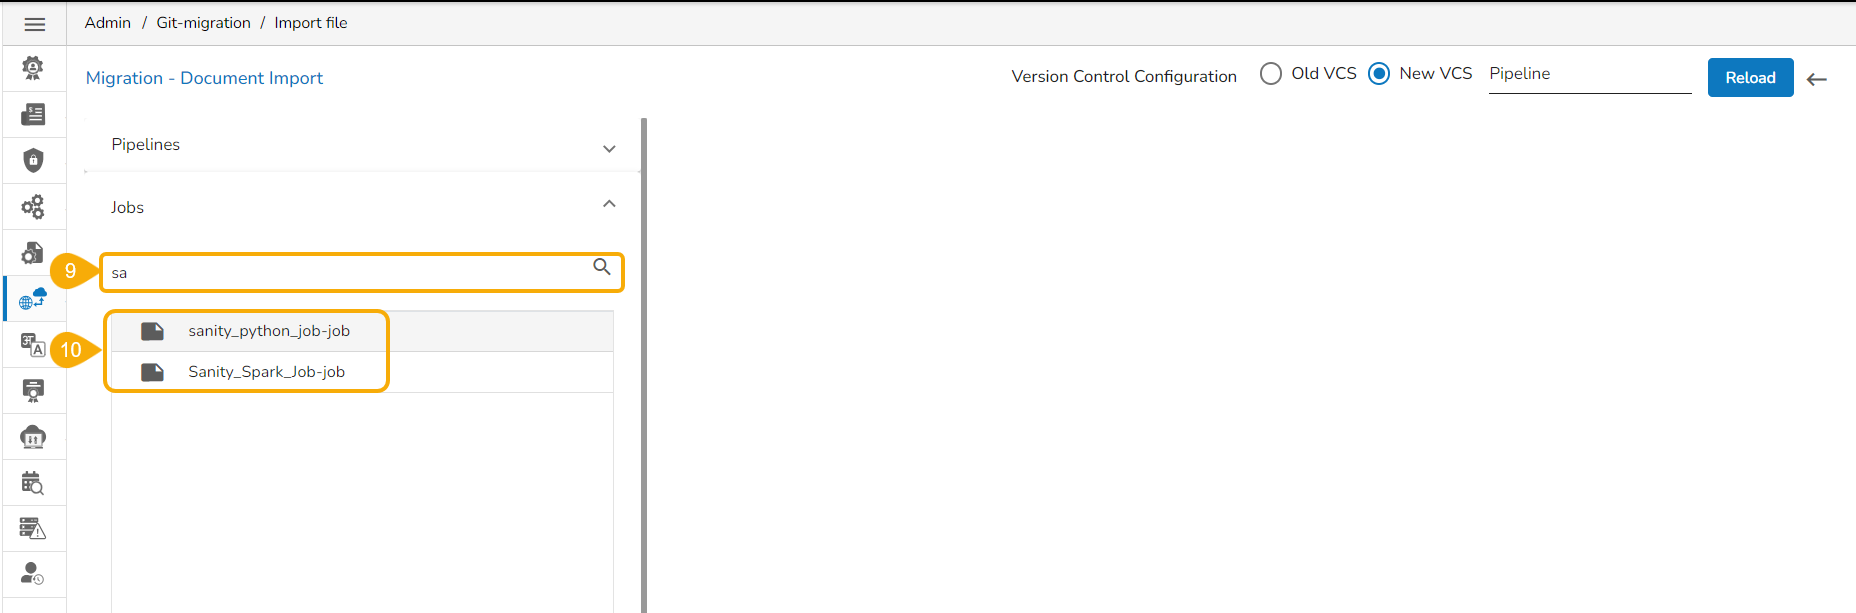
Select the Jobs from the other drop-down menu on the left side of the page.
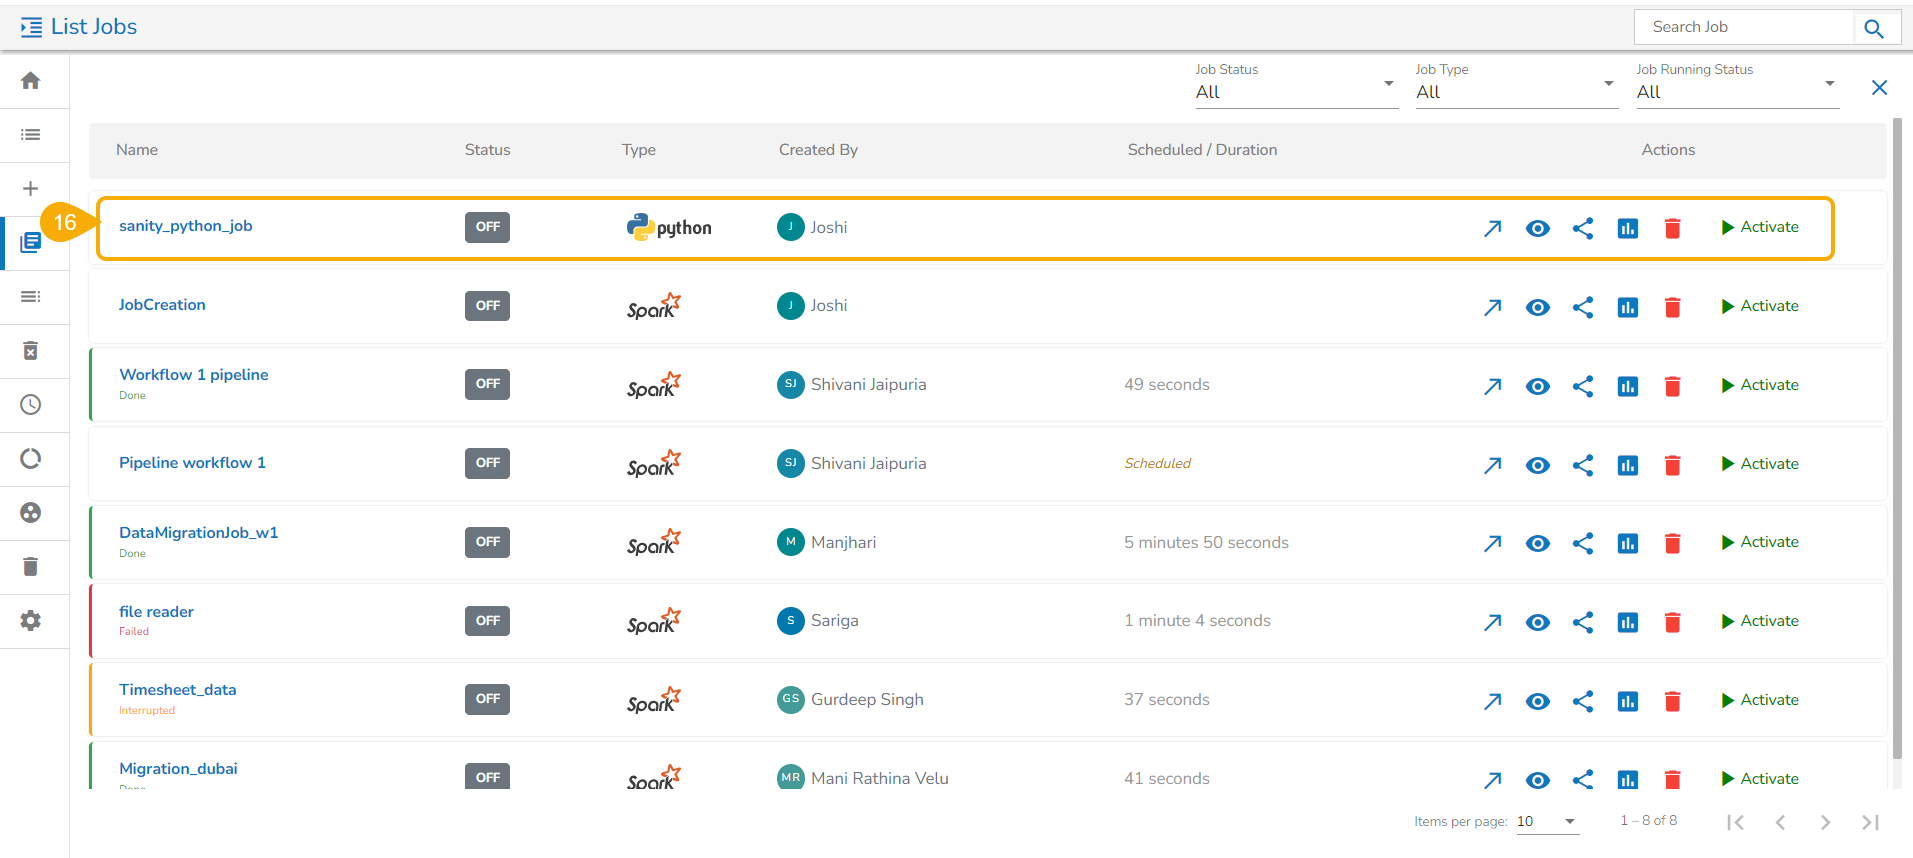
Search a job name in the Search bar.
A customized list of the imported jobs appears.
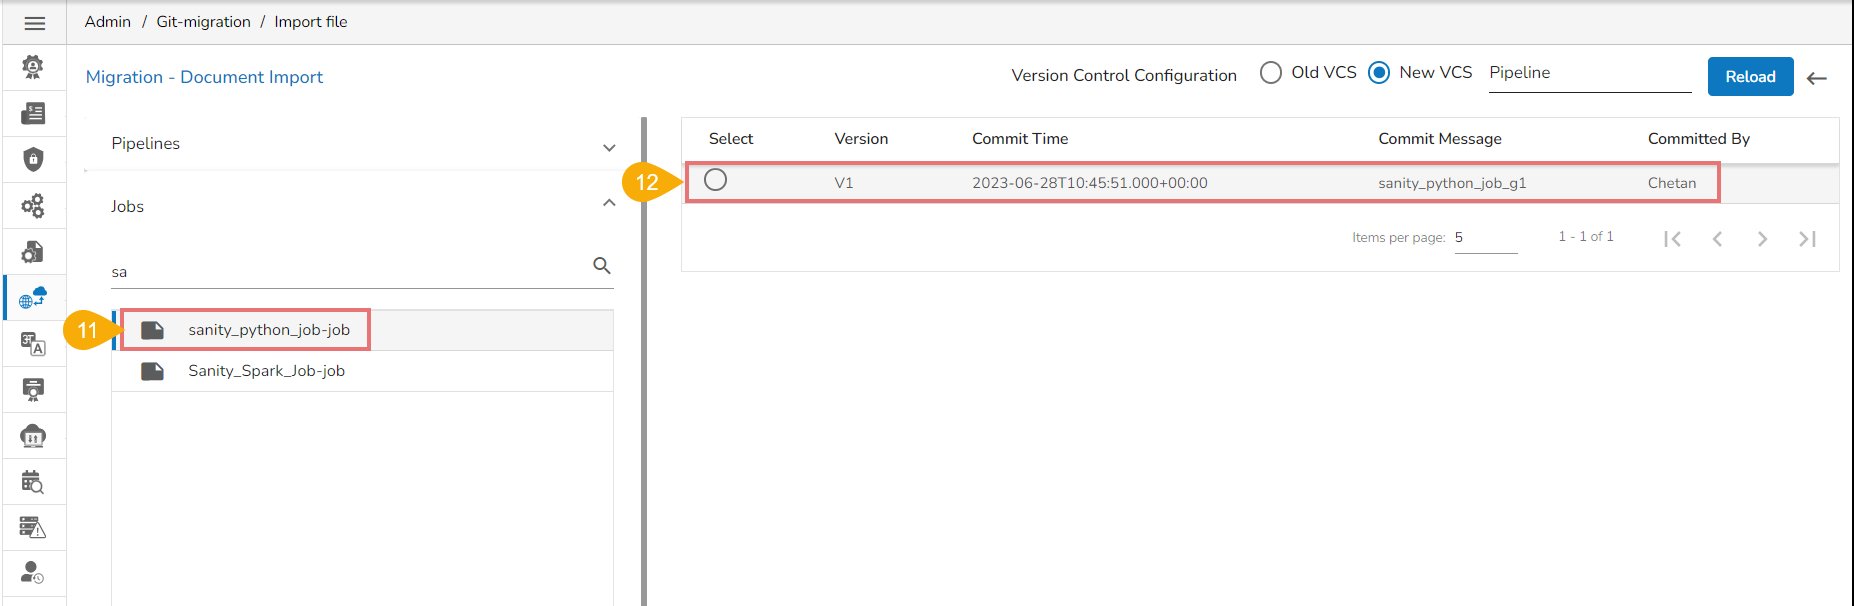
Select a job from the displayed list.
Available versions of the selected job appear.
Select a version using the given checkbox.
The Migrate option appears below, click it.
A success message appears to confirm the completion of the migration action.
The migrated job can be seen on the List Jobs page under the Data Pipeline module.


Configure the database settings for your Data Stores to get saved.
This Admin option helps to configure the Data Store settings. The Data Store settings currently provide three database types to choose from:
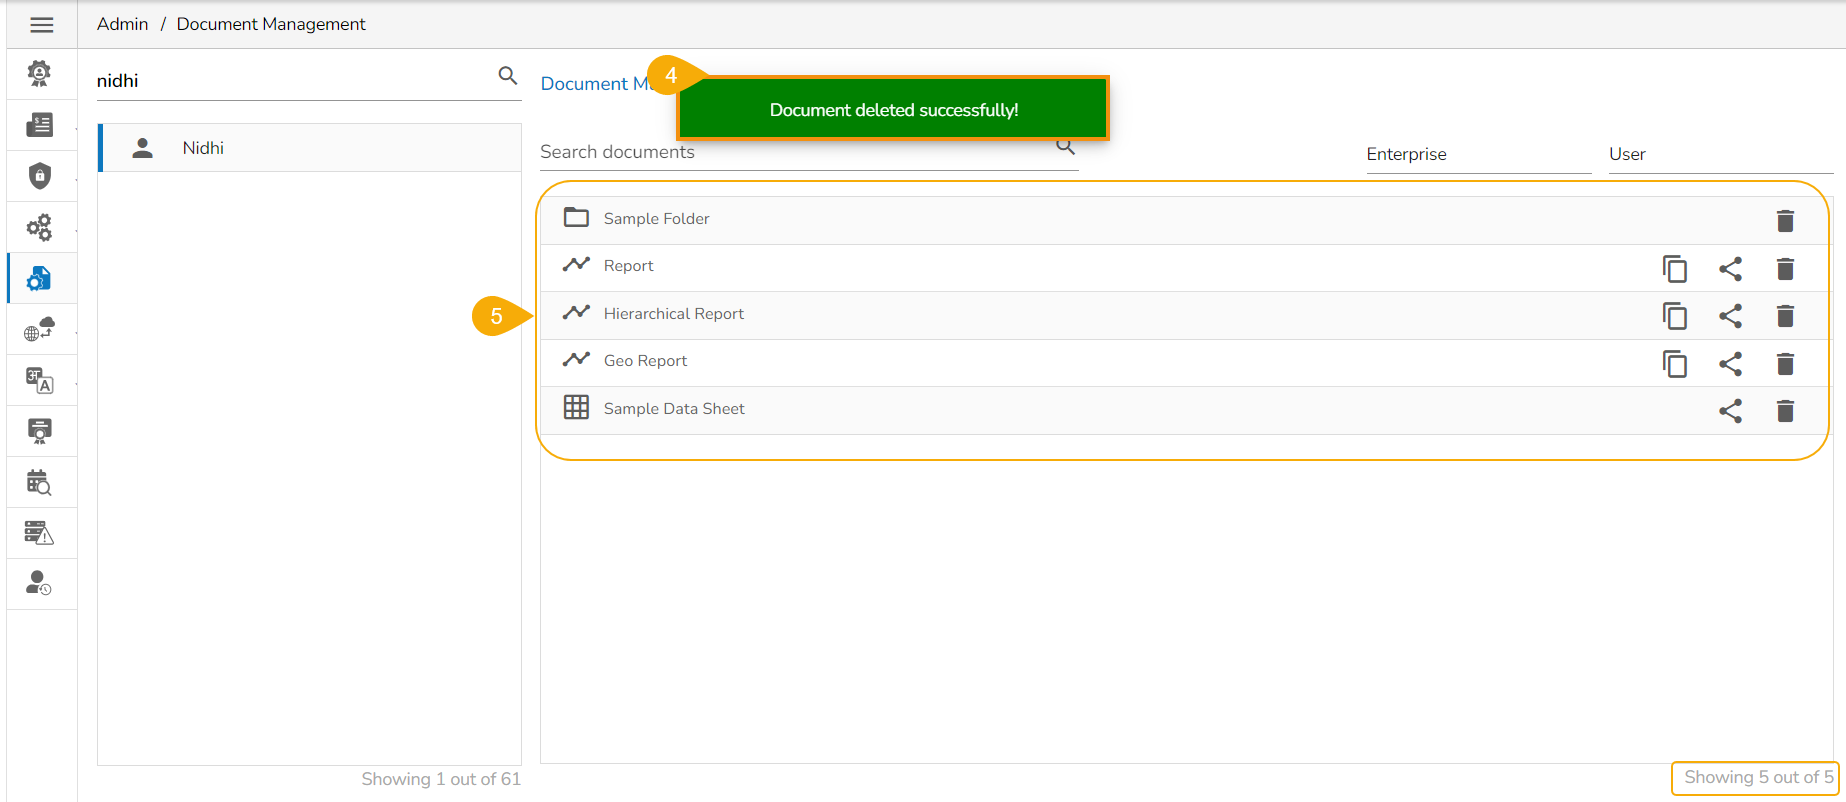
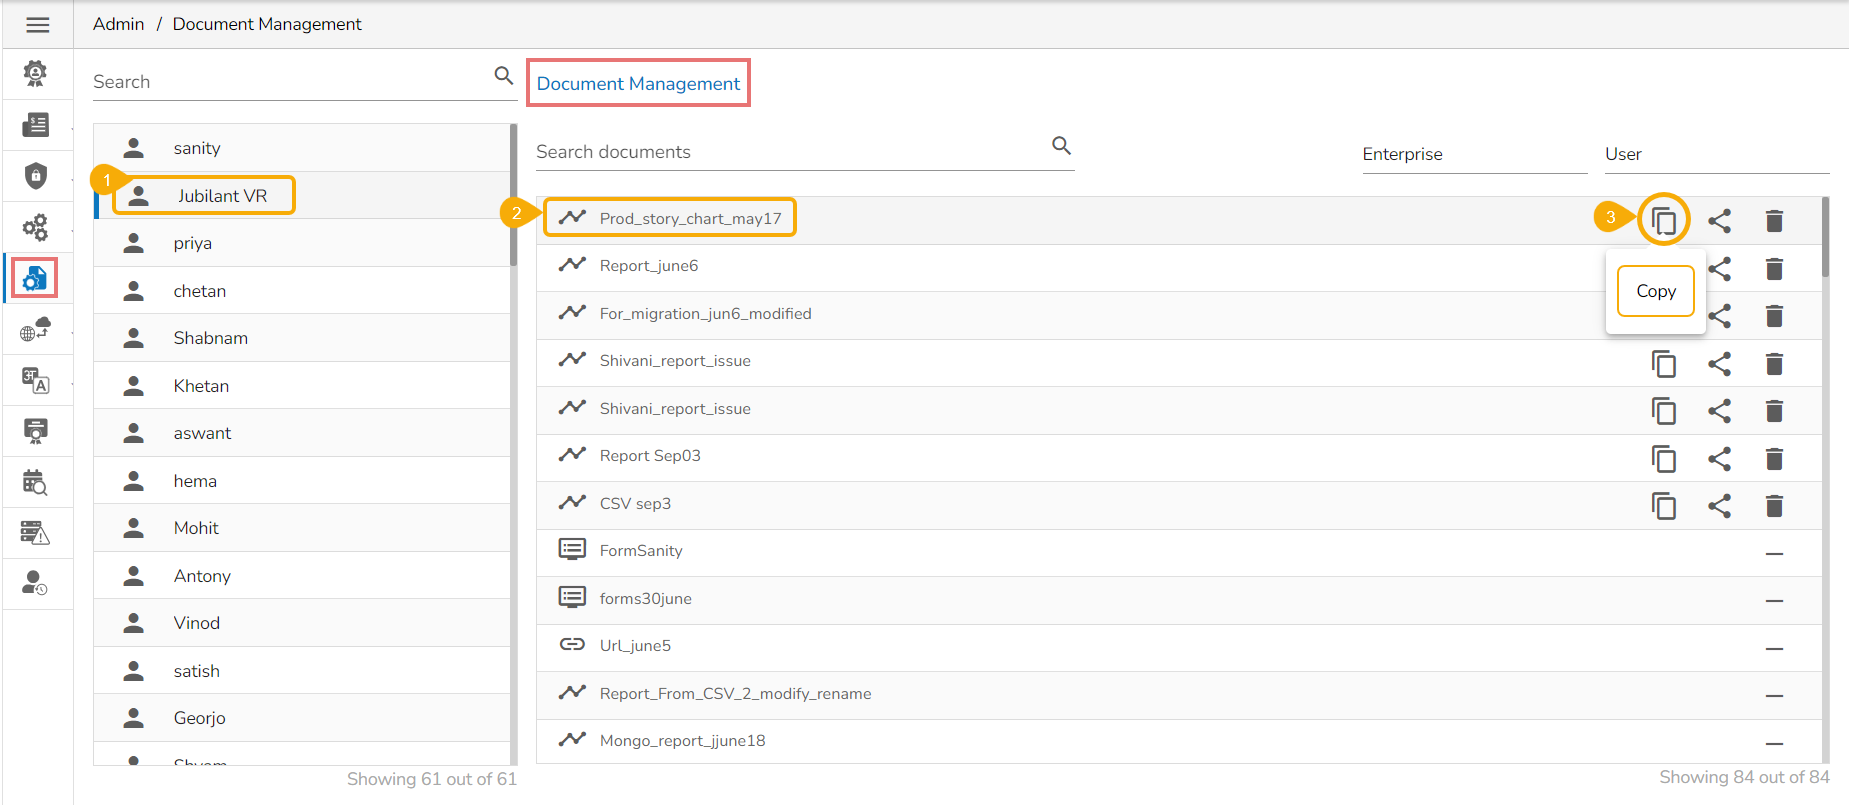
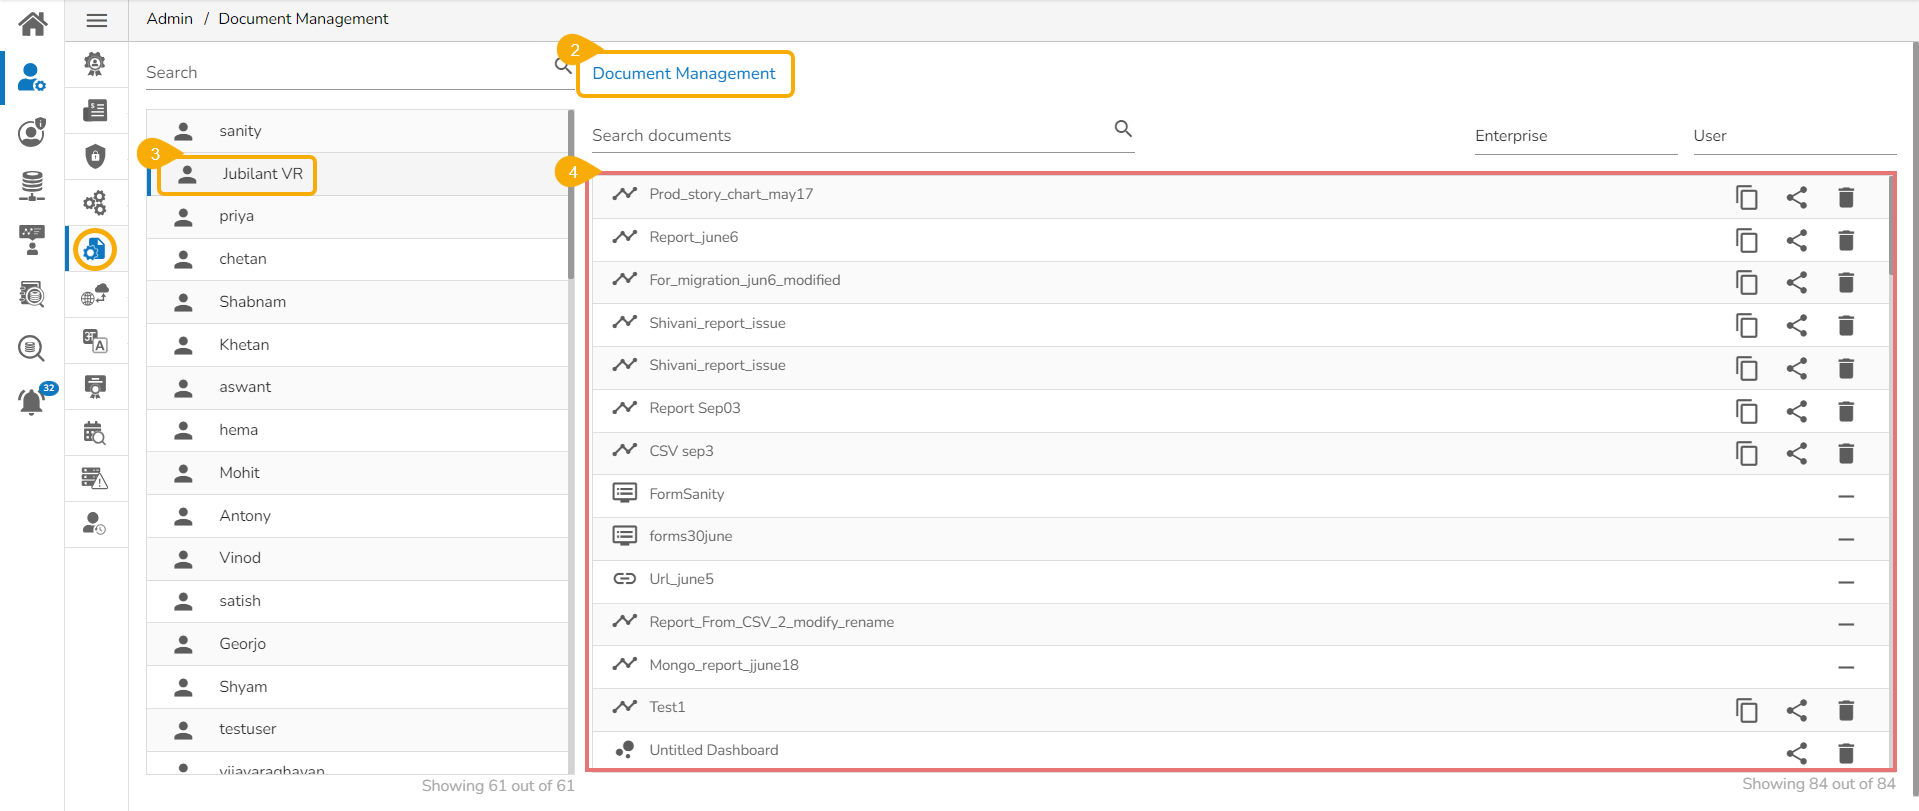
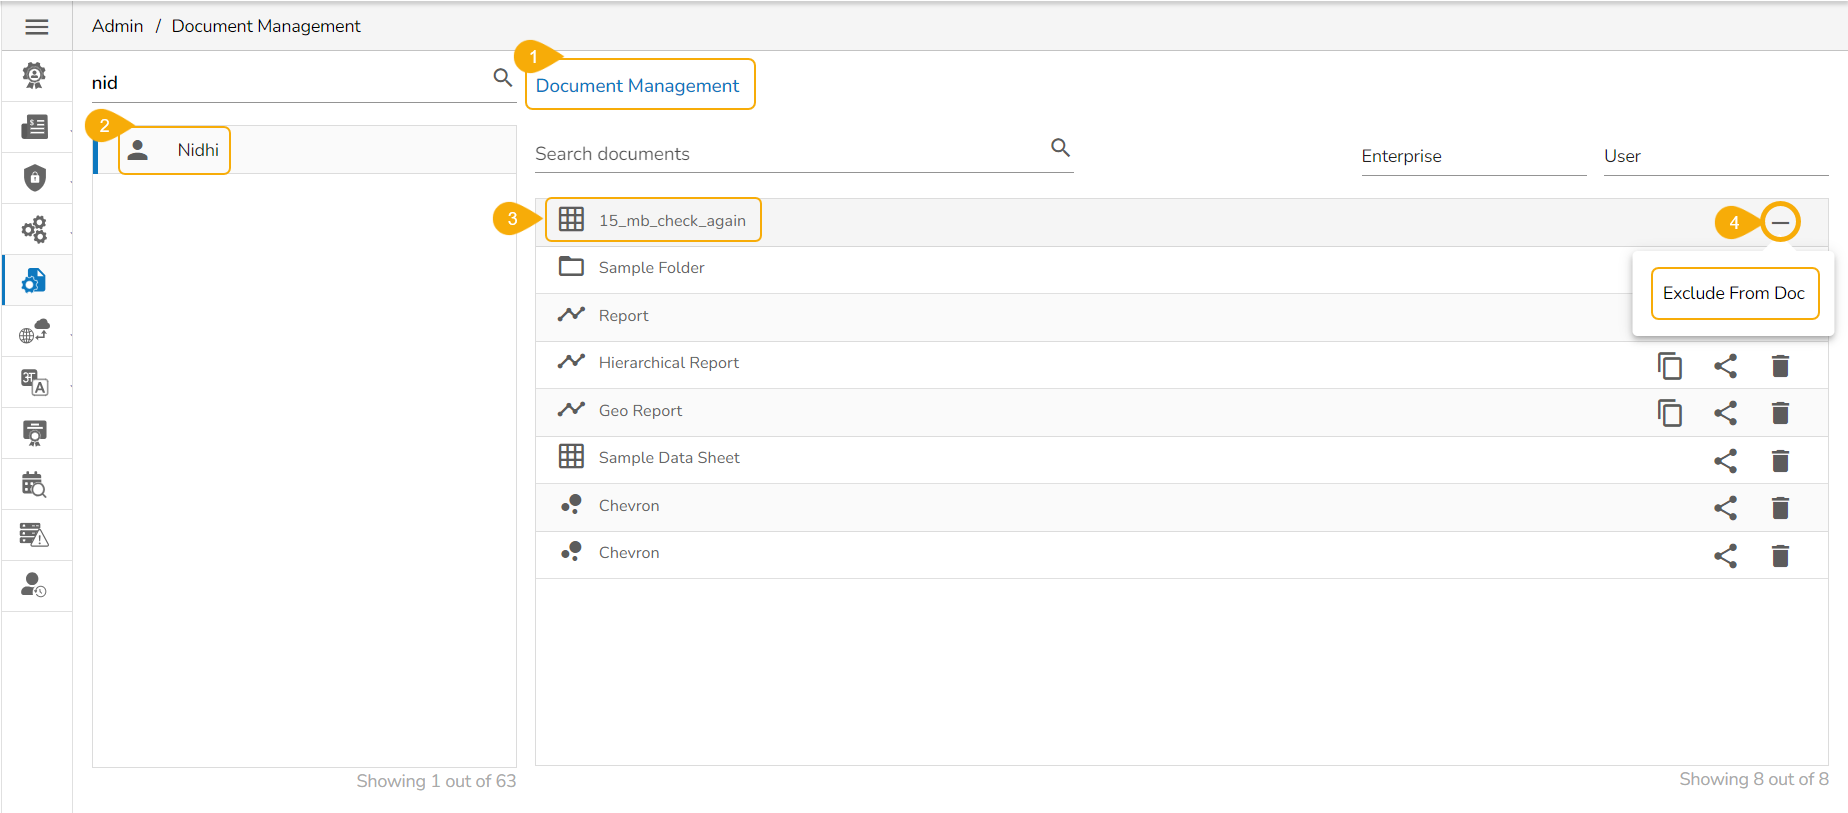
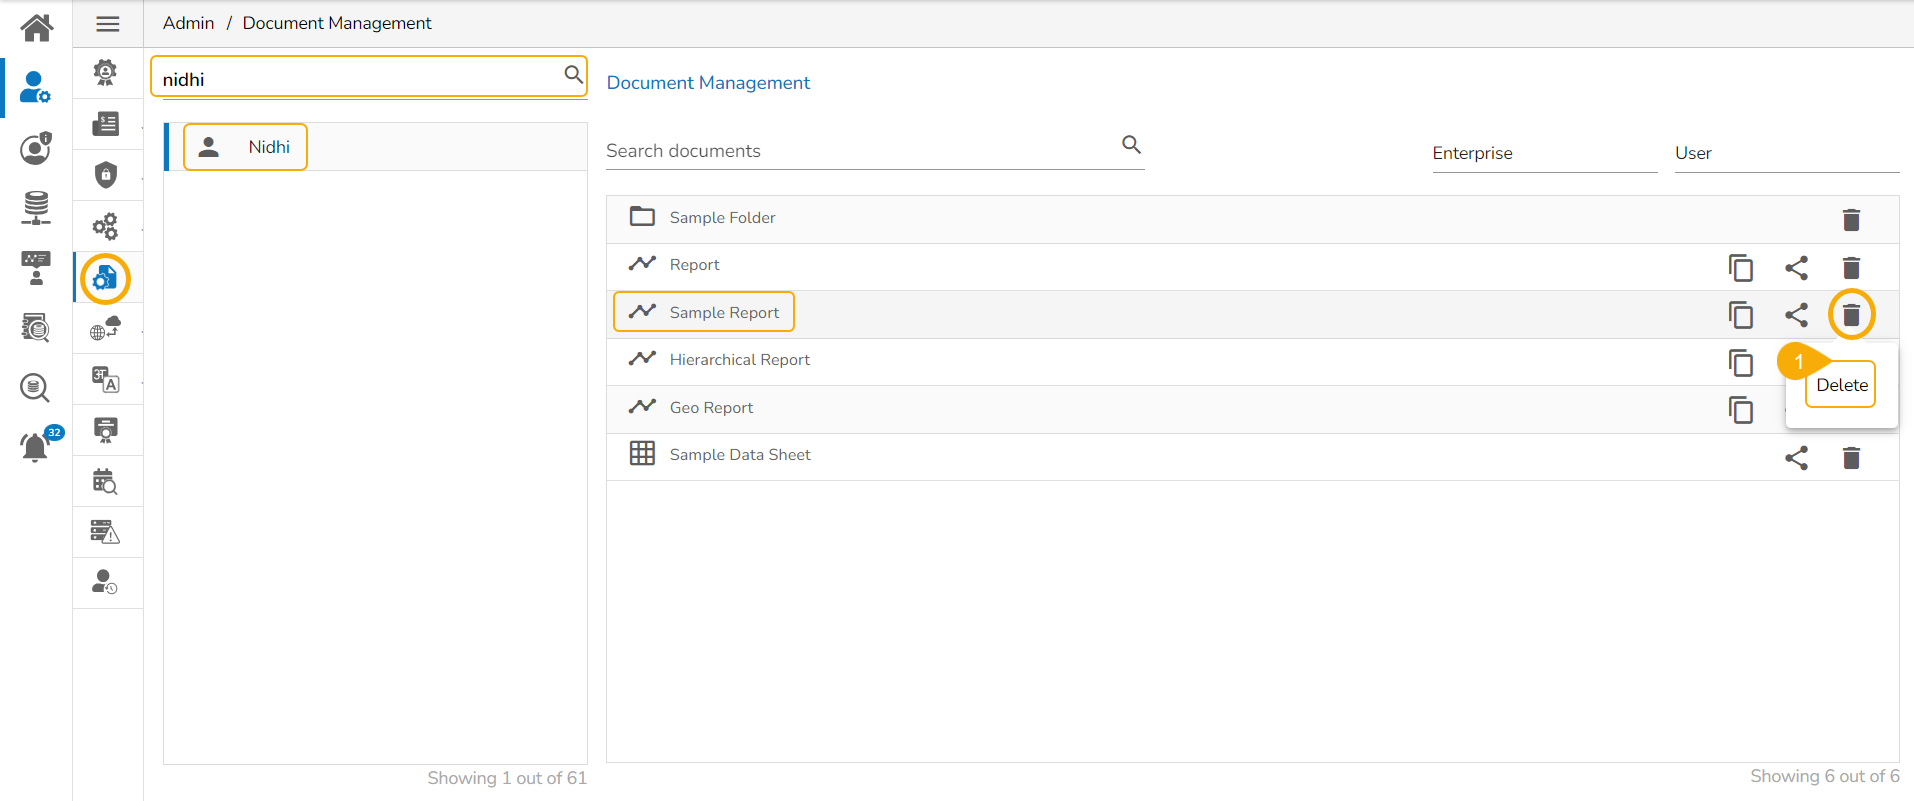
This feature allows an administrator to view all the user-specific documents. The administrator can share or delete user-specific documents via this module. The Document Management tile appears in the Administration module.
Click the Document Management option from the Administration menu panel.
The user gets directed to the


Click the Data Store Settings option from the Configuration and Settings options.
The Data Store Settings page appears.
Select the Mongo as the database option.
Provide the following information for the Data Store Settings:
Server Type
Username
Click the Validate option.
A notification message appears.
The Save option gets enabled. Click the Save option to save the inserted information.
A notification message confirms that the Data Store configuration for Mongo DB has been saved.
Click the Data Store Settings option from the Configuration and Settings options.
The Data Store Settings page appears.
Select a Database type. E.g., in this case, select the Elastic option.
Provide the following information for the Data Store Settings:
Elastic Search Cluster
Shards
Click the Validation option.
A notification message appears.
The Save option gets enabled. Click the Save option to save the inserted information.
A notification message confirms that the Data Store configuration for Elastic has been saved.
Click the Data Store Settings option from the Configuration and Settings options.
The Data Store Settings page appears.
Select a Database option. E.g., select the ClickHouse option.
Provide the following information for the Data Store Settings:
Username
Password
IP/Host
Port
Database Name
SSL Type - Select one option NON-SSL or SSL
TCP Port
Click the Validate option.
A notification message appears.
The Save option gets enabled. Click the Save option to save the inserted information.
A notification message confirms that the Data Store configuration for ClickHouse DB has been saved.
Click the Data Store Settings option from the Configuration and Settings options.
The Data Store Settings page appears.
Select a Database option. E.g., in this case, select the PostgreSQL option.
Provide the following information for the Data Store Settings:
Username
Password
Click the Validate option.
A notification message appears.
The Save option gets enabled. Click the Save option to save the inserted information.
A notification message confirms that the Data Store configuration for PostgreSQL has been saved.
Click the Data Store Settings option from the Configuration and Settings options.
The Data Store Settings page appears.
Select the Database option as Pinot.
Provide the following information for the Data Store Settings:
Username
Password
Click the Validate option.
A notification message appears.
The Save option gets enabled. Click the Save option to save the inserted information.
A notification message confirms that the Data Store configuration for PostgreSQL has been saved.
Please Note:
The users must provide the Upload Key while configuring the Data Store Settings with SSL for the Mongo DB, ClickHouse, and PostgreSQL database.
The PostgreSQL Datastore Settings support multiple IPs.
Select a user from the Users list.
A list of documents gets displayed as created by that user.
Redirects to Copy the selected document to another user(s)
Redirects the users to share the selected document with another user(s) or group(s). The users can also share the document with the excluded users
Removes the selected document from the list
Excludes the user from accessing the specific document.
Please Note: The Document List can be accessed for User and User groups.
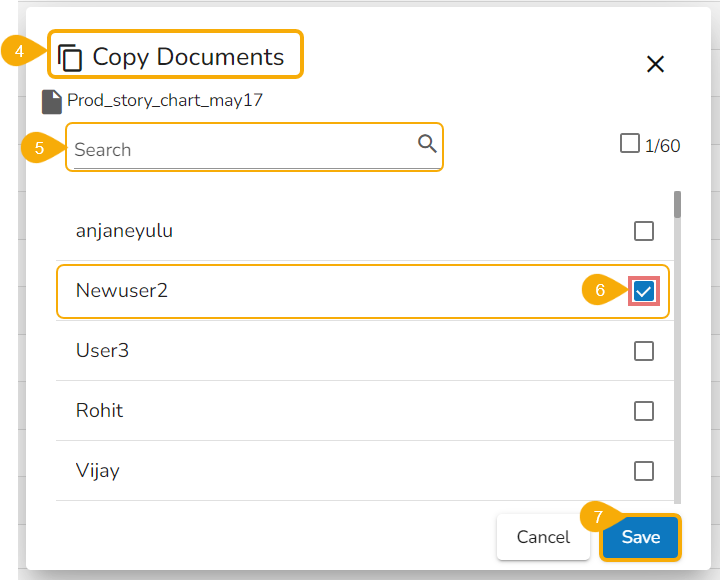
Navigate to the Documents list for a specific user.
Select a document from the list.
Click the Copy icon for a document from the document management list.
The Copy Document window opens.
Search the user using the Search space.
Select the user(s) by using the checkbox.
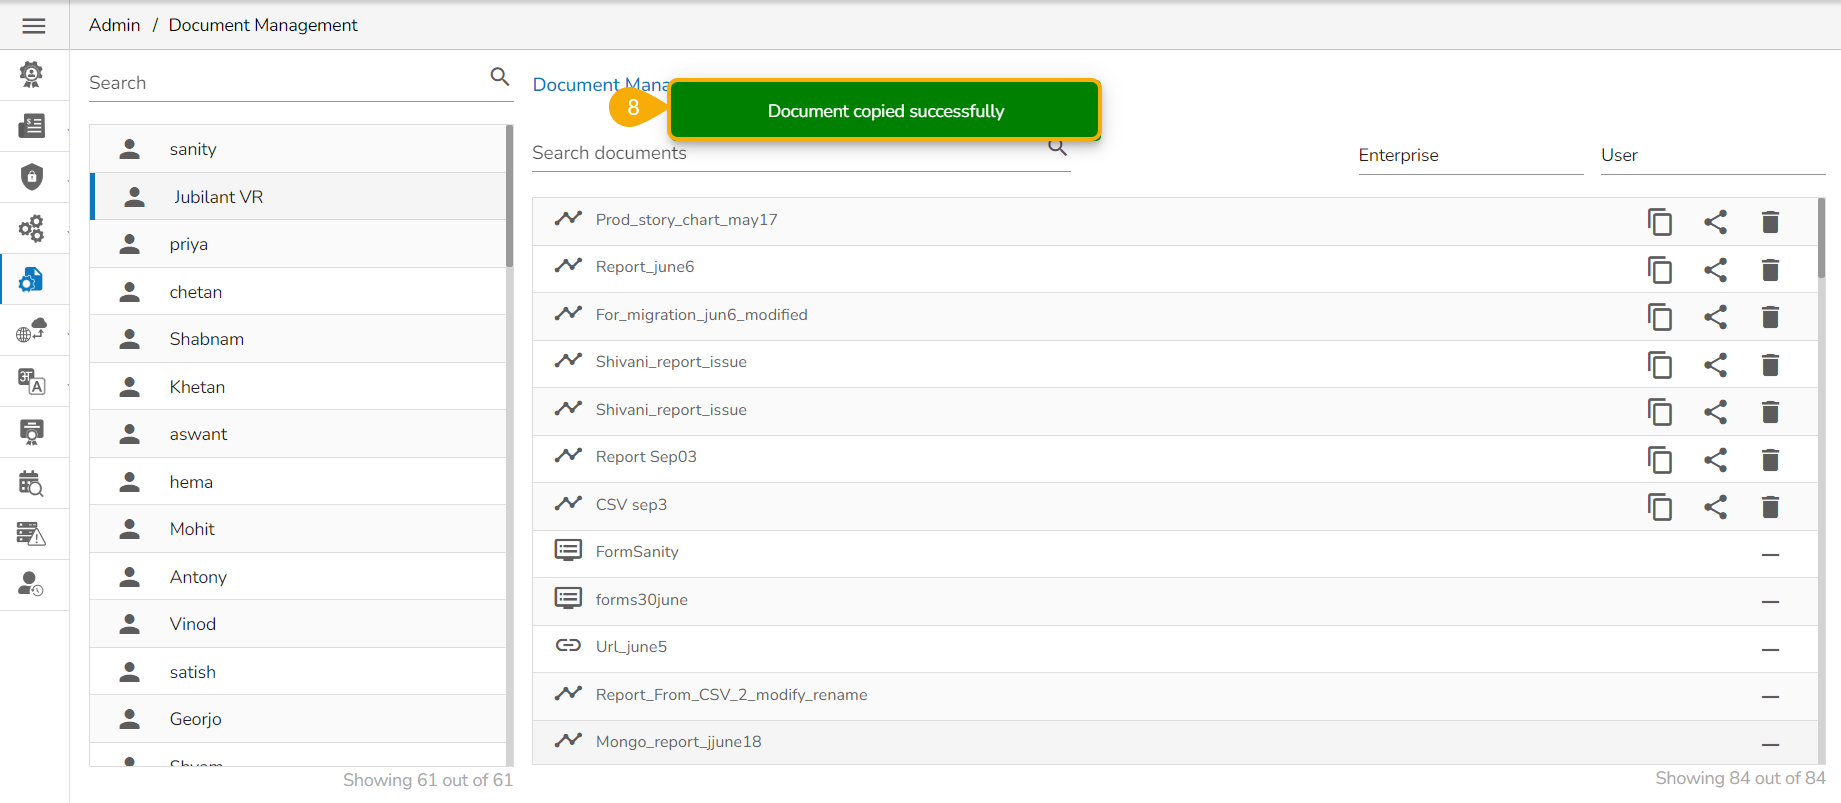
Click the Save option.
A notification message appears.
The document gets copied to the selected user’s account.
Please Note: The copied documents can be seen under the Shared Documents. The same gets notified by a notification message. The documents shared through the Copy option, get all the document operations.
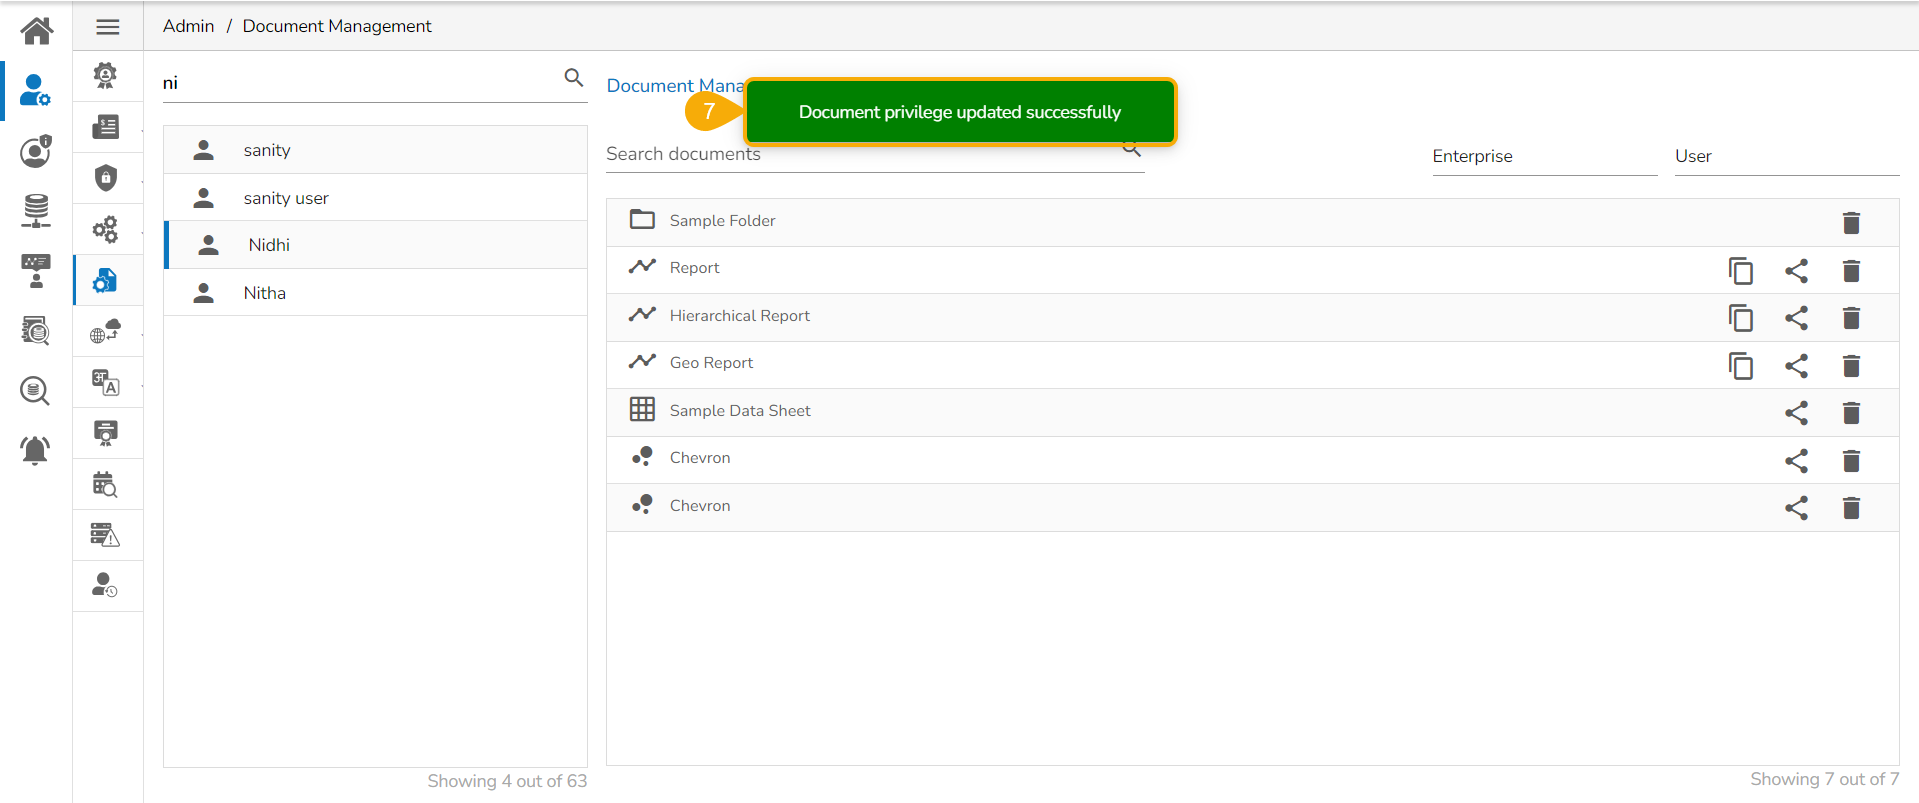
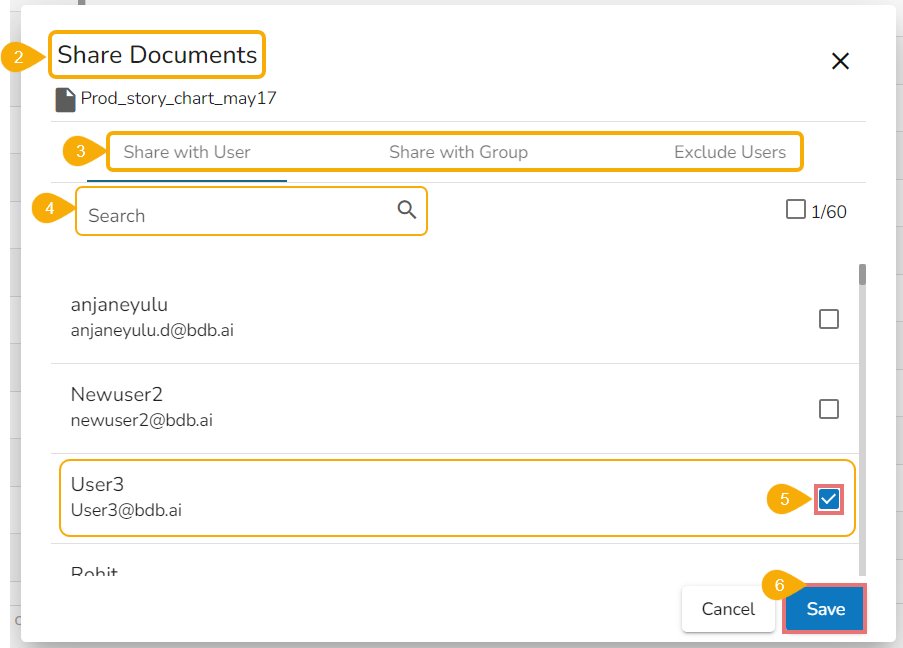
Click the Share icon for a document from the document management list.
The Share Documents window opens.
It contains Share with User, Share with Group, and Exclude User(s) tabs.
Search for the specific user(s)/ group(s) using the search space.
Select User(s)/Group(s)/User(s) to exclude using the checkboxes. E.g., the current image displays the Users option.
Click the Save option.
A notification message appears.
The document gets shared with the selected user’s account/ to the selected groups or the selected user(s) get excluded from the rights to access a document.
Please Note:
The Shared Documents can be seen under the Shared Documents. The same gets notified by a notification message. The documents that get shared through the Share option contain read-only permission.
The document must be shared with a user group before using the Exclude User function. Otherwise, no user will be listed under the Exclude Users page.
Users will get the Exclude From Doc option for all the shared documents. The admin can exclude these document from the ueser se shared documents can be excluded from the Document Management list using the Exclude Document option.
Navigate to the Document Management page.
Select a user from the user list.
Select a shared document from the listed documents.
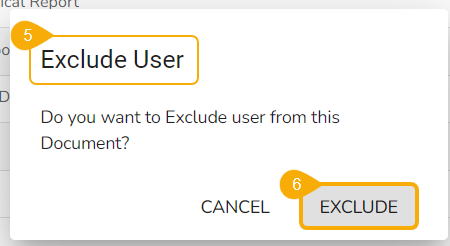
Click the Exclude From Doc icon.
The Exclude User dialog box appears.
Click the EXCLUDE option.
A notification message appears and the document will be removed from the Document Management list.
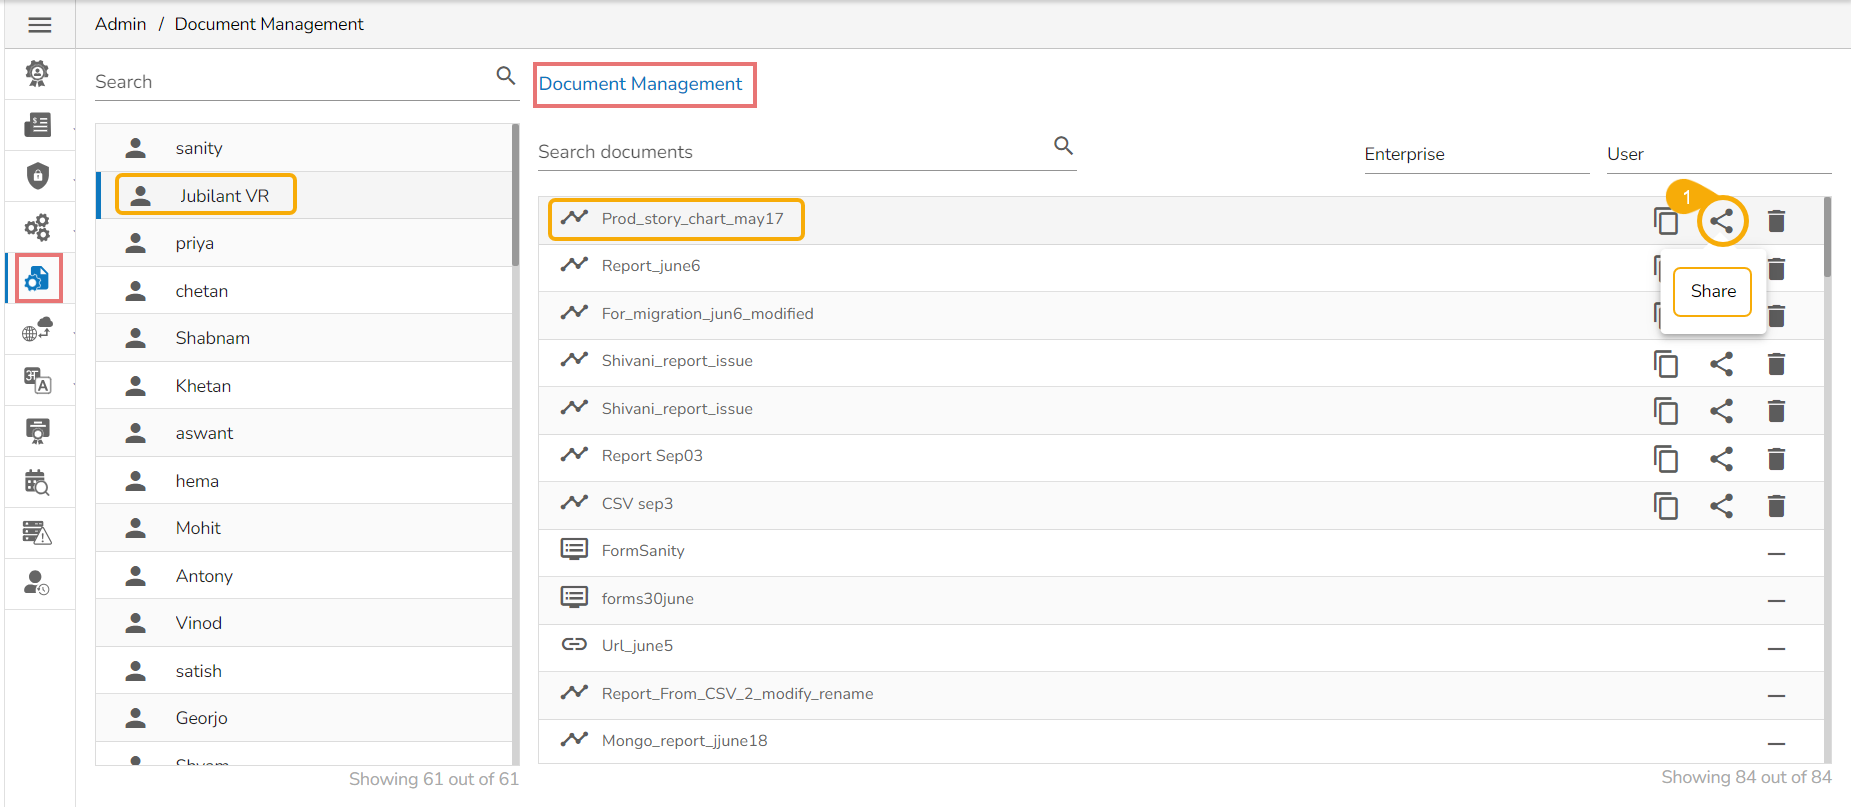
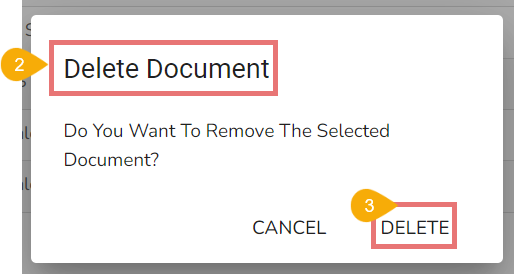
Click the Delete icon for a document from the document management list.
The Delete Document dialog box appears to confirm the action of deletion.
Click the DELETE option.
A notification message appears.
The selected document gets deleted and the same gets informed by a notification message.
Please Note:
The administrator must exclude users from a shared document before deleting the document.
The Share/Exclude options can be applied only to the files, the folders available under the Document Management module do not support these actions.
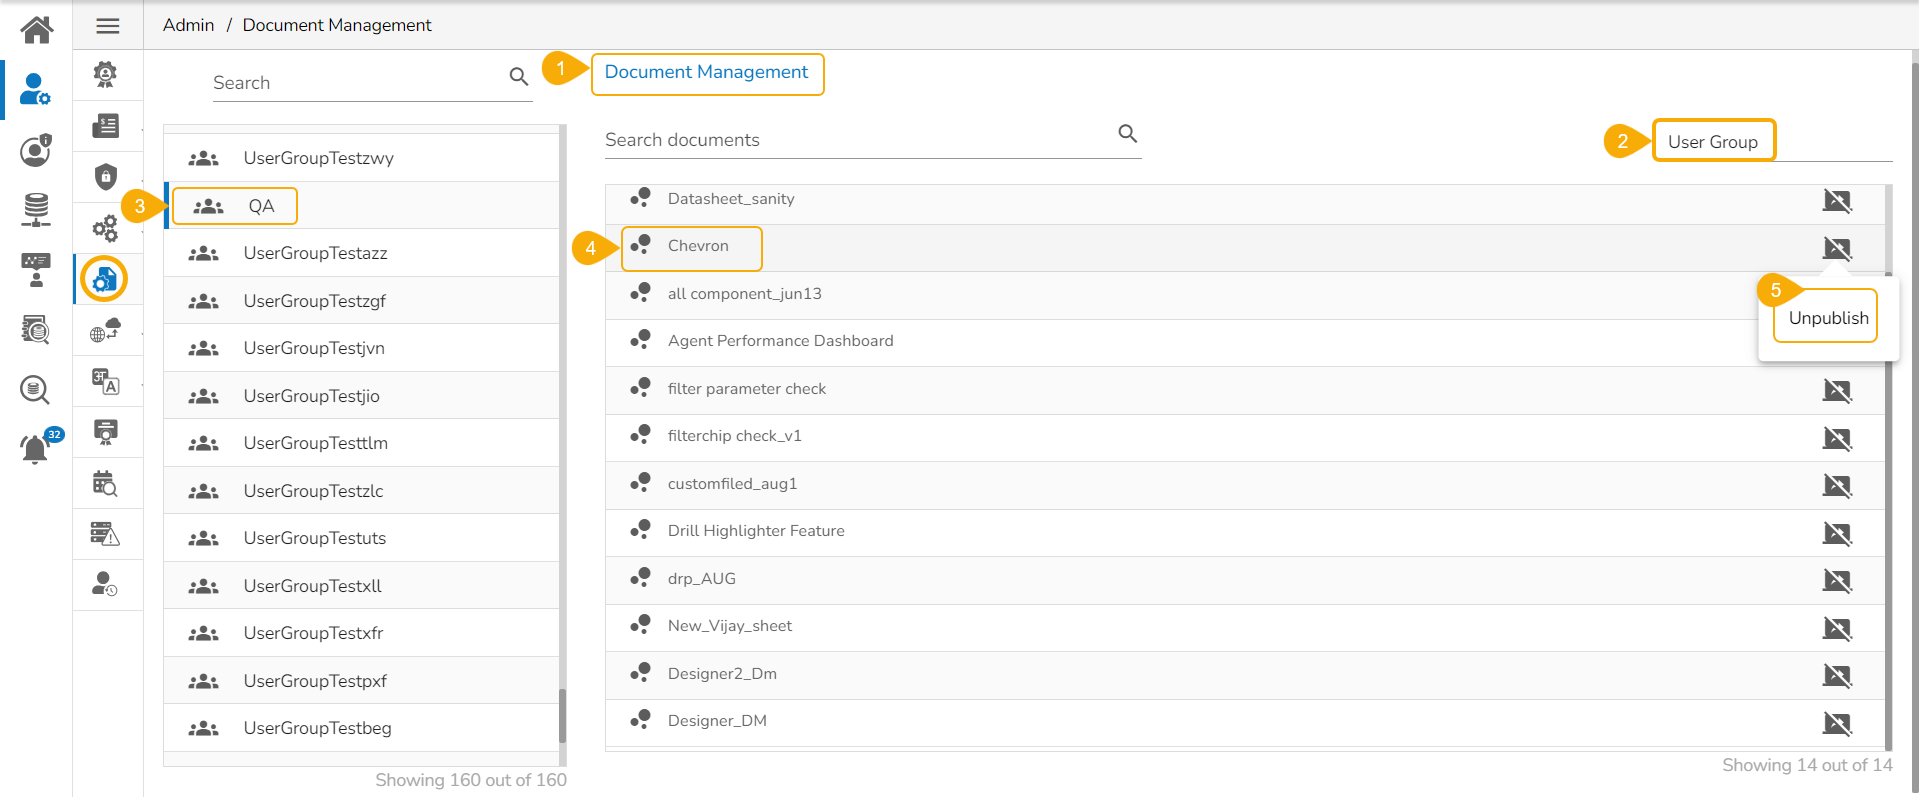
The Unpublish option is provided for the Dashboard that lists under a user group list.
Navigate to the Document Management page.
Select the User Group option to view the document list for the available user groups.
Select a User Group from the left side panel.
The documents inside the selected user group get listed. Select a Dashboard.
The Unpublish icon appears next to the dashboard. Click on the Unpublish icon.
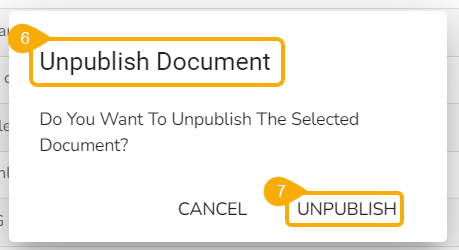
The Unpublish Document dialog box appears to confirm the action.
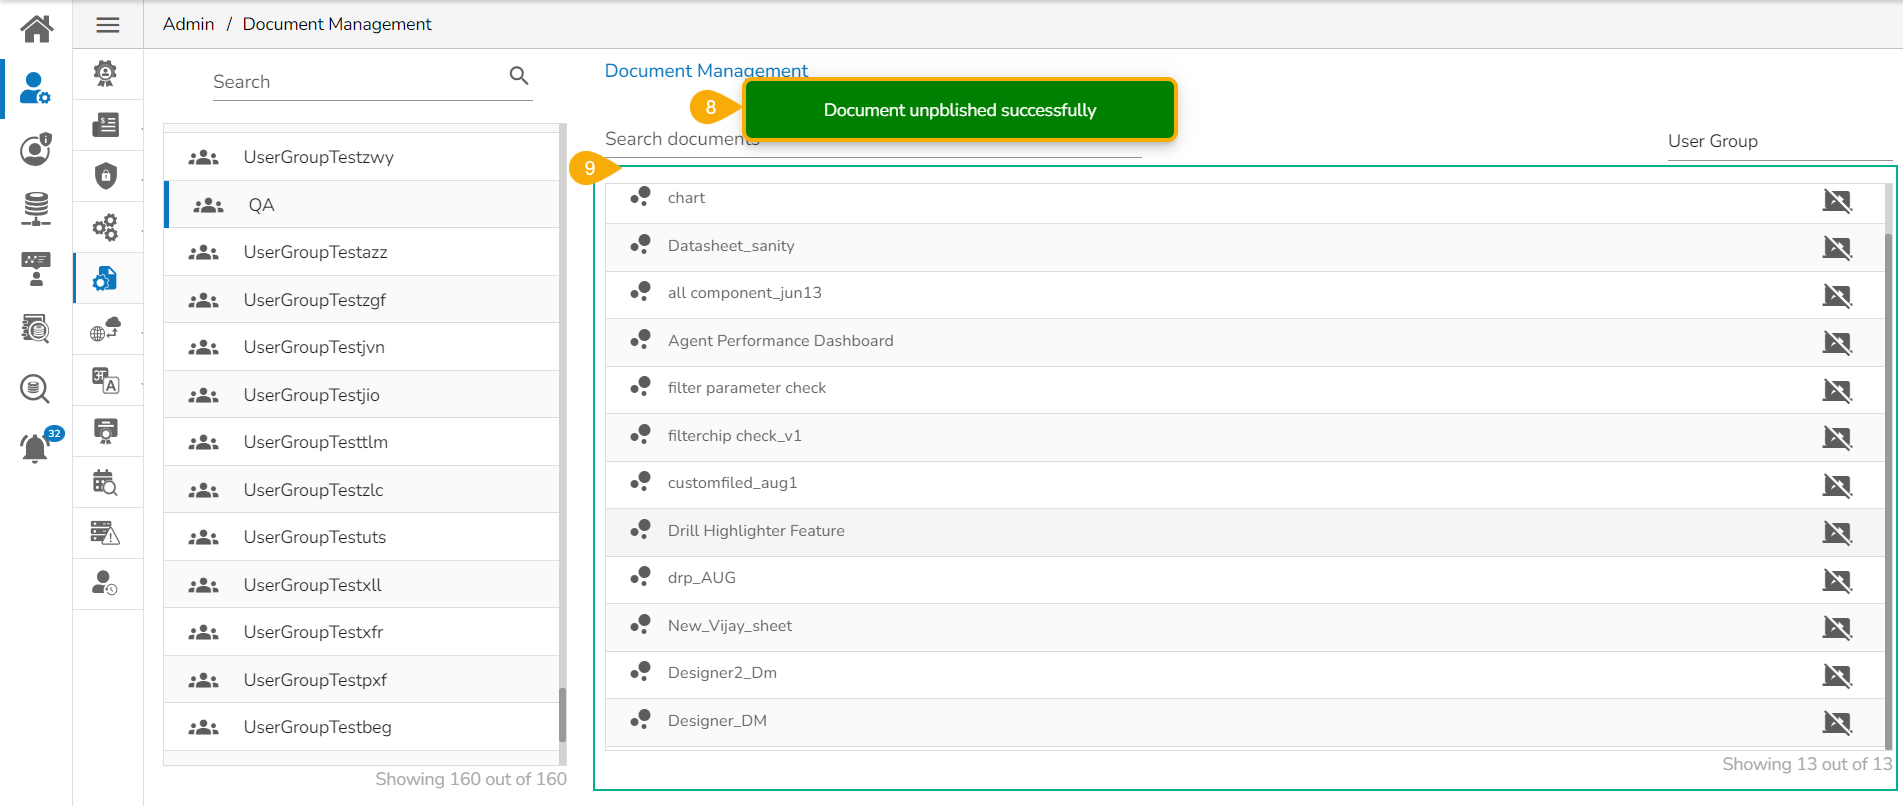
Click the UNPUBLISH option.
A notification message appears stating the completion of the Unpublish action.
The Dashboard gets unpublished and removed from the Documents list for that user group.


IP/Host
Port
Database Name
SSL Type - Select one option NON-SSL or SSL
Date Formats
Elastic Search Hosts
Elastic Search Ports
Elastic Search HTTP Ports
Port
Database Name
SSL Type - Select one option NON-SSL or SSL
TCP Port
Port
Database Name
SSL Type - Select one option NON-SSL or SSL
TCP Port


The user can export and import a story file by using this feature.
Please Note: The GIT Migration option for the Report module includes both Export and Import options.
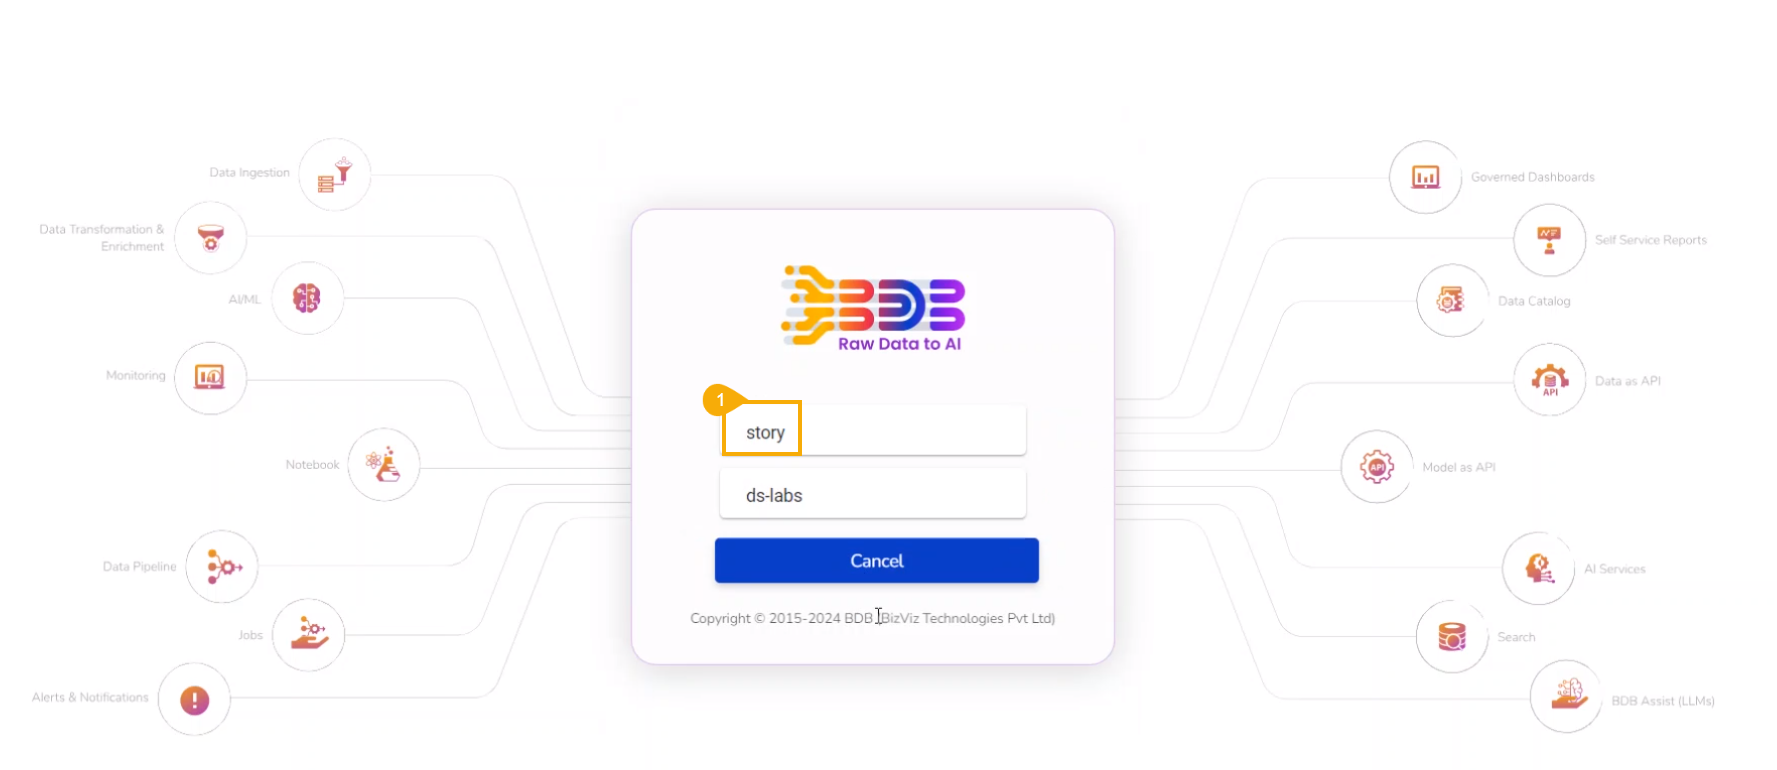
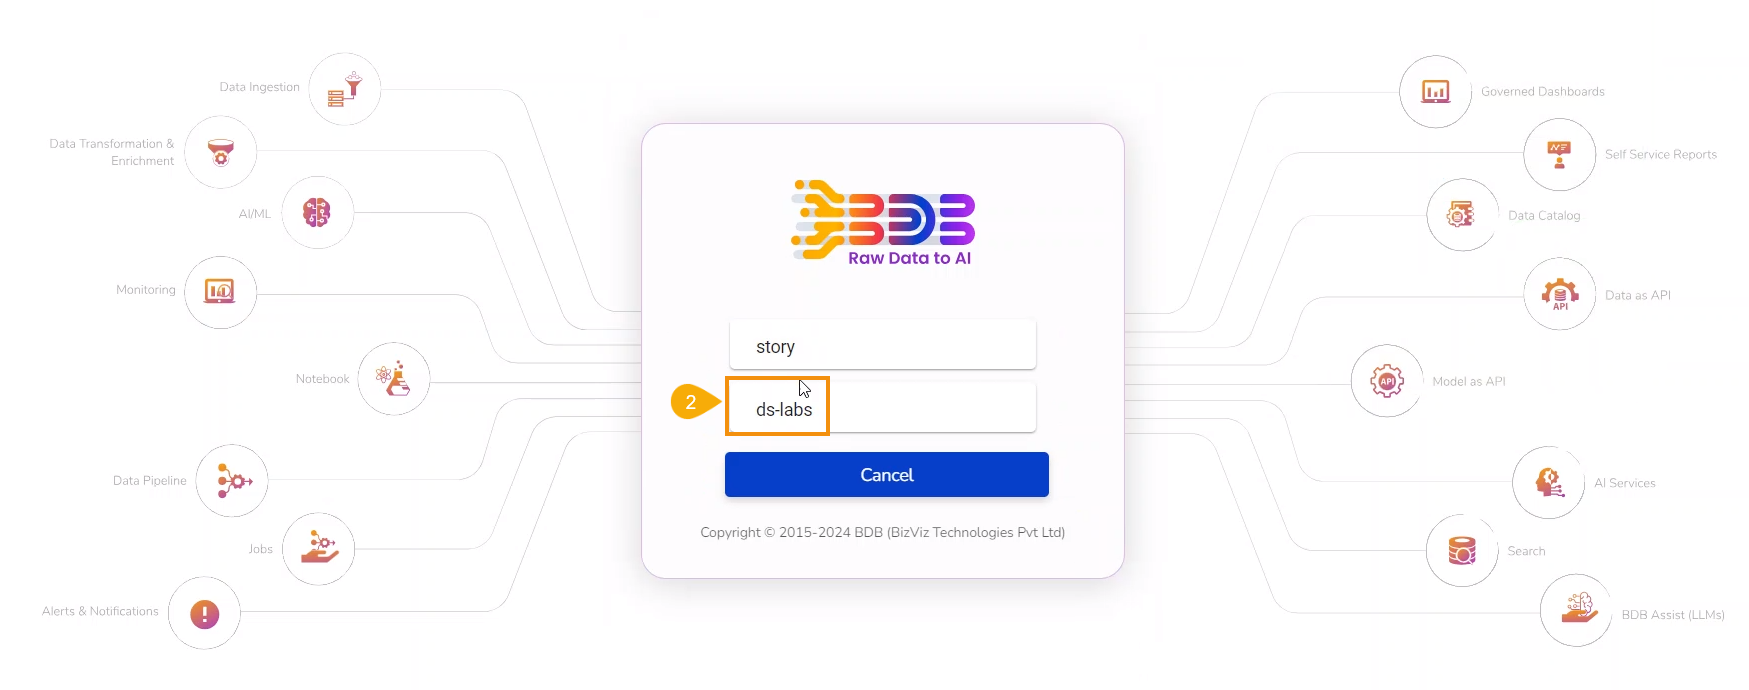
Login to the Platform with a specific space. The story space has been used in this case to export a report.
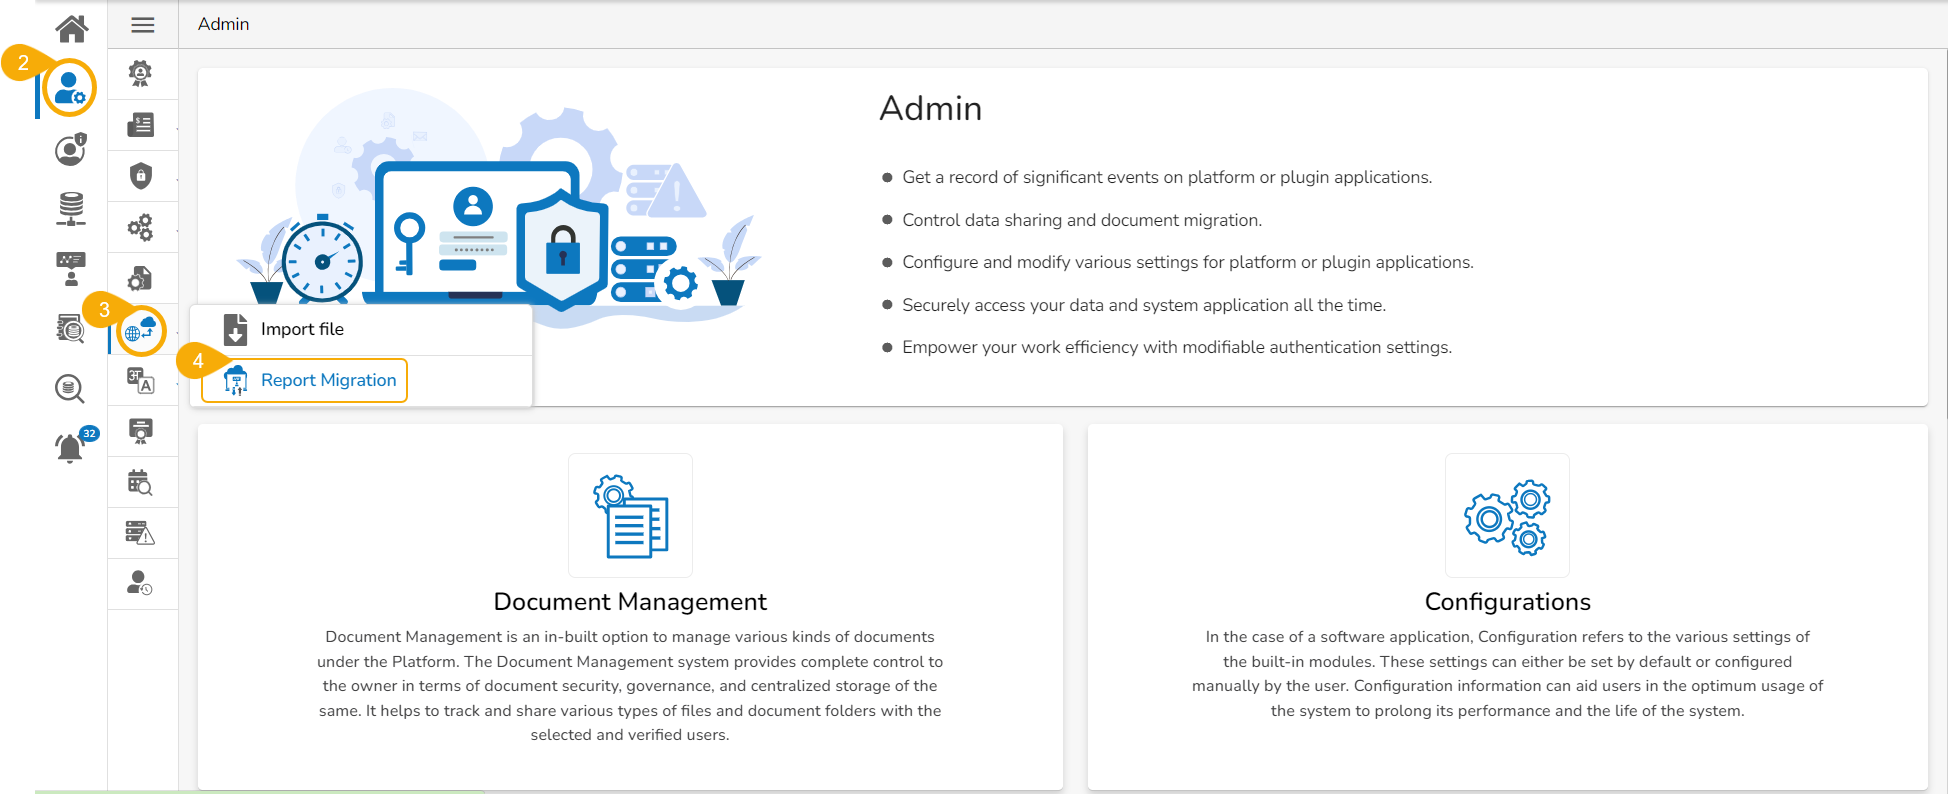
Navigate to the Admin option.
Open the GIT Migration option.
Click the Report Migration option from the GIT Migration.
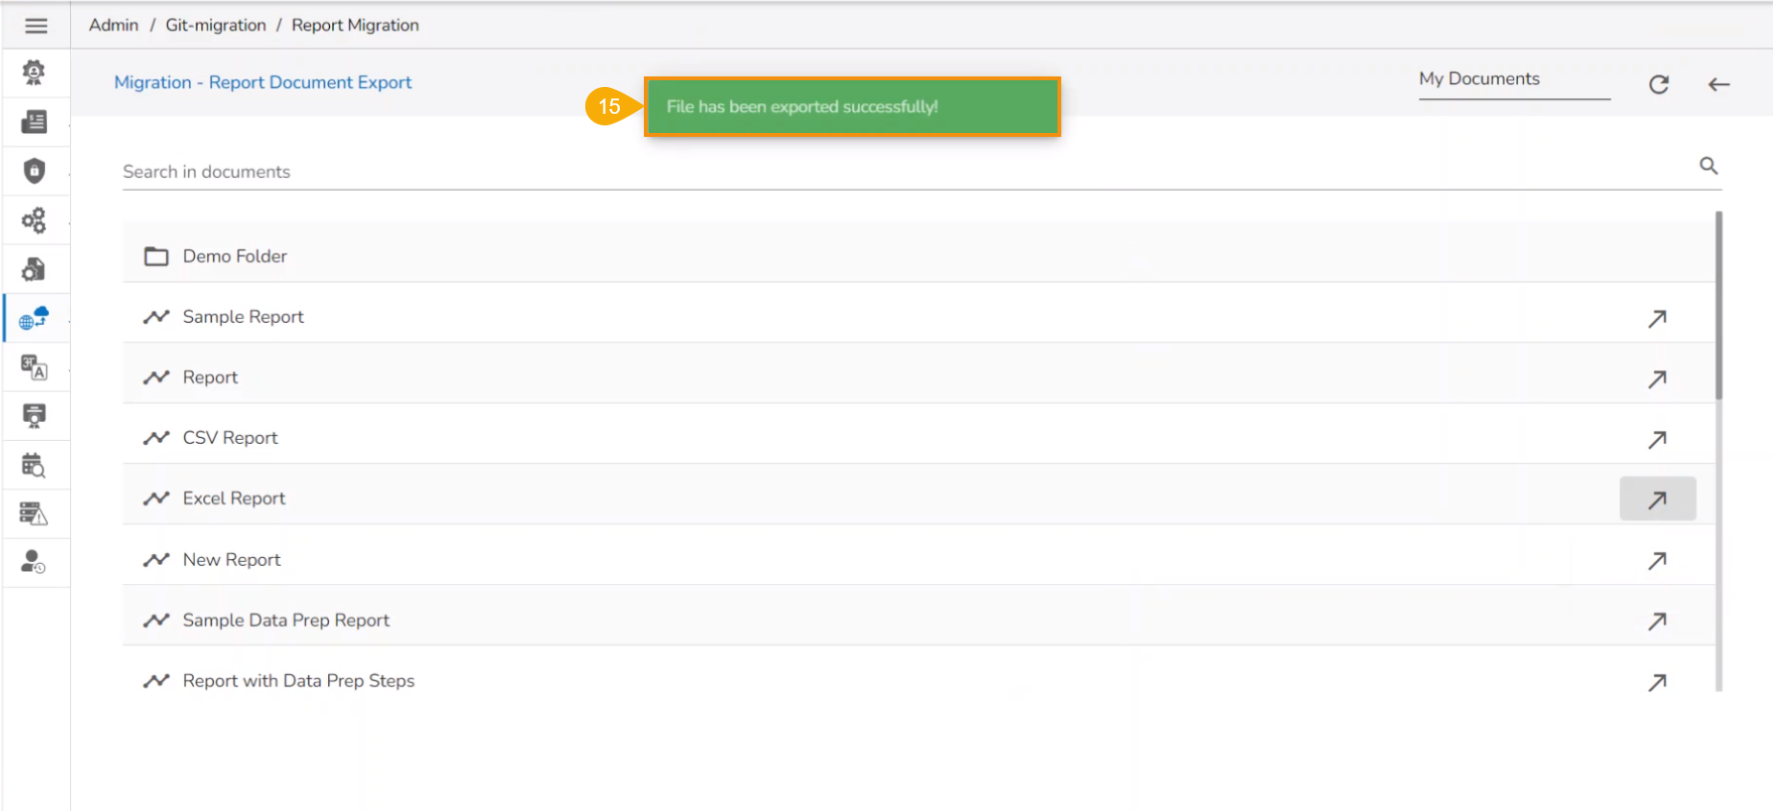
A notification message ensures the users of the success of the export action.
The Excel Report has been selected in the previous section to display the export steps. This section displays the steps for importing the same report file to another user space.
Use another user's credentials or another space.
The selected user tenant space is ds-labs which displays the steps to import the same exported report.
Navigate to the Admin module.
Open the GIT Migration option.
Select the Import File option from the GIT Migration context menu.

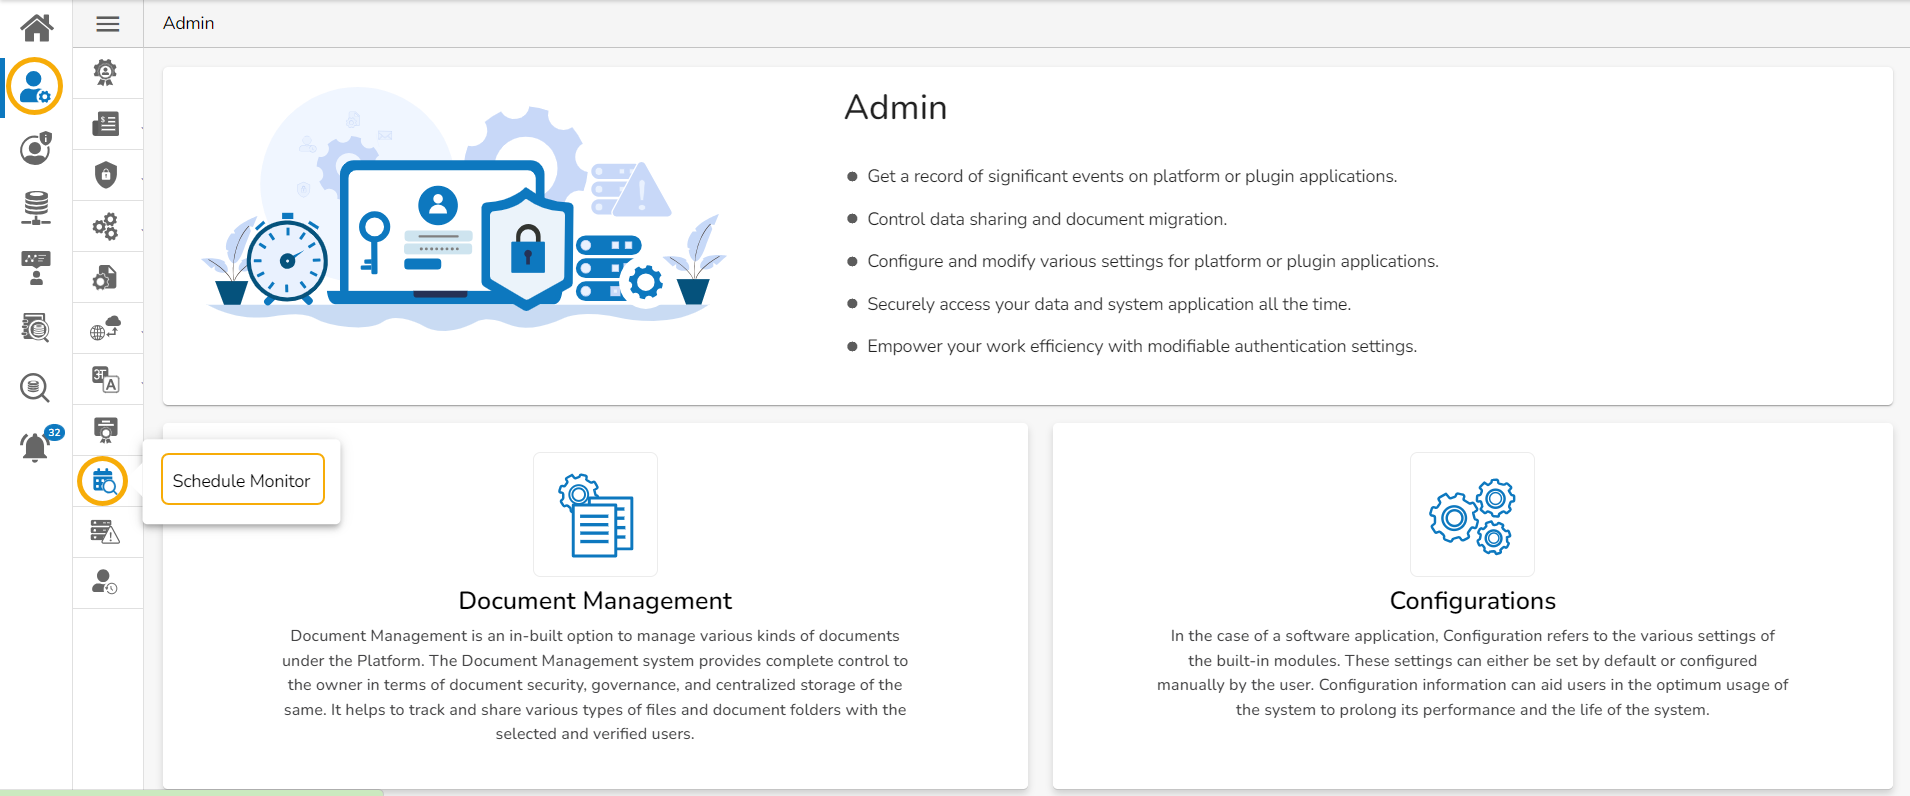
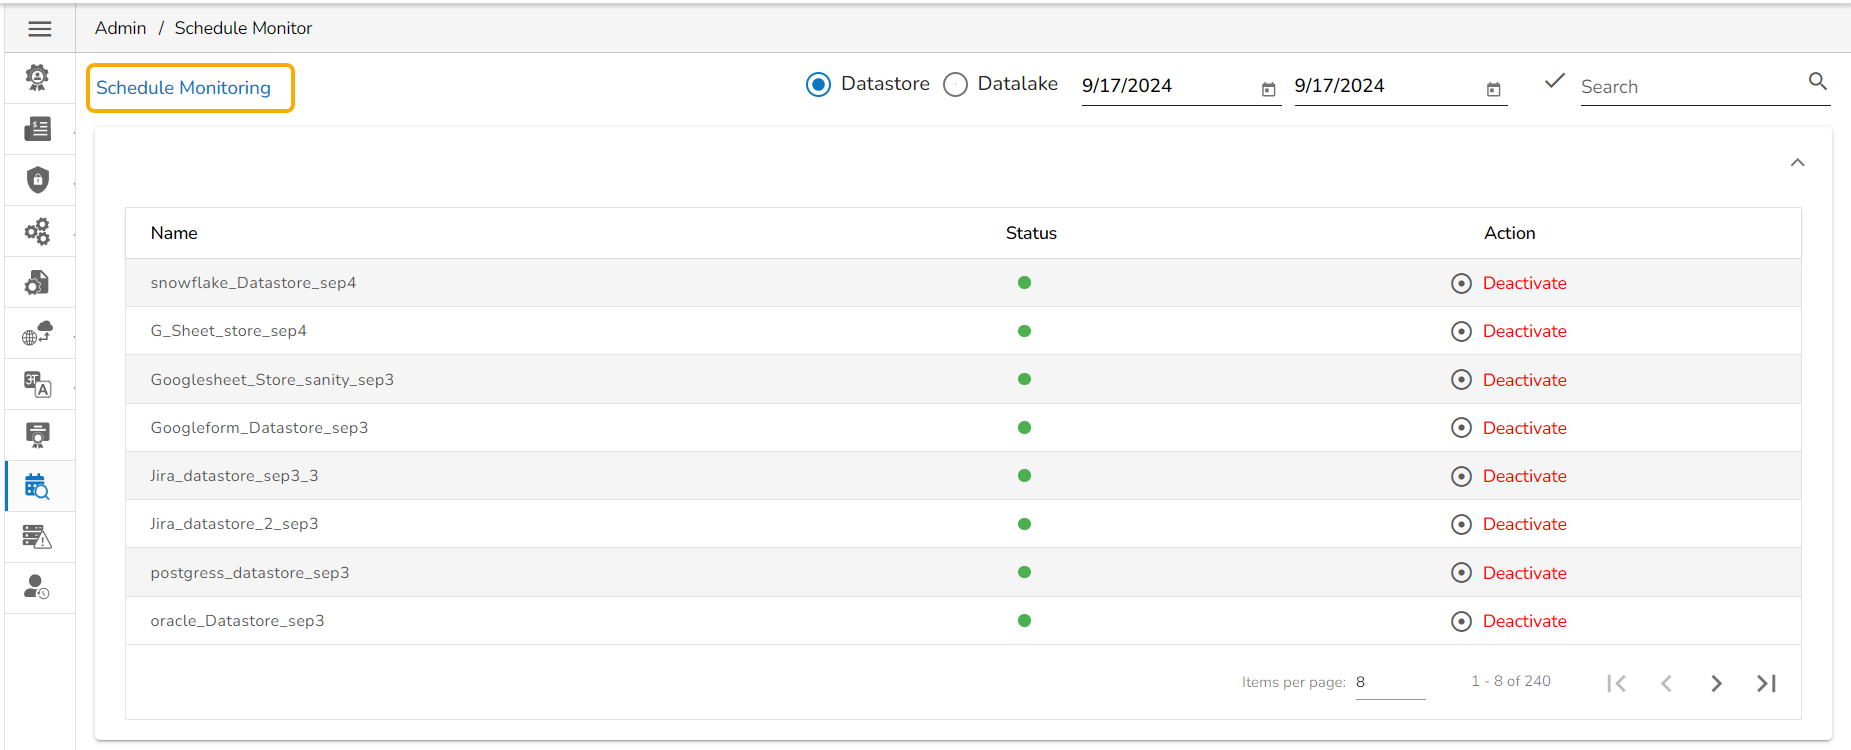
This option helps the administrator to monitor the scheduled data stores.
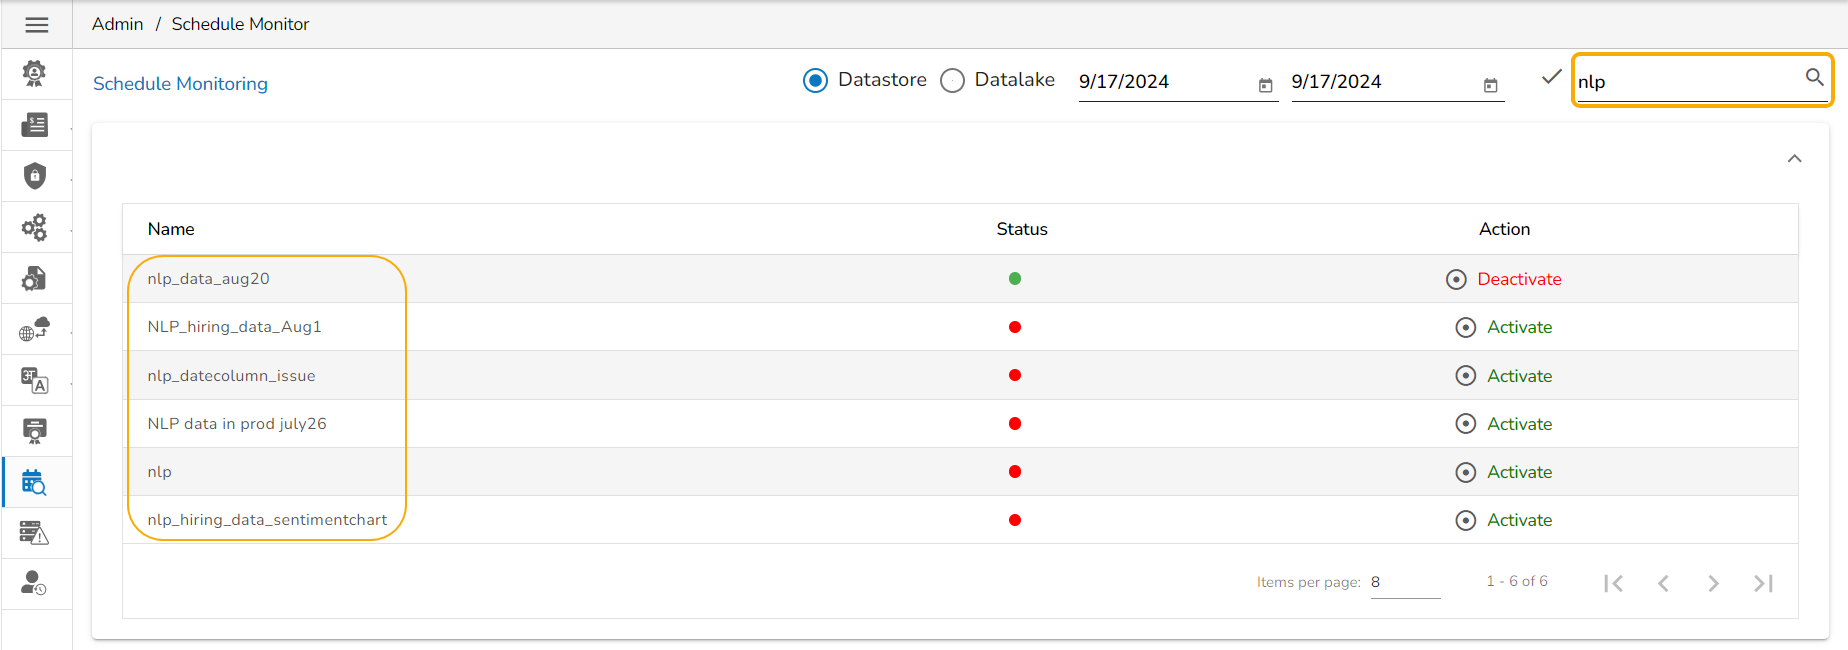
Click the Schedule Monitor option from the list of admin options.
The Schedule Monitoring page appears with a list of data stores displaying their current Status and Action.


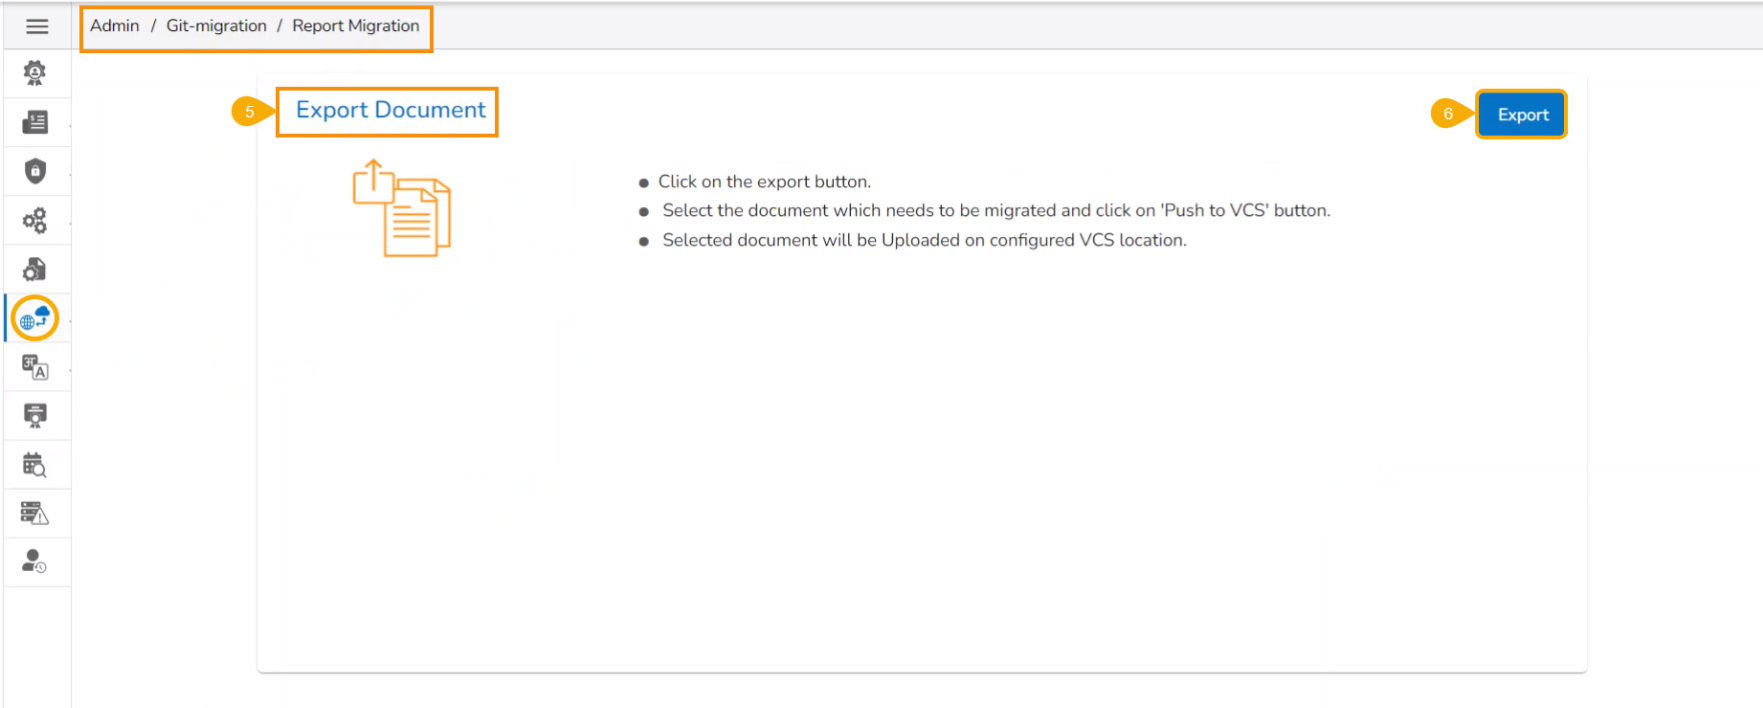
The user gets redirected to the Export Document page.
Click the Export option.
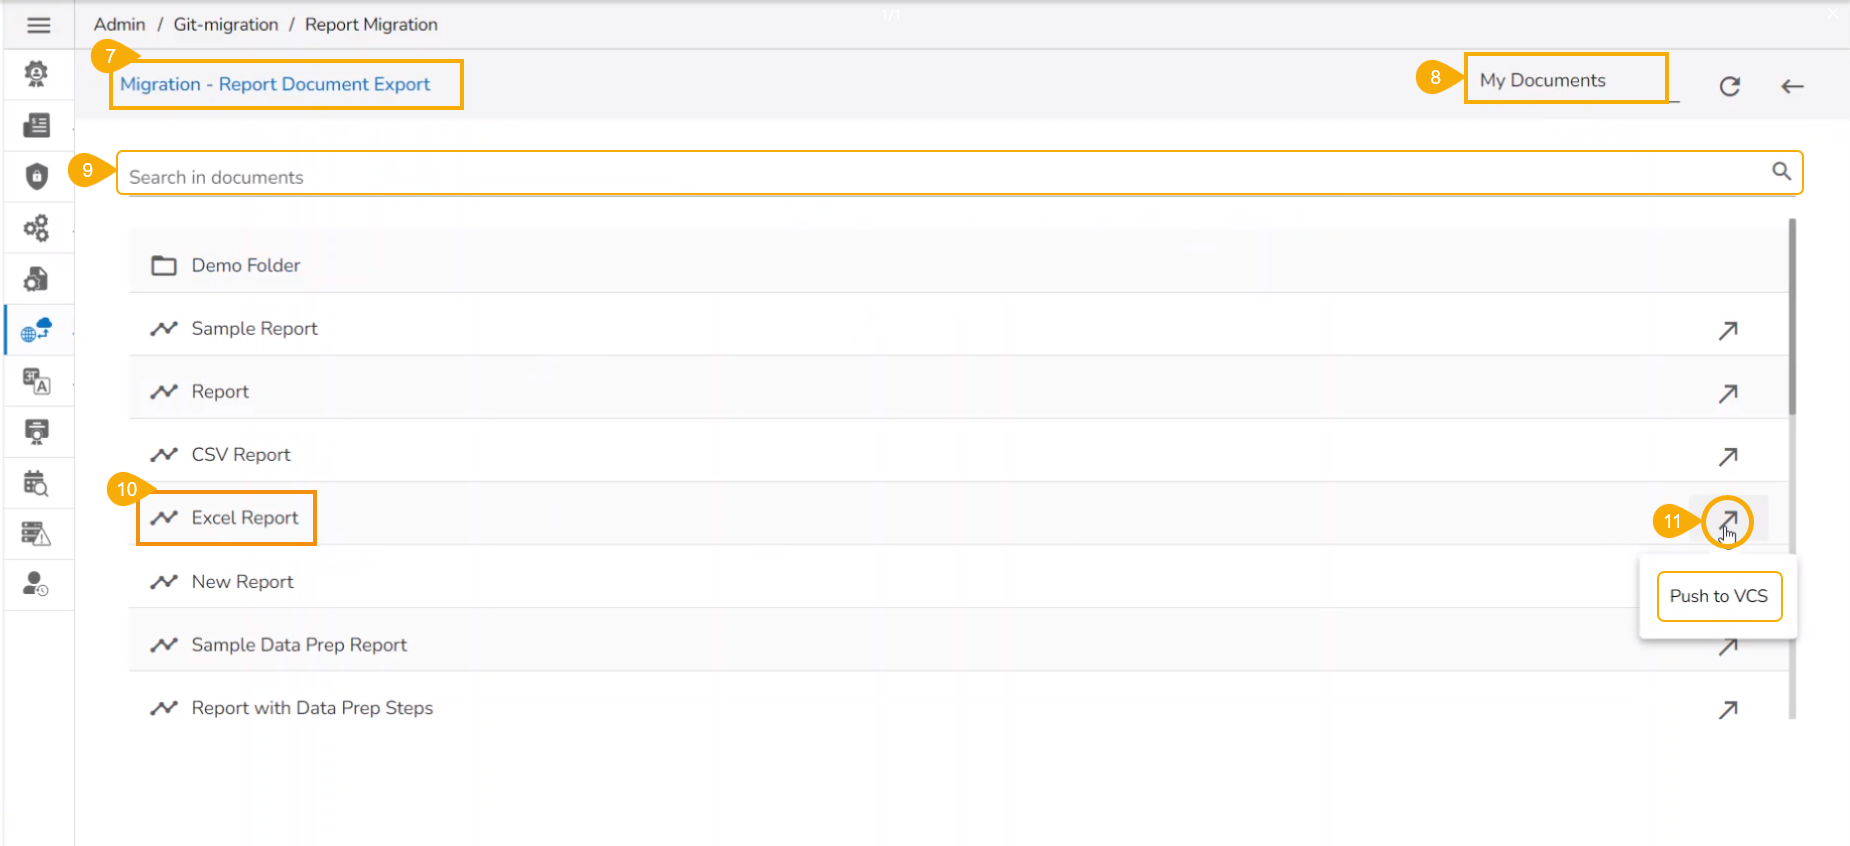
The user gets redirected to the Migration - Report Document Export page.
Select a document space to choose the Report from. The available document spaces are My Documents, Public Documents, and Favorites.
The user can Search for the specific file from the list.
Select a Report from the displayed list.
Click the Push to VCS icon for the selected Story file.
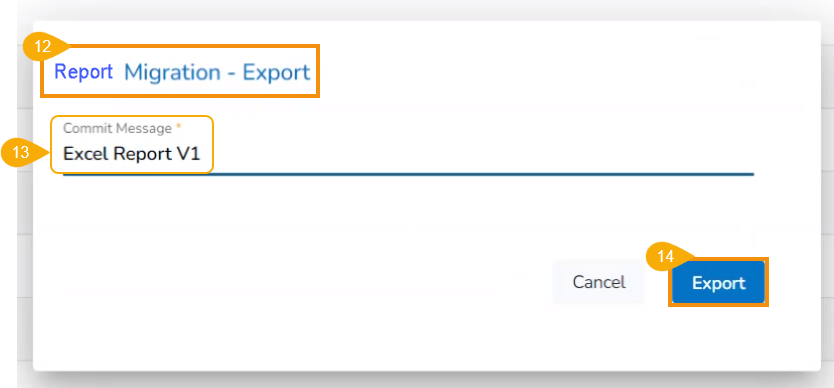
The Report Migration- Export dialog box appears.
Provide a Commit Message.
Click the Export option.
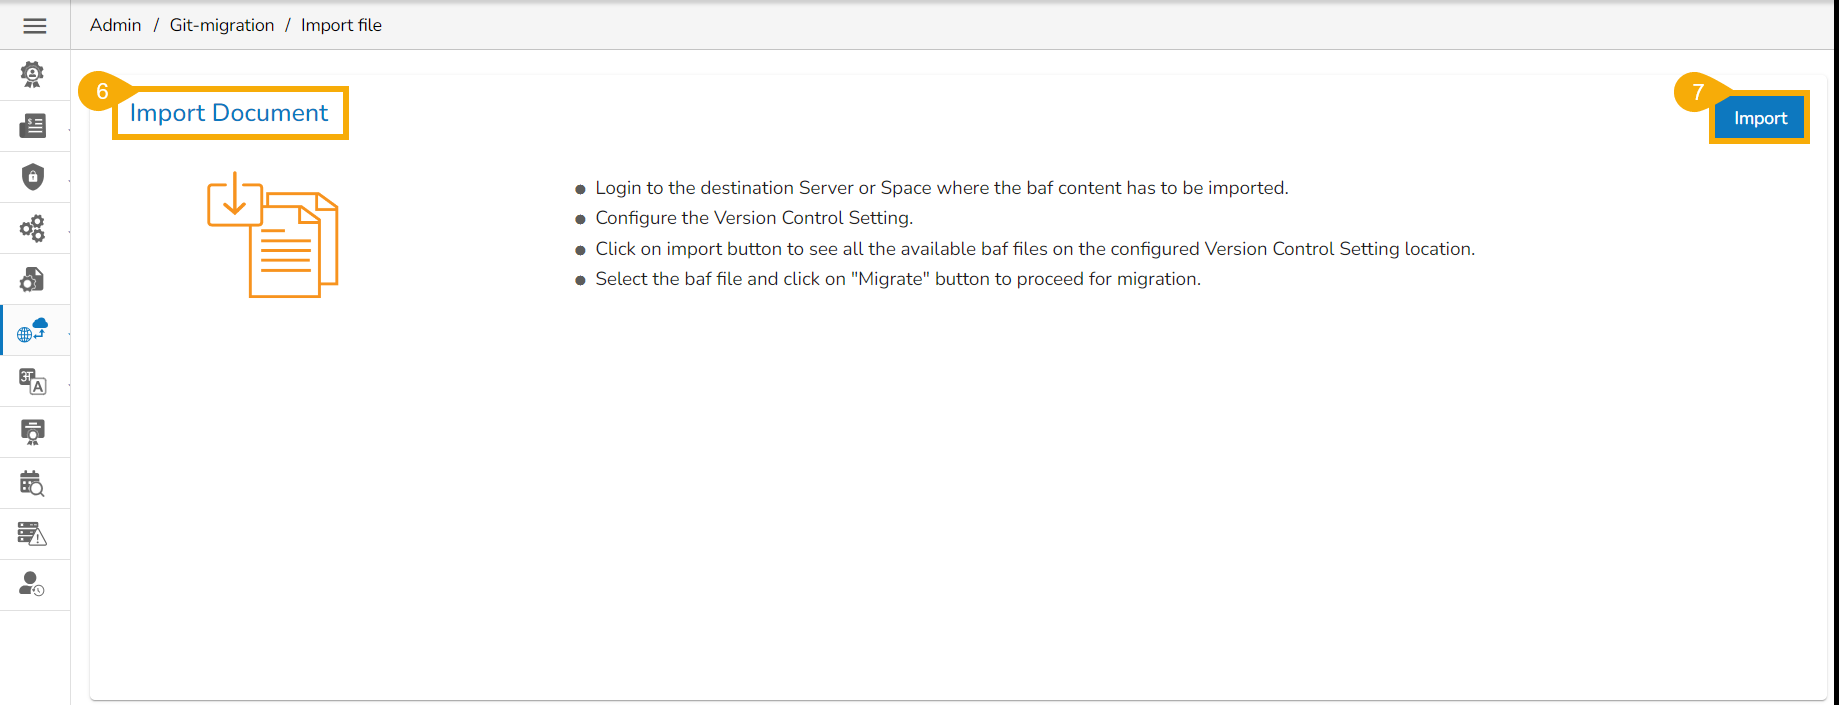
The Import Document page opens.
click the Import option.
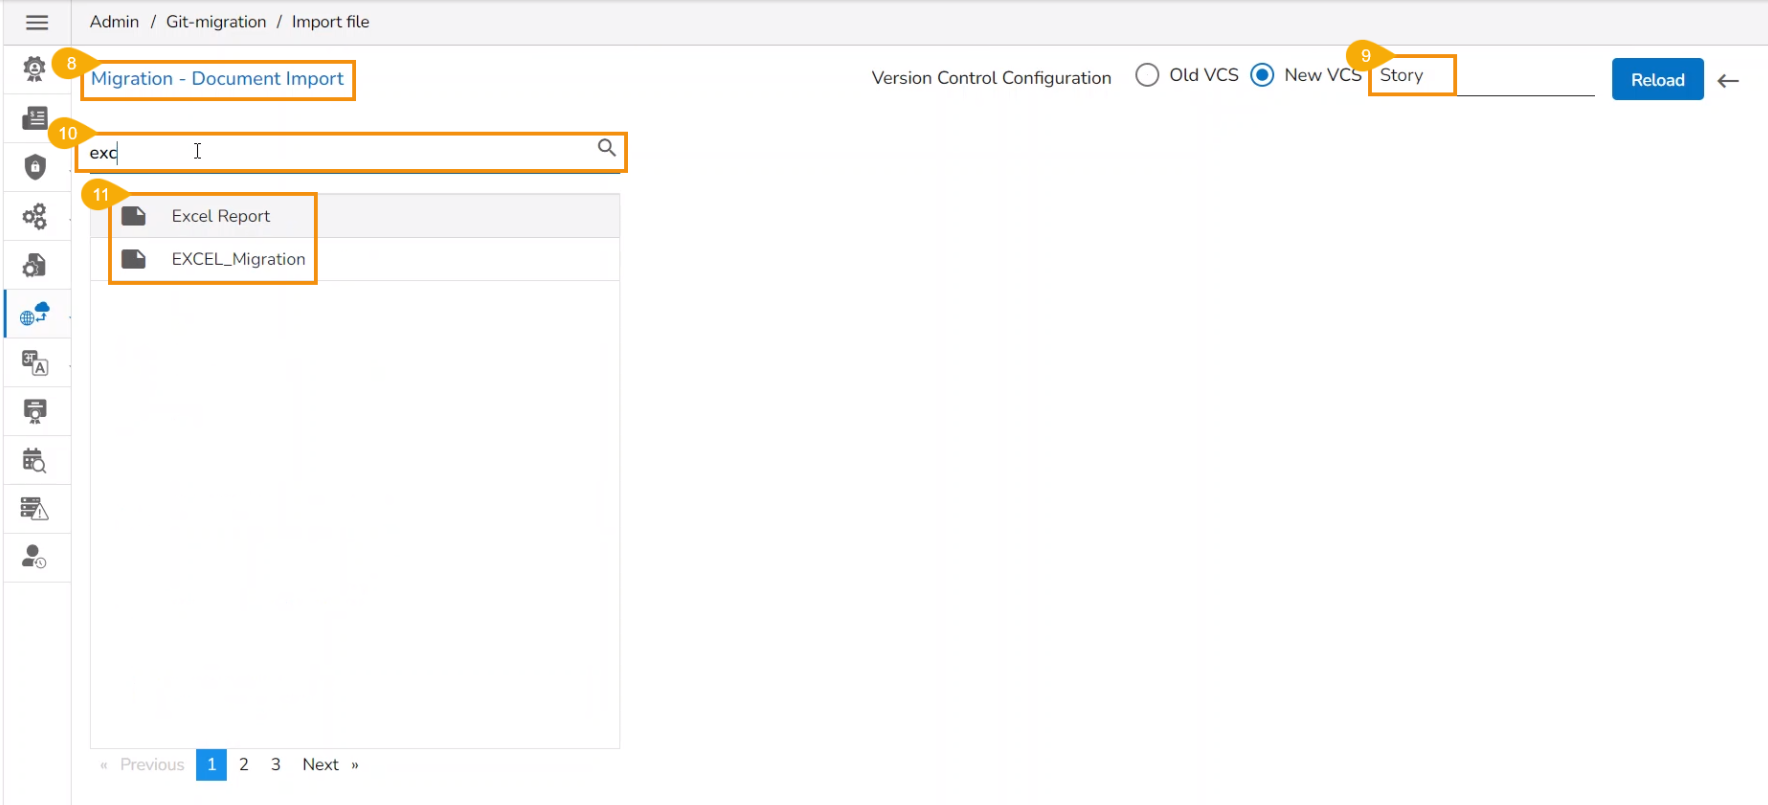
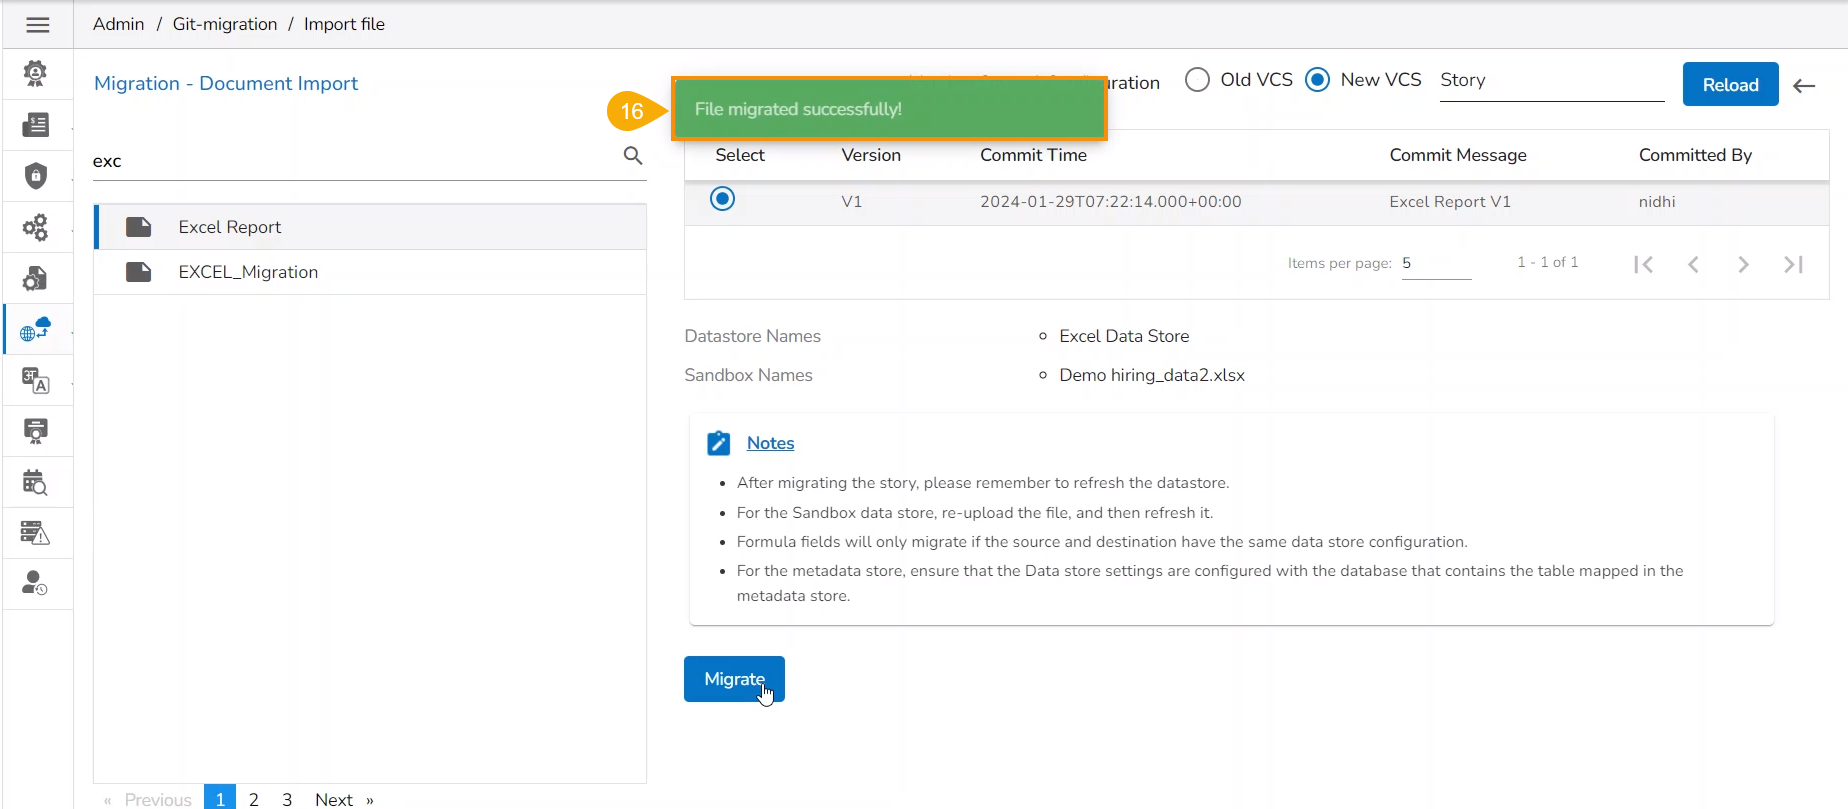
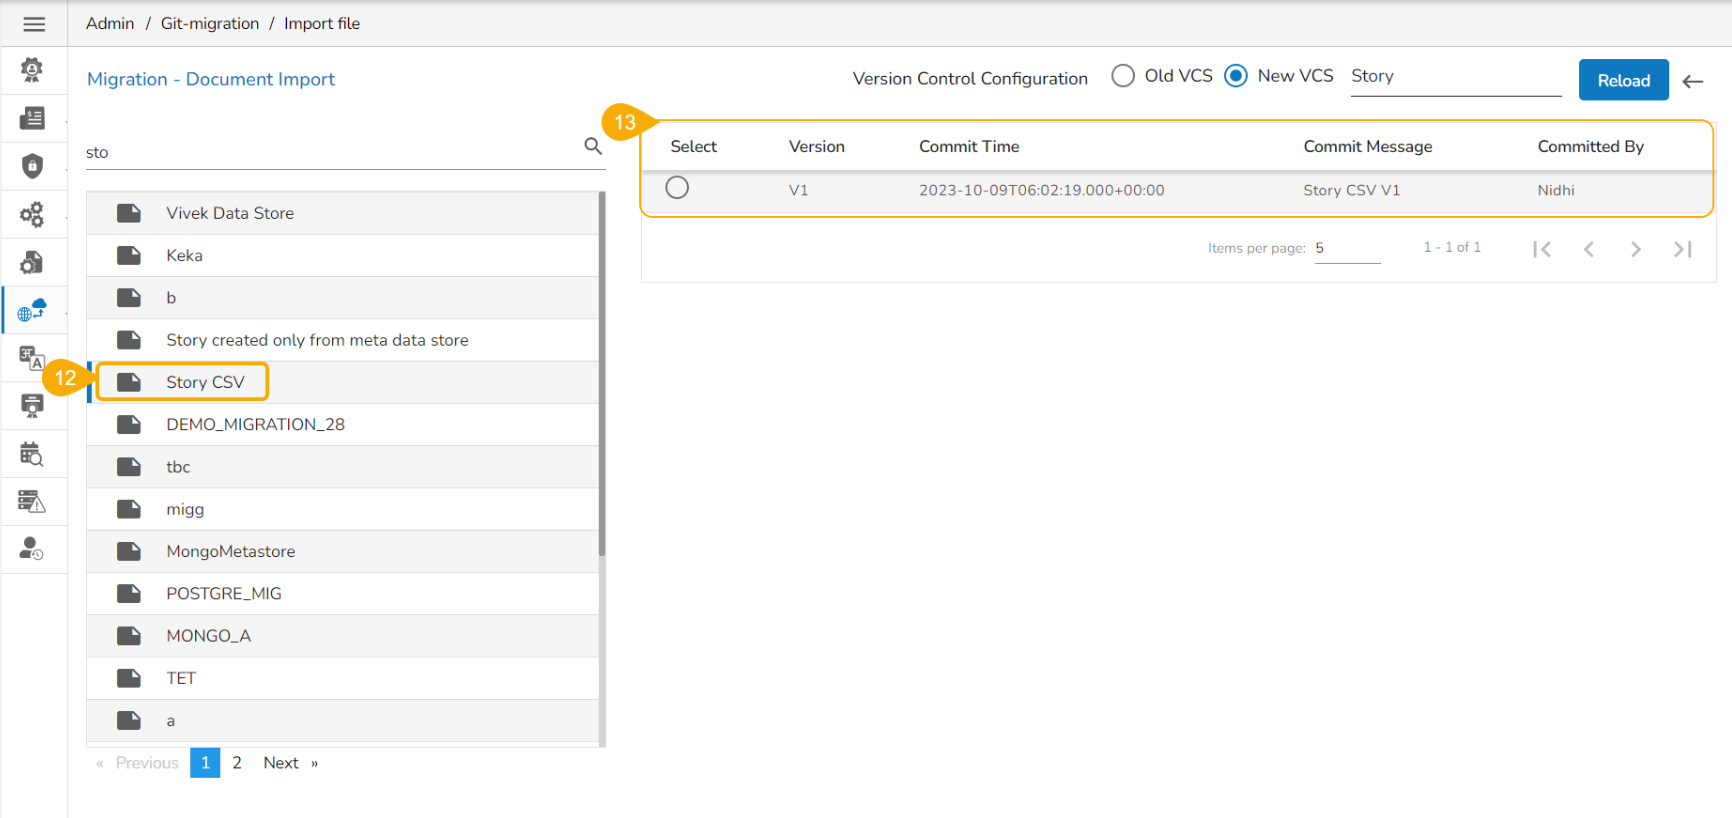
The Migration - Document Import page appears.
Select a module using the given drop-down menu.
Use the Search bar to search for a specific story file.
A customised list of the exported stories appears based on the search.
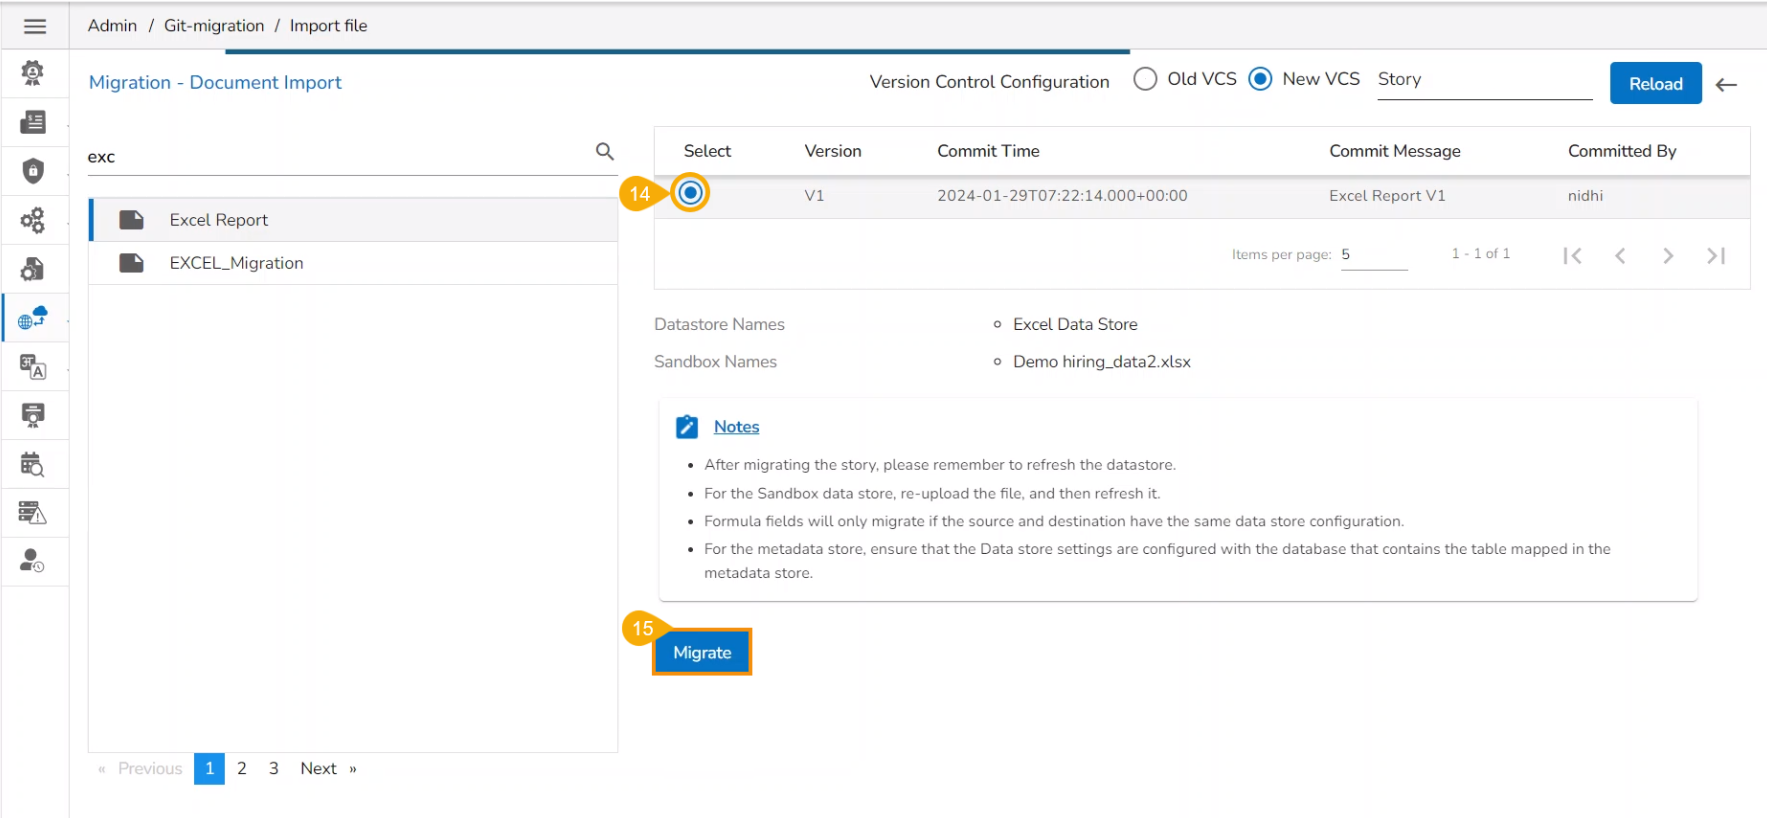
Select a Story file from the displayed list.
Available versions of the selected Story appears.
Select a Version by using the given checkbox.
Click the Migrate option.
A notification message appears to ensure completion of the migration process.
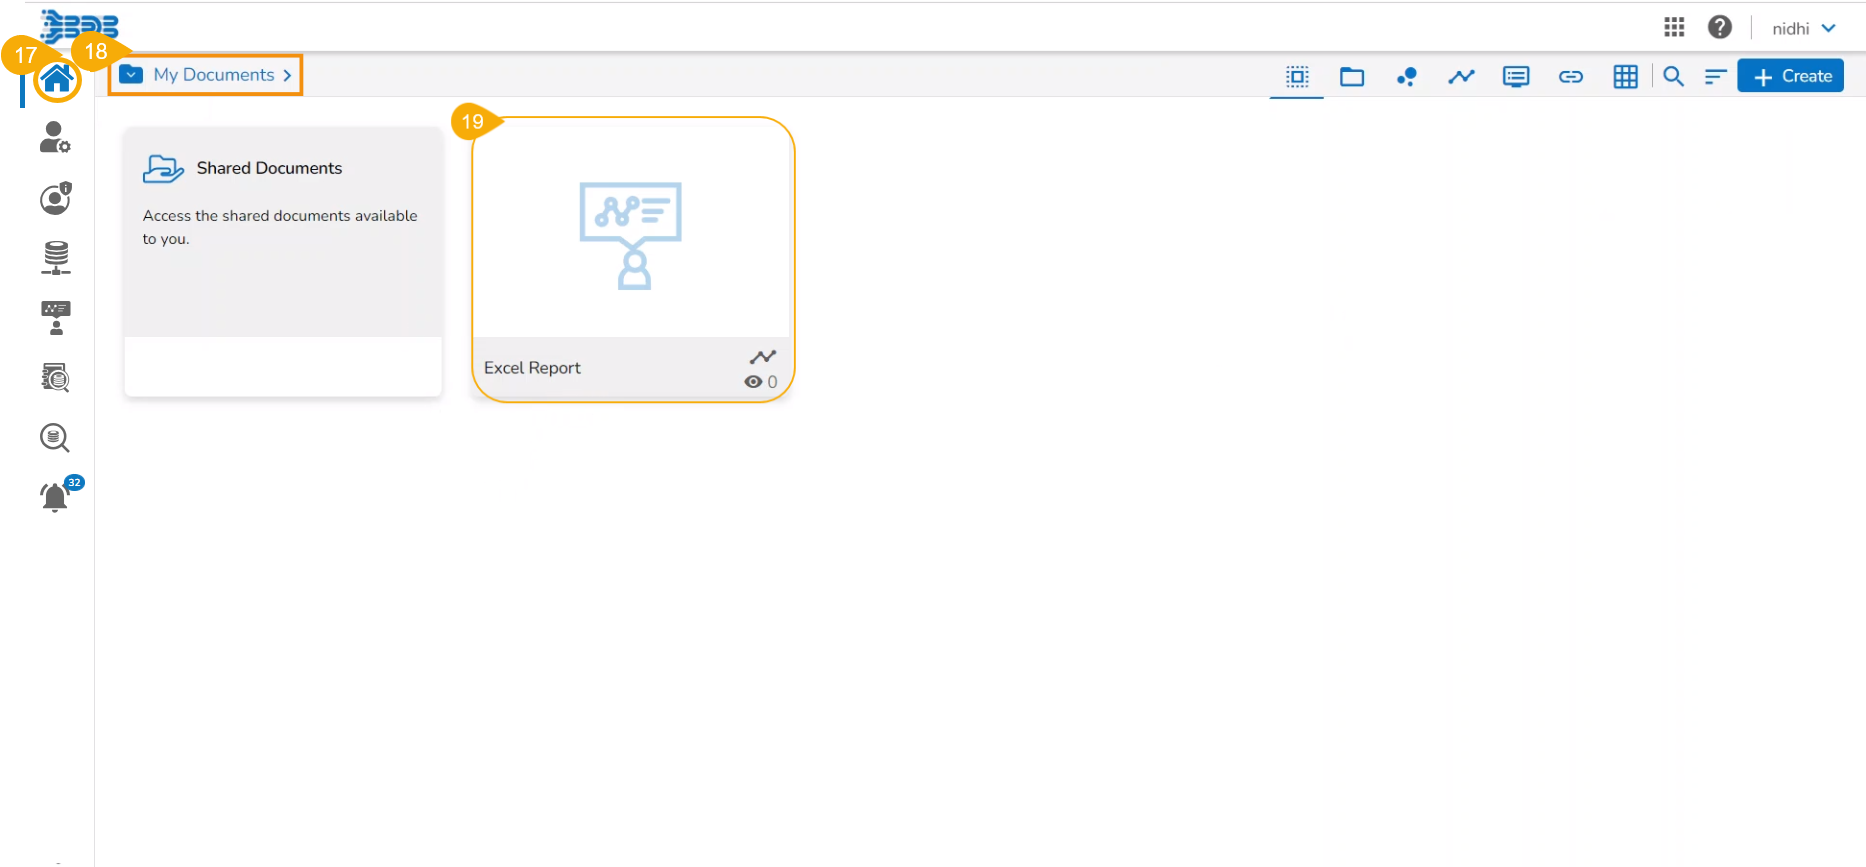
Navigate to the Platform Homepage.
The My Documents space opens by default.
The migrated Report gets added to the My Documents space.
Search and display specific scheduled data store(s) using the Search space.

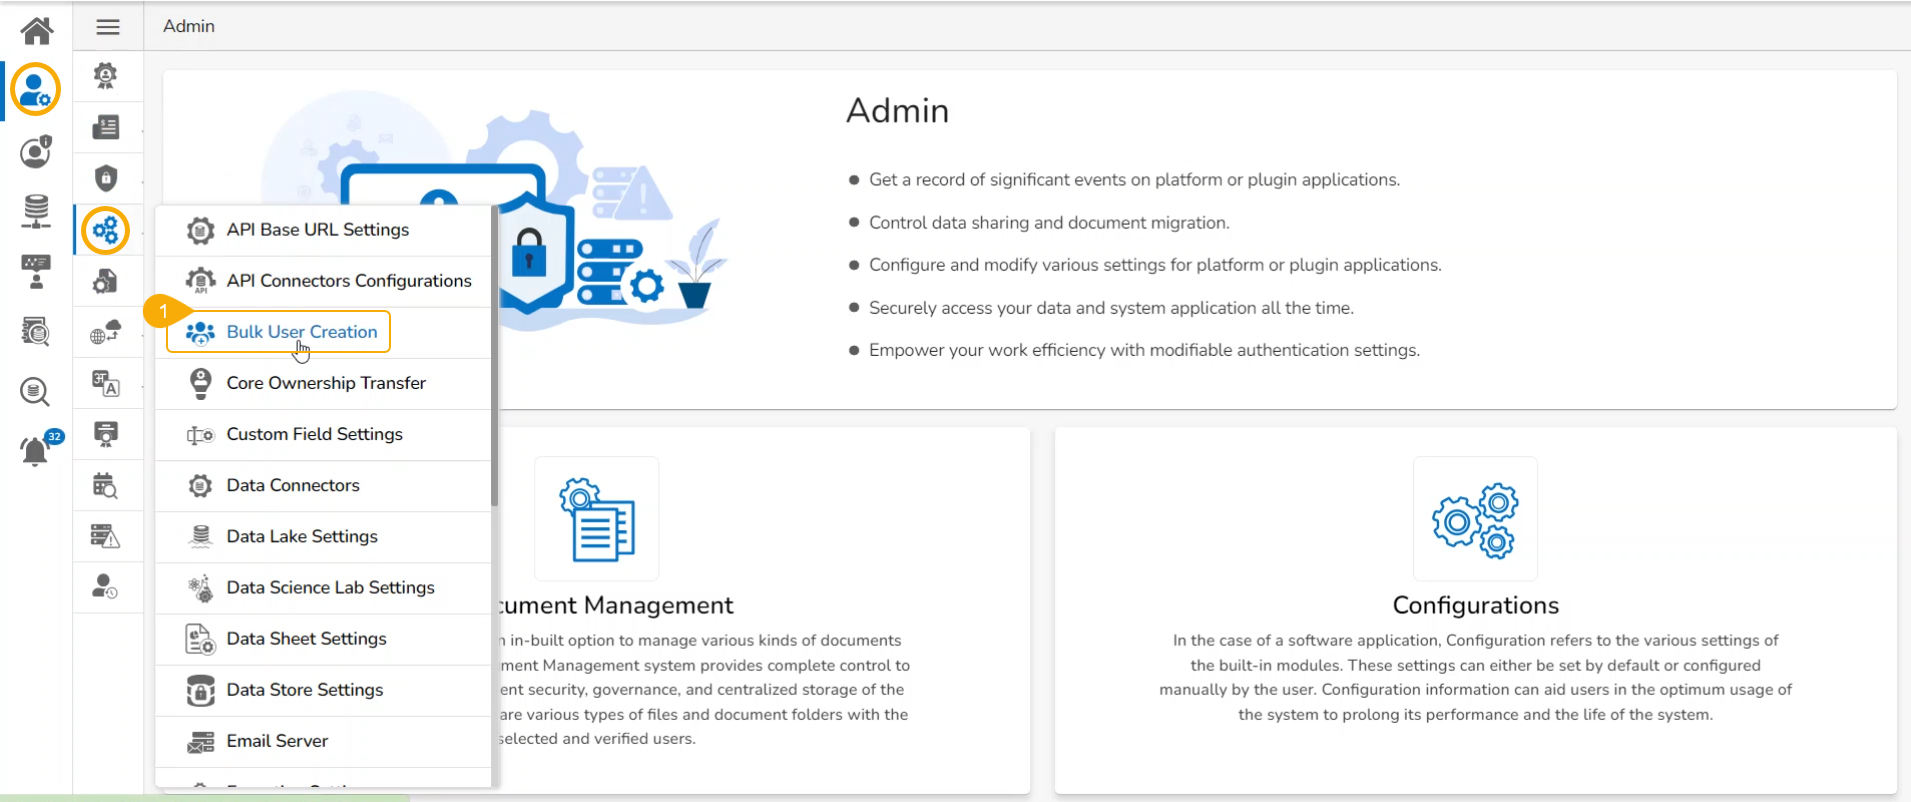
The current option provided under the Configuration and Settings tab helps the administrator to create multiple users using a standard template.
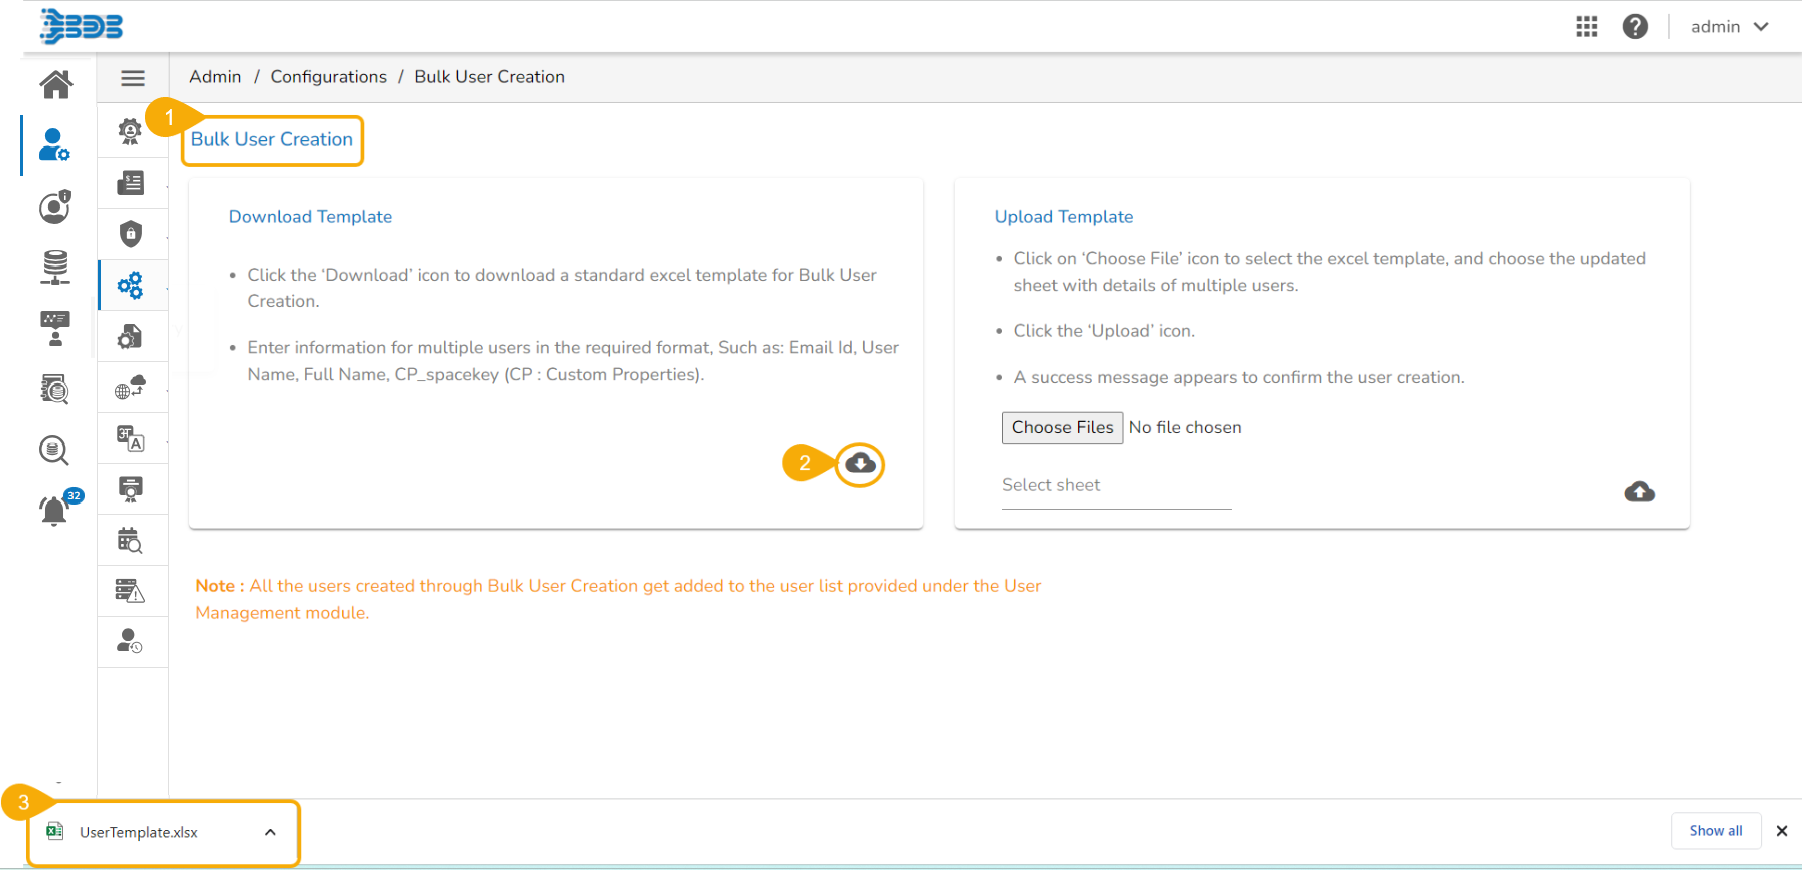
Click the Bulk Users Creation option from the Configurations.
The Bulk User Creation page opens.
Please Note: The Bulk User Creation is completed in two steps. Refer to the following content to understand the process of Bulk User Creation.
Navigate to the Bulk User Creation page.
Click the Download icon.
A model template for the bulk user creation gets downloaded.
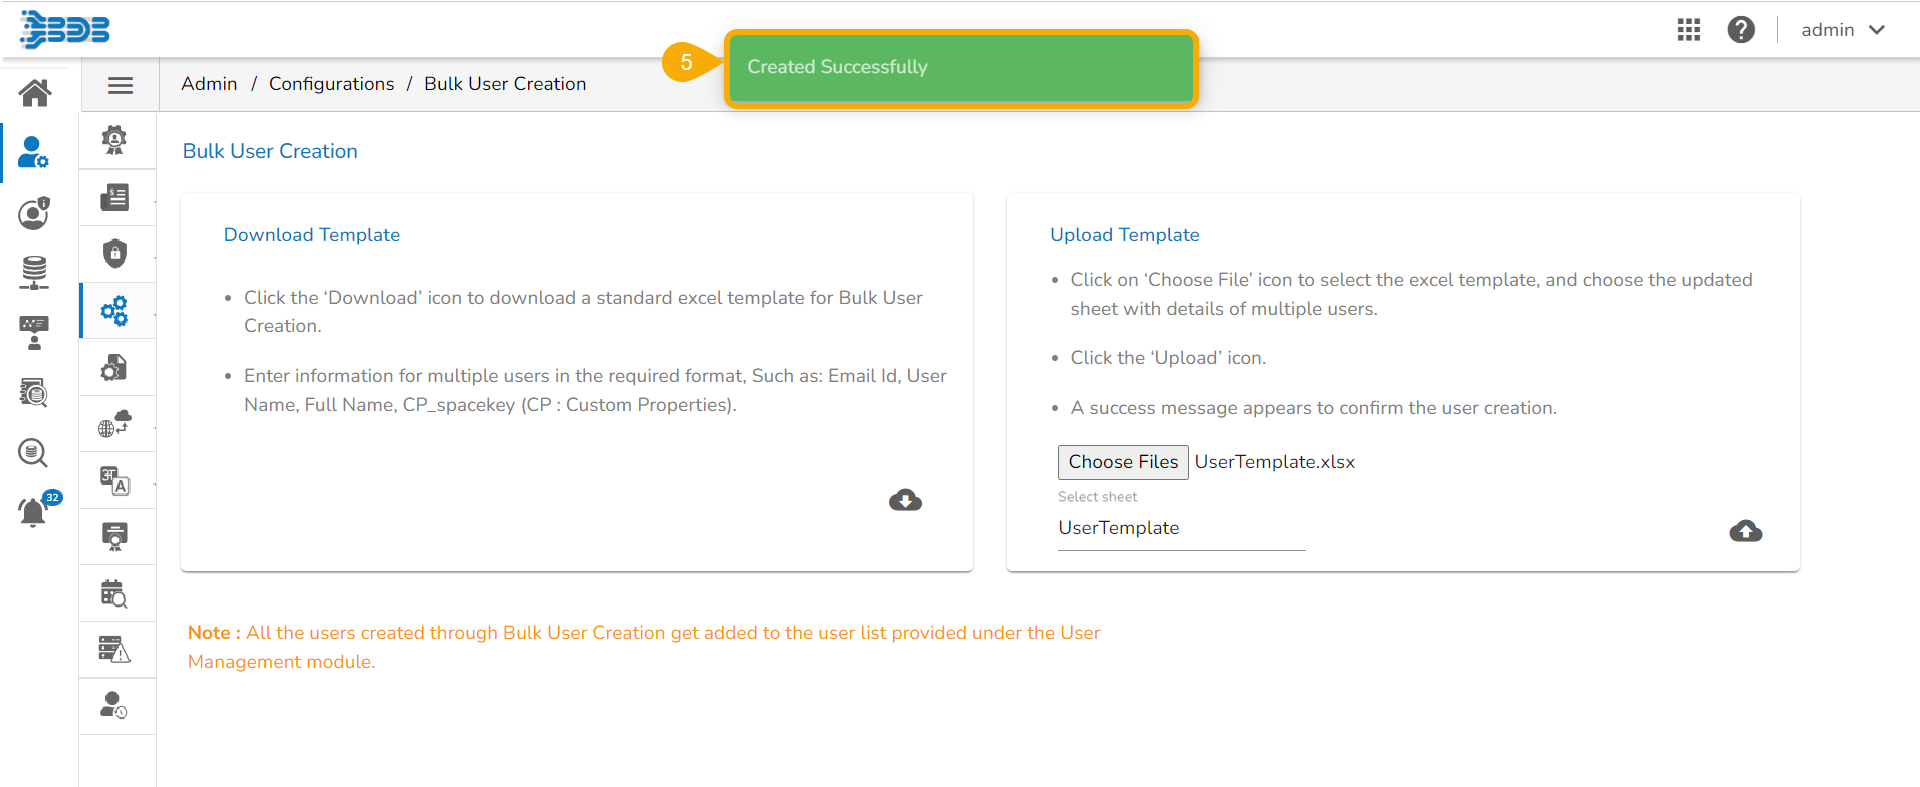
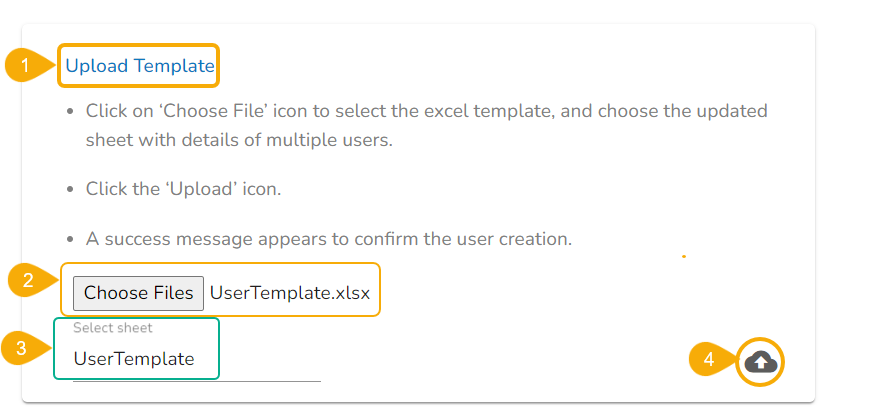
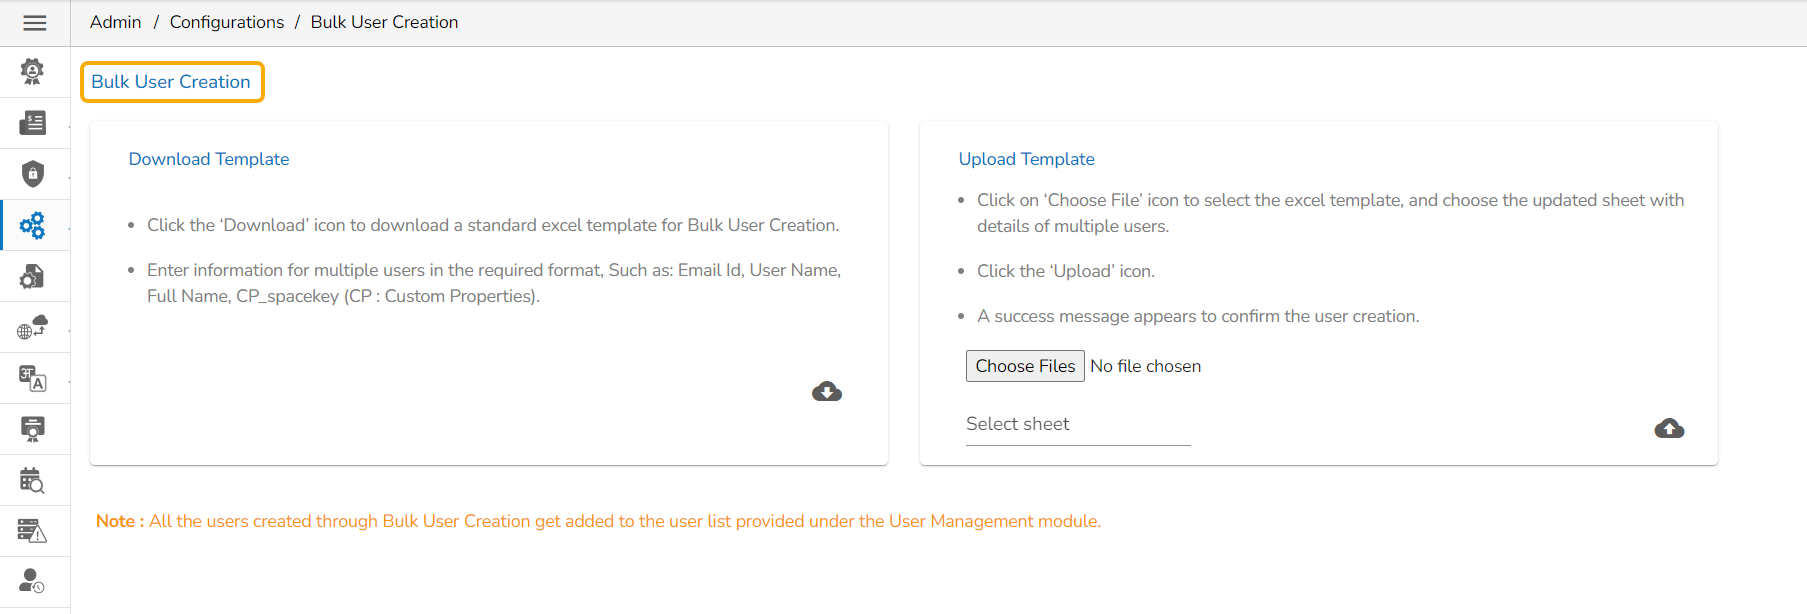
Navigate to the Upload Template option of the Bulk User Creation page.
Use the Choose File option to select the file with multiple usernames.
Select the sheet.
A success message appears to confirm that a new user has been created.
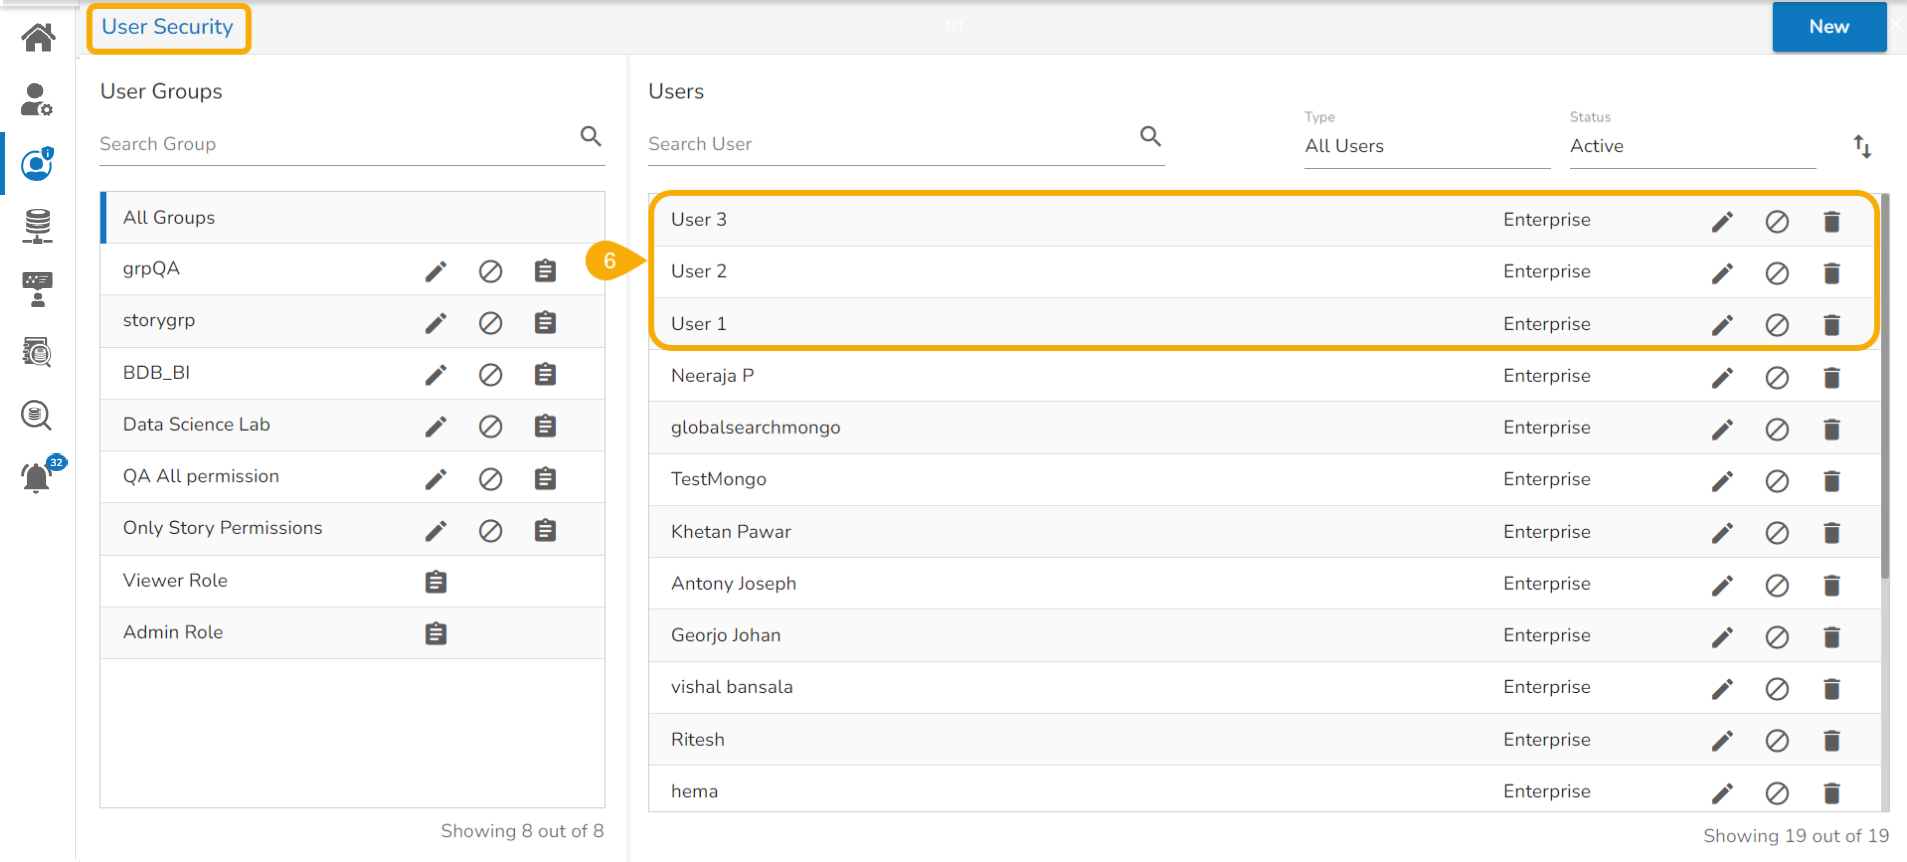
The newly created users get added to the user list provided inside the User Security module.
Please Note:
The users created through the Bulk User Creation functionality get added to the user group by default since no group is allotted to them at the time of creation.
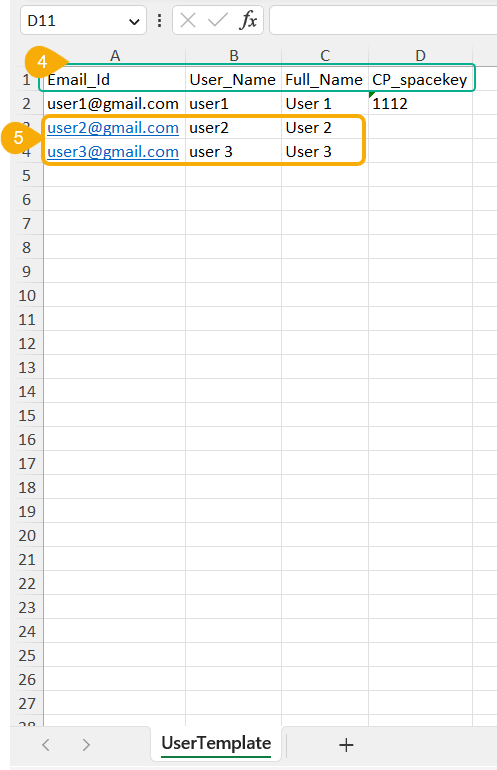
The admin can insert multiple users in the downloaded user template.
Use the following format (as shown in the image) to enter the user details.
Click the Upload option.
The admin can created via the Bulk User Creation option.
The administrator can allow different user groups to the users created via the Bulk User Creation functionality.
The CP_spacekey column provided in the user template refers to values that the administrator can insert It is optional information. The administrator can insert the user group-related custom properties value to restrict data display for the newly created users.

The users can import an exported API Service by using this feature.
Navigate to the Admin Module.
Click the GIT Migration icon from the side navigation bar.
Click the Import File option that appears.
Click the Import option that appears on the next page.
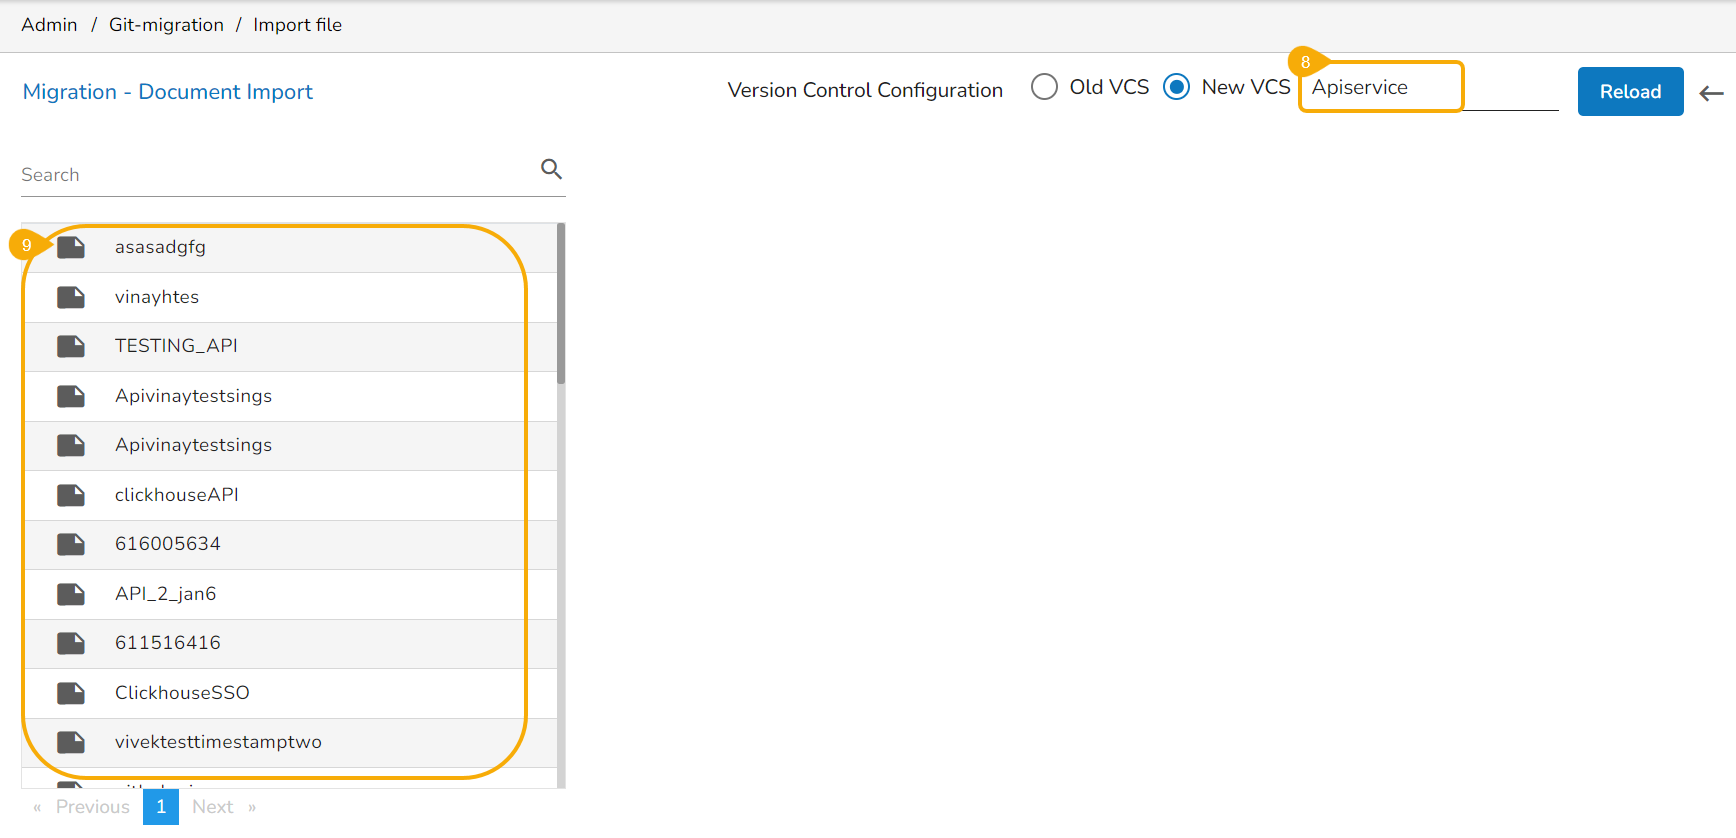
The Migration-Document Import screen appears.
Select the New VCS for the Version Control Configuration.
The Select a Module drop-down menu bar appears at the top-right side of the screen.
Select the API Service module using the Select a Module drop-down menu.
A list of the available Published API Services appears on the left side of the page.
Please Note: Only the Published and exported API Services will be visible in the list.
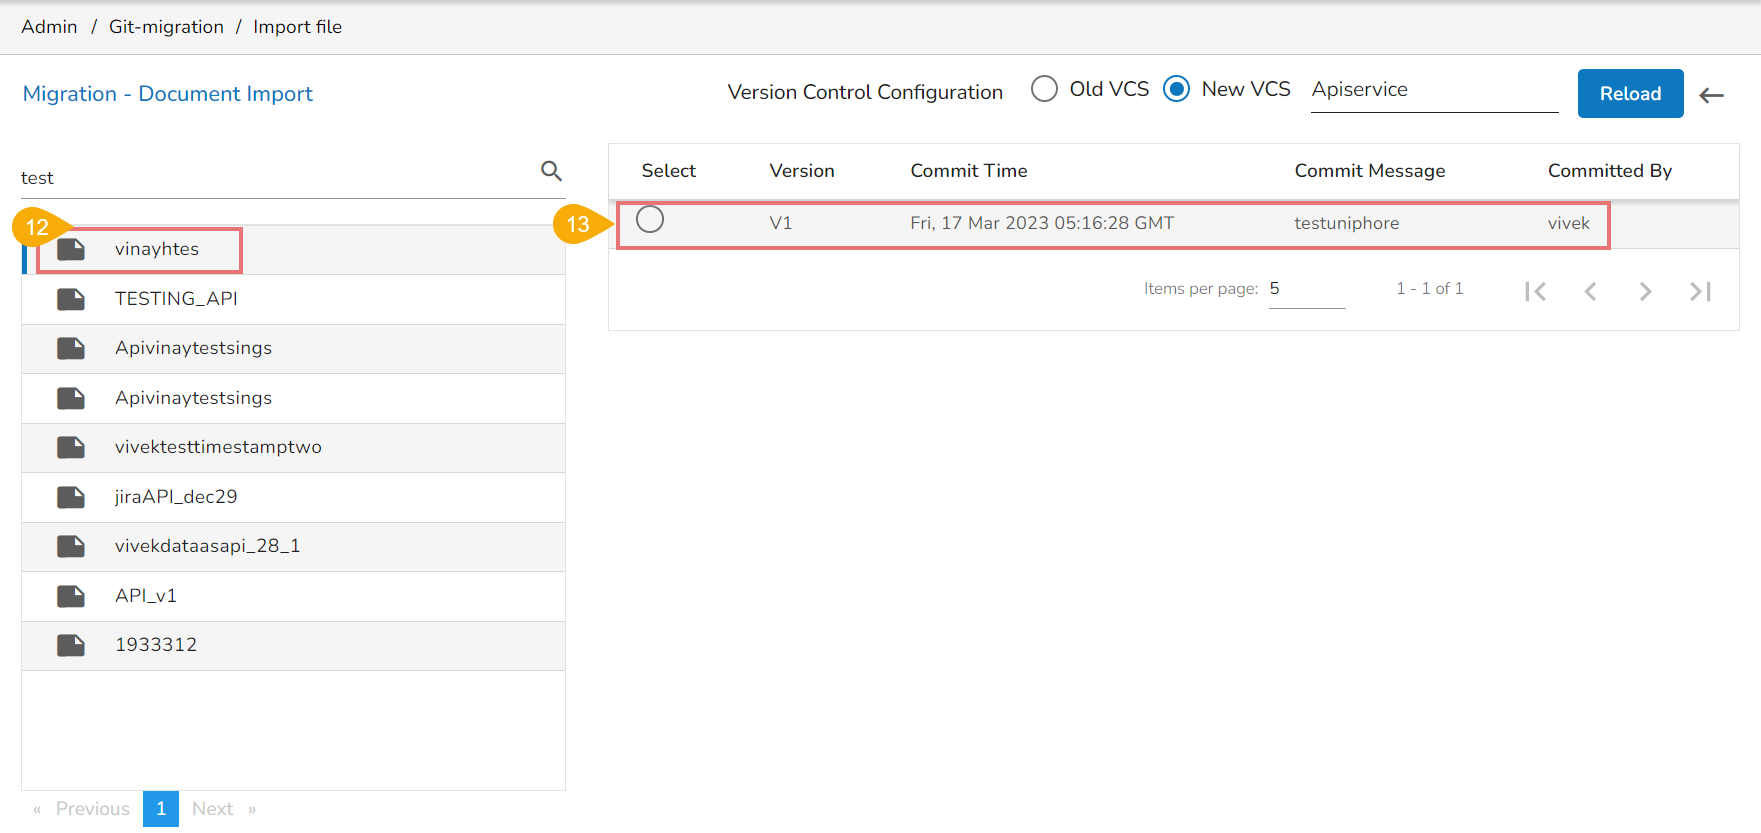
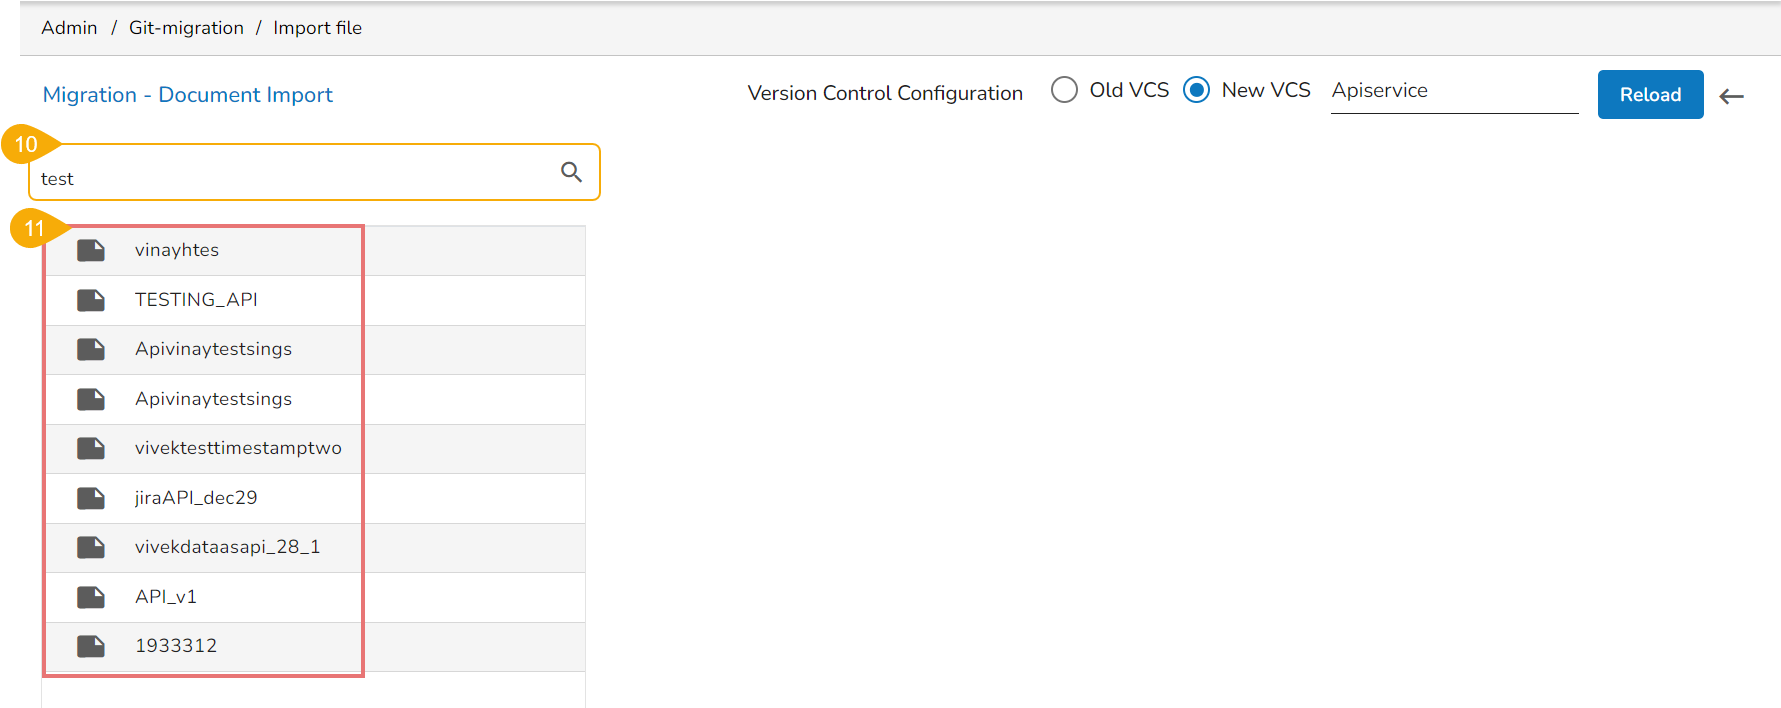
Use the search bar to search for an API Service. (Ex. export)
The customized list appears based on the searched term.
Select an API service and click to open the details.
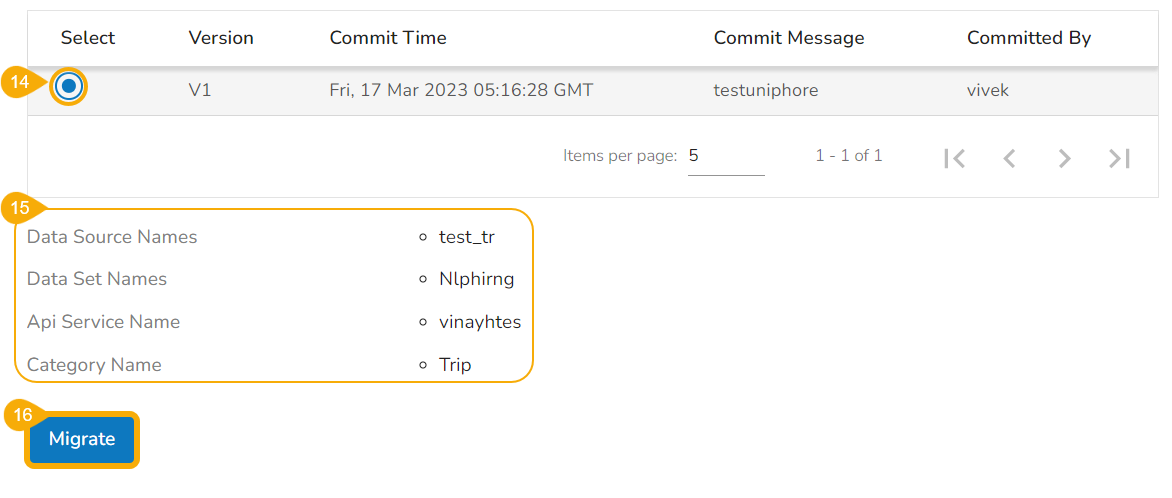
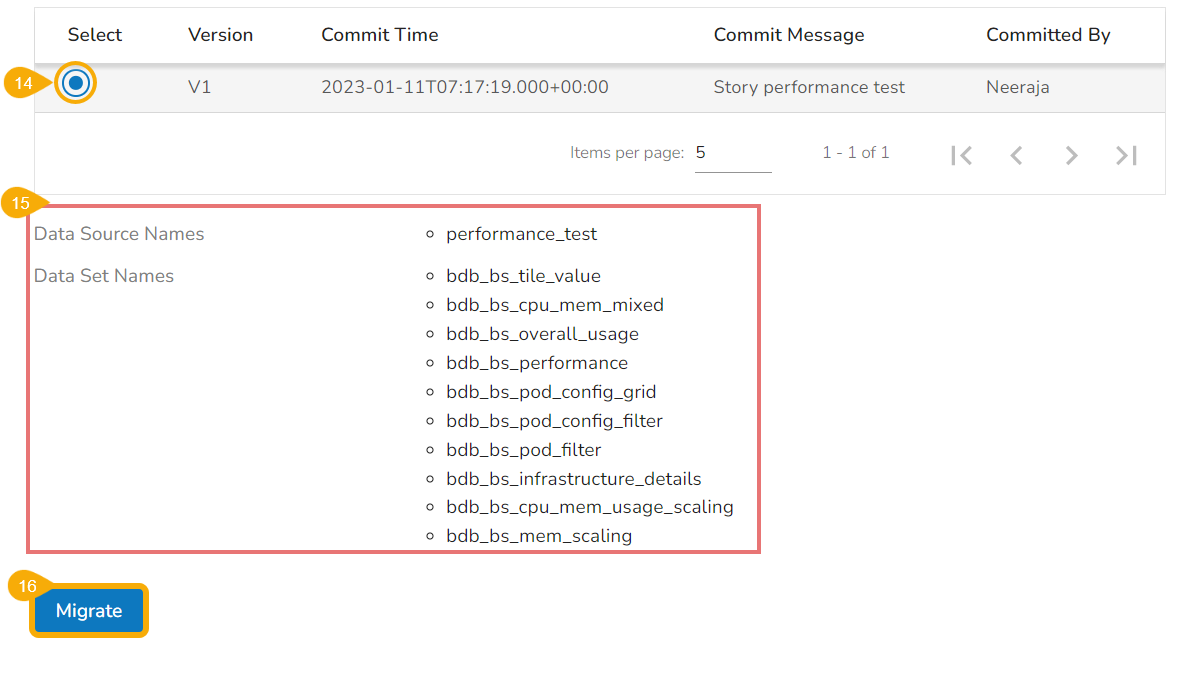
The various versions (if available in the GIT) of the selected API Service appear.
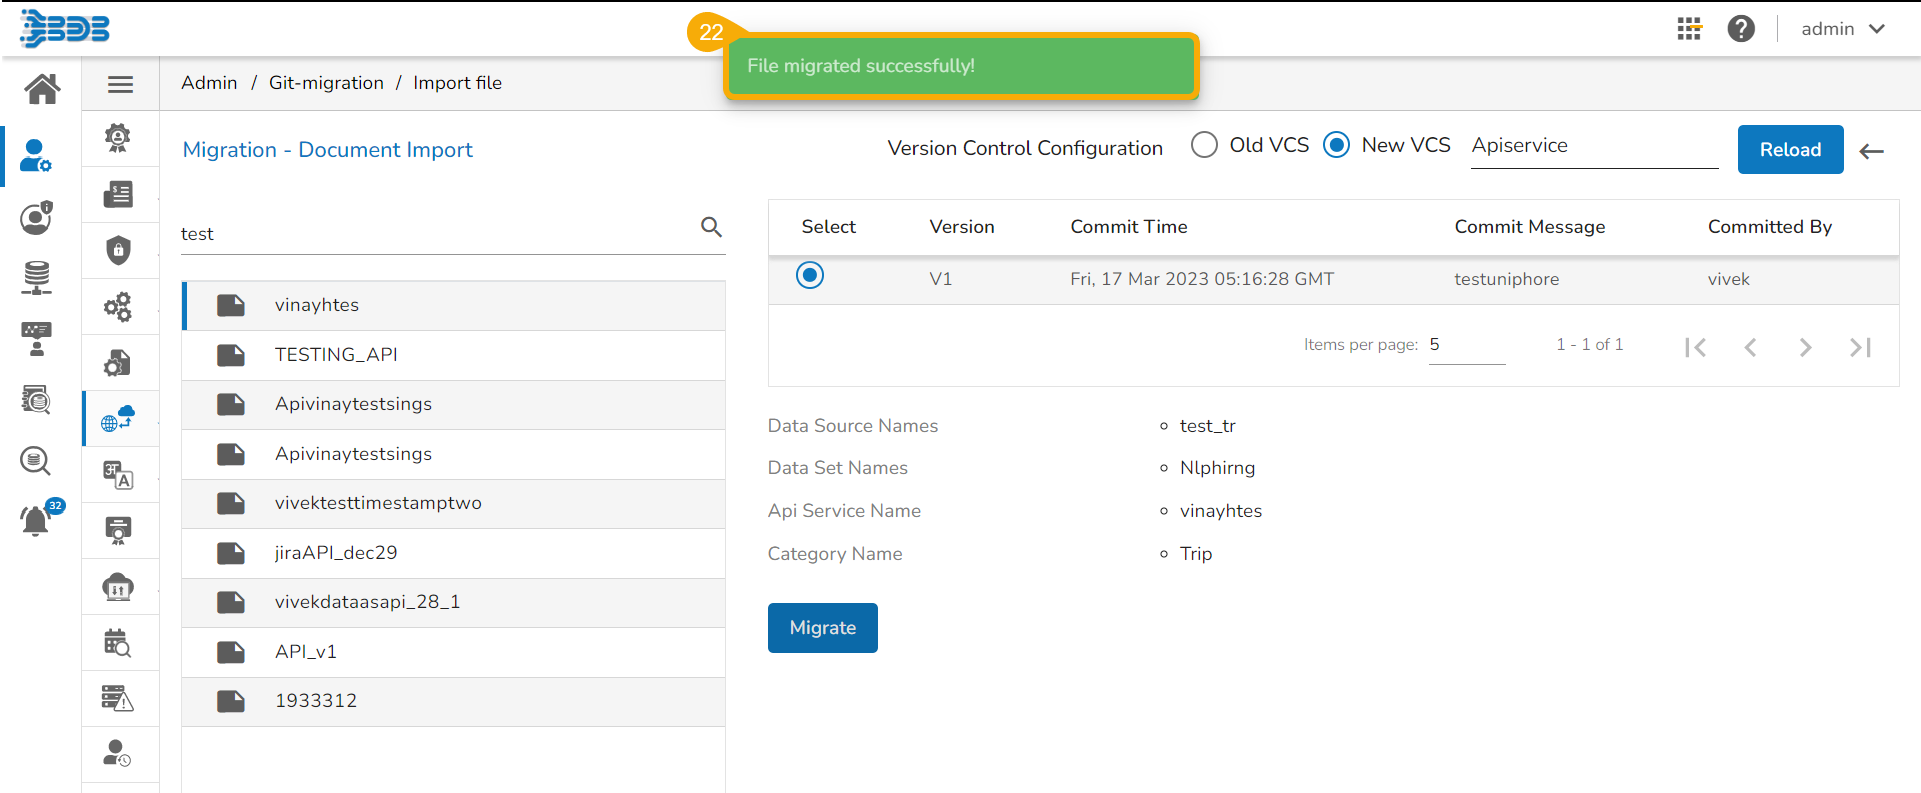
Select a version using the checkbox.
The following information gets displayed:
Data Source Names
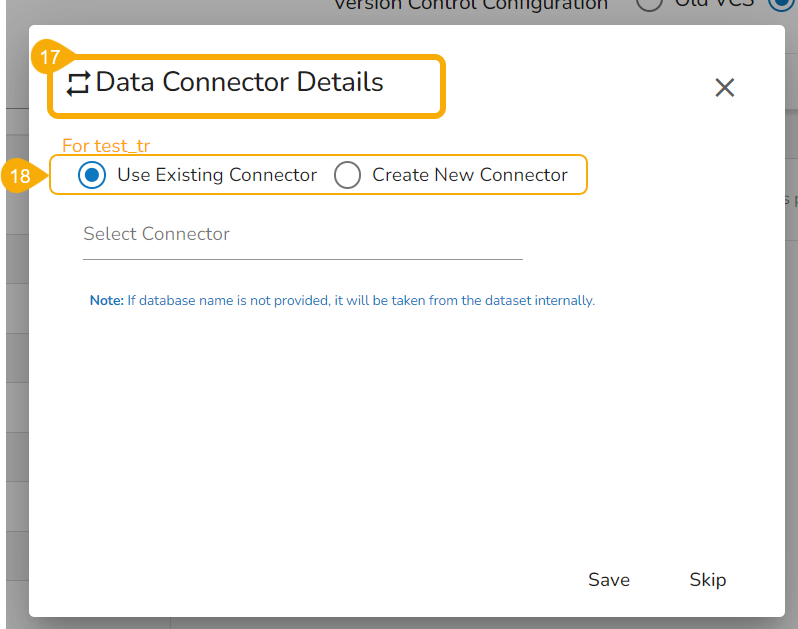
The Data Connector Details dialog box appears to configure a data connector.
The user gets two choices:
Choose the Use an Existing Connector option -> Select a data connector from the drop-down menu -> Click the Save option.
Configure/Create a New Data Connector-> Click the Save option to save the new connector details.
Please Note: The user can choose Skip while importing a version of the concerned API Service. It is mandatory to fill in the details while migrating the API Service for the first time.
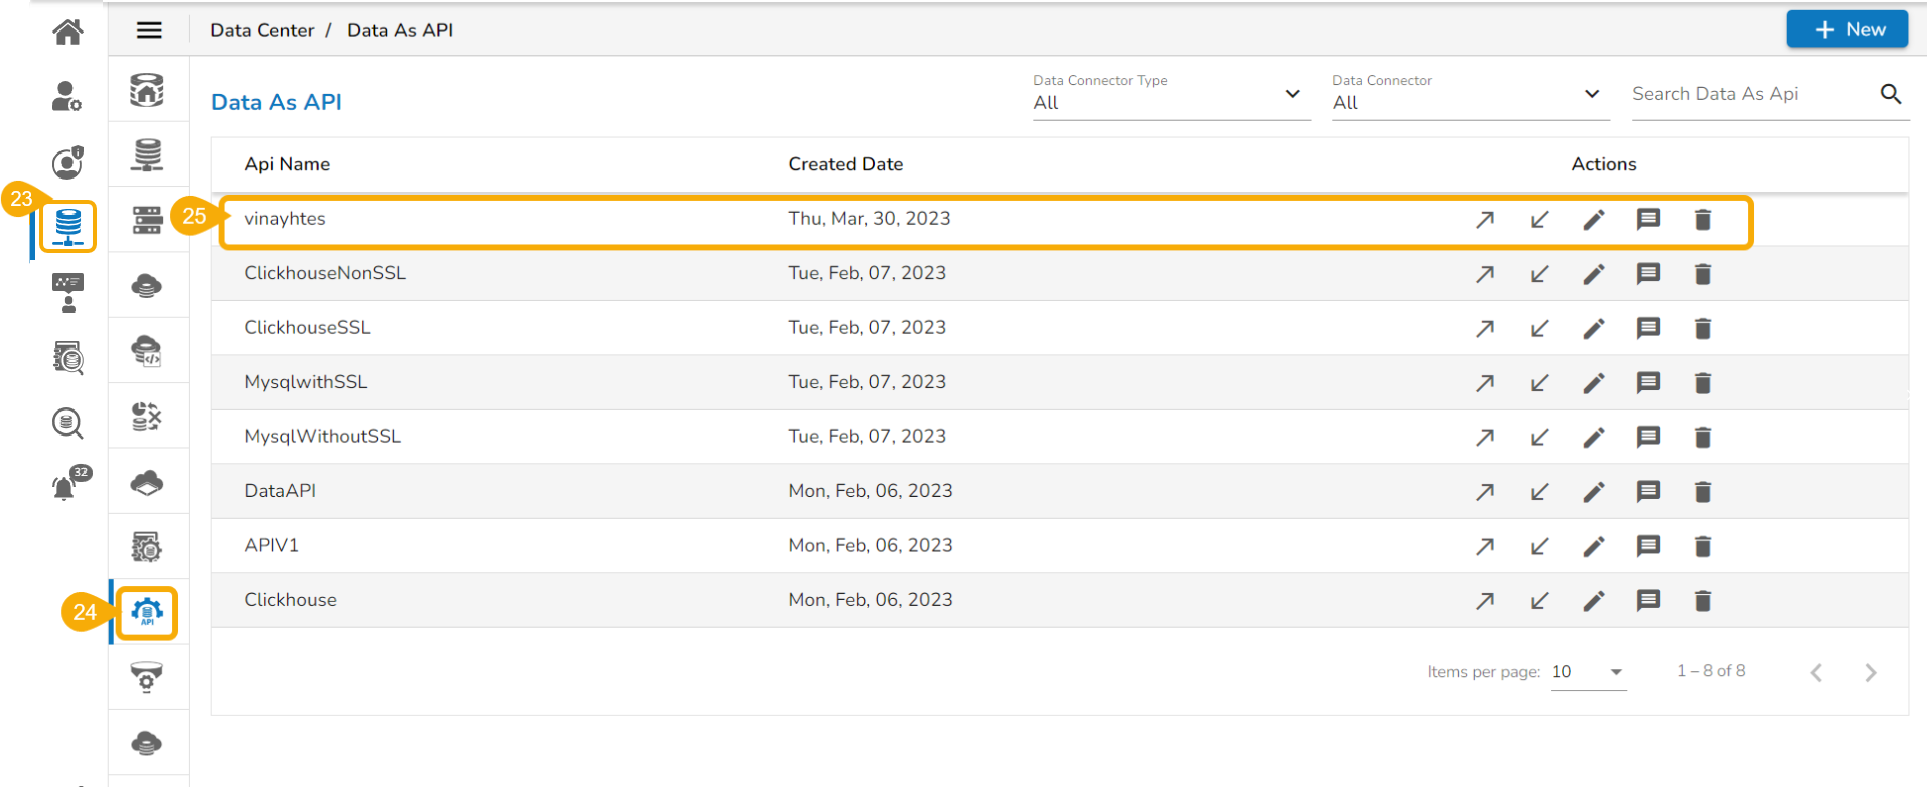
A notification message appears, and the selected API Service gets migrated to the Data Center module.
Navigate to the Data Center module.
Open the Data As API
Please Note:
The user can migrate the API service between two users, two spaces, or two servers. The Version control configuration settings should be the same for both users, spaces, and servers where the user attempts to migrate.
Data Set Names
API Service Name
Category Name
Click the Migrate option.
The imported API service gets added to the displayed list.