Explore the page where all the Data Science activities take place. The listed topics will be supported only for .ipynb files.
Loading...
Loading...
Loading...
Loading...
Loading...
Loading...
Loading...
Loading...
Loading...
Loading...
Loading...
This page displays the steps to Export a DSL script and register it as Job.
Loading...
Loading...
Loading...
Loading...
Loading...
Loading...
A Data Science Notebook (.ipynb files) page can be opened, and code & markdown cells can be previewed without activating the respective project.
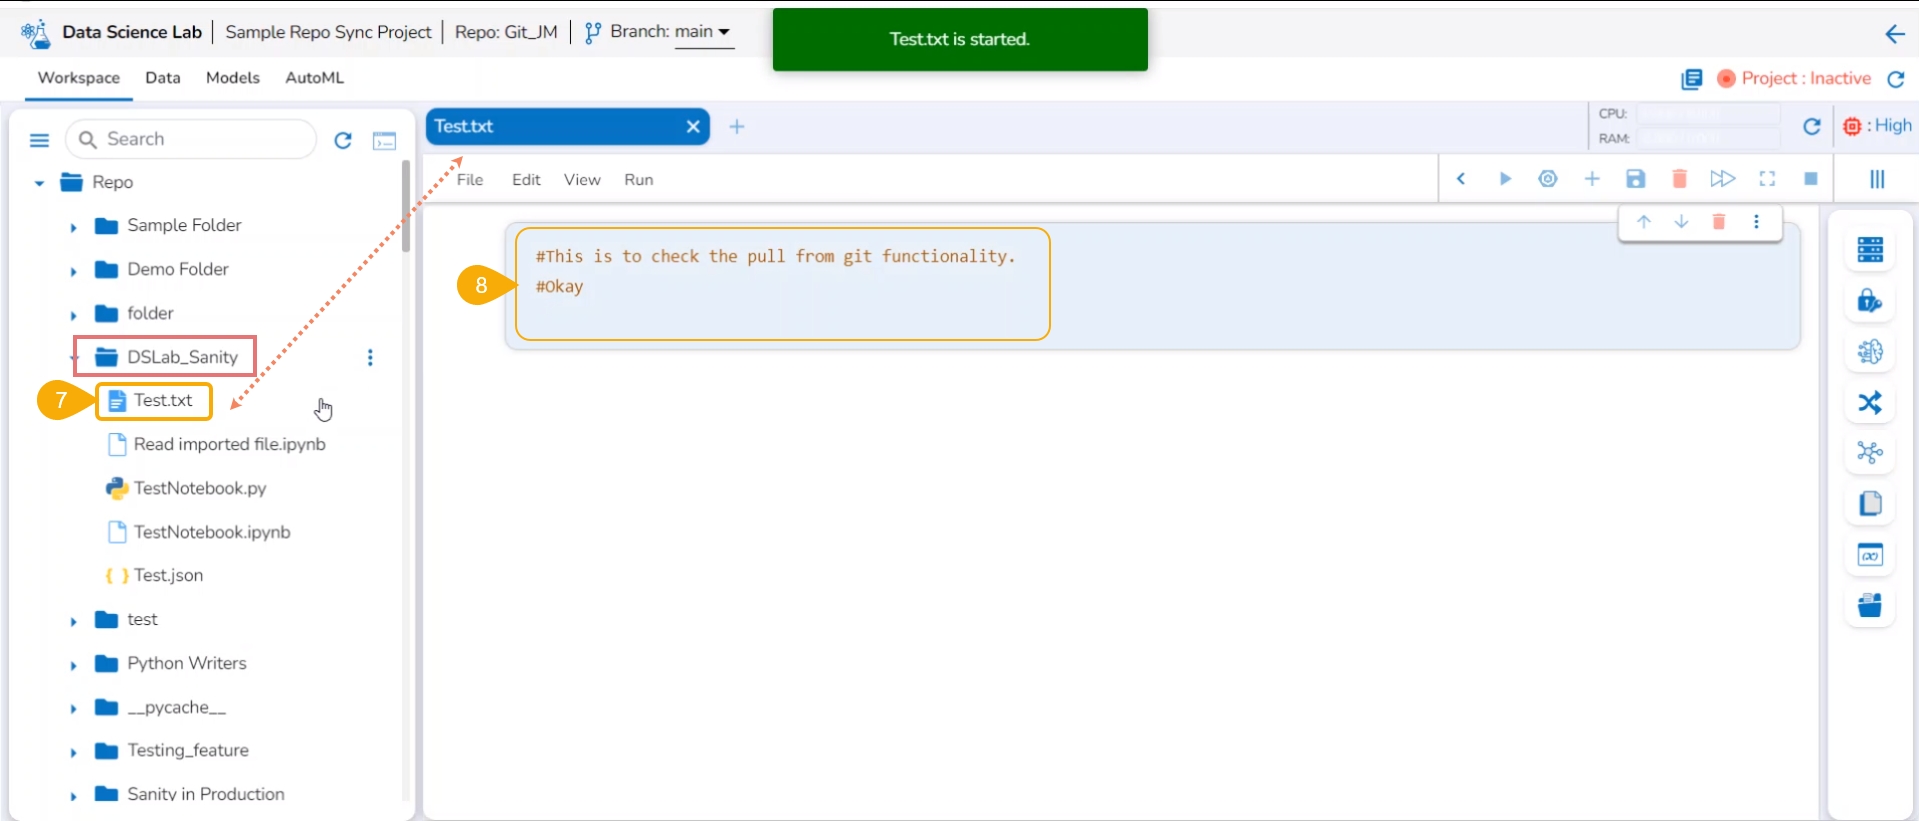
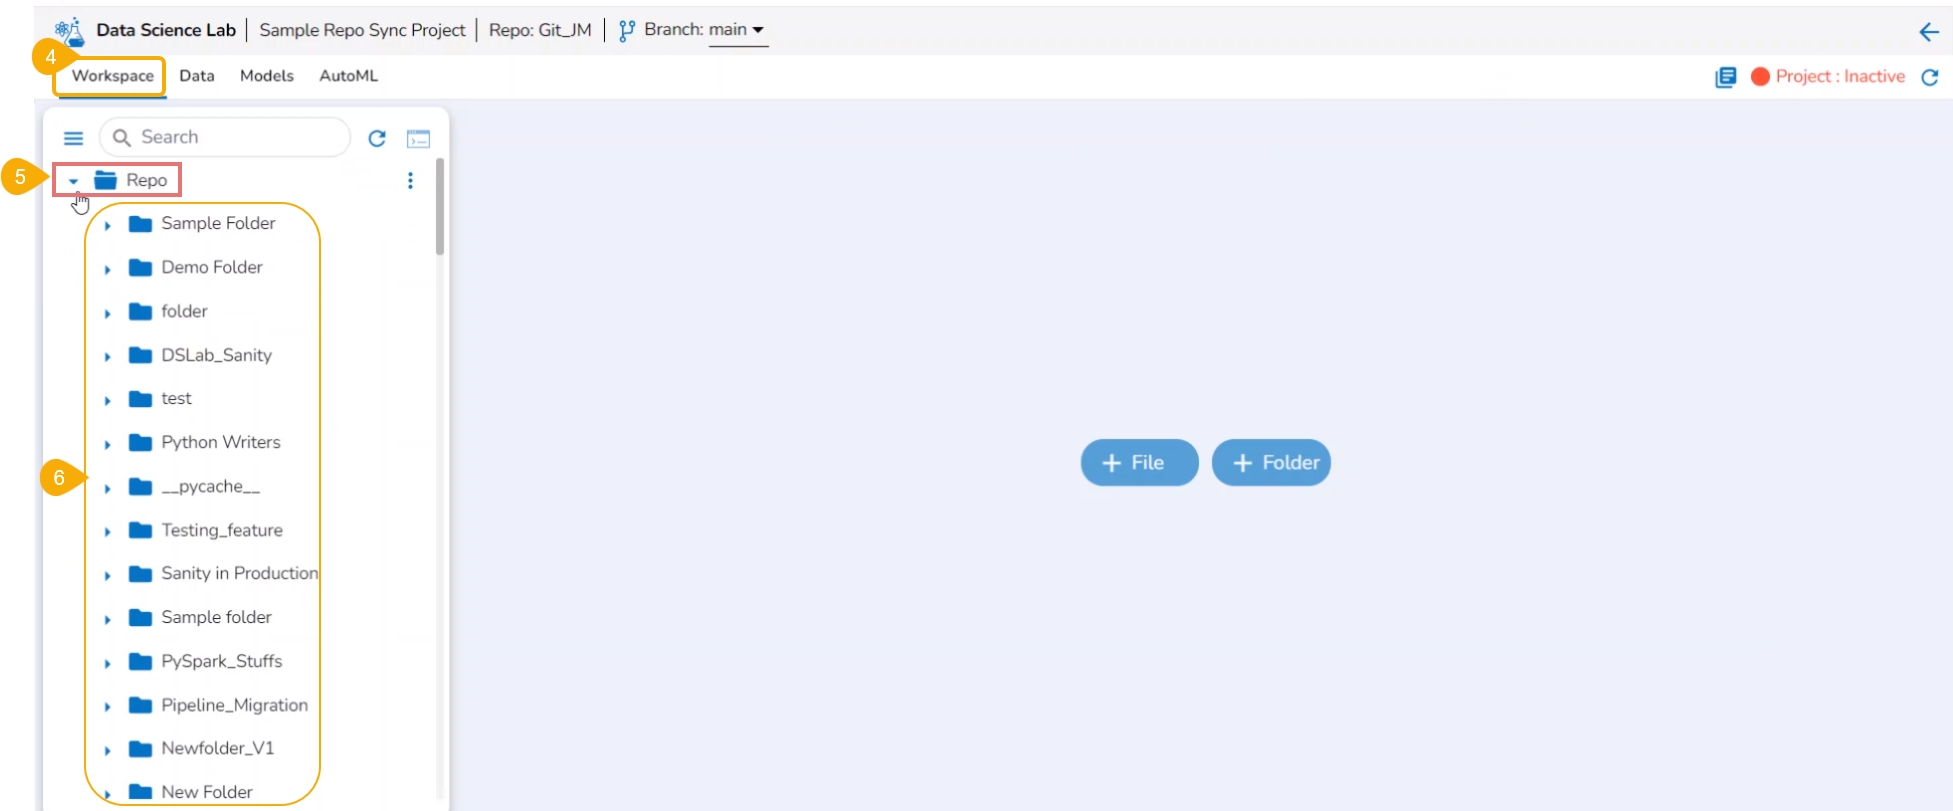
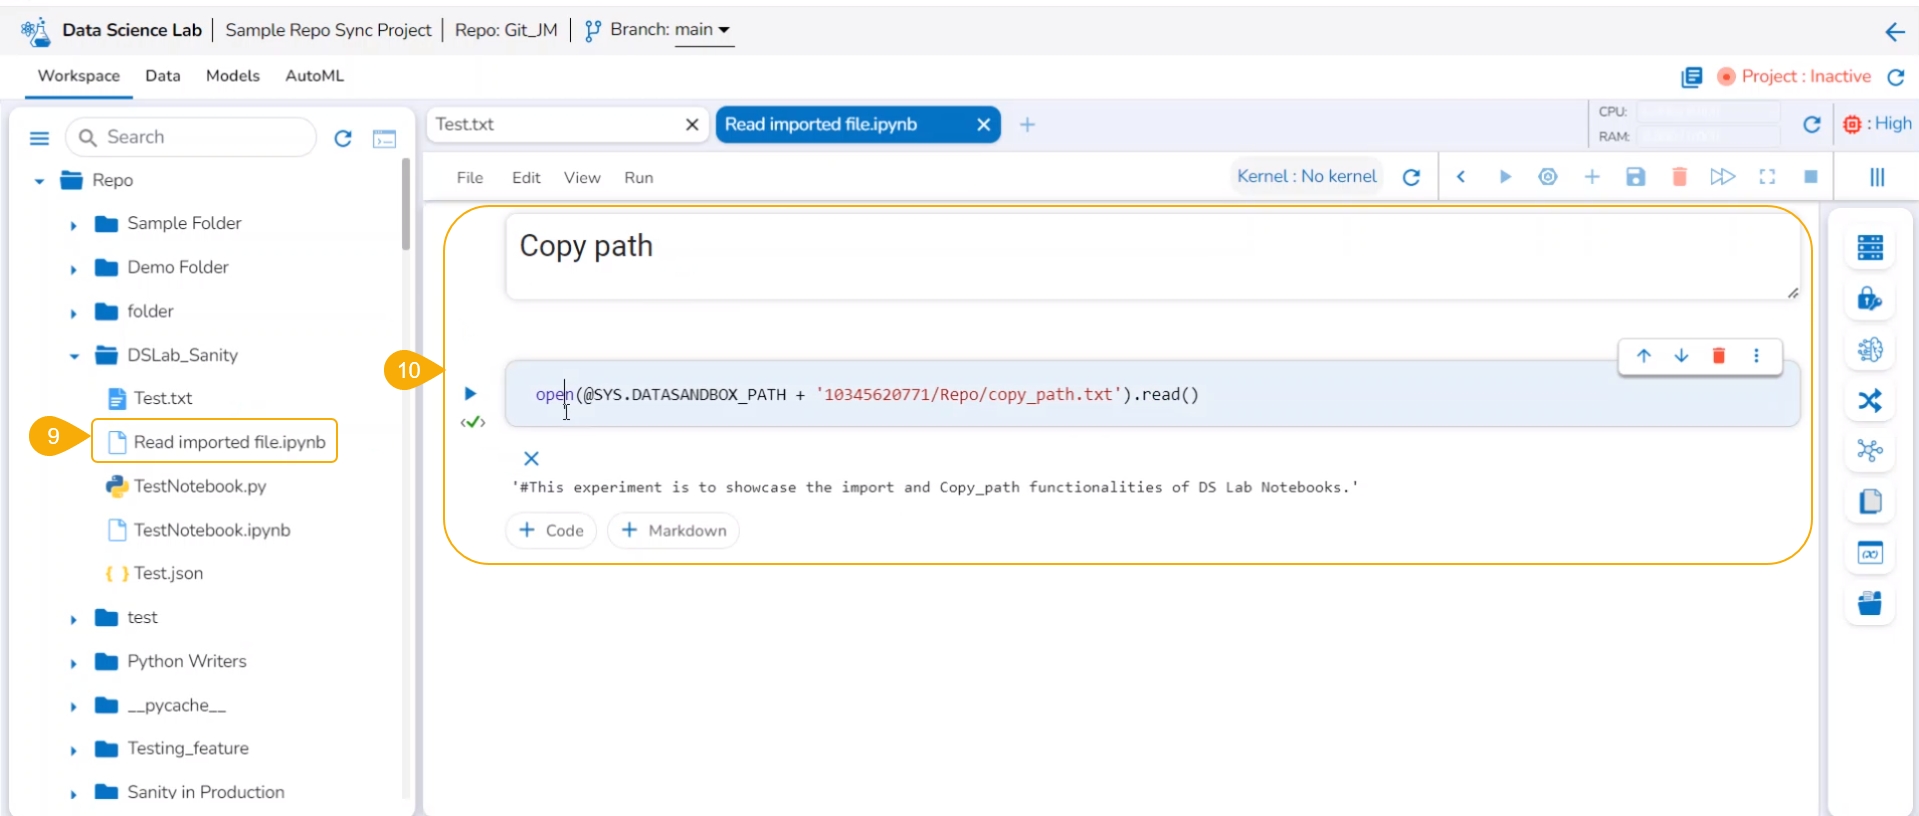
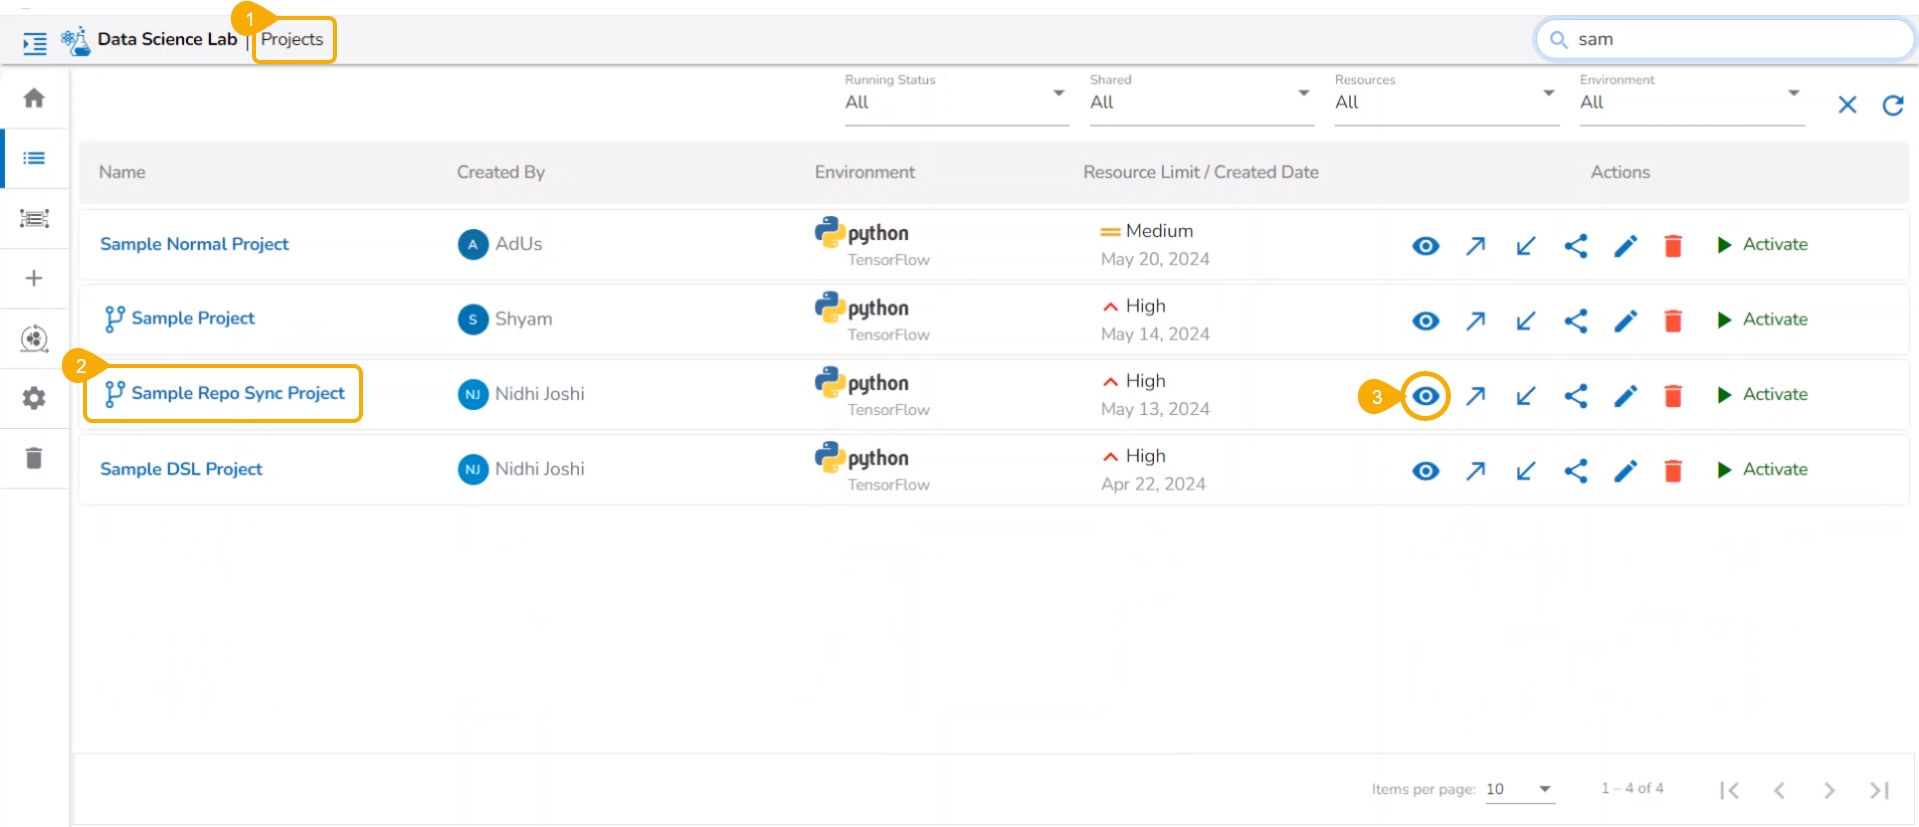
Check out the illustration to understand the preview file content inside a project.
Please Note: A Repo Sync project contains all the files under the Repo folder. A Normal project contains only Data Science Notebook(.ipynb) files under the Repo folder.
The user can preview the content saved under any file without activating the Project where it is saved.
Navigate to the Project List page.
Select a deactivated Repo Sync Project from the list.
Click on the View option to open the Project.
The Workspace tab opens under the selected Repo Sync Project.
Click on the Repo folder that is displayed under the Notebook tab.
A list of available folders and files appears under the Repo.
Click on a file.
The file content gets displayed.
Open a .ipynb file.
The content of the file is displayed.
Click the Add code or markdown cell.
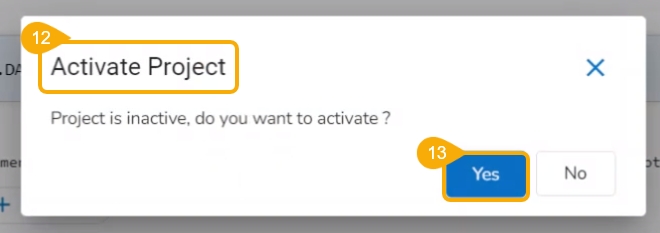
The Activate Project window opens prompting the user to activate the selected Project.
Click the Yes option from the confirmation window to activate the project. The user can choose the No option if there is no need for the project activation.
Please Note: Only Data Science Notebooks (.ipynb files) have Code, Markdown, and BDB Assist cells. The Data Science Noteboks content can be edited/ modified after activating the concerned project. The content of the other files remains in the preview category only for the activated projects as well.
The credited options provided to a Notebook are explained under this section.
This section explains Save as Notebook functionality for the .ipynb files.
A dialog box opens each time to save the recent changes from the user while closing the selected opened .ipynb file at any given time. The user can click the Yes option to save the Notebook.
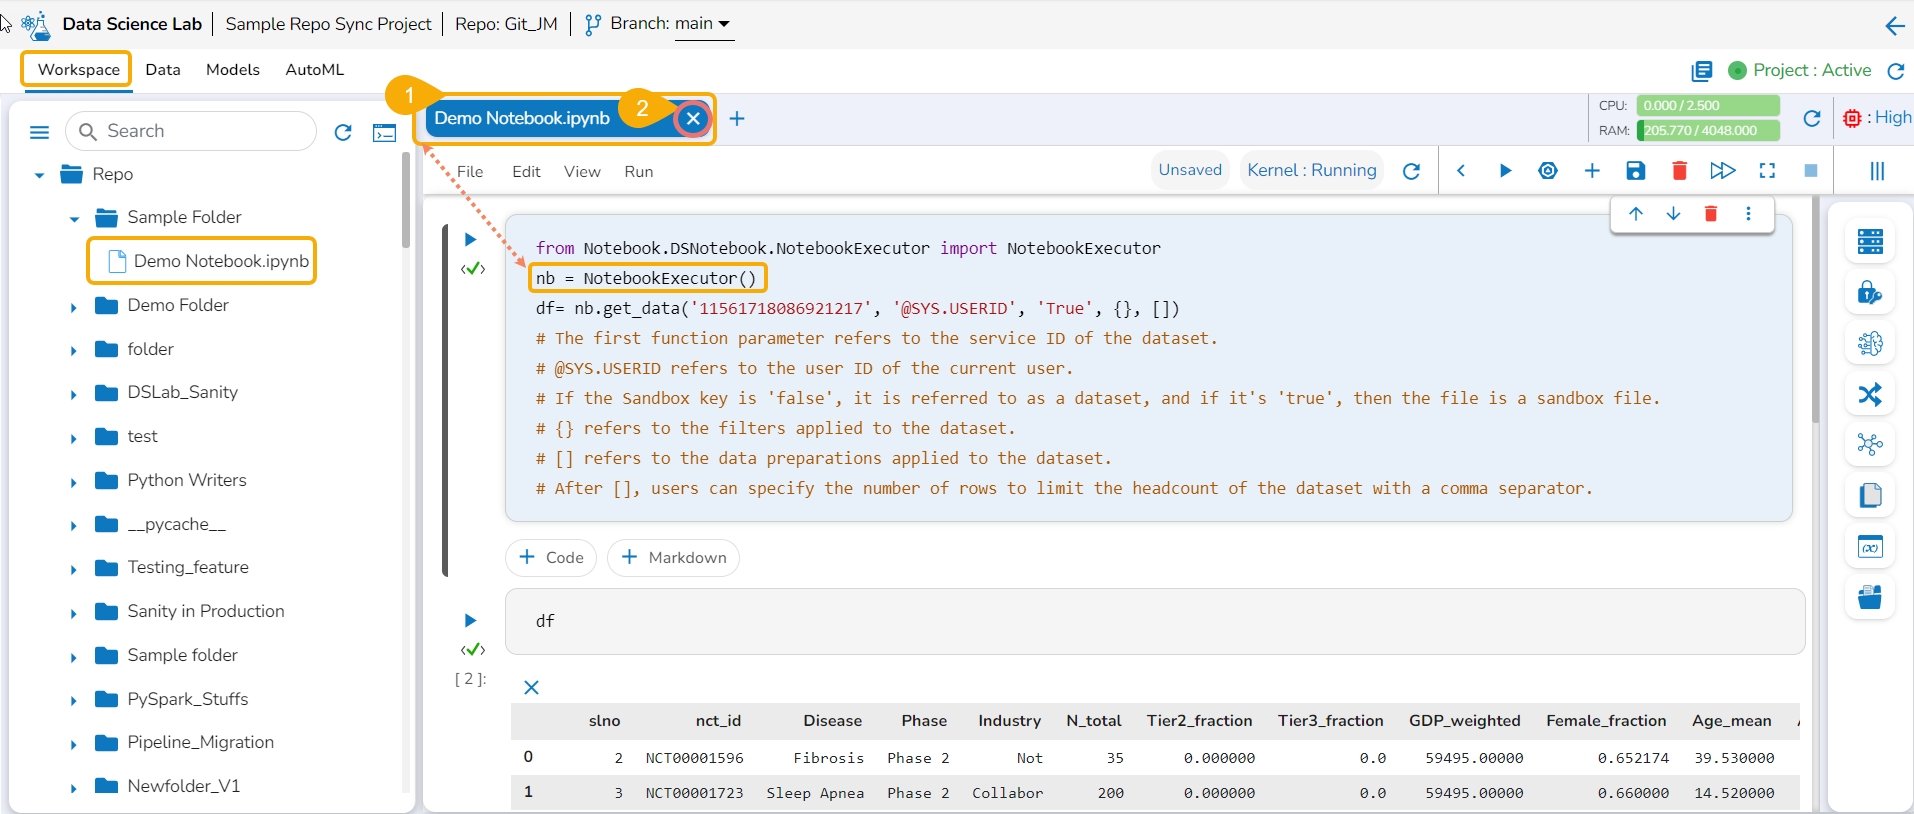
Navigate to an opened Data Science Notebook (.ipynb file) and modify the notebook content.
Click the Close icon provided to close the Notebook infrastructure.
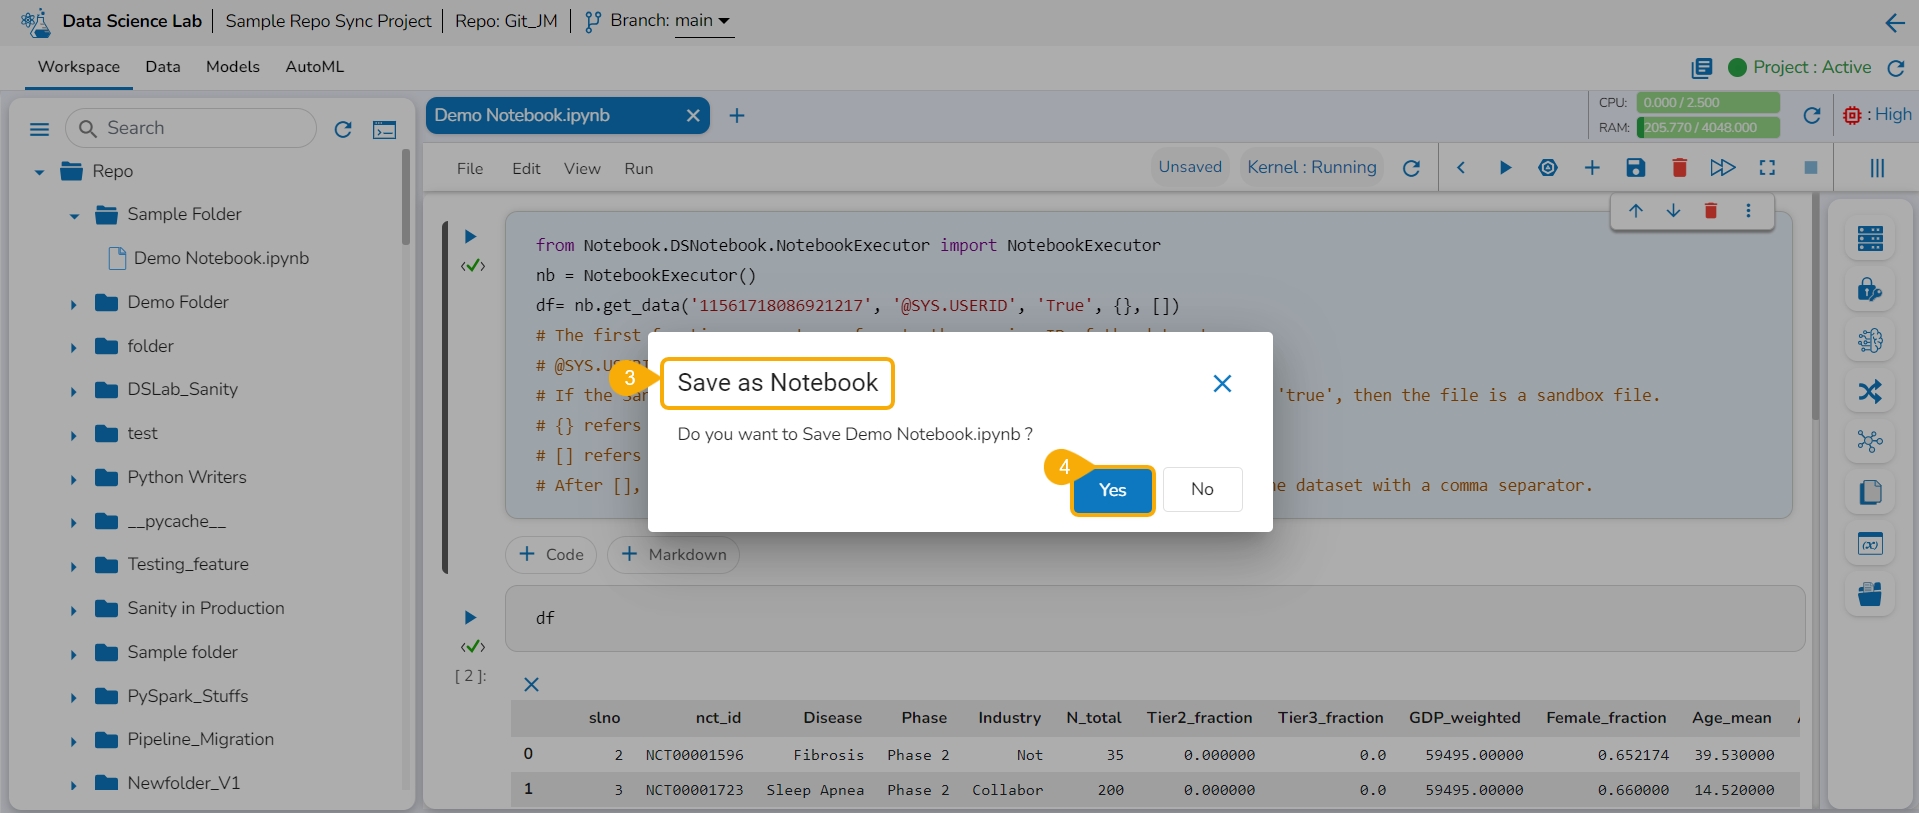
The Save as Notebook dialog box opens.
Click the Yes option.
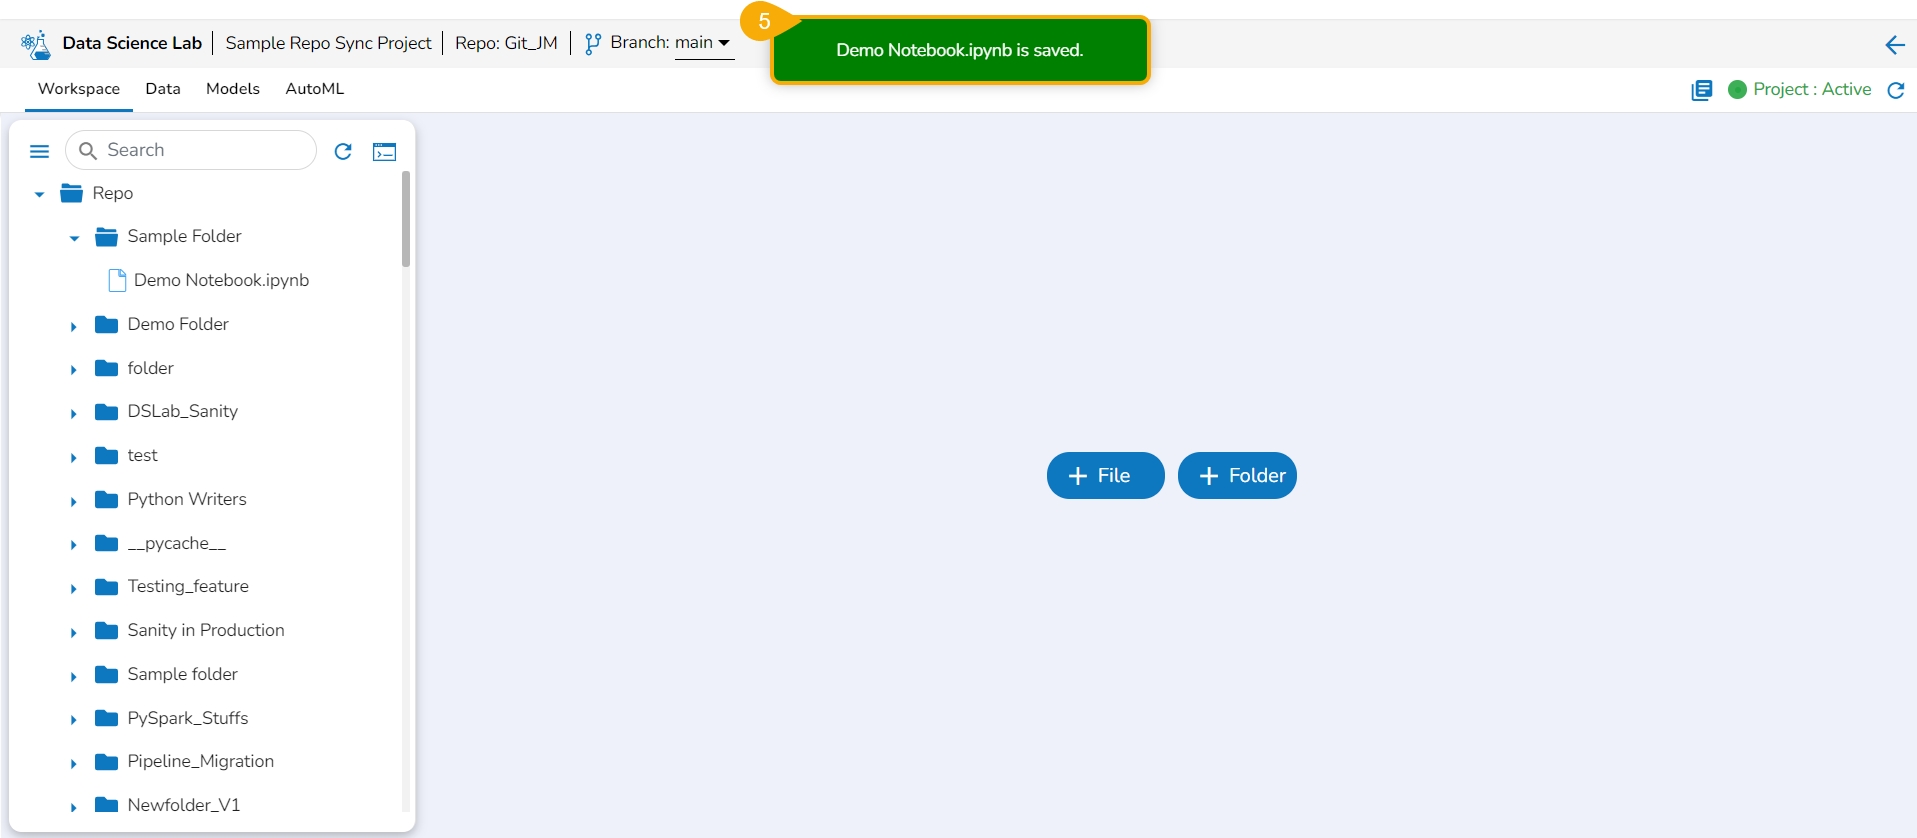
The current Notebook gets closed and a notification message appears to assure the user that all the recent changes are saved in it.
The user can expand and collapse the multiple Markdown cells based on their levels in a DS Notebook. The user can create a hierarchy of three levels using the Heading option in a Markdown cell.
Please Note:
The related code cells under one Markdown will fall into the same level as the Markdown.
The maximum three levels of hierarchy can be inserted for a Markdown cell using the Heading option.
Check out the following illustration on how to set the expand and collapse functionality in Markdown cells.
Navigate to a Notebook.
Access a Markdown cell.
To create a hierarchy within a Markdown cell, use the Heading button.
Click once for the first level, twice for the second, and thrice for the third.
Unassigned Markdown cells default to the nearest existing hierarchy.
Remember to click Save to preserve changes.
The Markdown cell will get a collapse/expand icon added to it.
Check out the illustration to see the Markdown expand and collapse feature at work.
Write & Run Code to create Data Science Scripts and models using the .ipynb file.
A user can write and execute code using the Data Science Notebook interface. This section covers the steps to write and run a sample code in the Code cell of the Data Science Notebook.
Check out the given walk-through on how to use a Code Cell under a .ipynb file.
Please Note: The above-given video displays inserting a new code cell using the Add Pre-cell icon for a code cell.
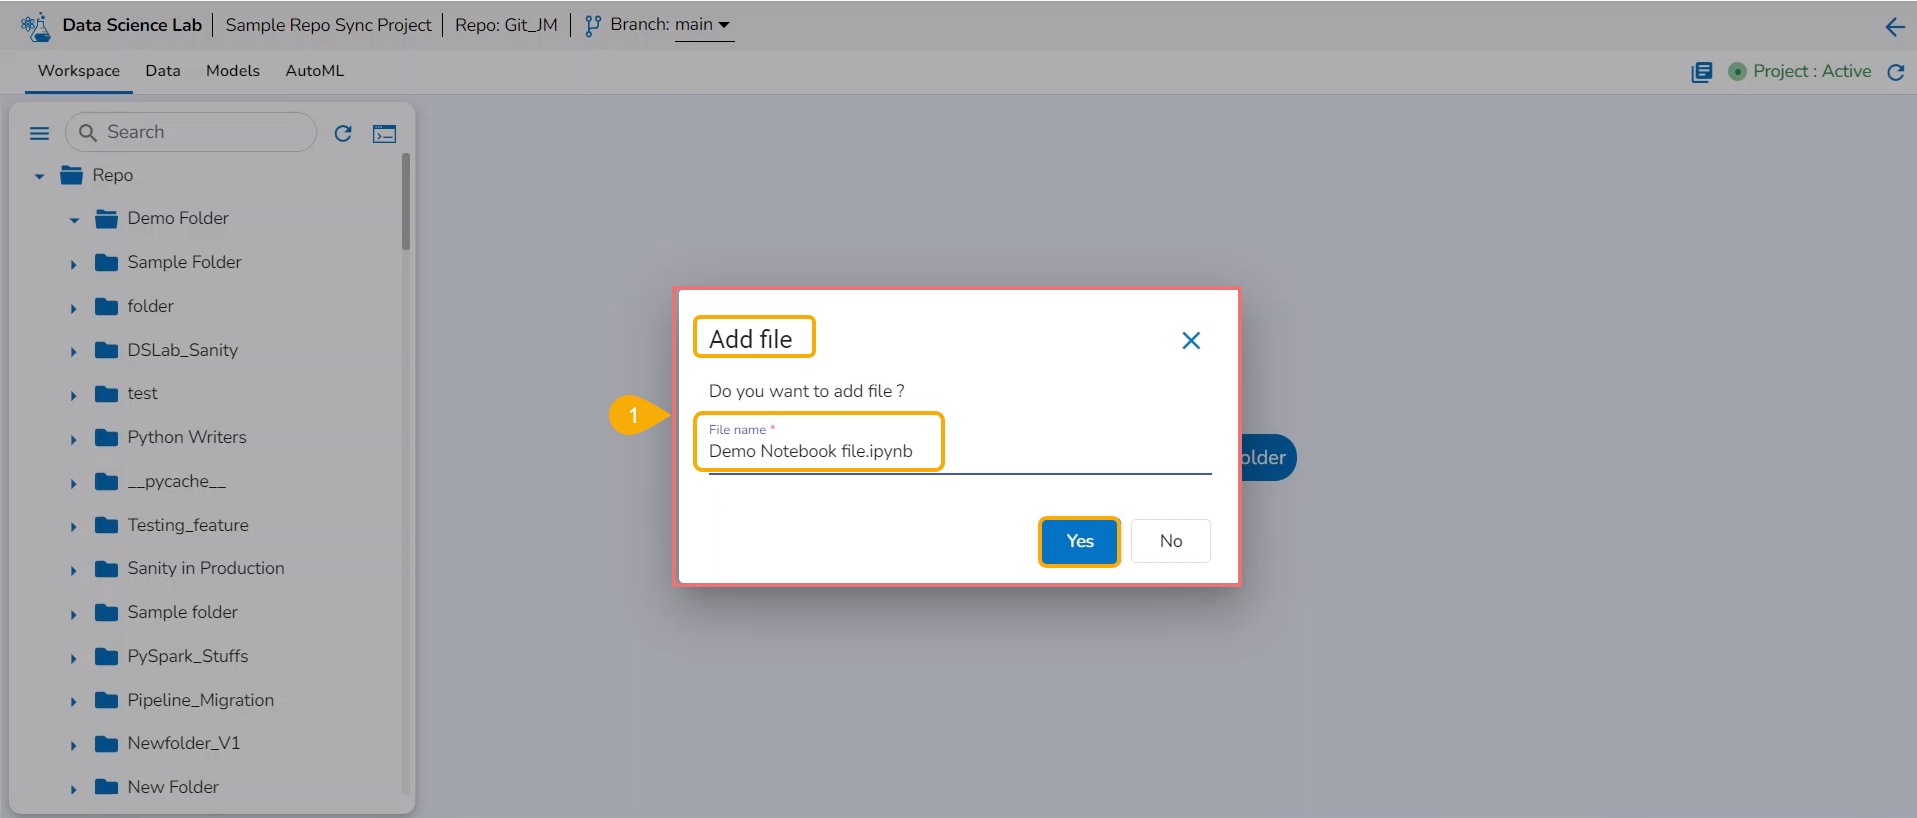
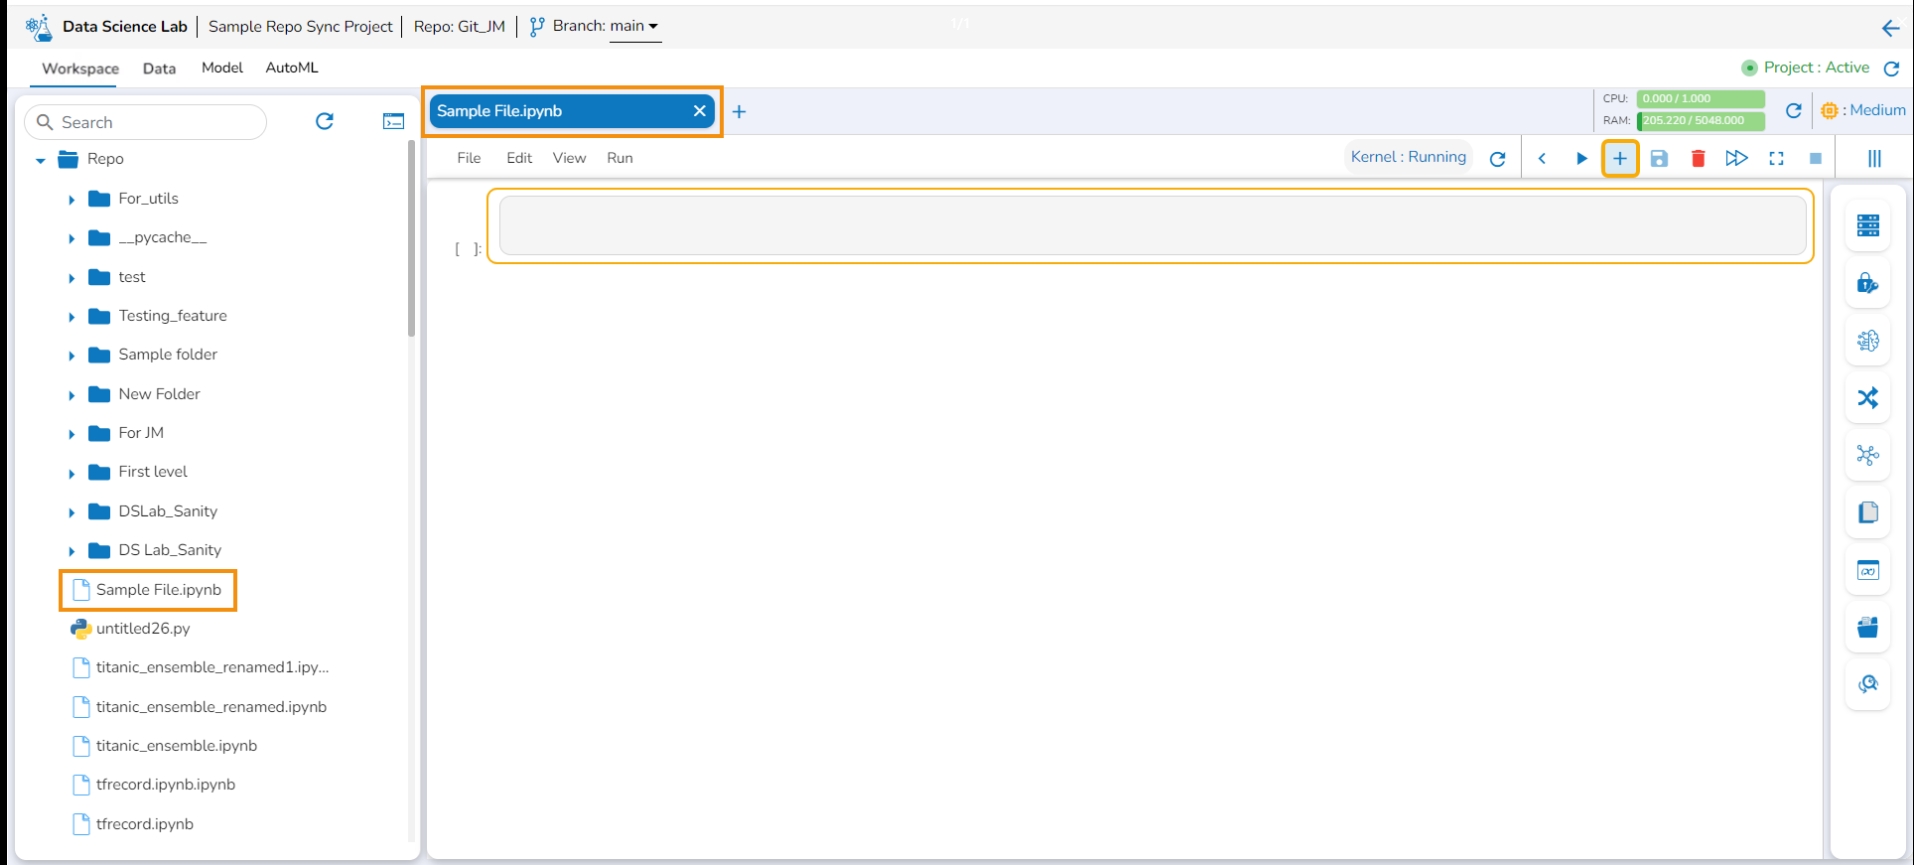
Create a new .ipynb file.
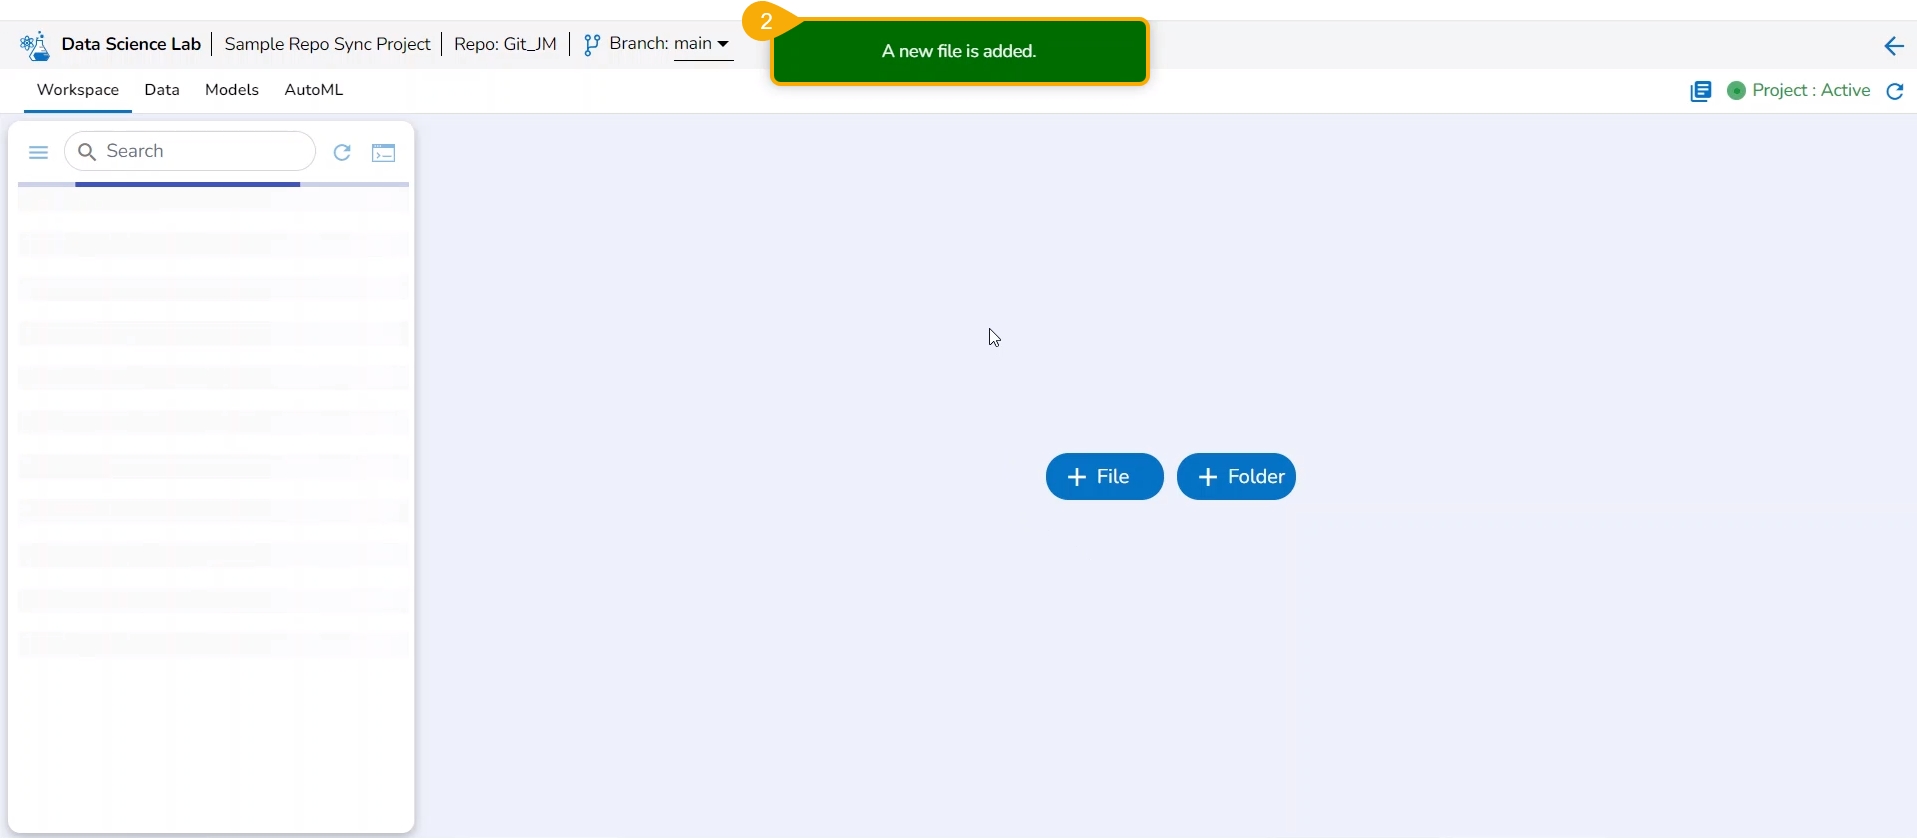
A notification message appears to ensure the creation of the new .ipynb file.
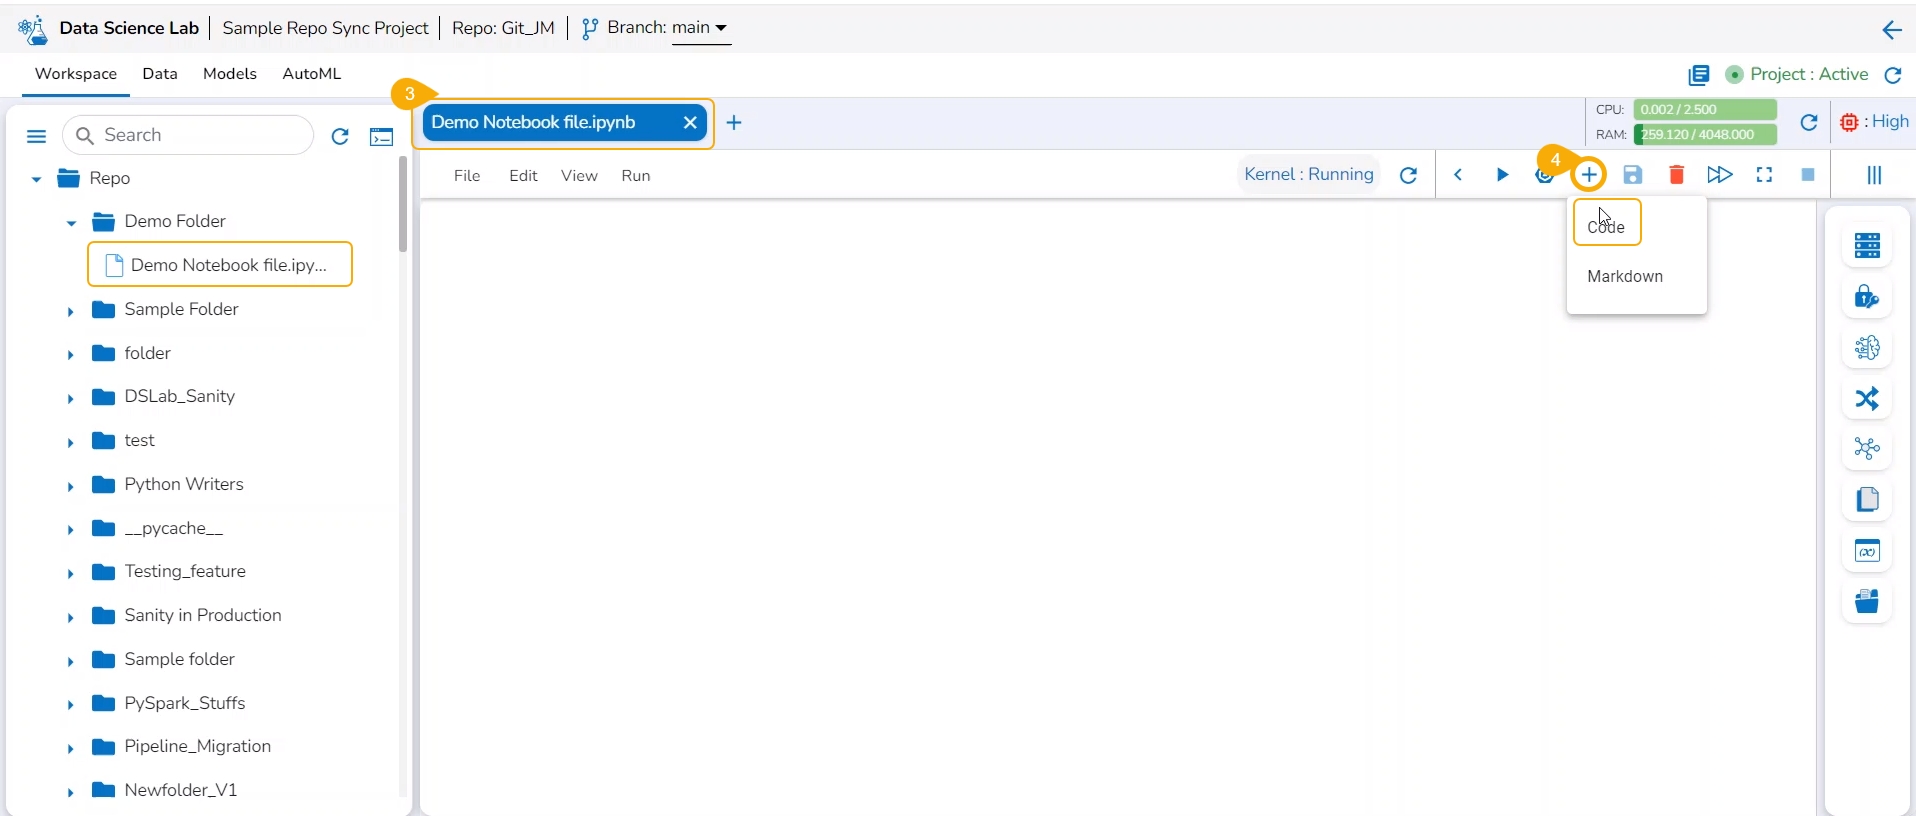
Open the newly created .ipynb file.
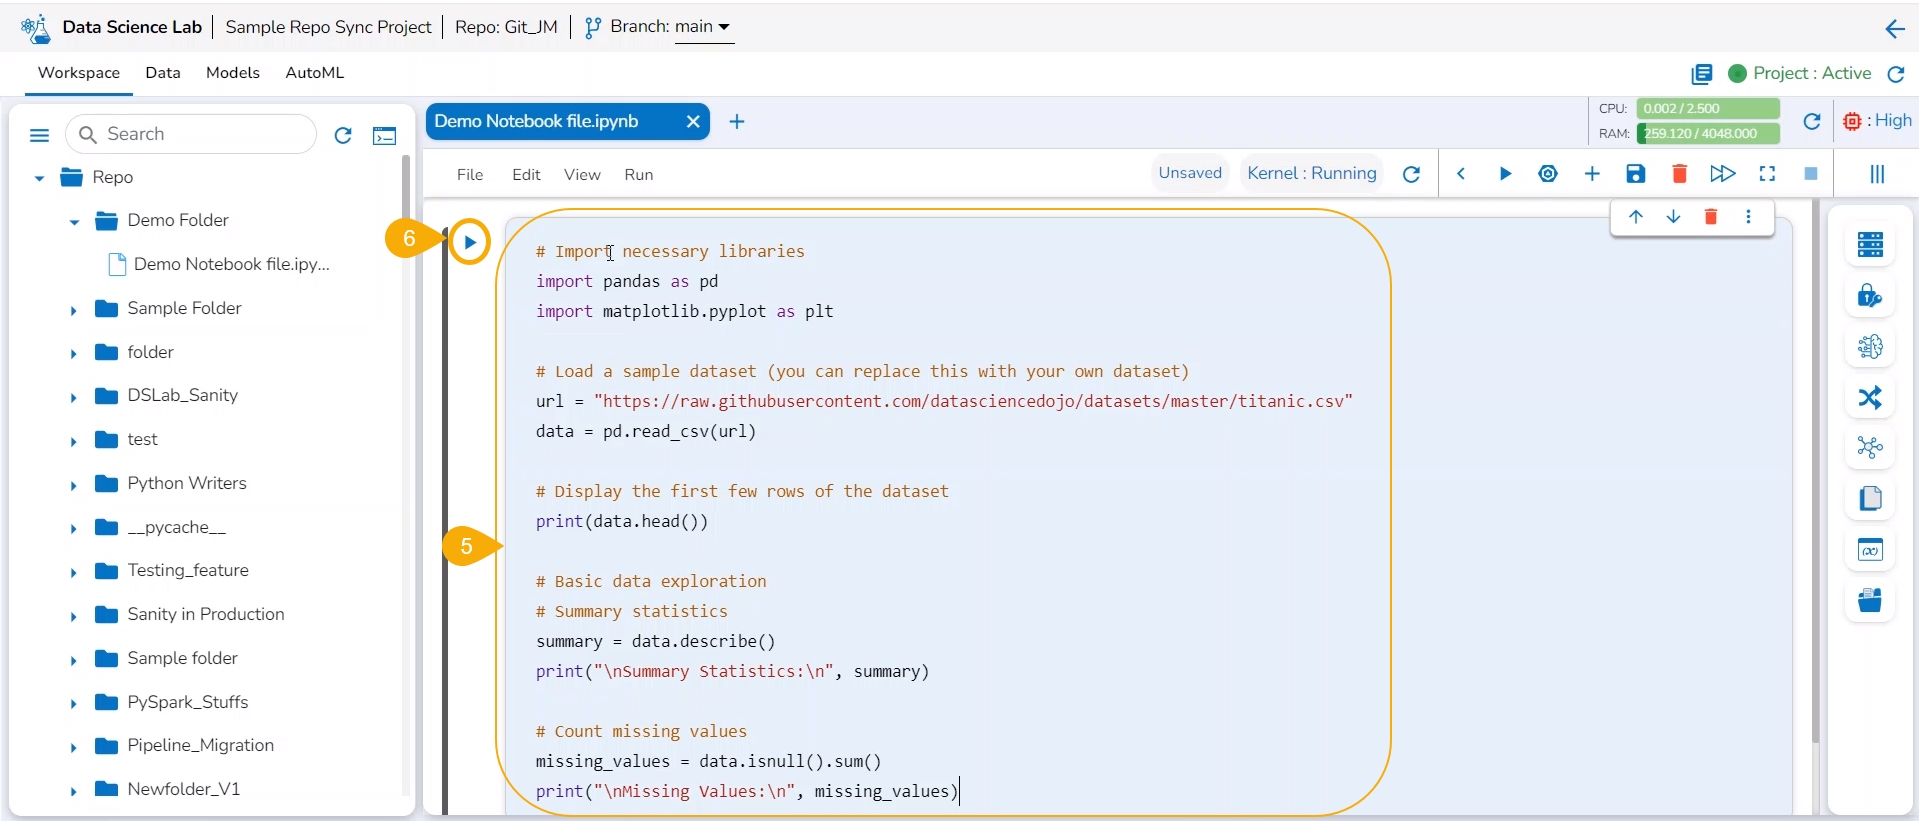
Insert the first Code cell by using the Add pre-cell icon.
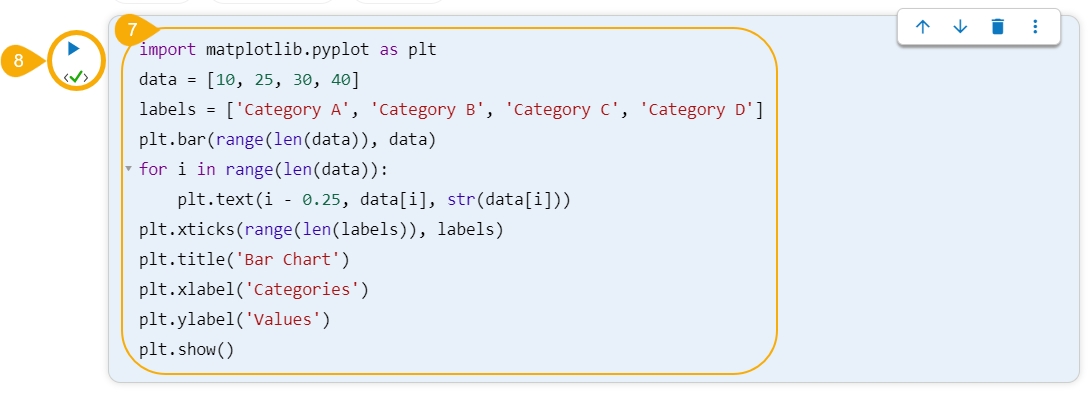
Write code inside the cell.
Click the Run cell icon to run the code.
Please Note: The Code cells also get code from the selected Notebook operations by using the right-side panel and selecting a specific option. E.g., The user can use the Data tab to get an added data set to the code cell.
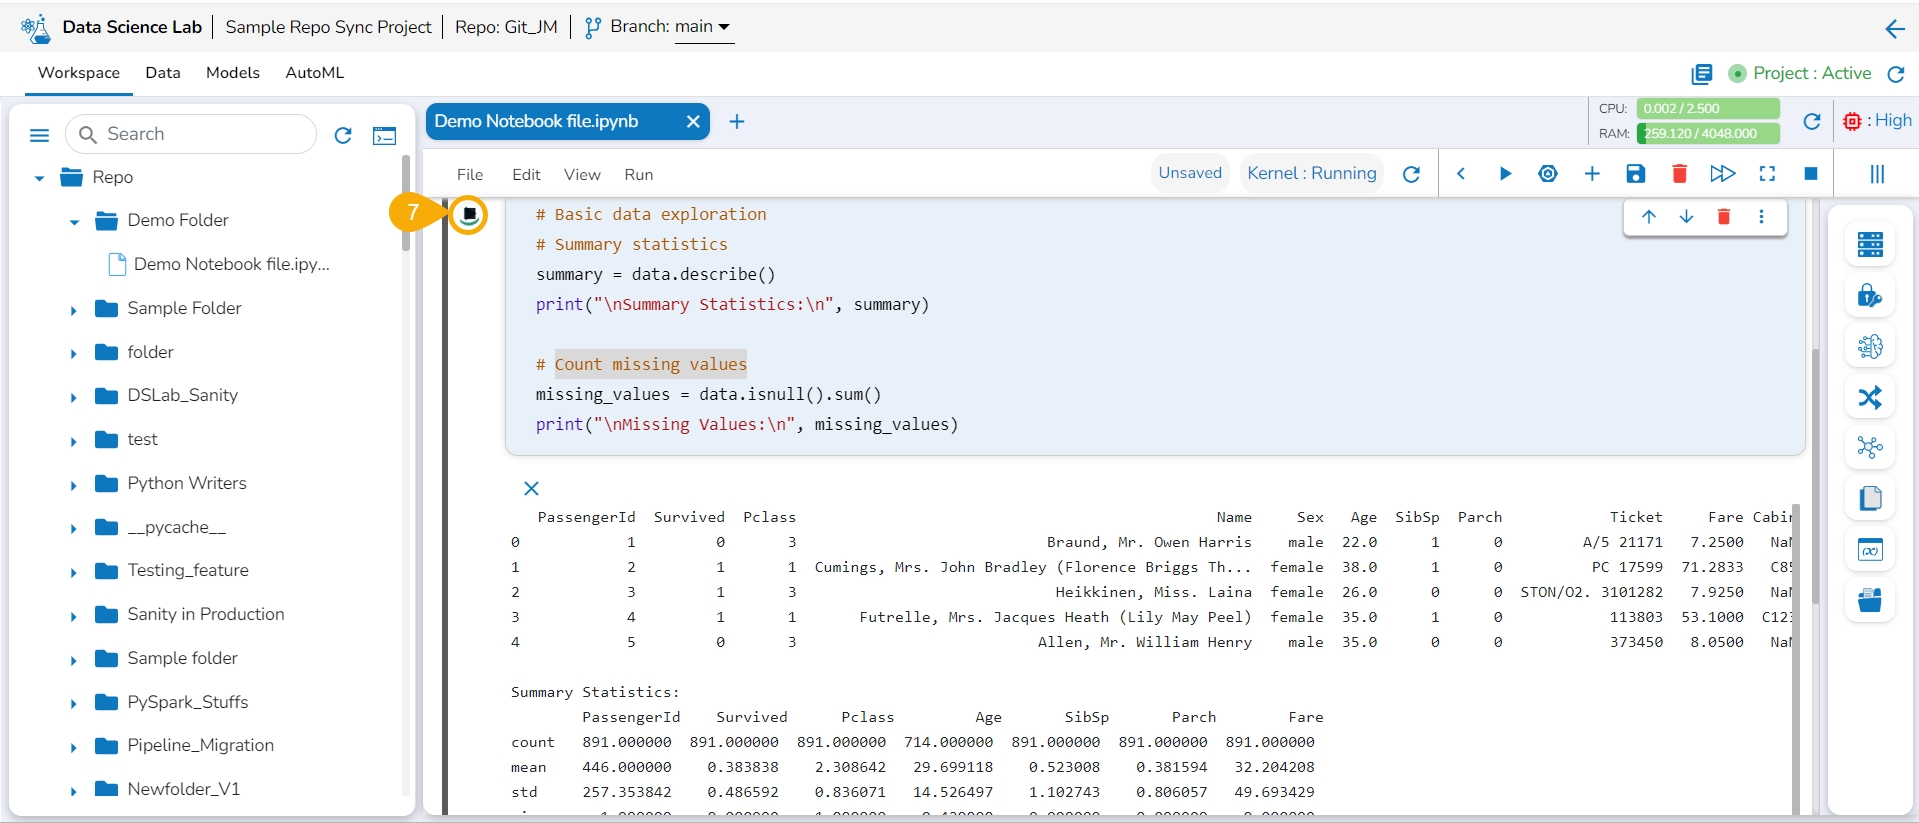
The Run cell button is changed into the Interrupt cell icon while running the code.
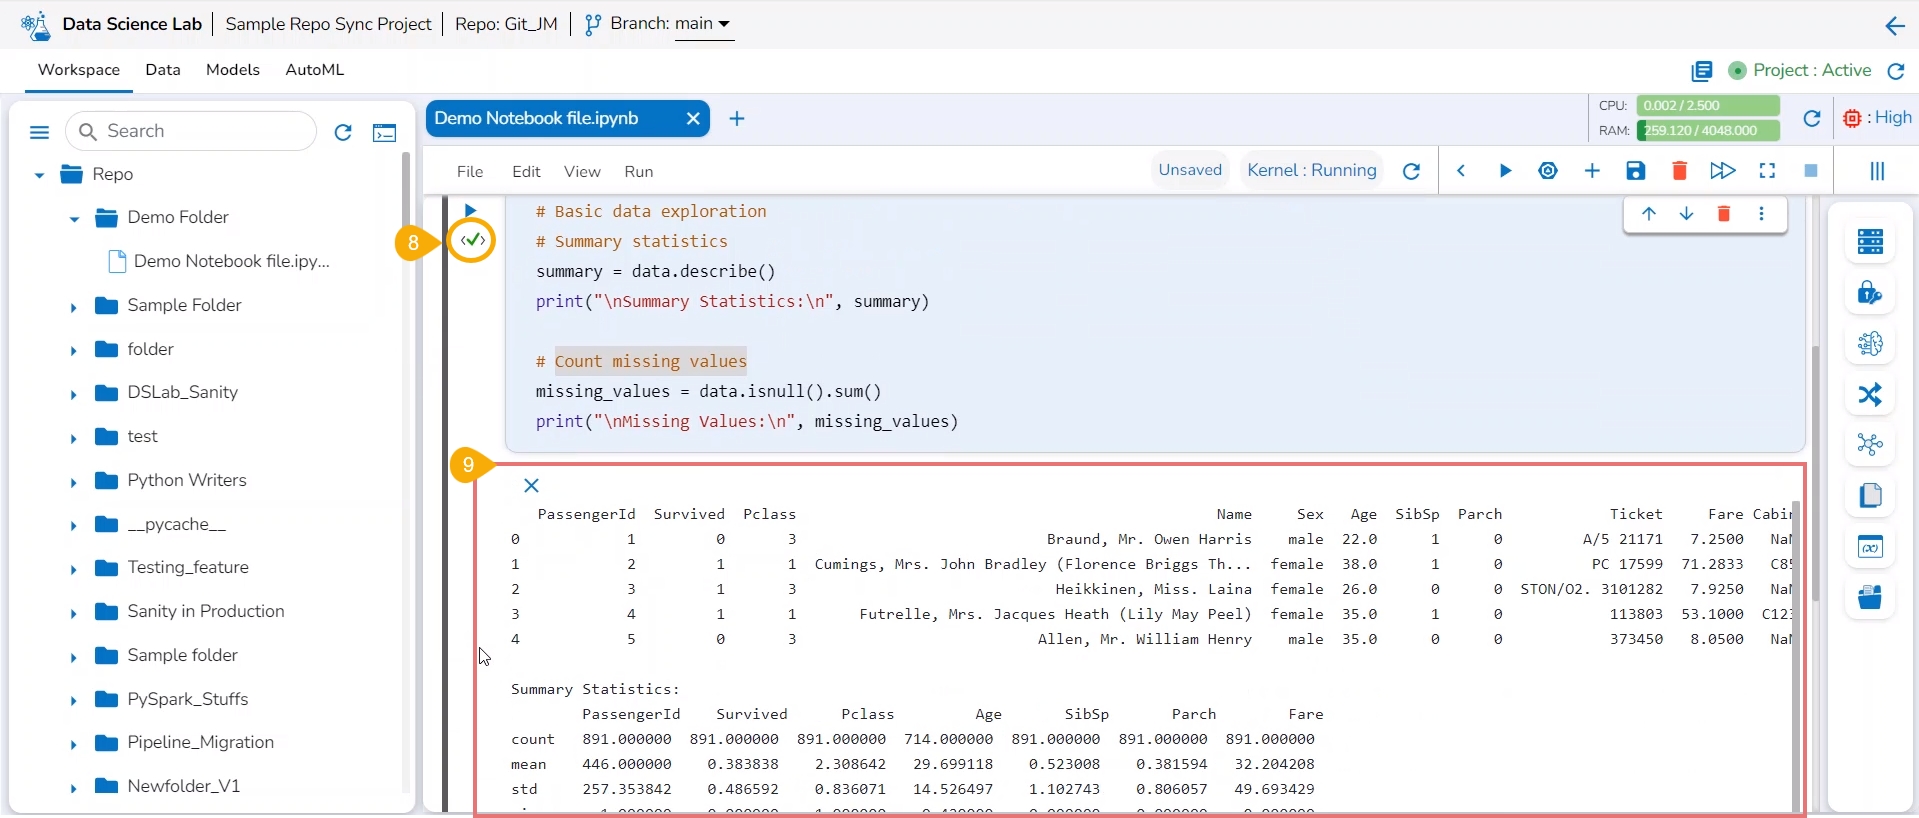
Once the code has run successfully a checkmark appears below the Run cell icon.
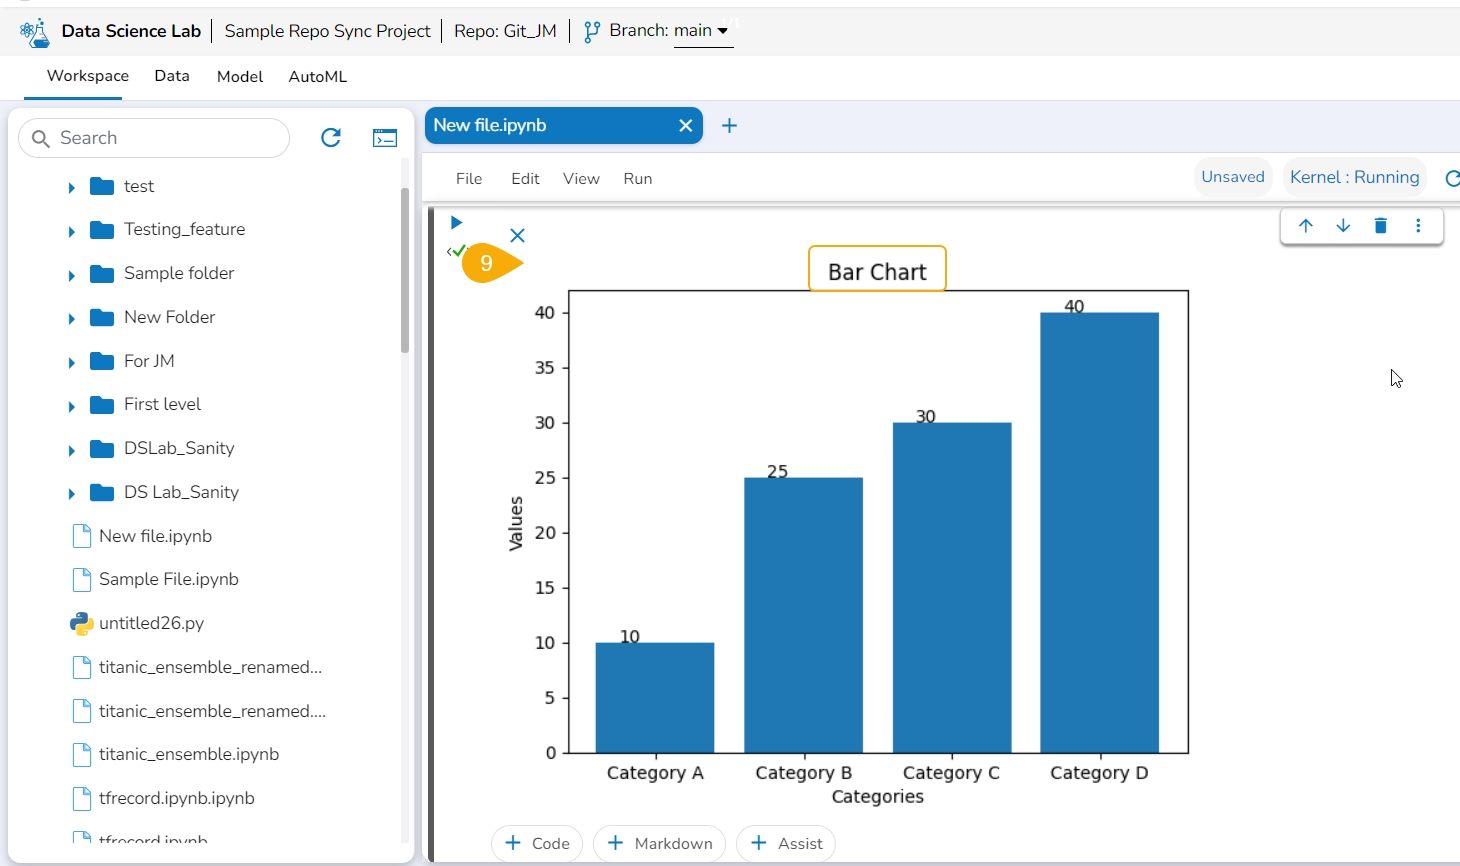
The code result is displayed below it.
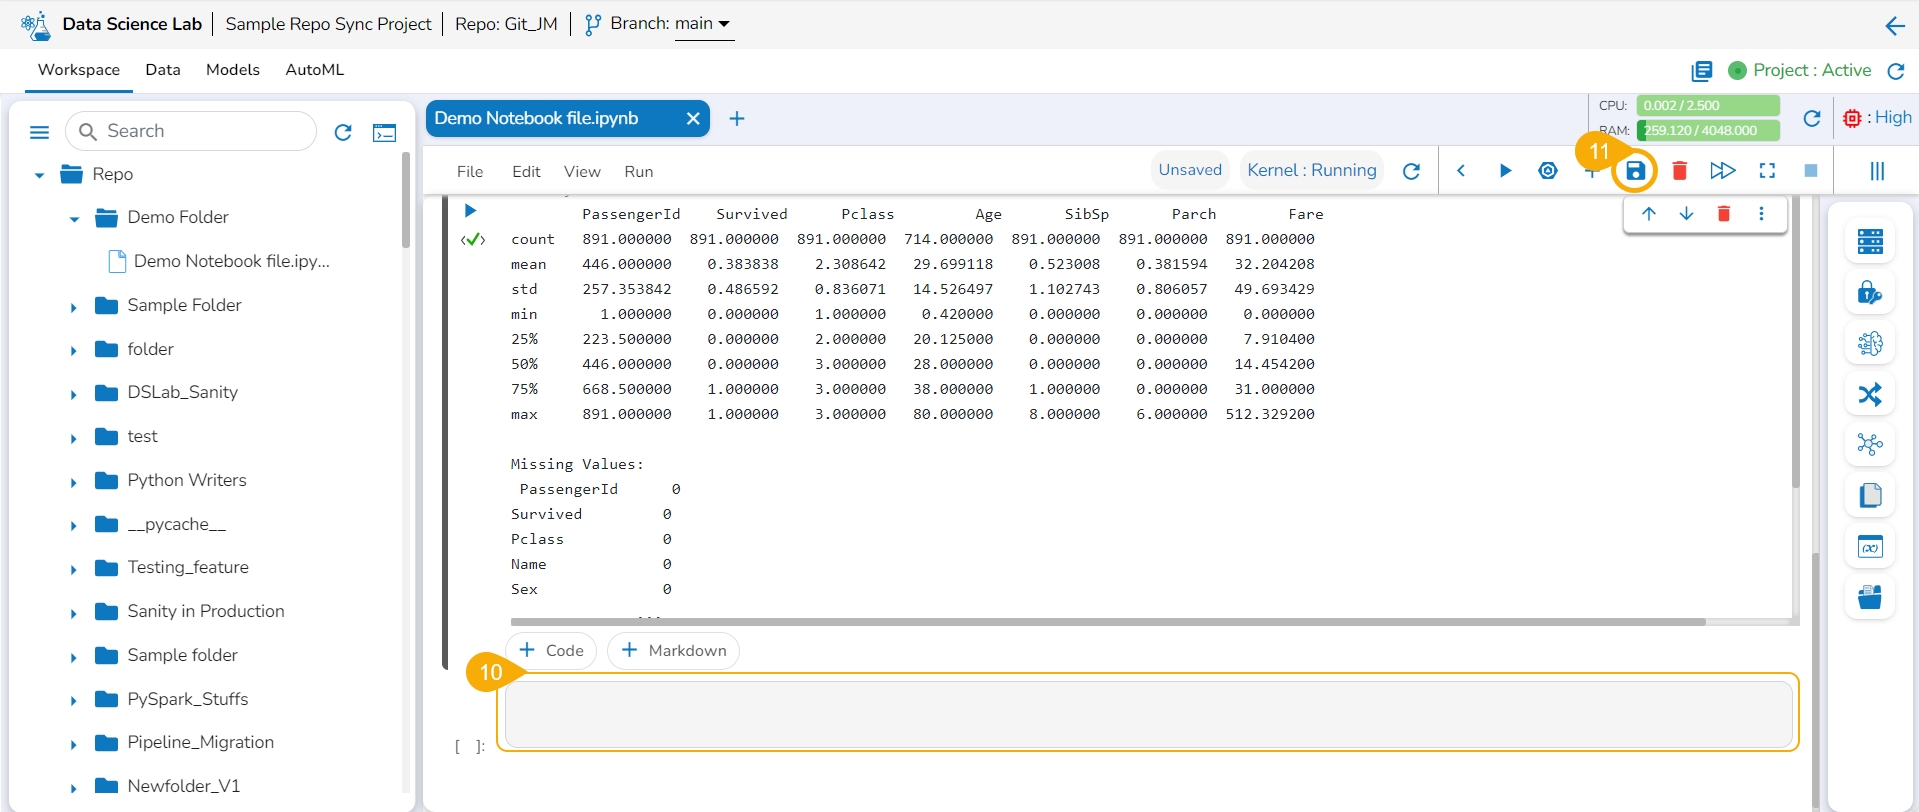
Another code cell gets added below (as shown in the following image).
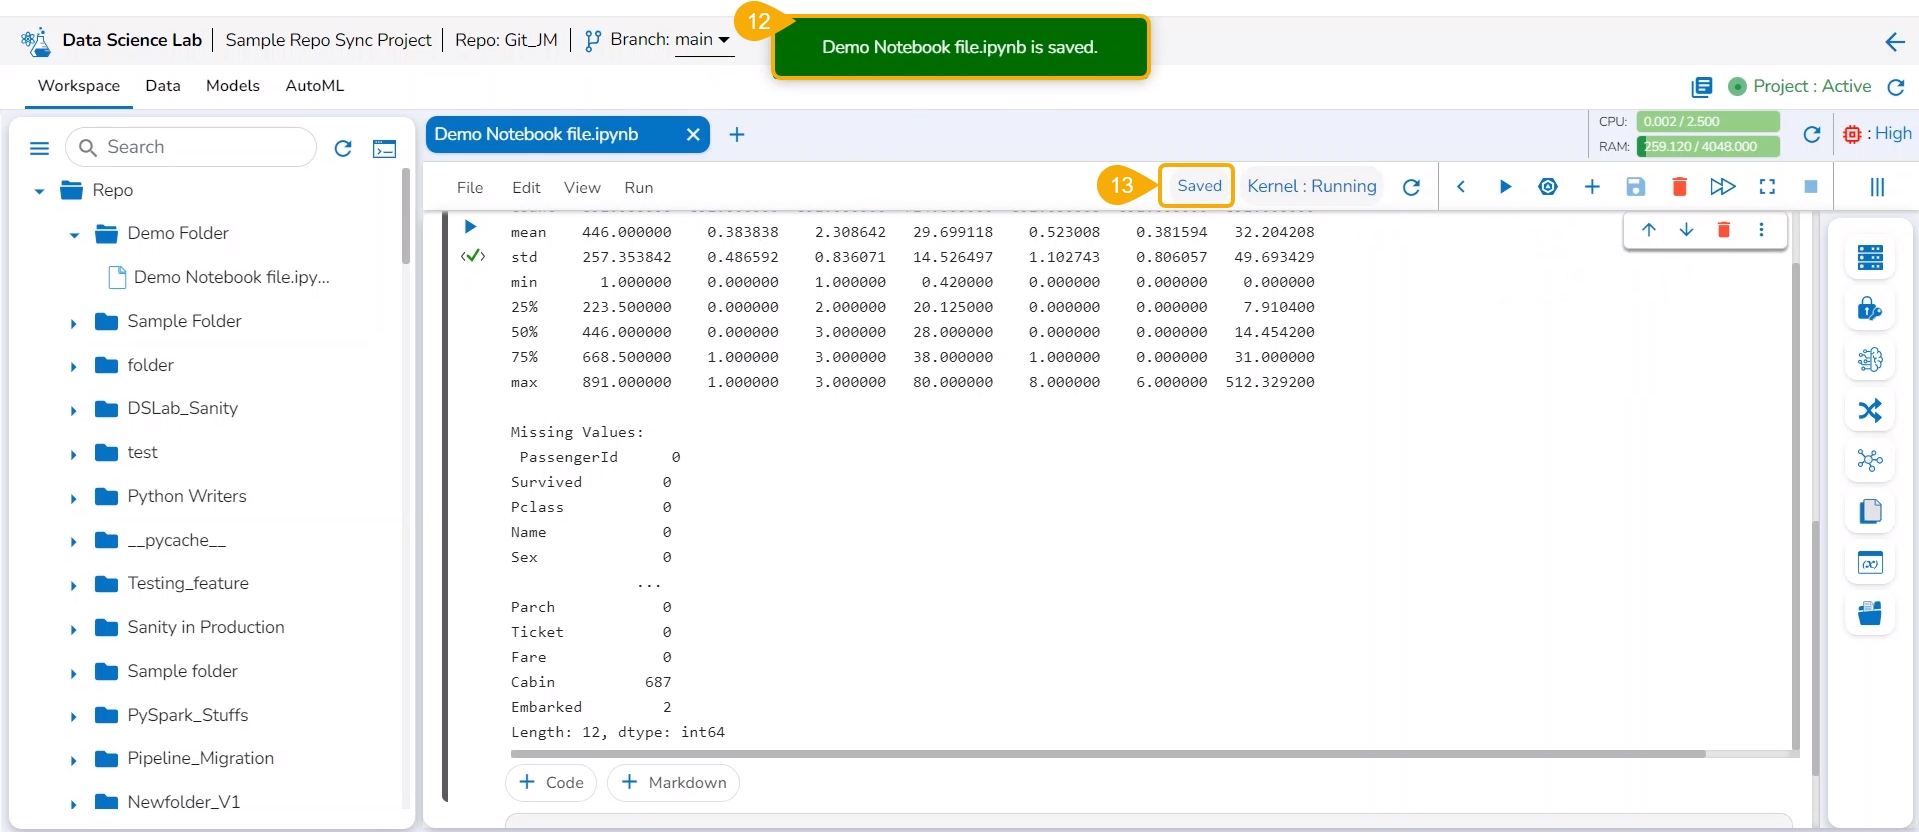
Click the Save icon provided for the Notebook.
A notification message appears to indicate the completion of the action.
The Data Science Notebook's status gets changed as saved and the new updates get saved in it.
By clicking on an inserted Code cell, some code-related options are displayed as shown in the image:
1
Move the cell up
Moves the cell upwards
2
Move the cell down
Moves the cell downwards
3
Delete Cell
Deletes the code cell.
4
More Actions
Opens four more actions that include:
Transform, Save Model, Predict, and Save artifact.
Please Note: The +Code, +Markdown, and +Assist options provided at the bottom of a cell insert a new cell after the given code/ Markdown cell.
The user should run the Notebook cells only after the Kernel is up and Running. If the user attempts to run a Notebook cell before the Kernel is started/ restarted, the following warning will be displayed.
This page describes steps to use the text cells of the Data Science Notebook.
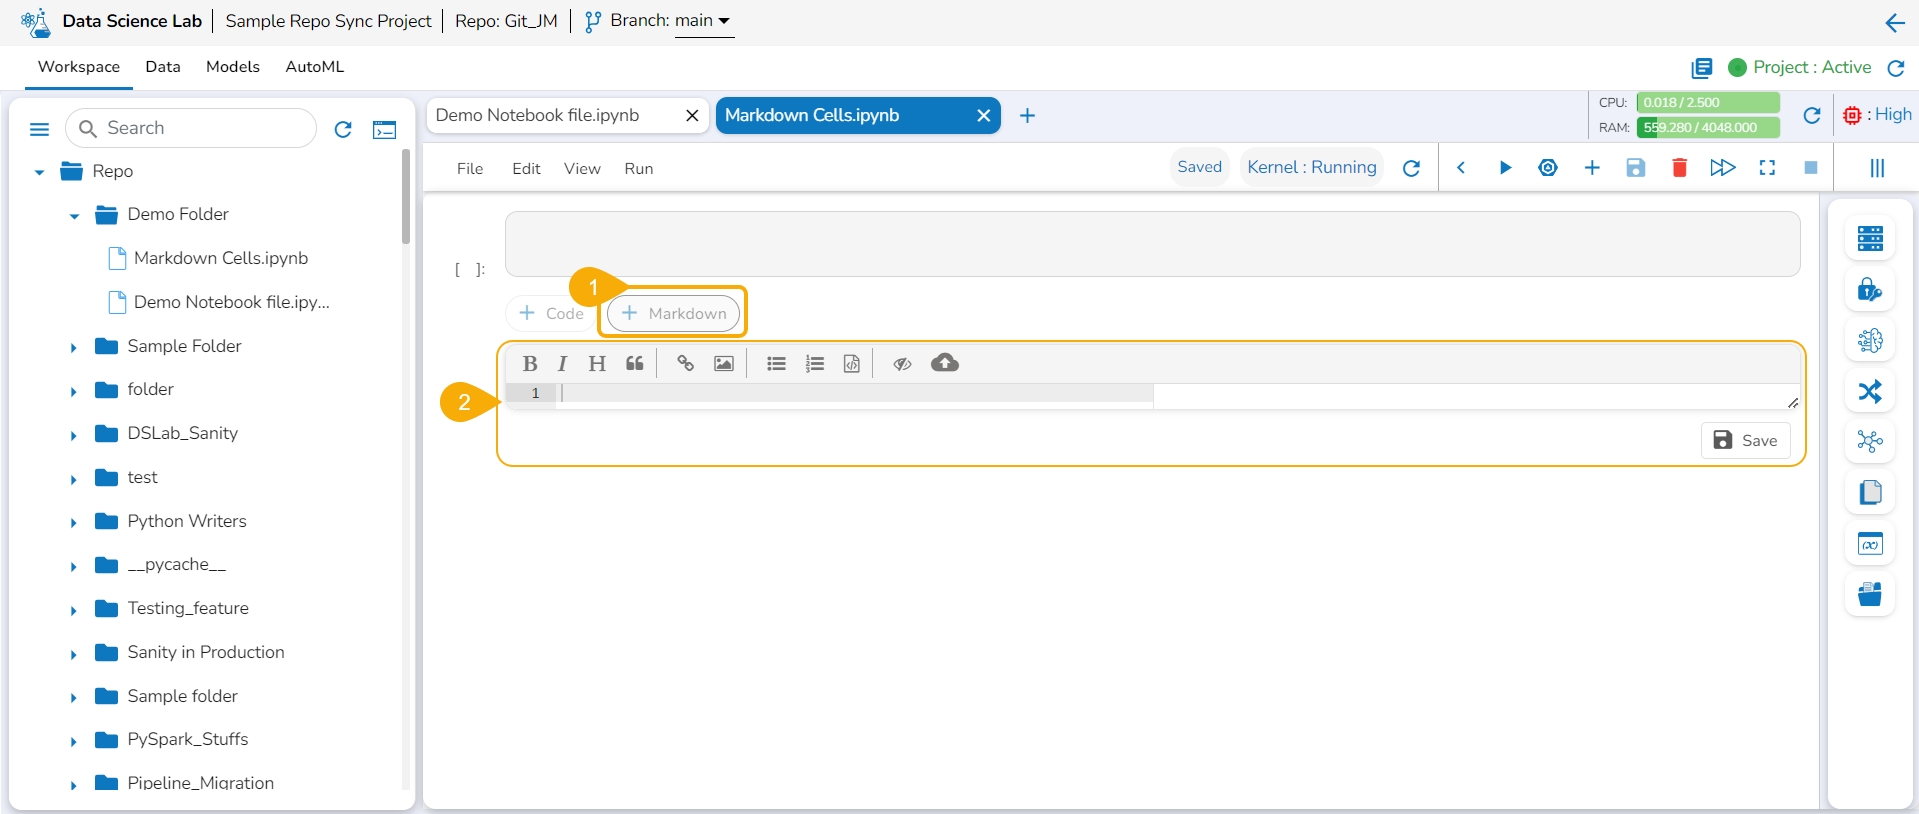
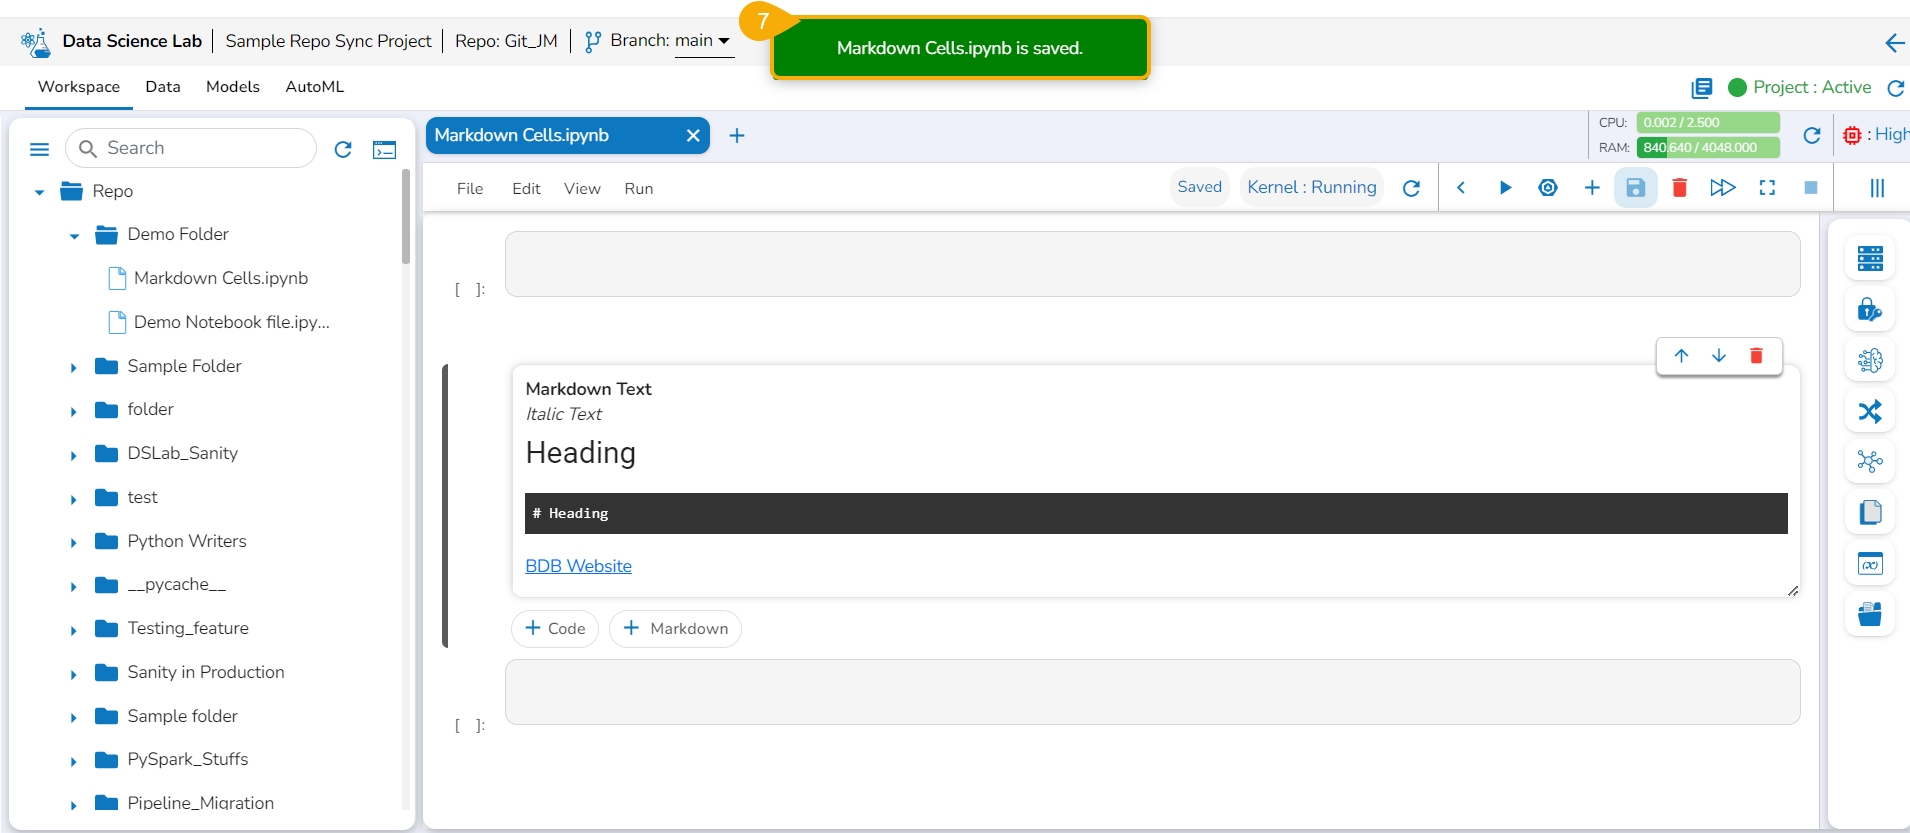
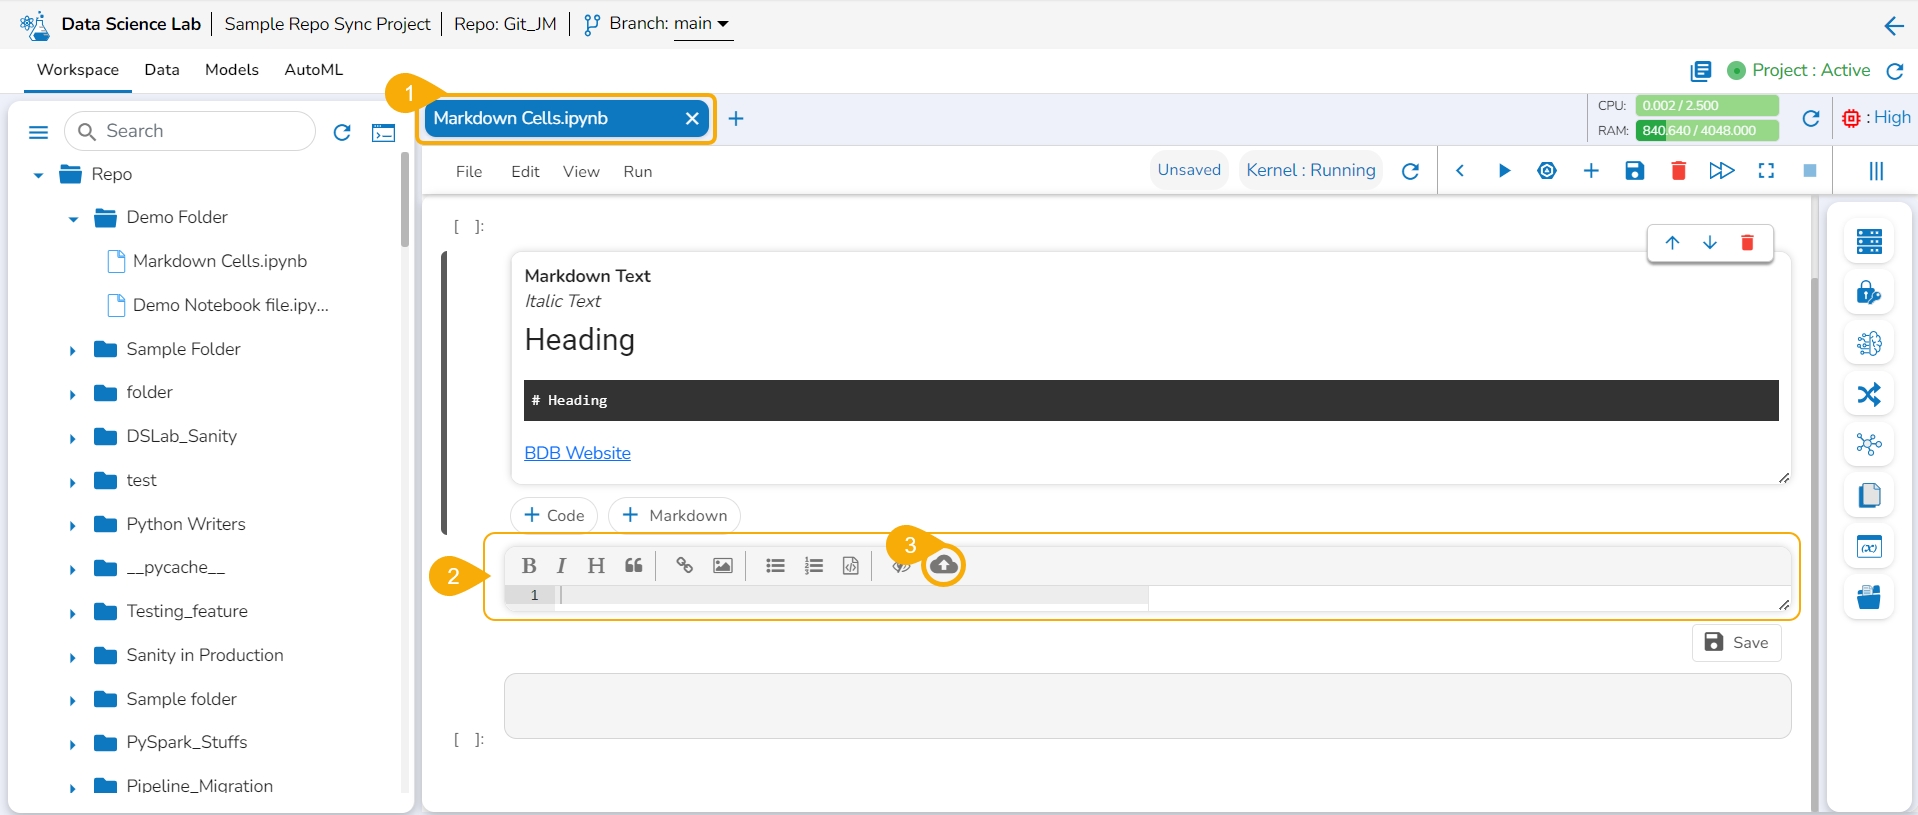
The Markdown cells are used to enter a description, links, images, headings, and text with Bold or Italics effect to a Data Science Notebook. They are formatted using a simple markup language called Markdown. The Markdown cell contains a toolbar to assist with editing.
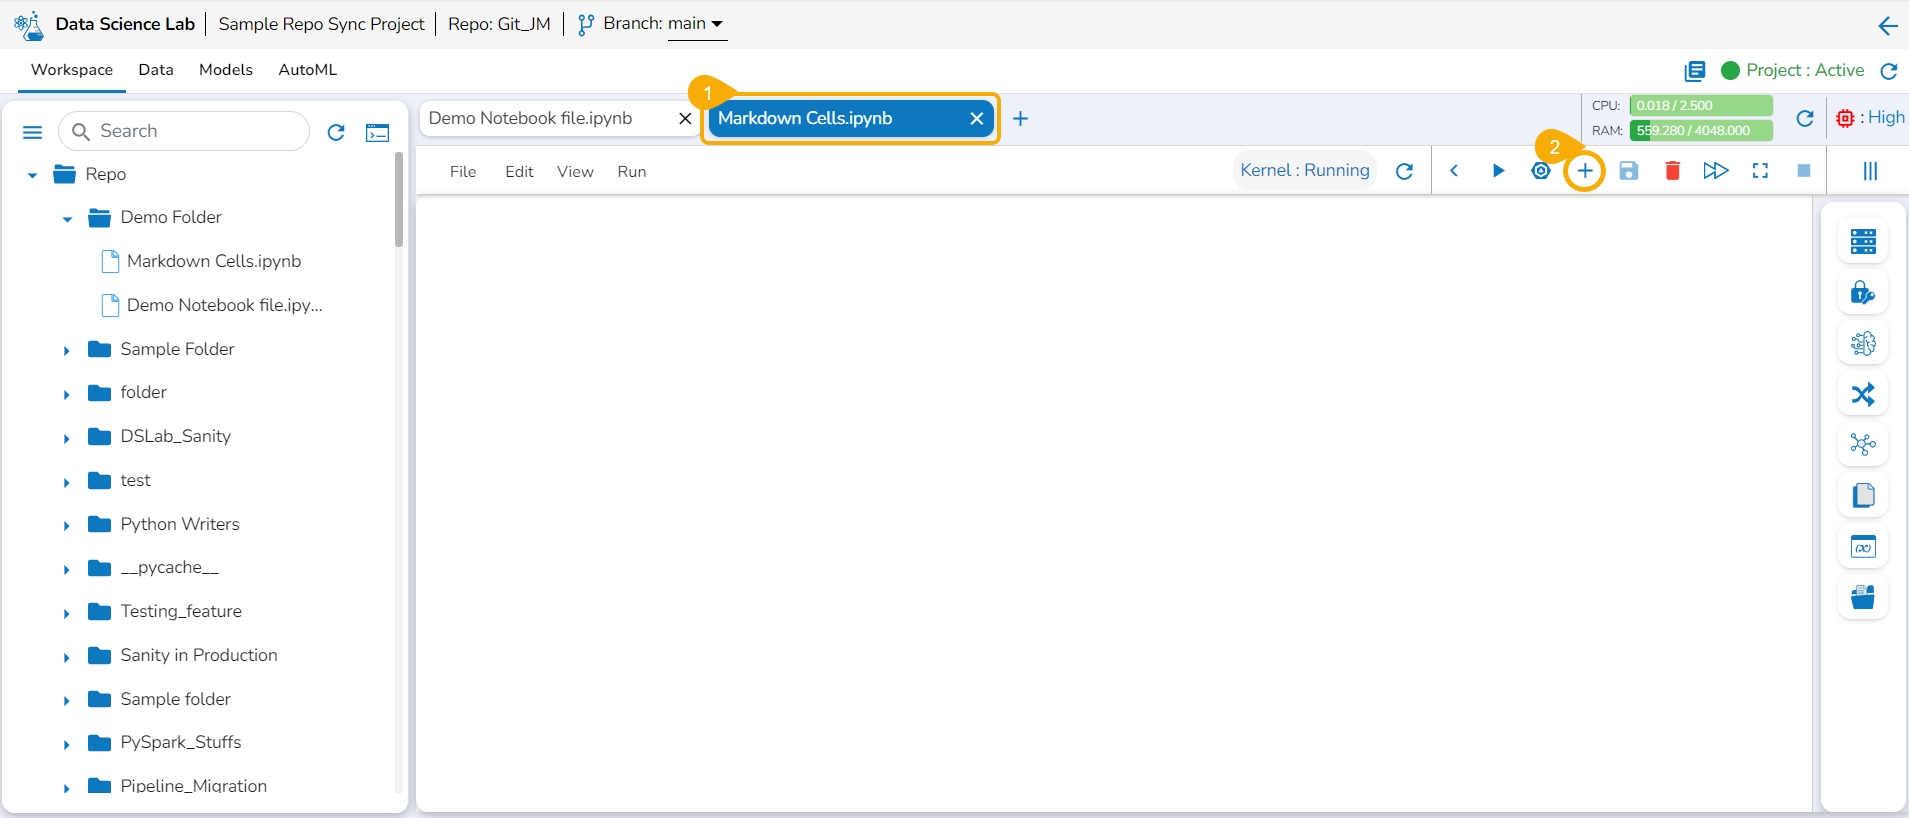
Navigate to a .ipynb file.
Use the Add pre-cell icon to insert a new code cell to the file.
OR
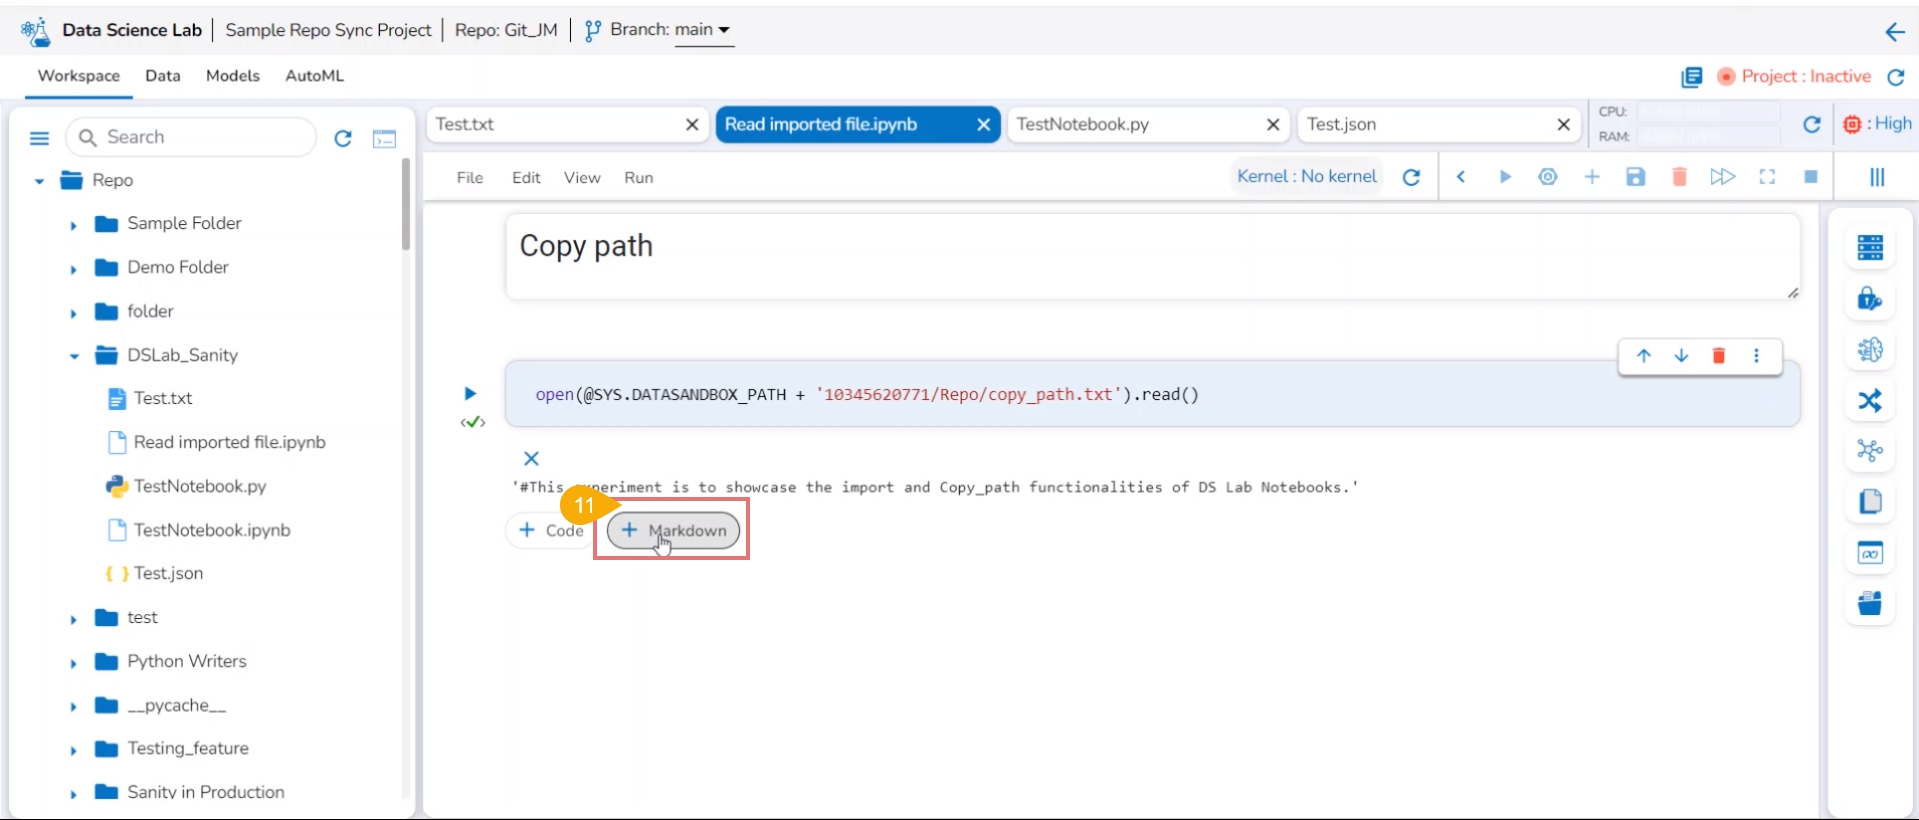
Click the +Markdown option that appears below the code cell.
The Markdown cell appears below to insert Markdown into the Notebook.
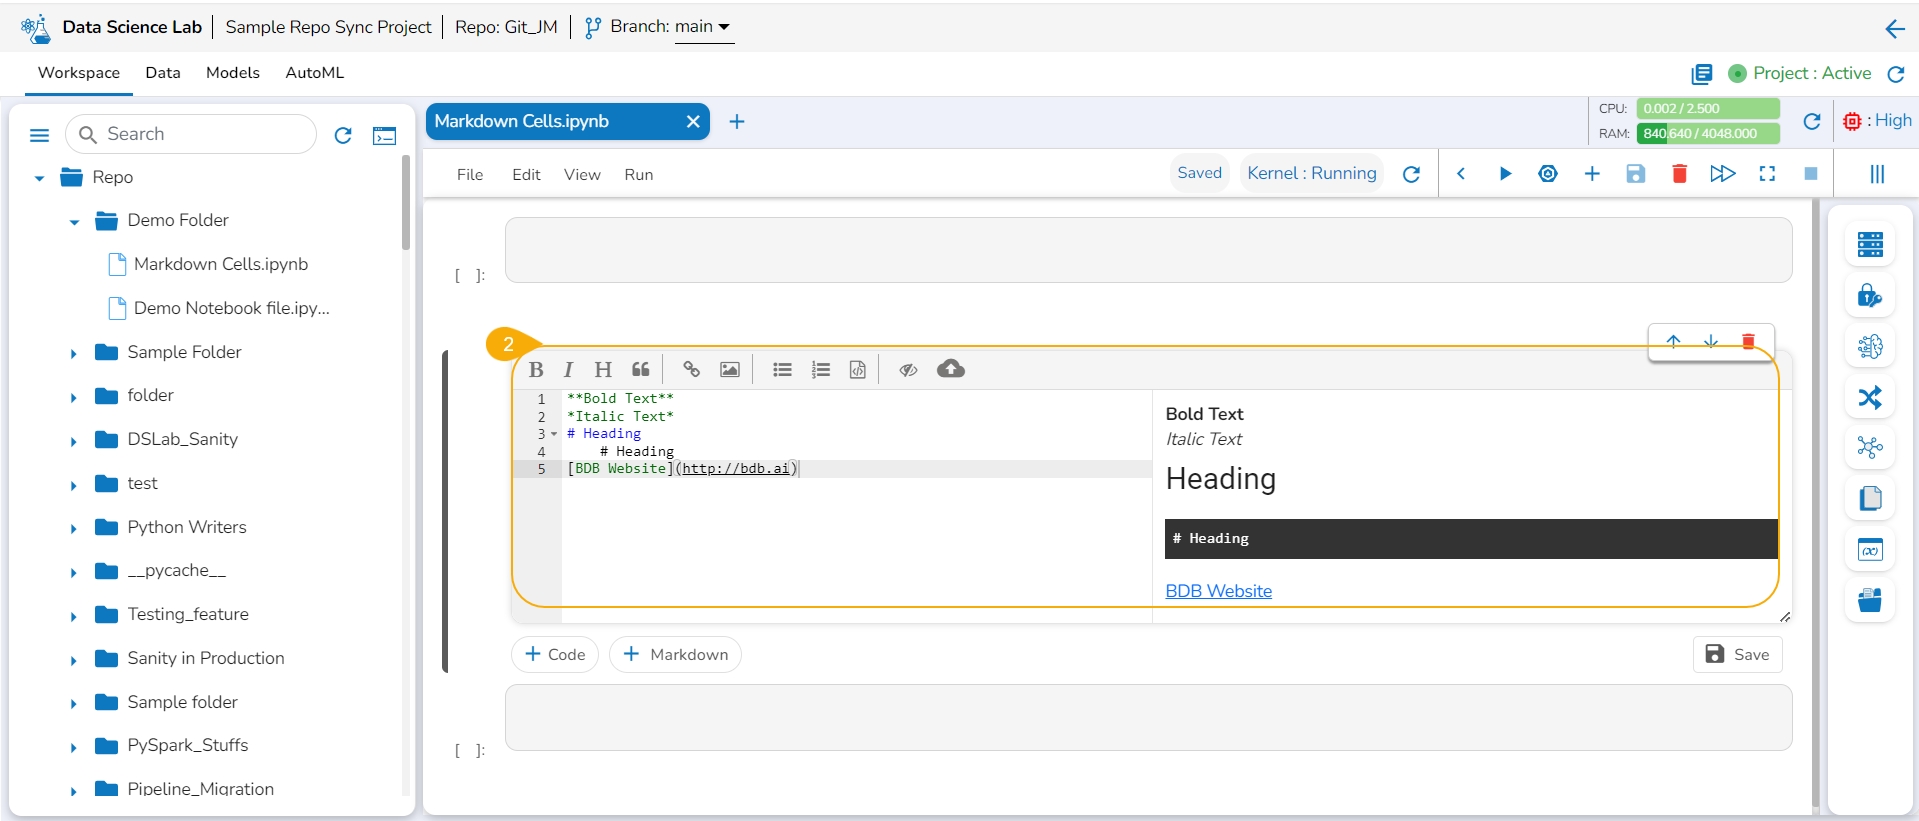
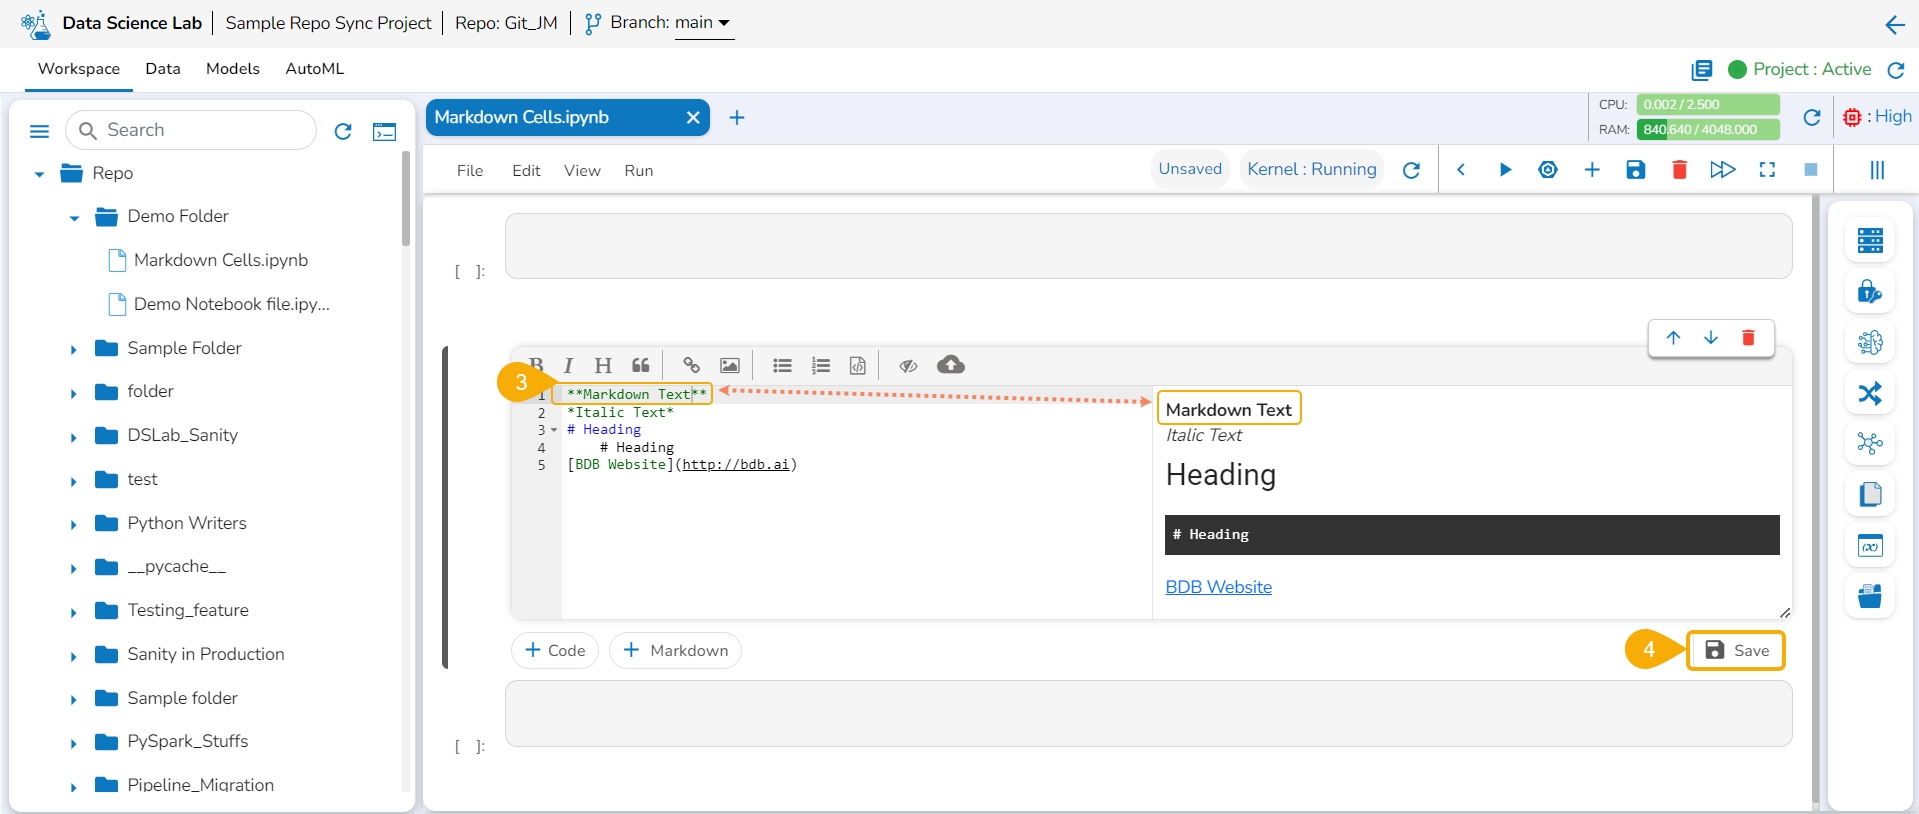
Choose an action from the toolbar.
It gets added to the left side of the Markdown cell.
The right-side Markdown space displays the text with the applied effect.
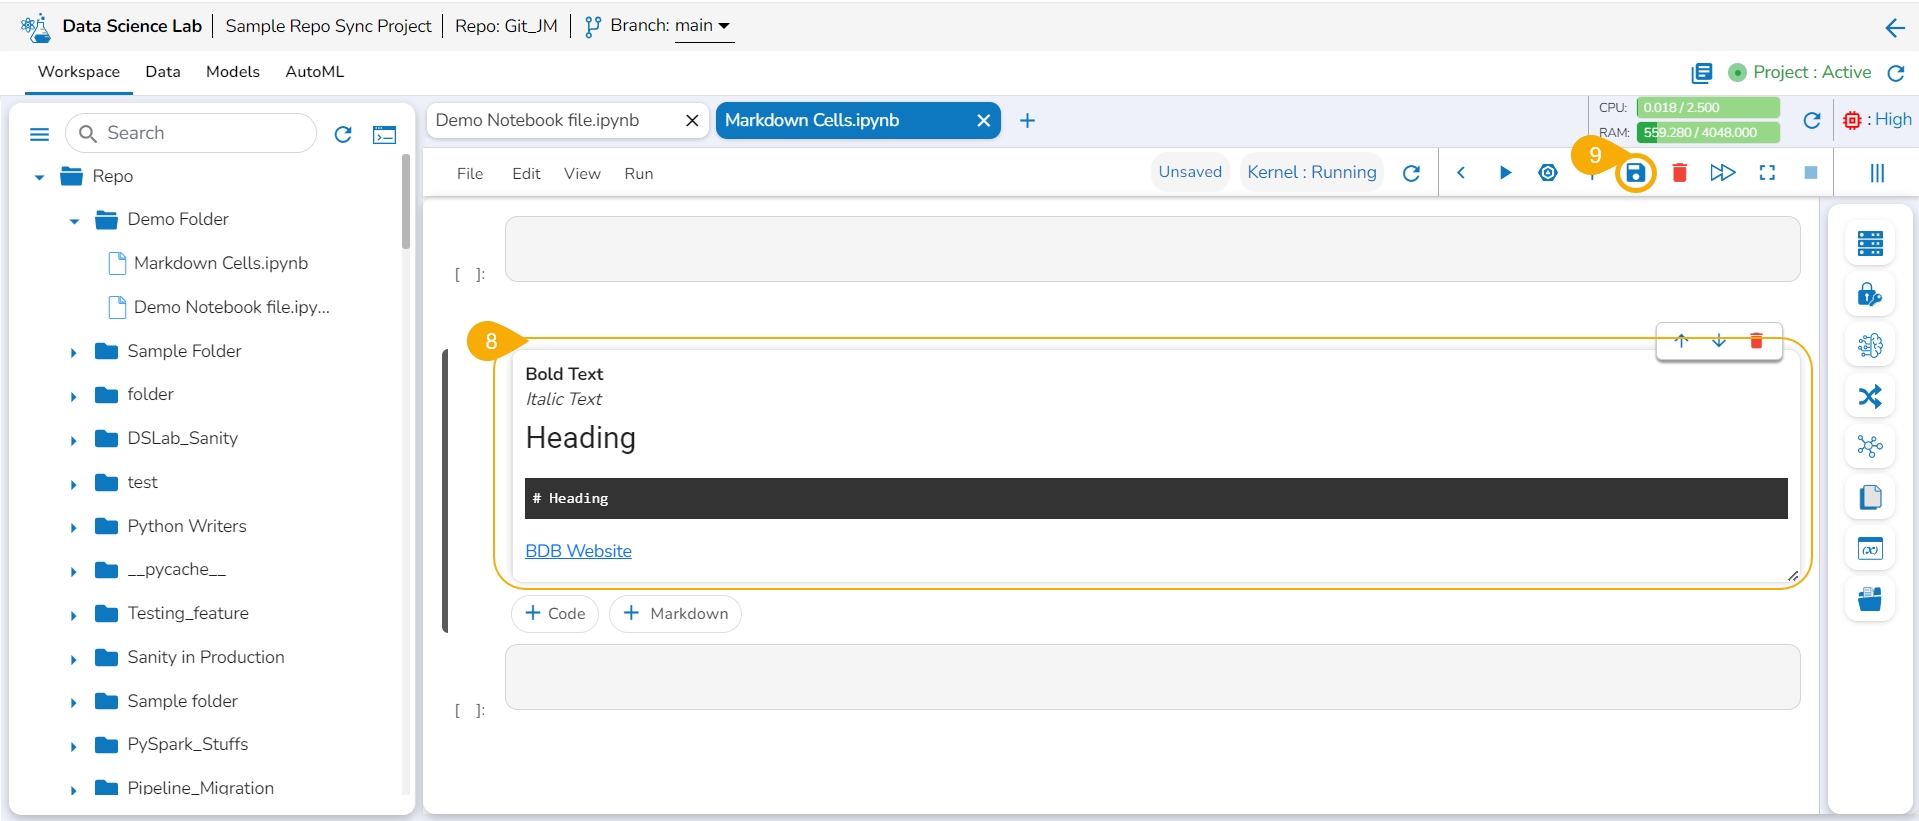
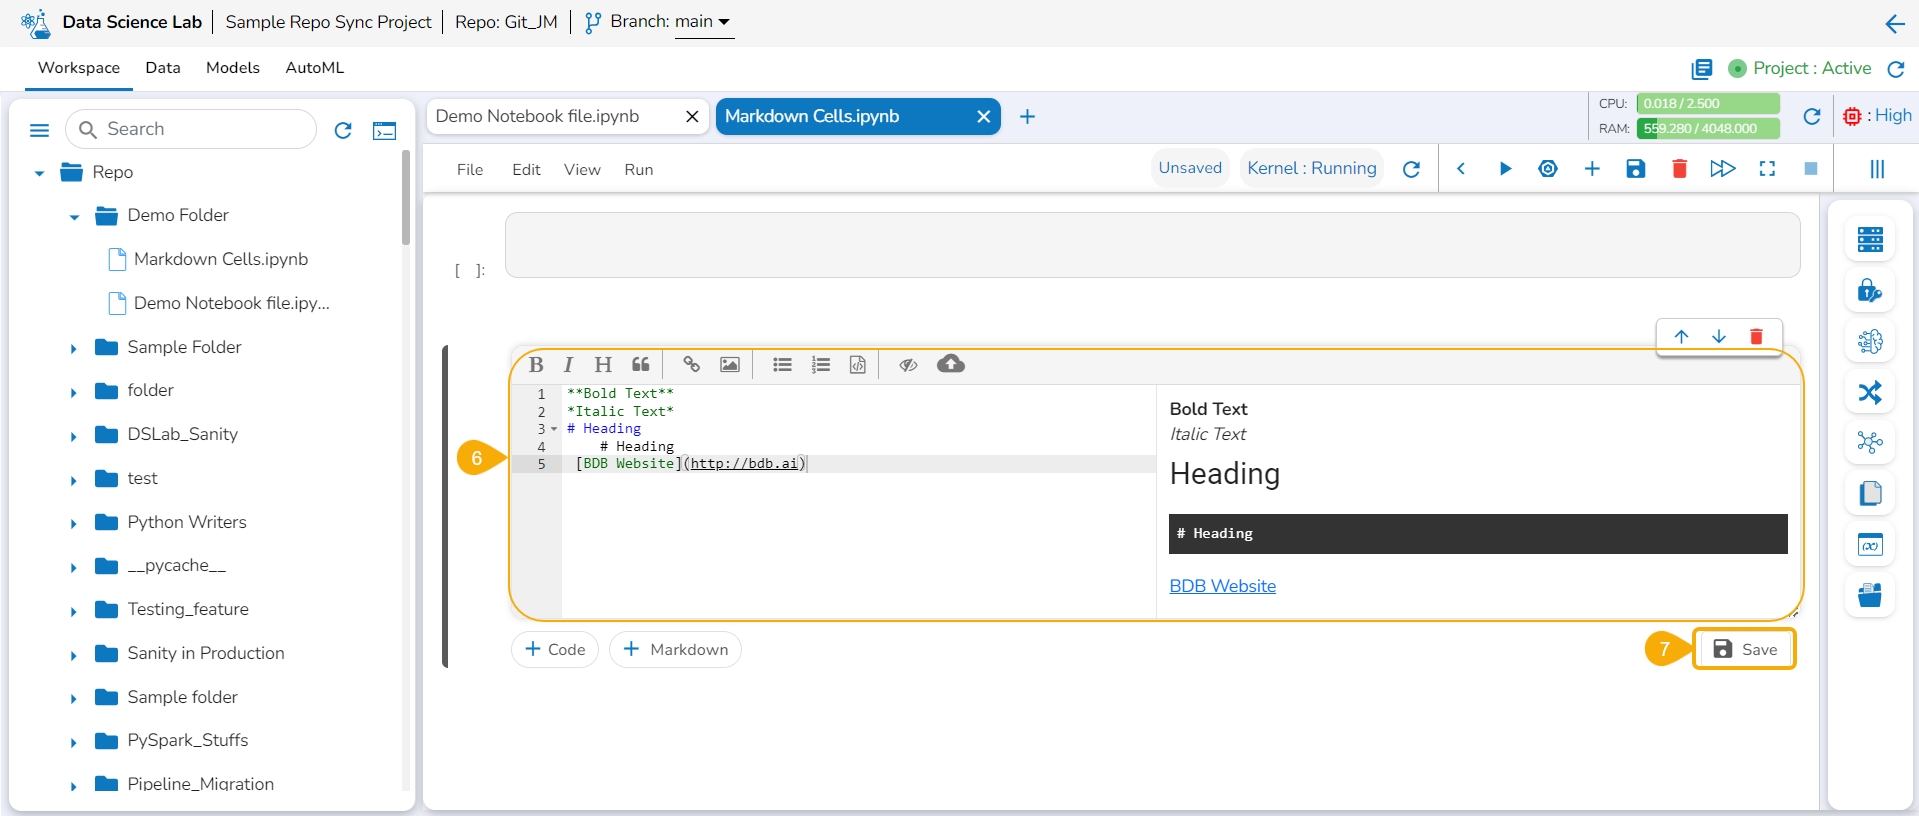
The image displays a few actions from the toolbar (such as Bold, Italic, Heading, and link) applied to the Markdown text.
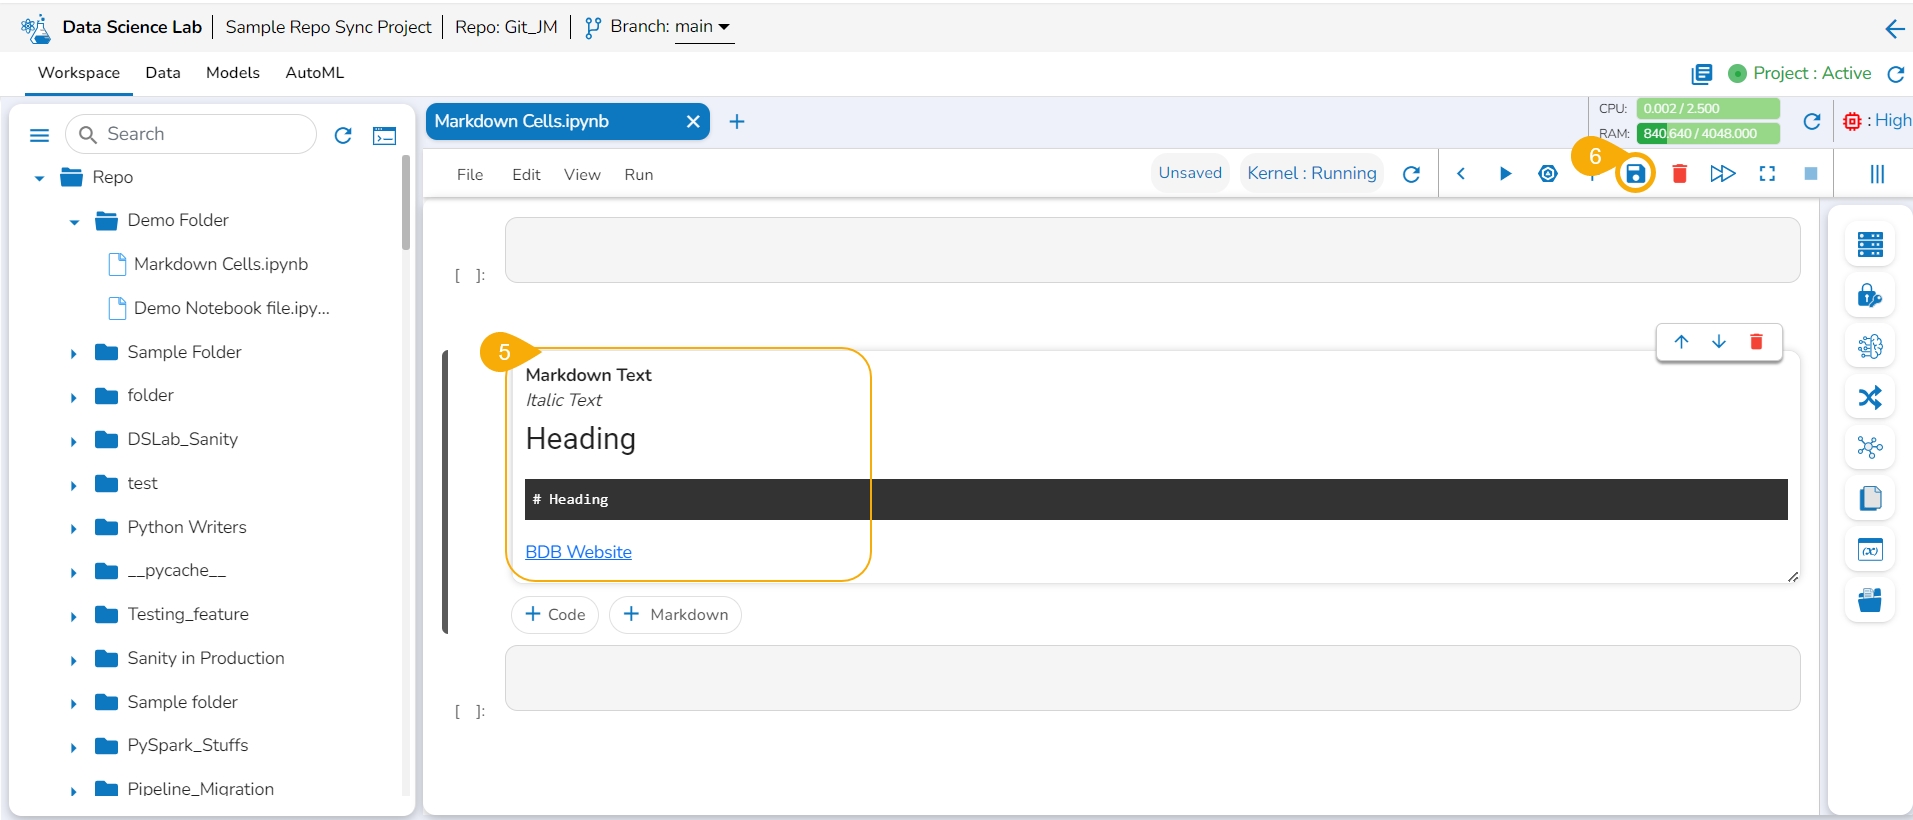
Click the Save option.
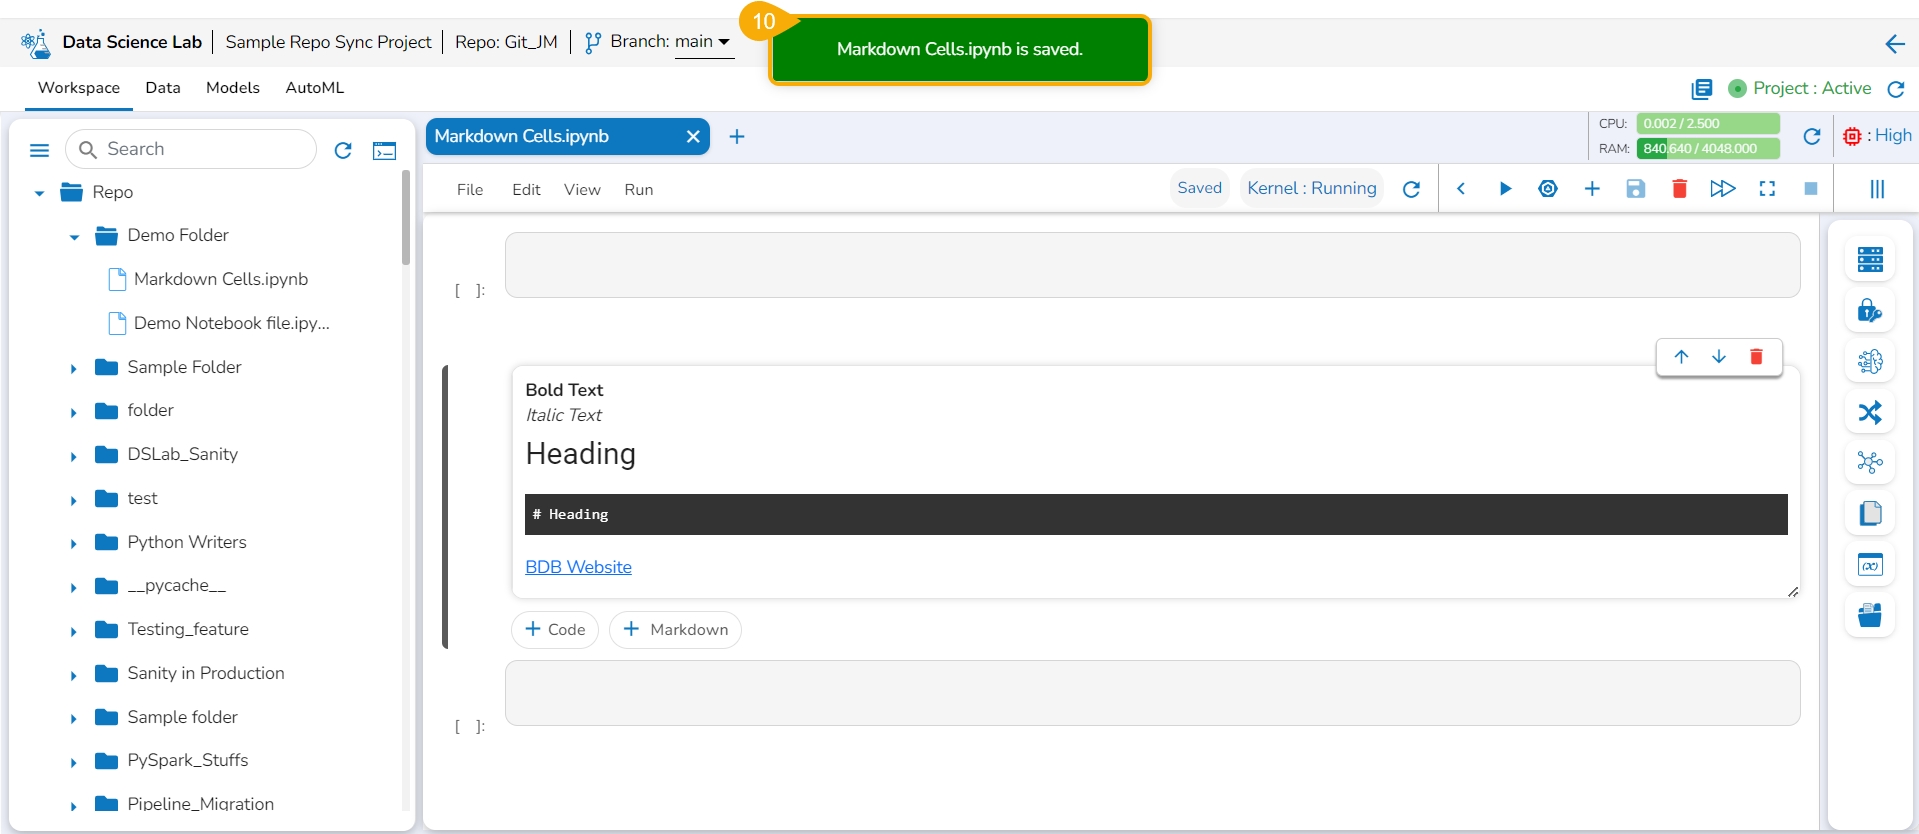
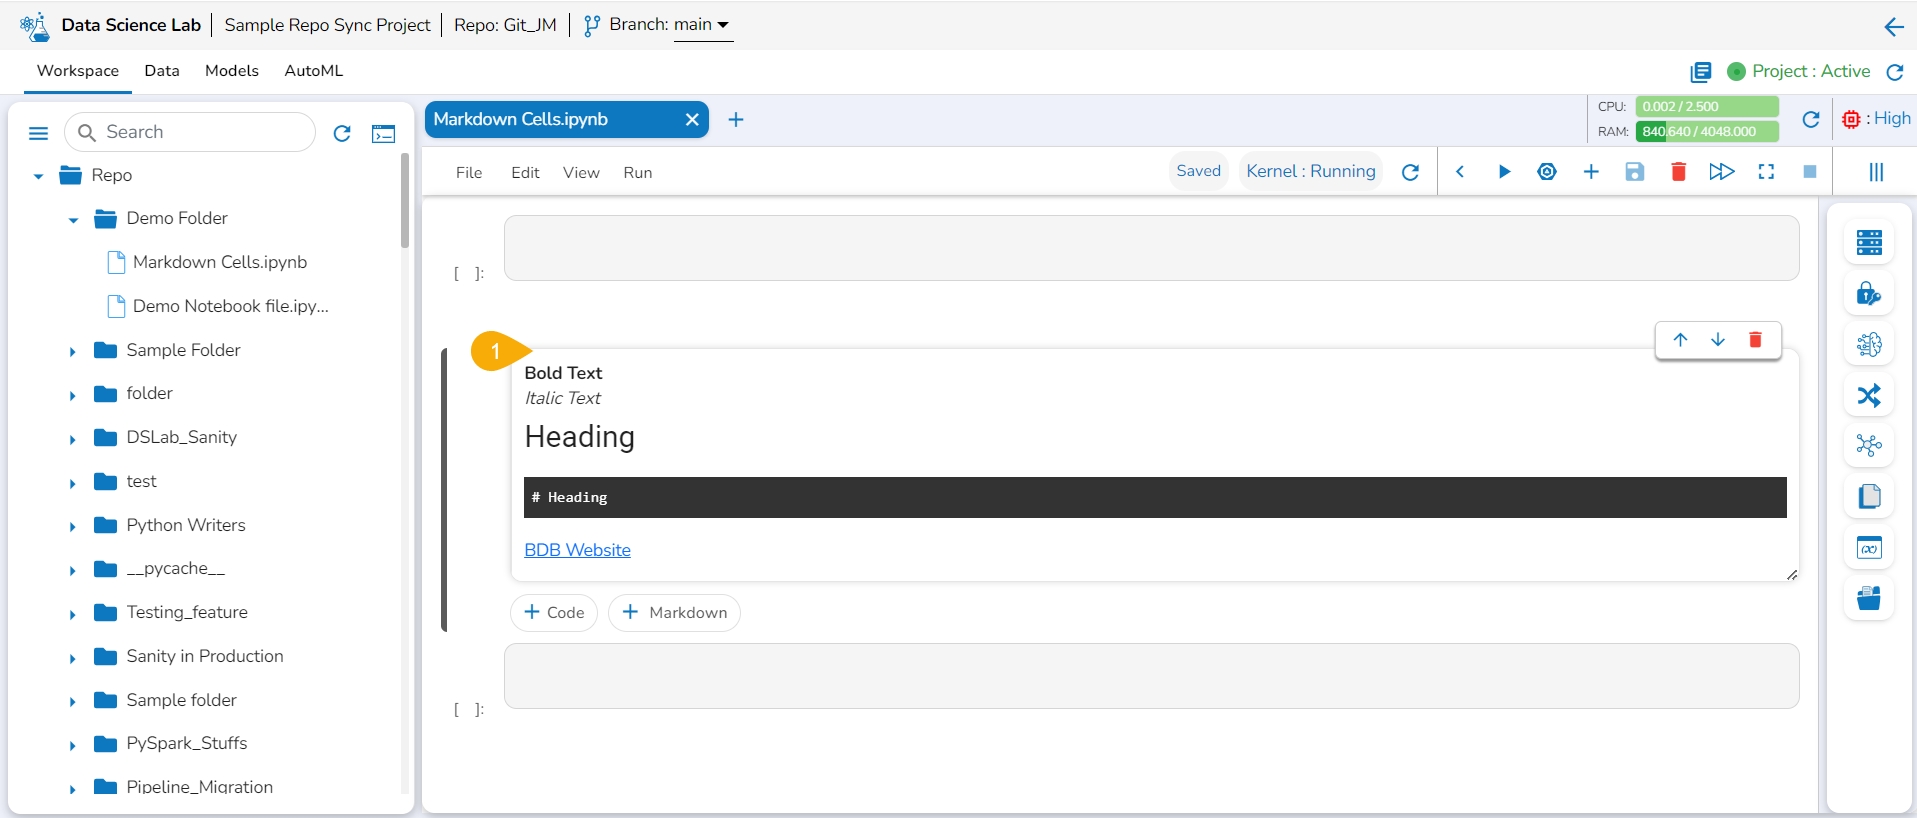
The Markdown cell with inserted effect gets saved and the Markdown display gets changed displaying the text with saved effects on the left side (as shown in the given image).
Please Note: A Code cell gets added below the saved Markdown cell.
The user can click the Save option provided for the Notebook to save the update in the Notebook (after the Markdown cell has been added to it).
The Notebook gets updated and the same gets communicated through a notification message.
Use the double clicks on a saved Markdown cell.
The Markdown cell opens in the editable format to edit it.
Modify the text inside the Markdown cell.
Click the Save option to update the edited Markdown in the Notebook.
Click the Save option for the file.
A notification message appears.
The file gets saved with the Markdown cell.
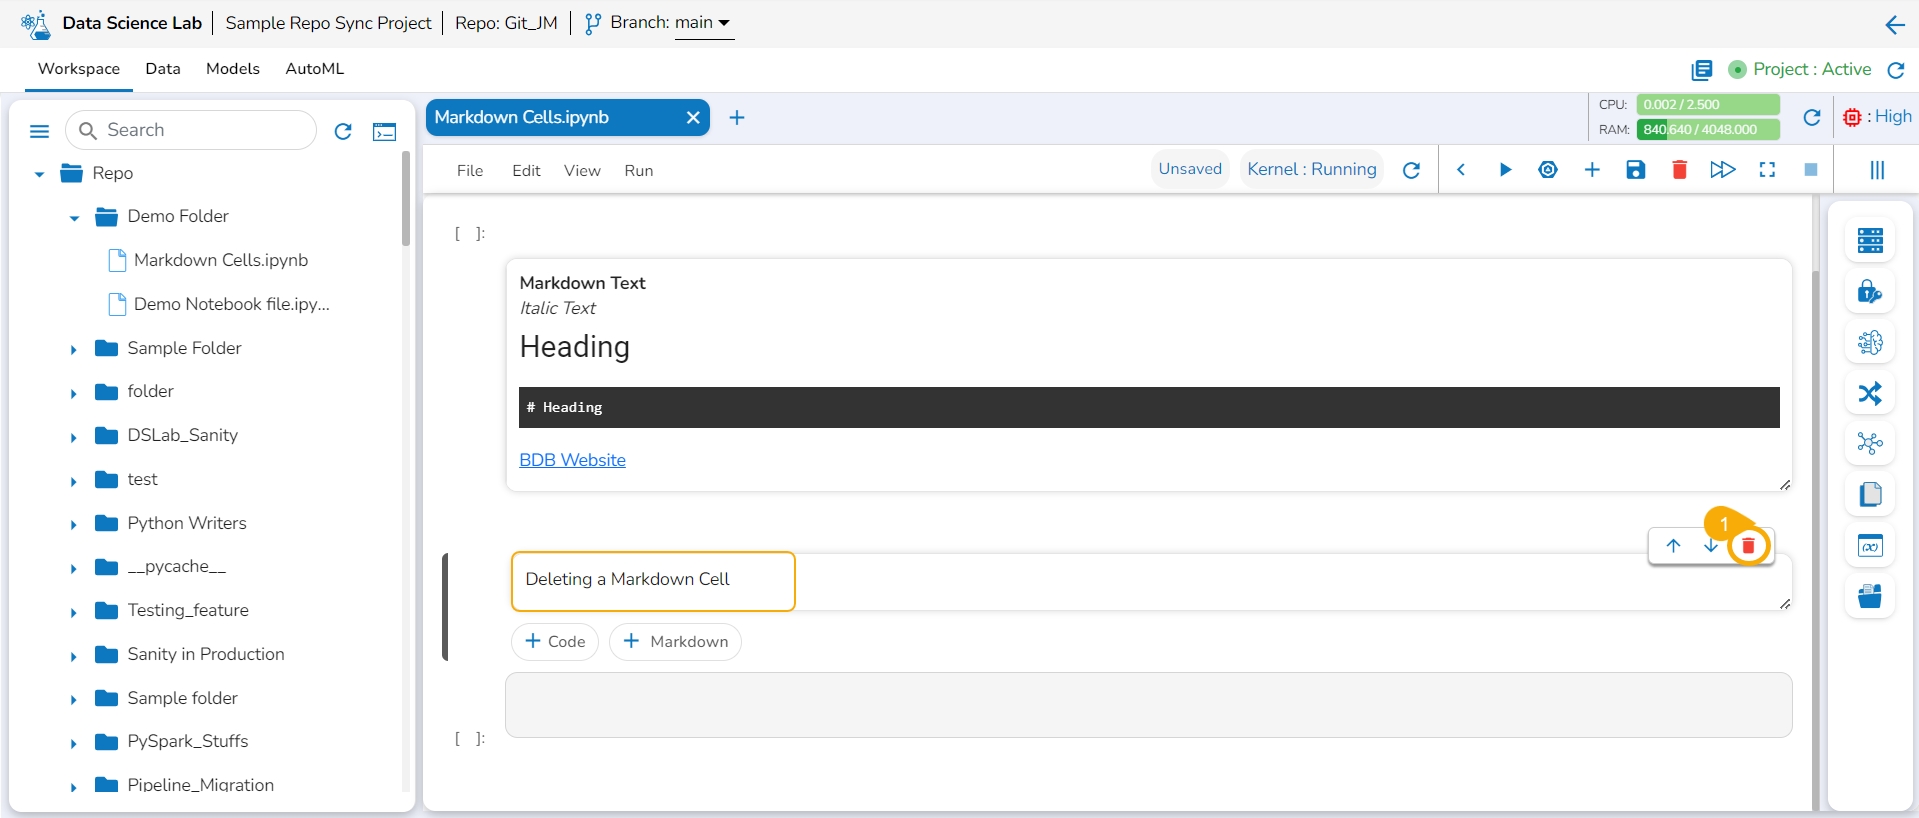
Click the Delete markdown icon for a saved Markdown cell.
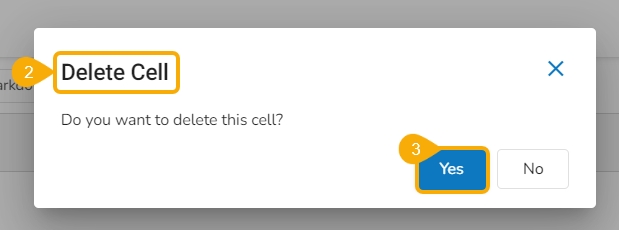
The Delete Cell dialog box opens.
Click the Yes option.
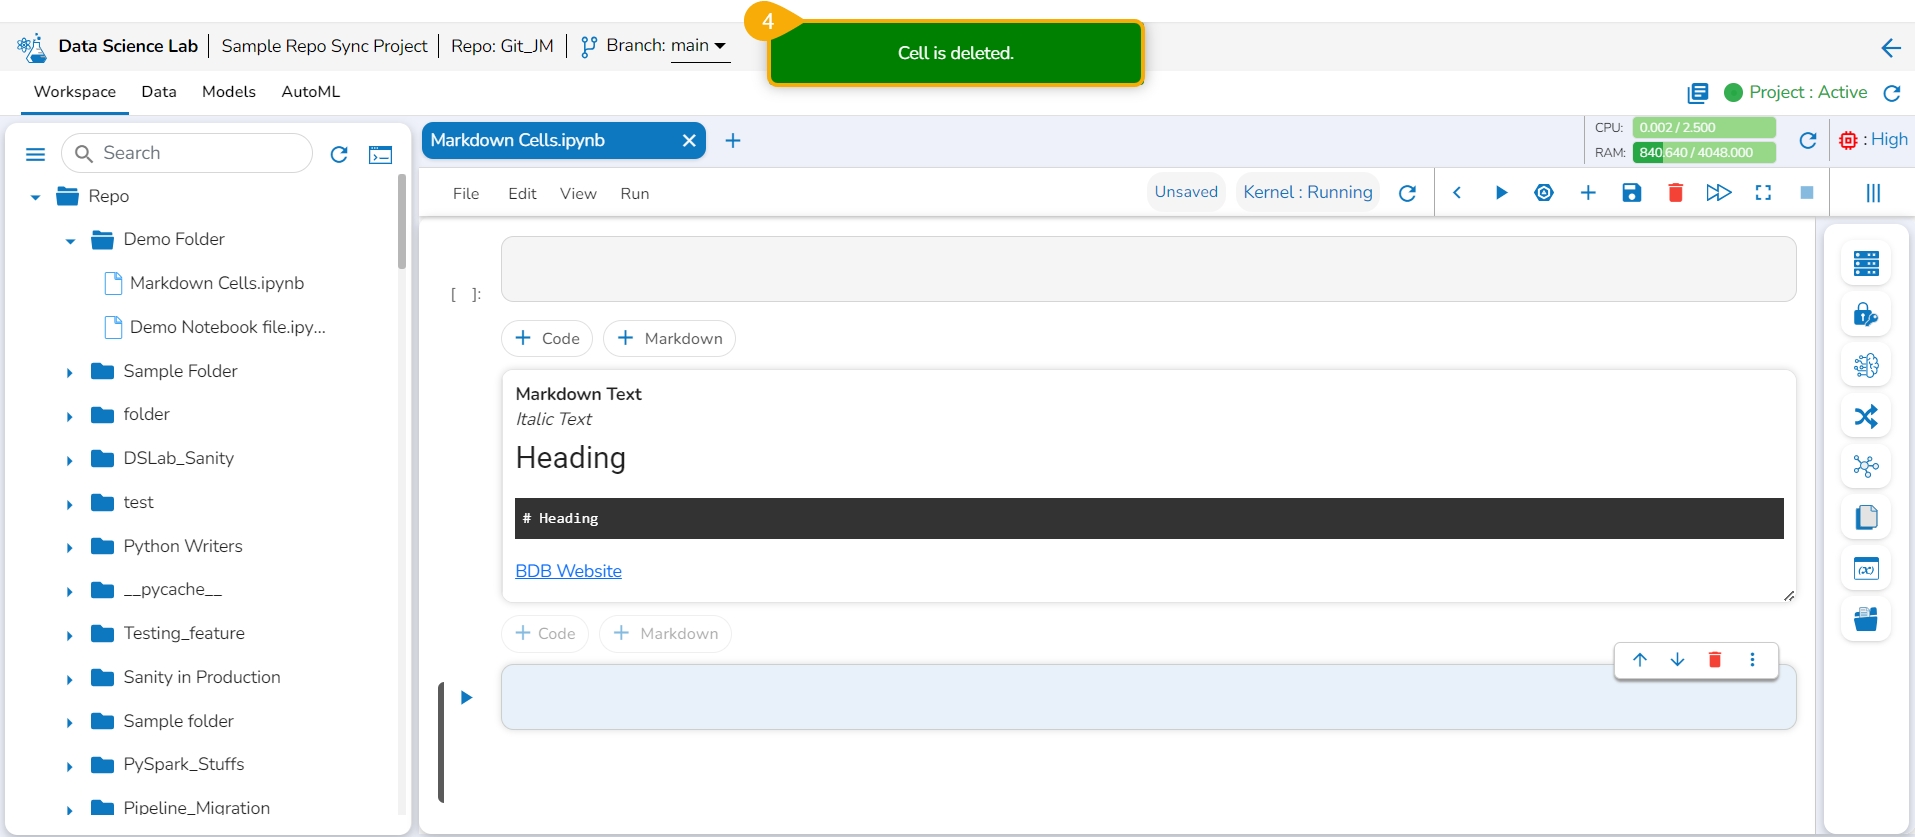
The selected Markdown gets removed and the same gets communicated by a notification message.
Navigate to a .ipynb file inside an activated Project.
Access a Markdown cell.
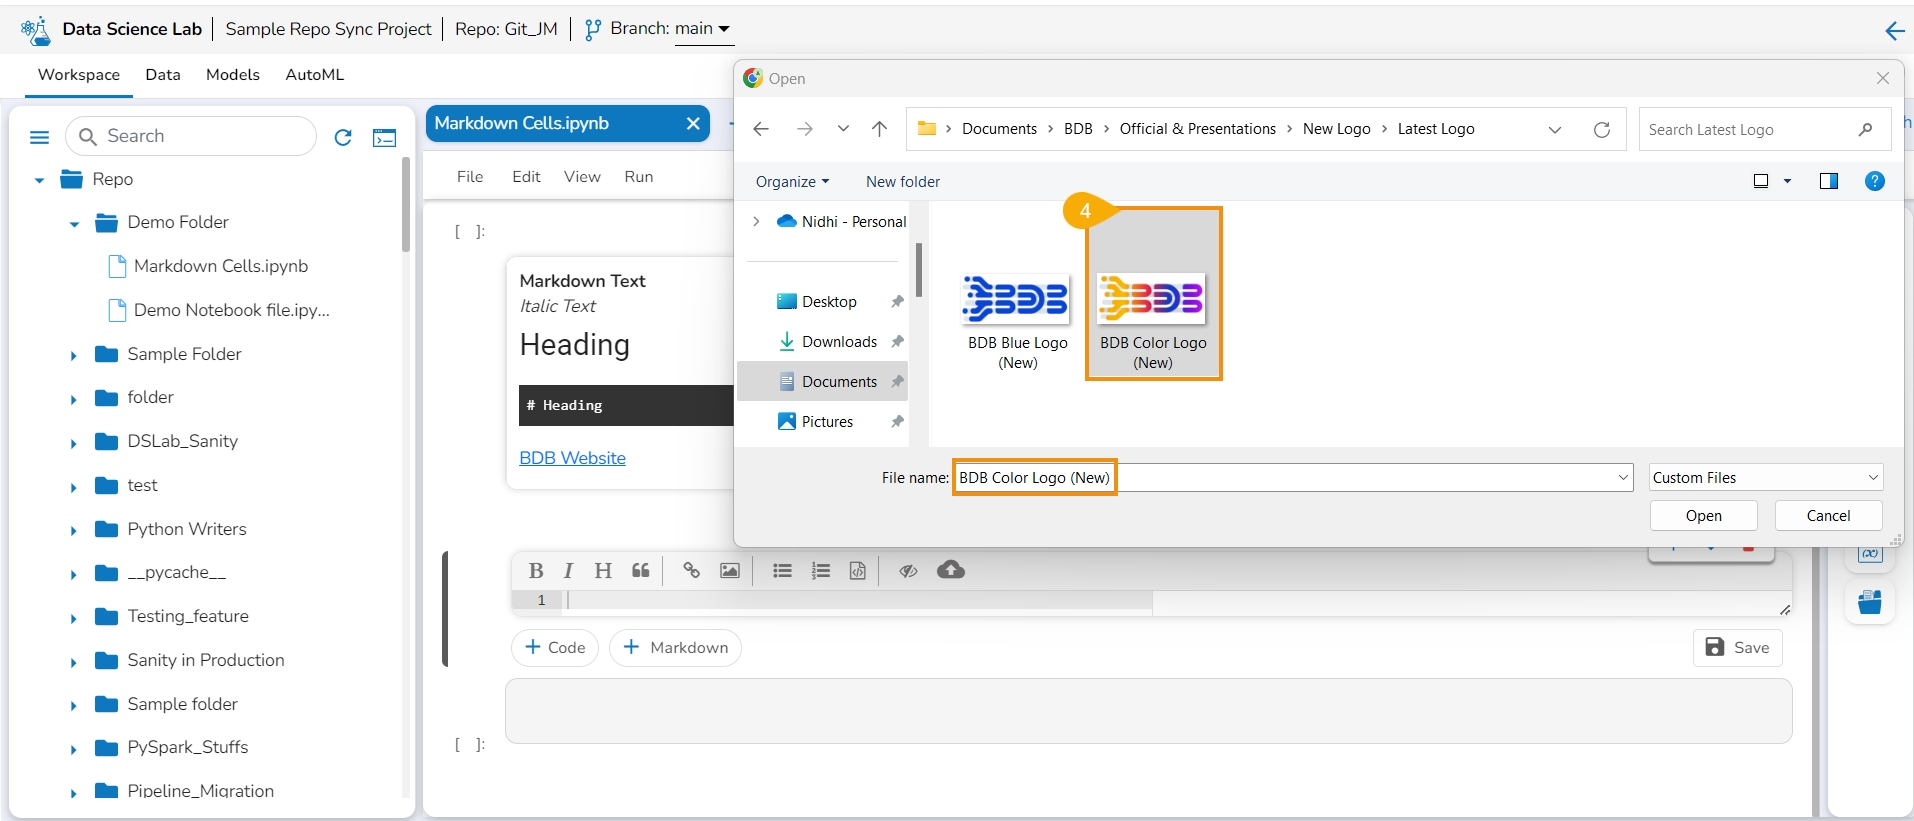
Click the Upload icon.
Upload an image.
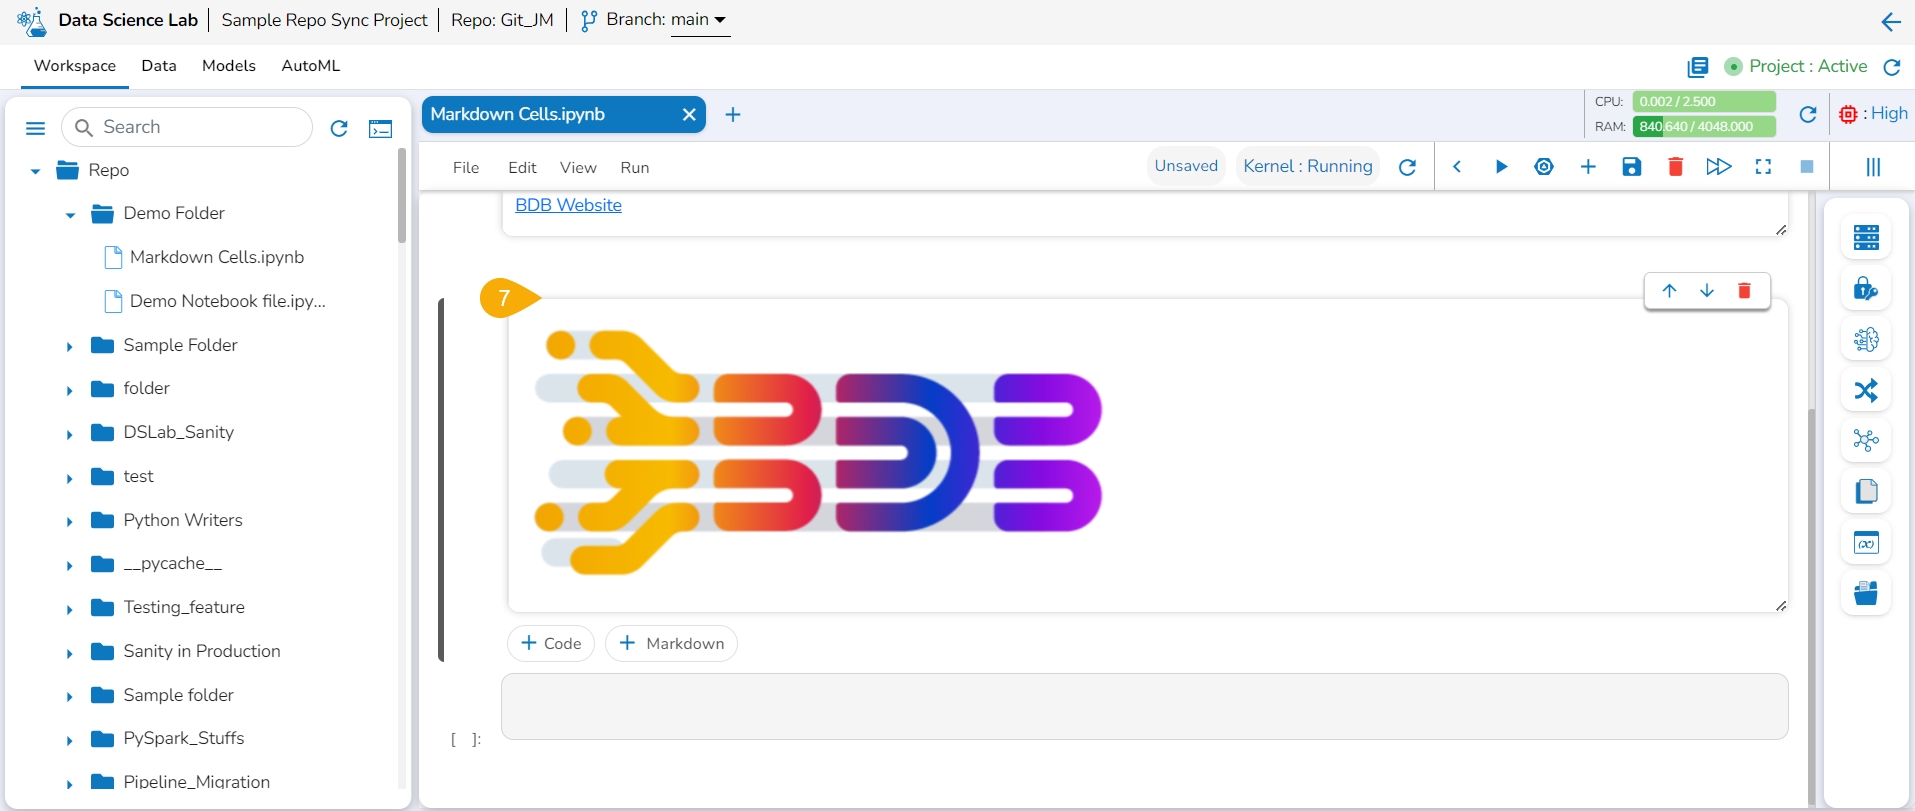
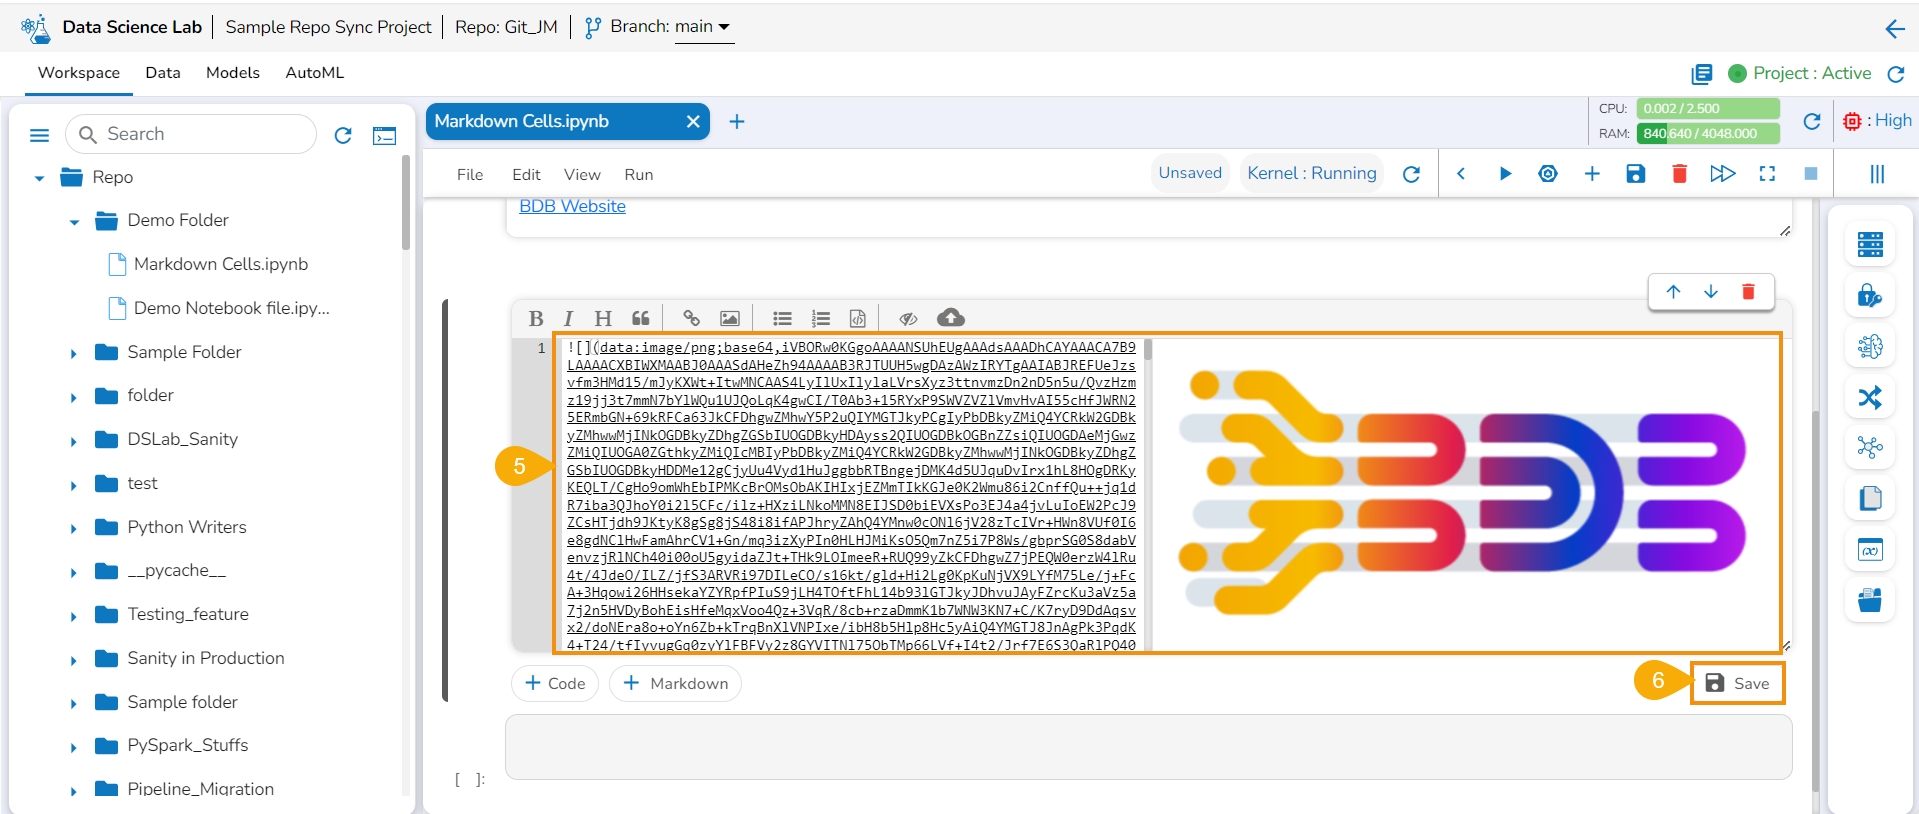
The image gets uploaded to the markdown cell.
Click the Save icon.
The markdown cell gets saved the uploaded image appears in the View mode of the markdown.
Please Note: Do not forget to click the Save icon for the Data Science Notebook to save the markdown updates in the .ipynb file.
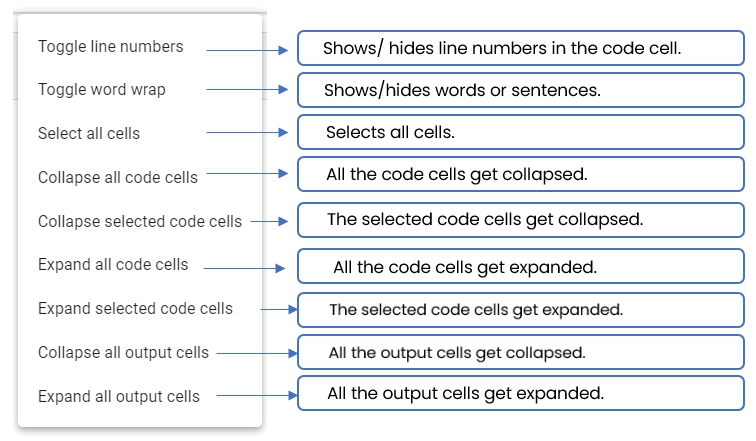
The Data Science Notebook task bar presents different options that may be used to manipulate the way the notebook functions.
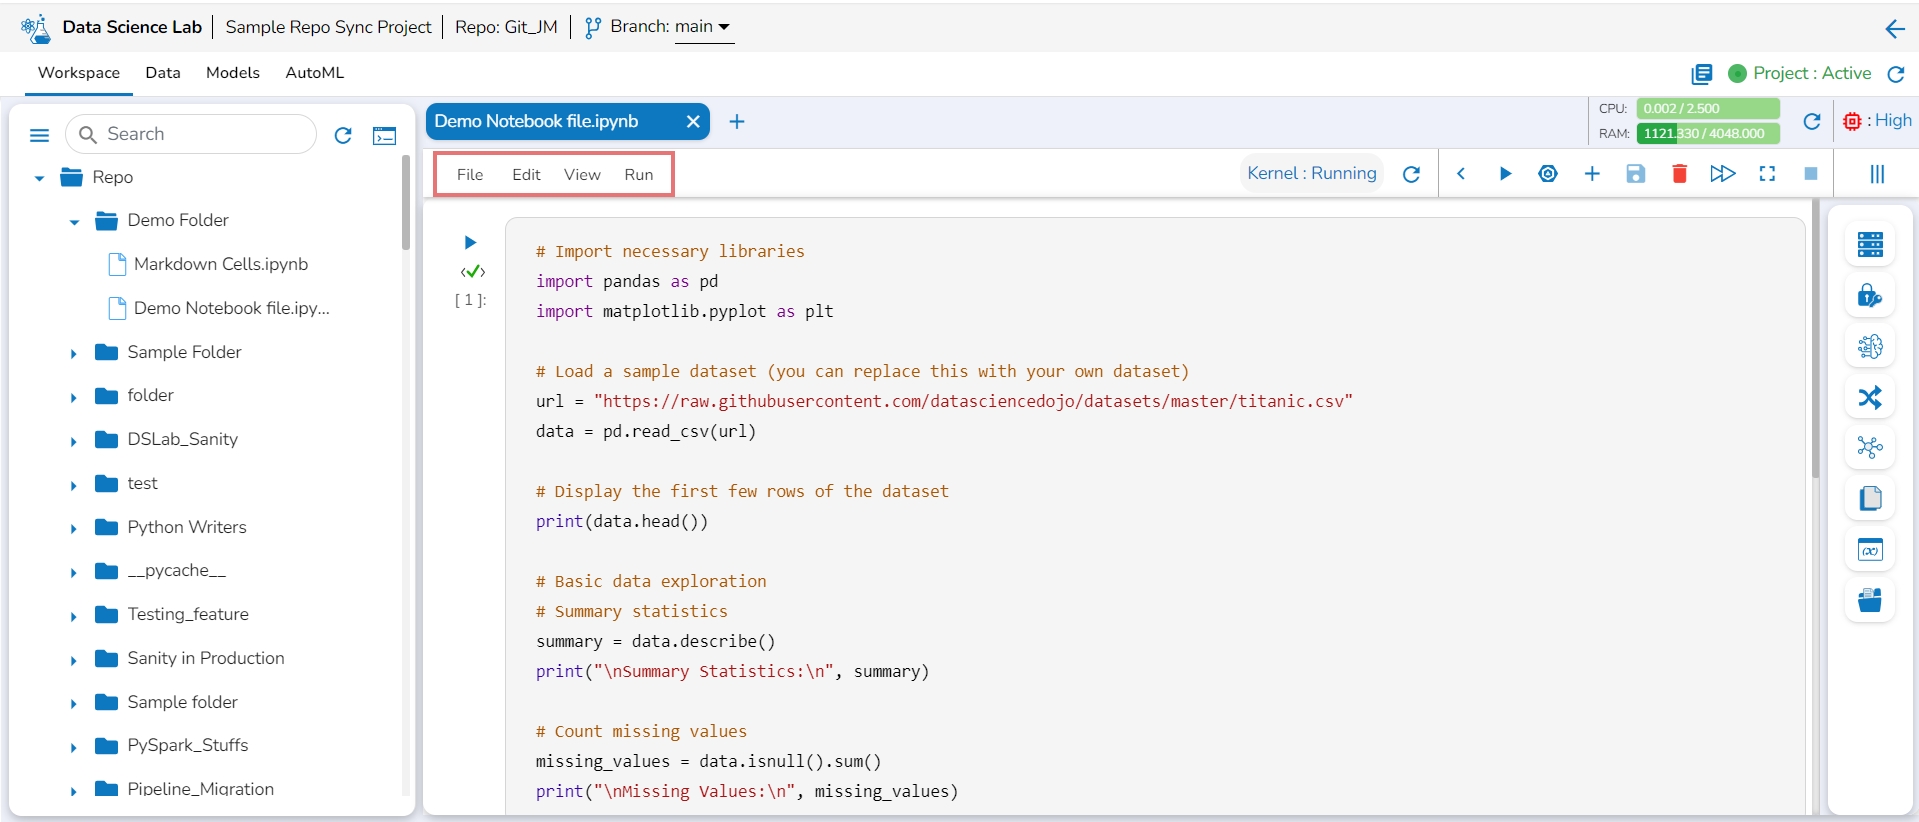
A taskbar has been provided on the top left of the Data Science Notebook screen to perform various tasks quickly.
Click on each tab of the following Taskbar to read about the specific tasks of that Notebook taskbar.
A Data Science Notebook or .ipynb file contains various types of cells inside it to create Data Science experiments.
These cells contain explanatory text (Markdown), executable code, and BDB Assist cells and their output.
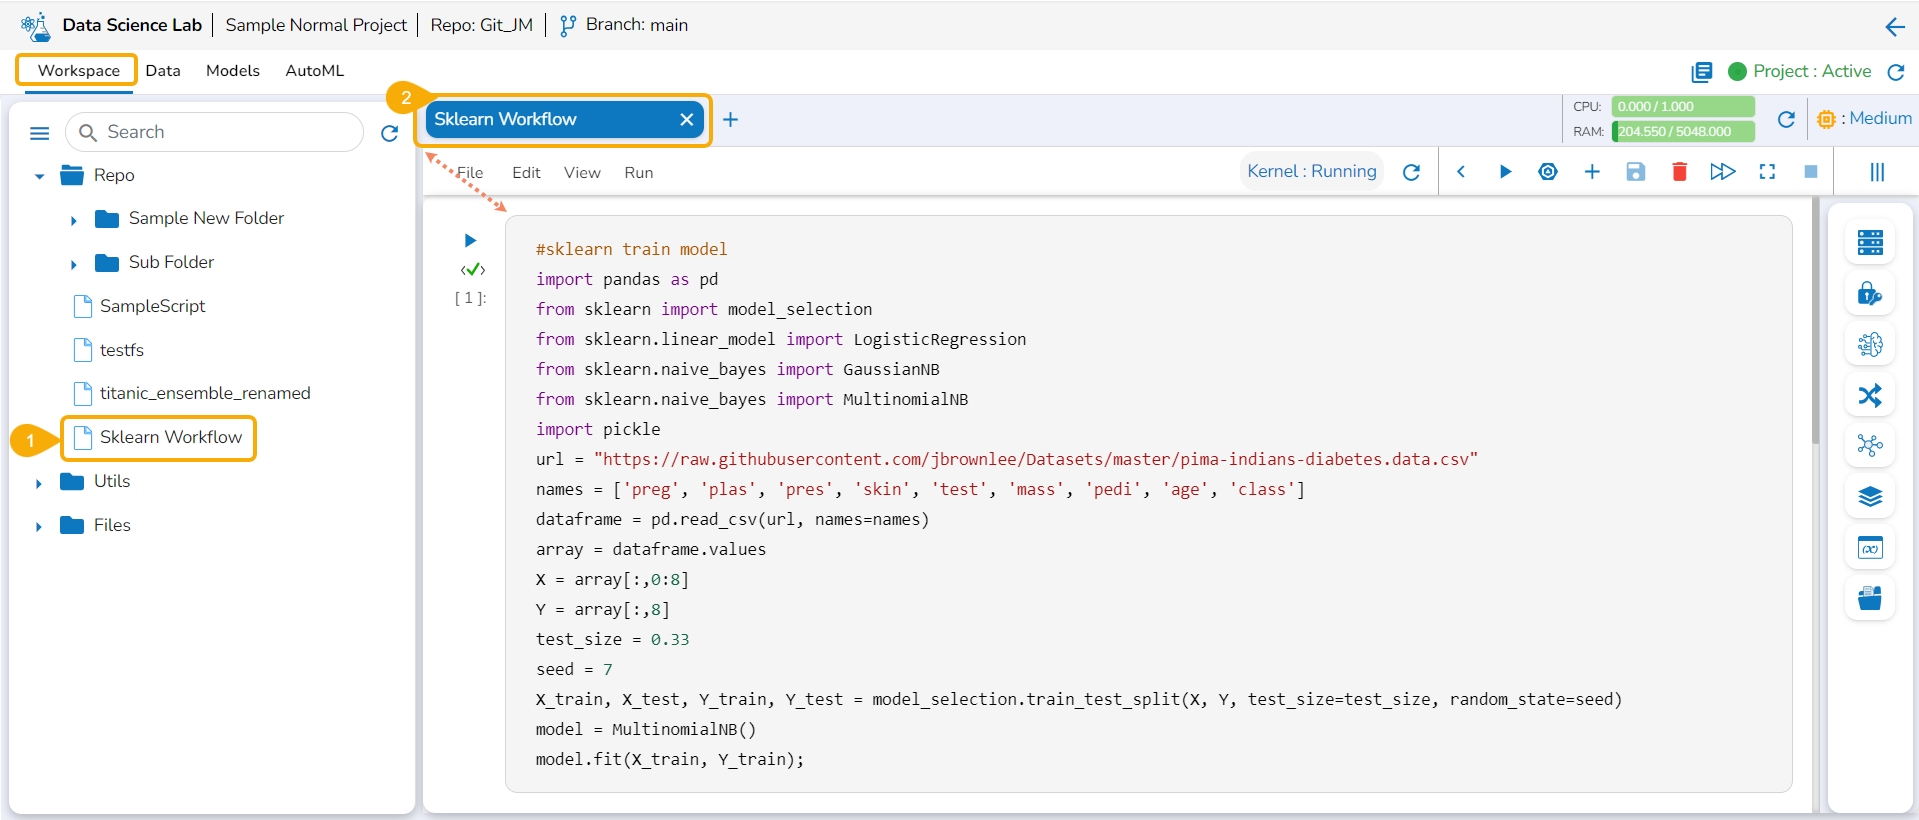
Navigate to the Notebook tab for a repo sync project.
Open a .ipynb file from the left side menu.
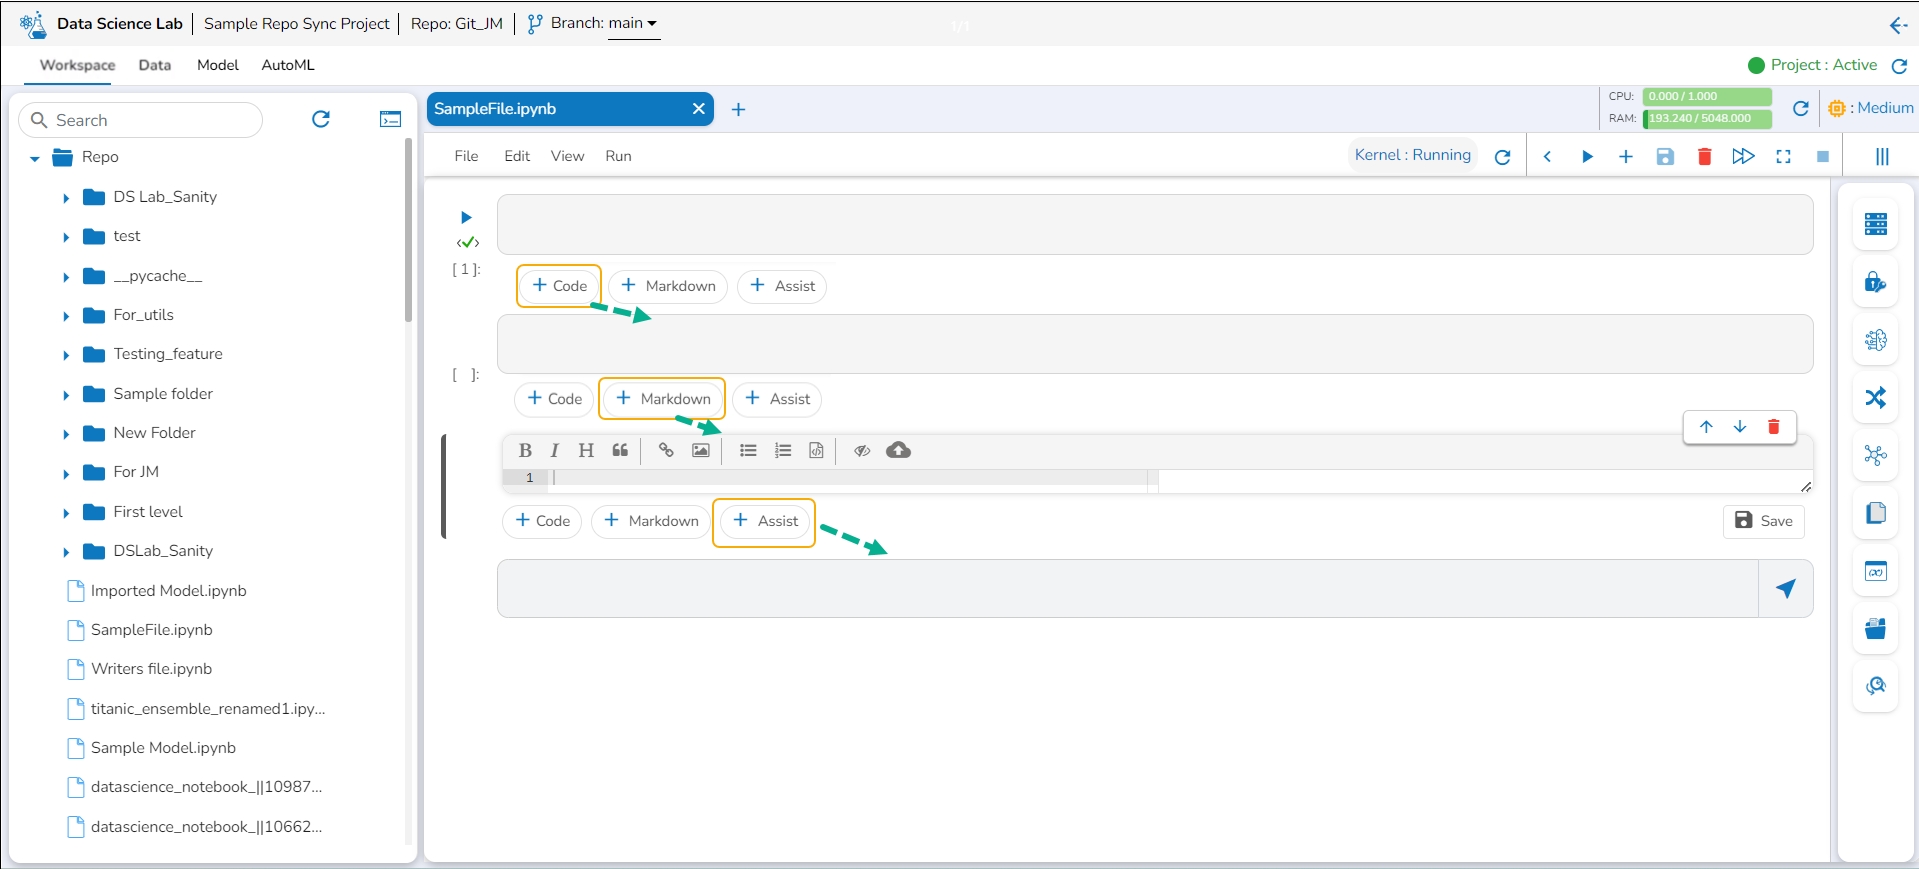
The user can use the Add pre-cell icon to add a new code cell at the beginning of the .ipynb file.
You can add new cells by using the +Code, +Markdown, and +Assist options given at the bottom of the cell.
The Export icon provided for a Notebook redirects the user to export the Notebook as a script to the Data Pipeline module and GIT Repository.
A Notebook can be exported to the Data Pipeline module using this option.
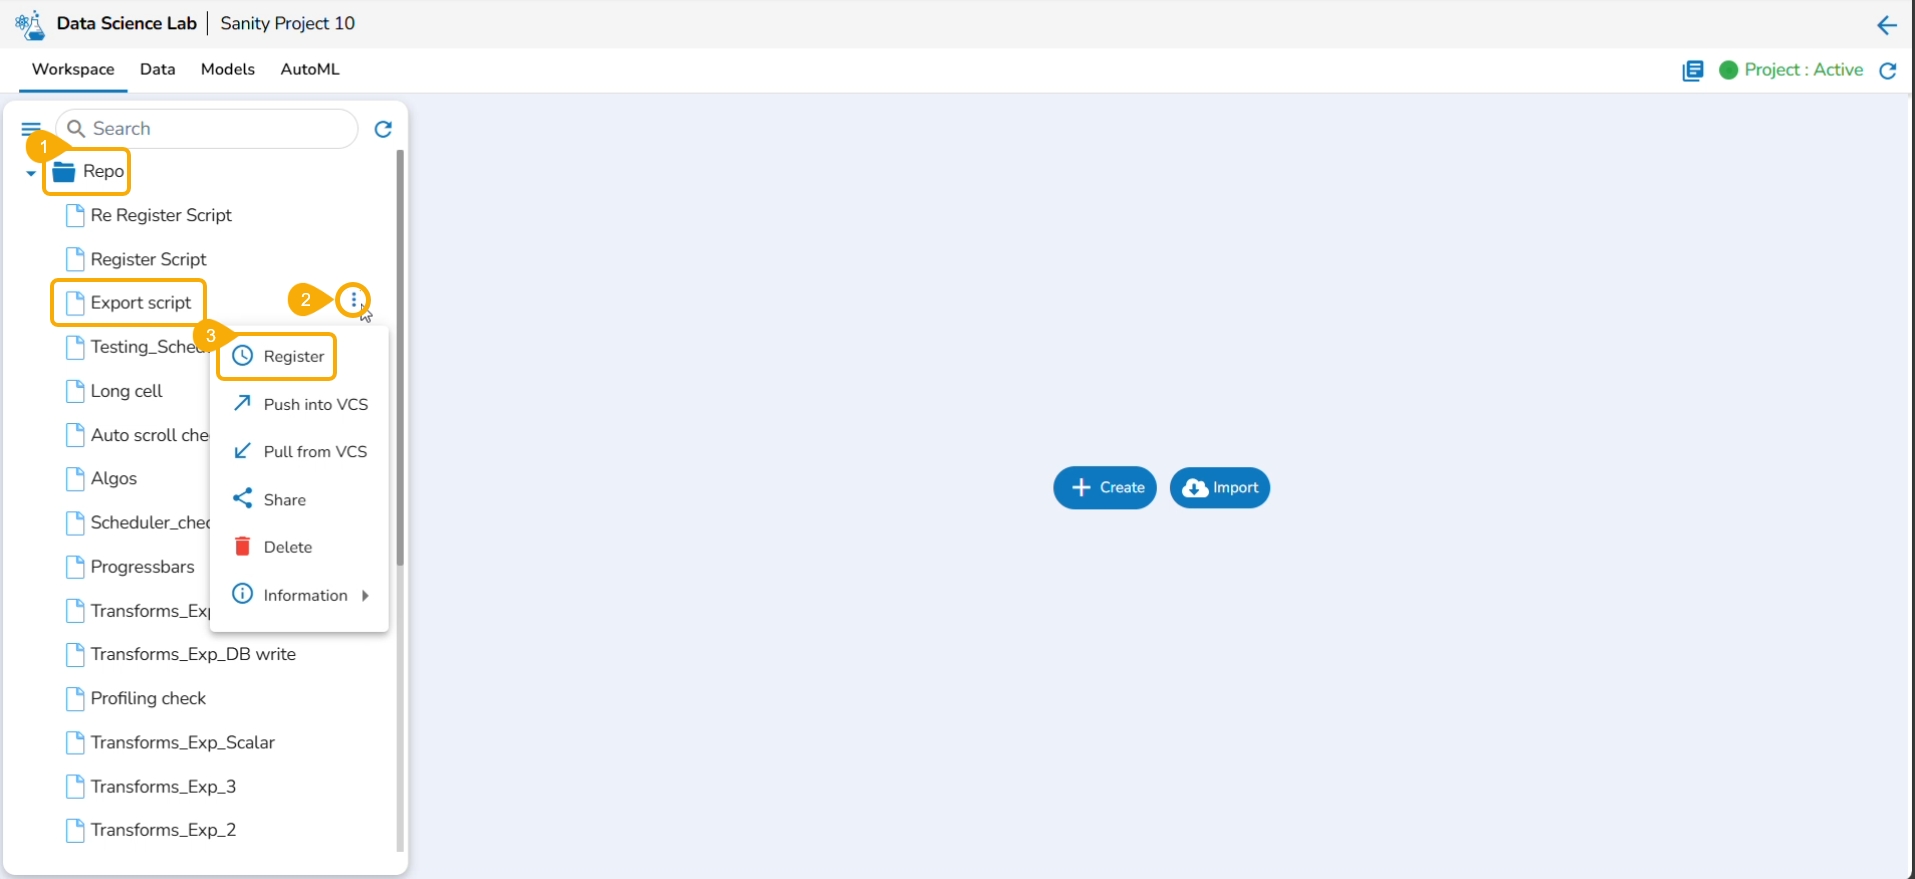
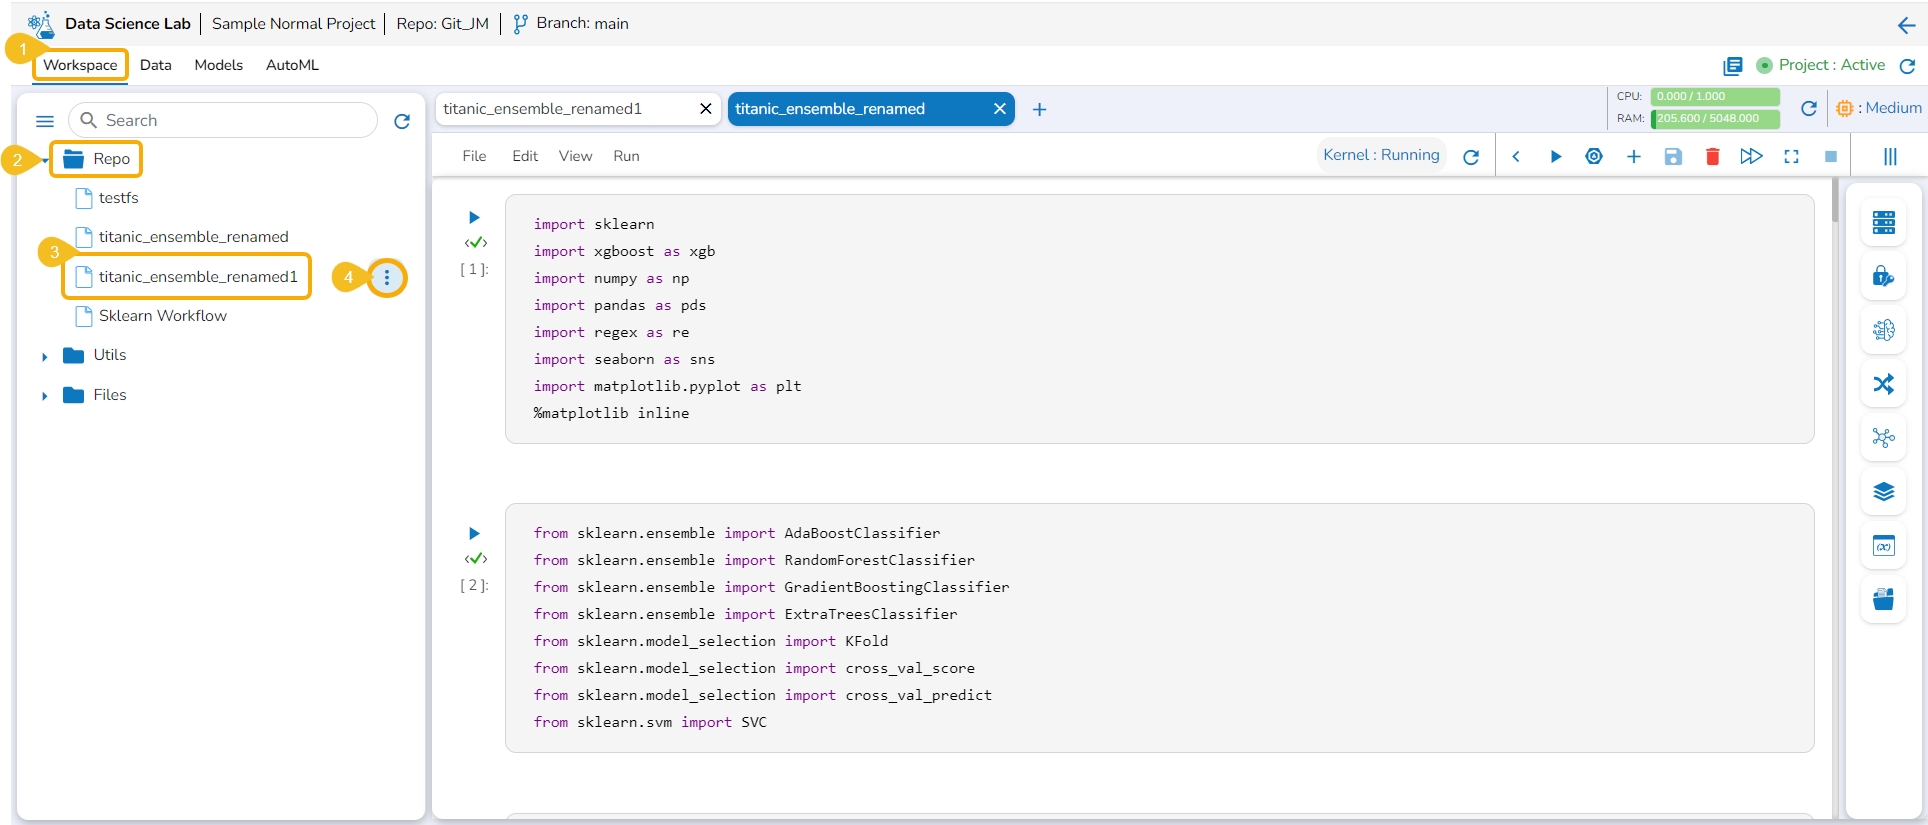
Navigate to the Repo folder and select a Notebook from the Workspace tab.
Click the Ellipsis icon for the selected Notebook to open the context menu.
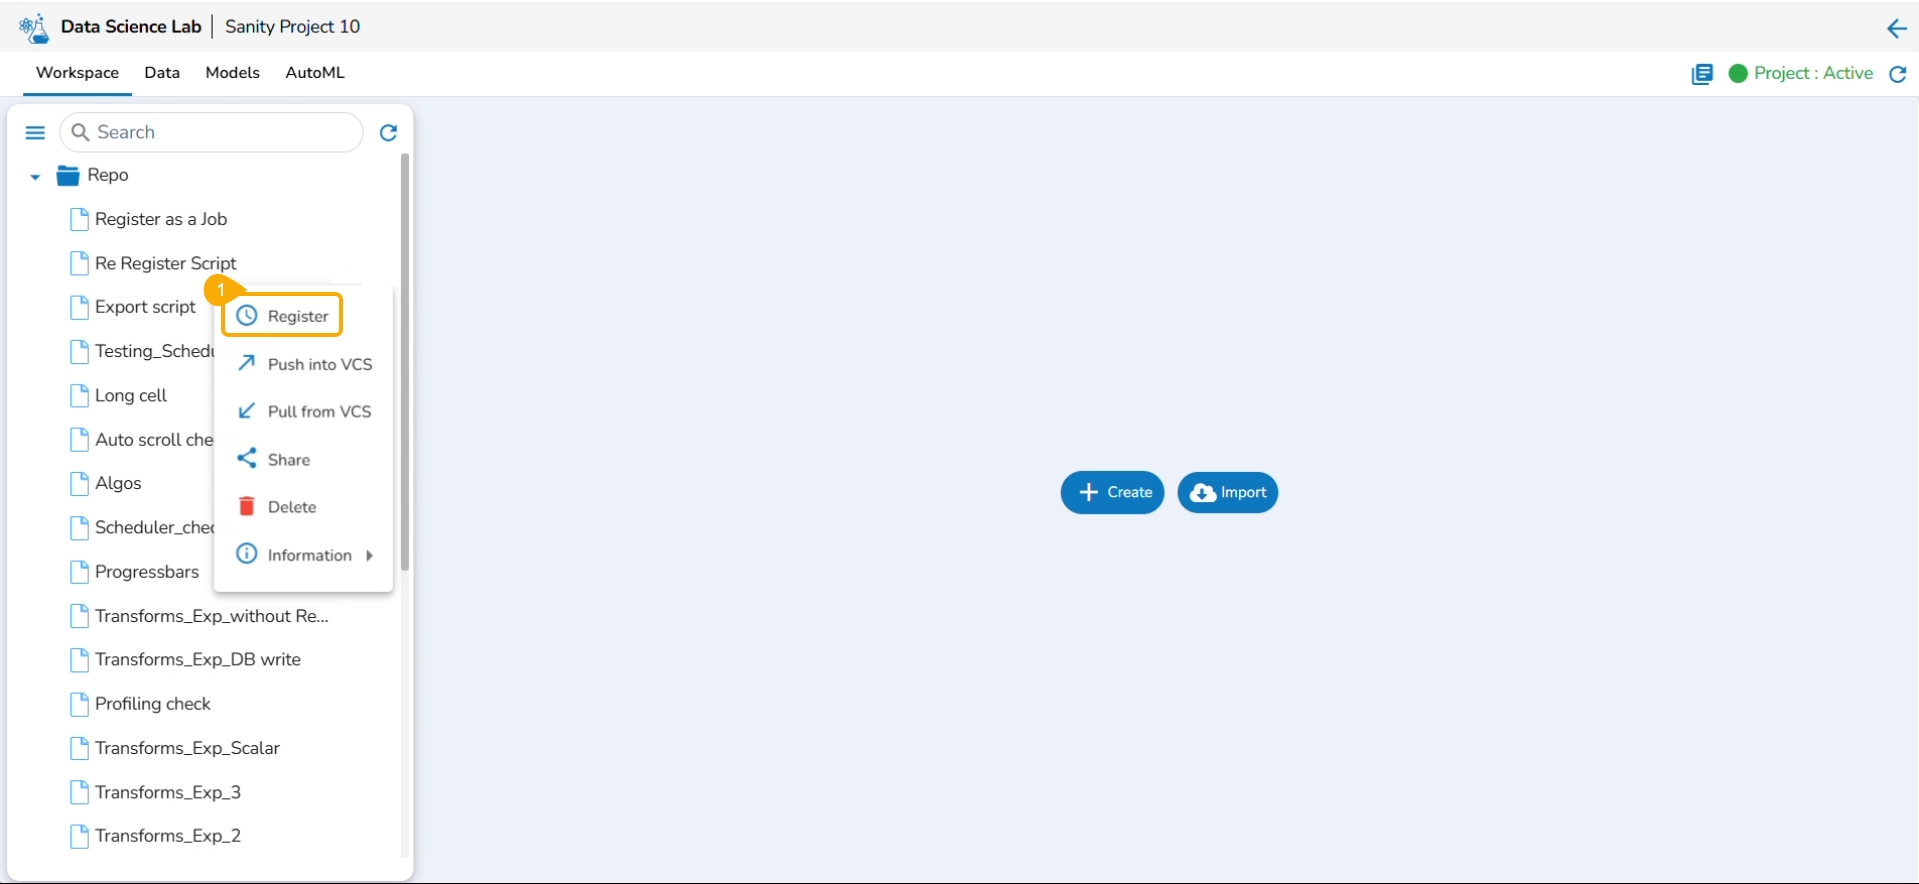
Click the Register option for the Notebook.
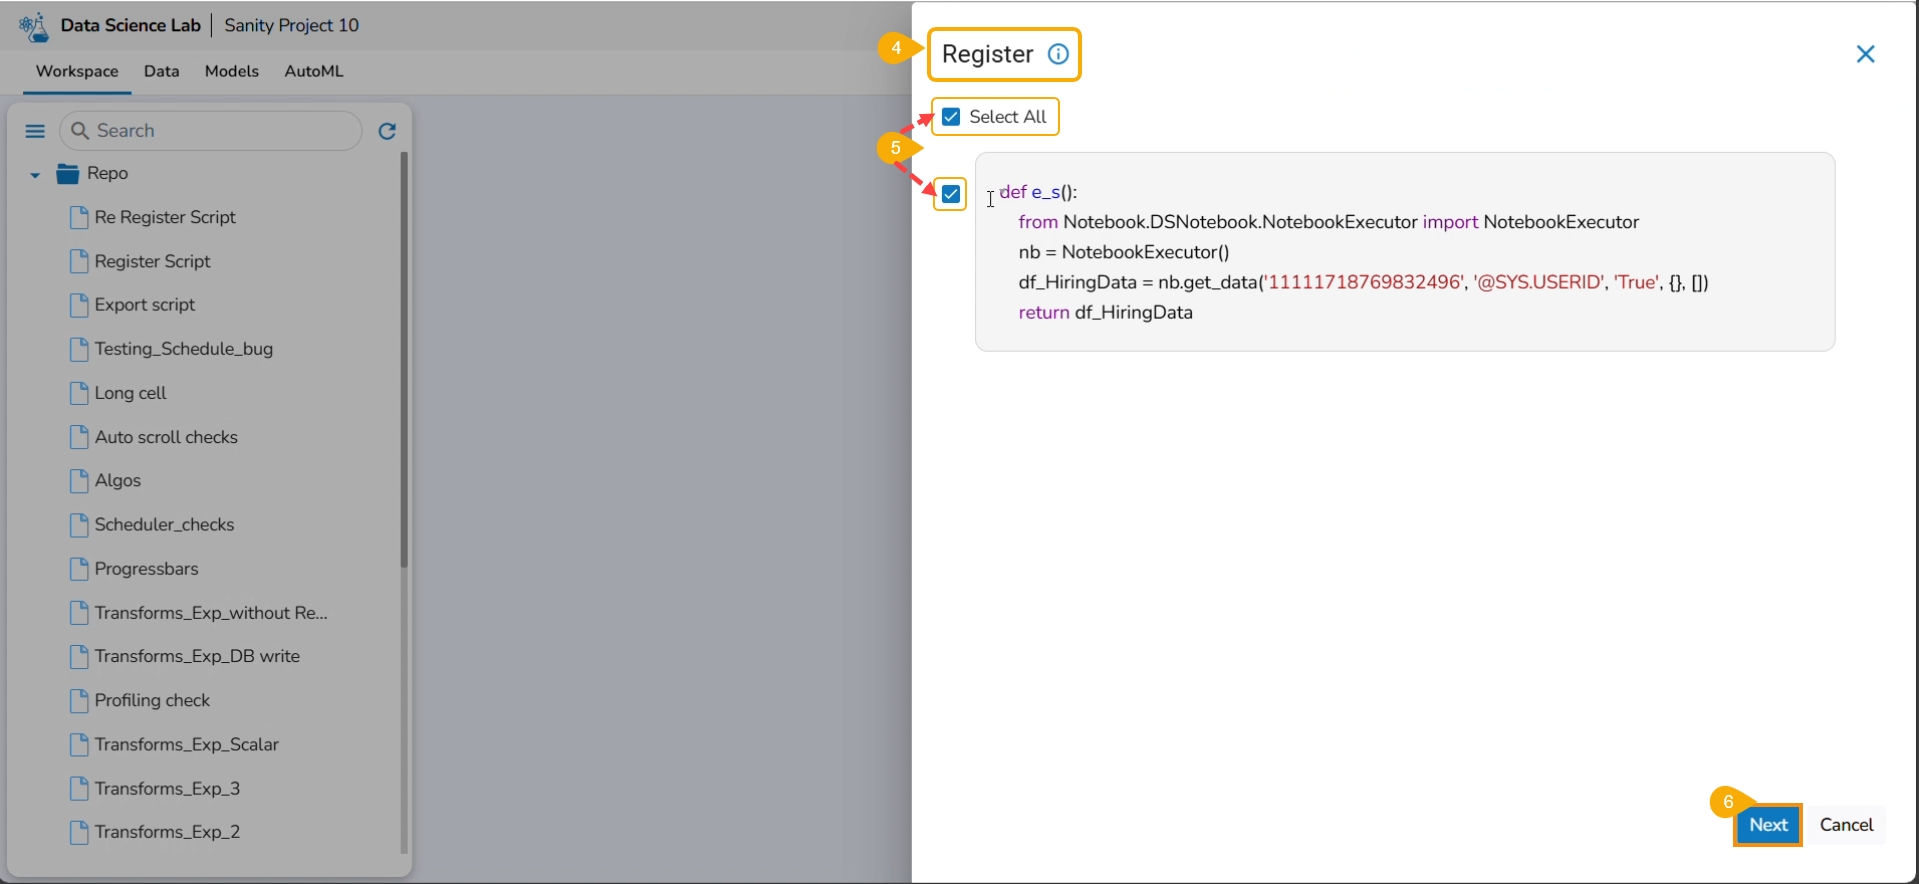
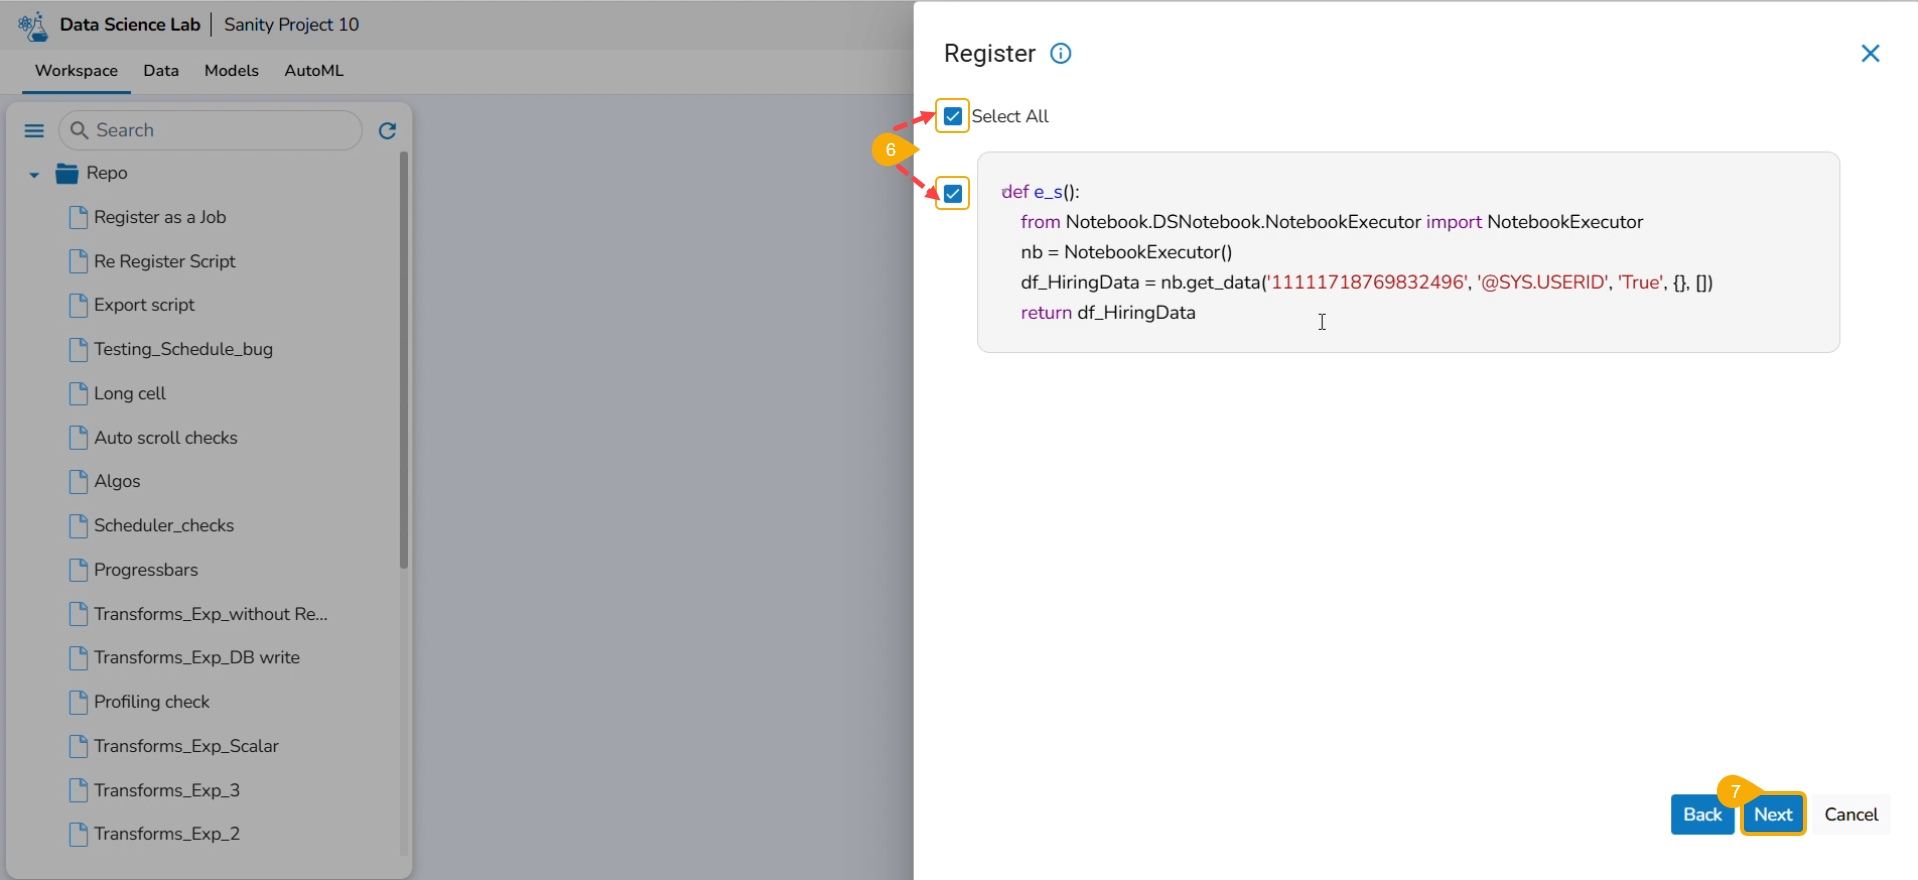
The Register window opens.
Select the Select All option or the required script using the checkbox(es).
Click the Next option.
Please Note: The user must write a function to use the Export to Pipeline functionality.
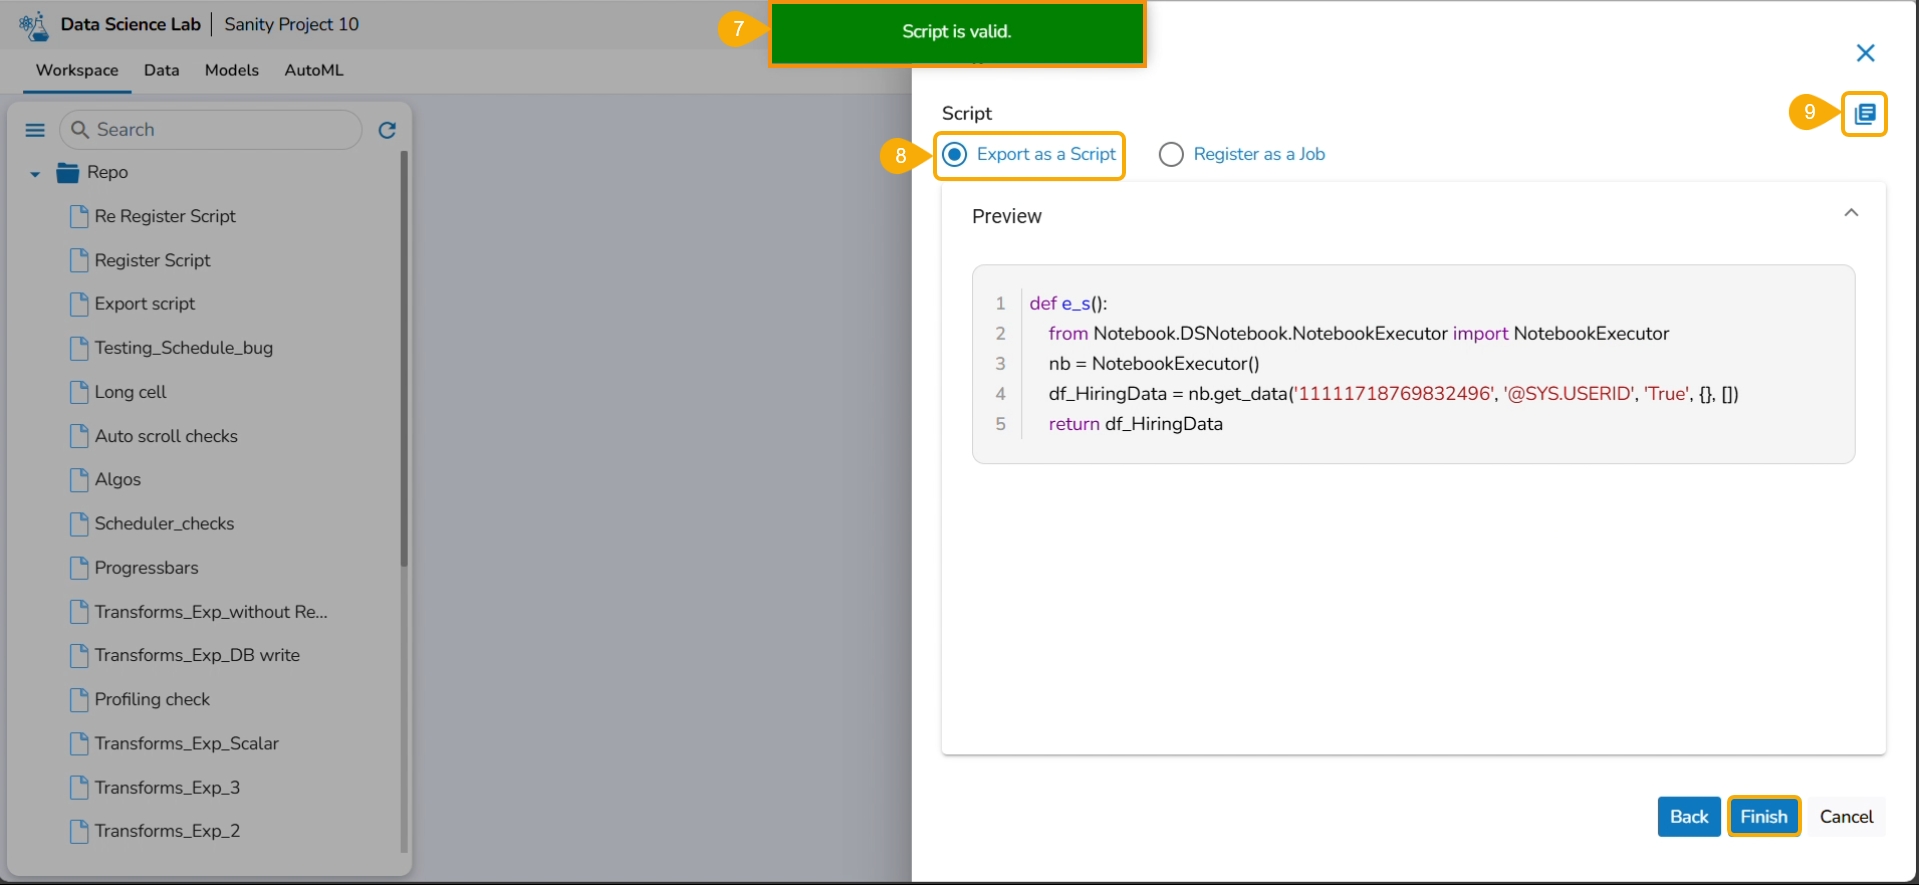
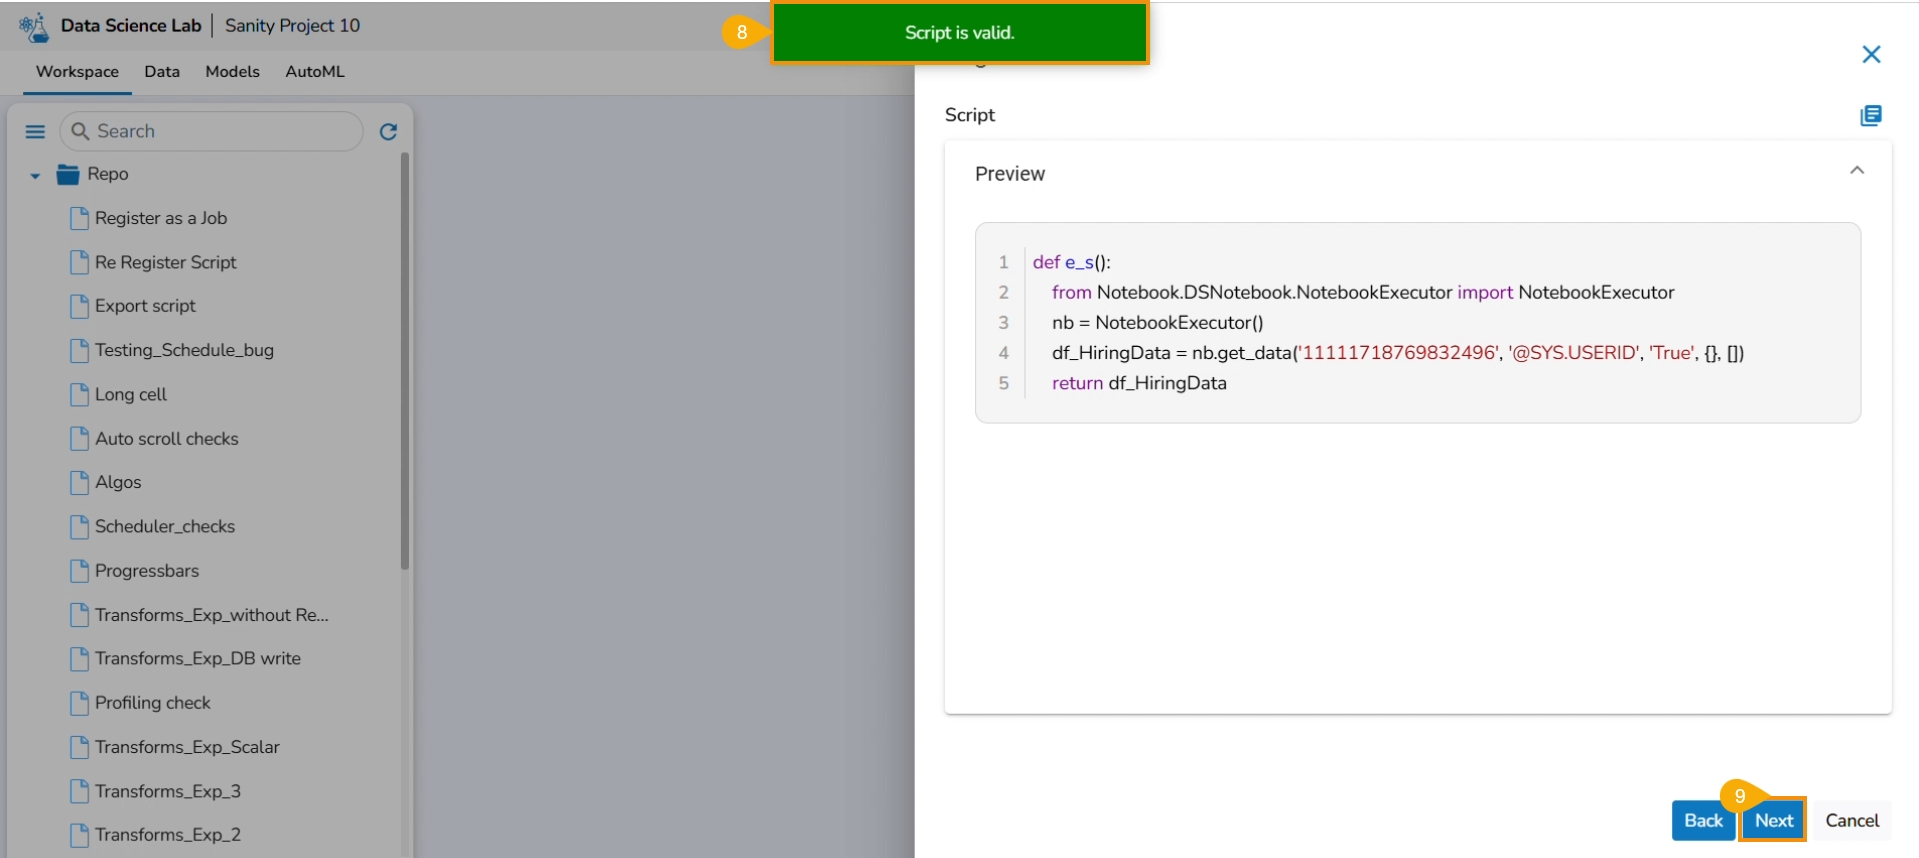
A notification appears stating that the selected script is valid.
Select Export as a Script option by selecting it via the checkbox.
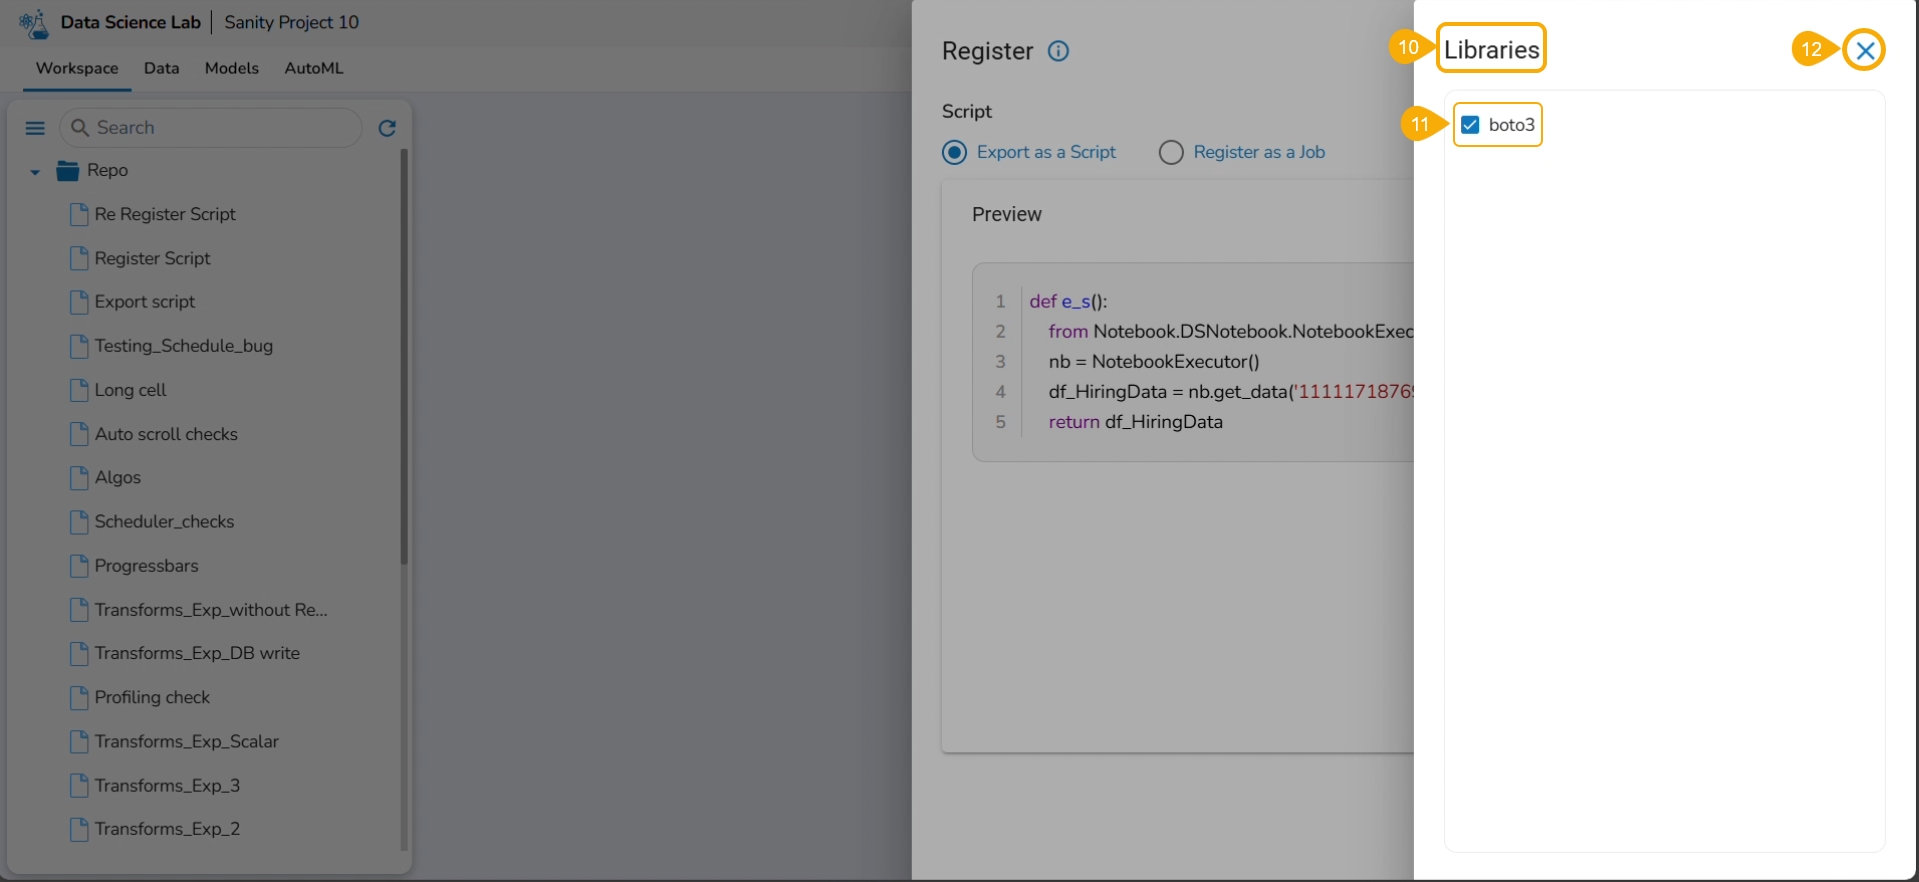
Click the Libraries icon.
The Libraries drawer opens.
Select available libraries by using checkboxes.
Click the Close icon to close the Libraries drawer.
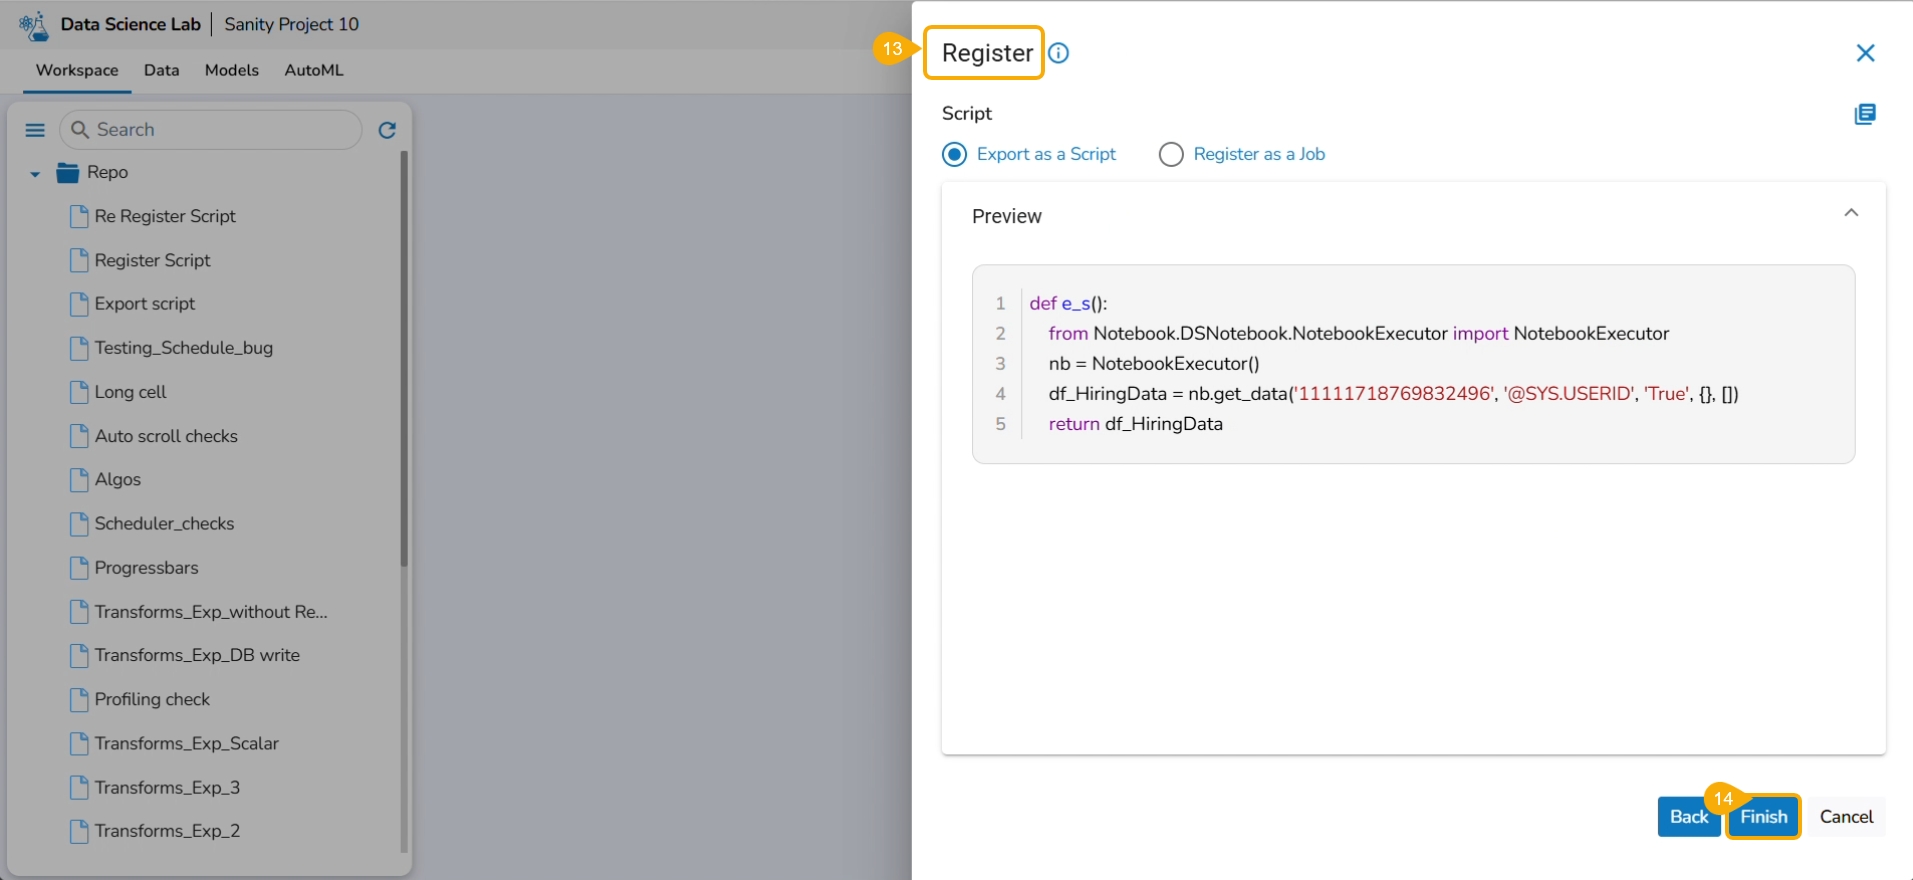
The user gets redirected to the Register page.
Click the Finish option.
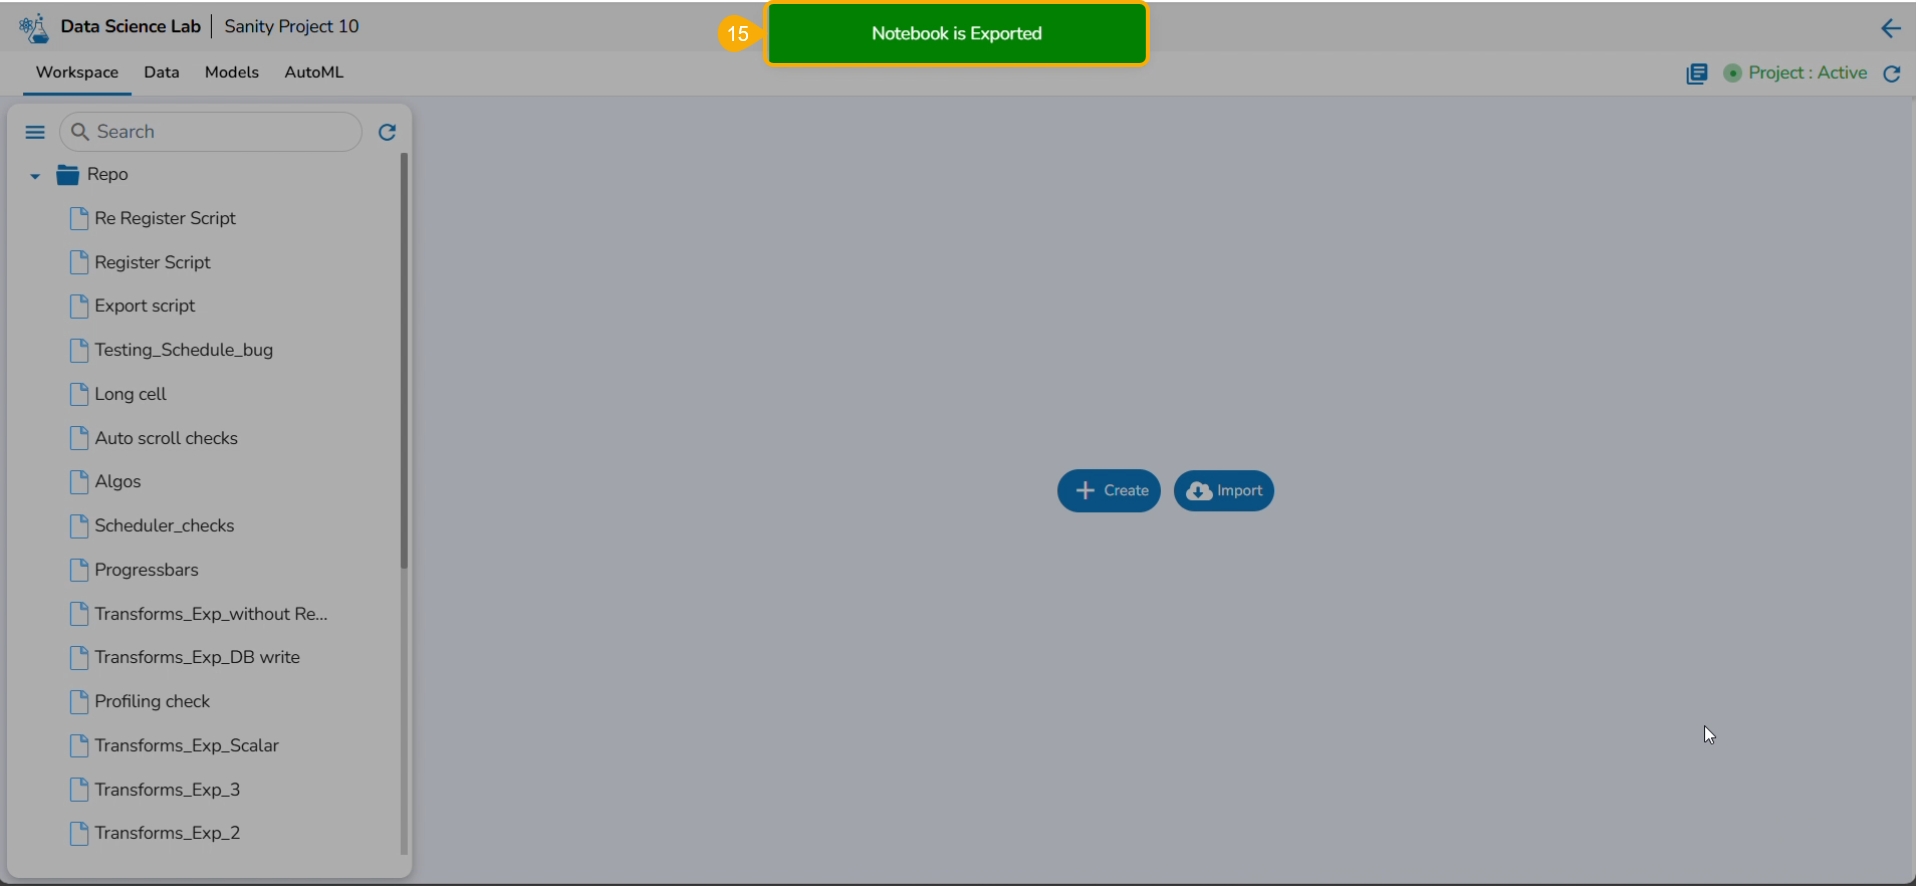
A notification message appears to ensure that the selected script is exported.
Please Note: The exported script will be available for the Data Pipeline module to be consumed inside a DS Lab Runner component.
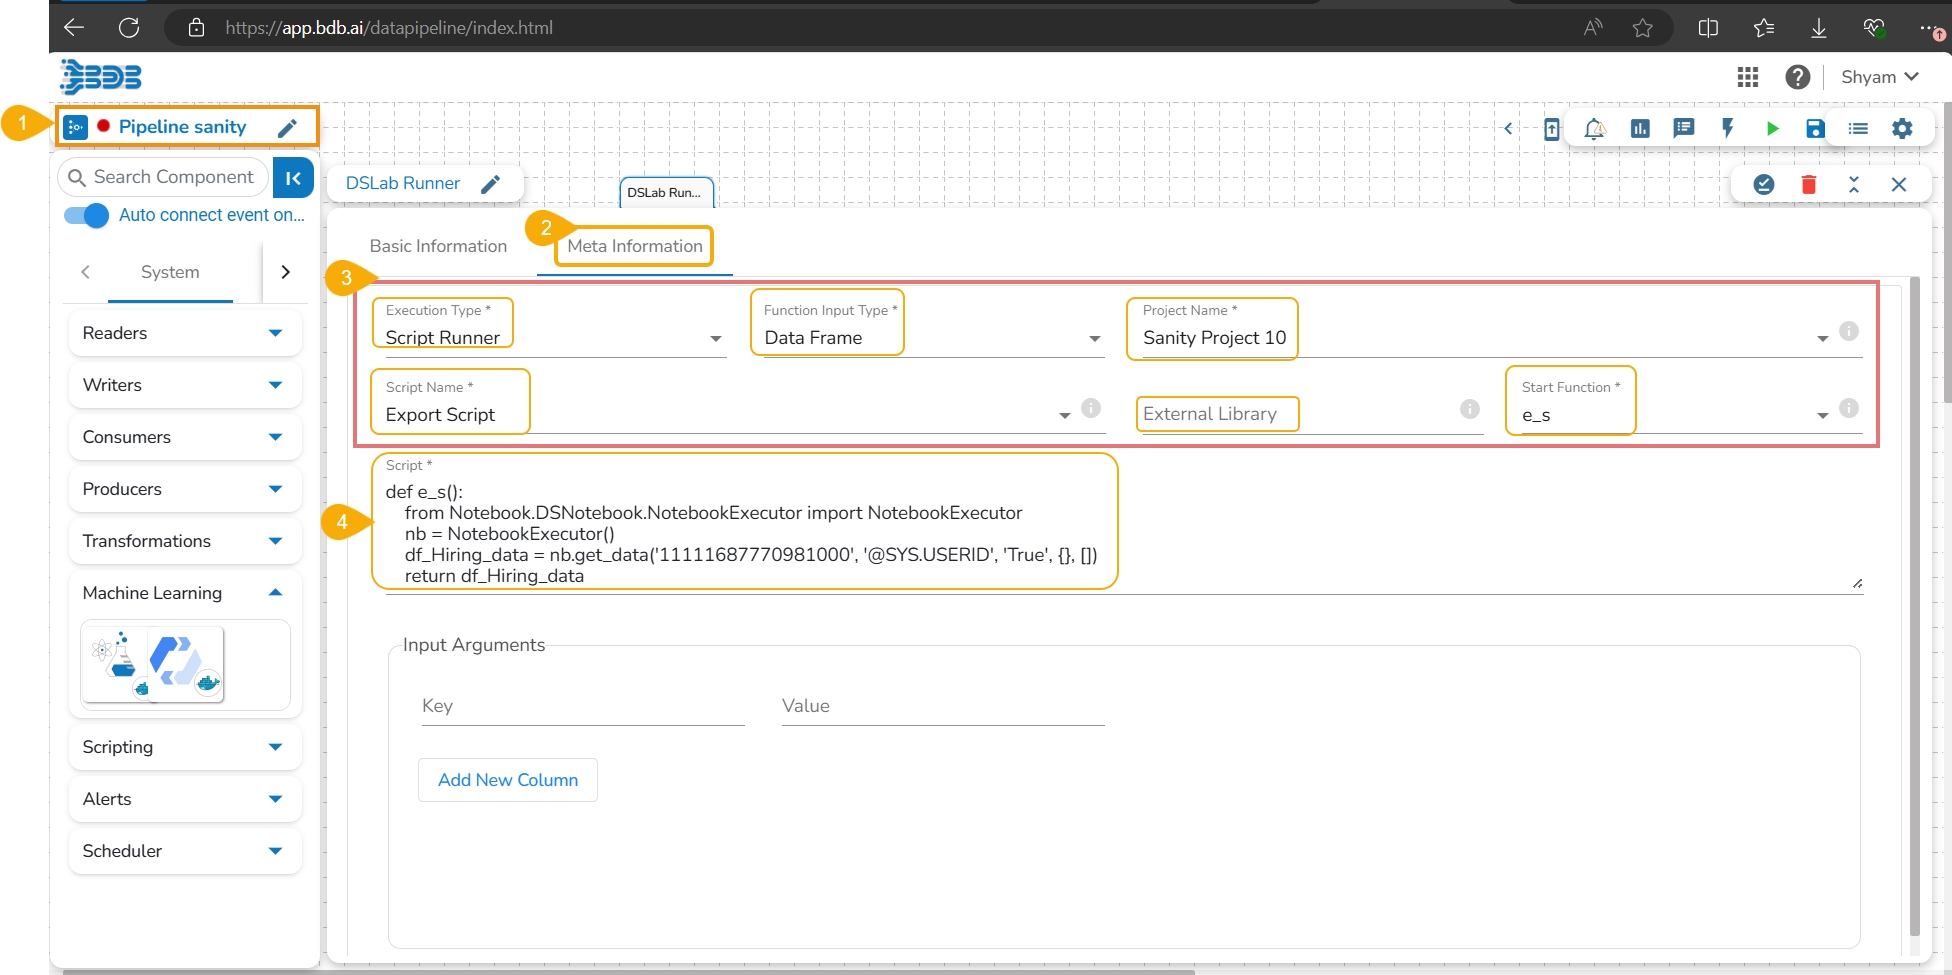
Navigate to a Data Pipeline containing the DS Lab Runner component.
Open the Meta Information tab of the DS Lab Runner component.
Select the required information as given below to access the exported script:
Execution Type: Select the Script Runner option.
Function Input Type: Select one option from the given options: Data Frame or List.
Project Name: Select the Project name using the drop-down menu.
Script Name: Select the script name using the drop-down menu.
External Library: Mention the external library.
Start Function: Select a function name using the drop-down menu.
The exported Script is displayed under the Script section.
This page covers all the actions provided for a Data Science Notebook file.
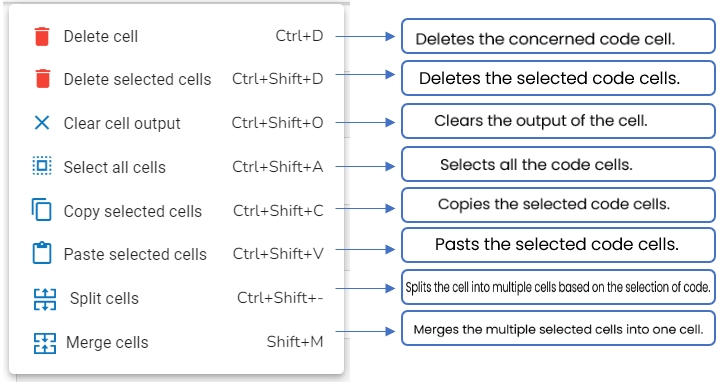
The Notebook Action icons (as provided below) help to apply various actions to the code/ code cell when clicked. They are provided on the top right side of the Data Science Notebook page.
The table given below lists all the Actions available in the Notebook Menu Bar:
Please Note: The Actions icons will be disabled for other file types under a Repo Sync Project.
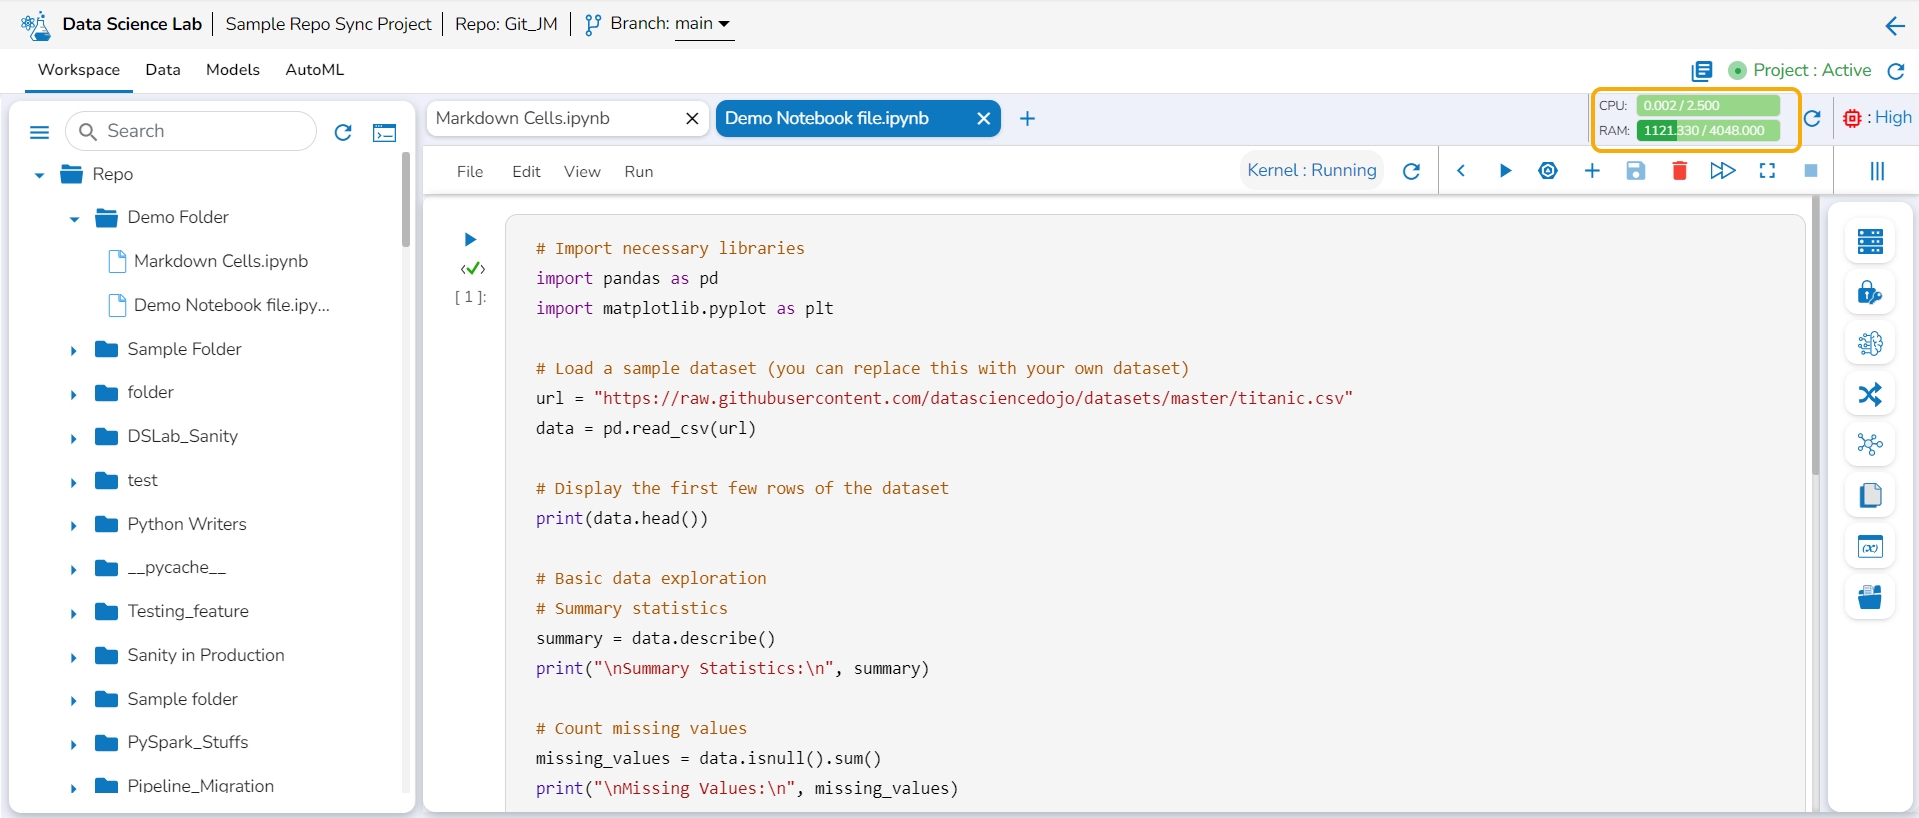
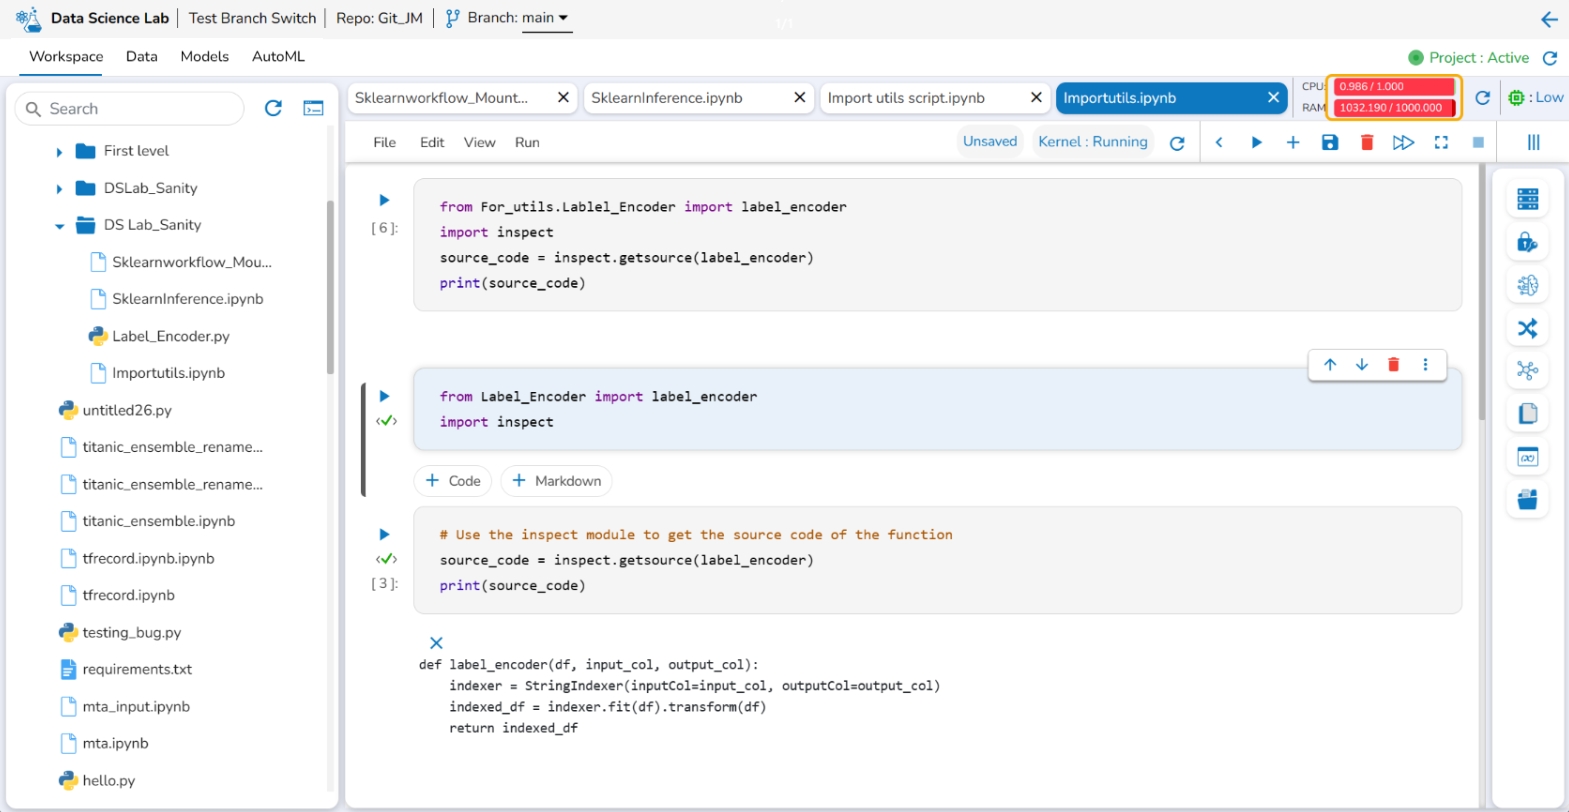
This feature helps to identify the resource utilization of a Data Science Lab Project where the Notebook is saved and executed.
Please Note: The graph displays requests and limits of CPU and Memory. The values will be calculated and previewed in the UI after each cell execution.
The image displays the resource utilization graph when the utilized resources are within the set limit.
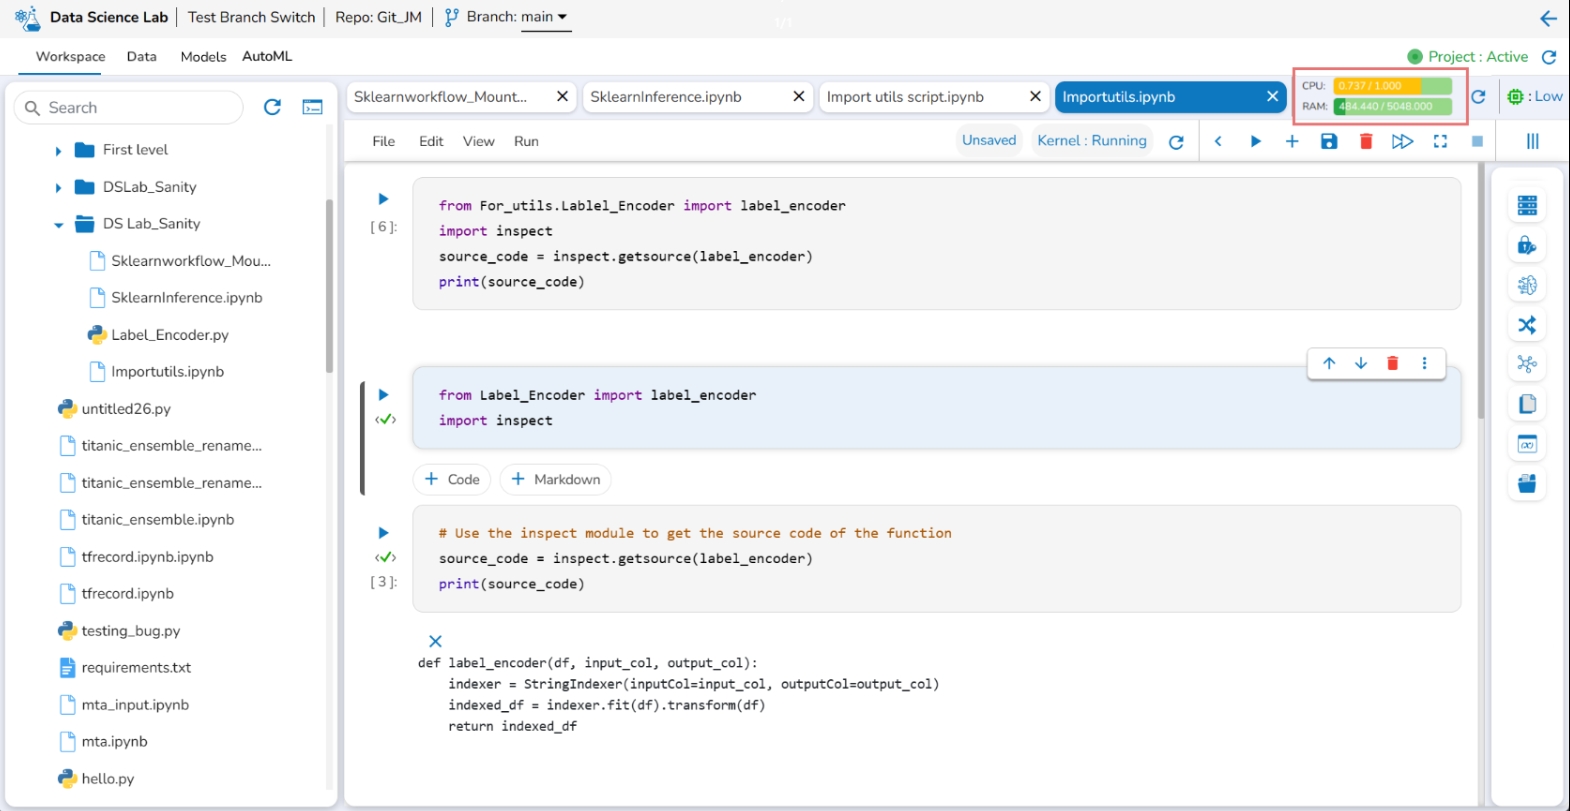
The resource utilization graph turns yellow if 60% of the given limit is utilized.
If 80% of the given limit is utilized the resource utilization graph turns red (as shown in the below-given image).
Please Note:
The user can open a maximum of four files in the Tab format.
If CPU and Memory usage exceeds the threshold, the Kernal and the Data Science Notebook will be restarted.
This section focuses on the BDB Assist functionality provided inside the Data Science Notebook infrastructure.
BDB Assist is designed to be a transparent and explainable AI assistant. Our notebook system guarantees that every AI recommendation transforms into transparent and replicable outcomes, enabling data teams to place unprecedented trust in AI.
Some of the key features of the BDB Assist are as listed below:
Generate Code Automatically: Starting from scratch is no longer a hurdle with BDB Assist code generation capability. Provide your prompts, questions, or instructions, and watch as an entire notebook— including code, SQL queries, and text — materializes before your eyes.
Explain the code: BDB Assist doesn't let complex pieces of code baffle you anymore with concise, easy-to-understand explanations.
Debug & Edit the code: BDB Assist helps you to revise or refactor your code, pinpoints the issue, and provides an immediate fix.
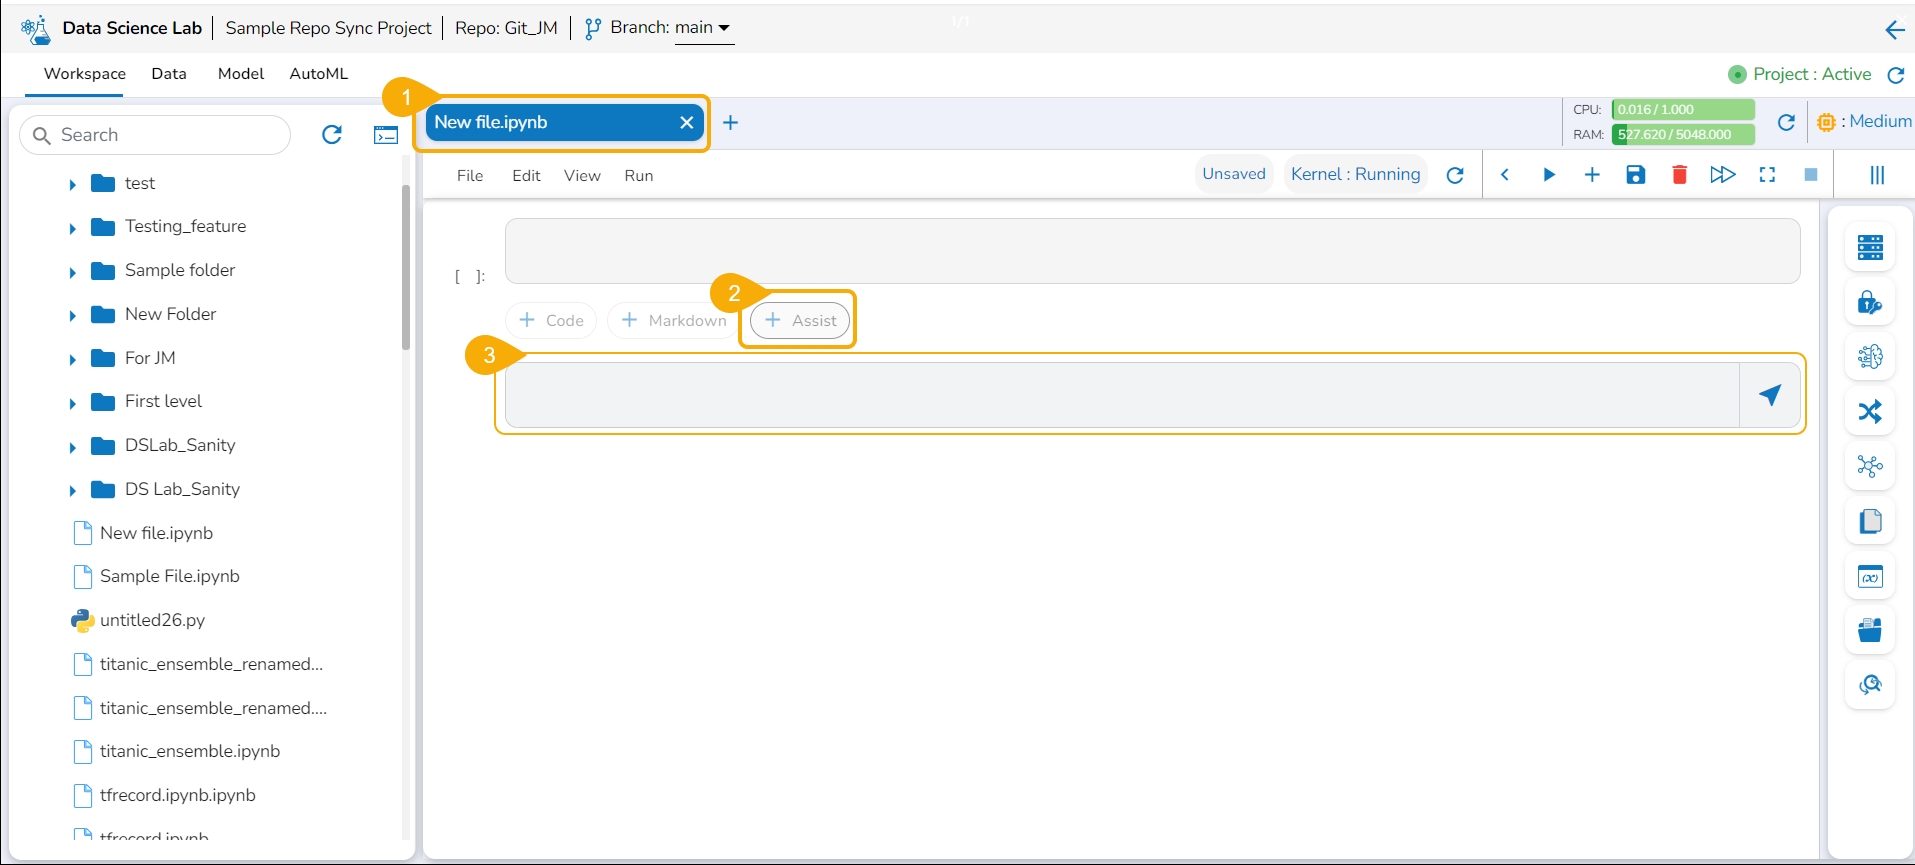
Steps to use an Assist cell:
Navigate to a Notebook.
Click on the Assist option.
The Assist cell gets inserted below.
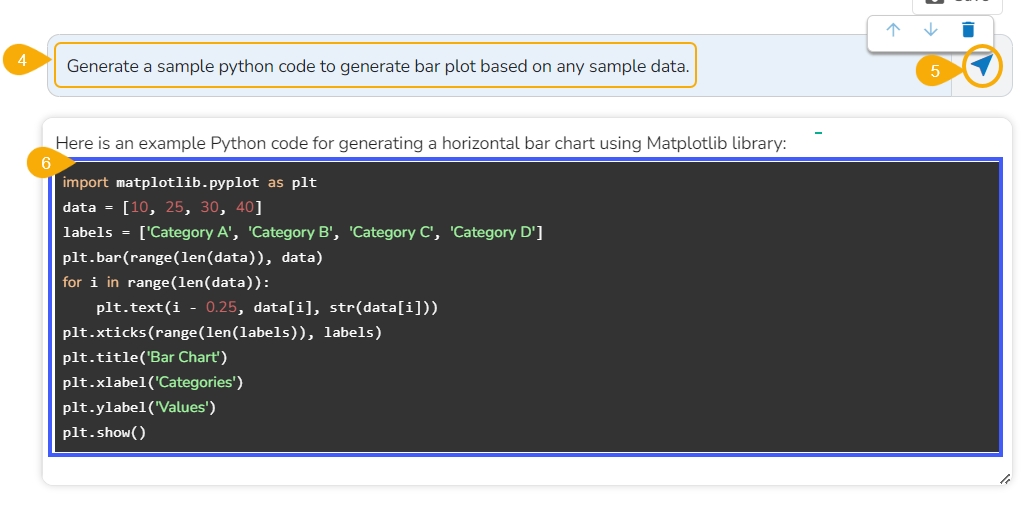
Type a prompt in the Assist cell.
Click the Send icon.
The response based on your prompt is generated below.
Since the generated result in this case is a code, add a new code cell and copy the generated code in it.
Run the code cell.
The Bar plot gets generated below the code cell.
Icon
Icon Name
Action
Expand / Collapse
Expands or collapses the Actions Menu Bar.
Run Current cell
Runs code given for a specific cell.
Linter
Opens the Linter panel.
Add Pre cell
Adds a code cell before the first cell.
Save
Saves the Notebook updates.
Delete cell
Removes the selected cell.
Restart kernel
Restarts the kernel by killing the current session and creates a new session.
Interrupt cell
Interrupts the running cell
Logs
Opens Logs window to display logs.
Undo Delete cell
Reverts the Deleted cell.
Cut cell
Cuts the code from a specific cell.
Copy cell
Copies the code from a specific cell.
Paste cell
Pastes the cut or copied code to the selected cell.
Auto Save
Auto-saves the Notebook updates when enabled.
Run all cells
Runs the codes for all the cells.
Shutdown
Stops the Kernel/Disconnects the instance and allocated resources.
This option displays the last modified date for the selected notebook.
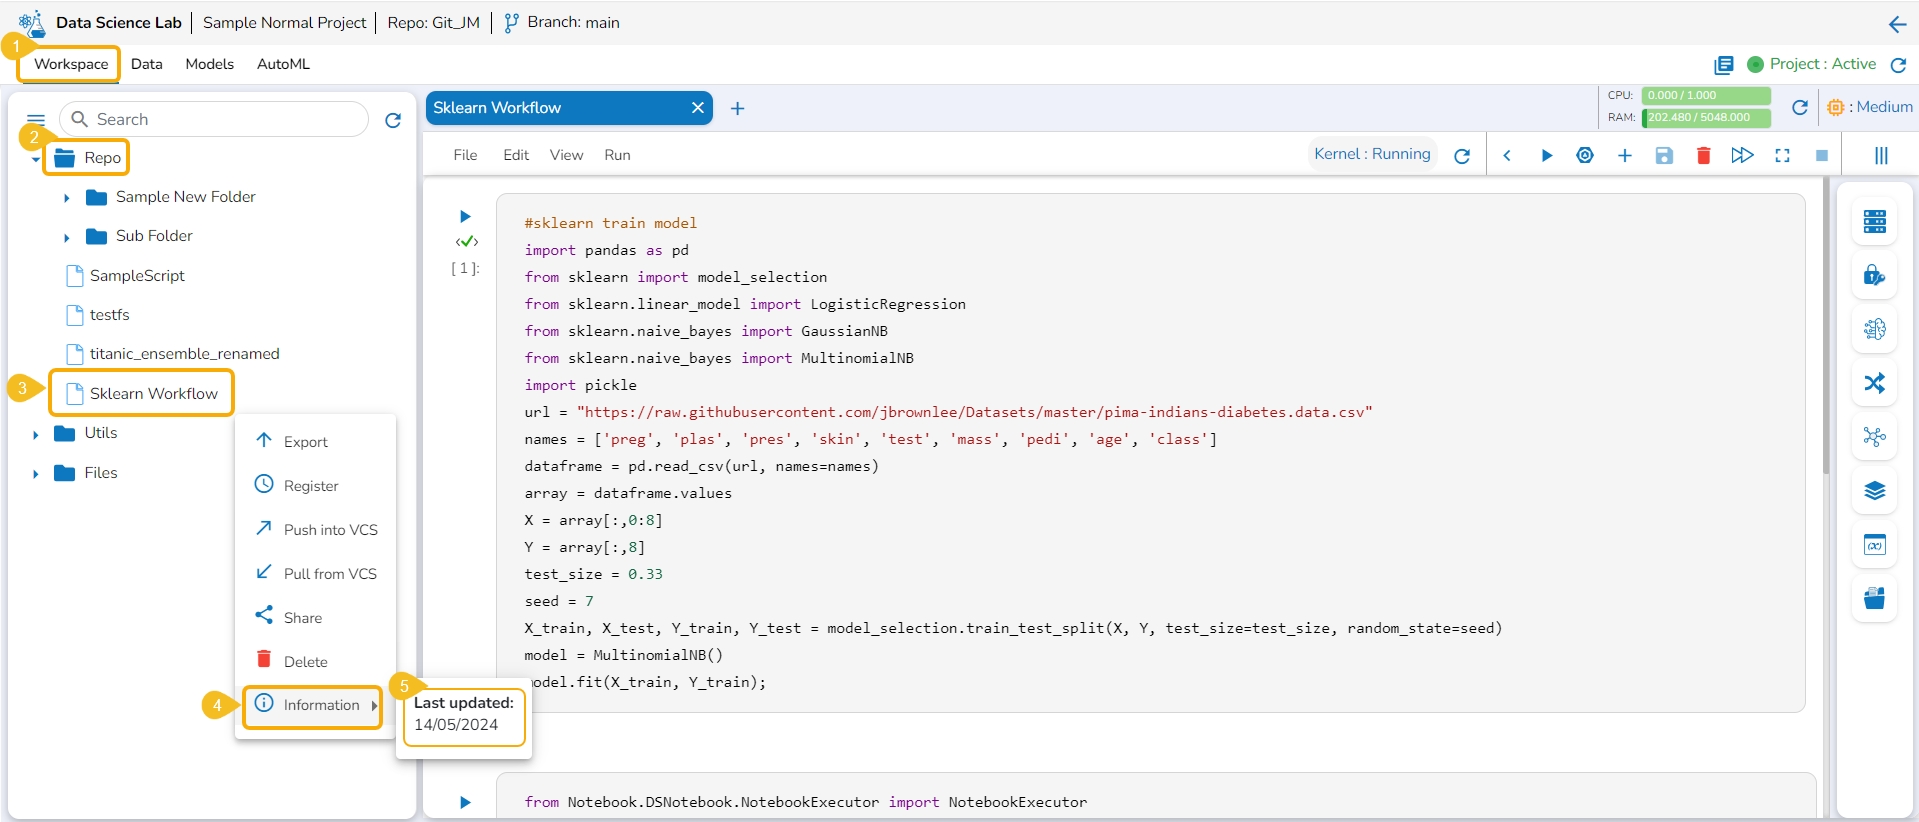
Navigate to the Workspace tab.
Open the Repo folder.
Select a notebook from the Repo folder and click the ellipsis icon for the selected notebook.
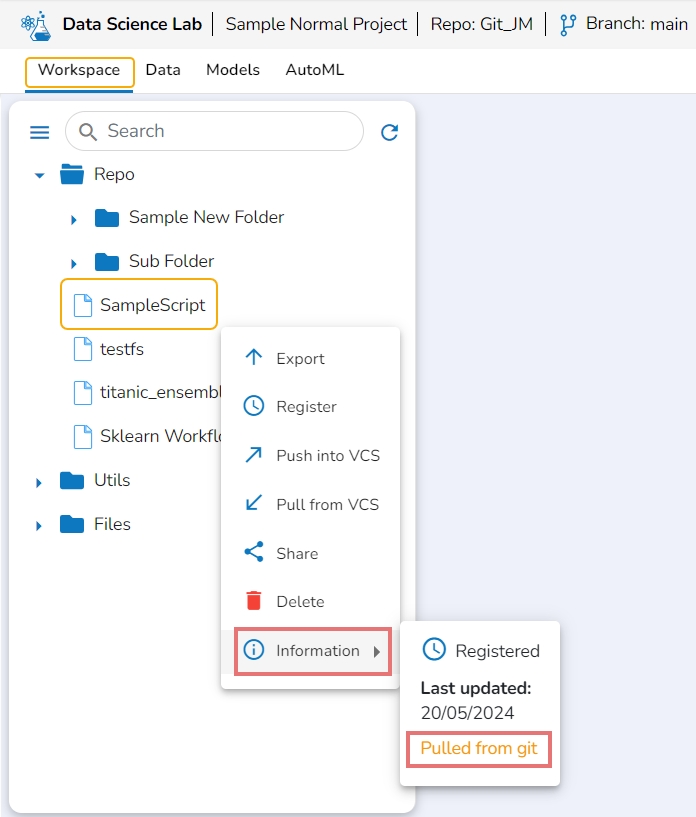
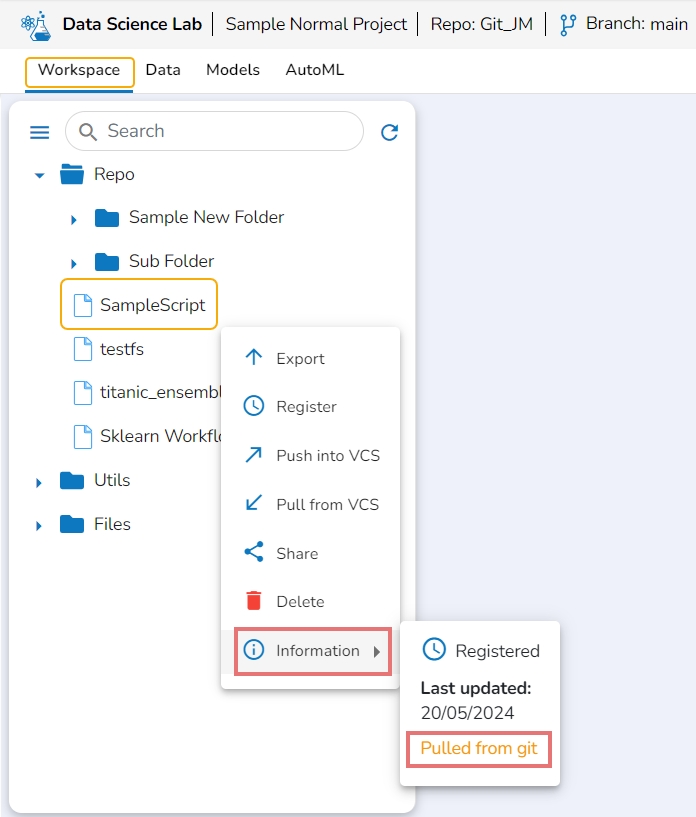
A Context Menu opens. Select the Information option from the Context Menu.
The last modified date for the selected notebook is displayed.
The Notebooks pulled from Git get 'Pulled from git' mentioned inside the Information Context menu.
/
/
This page explains steps to delete a Notebook.
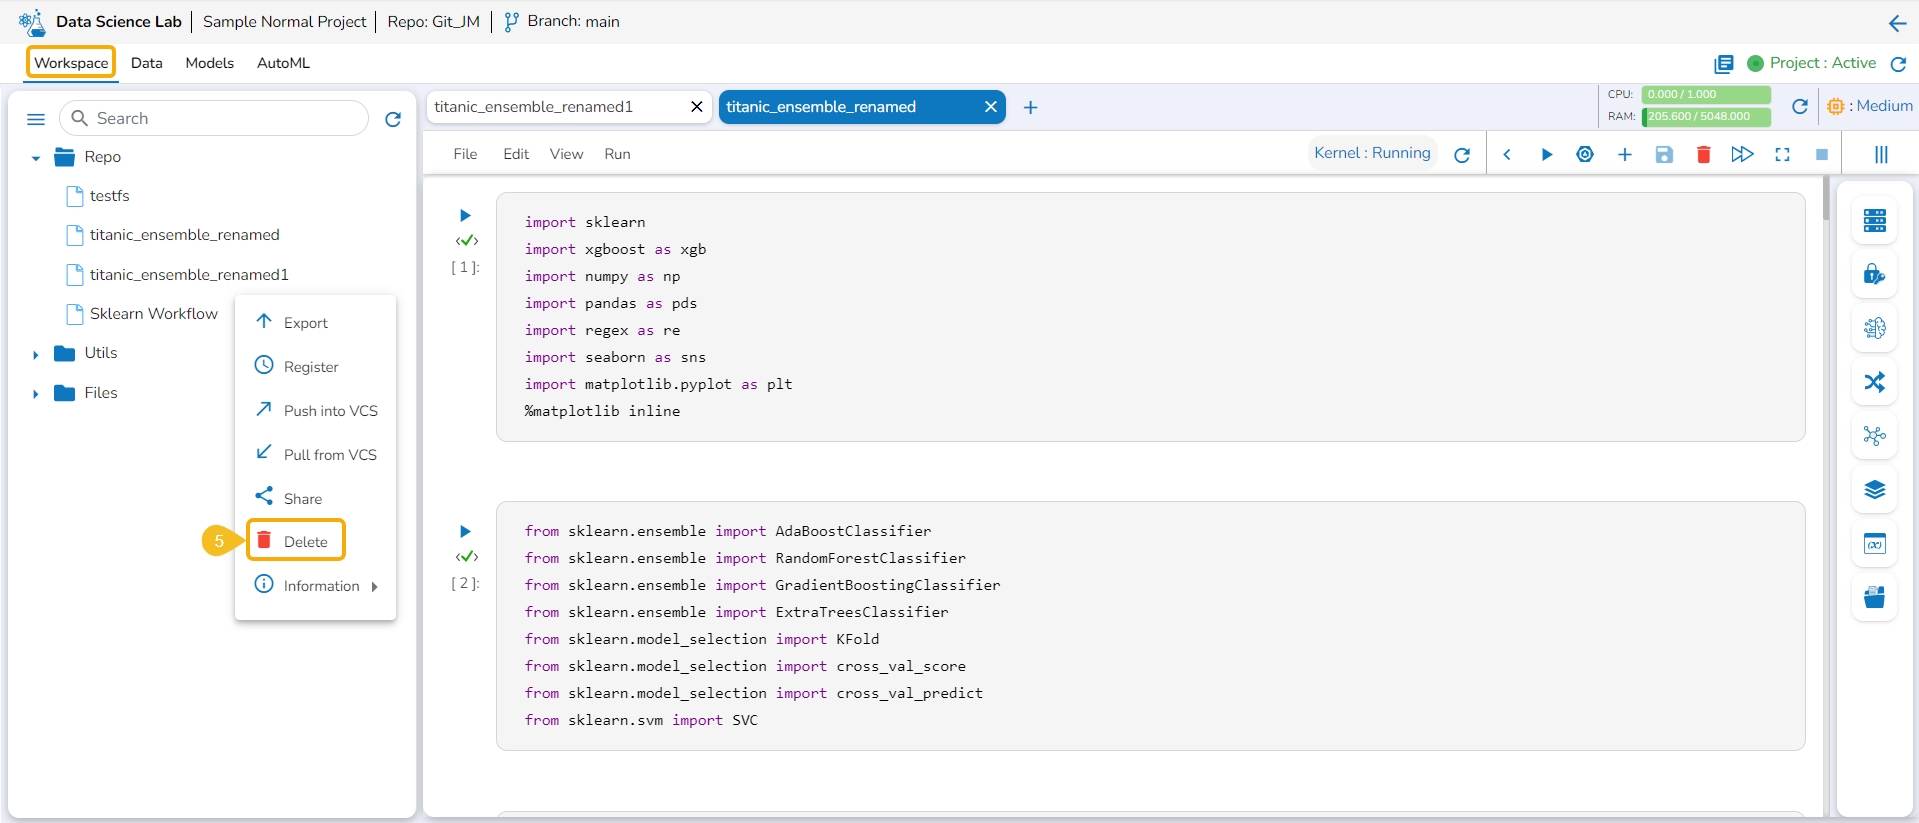
Navigate to the Workspace tab.
Open the Repo folder.
Select a Notebook from the Repo folder.
Click on the ellipsis icon provided for the selected Notebook.
A Context menu appears. Click the Delete option from the Context menu.
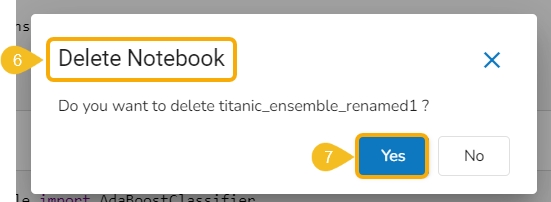
The Delete Notebook dialog box appears for the deletion confirmation.
Click the Yes option.
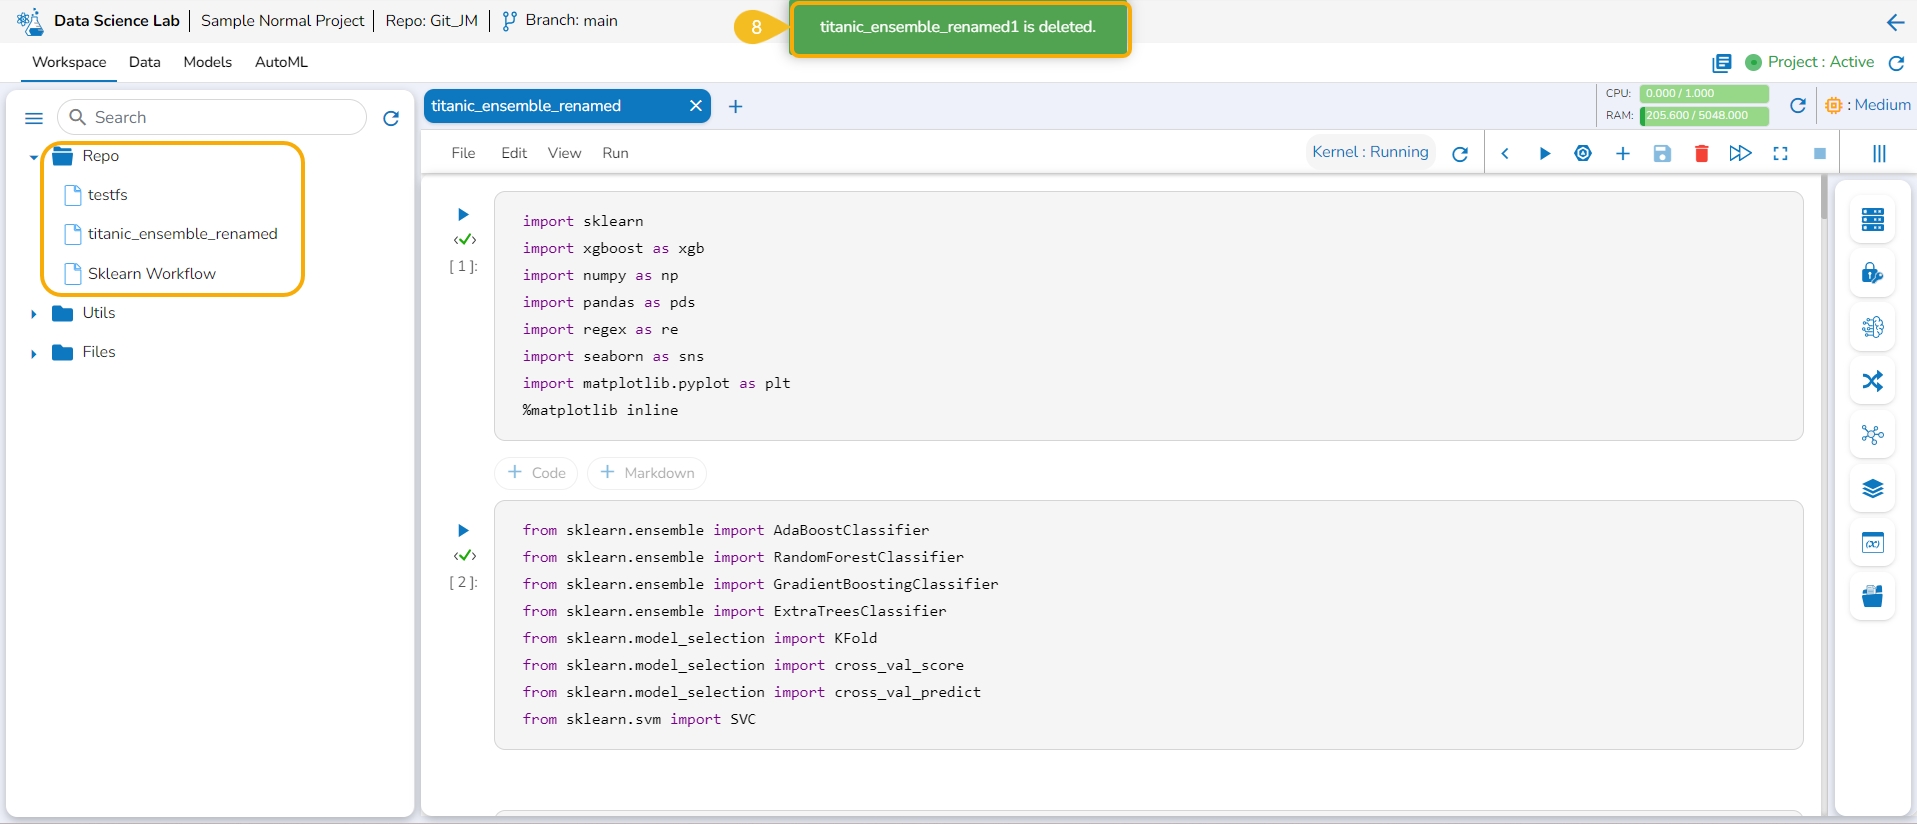
A notification appears to ensure the successful removal of the selected Notebook. The concerned Notebook gets removed from the Repo folder.
This page describes the steps involved to share a Notebook script and access it as a shared Notebook.
The user can share a DSL Notebook across the teams using this feature.
Check out the walk-through on sharing a Notebook.
Navigate to the Workspace tab for a DS Lab project.
Select a Notebook from the list.
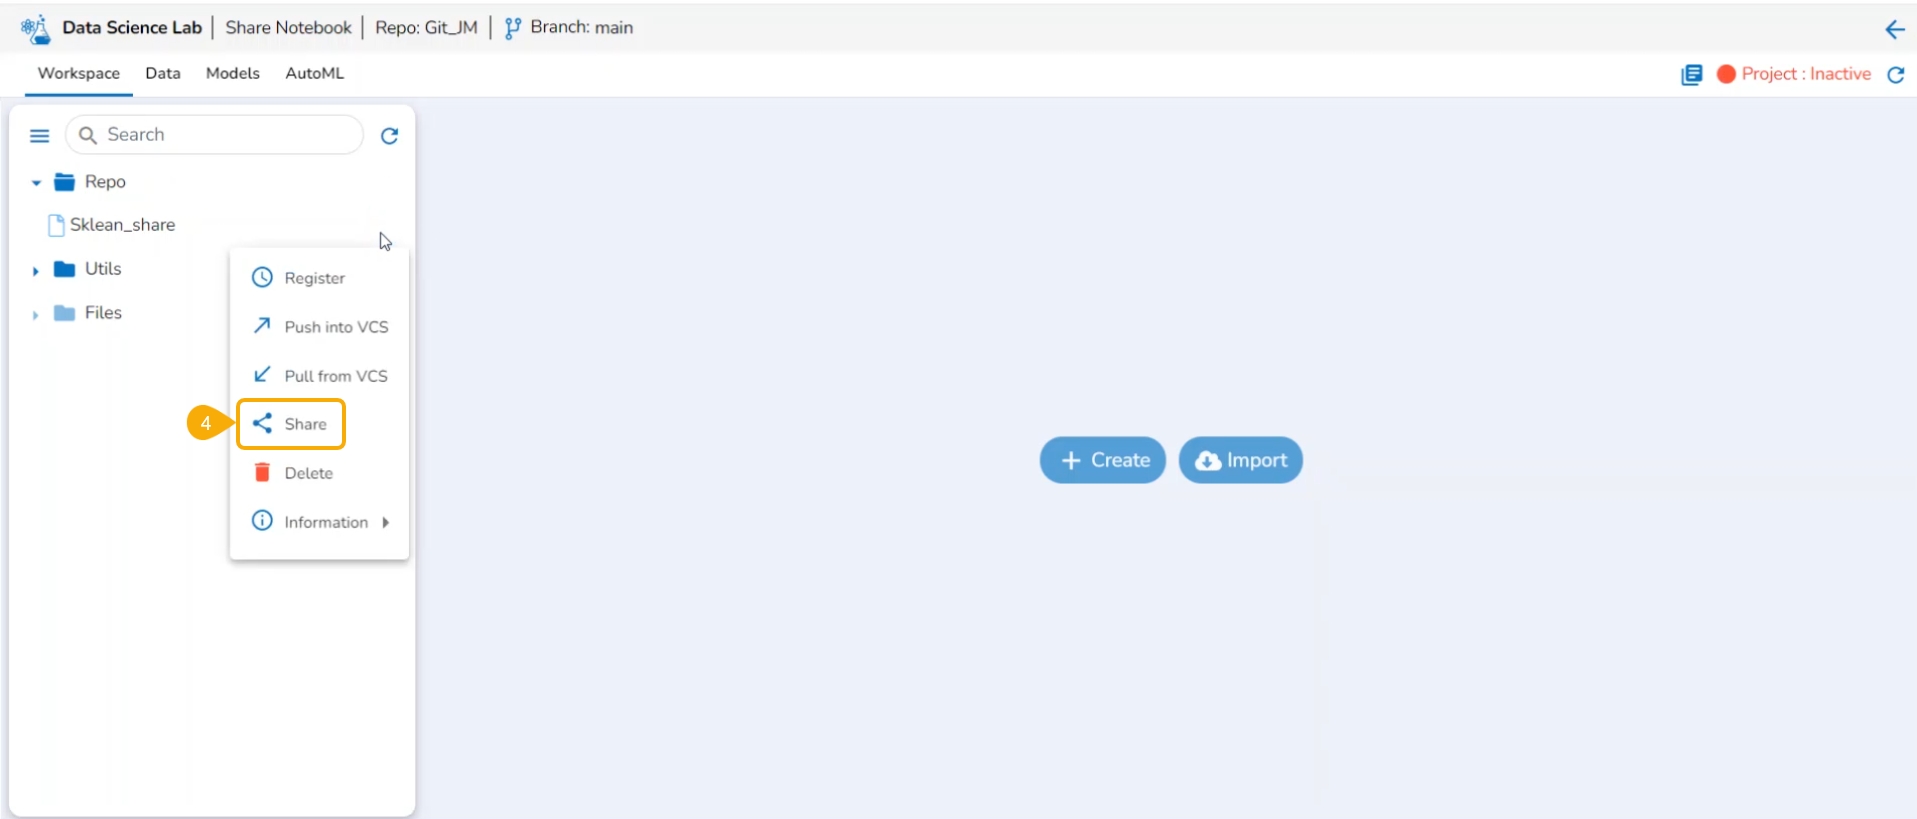
Click on the Ellipsis icon.
A context menu opens for the selected Notebook, click the Share option from the Context menu.
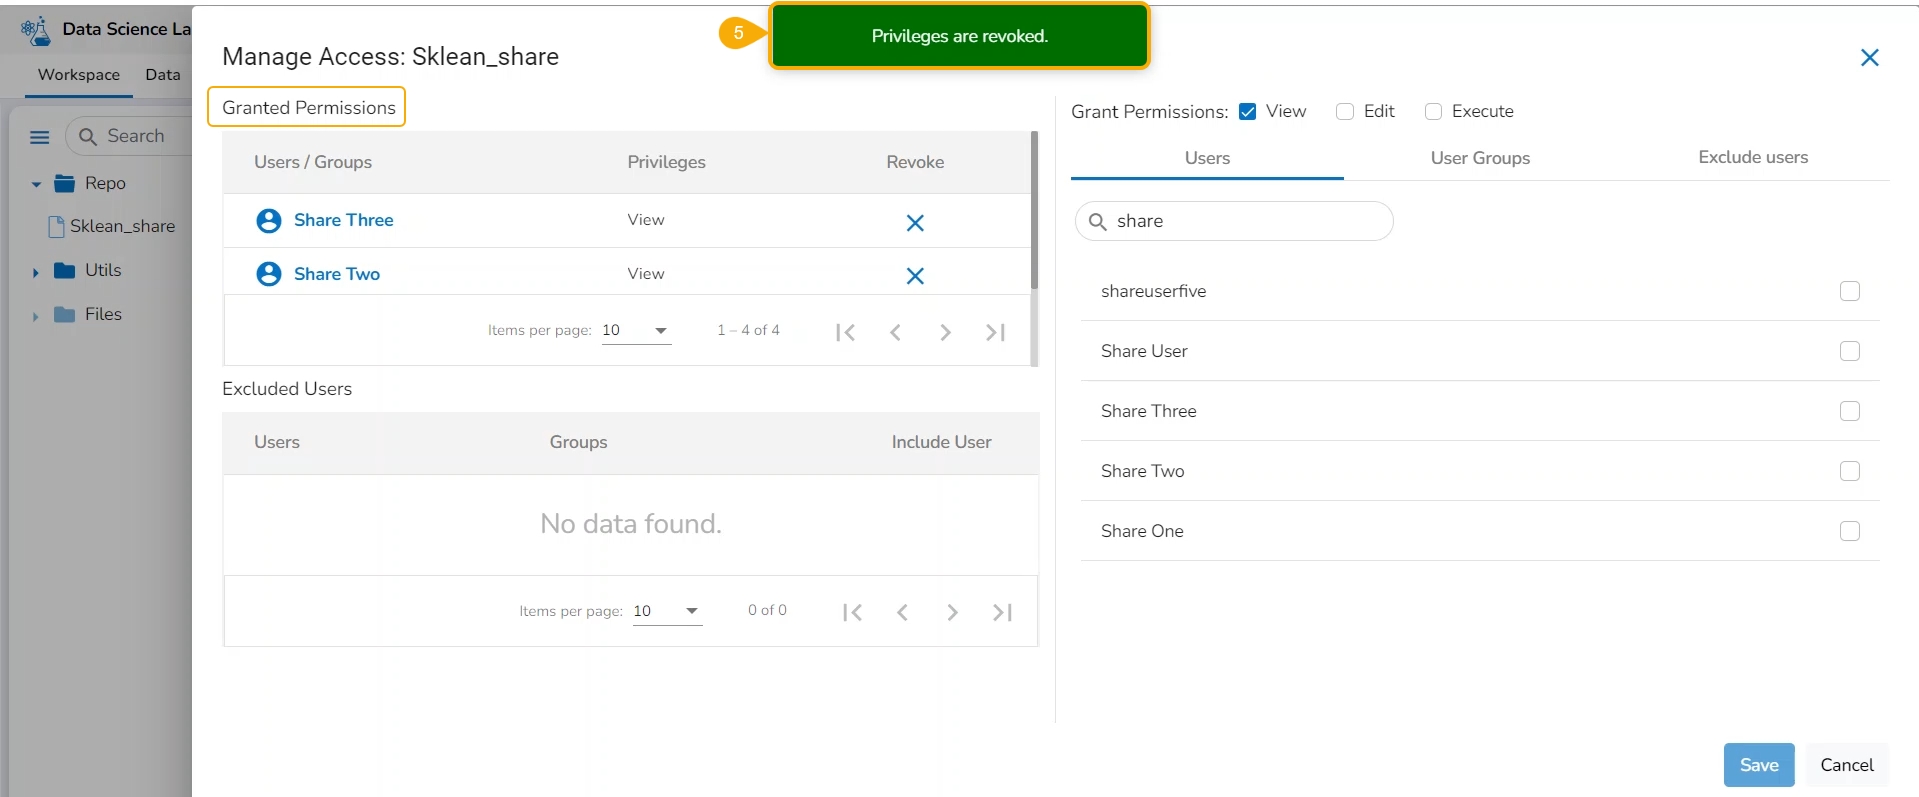
The Manage Access window opens for the selected Notebook.
Select the permissions to be granted to users/ groups using the checkboxes.
The Users, User Groups, and Exclude Users tabs appear. Select a tab from the Users and User Groups tabs.
Search for a specific user or user group to share the Notebook.
Select a User or user group from the respective tabs (as displayed in the image for the Users tab).
Click the Save option.
A notification message appears to ensure about the share action.
The selected user gets added to the Granted Permissions section.
Check out the illustration to access a shared Notebook.
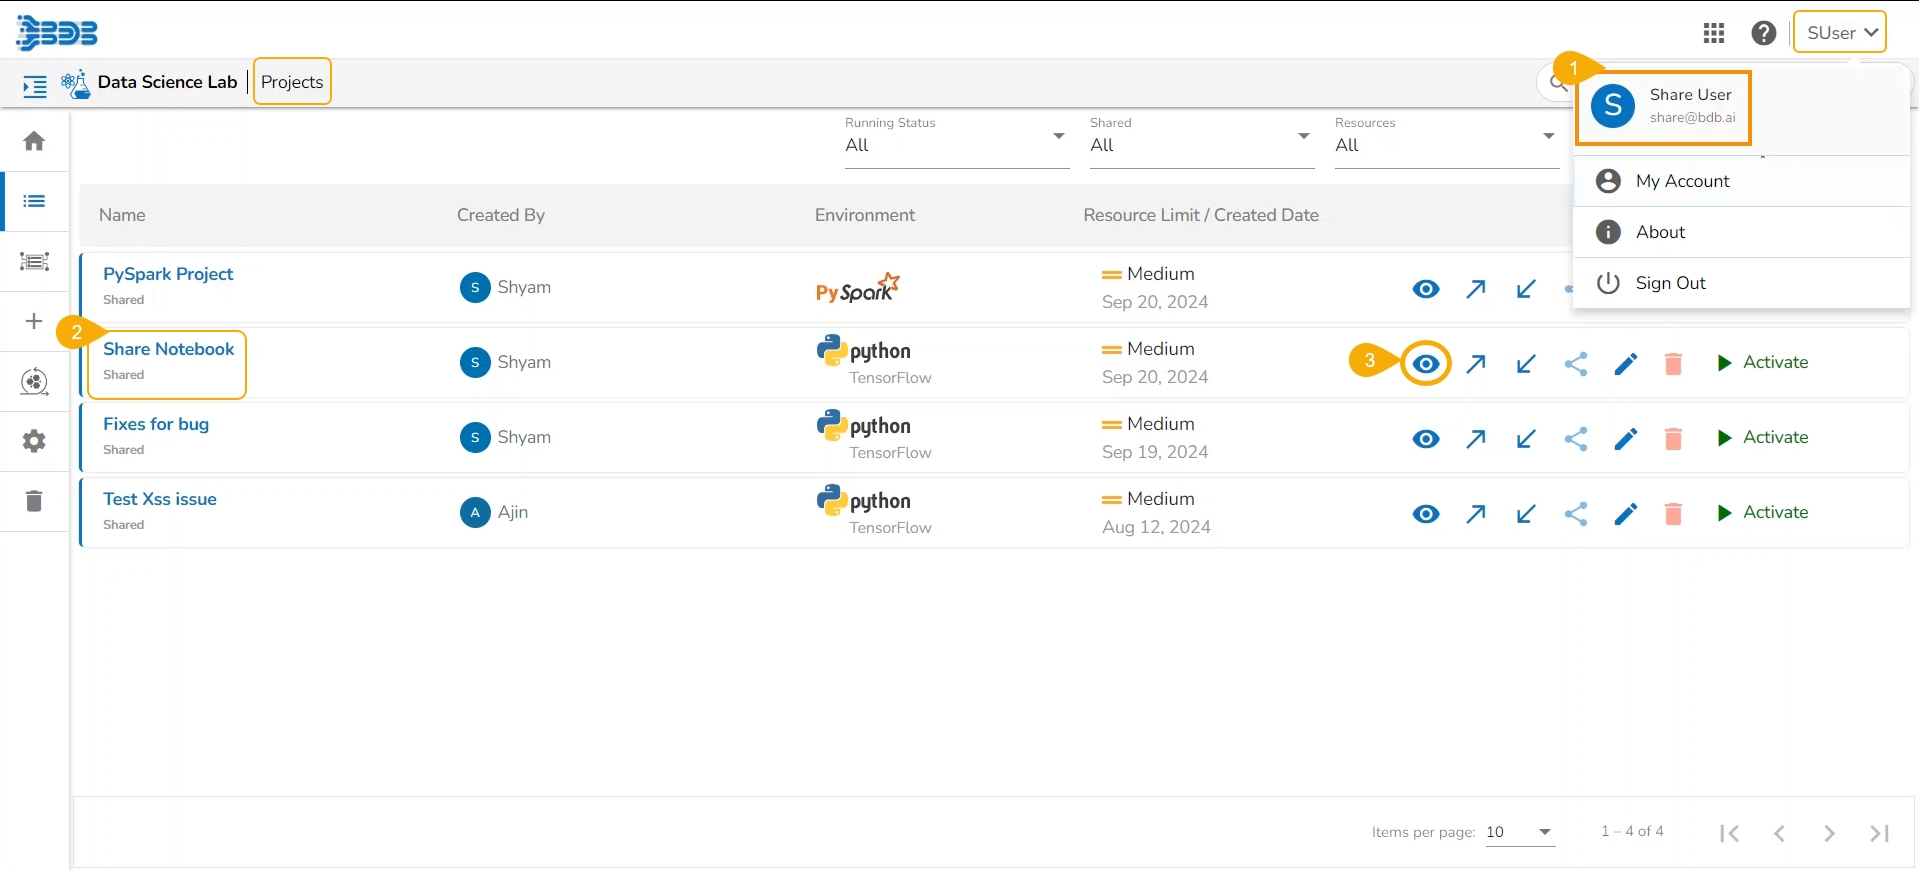
Login to the Platform using the user's credentials to whom the Notebook is shared and navigate to the Projects page for the DS Lab module.
The Shared Project gets indicated as shared on the Projects page.
Click the View icon to open the project.
The Workspace tab opens by default for the shared Project.
The shared Notebook would be listed under the Repo folder.
Open the Notebook Actions menu. The Share and Delete options will be disabled for a shared Notebook.
Please Note: A targeted share user cannot re-share or delete a shared DSL Notebook regardless of the permission level (View/ Edit/Execute).
You can revoke the permissions shared with a user or user group by using the Revoke Permissions icon.
Check out the illustration on revoking the granted permissions.
Navigate to the Manage Permissions window for a shared Notebook.
The Granted Permissions section lists all the users or user groups to whom the Notebook has been shared.
Select a user or user group from the list.
Click the Revoke Privileges icon.
A con
A notification appears, and the shared privileges will be revoked for the selected user/ user group. The user/ user group gets removed from the Granted Permissions list.
The user can exclude some users from the privileges to access a shared Notebook while allowing permissions for the other users of the same group.
Check out the illustration on excluding a user/ user group from the shared privileges of a Notebook.
Navigate to the Manage Access window for a shared Notebook.
Grant Permissions to the user(s)/ user group(s) using the checkboxes.
Open the User Groups tab.
Select a User Group from the displayed list.
Use the checkbox to select it for sharing the Notebook.
Navigate to the Exclude Users tab.
Select a user from the displayed list and use the checkbox to exclude that user from the shared permissions.
Click the Save option.
A notification appears to ensure the shared action.
The selected user gets excluded from the shared Notebook permissions.
The Notebook gets shared with the rest of the users in that group.
Check out the illustration on including an Excluded user for accessing a shared Notebook.
Navigate to the Excluded Users section.
Select a user from the displayed list.
Click the Include User icon.
The Include User confirmation dialog box appears.
Click the Yes option.
A notification appears to ensure the success of the action.
The selected user gets included in the group with the shared permissions for the Notebook. The user will get removed from the Excluded Users list.
Please Note:
If the project is shared with a user group, then all the users under that group appear under the Exclude User tab.
The Project gets shared by default with the concerned Notebook while using the Share function for a Notebook.
A Shared Project even if it is shared by default with a Notebook remains Active for the user to access the Notebook and open it.
This page describes steps to register a Data Science Script as a Job.
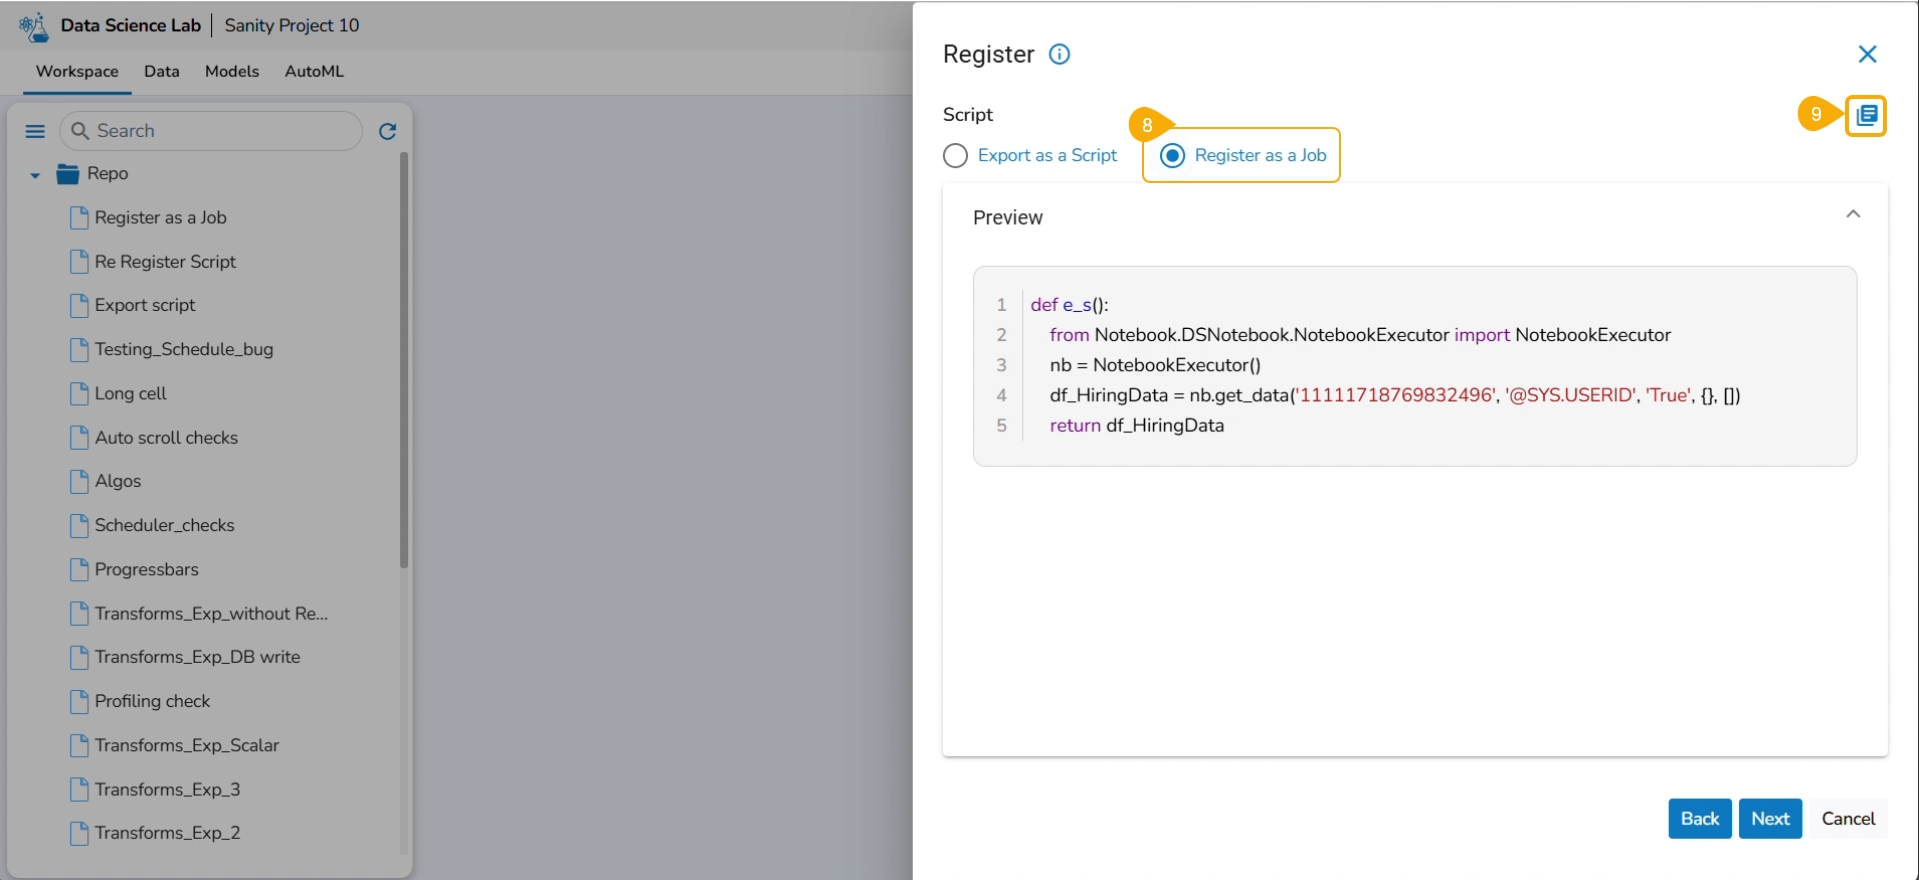
Check out the illustration on registering a Notebook script as a Job to the Data Pipeline module.
The user can register a Notebook script as a Job using this functionality.
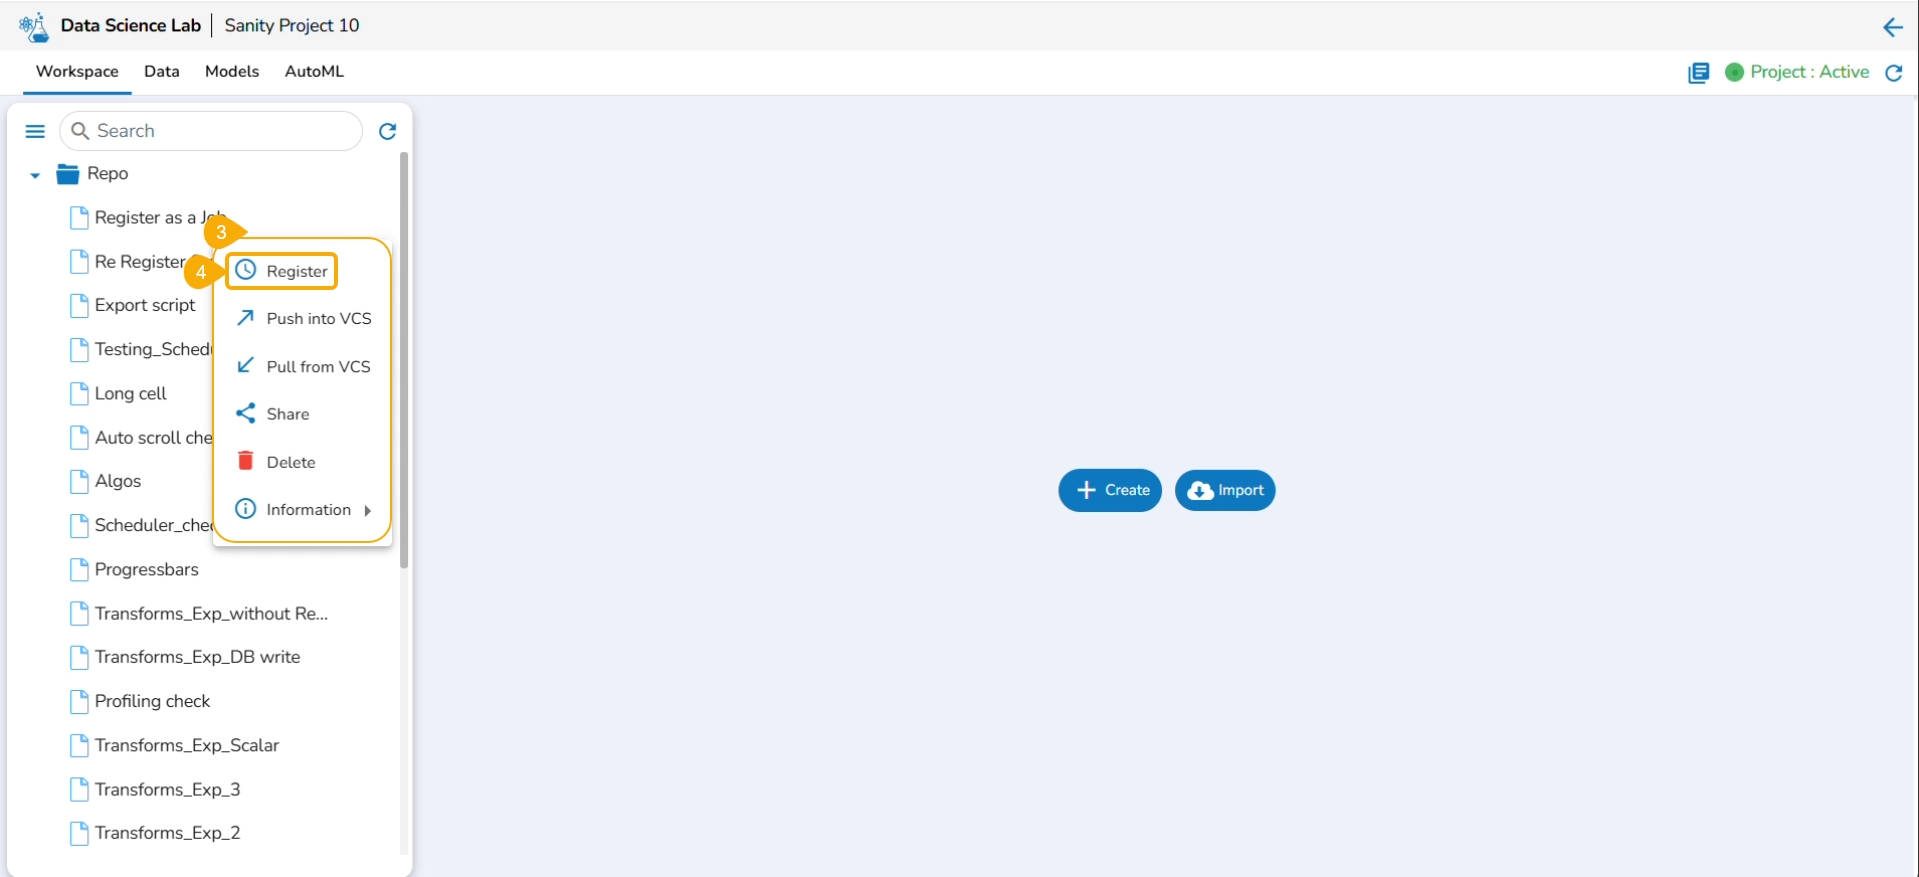
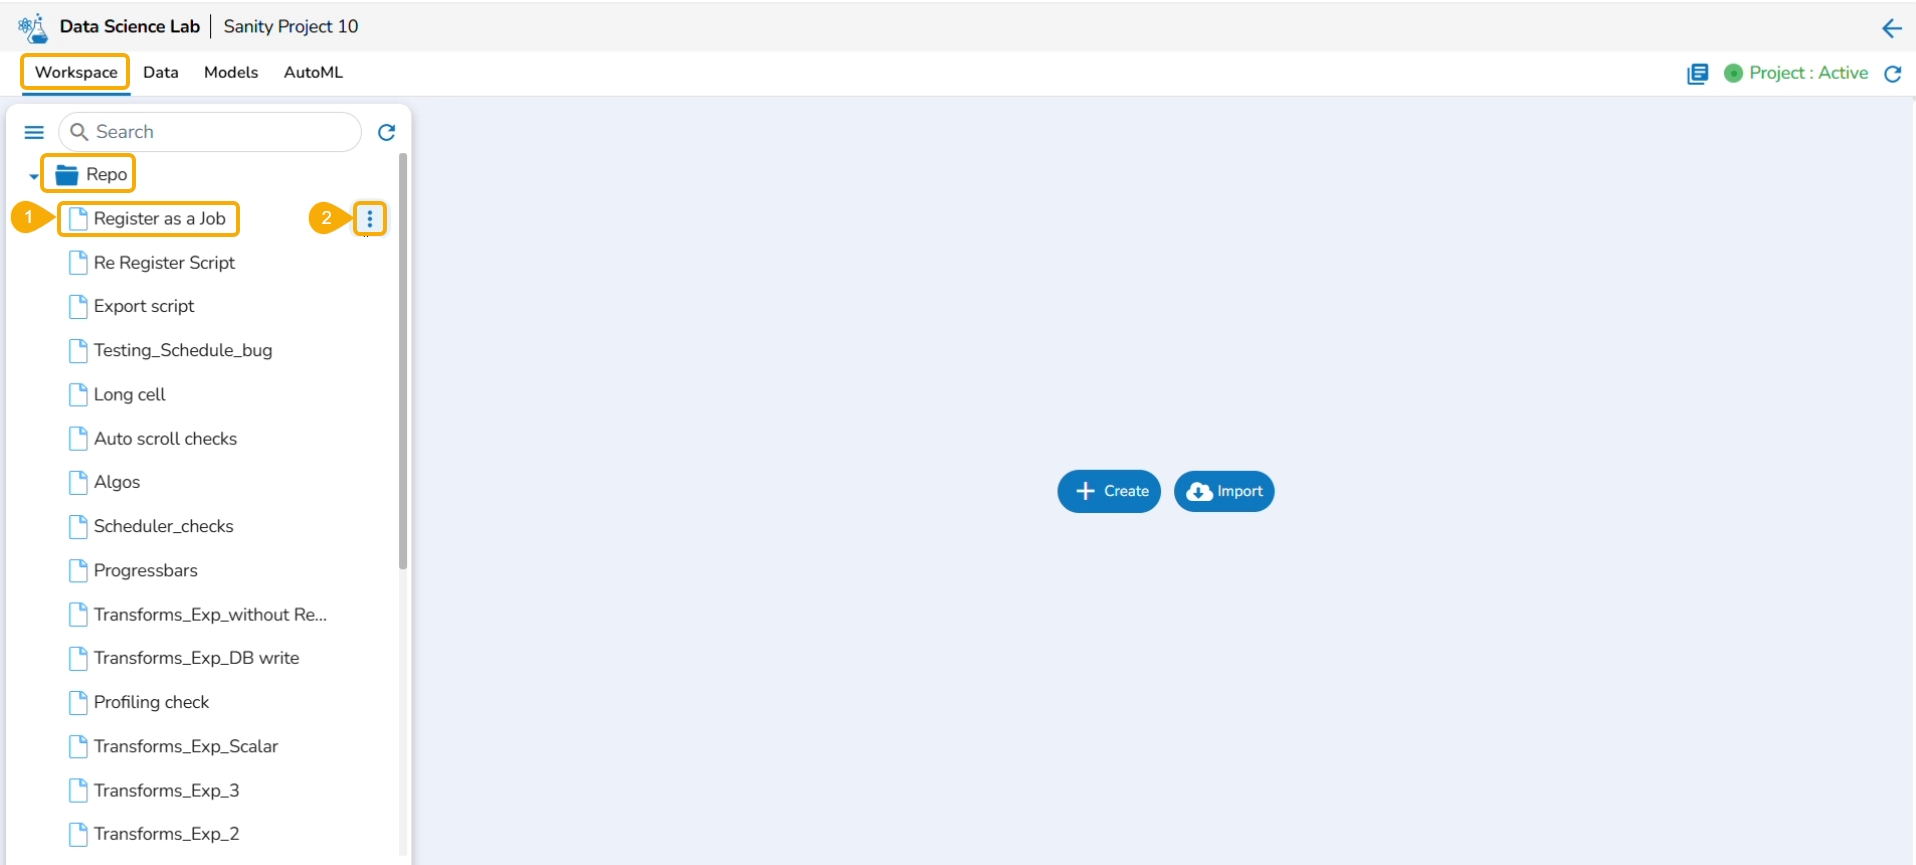
Select a Notebook from the Repo folder in the left side panel.
Click the ellipsis icon.
A context menu opens.
Click the Register option from the context menu.
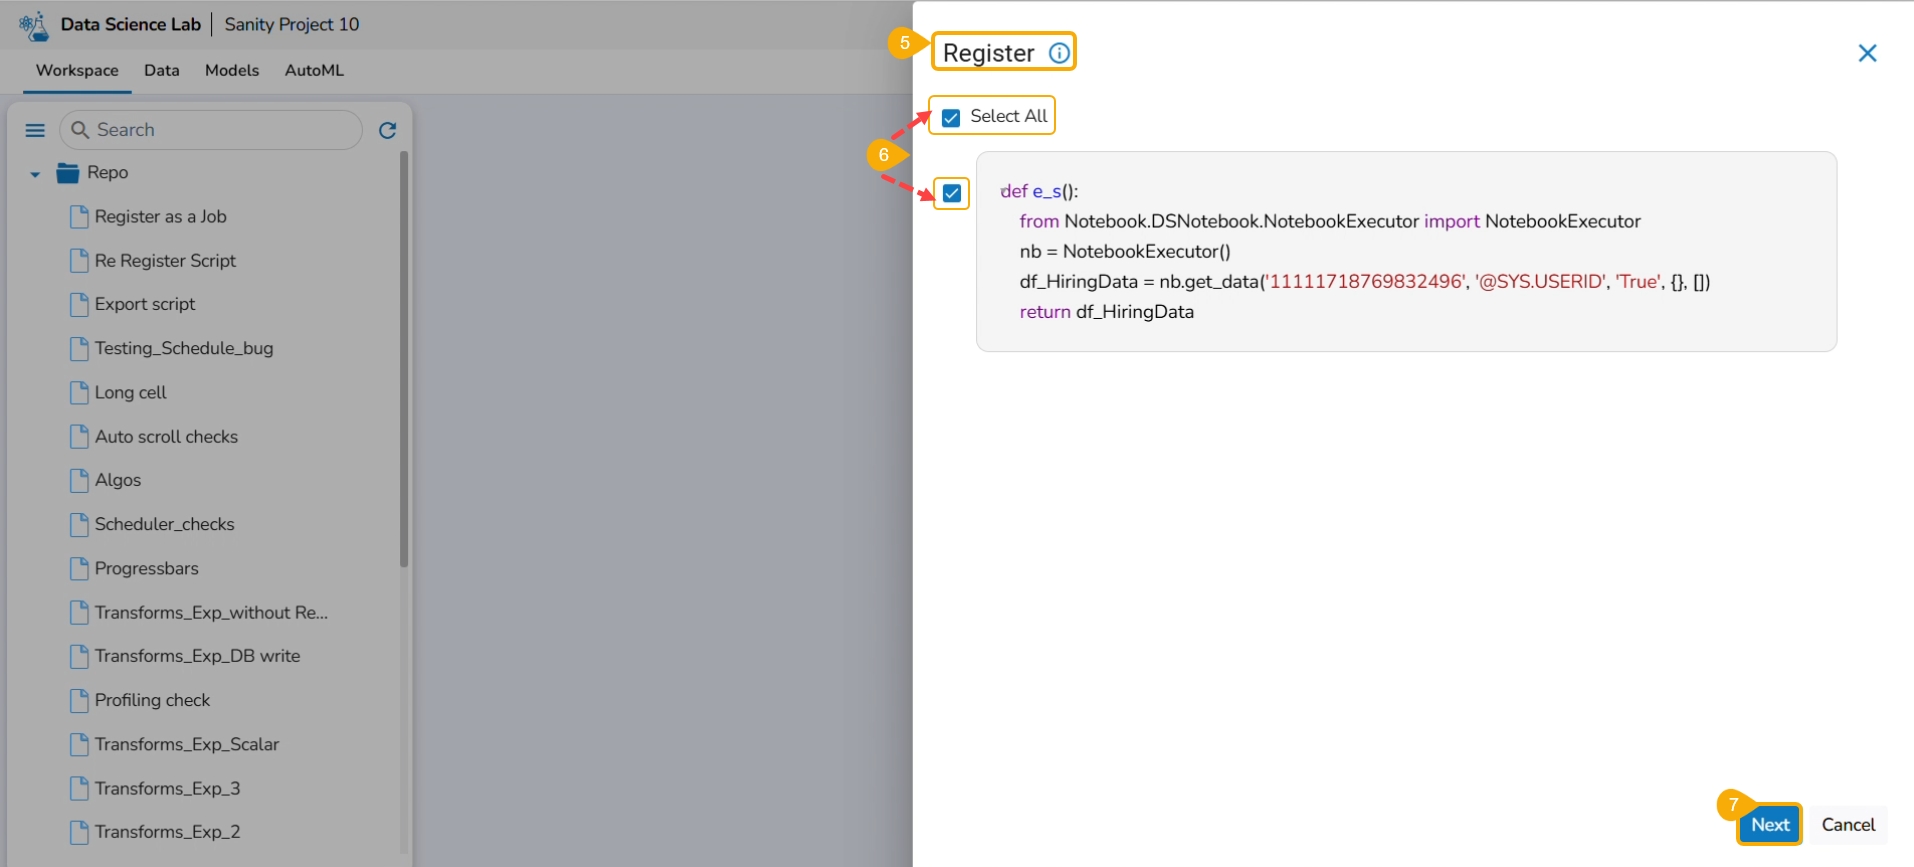
The Register page opens.
Use the Select All option or select the specific script by using the given checkmark.
Click the Next option.
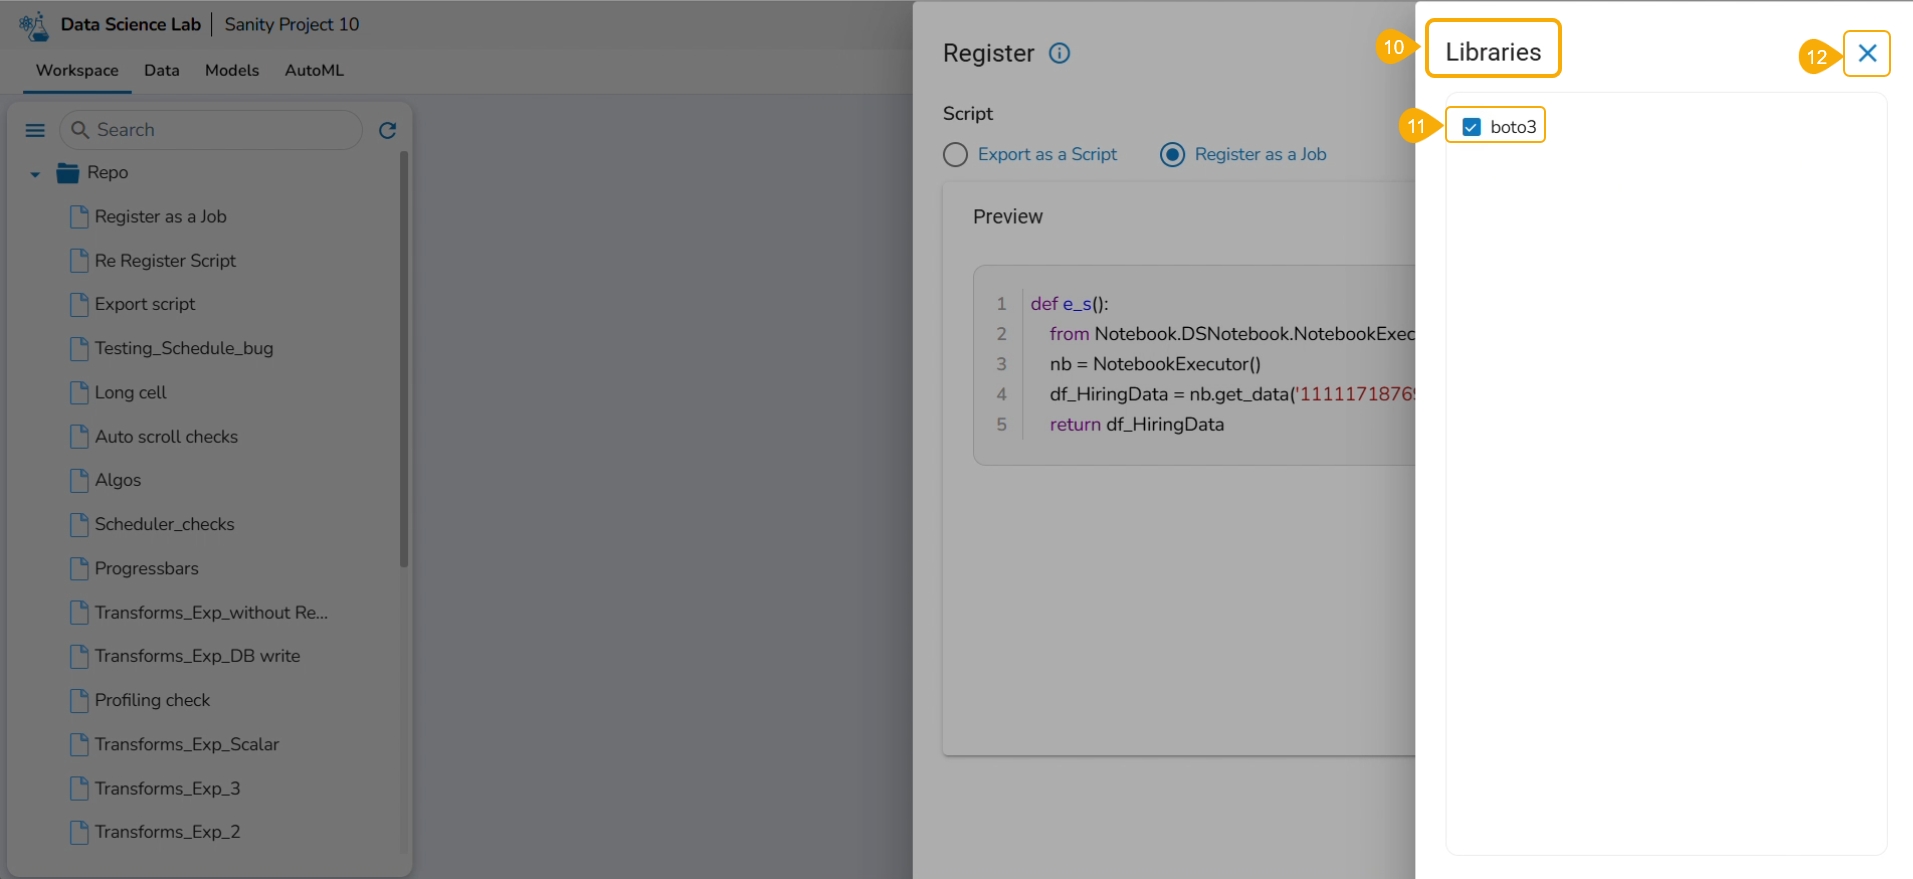
Select the Register as a Job option using the checkbox.
Click the Libraries icon.
The Libraries drawer opens.
Select libraries by using the checkbox.
Click the Close icon.
The user gets redirected to the Register drawer.
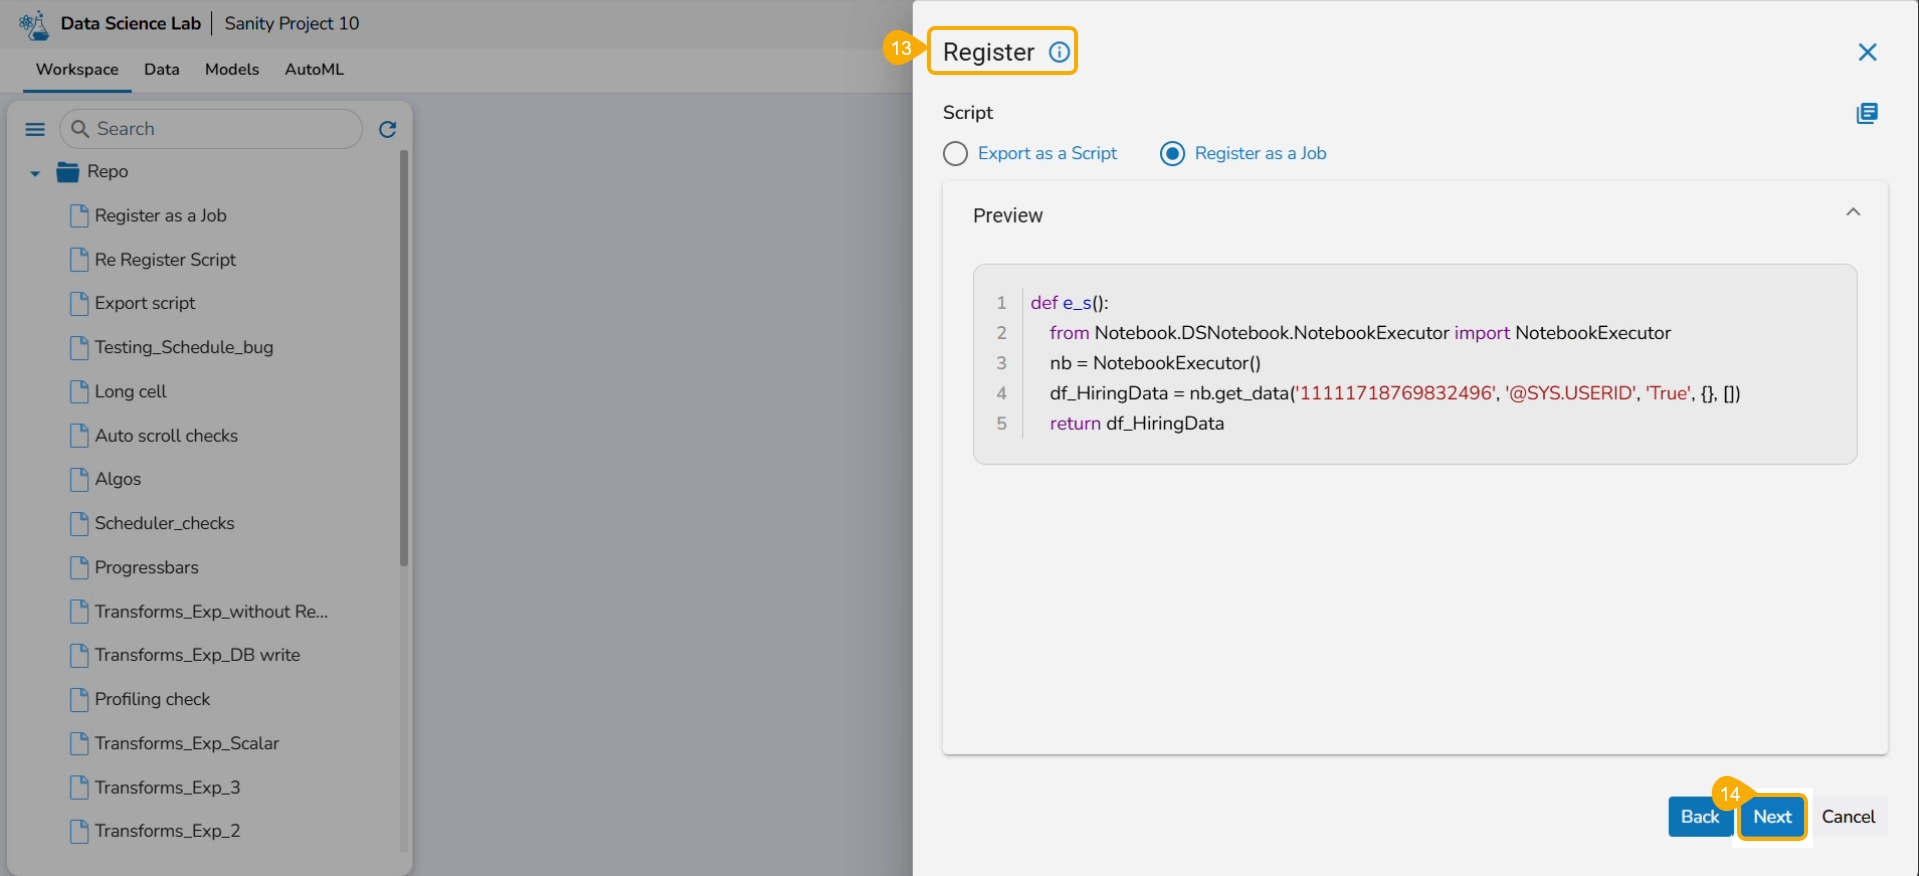
Click the Next option.
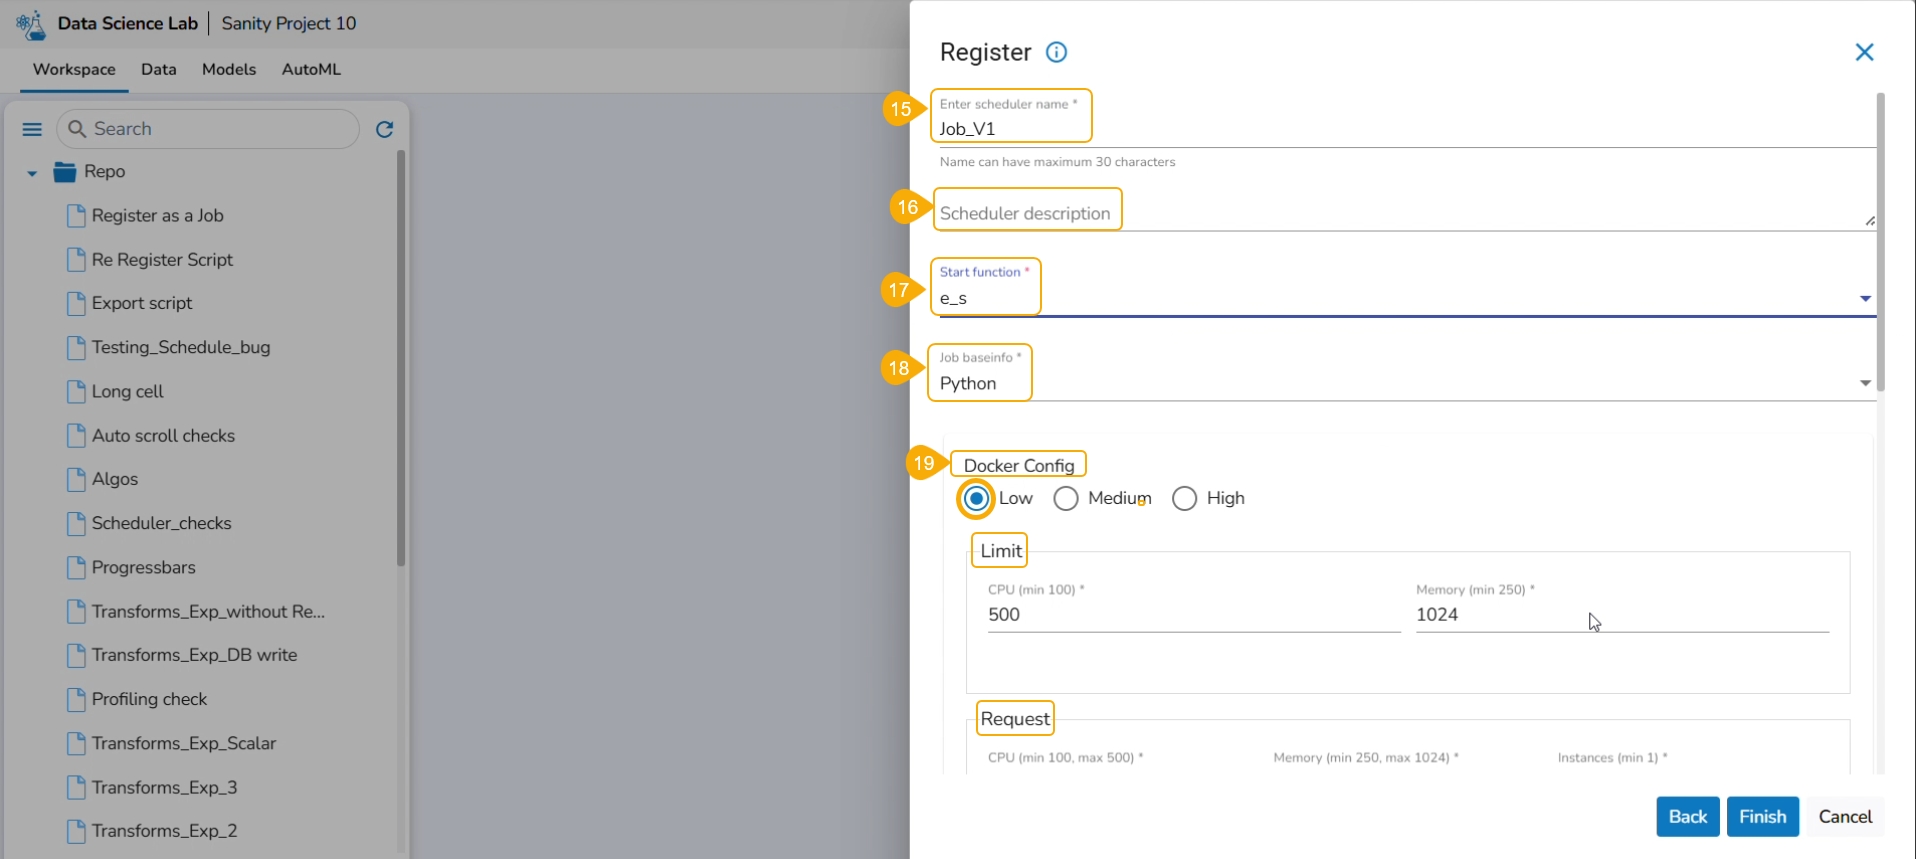
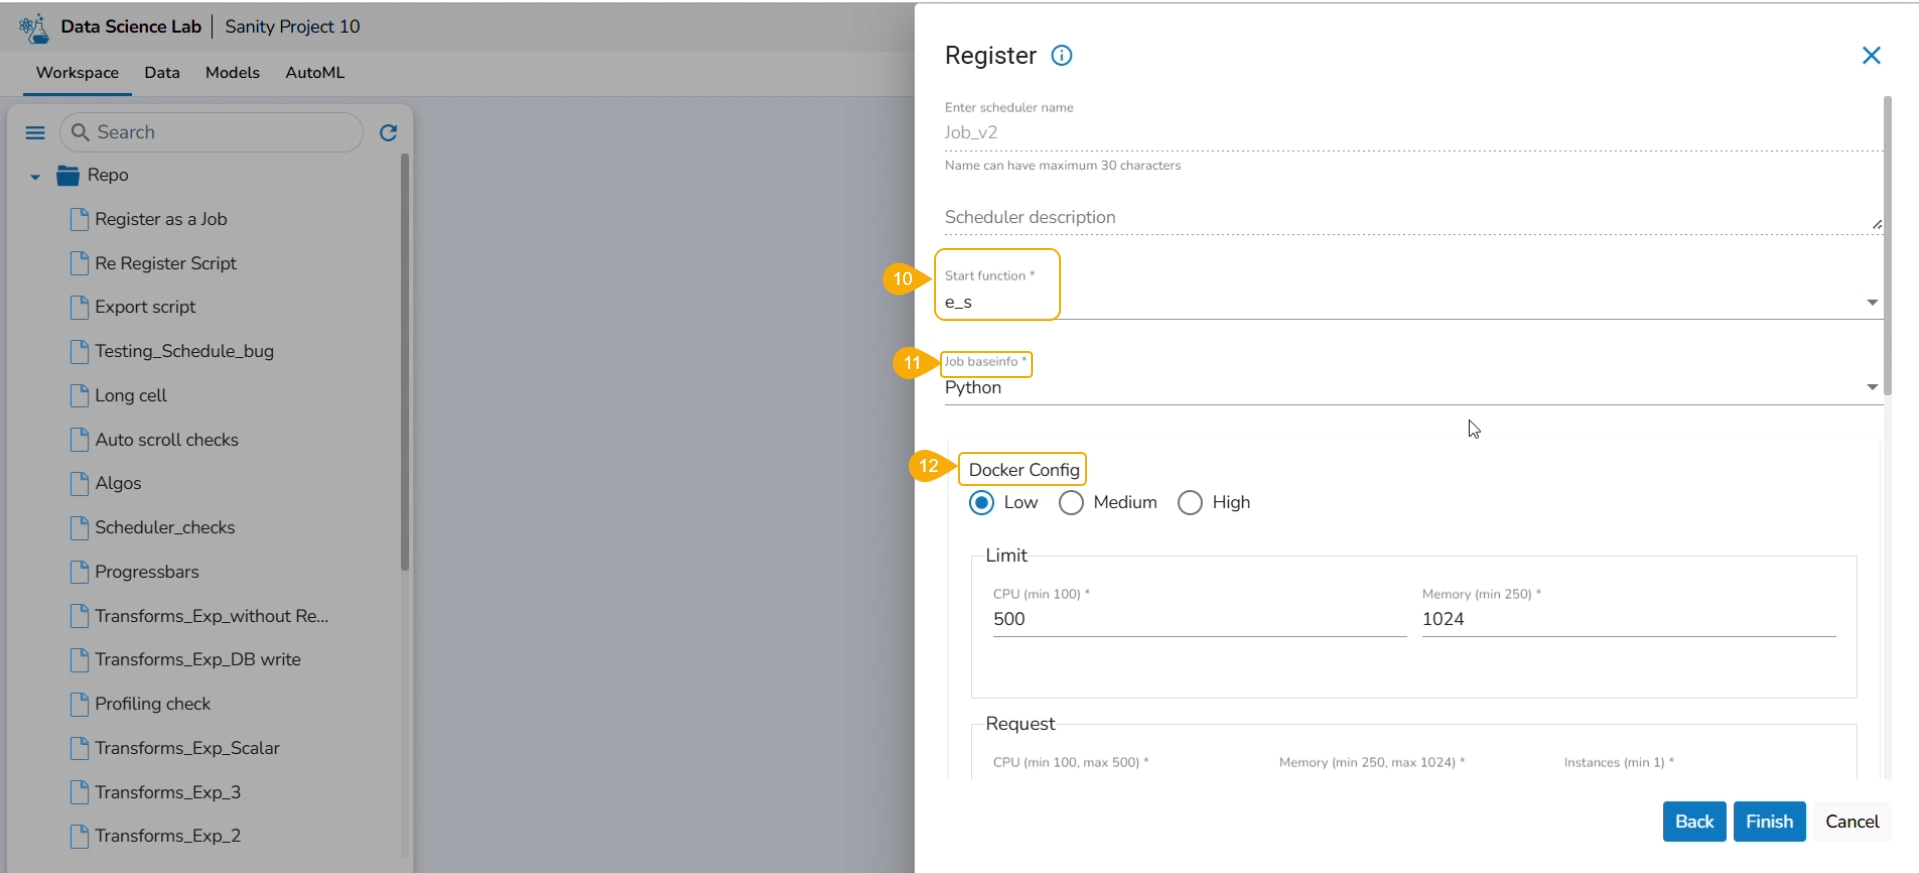
Provide the following information:
Enter scheduler name
Scheduler description
Start function
Job basinfo
Docker Config
Choose an option out of Low, Medium, and High
Limit - based on the selected docker configuration option (Low/Medium/High) the CPU and Memory limit are displayed.
Request -It provides predefined values for CPU, Memory, and count of instances.
On demand: Check this option if a Python Job (On demand) must be created. In this scenario, the Job will not be scheduled.
Please Note: The Concurrency policy option doesn't appear for the On-demand jobs, it displays only for the jobs wherein the scheduler is configured.
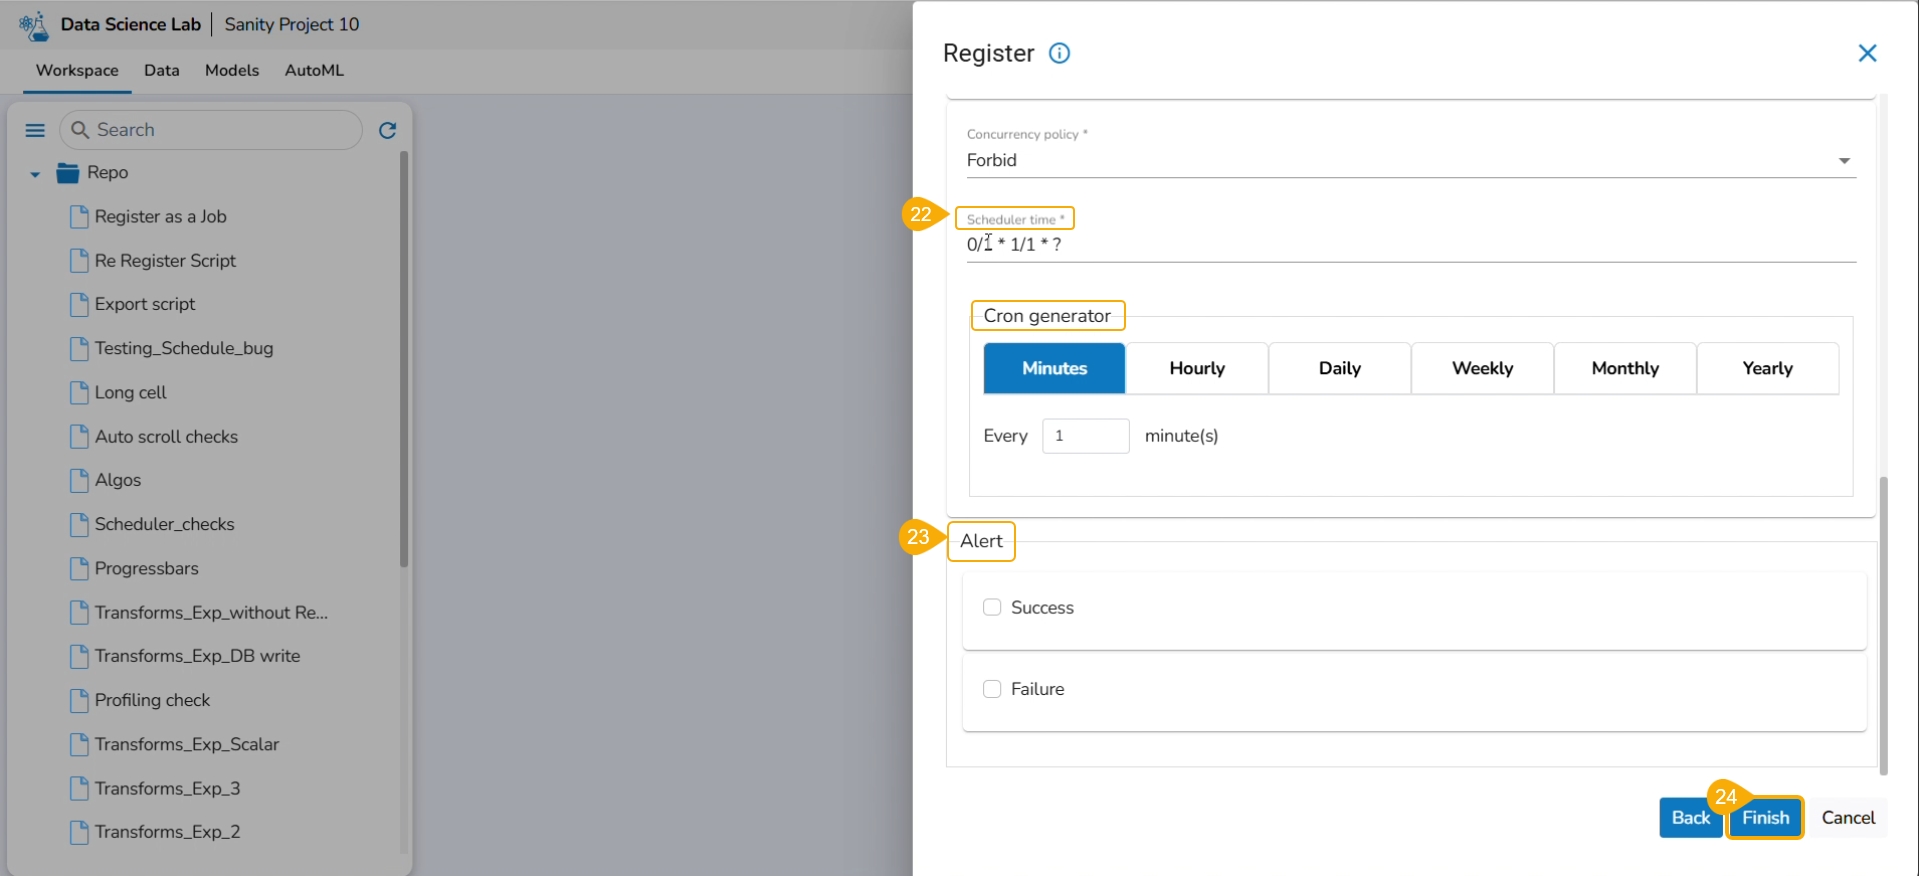
The concurrency policy has three options: Allow, Forbid, and Replace.
Allow: If a job is scheduled for a specific time and the first process is not completed before the next scheduled time, the next task will run in parallel with the previous task.
Forbid: If a job is scheduled for a specific time and the first process is not completed before the next scheduled time, the next task will wait until all the previous tasks are completed.
Replace: If a job is scheduled for a specific time and the first process is not completed before the next scheduled time, the previous task will be terminated and the new task will start processing.
Scheduler Time: Provide scheduler time using the Cron generator.
Click the Finish option.
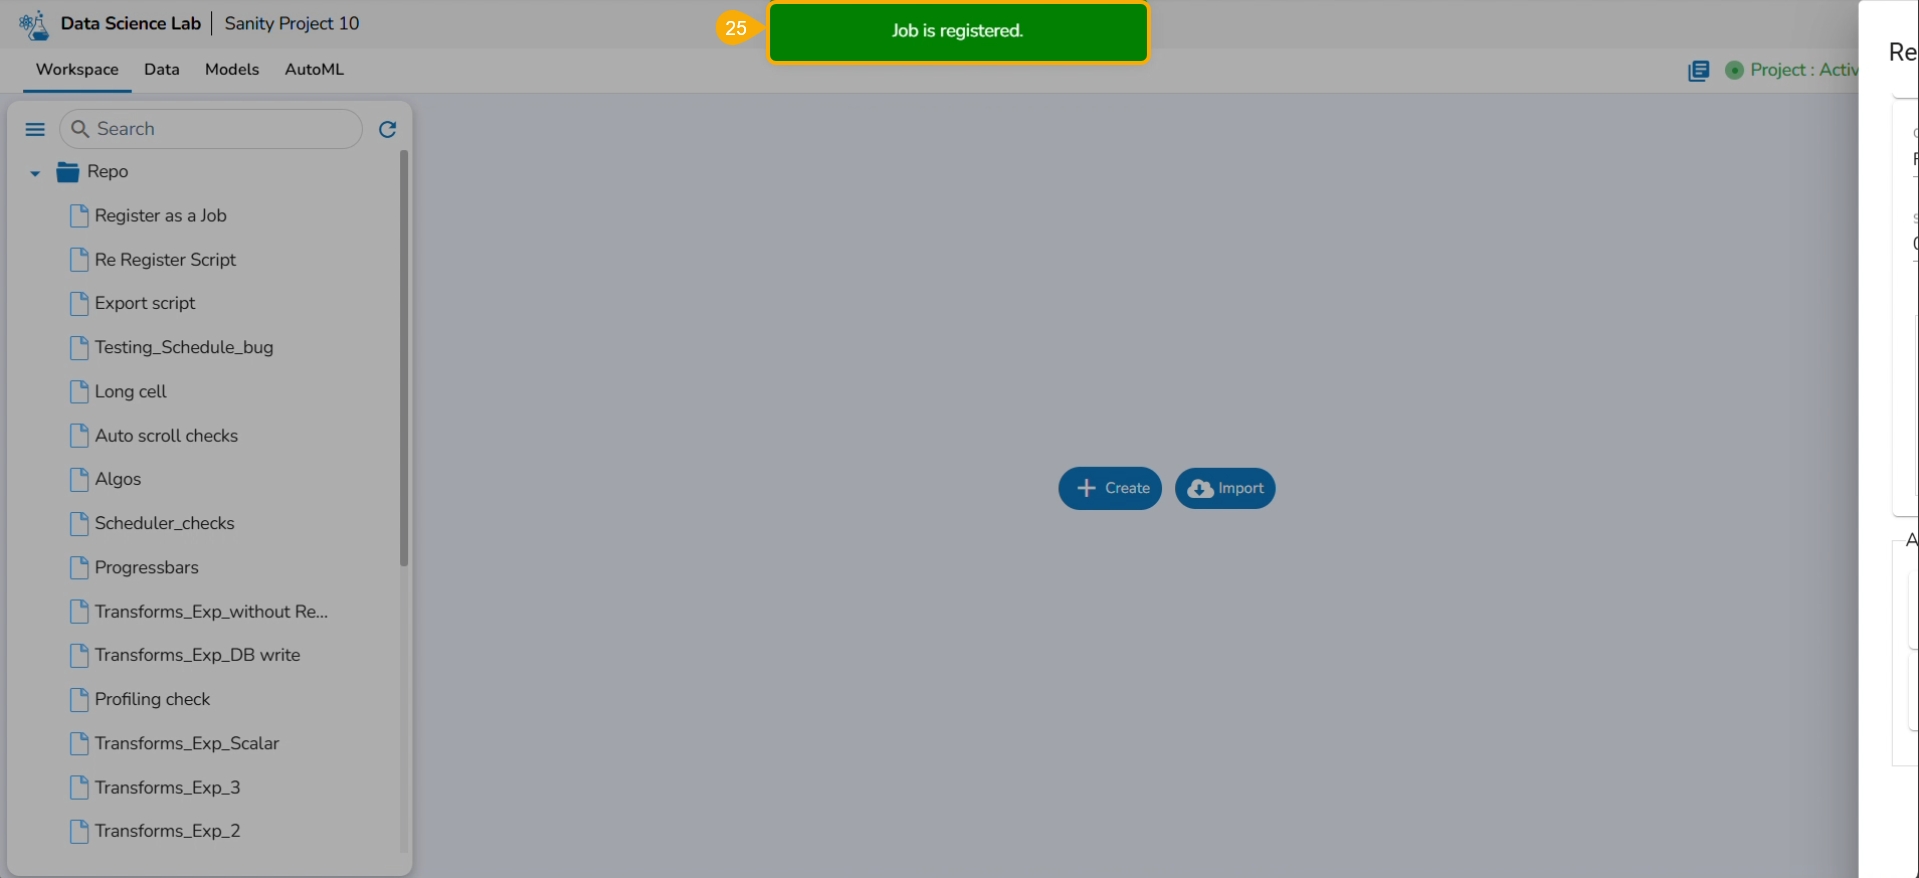
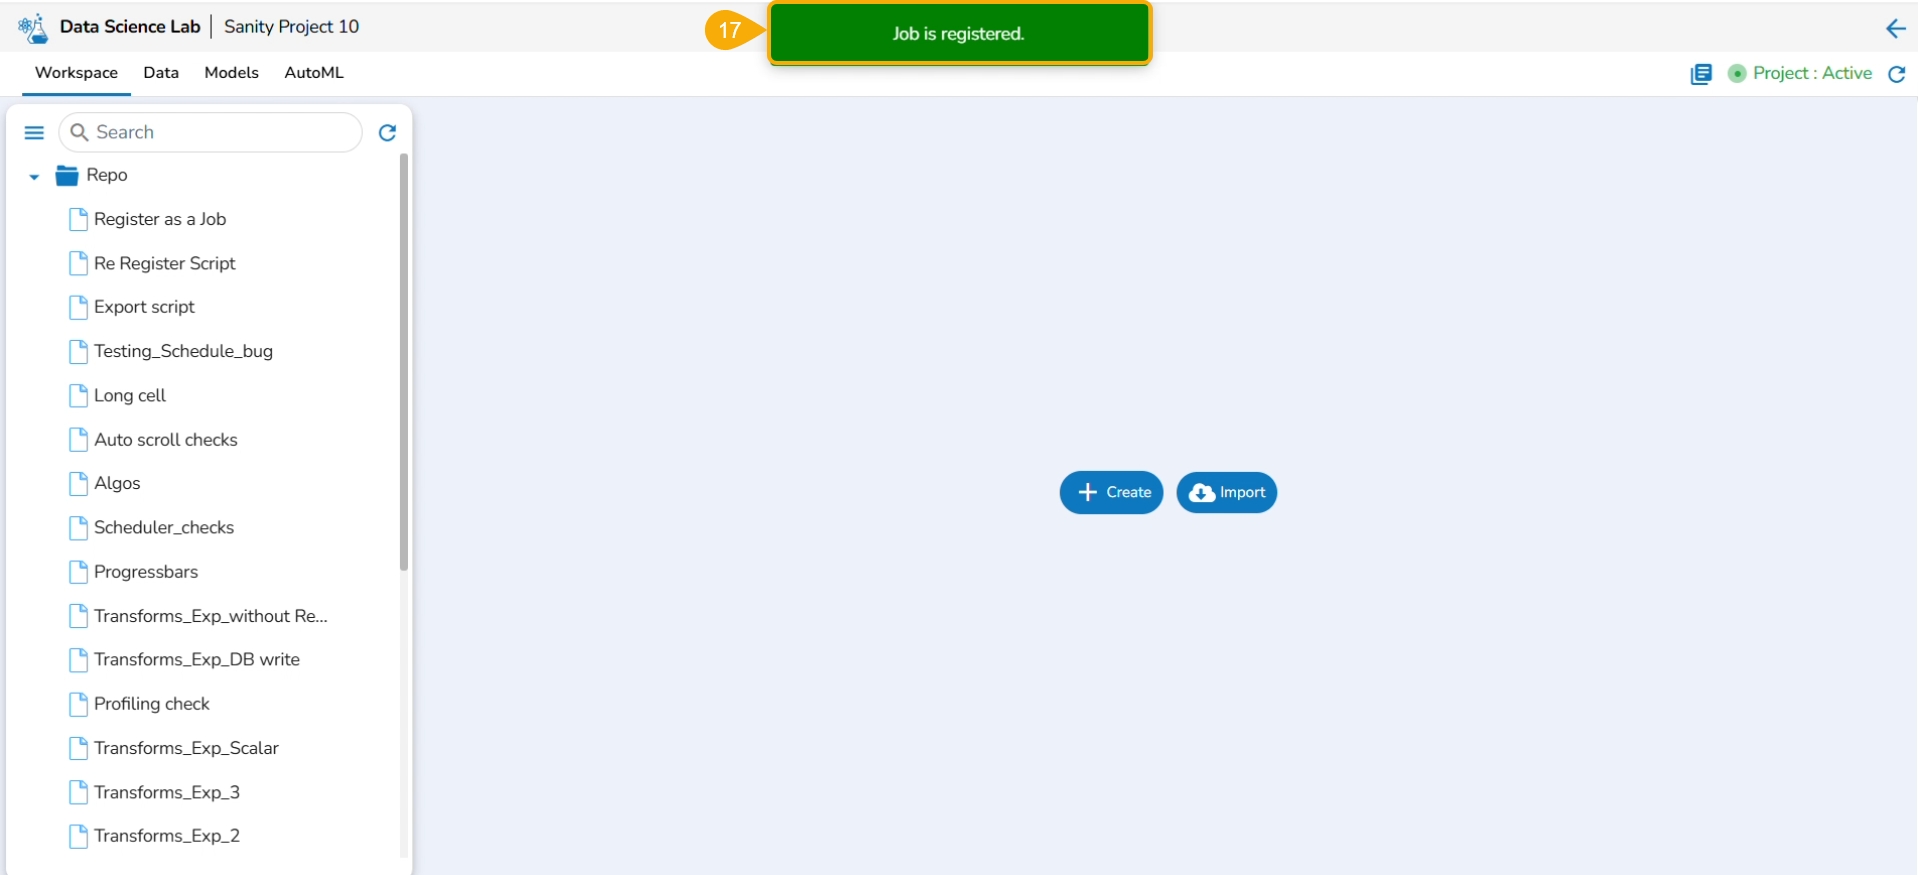
A notification message appears.
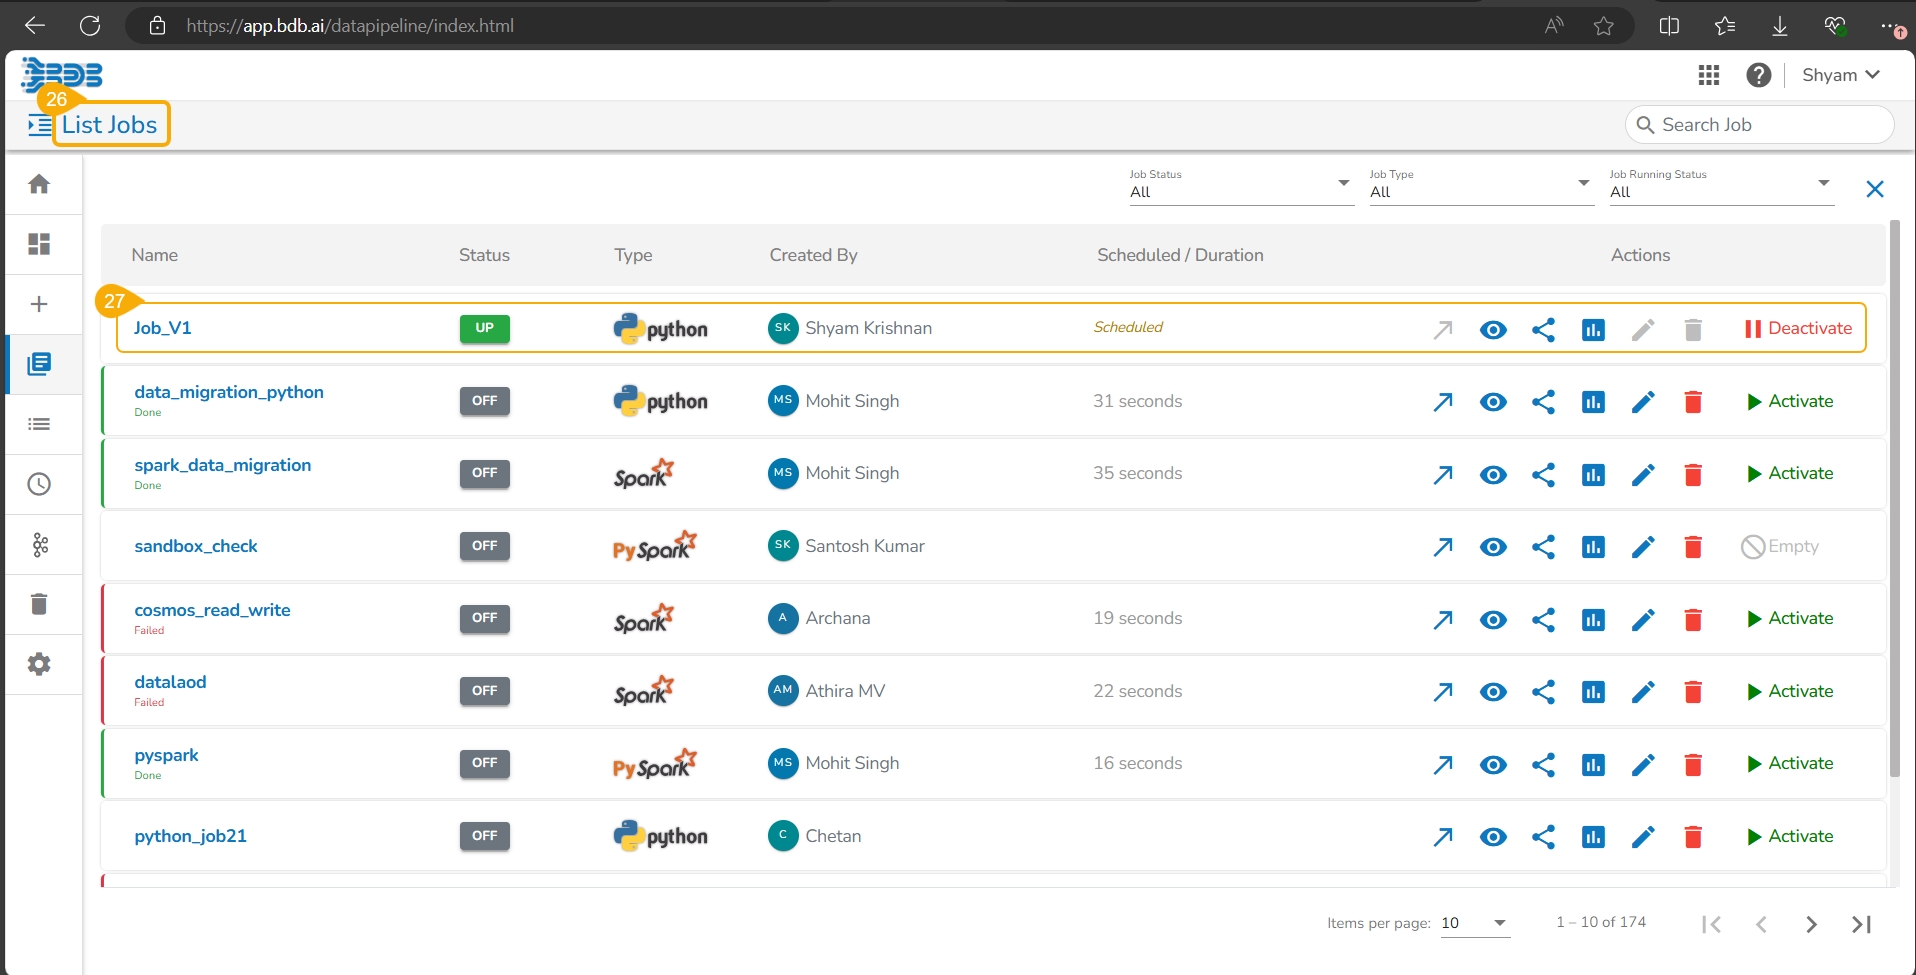
Navigate to the List Jobs page within the Data Pipeline module.
The recently registered DS Script gets listed with the same Scheduler name.
Check out the illustration on re-registering a DS Script as a job.
This option appears for a .ipynb file that has been registered before.
Select the Register option for a .ipynb file that has been registered before.
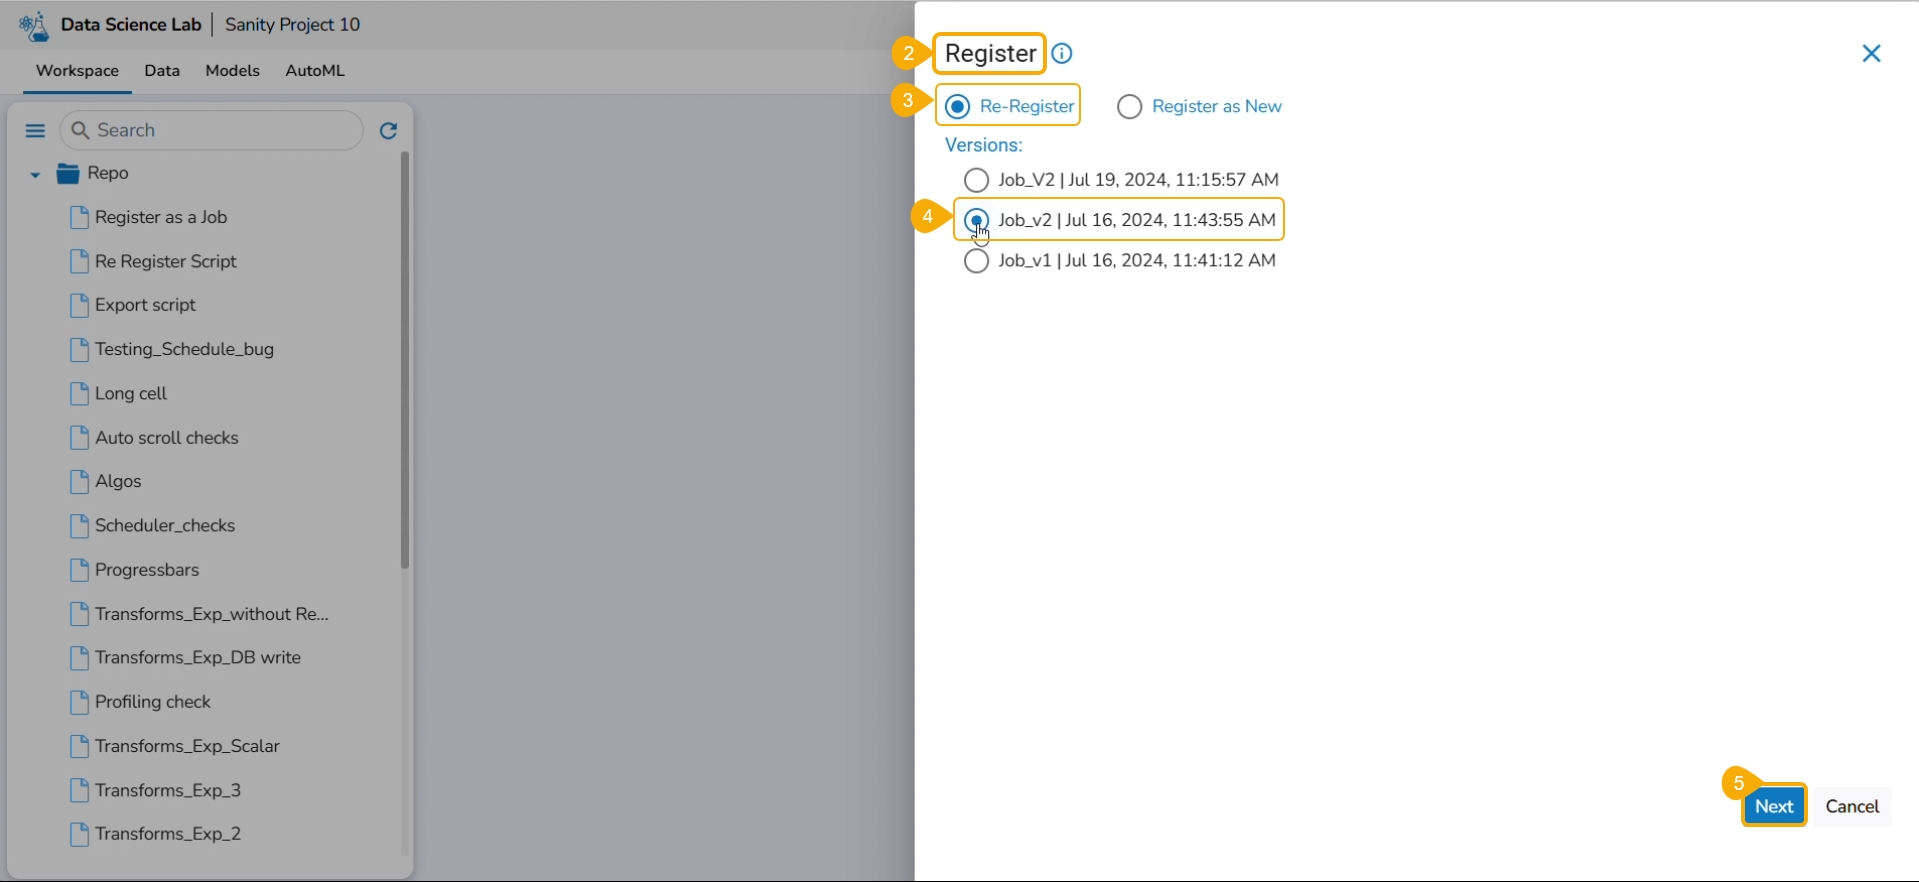
The Register page opens displaying the Re-Register and Register as New options.
Select the Re-Register option by using the checkbox.
Select a version by using a checkbox.
Click the Next option.
Select the script using the checkbox (it appears as per the pre-selection). The user can also choose the Select All option.
Click the Next option.
A notification message appears to ensure that the script is valid.
Click the Next option.
Start function: Select a function from the drop-down menu.
Job basinfo: Select an option from the drop-down menu.
Docker Config
Choose an option for Limit out of Low, Medium, and High
Request - CPU and Memory limit are displayed.
On demand: Check this option if a Python Job (On demand) must be created. In this scenario, the Job will not be scheduled.
Please Note: The Concurrency policy option doesn't appear for the On-demand jobs, it displays only for the jobs wherein the scheduler is configured.
The concurrency policy has three options: Allow, Forbid, and Replace.
Allow: If a job is scheduled for a specific time and the first process is not completed before the next scheduled time, the next task will run in parallel with the previous task.
Forbid: If a job is scheduled for a specific time and the first process is not completed before the next scheduled time, the next task will wait until all the previous tasks are completed.
Replace: If a job is scheduled for a specific time and the first process is not completed before the next scheduled time, the previous task will be terminated and the new task will start processing.
Click the Finish option to register the Notebook as a Job.
A notification message appears.
The user must follow all the steps from the Register a Data Science Script as a Job section while re-registering it with the Register as New option.
Check out the illustration on Registering a DS Script as New.
This page explains the step by step process for Notebook migration and Push to VCS functionality.
A Notebook script can be migrated across the space and server using the Push into GIT option.
Prerequisites: It is required to set the configuration for the Data Science Lab Migration using the Version Control option from the Admin module before migrating a DS Lab script or model.
Check out the walk-through on how to migrate/ export a Notebook script to the GIT Repository.
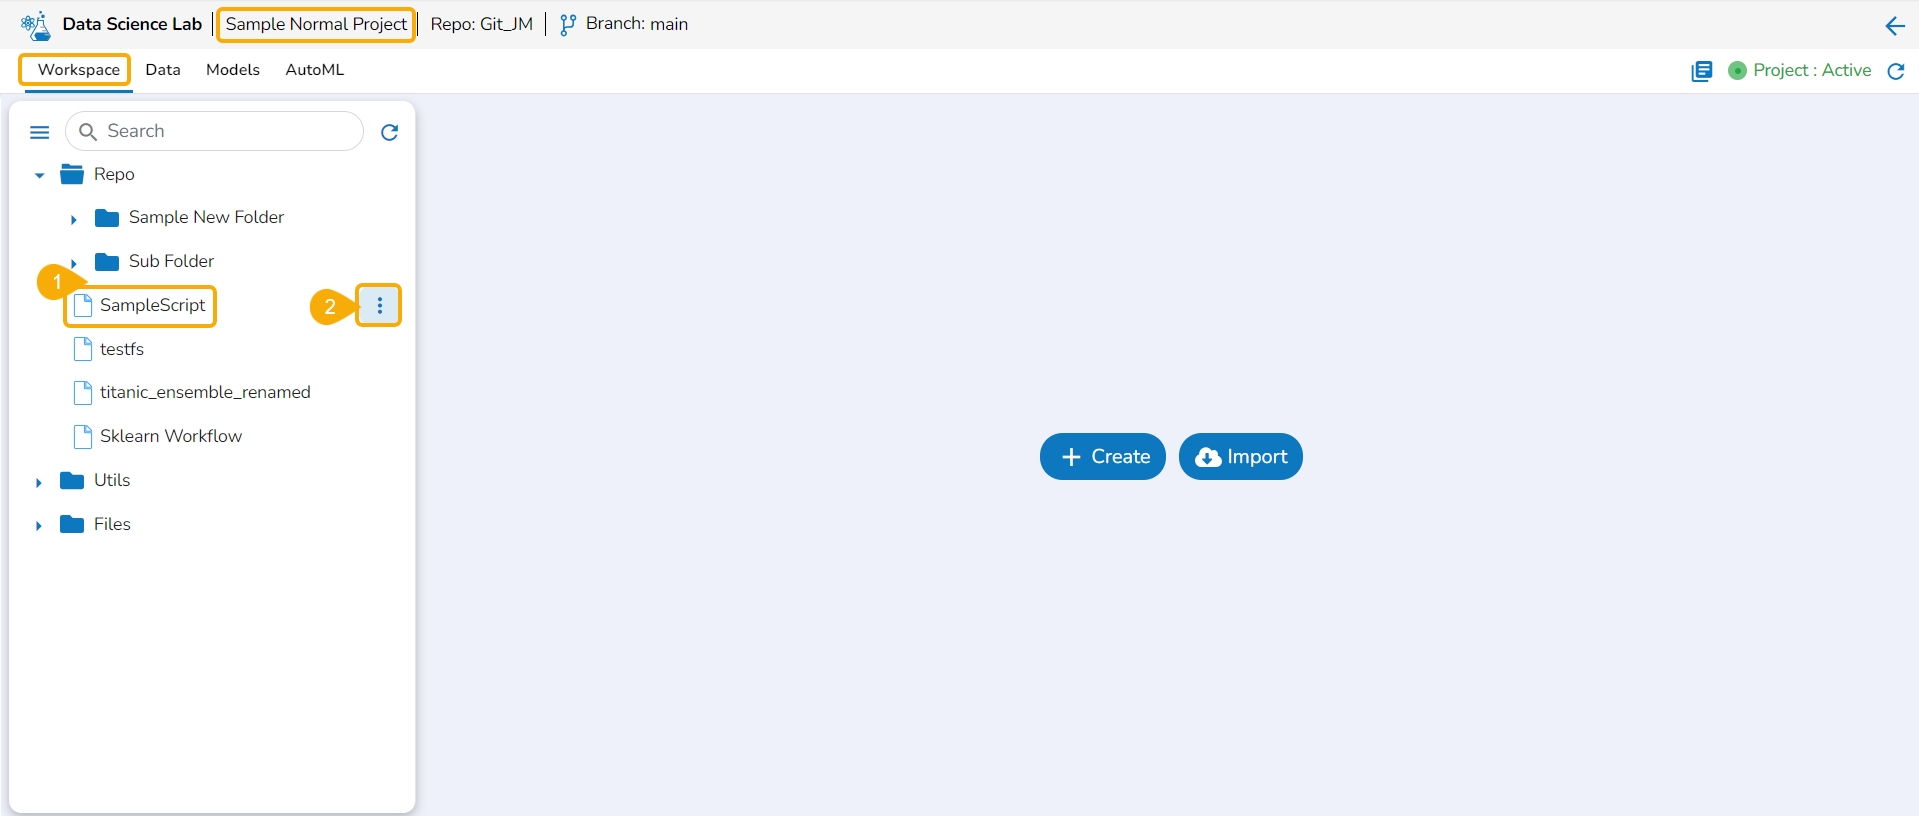
Select a Notebook from the Workspace tab.
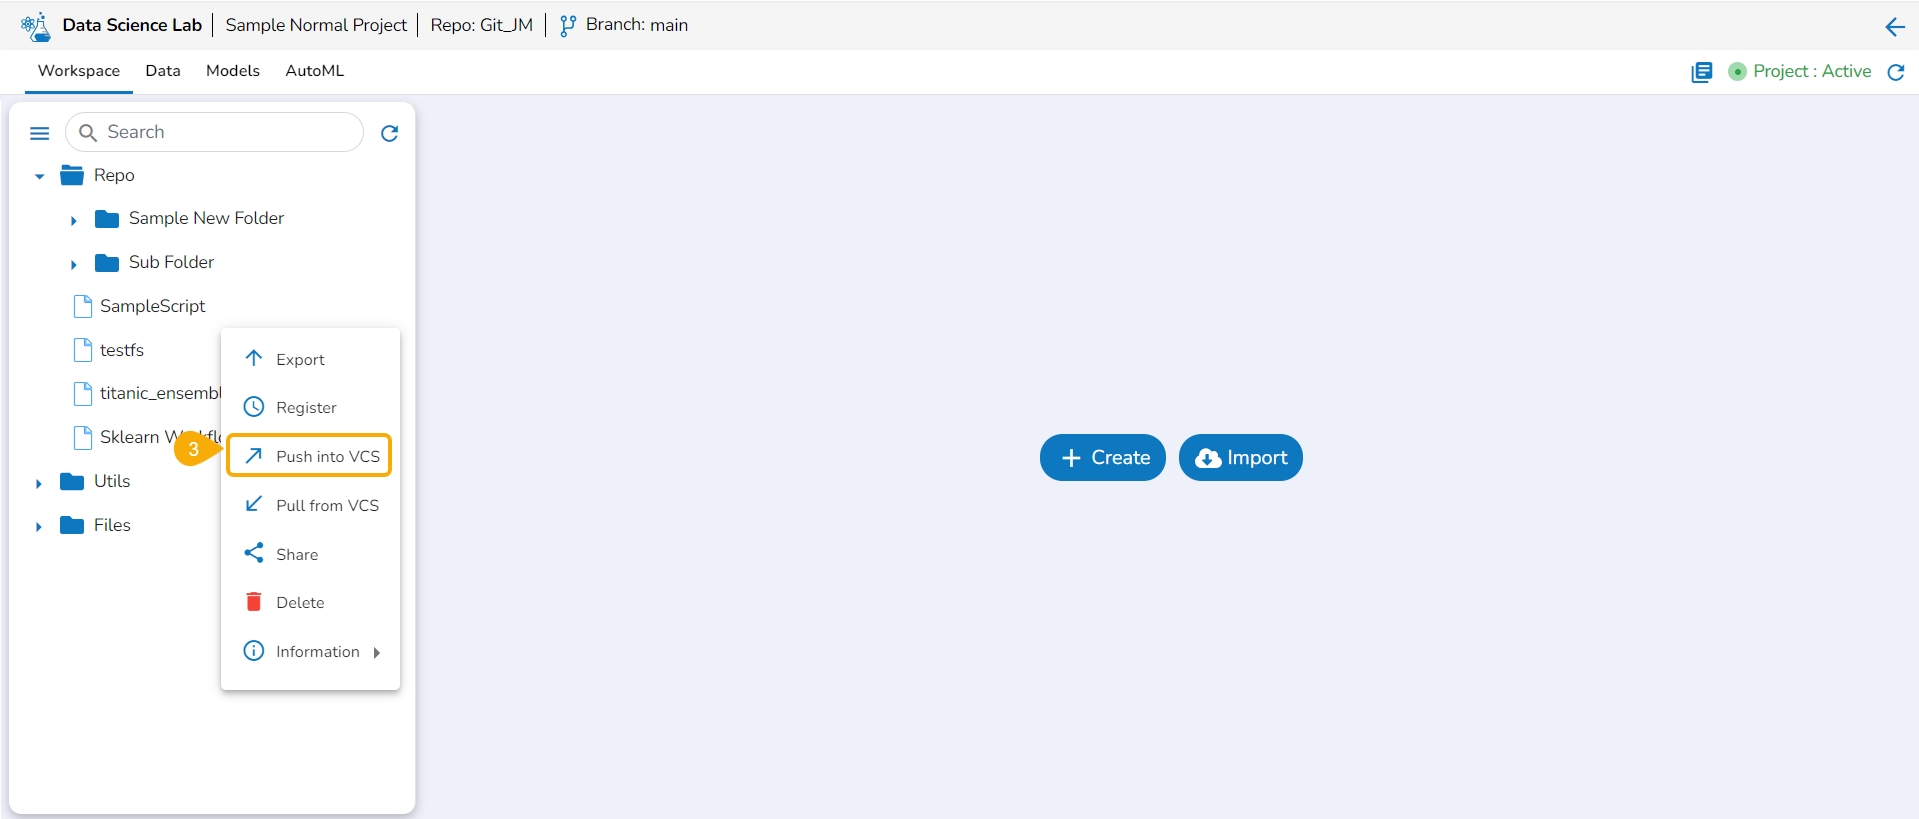
Click the Ellipsis icon to get the Notebook list actions.
Click the Push into VCS option for the selected Notebook.
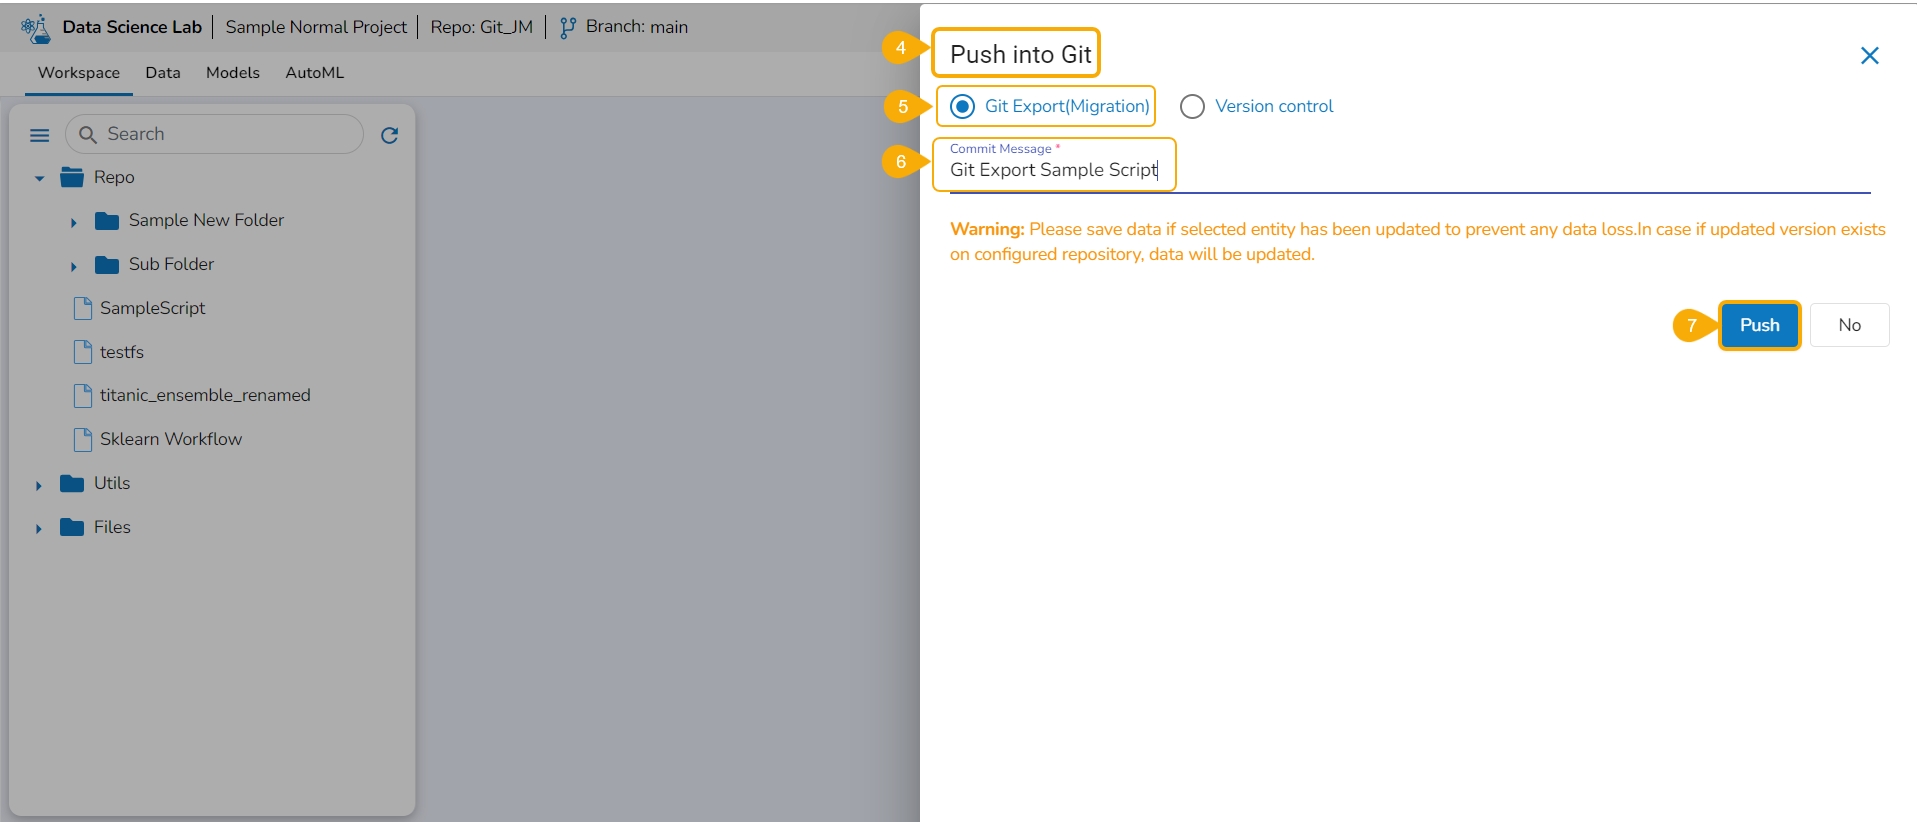
The Push into Git drawer opens.
Select the Git Export (Migration) option.
Provide a Commit Message in the given space.
Click the Push option.
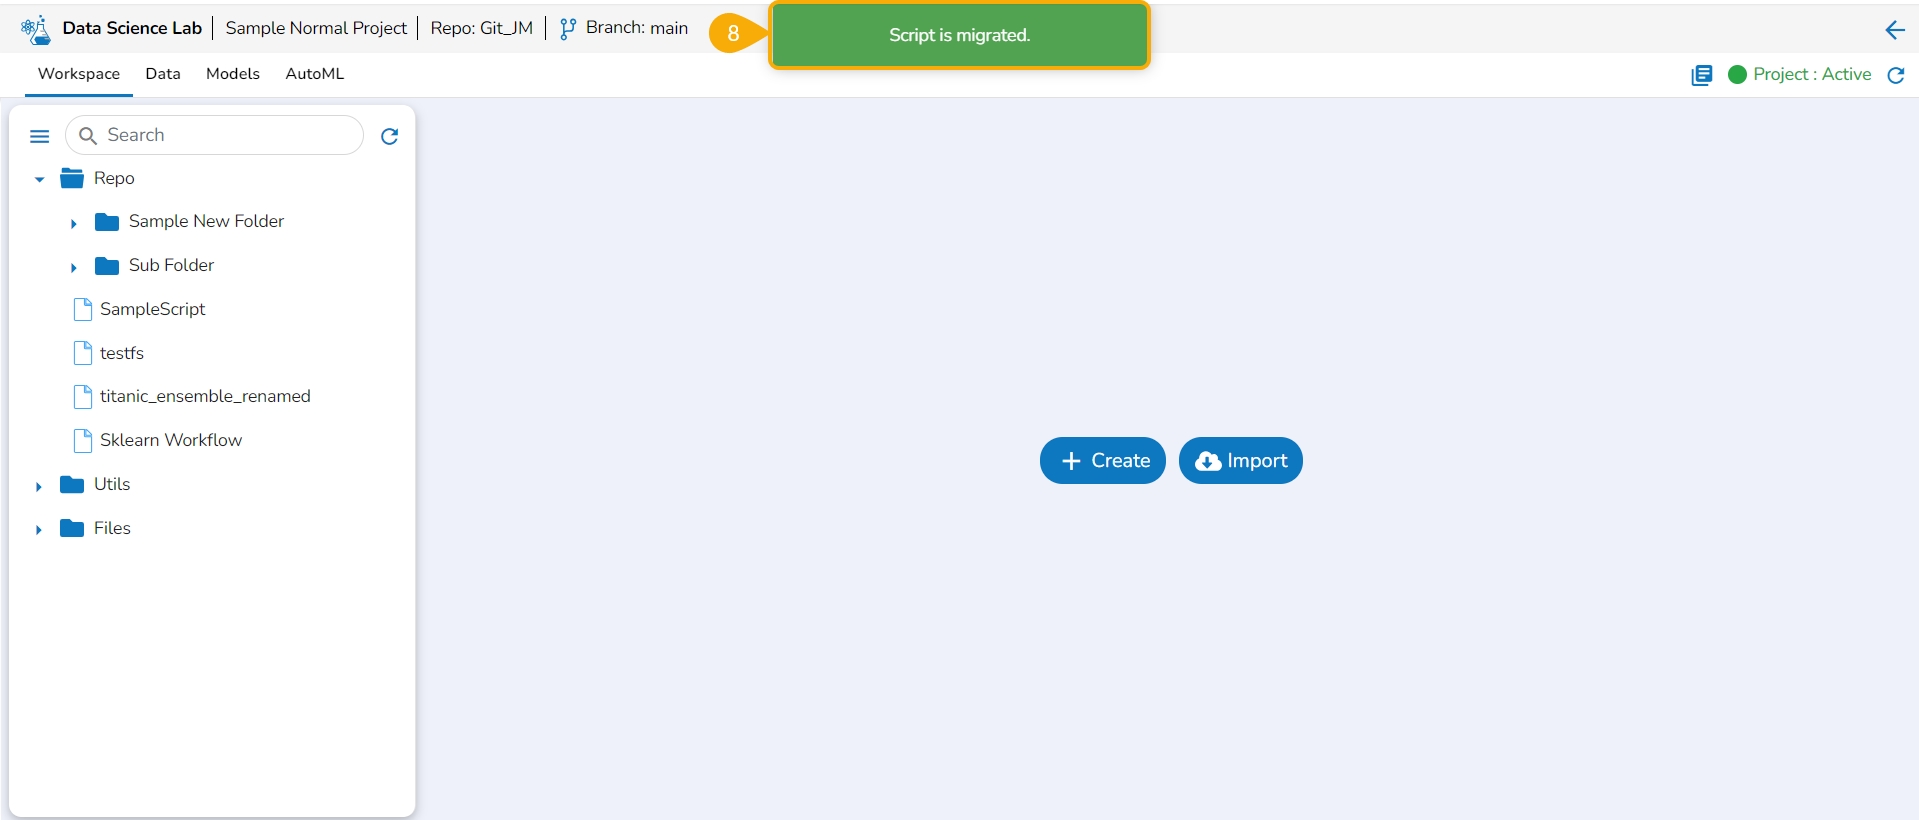
The selected Notebook script version gets migrated to the Git Repository and the user gets notified by a message.
After exporting a DSL script, you can sign in to another user account on a different space or server and import the DSL script.
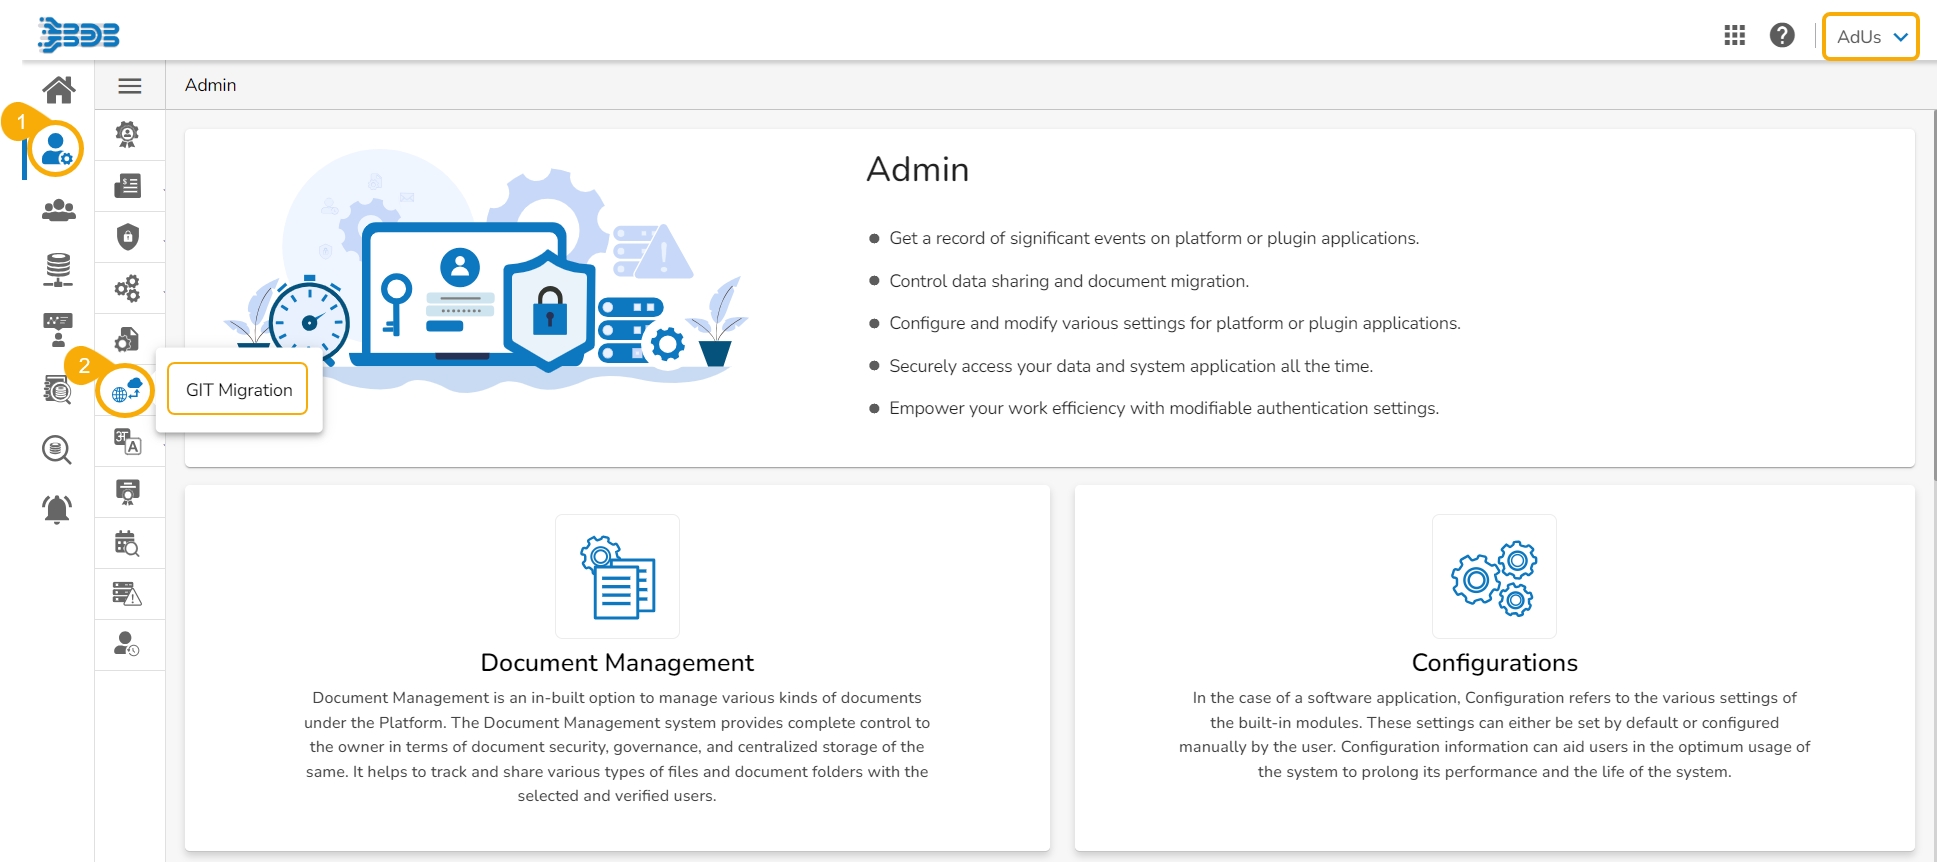
Click the Admin module from the Apps menu.
Select the GIT Migration option from the admin menu panel.
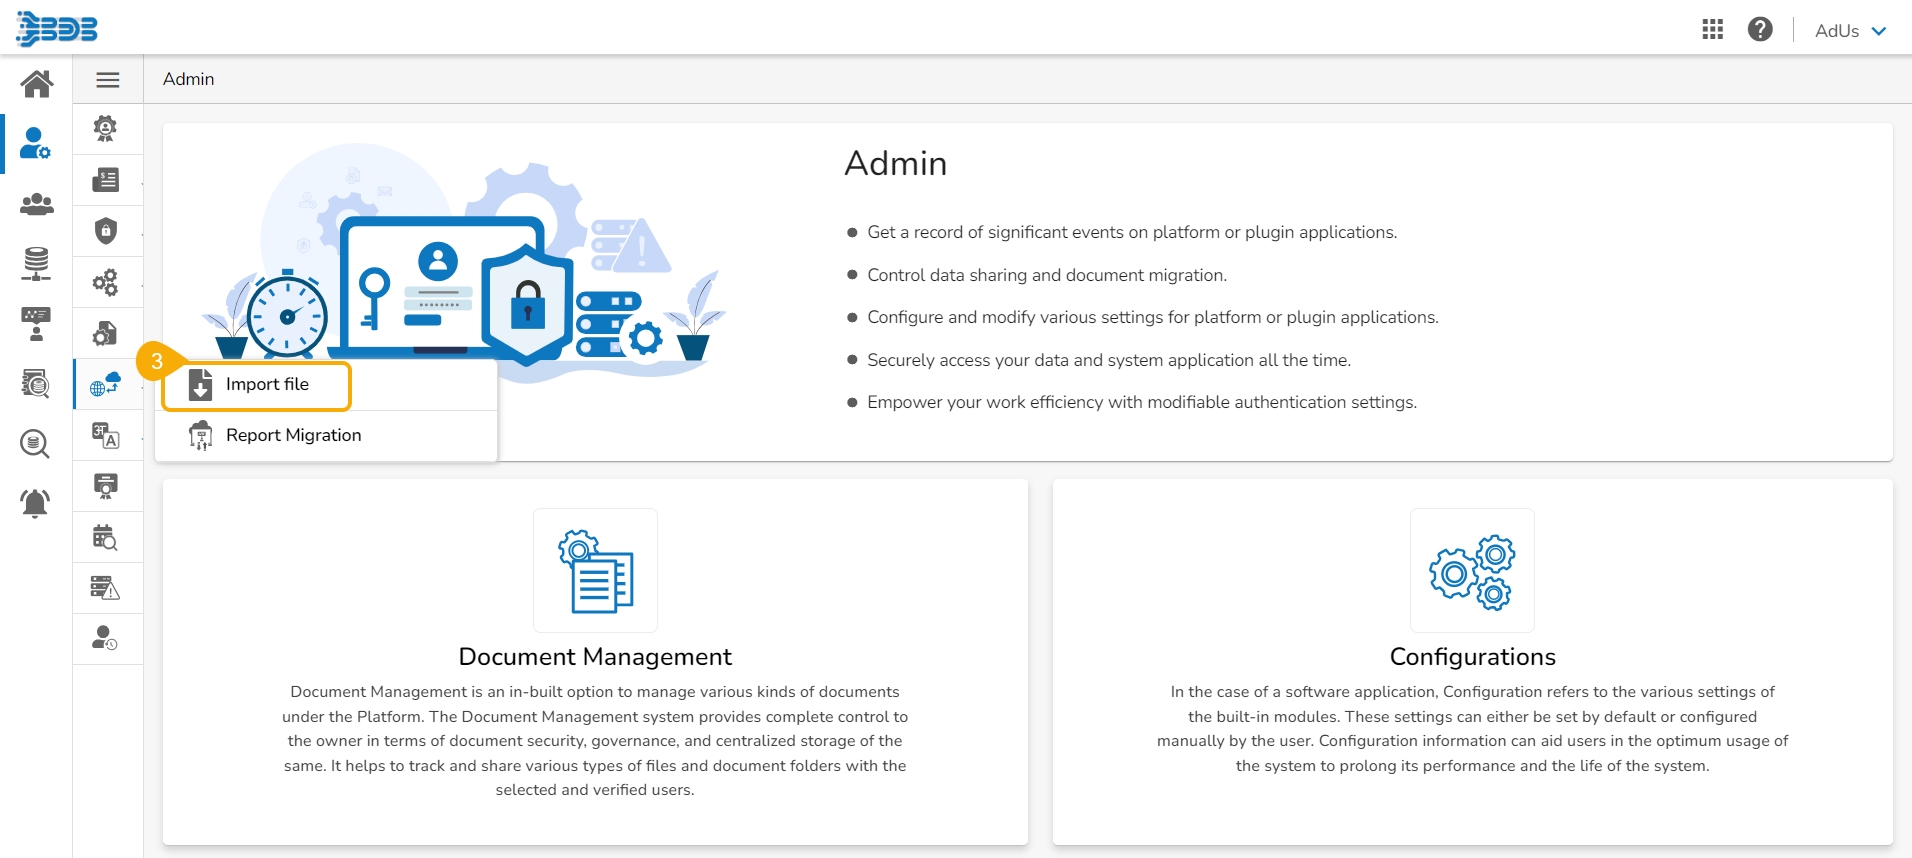
Click the Import File option.
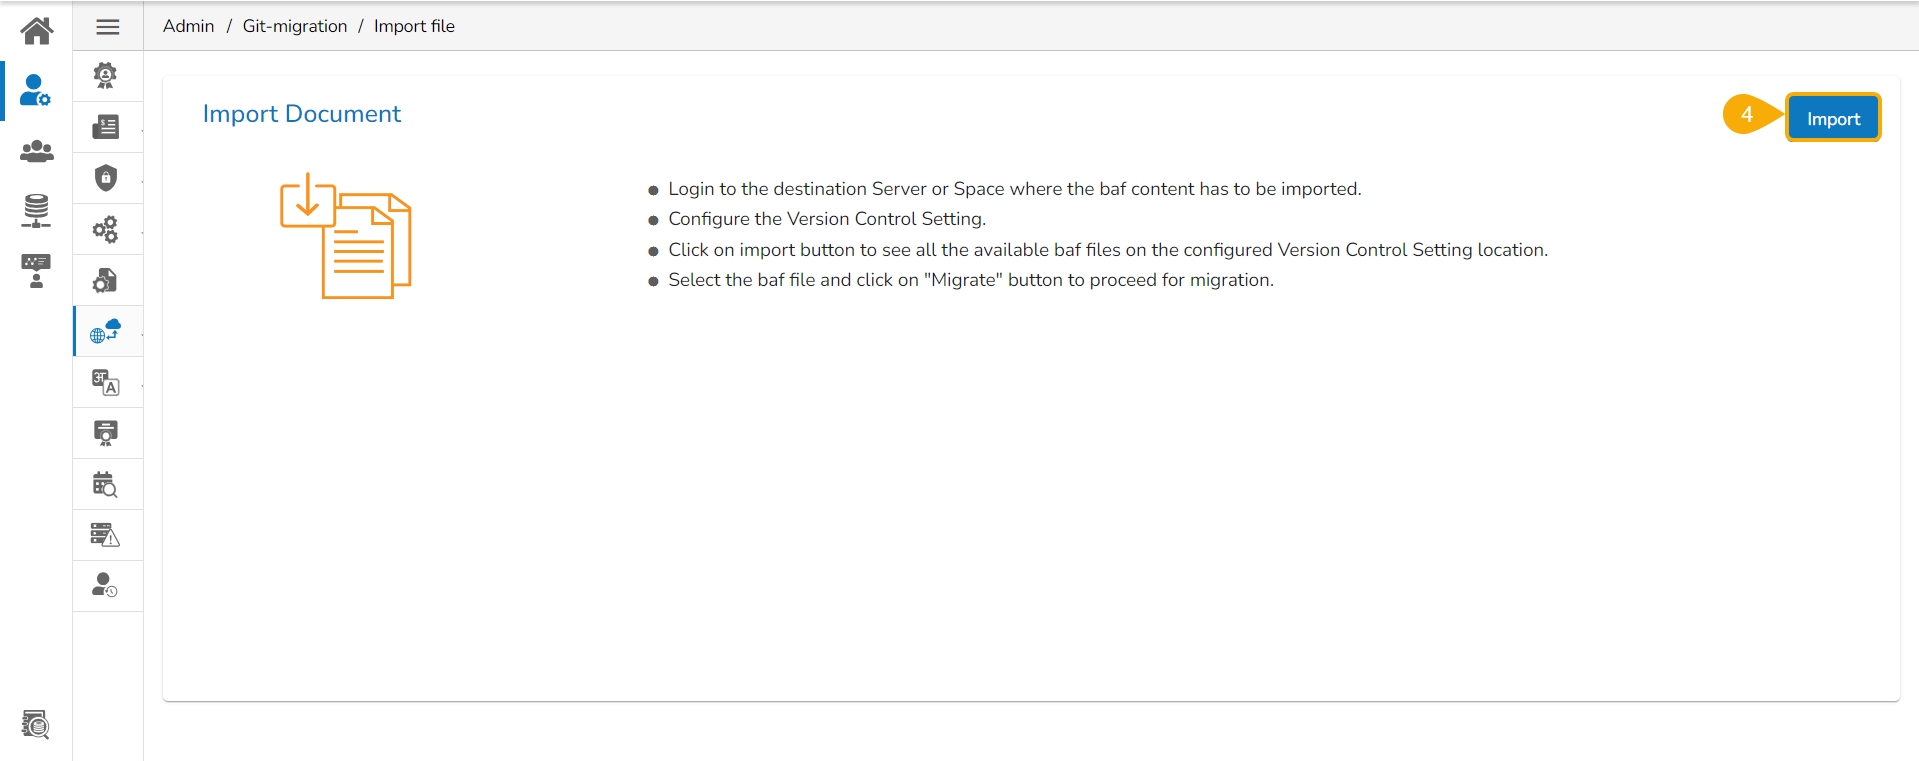
The Import Document page opens, click the Import option as suggested in the following image.
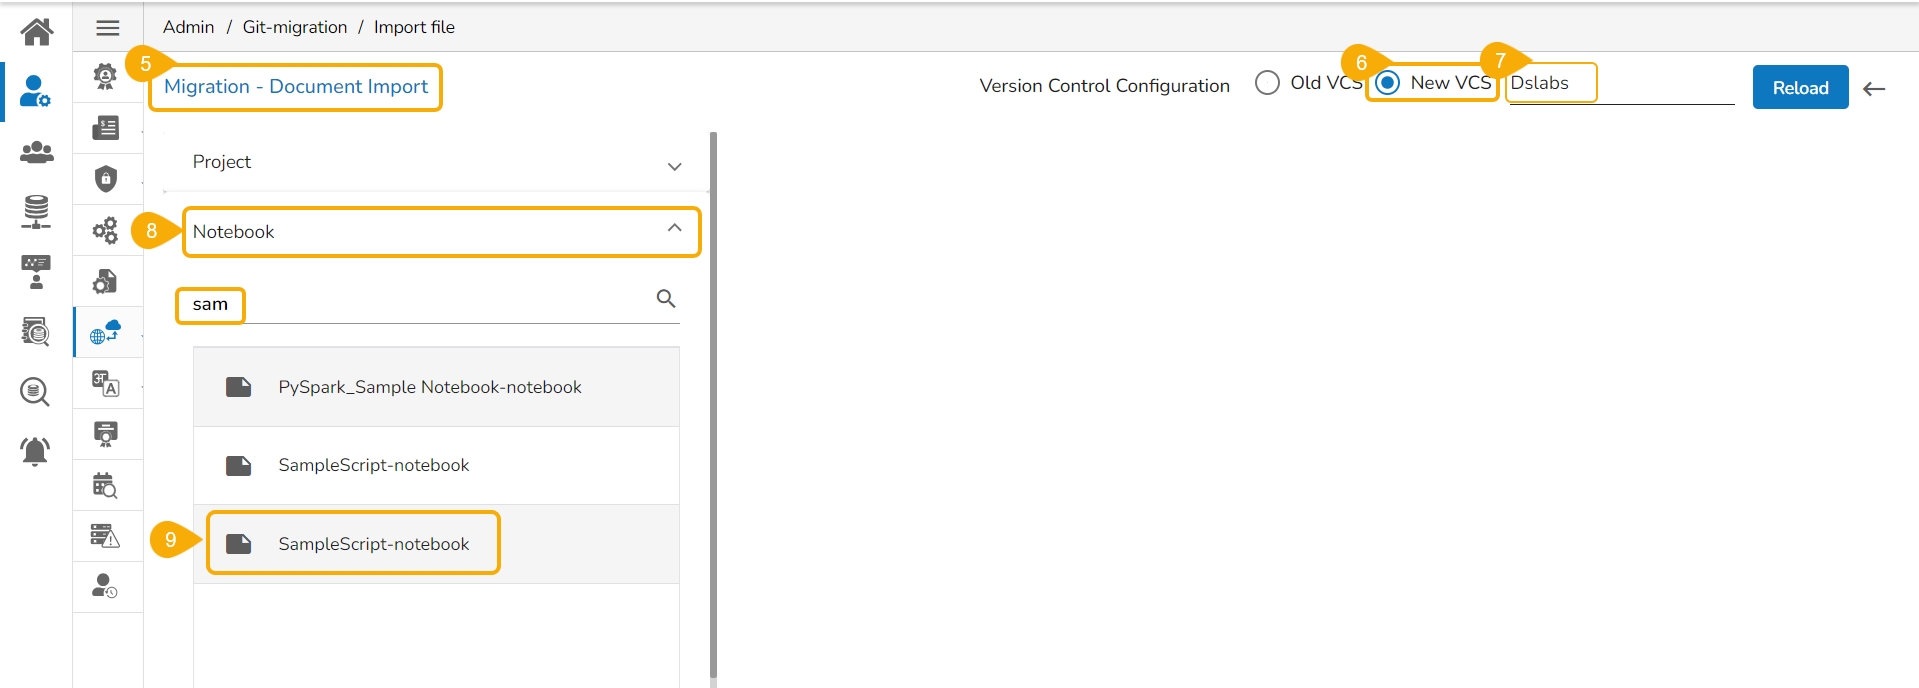
The Migration- Document Import page opens.
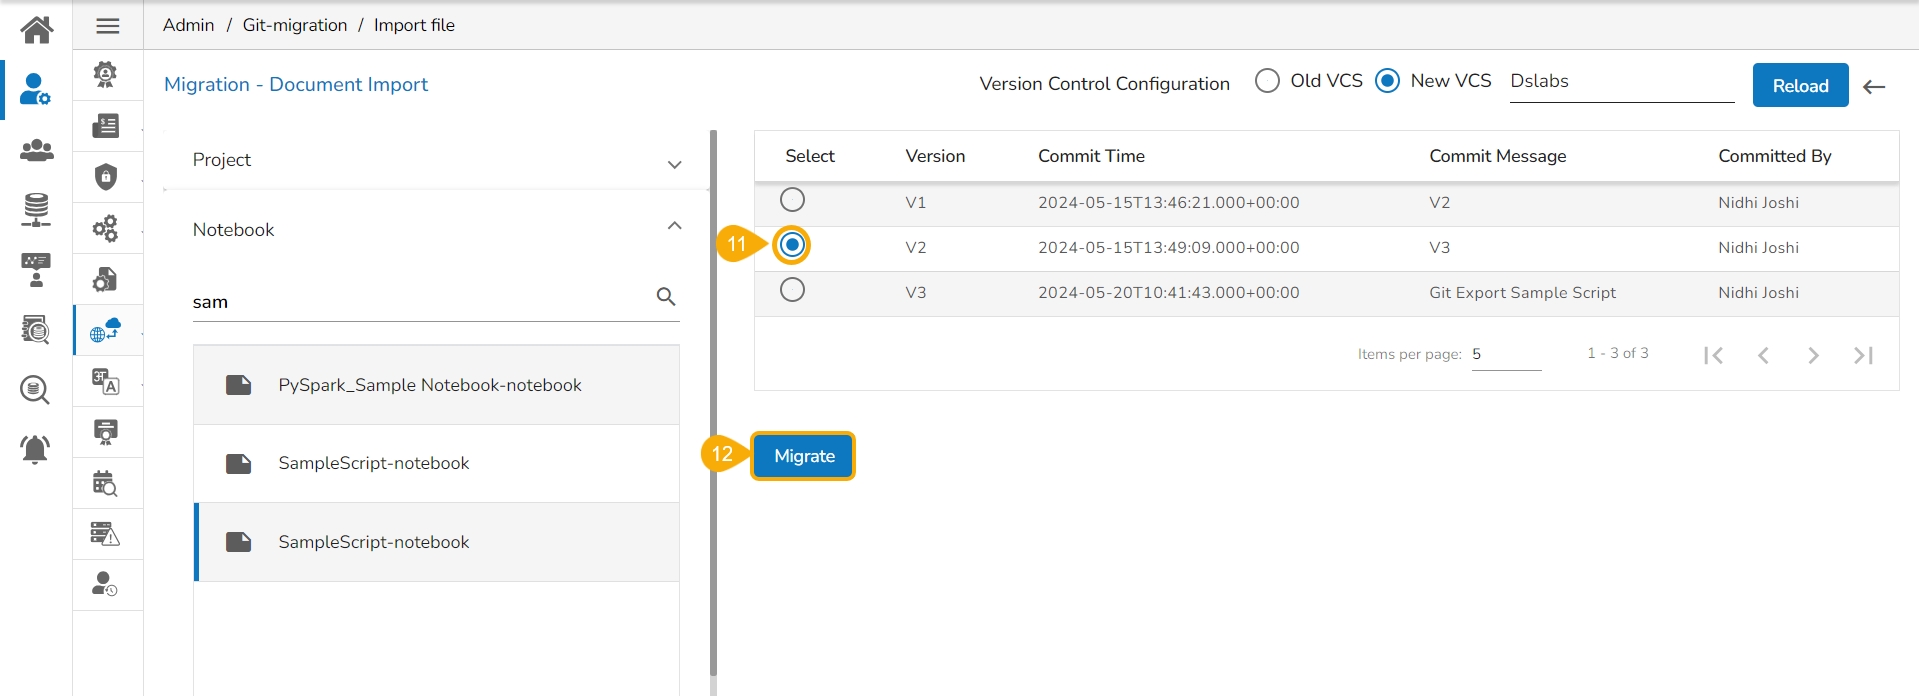
Select New VCS as Version Control Configuration.
Select the DSLab option from the module drop-down menu.
Select the Notebook option from the left side panel.
All the migrated Notebooks are listed. The user can use the Search bar to customize the displayed list of the exported Notebooks.
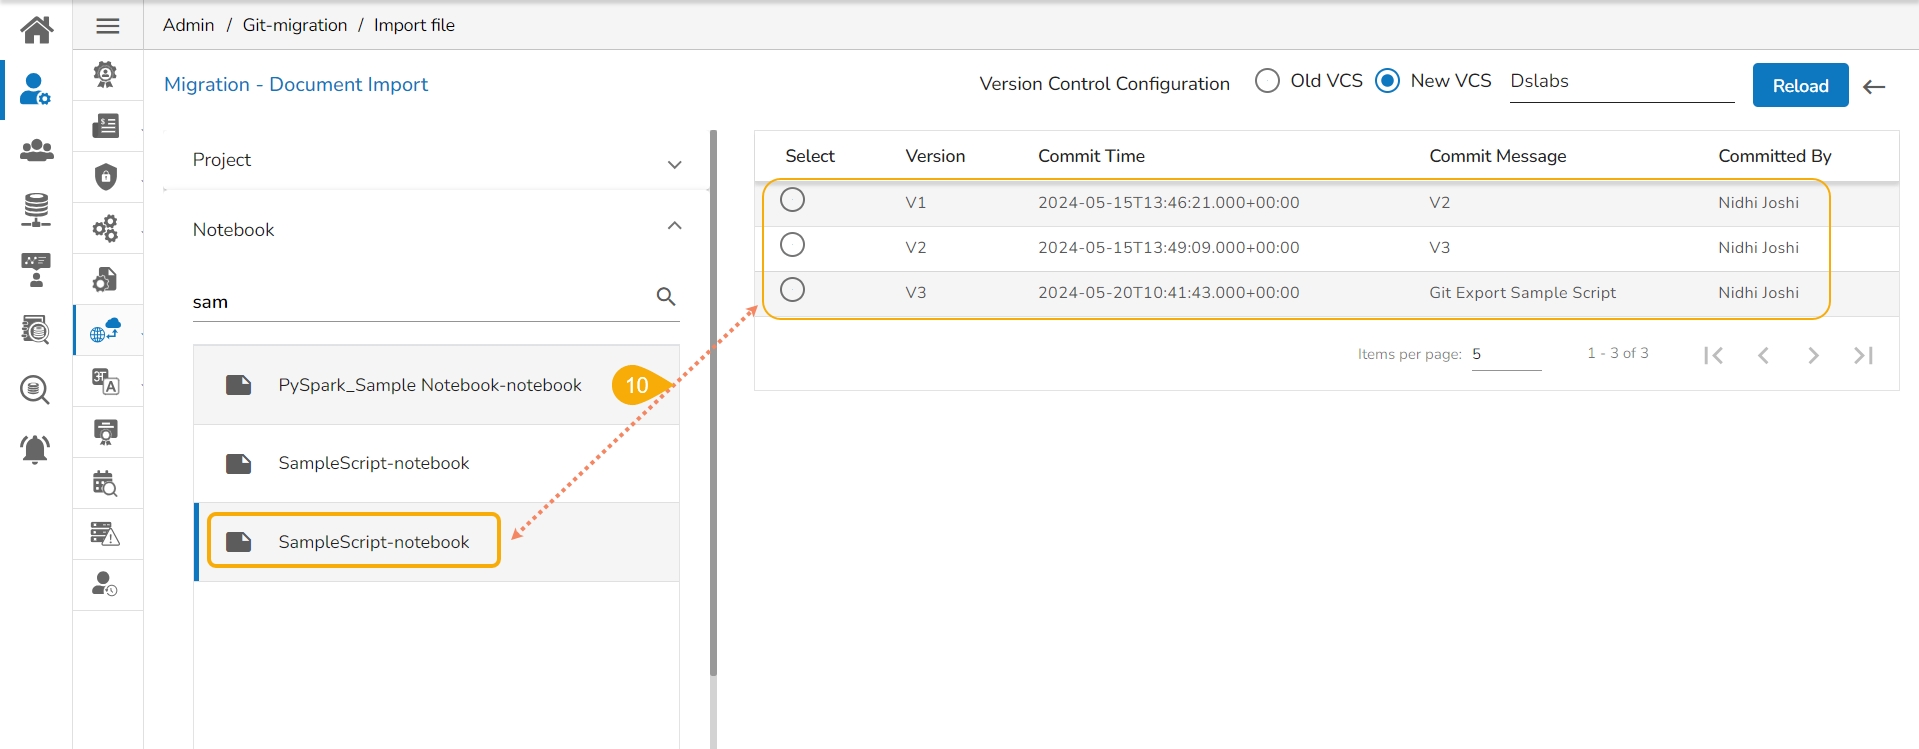
Select a Notebook from the displayed list to open the available versions of that Notebook.
Select a Version that you wish to import.
Click the Migrate option.
A notification message appears informing that the file has been migrated.
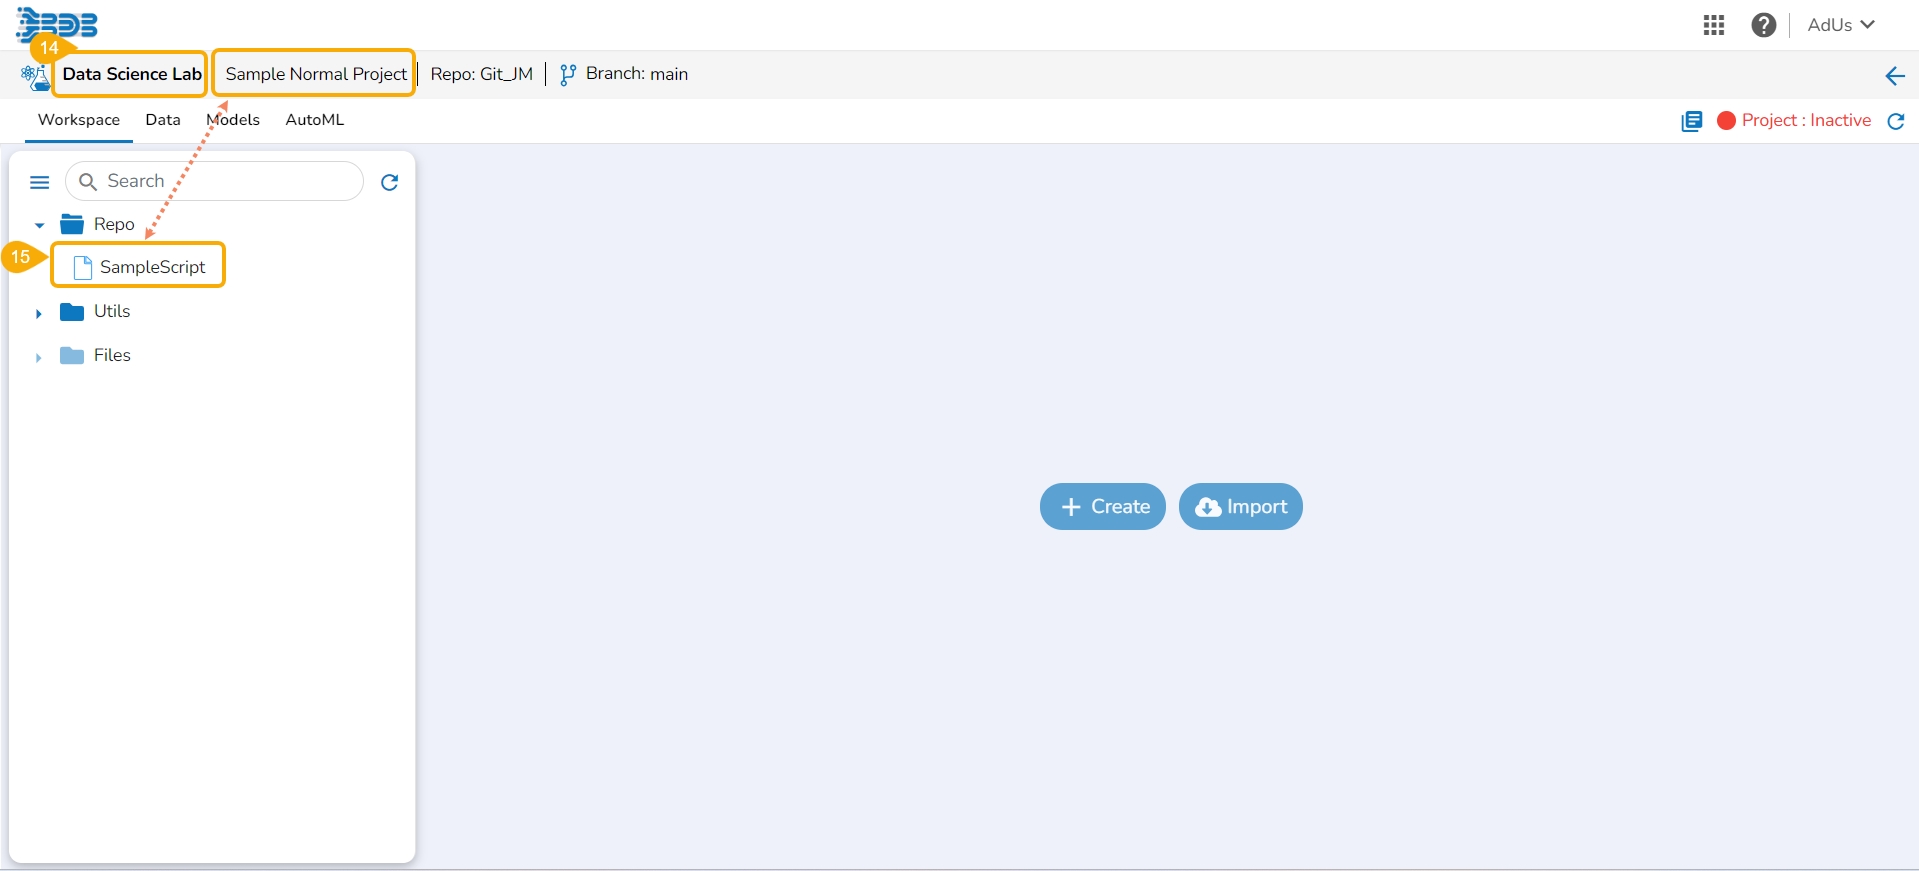
Open the Data Science Lab module and navigate to the List Project Page.
The imported Notebook gets listed with the concerned DSL Project.
Please Note:
The user can migrate only the exported scripts (the exported scripts to the Data Pipeline).
While migrating a DSL Notebook/Script using the Export to Git functionality, the concerned Project under which the Notebook is created also gets migrated.
While migrating a DSL Notebook the utility files which are part of the same Project will also get migrated.
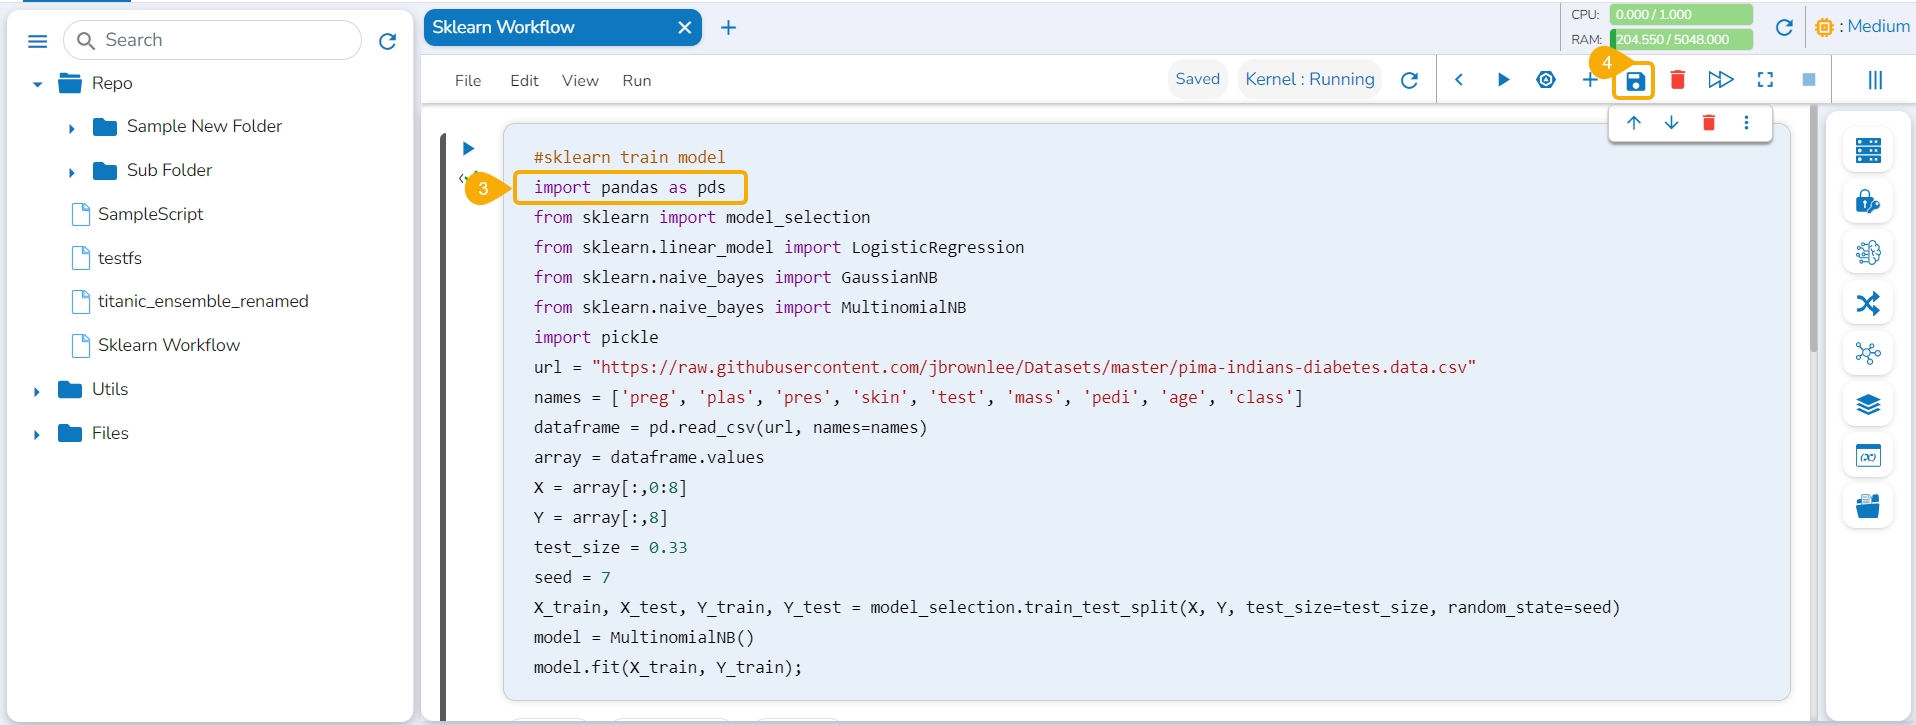
Check out the illustrations on the Notebook Version Control functionality.
Select a Notebook file from the Workspace tab.
Open the Notebook file.
Modify the Notebook script.
Click the Save icon.
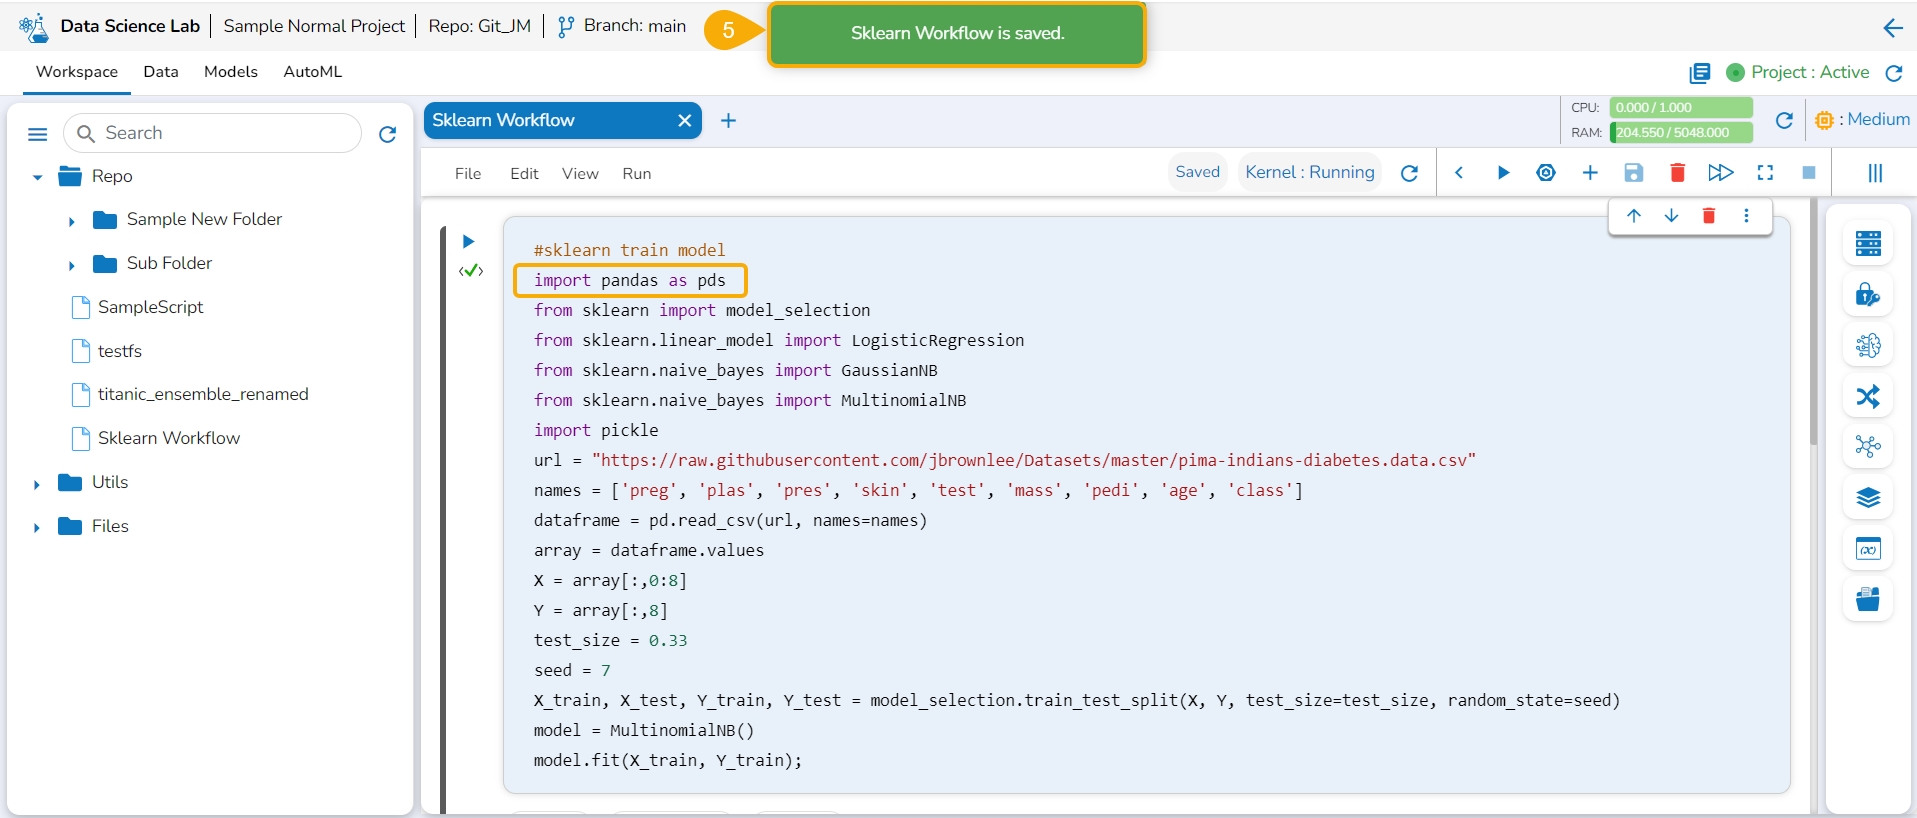
A message notifies the user that the workflow changes are saved.
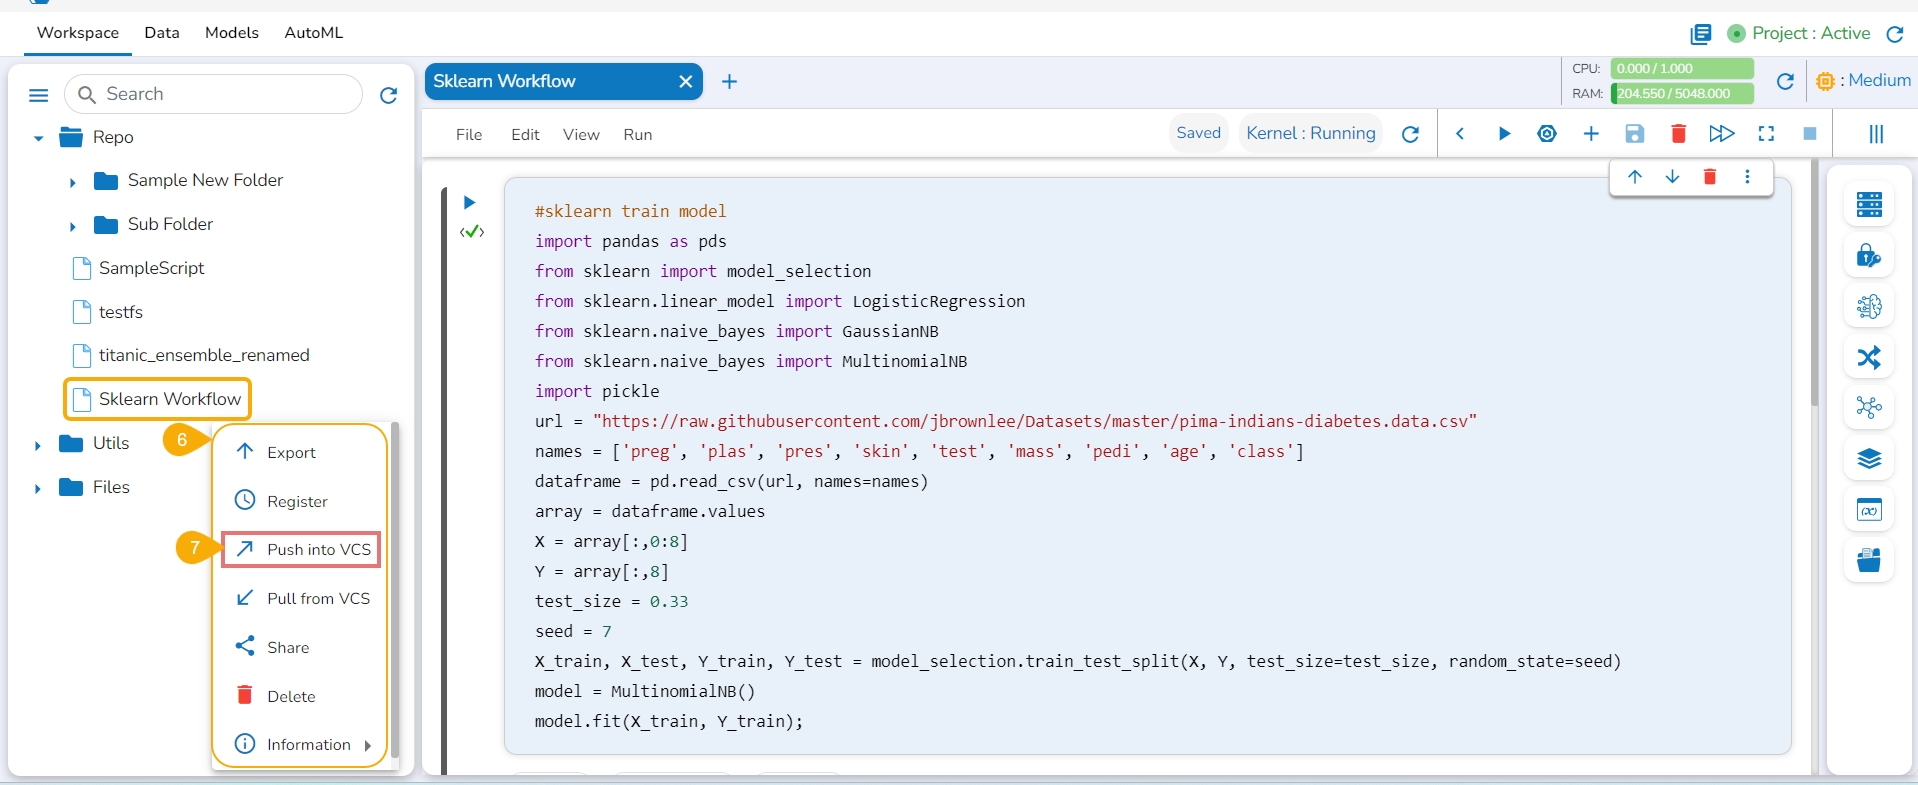
Access the Context menu for the Notebook.
Click the Push into VCS option for the selected Notebook.
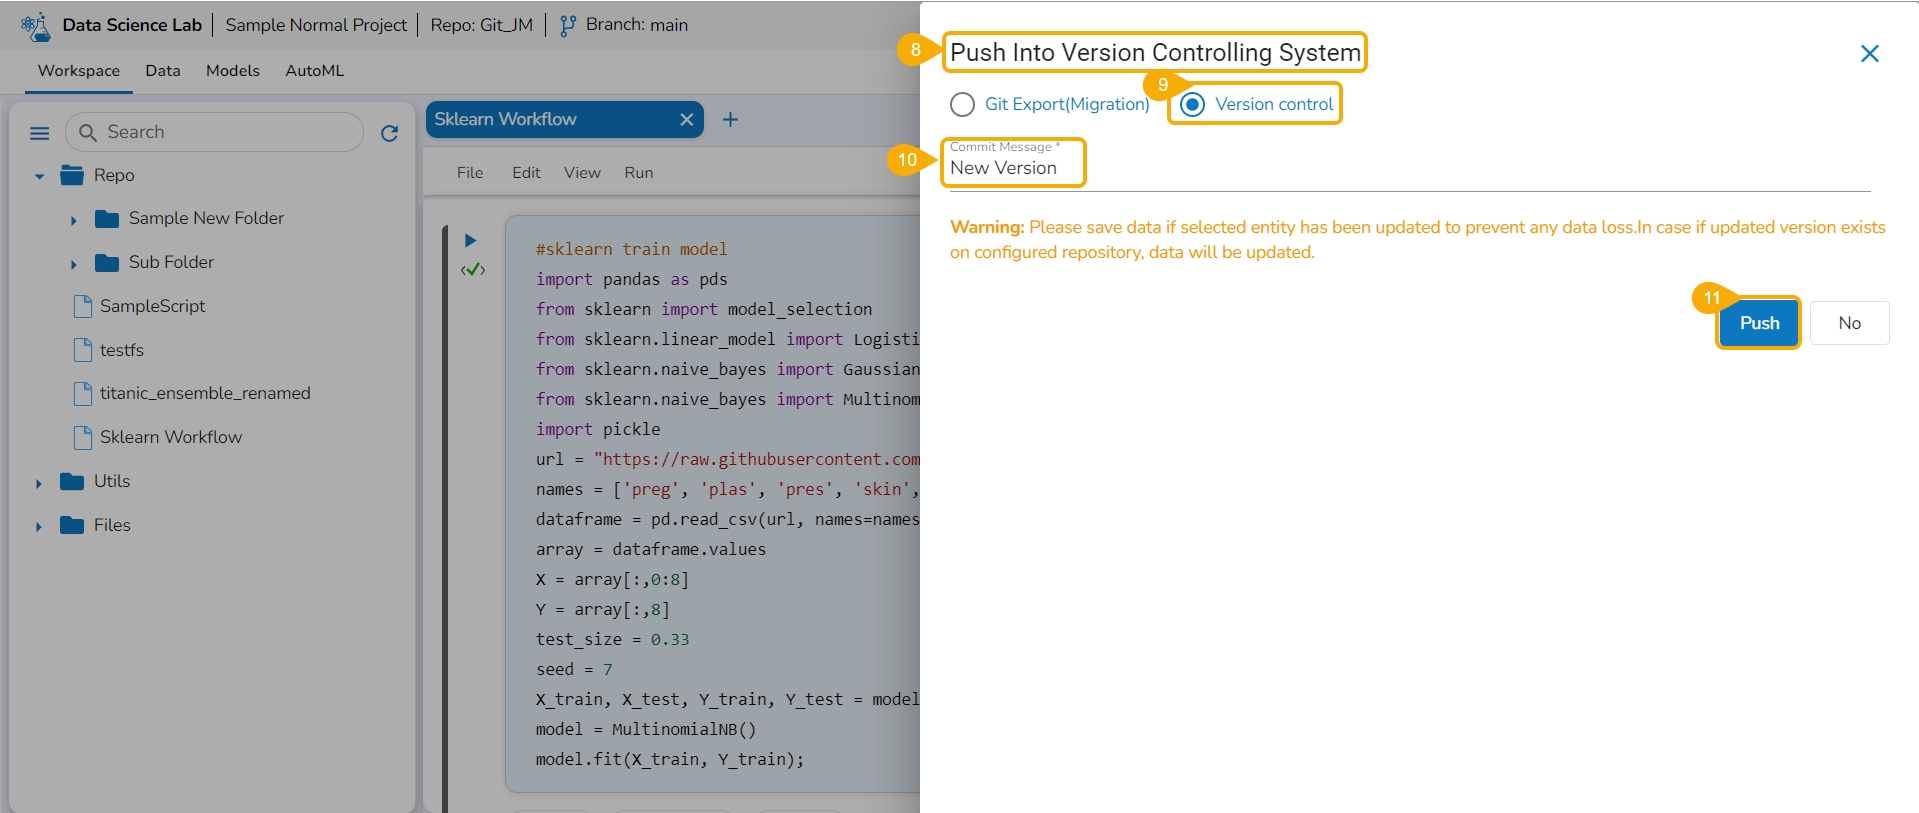
The Push into Version Controlling System drawer opens.
Select the Version Control option.
Provide a Commit Message.
Click the Push option.
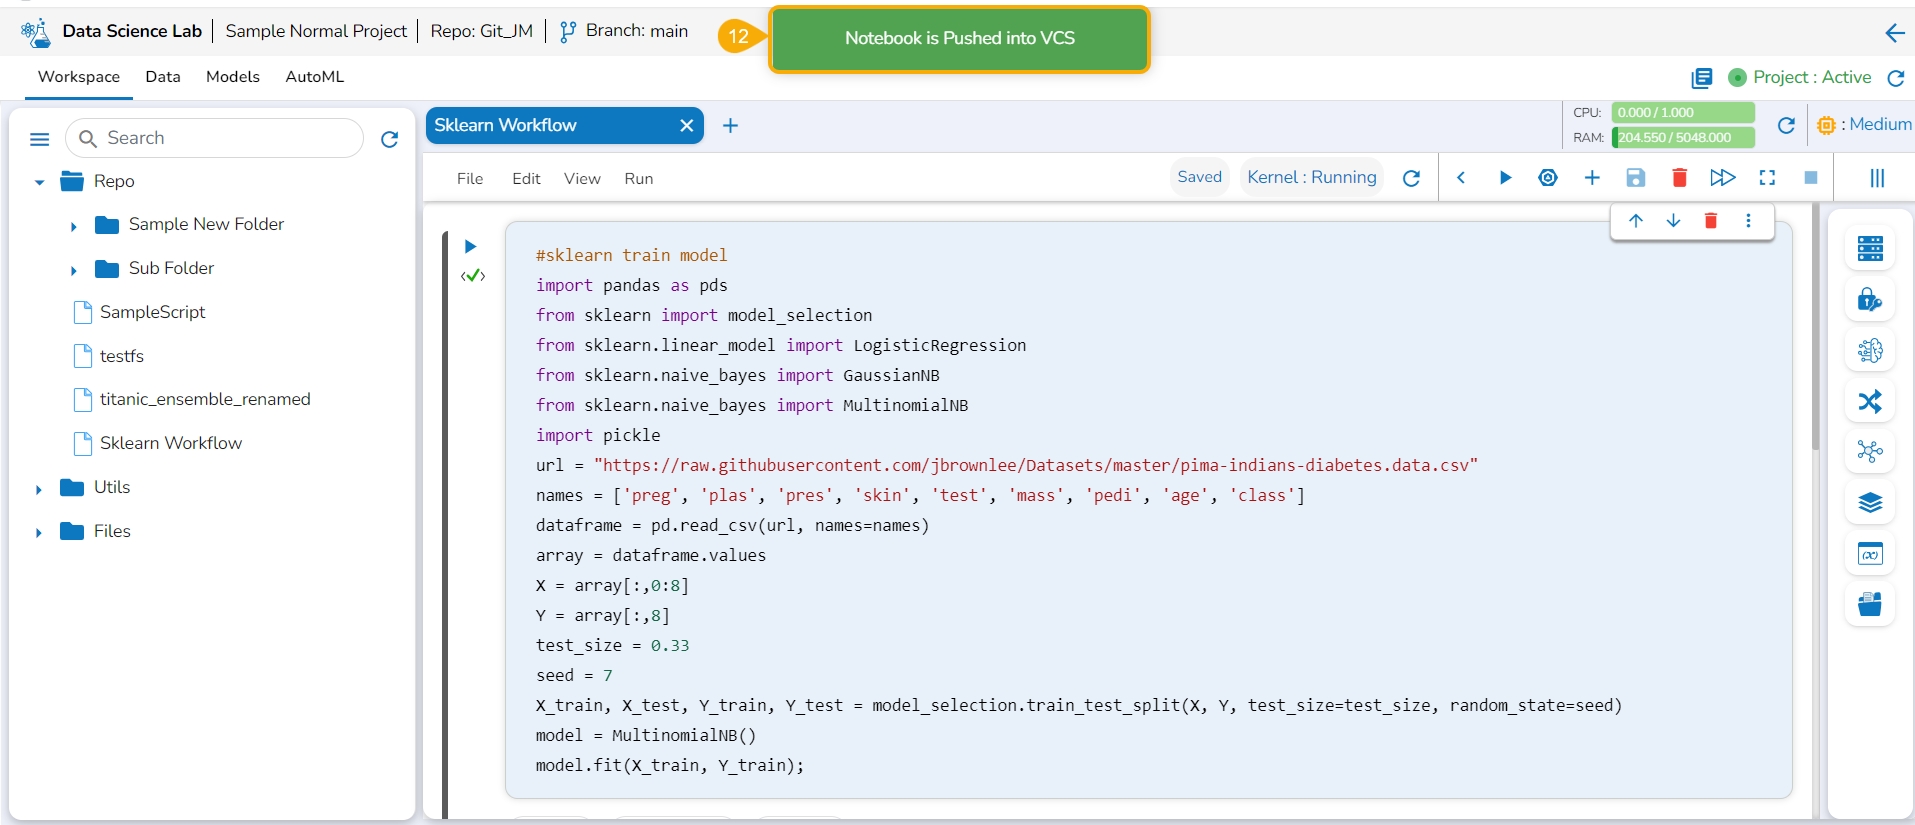
The selected version of the Notebook gets pushed to VCS, and the same is informed by a message.
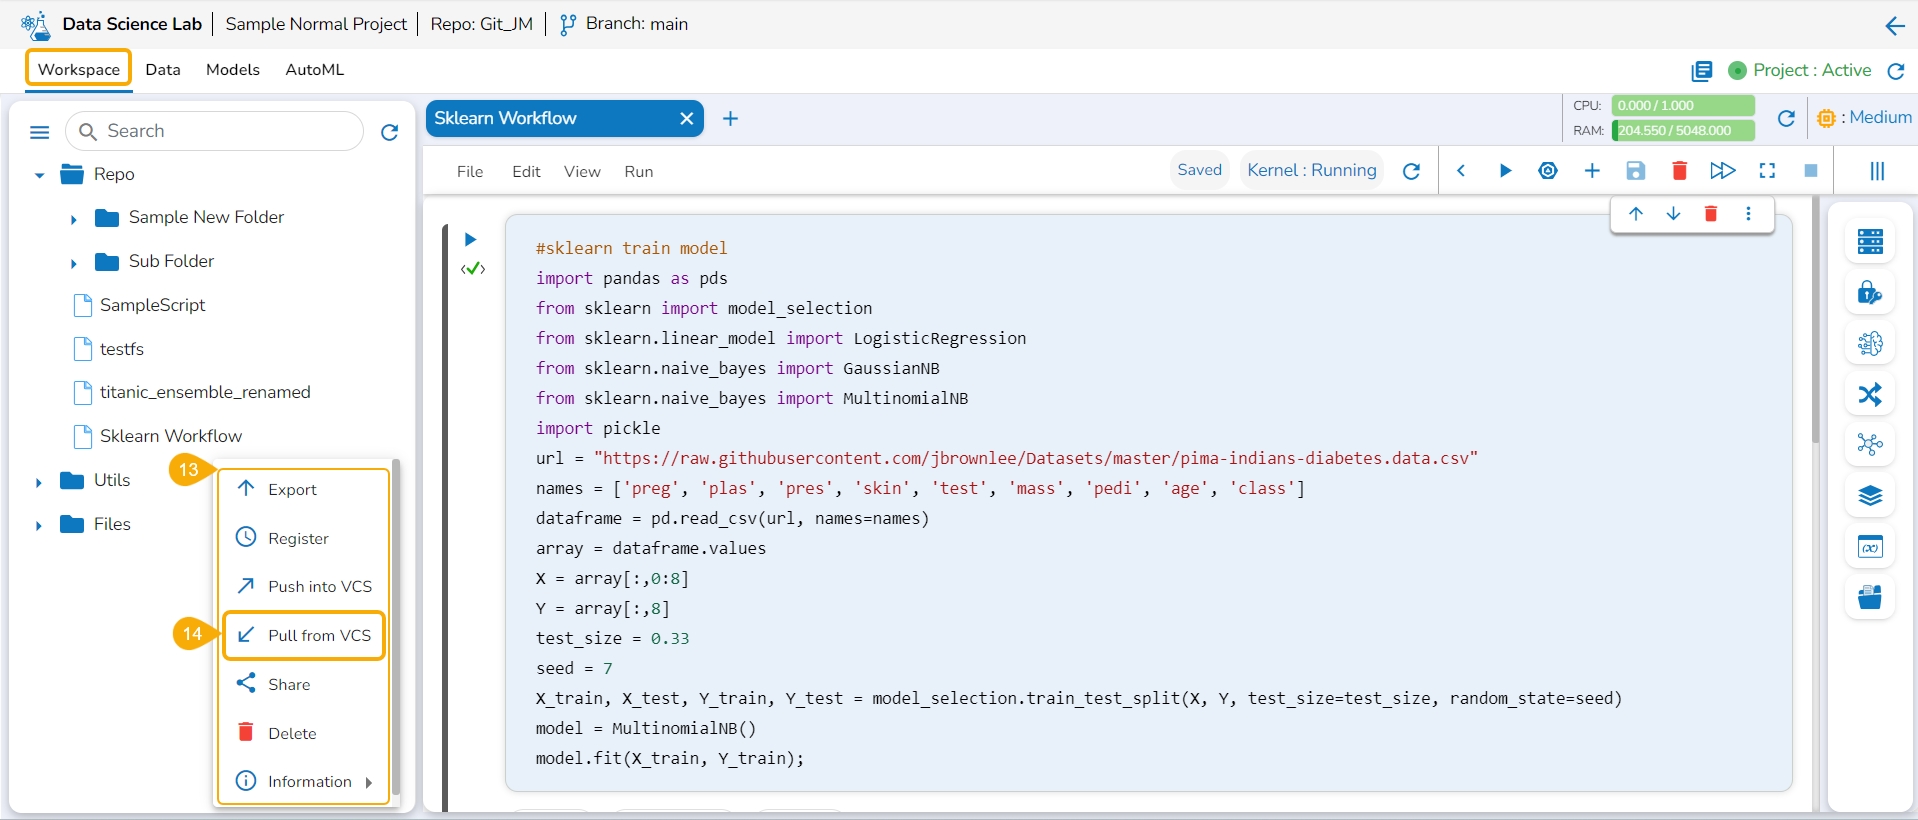
Open the context menu for the Notebook of which multiple versions are pushed to the VCS.
Click the Pull from VCS option from the Context menu.
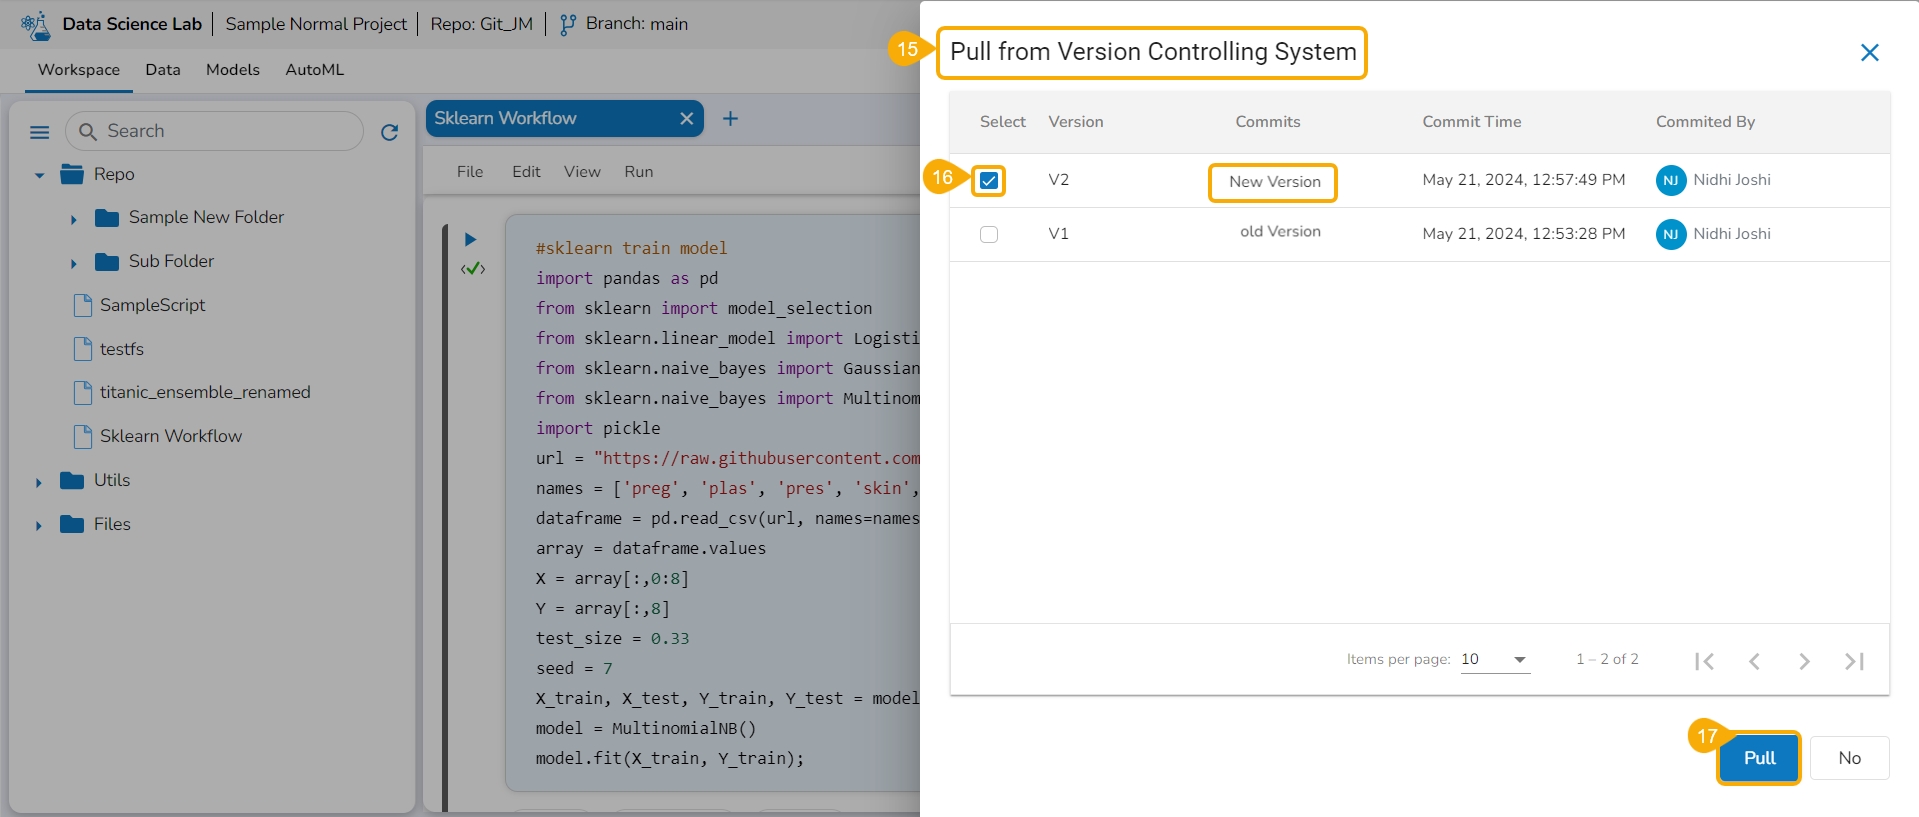
The Pull from Version Controlling System drawer opens.
Select a version using the checkbox.
Click the Pull option.
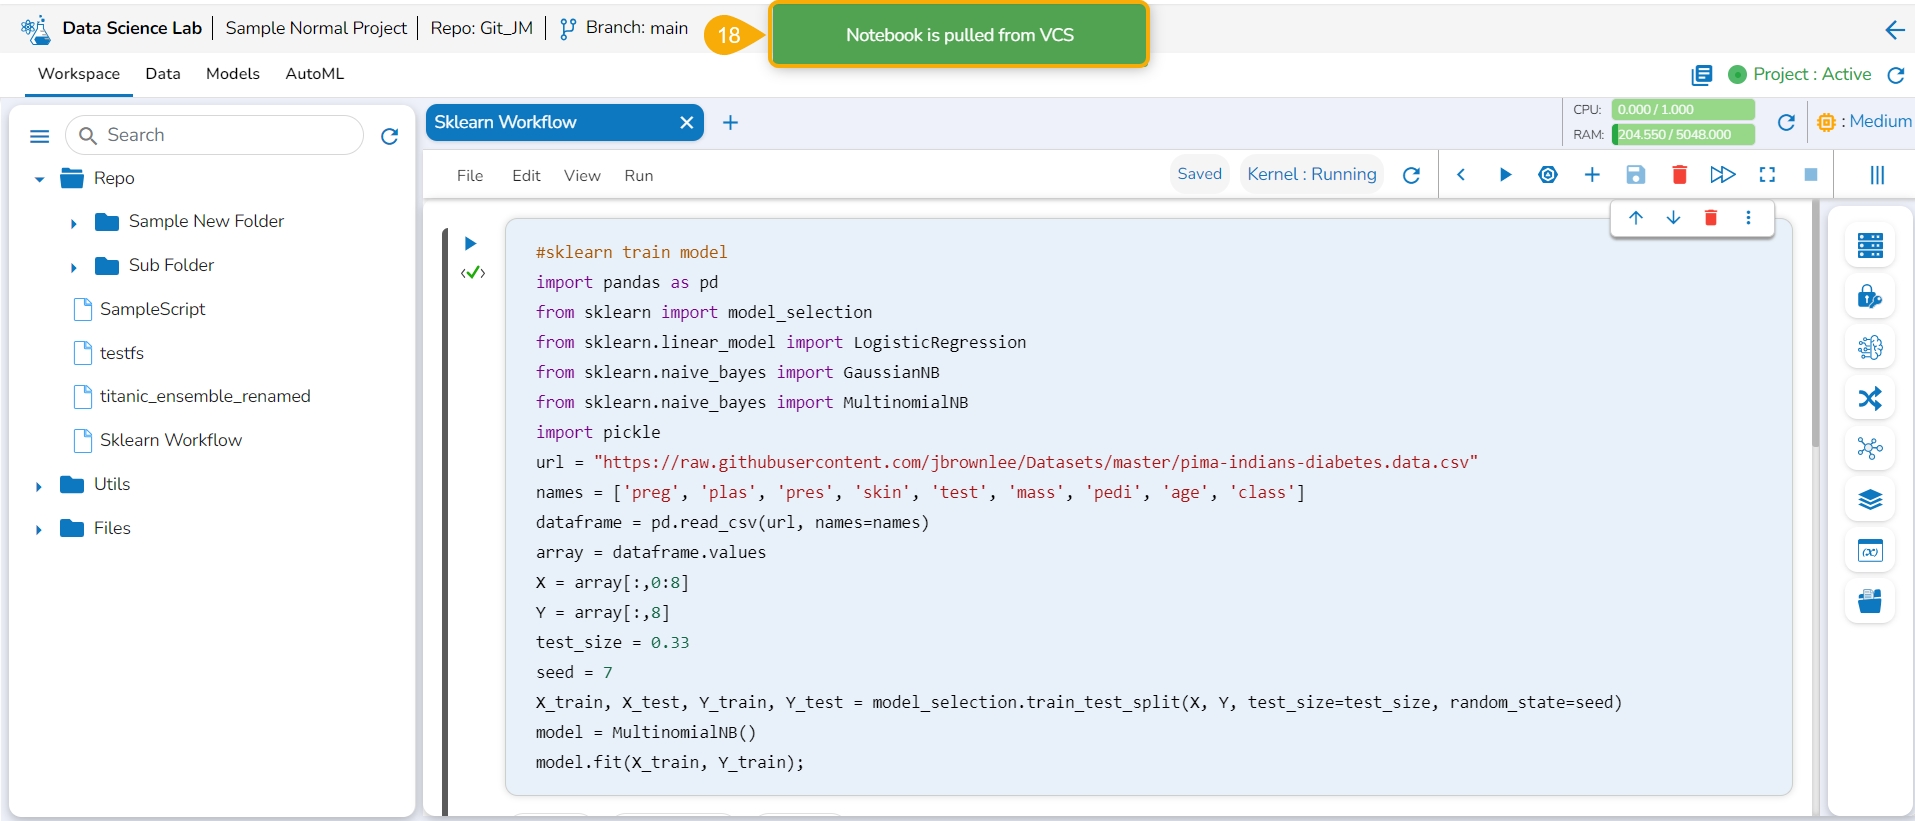
A message appears to notify the user that the Notebook is pulled from the VCS.
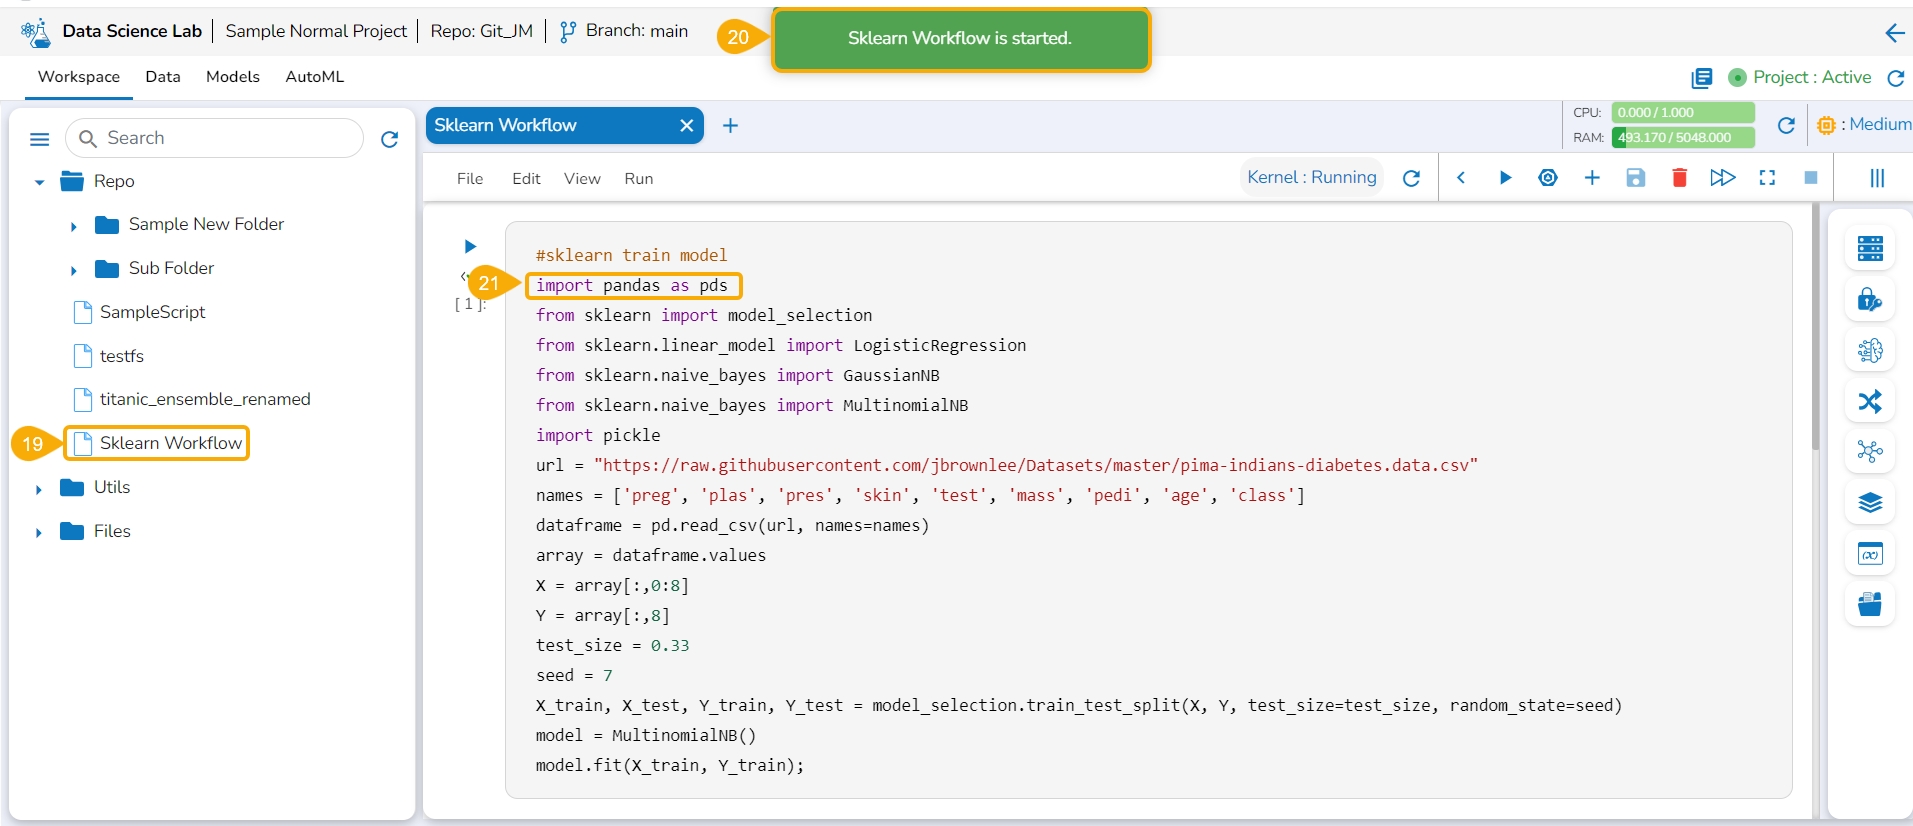
Select the same Notebook file from the Repo folder of the Workspace tab, and open it
A message appears to notify that the selected workflow is started.
The user can verify the Notebook script will reflect the modifications done by the user for the pulled version of the Notebook.
The Version Control feature for a Notebook file pulled from Git differs from the Notebook file created/ owned by the user.
Click the Information option provided in the Context menu for a Notebook. It will mention Pulled from git if the selected Notebook is pulled from Git.
Please Note: The Notebook file from Git gets overwritten with each pull, consistently fetching the latest version and does not allow version selection.
Check out the illustration to understand the Version control steps for a Notebook file pulled from the Git Repo.
Payload: This option will appear if the On-demand option is checked in. Enter the payload in the form of a list of dictionaries. For more details about the Python Job (On demand), refer to this link:
Concurrency Policy: Select the desired concurrency policy. For more details about the Concurrency Policy, check this link:
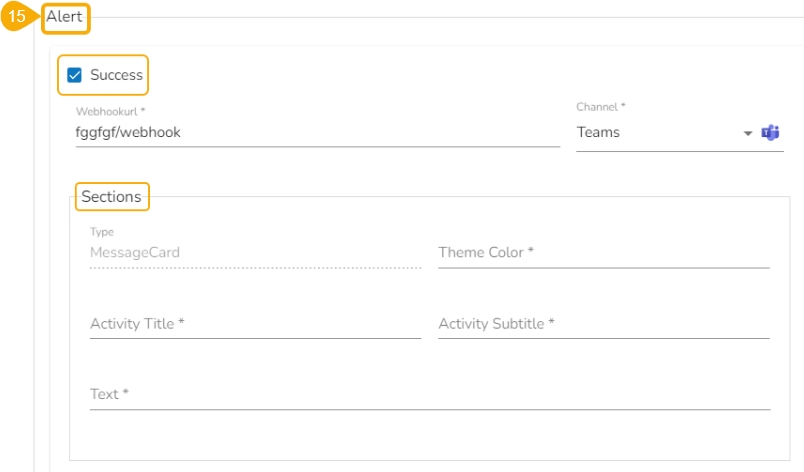
Alert: This feature in the Job allows the users to send an alert message to the specified channel (Teams or Slack) in the event of either the success or failure of the configured Job. Users can also choose success and failure options to send an alert for the configured Job. Check the following link to configure the Alert:


