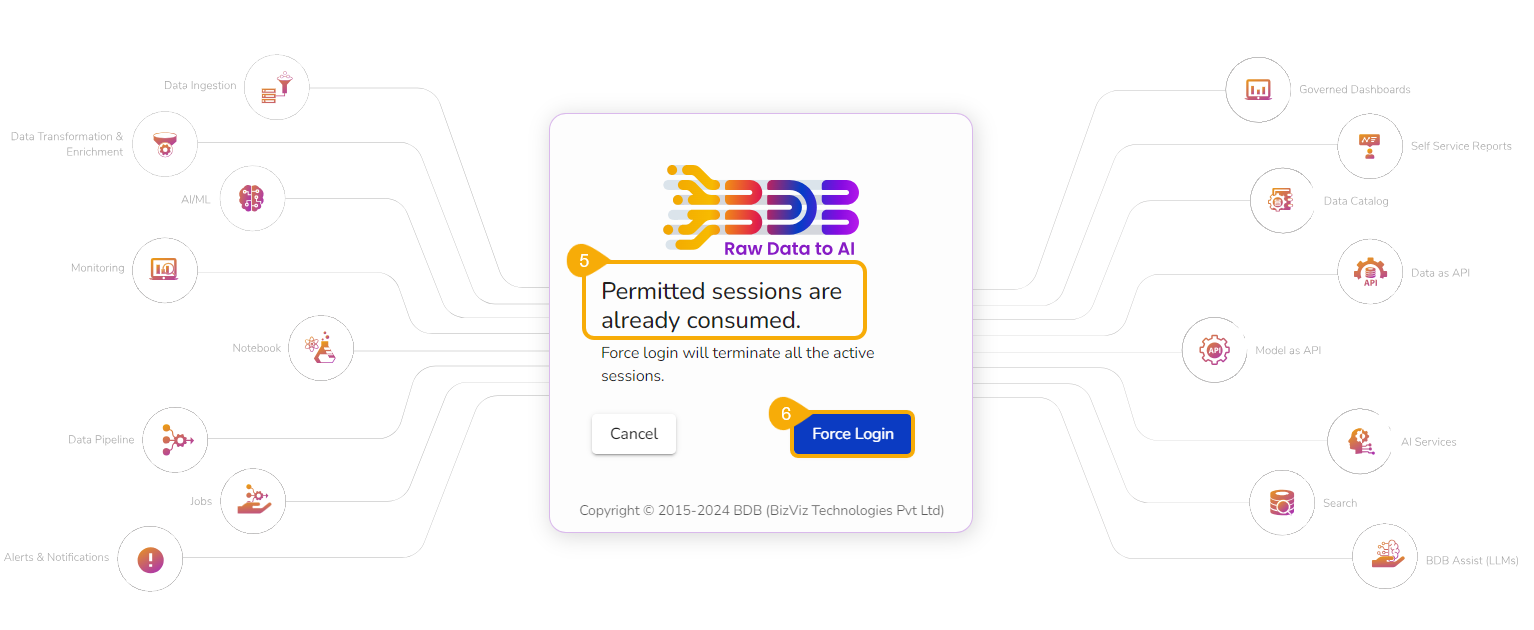
This functionality facilitates the user to kill active sessions while logging in after all the permitted sessions are consumed.
The Force Login functionality has been established to control the number of active sessions up to three. The users can access only 3 sessions at a time when they try to access the 4th session, a warning message displays to inform them that the user has consumed the permitted sessions, and a click on the Force Login would kill all those active sessions.
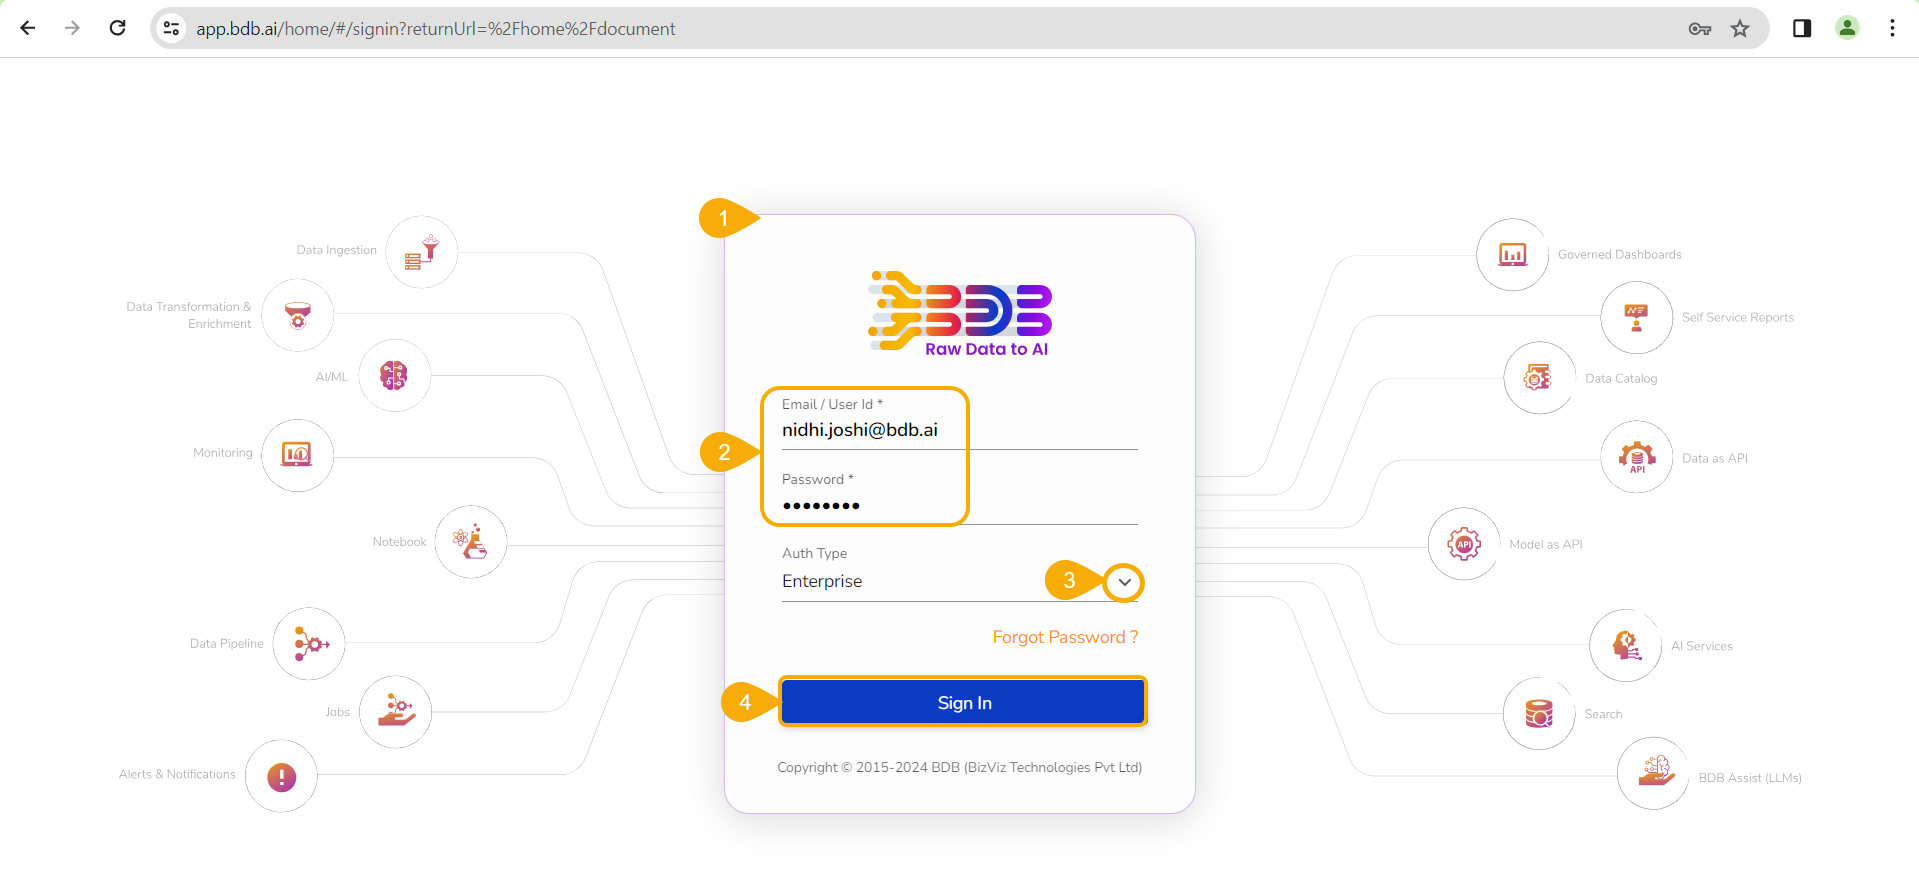
Navigate to the BDB Platform Sign-In page.
Enter the valid credentials to log in.
Select an Auth Type from the given choices.
Click the Sign In option.
The user gets a notification that all the permitted sessions are already consumed and it will inform the user that Force Login will terminate all the active sessions.
Click the Force Login option if you are willing to kill the current active sessions.
The user gets redirected to the Platform Sign Inpage after clicking the Force Login option.
Please Note: The user needs to provide valid credentials once again and click the Continue option to access the platform with the same user account.
Sign In
Access the BDB Platform and begin your data exploration journey.
This section explains how to access the BDB Platform and the variety of modules that it offers:
Open the BDB Enterprise Platform Link:
Enter your credentials to log in.
Select an Auth Type option using the drop-down menu.
Click the Sign In option.
Sign In page for the BDB Platform
The default landing page for the BDB Platform opens.
The Default Landing Page of the BDB Platform
Spaces
The user needs to select a space in case multiple spaces exist. This screen will appear next to the Sign In page for the user to select a specific space.
Users get the Create a Folder, Link a URL, and Create a Report under the My Documents or Public Documents space. All the folders and documents that a user creates under the My Documents space of the Platform are provided with some attributive options.
Navigate to the My Document or Public Document space.
Access these document creation options either by clicking the Create option or using a right-click on the blank space under the My Documents or Public Documents.
Please Note: The user can also get similar options context menu for published documents such as Dashboards, Forms, and Datasheets other than the above-explained folders and document options.
Please refer to the following document-specific explanation of the attributed Options to understand them in detail:
Please Note:
Some attributive options are available for the folders and documents accessible under the Public Documents as well.
The accessible shared folders under the Public Documents
space
do not contain
Move to, Copy,
and
Delete
options.
The accessible shared Reports, Linked URLs, published Dashboards, published Forms, and published Datasheets under the Public Documentsdo not contain Move to and Delete options.
The folders/ files created or copied by the same user under the Public Documents get credited with all the document-specific options.
The user can publish a Data Sheet by clicking the Publish icon from the Data Center module.
Navigate to the Data Sheets list using the Data Center module.
Select a Data Sheet from the Data Sheets list (E.g., Sample Data Sheet in the following image).
Click the Publish icon for the selected Data Sheet.
The Publish Datasheet drawer opens.
Select either the User or User group tab to share the published Data Sheet (Use the Exclude User tab to exclude any user from the rights to access a data sheet).
Select user(s) or group(s) based on the selected tabs using the checkbox(es).
Click the Save option.
A confirmation message appears as shown below.
The Data Sheet will be added at the top of the Data Sheets list.
The selected Data Sheet gets published in the My Documents space of all the selected user(s).
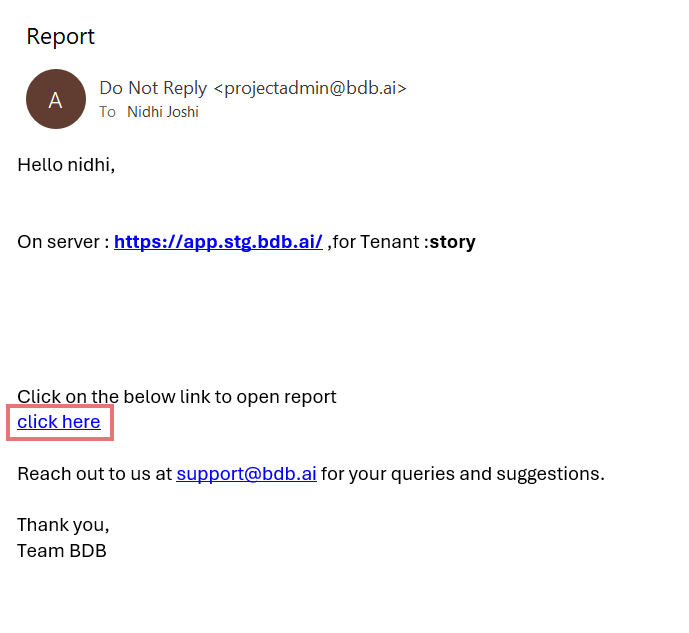
The user also receives a mail notification (as displayed below) for the published Datasheet.
Options Assigned to a Published Datasheet
Each published Datasheet is credited with some operations on the BDB Platform. Use the right-click to access the available Datasheet operations in a context menu.
Open in New Tab
Select the Open in New Taboption using the Context menu.
The Datasheet opens in the new tab.
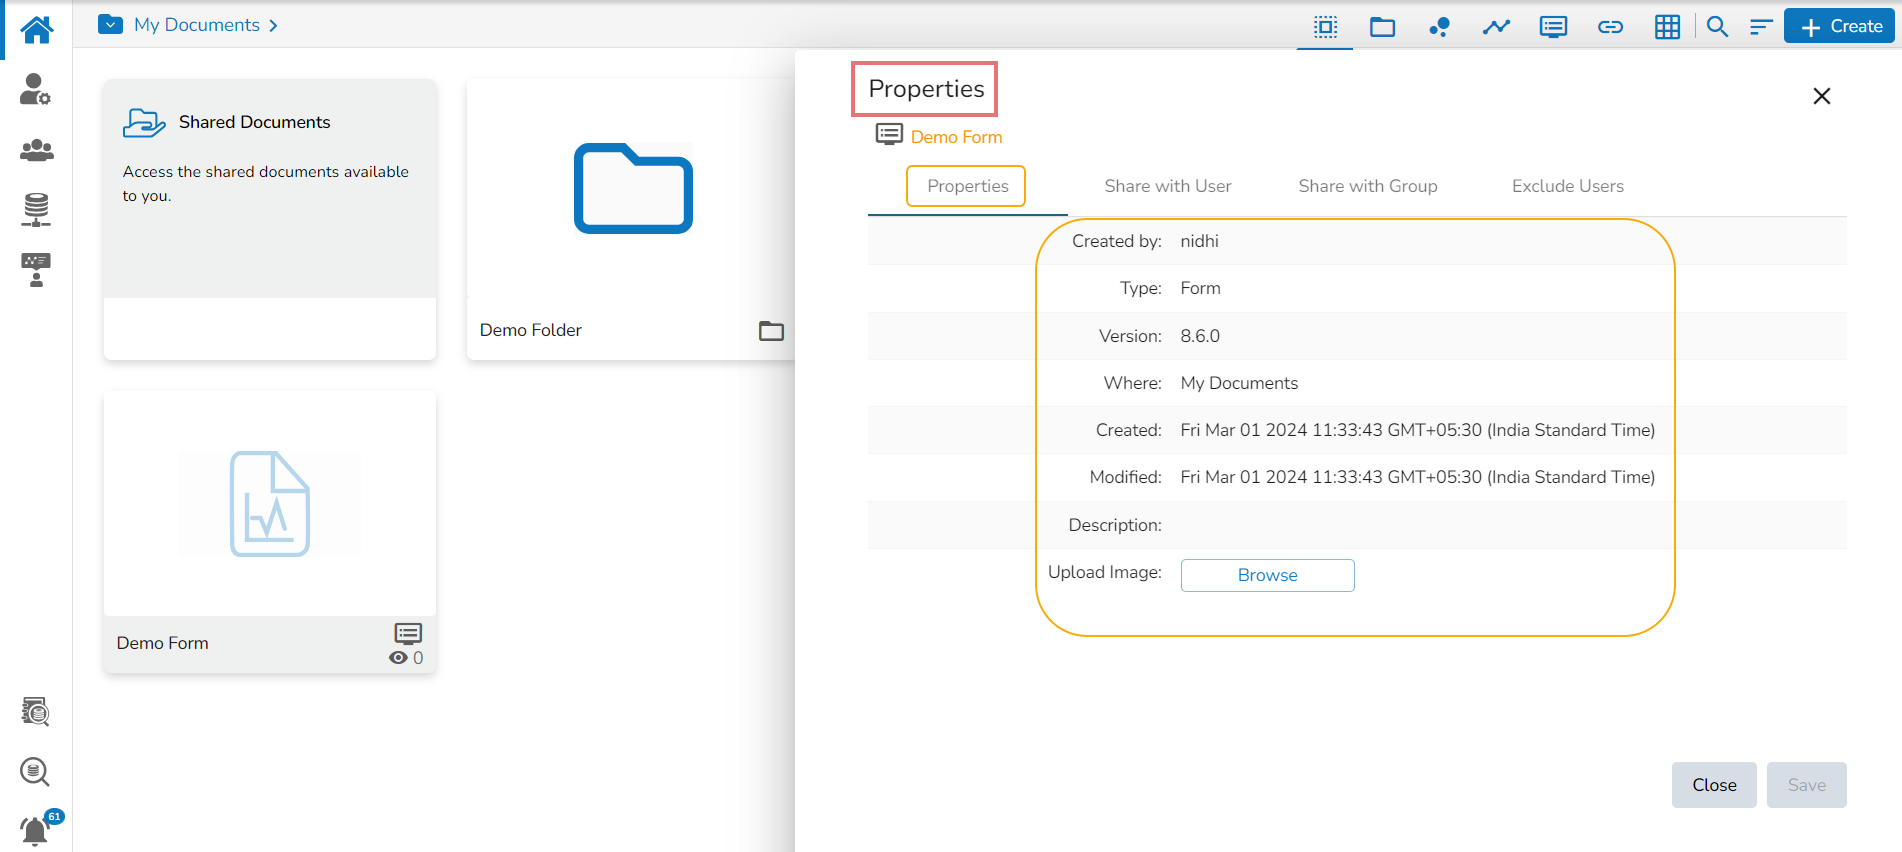
Properties
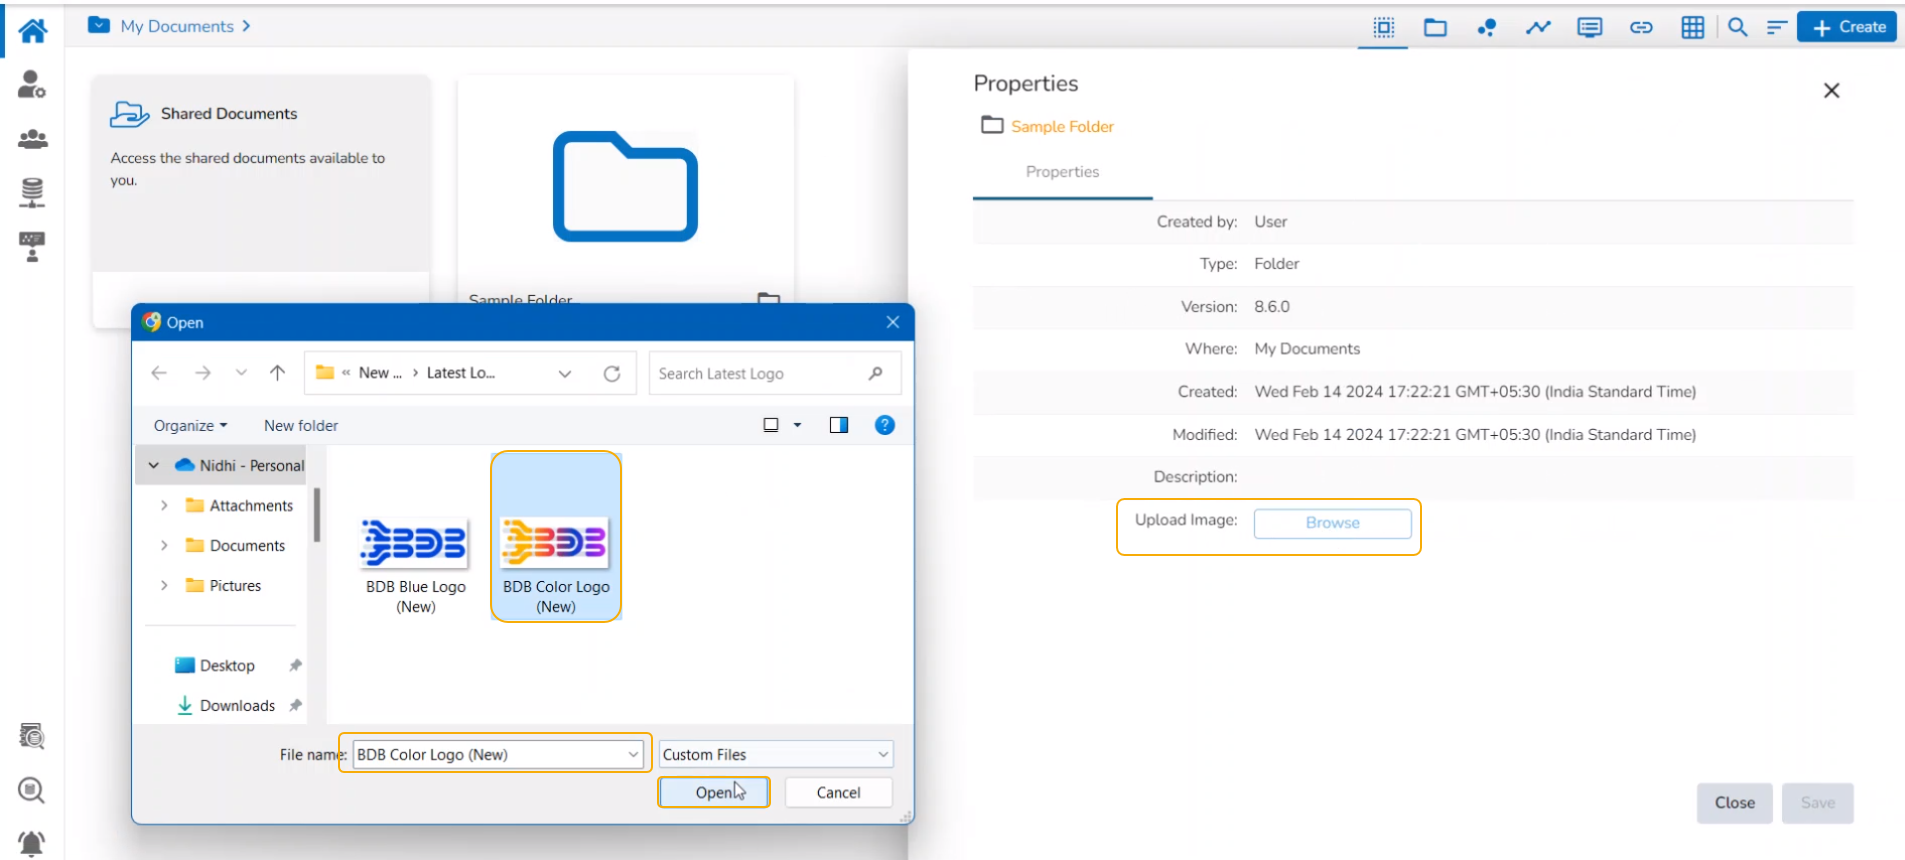
Select the Properties option from the context menu.
The Properties window appears with four options:
Properties
Properties: Displays basic details about the Datasheet creation.
Click the Browse option to upload an image.
Click the Save option to save the update.
A message appears to assure about the update.
Share with User
The Datasheet can be shared with the selected User using the Share with User option.
Select the Share with User option using the Properties window.
Search for the specific user(s) using the Search bar.
Select a user or multiple users using the checkbox(es).
Share with Group
The Datasheet can be shared with the selected User Group by selecting the Share with Group option.
Select the Share with Group option using the Properties window.
Search for the specific user group(s) using the Search bar.
Select a user group or multiple groups using the checkbox(es).
Please Note: A notification mail is sent to the users on their registered mail IDs to whom the concerned Datasheet has been shared either using the Share with User option or the Share with Group option.
Exclude the User
The Selected User(s) will be excluded from therights to access the Datasheet.
Select theExclude User option using the Properties window.
Search for the specific user(s) using the search bar.
Select a user or multiple users using the checkbox(es).
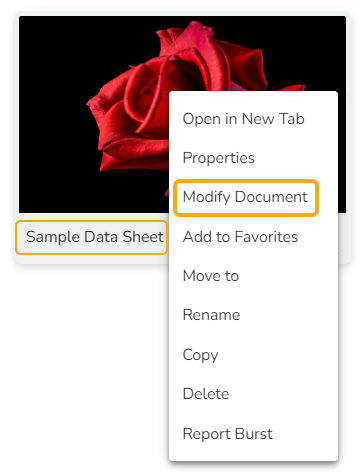
Modifying a Datasheet
The user can modify the Datasheet name and description using the Modify Document option.
Select the Modify Document option using the context menu.
The Modify Datasheet window opens for the selected datasheet.
Modify the required information:
Name of the Datasheet.
The selected information gets modified, and a message appears to ensure the same.
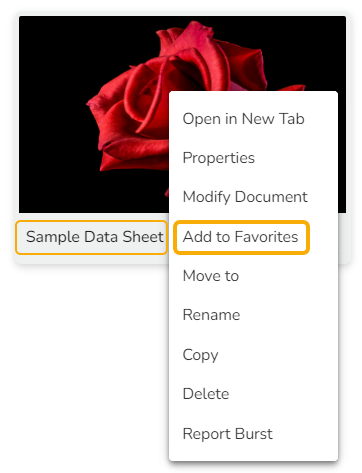
Adding a Datasheet to Favorite
Select the Add to Favorite option from the context menu.
A message appears to ensure the success of the action.
Open the Favorites section.
The selected datasheet will be added to the Favorites.
Open the context menu option for the same Datasheet.
Click the Remove from Favorites option.
OR
Use the right-click on the datasheet which has been added to the Favorites.
Click the Remove from Favorites option appears.
The Datasheet gets removed from the Favorites, and a notification message states the same.
Moving a Datasheet
Administrators can move a Datasheet from one folder or document space (E.g. My Documents) to another folder or document space.
Select a Published Datasheet.
Select the Move to option from the operation context menu.
The Move To window appears displaying the available folders.
The Datasheet gets moved to the selected space or the folder under a space.
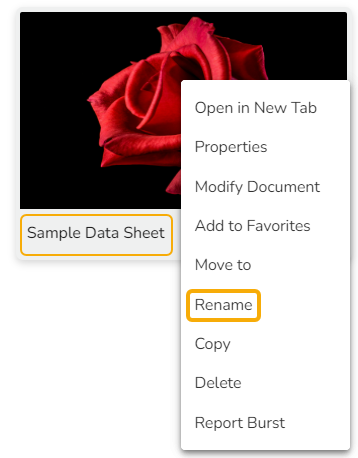
Renaming a Datasheet
Select the Rename option from the context menu.
A new window opens prompting to rename the Datasheet.
Provide a New Name for the selected datasheet.
Click the Save option.
The selected datasheet gets renamed.
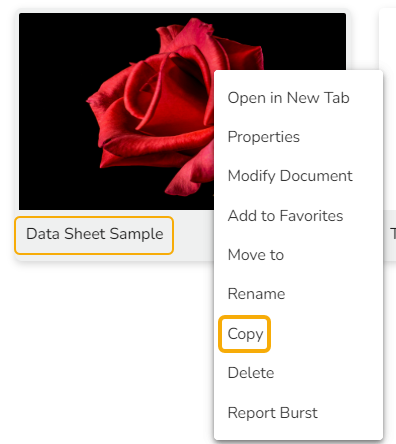
Creating a Copy of a Datasheet
Select the Copy option from the context menu.
Use the right-click on another folder or on the blank space to get the Paste option.
Click the Paste option.
The Paste window displays the selected datasheet name with the 'Copy of-' prefix. E.g., A Datasheet named
The datasheet gets copied to the selected space with the new name.
Deleting a Datasheet
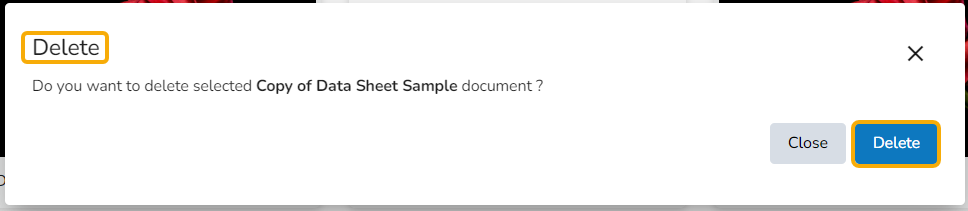
Select the Delete option from the context menu.
The Delete window opens to confirm the action.
Click the Delete option to delete the selected Datasheet.
The selected Datasheet will be deleted.
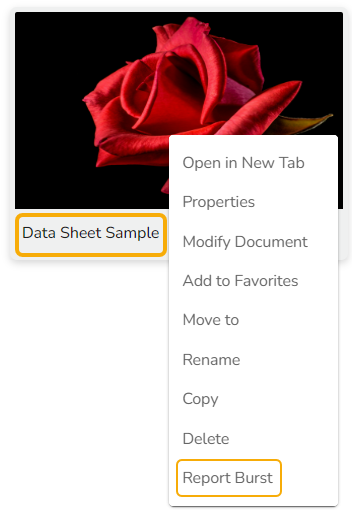
Report Burst
Select the Report Burst option from the context menu.
The Report Burst drawer opens.
Enter the internal or external user names/ mail IDs.
Provide Subject.
Please Note: Click the Stop Schedule icon to stop the scheduled Report Burst action.
The image gets updated to the Datasheet.
Click the Save option.
A success message appears stating that the document privilege has been updated.
The Datasheet gets shared with the selected user(s) under the Shared Documents folder.
Click the Saveoption.
A success message appears stating that the document privilege has been updated.
The Datasheet is shared with the selected user group(s).
Click the Save option.
A success message appears, and the document privilege gets updated to exclude the selected users.
The Datasheet permission gets excluded for the selected user/users.
Description of the Datasheet.
Click the Save option.
Select a folder.
Click the Moveicon.
The users get redirected to the next screen displaying the selected folder name at the top.
Click the Save option.
A notification message appears.
Data Sheet Sample
gets a new name,
Copy of Data Sheet Sample
as shown in the following image:
Click the Save option.
Add description.
Use the Schedule part to schedule the report burst using the Daily, Weekly, or Monthly option.
Click the Save option.
A notification message will ensure the Report Burst schedule status has been updated successfully.
The Report Burst option turns active.
The user will receive an email with the open doc link to the concerned Datasheet at the scheduled time.
Options Assigned to a Linked URL
Creating a Link URL
The user can connect to the URLs with the chosen folders or to the selected Document space.
Select the Link a URL option from the Options or Create Context menu.
The Link a URL window opens displaying the Add Details tab.
Enter a name for the URL.
Provide the URL link that you wish to add in the Type URL field.
Describe the URL (optional).
Navigate to the URL Parameter tab to add parameters (Optional).
Click the Save option.
A success message appears.
The URL gets created under the selected document folder. E.g., A URL document has been created under My Documents.
The user can see the linked URL by opening the created sample URL.
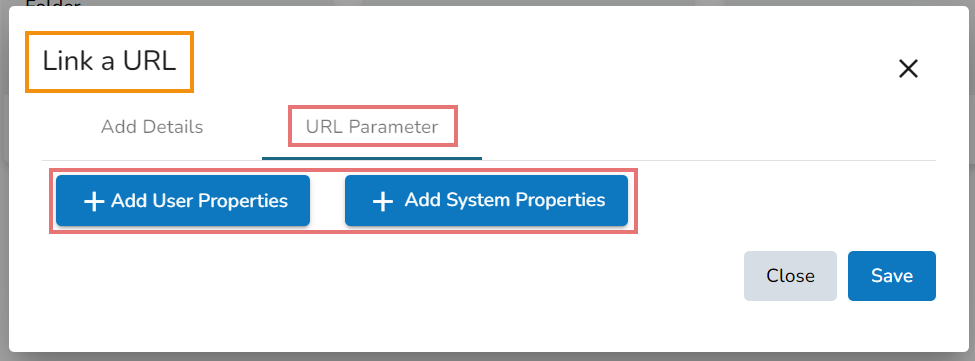
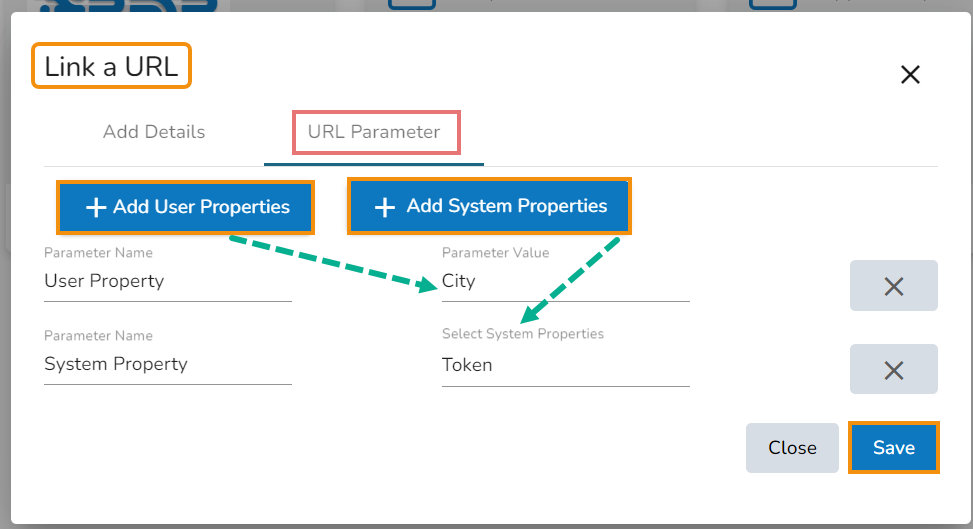
Adding or Removing a URL Parameter
The user can add or remove parameters to the linked URL by using this option.
Navigate to the URL Parameter tab.
Two options for adding URL properties are displayed:
Add User Properties
By clicking the AddUser Properties option, the user is required to add Parameter Name and Parameter Values.
By selecting the User Properties option, the administrator needs to insert a valid user custom field. (E.g., In the below-given image, parameter Param 1passes the defined value for the citycustom field provided for the selected user).
Please Note:
The user can easily connect internal URLlinks by using the parameters, while the external URLsrequire security permission to link.
Options Assigned to a Link URL
A document with a Linked URL is credited with various options in a context menu by using a right-click on it as displayed below:
Open in New Tab
Select a linked URL document.
Select the Open in New Tab option from the context menu.
The concerned linked URL will be opened in a new tab.
Properties
Select a linked URL document.
Select the Properties option from the context menu.
The Propertieswindow appears with four options:
Properties: The Properties tab of the linked URL document gets displayed IT displays the Version, Creator's name, space, date of creation, and date of modification. The description entered by the user is also shown.
Uploading Image using the Properties Tab
Click the Browse option to upload an image.
The uploaded image appears next to the Browse option.
Click the Save option to save the updates.
Share with User
The linked URL document is shared with the selected user(s).
Select the Share with User optionin the Properties window.
Search a specific user by using the search bar.
Select a user or all the users using the checkbox(es).
The document gets shared with the selected user(s).
Share with Group
The linked URL document can be shared with the selected group.
Select theShare with Groupoption from the Properties window.
Search for a specific user group using the search bar.
Select one or multiple groups using the checkbox(es).
The document gets shared with the selected group(s).
Exclude User
The selected user cannot access the linked URL file.
Select the Exclude User on the Propertiespop-up screen.
Search for a specific user using the Search bar.
Select a useror all the users using the checkbox(es).
The selected user(s) will be excluded from the rights to access the linked URL.
Please Note:
Click the Copy Link icon to copy the open document link of the Link URL. The copied Open link can be pasted to the desired place.
Modifying a Document (URL information)
Select the Modify Document from the URL options context menu.
The Modify Linked URL window opens.
The Edit Details
A success message informs the user that the selected URL has been updated.
Adding/Removing a URL Document to/from Favorites
The user can add a URL document to or remove it from the Favorites section.
Select a linked URL document.
Select the Add to Favorites option from the context menu.
A message, “Document Added to Favorites” appears.
OR
Navigate to the original URL document.
Use the right-click to open the context menu.
Click the Remove from Favoritesoption.
Moving a URL File
Select the Move to option from the Link URL context menu.
The Move to window appears displaying the available folders.
Select a folder.
Renaming a URL Document
Select the Rename option from the Link URL context menu.
The Rename window opens.
Enter a New Name
Creating a Copy of a URL Document
It is possible to copy and paste a link URL into a different place.
Select the Copy option from the Link URL context menu.
Select another folder and use the right-click to get the Paste option in the context menu.
Or
Use the right-click on the blank space of My Documents or Public Documents.
A context menu will appear with the Paste option.
Select the Paste option.
A new window appears.
The Namementioned in the pop-up window shows the prefix ‘Copy of-’ before the original name of the Link URL document (E.g., Model URL gets a new name Copy of Model URL).
Click the
The copied link URL is replicated with a different name.
Deleting a URL Document
Select the Delete option from the URL Options context menu.
The Delete window appears to confirm the deletion.
Click the
Scheduling the Report Burst
Select the Report Burst option from the Link URL context menu.
The Report Burst window opens.
Steps to Stop the Scheduled Report Burst
The Inactive button will be changed into the Active after the report bursts details are saved.
Click the Active button.
Please Note: The Move to and Delete options are not available for the link URL shared under the Public Documents, but the Link URL documents created under the Public Documents folder get these two options.
Add System Properties
By clicking the Add System Properties option, the user is required to add a Parameter Name and Select a system property via a drop-down menu.
By choosing the System Properties option, it requires the administrator to select an option from the available System Properties drop-down menu. (E.g., in the below-given image, parameter Param 2 passes the authentication Token as system properties to link the URL).
Click the Save option to save the information.
The user can click the Remove option provided next to an added parameter to remove the parameter.
A success message appears after uploading the image.
The image gets uploaded.
Click the Save option.
A success message appears stating that the document privilege is updated.
Click the Save option.
A success message appears stating that the document privilege is updated.
Click the Saveoption.
A success message appears, and the document privilege gets updated to exclude the selected user(s).
If a URL file is shared with the user(s) or group(s) via the Share With option, it will open as a view-only copy for the selected user or user group.
tab opens by default.
The user can modify the following information (if required):
URL Name
URL Link
Description
The URL Parameters can be edited from the URL Parameter tab (if needed).
Click the Save option.
The selected link URL gets added to the Favorites section.
Navigate to the link URL you wish to remove from the Favorites section.
Use right-click on the URL to get the remove option.
Click the Removefrom Favoritesoption.
Remove from Favorites option for the linked URL under the Favorites folder
A message appears stating, “Document removed from Favorites” and the selected document with the linked URL gets removed.
The URL file gets removed from the Favorites section.
Confirmation message after the linked URL gets removed from the Favorites
Click the Move icon.
The user gets redirected to the next screen, where the selected folder is displayed at the top.
Click the Save option.
A message appears to notify the user that the document has been moved.
Confirmation message after the linked URL gets moved
The concerned document with a linked URL gets moved to the selected folder.
for the URL document.
Click the Save option.
A success message appears.
The linked URL document gets renamed.
Save
option.
Delete
option.
A confirmation message appears, and the selected URL file gets removed.
Confirmation message after a Link URL document gets deleted
Add the users or user groups.
Provide a subject.
Provide a description (optional).
Schedule the report.
Click the Saveoption.
A success message appears.
The open document link of the report gets shared with the selected user(s)/ user group(s).
the report link will be sent through the given mail ID
Click the Save option.
A success message informs the user that the schedule has been stopped.
Confirmation message after the linked URL document gets created
Opening the linked URL
Saving User Properties and System Properties for a Linked a URL
Opening the linked URL in a new tab
Uploading image on a Linked URL document
Sharing URL with a User
Sharing URL with a User Group
Confirmation message after the Linked URL is renamed
Accessing the Copy option
The two ways to access the Paste option for a copied Lined URL
Pasting a copied URL document
Accessing the Delete option for the Linked URL document
Options Assigned to a Report
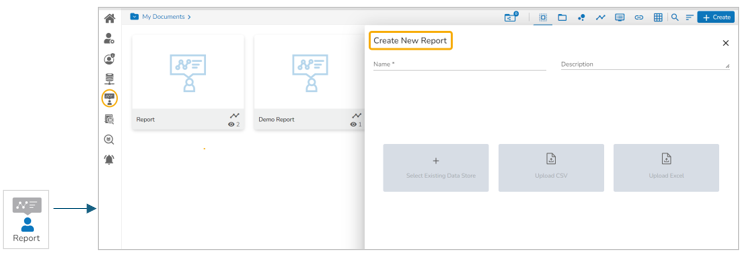
Creating a Report: Create a New Report option
Navigate to the Platform Homepage.
The Create New Report option is accessible on the Platform Homepage in two ways:
Right-click anywhere on the My Documents or Public Documents blank space to get the context menu.
OR
The user can also use the Report icon either from the left side panel of the Homepage or the Apps Menu, to begin with the Report creation process.
The Create New Reportwindow opens.
Enter a title for the report.
Describe the report (optional).
Creating a Report based on the Existing Data Store
Select a Data Store from the list by using the given checkbox. In the given image the available Data Store is only one.
Click the Create Report option.
Creating a Report by Uploading a File
Select the Upload File option for CSV or Excel.
Provide a Data Store Name.
Choose a File and upload it.
Please Note: After the user clicks the Create Report option using the Create New Report dialog box, the Data Store also gets created, the Data Store Created option gets a checkmark, and it turns blue.
The Report will be created based on the selected options, and the Design page will open by default.
Navigate to the Document Folder where the Report creation was intended, the newly created Report will be added there.
Please Note:The user can also initiate report creation by clicking on the Report module icon from the left panel of the homepage or from the Apps menu.
Options Assigned to a Report
Select an existing Report.
Use the right-click on it to get the credited options for a Report in a context menu.
Open in New Tab
The user can open the selected report in a new tab using this option.
Click the Open in New Tab option from the Report context menu containing all the credited options.
The concerned report opens in a new tab.
Properties
Select the Properties option from the Optionsmenu.
A new screen pops up with some options:
Properties
Displays the basic properties of the selected Report.
The user can upload an image by using the Browseoption.
Click the Copy link icon to copy the open document link.
Select an option from the Can view and Can edit options using the radio button.
Please Note: The users can select via the Properties screen whether the other users to whom the report has been shared would have view-only rights or they can edit the shared copy.
If a document is shared using the Can View option, it will only have the View-only access.
Share with User
The report document gets shared with the selected user or users.
Select the Share with User tab.
Search for a specific user(s) using the search bar.
Select a user or multiple users using the checkbox(es).
A success message appears, “Document privilege has been updated successfully”.
The report gets shared with the selected user or users.
Share with Group
The report gets shared with the selected user group or user groups.
Select the Share with Group tab.
Search for the specific (user) Group(s) via the Search bar.
Select a user group or multiple groups using the checkbox(es).
A success message appears, “Document privilege has been updated successfully."
The report is shared with the selected user group or user groups.
Please Note:If a report is shared using this option, the selected users or user groups receive a view-only copy. The shared report is added to the Shared Documents space.
Exclude Users
The selected user will be excluded from the privilege of accessing the report.
Select the Exclude Users tab
Search for the specific user via the Search bar.
Select a user or multiple usersusing the checkbox(es).
Copy to
A copy of the report is created and shared with the selected users.
Select the Copy to tab.
Search the specific user(s) via the Search bar
Select the user(s) using the checkbox(es).
A message appears stating, “Document copying process started. Please check the notification for confirmation.”
The user can open the Notification window to see the updates on the current task of copying the report. For example, the following image displays that the report was successfully copied to the selected users.
A copy of the report is shared with the selected user or users.
Please Note: If a report is shared using the Copy to option, the selected users can modify the received report. The copied report can be accessed from the Shared Documents space.
Report Burst
Please Note: Reports created or shared under the Public Documents space get the Report Burst tab as a part of its Properties tabs.
The Report Burst operation allows the user to share the open document link of a Report to another user(s).
Navigate to the Public Documents documents space.
Select a report and open the context menu with the available operations.
Click the Properties option.
Please Note:
The Report Burst option is provided for a created Report as an option in the context menu.
Modifying a Document
Select the Modify Document option from the Report Options menu.
The Modify Report window opens.
Modify the following information:
Title: Enter a title for the Report
A confirmation message appears and the chosen information for the Report gets modified.
Adding/Removing a Report Document to/from Favorites
The user can add a Report to or remove it from the Favorites.
Select the Add to Favoritesoption from the Operations menu.
A new message pops up, “Document Added to favorites.”
The selected Data Sheet document gets added to the Favoritesspace.
Click the Remove from Favorites option by right-clicking on the report under the Favorites.
OR
Please navigate to the original Report document and right-click on it to get the Remove from Favorites option.
A confirmation message appears.
The selected report gets removed from the Favorites
Move to
Select the Move to option from the Report Options menu.
A new screen opens with the available folder options.
Select a folder or subfolder.
Renaming a Report Document
Select the Rename option from the Operations menu.
The Rename dialog box opens.
Enter the New Name
A confirmation message appears.
The report gets renamed successfully.
Creating a Copy of a Report
The user can copy a report and paste it into the selected place on the BDB Platform.
Select the Copy option from the Report options menu.
Select another folder and use right-click to get the Paste option.
Or
Navigate to My Documents or Public Documents and right-click anywhere.
A context menu with the Paste option appears.
Select the Paste option.
The copied report document gets pasted successfully with a different name in the given space.
E.g., The following image shows that the Report is named Copy of Reportand has been pasted into the My Documentsspace.
Deleting a Report
Select the Delete option from the Operations menu.
A new window opens, assuring the deletion.
Click the Delete option.
A success message appears.
The selected report gets removed.
Report Burst
Select the Report Burst option from the Report options menu.
The Report Burst window opens.
Add the users or user groups.
The inactive button turns into active.
The open document link and PDF report get shared with the selected user(s)/ user group(s) on the user's mail ID.
The scheduler turns on. You can switch it off by clicking the Stop Schedule icon.
The scheduler gets stopped and the same gets communicated through a confirmation message.
Please Note:
The documents which are created in the Public Documents space get the Delete and Move To operations, the shared documents in this space do not get these two operations.
Click the Create option to open the context menu from the Platform Homepage.
Accessing Create New Report option
OR
Select any one option to begin with the Report.
Select Existing Data Store: It will redirect the user to the list of existing data stores.
Upload CSV: It will redirect the user to upload a CSV file.
Upload Excel: It will redirect the user to upload an Excel file.
Once the file is chosen, the Data Store Details, Variable Types, and Examples tabs will appear.
Click the Create Report option when it gets enabled.
Click the Save option to save the properties settings.
If a document is shared using the Can edit option, then it can be modified by the user.
Click the Save option.
Click the Save option.
Click the Save option.
A success message appears, “Document privilege has been updated successfully.”
The selected users are excluded from the rights to access the report.
Click the Save option.
A new window opens with multiple tabs.
Select the Report Burst tab.
Add an external or internal user(s).
Provide Subject.
Provide Description.
Schedule the selected Report by configuring the time range.
Click the Save option.
A confirmationmessage appears.
The Scheduler status becomes active.
Click the Stop Schedule button to stop the scheduled Report Burst.
A confirmation message appears to inform the same.
The schedule stops.
The open doc link of the selected report gets shared to the selected user at the scheduled time through the registered email.
The notification mail will be sent to the concerned users from the BDB Support team while Sharing the report with user(s)/ group(s), Excluding user(s), or using the Report Burst options.
Description: Describe the Report (Optional)
Click the Saveoption.
Open the Favorites document using the document drop-down menu.
.
Confirmation message after the report gets removed from the Favorites
Click on the Move option to open a list of available sub-folders.
A new window opens with the selected Folder mentioned on the top.
Click the Save option.
A confirmation message appears.
The concerned report gets moved to the selected folder or subfolder.
for the report.
Click the Save option.
The Paste window appears.
TheNamefield displaystheprefix ‘Copy of-’ before the original name of the report (E.g., Report gets a new name Copy of Report.
Click the Save option.
Provide a subject.
Provide a description (optional).
Schedule the time for report bursting.
Click the Saveoption.
A confirmation message appears.
The user can also access the Report module on the left panel provided on the Homepage and from the Apps menu.
The Report also contains a Comments option to insert the report-related Comments. The functionality works in the same way as described for the Dashboards. You can refer to the Insert Comments section provided under the Options for a Published Dashboard for the details.
Accessing the Report icons
Creating a New Report by selecting an existing Data Store
Creating a New Report by uploading a CSV file
Creating a New Report by uploading an Excel file
Design page of the Report
The Reports get created under the My Documents
Various options to start Report Creation
Document Options
Resetting Password
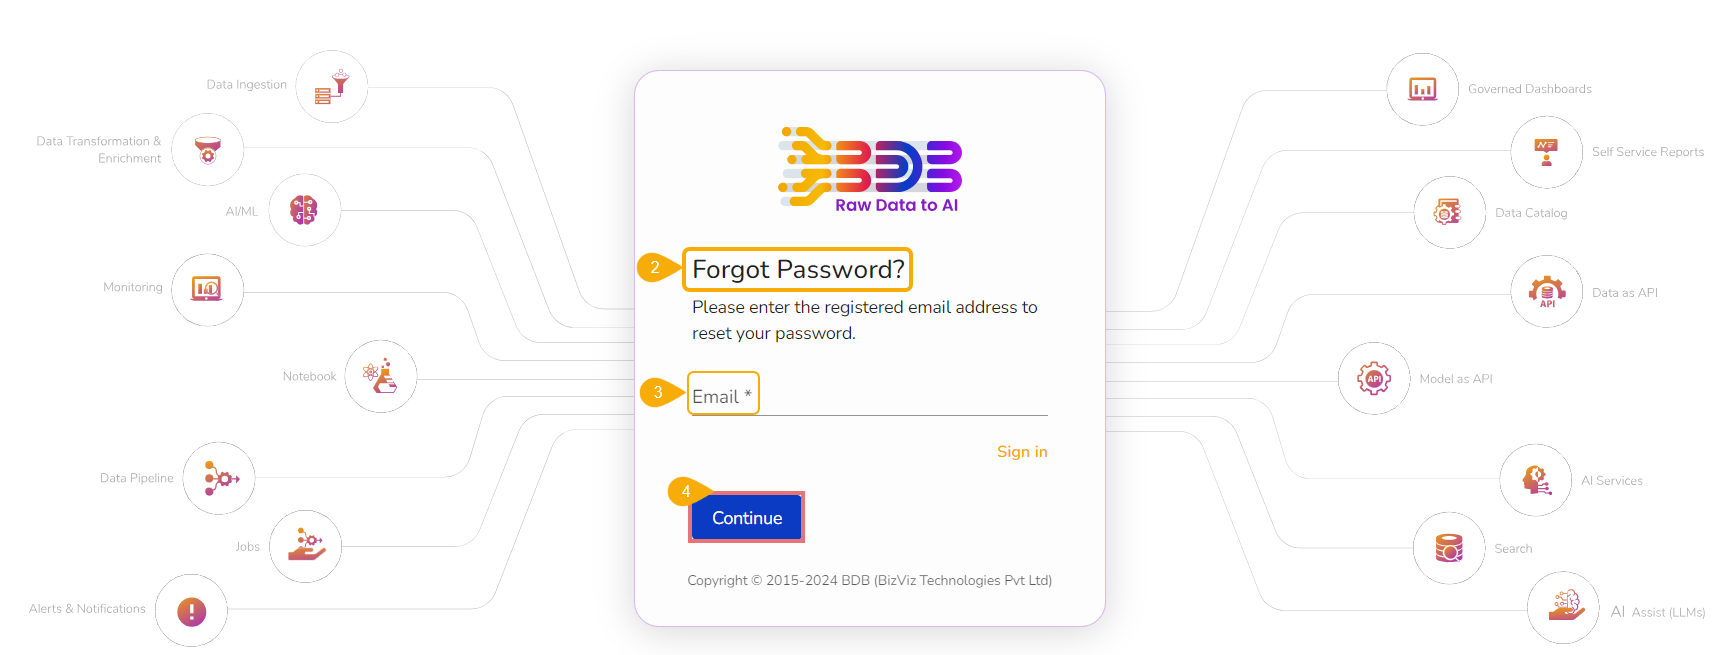
This section aims to describe steps to reset password for your user account using the Forgot Password option.
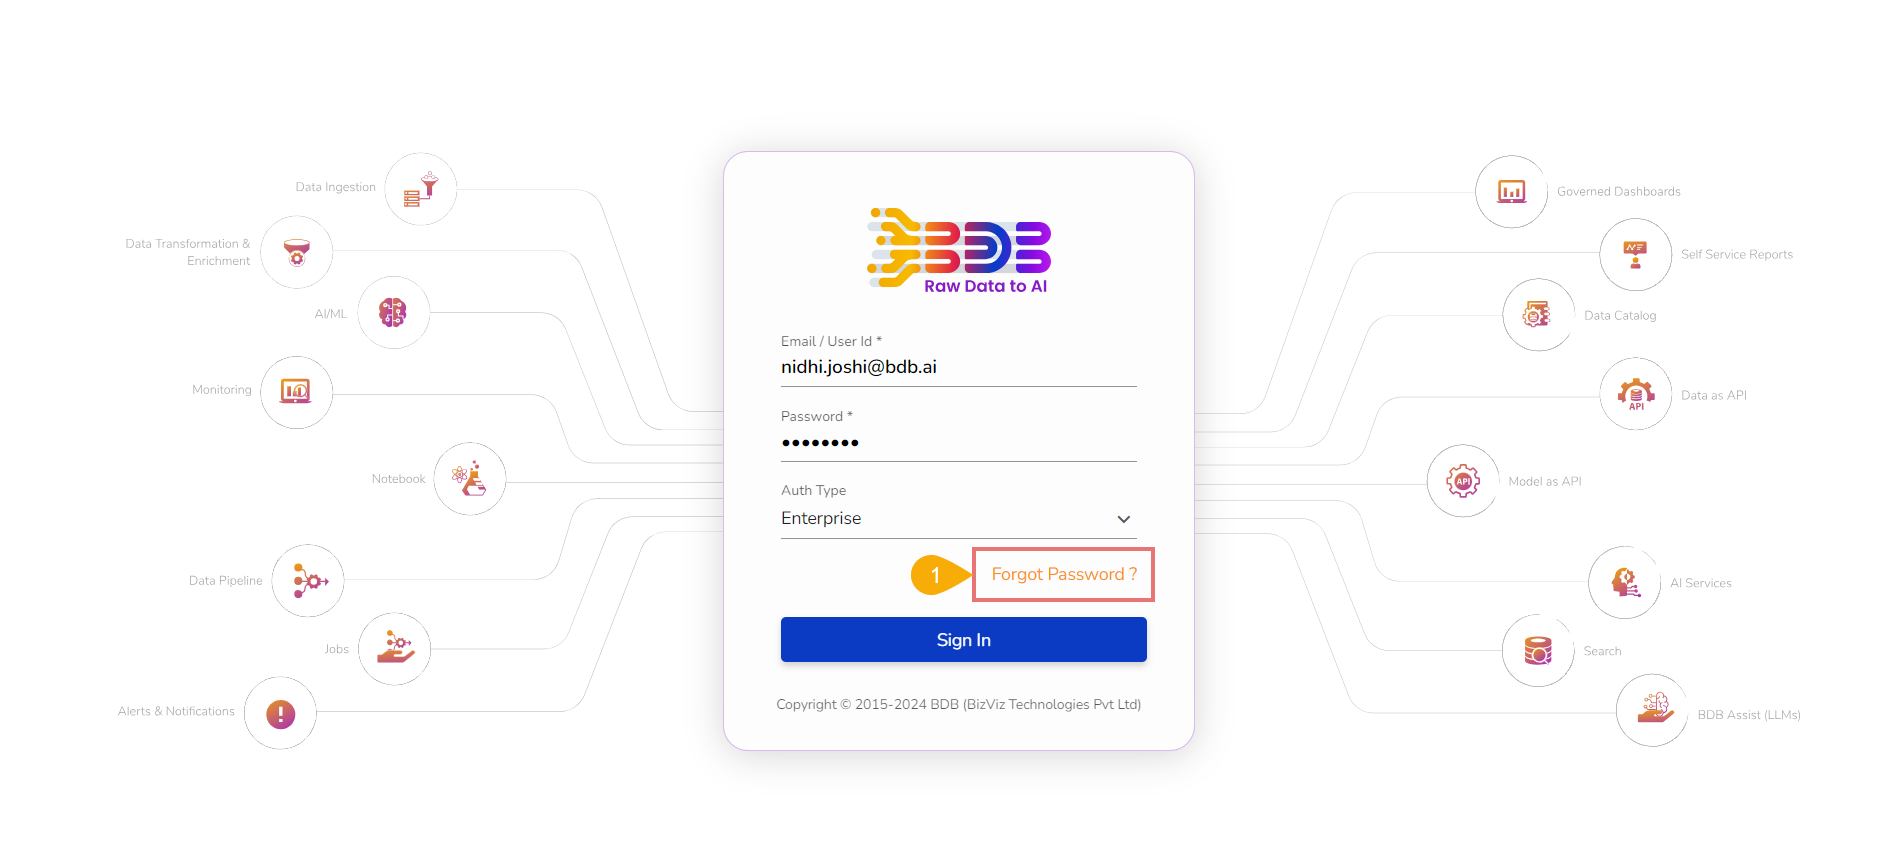
The users are provided with a choice to reset the password in case they forget it. This functionality is provided on the sign-in page of the platform.
Click the Forgot Password?option from the Sign In page.
Accessing the Forgot Password option from the Sign-In Page
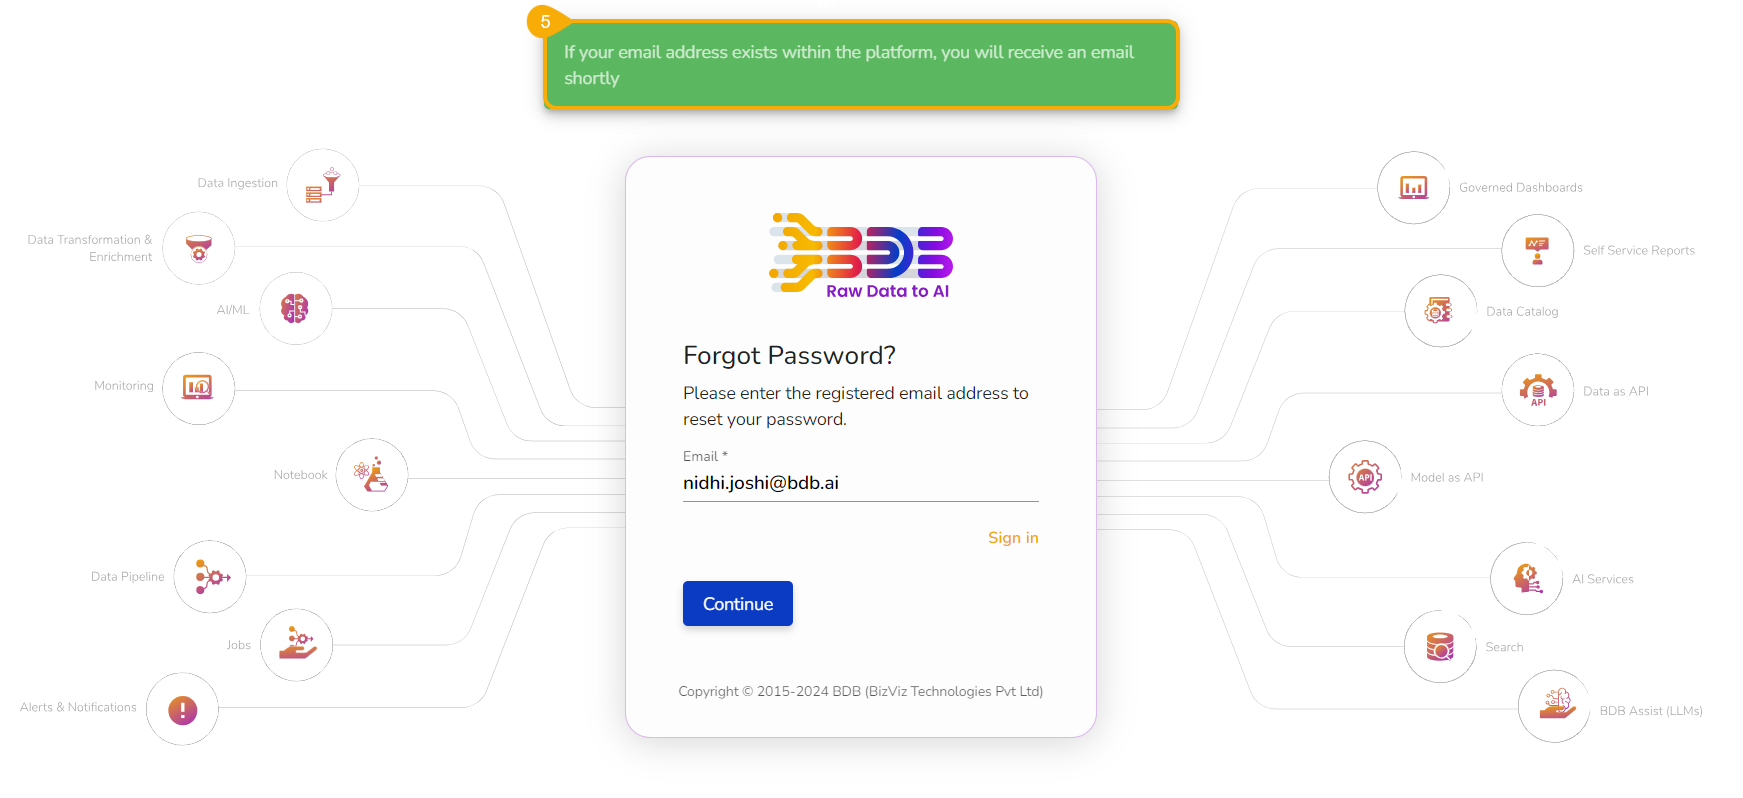
The Forgot Password? page opens.
Provide the registered email ID to send the reset password link.
Click the Continue option.
Please Note: The user may get redirected to select a space in case of multiple spaces under one server link. The user needs to select a space and click the Continue option once again.
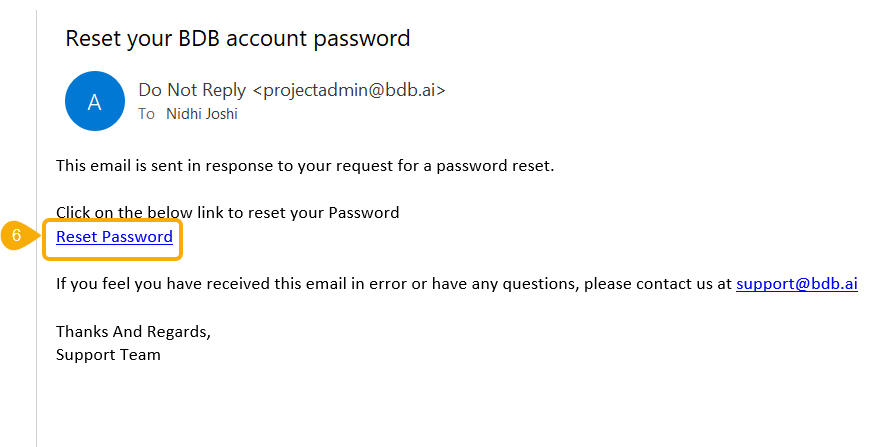
In case, a user does not have multiple spaces, a message appears to notify the user about the password reset link (the reset link gets shared via the registered email).
Click the link from your registered email.
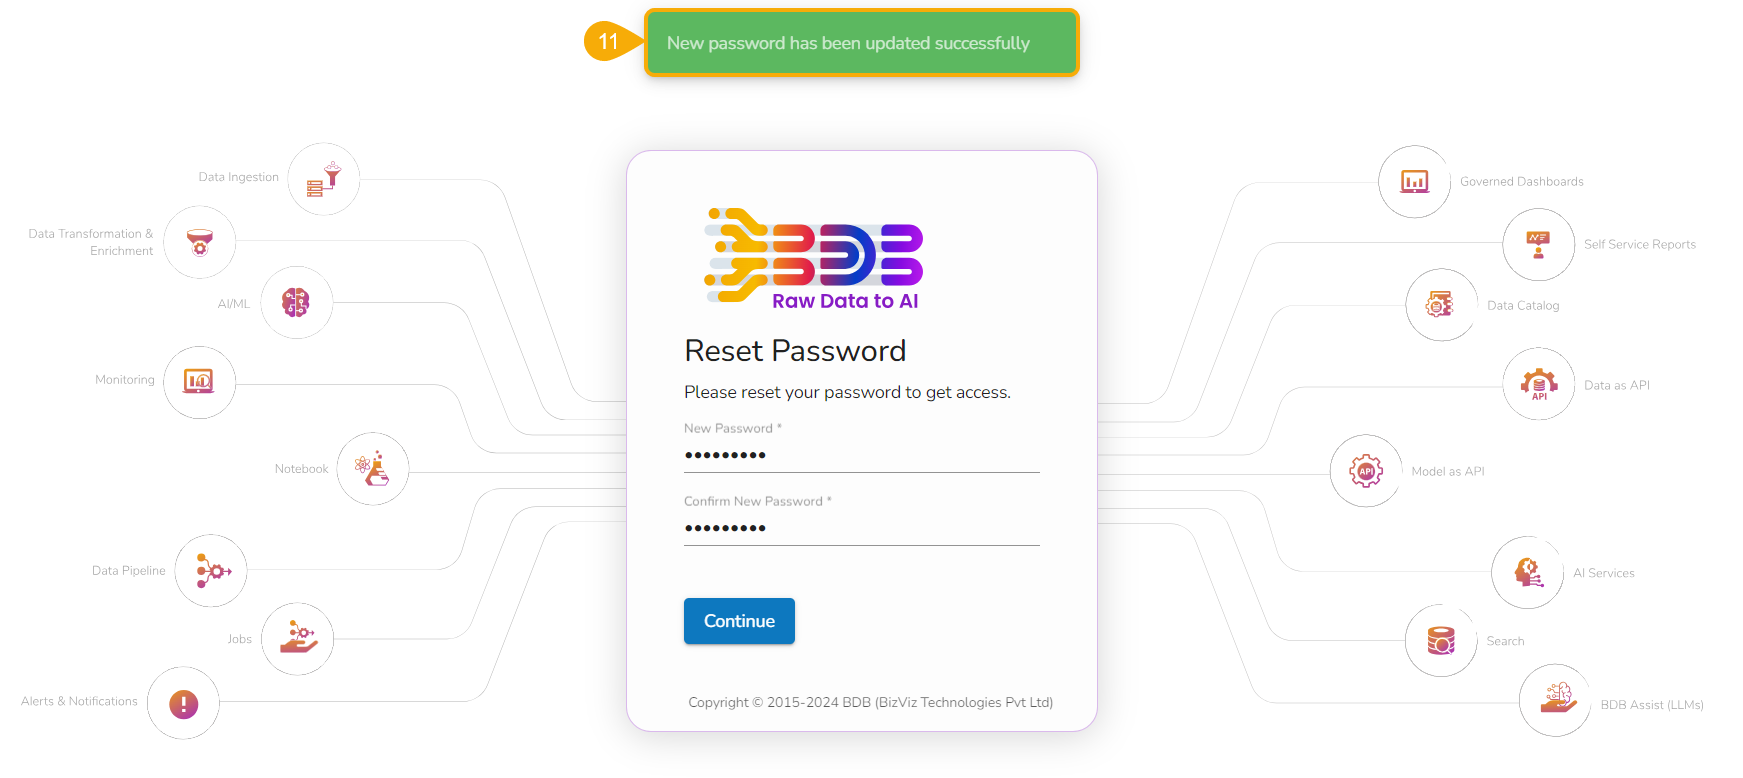
The user gets redirected to the Reset Password page to set a new password.
Set a new password.
Confirm the newly set password.
The password for the selected BDB account gets reset and a confirmation message appears to inform the user.
Please Note: The user gets redirected back to the Sign In page after successfully resetting the password for their platform account.
Click the Continue option.
Reset Password link sent via mail
Confirmation message after the password gets reset.
Module Icons
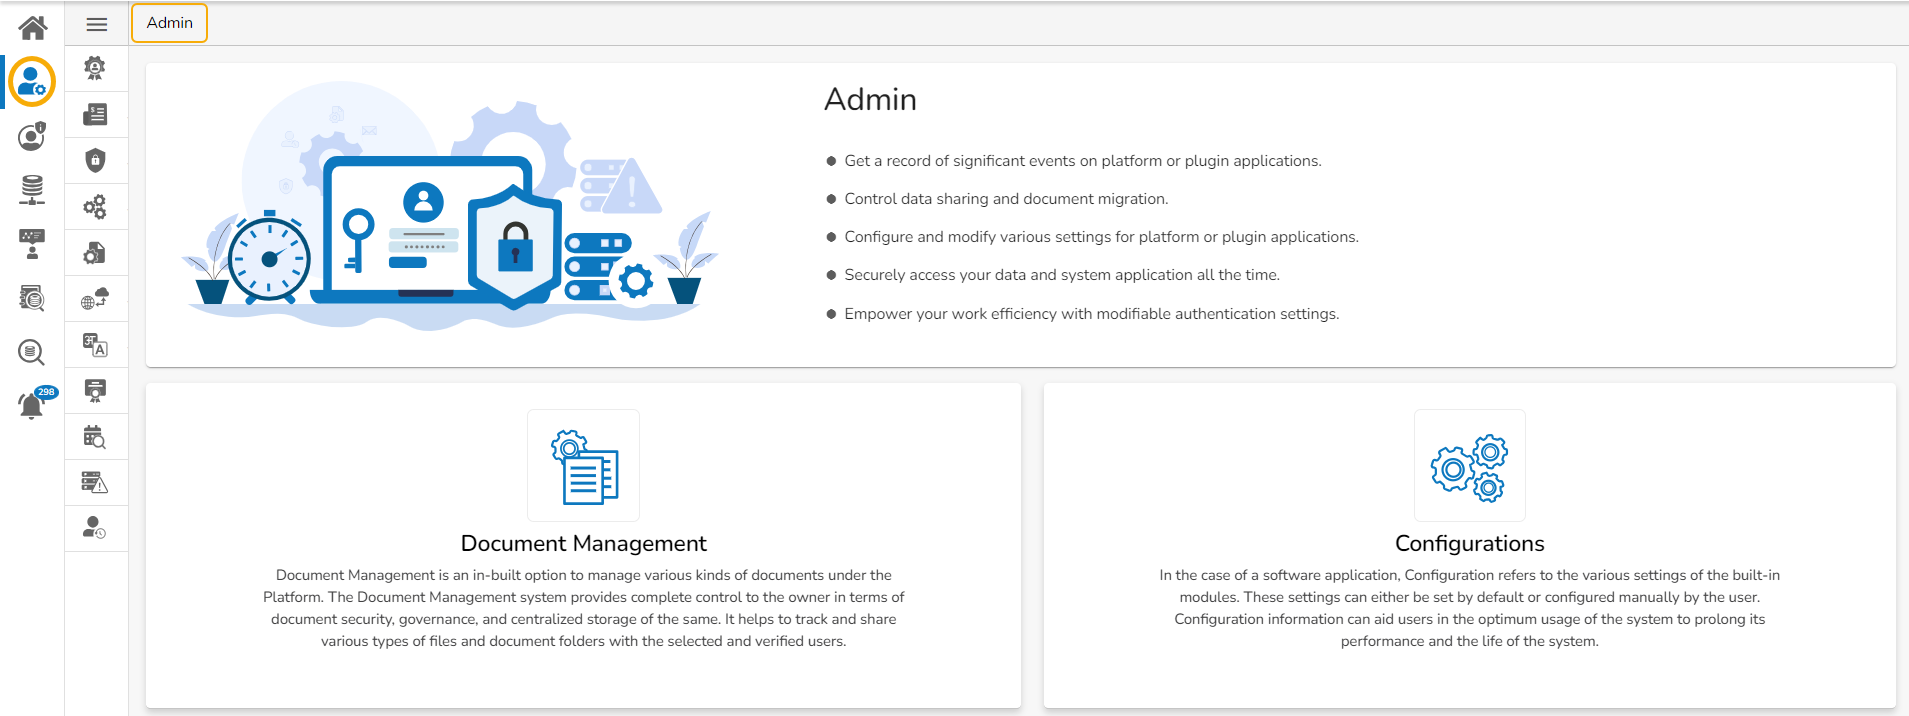
The Platform Homepage displays icons of the Admin, Security, Data Center, and Report modules on the homepage to make them easily available for the user.
The user can click on a module icon from the left menu panel to get redirected to that module. E.g., In the below-given image by clicking the Admin icon, the user is redirected to the Admin module's homepage.
The user can also access these modules (Admin, Security, Data Center, and Report) with the Home module icon under the Apps menu.
Left panel module icons highlighted under the Apps menu
Header Menu Panel
The Header menu panel contains Apps and Help icons to allow user access of more platform modules and related help links. It has User Profile to help with the user level configuration.
Apps Menu
The Apps menu lists all the BDB modules together with the platform core modules for the user to kick start the data analytics journey.
The Apps menu displays all the available applications.
Navigate to the Platform homepage.
Click the Apps icon.
All the available platform modules will be displayed.
Users can select and open various modules using the application-specific icons in the Apps menu window.
Core Platform Modules under the Apps Menu
Please Note:
This is the default homepage screen when the user logs in to the Platform for the first time.
The user can access the Home icon in the left side panel and the
Modules dealing with Data Ingestion and streaming under the Apps menu
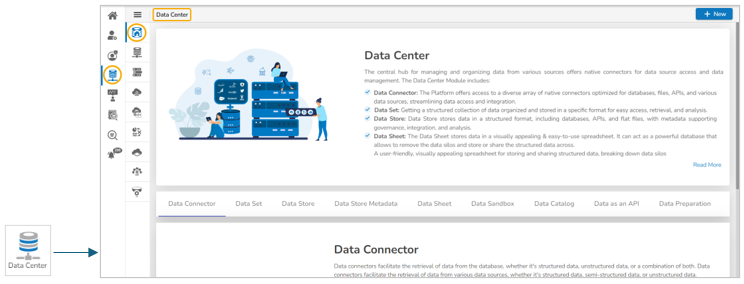
Please Note: The user gets the Data Center option on the left side panel and inside the Apps menu.
Modules dealing with Data Collection under the Apps menu
Module dealing with Data Science Module under the Apps menu
Please Note: The current image displays the project list with the created DS Lab Project.
Modules dealing with Data Visualization under the Apps menu
Please Note:
The modules in the Apps menu may vary based on the User Role and given permissions. Check out the various User roles section of the Security module to understand the user permission.
Apps
menu.
Please Note: The Admin module is accessible to the users from the left side panel and the Apps menu.
Other than the Apps menu, modules like Platform Homepage, Admin, Security, DataCenter, and Report are also accessible from the left-side menu panel provided on the Platform Homepage.
Apps Menu on the Platform Homepage
Clicking the Home icon redirects to the platform homepage.
Clicking the Data Center icon redirects to the Data Center homepage.
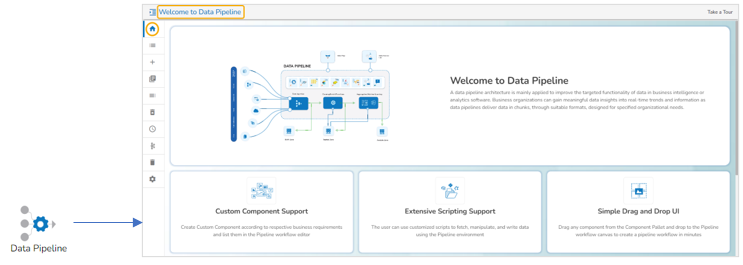
Clicking the Data Pipeline icon from the Apps menu redirects to the Data Pipeline homepage.
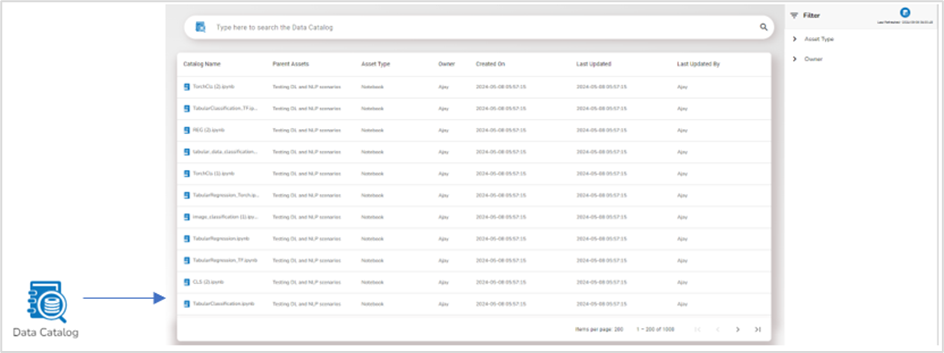
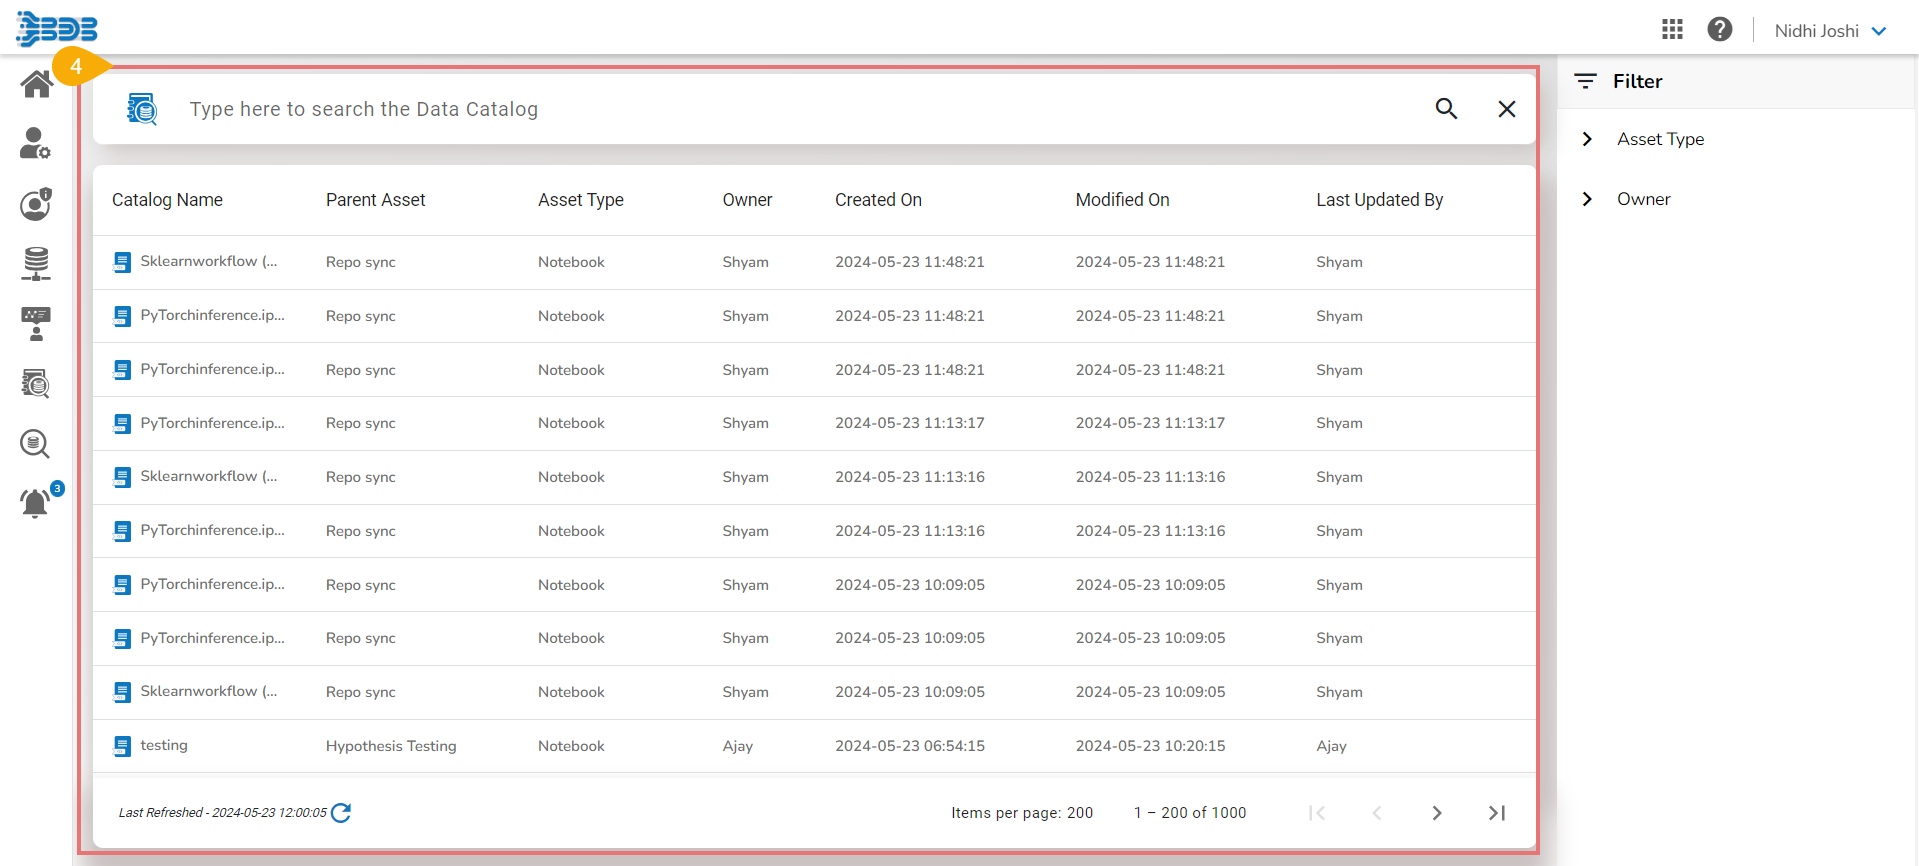
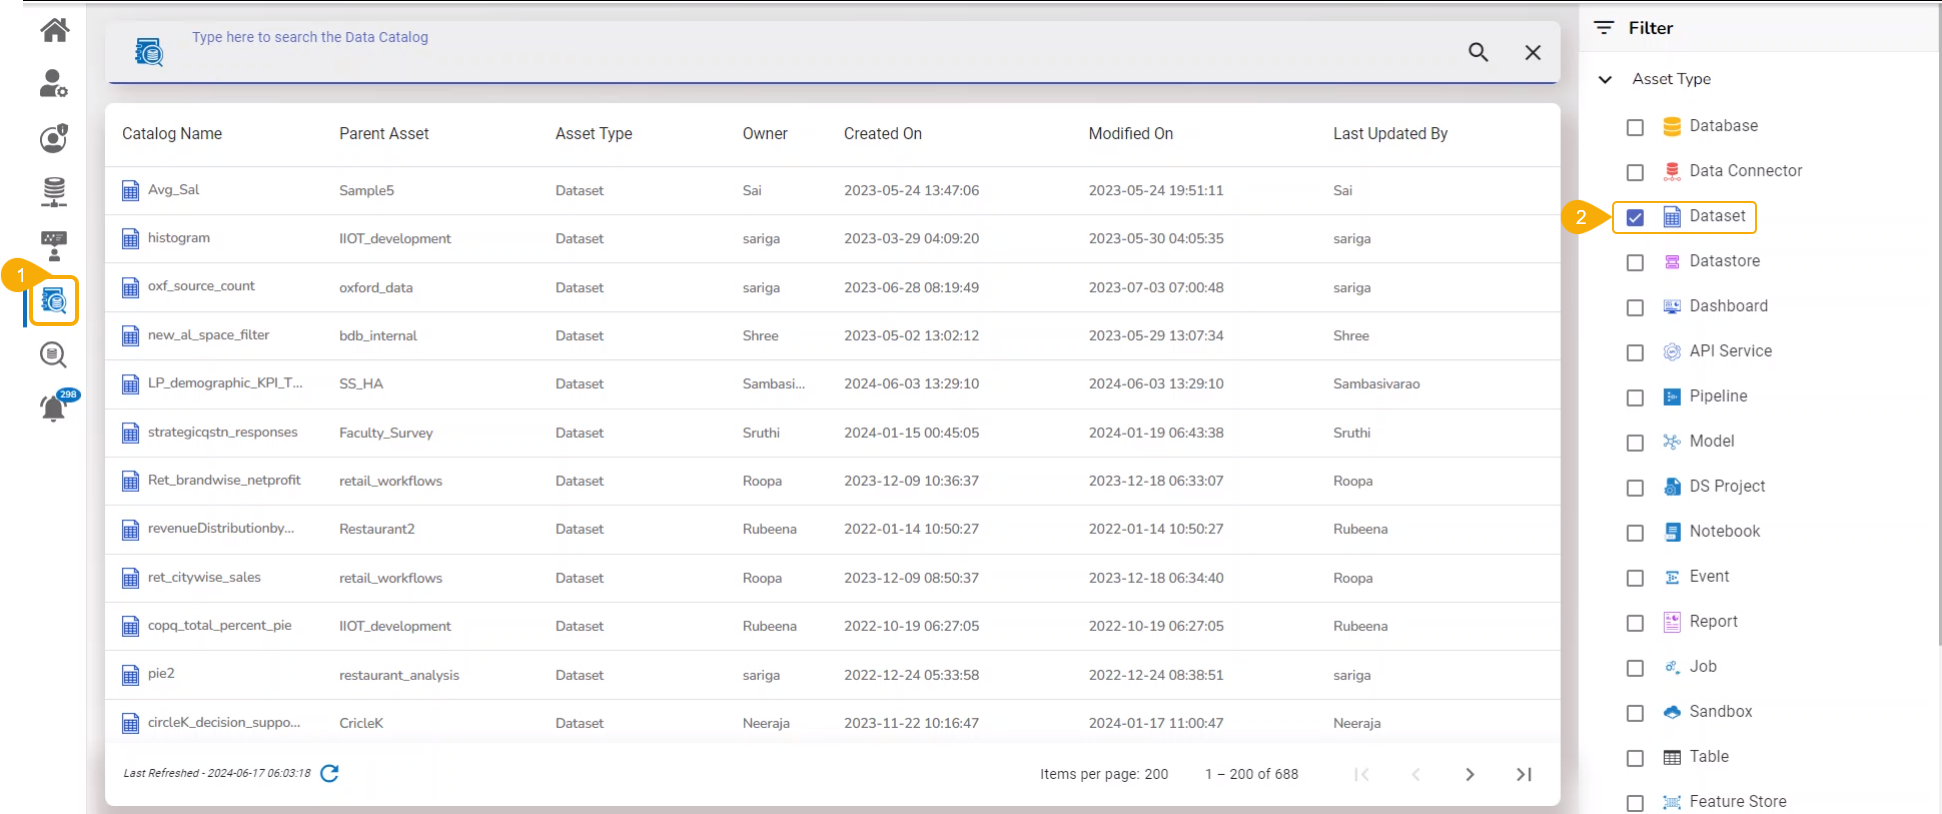
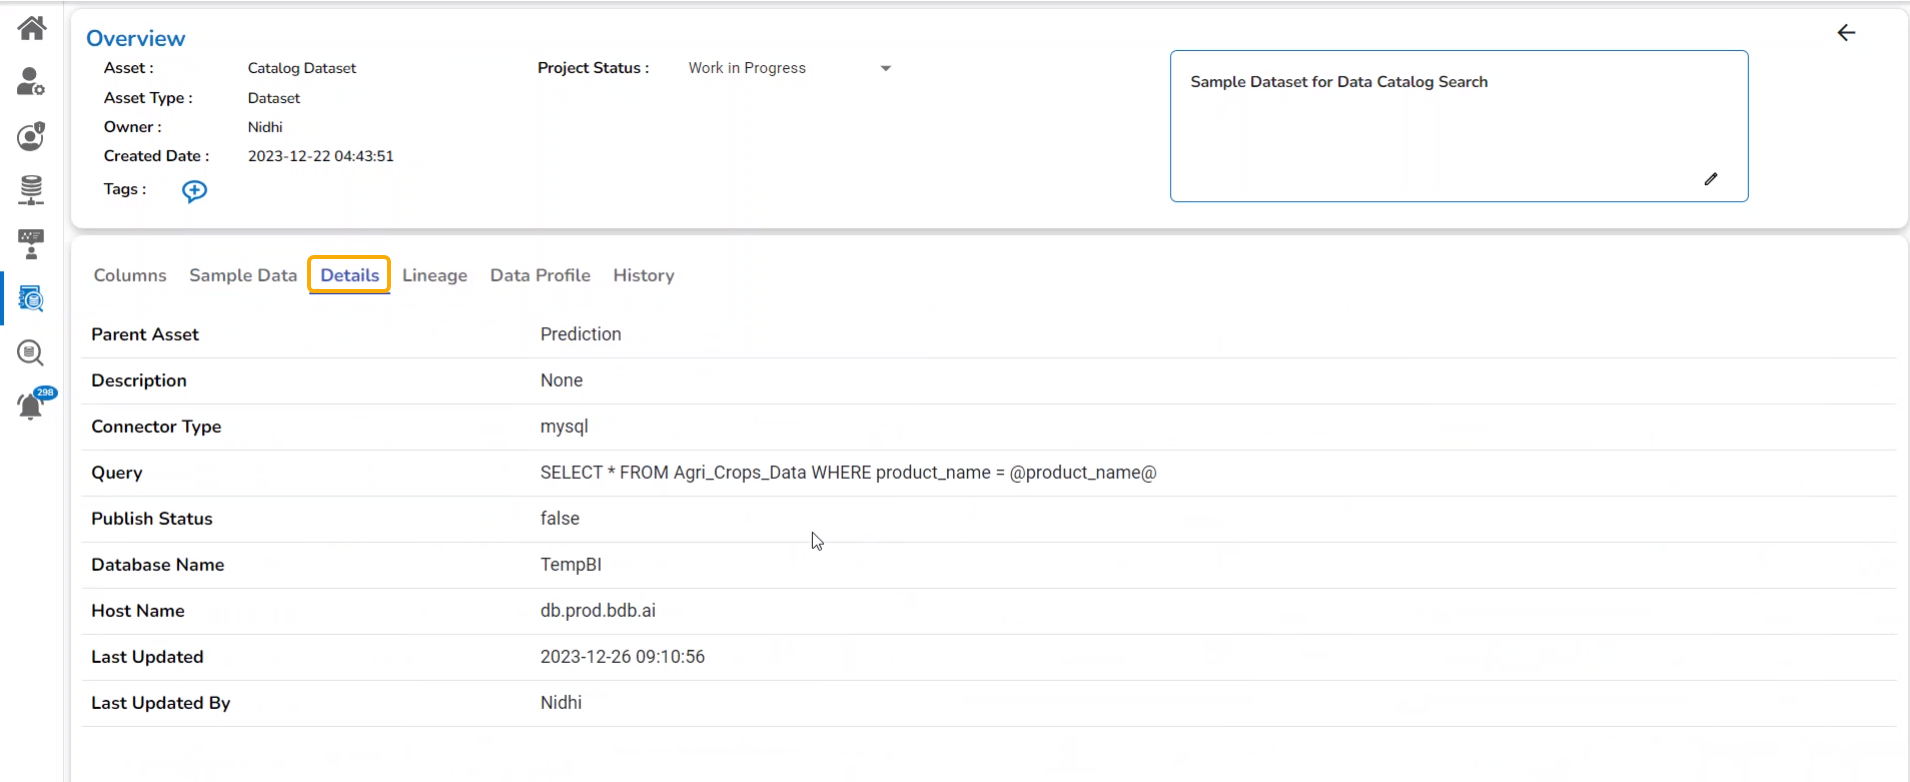
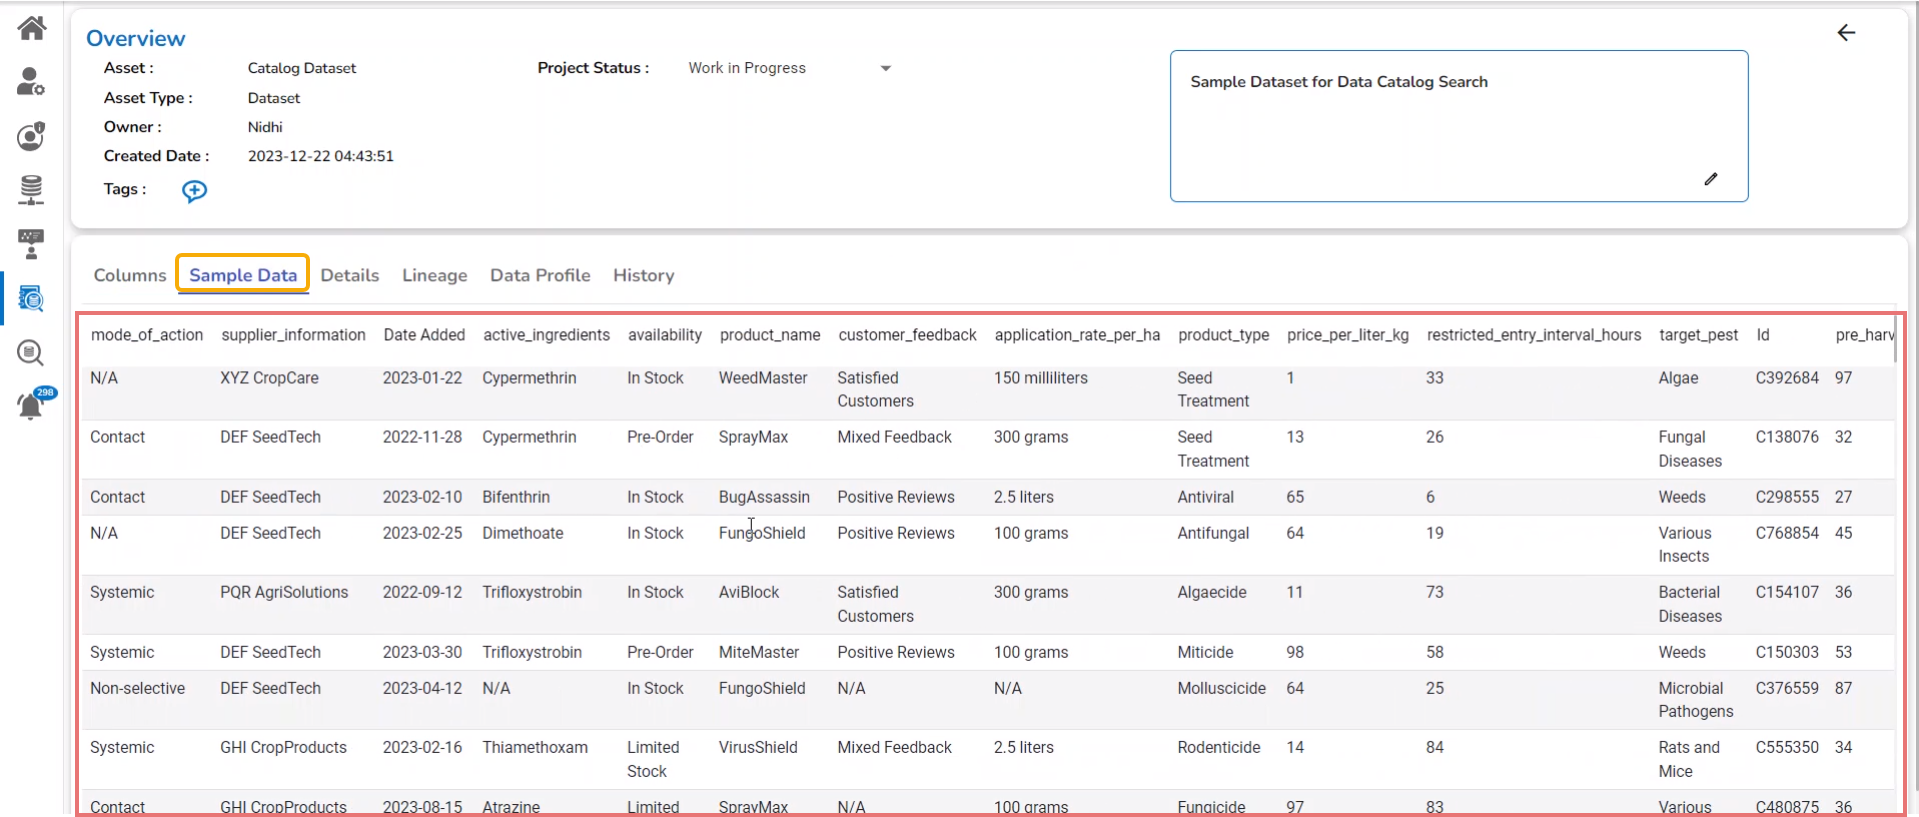
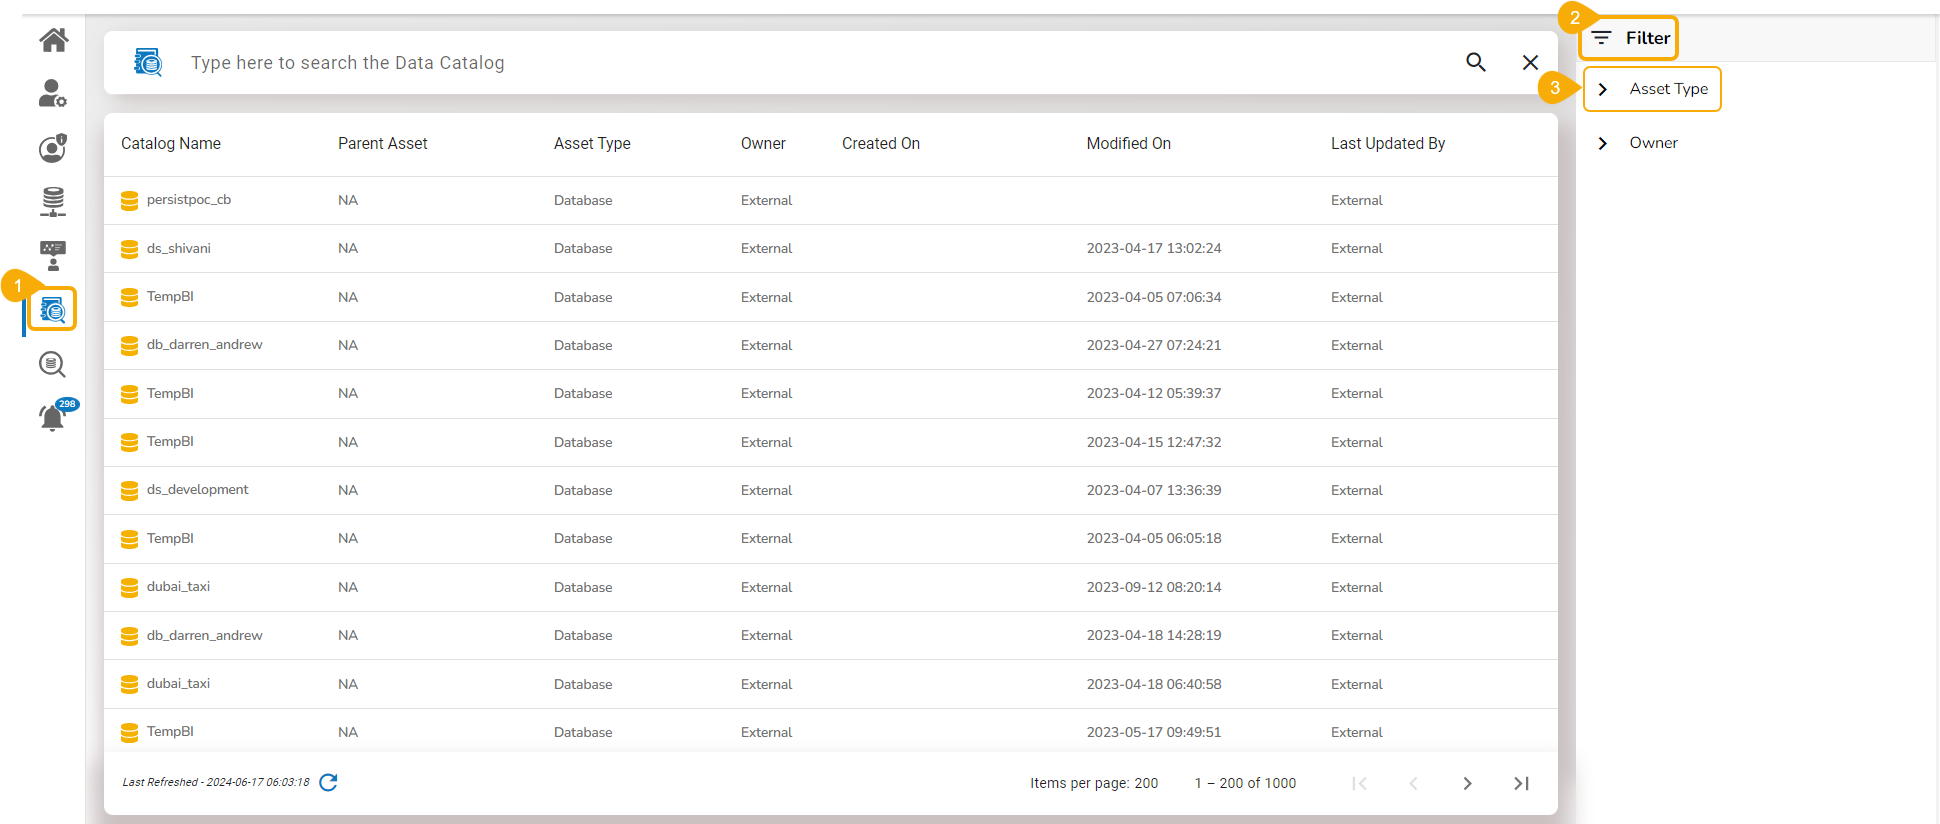
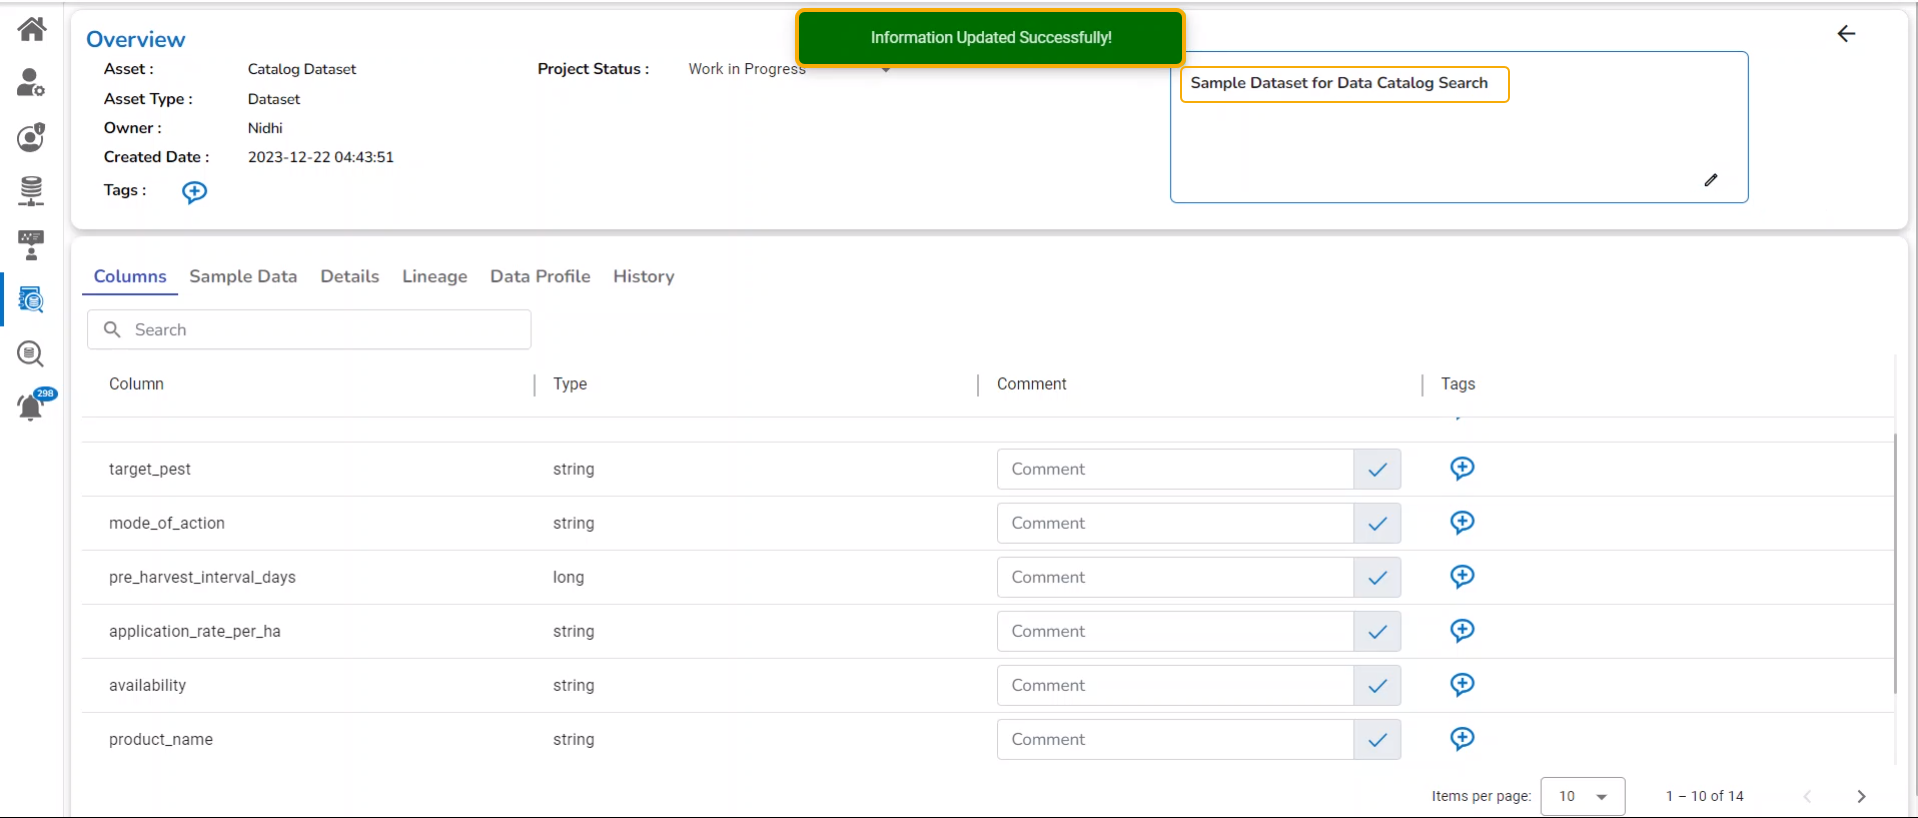
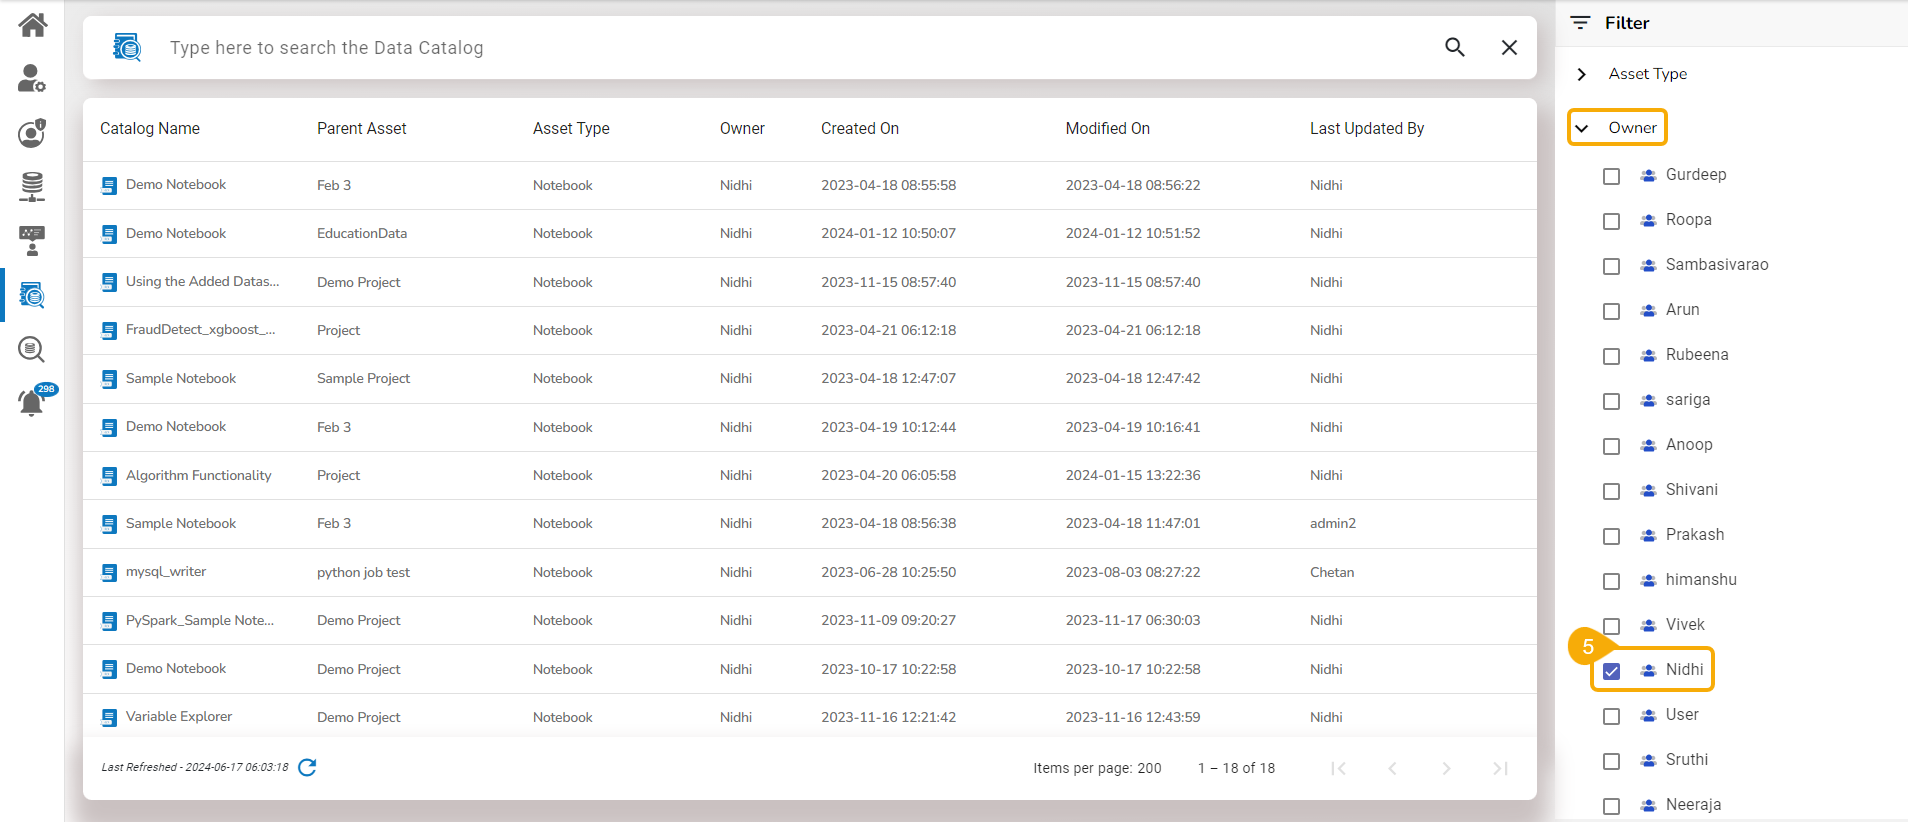
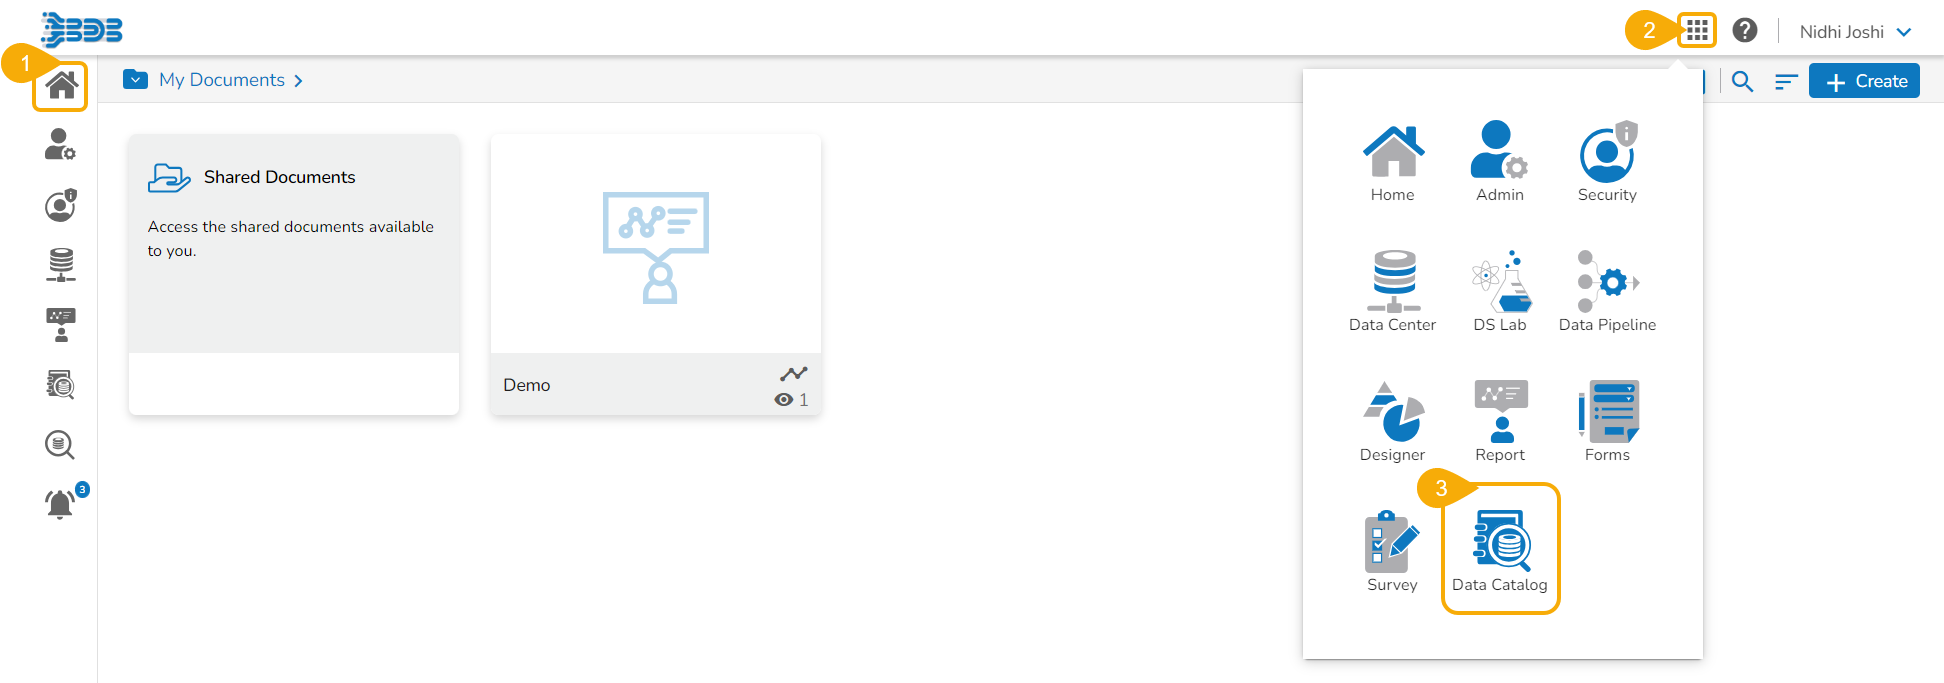
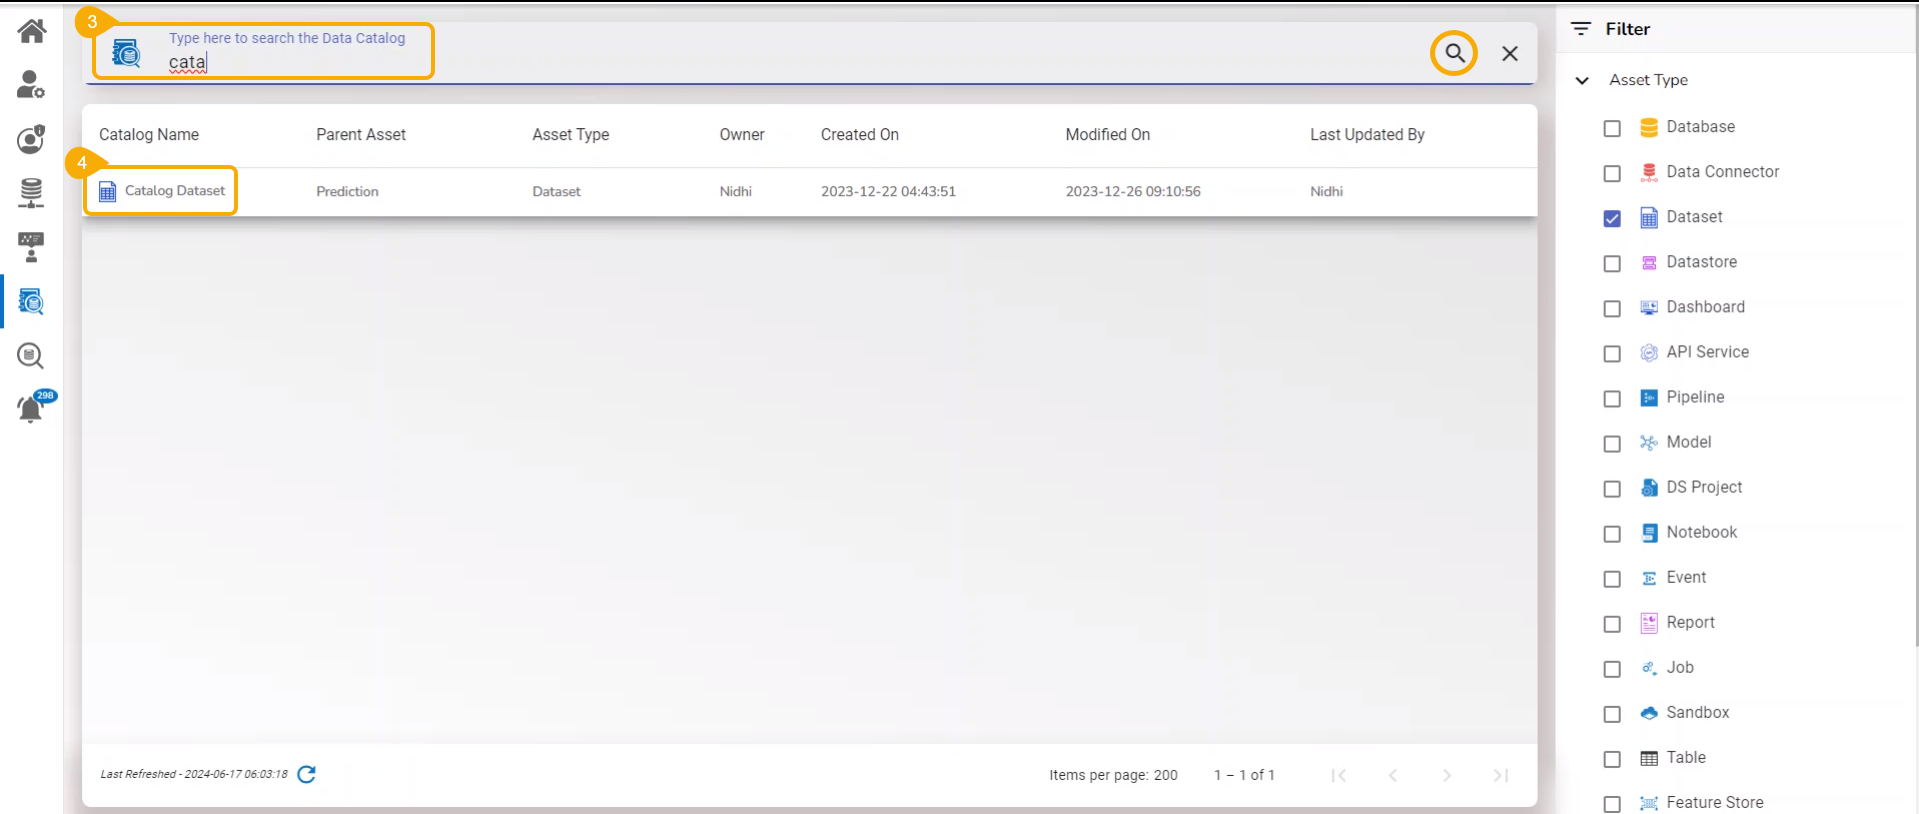
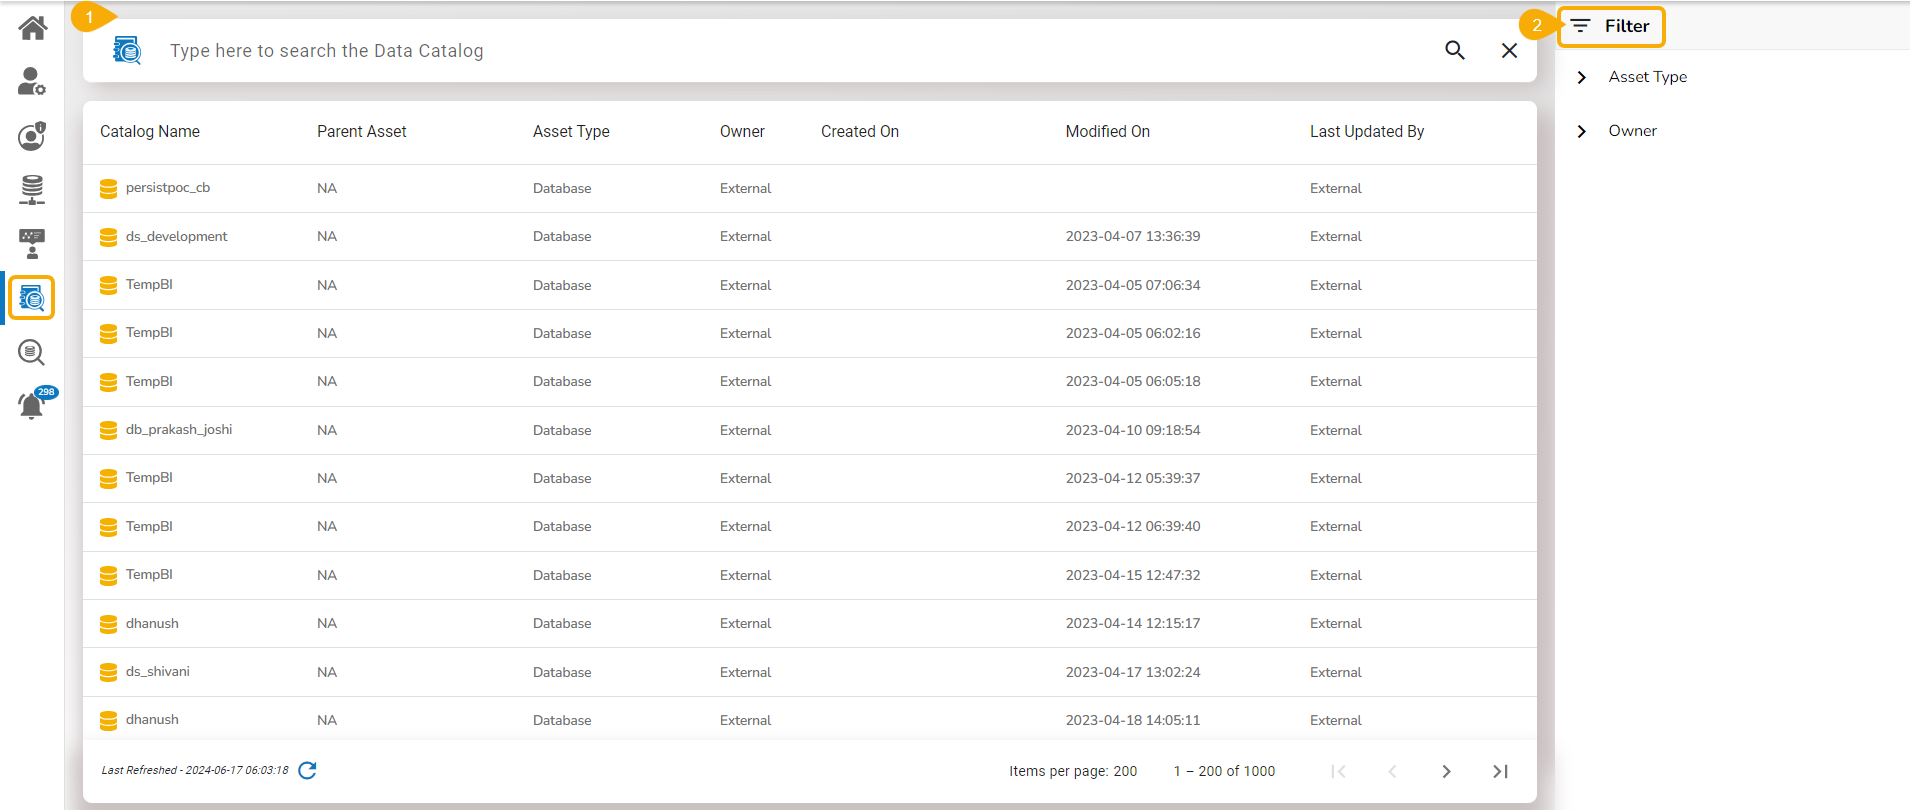
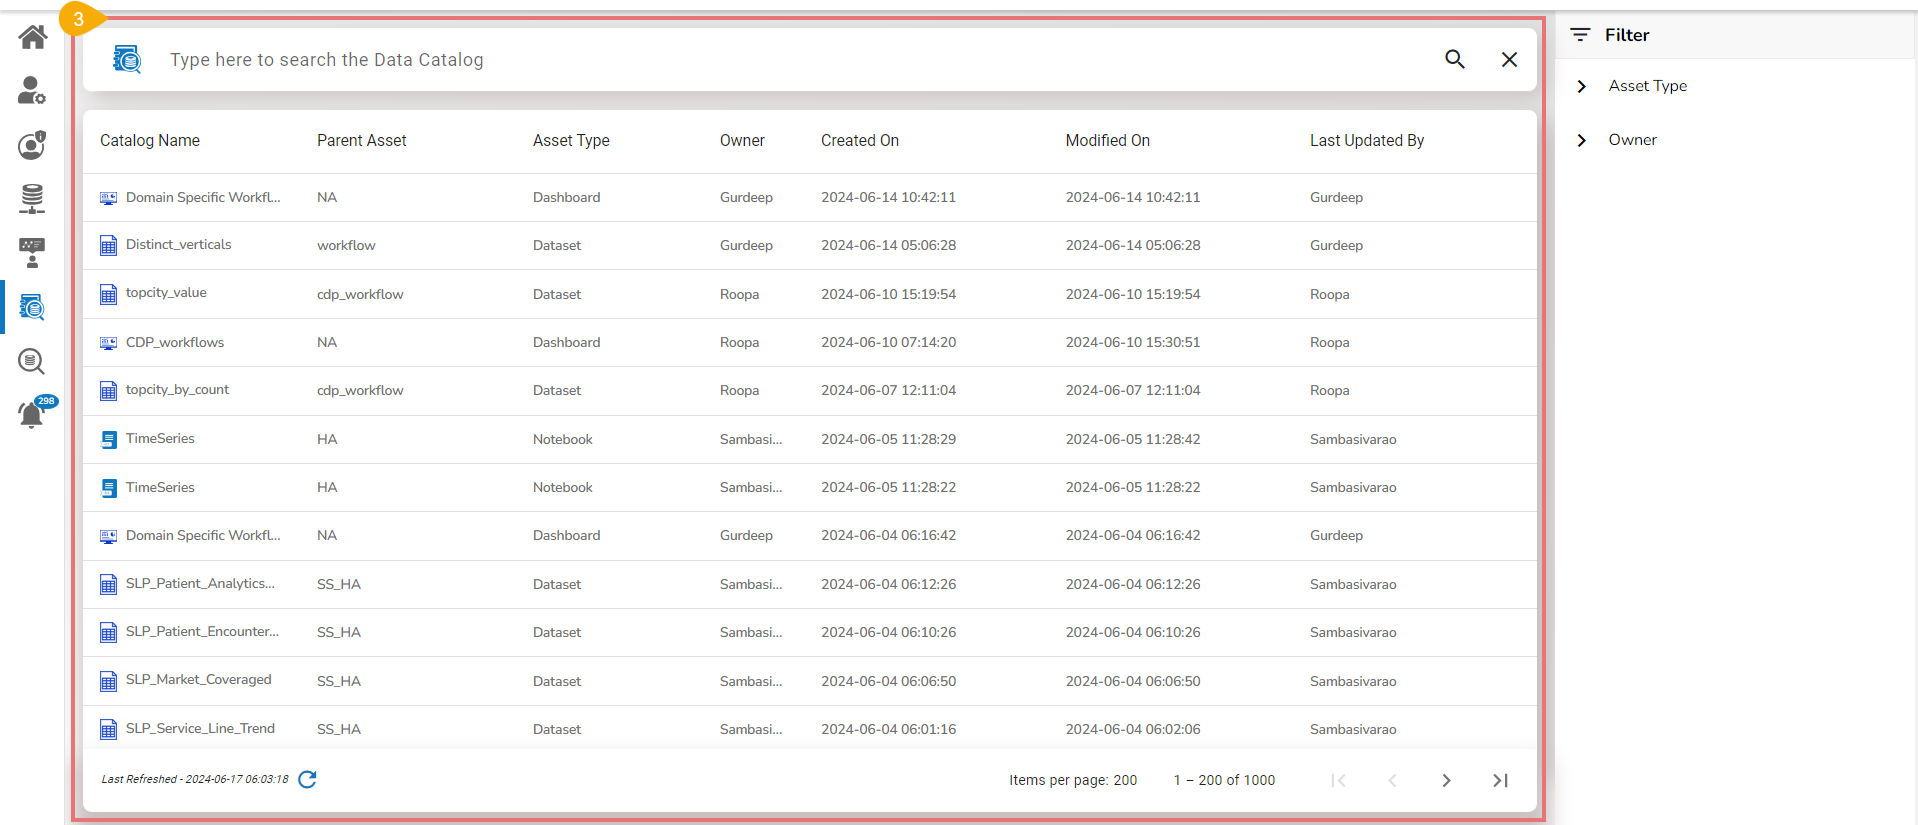
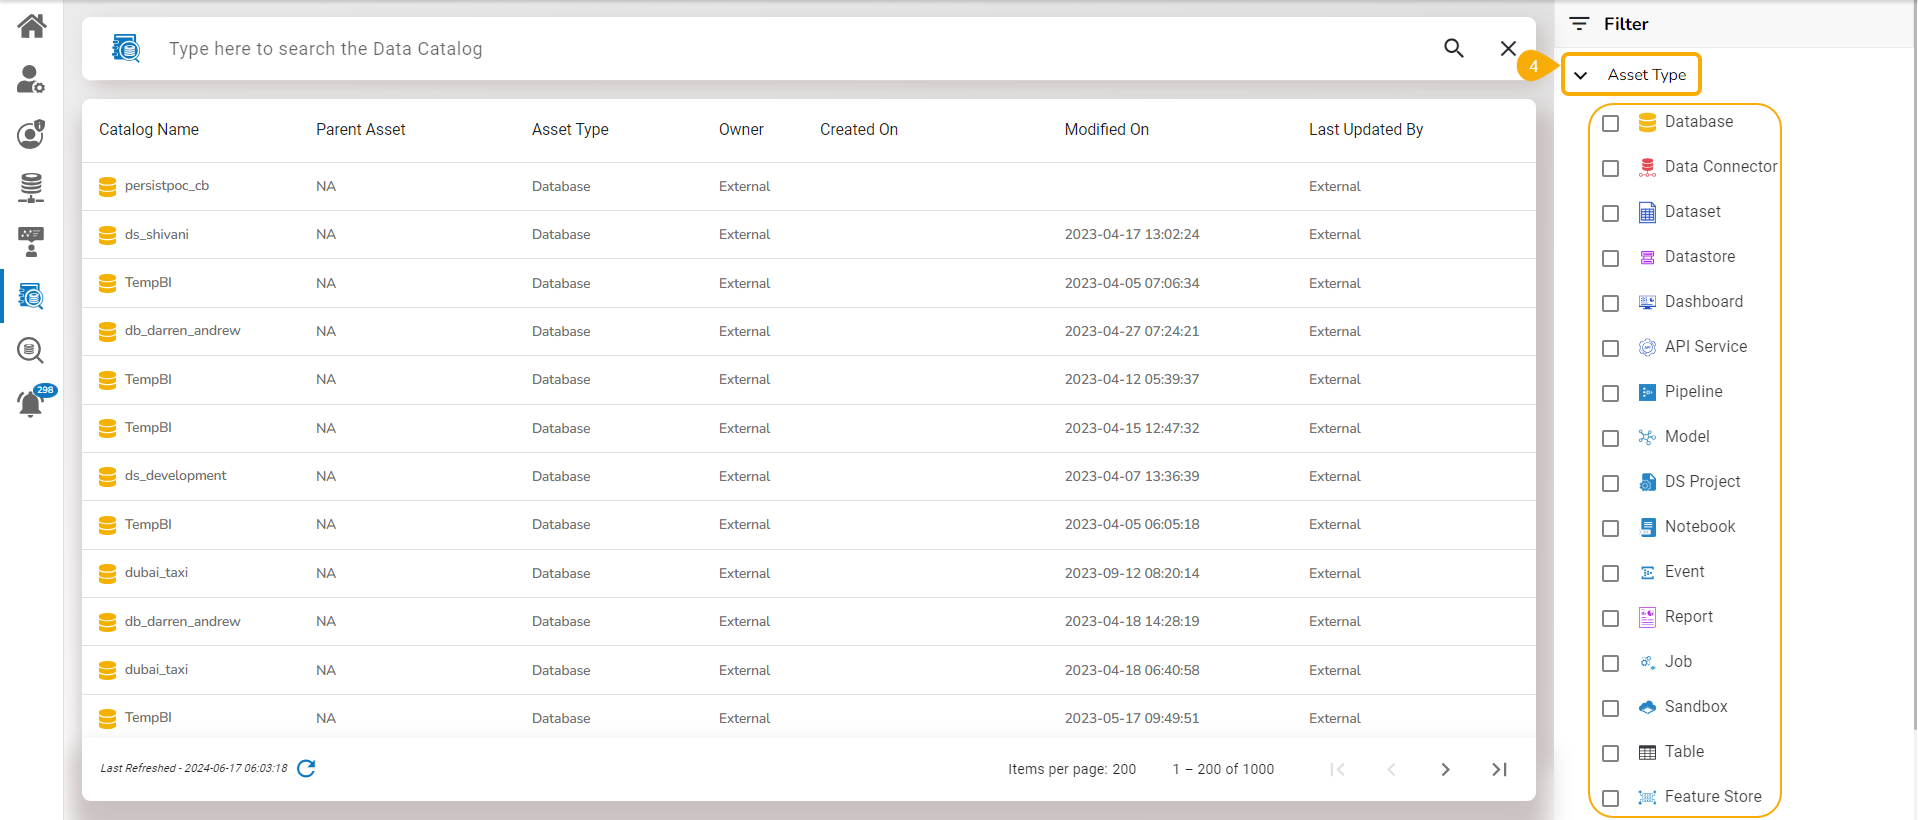
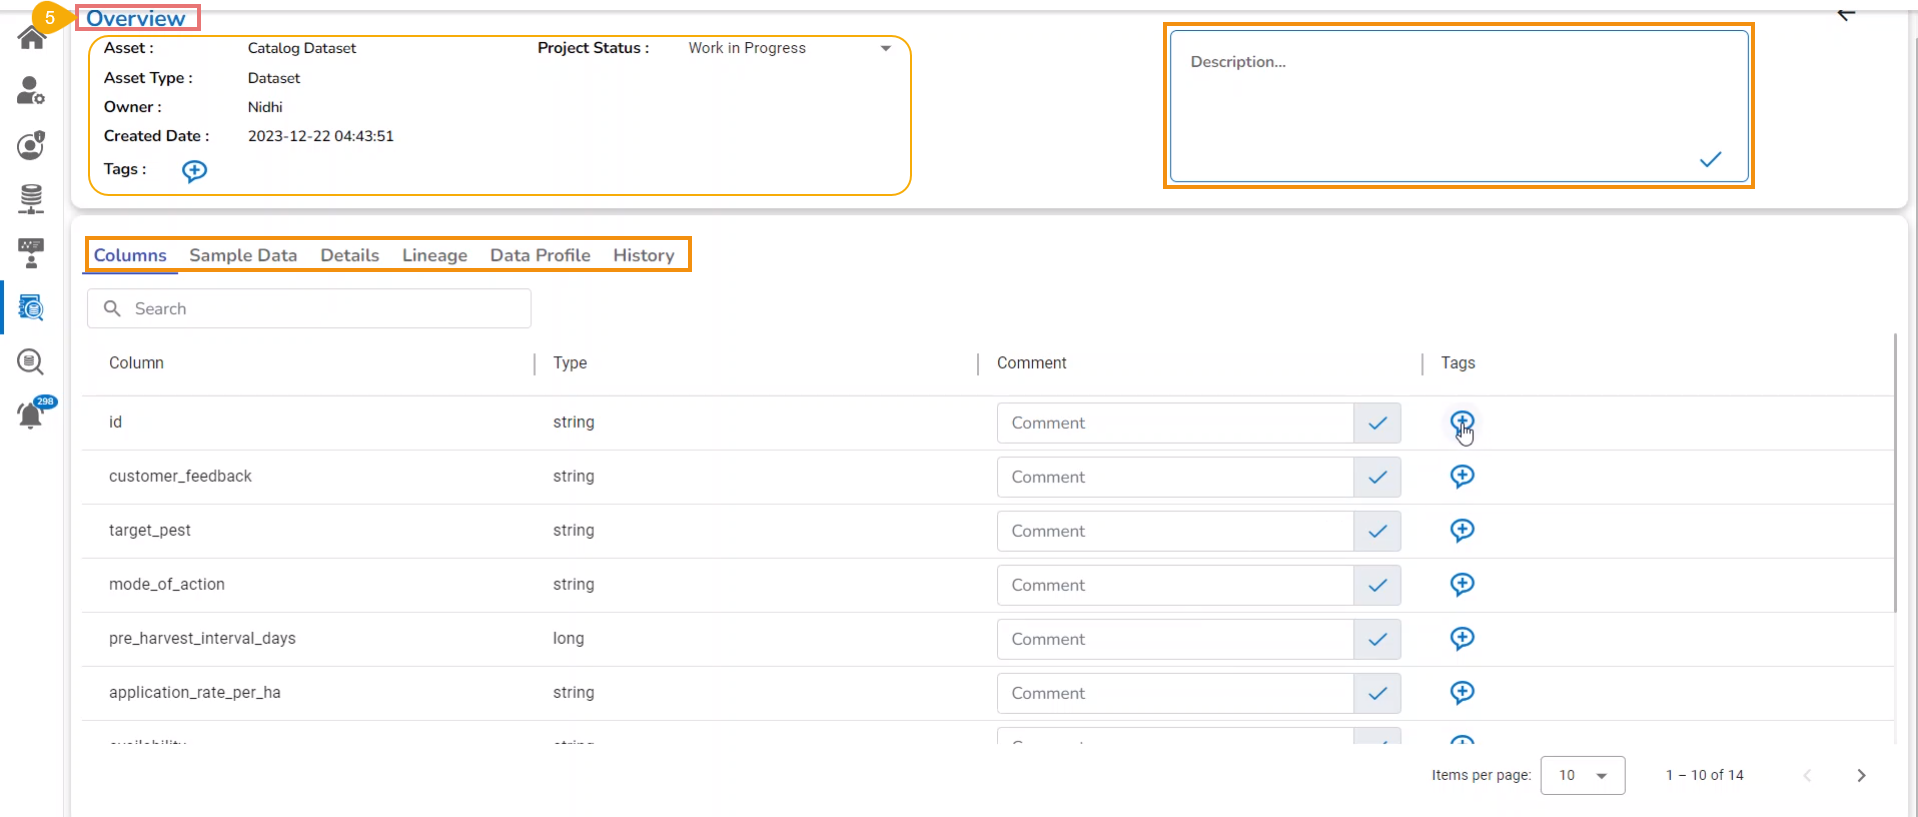
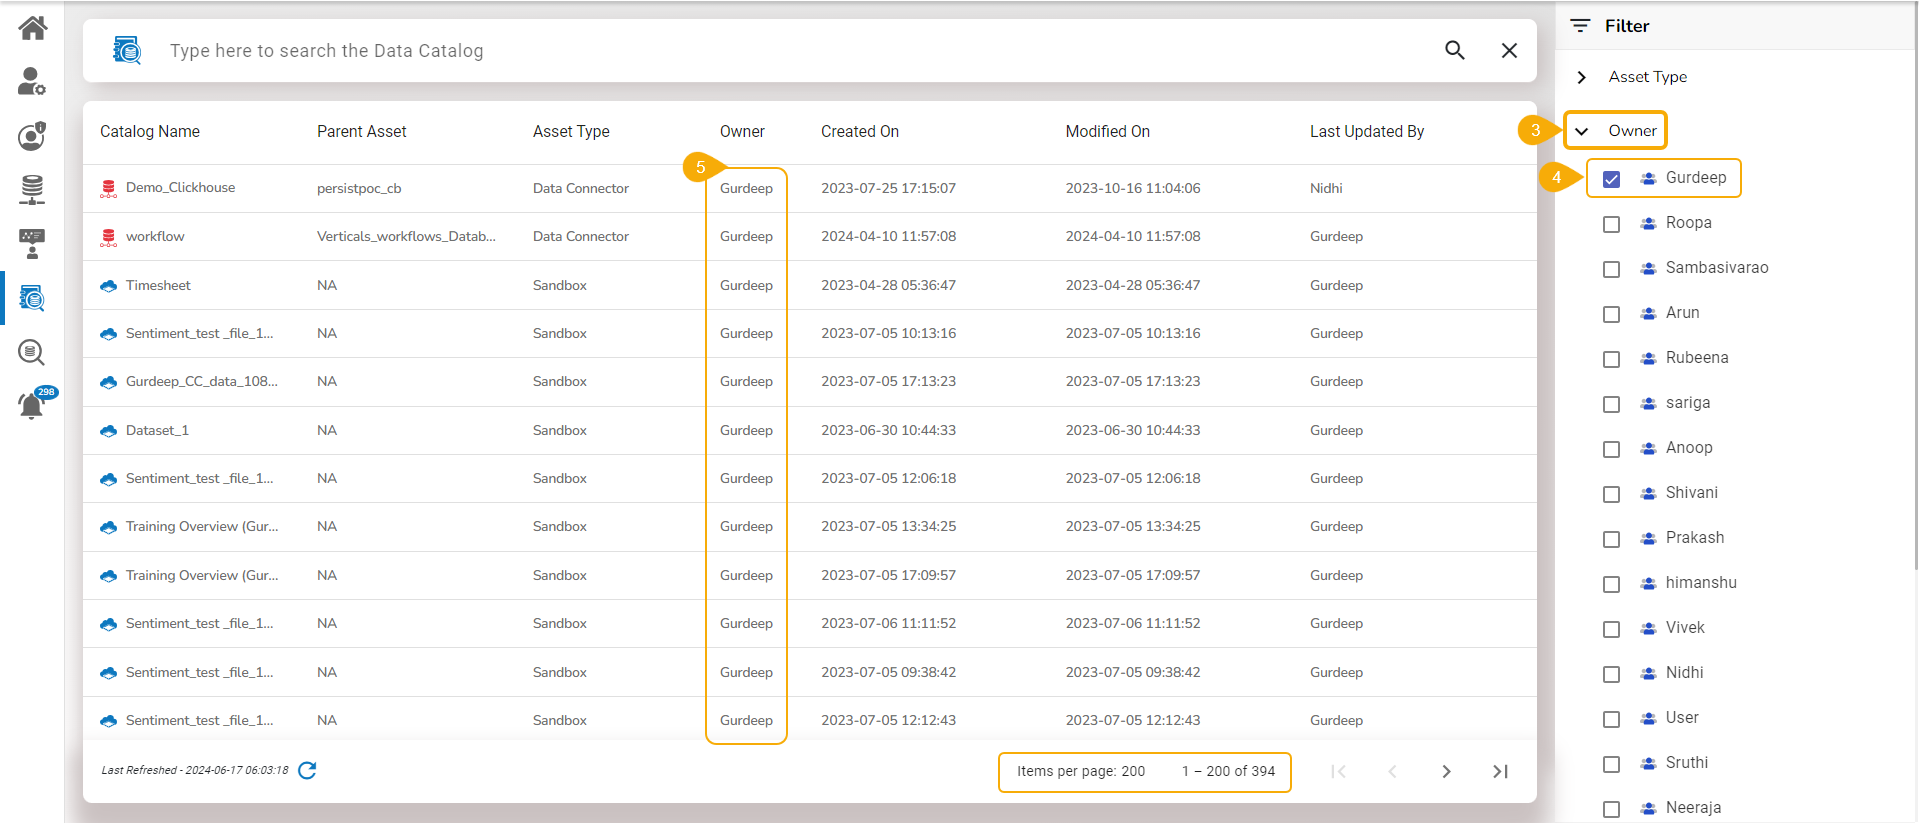
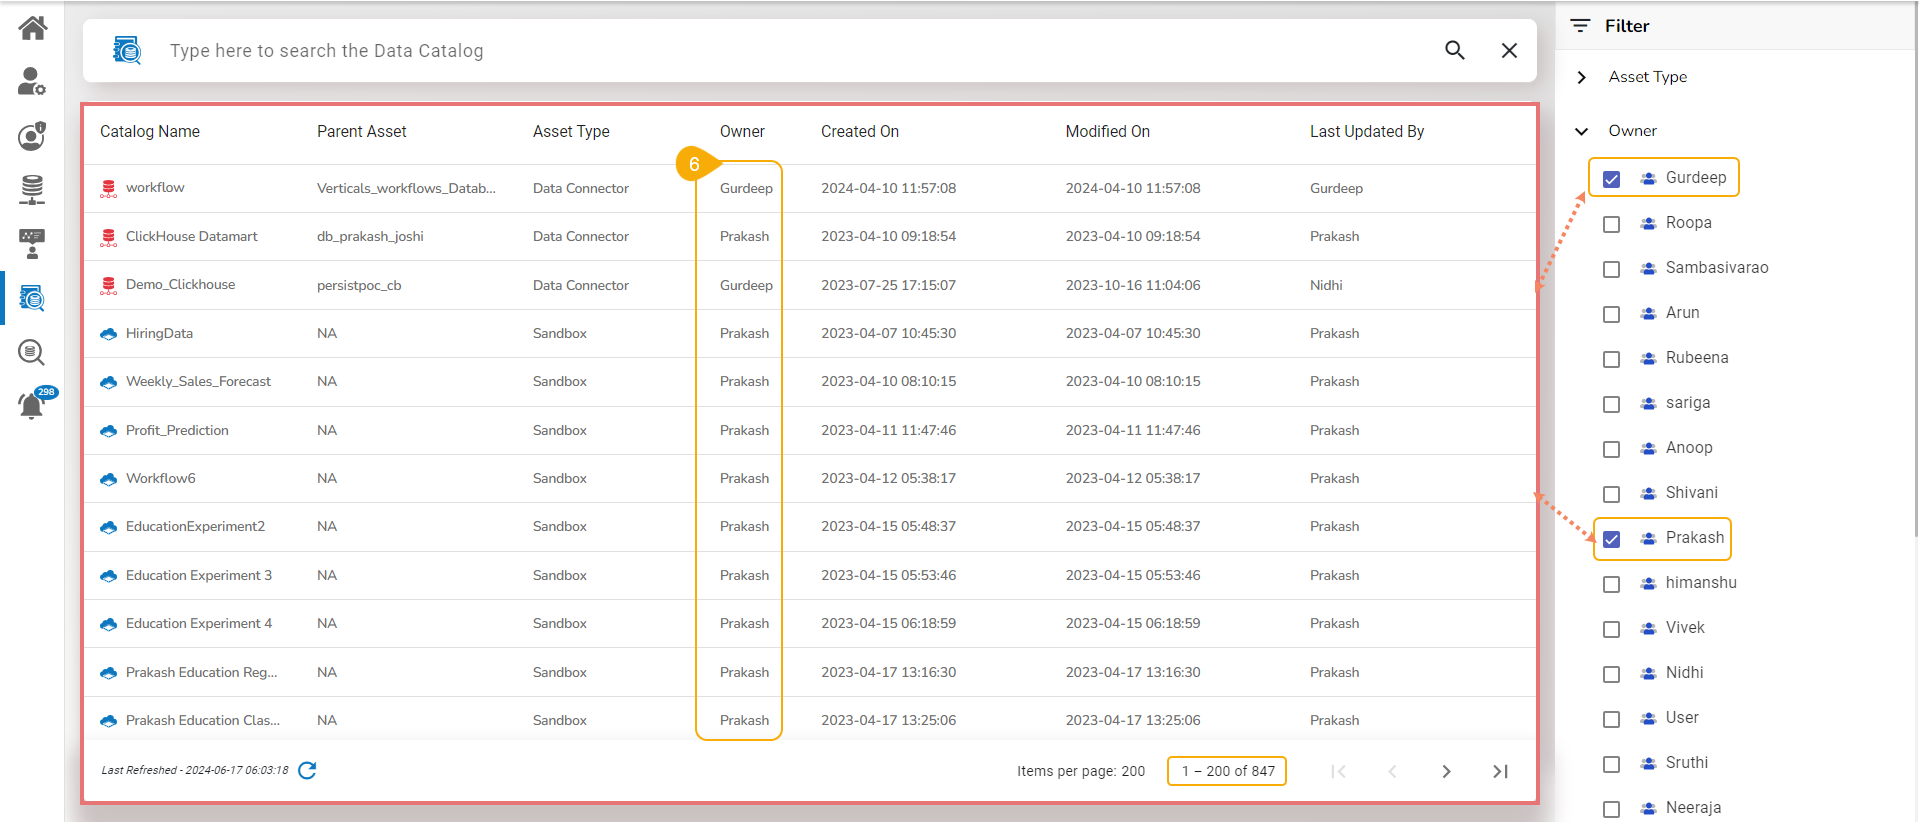
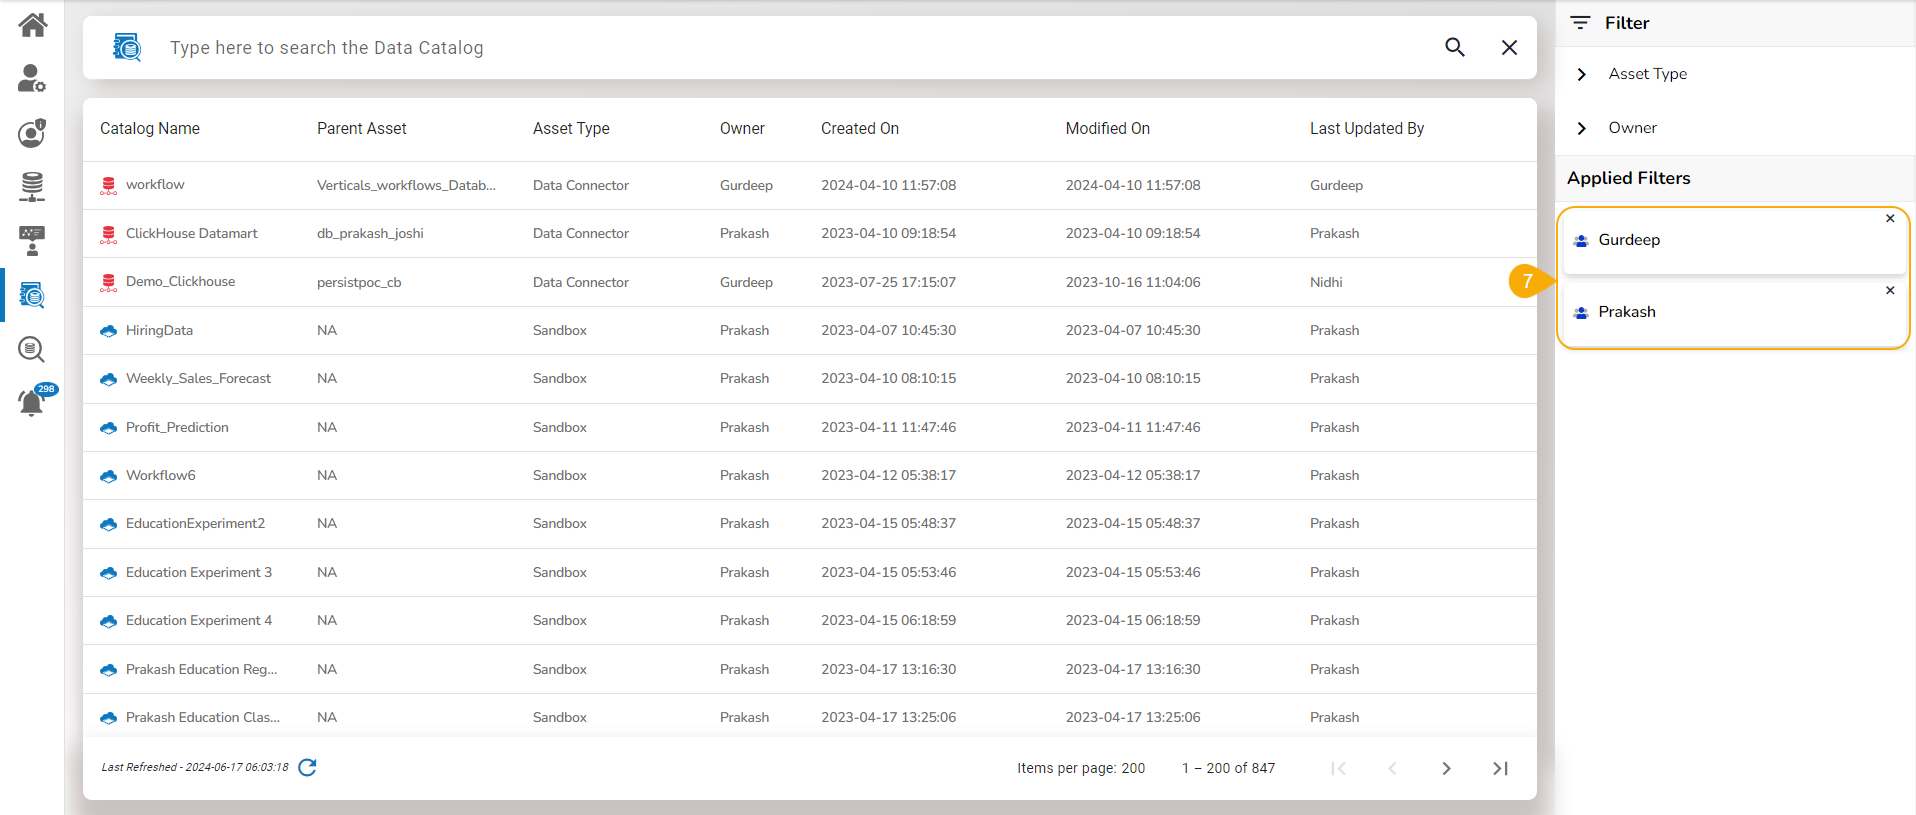
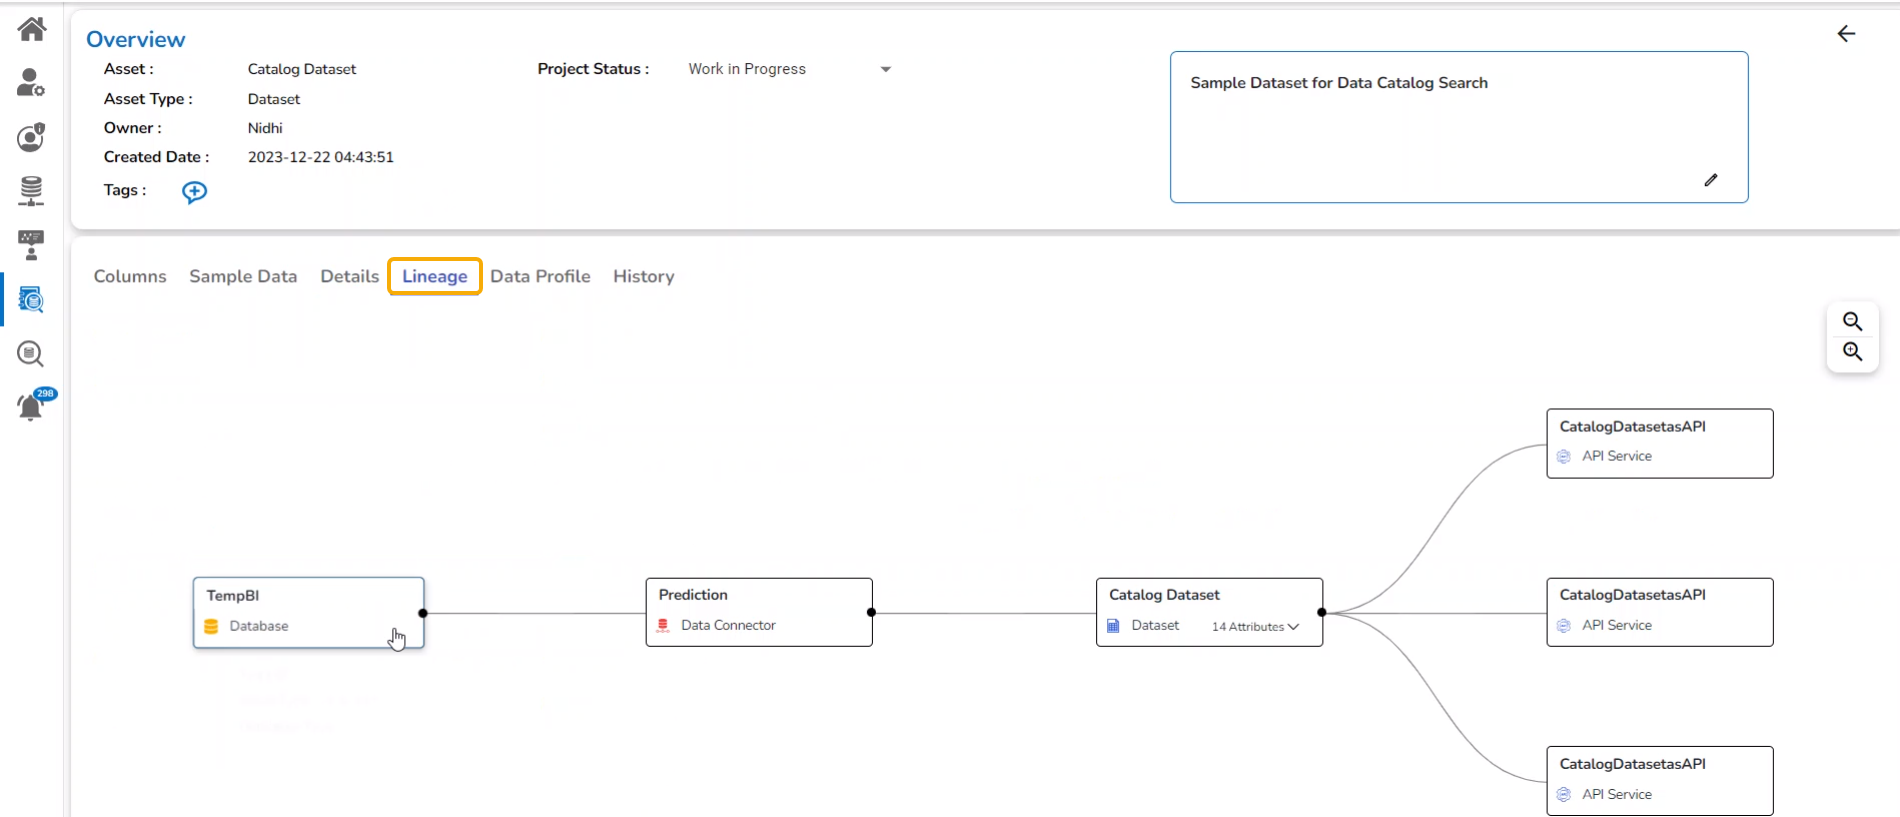
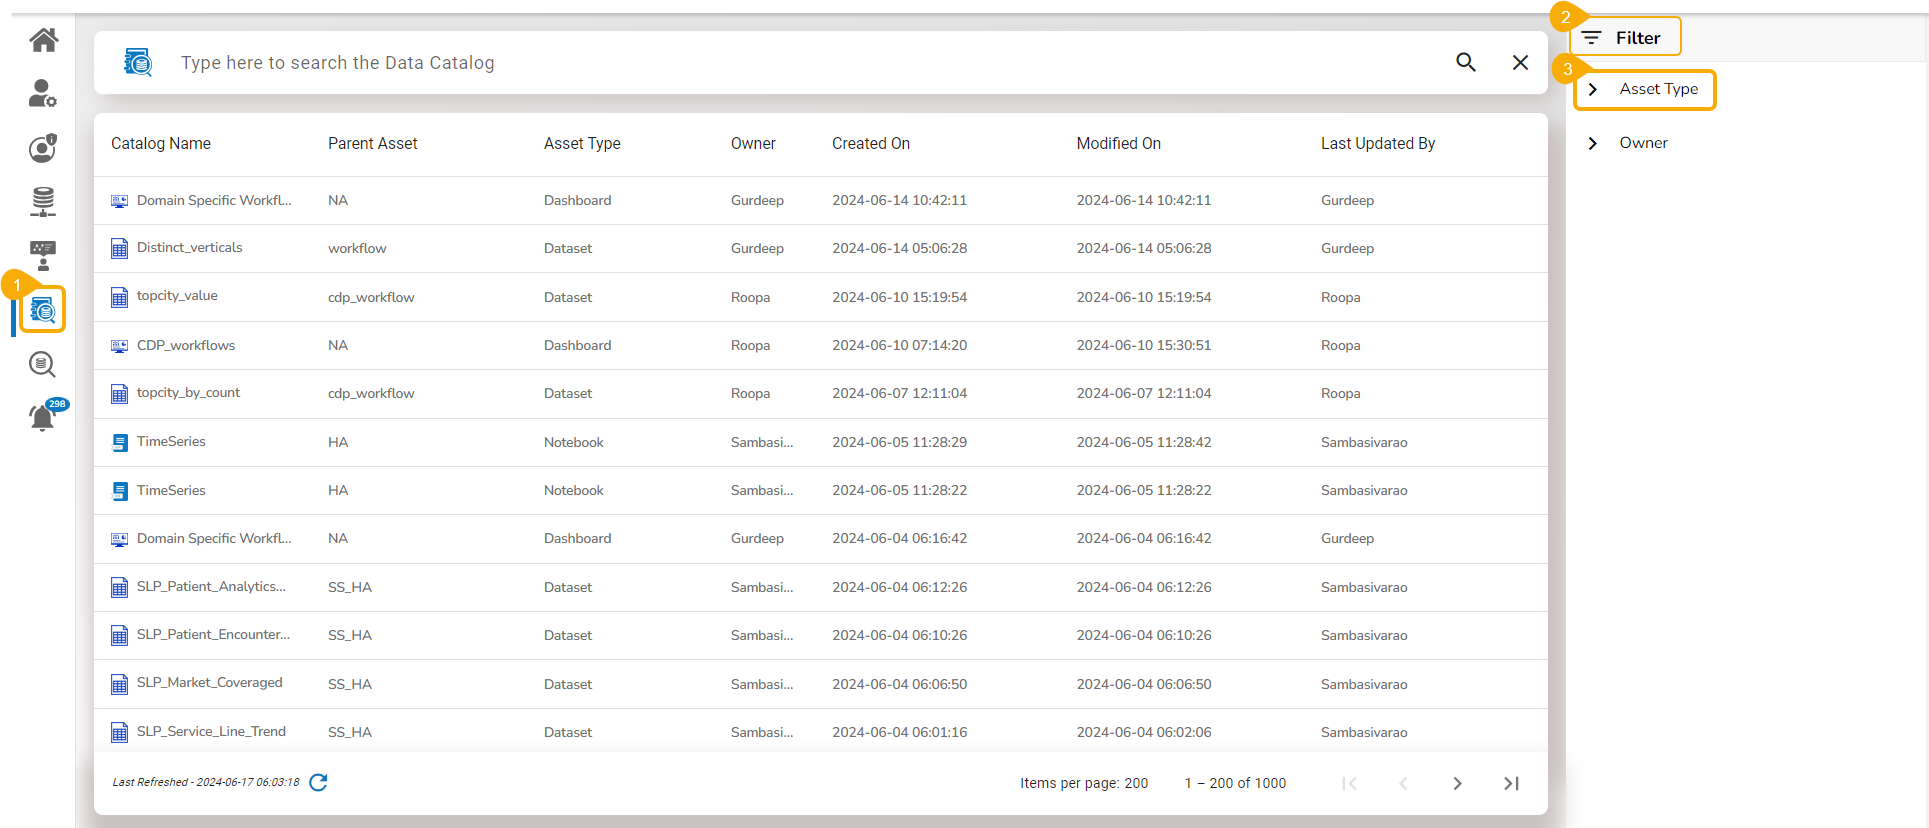
Clicking the Data Catalog icon from the Apps menu redirects to the Data Catalog Search page.
Clicking the Survey icon from the Apps menu will redirect to the Survey landing page. The Survey landing page also displays the list of created Surveys.
Clicking the Forms icon from the Apps menu redirects to the landing page of the Forms module. The same page also lists all the created forms.
Clicking the DS Lab icon from the Apps menu redirects to the Project list page of the DS Lab
Clicking the Designer icon from the Apps menu redirects to the landing page of the Designer module.
Clicking the Report icon from the Apps menu redirects to Create a new Report under My Documents.
Clicking the Admin option from the Apps menu redirects to the Admin landing page.
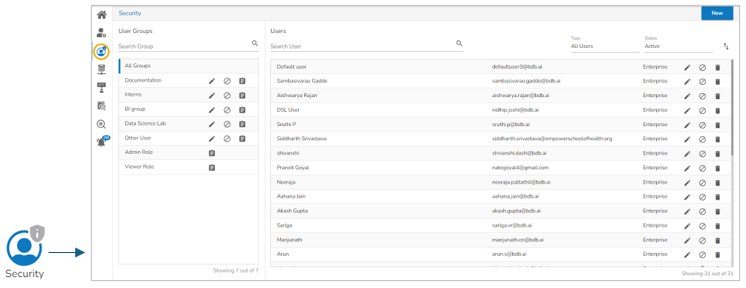
Clicking the Security option from the Apps menu redirects to the Security landing page.
Search Option
This is the Document Search option provided to search through the homepage documents.
The administrator can search for a specific document by typing the document title in the Searchoption.
The user gets a navigation bar/ search option on the platform homepage to search for the desired documents. Click the Searchicon.
Search option for the Platform documents
The search space is displayed for users to insert the document title they want to search in the given space.
Click the Search icon again.
All the available documents with the matching search term get displayed as Search Result. E.g., The following image displays the documents containing the word test in their titles:
Options for a Published Dashboard
Pre-requisites: The user should have permission to access the Designer module and the Dashboard must be published to a user account to get the options context menu for it.
Publishing a Dashboard to the BDB Platform
The user can publish various analytics dashboards to the BDB Platform homepage via the Publish to Portal option provided in the Dashboard Designer plugin.
The user needs to navigate to the dashboard list provided in a workspace.
Access the Publish to Portal icon from the list of Dashboards.
Please Note: The shared Workspaces and Dashboards are mentioned with the letter 's' to indicate that they are shared with the user.
The user gets redirected to the Publish wizard to choose a user or group or exclude the user.
Select the folder location for the published dashboard.
Use a checkmark to choose the desired user/user group (Selecting the Exclude Users option will exclude the user from the permission to access the specific dashboard).
Two consecutive messages confirm that the latest changes have been saved and the selected dashboard has been published.
The user can access the published dashboard from the given location (My Documents is the default location for the published dashboards).
Please Note: The Publish dialog box can also be used to Exclude Users from the permission to access a Dashboard.
Options Assigned to a Published Dashboard
Navigate to the platform homepage.
Select a published dashboard on My Documents or Public Documents.
Right-click the published dashboard to open various credited options in a context menu.
Open in New Tab
The user can open the selected dashboard in a new tab.
Select the Open in New Tab option from the context menu.
The concerned dashboard opens in a new tab.
Properties
The user can access the Properties details of a selected dashboard using this option.
Select a dashboard.
Select the Properties option from the context menu.
The Properties window appears with four options.
Properties: Thebasic dashboard properties are displayed.
Please Note: The dashboard will be shared with the selected user(s).
Share with Group: The dashboard gets shared with the selected group(s).
Select Share with Group in the Properties window.
Search a specific group by using the search bar.
Please Note:
If a dashboard document is shared using this option, the selected users and user groups receive a view-only copy.
Exclude Users: The user gets excluded from the rights to access a dashboard.
Select the Exclude Usersoption on the Properties window.
Search a specific user by using the search bar.
Modifying a Dashboard
This section explains the step-by-step process to modify an existing dashboard.
Select the Modify Document option from the Dashboard context menu.
The Modify Dashboard window opens.
Enter the name of the dashboard.
A confirmation message appears to ensure that the required data is updated.
Adding/Removing a Dashboard (to/from Favorites)
Administrators can add a dashboard to or remove it from the Favoritessection.
Select the Add to Favorites operation from the Dashboard context menu.
A pop-up window appears with a message, “Document added to Favorites”.
The selected dashboard gets added to the Favorites section.
Use right-click on the dashboard to get the remove option.
Click the Remove from Favorite option.
OR
Navigate to the original Dashboard.
Use right-click on the dashboard to get the remove option.
Click the Remove from Favorites option.
Moving a Dashboard
Administrators can move a dashboard from one folder or document space (E.g. My Documents) to another folder or document space.
Select a dashboard.
Select the Move to option from the context menu.
The Move to window appears displaying the available folders.
The dashboard gets moved to the selected space.
Please Note: To view a dashboard, click on the selected dashboard.
Renaming a Dashboard
The Administrator can change the name of an existing dashboard.
Select the Renameoption from the Dashboard context menu.
The Rename window opens.
Enter a new name for the dashboard.
A confirmation message appears to ensure the action.
The selected dashboard gets renamed.
Creating Copy of a Dashboard
Administrators can copy and paste an existing dashboard anywhere within the My Documents or Public Documents folders.
Select a dashboard.
Select the Copy option from the dashboard Context menu.
Select another folder and open the menu with the credited options.
Or
Please navigate to My Documents or Public Documents and right-click anywhere in the blank space.
A context menu with the Paste option appears.
The selected dashboard gets copied with a different name.
Deleting a Dashboard
Administrators can remove a dashboard by following the given steps:
Select a dashboard.
Select the Delete option from the operation context menu.
A new window pops up to confirm the deletion.
Report Burst
This feature helps to notify the selected users or user groups with the open link and PDF report of the selected dashboard.
Select the Report Burst option from the Dashboard options menu.
The Report Burst window opens.
Add the users or user groups.
Provide a subject.
The scheduler turns on. You can switch it off by clicking the Stop Schedule option.
The scheduler gets stopped and the same gets communicated through a confirmation message.
Please Note: You can enable or disable the Report Burst option using the Dashboard Properties.
Insert Comments
The comment option is provided for the published Dashboards to explain or insert feedback for the dashboard.
Open a published Dashboard from the BDB Platform.
Click the Comments icon from the header.
A new window opens below with space to insert a message at the end of the window.
The message gets added to the Comments window.
Please Note:
The Comments feature is enabled for all the users accessing the dashboard document.
Click the Publishoption.
Click the
Browse
option to upload an image.
Click the Copy Link icon to copy the open document link of the published Dashboard.
Click the Save option to save the update.
A notification message appears to ensure the image is successfully updated.
Share with User: The dashboard gets shared with the selected user(s).
Select the Share with User option on the Properties window.
Search a specific user using the search bar.
Select a user or all the users using the checkbox(es).
Click the Save option.
A success message appears stating that the document privilege is updated.
Notification message while using the Share with User option
Select a group or all the groups using the checkbox(es).
Click the Save option.
A success message appears stating that the document privilege is updated.
The dashboard gets shared with the selected group(s).
The selected user also gets notified through mail using the
Share with User
and
Share with Group
options.
Select a user or all/multiple users using the checkbox(es).
Click the Save option.
A success message appears, and the document privilege gets updated to exclude the selected user(s).
Describe the dashboard (optional).
Click the Save option.
Open the Favorites section.
A message appears to notify the removal of the dashboard from the Favorites (the dashboard gets removed from the Favorites).
Select a folder.
Click the Move icon.
The user gets redirected to the next screen where the selected folder appears.
Click the Save option.
A success message appears.
Click the Save option.
The Context menu appears with the Paste option.
Click the Paste option.
The Paste window opens.
Thedashboard name displays the prefix ‘Copy of-’ before the original name of the dashboard (E.g., the Dashboard named Sample Dashboard gets a new name Copy of Sample Dashboard ).
Click the Save option.
Click the Delete button.
A confirmation message appears.
The selected dashboard gets deleted.
Provide a description (optional).
Schedule the report.
Click the Saveoption.
A confirmation message appears.
The open document link is shared with the selected user(s)/ user group(s) on the user's email ID.
Type a comment in the given Message space.
Click the Send icon.
The inserted comments display user initials and a record of time.
Full Screen/ Reduce Size icon is provided to view the form on full screen orreduce the form screen size.
A published dashboard on the My Documents space of the selected user
Properties Wizard for a Published Dashboard
Two ways to access Paste option for a copied Dashboard
Left Menu Panel
This section explains the Left-side Menu panel given on the Platform Homepage.
Document Folders
The various document folders available on the BDB Platform are explained under this section.
Please be informed that the Story module has been renamed as Report. The steps to access the attributed options to a report and apply them remain the same.
Available Documents
The Home page displays the following documents by clicking on the Folder icon:
My Documents
Public Documents
Shared Documents
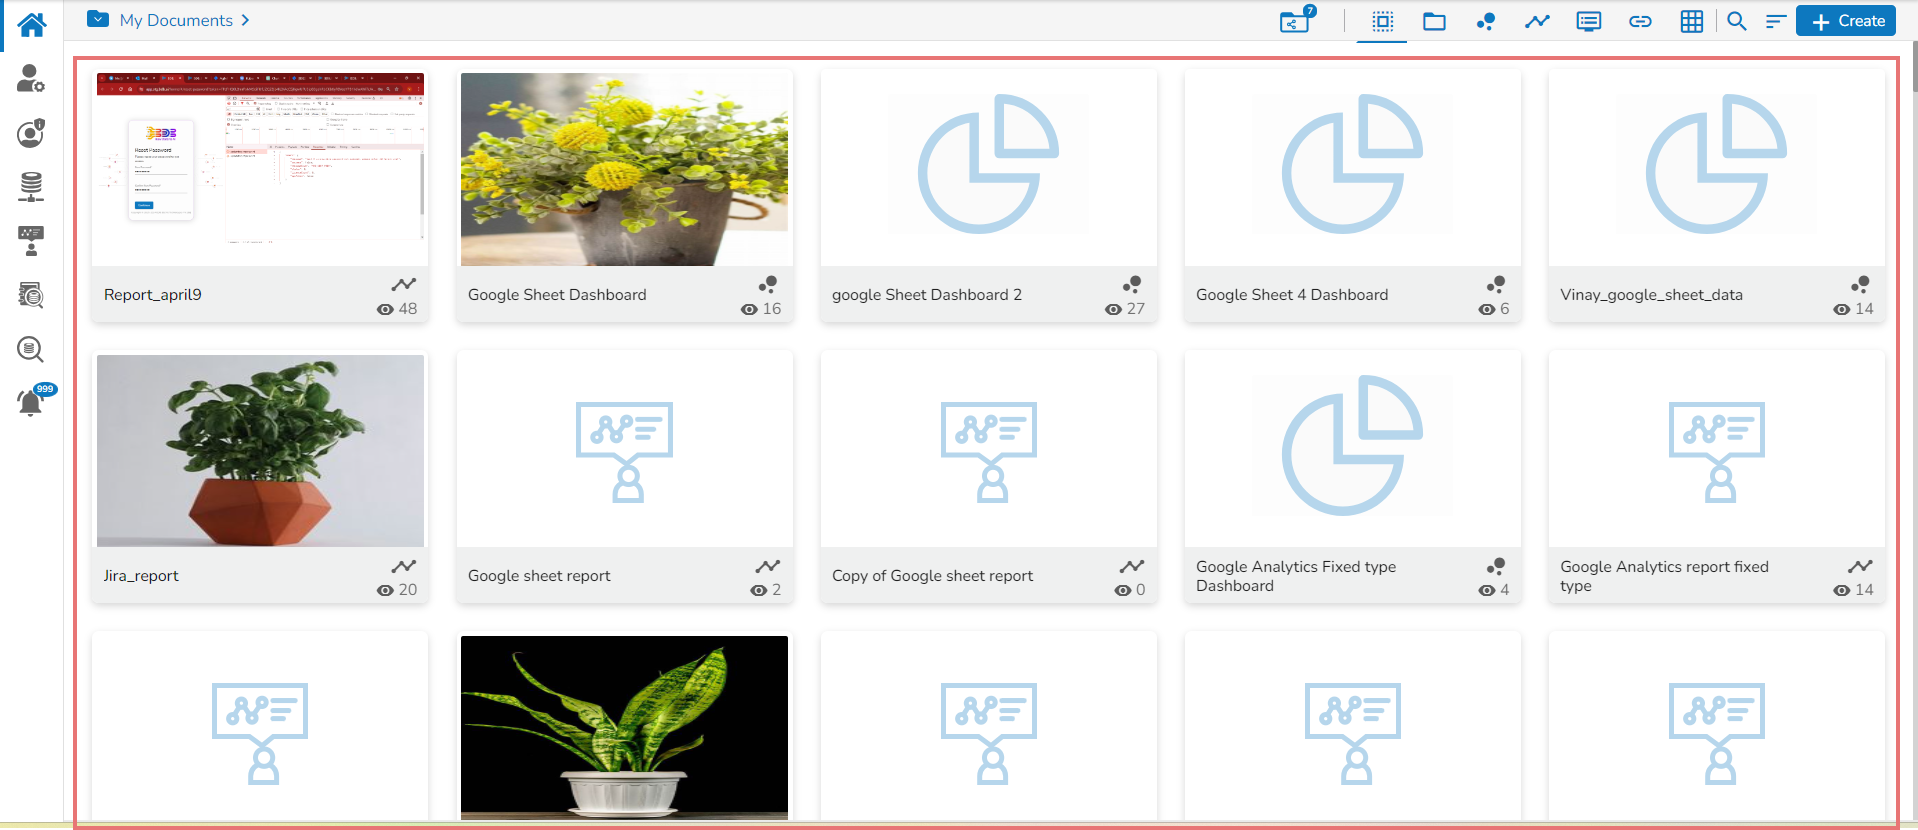
My Documents
My Documentslists all the documents created by the user or assigned to the user.
The documents are displayed in thumbnail format.
The default screen for a Platform user displays the given notification message until they create their first document.
Public Documents
The Public Documents folder is available to all users.
Users can view documents shared by others.
The users also get the Create option to create various documents inside the Public Documents space. Those documents will be available publicly to the other users by default.
Options Provided to Public Documents
The documents and folders shared under the Public Documents space also get some modification options. Mostly the following options are provided to the folders available under the Public Documents folder:
Open in New Tab
Properties
Add to Favorites
The following image displays documents created under the Public Documents folder with the shared documents inside the Public Documents folder to display the difference between the credited options.
The following image displays a list of the attributed options provided for a created folder and shared folder under the Public Documents.
Please Note: The folders and documents shared with the Public Documentsdo not containMove to, Copy, and Delete options. If the logged-in user has created some documents under the Public Documents folder, they will get all the credited document options.
Shared Documents
The documents shared by other users to you can be part of the Shared Documents.
The users receive a view-only copy of the documents shared using the Share With option.
The documents shared via the
Please Note:
The document shared using the Copy To option gets all the permissions to modify it, while the document shared using the Share with option gets no permission to modify it.
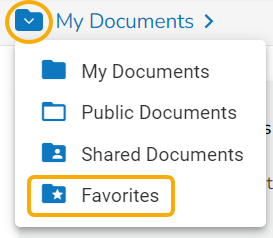
Favorites
The documents marked as a favorite by a user are saved under the Favoritesdocument folder.
The documents in frequent use by the users are a part of the Favoritesdocument folder.
Users can remove a document from Favorites (if desired).
Please Note: The My Documents is a default space to appear while opening the BDB Platform homepage.
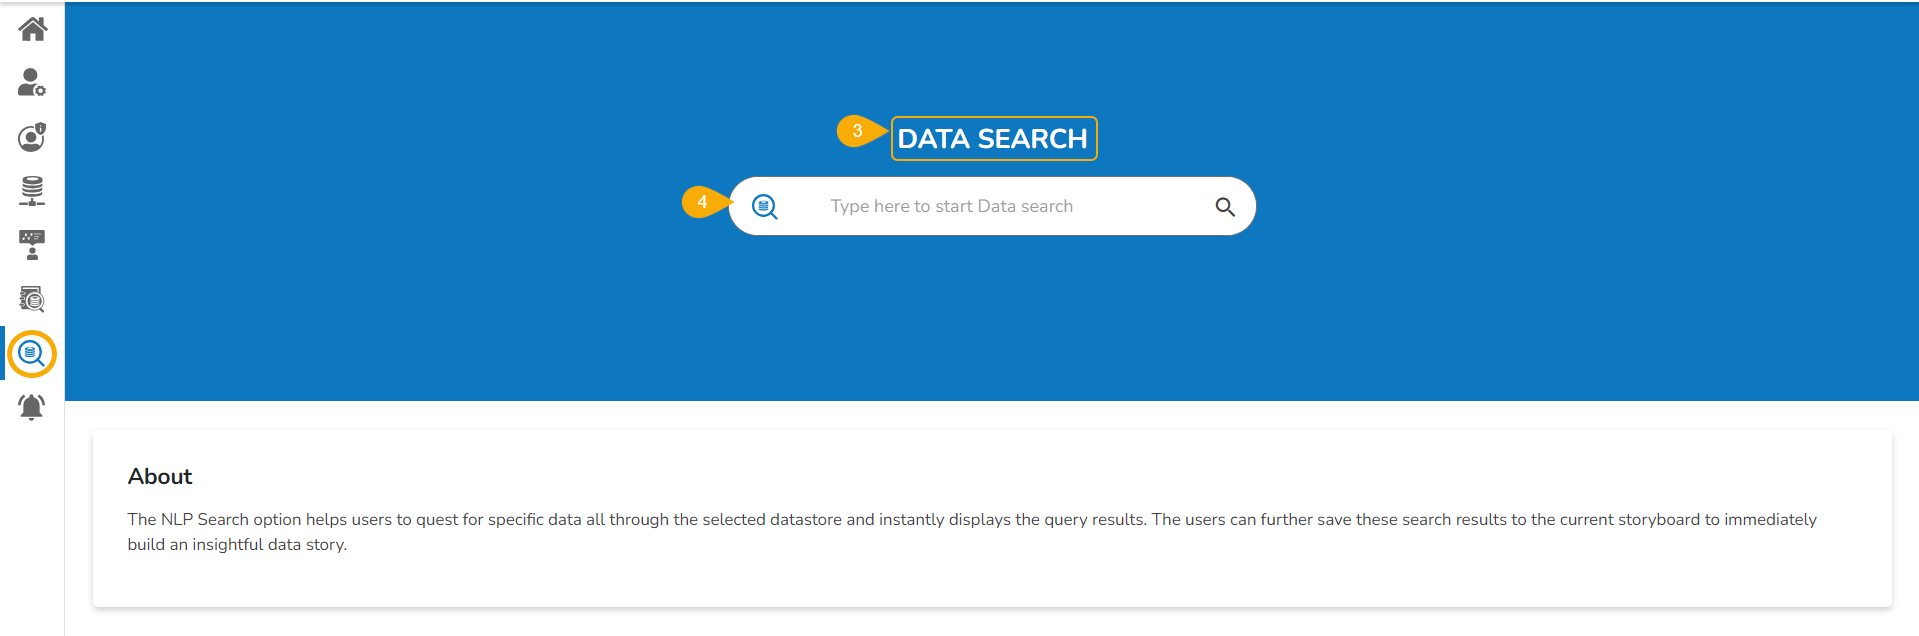
Data Search (Global Search)
Data Search enables the user to create their data stories based on the textual and voice based search option.
The Data Search feature facilitates the user to search specific data queries across the Data Stores using text or voice. The user can drill into any granularity of the data using this interactive Data Search option.
Check out the given illustration to understand the Data Search functionality.
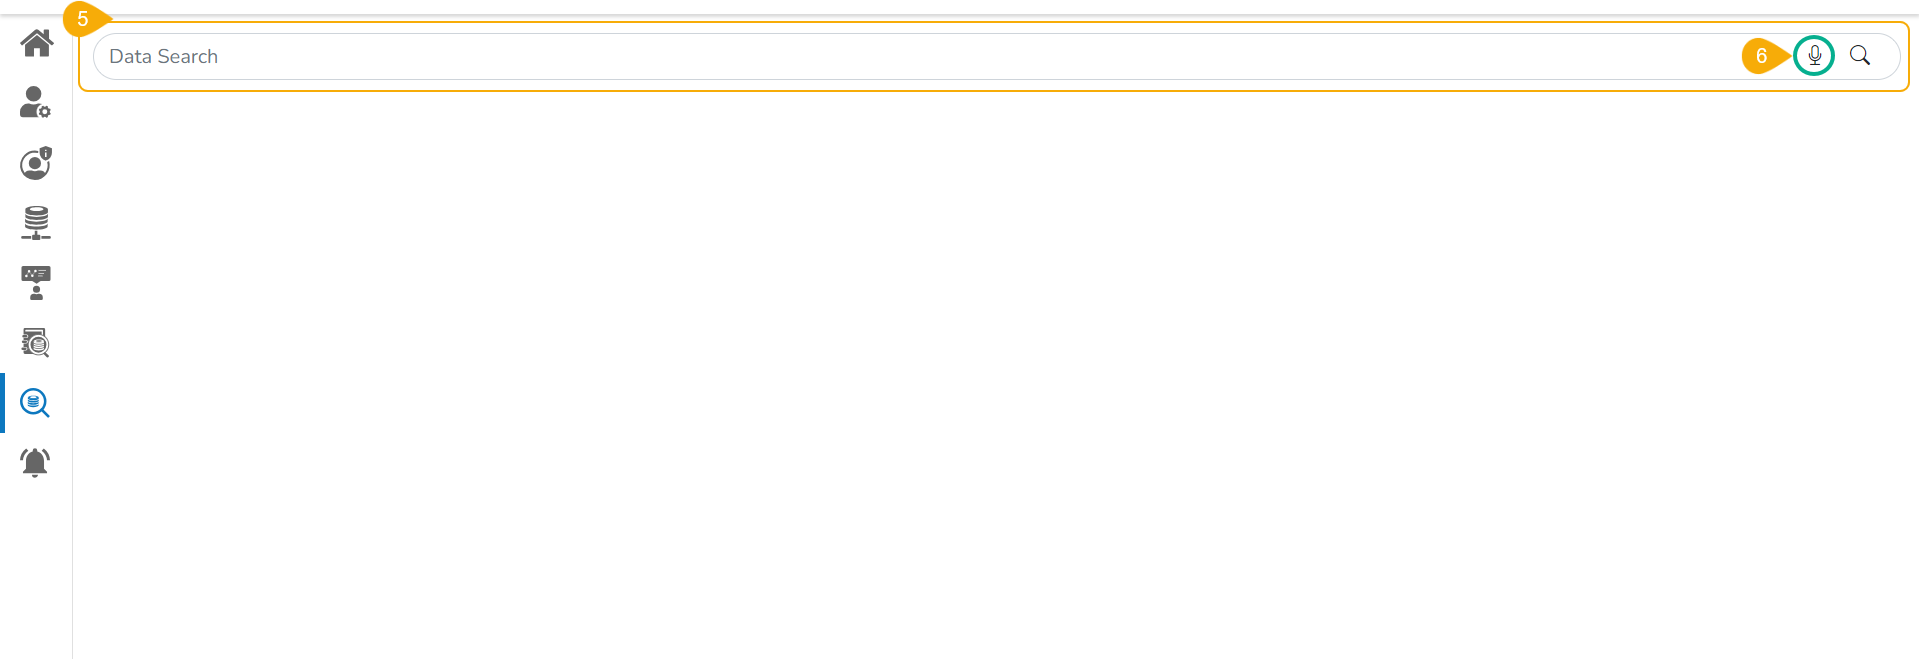
Navigate to the Platform homepage.
Click the Data Search icon provided on the left side panel.
The DATA SEARCH page opens.
The user can use the given space to begin their data search.
The user gets redirected to the following page by clicking the Search space.
Click the microphone icon to use the voice search.
By clicking the microphone the icon turns red and keeps blinking till you enter your voice search.
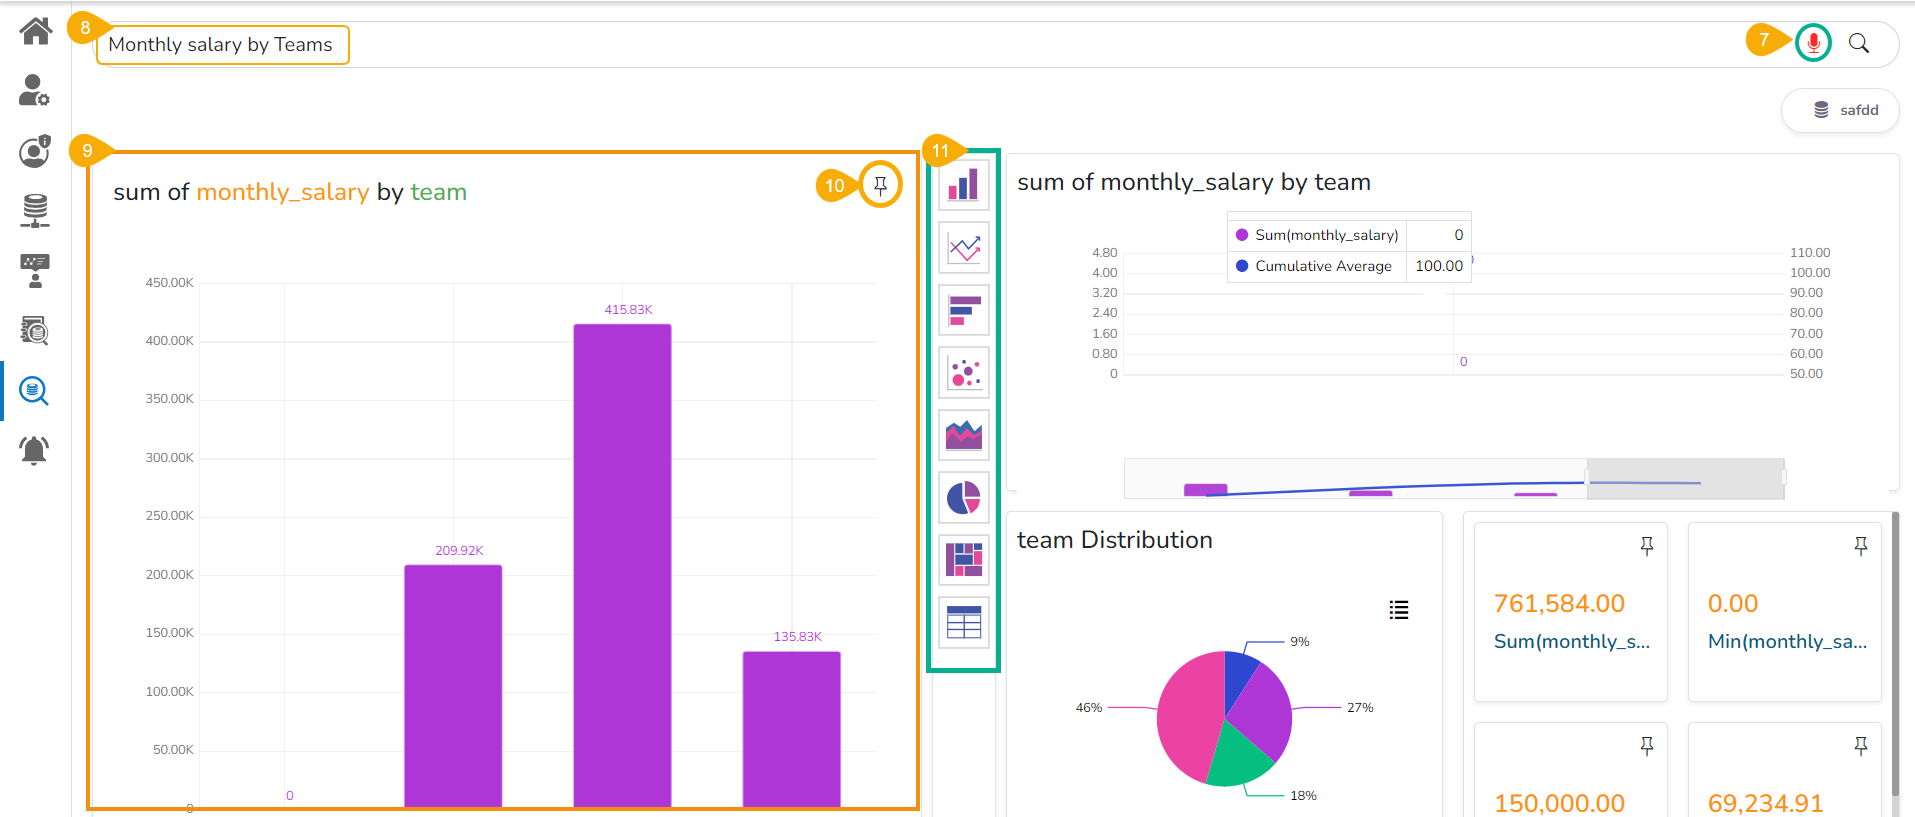
As soon as your search query gets entered either through text or voice.
The searched data query result appears below on the screen. E.g., the given image displays the Sum of the monthly salary.
Please Note: The Data Store from where Global Search gets the data to plot the charts will also be mentioned on the top right side of the Global Search page.
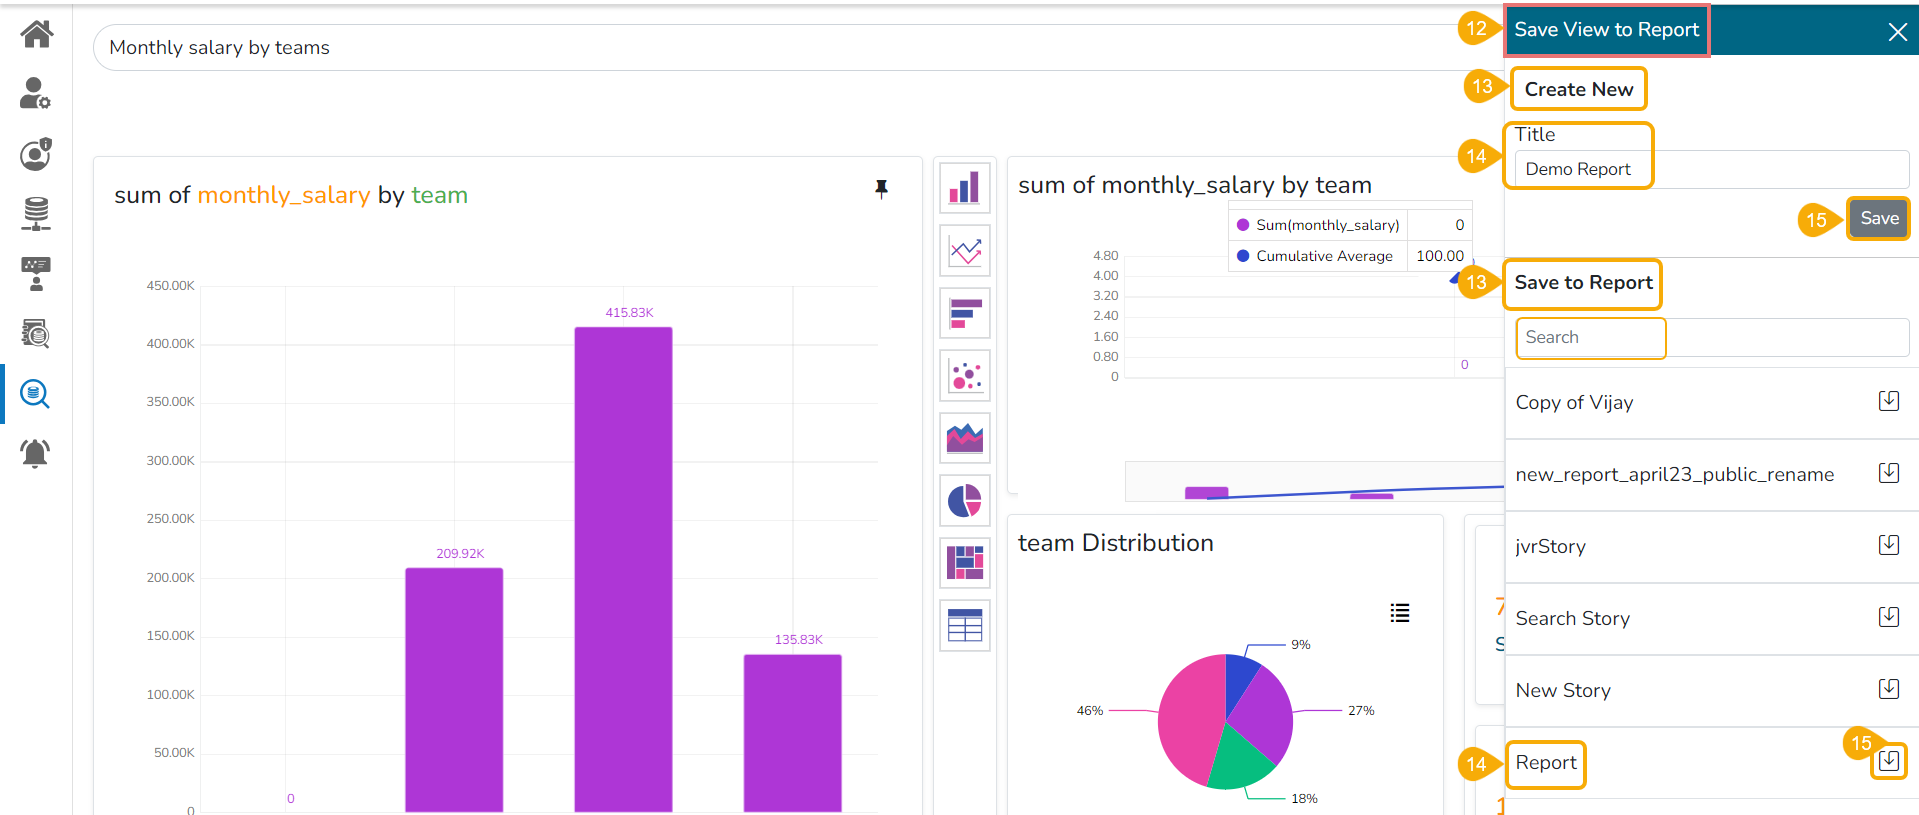
By clicking the Pin icon the Save View to Report drawer opens on the right side of the screen.
Either Create a New Report to save the search result View.
Please Note: Use the Search bar to search for a report from the displayed list.
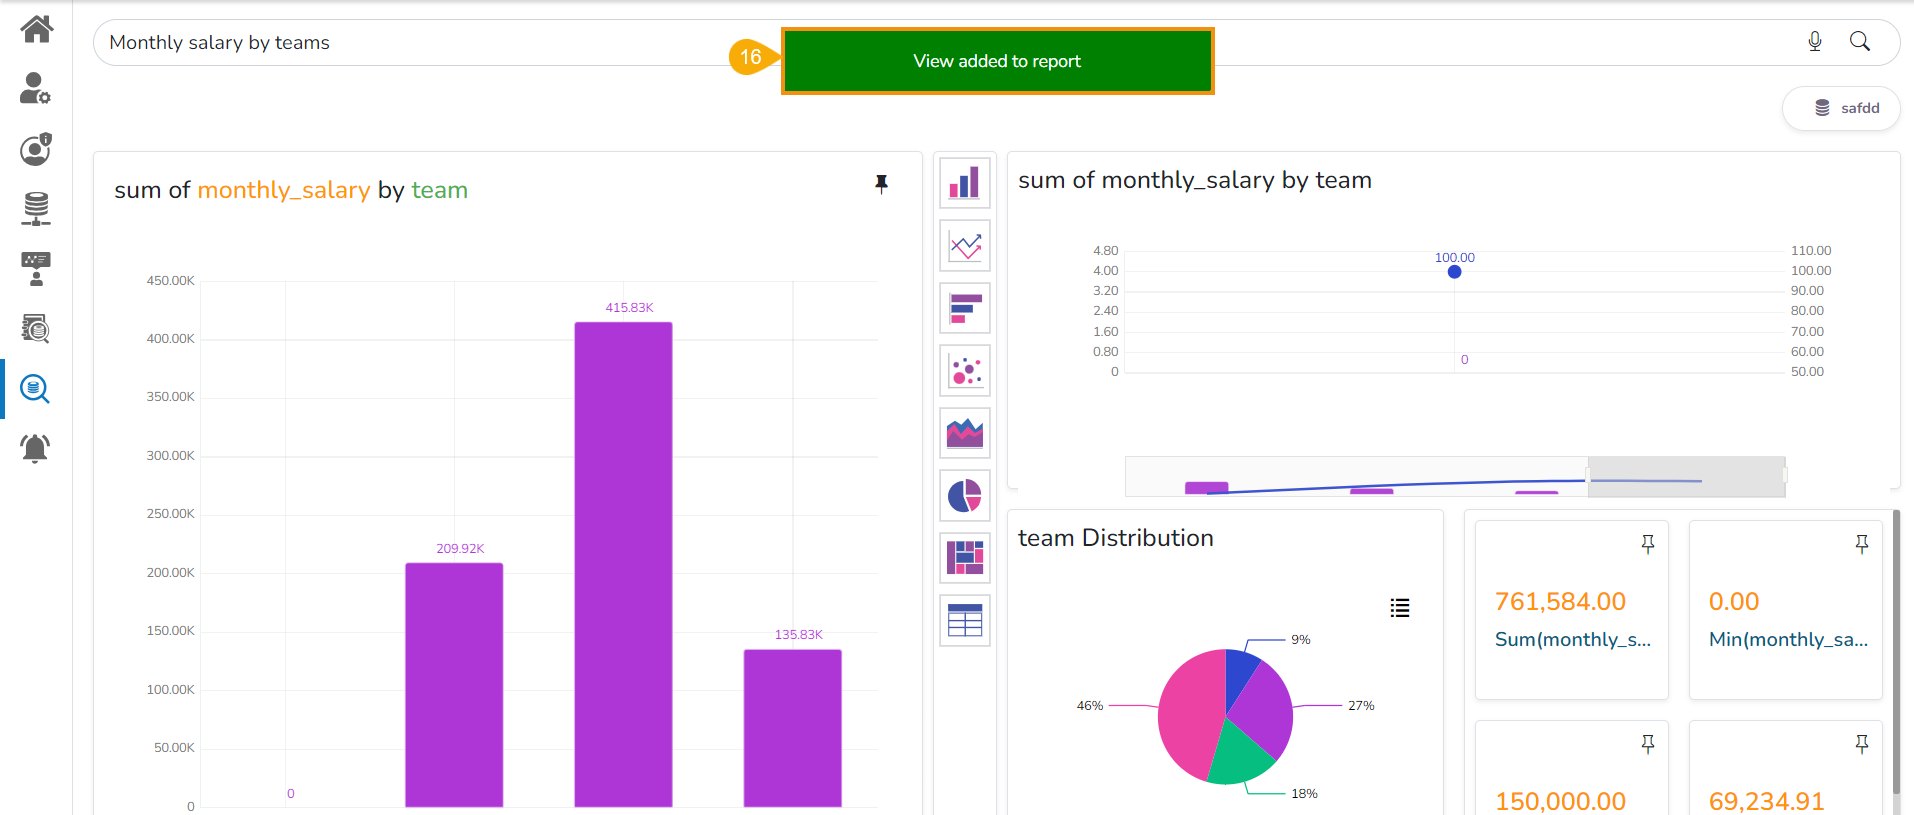
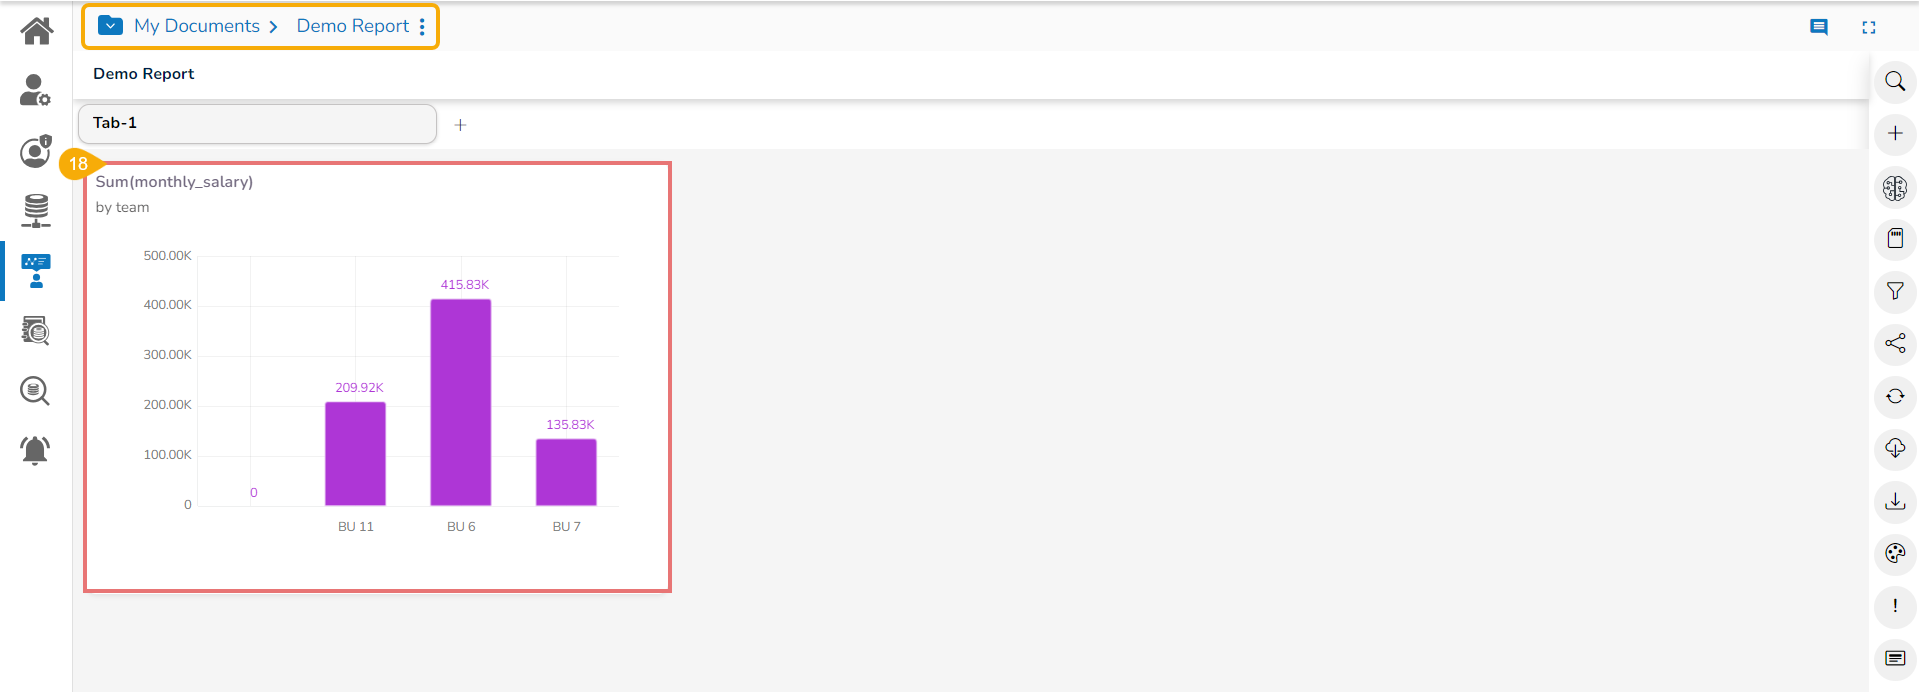
A notification message informs the user that the searched View has been added to the Report.
Navigate to the concerned Reports. The Reports will be available under the My Documents.
The searched View can be seen added to the Report.
Favorites
Create New Folder
Create New Story
Link a URL
Rename
Copy To
option contain all the edit permissions for the users.
For example, the following image displays some shared documents under the Shared Documents.
Documents under the Shared Documents folder
Use the right-click on both documents to get the credited operations.
You can see here that the stories shared using the Copy To option have all the document options to modify.
The stories shared using the Share with option do not display any documentation modification option.
The following notification will appear while accessing the Shared Documents if the Shared Documents folder does not contain any shared document.
The document shared with another user using the Share with option will reflect all the changes in the shared version which the original version of that document goes through.
The documents added to the Favorites don't get any permission to modify them.
The user can open the document added to the Favorites into a new tab.
Documents under the Favorites folder
Documents from the My Documents section
Default Display of the My Documents when no Document is available inside it
Public Documents
Displaying Different Credited options for a Created or Shared Document
Displaying Different Credited options for a Created or Shared Folder
The user can pin the displayed result.
The user can visualize the same data using other charting options provided in the chart menu.
Provide a Title for a new Report.
Click the Save option.
Or select an existing Report to save the search result View.
Select an existing Report from the list.
Click the Save to Report icon.
Sorting Documents
This functionality helps the users to sort the documents in ascending or descending order either based on alphabets or dates. The custom sorting is also available for the platform documents.
This feature allows users to sort documents by selecting a specific order on the platform homepage.
The following options are provided to display the available documents on the platform homepage:
Alphabetical/ Name (Ascending and Descending)
Date (Ascending and Descending)
Custom
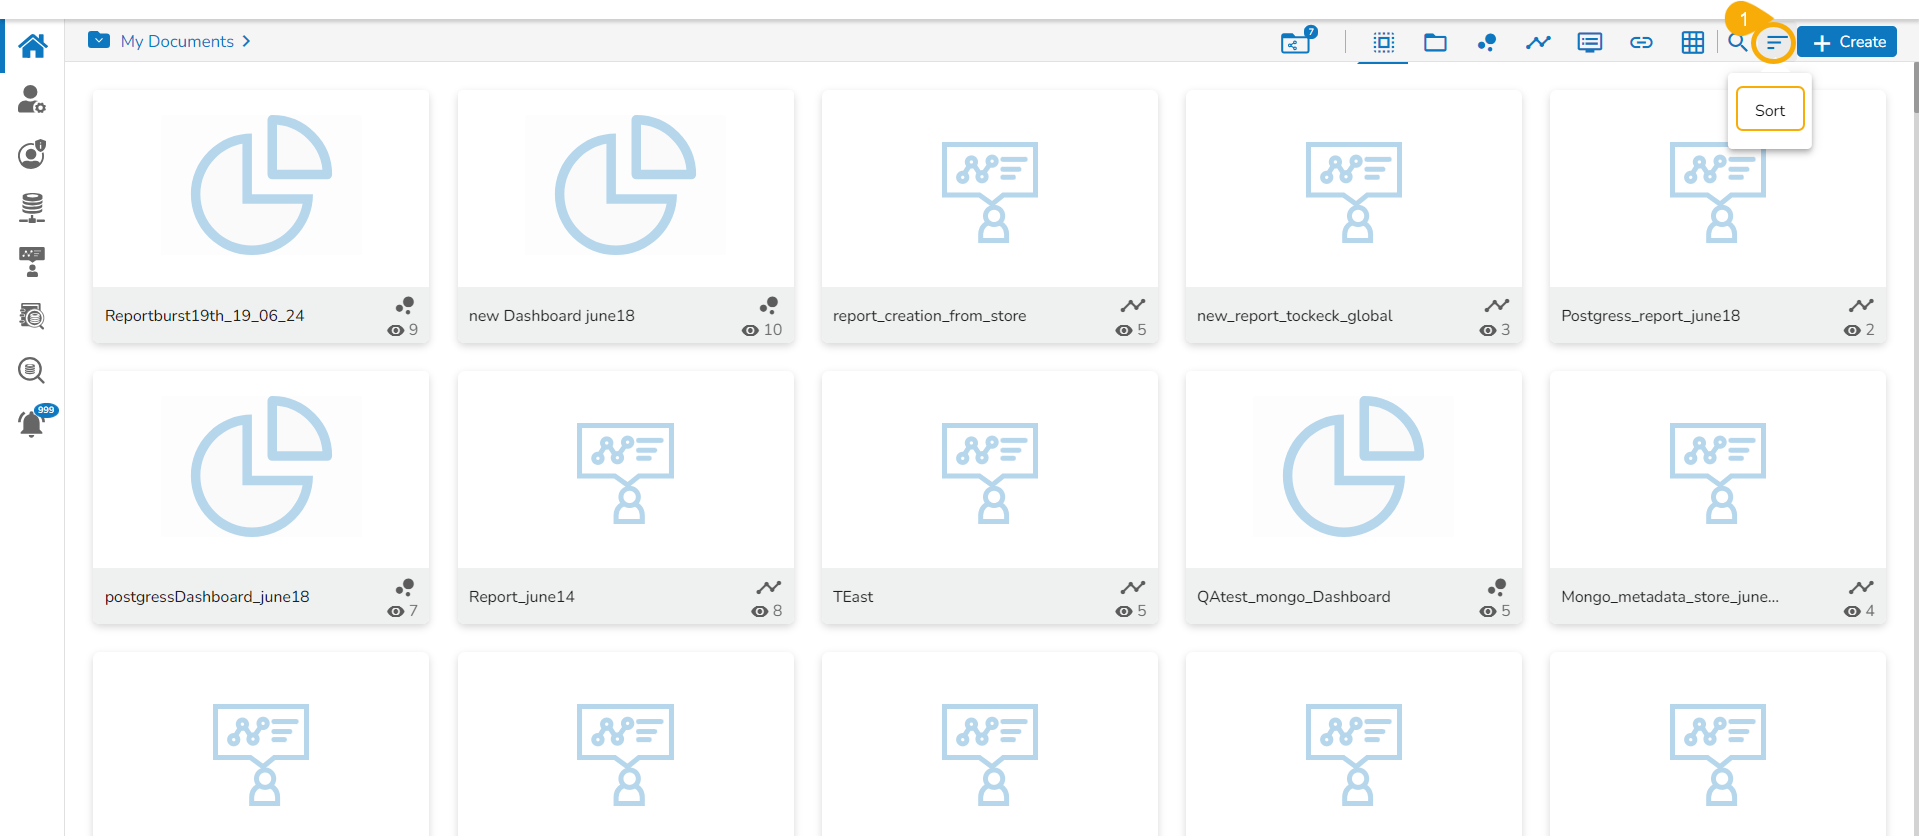
Click the Sort icon on the platform homepage.
Accessing Sort option for the Platform Documents
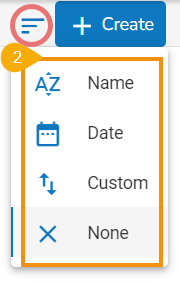
A context menu opens with the following sorting options:
Various available Sorting options on the Platform Homepage.
You can sort documents by their names in ascending or descending order (Ascending is the default order).
You can sort documents by date using this option (Ascending is the default order).
You can manually drag and change the order of documents.
You can remove the impact of the applied Sort by option by selecting the None option.
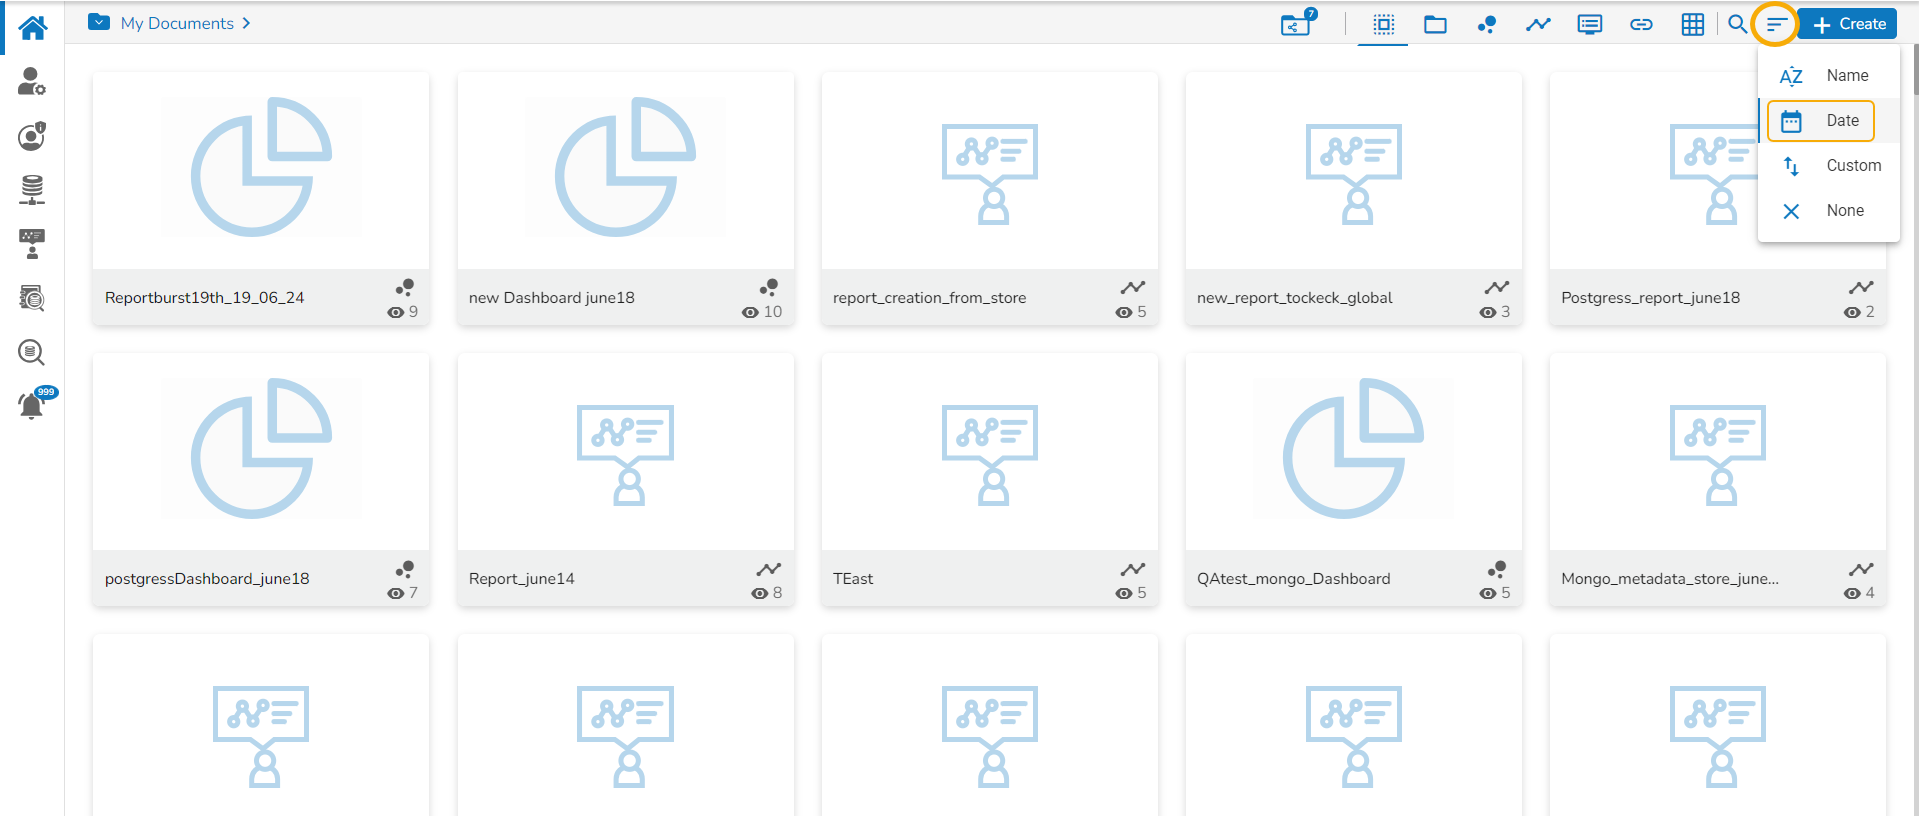
Select an option from the context menu. E.g., The Date option is selected in the following image:
The platform documents get sorted as per the selected order. E.g., The following image shows documents sorted by date.
Documents sorted by Dates
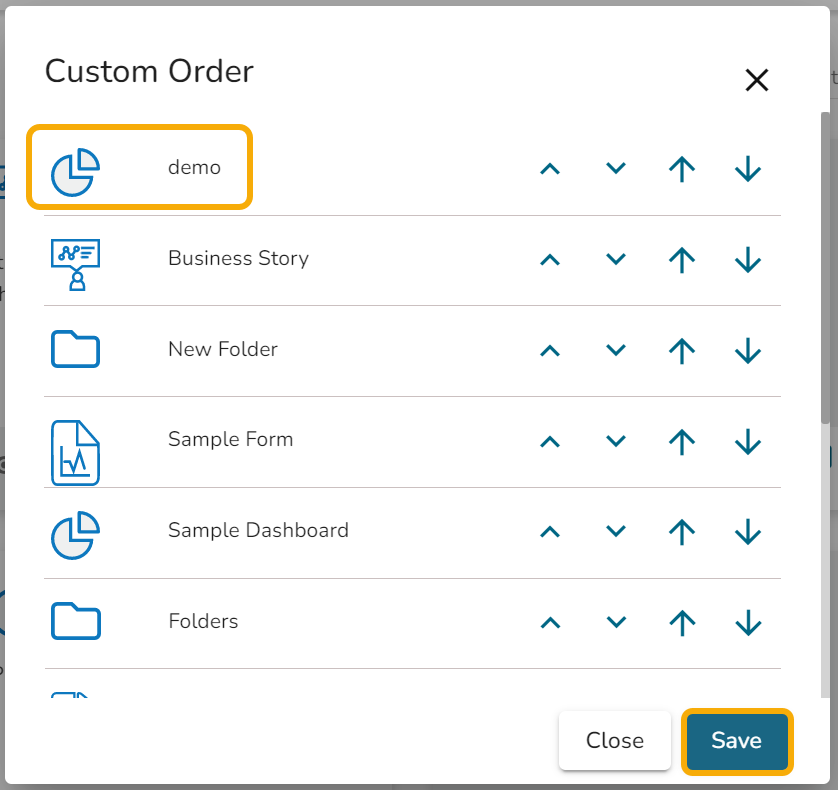
The user can set a customized order for the documents by choosing the Custom Order option.
Choose the Custom option.
The Custom Order window opens.
Set a customized order for displaying the available documents or folders using the arrows or move-up and move-down icons.
The records will get shuffled as per the selected order. The chosen order in the given image is moved to the top, therefore the selected document is added to the top position in the list.
Click the Save option to save your selected order of display.
Please Note:
The platform homepage displays the saved documents as My Documents by default.
A Search Bar has been provided on the Platform homepage to search the specific folders and files.
Documents can be sorted in ascending order by default; users need to click on the Name option again to sort the documents in descending order.
The Sort functionality is available for My Documents, Shared Documents, Public Documents, and Favorites document folders.
Documents under the Shared Documents
Shared Documents Default Display
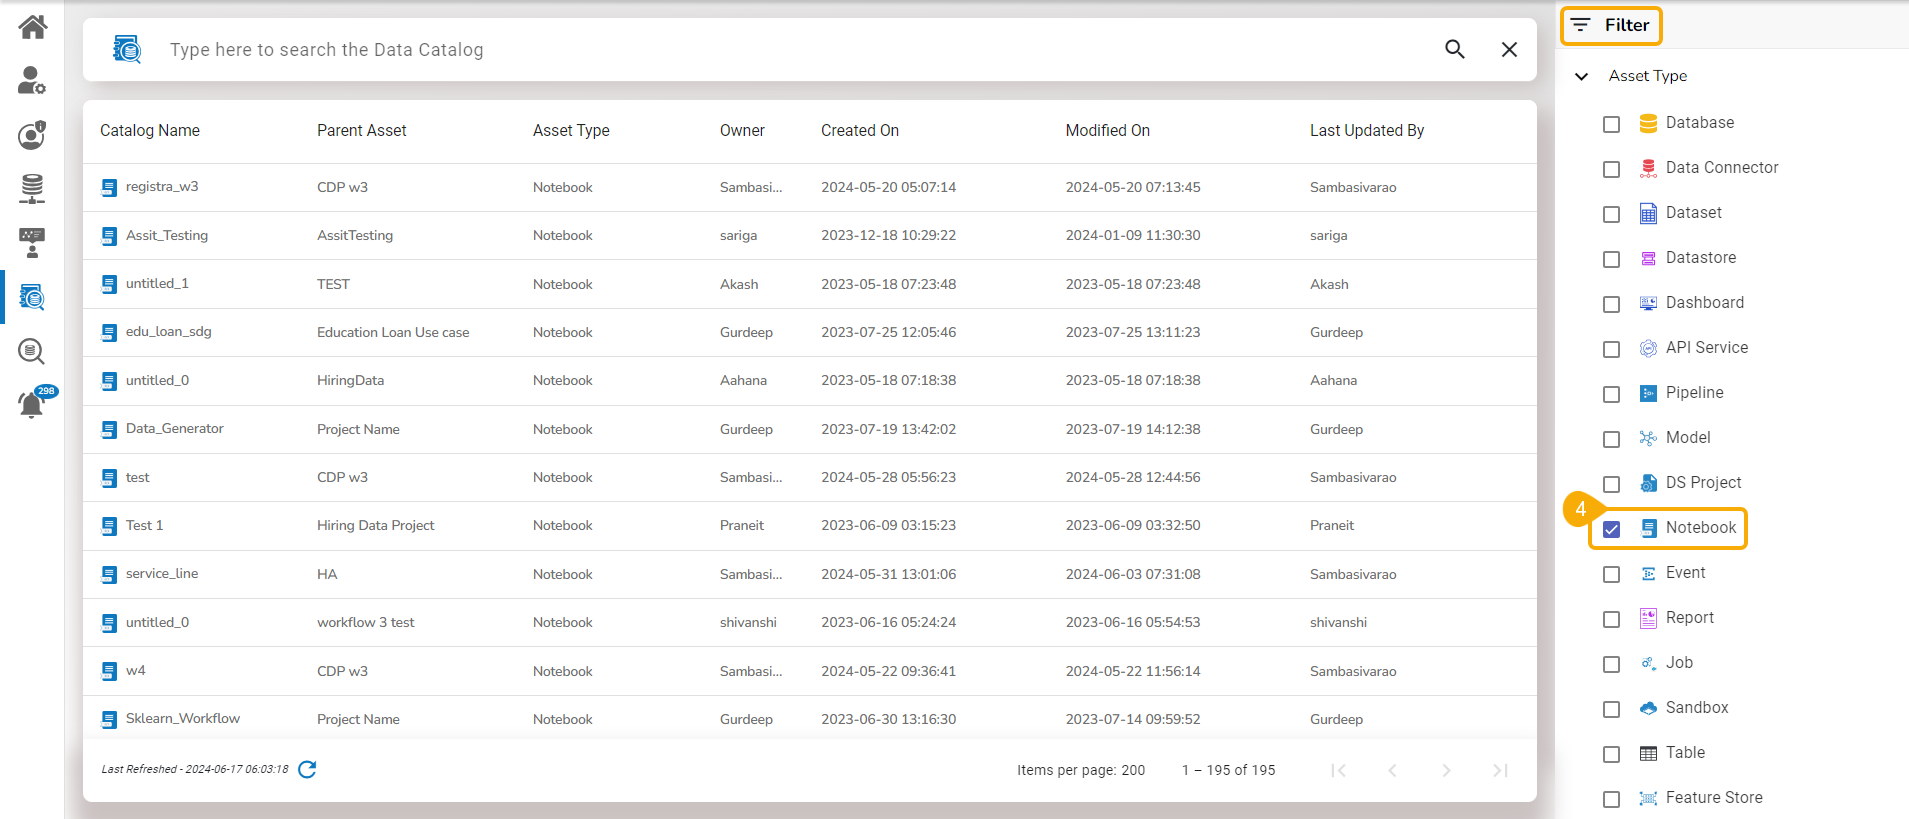
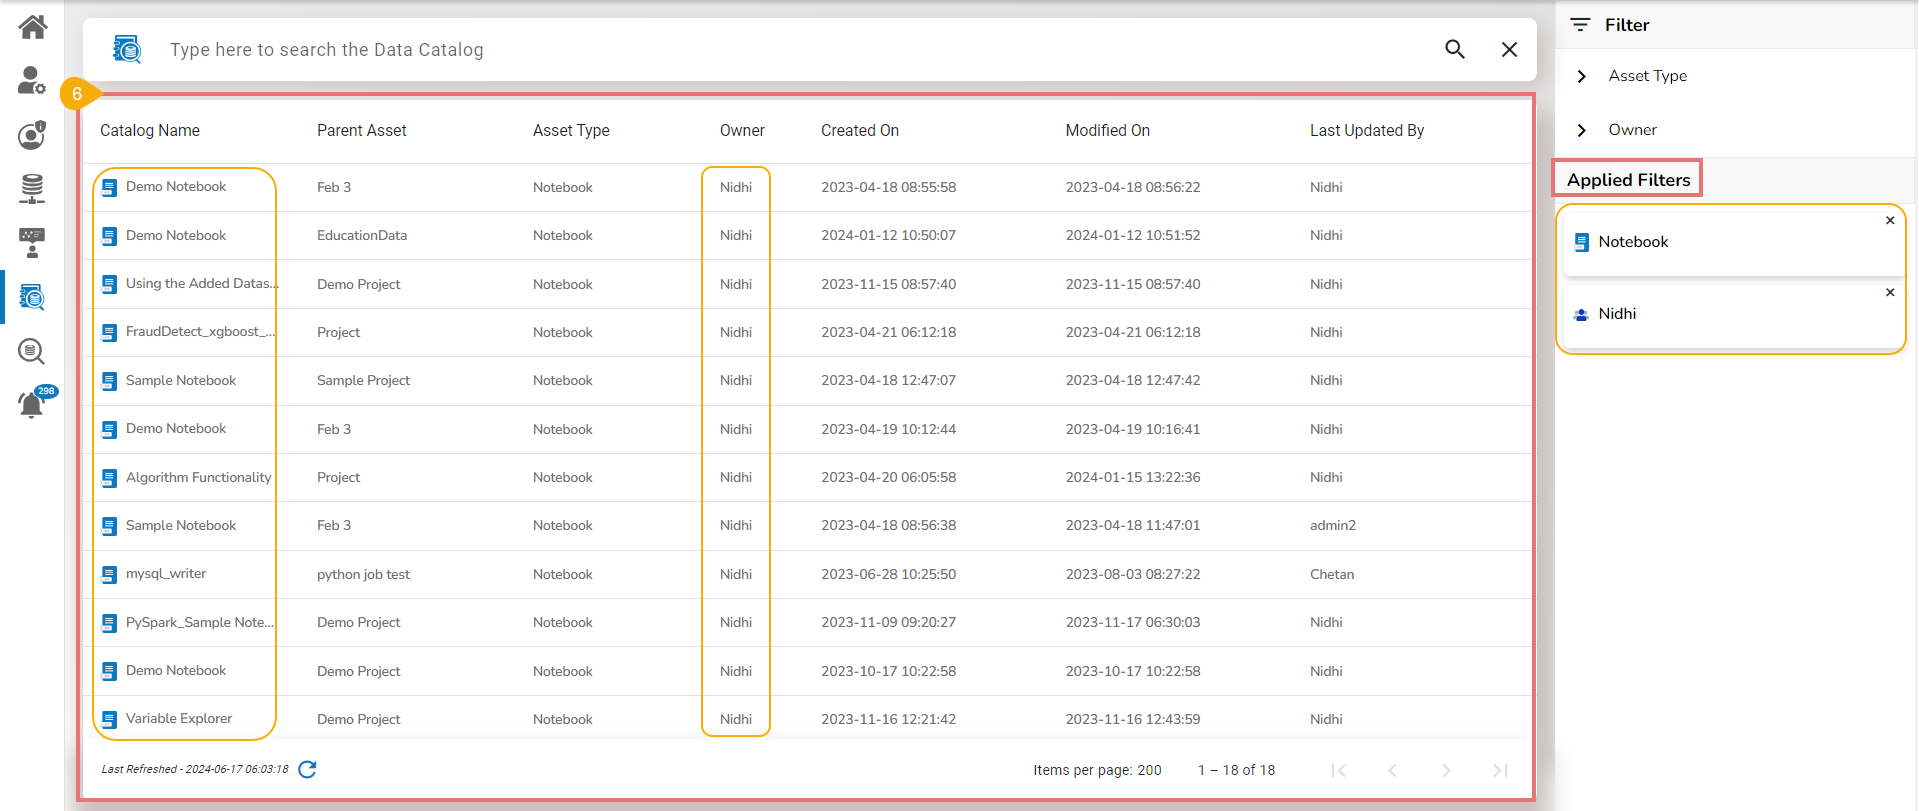
Filter Panel
This section explains how to filter the documents using the filter panel provided on the platform homepage.
The Filter functionality helps to filter the available platform documents by the selected category.
Navigate to the platform Homepage.
The List All option is the default filter option for the platform documents.
As a result, all the available documents stored under the My Documents folder get listed (by default).
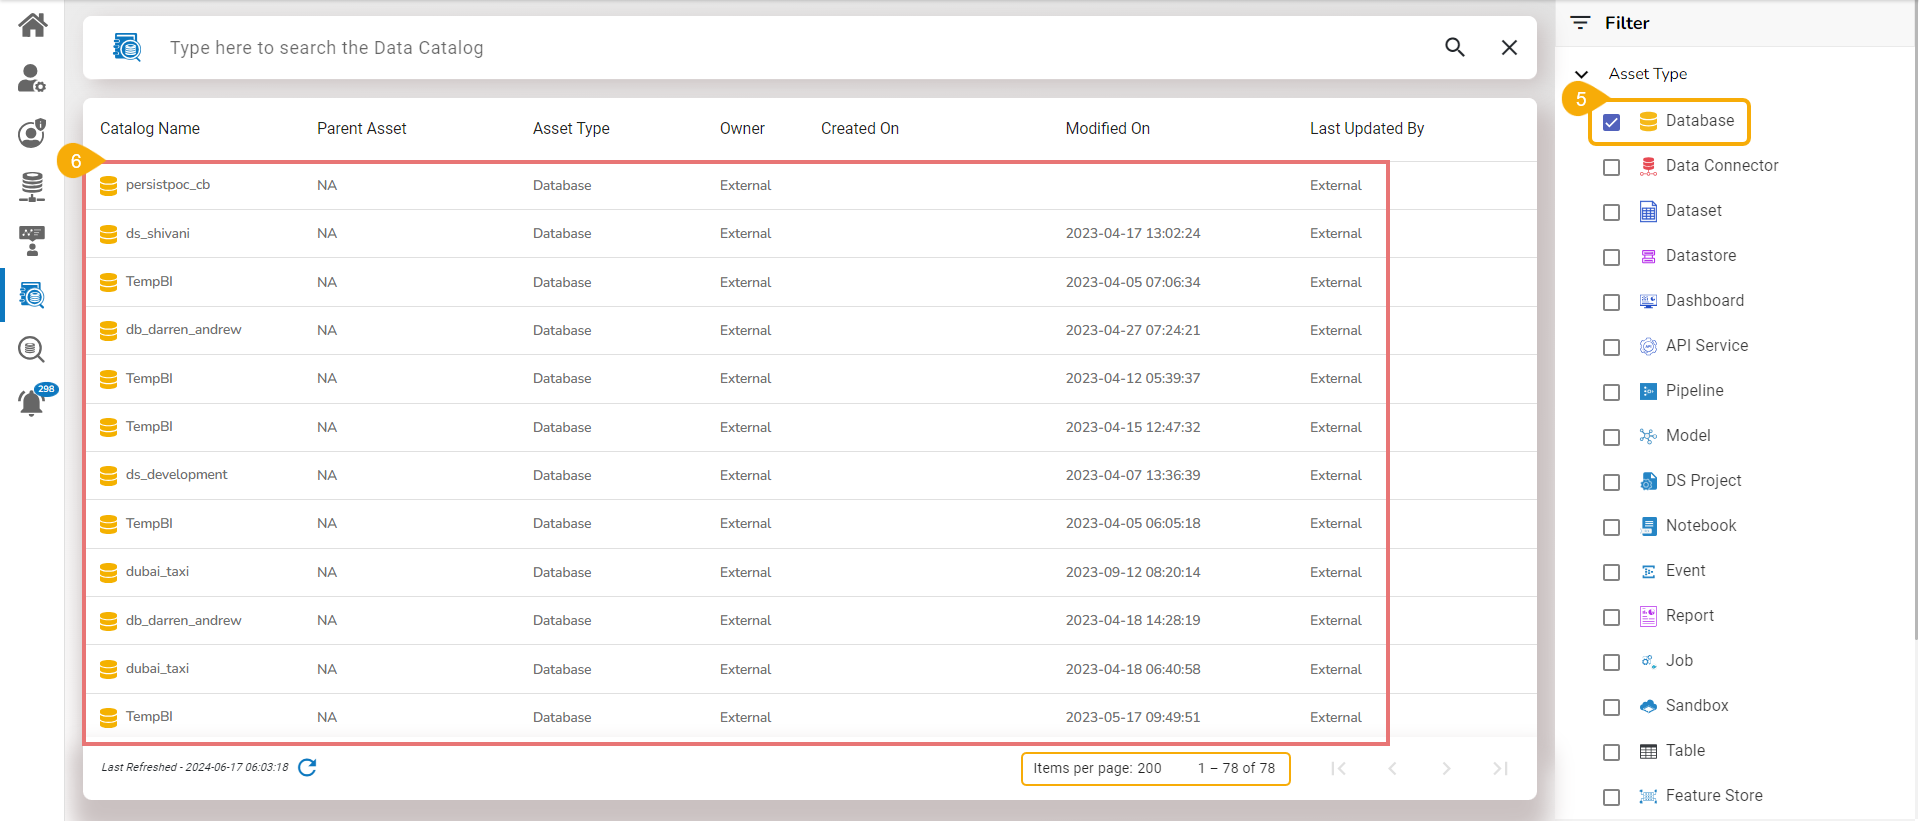
Select a Document Category. E.g., the Report category has been selected in the given image.
The homepage displays only the documents/ folders based on the selected category. For example, the following image shows only available Reports since the Report option is selected as a filtering category.
Please Note:
The Homepage displays the available documents under the My Documents folder as it is the default documents folder of the Platform.
The Document Filter option filters folders and files from Public Documents, Favorites, and Shared Documents folders.
Sign Out
This section mentions steps to Sign off from the BDB Platform.
Click the User Profile icon on the Platform homepage.
Click the Sign-Out option.
The user successfully signs off from the BDB Platform.
Please Note: Clicking theSign Out optionredirects the user back to thepageof the BDB platform.
Options for a Published Form
Pre-requisites: Configuring the option from the Admin module is required before accessing the Forms module for Form creation.
Publishing a Form
The users can publish the forms they created by them to the BDB Platform. The published forms can be accessed on the BDB Platform homepage under the My Documents section.
Click the Publish icon from the header panel of the selected Form.
Or
Click the Publish option using the Form Options menu.
A pop-up window opens to confirm the action.
Click the Yesoption to publish the form.
A success message appears to confirm the action of the publish.
The published form appears under My Documents place of the same Platform account.
A Published Form
Options Assigned to a Published Form
Each published Form is credited with some operations on the BDB Platform. Use right-click to access the available Form operations in a context menu.
Open in New Tab
Select the Open in New Taboption using the Context menu.
The form opens in the new tab.
Properties
Select the Properties option from the context menu.
The Properties window appears with four options:
Properties
Properties: Displays basic details about the Form creation.
Click the Browse option to upload an image.
Click the Save option to save the update.
A message appears to assure about the update.
The image gets updated to the Form.
Share with User
The Formwill be shared with the selected User using the Share with User option.
Select the Share with User option using the Properties window.
Search for the specific user(s) using the Search bar.
Select a user or multiple users using the checkbox(es).
Click the Save option.
A success message appears stating that the document privilege has been updated.
The Form will be shared with the selected user(s) and added to the Shared Documents folder.
Share with Group
The Form gets shared with the selected User Group by selecting the Share with Group option.
Select the Share with Group option using the Properties window.
Search for the specific user group(s) using the Search bar.
Select one or multiple user groups using the checkbox(es).
Click the Saveoption.
A success message appears stating that the document privilege has been updated.
The Form gets shared with the selected user group(s).
Please Note: A notification mail is sent to the users on their registered mail IDs to whom the concerned Form has been shared either using the Share with User option or the Share with Group option.
Exclude the User
The Selected User gets excluded from therights to access the Form
Select theExclude User option using the Properties window.
Search for the specific user(s) using the search bar.
Select a user or multiple users using the checkbox(es).
Click the Save option.
A success message appears, and the document privilege gets updated to exclude the selected users.
The Form permission will be excluded for the selected user/users.
Modifying a Form
The user can modify the Form name and description using the Modify Document option.
Select the Modify Document option using the context menu.
The Modify Forms window opens for the selected form.
Modify the required information:
Name of the Form
Description of the Form
Click the Save option.
The selected information gets modified, and a message appears to ensure the same.
Adding a Form to Favorites
Select the Add to Favorite option from the context menu.
A message appears to ensure the success of the action.
Open the Favorites section.
The selected form will be added to the Favorites.
Open the context menu option for the same form to get the Remove from Favorites option.
OR
Use the right-click on the form that has been added to the Favorites.
Click the Remove from Favorites option that appears.
The form gets removed from the Favorites, and a notification message ensures the same.
Moving a Form
Administrators can move a Form from one folder or document space (E.g. My Documents) to another folder or document space.
Select a form.
Select the Move to option from the operation context menu.
The Move To window appears displaying the available folders.
Select a folder.
Click the Moveicon.
The users get redirected to the next screen showing the selected folder name at the top.
Click the Save option.
A notification message appears.
The form gets moved to the selected space.
Please Note:To view a form, click on the selected form.
Renaming a Form
Select the Rename option from the context menu.
A new window opens prompting to rename the form.
Provide a New Name for the selected form.
Click the Save option.
A notification message appears and the selected form gets renamed.
Creating a Copy of a Form
Select the Copy option from the context menu.
Use the right-click on another folder or on the blank space to get the Paste option.
Click the Paste option.
The Paste window displays the selected form name with the 'Copy of-' prefix. E.g., A form named Sample Form gets a new name, Copy of Sample Form as shown in the following image:
Click the Save option.
The form gets copied to the selected space with the new name.
Deleting a Form
Select the Delete option from the context menu.
The Delete window opens to confirm the action.
Click the Delete option to delete the selected form.
The selected form gets deleted.
Please Note: Published Forms do not support the Report Burst functionality.
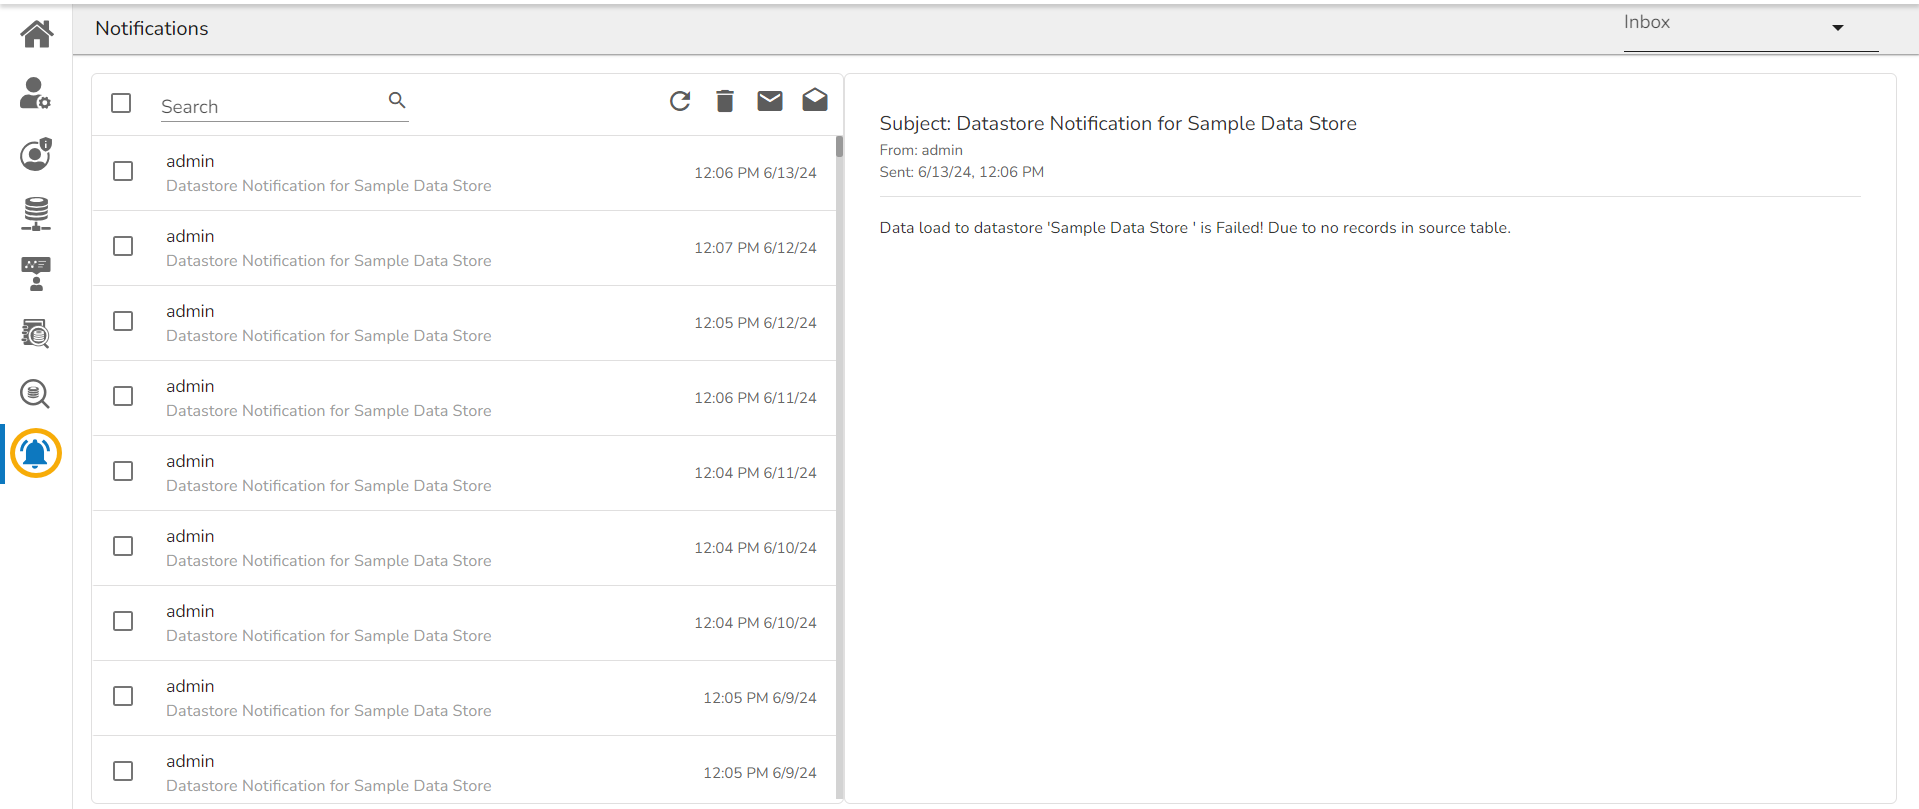
The Notification feature is a way to send and receive messages from processes to people (the platform user). By default, it has Inbox and Trash folders. The data store refresh and copy of a story document get communicated through this feature.
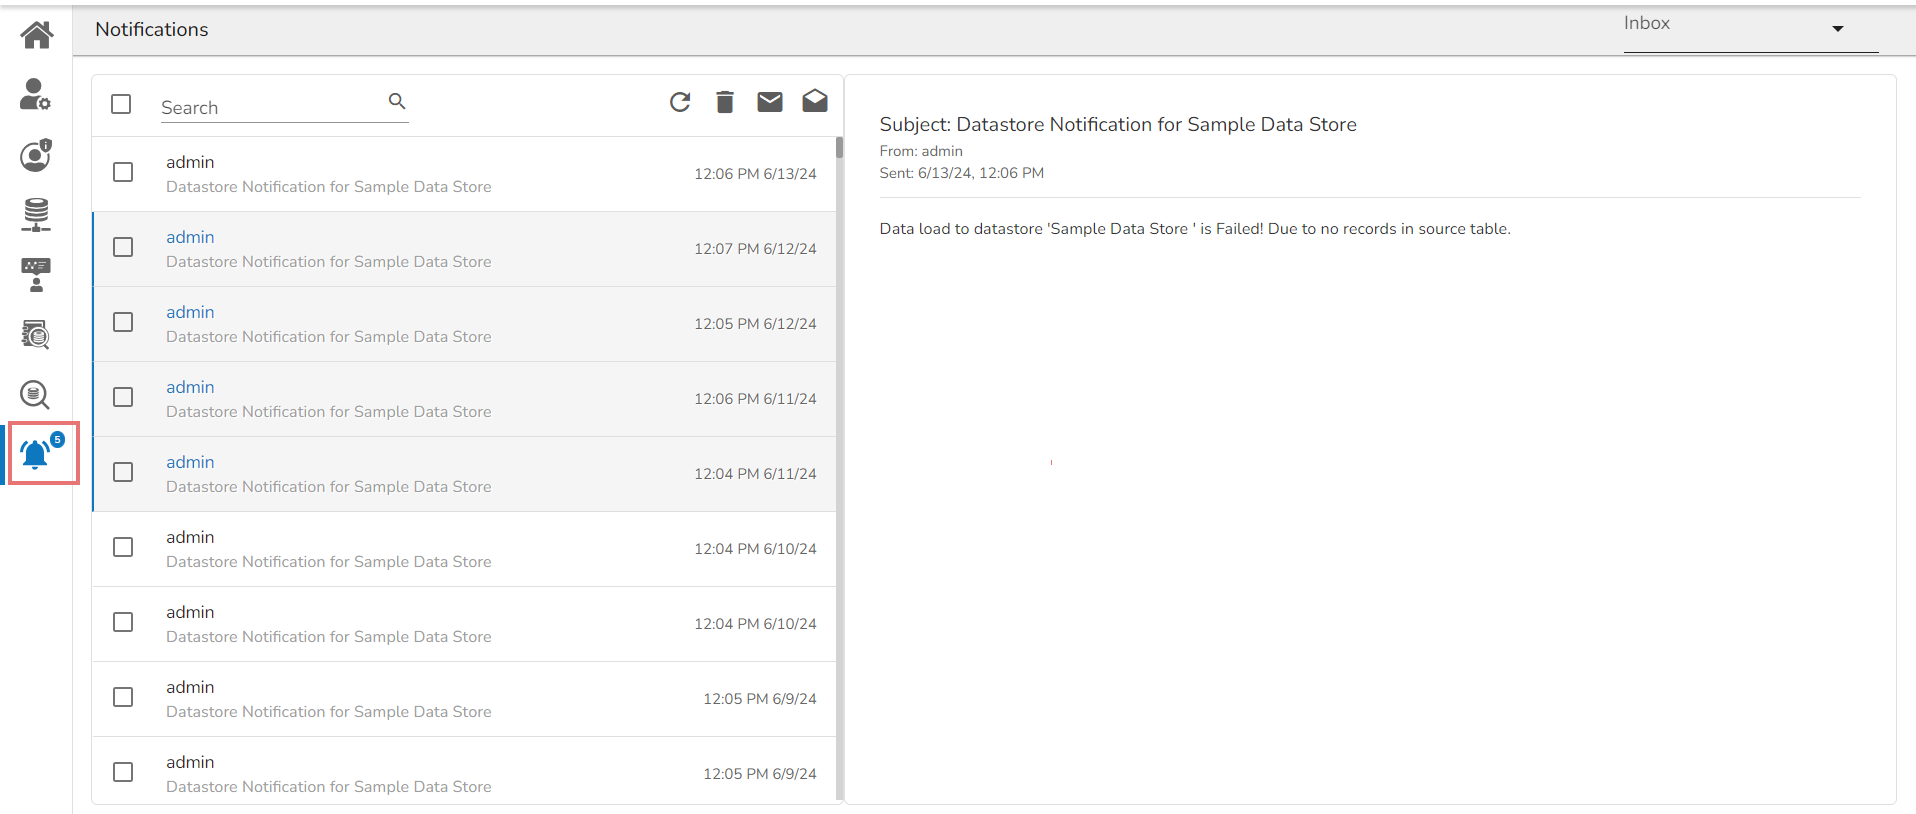
Notification Inbox
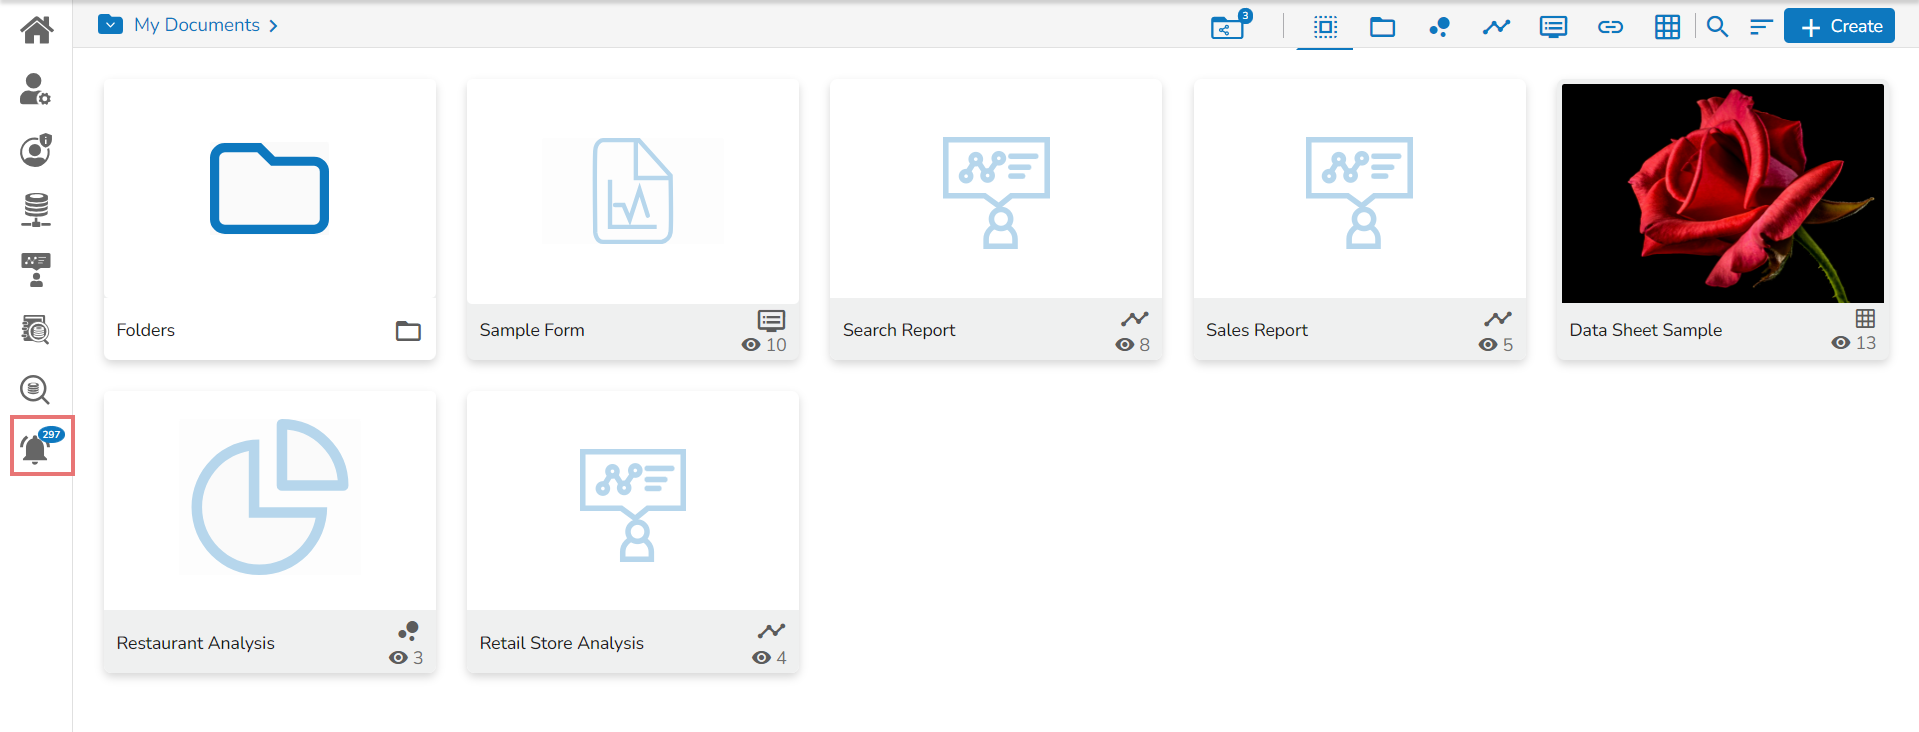
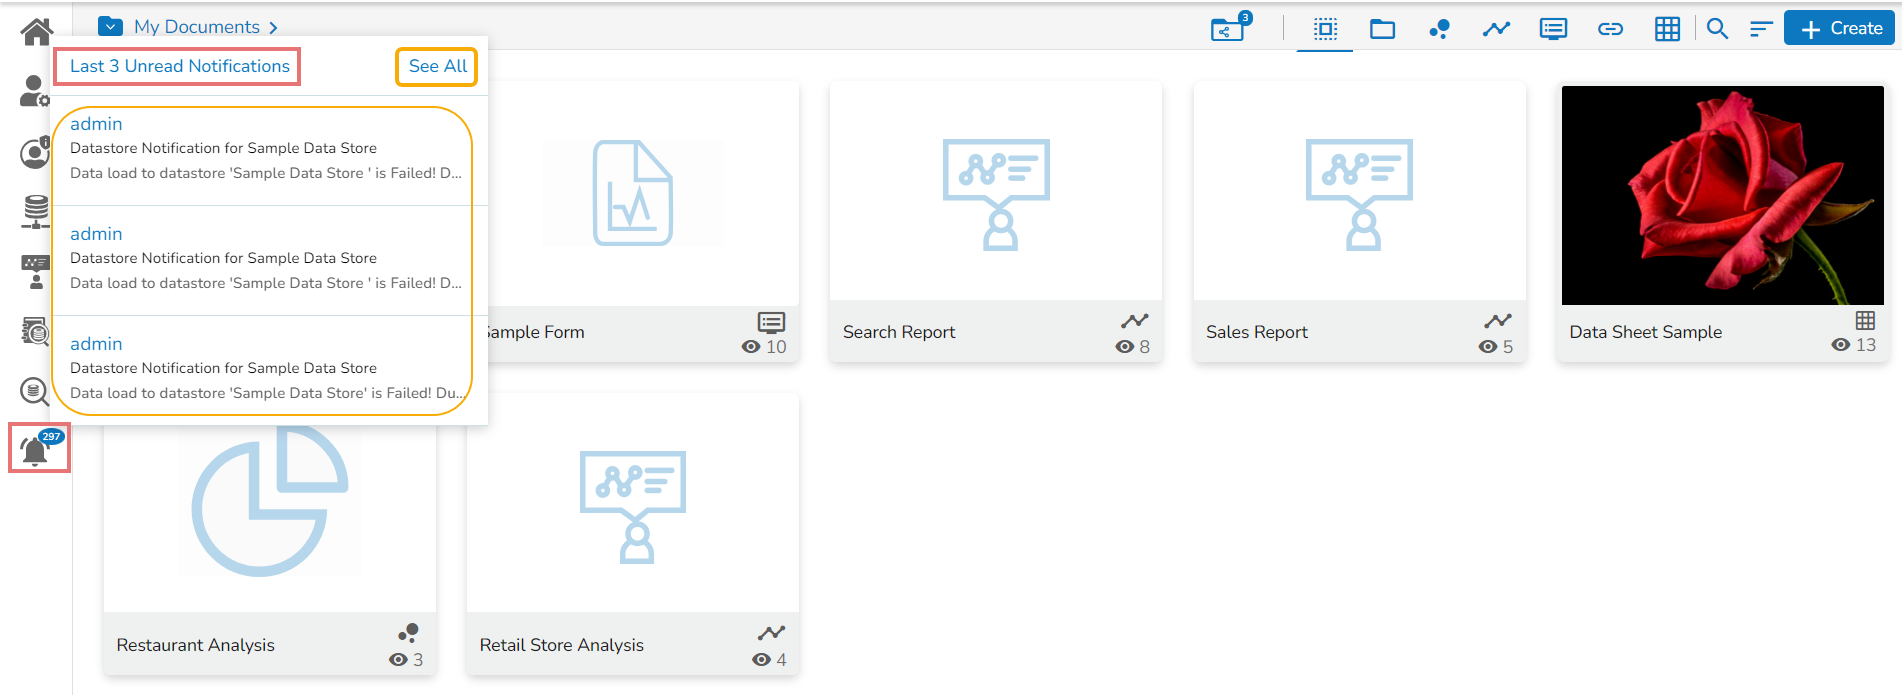
Click the Notification option using the Platform homepage header (the Notification icon appears with the count of unread notifications).
A window opens with the latest 3 notifications.
Click the See All option.
The notification Inbox page opens displaying the latest notification in detail (by default).
Please Note: Unread Notifications are indicated through numbers on the Notification icon.
Icons provided on the inbox window:
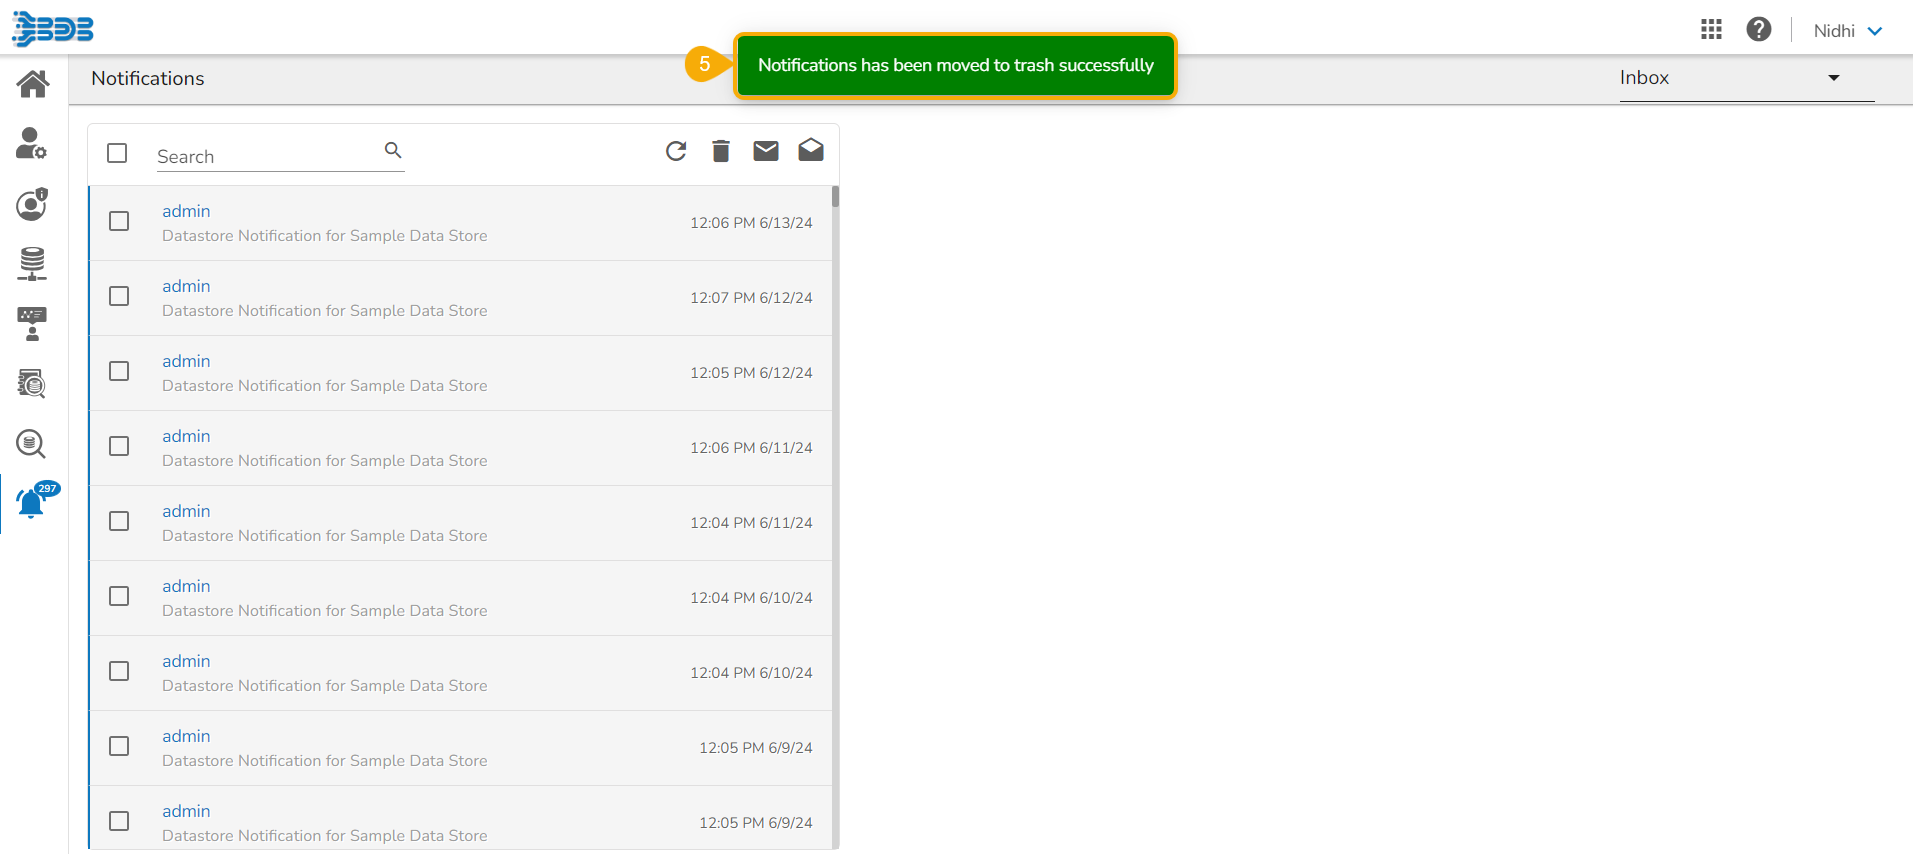
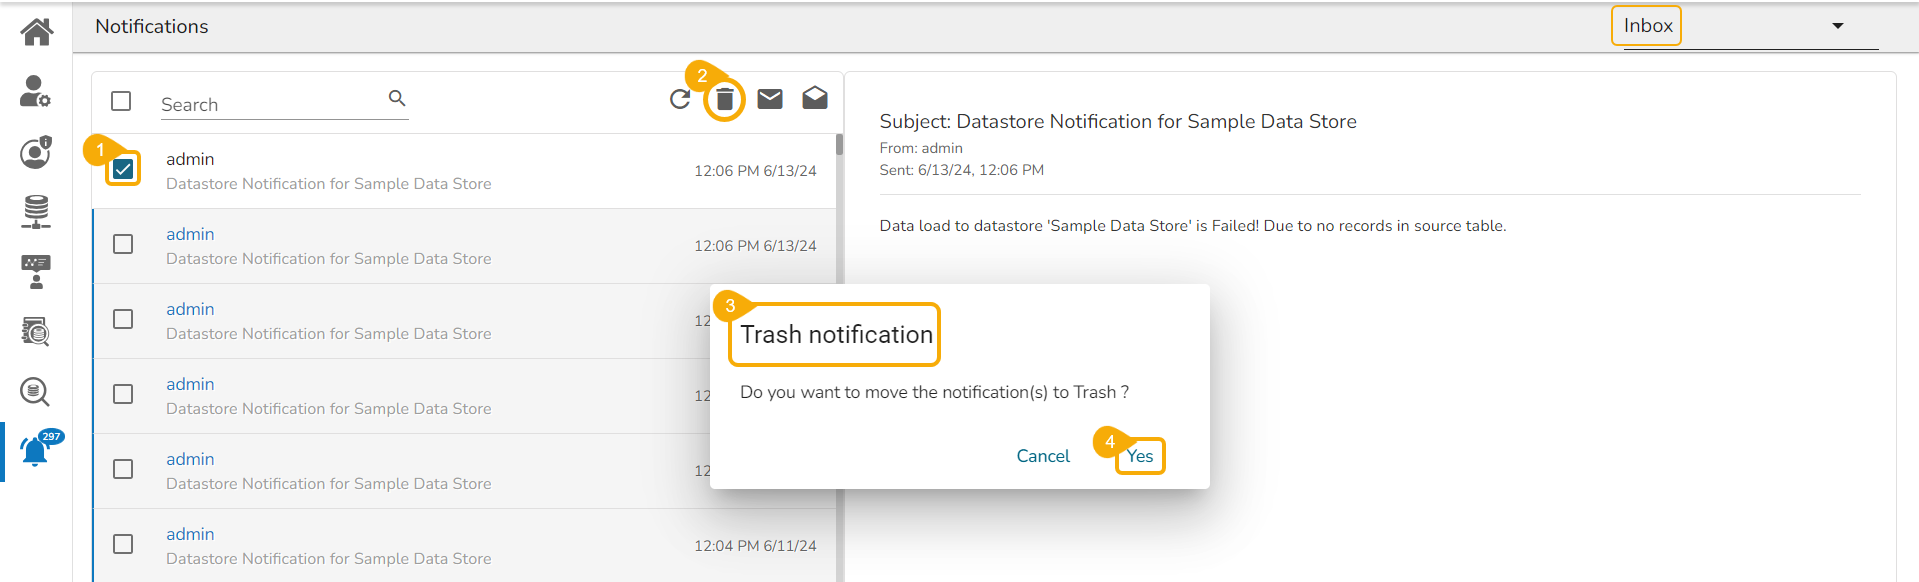
Moving a Notification message into Trash Folder
Select a notification using the checkbox.
Click the Delete icon from the header panel of the notification inbox.
A dialog box appears to confirm from the user's end to move the selected notification to Trash.
A message ensures that the selected notification(s) has been moved to the Trash folder.
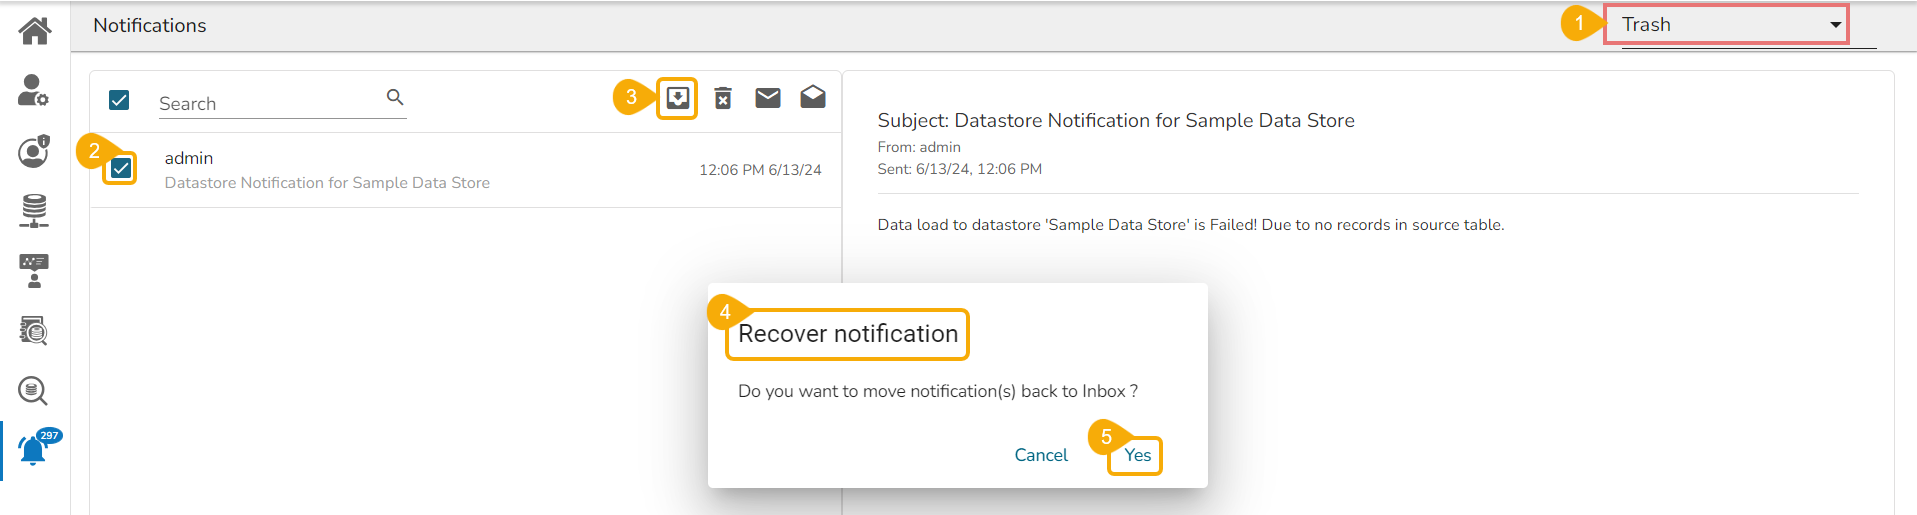
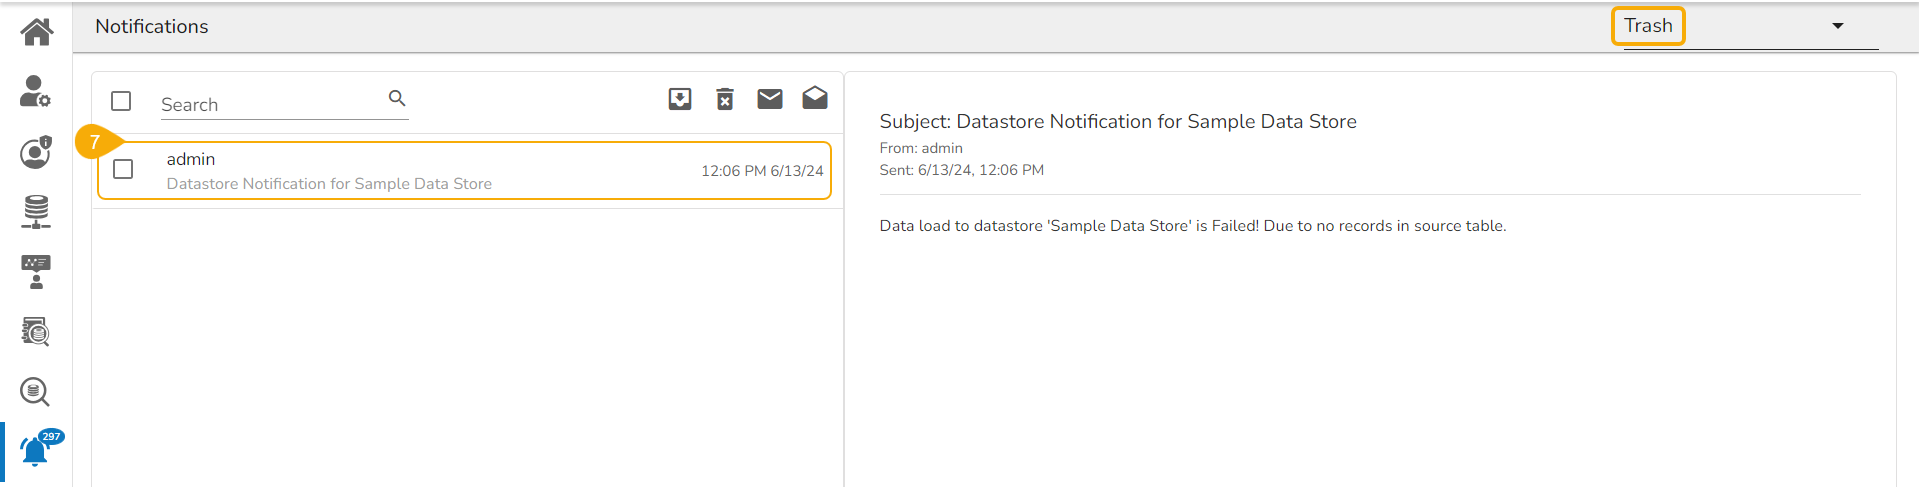
Select the Trash option from the drop-down and click on it.
The notifications under the Trash folder get displayed (by default the latest notification opens in details).
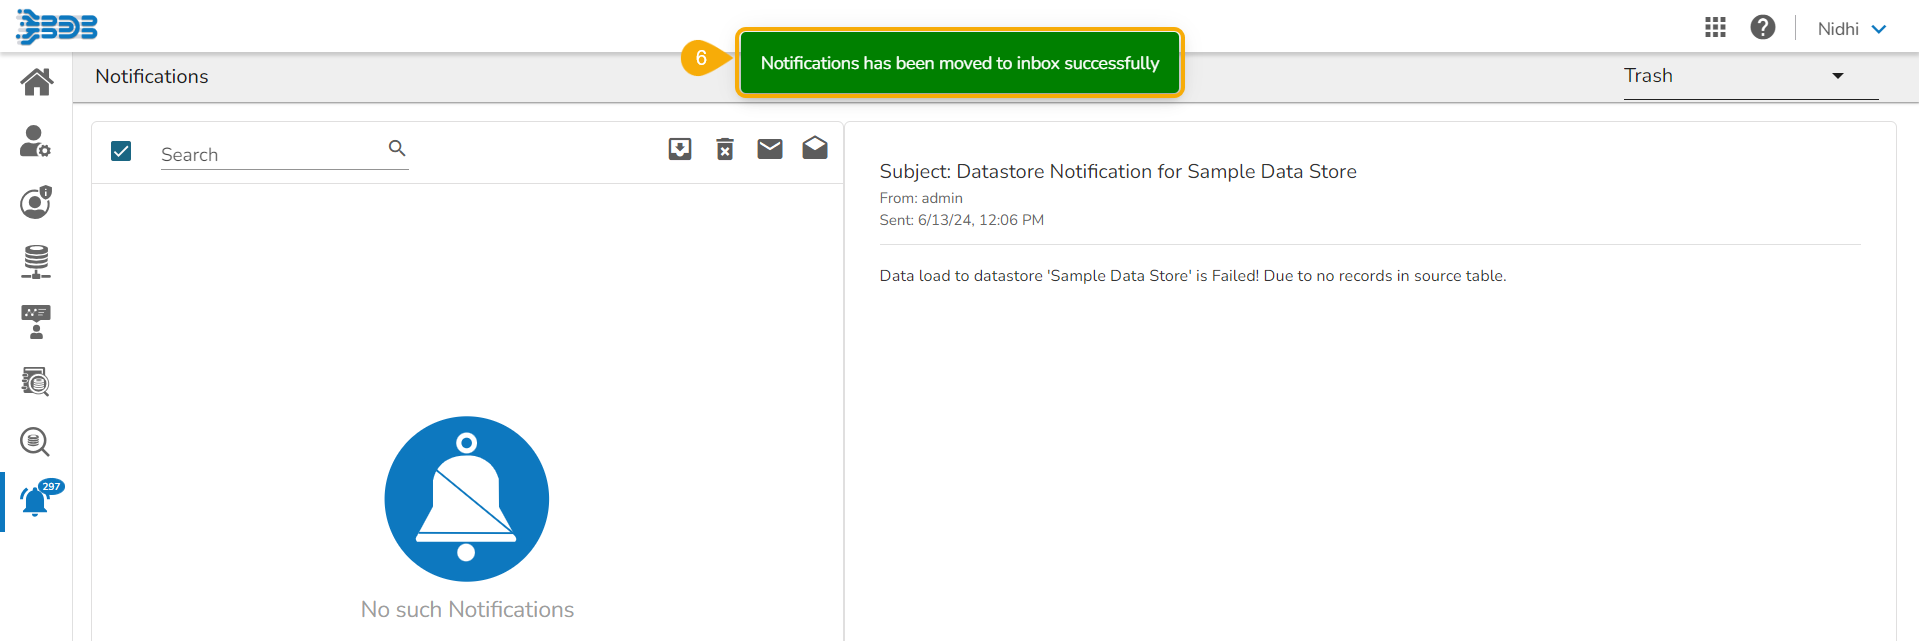
Recovering Notification(s) from Trash
Navigate to the notification list under the Trash folder.
Select a notification using the checkbox.
Click the Move to Inbox icon from the header panel.
A message appears to ensure that the selected notification has been recovered. The selected notification is moved back to the Inbox folder.
Mark Notifications as Read or Unread
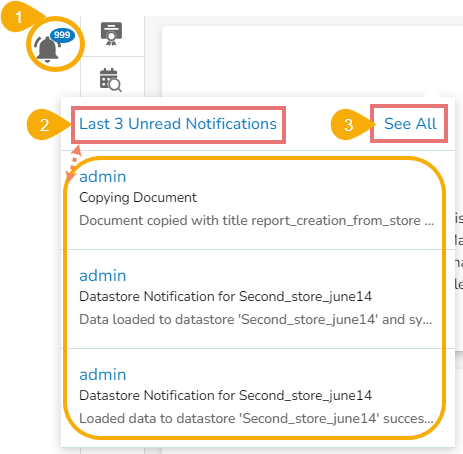
The left panel contains the Notification icon. The number of notifications displayed at the top of the Notification icon indicates the unread notification messages.
Click on the Notification icon.
A window opens with the See All option and displays the Last 3 Unread Notifications.
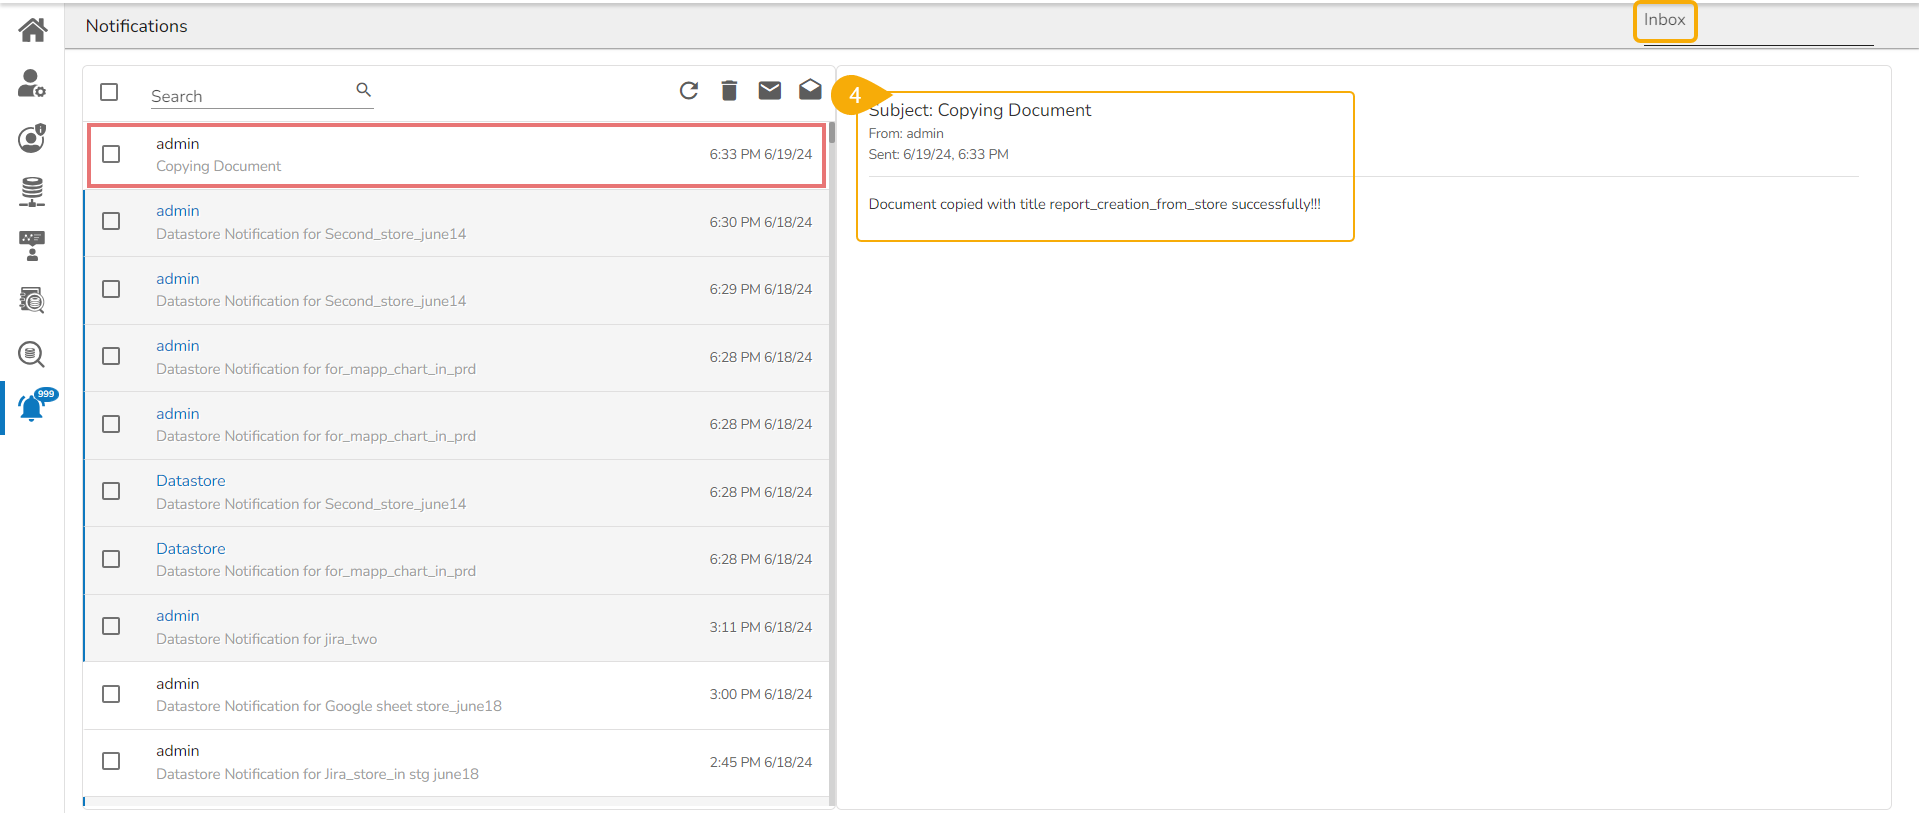
Click the See All option to display all the notification messages in the Inbox (By default, the Inbox folder opens).
The notification Inbox opens displaying all the available notifications.
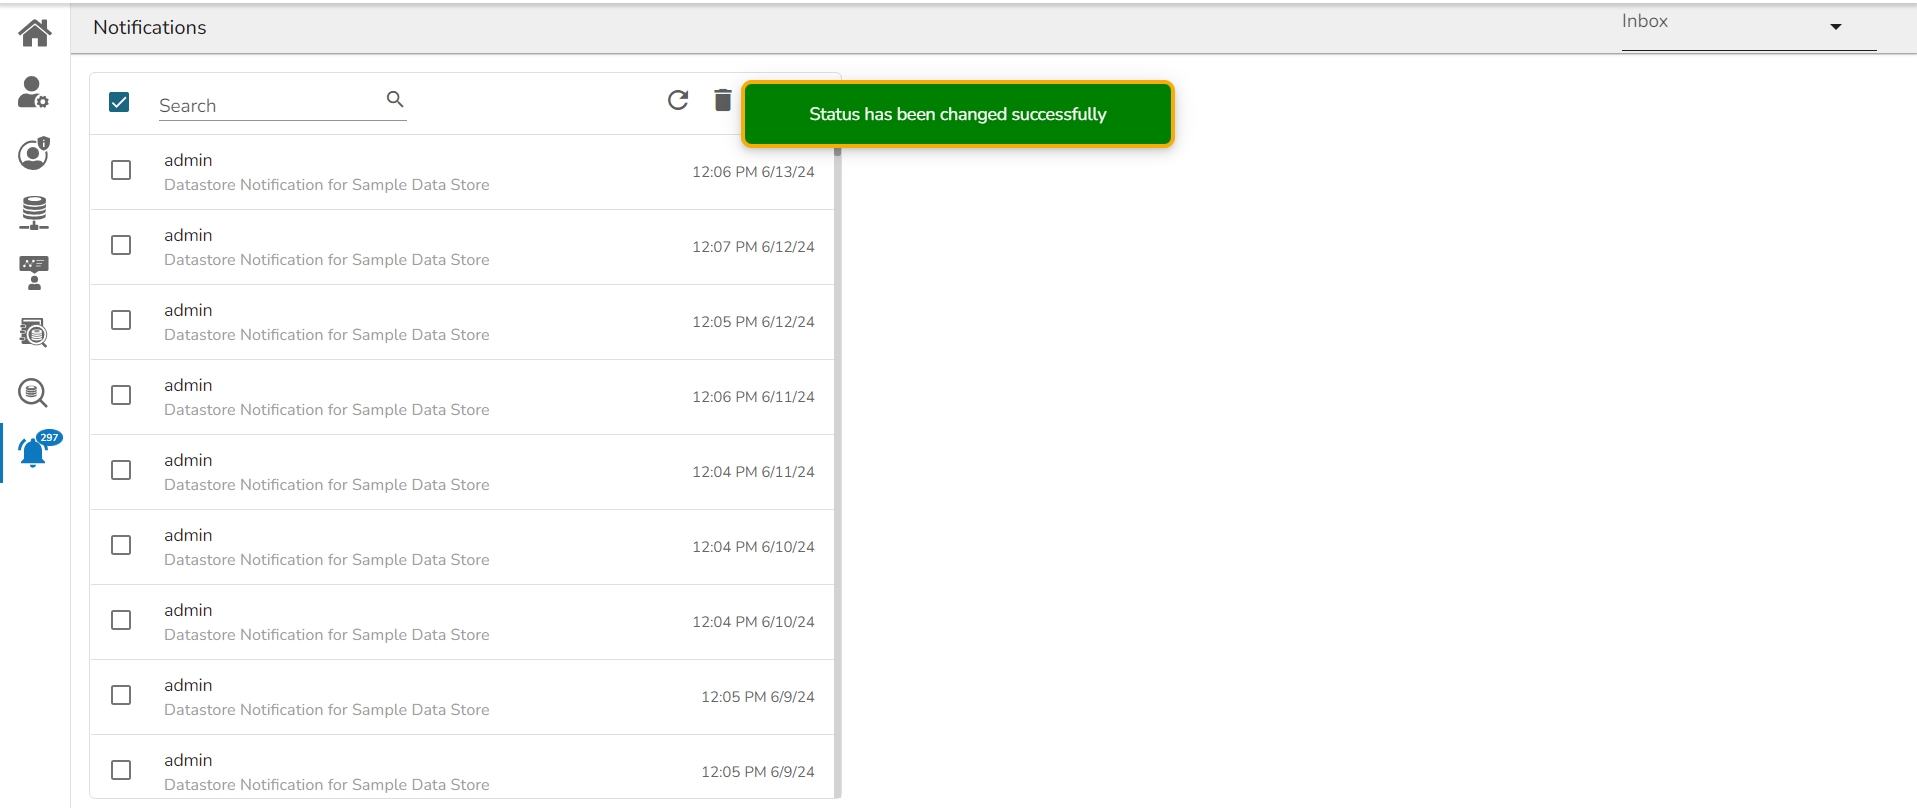
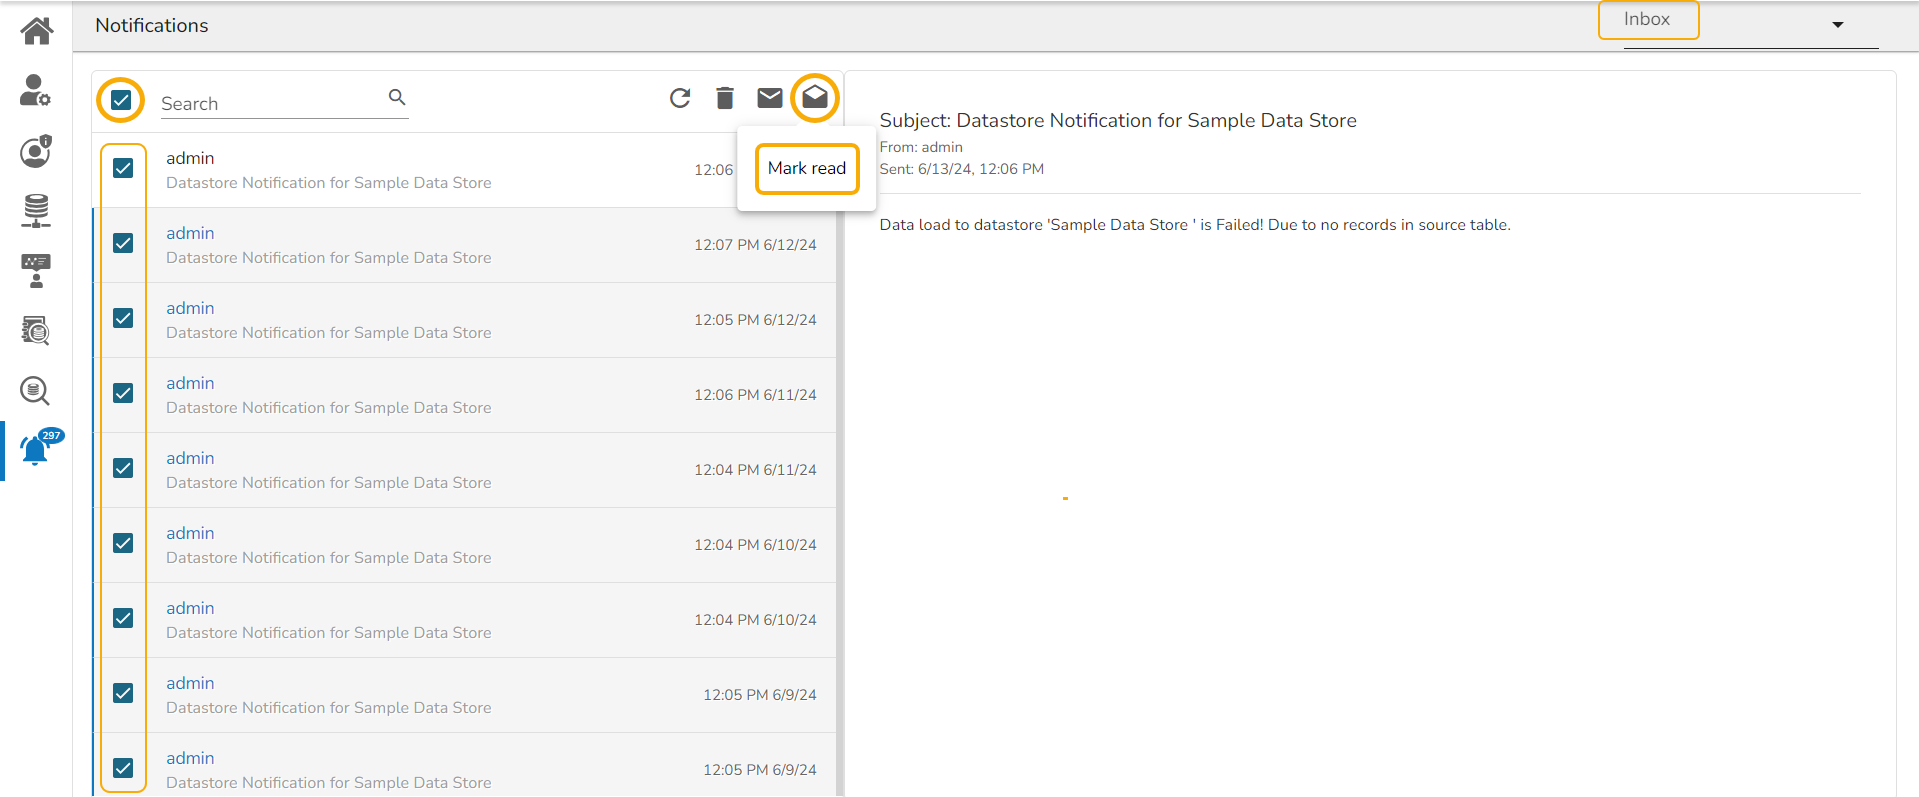
Use a checkmark in the given checkbox beside the search bar to select all the notifications. or Select the notifications by using the checkboxes provided next to those notifications.
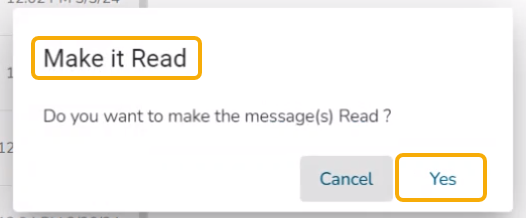
Click the Mark Read icon.
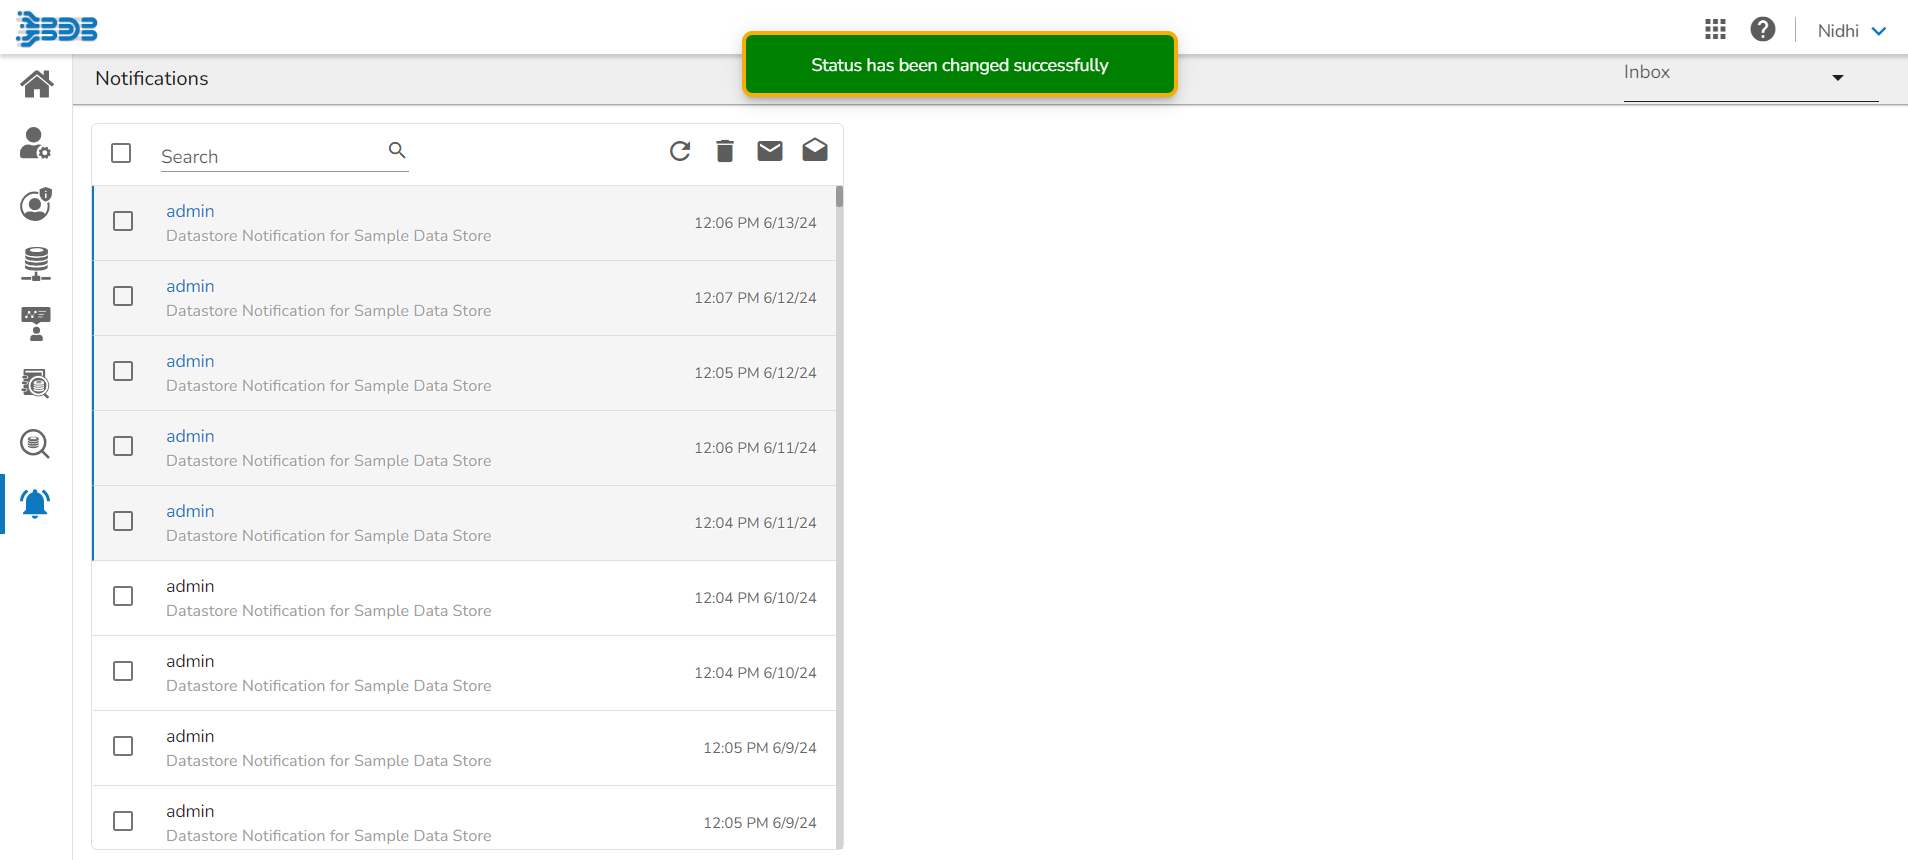
The Make it Read window appears.
Click the Yes option.
A notification message appears.
Use the Refresh icon available for the browser, the status of the selected notification(s) gets updated as Read, and the numbers indicating the unread notifications will disappear.
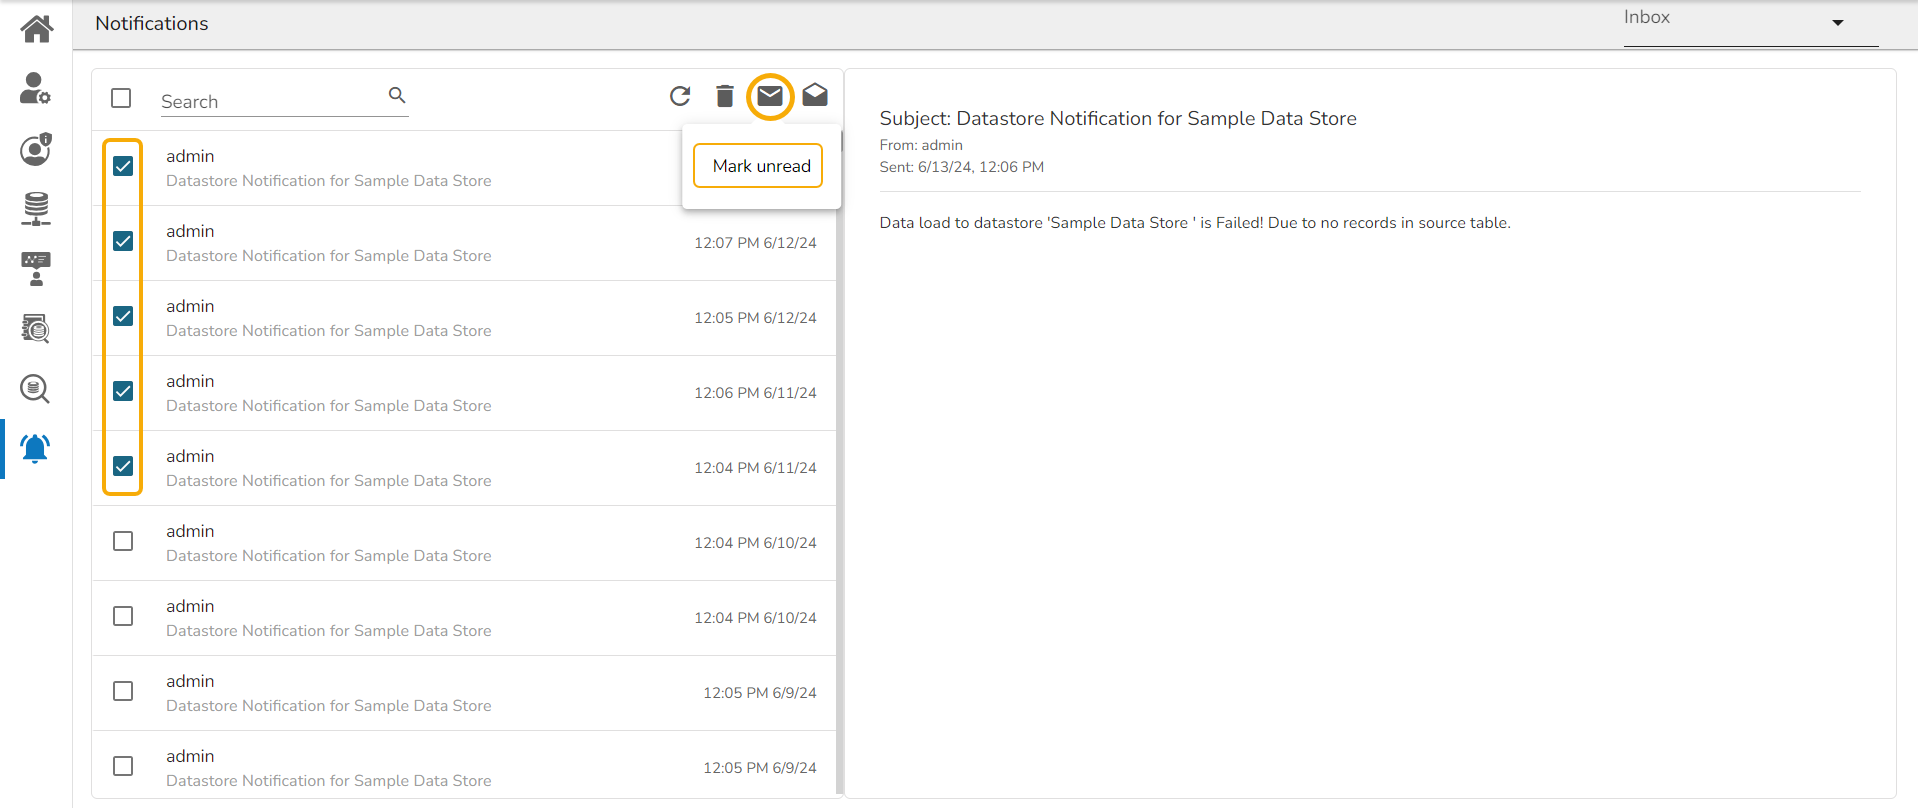
Navigate to the Inbox page and select the notification messages either by using the checkbox provided for Select All or selecting the individual messages by using the checkboxes next to them.
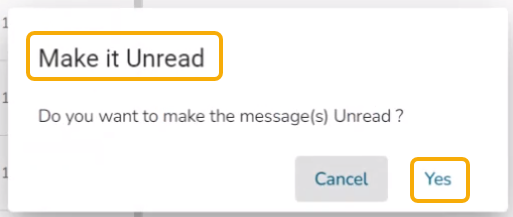
Click the Mark Unread icon.
The Make it Unread window appears.
Click the Yes option.
A notification message appears.
All the notifications or the selected notification messages will turn Unread, and the number indicating the unread notifications appears at the top of the notification icon.
Gloabal Search
Mark unread
Marks messages status as ‘unread’
Mark read
Marks messages status as ‘read’
Click the Yesoption to move the notification(s) to Trash.
A dialog box confirms the intended action of moving the selected notification to the Inbox.
Click the Yesoption to move the notification(s) to recover the Notification.
Icons
Name
Task Assigned
Refresh
Receives the latest messages
Delete
Moves the selected messages to the Trash folder
Options Assigned to a Folder
The user can create a folder under the My Documents space and access a publicly available folder under the Public Documents space. In contrast, the Shared folders will be listed under the Shared Documents.
Creating a Folder
Select the Create New Folderfrom the Options or Create Context menu.
The Create New Folder dialog box opens.
Fill in the following information:
Name: Enter a folder name.
Description: Describe the folder (optional).
Click the Saveoption.
A confirmation message appears.
The newly created folder gets added to the selected document space.
Options Assigned to a Folder
A single folder is credited with various options in a context menu by using a right-click on it as displayed below:
Open in New Tab
Select a folder.
Select the Open in New Tab option using the Folder options context menu.
The concerned folder opens in a new tab.
Properties
Select a folder.
Select the Properties option from the context menu.
The folder Properties opens displaying the creator's name, document type, version, space, date of creation, and modification. The inserted description also gets displayed over here. The user can also upload an image using the Properties tab.
Uploading Image using the Properties Tab
Click the Browse option to update the image.
The image gets uploaded.
Please Note: Click the Close option to close the folder properties.
Adding/Removing a Folder to/from Favorites
The user can add a folder to or remove it from the Favorites.
Select the Add to Favorites option from the Folder context menu.
A confirmation message appears, “Document added to favorites”.
The selected folder gets added to the Favorites document space.
Use the right-click on the folder in the Favorites document folder that you wish to remove.
The
OR
Navigate to My Documents and use right-click on the same folder. Click the Remove from Favorites option.
A message, “Folder removed from Favorites” appears on the screen, and the selected folder gets removed from the Favorites document space.
Creating a New Folder (Sub-Folder)
Select the Create New Folder option by using right-clicking on a Folder.
The Create New Folder window opens.
Fill in the following information:
Name: Enter a folder name
Please Note:
The user can create multiple folders under a folder.
Creating a New Report
Select the Create New Story option from the Folder context menu.
The Create New Reportwindow opens.
Enter a title for the report document.
Describe the report (optional).
Please Note: After the user clicks the Create New Report option while uploading a CSV or Excel file, a new Data Store gets created. The user gets notified by a confirmation message as shown in the following image and the targeted report gets created.
Based on the selected options, the Report will be created and the Design page will open by default.
Navigate to the source Folder, and the created Report gets added to it.
Linking a URL
The user can connect a URL to the required platform documents.
Select the Link a URLoption from the context menu that opens by clicking on a folder.
The Link a URL dialog box opens.
The Add Details tab opens by default.
Adding or Removing a URL Parameter
The user can add or remove parameters to the linked URL by using this option.
Navigate to the URL Parameter tab.
Two options for adding URL properties get displayed:
Add User Properties
By clicking the AddUser Properties option, the user requires to add Parameter Name and Parameter Values.
By selecting the User Properties option, the administrator needs to insert a valid user custom field. (E.g., In the below-given image, parameter Param 1passes the defined value for the citycustom field provided for the selected user).
Please Note:
The user can easily connect internal URLlinks using the parameters, while the external URLsrequire security permission to link.
Moving a Folder
Select the Move to option from the Folder context menu.
The Move to window appears displaying the available folders.
Select a folder. You may use the Search bar to search a specific folder.
Please Note: The Move To option is not supported in the folders shared as the Public Documents.
Creating a Copy of a Folder
The system user can copy and paste a folder into a different one.
Select the Copy option from the context menu.
Select another folder and use the right-click to get the Paste option. Click the Paste option.
OR
Navigate to My Documents or Public Documentsand right-click anywhere on the blank space to get the Paste option. Click the Paste option.
The Pastewindow appears.
The copied folder gets pasted successfully with a different name.
E.g., The following image shows that a folderSample Folderfrom My Documentsis named Copy of Sample Folder and has been pasted under the My Documents on the Platform Homepage.
Renaming a Folder
Select the Rename option from the Folder context menu.
The Rename window opens.
Enter a New Name for the folder.
Click the Save option.
A confirmation message appears.
The folder gets renamed.
Deleting a Folder
Select the Delete option from the context menu.
The Delete window appears to ensure the action of folder deletion.
Click the
Please Note:
The Delete option is not available in the folders shared as the Public Documents.
Once the Image gets selected, Click the Save option.
A success message appears, “Image has been updated successfully”.
Remove from Favorites
option appears.
Click the Remove from Favorites option.
Description: Describe the folder (optional)
Click the Save option.
A confirmation message appears for the folder creation.
A new (sub) folder gets created inside the selected folder.
A sub folder gets created inside the concerned folder
A sub-folder created inside another folder gets the same set of credited options as a folder.
Select either of the options to begin with the report.
Select Existing Data Store: It will redirect the user to the list of existing data stores.
Upload CSV: It will redirect the user to upload a CSV file.
Upload Excel: It will redirect the user to upload an Excel file.
The next screen when an existing Data Store is selected to create a Report is displayed in the image.
Select a Data Store from the list by using the given checkbox.
Click the Create Report option.
Create New Report page while selecting an existing Data Store
The next screen when a CSV file is uploaded to create a Report is given below.
Provide a Data Store Name.
Choose a File and upload it.
Once the file is chosen, it will display the Data Store details such as Variable Types and Examples tabs, and a confirmation message appears to notify the user of the successful update of the file.
Click the Create Report option when it gets enabled.
The next screen when an Excel file is uploaded to create a Report is given below.
Provide a Data Store Name.
Choose a File and upload it.
Once the file is chosen, it will display the Data Store details such as Variable Types and Examples tabs, and a confirmation message appears to notify the user of the successful update of the file.
Click the Create Report option when it gets enabled.
Enter a name for the URL.
Provide the URL link that you wish to add in the Type URL field.
Describe the URL (optional).
Navigate to the URL Parameter tab to add parameters (Optional).
Click the Save option.
A confirmation message appears.
The URL gets created in the selected folder.
Confirmation message after a document with a linked URL gets created
The user can see the linked URL by opening the created sample URL.
Opening a linkedURL
Add System Properties
By clicking the Add System Properties option, the user requires to add Parameter Name and Select a system property via a drop-down menu.
By choosing the System Properties option, it requires the administrator to select an option from the available system properties drop-down menu. (E.g., in the below-given image, parameter Param 2 passes the authentication Token as system properties to link the URL).
Click the Save option to save the information.
The user can click the Remove option provided next to an added parameter to remove the parameter.
Click the Move icon.
A new window displays the available folders/ documents inside the selected folder.
Click the Save option.
A confirmation message appears.
The folder gets moved to the targeted folder.
The Namementioned in the pop-up window shows the prefix ‘Copy of-’ before the original name of the folder (E.g., Sample folder Foldergets a new name Copy of Sample Folder).
Click the Saveoption.
Delete
option.
A confirmation message appears to inform about the targeted deletion.
The selected folder gets removed from the platform.
Confirmation message after the selected Folder gets deleted
The following confirmation message appears if the deleted folder is the only document available under the My Documents space.
Notification message after all the documents get deleted
By Deleting a folder all the documents saved under it will also get deleted.
Confirmation message after a folder gets created
The Folder opens in a new tab
Confirmation message after the document is added to the Favorites
Confirmation message after the folder gets removed
Confirmation message while uploading a CSV or Excel file
Design Page of the newly created Report
The Report gets created inside the folder
Two options to add URL Properties
Saving User Properties and System Properties for a linked URL
The two ways to get the Paste option for a folder
Pasting a copied folder
Notification message after the Folder is renamed
Delete Option in the Folder Context menu
The Create New Report Page
Create New Report page after uploading a CSV file
User Profile
The administrator can edit basic information, set preferences, change the password, set API token access, deregister the mobile device, navigate to the default Platform page, and sign off from the BDB Platform by using the User Profile icon provided on the Platform homepage.
Accessing the User Profile Menu
Navigate to the Platform homepage.
Click the User Profile option.
Displays the following options:
My Account: Displays account details of the logged-in user.
About: Displays a welcome page of the BDB Platform.
My Account
This section covers three options to manage settings for a user account.
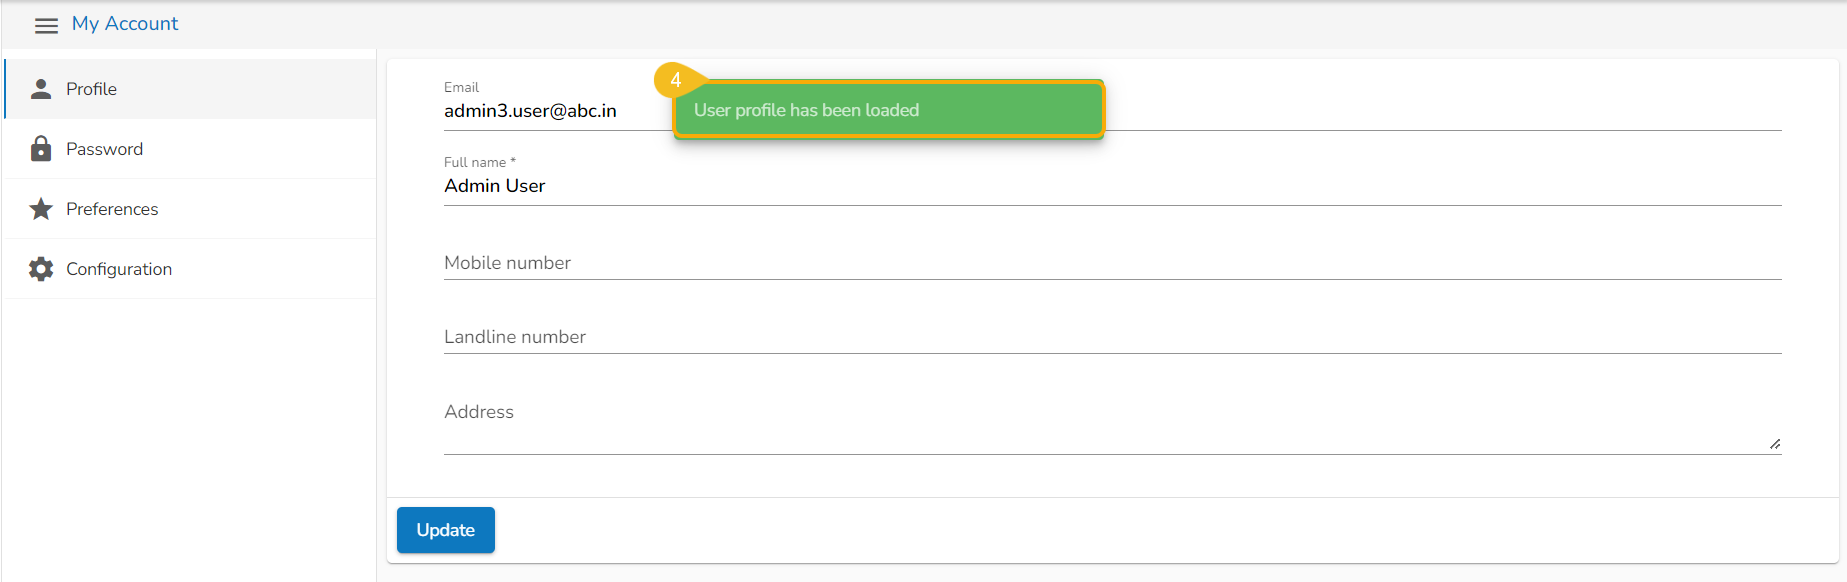
Click the User Profile icon from the Platform homepage.
The existing user profile will be loaded by default.
Click the My Accountoption.
A notification message appears, and the user profile gets loaded.
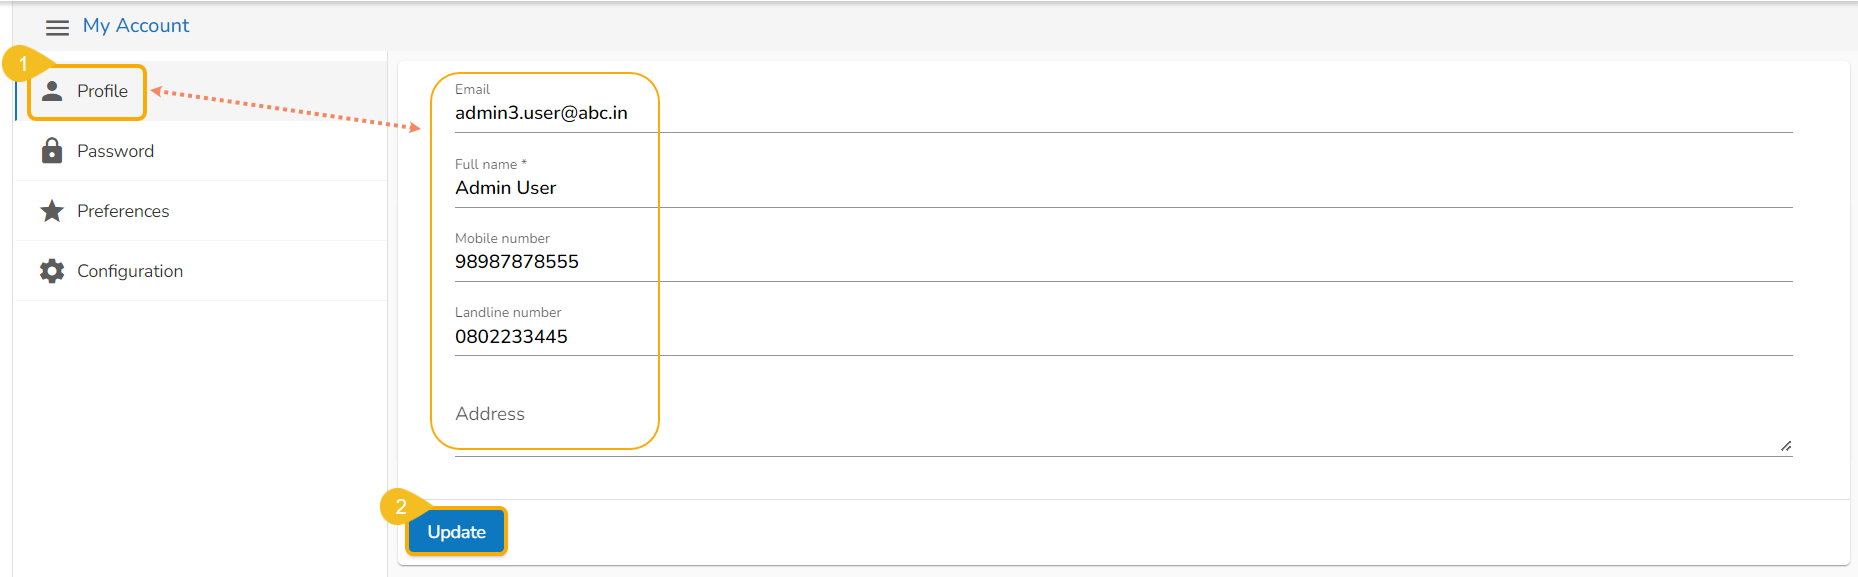
Profile
The Profile tab displays personal information about the logged-in user.
The Profile tab opens by default displaying the following fields:
Email (not editable)
Full Name
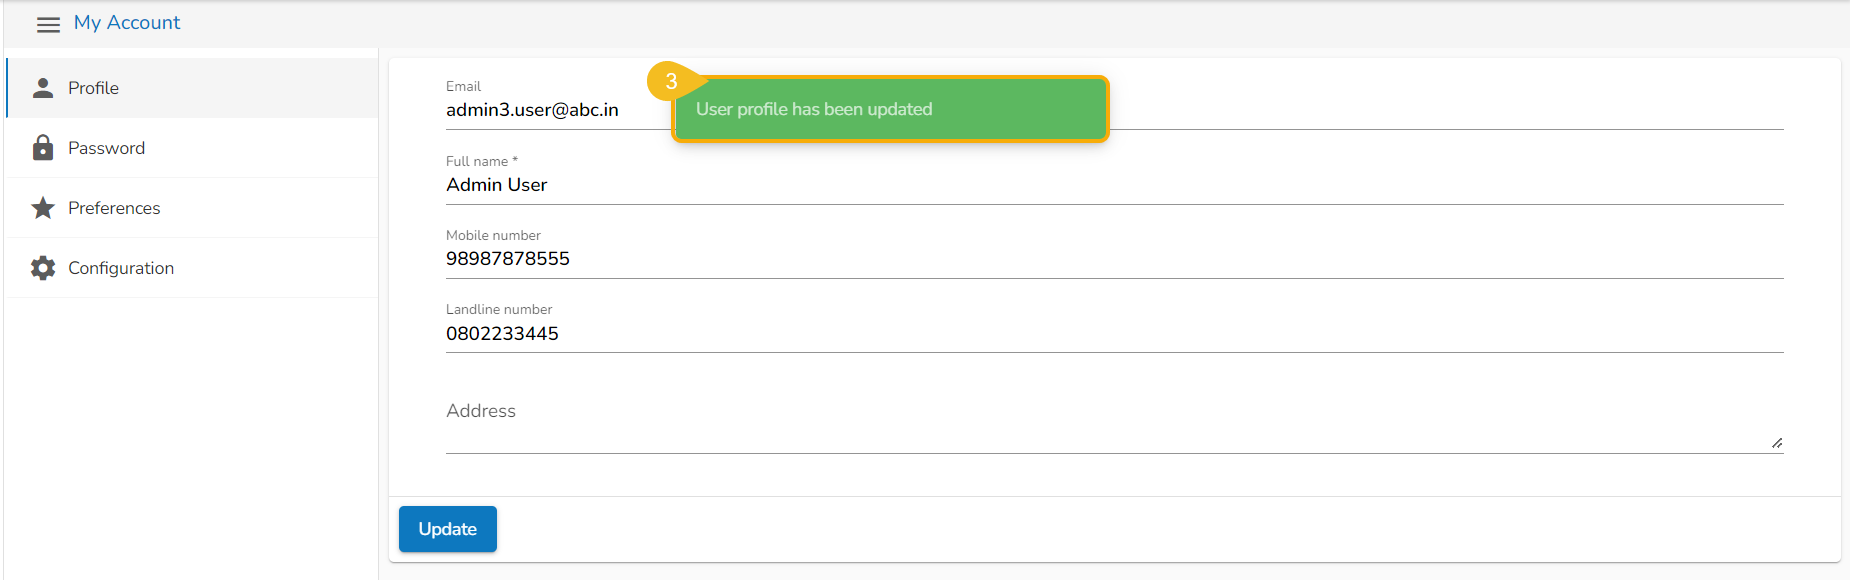
The profile changes get saved, and the same gets communicated through a confirmation message.
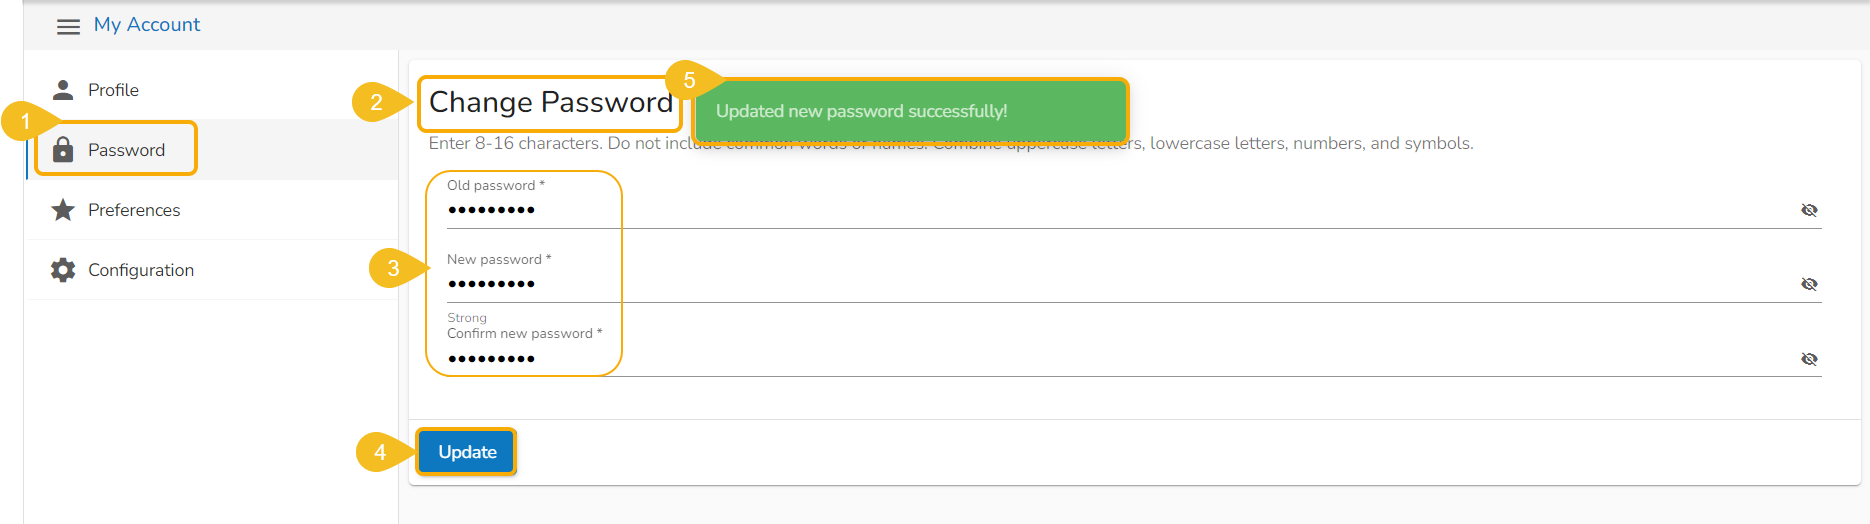
Password
The user can reset the password for his account using this segment.
Click the Password tab using the My Account page.
The Change Password window opens.
Enter the Password, New Password, and Confirm Password (the newly set password).
Preferences
The Administrator can change the users' preference settings using this module from the left side of the pane.
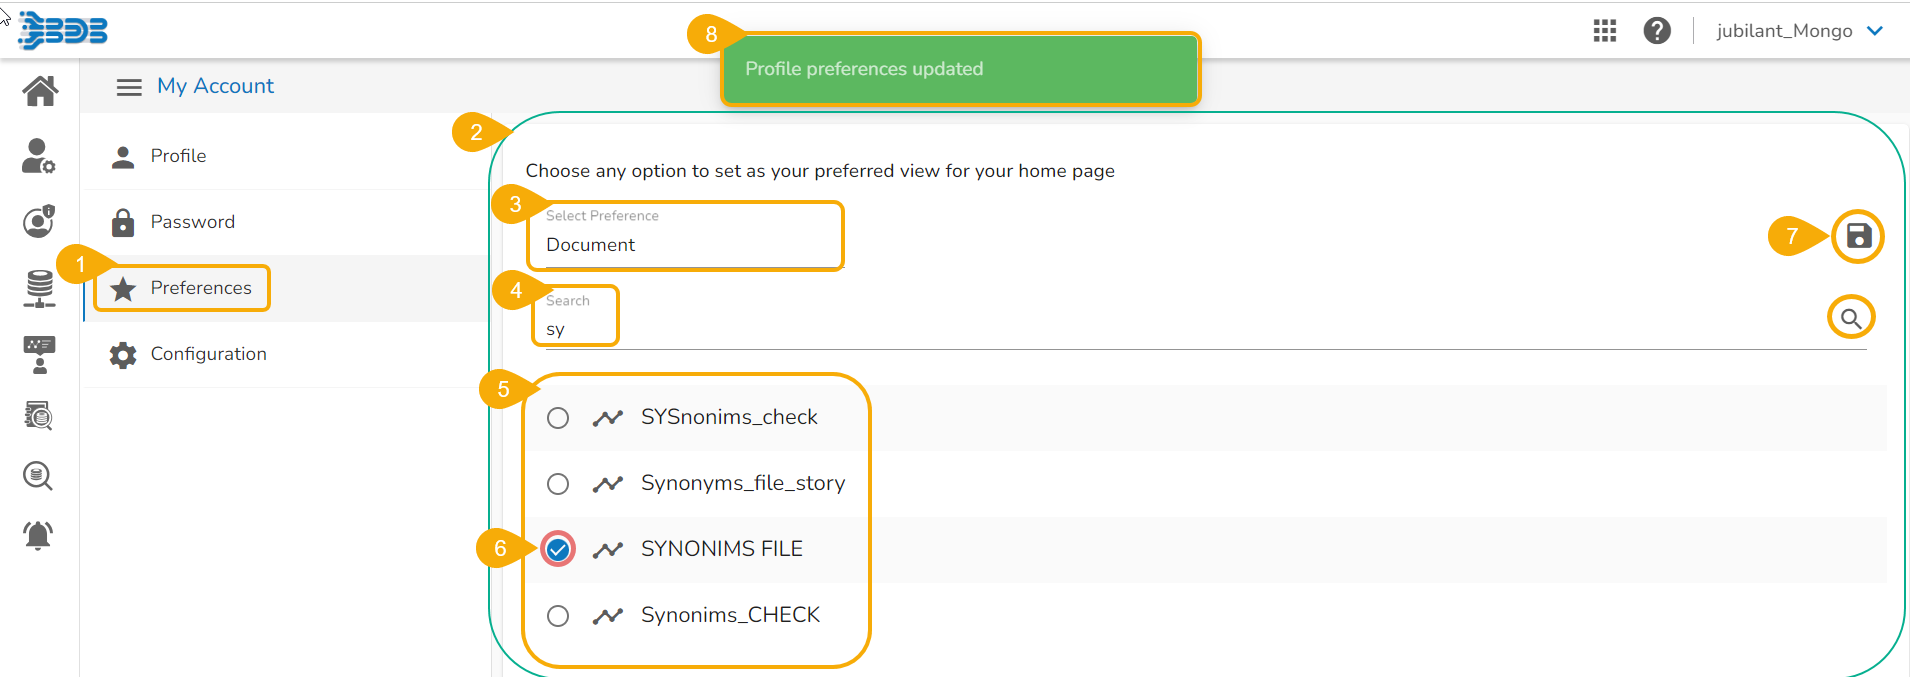
Follow the below-given steps to change preference settings:
Click the Preferences tab using the My Account menu row.
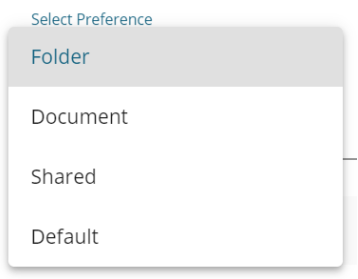
The right-side panel displays the option to set the preferred view for the user's homepage.
Please Note:Folders or documents get displayed to the users as per the set preferences by the Administrator.
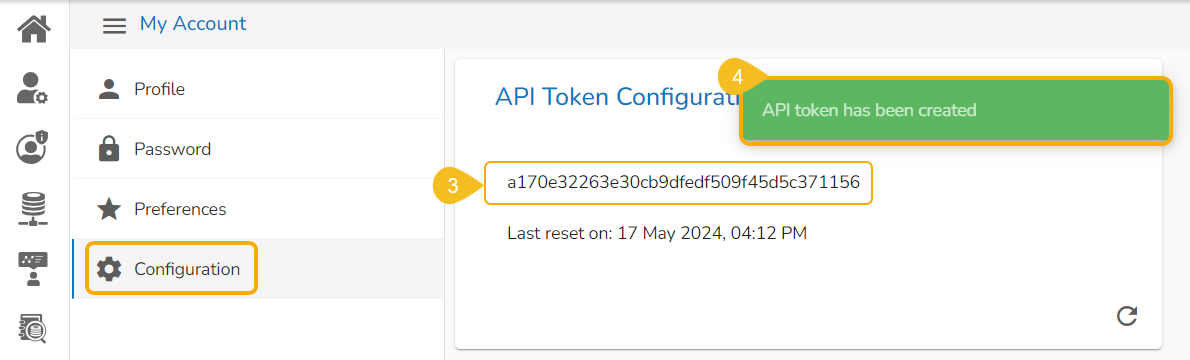
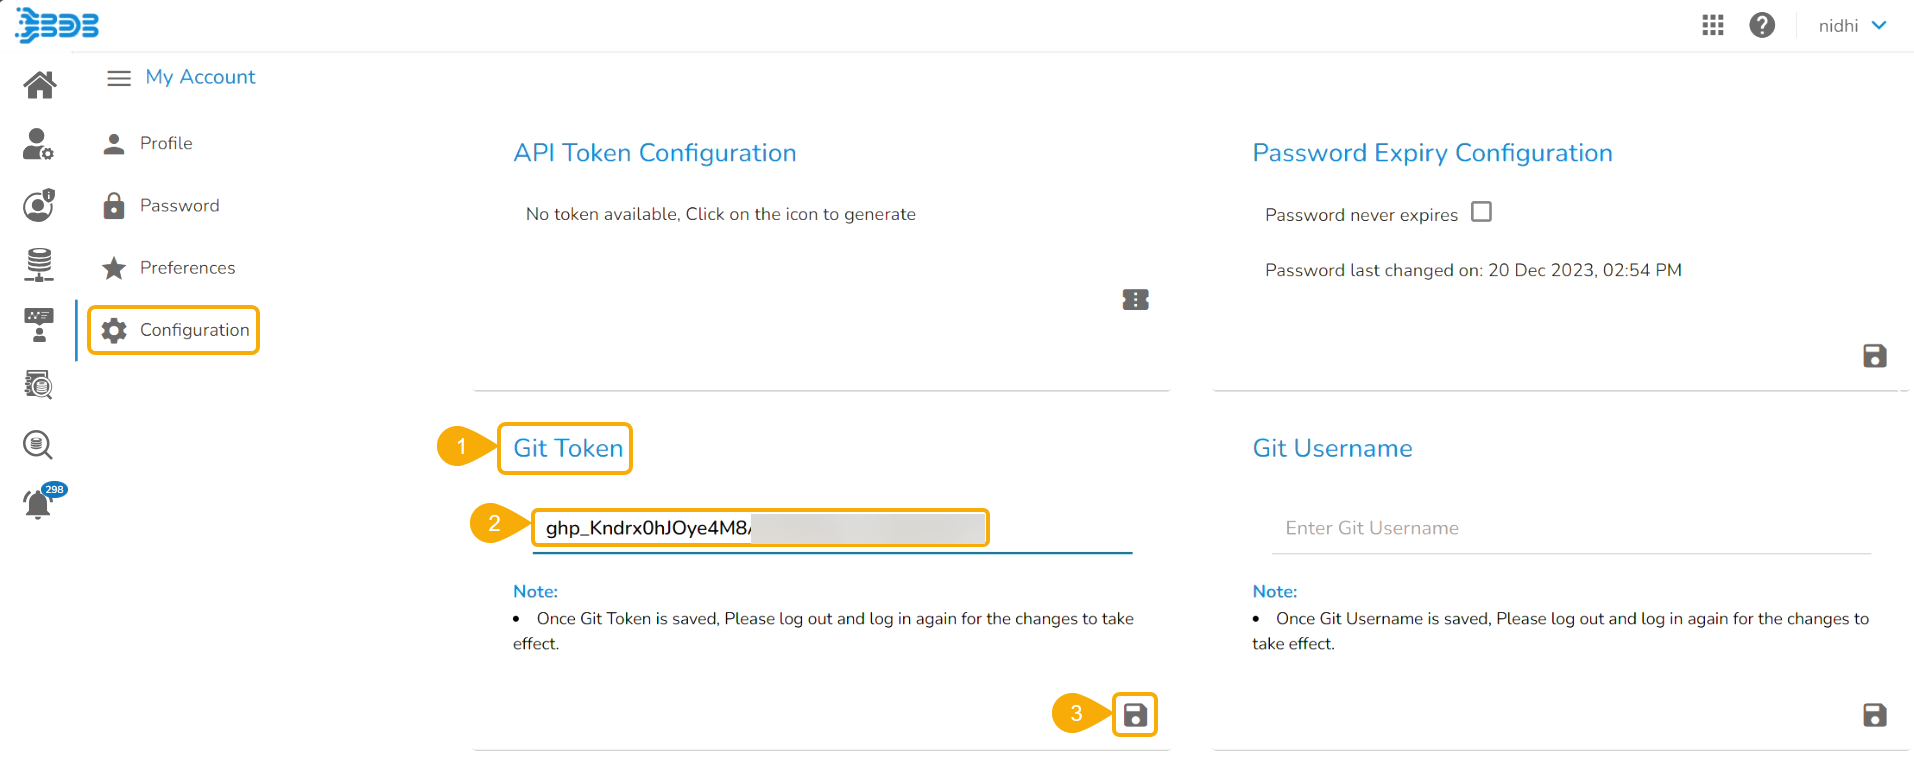
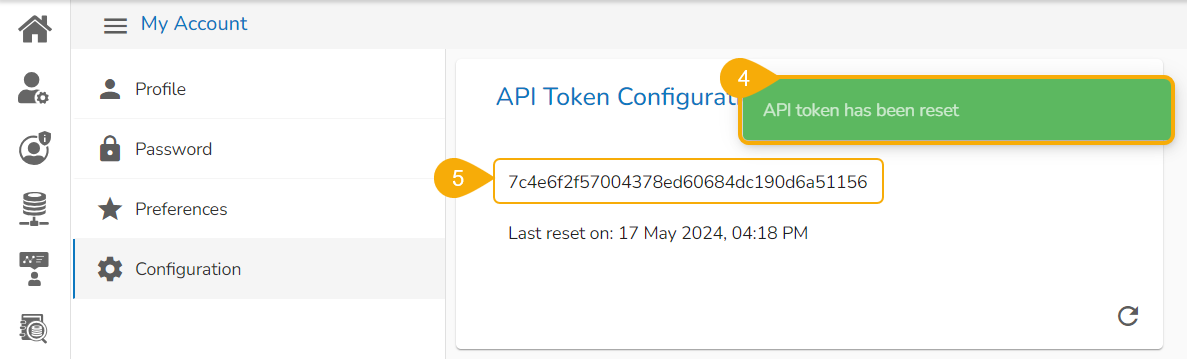
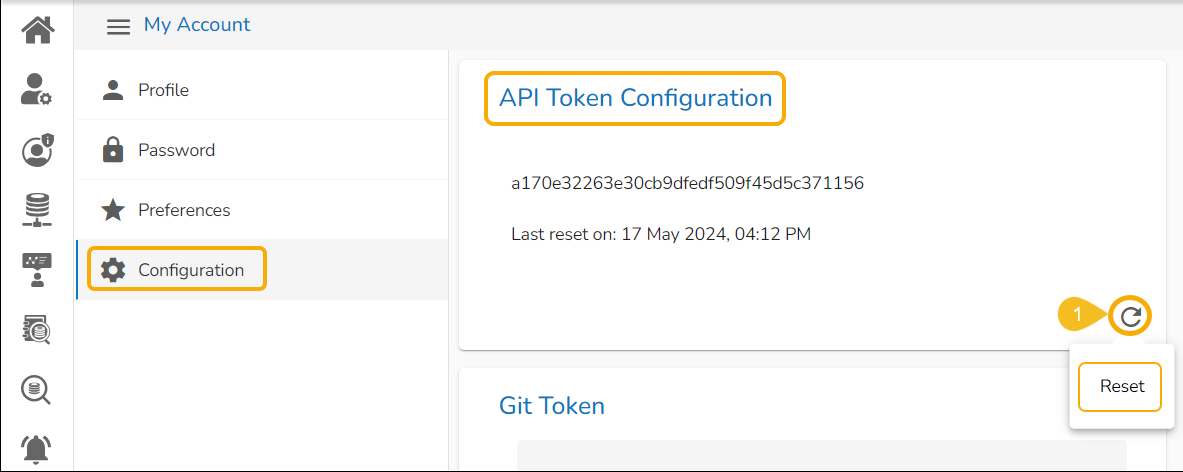
Configuration
The Configuration tab allows to create or reset the API Token and set the Password Expiry configuration.
API Token Configuration
The API Token is used to expose the document as an open document.
Navigate to the API Token Configuration option using the Configuration tab.
Click the Generate icon to generate an API token.
The API token gets generated and displayed below with the mention of the last reset date and time.
A notification message appears to convey the completion of the action.
Resetting API Token
Click the Reseticon from the API Token Configuration window to reset the API Token.
The Reset Token Confirmation window opens with a warning that a reset of the API token using the Reset option will convert the old open doc dashboards as invalid.
Click the YESoption from the warning message window to reset the API Token.
A confirmation message appears to inform that the API token has been reset.
The API Token gets reset displaying the recent Date and time under the API Token Configuration window.
Please Note: The last reset date and time are also updated under the API Token Configuration window.
Password Expiry Configuration
The password expiry limit can be configured via this option.
Navigate to the Password Expiry Configurationoption using the Configuration tab.
Select the Password Never Expiresoption by putting a tick mark in the given checkbox.
Click the Apply Changes icon to save the changes.
A notification message appears to confirm the update and the selected configuration gets saved.
Please Note: The Git Token and Git Username fields must be configured to access the Git Pull-Push and Repo Sync Project functionalities under the DS Lab module.
Git Token
The user can configure Git Token using this option.
Navigate to the Git Token section under the Configuration tab.
Provide the Git Token provided by your deployment team.
Click the Save icon.
A notification message appears to ensure that the Git Token has been saved.
Git Username
The user can configure Git Token using this option.
Navigate to the Git Username section under the Configuration tab.
Provide the Git Username.
Click the Save icon.
A notification message appears to ensure that the Git Username has been saved.
Please Note: The user can also configure the Git Token and Git Username through the Security module. These fields can be accessed as . Users can specify the Custom Fields using the admin option.
Sign Out: Allows to sign out from the Platform.
Mobile Number
Landline Number
Address
The user can modify/change the required details and click the Update option.
Click the Update option.
A confirmation message appears and the password gets changed for the concerned User Account.
Select an option using the Select Preference drop-down option. The following choices will be displayed:
Folder- the user can set any folder as the preferred view for the homepage.
Document- the user can set any document as the preferred view for the homepage.
Shared- the user can set any document from the Shared folder as the preferred view for the homepage.
Default – it opens the My Documents page for the user as the default homepage.
Use the Search space to customize the list (In this case, the list of folders gets customized based on the searched folder).
As per the selected choice, a drop-down menu appears (E.g., The following image displays all the available folders since the Folder option is selected from the Select Preference drop-down).
Select a specific folder/document from the below-displayed choices using a tick mark in the radio button.
Click the Save option.
A pop-up confirmation message appears to ensure that the preferences have been updated.
The existing user profile gets loaded by default while opening the My Account
Updating Password
Generating the API Token for the first time
Resetting the API Token
Accessing the Password Expiry Configuration option using the Configuration tab.
Notification message after the Password Expiry configuration gets set for never expires
Configuring Git Token
Configuring Git Username
Data Catalog Search
Data Catalog empowers the data user to have wholistic view of data quickly discover data lineage that can drive towards insightful decisions optimizing their business worth.
Data Catalog Search is your ultimate gateway to discovering, accessing, and leveraging data. With intuitive search capabilities, seamless navigation, and comprehensive datasets, Data Catalog Search transforms how you explore and utilize data. Start your journey towards smarter insights and informed decisions today!
Data Catalog ensures that the most trusted data is always available to the Citizen Data Scientists, including tables, databases, saved data sets, or dashboards – all in one place. Data Catalog Search provides a centralized place to:
Accessing Data Catalog Option
From the Left menu
Navigate to the Platform Homepage.
Click the Data Catalog Search icon on the homepage left panel.
A default list of the Data Catalog appears.
From the Apps Menu
Navigate to the Platform Homepage.
Click on the Apps menu.
Click the Data Catalog module from the Apps menu.
A default list of the Data Catalog appears.
Search Bar for the Data Catalog
Navigate to the default Data Catalog list.
Type in the given bar to search the Data Catalog.
Click the Search icon.
The displayed list gets customized based on the search result.
Applying Filter
By Asset Type
Check out the illustration on the Apply Filter functionality by Asset Type.
Navigate to the Data Catalog Search page.
The Filter option is provided on the right side of the page.
Access the Asset Type filter option. Click on it to get a list of the various Asset types.
The Asset Types opens.
Select an Asset type from the displayed list using the checkbox.
The displayed Data Catalog list will be customized based on the selected Asset type.
Users can apply multiple assets as filters to customize the displayed catalog list. E.g., Database and API Service filter categoriesare selected in the given image.
The applied filters will be displayed below.
The displayed list will be filtered based on the selected Asset types.
The total number of the items displayed at the end of the list indicates the same
Please Note: The user can click the cross mark provided next to the selected Asset Type under the Applied Filters section to remove that applied filter category from the displayed Data Catalog list.
By Owner
Check out the illustration on the Apply Filter functionality by Owner.
Navigate to the Data Catalog Search page.
The Filter panel is displayed on the right side of the page.
Access the Owner filter option. Click on it to get a list of the owners.
Select an owner by using the checkbox.
The displayed Data Catalog list will be customized based on the selected owner.
Users can apply multiple owners as filters to customize the displayed catalog list.
All the applied owners will be listed under the Applied Filters.
Please Note: The user can click the cross mark provided next to the selected Owner under the Applied Filters section to remove that applied filter category from the displayed Data Catalog list.
Applying Filter by Both Filter Categories
The user can apply filter conditions based on the combination of both filter categories and the Data Catalog list will get filtered accordingly.
Navigate to the Data Catalog search displaying the default Data Catalog list.
Access the Filter option on the right side of the page.
Open the Asset Type option.
Select an Asset type from the Asset Types list.
Select an owner from the Owner's list.
The combination of both the selected filter conditions will modify the displayed Data Catalog list.
Please Note: Click the Close icon under the Applied Filters options to remove that filter option.
Overview of the Selected Data Catalog Entry
Check out the given demonstration on how to explore the Data Catalog Search.
Once the user clicks on a Catalog entry from the displayed Data Catalog list, an Overview page opens with various tabs for the selected Data Catalog asset.
Navigate to the Data Catalog Search.
Click on a specific Catalog entry from a filtered or unfiltered CatalogList. The image displays the filtered list by Data Set asset.
Use the Search bar to search for the specific Catalog.
Click on the specific Catalog entry.
The Overview page opens for the chosen Asset displaying the following details.
Asset, Asset Type, Owner, Created Date, and Tags.
Description section to display the description for the selected Asset.
Columns
This is the default tab to open, it displays all the column names with Column Type and allows the Data Catalog users to modify or insert Comments and tags to the displayed columns.
Please Note: The Columns tab is restricted. Columns will appear only in the case of Data Set, Data Store, and Table. It displays the column names, column types, comments, and tags. The user can insert comments and modify tags using the Columns tab.
Notifications
The user gets notified under the Columns tab if a column contains Personal Information. The user may mask the concerned personal information to hide it in the data preview.
Navigate to the Columns tab.
Select a column from the displayed list of columns.
The notification will be displayed under the Comment section of the selected column.
Sample Data
Click on the Sample Data tab to display the sample data for the selected Data Set or Feature Store. The user gets to see the sample of the data that is in use.
Please Note: The Feature Store and Data Set asset types will display the Sample Data tab.
Details
The Details tab displays the key information for the selected Catalog asset.
Navigate to the Details tab that displays the following details:
Parent Asset
Query
Publish Status
Database Name
Lineage
The Lineage tab displays Data Lineage for the selected Catalog. Click on the Lineage tab to open the Data Lineage. This page reveals the relationship between the searched asset and the base data source.
Data Profile
Navigate to the Data Profile tab to get the statistical information about the selected asset. It also displays a column chart based on the column names.
Please Note: The Data Profile tab is only available for the Data Set asset type.
History
Click on the History tab to display the change history of the selected Data Catalog.
History Tab for Data Pipeline and Job
The History tab displays the last activated and deactivated information for the Data Pipelines and Jobs asset types.
Navigate to the Overview page for a Pipeline or Job Asset type.
Open the History tab.
Scrolling in the History tab displays the Last Activated and Last Deactivated
Please Note: Use the Back to Main Page icon to get back the Data Catalog list.
Delete Option for Data Catalog
The Admin users will get a Delete icon for the Data Catalog Search to remove a specific Data Catalog entry from the list. Once the Data Catalog entry is removed from the Data Catalog Search page, it will not be displayed for the other users.
Check out the illustration on removing an asset from theData Catalog List.
Click the Data Catalog Search icon from the platform homepage.
The Data Catalog list appears.
Search and select an asset from the displayed Catalog list.
Click the Delete icon for the selected asset.
A notification message appears to ensure that the selected asset is deleted.
The asset gets removed from the displayed catalog.
Attention: While removing a specific Catalog entry from the list, it will not get removed from the Platform, Data Center, or specific module based on the asset type. E.g., By removing a Sandbox file from the Data Catalog list, it will not get removed from the Data Center module (as displayed in this use case).
Navigate to the Data Center module.
Open the Data Sandbox List page.
The Data Sandbox file based on which the Data Catalog entry was removed would be displayed in the list.
Please Note: The Delete option is provided only for the admin users roles.
Insert Description in the box given for description.
A success message ensures that the provided description has been added to the concerned Data Catalog.
The inserted description remains in the Data Catalog.
Multiple tabs appear for a selected Asset such as Columns, Details, Lineage, Data Profile, and History.
Host Name
Last Updated
Last Updated By
information with the user's name, date, and time stamp for the selected pipeline/ job.