
Forecasting Method
This document provides an in-depth overview of the time series forecasting capabilities of BDB. Specifically, we will cover:
What is probabilistic time series forecasting?
Forecasting time series with additional information
Which forecasting models are available in AutoGluon?
How does AutoGluon evaluate performance of time series models?
What functionality does
TimeSeriesPredictoroffer?Basic configuration with
presetsandtime_limitManually selecting what models to train
Hyperparameter tuning
Forecasting irregularly-sampled time series
What is probabilistic time series forecasting?
A time series is a sequence of measurements made at regular intervals. The main objective of time series forecasting is to predict the future values of a time series given the past observations. A typical example of this task is demand forecasting. For example, we can represent the number of daily purchases of a certain product as a time series. The goal in this case could be predicting the demand for each of the next 14 days (i.e., the forecast horizon) given the historical purchase data. In AutoGluon, the prediction_length argument of the TimeSeriesPredictor determines the length of the forecast horizon.
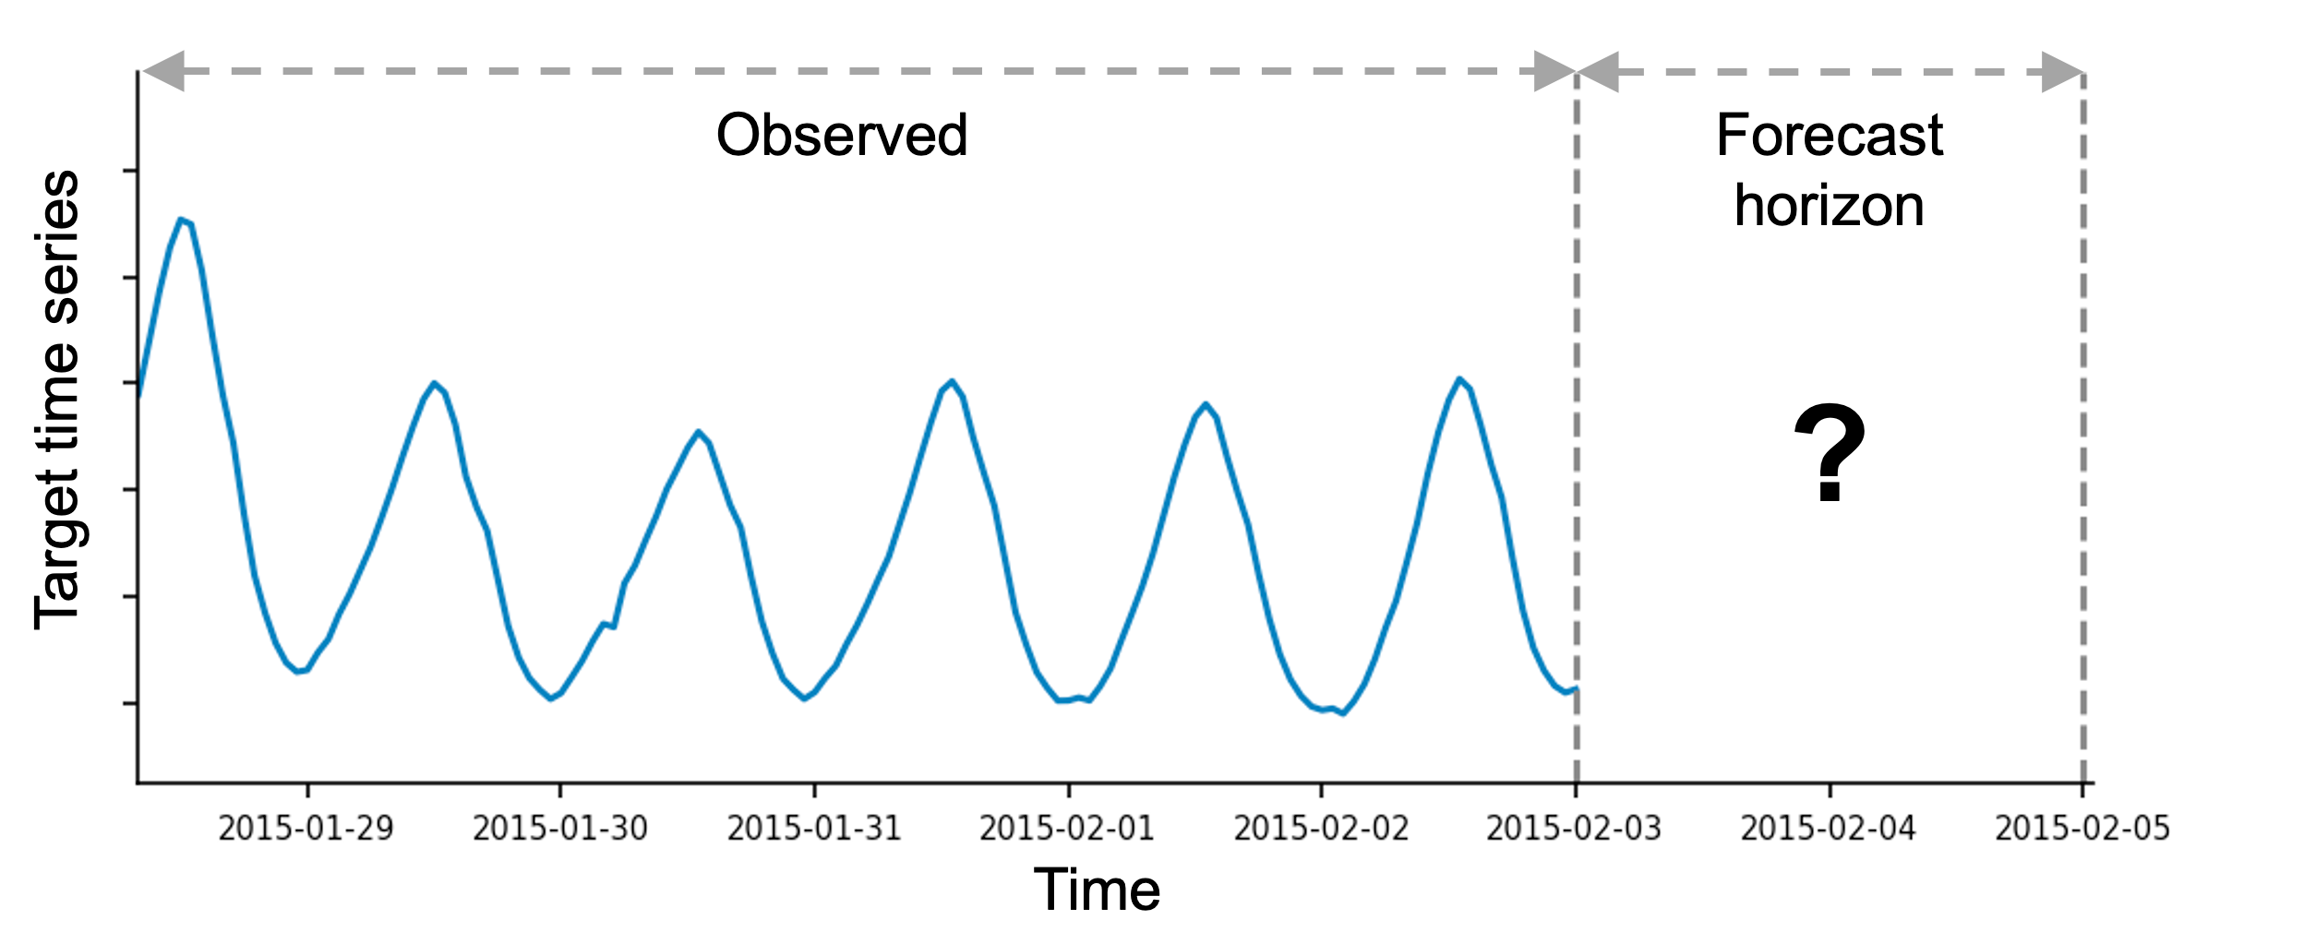
The objective of forecasting could be to predict future values of a given time series, as well as establishing prediction intervals within which the future values will likely lie. In AutoGluon, the TimeSeriesPredictor generates two types of forecasts:
mean forecast represents the expected value of the time series at each time step in the forecast horizon.
quantile forecast represents the quantiles of the forecast distribution. For example, if the
0.1quantile (also known as P10, or the 10th percentile) is equal tox, it means that the time series value is predicted to be belowx10% of the time. As another example, the0.5quantile (P50) corresponds to the median forecast. Quantiles can be used to reason about the range of possible outcomes. For instance, by the definition of the quantiles, the time series is predicted to be between the P10 and P90 values with 80% probability.
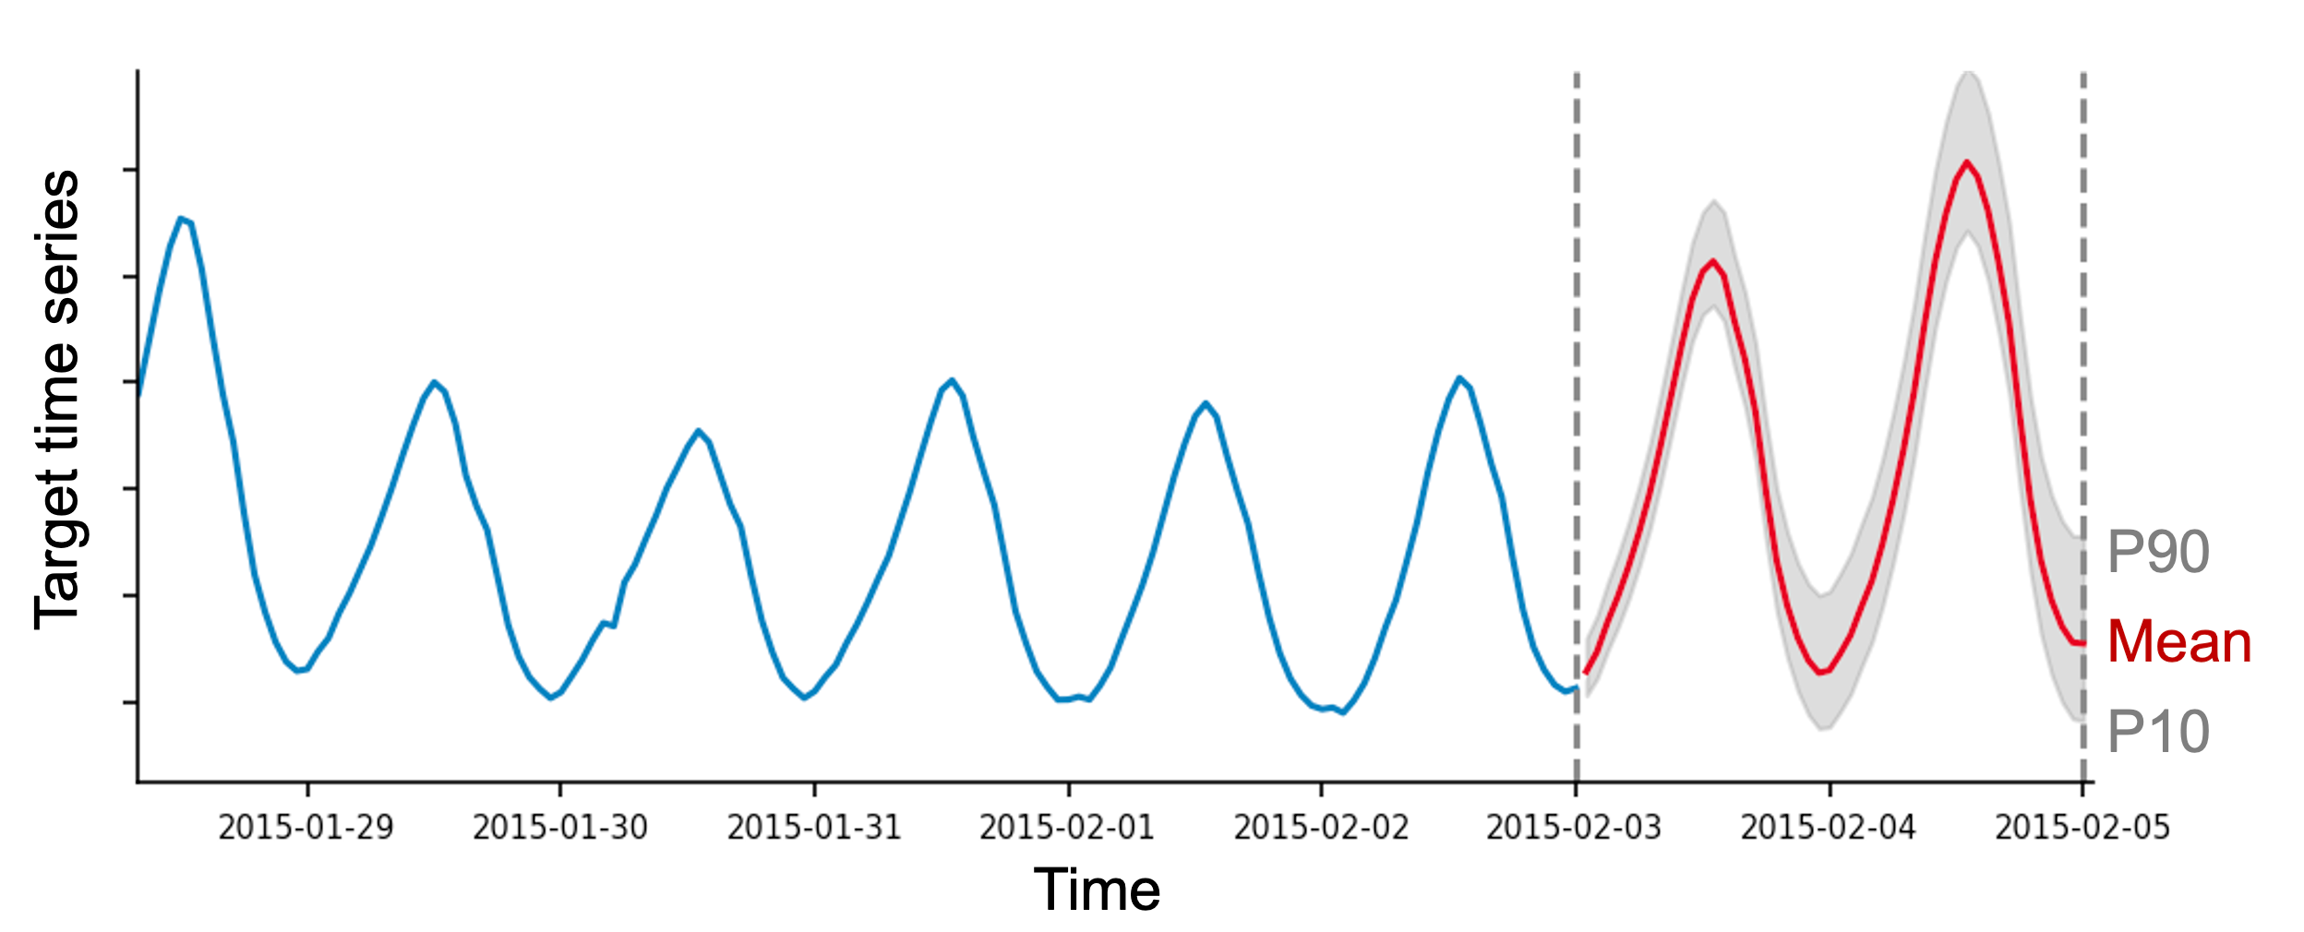
By default, the TimeSeriesPredictor outputs the quantiles [0.1, 0.2, 0.3, 0.4, 0.5, 0.6, 0.7, 0.8,0.9]. Custom quantiles can be provided with the quantile_levels argument
Forecasting time series with additional information
In real-world forecasting problems we often have access to additional information, beyond just the raw time series values. AutoGluon supports two types of such additional information: static features and time-varying covariates.
Static features
Static features are the time-independent attributes (metadata) of a time series. These may include information such as:
location, where the time series was recorded (country, state, city)
fixed properties of a product (brand name, color, size, weight)
store ID or product ID
Providing this information may, for instance, help forecasting models generate similar demand forecasts for stores located in the same city.
In AutoGluon, static features are stored as an attribute of a TimeSeriesDataFrame object. As an example, let’s have a look at the M4 Daily dataset.
We download a subset of 100 time series as a TimeSeriesDataFrame
1995-05-23 12:00:00
1900
1995-05-24 12:00:00
1877.0
1995-05-25 12:00:00
1873.0
1995-05-26 12:00:00
1859.0
1995-05-27 12:00:00
1876.0
AutoGluon expects static features as a pandas.DataFrame object, where the index column includes all the item_ids present in the respective TimeSeriesDataFrame.
D1737
Industry
D1843
Industry
D2246
Finance
D909
Micro
D1345
Micro
In the M4 Daily dataset, there is a single categorical static feature that denotes the domain of origin for each time series.
We attach the static features to a TimeSeriesDataFrame as follows
If static_features doesn’t contain some item_ids that are present in train_data, an exception will be raised.
Now, when we fit the predictor, all models that support static features will automatically use the static features included in train_data.
This message confirms that column 'domain' was interpreted as a categorical feature. In general, AutoGluon-TimeSeries supports two types of static features:
categorical: columns of dtypeobject,stringandcategoryare interpreted as discrete categoriescontinuous: columns of dtypeintandfloatare interpreted as continuous (real-valued) numberscolumns with other dtypes are ignored
To override this logic, we need to manually change the columns dtype. For example, suppose the static features data frame contained an integer-valued column "store_id".
By default, this column will be interpreted as a continuous number. We can force AutoGluon to interpret it a a categorical feature by changing the dtype to category.
Note: If training data contained static features, the predictor will expect that data passed to predictor.predict(), predictor.leaderboard(), and predictor.evaluate() also includes static features with the same column names and data types.
Time-varying covariates
Covariates are the time-varying features that may influence the target time series. They are sometimes also referred to as dynamic features, exogenous regressors, or related time series. AutoGluon supports two types of covariates:
known covariates that are known for the entire forecast horizon, such as
holidays
day of the week, month, year
promotions
past covariates that are only known up to the start of the forecast horizon, such as
sales of other products
temperature, precipitation
transformed target time series
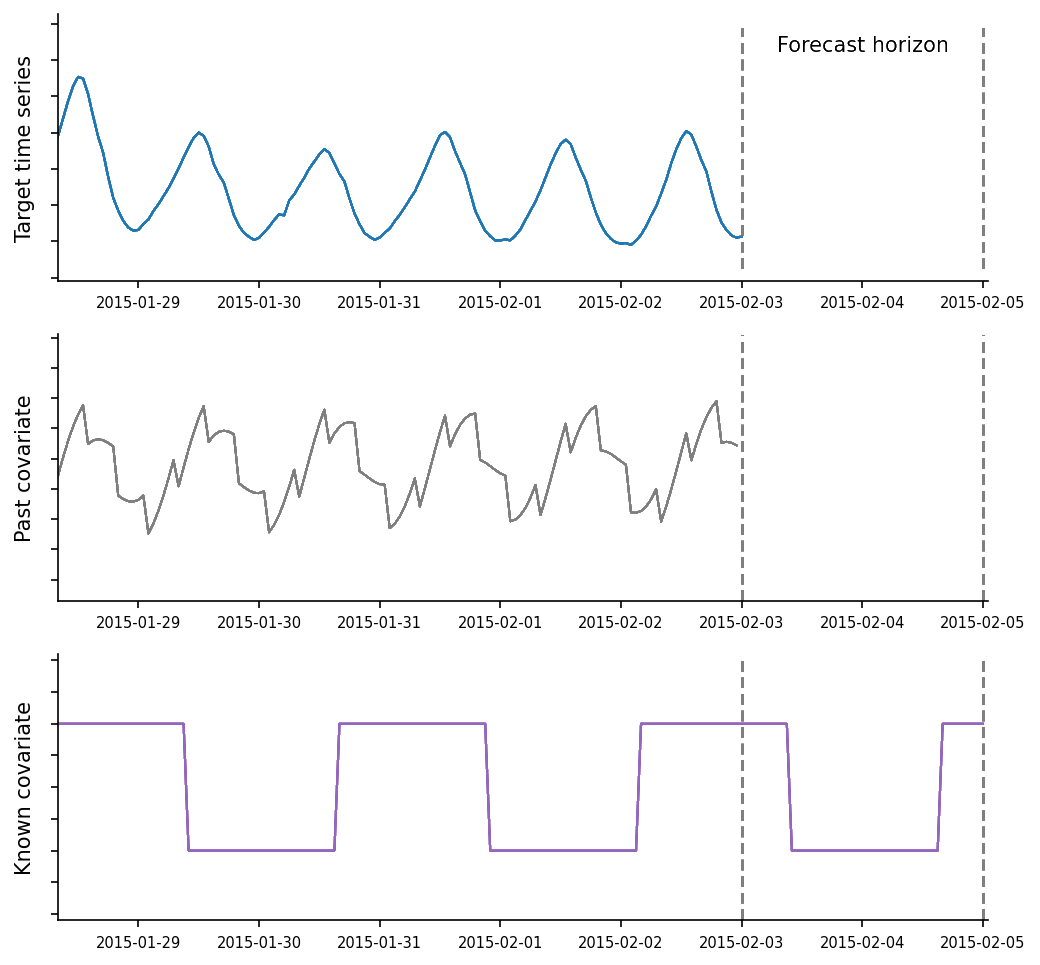
In AutoGluon, both known_covariates and past_covariates are stored as additional columns in the TimeSeriesDataFrame.
We will again use the M4 Daily dataset as an example and generate both types of covariates:
a
past_covariateequal to the logarithm of the target time series:a
known_covariatethat equals to 1 if a given day is a weekend, and 0 otherwise.
1995-05-24 12:00:00
1877.0
7.537430
0.0
1995-05-25 12:00:00
1873.0
7.535297
0.0
1995-05-26 12:00:00
1859.0
7.527794
0.0
1995-05-27 12:00:00
1876.0
7.536897
1.0
When creating the TimeSeriesPredictor, we specify that the column "target" is our prediction target, and the column "weekend" contains a covariate that will be known at prediction time.
Predictor will automatically interpret the remaining columns (except target and known covariates) as past covariates. This information is logged during fitting:
Finally, to make predictions, we generate the known covariates for the forecast horizon
1997-05-28 12:00:00
0.0
1997-05-29 12:00:00
0.0
1997-05-30 12:00:00
0.0
1997-05-31 12:00:00
1.0
1997-06-01 12:00:00
1.0
Note that known_covariates must satisfy the following conditions:
The columns must include all columns listed in
predictor.known_covariates_namesThe
item_idindex must include all item ids present intrain_dataThe
timestampindex must include the values forprediction_lengthmany time steps into the future from the end of each time series intrain_data
If known_covariates contain more information than necessary (e.g., contain additional columns, item_ids, or timestamps), AutoGluon will automatically select the necessary rows and columns.
Finally, we pass the known_covariates to the predict function to generate predictions
The list of models that support static features and covariates is available in Forecasting Model Zoo.
Which forecasting models are available in AutoGluon?
Forecasting models in AutoGluon can be divided into three broad categories: local, global, and ensemble models.
Local models are simple statistical models that are specifically designed to capture patterns such as trend or seasonality. Despite their simplicity, these models often produce reasonable forecasts and serve as a strong baseline. Some examples of available local models:
ETSARIMAThetaSeasonalNaive
If the dataset consists of multiple time series, we fit a separate local model to each time series — hence the name “local”. This means, if we want to make a forecast for a new time series that wasn’t part of the training set, all local models will be fit from scratch for the new time series.
Global models are machine learning algorithms that learn a single model from the entire training set consisting of multiple time series. Most global models in AutoGluon are provided by the GluonTSlibrary. These are neural-network algorithms (implemented in PyTorch or MXNet), such as:
DeepARSimpleFeedForwardTemporalFusionTransformer
AutoGluon also offers a tree-based global model AutoGluonTabular. Under the hood, this model converts the forecasting task into a regression problem and uses a TabularPredictor to fit gradient-boosted tree algorithms like XGBoost, CatBoost, and LightGBM.
Finally, an ensemble model works by combining predictions of all other models. By default, TimeSeriesPredictor always fits a WeightedEnsemble on top of other models. This can be disabled by setting enable_ensemble=False when calling the fit method.
For a list of tunable hyperparameters for each model, their default values, and other details see Forecasting Model Zoo.
How does AutoGluon evaluate performance of time series models?
AutoGluon evaluates the performance of forecasting models by measuring how well their forecasts align with the actually observed time series. We can evaluate the performance of a trained predictor on test_data using the evaluate method
For each time series in test_data, the predictor does the following:
Hold out the last
prediction_lengthvalues of the time series.Generate a forecast for the held out part of the time series, i.e., the forecast horizon.
Quantify how well the forecast matches the actually observed (held out) values of the time series using the
eval_metric.
Finally, the scores are averaged over all time series in the dataset.
The crucial detail here is that evaluate always computes the score on the last prediction_length time steps of each time series. The beginning of each time series (except the last prediction_length time steps) is only used to initialize the models before forecasting.
Multi-window backtesting
If we want to perform multi-window backtesting (i.e., evaluate performance on multiple forecast horizons generated from the same time series), we need to generate a new test set with multiple copies for each original time series. This can be done using a MultiWindowSplitter.
The new test set test_data_multi_window will now contain up to num_windows time series for each original time series in test_data. The score will be computed on the last prediction_length time steps of each time series (marked in orange).
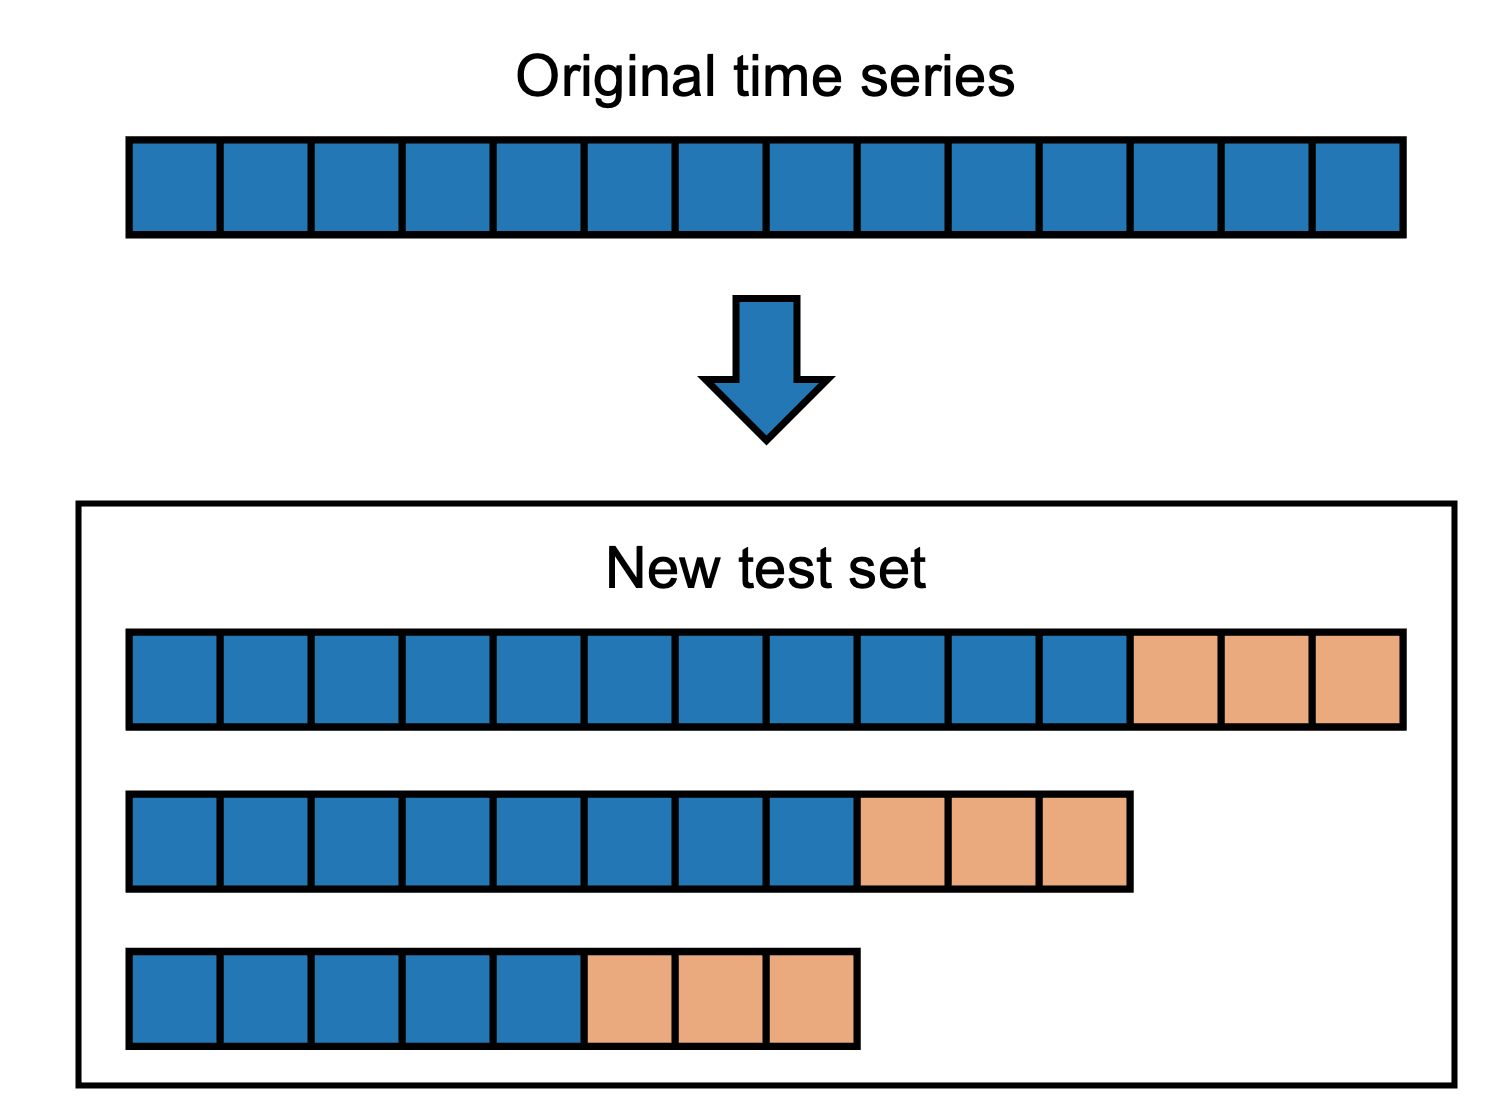
Multi-window backtesting typically results in more accurate estimation of the forecast quality on unseen data. However, this strategy decreases the amount of training data available for fitting models, so we recommend using single-window backtesting if the training time series are short.
How to choose and interpret the evaluation metric?
Different evaluation metrics capture different properties of the forecast, and therefore depend on the application that the user has in mind. For example, weighted quantile loss ("mean_wQuantileLoss") measures how well-calibrated the quantile forecast is; mean absolute scaled error ("MASE") compares the mean forecast to the performance of a naive baseline. For more details about the available metrics, see the documentation for autogluon.timeseries.evaluator.TimeSeriesEvaluator.
Note that AutoGluon always reports all metrics in a higher-is-better format. For this purpose, some metrics are multiplied by -1. For example, if we set eval_metric="MASE", the predictor will actually report -MASE (i.e., MASE score multiplied by -1). This means the test_score will be between 0 (best possible forecast) and (worst possible forecast).
How does AutoGluon perform validation?
When we fit the predictor with predictor.fit(train_data=train_data), under the hood AutoGluon further splits the original dataset train_data into train and validation parts.
Performance of different models on the validation set is evaluated using the evaluate method, just like described above in “How does AutoGluon evaluate performance of time series models?”. The model that achieves the best validation score will be used for prediction in the end.
By default, the internal validation set uses the last prediction_length time steps of each time series (i.e., single-window backtesting). To use multi-window backtesting instead, set the validation_splitter argument to "multi_window"
or pass a MultiWindowSplitter object
Alternatively, a user can provide their own validation set to the fit method and forego using the splitter completely. In this case it’s important to remember that the validation score is computed on the last prediction_length time steps of each time series.
What functionality does TimeSeriesPredictoroffer?
TimeSeriesPredictoroffer?AutoGluon offers multiple ways to configure the behavior of a TimeSeriesPredictor that are suitable for both beginners and expert users.
Basic configuration with presets and time_limit
presets and time_limitWe can fit TimeSeriesPredictor with different pre-defined configurations using the presets argument of the fit method.
Higher quality presets usually result in better forecasts but take longer to train. The following presets are available:
"fast_training": fit simple “local” statistical models (ETS,ARIMA,Theta,Naive,SeasonalNaive). These models are fast to train, but cannot capture more complex patterns in the data."medium_quality": all models in"fast_training"in addition to the tree-basedAutoGluonTabular, automatically tuned local modelAutoETSand theDeepARdeep learning model. Default setting that produces good forecasts with reasonable training time."high_quality": all models in"medium_quality"in addition to two more deep learning models:TemporalFusionTransformerandSimpleFeedForward. Moreover, this preset will enable hyperparameter optimization for local statistical models. Usually more accurate thanmedium_quality, but takes longer to train."best_quality": all models in"high_quality"in addition to the transformer-basedTransformerMXNetmodel (if MXNet is available). This setting also enables hyperparameter optimization for deep learning models. Usually better thanhigh_quality, but takes much longer to train.
Another way to control the training time is using the time_limit argument.
If no time_limit is provided, the predictor will train until all models have been fit.
Manually configuring models
Advanced users can override the presets and manually specify what models should be trained by the predictor using the hyperparameters argument.
The code above will only train two models:
DeepAR(with default hyperparameters)ETS(with the givenseasonal_period; all other parameters set to their defaults).
For the full list of available models and the respective hyperparameters, see Forecasting Model Zoo.
Hyperparameter tuning
Advanced users can define search spaces for model hyperparameters and let AutoGluon automatically determine the best configuration for the model.
This code will train multiple versions of the DeepAR model with 10 different hyperparameter configurations. AutGluon will automatically select the best model configuration that achieves the highest validation score and use it for prediction.
AutoGluon uses different hyperparameter optimization (HPO) backends for different models:
Ray Tune for GluonTS models implemented in
MXNet(e.g.,DeepARMXNet,TemporalFusionTransformerMXNet)Custom backend implementing random search for all other models
We can change the number of random search runs by passing a dictionary as hyperparameter_tune_kwargs
The hyperparameter_tune_kwargs dict must include the following keys:
"num_trials": int, number of configurations to train for each tuned model"searcher": one of"random"(random search),"bayes"(bayesian optimization for GluonTS MXNet models, random search for other models) and"auto"(same as"bayes")."scheduler": the only supported option is"local"(all models trained on the same machine)
Note: HPO significantly increases the training time for most models, but often provides only modest performance gains.
Forecasting irregularly-sampled time series & handling missing data
By default, TimeSeriesPredictor expects the time series data to be regularly sampled (e.g., measurements done every day). However, in some applications, like finance, data often comes with irregular measurements (e.g., no stock price is available for weekends or holidays). AutoGluon provides two options for working with such data.
Option 1: Extend the index and fill missing values
Here is an example of a dataset with an irregular time index:
item_id
timestamp
0
2022-01-01
1
2022-01-02
2
2022-01-04
3
1
2022-01-01
4
2022-01-04
5
We can fill the gaps in the time index using the method TimeSeriesDataFrame.to_regular_index(). Here we specify freq="D" to indicate that the filled index must have a daily frequency (see other possible choices in pandas documentation).
item_id
timestamp
0
2022-01-01
1.0
2022-01-02
2.0
2022-01-03
NaN
2022-01-04
3.0
1
2022-01-01
4.0
2022-01-02
NaN
2022-01-03
NaN
2022-01-04
5.0
We can verify that the index is now regular and has a daily frequency
However, now the data contains missing values represented by NaN. To fill the NaNs, we use the method TimeSeriesDataFrame.fill_missing_values() that implements various imputation strategies.
item_id
timestamp
0
2022-01-01
1.0
2022-01-02
2.0
2022-01-03
2.0
2022-01-04
3.0
1
2022-01-01
4.0
2022-01-02
4.0
2022-01-03
4.0
2022-01-04
5.0
Now the data has a regular index and contains no missing values, so it can be used to train a TimeSeriesPredictor.
Option 2: Completely ignore the time index
This can be done by setting the ignore_time_index flag in the predictor.
In this case, the following will happen
the predictor will completely ignore the timestamps in
train_data;predictions will have a dummy
timestampindex with an arbitrary starting date and frequency equal to 1 second;seasonality will be disabled for models like as
ETSandARIMA.
Last updated