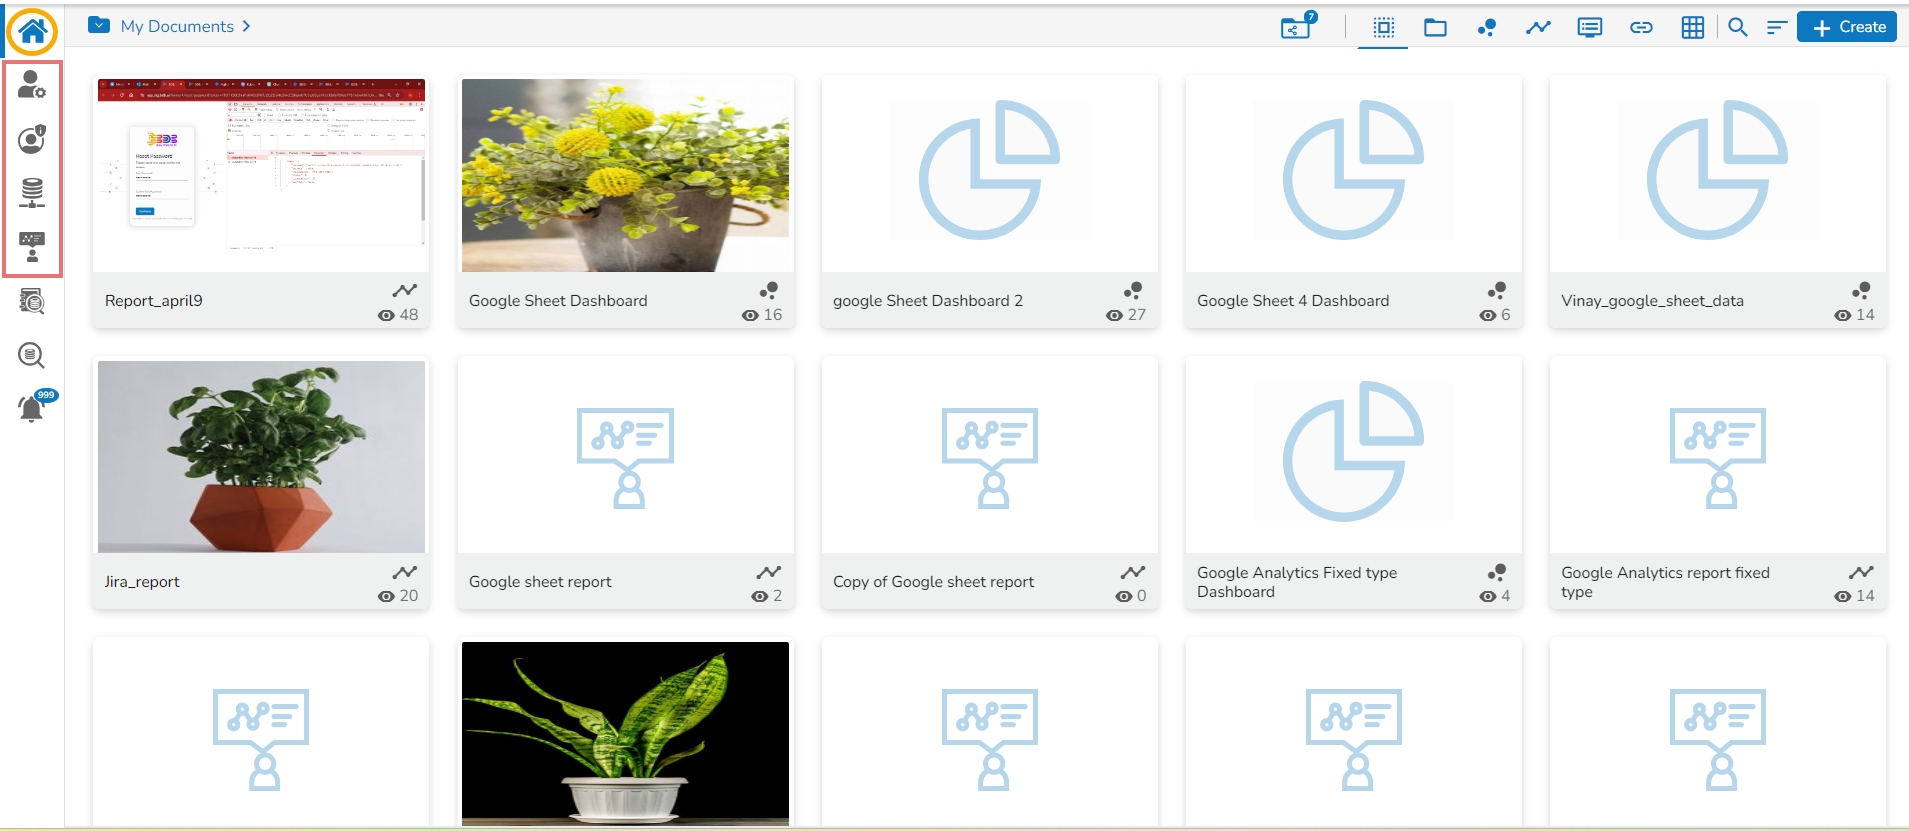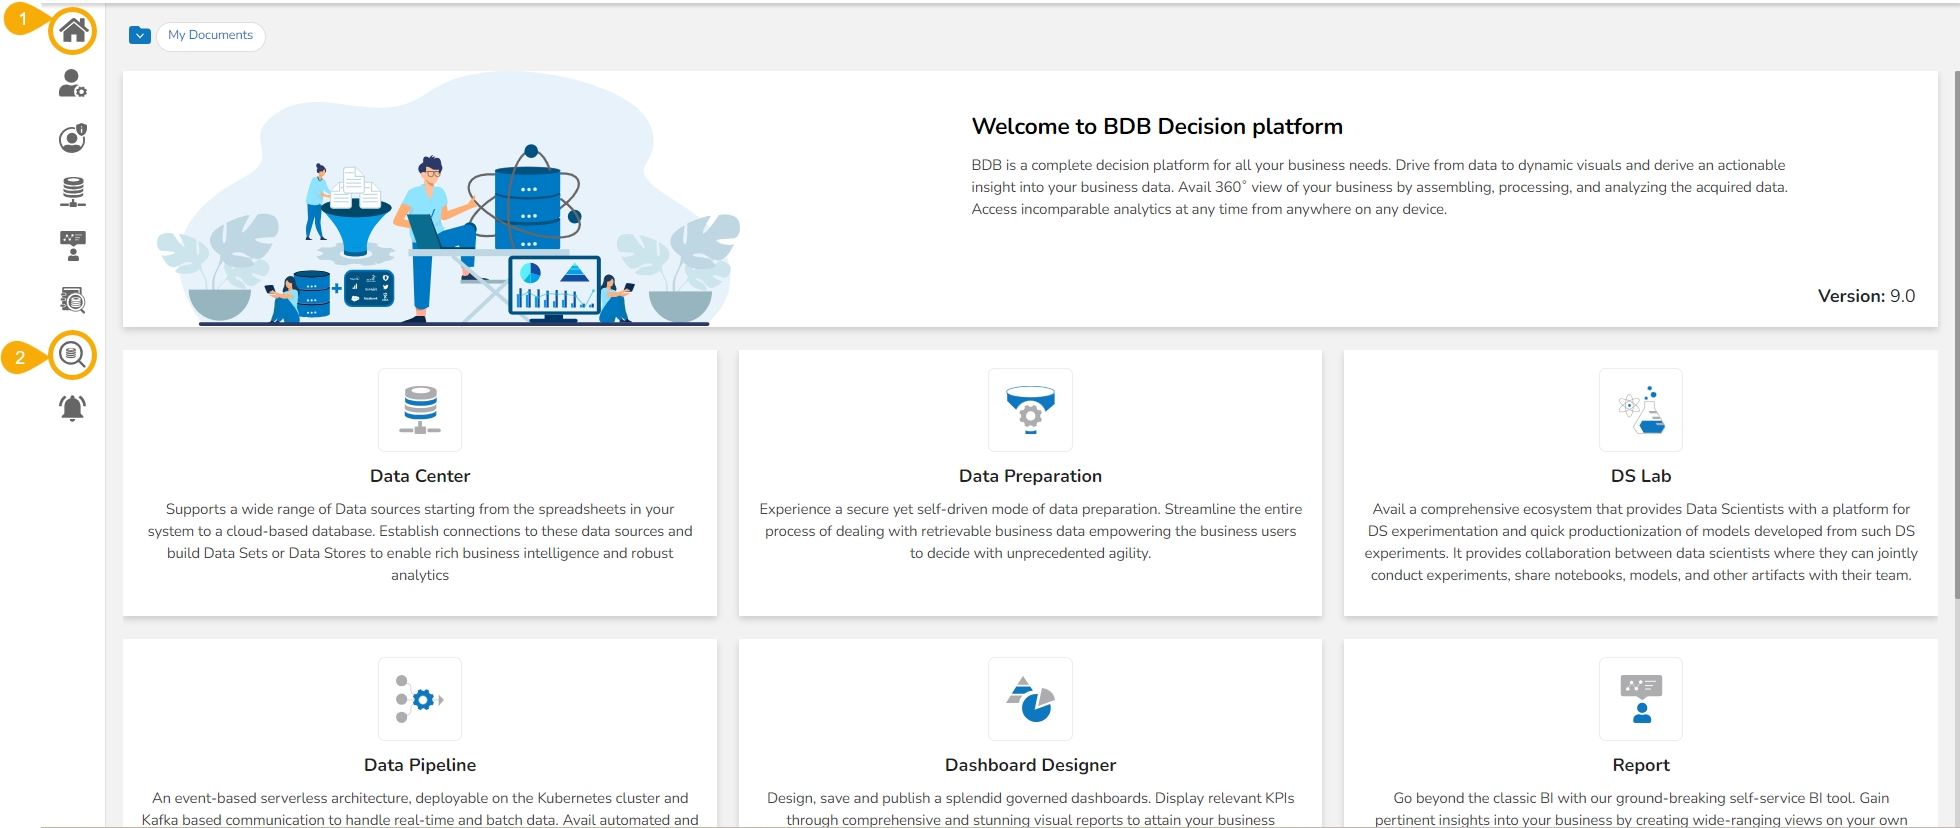
The Platform Homepage displays icons of the Admin, Security, Data Center, and Report modules on the homepage to make them easily available for the user.
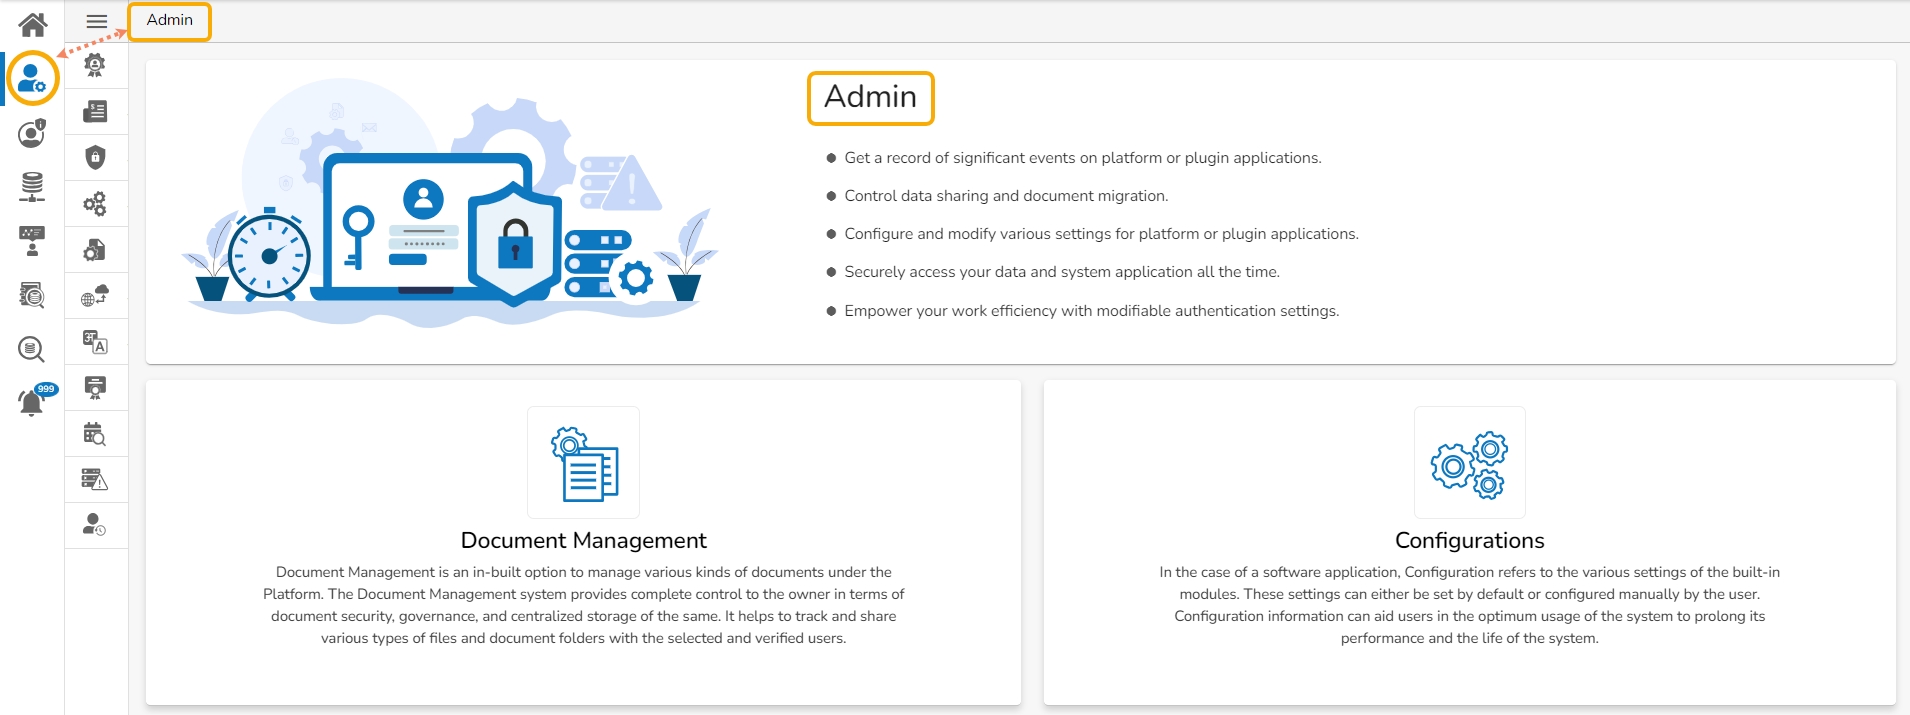
The user can click on a module icon from the left menu panel to get redirected to that module. E.g., In the below-given image by clicking the Admin icon, the user is redirected to the Admin module's homepage.
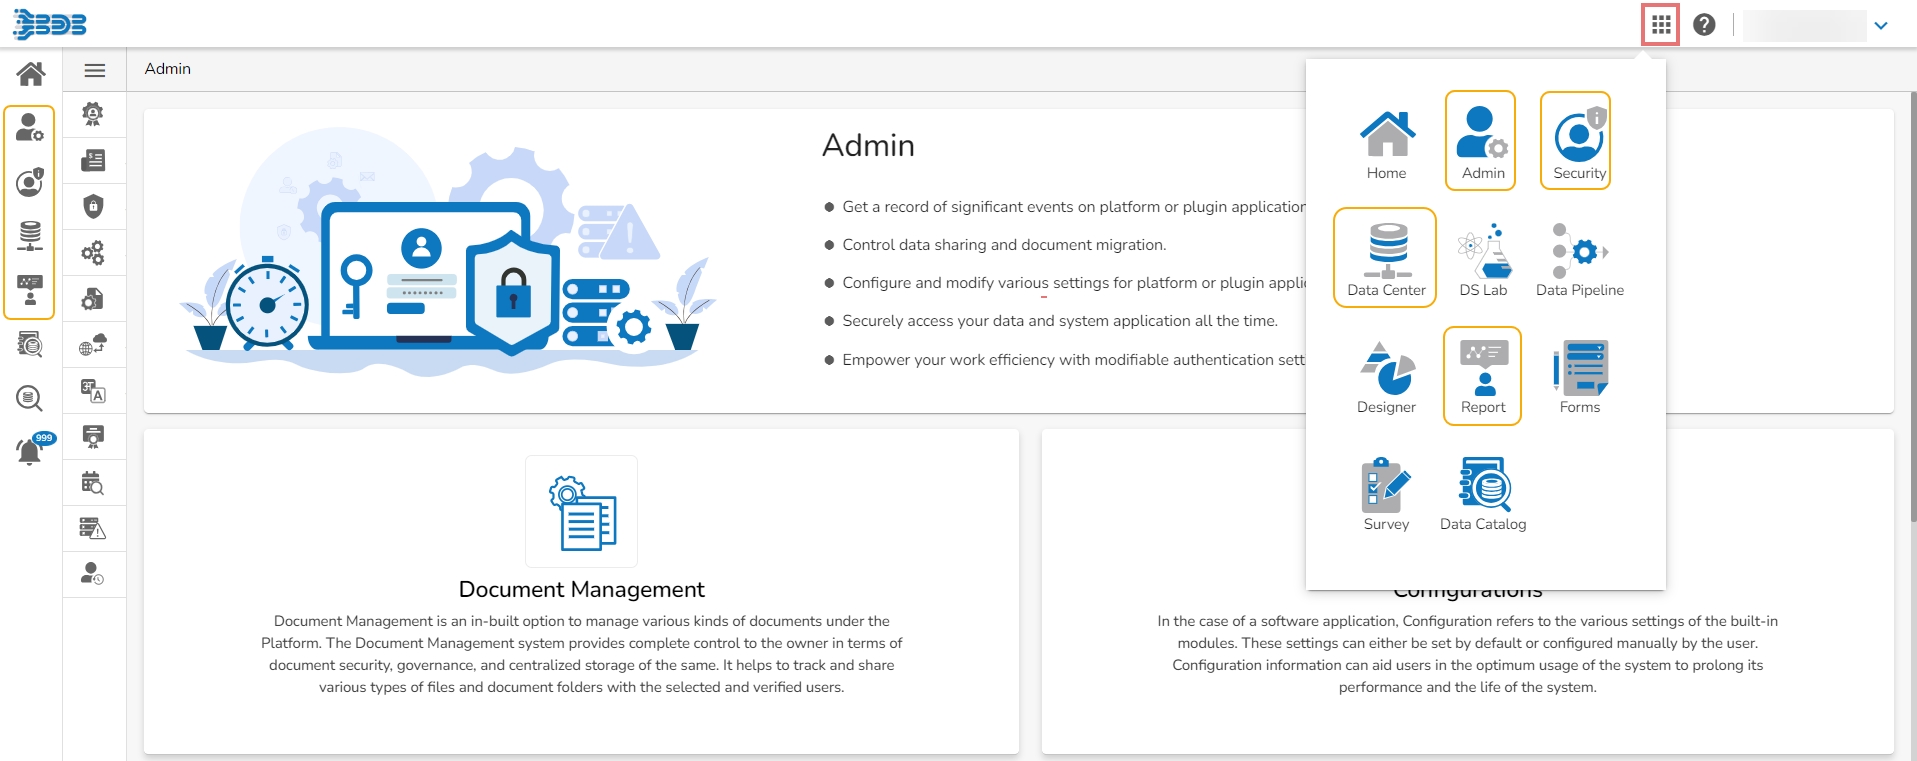
The user can also access these modules (Admin, Security, Data Center, and Report) with the Home module icon under the Apps menu.
This section explains the Left-side Menu panel given on the Platform Homepage.
Data Search enables the user to create their data stories based on the textual and voice based search option.
The Data Search feature facilitates the user to search specific data queries across the Data Stores using text or voice. The user can drill into any granularity of the data using this interactive Data Search option.
Check out the given illustration to understand the Data Search functionality.
Navigate to the Platform homepage.
Click the Data Search icon provided on the left side panel.
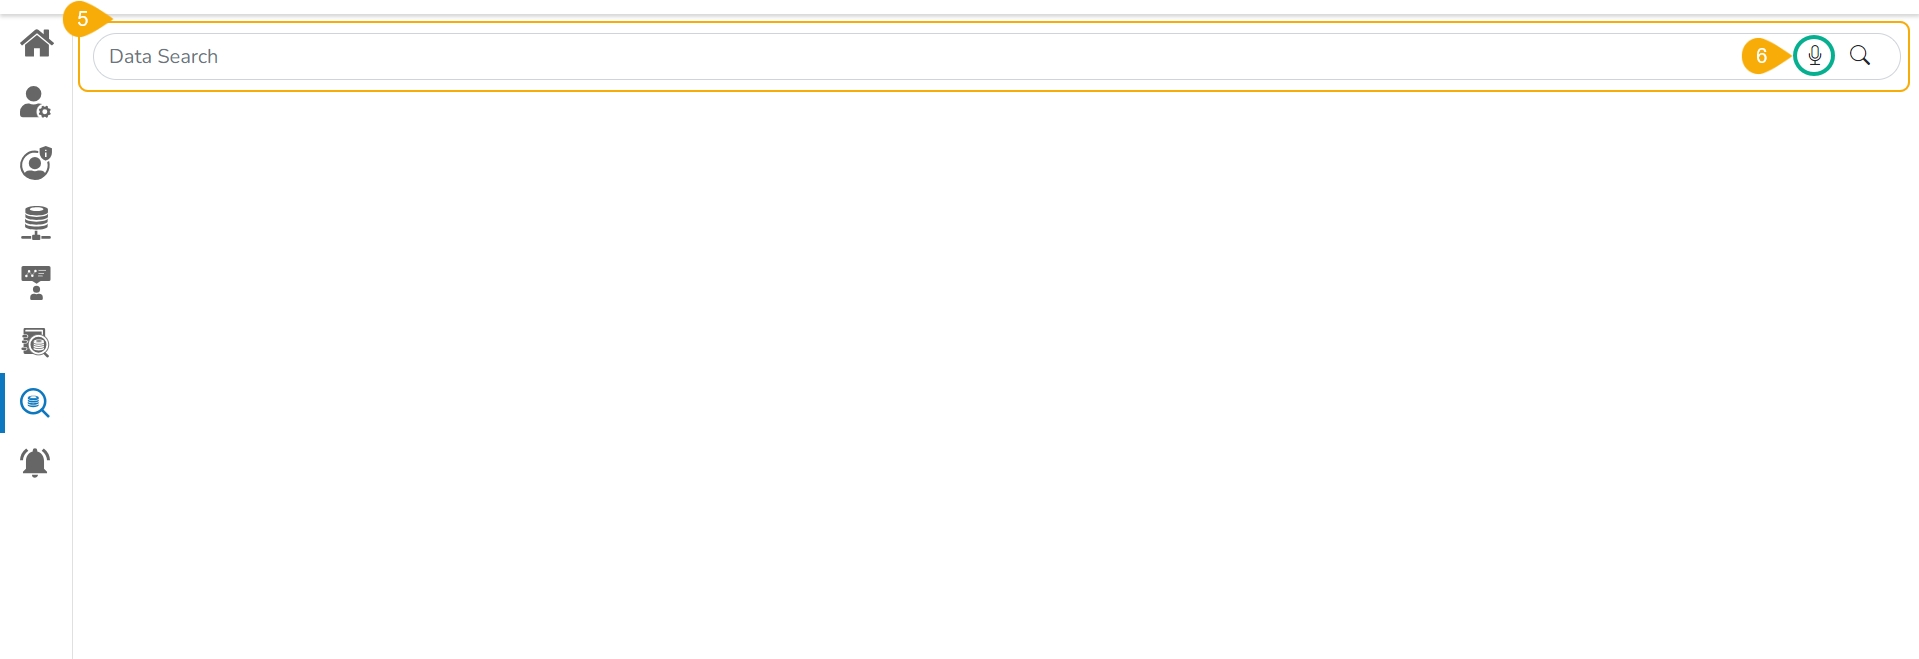
The DATA SEARCH page opens.
The user can use the given space to begin their data search.
The user gets redirected to the following page by clicking the Search space.
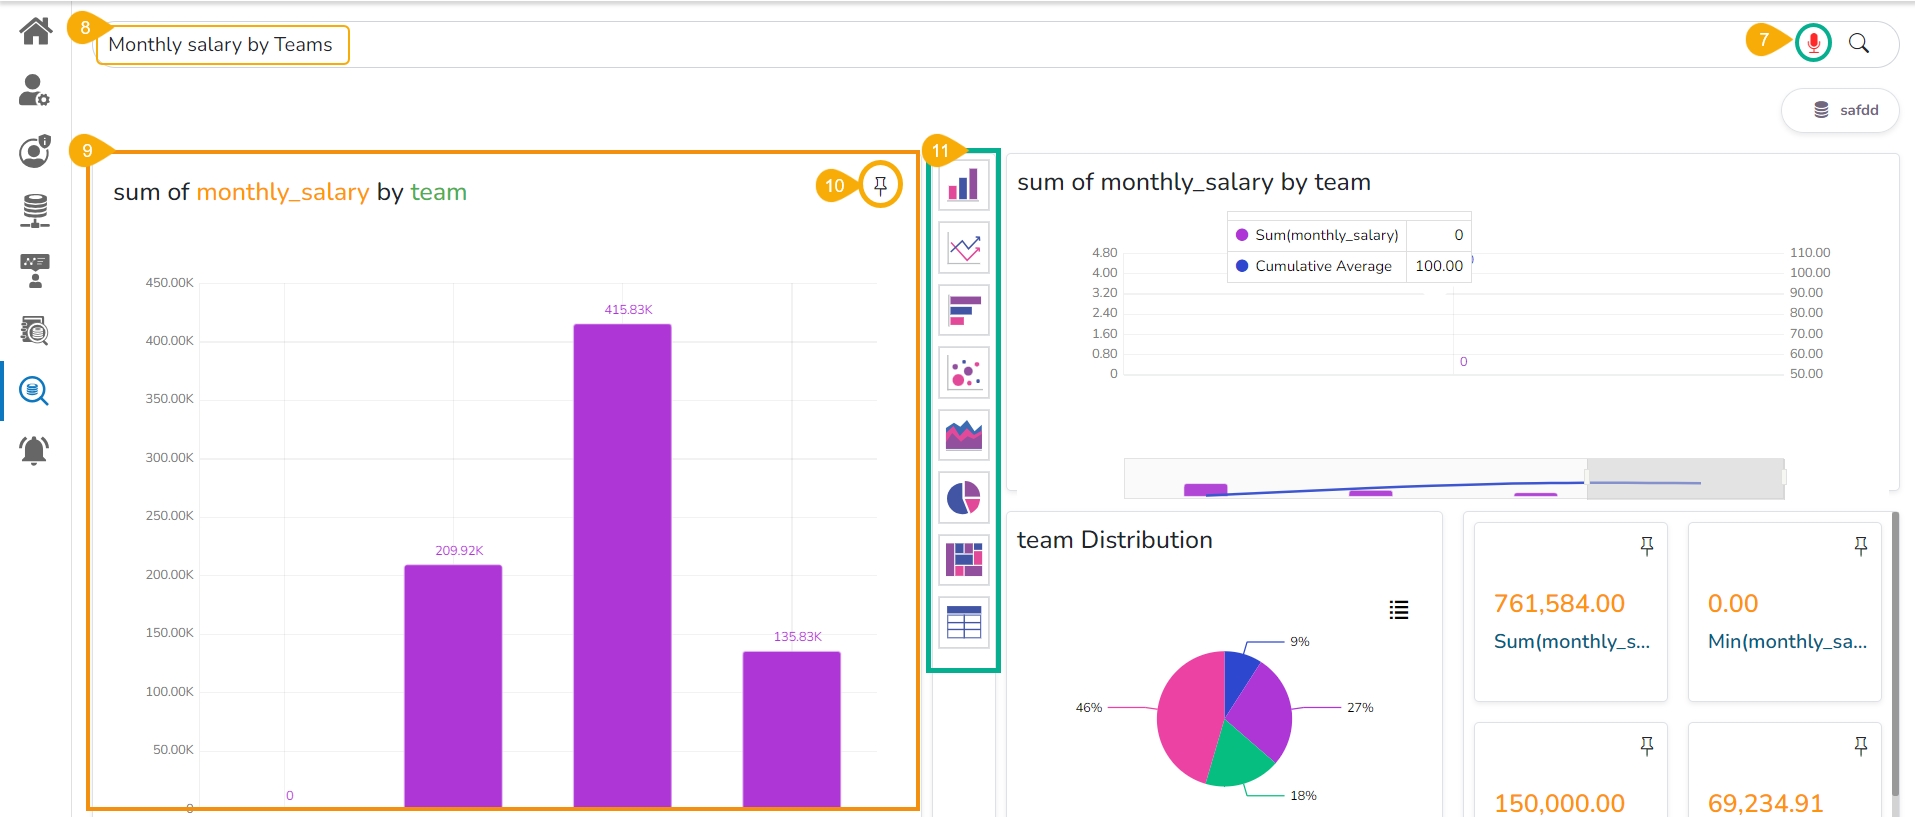
Click the microphone icon to use the voice search.
By clicking the microphone the icon turns red and keeps blinking till you enter your voice search.
As soon as your search query gets entered either through text or voice.
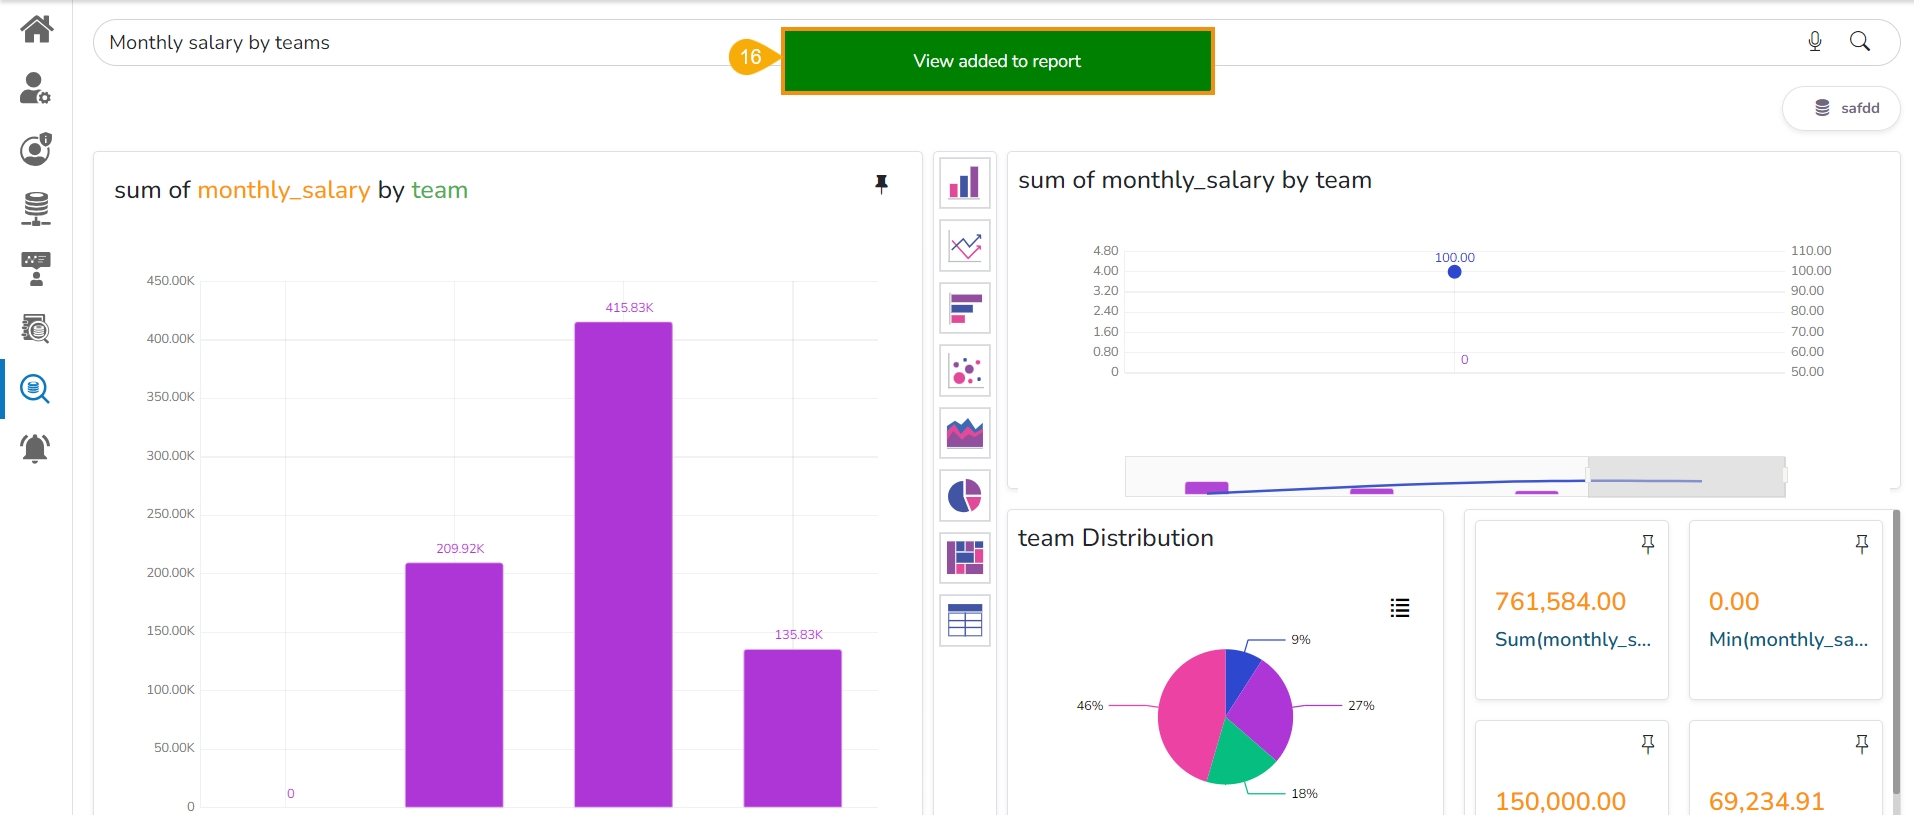
The searched data query result appears below on the screen. E.g., the given image displays the Sum of the monthly salary.
The user can pin the displayed result.
The user can visualize the same data using other charting options provided in the chart menu.
Please Note: The Data Store from where Global Search gets the data to plot the charts will also be mentioned on the top right side of the Global Search page.
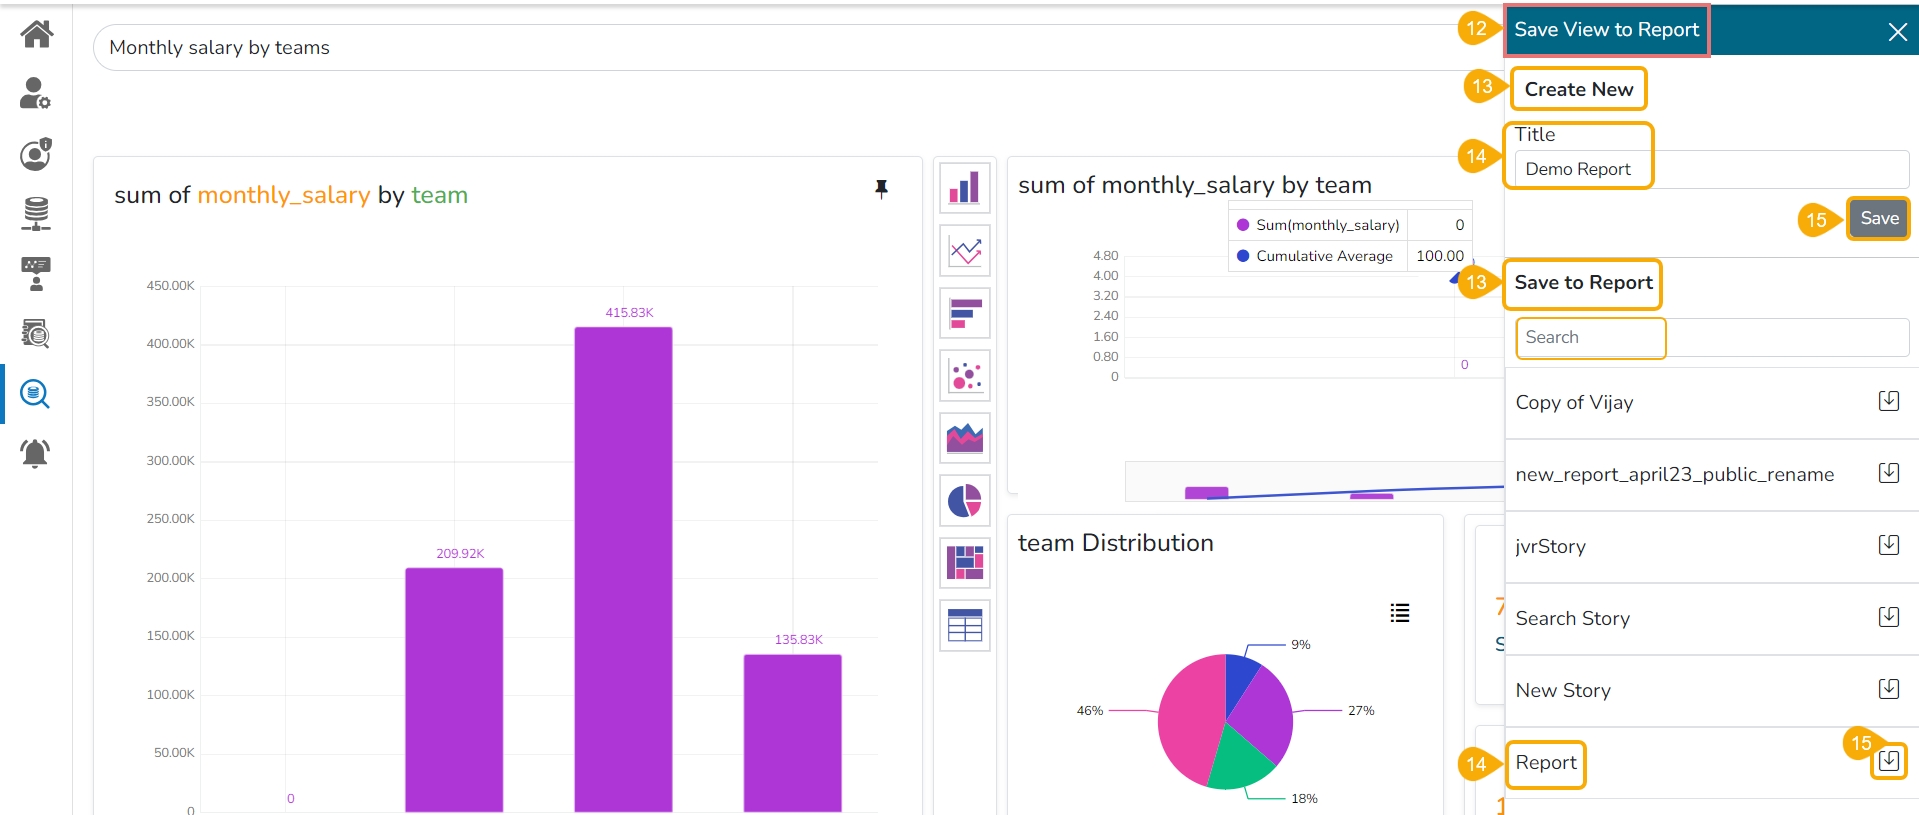
By clicking the Pin icon the Save View to Report drawer opens on the right side of the screen.
Either Create a New Report to save the search result View.
Provide a Title for a new Report.
Click the Save option.
Or select an existing Report to save the search result View.
Select an existing Report from the list.
Click the Save to Report icon.
Please Note: Use the Search bar to search for a report from the displayed list.
A notification message informs the user that the searched View has been added to the Report.
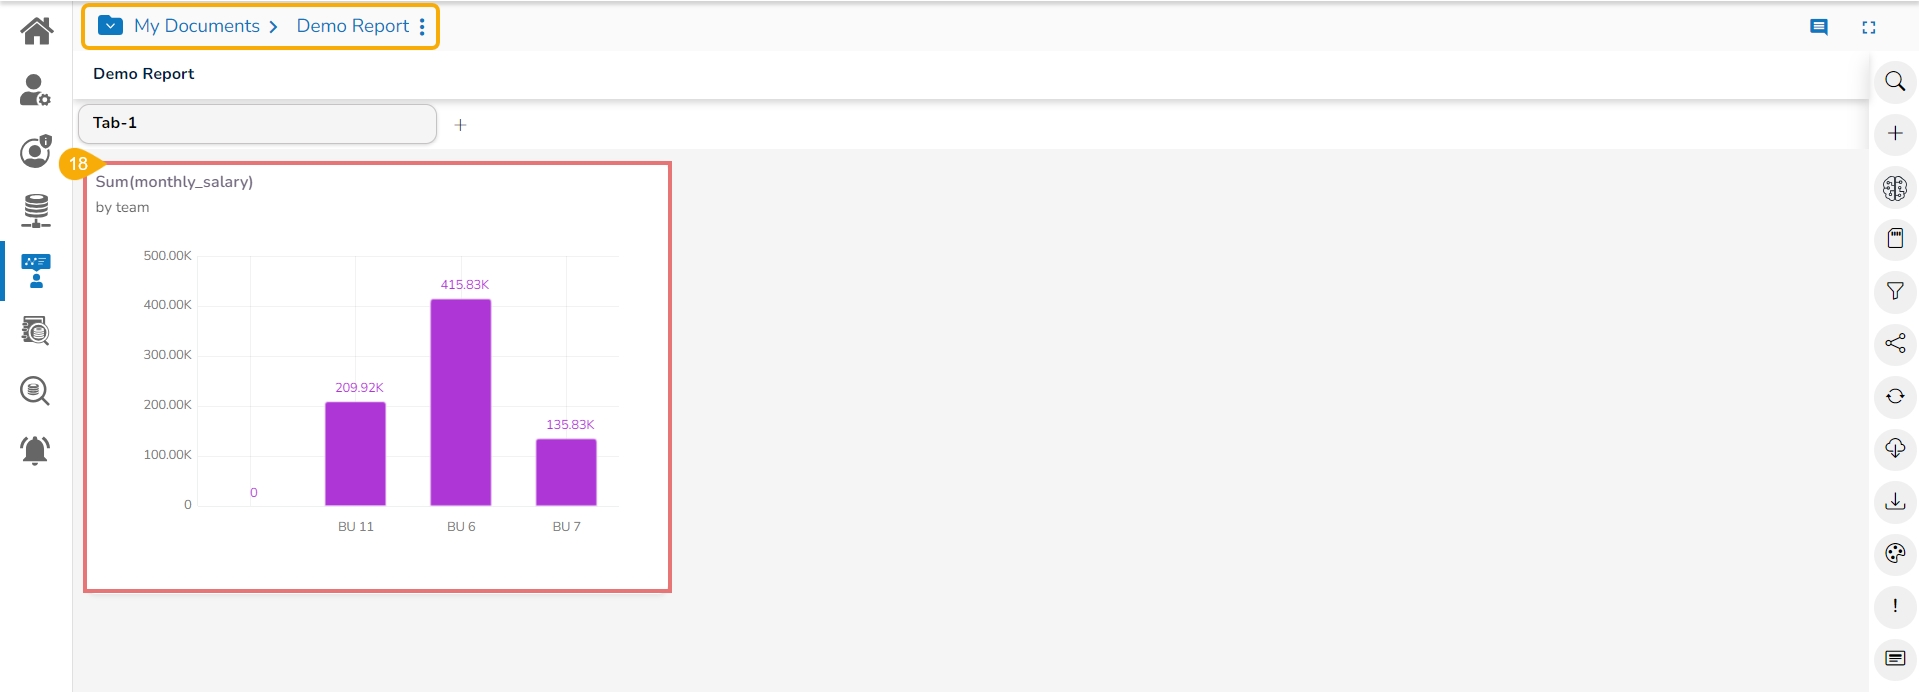
Navigate to the concerned Reports. The Reports will be available under the My Documents.
The searched View can be seen added to the Report.
The Notification feature is a way to send and receive messages from processes to people (the platform user). By default, it has Inbox and Trash folders. The data store refresh and copy of a story document get communicated through this feature.
Click the Notification option using the Platform homepage header (the Notification icon appears with the count of unread notifications).
A window opens with the latest 3 notifications.
Click the See All option.
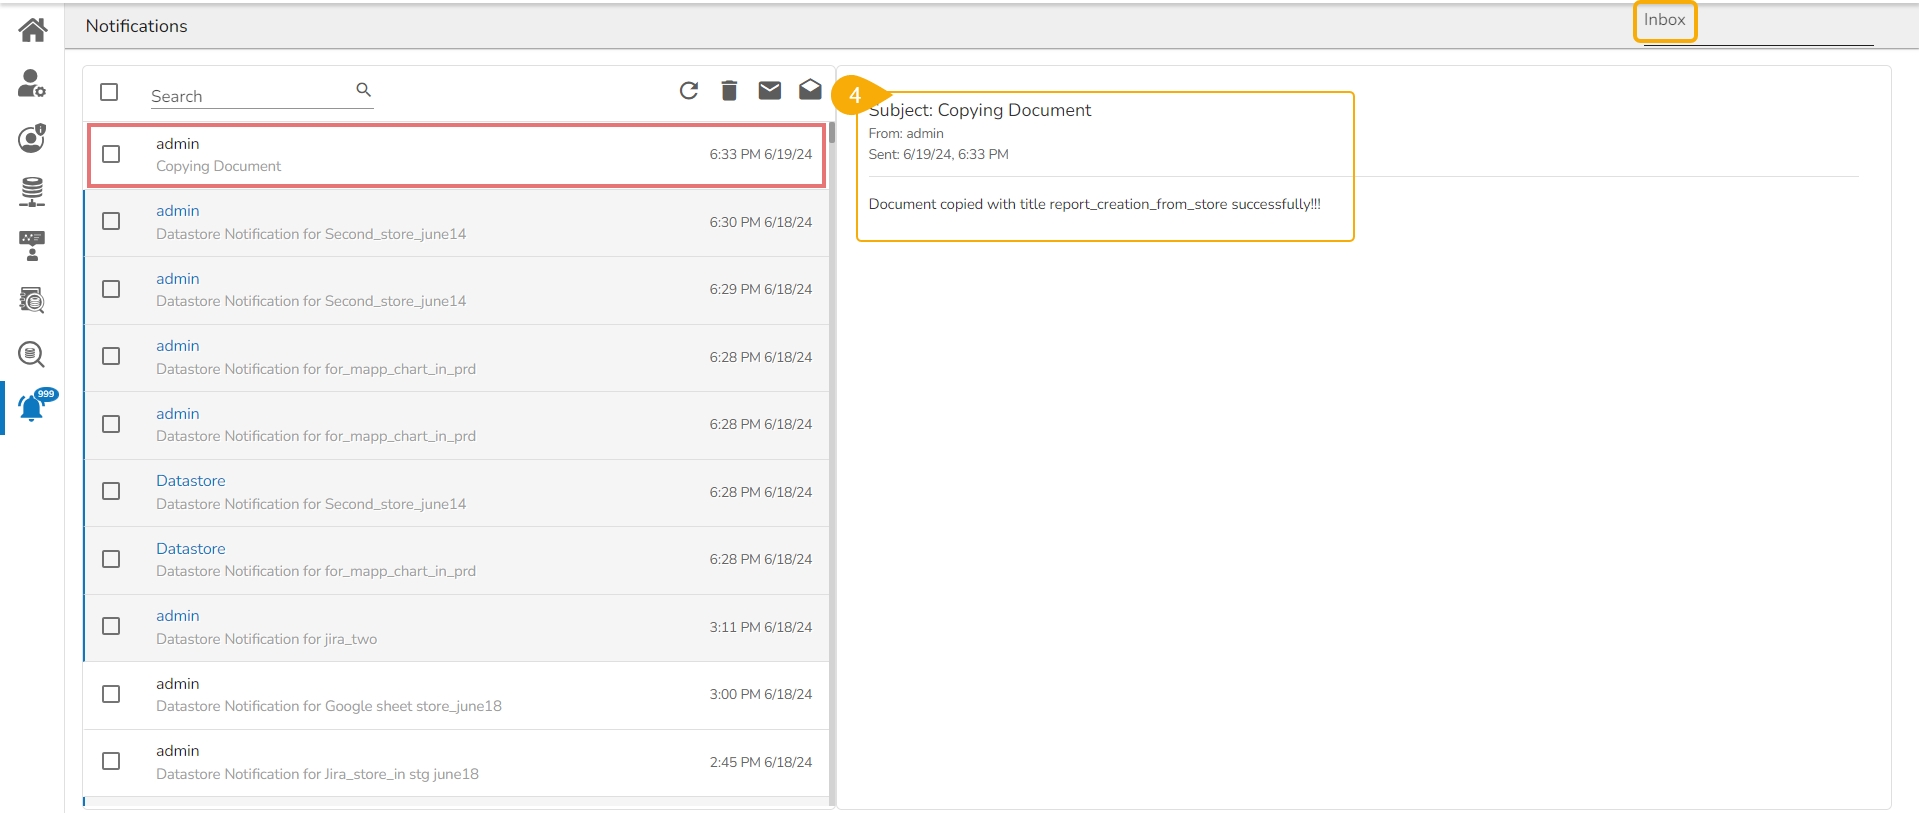
The notification Inbox page opens displaying the latest notification in detail (by default).
Please Note: Unread Notifications are indicated through numbers on the Notification icon.
Icons provided on the inbox window:
Icons
Name
Task Assigned
Refresh
Receives the latest messages
Delete
Moves the selected messages to the Trash folder
Mark unread
Marks messages status as ‘unread’
Mark read
Marks messages status as ‘read’
Select a notification using the checkbox.
Click the Delete icon from the header panel of the notification inbox.
A dialog box appears to confirm from the user's end to move the selected notification to Trash.
Click the Yes option to move the notification(s) to Trash.
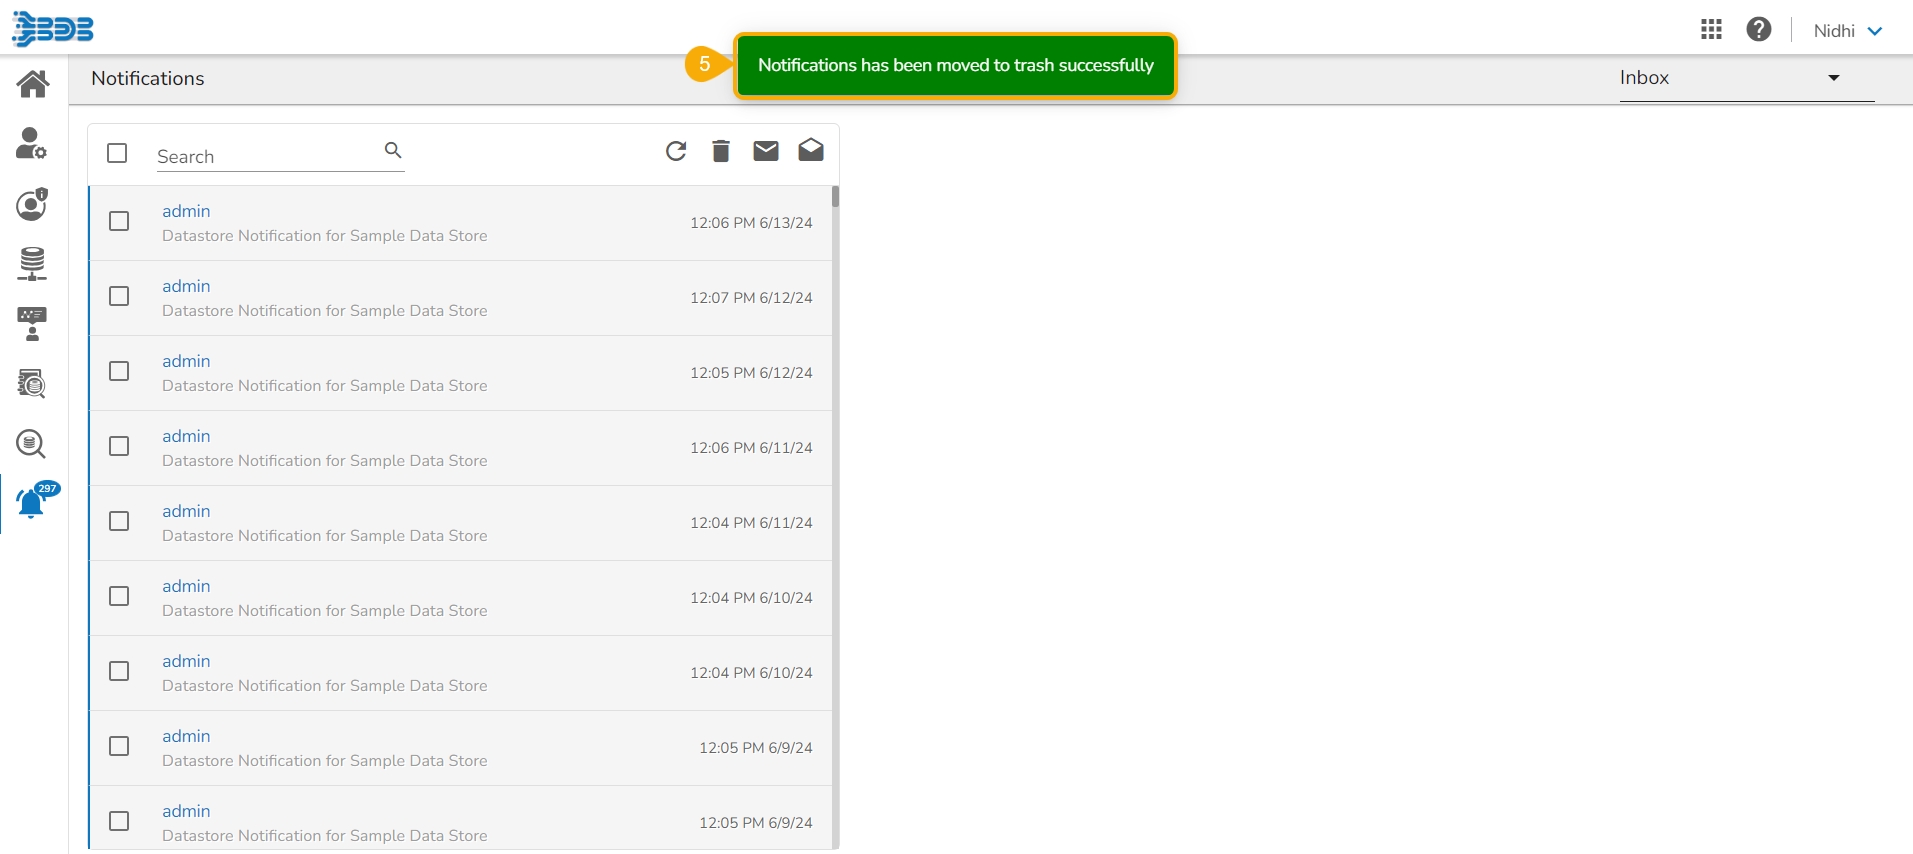
A message ensures that the selected notification(s) has been moved to the Trash folder.
Select the Trash option from the drop-down and click on it.
The notifications under the Trash folder get displayed (by default the latest notification opens in details).
Navigate to the notification list under the Trash folder.
Select a notification using the checkbox.
Click the Move to Inbox icon from the header panel.
A dialog box confirms the intended action of moving the selected notification to the Inbox.
Click the Yes option to move the notification(s) to recover the Notification.
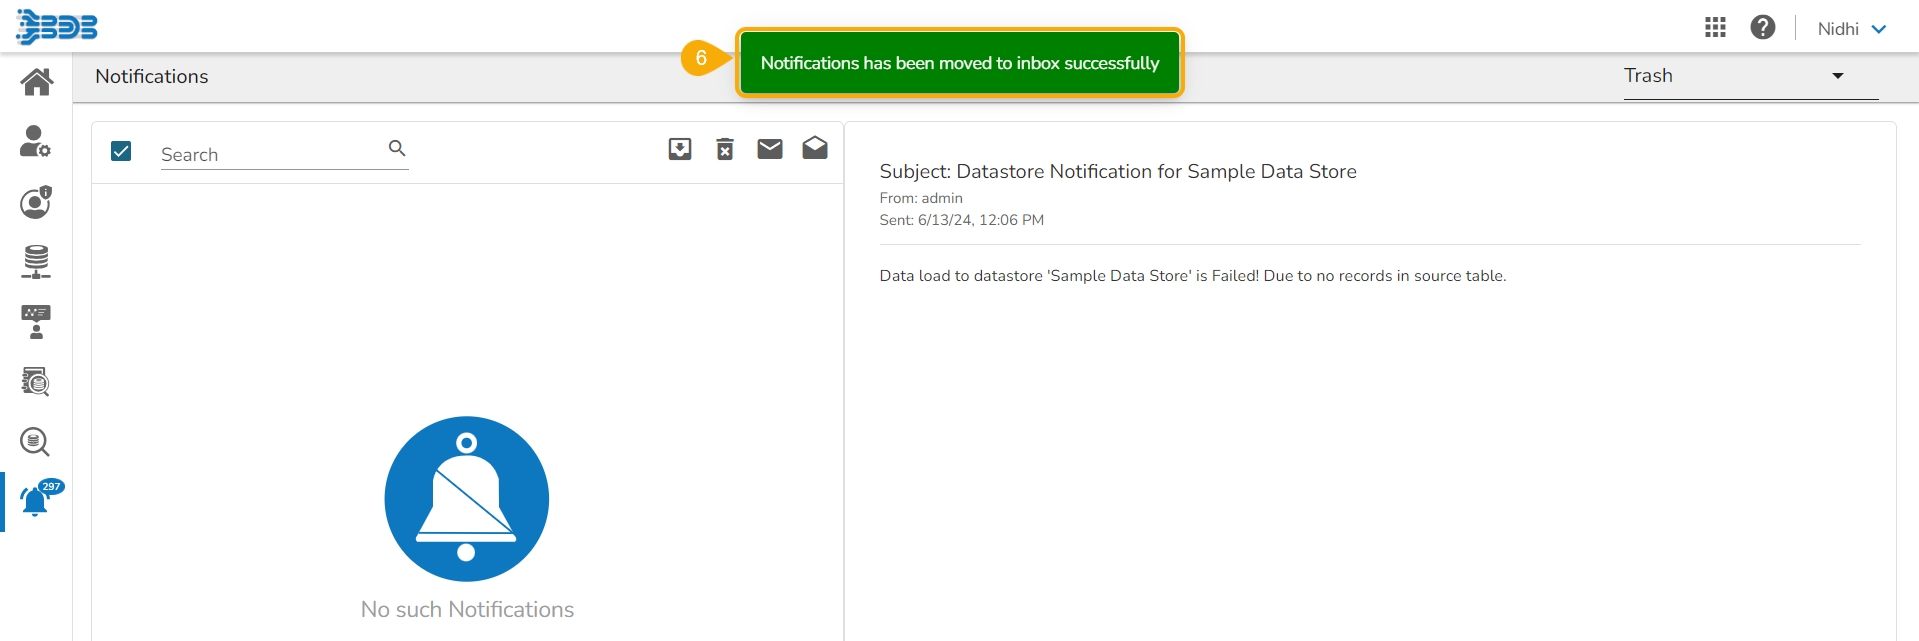
A message appears to ensure that the selected notification has been recovered. The selected notification is moved back to the Inbox folder.
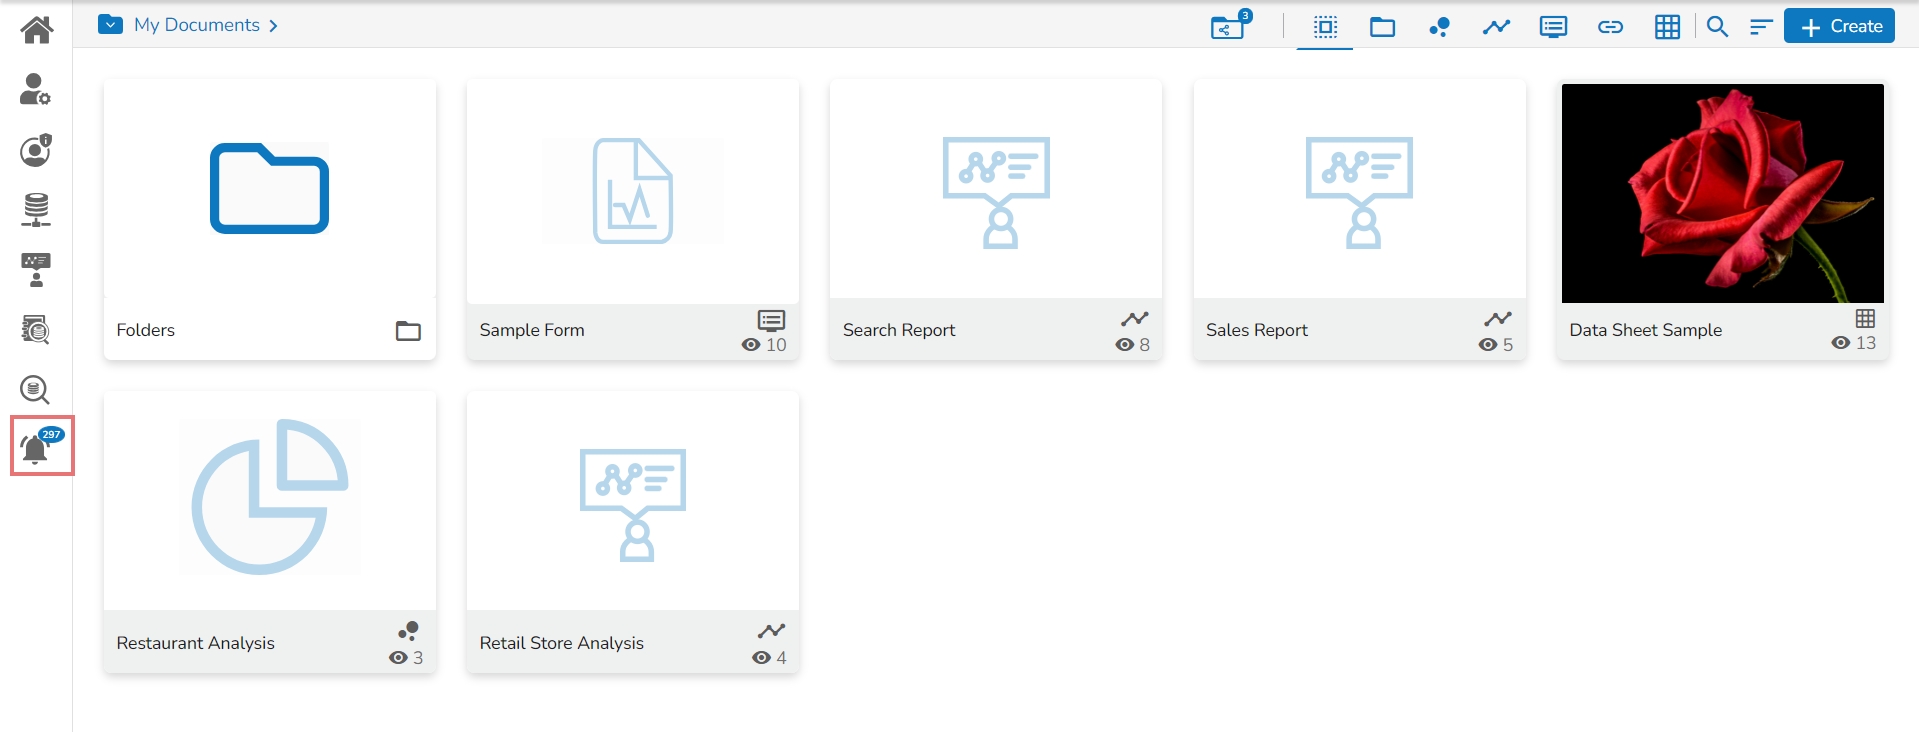
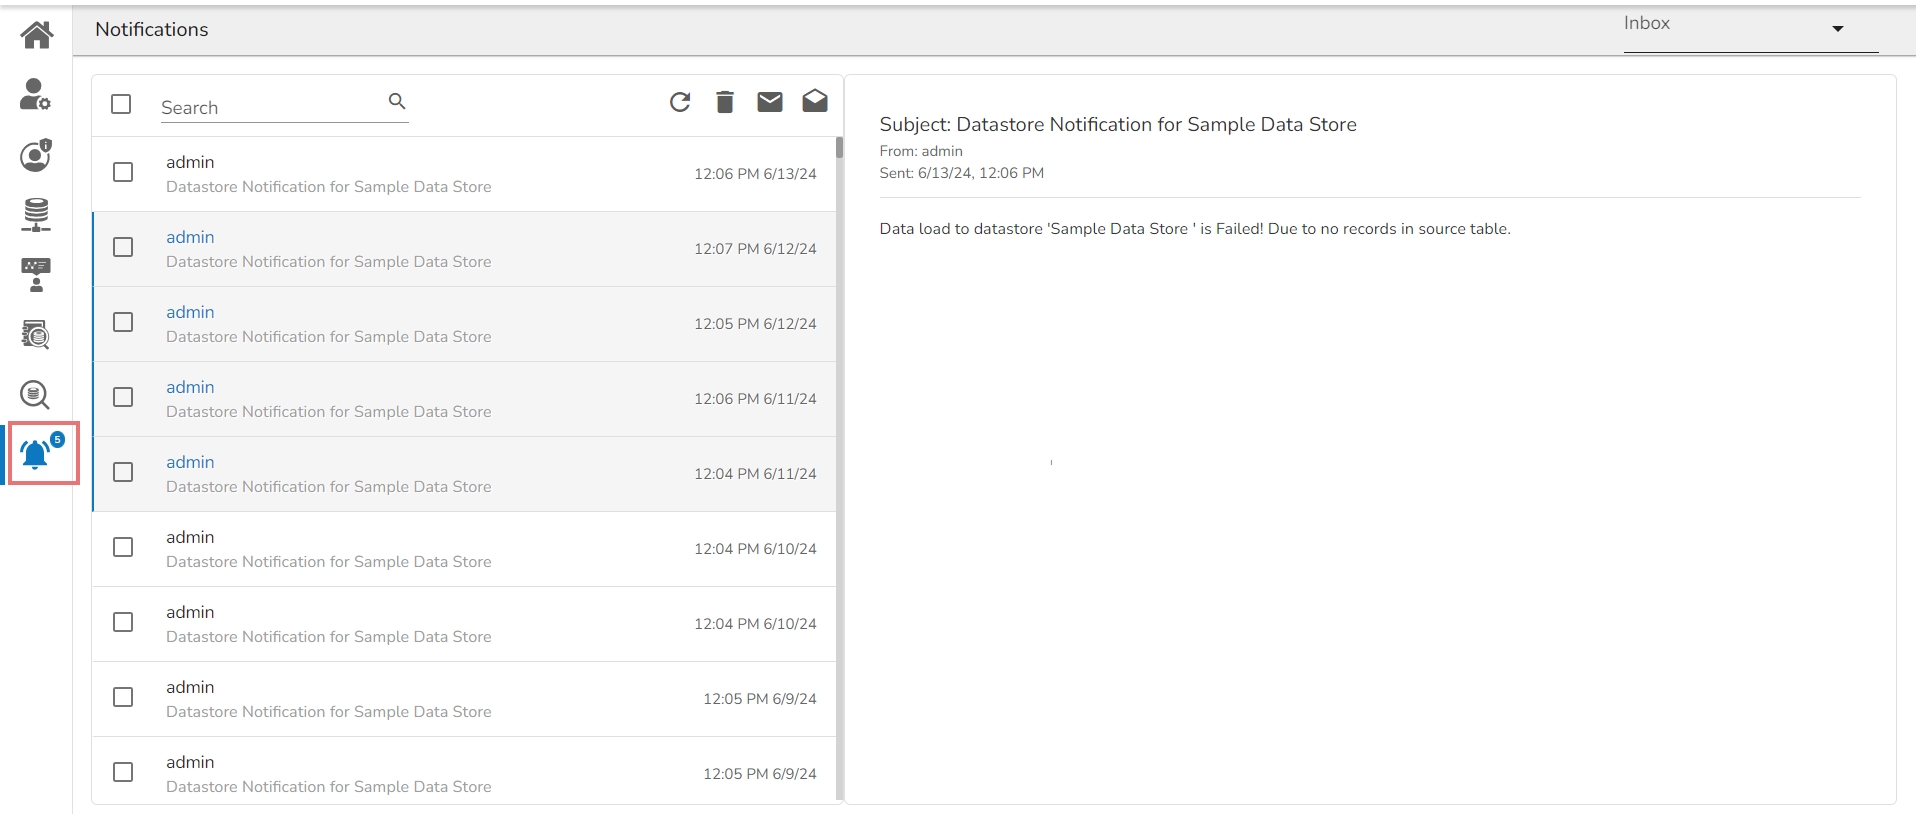
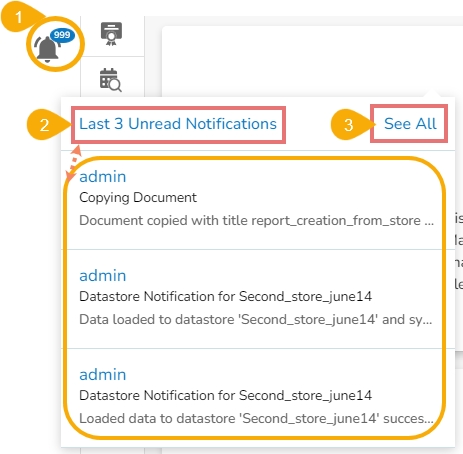
The left panel contains the Notification icon. The number of notifications displayed at the top of the Notification icon indicates the unread notification messages.
Click on the Notification icon.
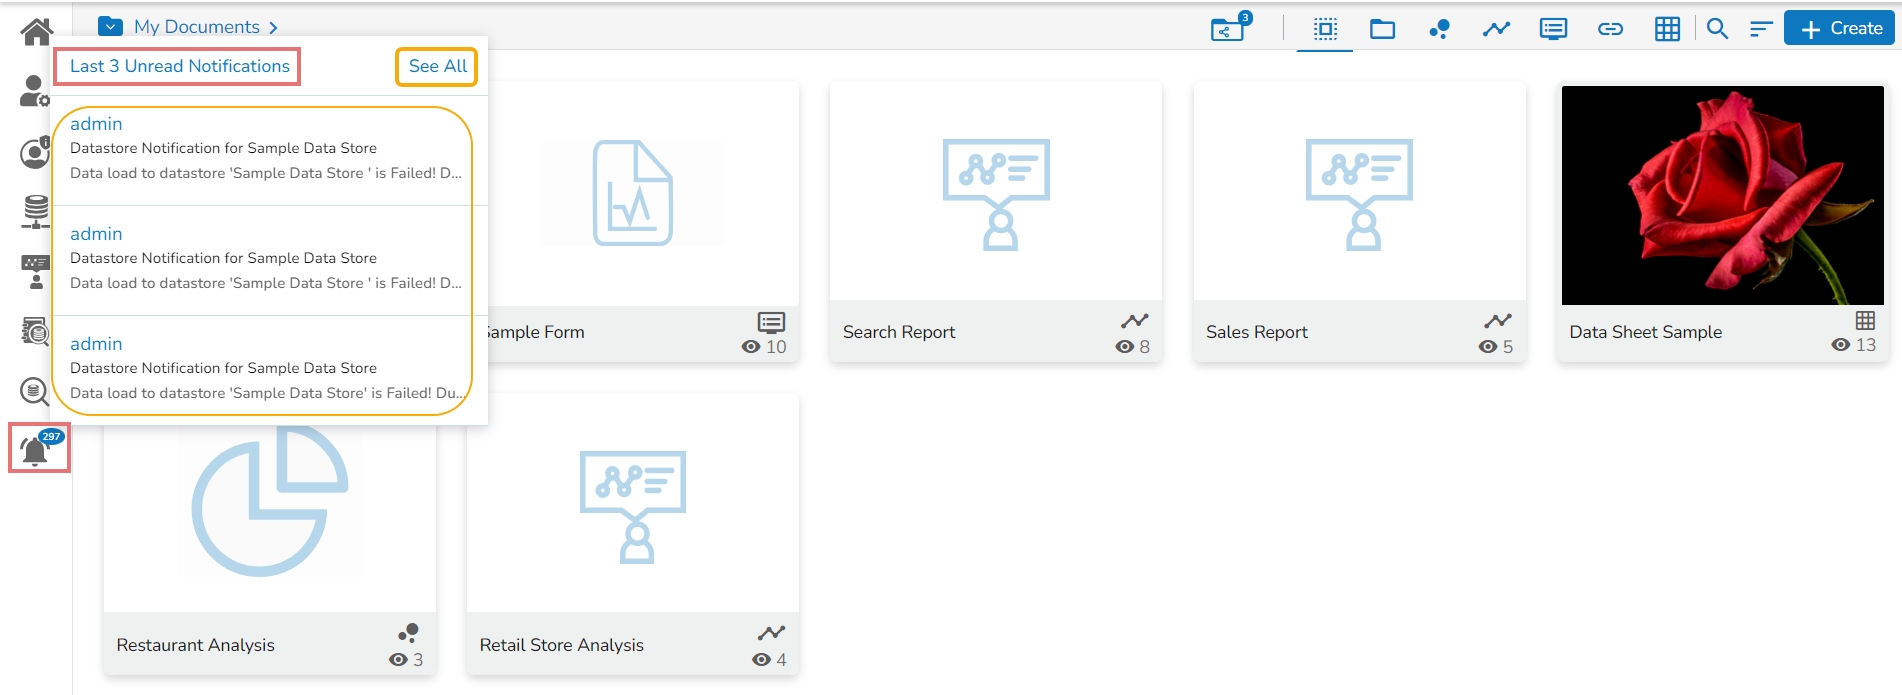
A window opens with the See All option and displays the Last 3 Unread Notifications.
Click the See All option to display all the notification messages in the Inbox (By default, the Inbox folder opens).
The notification Inbox opens displaying all the available notifications.
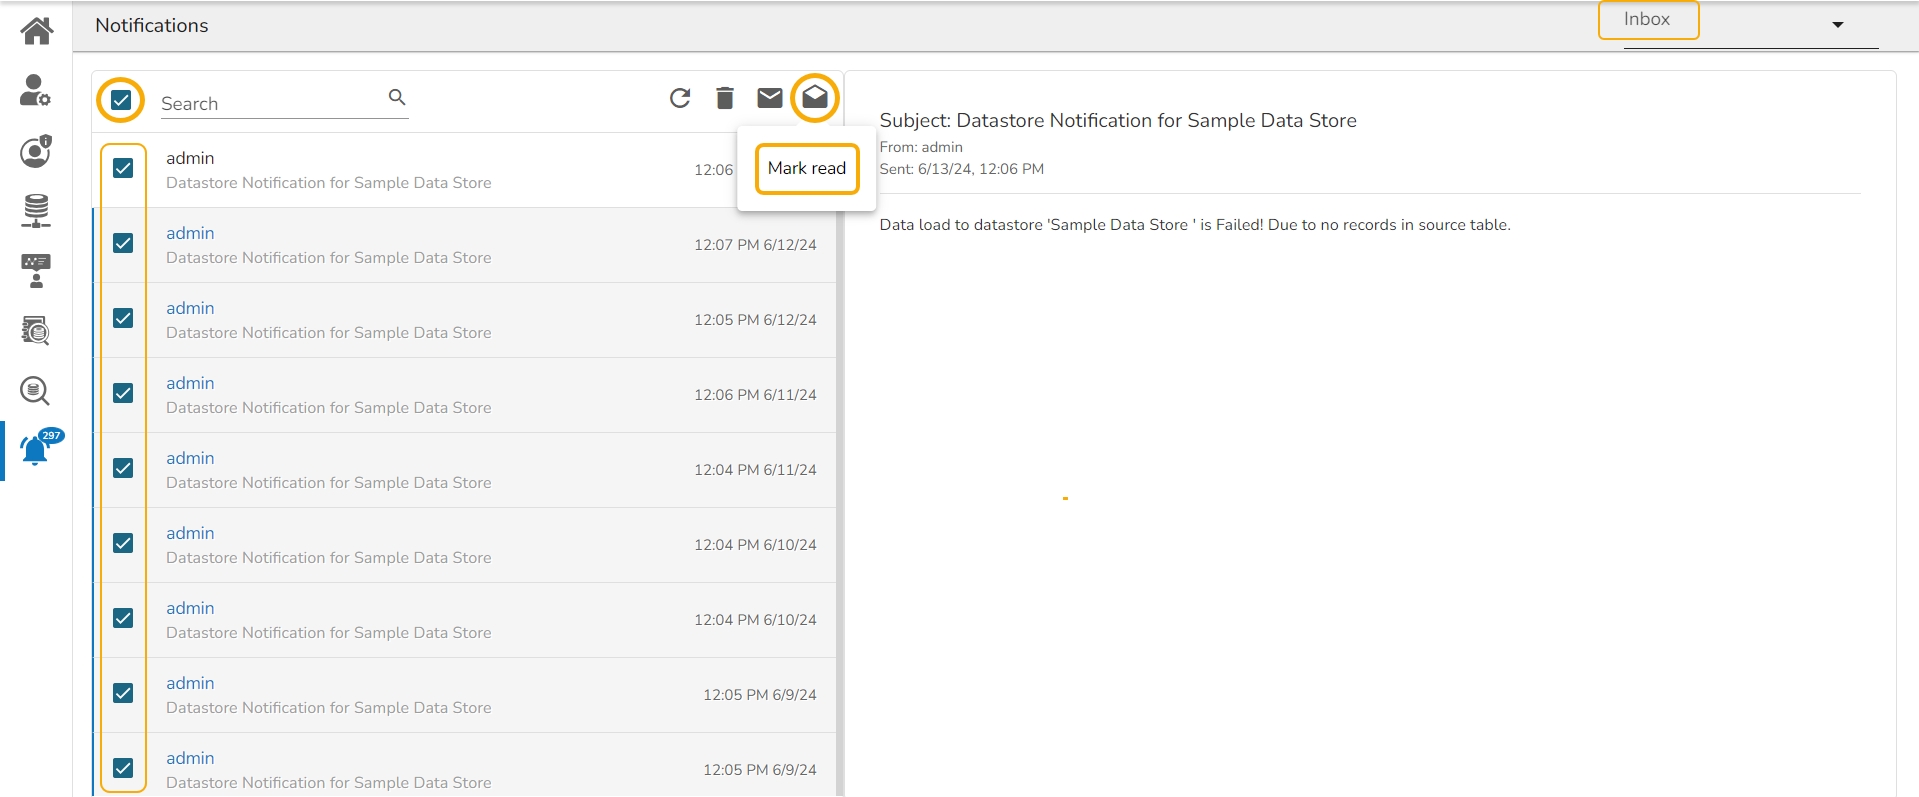
Use a checkmark in the given checkbox beside the search bar to select all the notifications. or Select the notifications by using the checkboxes provided next to those notifications.
Click the Mark Read icon.
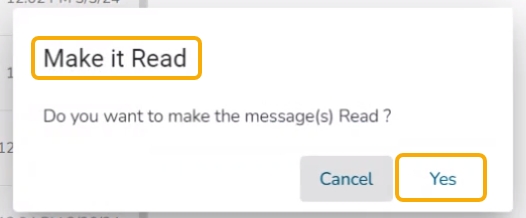
The Make it Read window appears.
Click the Yes option.
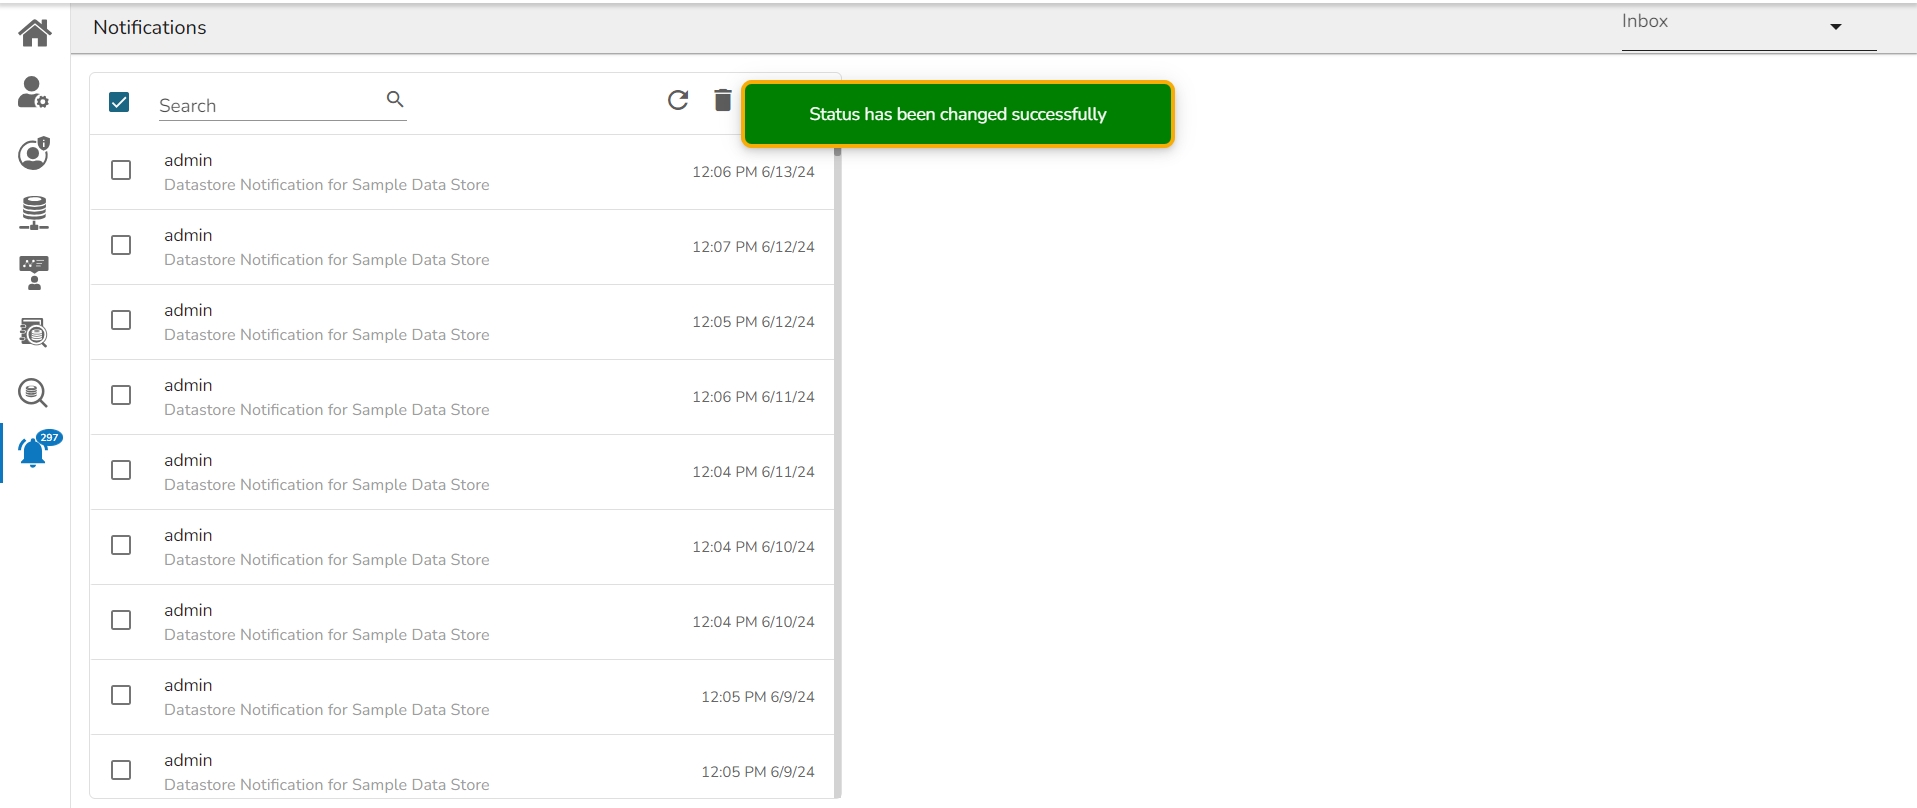
A notification message appears.
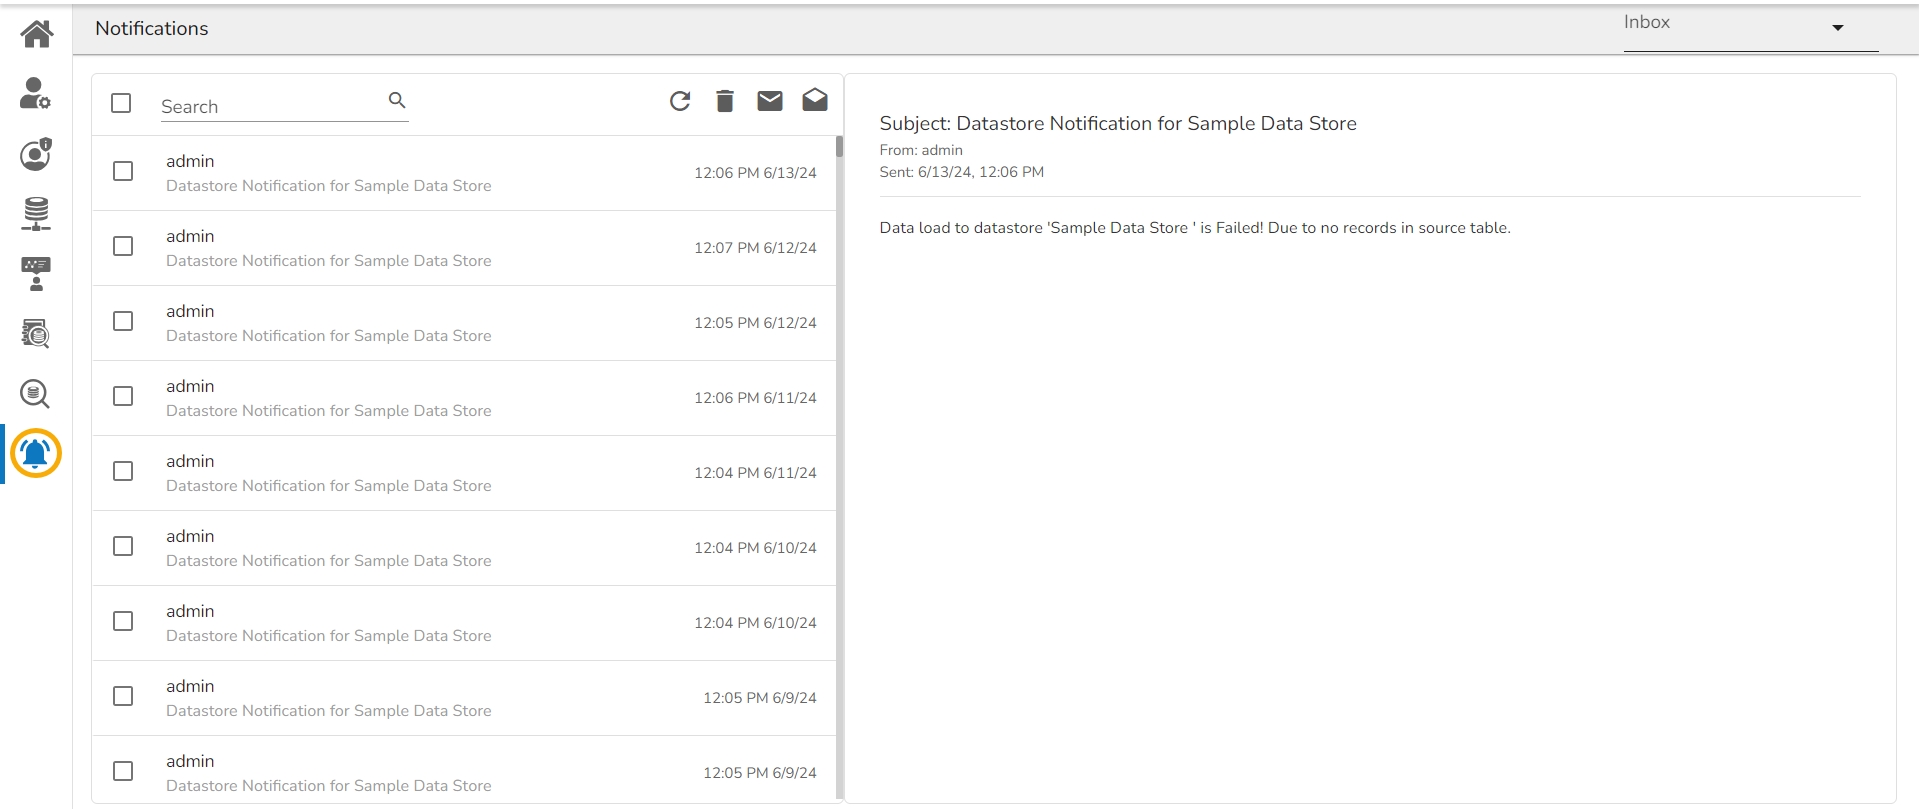
Use the Refresh icon available for the browser, the status of the selected notification(s) gets updated as Read, and the numbers indicating the unread notifications will disappear.
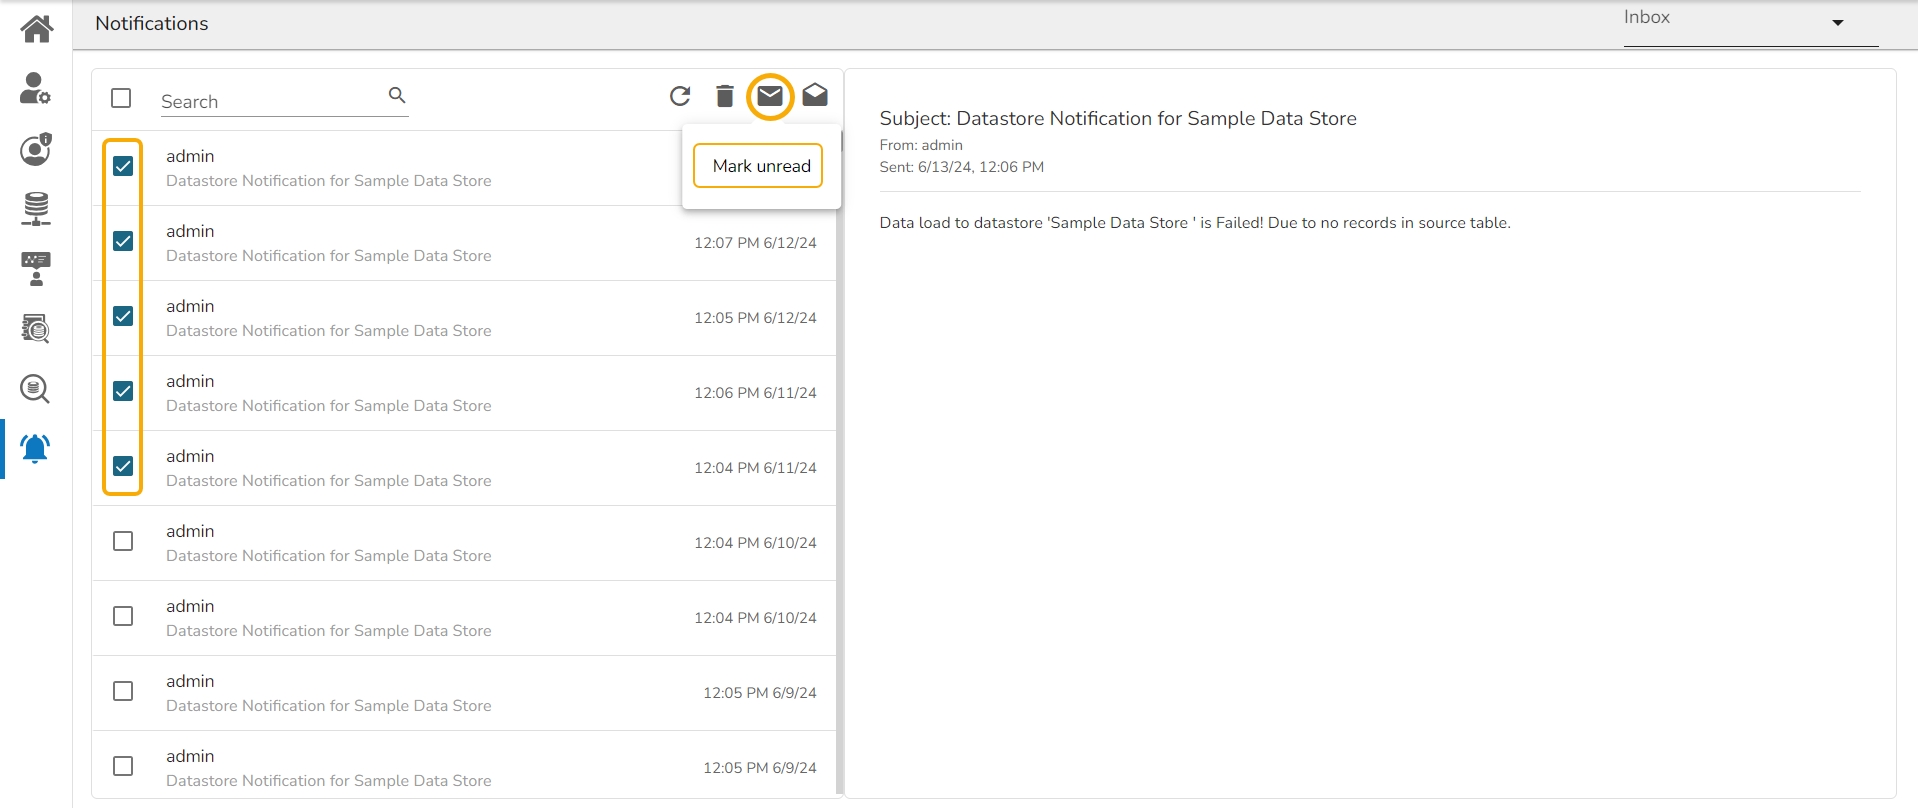
Navigate to the Inbox page and select the notification messages either by using the checkbox provided for Select All or selecting the individual messages by using the checkboxes next to them.
Click the Mark Unread icon.
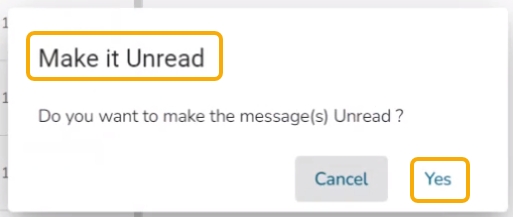
The Make it Unread window appears.
Click the Yes option.
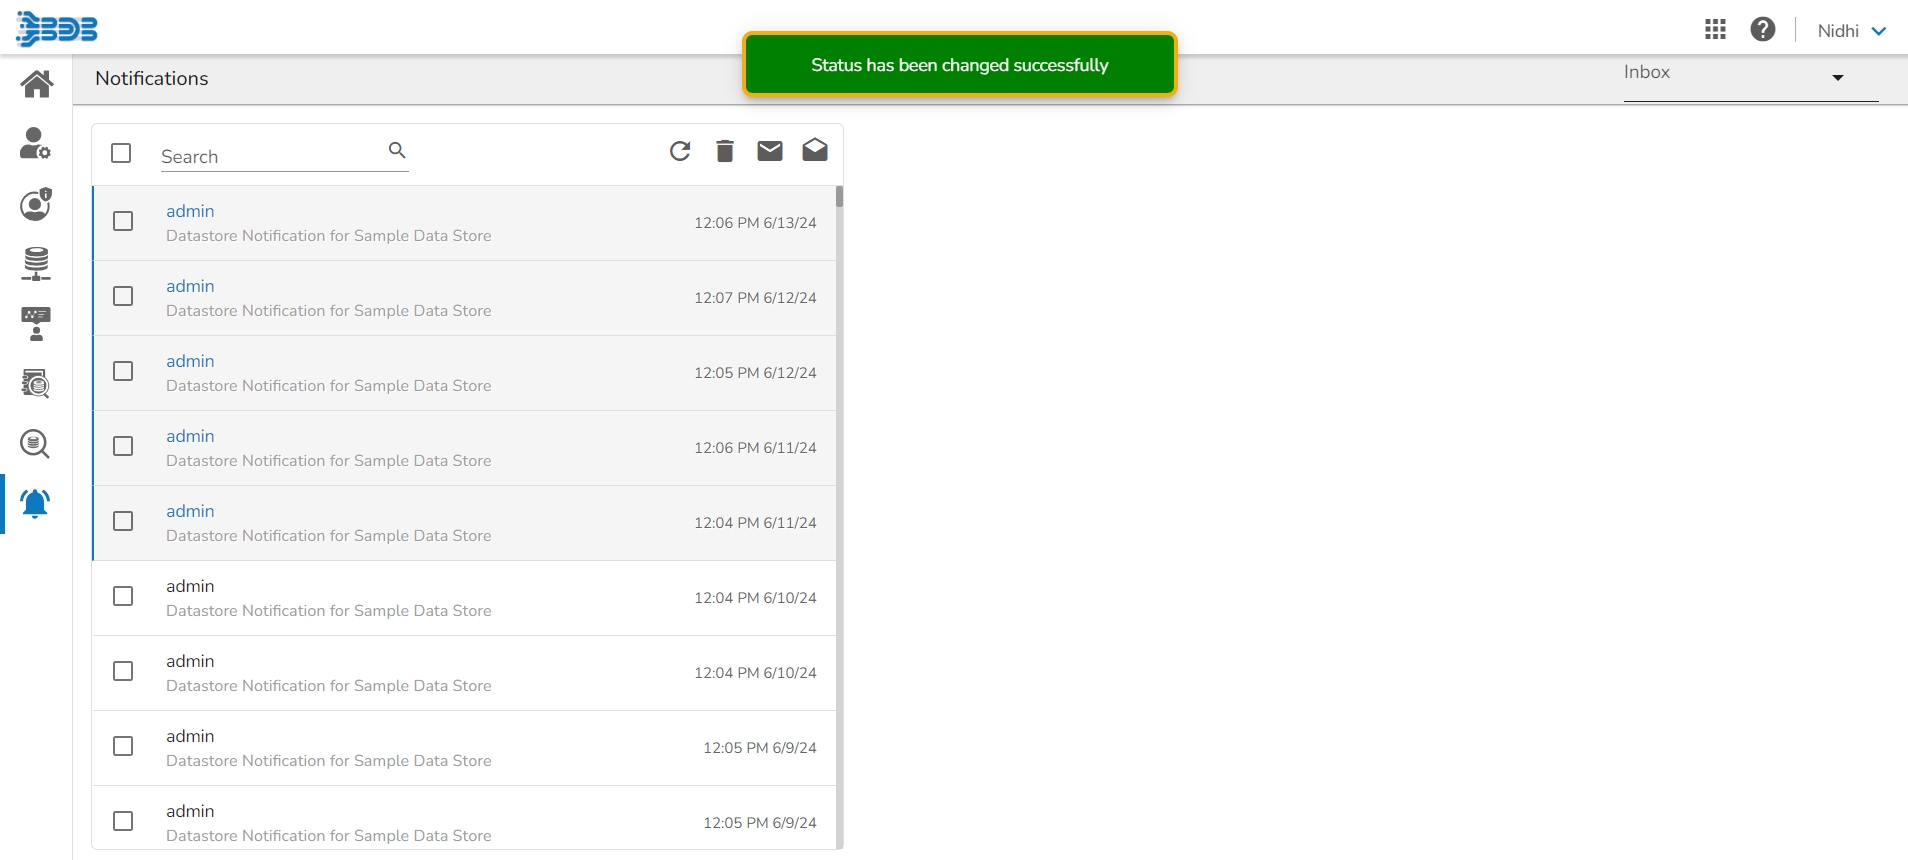
A notification message appears.
All the notifications or the selected notification messages will turn Unread, and the number indicating the unread notifications appears at the top of the notification icon.
Data Catalog empowers the data user to have wholistic view of data quickly discover data lineage that can drive towards insightful decisions optimizing their business worth.
Data Catalog Search is your ultimate gateway to discovering, accessing, and leveraging data. With intuitive search capabilities, seamless navigation, and comprehensive datasets, Data Catalog Search transforms how you explore and utilize data. Start your journey towards smarter insights and informed decisions today!
Data Catalog ensures that the most trusted data is always available to the Citizen Data Scientists, including tables, databases, saved data sets, or dashboards – all in one place. Data Catalog Search provides a centralized place to:
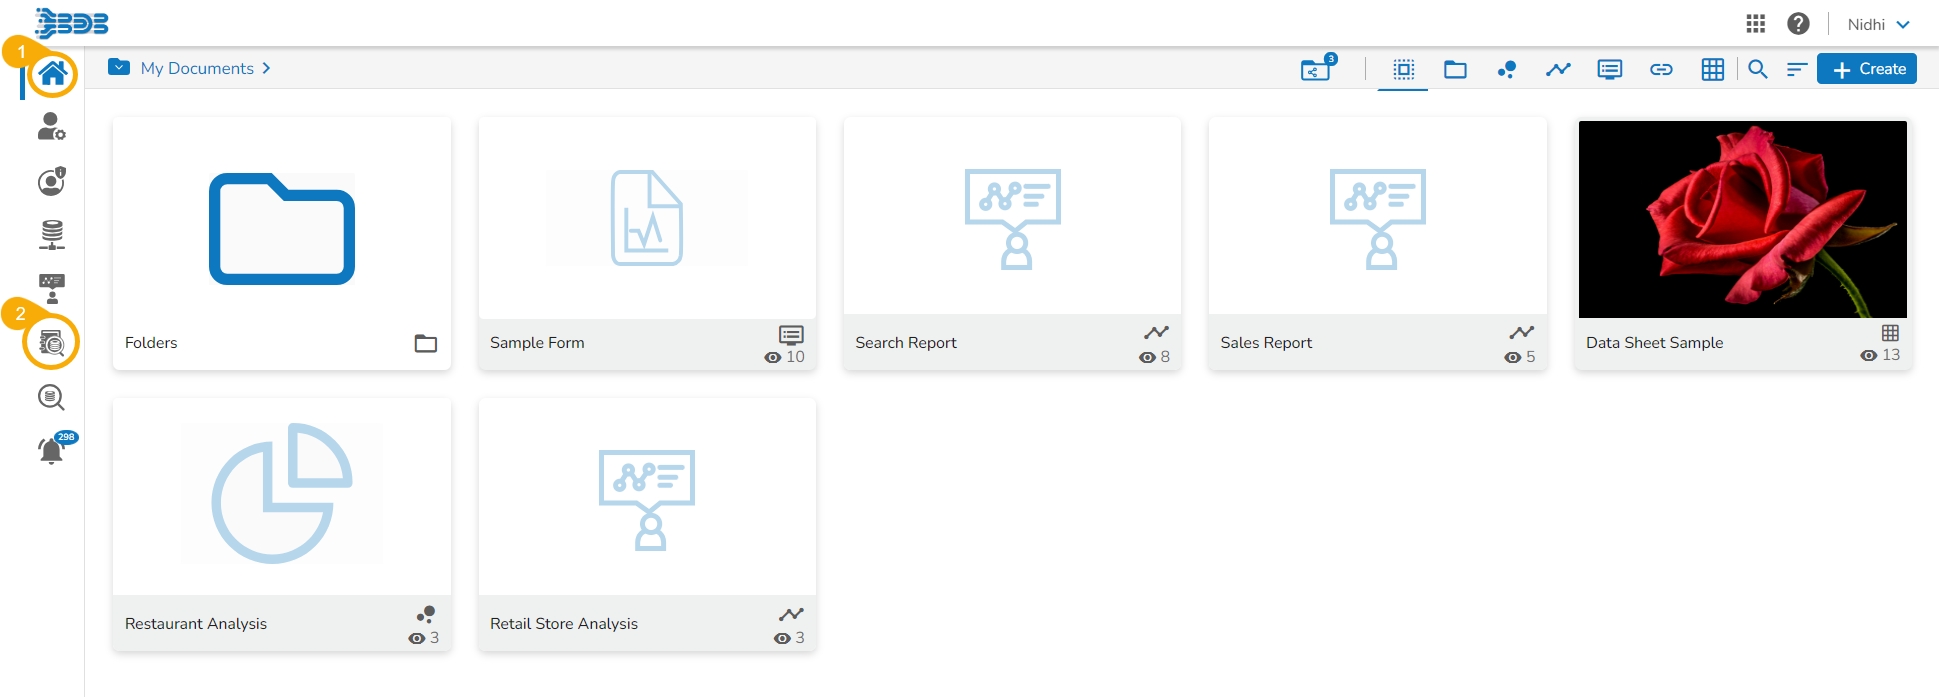
Navigate to the Platform Homepage.
Click the Data Catalog Search icon on the homepage left panel.
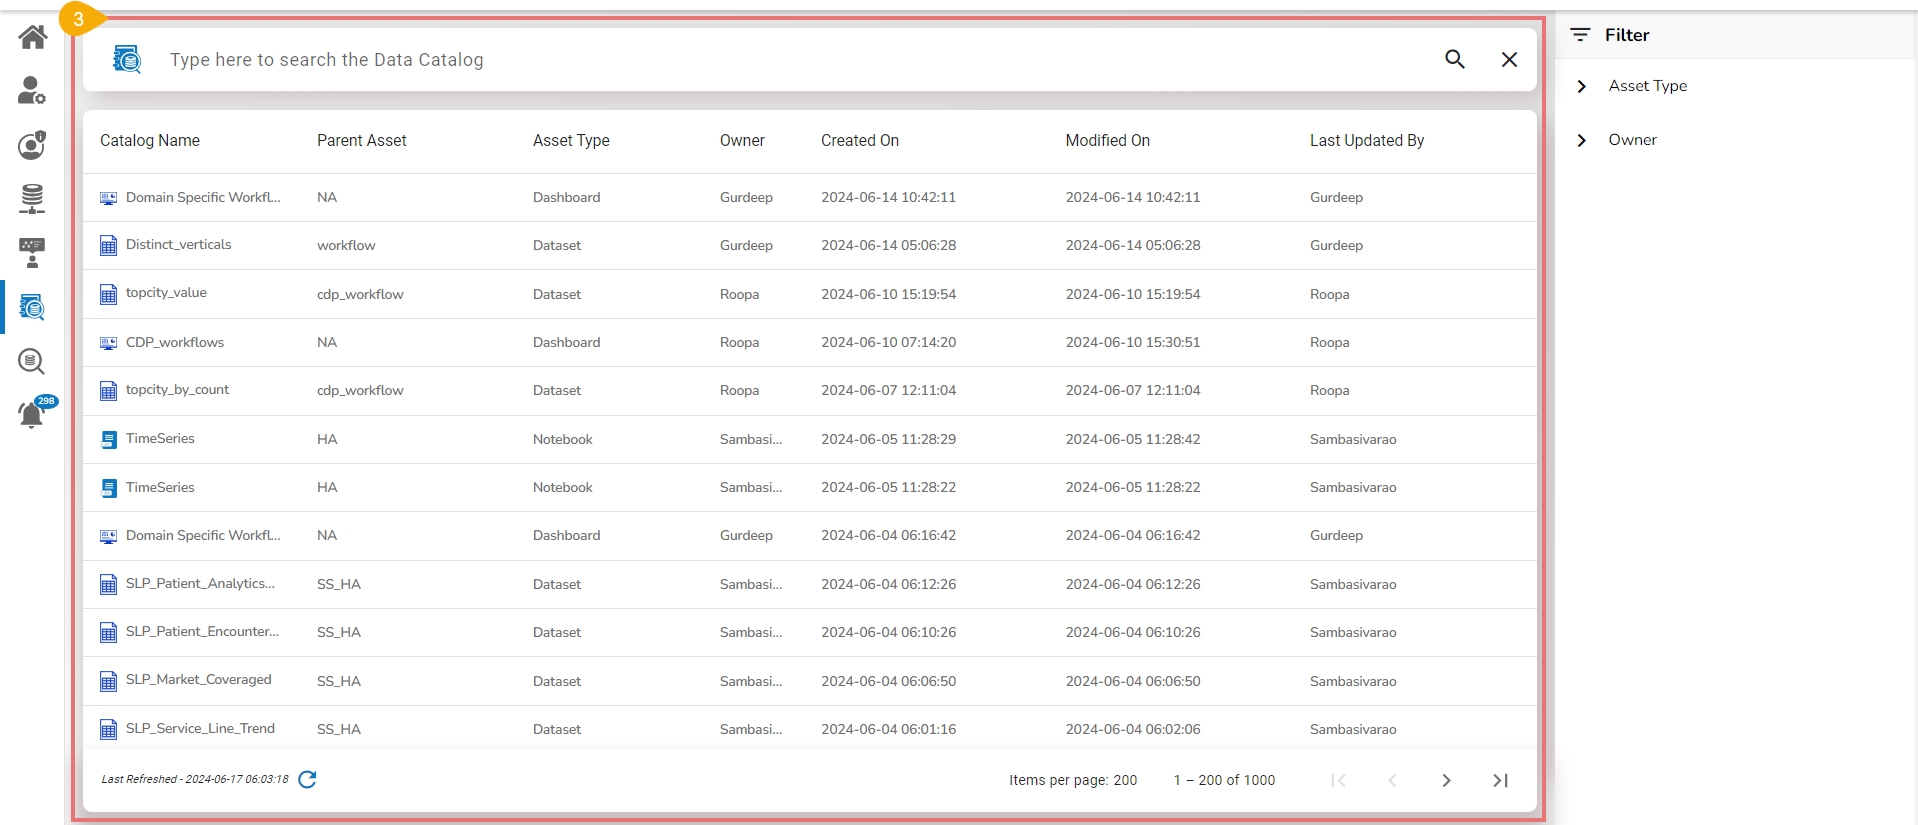
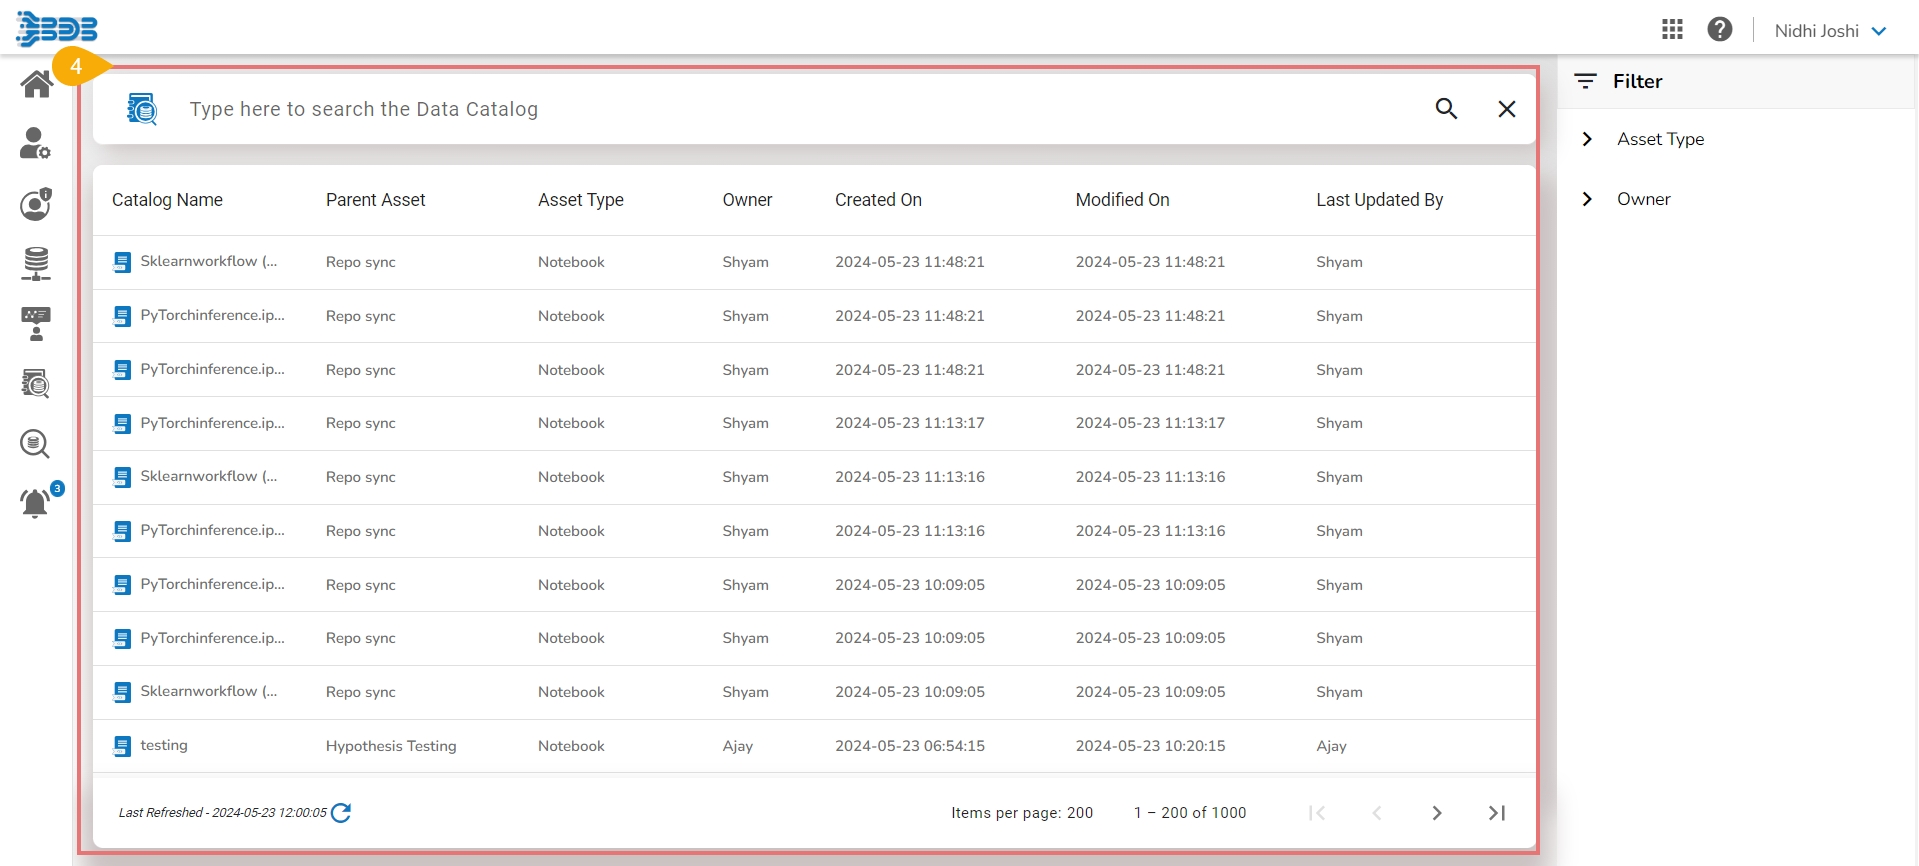
A default list of the Data Catalog appears.
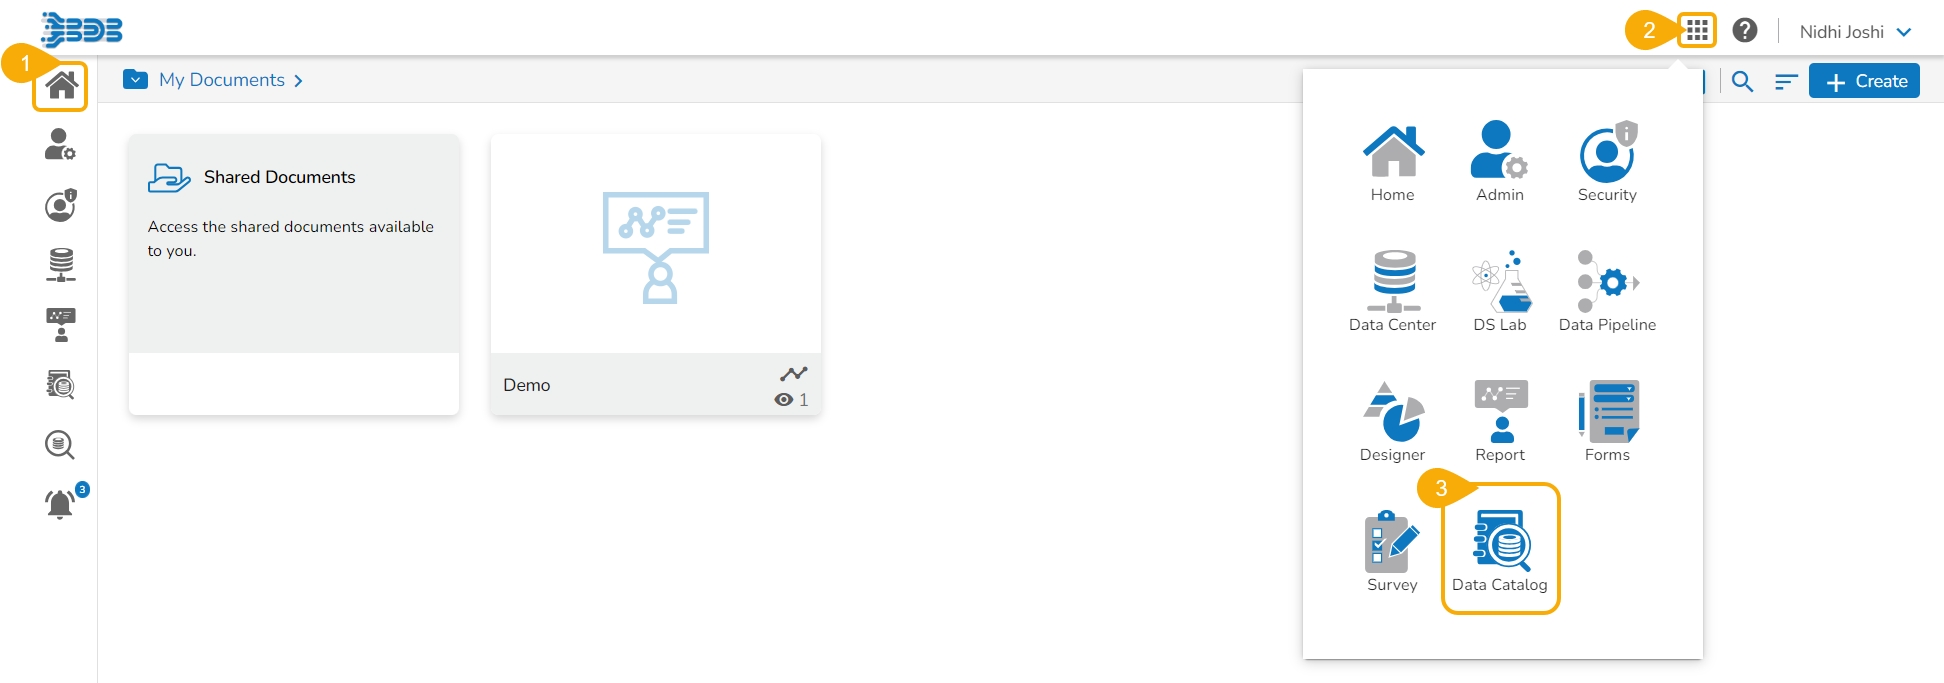
Navigate to the Platform Homepage.
Click on the Apps menu.
Click the Data Catalog module from the Apps menu.
A default list of the Data Catalog appears.
Navigate to the default Data Catalog list.
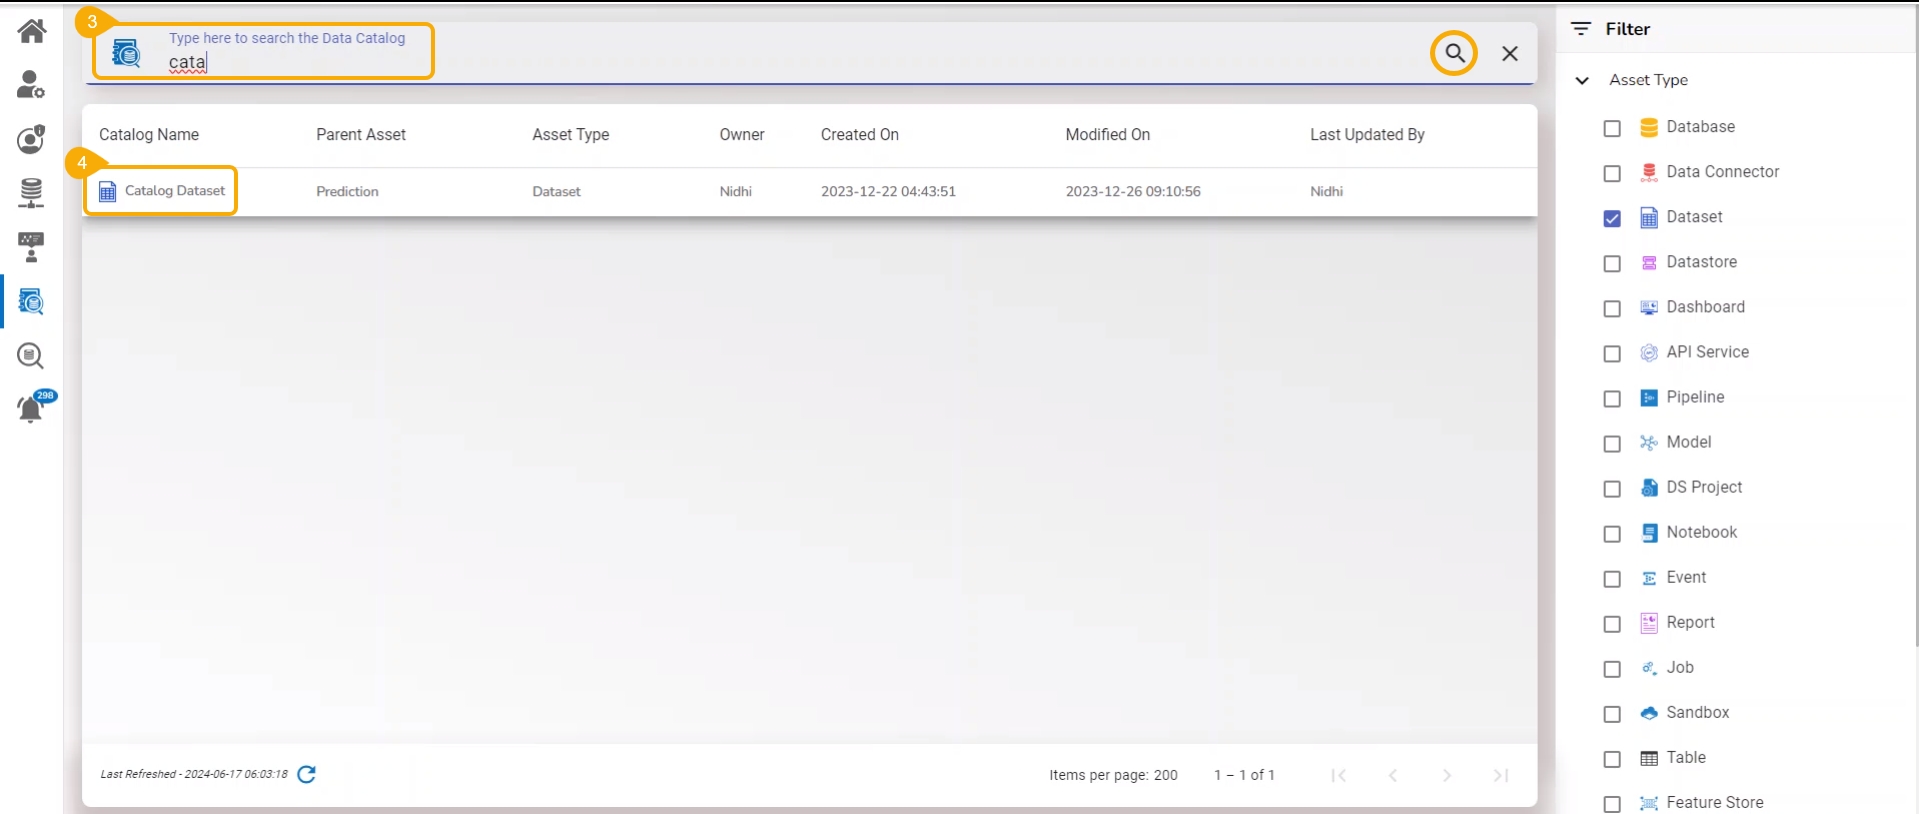
Type in the given bar to search the Data Catalog.
Click the Search icon.
The displayed list gets customized based on the search result.
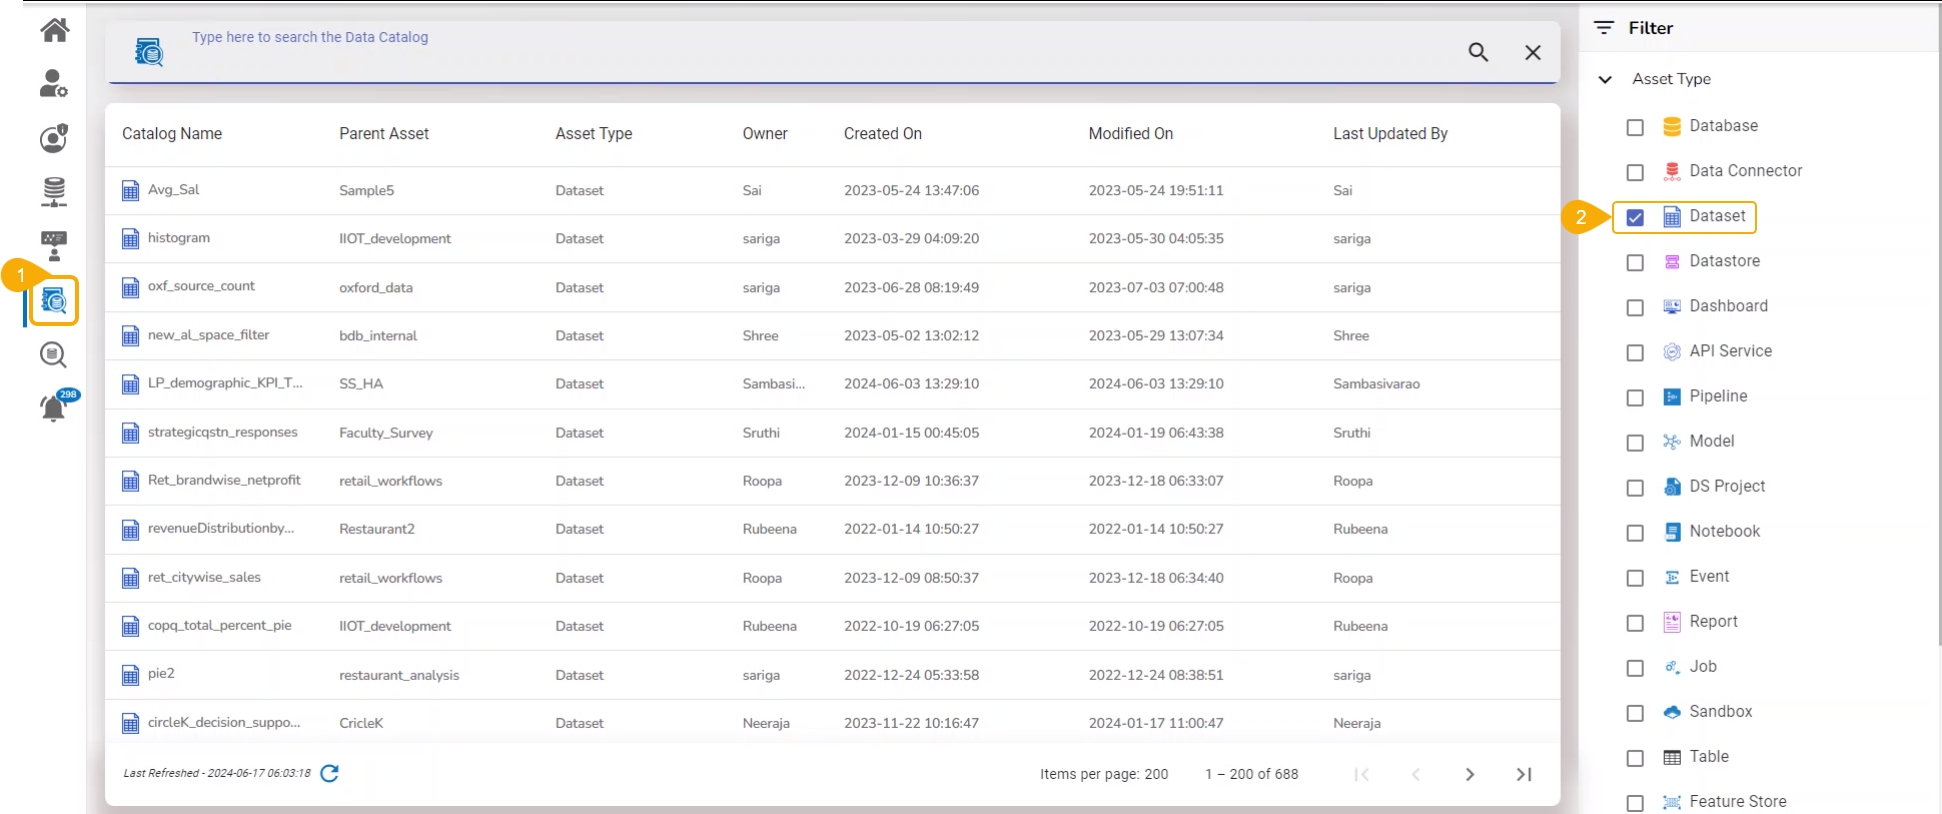
Check out the illustration on the Apply Filter functionality by Asset Type.
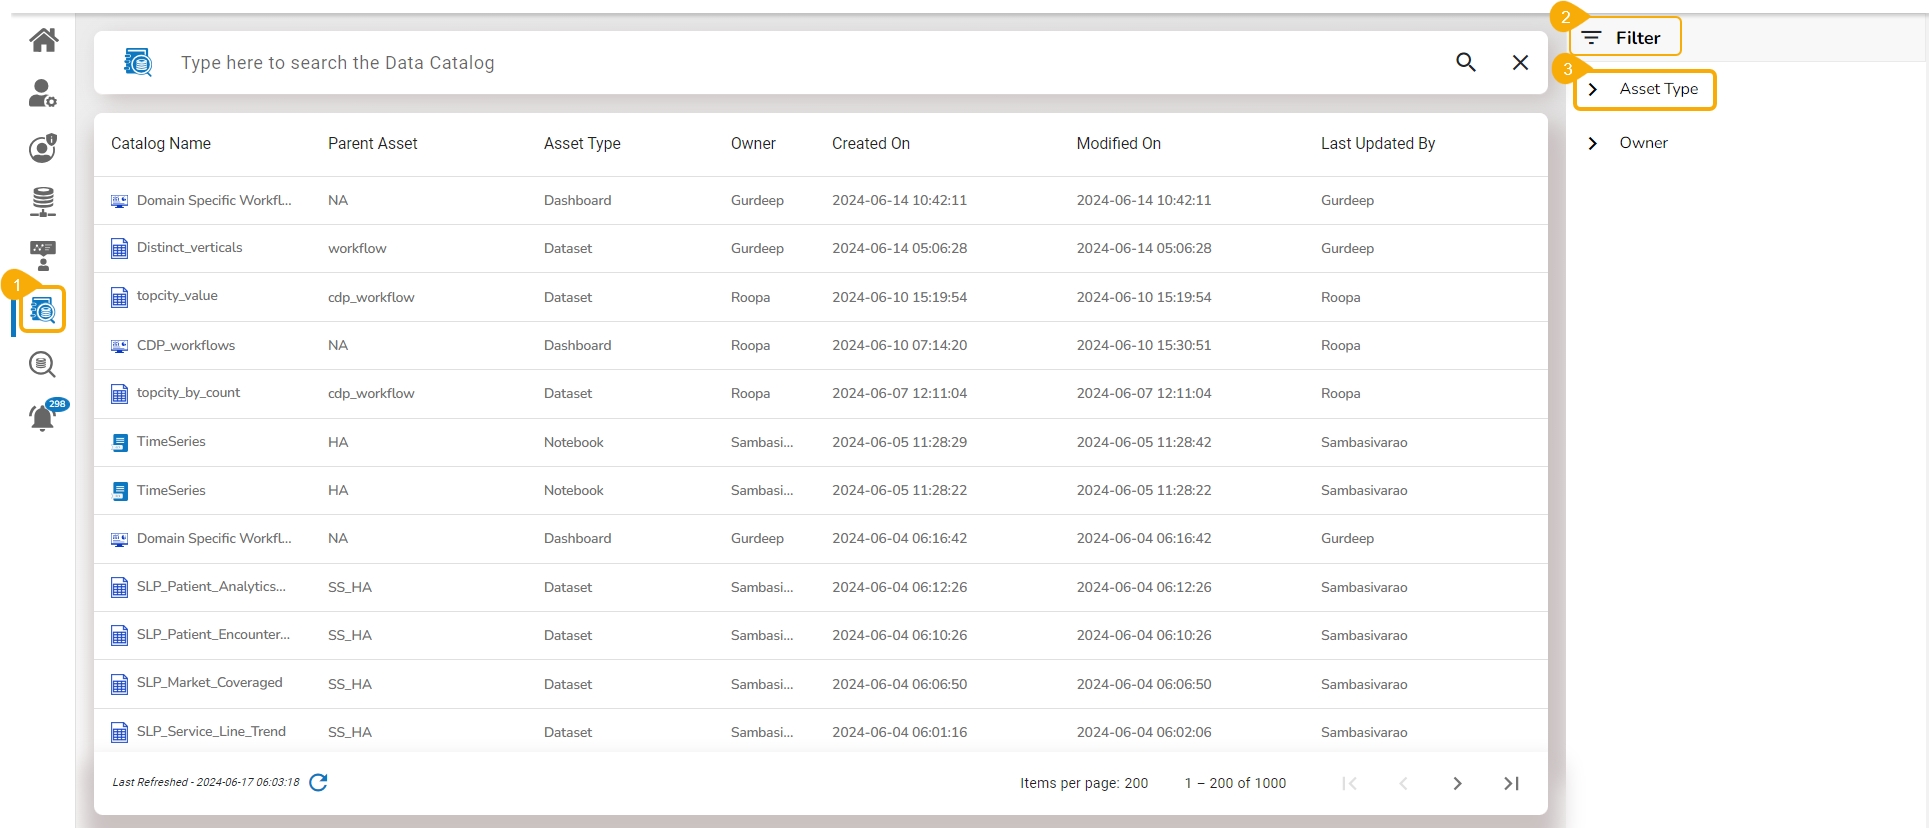
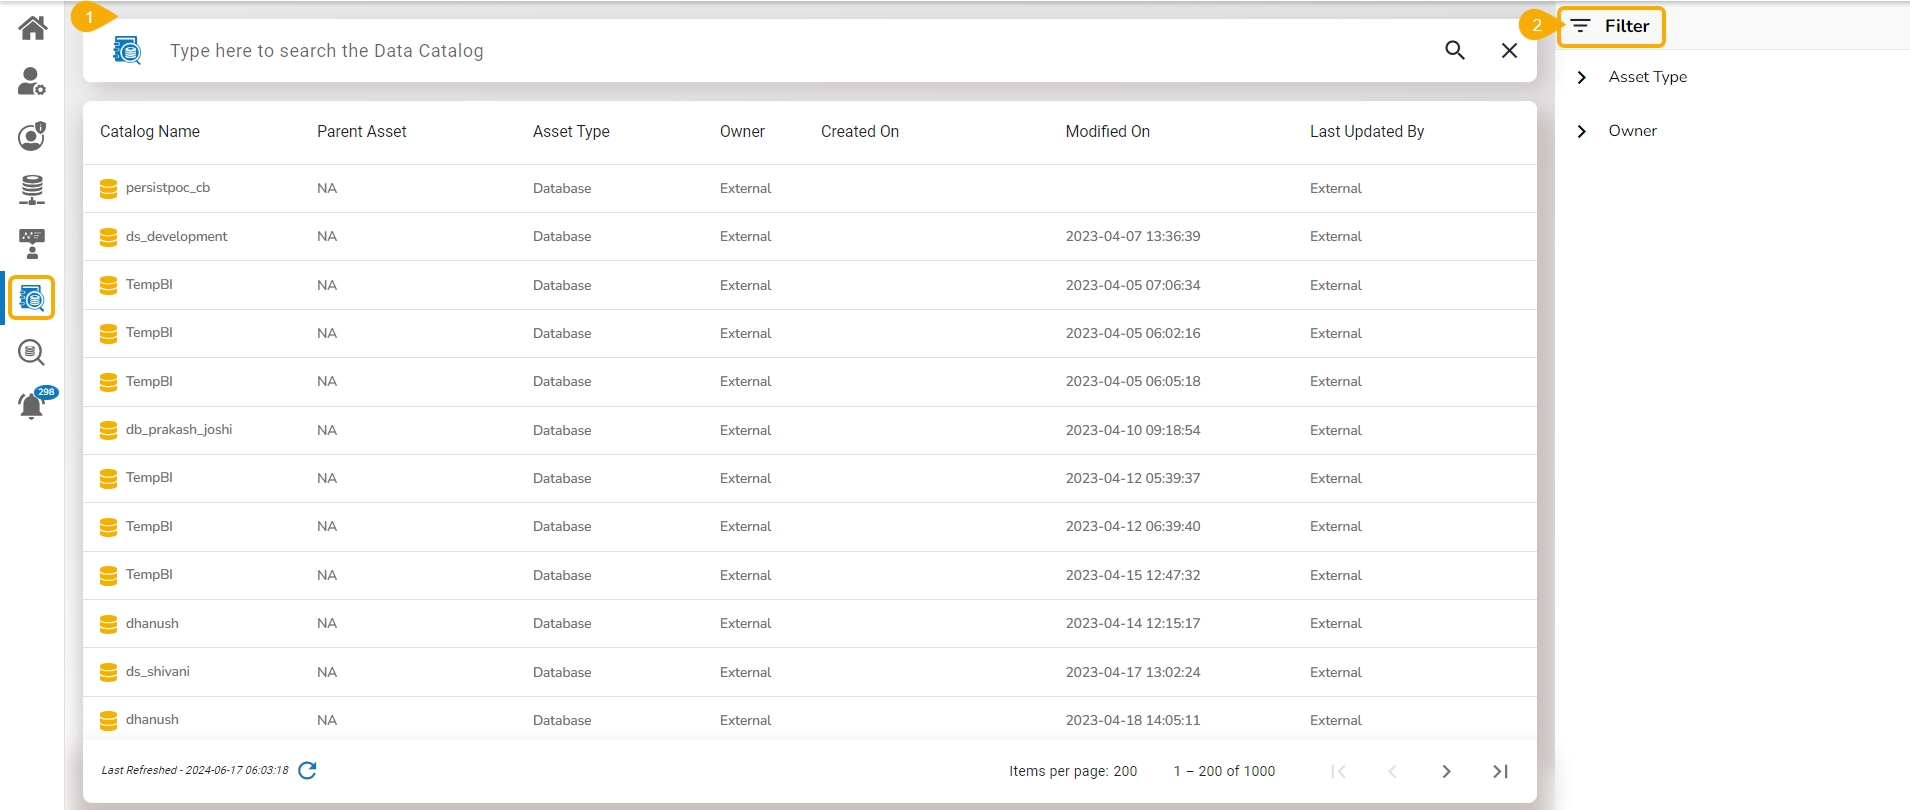
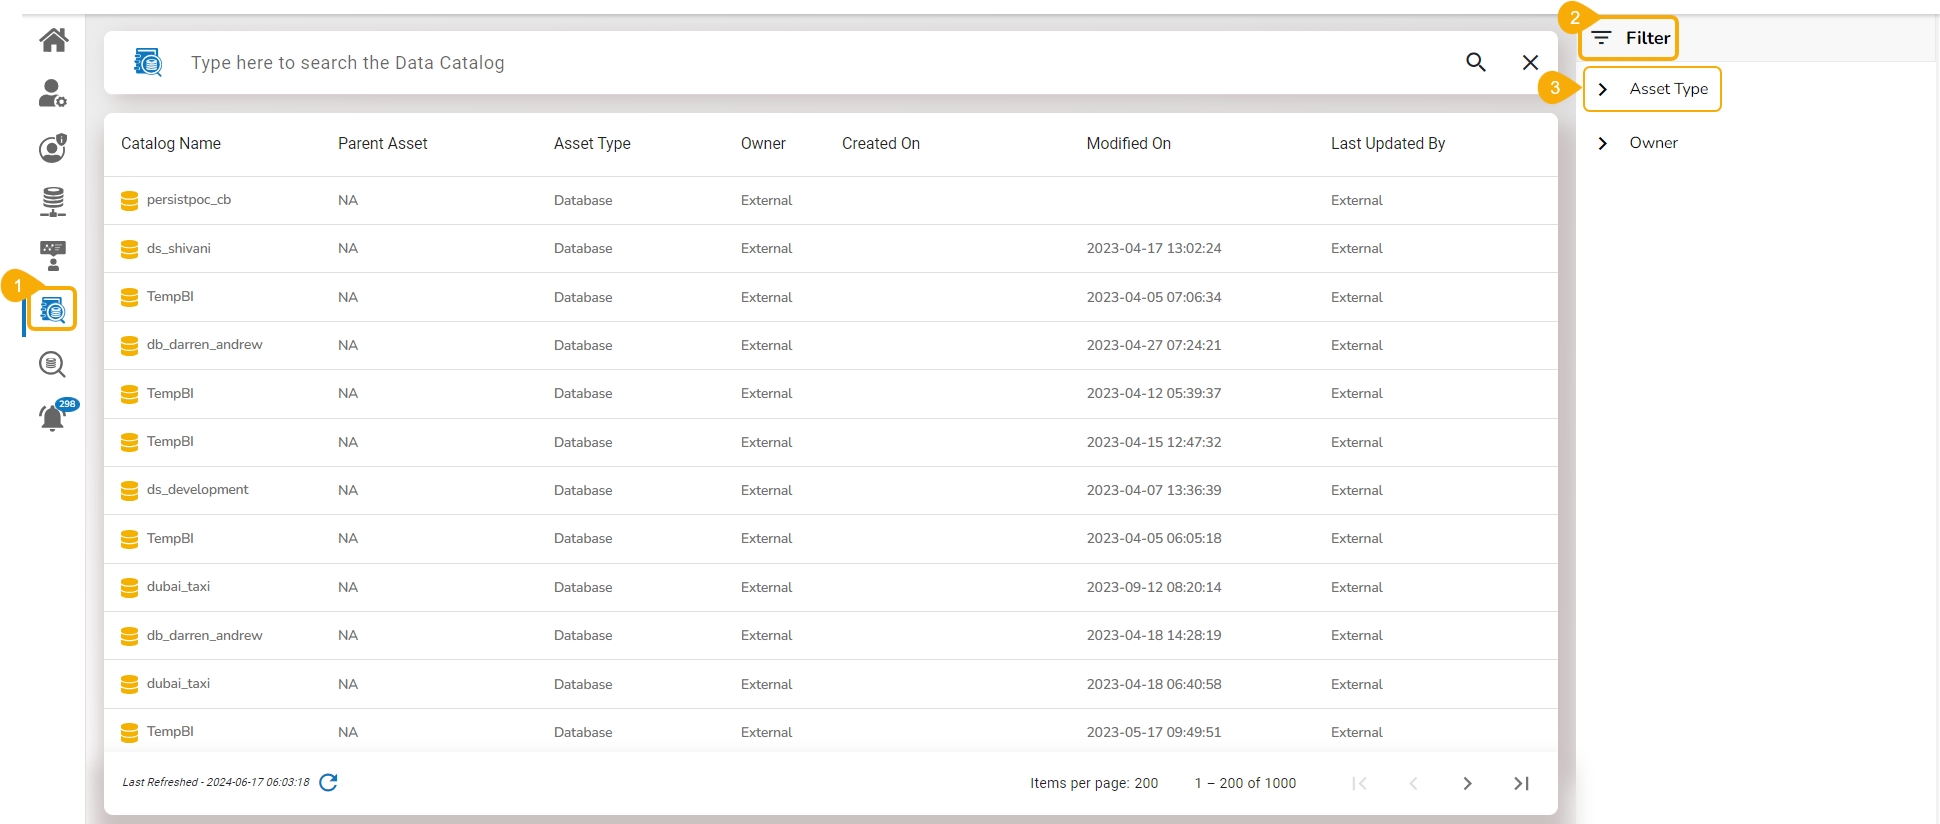
Navigate to the Data Catalog Search page.
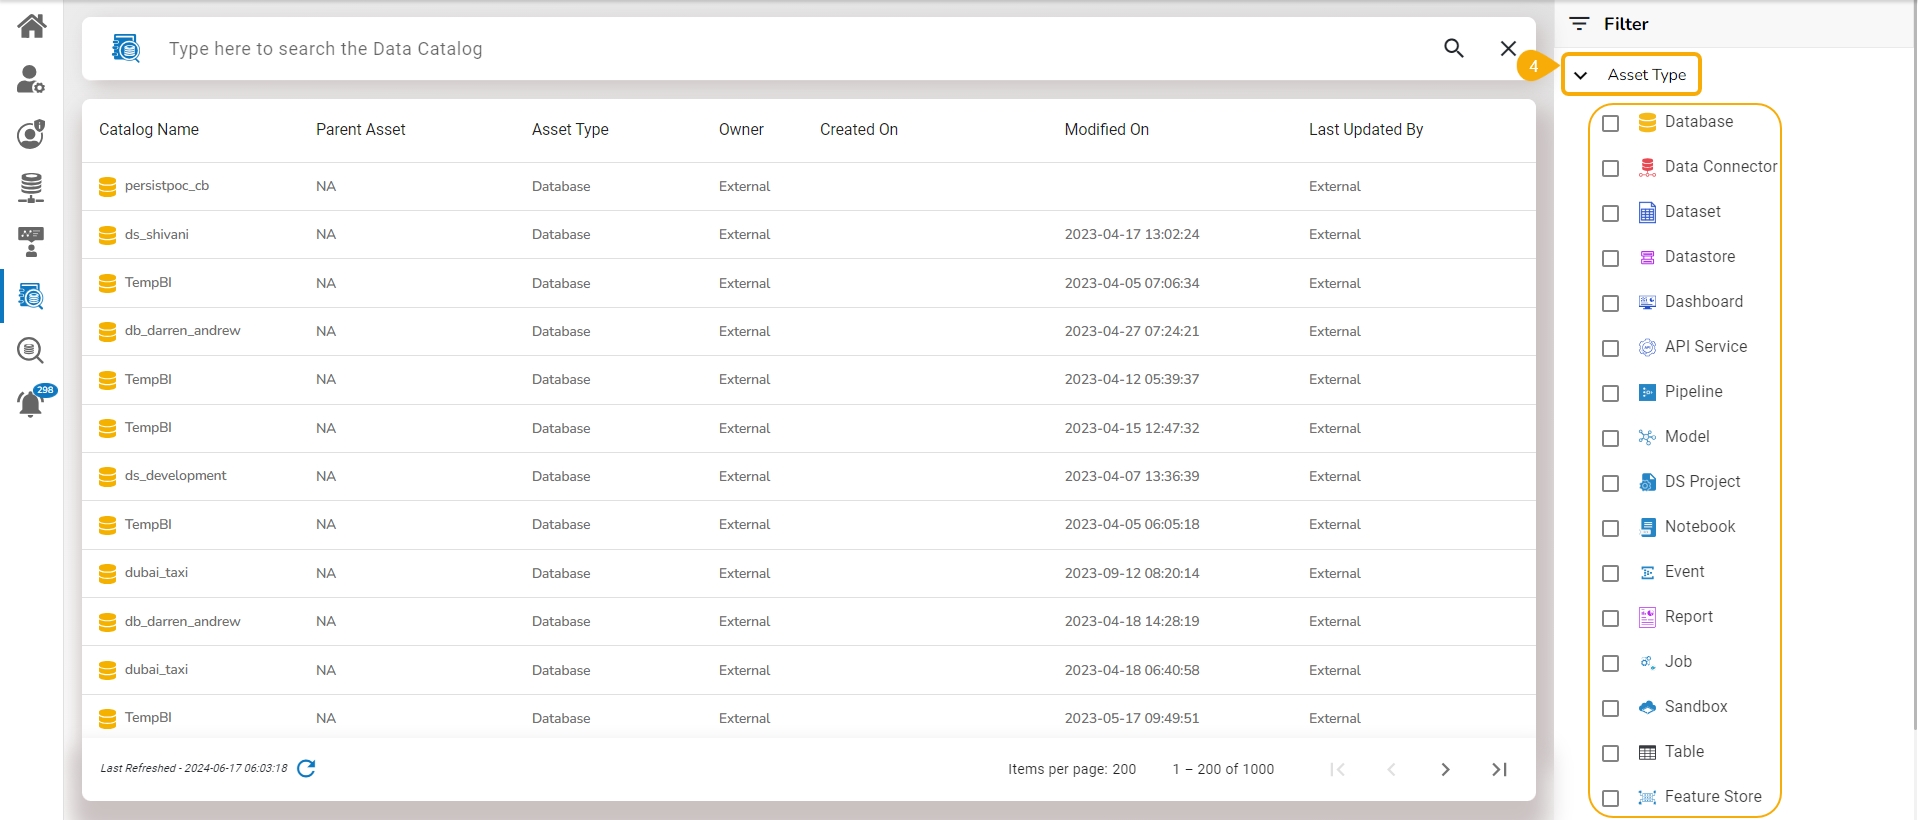
The Filter option is provided on the right side of the page.
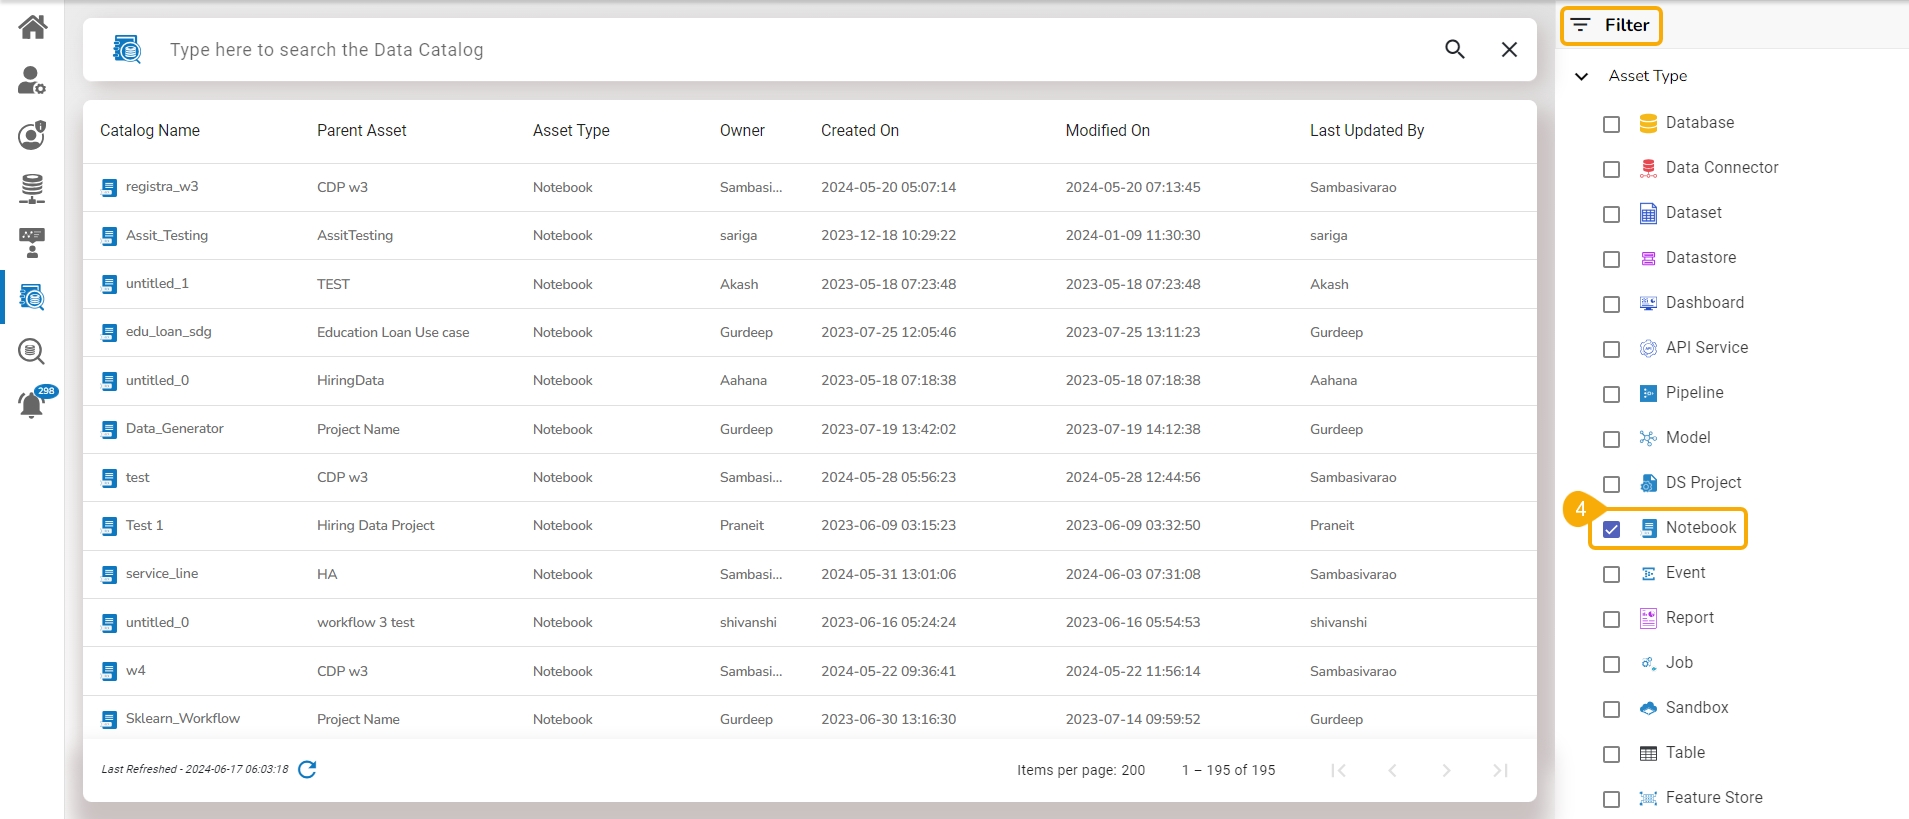
Access the Asset Type filter option. Click on it to get a list of the various Asset types.
The Asset Types opens.
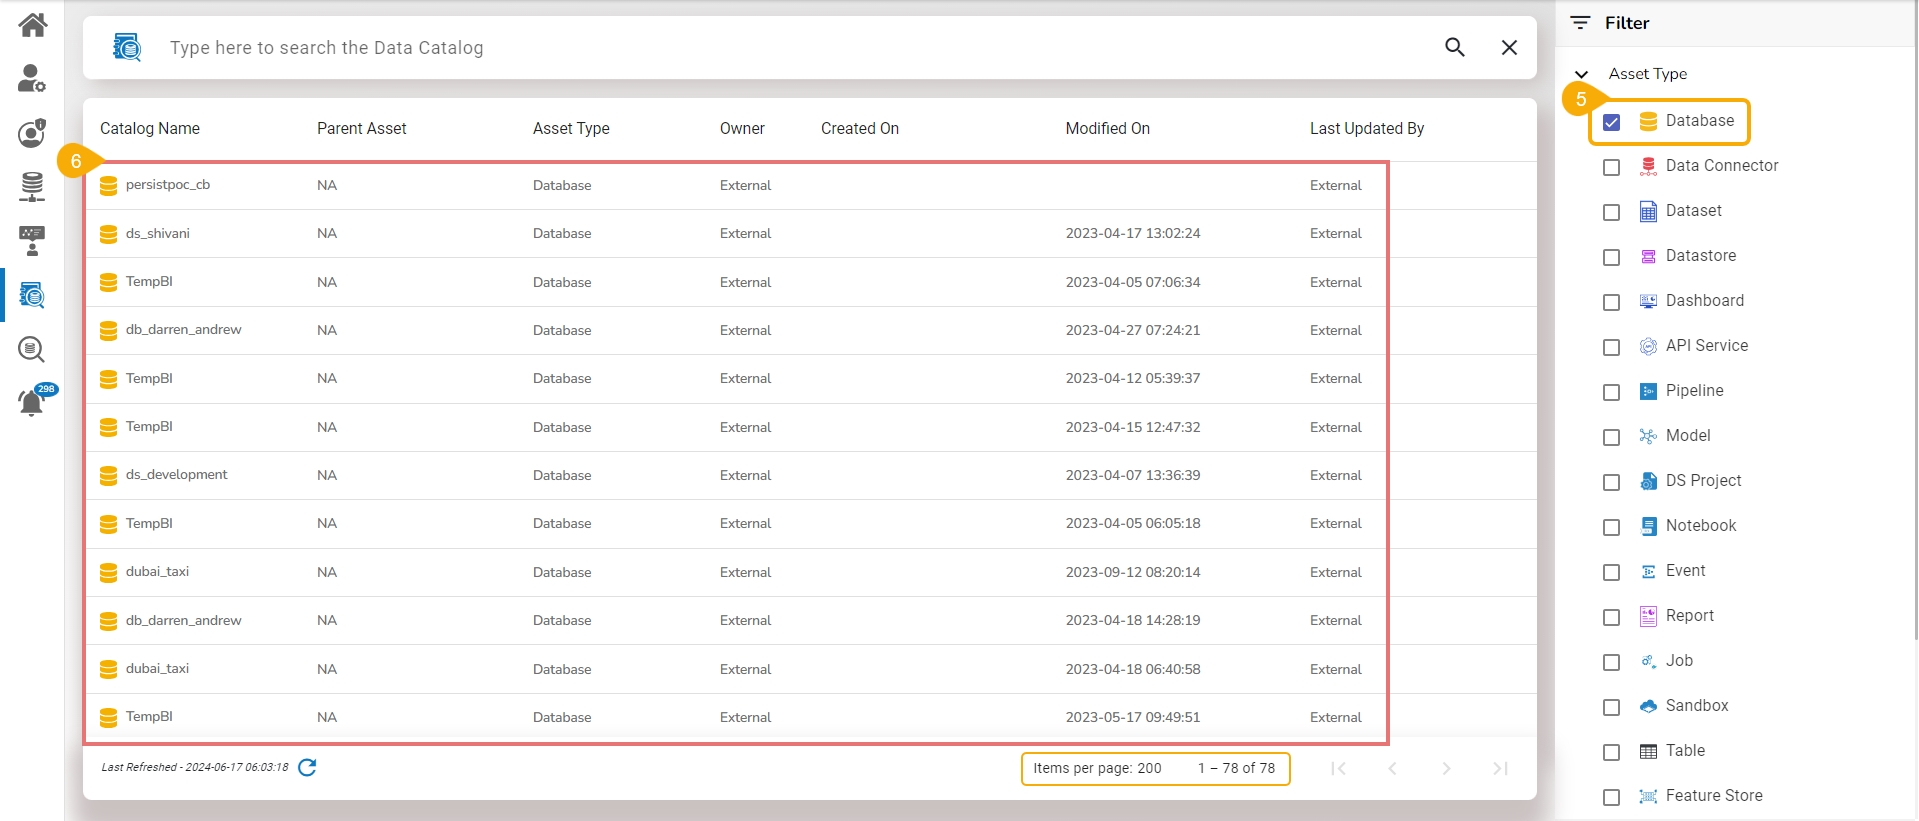
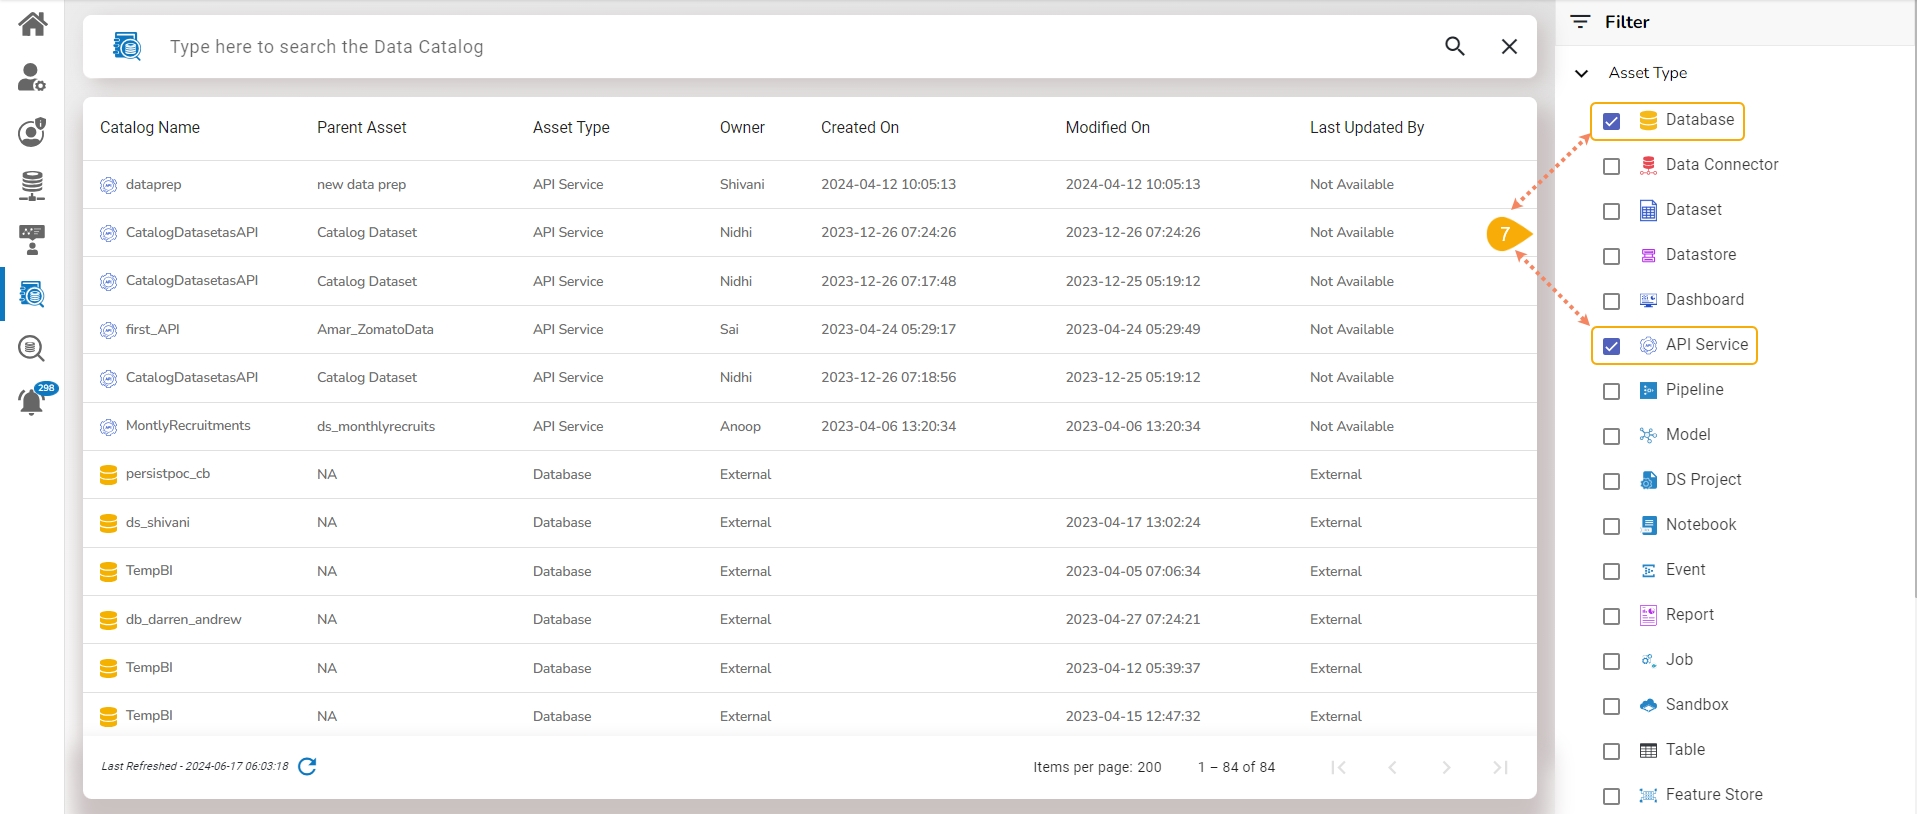
Select an Asset type from the displayed list using the checkbox.
The displayed Data Catalog list will be customized based on the selected Asset type.
Users can apply multiple assets as filters to customize the displayed catalog list. E.g., Database and API Service filter categories are selected in the given image.
The applied filters will be displayed below.
The displayed list will be filtered based on the selected Asset types.
The total number of the items displayed at the end of the list indicates the same
Check out the illustration on the Apply Filter functionality by Owner.
Navigate to the Data Catalog Search page.
The Filter panel is displayed on the right side of the page.
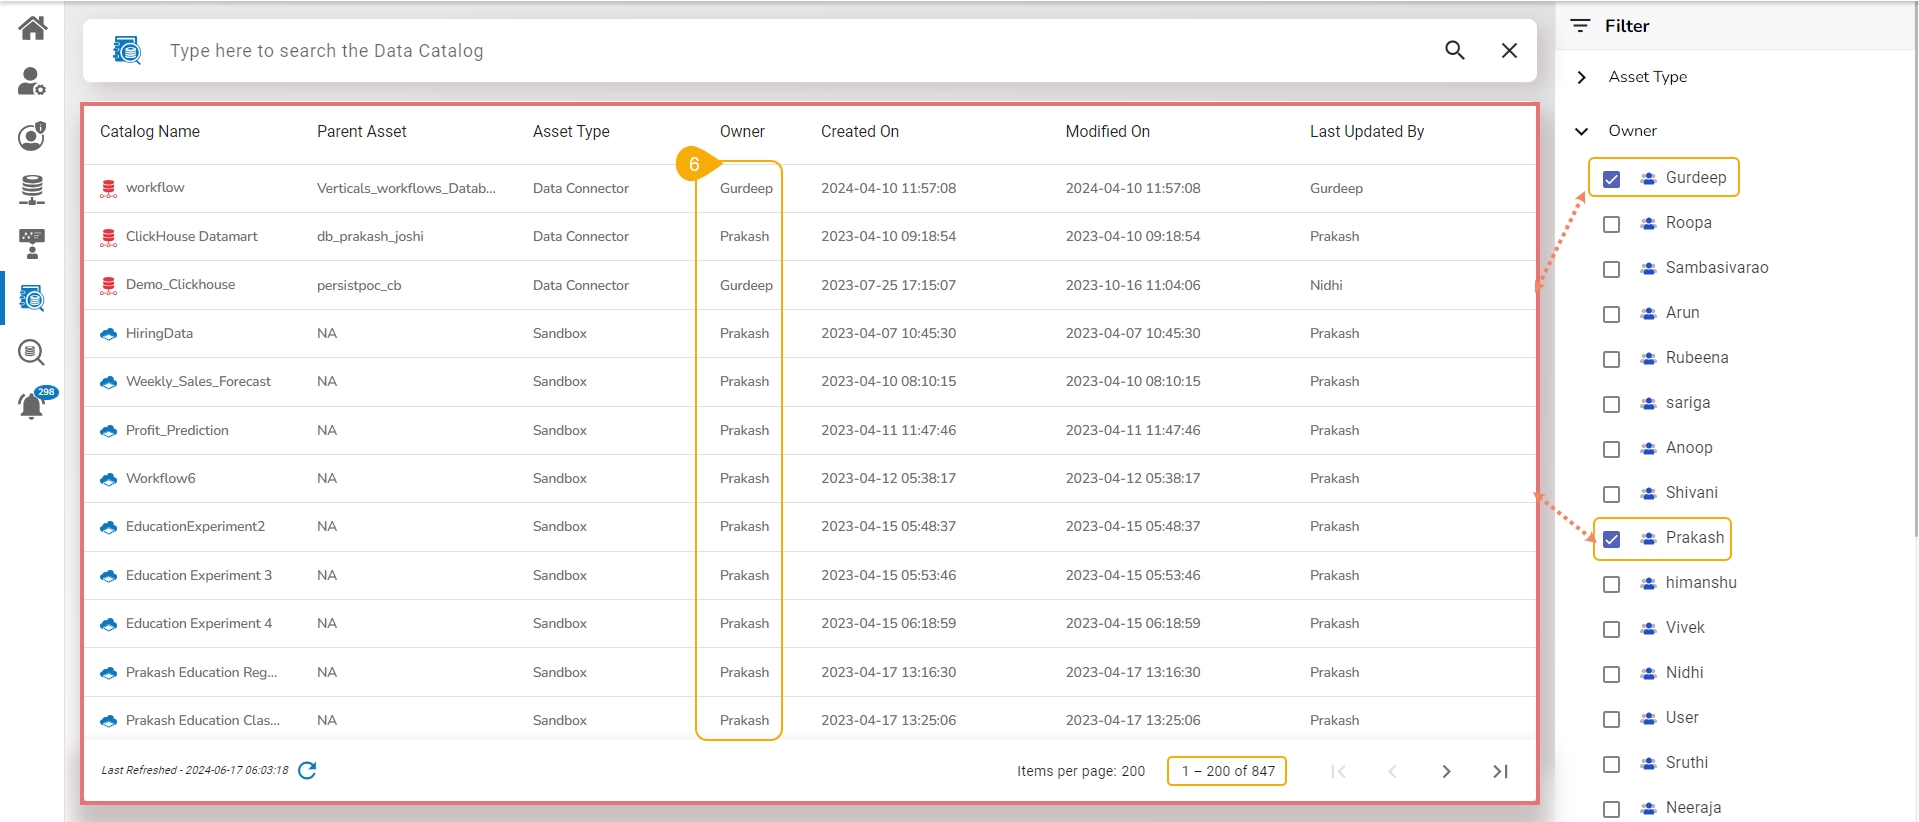
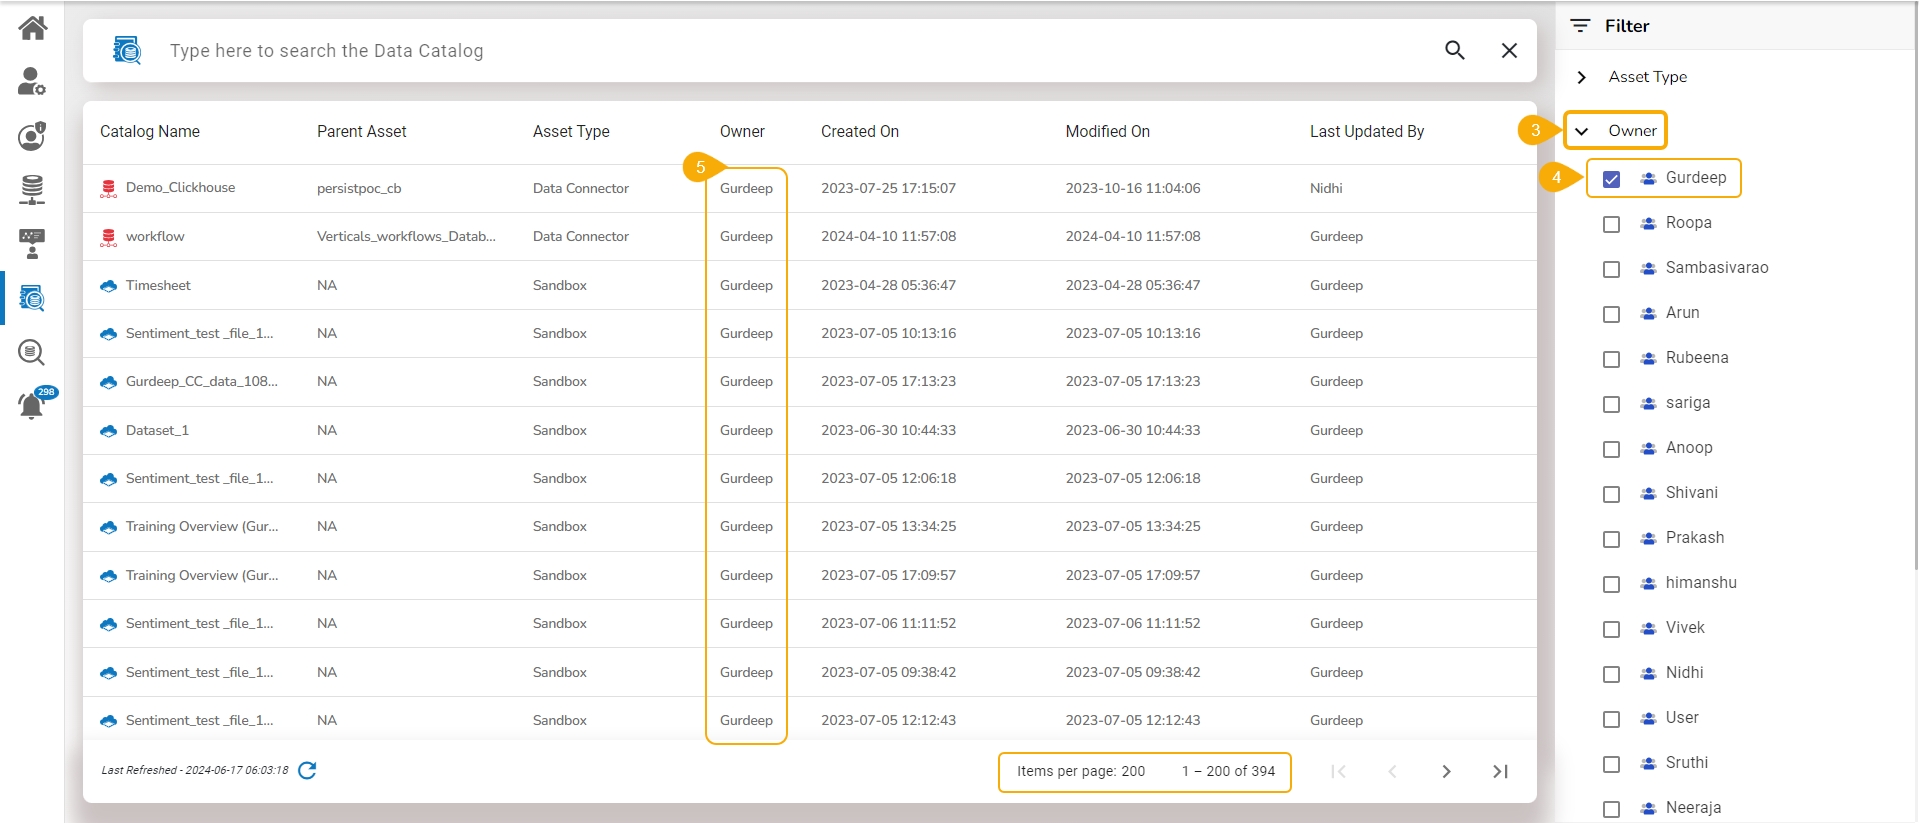
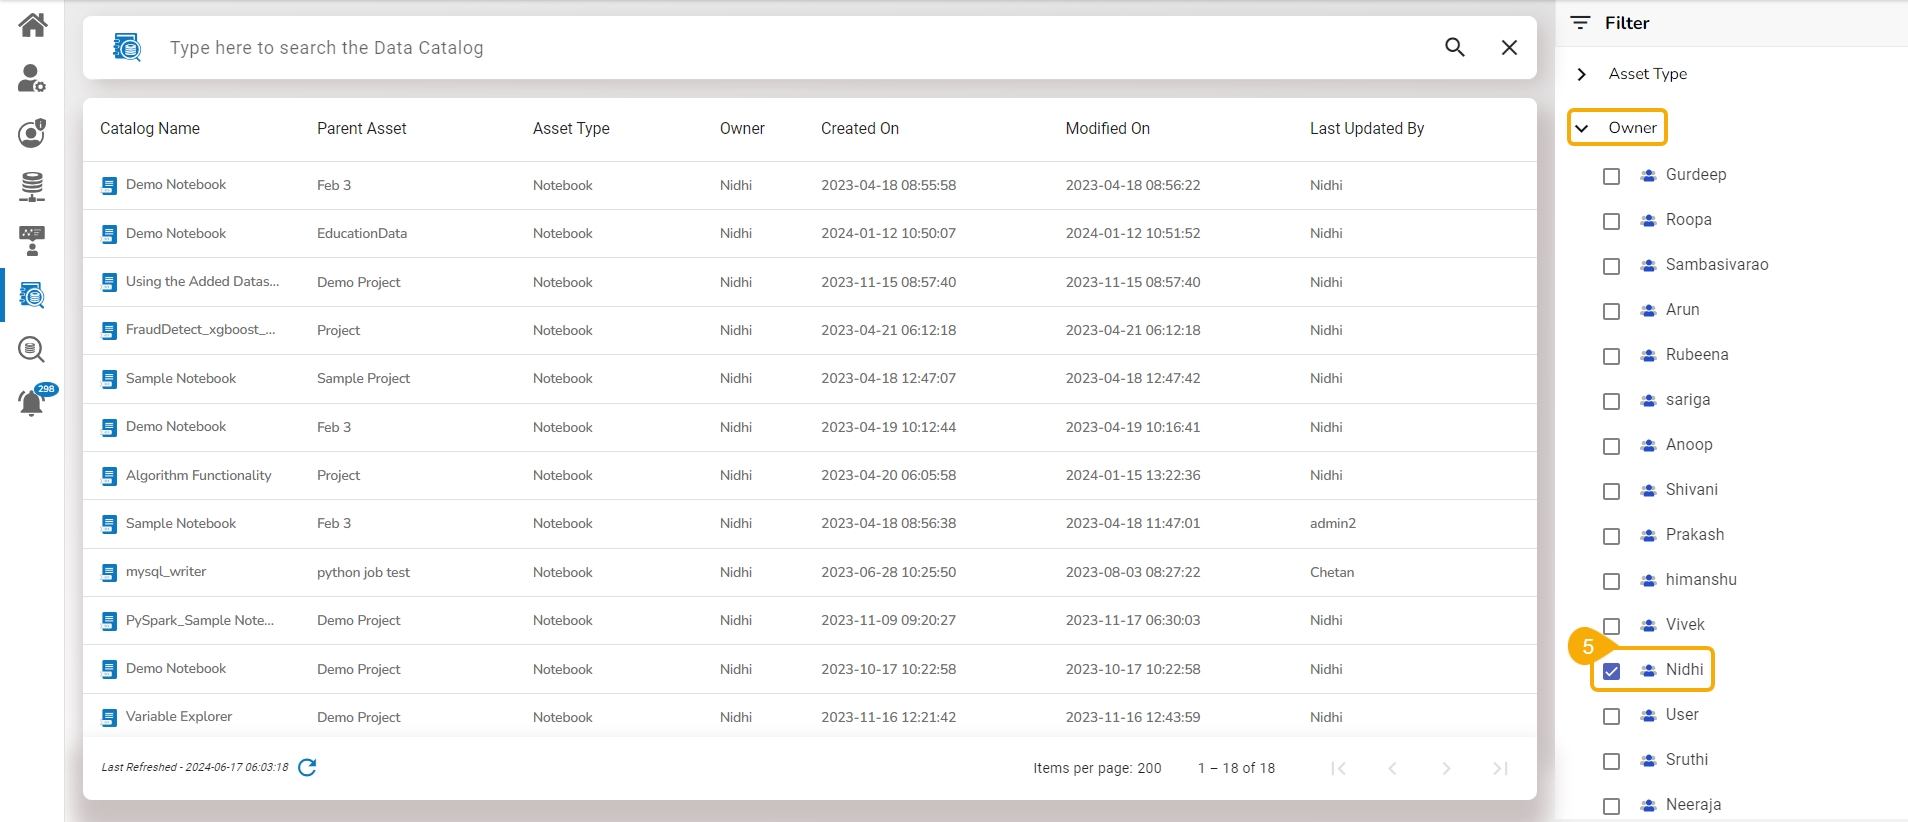
Access the Owner filter option. Click on it to get a list of the owners.
Select an owner by using the checkbox.
The displayed Data Catalog list will be customized based on the selected owner.
Users can apply multiple owners as filters to customize the displayed catalog list.
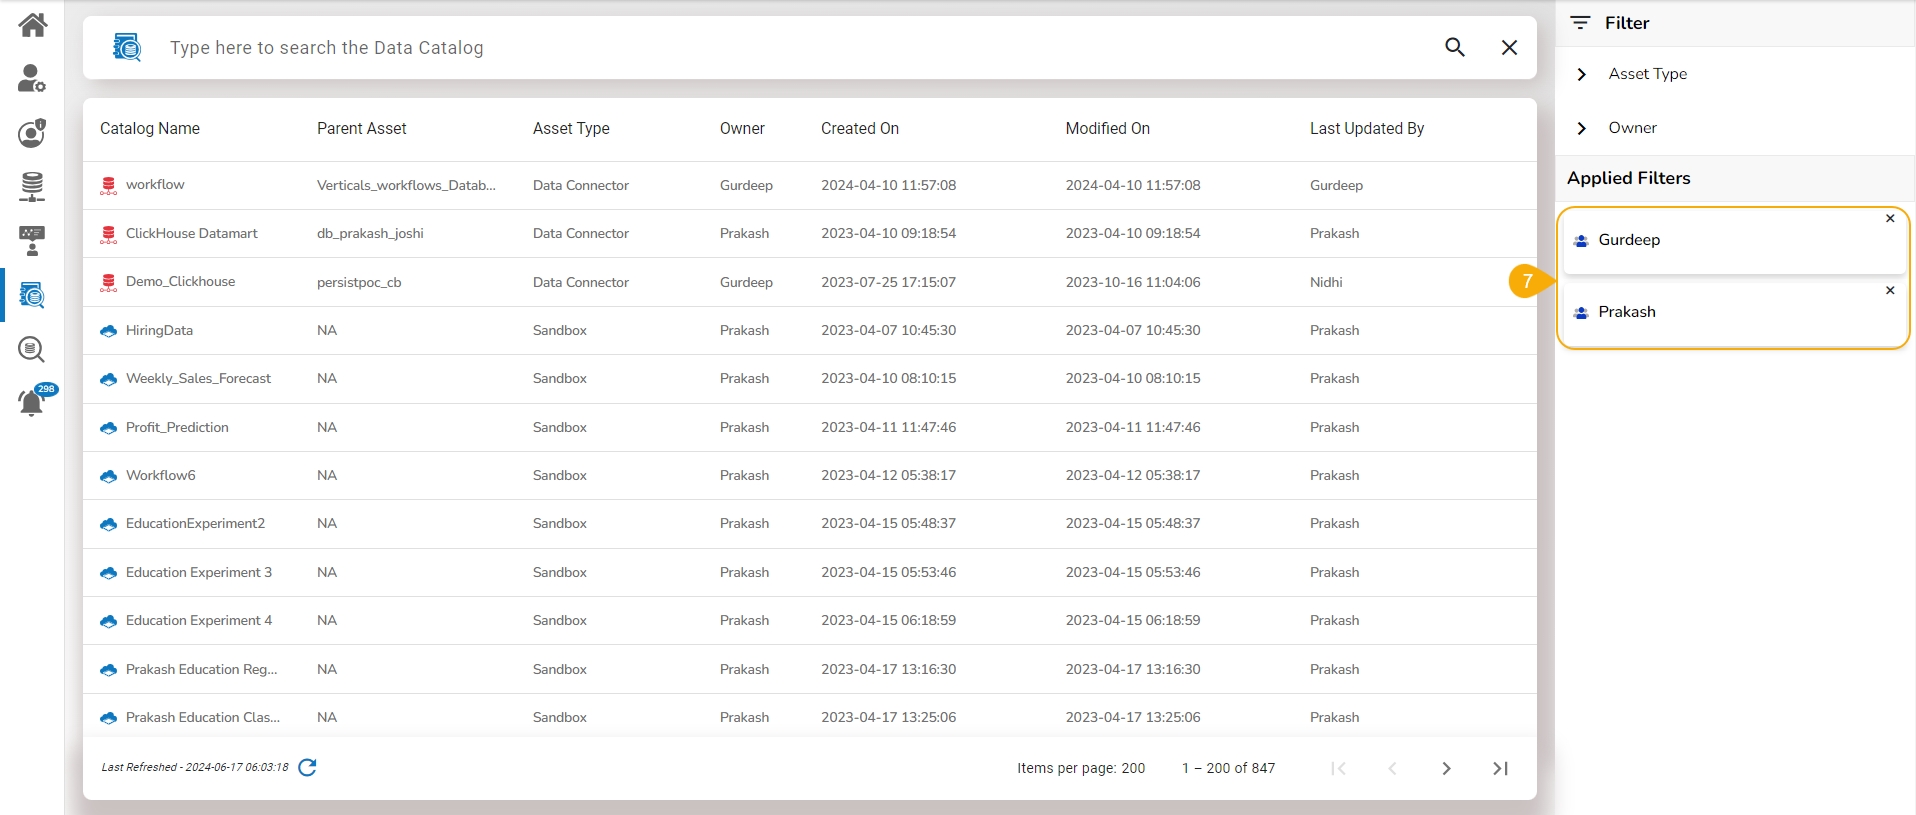
All the applied owners will be listed under the Applied Filters.
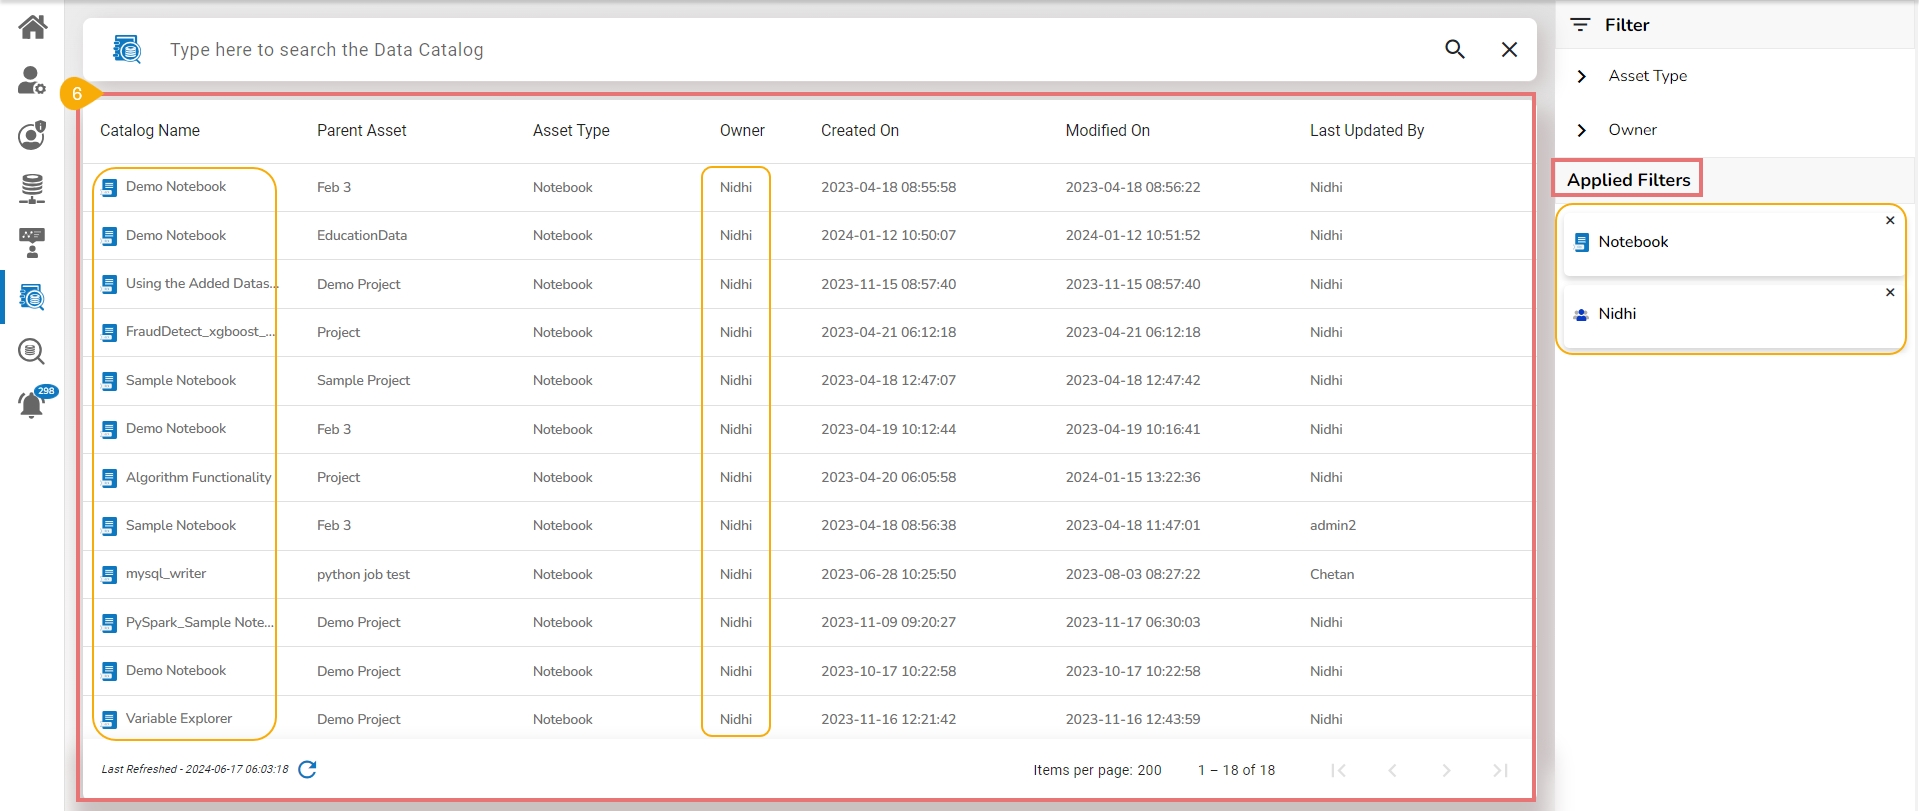
The user can apply filter conditions based on the combination of both filter categories and the Data Catalog list will get filtered accordingly.
Navigate to the Data Catalog search displaying the default Data Catalog list.
Access the Filter option on the right side of the page.
Open the Asset Type option.
Select an Asset type from the Asset Types list.
Select an owner from the Owner's list.
The combination of both the selected filter conditions will modify the displayed Data Catalog list.
Please Note: Click the Close icon under the Applied Filters options to remove that filter option.
Check out the given demonstration on how to explore the Data Catalog Search.
Once the user clicks on a Catalog entry from the displayed Data Catalog list, an Overview page opens with various tabs for the selected Data Catalog asset.
Navigate to the Data Catalog Search.
Click on a specific Catalog entry from a filtered or unfiltered Catalog List. The image displays the filtered list by Data Set asset.
Use the Search bar to search for the specific Catalog.
Click on the specific Catalog entry.
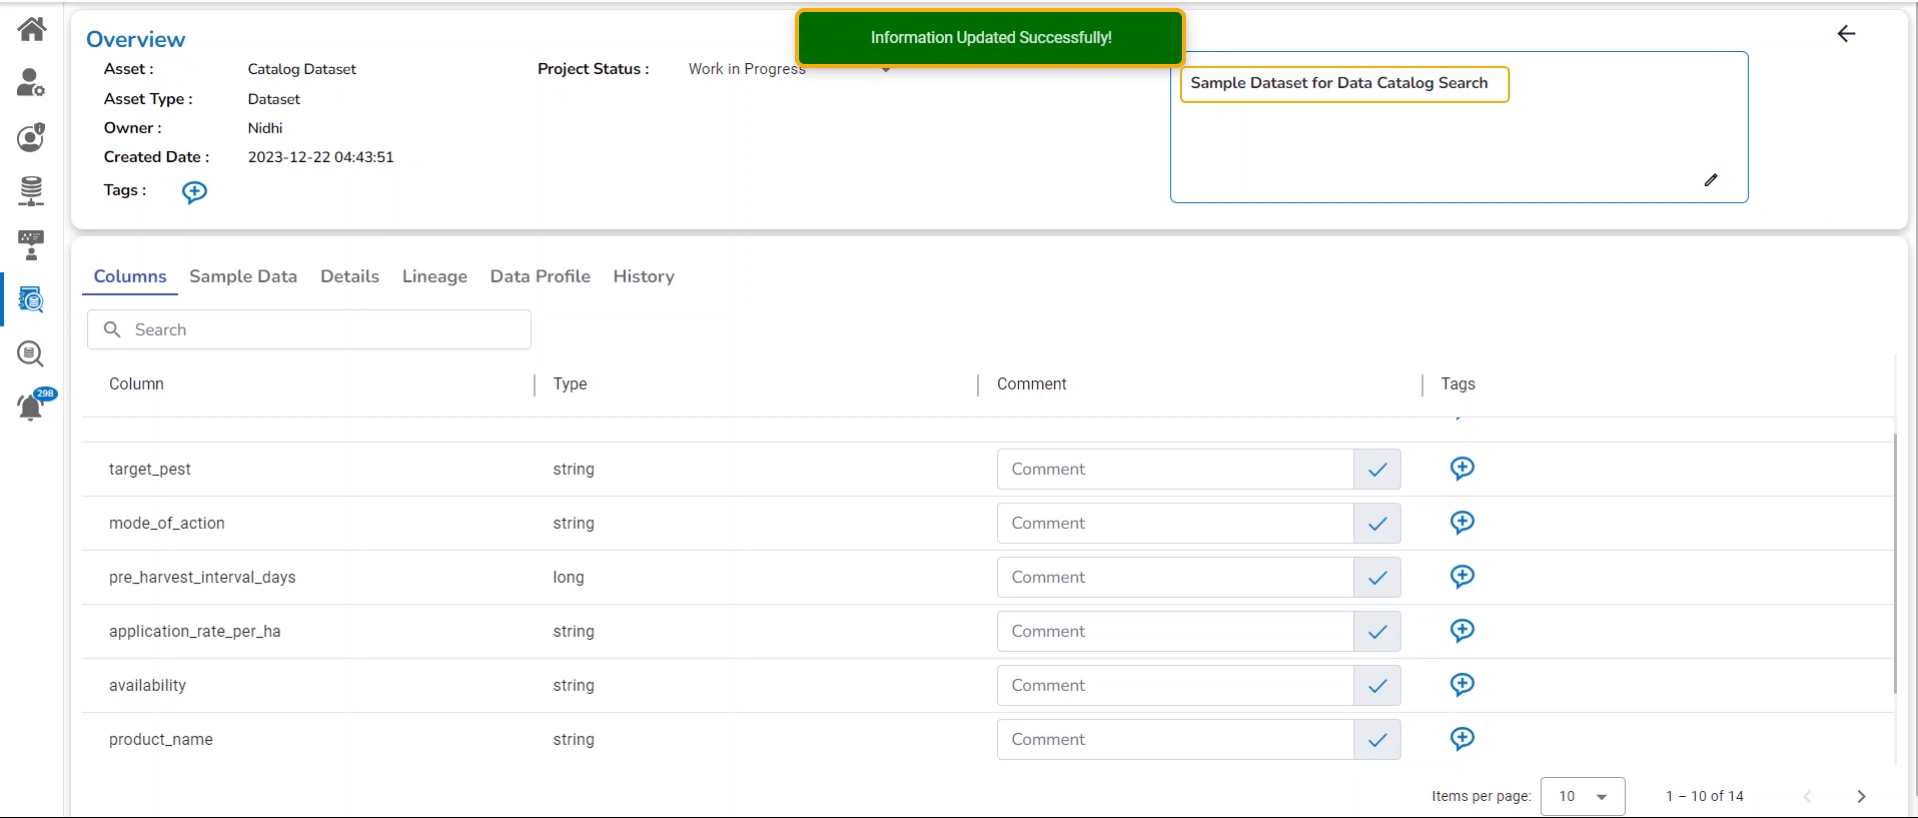
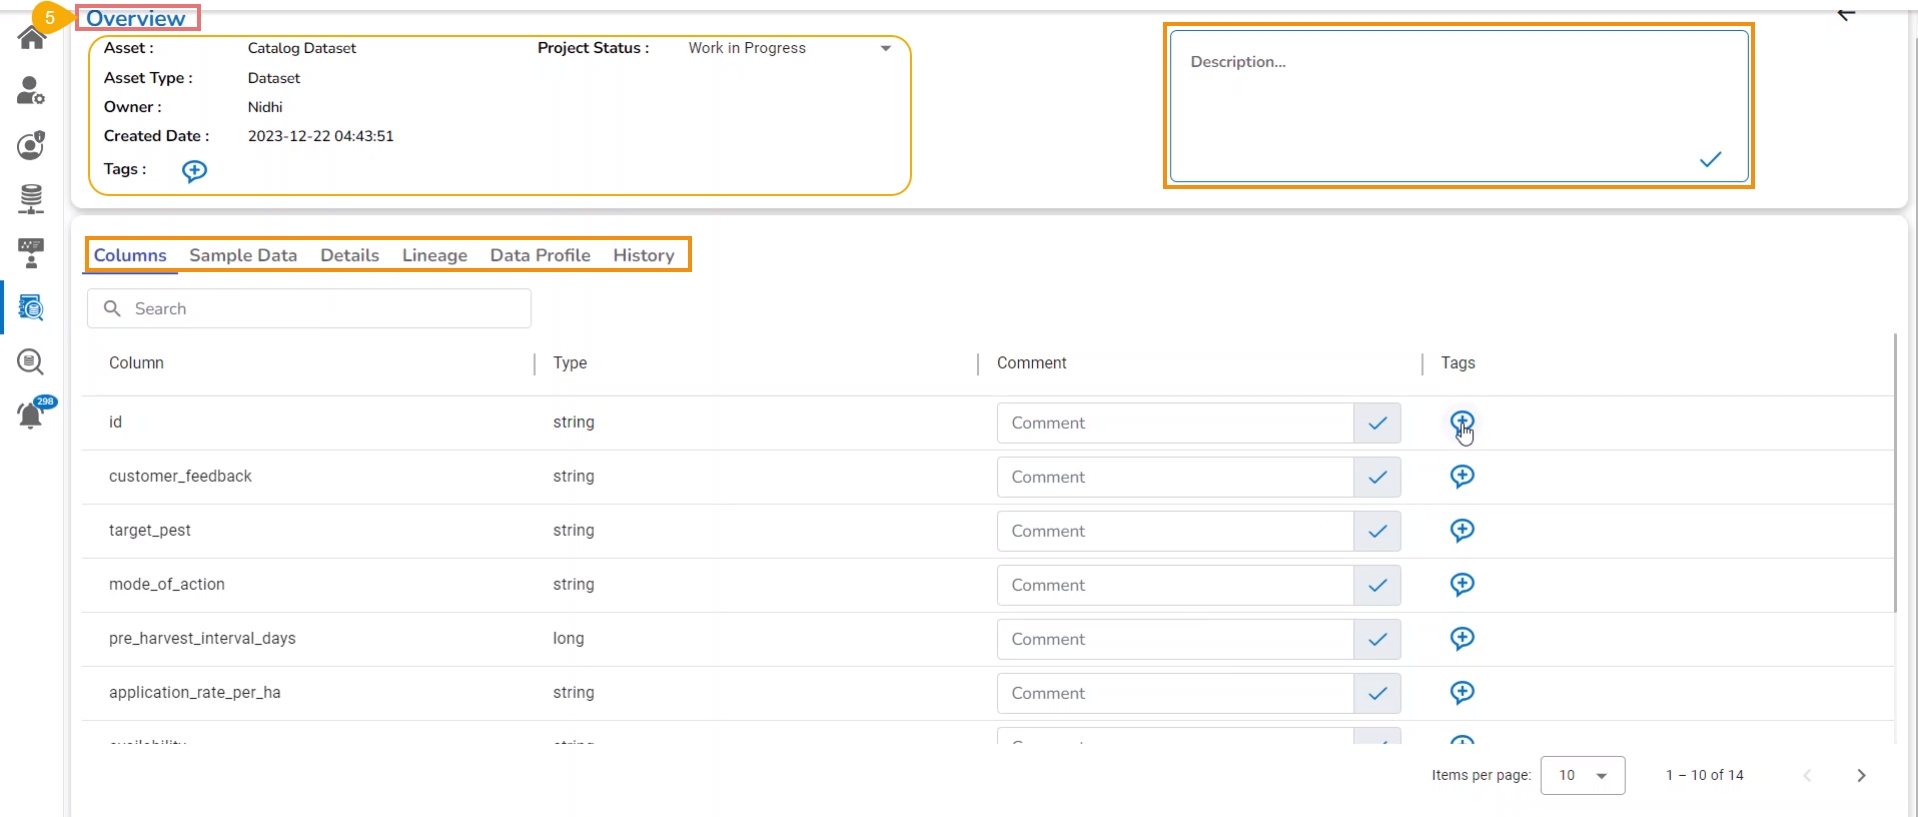
The Overview page opens for the chosen Asset displaying the following details.
Asset, Asset Type, Owner, Created Date, and Tags.
Description section to display the description for the selected Asset.
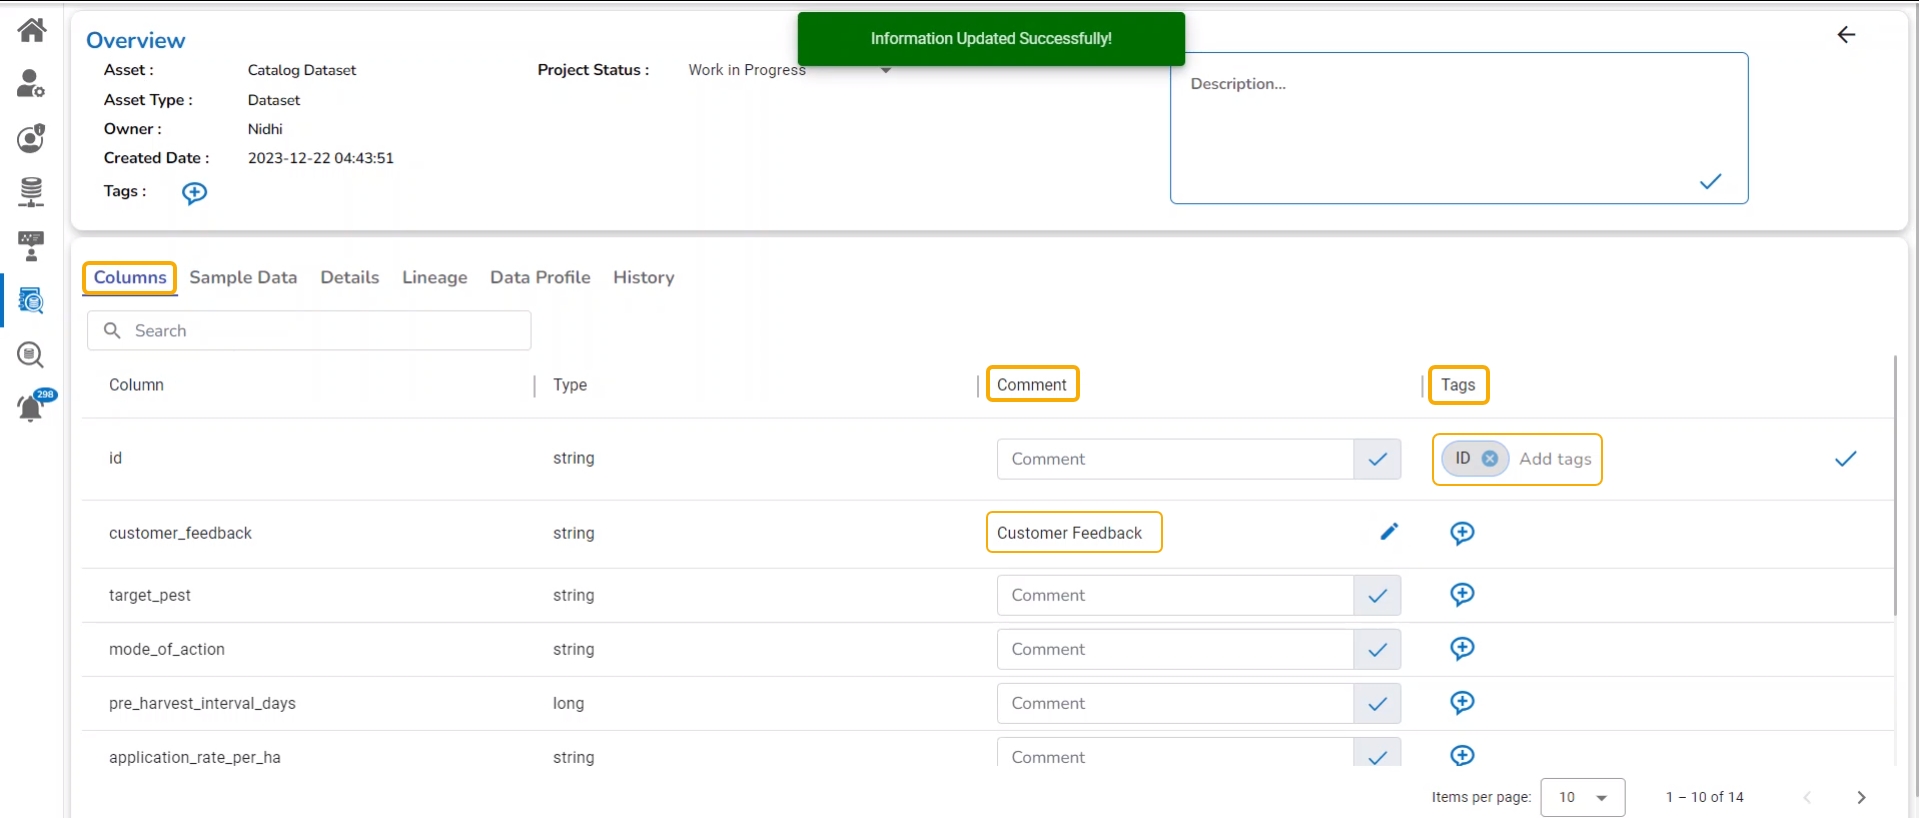
Insert Description in the box given for description.
A success message ensures that the provided description has been added to the concerned Data Catalog.
The inserted description remains in the Data Catalog.
Multiple tabs appear for a selected Asset such as Columns, Details, Lineage, Data Profile, and History.
This is the default tab to open, it displays all the column names with Column Type and allows the Data Catalog users to modify or insert Comments and tags to the displayed columns.
Please Note: The Columns tab is restricted. Columns will appear only in the case of Data Set, Data Store, and Table. It displays the column names, column types, comments, and tags. The user can insert comments and modify tags using the Columns tab.
The user gets notified under the Columns tab if a column contains Personal Information. The user may mask the concerned personal information to hide it in the data preview.
Navigate to the Columns tab.
Select a column from the displayed list of columns.
The notification will be displayed under the Comment section of the selected column.
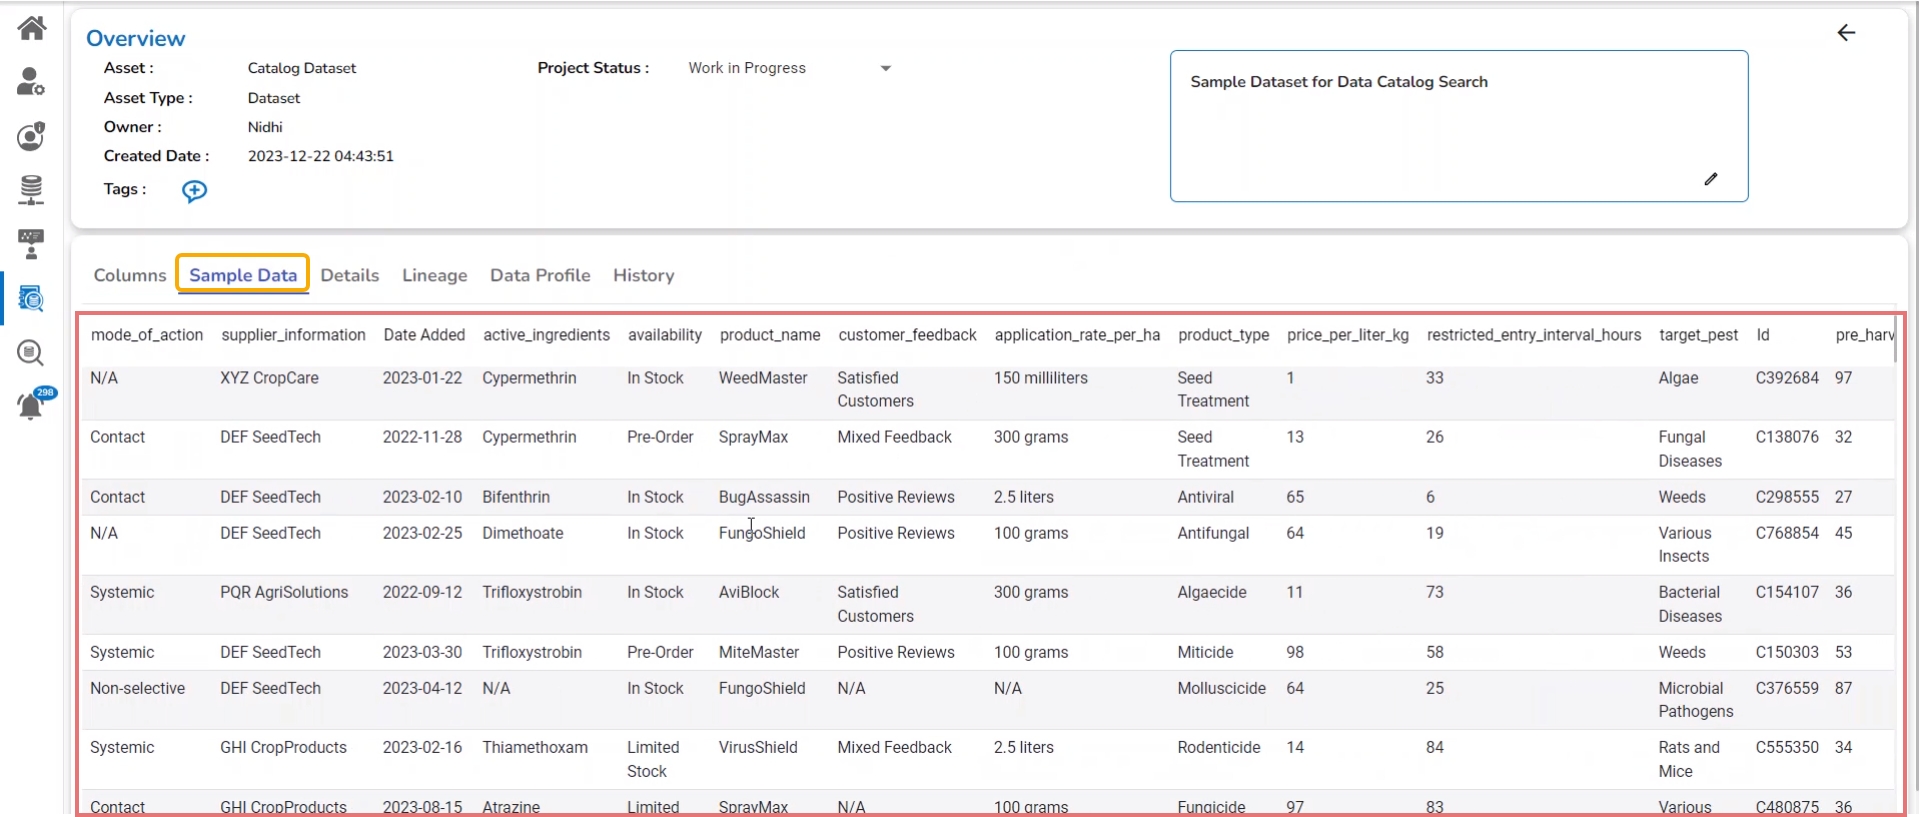
Click on the Sample Data tab to display the sample data for the selected Data Set or Feature Store. The user gets to see the sample of the data that is in use.
Please Note: The Feature Store and Data Set asset types will display the Sample Data tab.
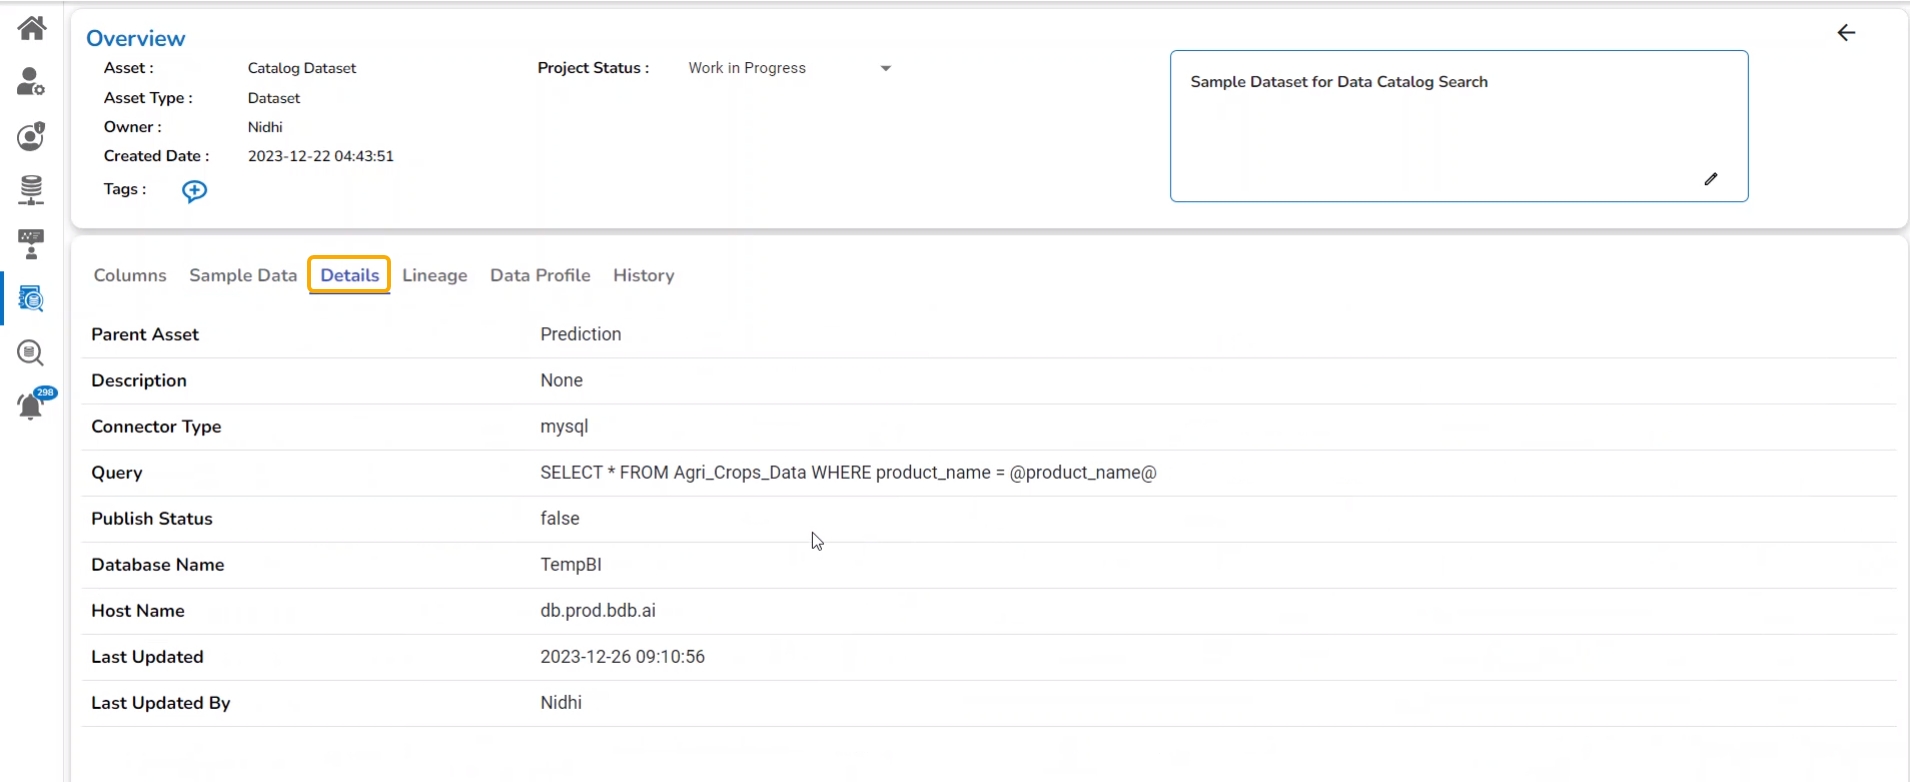
The Details tab displays the key information for the selected Catalog asset.
Navigate to the Details tab that displays the following details:
Parent Asset
Query
Publish Status
Database Name
Host Name
Last Updated
Last Updated By
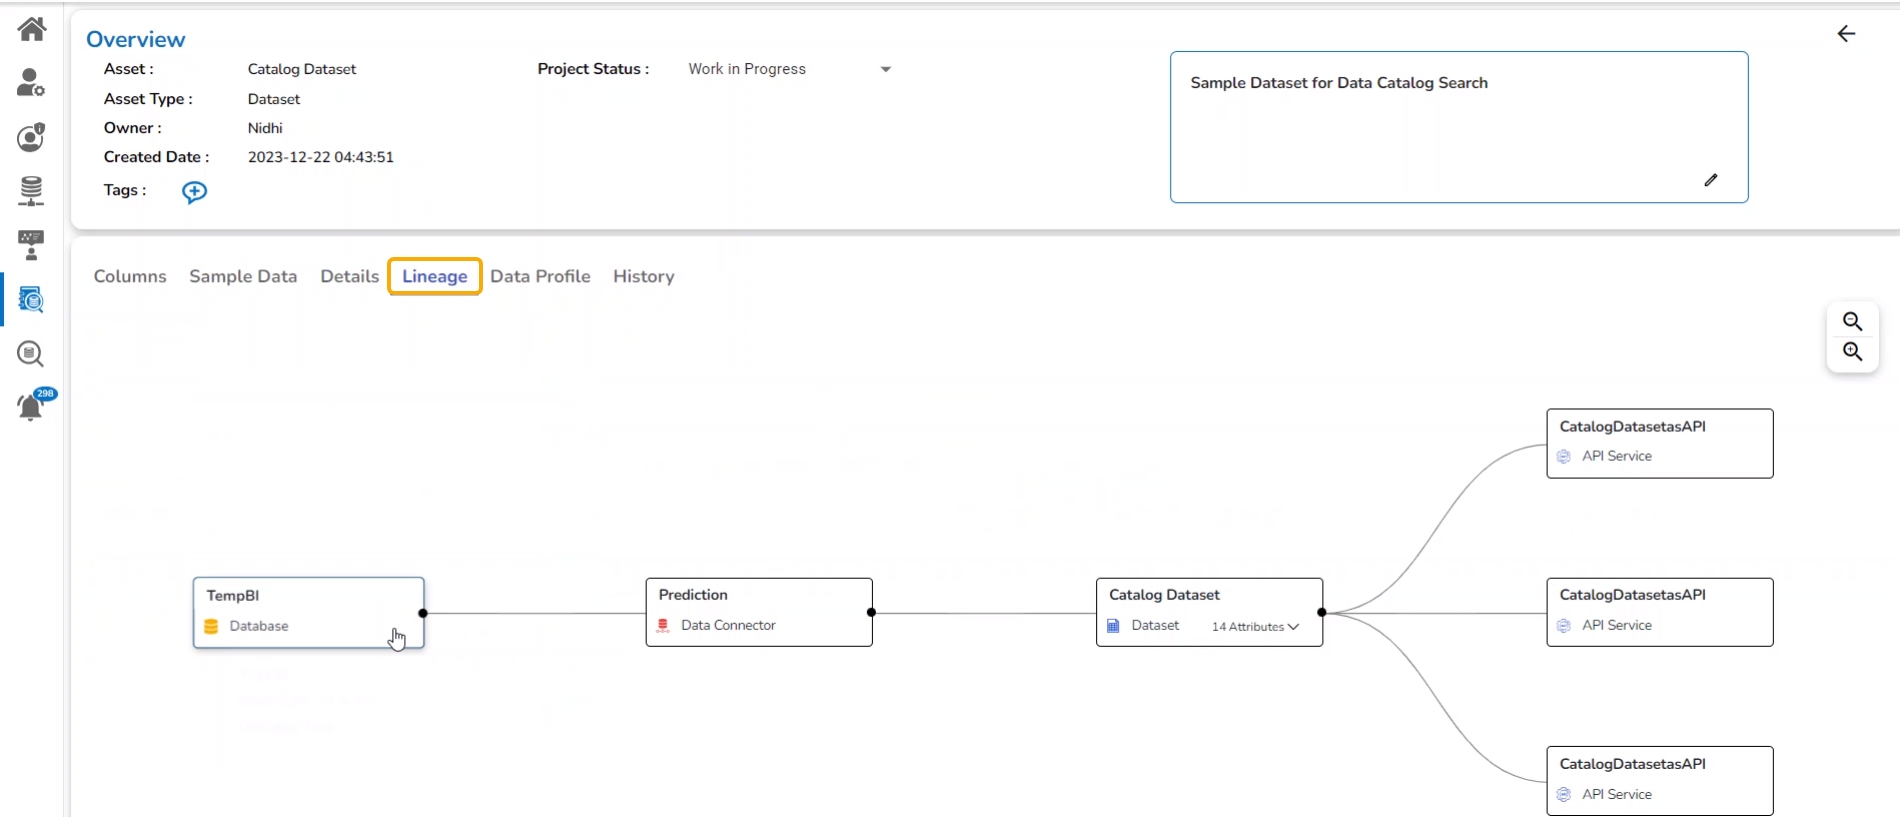
The Lineage tab displays Data Lineage for the selected Catalog. Click on the Lineage tab to open the Data Lineage. This page reveals the relationship between the searched asset and the base data source.
Navigate to the Data Profile tab to get the statistical information about the selected asset. It also displays a column chart based on the column names.
Please Note: The Data Profile tab is only available for the Data Set asset type.
Click on the History tab to display the change history of the selected Data Catalog.
The History tab displays the last activated and deactivated information for the Data Pipelines and Jobs asset types.
Navigate to the Overview page for a Pipeline or Job Asset type.
Open the History tab.
Scrolling in the History tab displays the Last Activated and Last Deactivated information with the user's name, date, and time stamp for the selected pipeline/ job.
Please Note: Use the Back to Main Page icon to get back the Data Catalog list.
The Admin users will get a Delete icon for the Data Catalog Search to remove a specific Data Catalog entry from the list. Once the Data Catalog entry is removed from the Data Catalog Search page, it will not be displayed for the other users.
Check out the illustration on removing an asset from the Data Catalog List.
Click the Data Catalog Search icon from the platform homepage.
The Data Catalog list appears.
Search and select an asset from the displayed Catalog list.
Click the Delete icon for the selected asset.
A confirmation dialog box appears.
Click the Yes option.
A notification message appears to ensure that the selected asset is deleted.
The asset gets removed from the displayed catalog.
Attention: While removing a specific Catalog entry from the list, it will not get removed from the Platform, Data Center, or specific module based on the asset type. E.g., By removing a Sandbox file from the Data Catalog list, it will not get removed from the Data Center module (as displayed in this use case).
Navigate to the Data Center module.
Open the Data Sandbox List page.
The Data Sandbox file based on which the Data Catalog entry was removed would be displayed in the list.
Please Note: The Delete option is provided only for the admin users roles.
Please Note: The user can click the cross mark provided next to the selected Asset Type under the Applied Filters section to remove that applied filter category from the displayed Data Catalog list.
Please Note: The user can click the cross mark provided next to the selected Owner under the Applied Filters section to remove that applied filter category from the displayed Data Catalog list.


