Loading...
Loading...
Loading...
Loading...
Loading...
Loading...
Loading...
This section explains way to begin work with the Workspace tab. The Create and Import options are provided for Repo folders.
Loading...
Loading...
Loading...
Loading...
Loading...
Loading...
Loading...
Loading...
The Workspace is a placeholder to create and save various data science experiments inside the Data Science Lab modules.
The Workspace is the default tab to open for each Data Science Lab project. Based on the Project types the options to begin working with Workspace may differ.
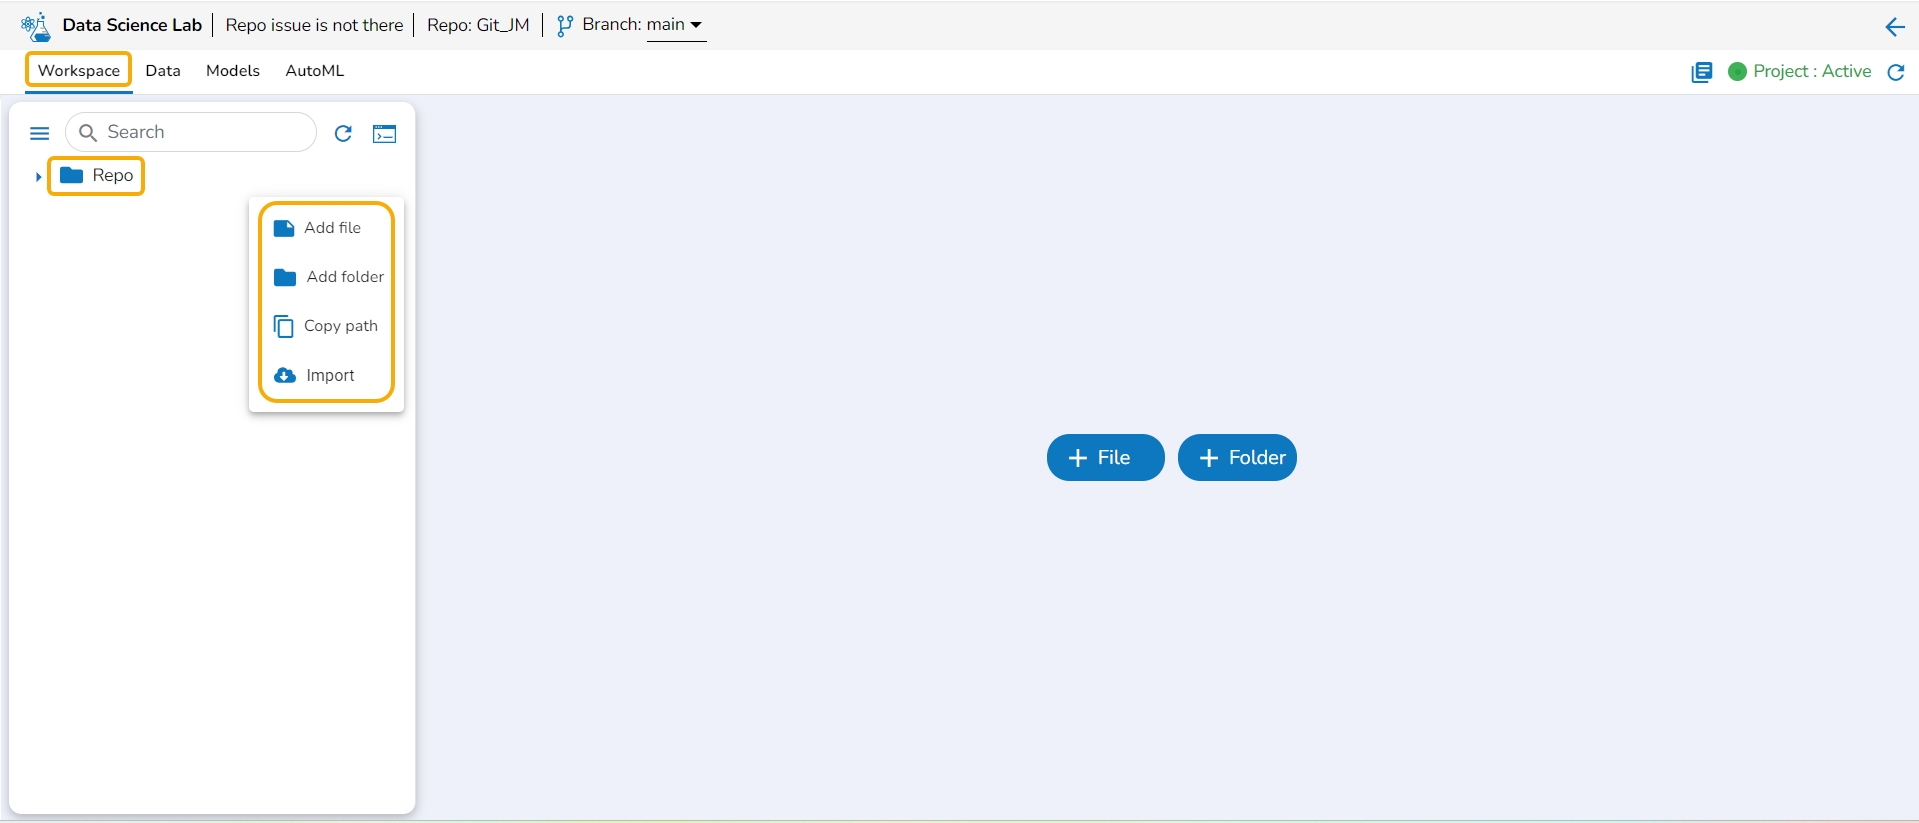
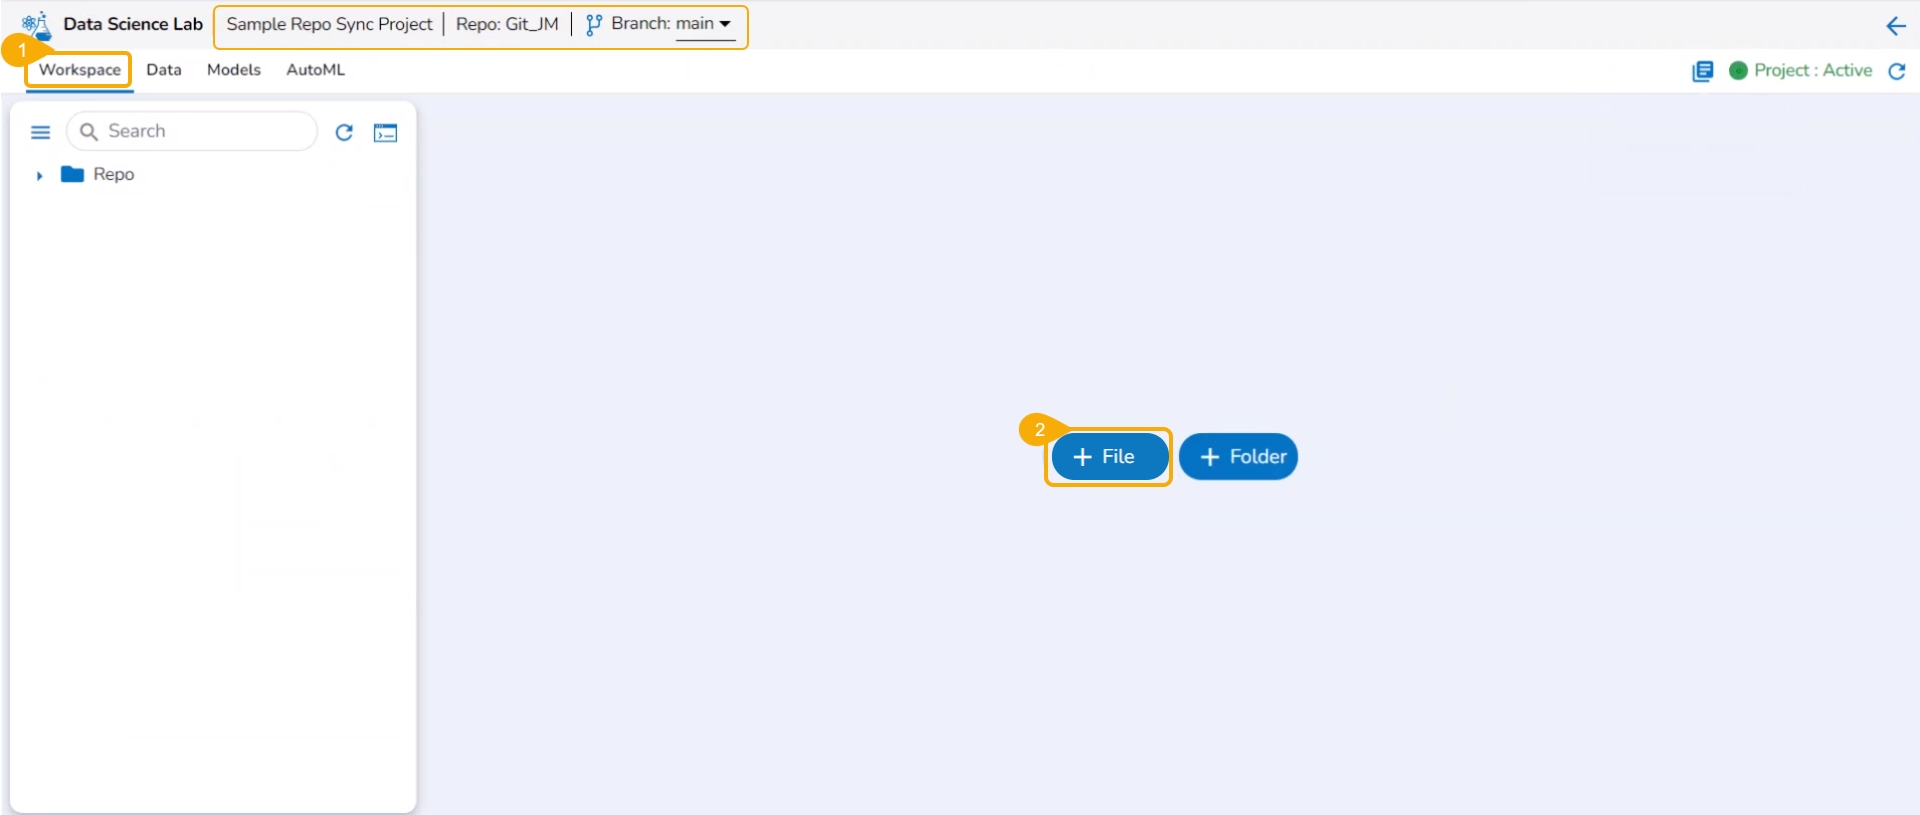
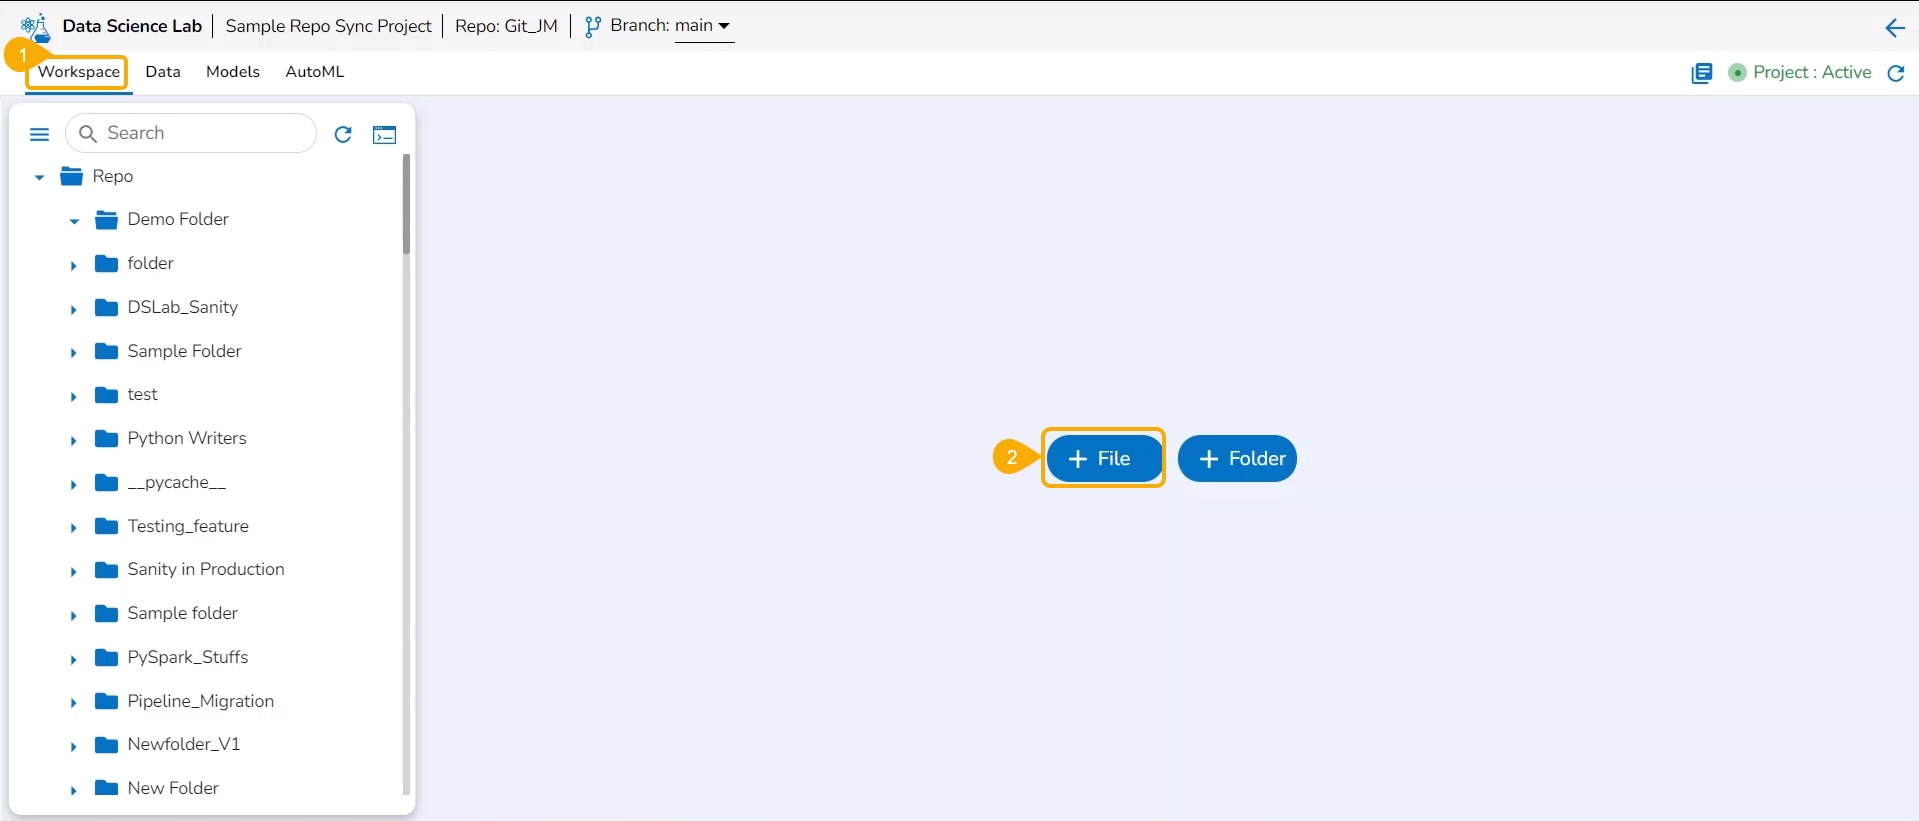
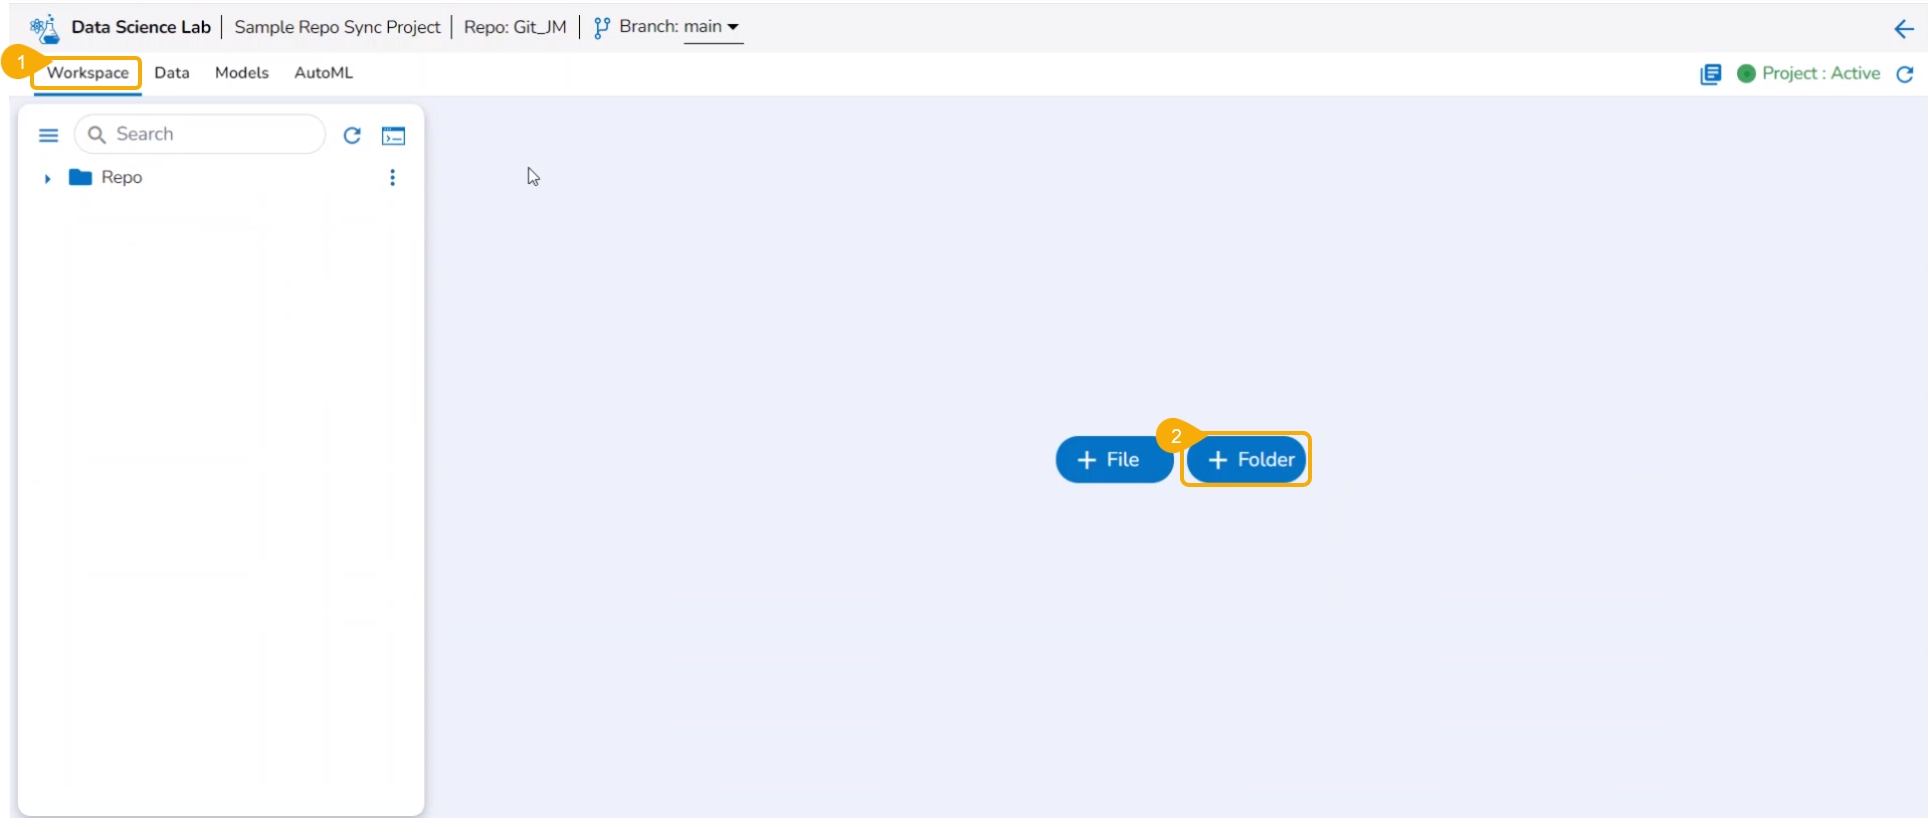
The Repo Sync Projects offer File and Folder options on the default page of the Workspace tab.
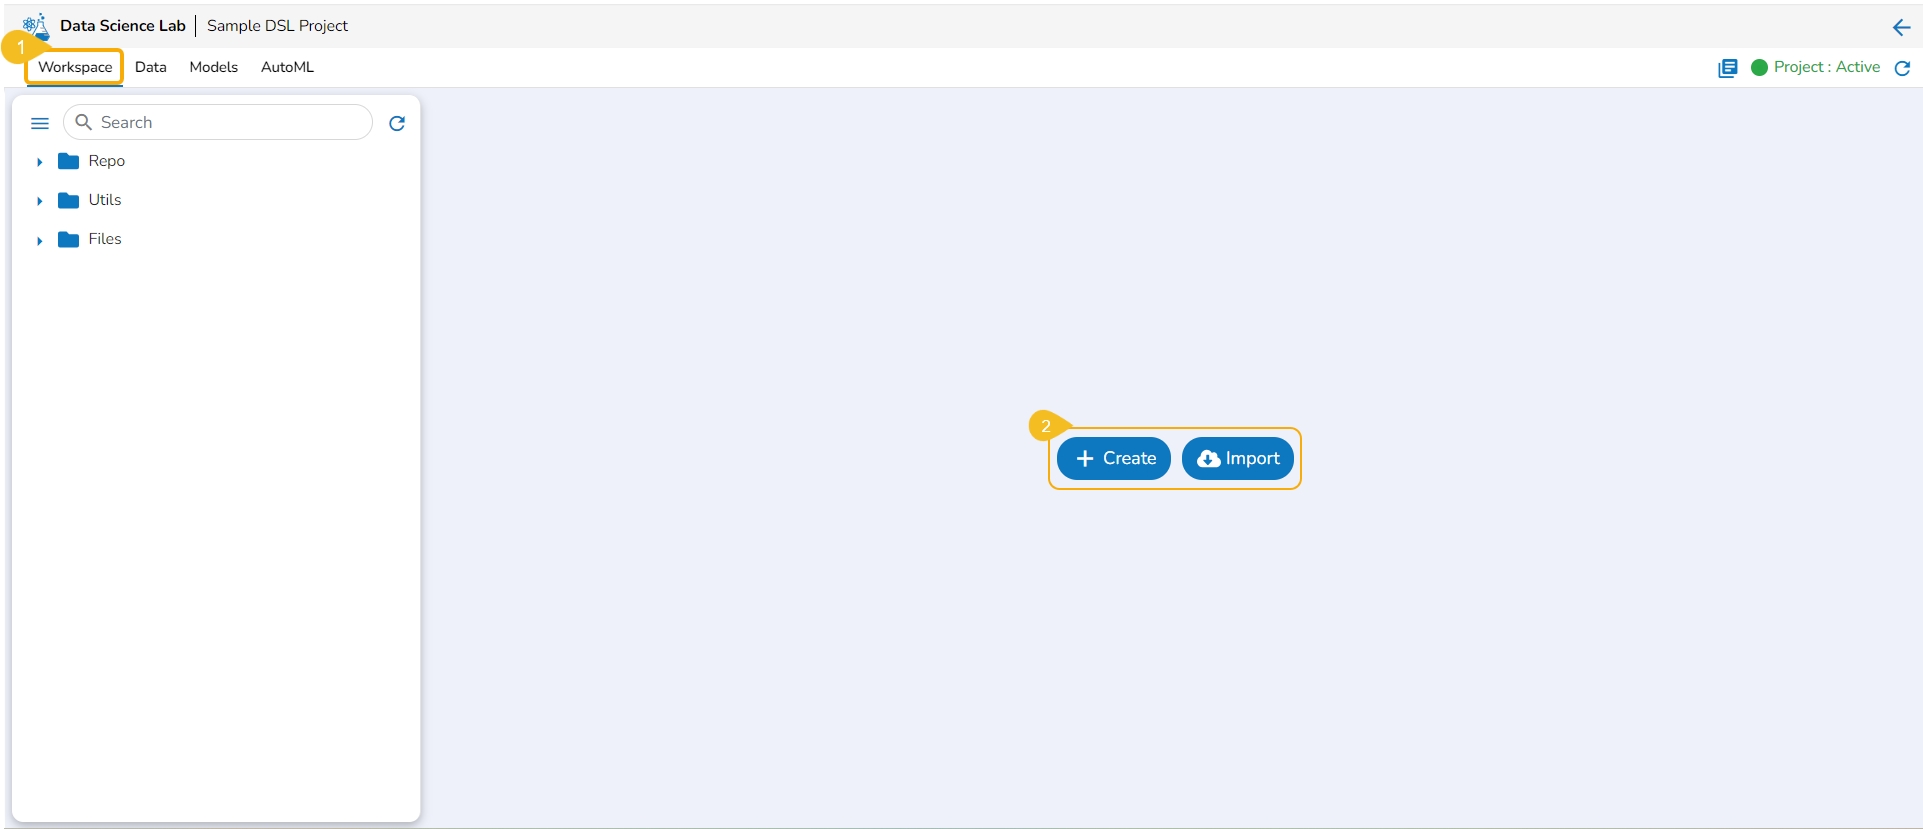
The normal Data Science Projects will have Create and Import options under the Workspace landing page.
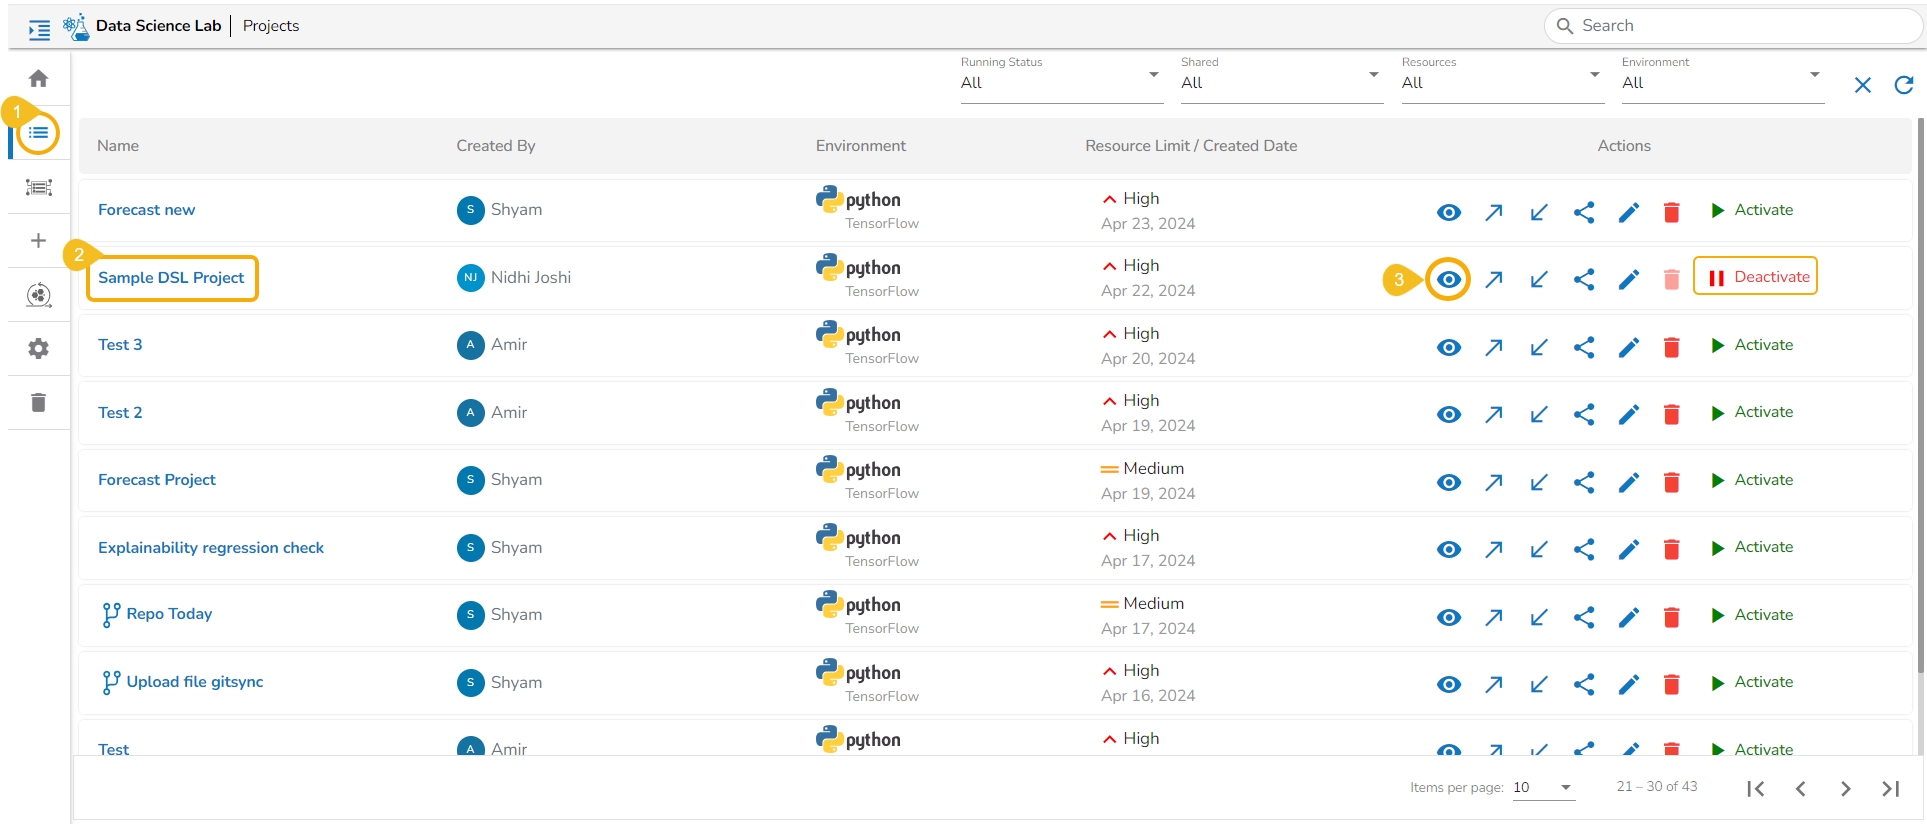
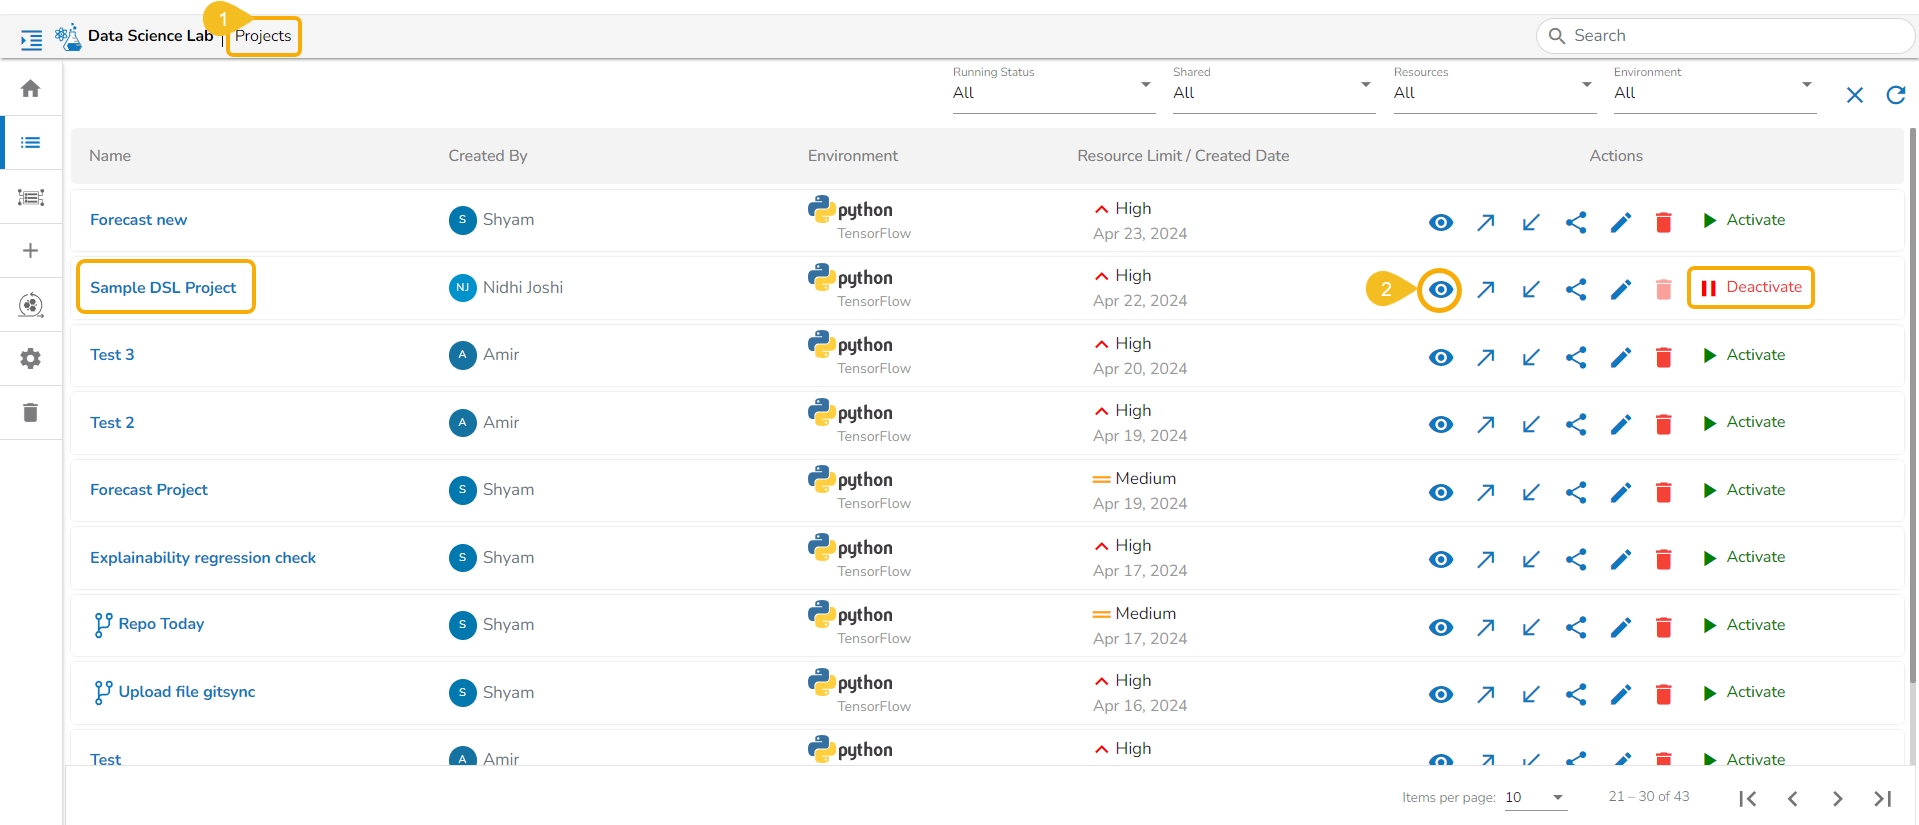
Navigate to the Projects page.
Select an activated Repo Sync Project from the displayed list.
Click the View icon to open the project.
The Repo Sync project opens displaying the Workspace tab.
A Repo folder gets added to the selected Repo Sync project based on the selected Git repository account (at the user-level settings) under the Notebook tab with Refresh and Git Console icons.
Refresh
Refreshes the data taken from the selected Git Repository.
Git Console
Opens a console page to use Git Commands.
Please Note:
The Repo Sync Project opens with a branch configured at the project level.
A Repo Sync Project contains other than .ipynb files under the Workspace tab.
Navigate to the Projects page.
Select an activated Project from the displayed list.
Click the View icon to open the project.
The Project opens displaying the Workspace tab.
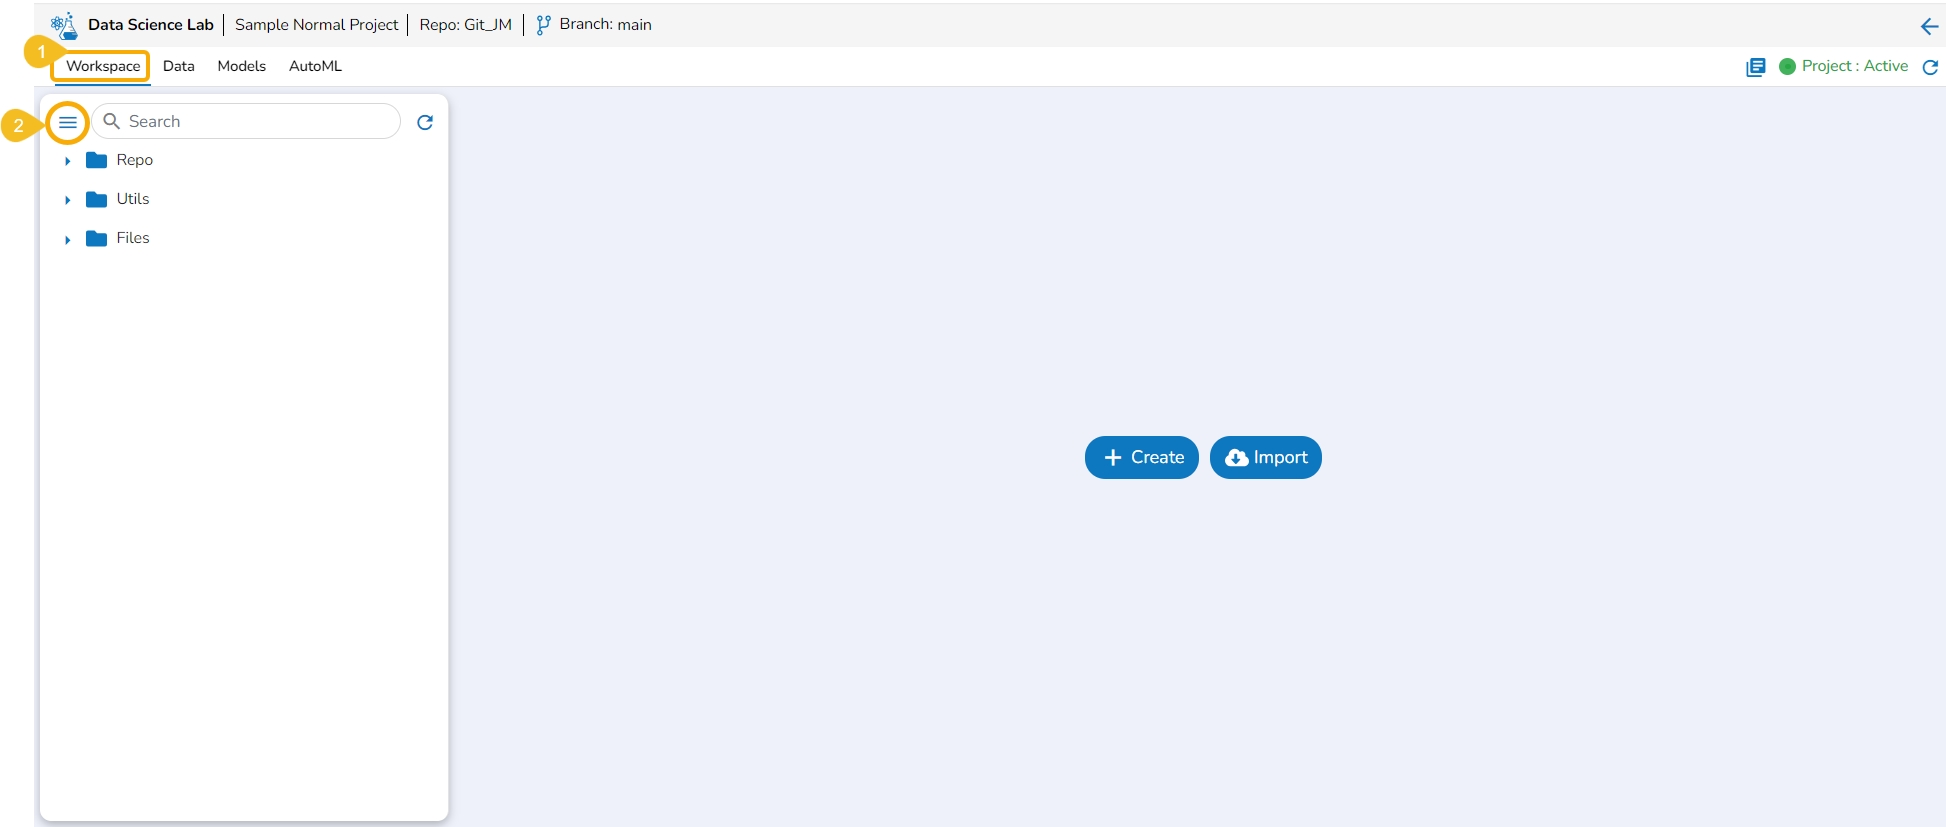
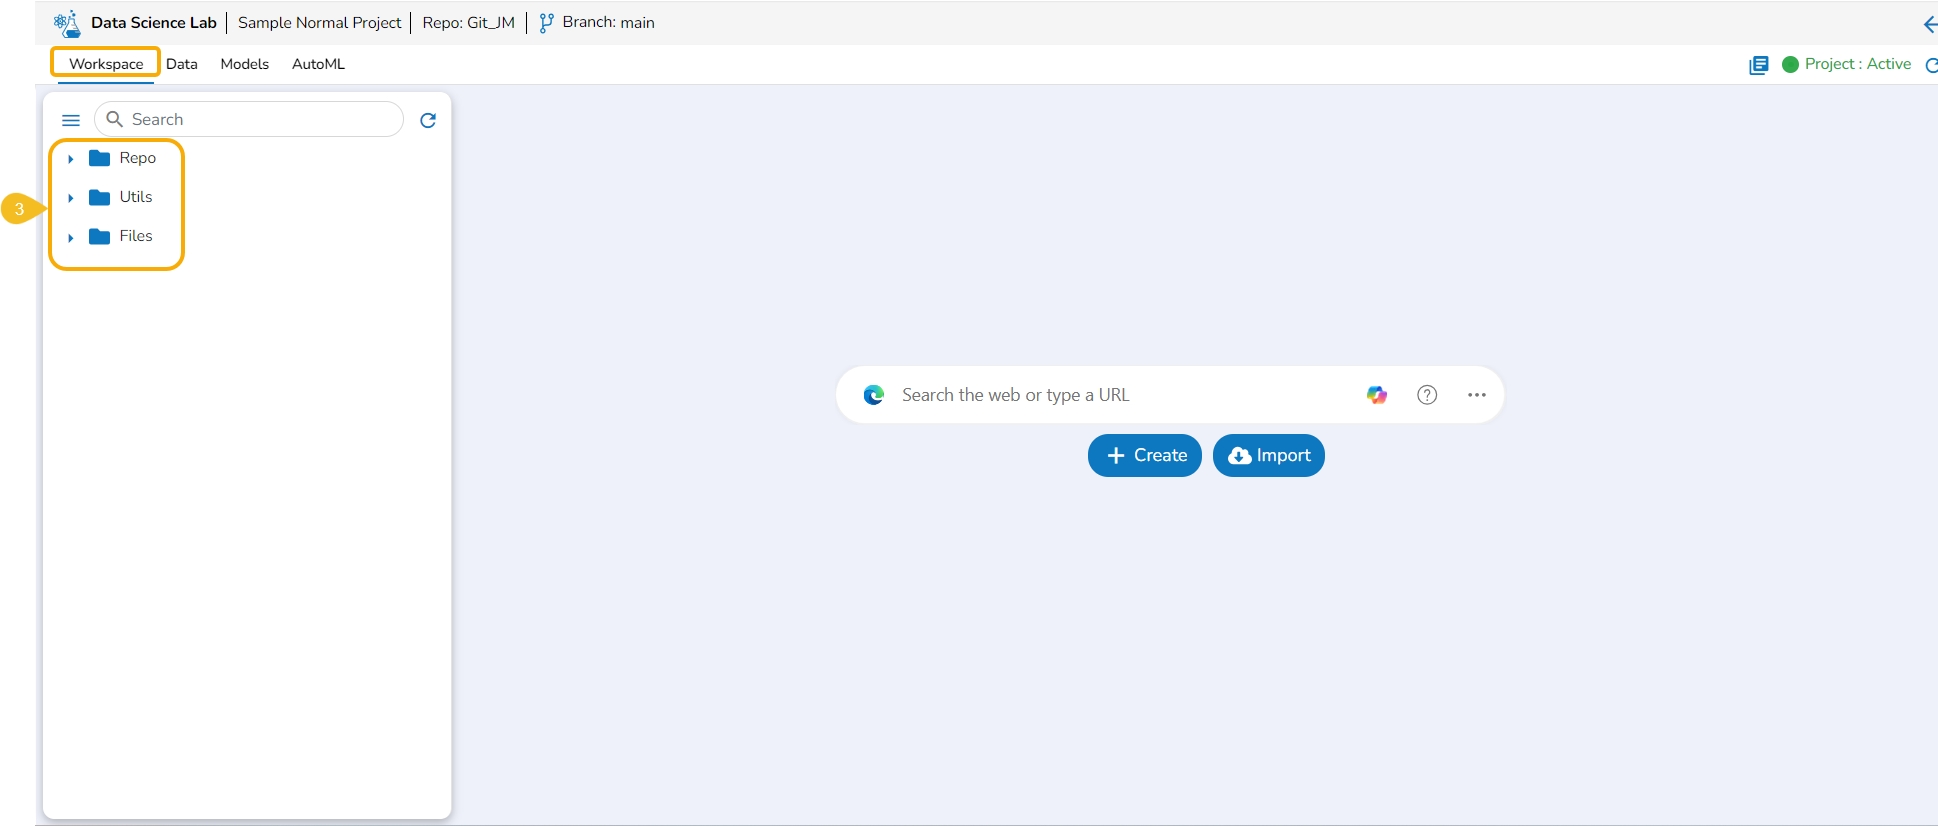
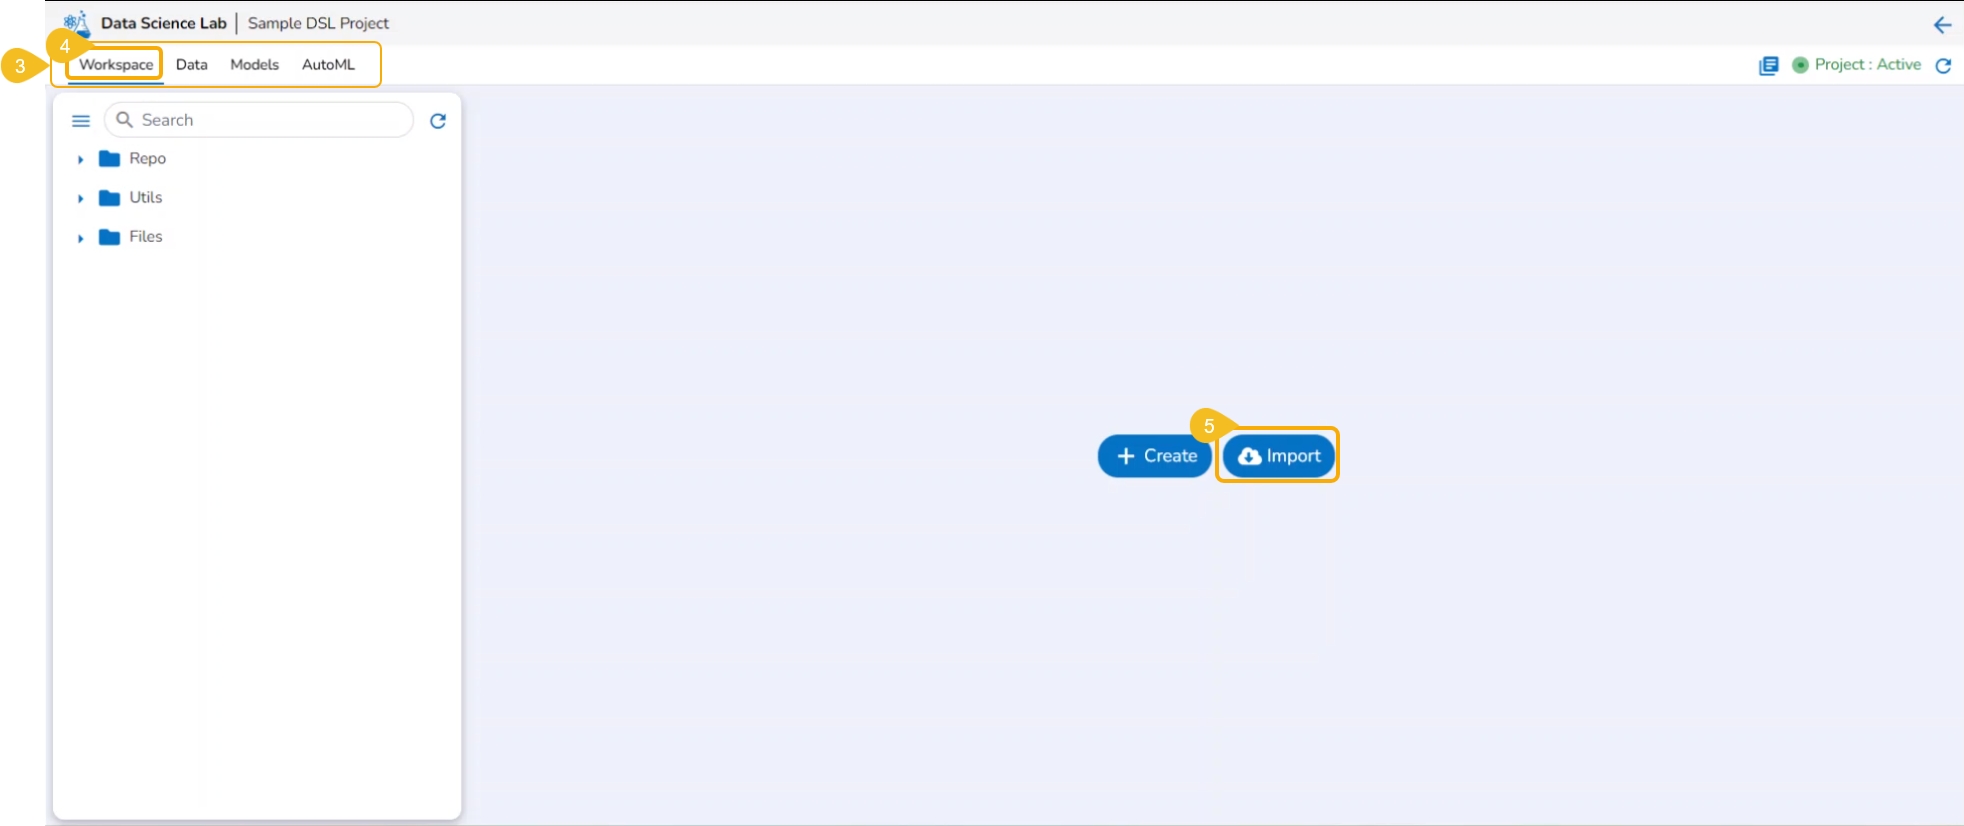
The Repo, Utils, and Files default folders appear under the Workspace tab.
Please Note: If the selected project is a Repo Sync Project, it will only contain a Repo folder under the Workspace tab. Here, the Repo folder will support all file types. Three folders (Repo, Utils, and Files) will be available under the Workspace tab for a normal Data Science Lab project.
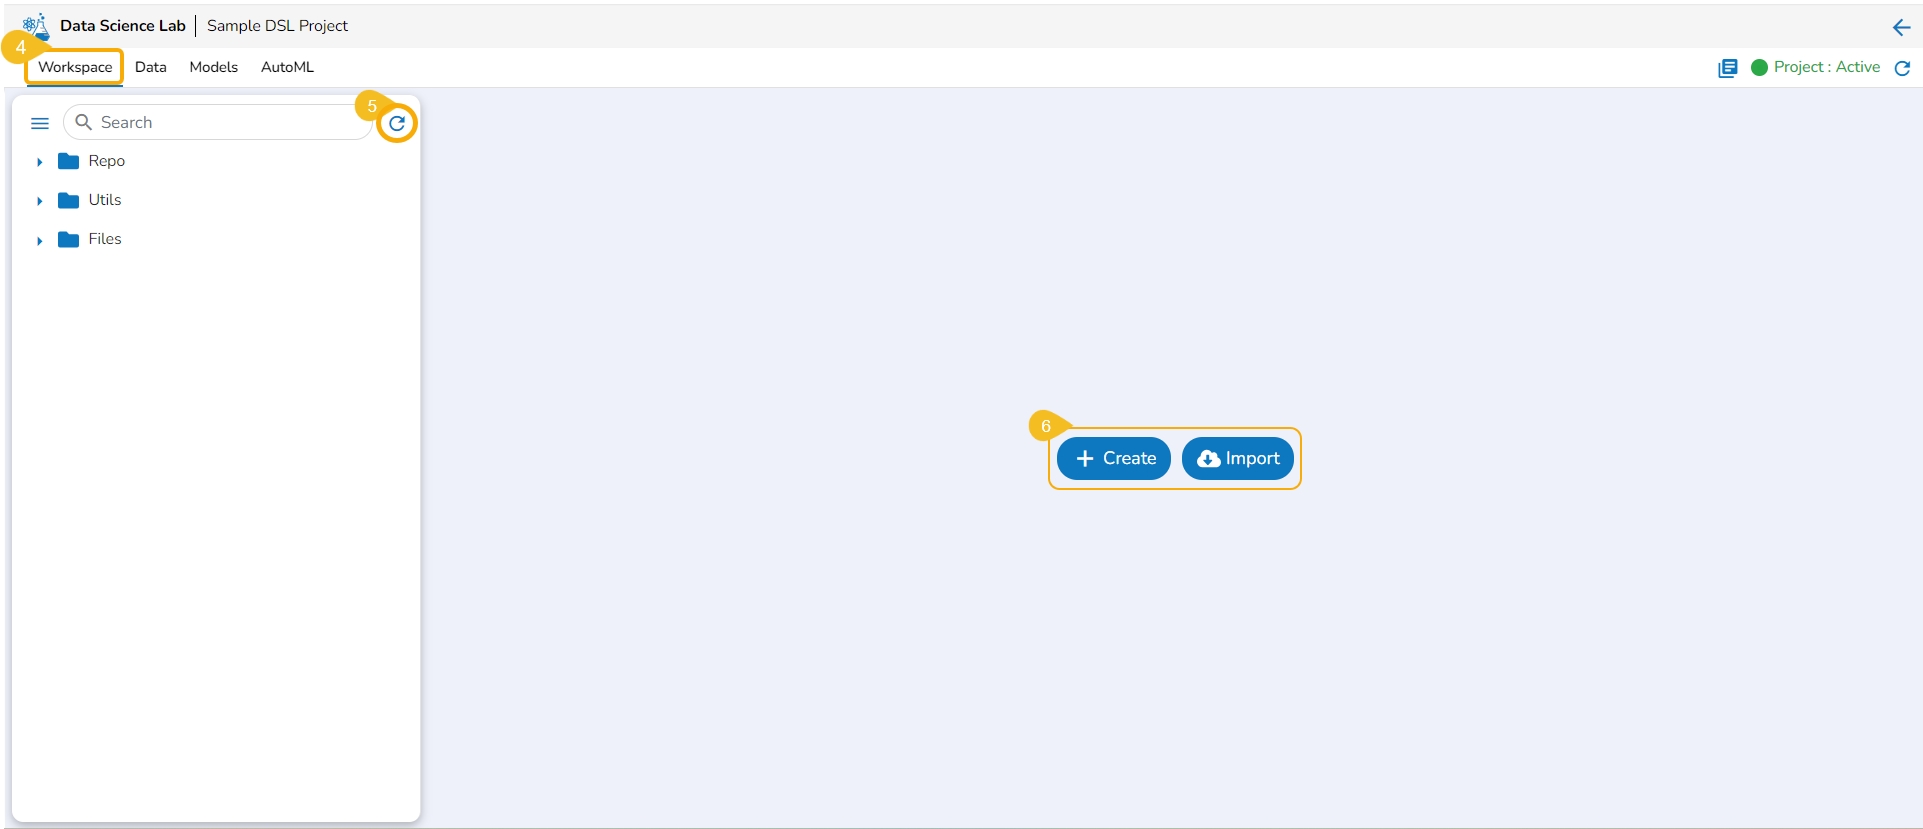
A Refresh icon is provided to refresh the data.
The users get two options to start with their data science exploration:
Create - By Creating a new Notebook
Import -By Importing a Notebook
The Libraries icon on the Workspace displays all the installed libraries with version and status.
Navigate to the Workspace tab.
Click the Libraries icon.
The Libraries window opens displaying Versions and Status for all the installed libraries.
Click the Failed status to expand the details of a failed library installation.
The Workspace tab contains default folders named Repo, Utils, and Files. All the created and saved folders and files will be listed under either of these folders.
Navigate to the Workspace tab (it is a default tab to open for a Project).
The left side panel displays the default Folders.
These folders will save all the created or imported folders/ files by the user.
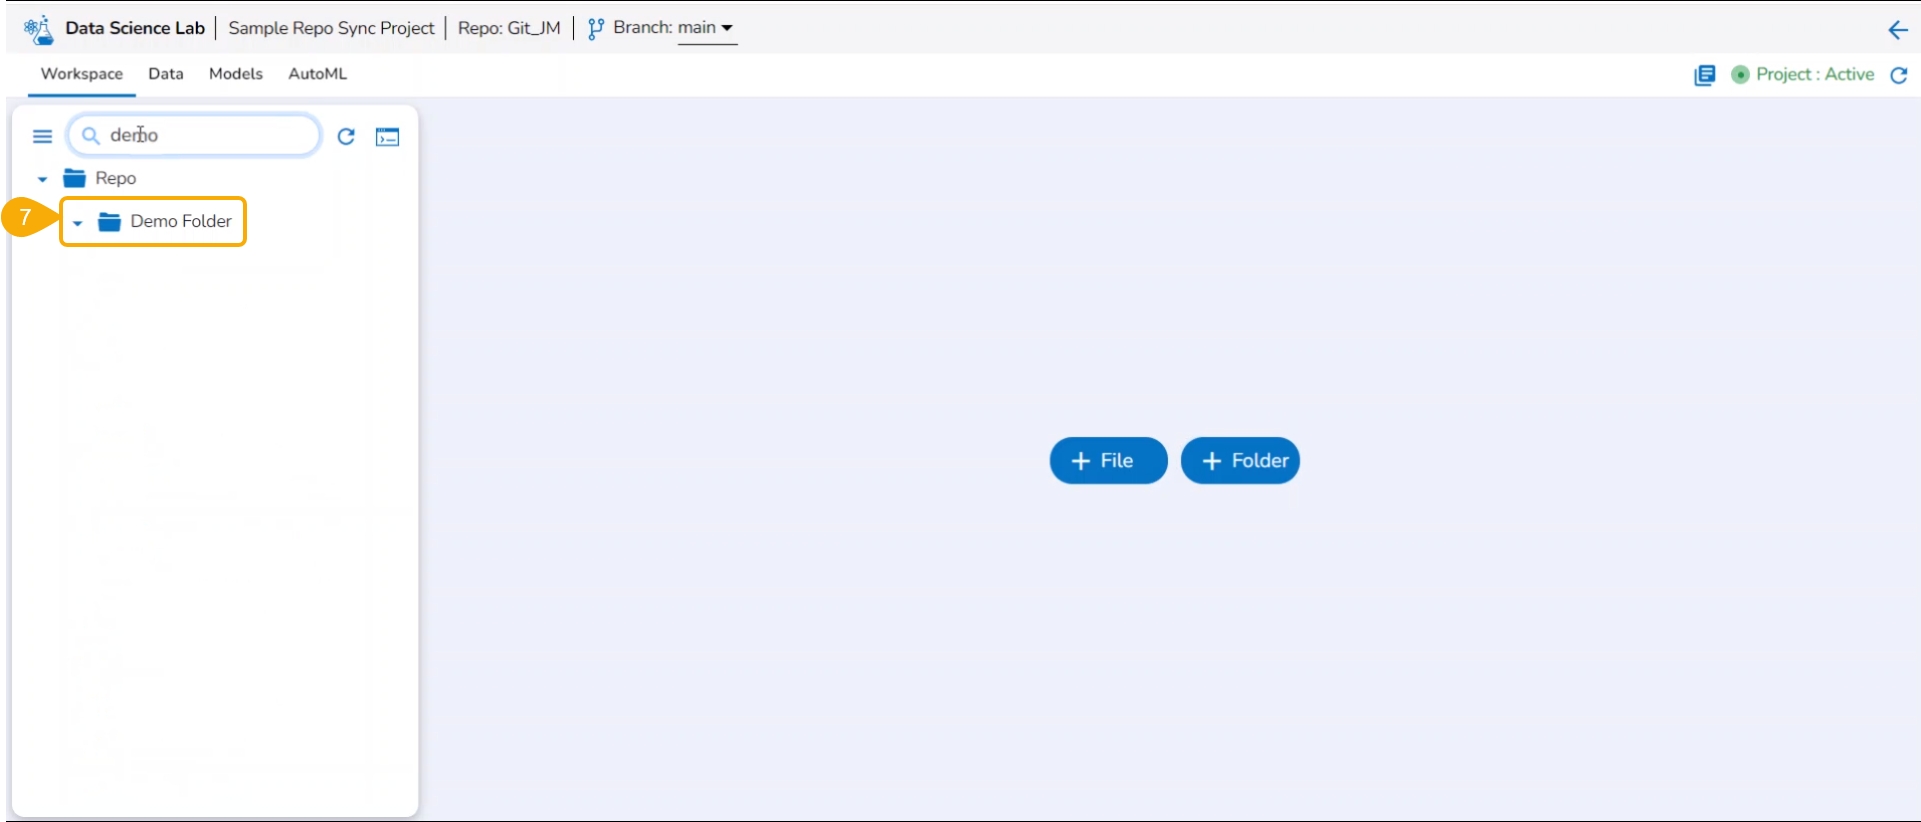
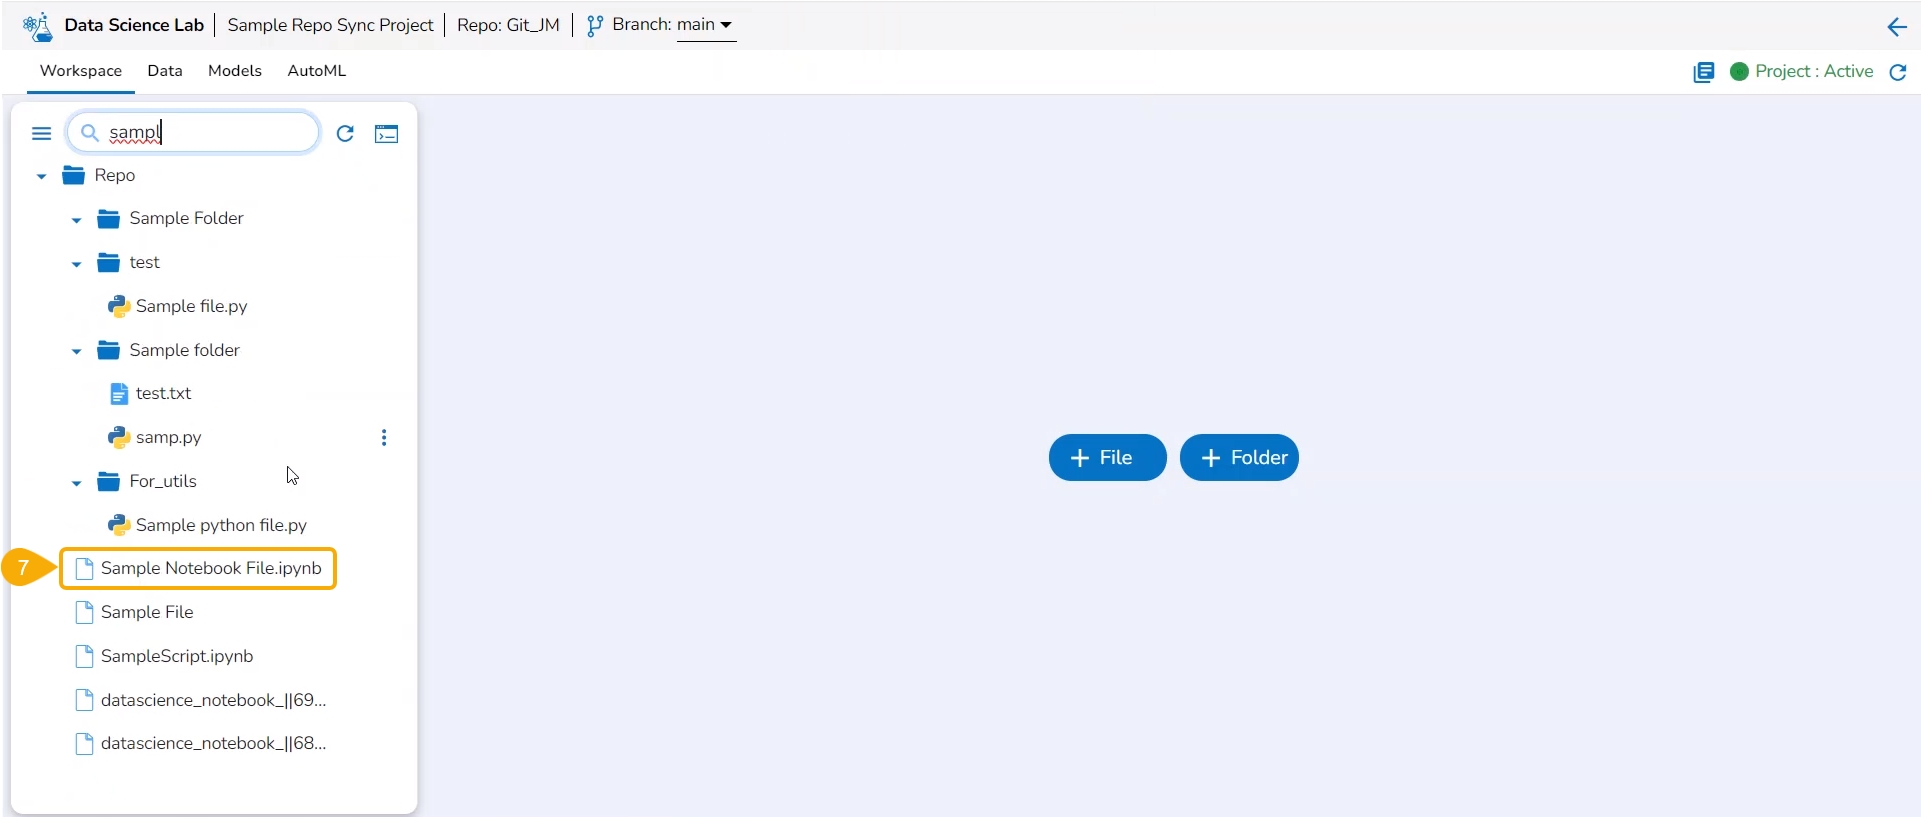
The Workspace tab also contains a Search bar to search the available Assets.
Please Note: The Workspace will be blank for the user, in case of a new Project until the first Notebook is created. It will contain the default folders named Repo, Utils, and Files.
Navigate to the Workspace Assets.
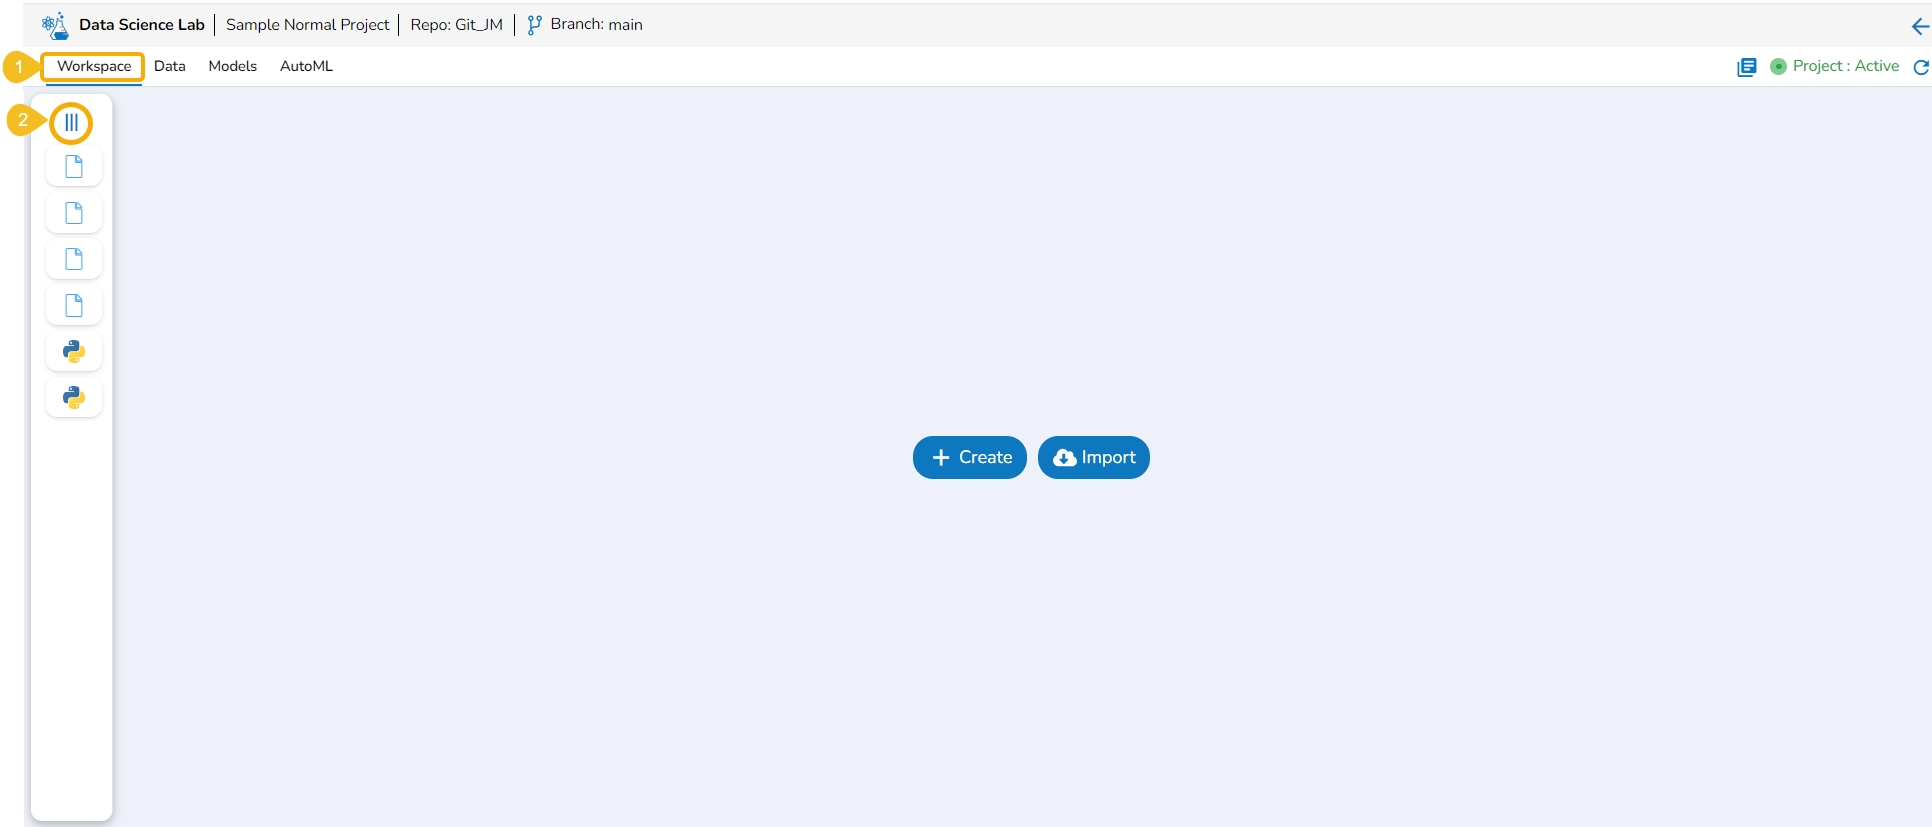
Click the Collapse icon.
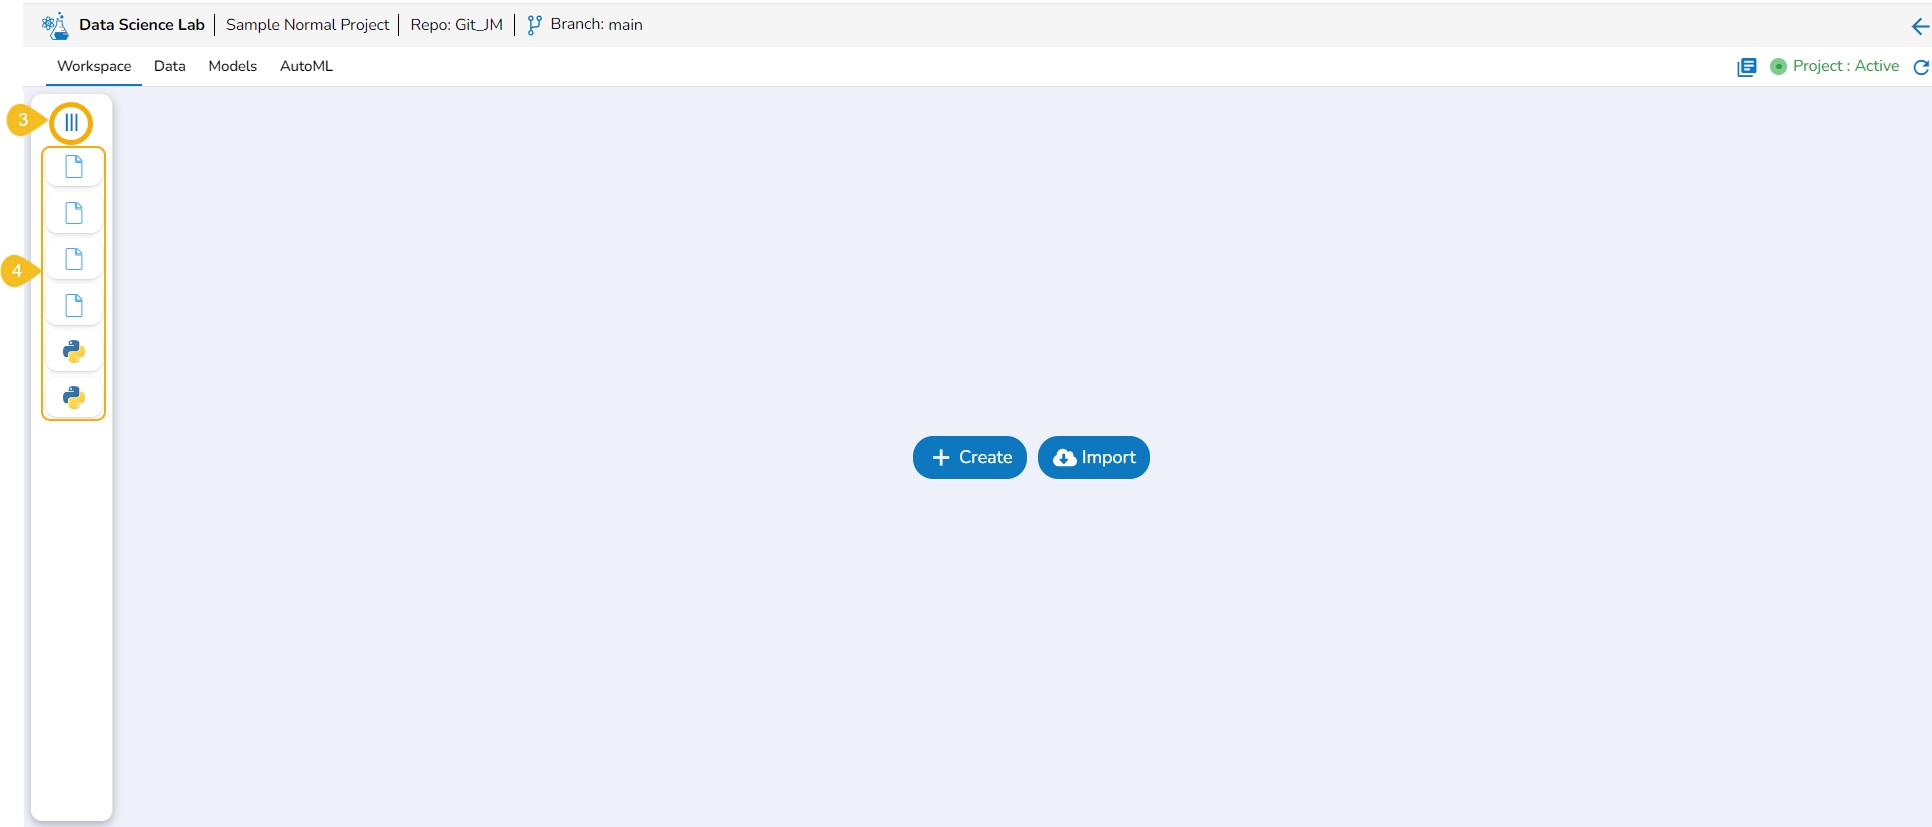
The Workspace left-side panel will be collapsed displaying all the created or imported files and folders as icons.
Navigate to the Workspace tab with the collapsed left-side panel.
Click the Expand icon.
The Workspace's left-side panel will be expanded. In the expanded mode of the left-side panel, the default folders of the Workspace tab will be visible in the default view.
Please Note:
The Workspace left side menu appears in the expanded mode by default while opening the Workspace tab.
The Workspace List displays the saved/ created folders and files in the collapsed mode (if any folder or file is created inside that Workspace).
The normal Data Science Project where Git Repository and Git Branch are selected while creating the project, displays the selected branch on the header.
A Repo Sync Project can display the selected branch on the Project header, and the user will be allowed to change the branch using the drop-down menu.
This section describes steps to import a Notebook to a DSL project.
A Repo Sync Project will have only a Repo folder allowing users create various Data Science experiments for the project.
A Repo folder available inside a Repo Sync Project contains the following attributives:
The user can add a file to the Repo folder using the Add File option.
Follow the steps demonstrated in the walk-through to add a file to the Repo Folder of a Repo Sync Project.
The user can create a folder inside the Repo folder of a Repo Sync project using this functionality.
Check out the illustration on the Copy path functionality provided for the Repo folder of a Repo Sync Project.
The import functionality allows the users to import a file from the local directory to the repository.
Check out the illustration on the import functionality provided for the Repo folder of a Repo Sync Project.
Please Note: All the folders or sub-folders created inside the Repo Folder also contain the same set of attributes as explained here for the Repo Folder.
The Repo folder is a default folder created under the Workspace tab. It opens by default while accessing the Workspace tab.
The user can perform some attributive actions on the Repo folder using the ellipsis icon provided next to it. This page explains all the attributes given to the Repo folder. This folder contains only .ipynb files in it. The actions provided for a .ipynb file (Notebook) are mentioned under the Notebook Actions page.
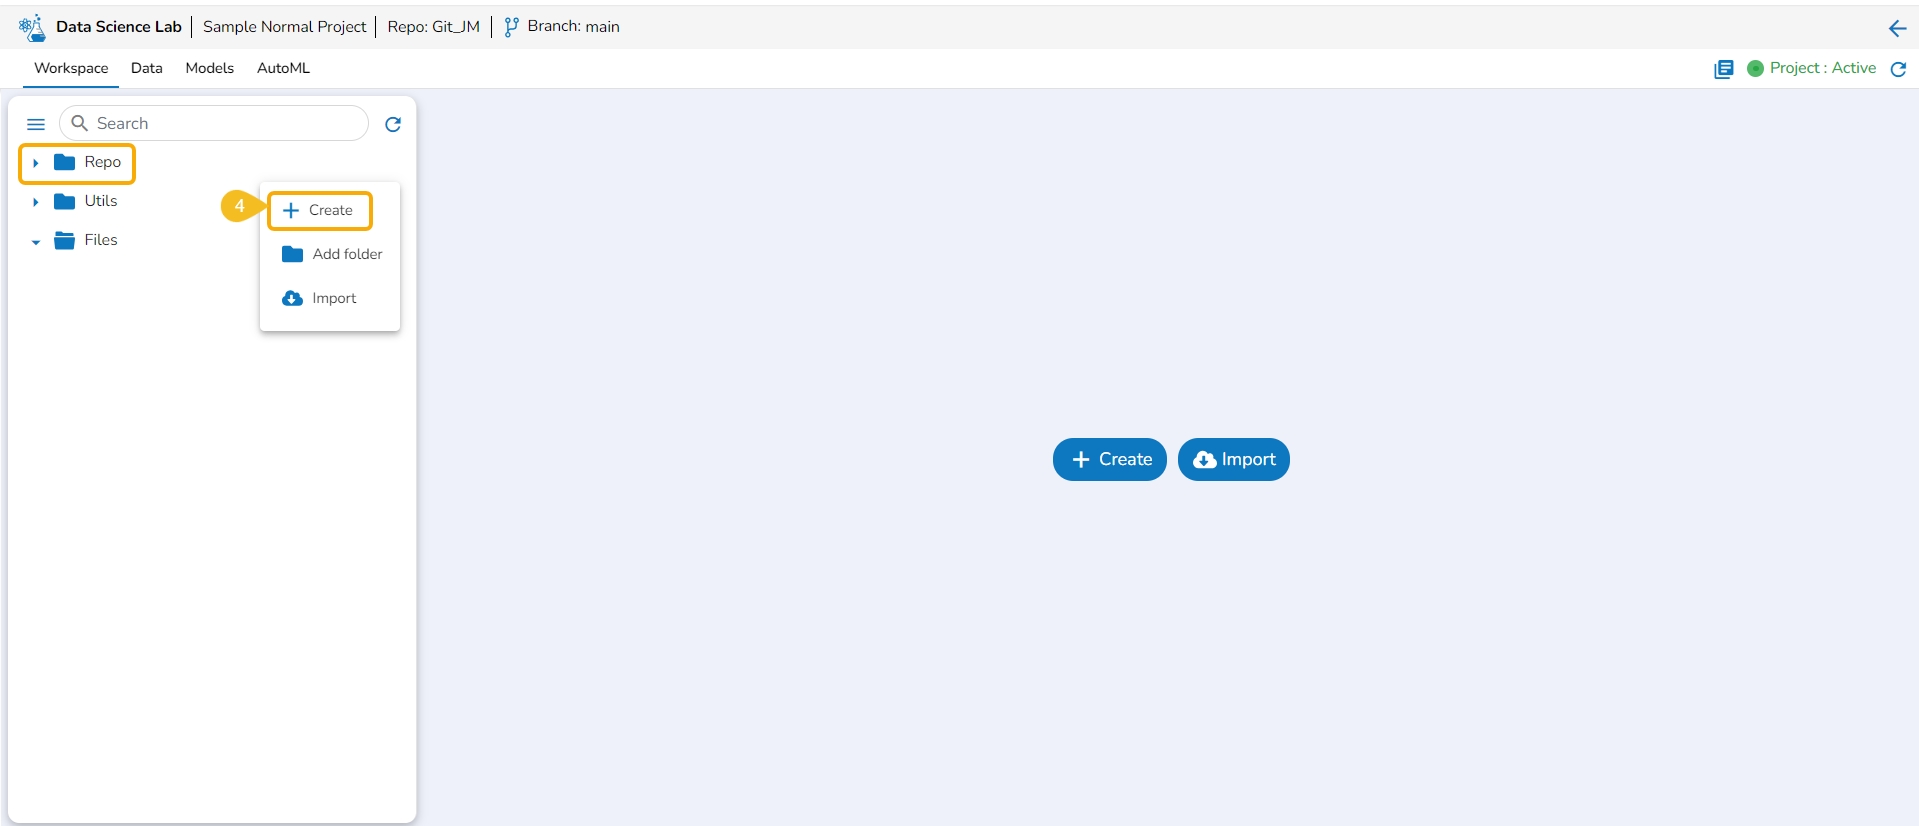
This option redirects the user to the Create Notebook page to create a new Notebook.
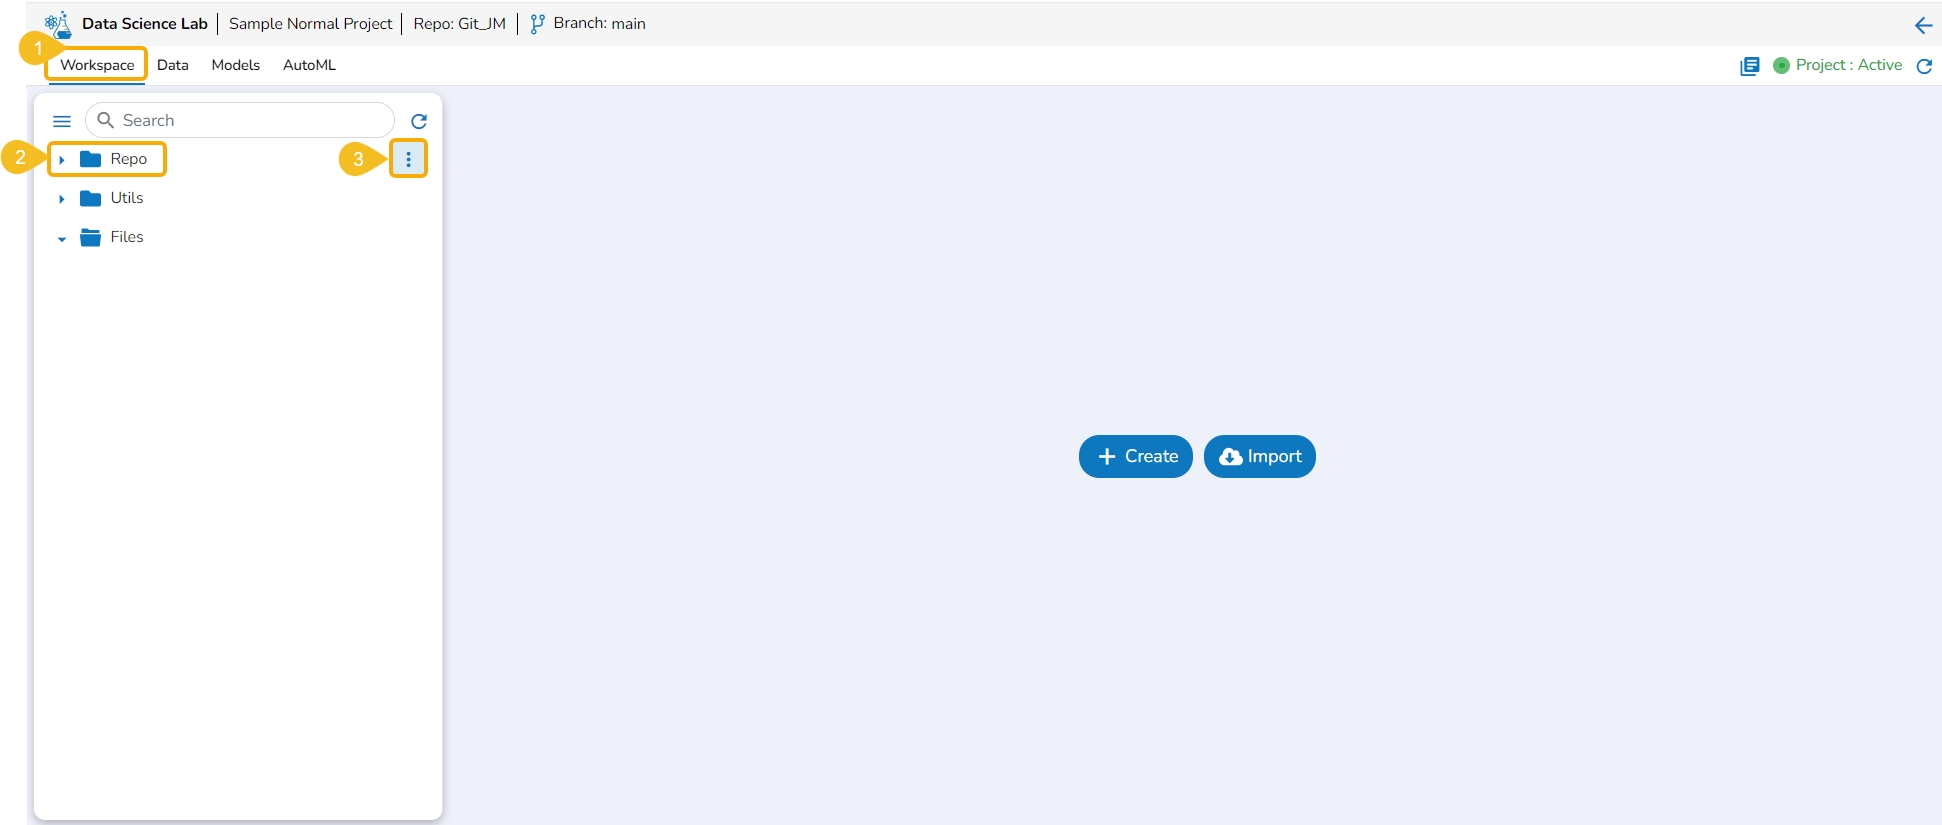
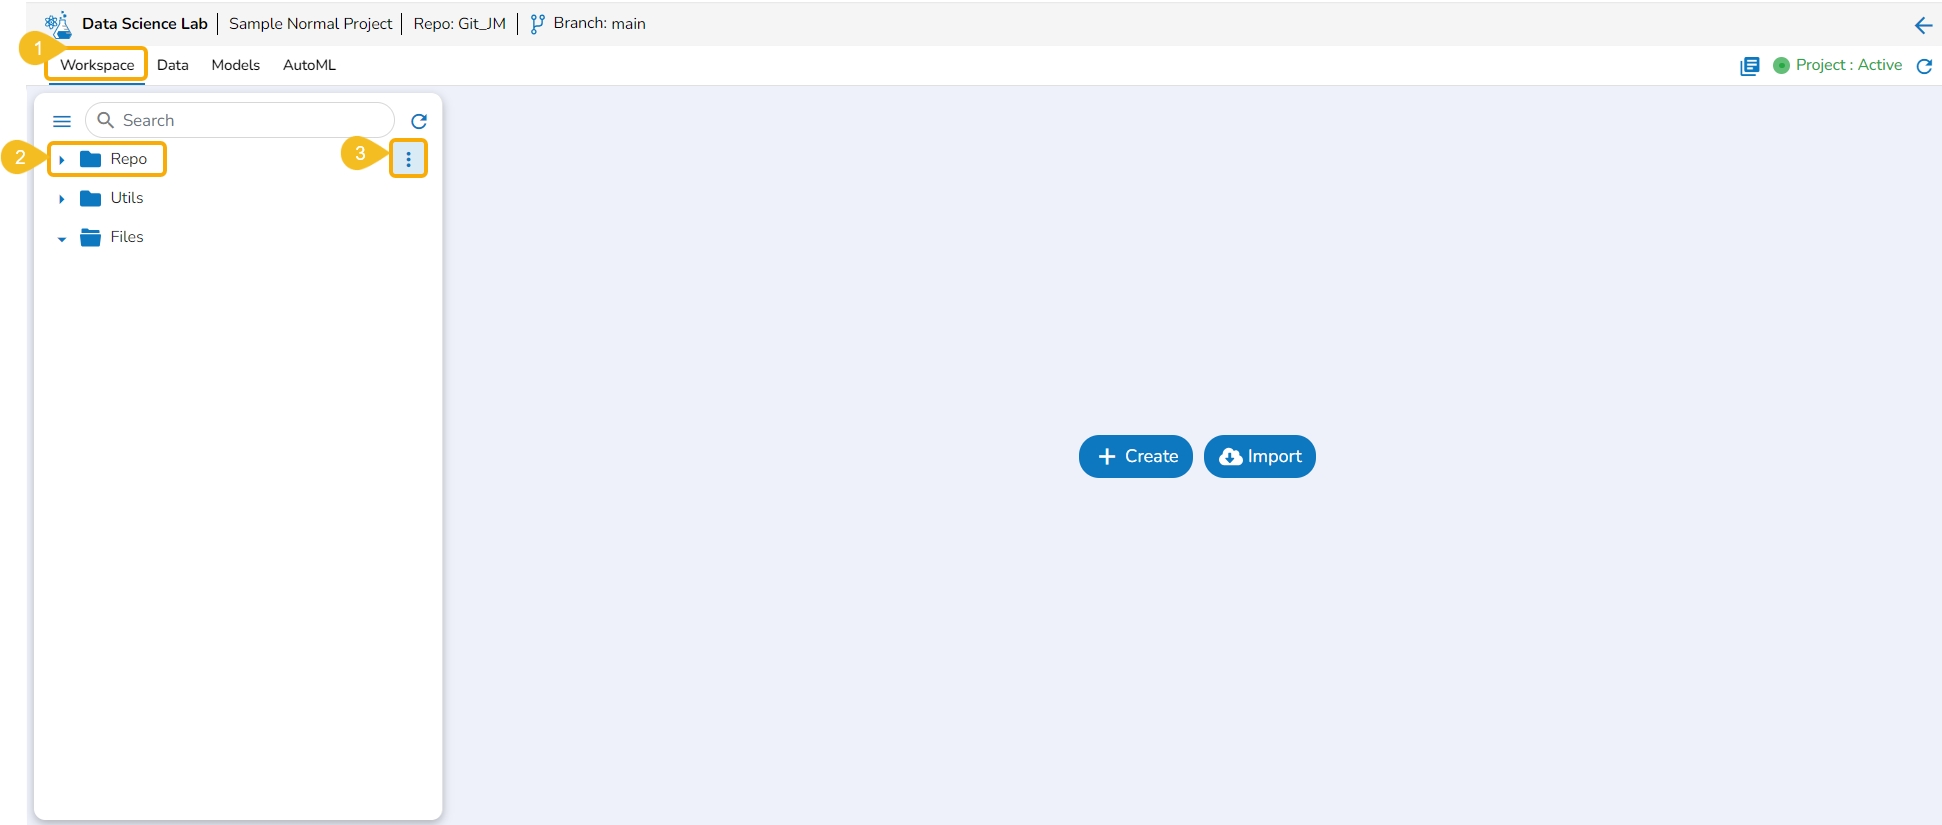
Navigate to the Workspace tab.
Select the Repo folder.
Click the Elipsis icon.
A Context Menu appears. Select the Create option from the Context Menu.
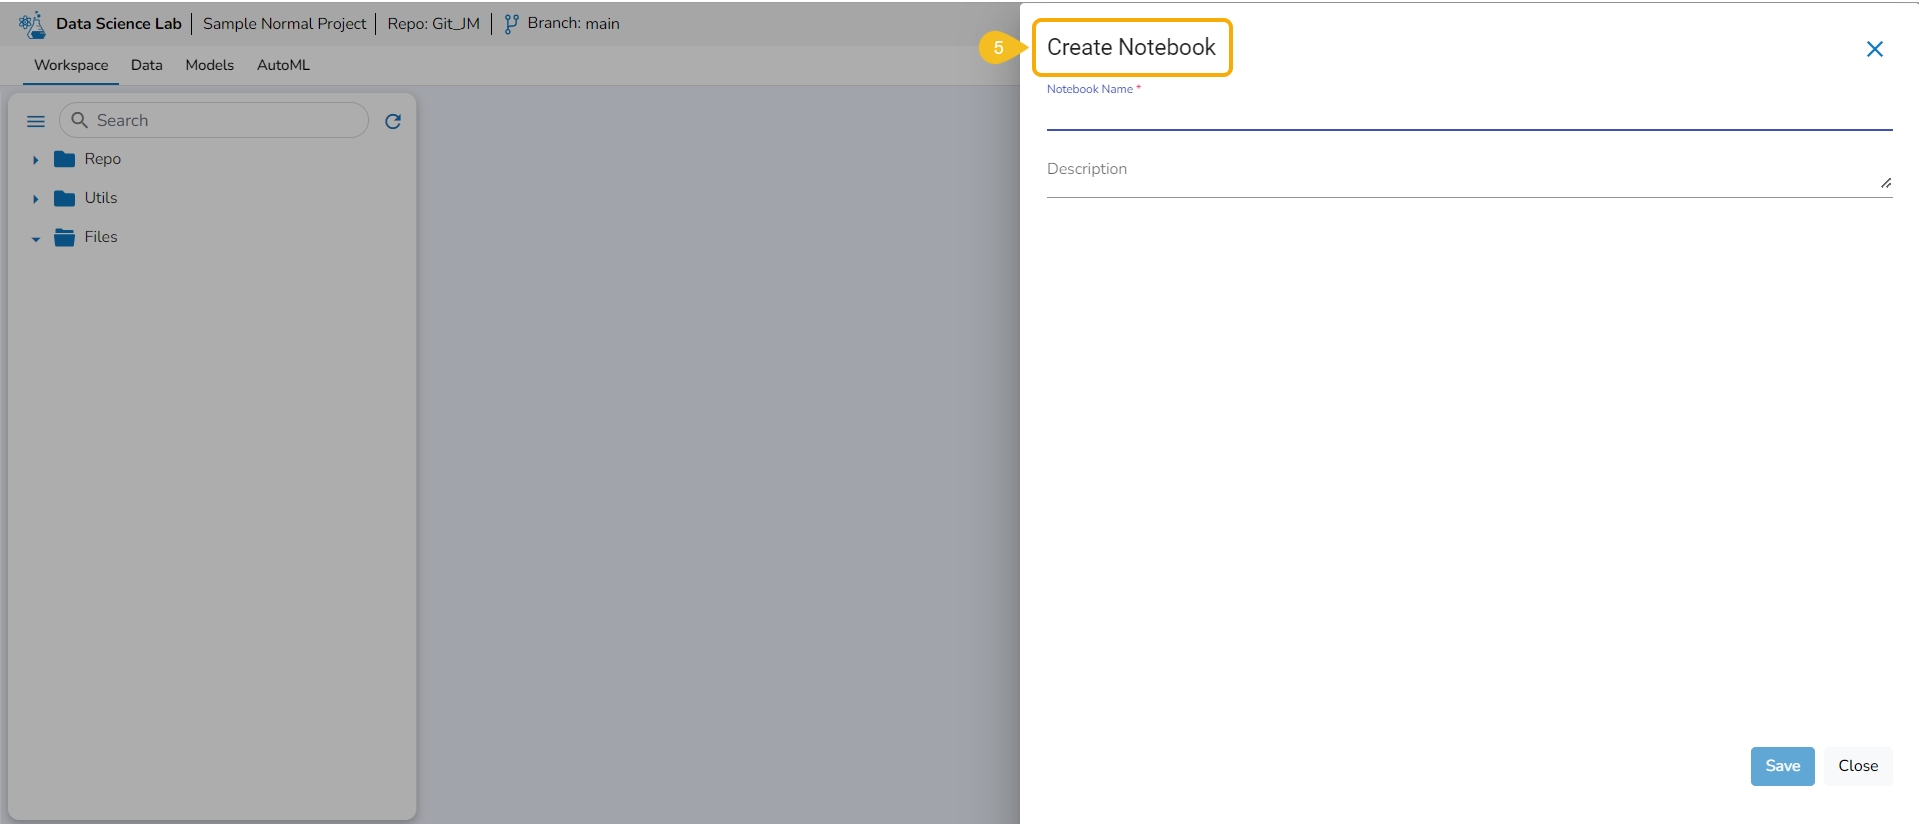
The Create Notebook drawer opens.
Please Note: Refer to the Create page to learn the steps to create a new Notebook.
This option allows the user to create folders under the Repo folder.
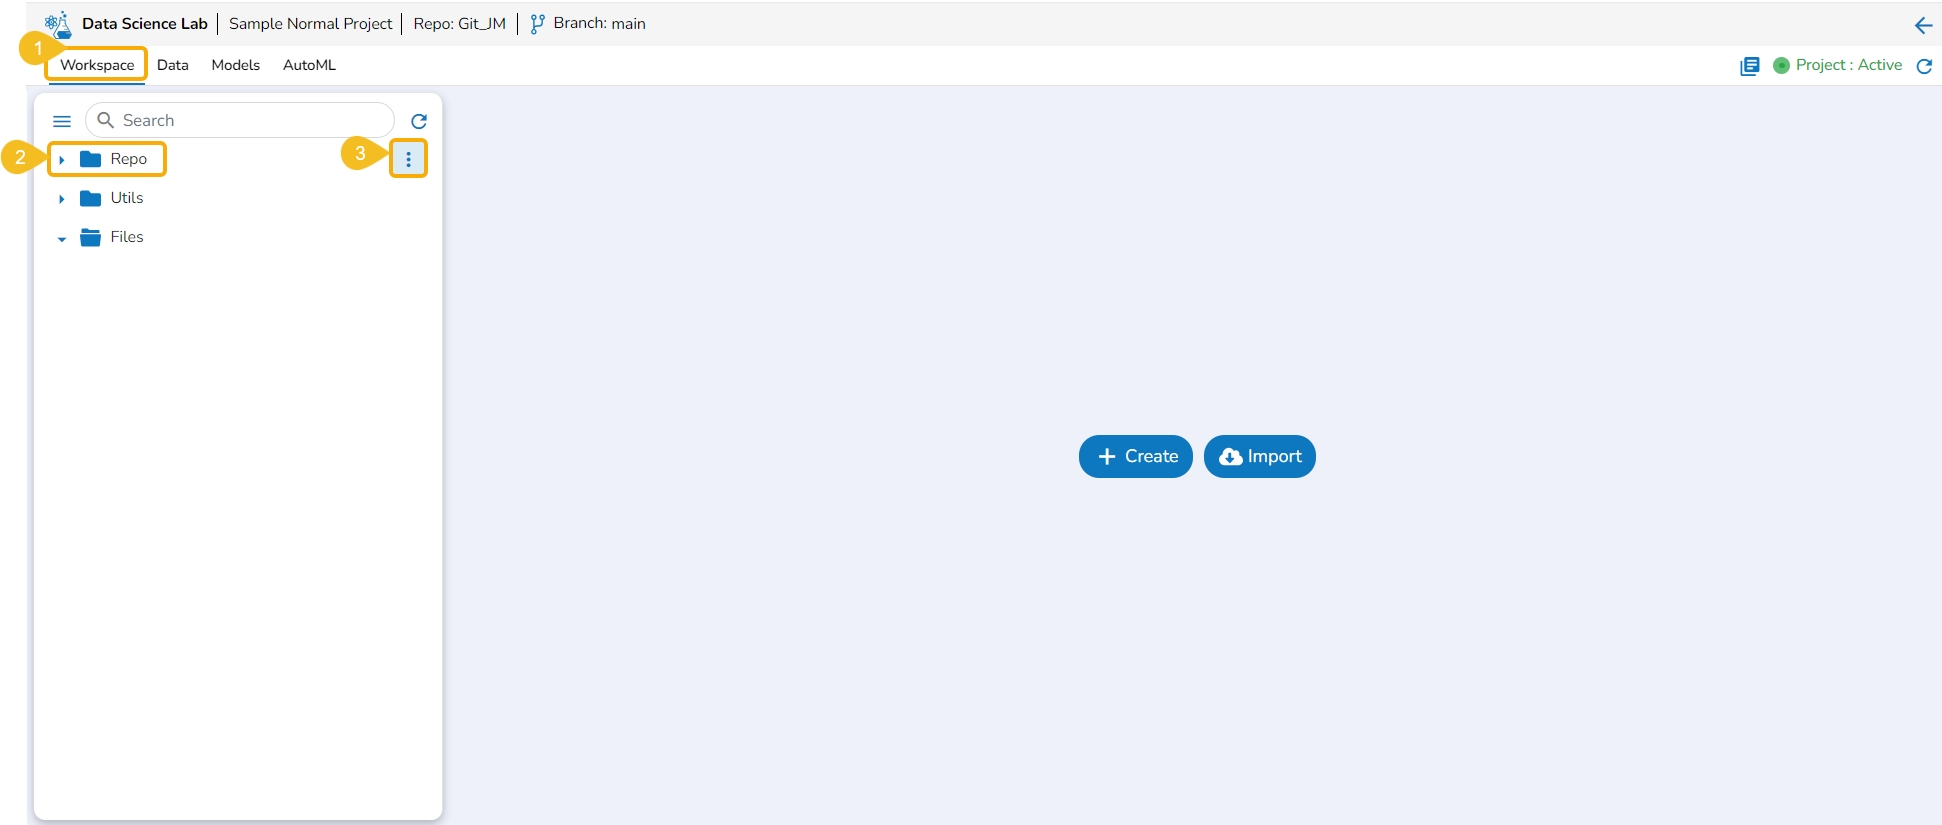
Navigate to the Workspace tab.
Select the Repo folder.
Click the Elipsis icon.
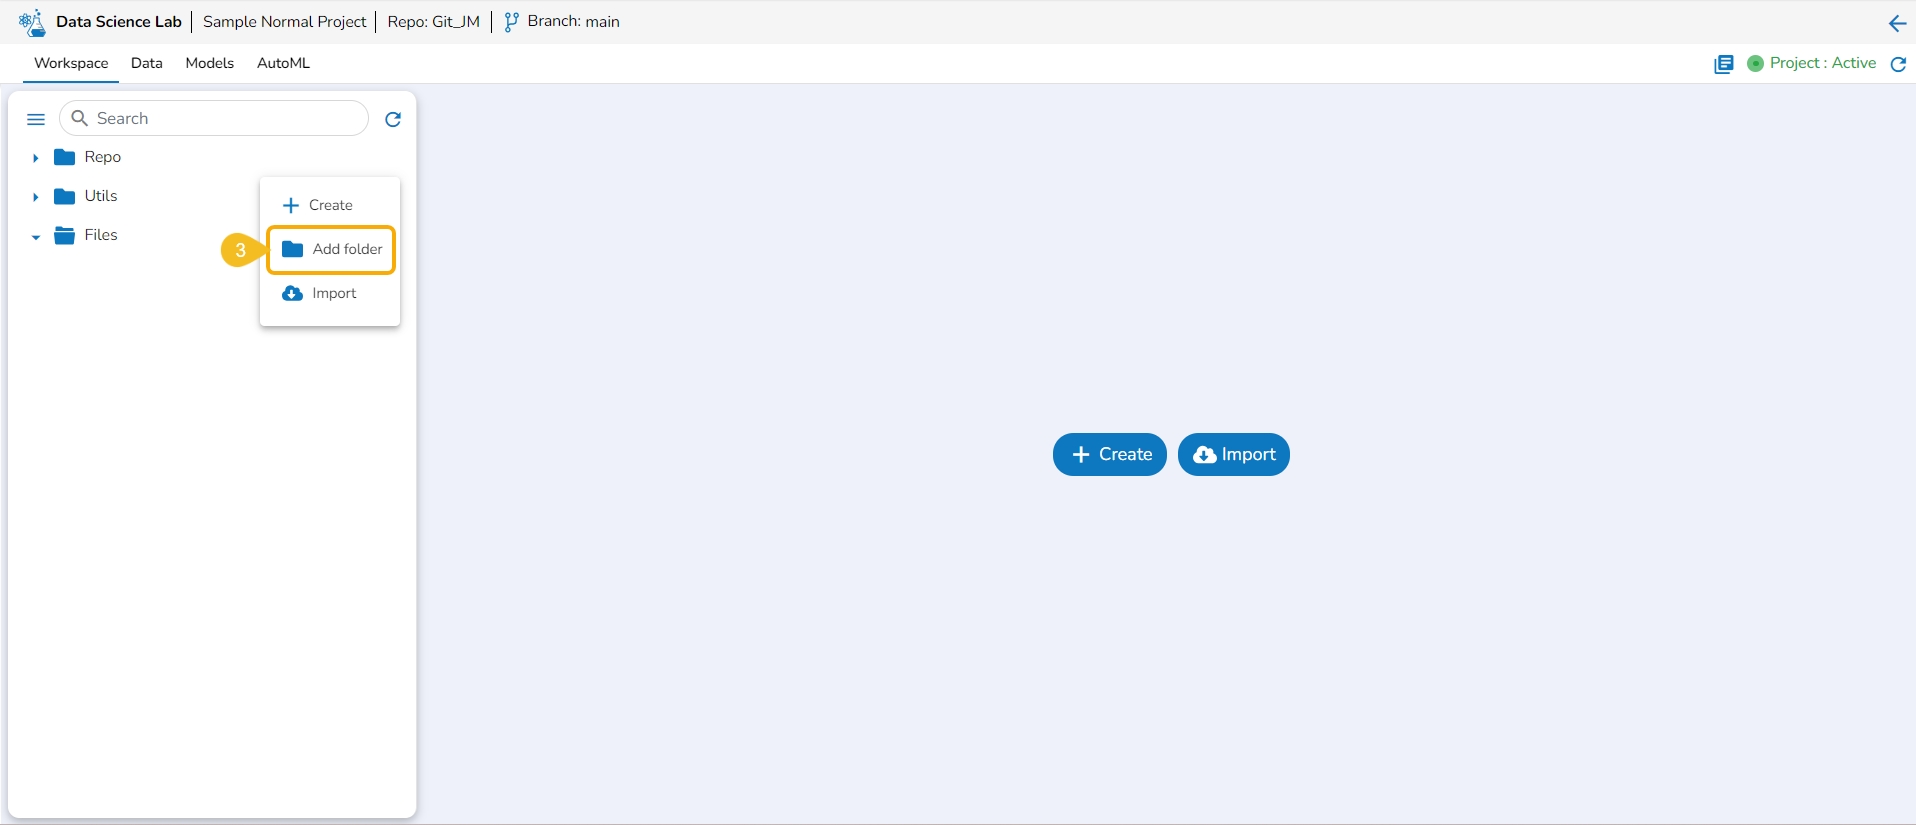
A Context Menu appears. Select the Add Folder option from the Context Menu.
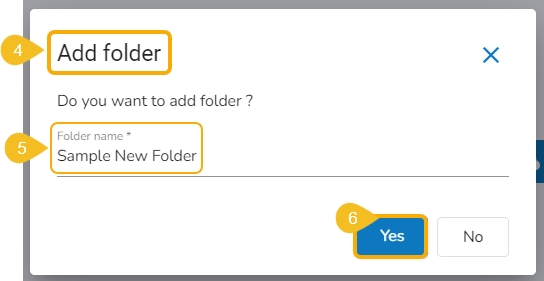
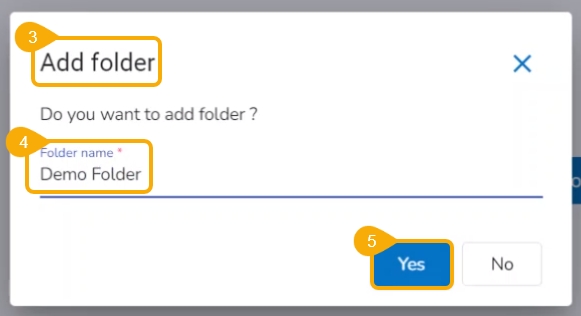
The Add folder dialog box opens.
Provide a name to the folder.
Click the Yes option.
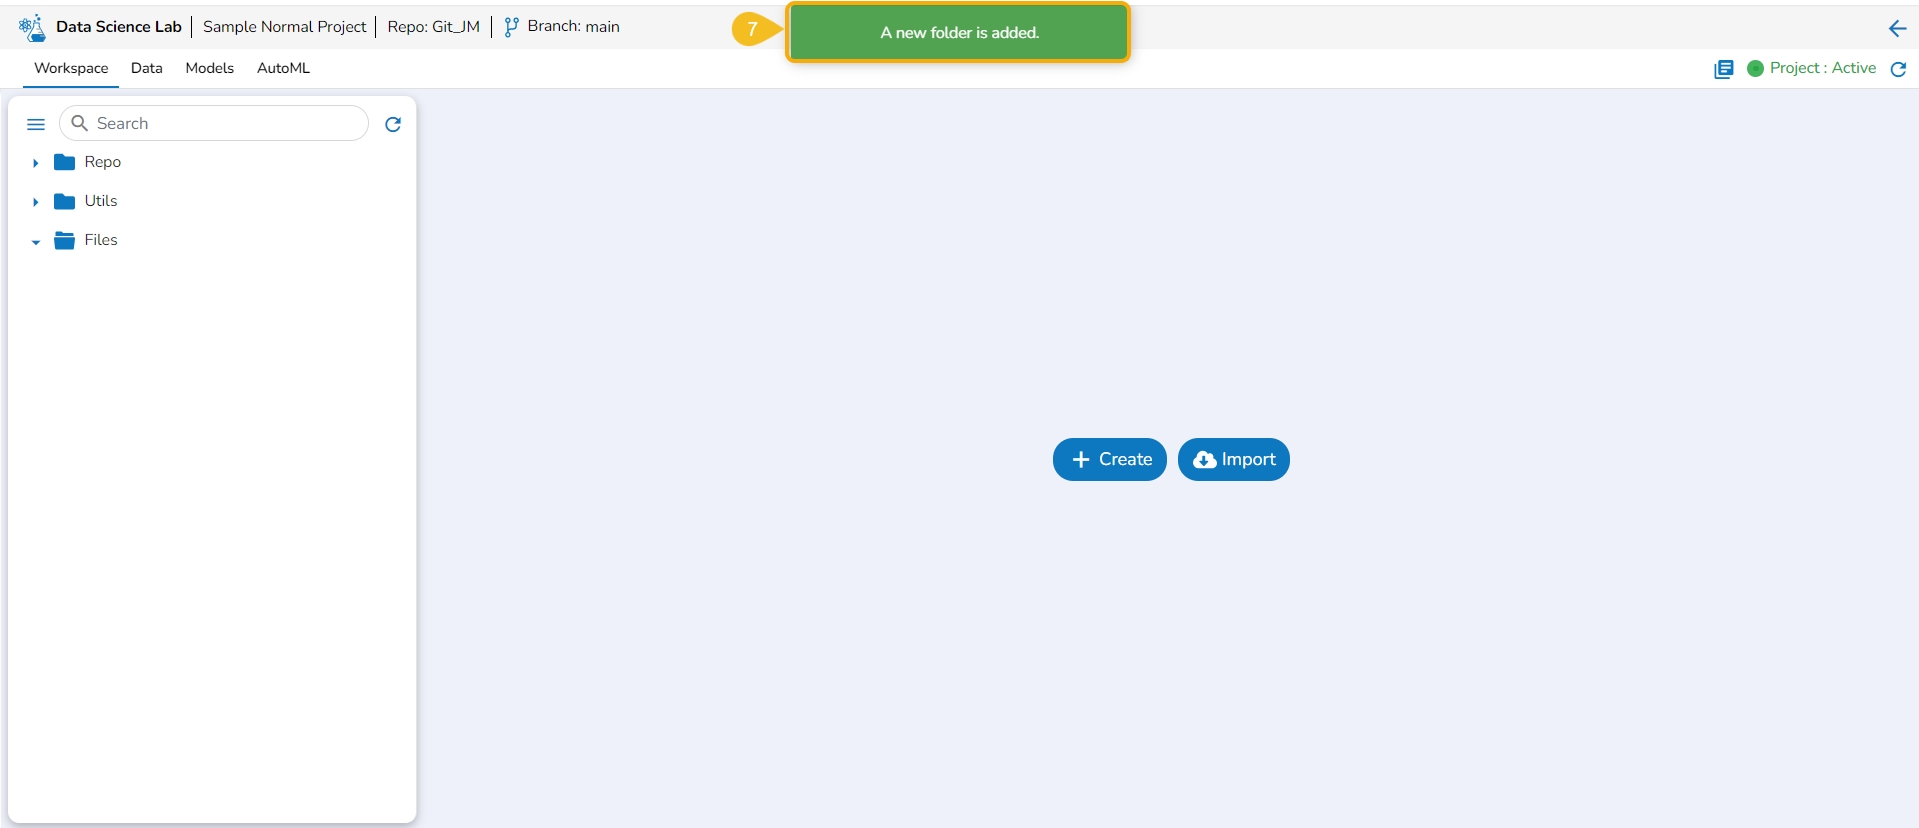
A notification appears to ensure the folder creation.
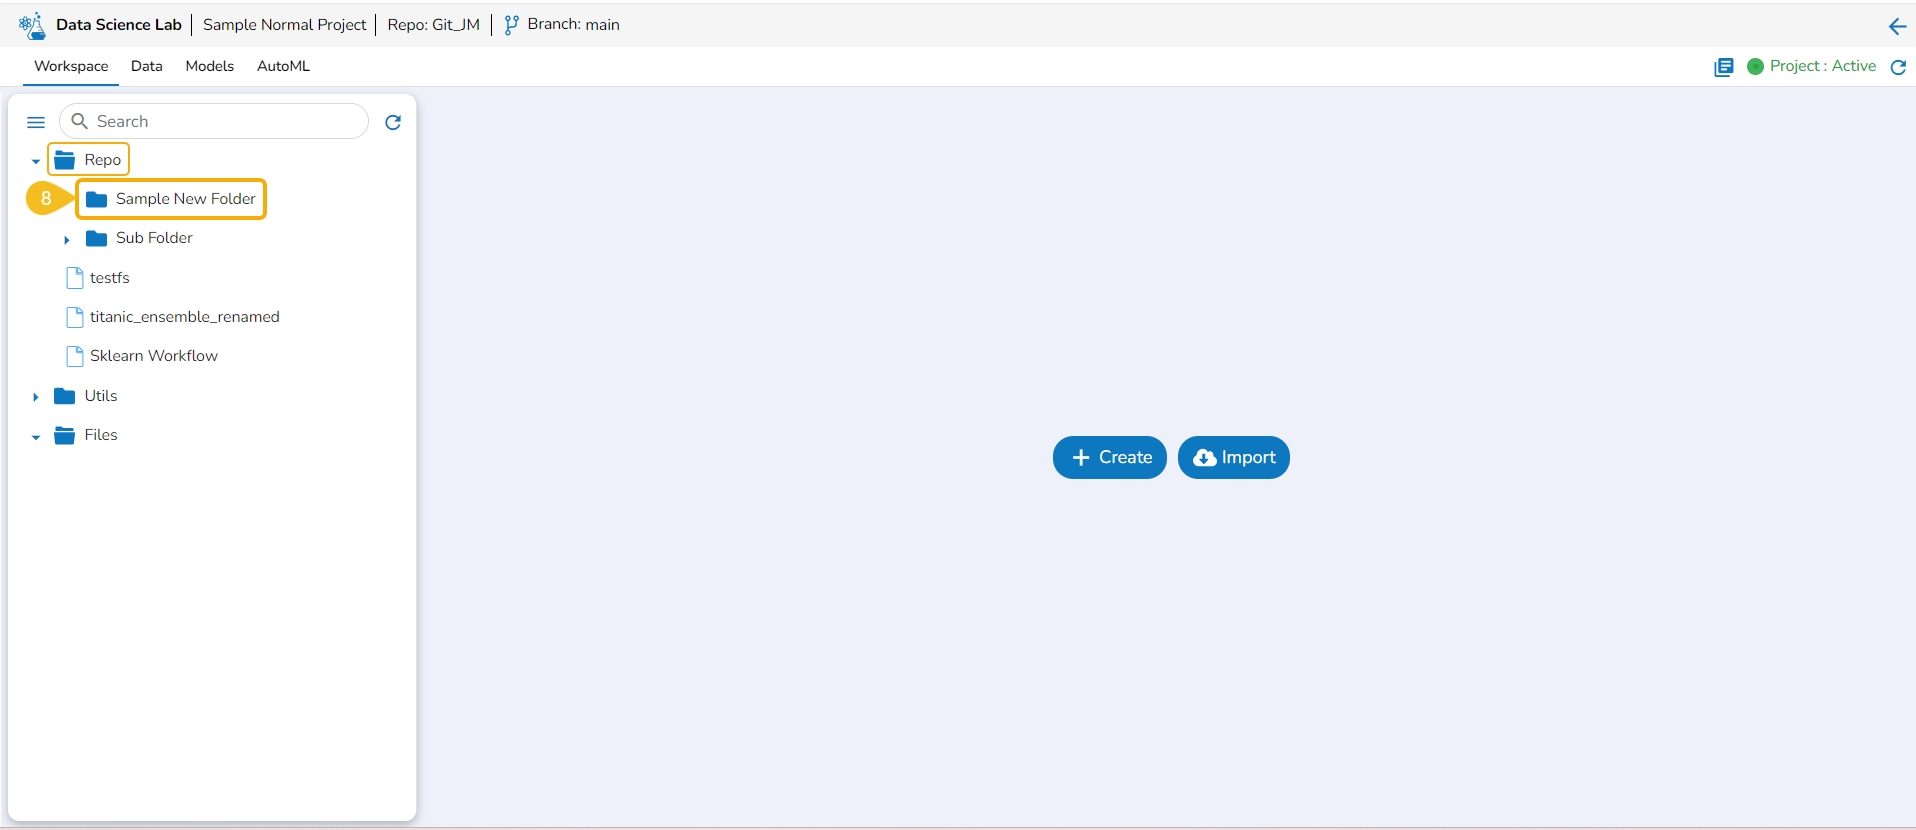
The newly added folder is listed under the Repo folder. Expand the Repo folder to see the newly added folder.
The Import option allows users to import a .ipynb file to the selected Data Science Lab project from their system.
Navigate to the Workspace tab.
Select the Repo folder.
Click the Elipsis icon.
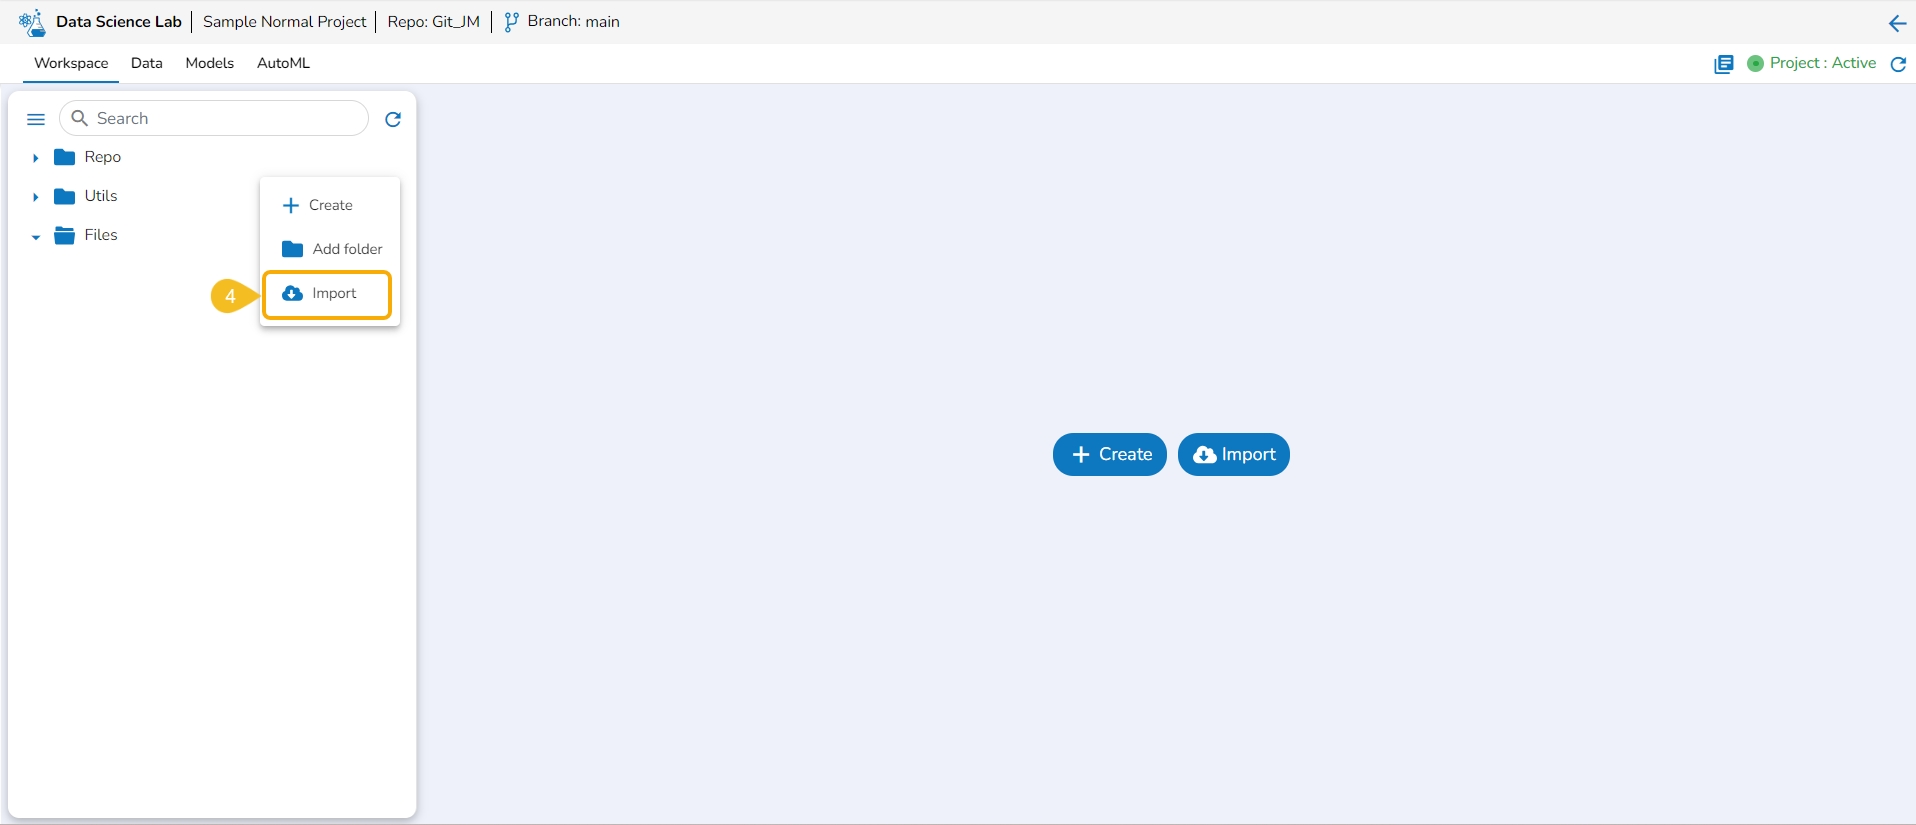
A Context Menu appears. Select the Import option from the Context Menu.
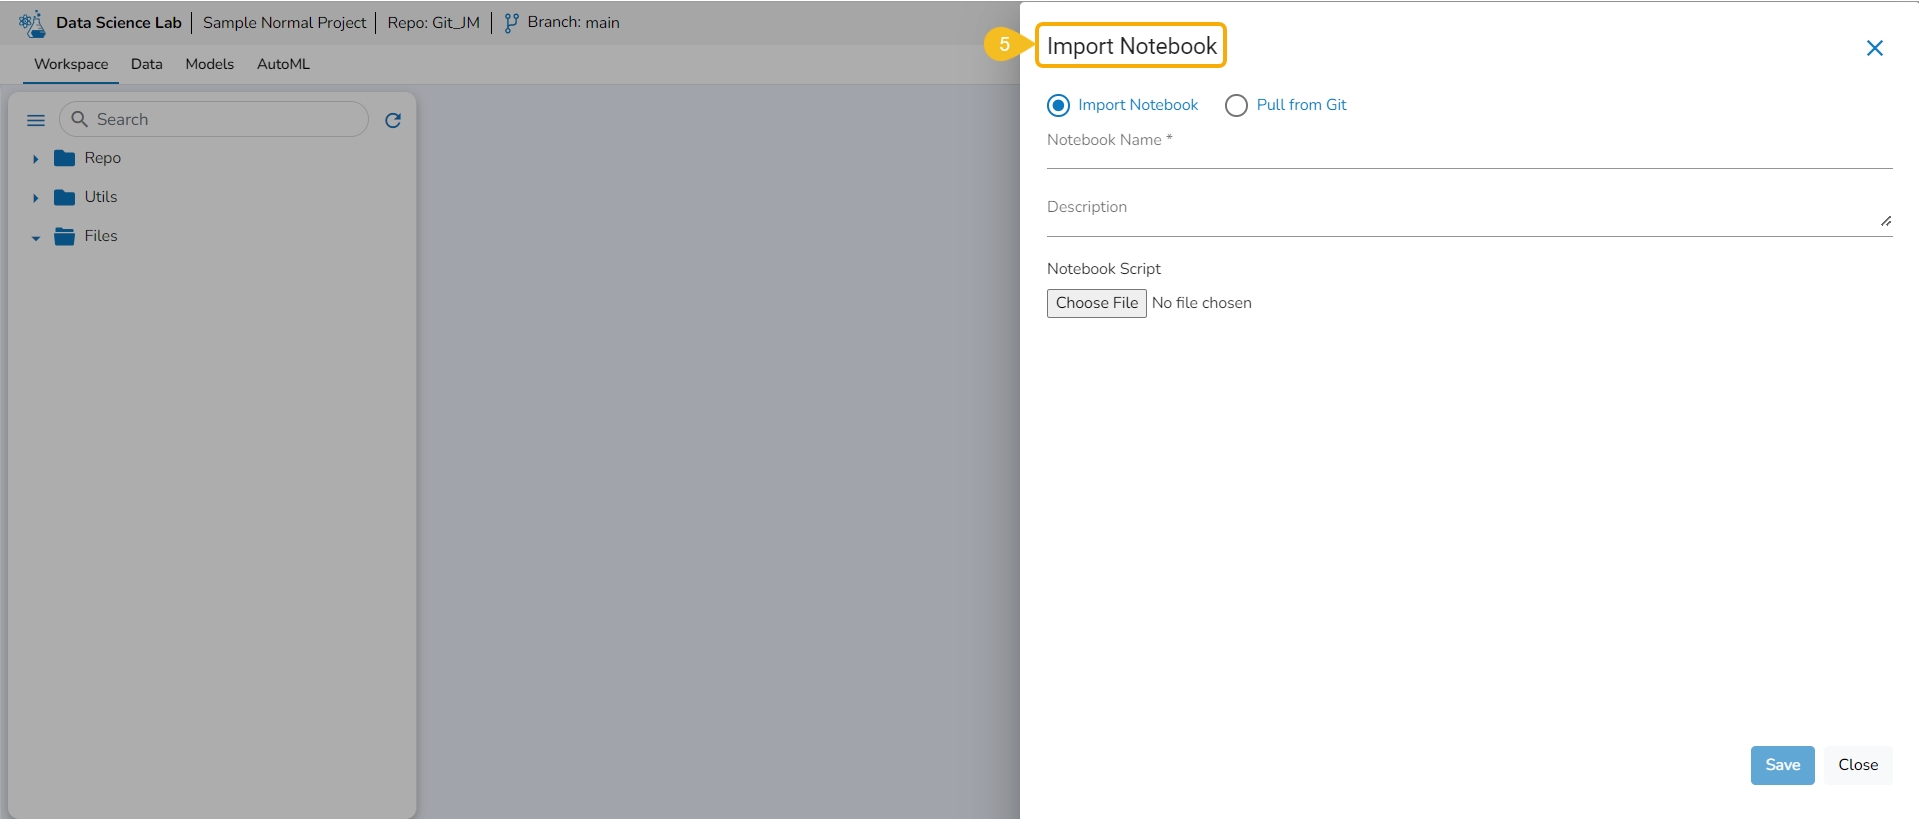
The Import Notebook page opens.
Please Note:
Refer to the Import Notebook page to learn how to import a Notebook.
Created or Imported Notebooks will get some attributed Actions. The Notebook Actions are described under this documentation's Data Science Notebook section.
This section explains the attributive action provided for the Utils folder.
The Utilis folder allows the users to import the utility files from their systems and Git repository.
Please Note: The Utils folder will be added by default to only normal Data Science Lab projects.
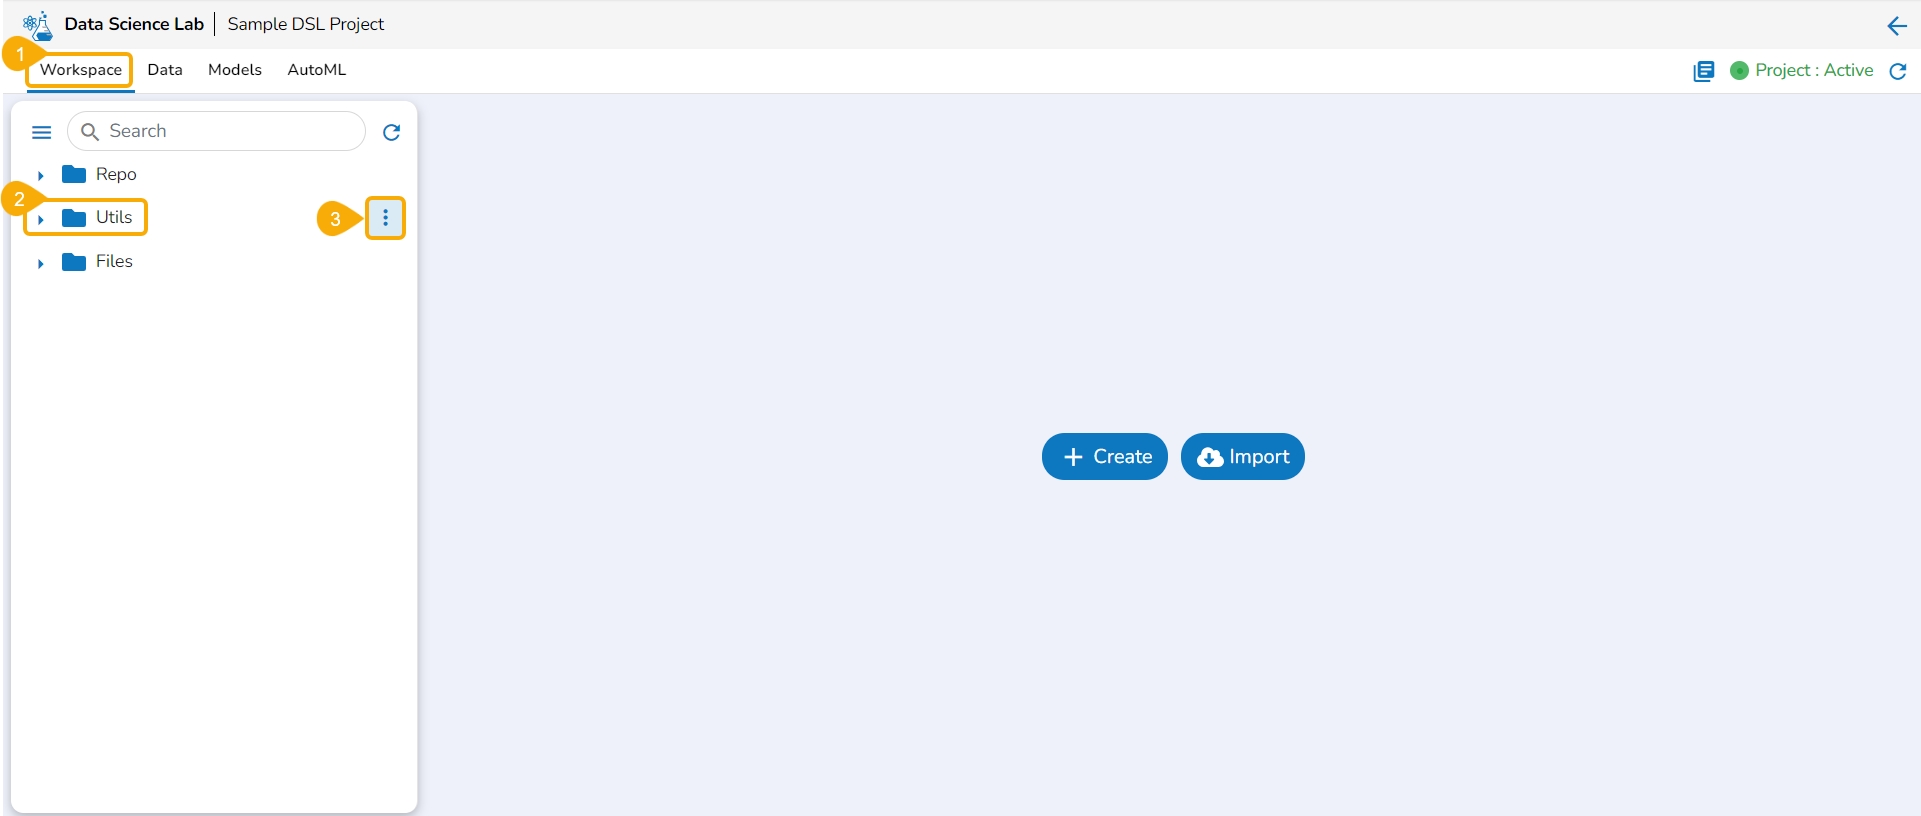
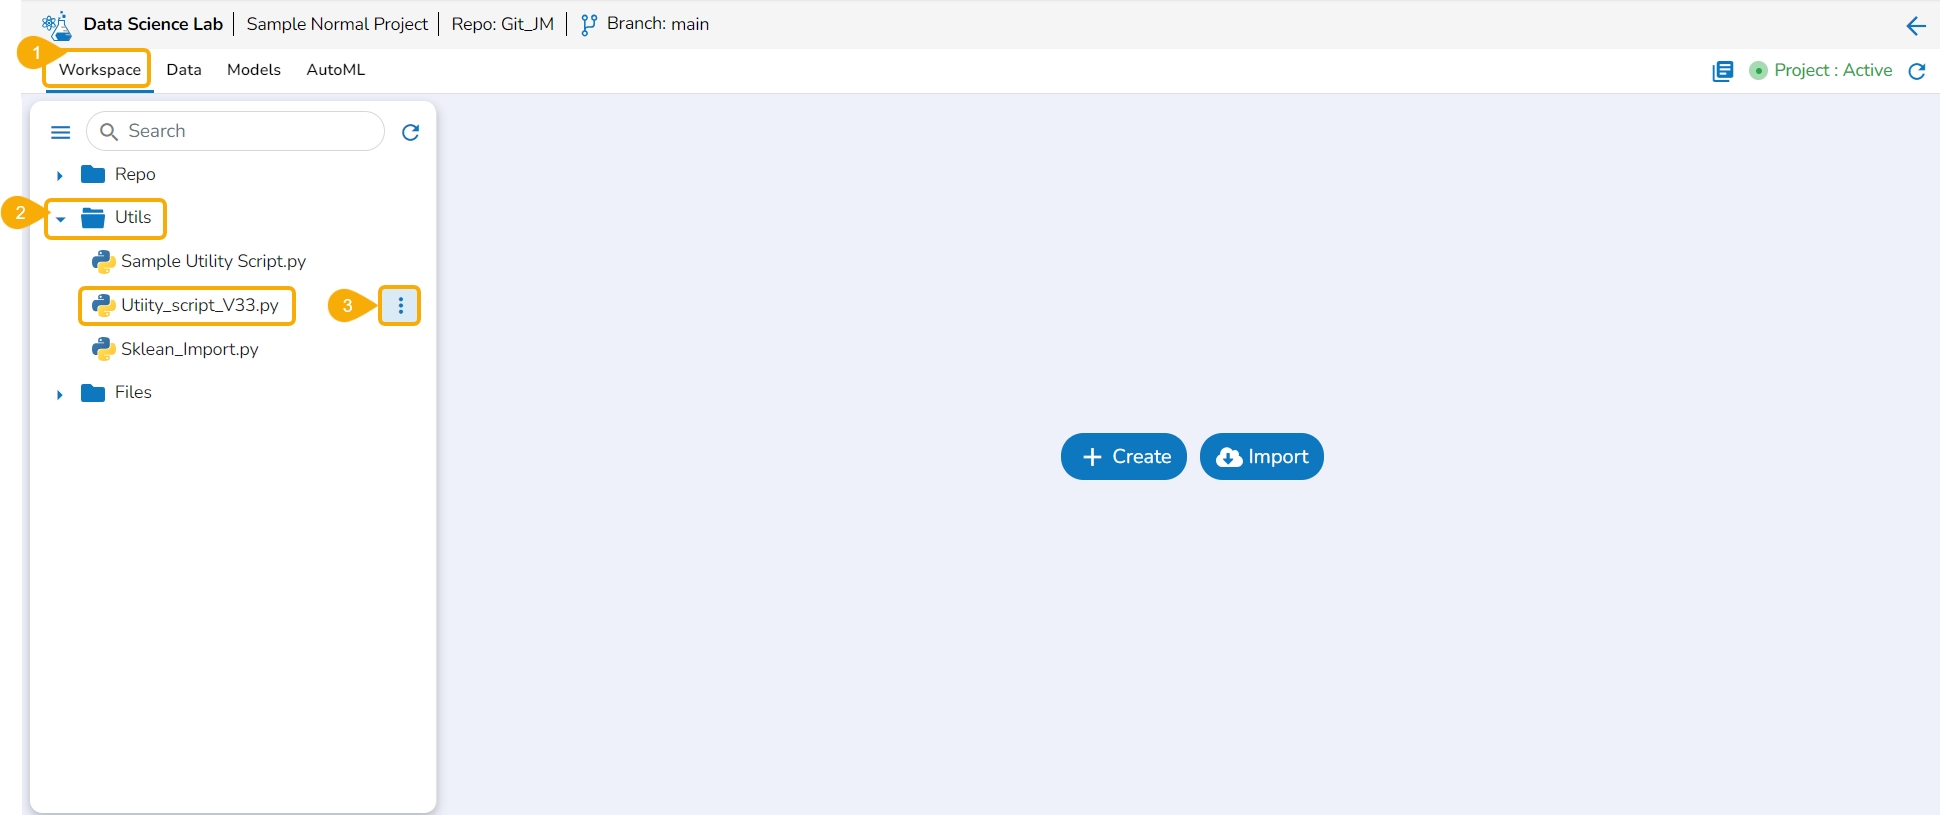
Navigate to the Workspace tab.
Select the Utils folder.
Click the ellipsis icon to open the context menu.
Click the Import option that appears in the context menu.
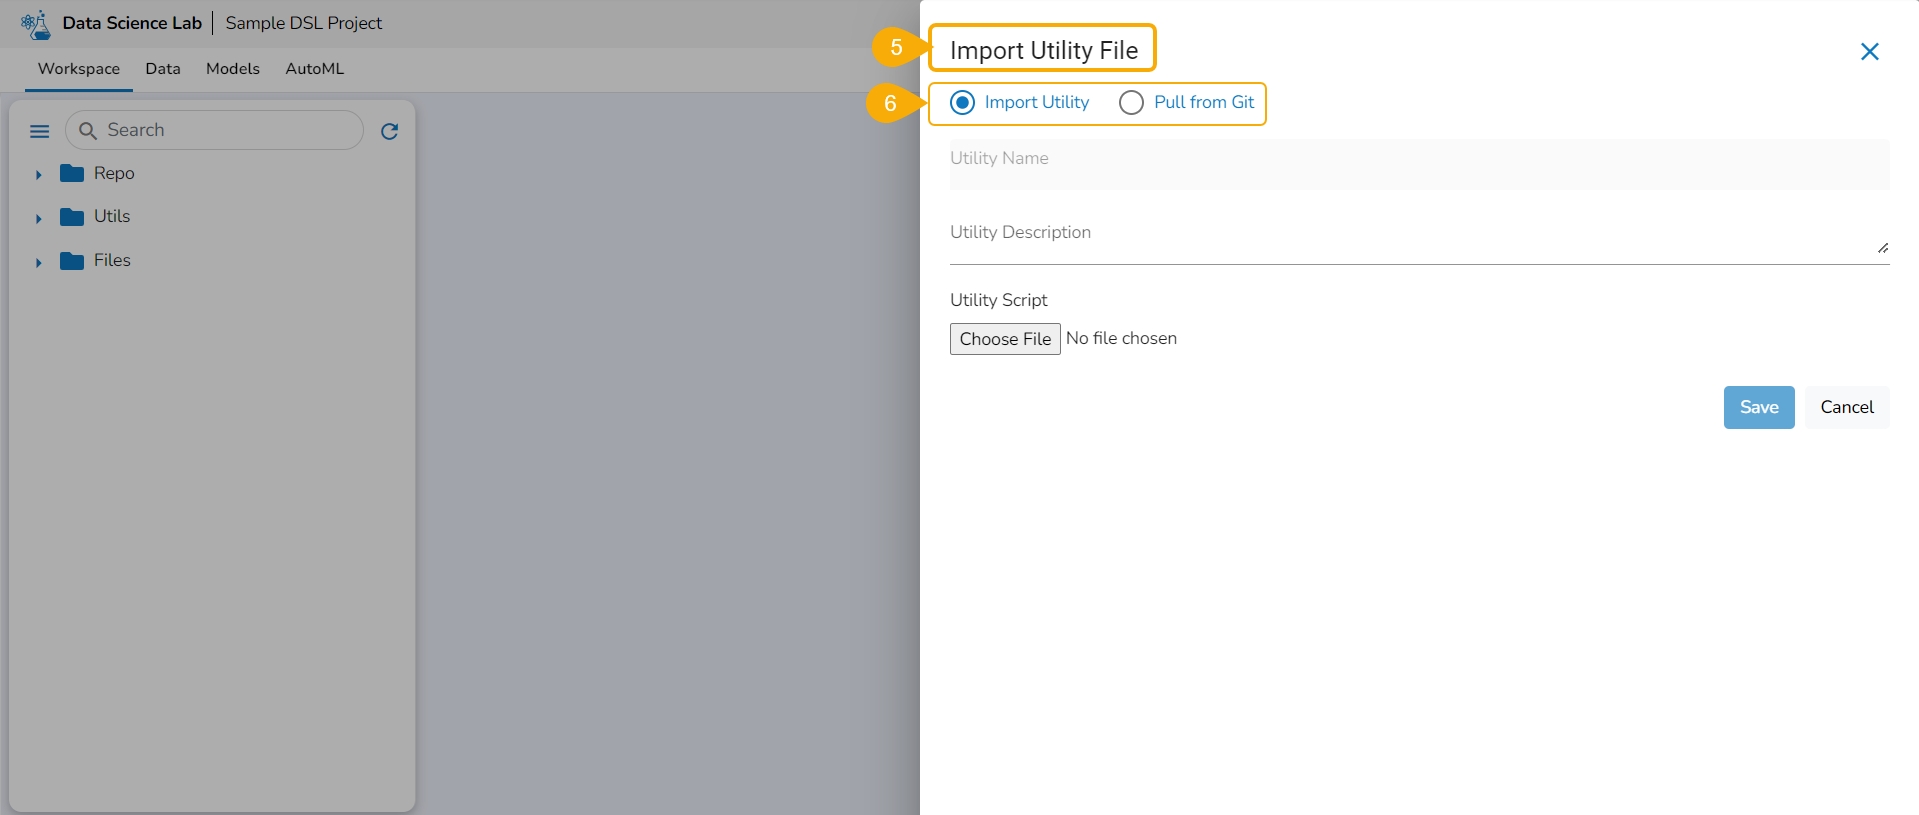
The Import Utility File window opens.
The user can import a utility file using either of the options: Import Utility or Pull from Git.
Check out the walk-through video to understand the Import Utility functionality.
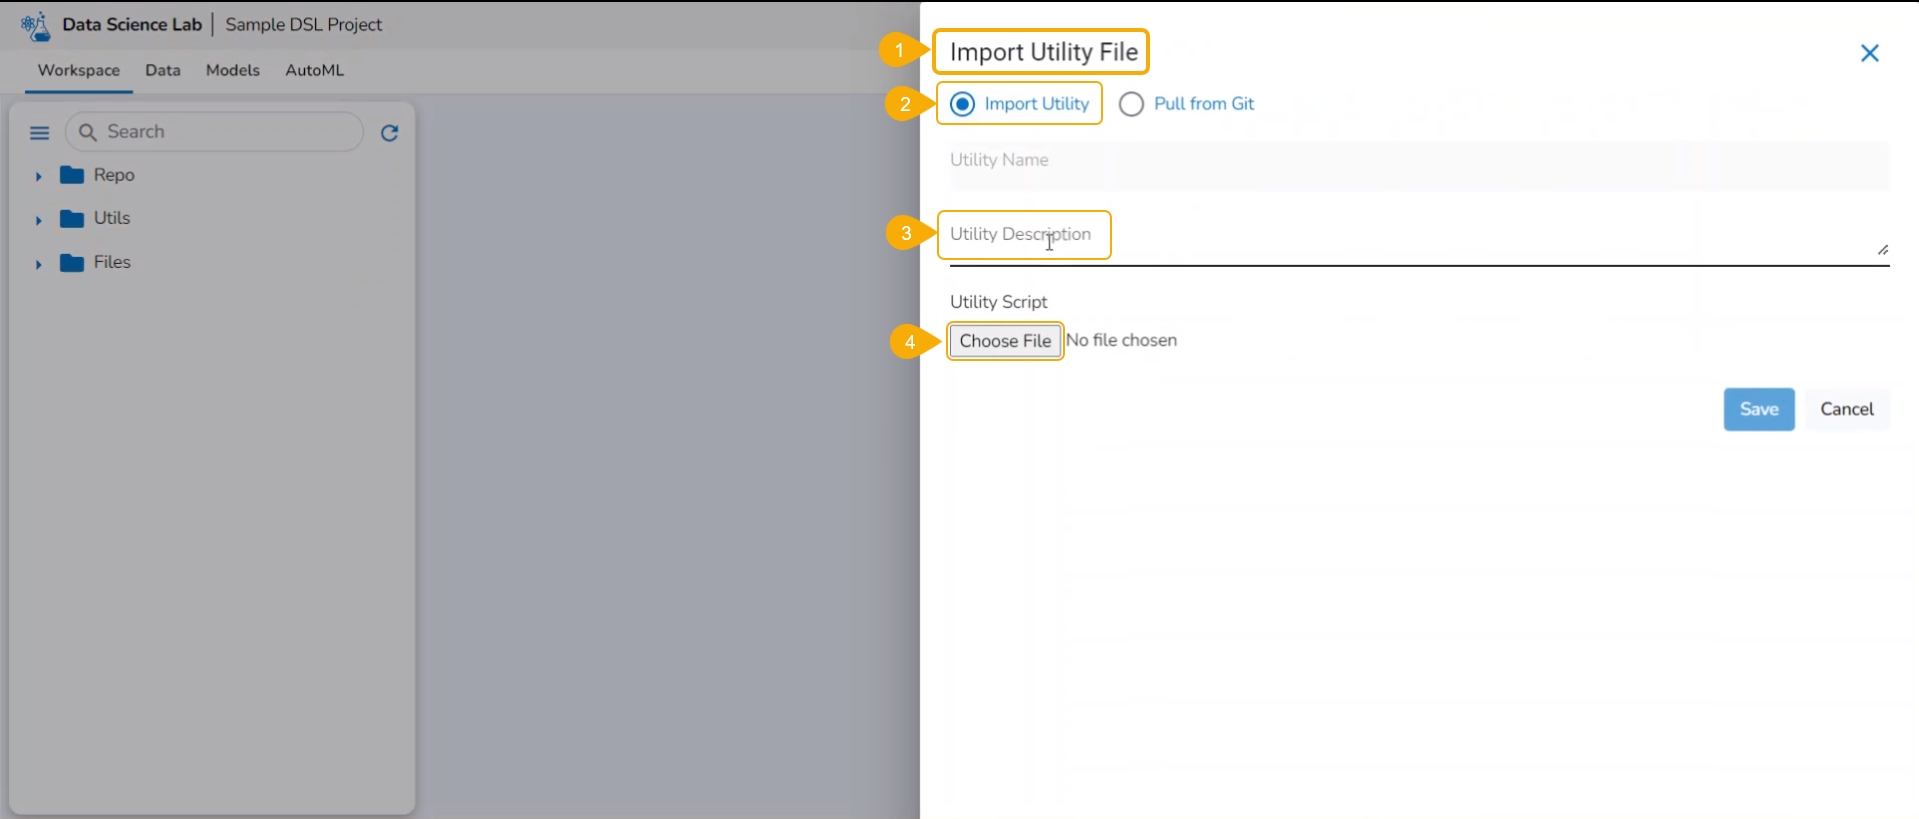
Navigate to the Import Utility File window.
Select the Import Utility option by using the checkbox.
Describe the Utility script using the Utility Description space.
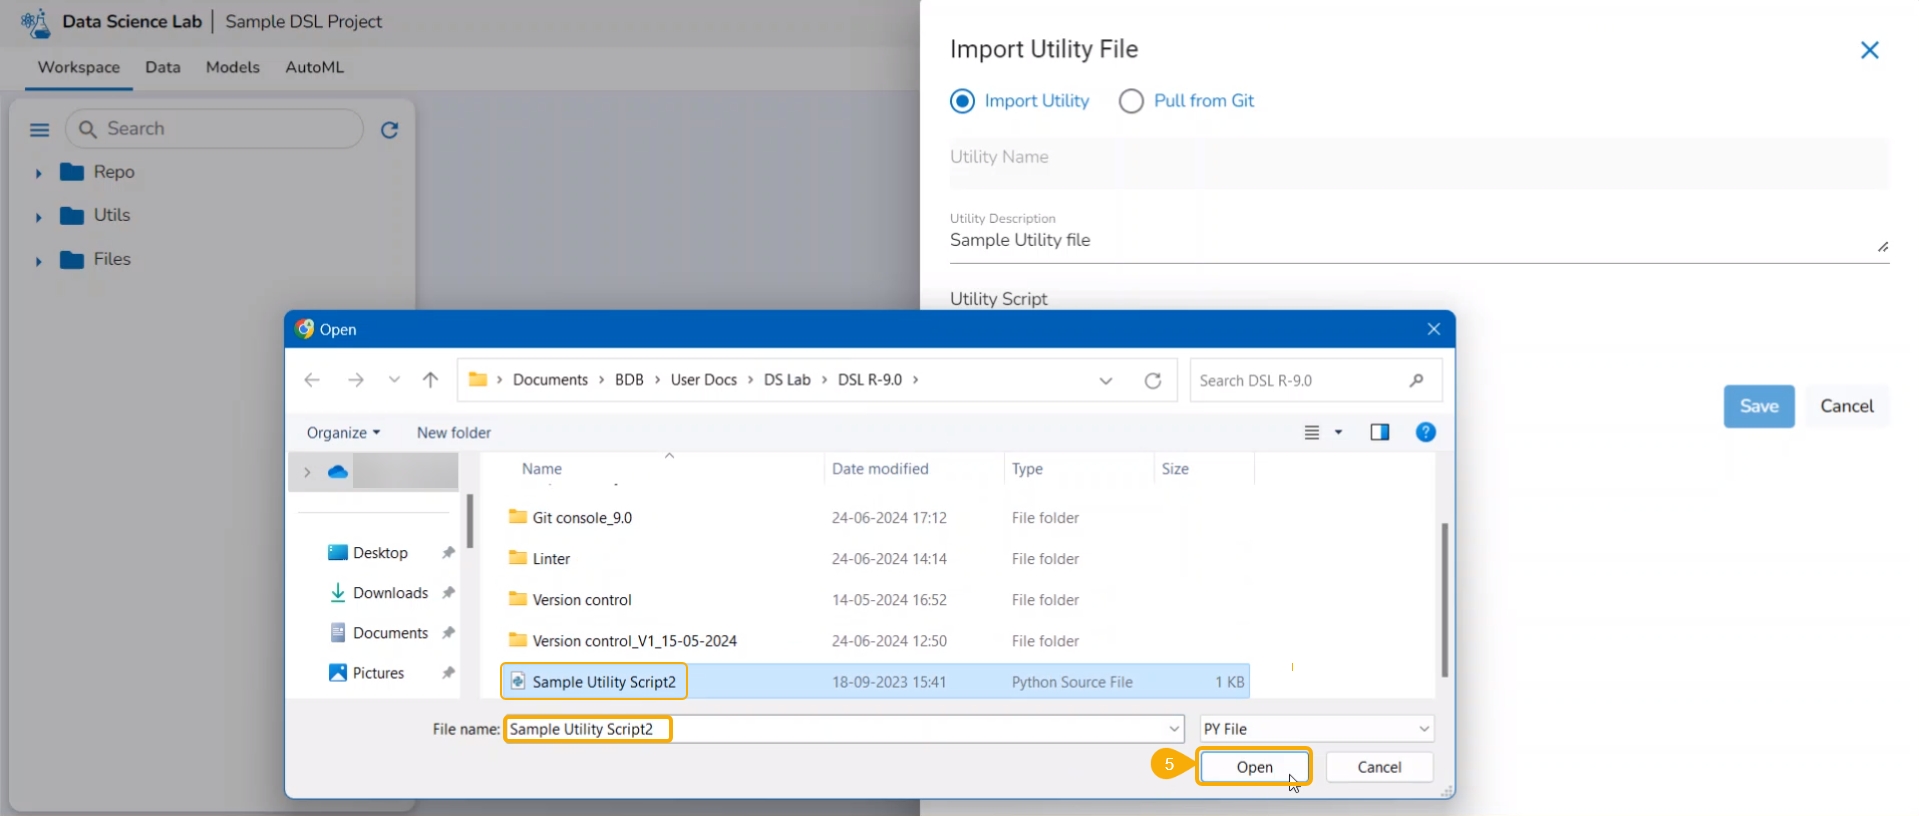
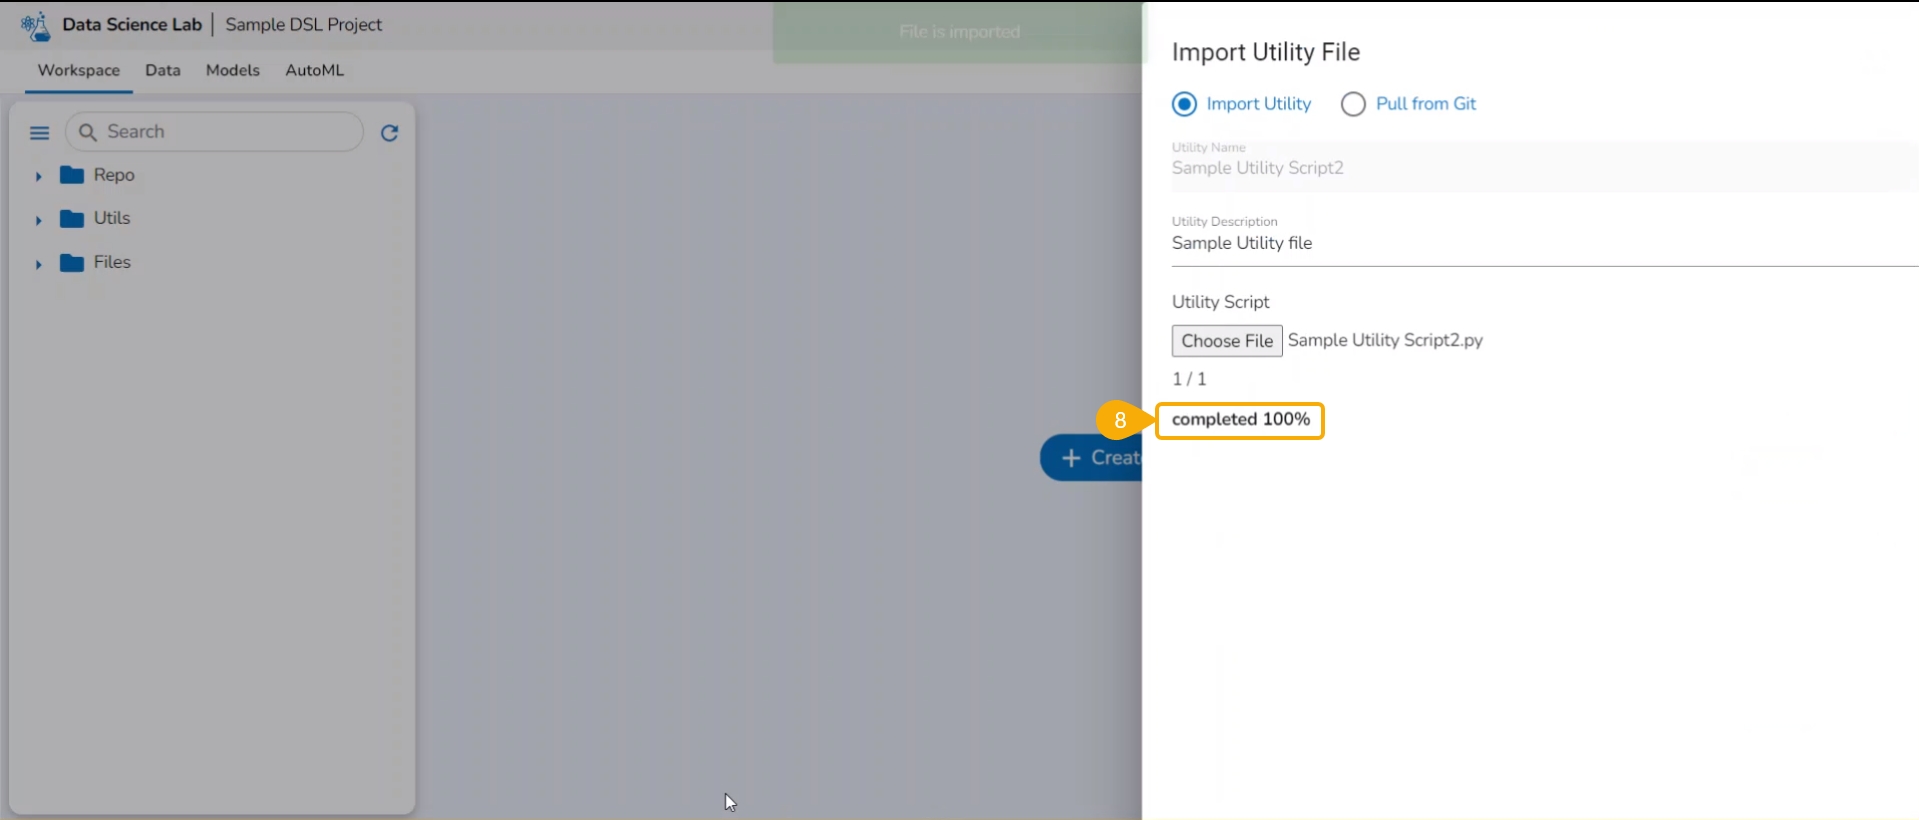
Click the Choose File option to import a utility file.
Search and upload a utility file from the system.
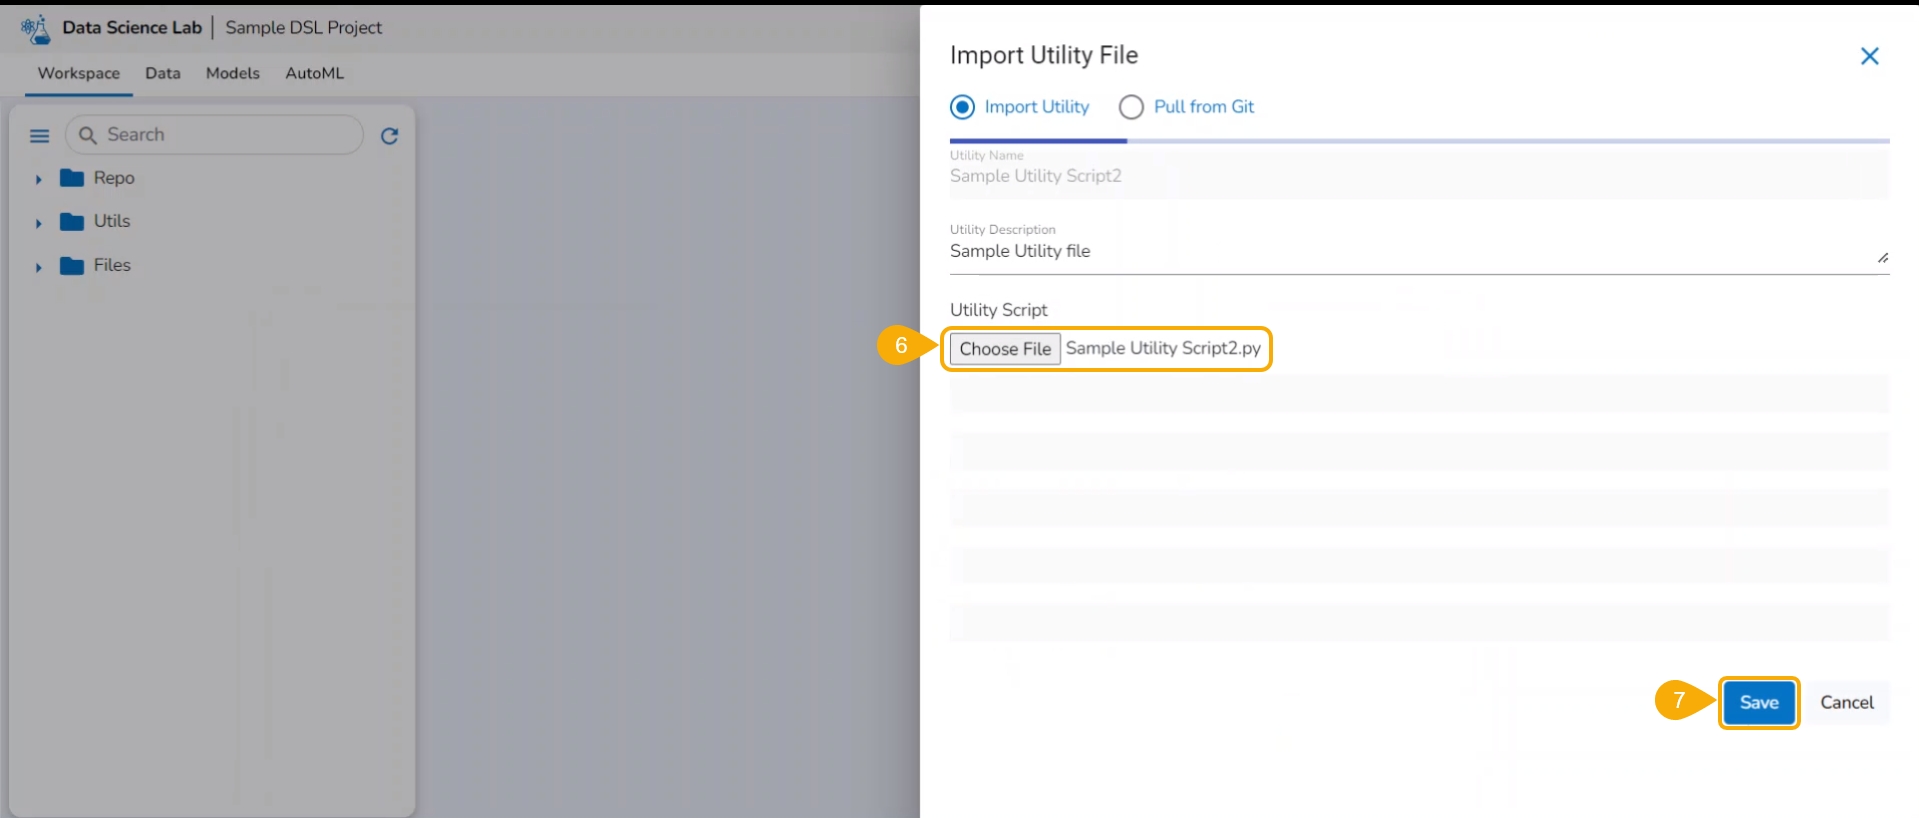
The uploaded utility file title appears next to the Choose File option.
Click the Save option.
The imported utility file will display completed 100% when imported completely.
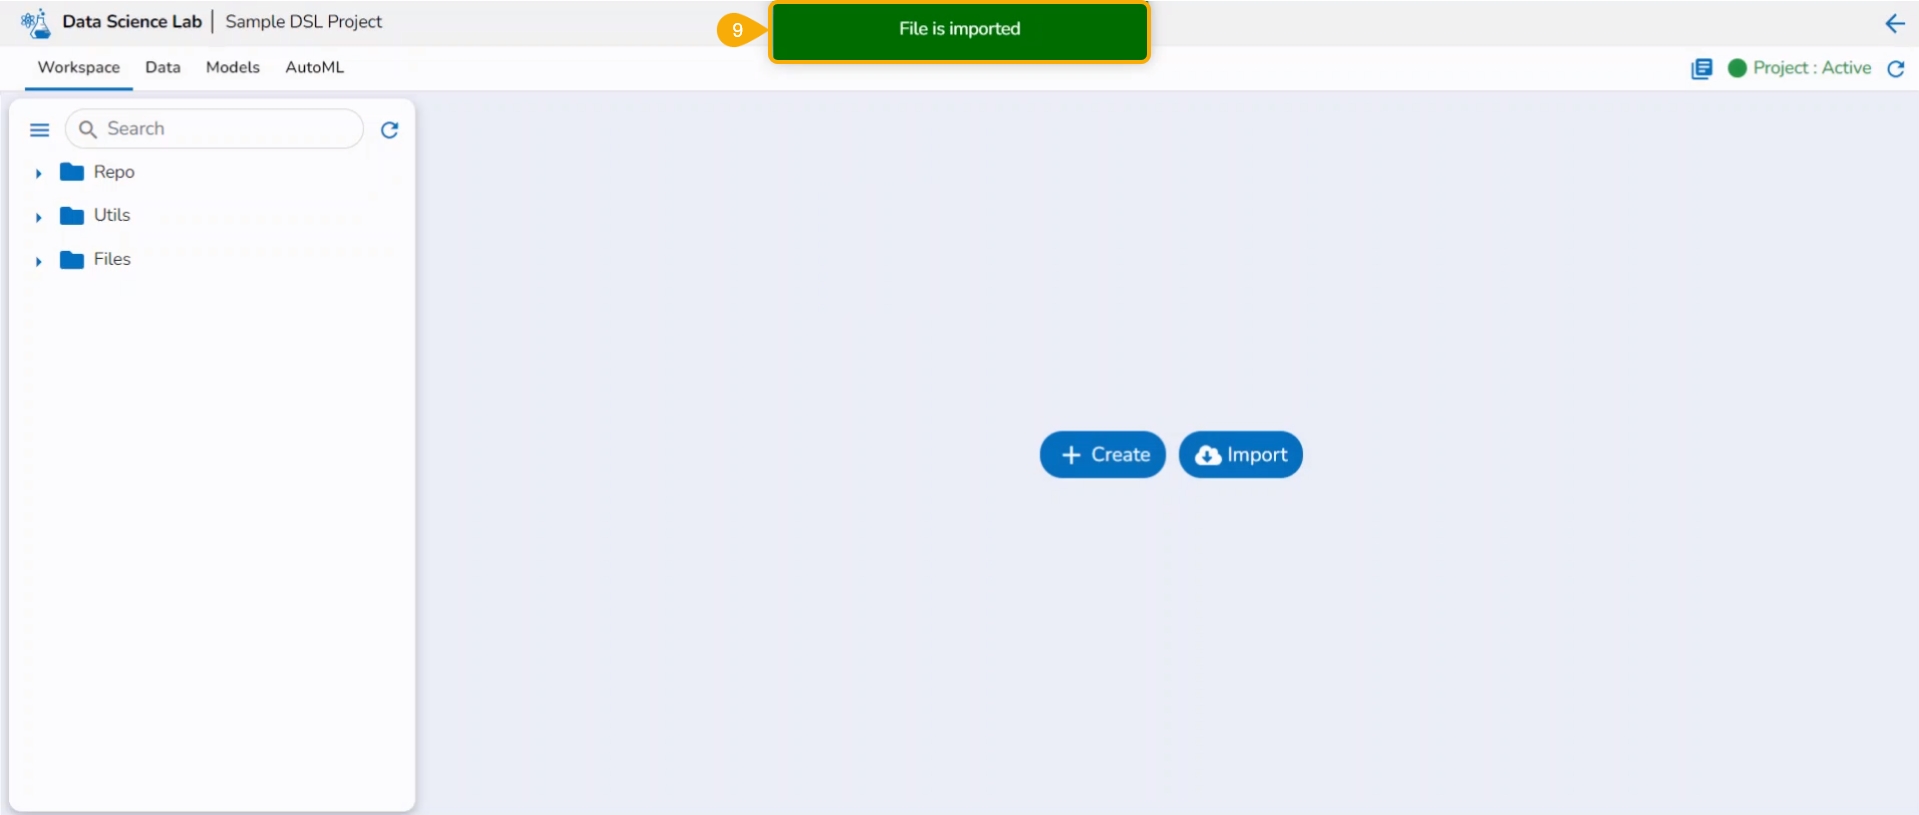
A notification also ensures that the file has been imported.
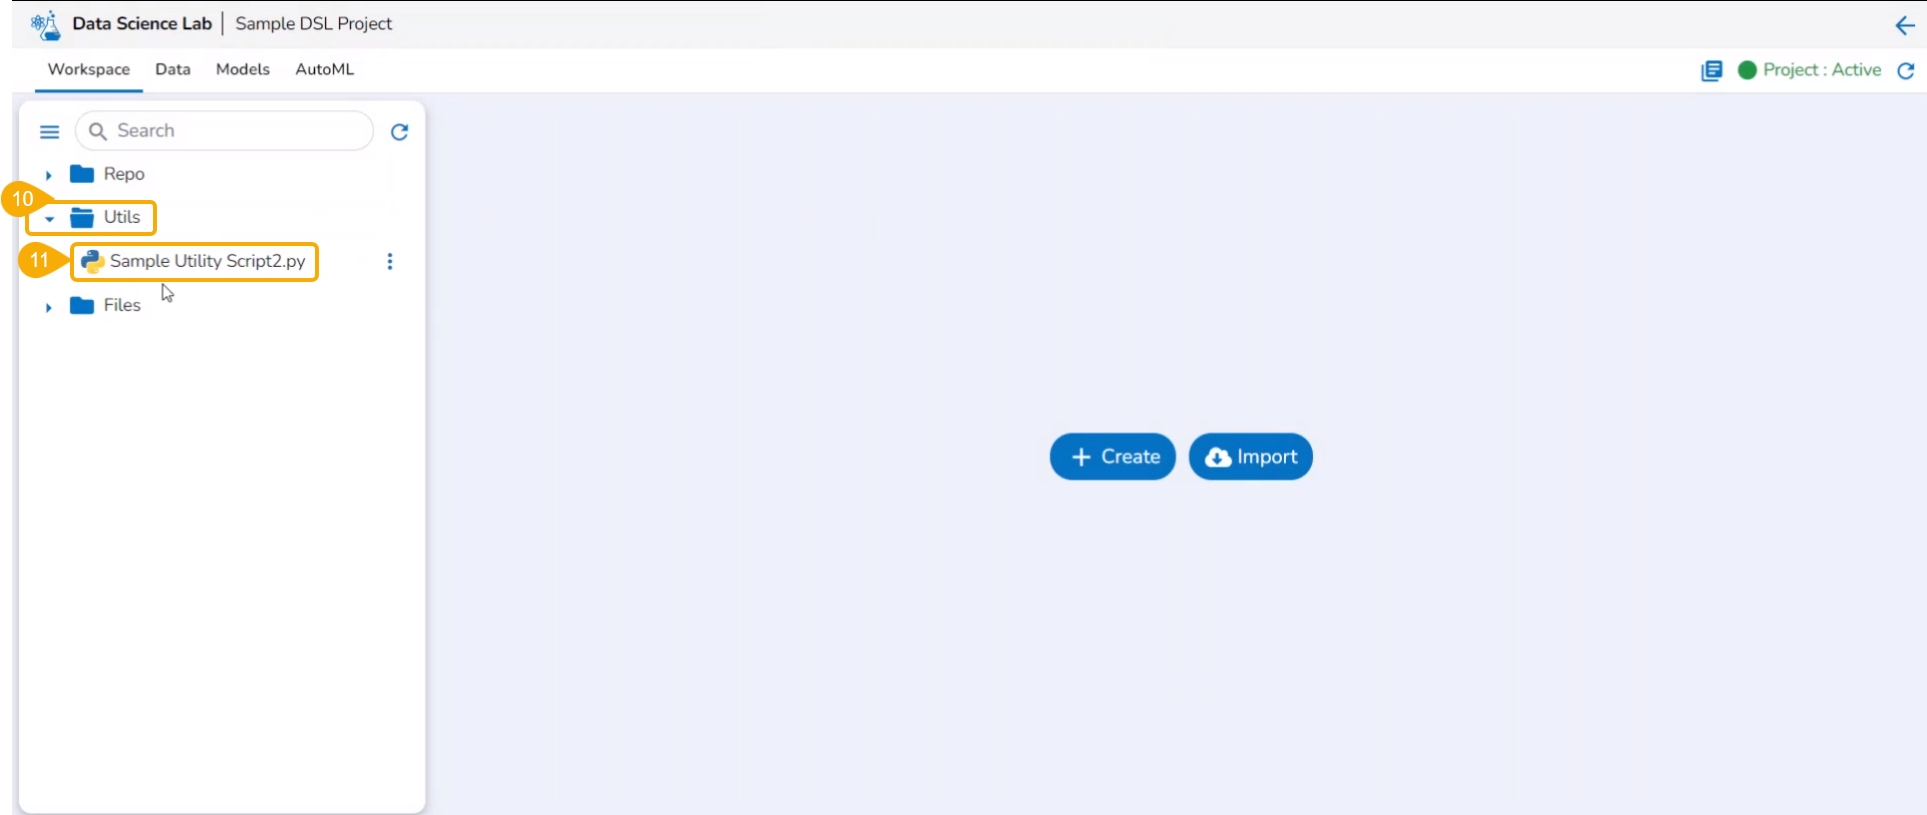
Open the Utils folder provided under the Workspace tab.
The imported utility file appears under the Utils folder.
This section helps the user to understand the attributes provided to the file folder created inside a normal Data Science Lab project.
Check out the illustration to access the attributes for a File folder.
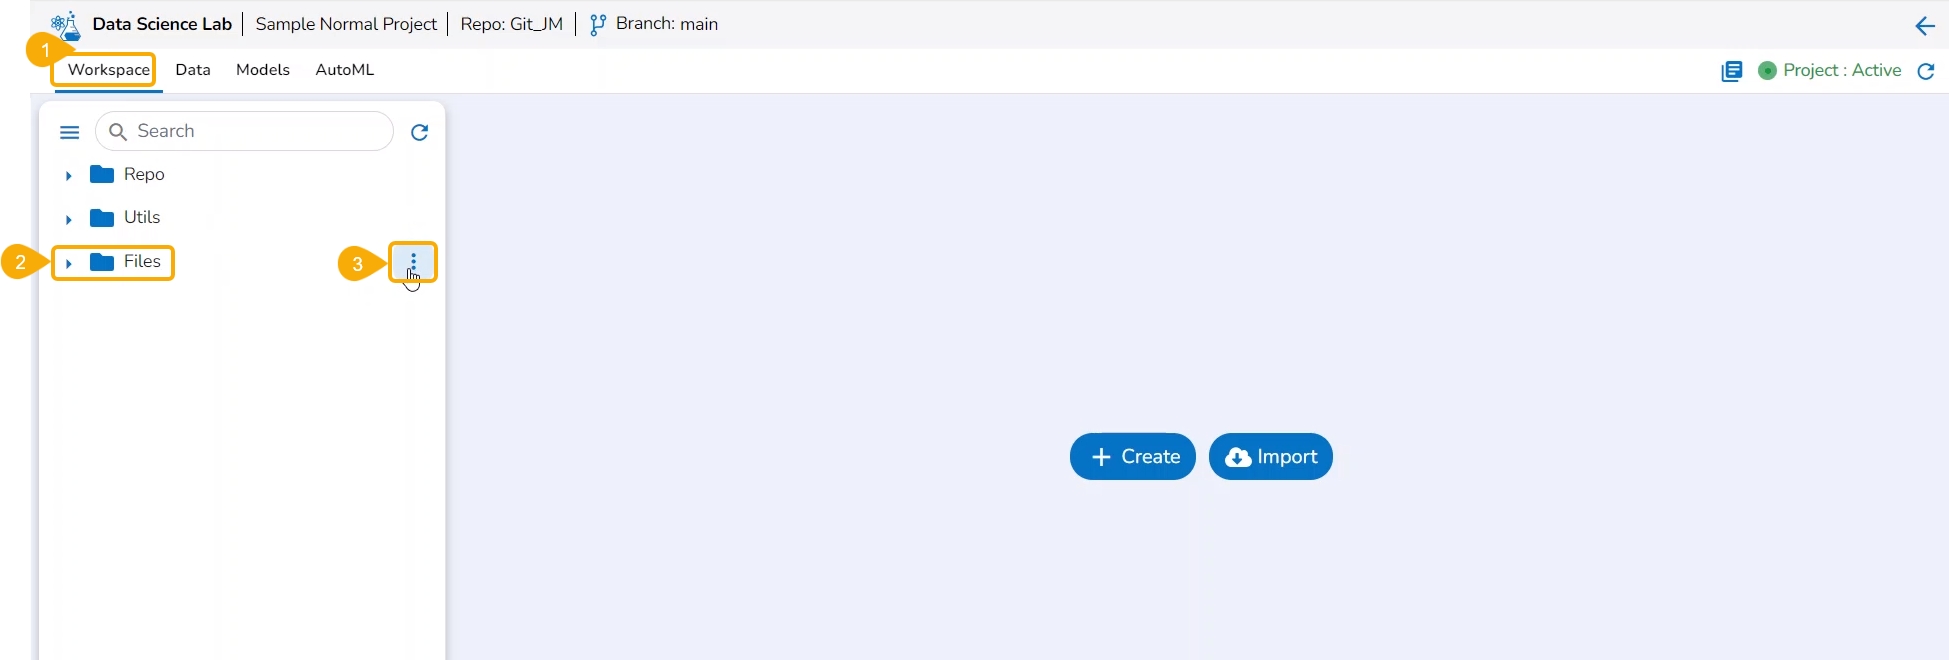
Navigate to the Workspace tab of a normal Data Science project.
Select the File folder that is created by default.
Click the Ellipsis icon for the File folder.
The credited attributive will be listed in the context menu.
Check out the illustration on adding a file to the File folder of a normal Data Science Project.
Check out the illustration on adding a folder to the File folder of a normal Data Science Project.
Check out the illustration on using the Copy path functionality inside the File folder of a normal Data Science Project.
Check out the illustration on importing a file to the File folder of a normal Data Science Project.
You can bring your Python script to the Notebook framework to carry forward your Data Science experiment.
The Import functionality contains two ways to import a Notebook.
Pull from Git
Please Note: Only .ipynb files will be supported.
Pre-requisite:
The user needs to configure the admin-level settings with an authentication token.
The user needs to do Project-level configuration of Git Project and Git branch.
The user needs to Pull a version of the file from Git before using the Pull and Push functionality for the projects where the source files are available in Git Repo.
Please Note: the user can generate an authentication token from their Git Lab or Git Hub repositories.
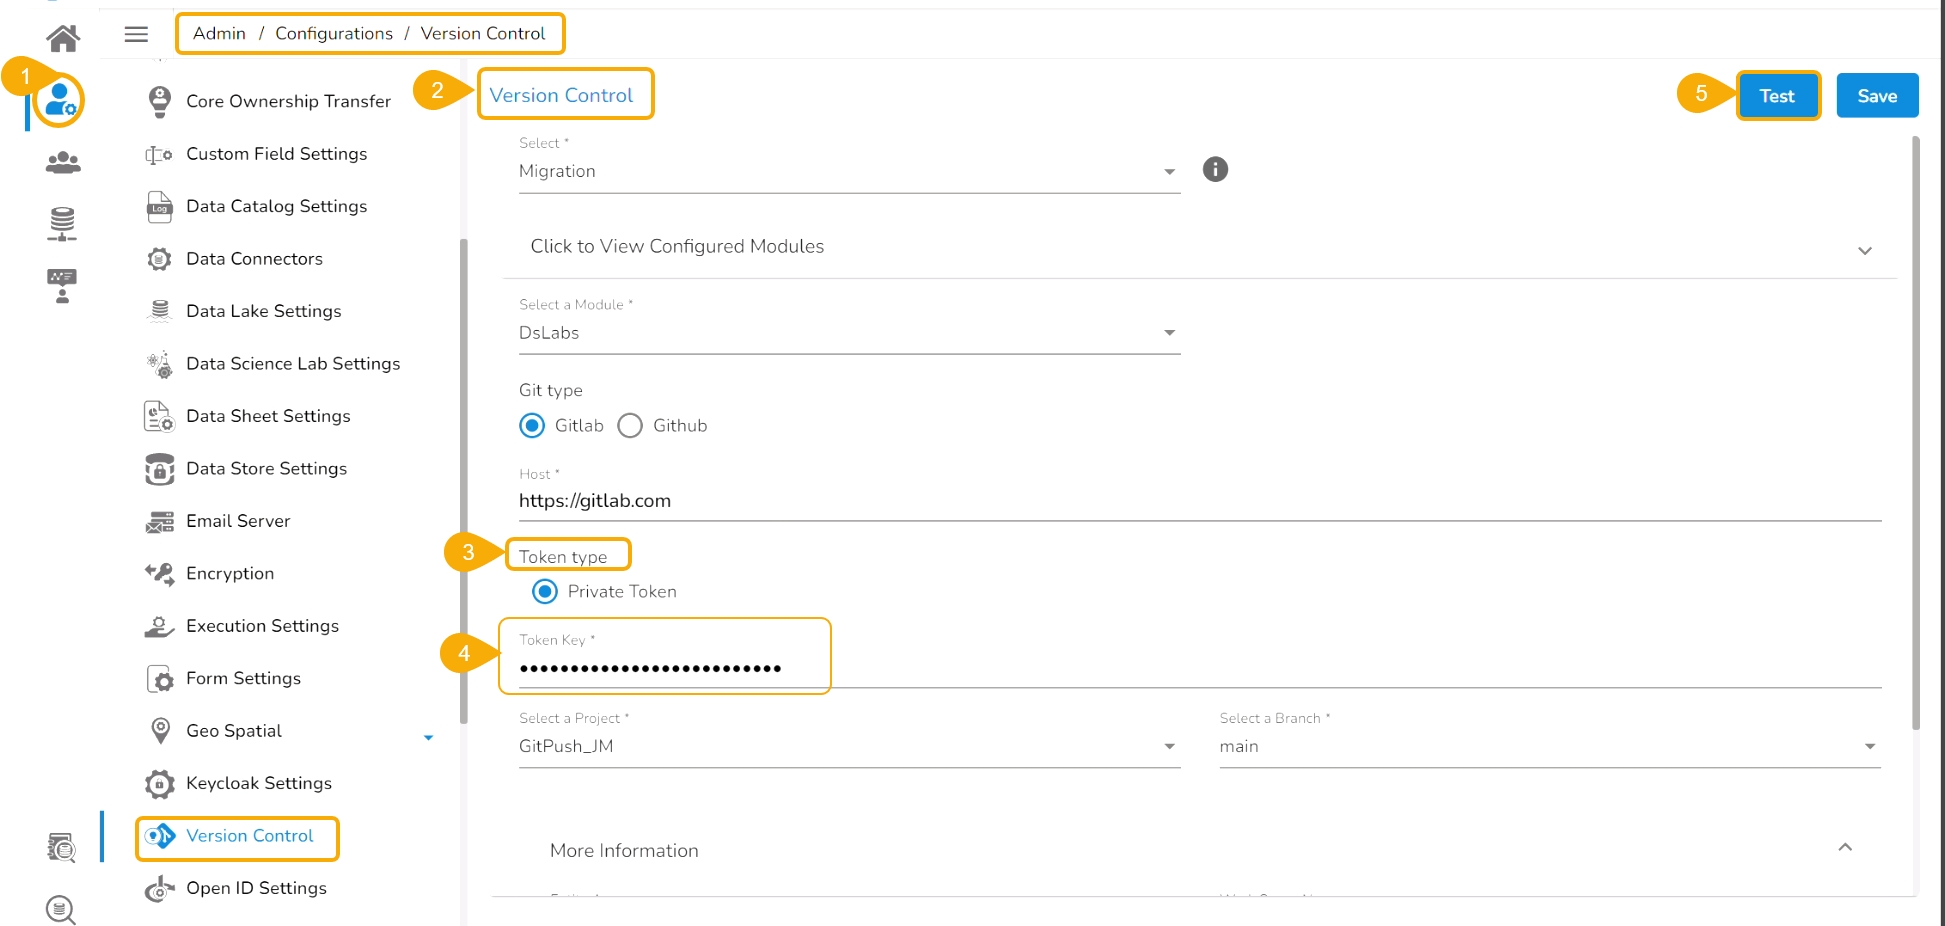
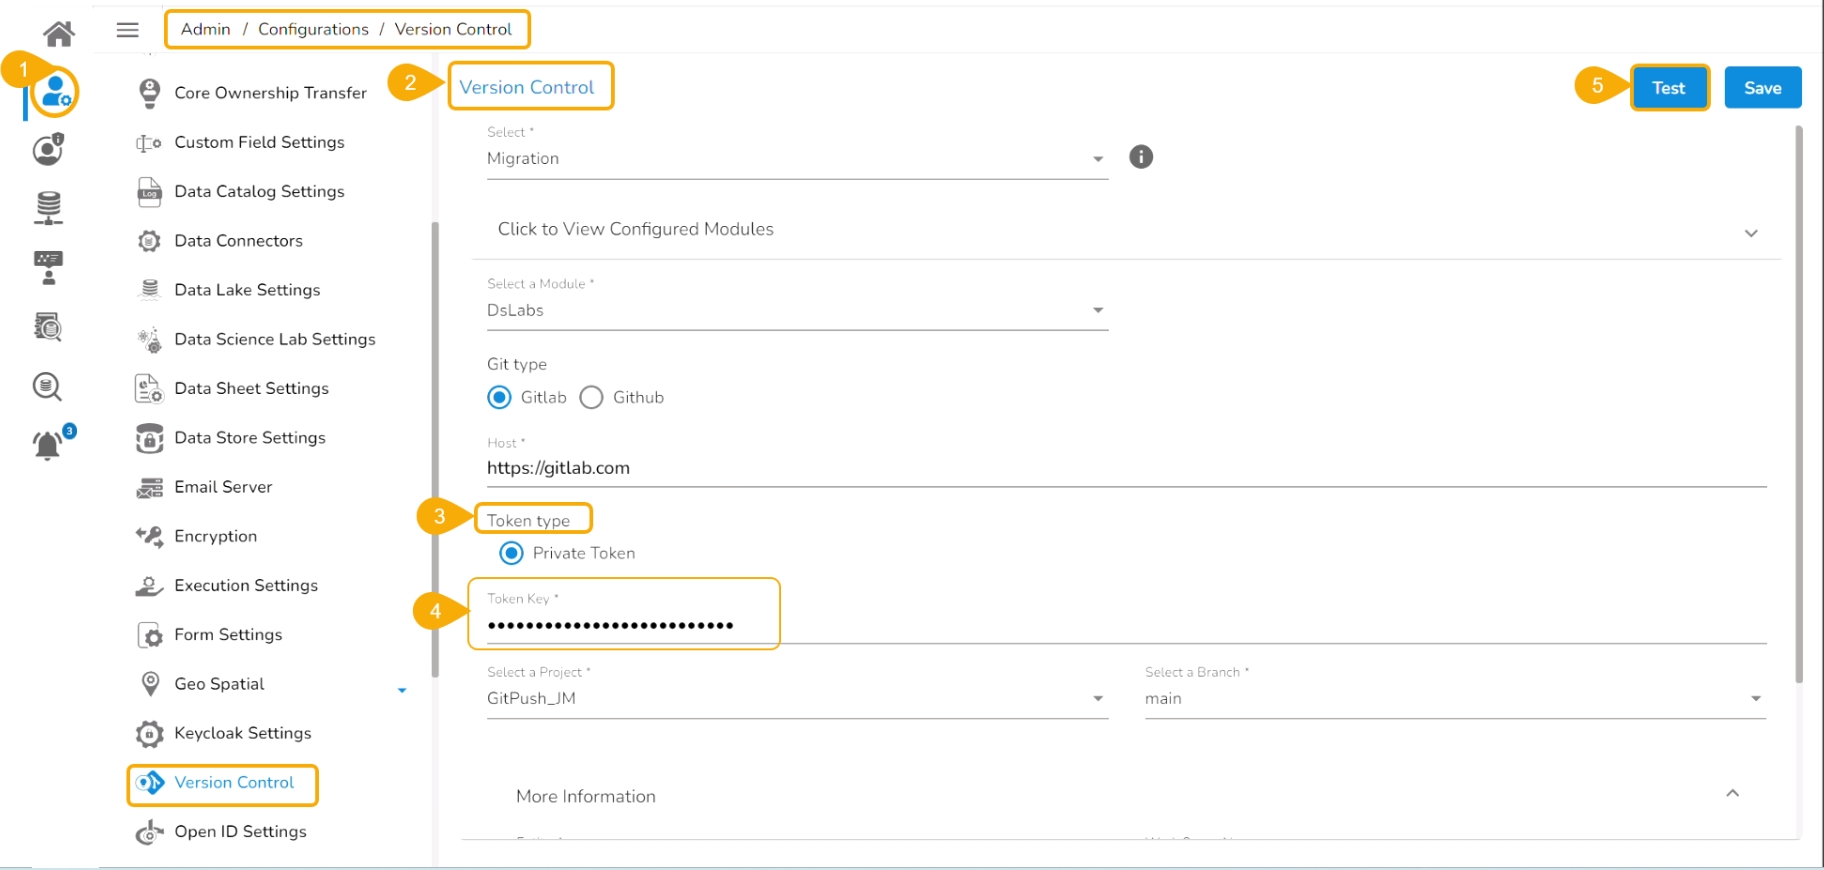
Check out the given illustration to understand the Admin configuration part with the authentication token under the platform.
Navigate to the Admin module.
Open the Version Control from the Configuration options.
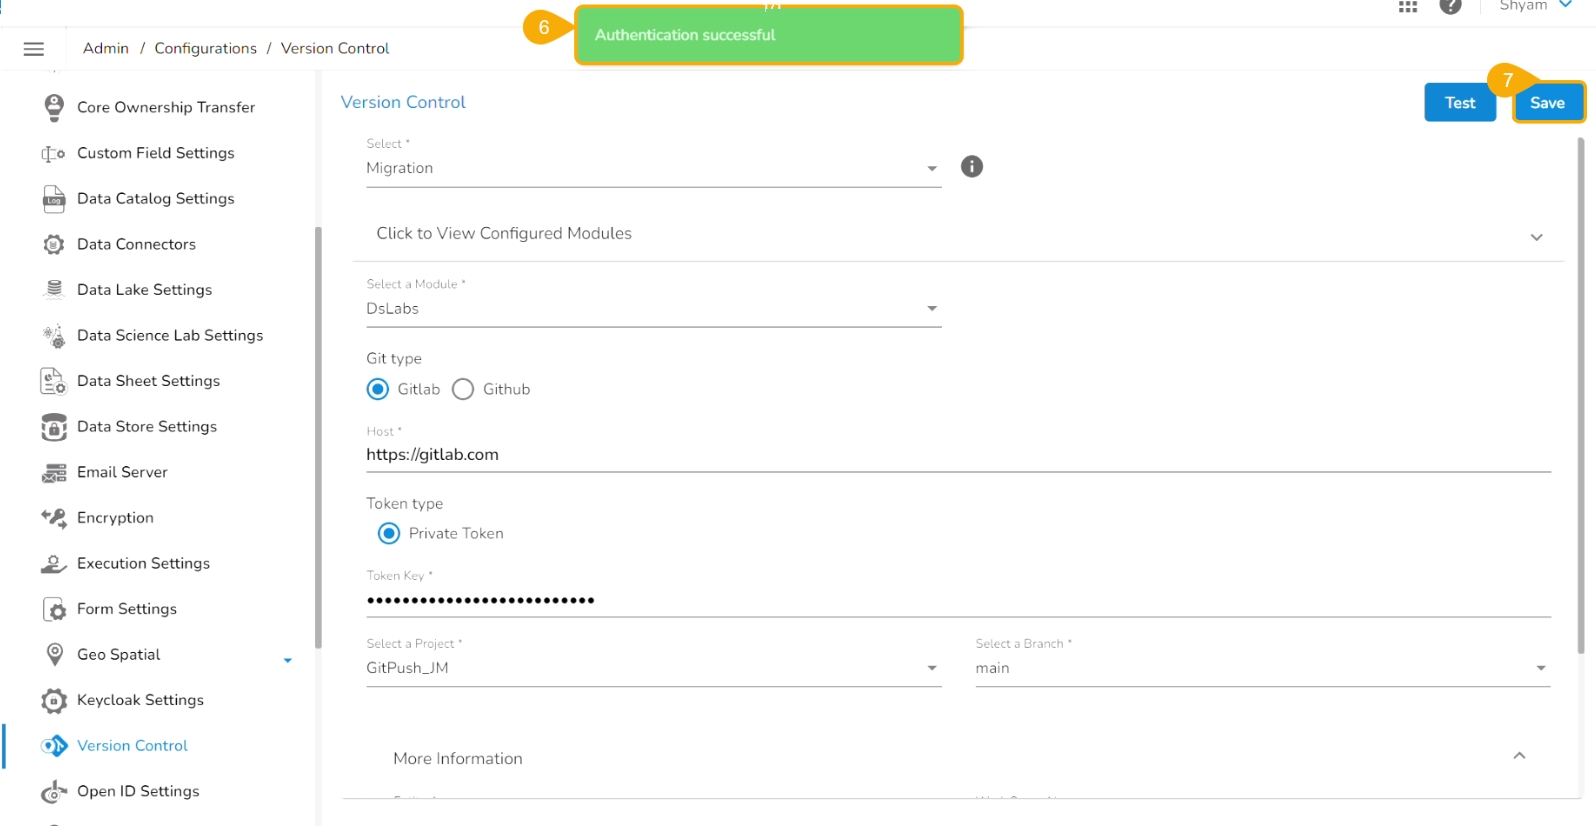
Select the Token type as a private token.
Provide the authentication token in the given space.
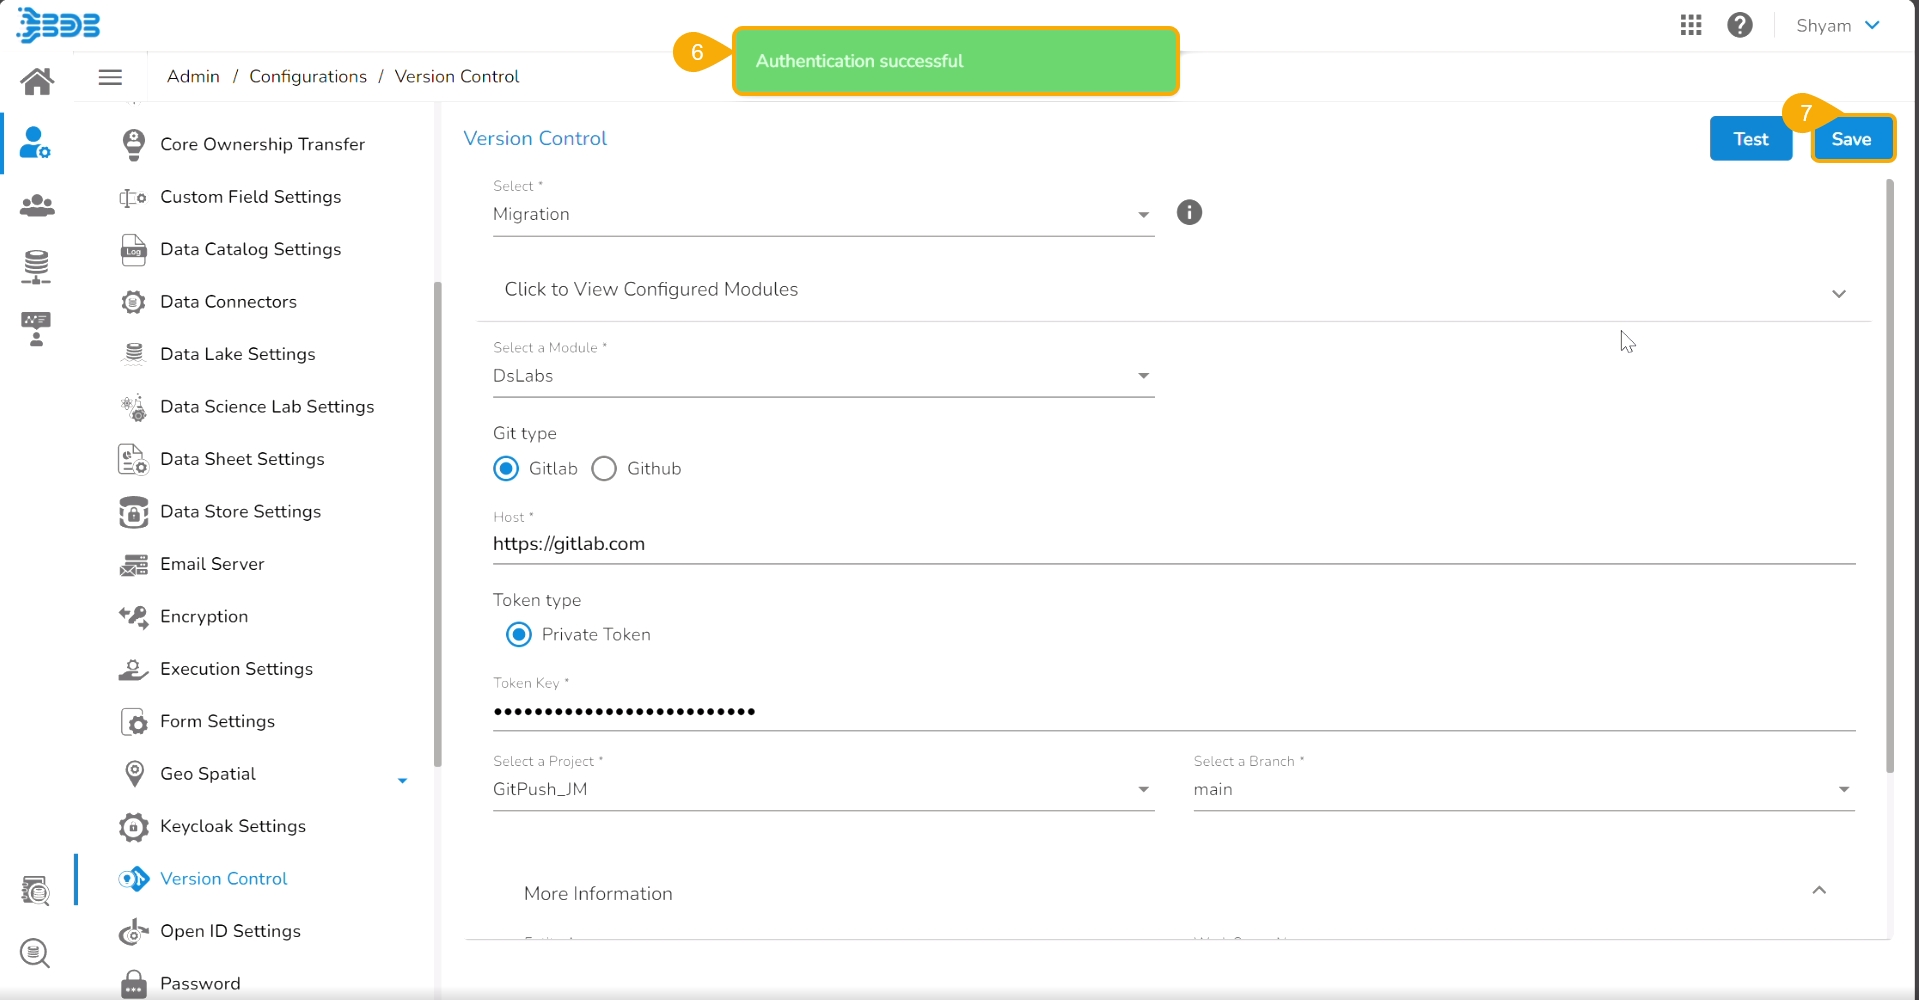
Click the Test option.
A notification message appears to inform the user that authentication has been established.
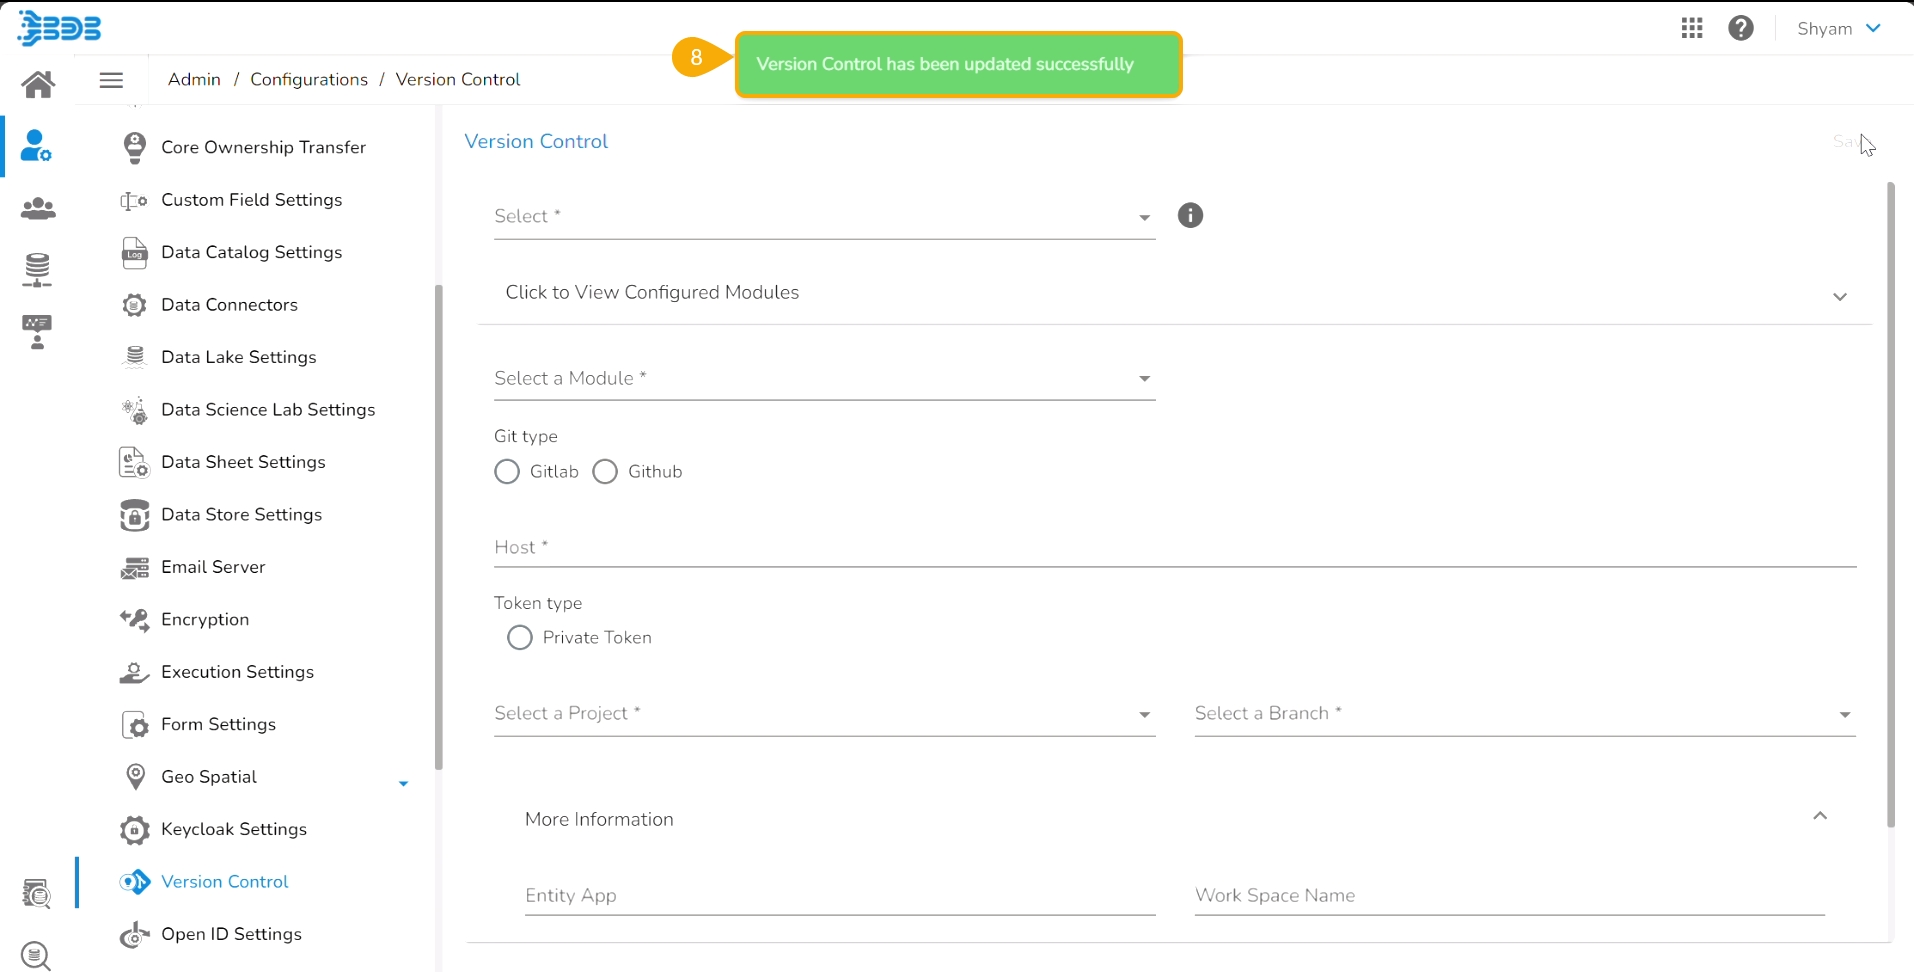
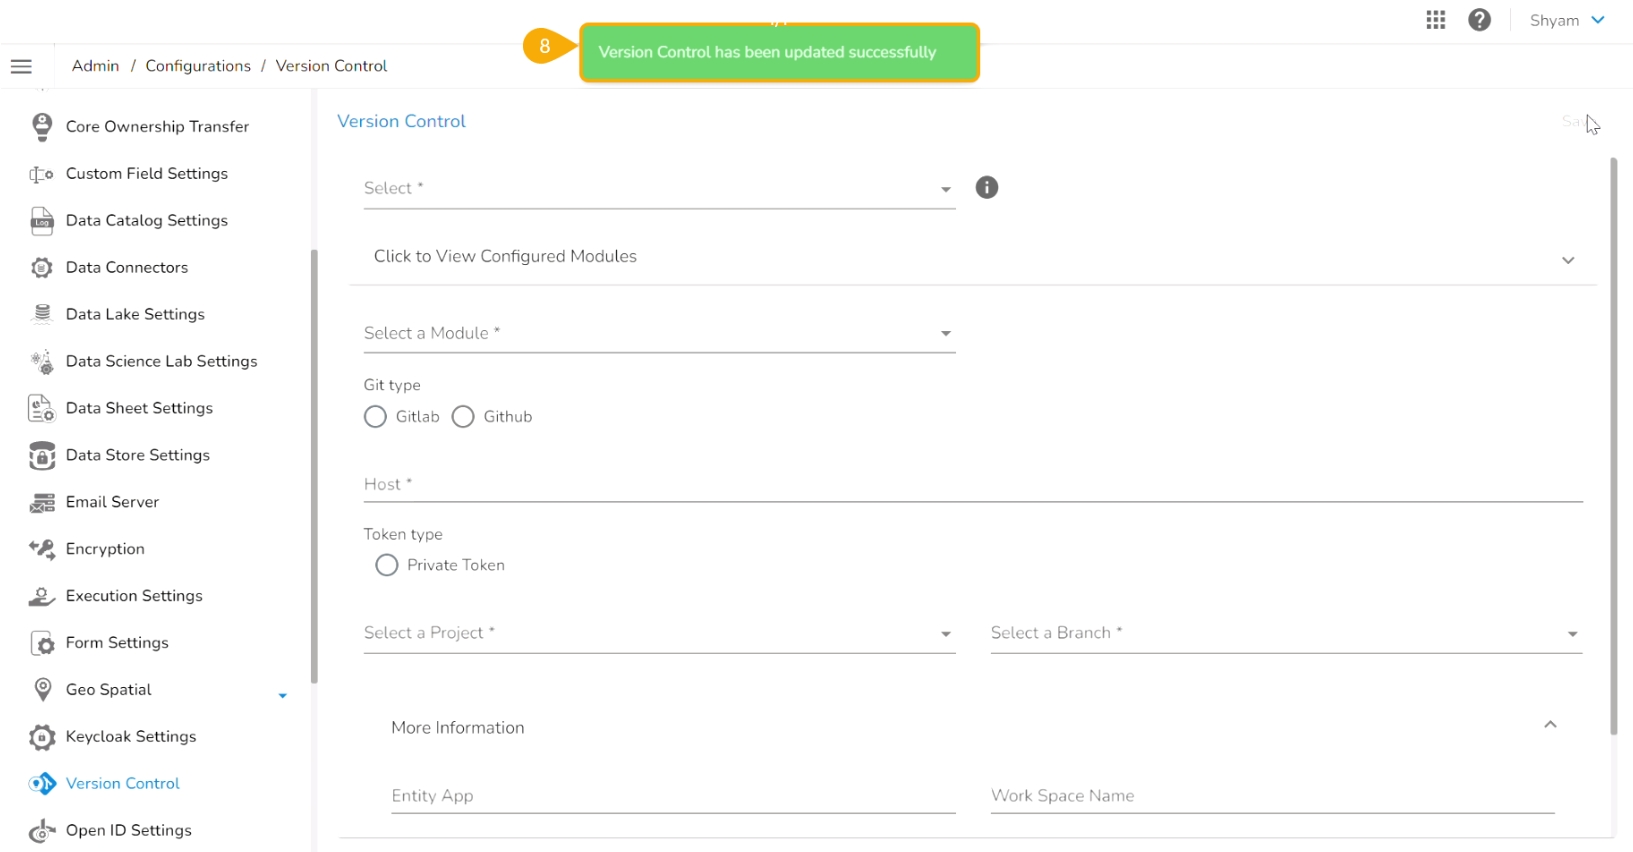
Click the Save option.
A notification message appears to inform that the version control has been updated.
Projects and Branches created in GitLab/GitHub can be accessed using the access token inside the DS Lab and the files (.ipynb) can be pulled using the Pull from Git functionality.
Check out the given illustration to understand the Pull from Git functionality.
Once the initial pull (import) has happened, the user can pull the latest version of the Python file from Git using the Pull from VCS functionality available in the Notebook List.
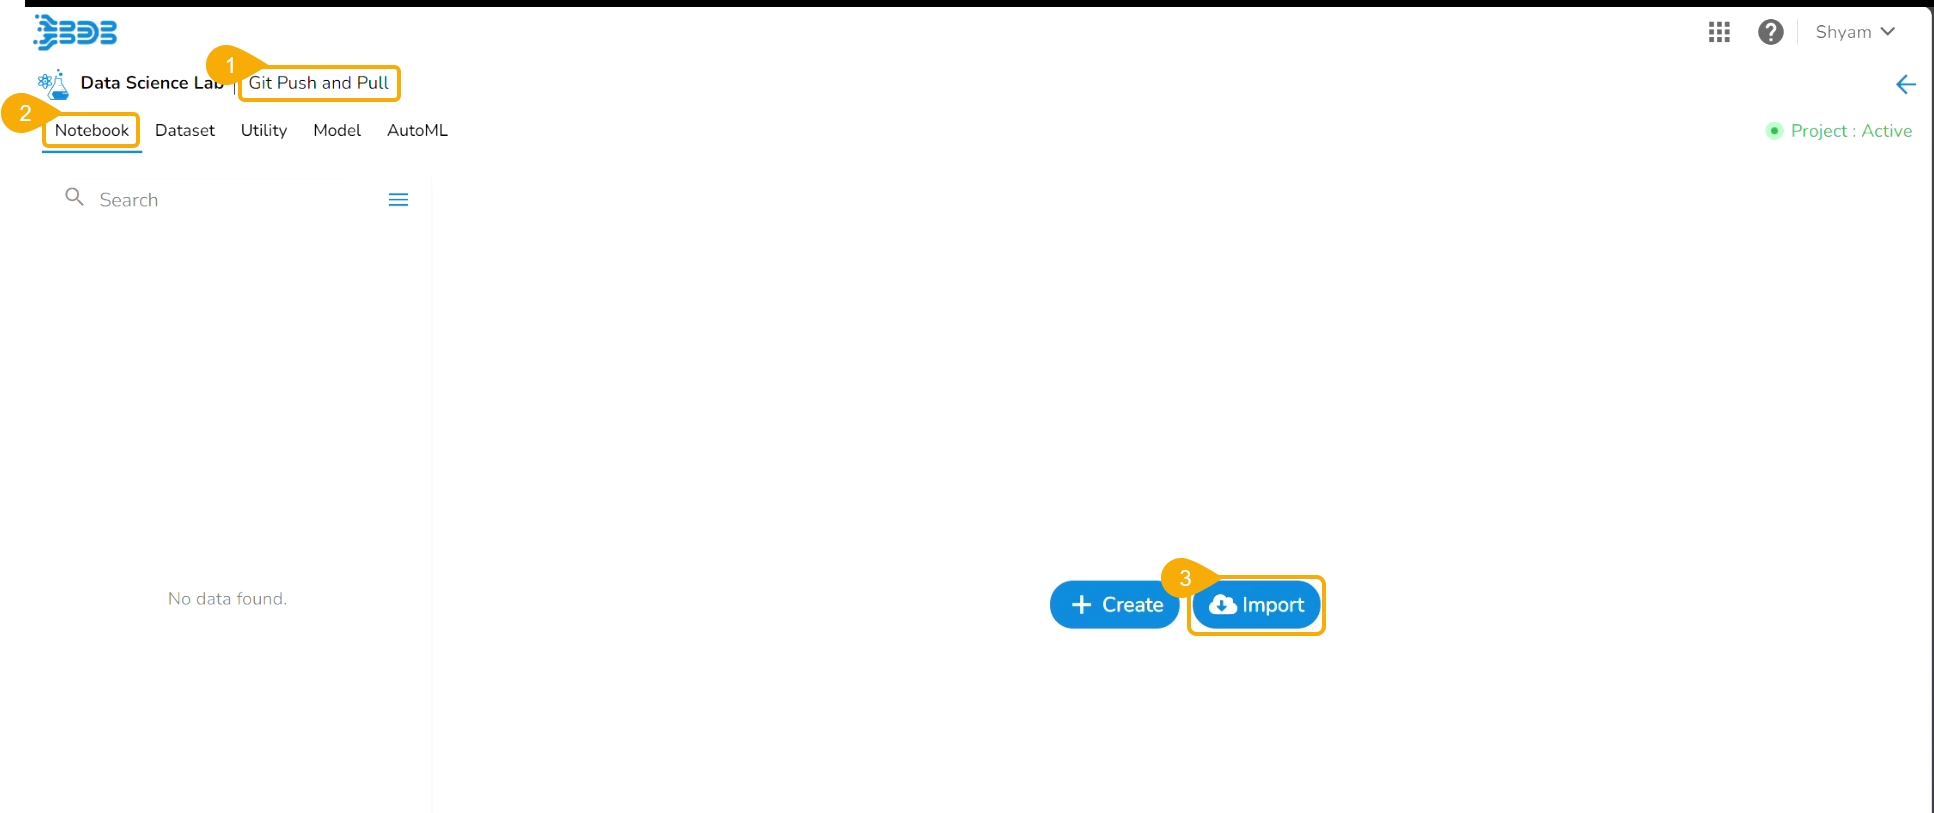
Navigate to an activated Project.
Open the Notebook tab (It opens by default).
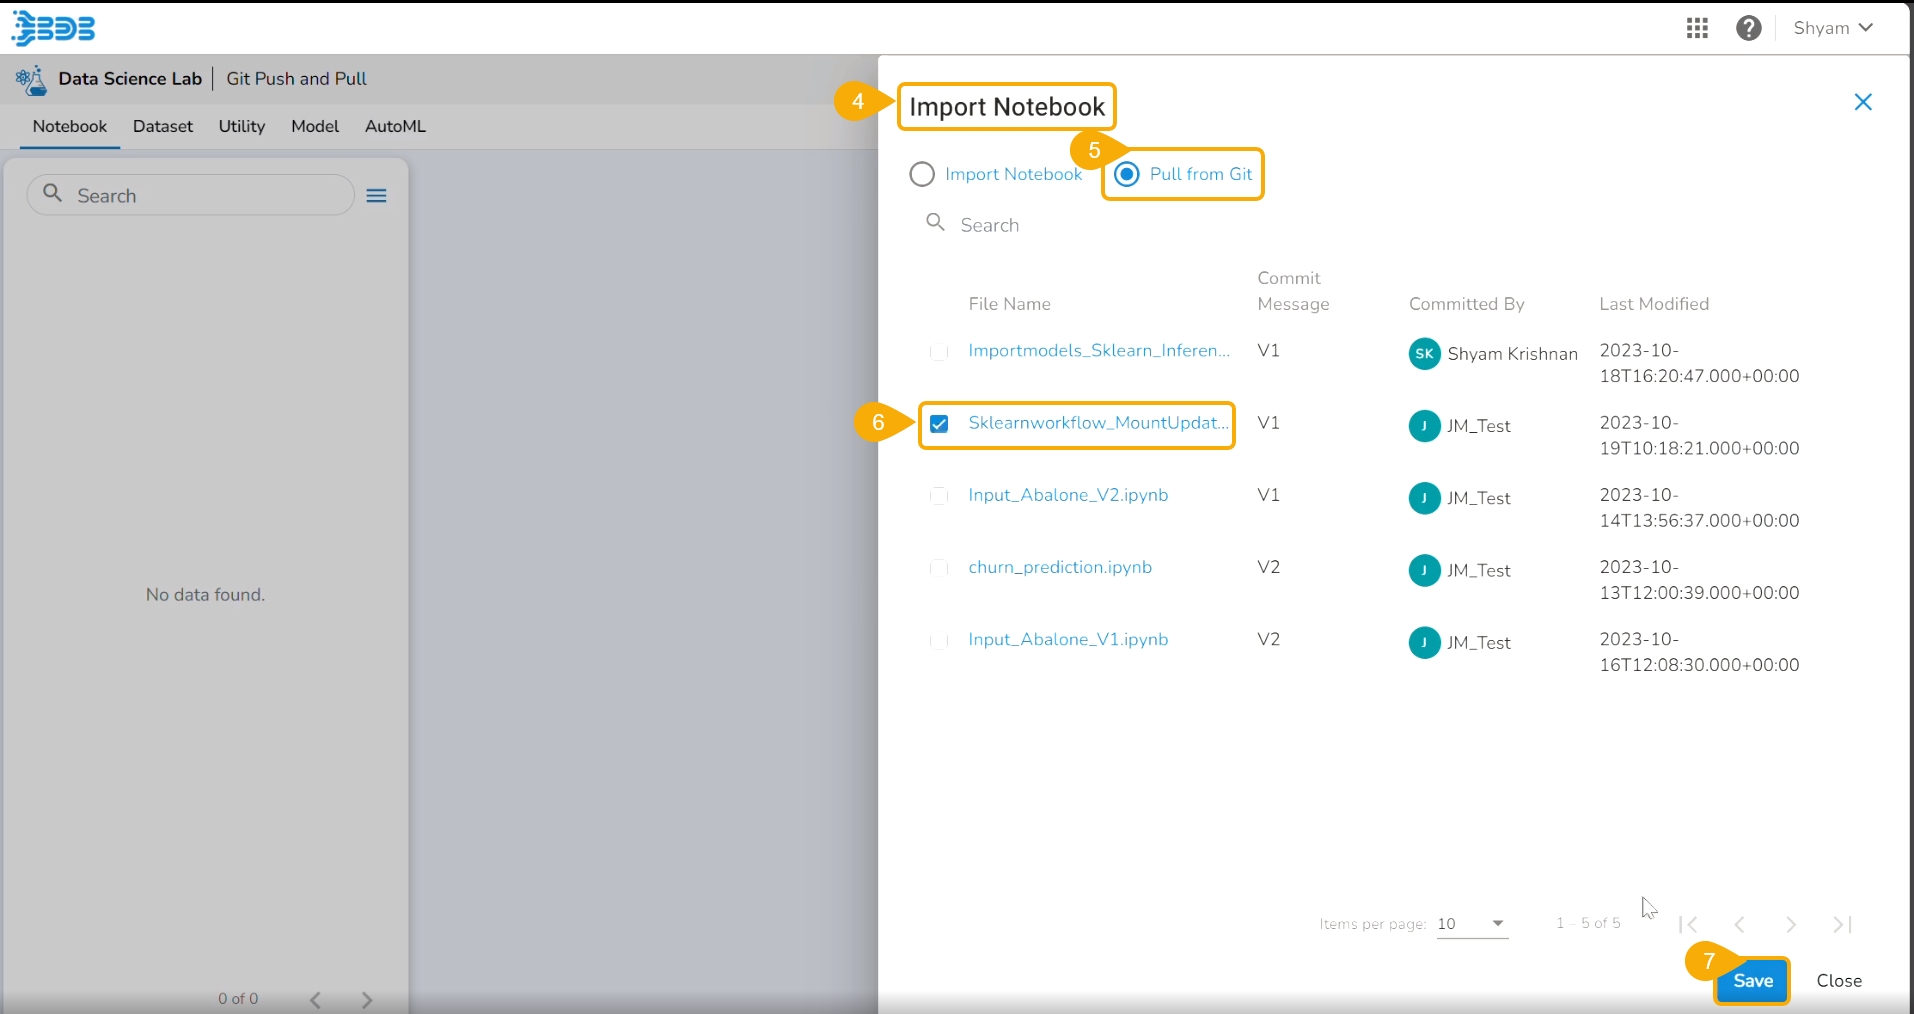
Click the Import option.
The Import Notebook page opens.
Select the Pull from Git option.
All the available versions appear.
Click the Save option.
A notification message appears to ensure that the selected file is pulled.
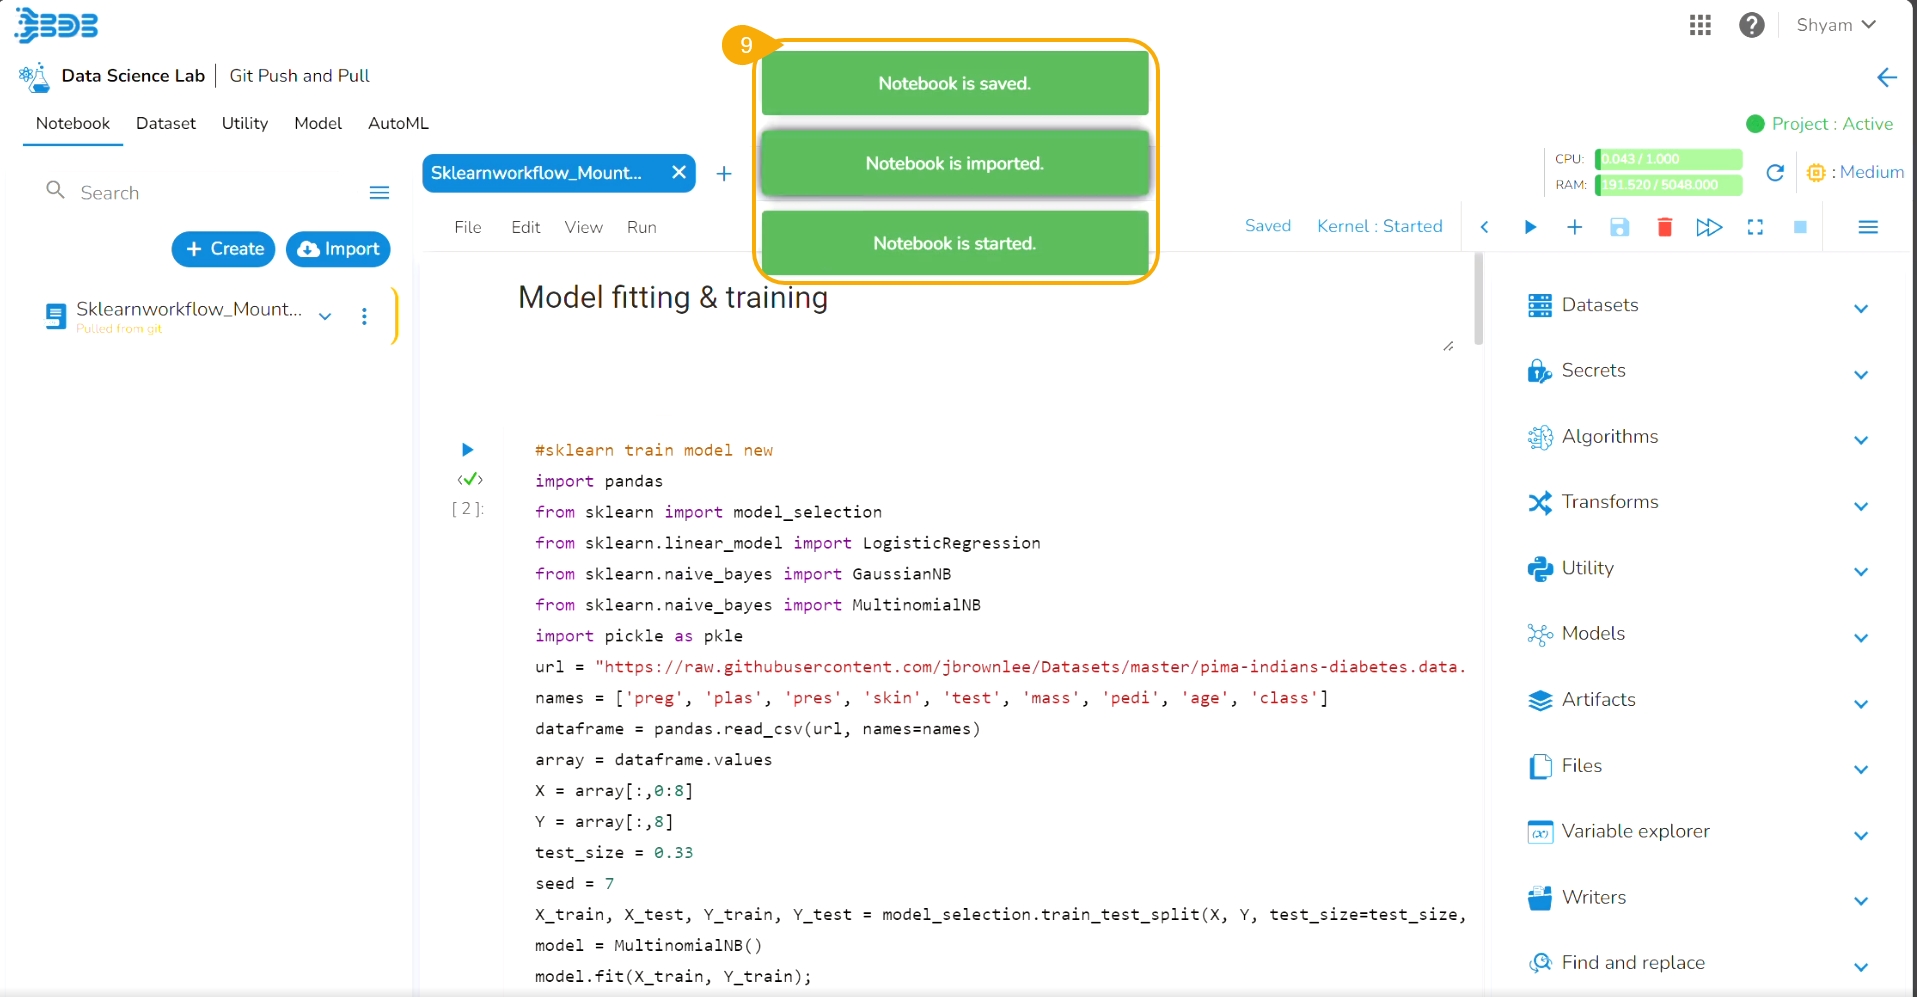
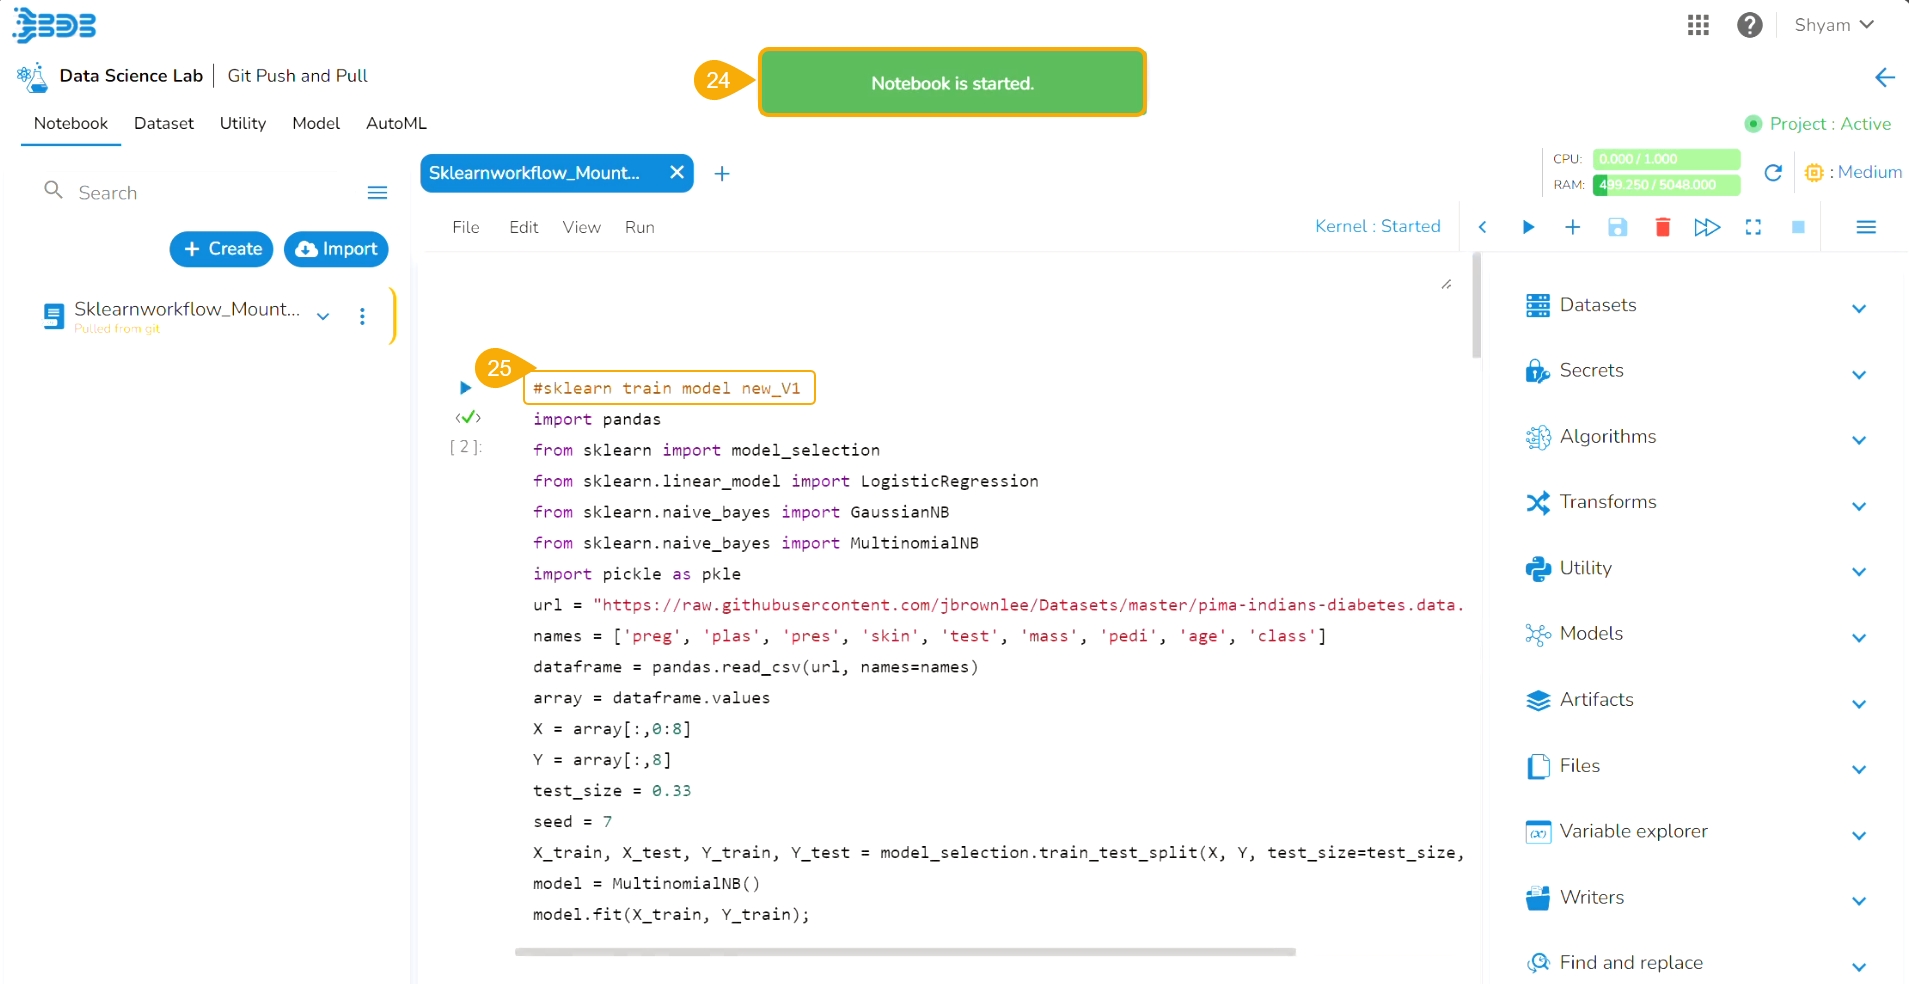
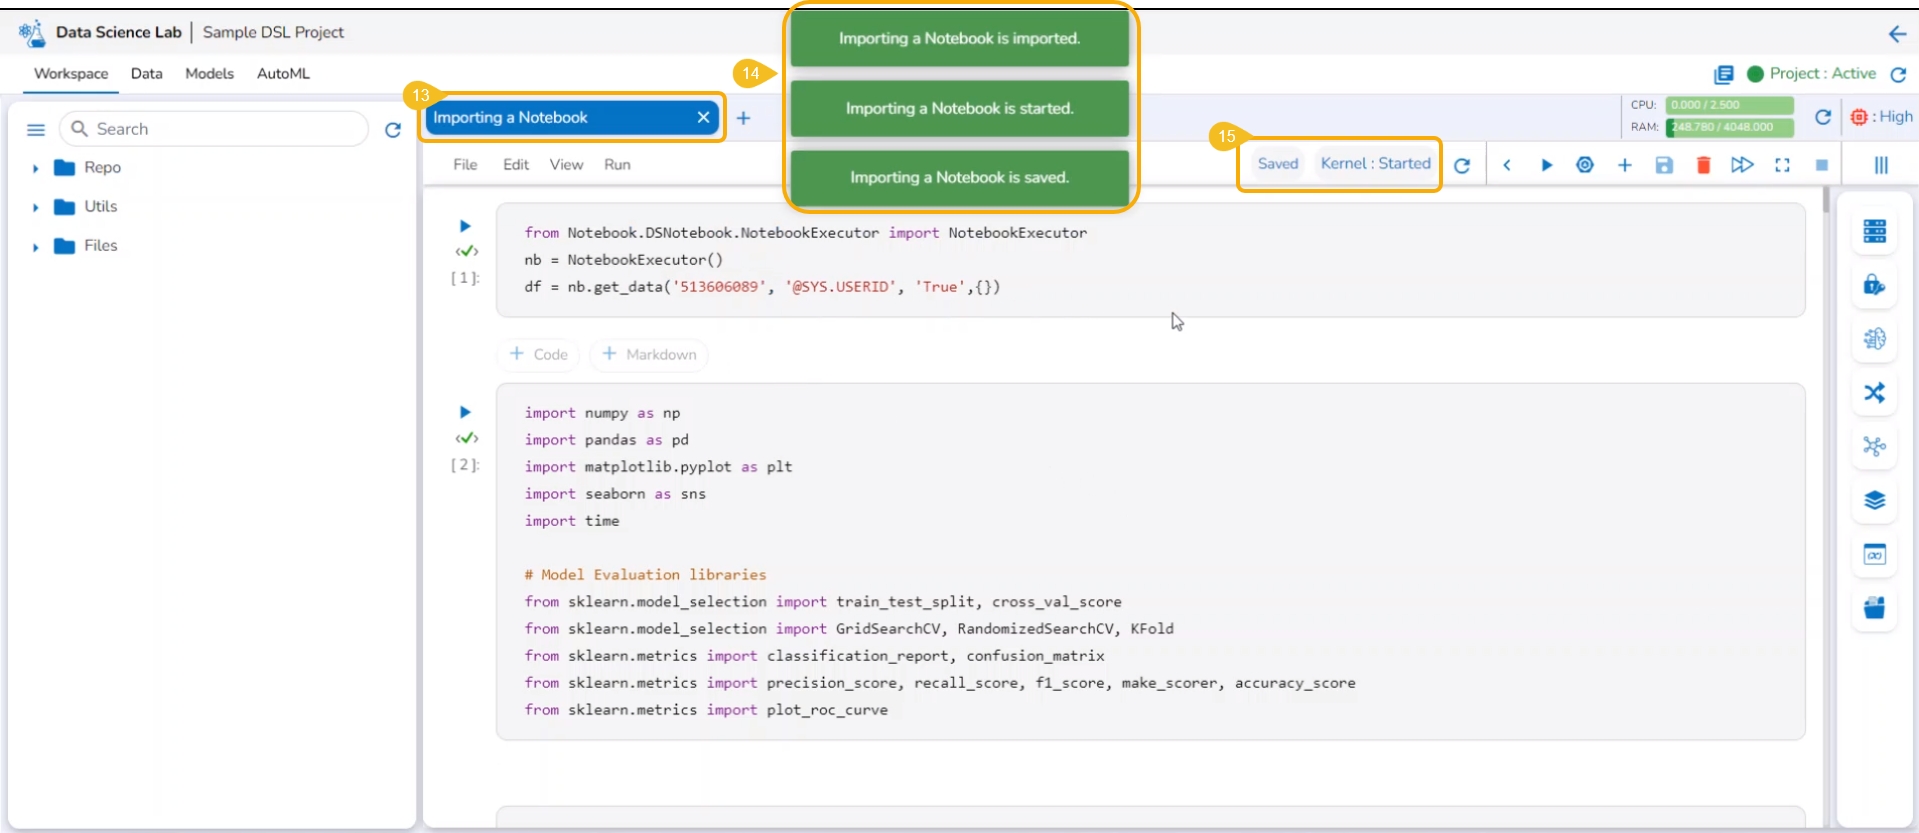
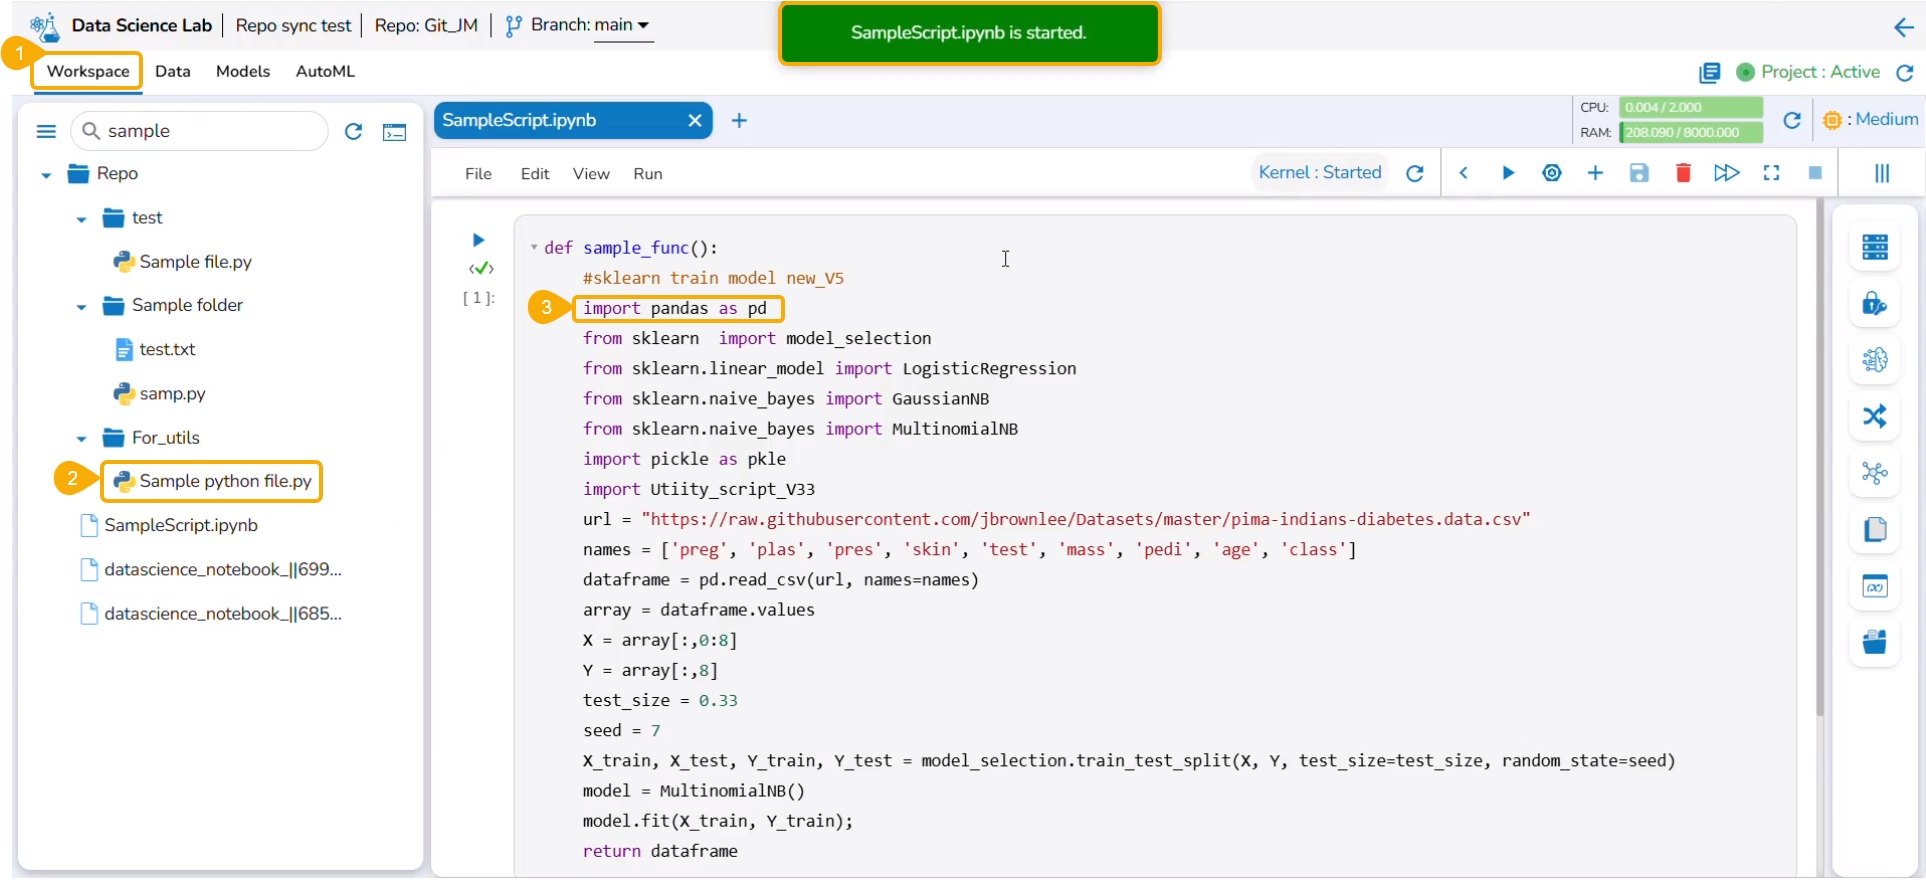
Consecutive notifications ensure that the Notebook is started, imported, and saved.
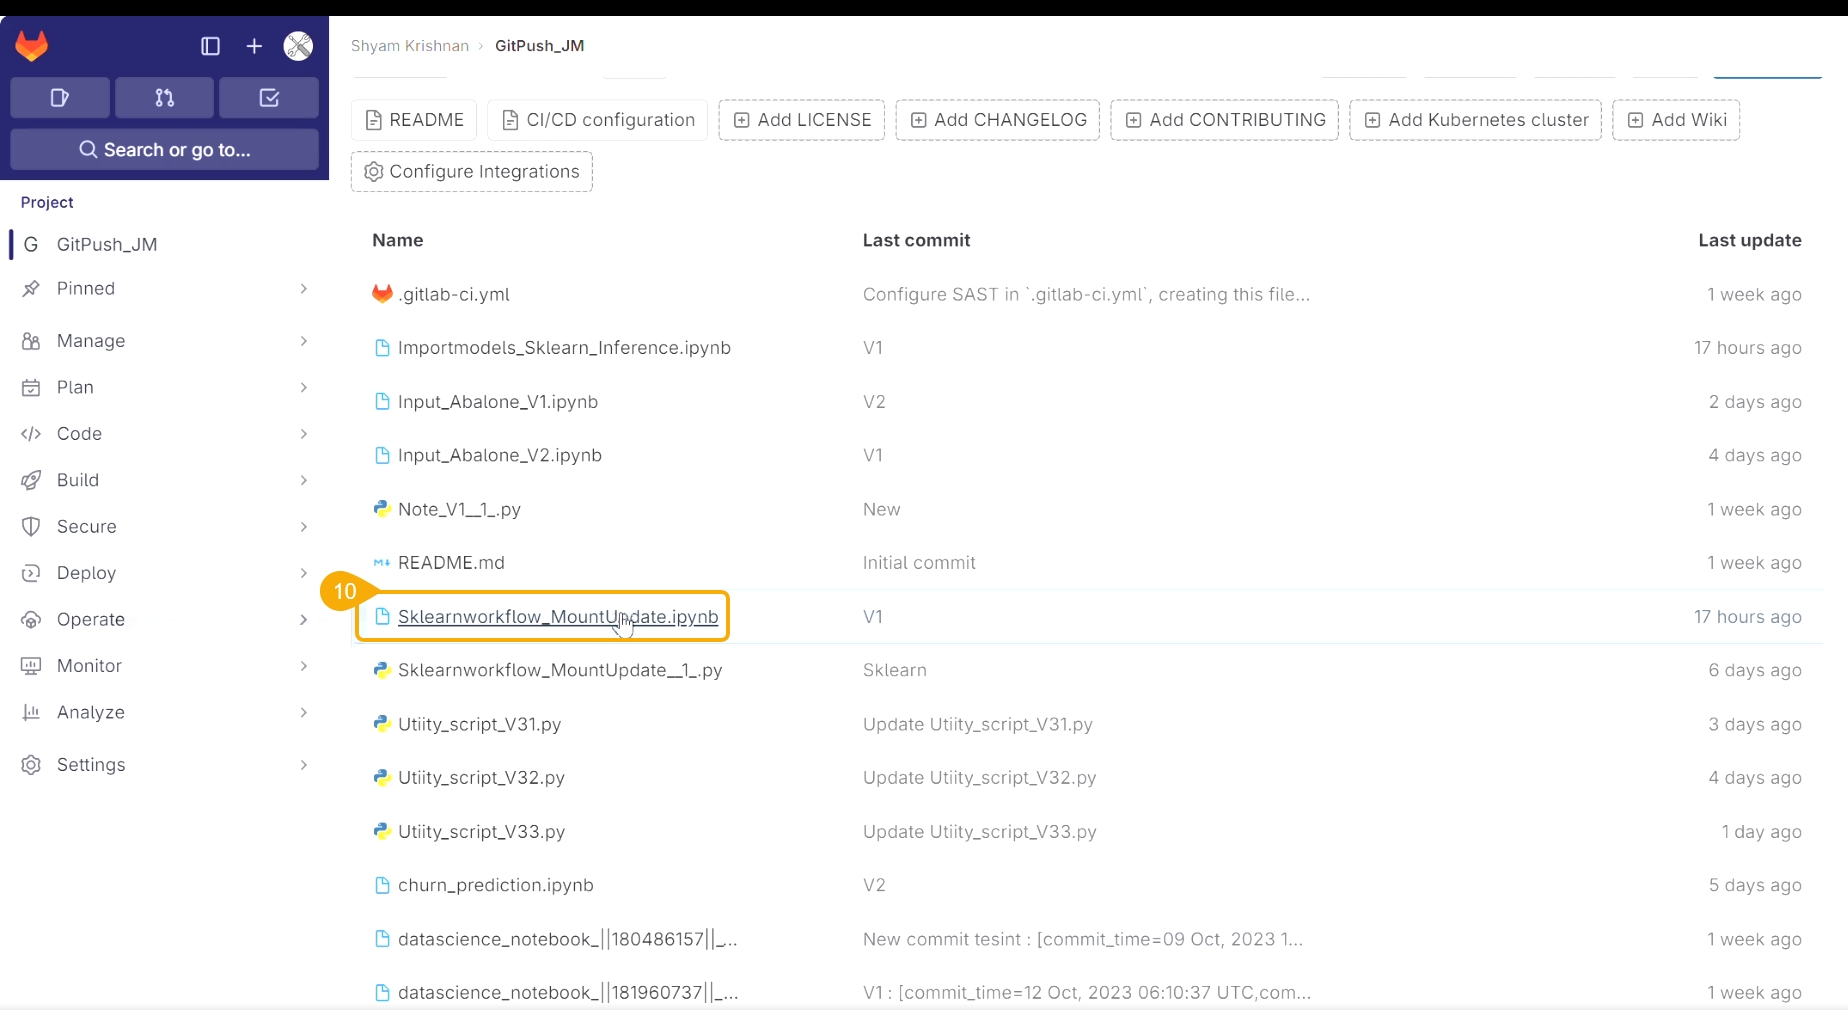
Access the Notebook script from the Git repository.
Open the same script from Git.
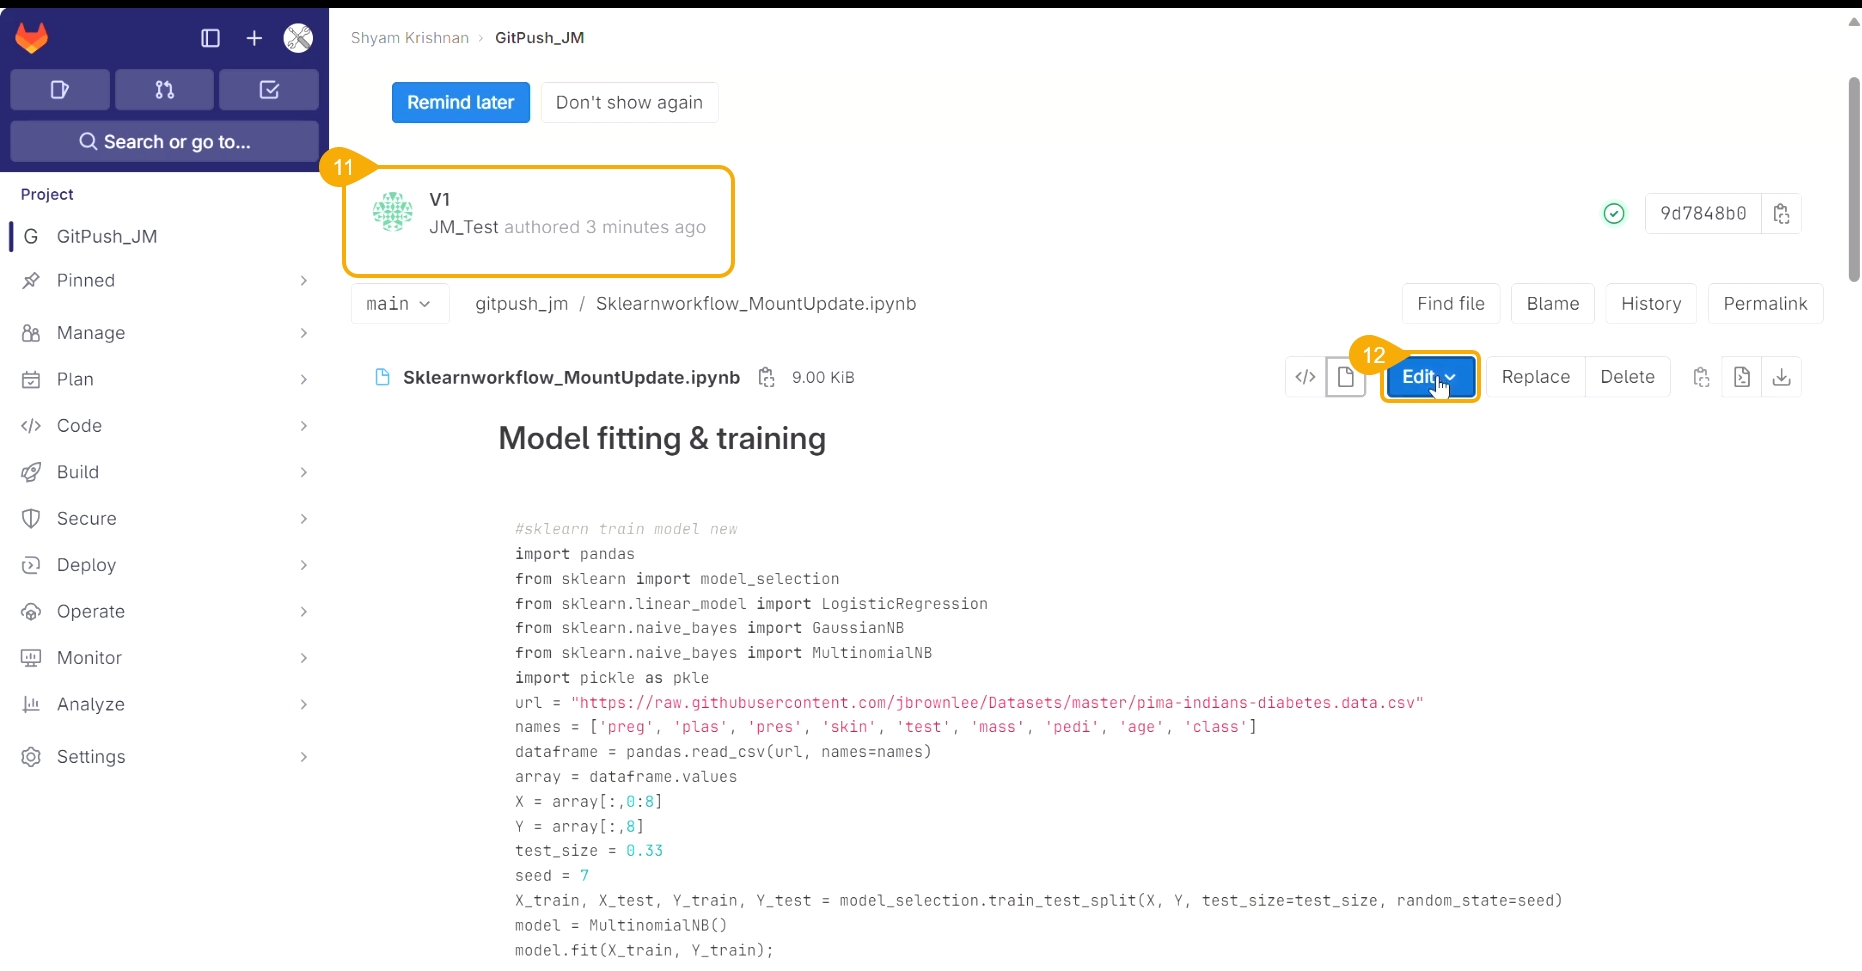
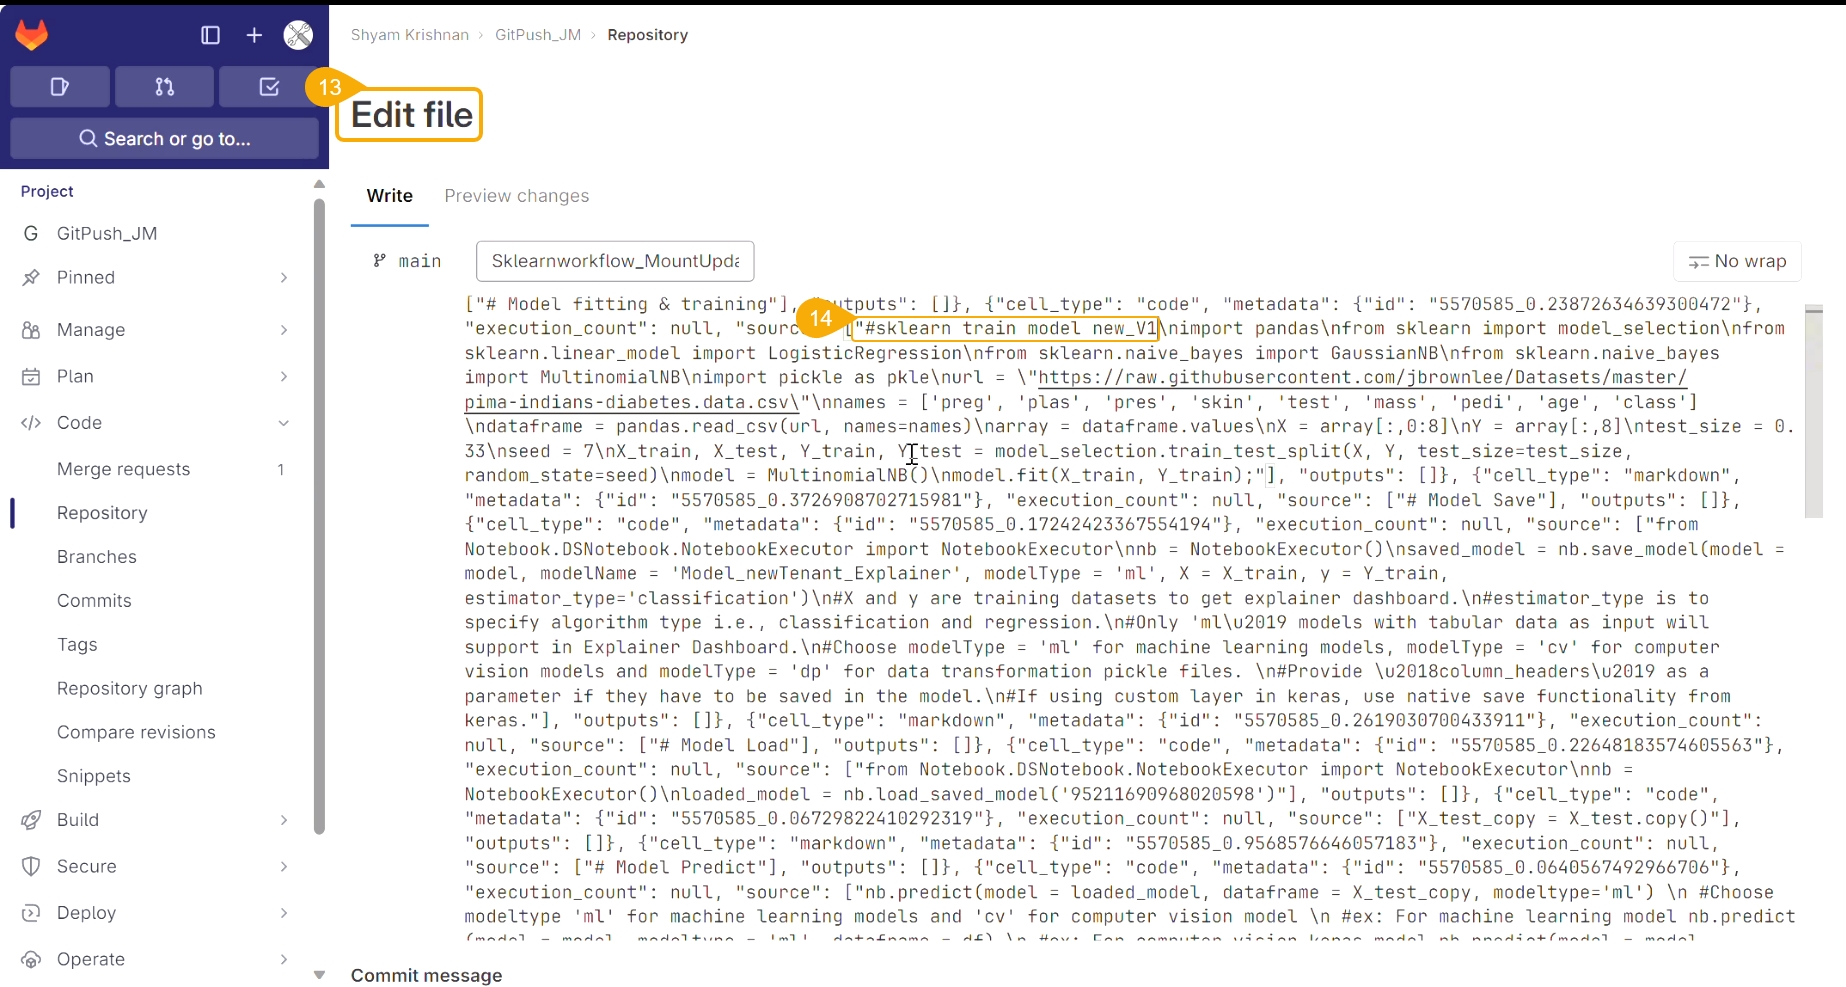
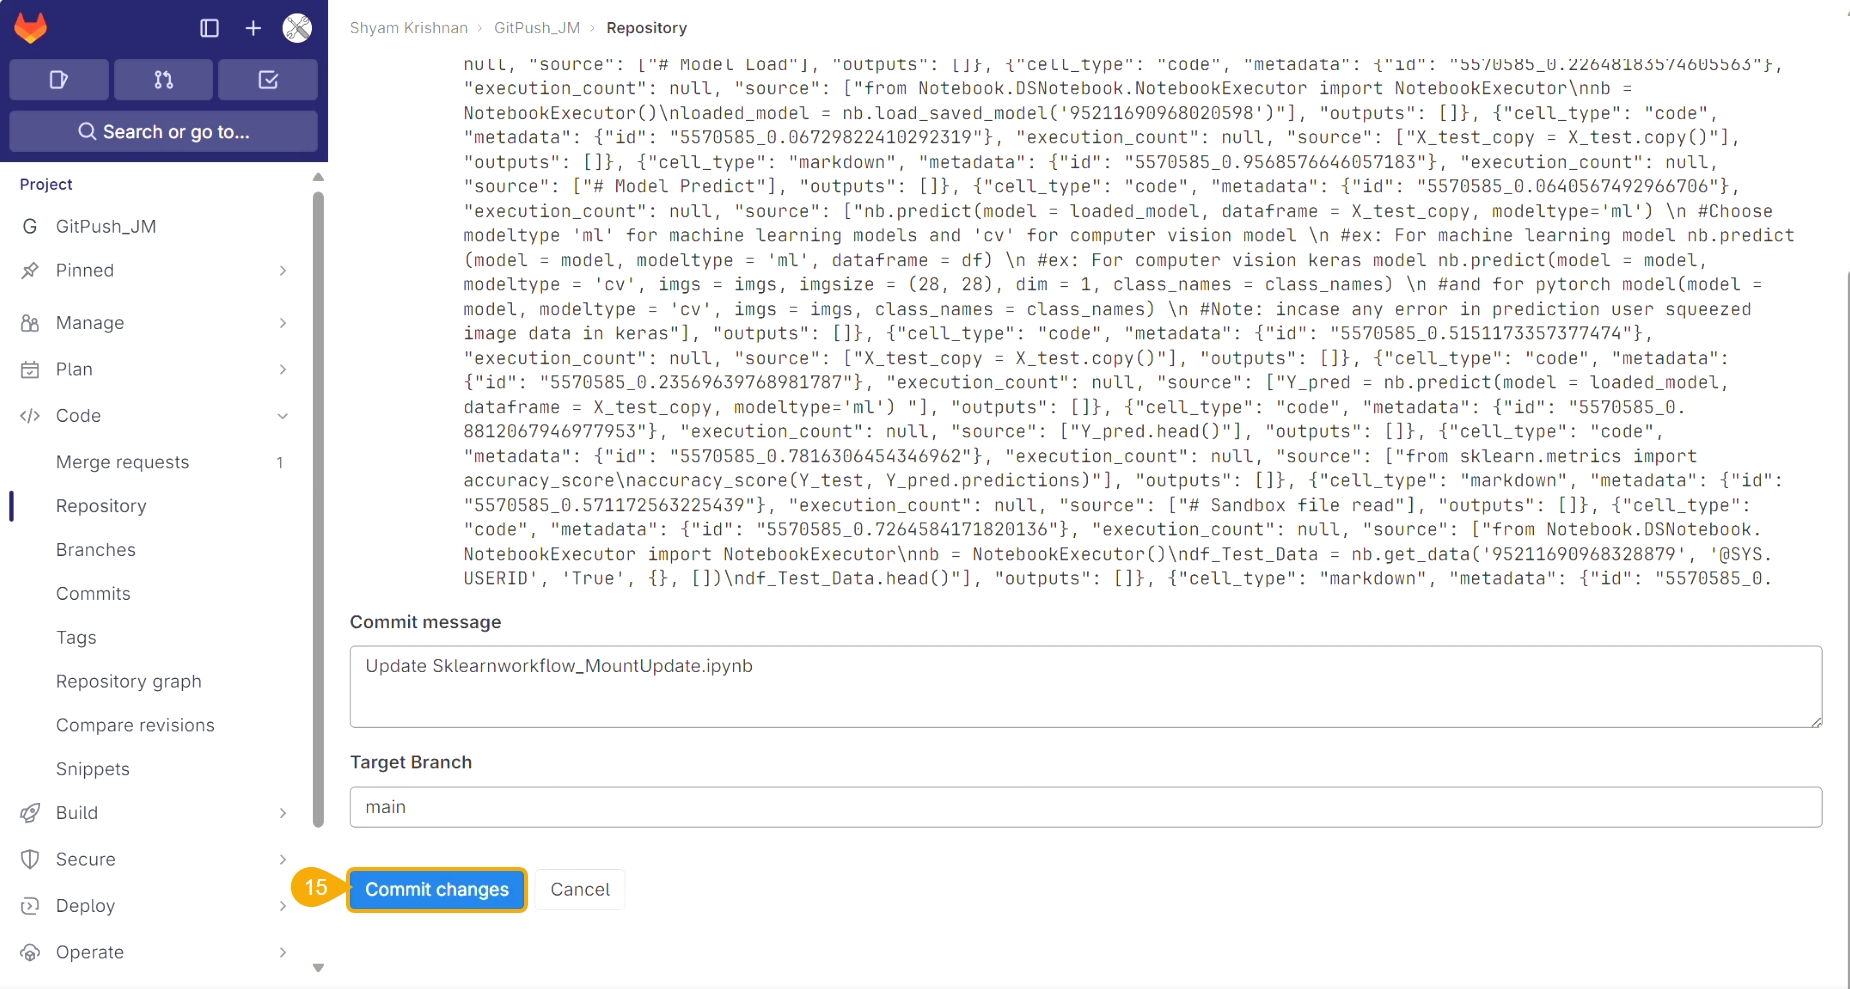
Click the Edit option.
The script opens in Edit file mode.
Modify the script.
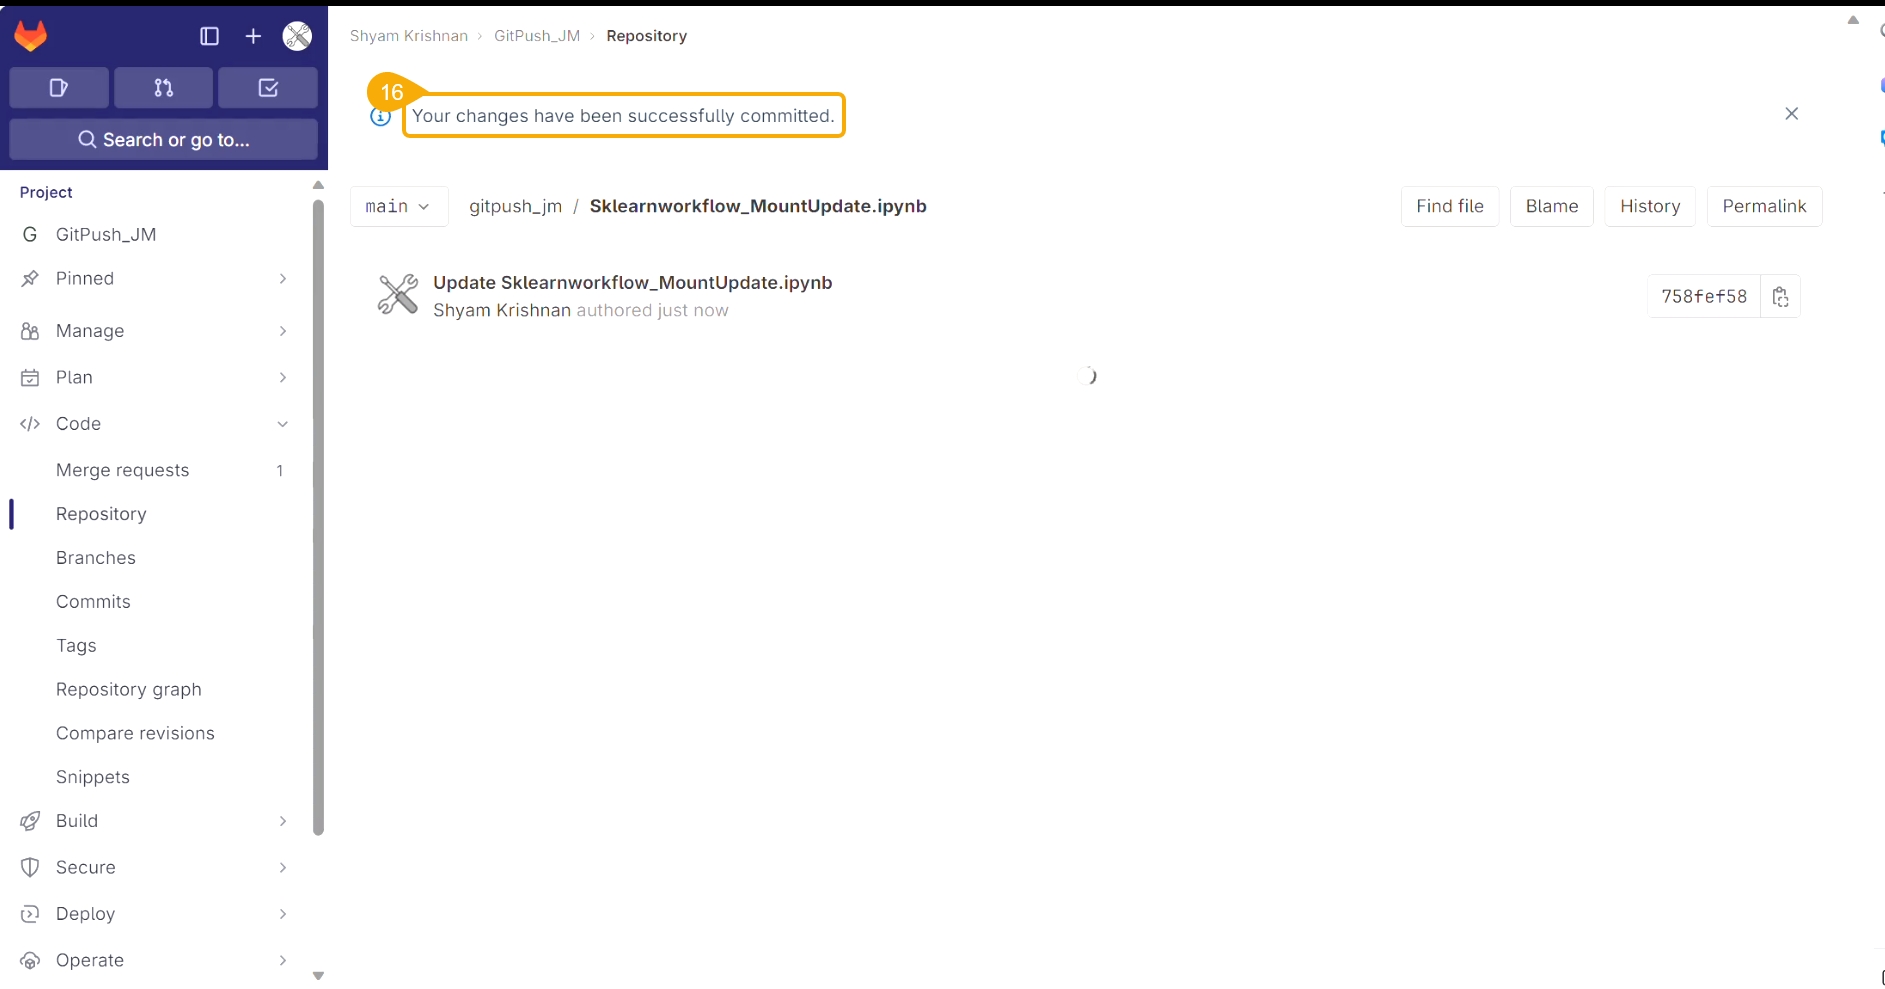
Click the Commit changes option.
A notification message appears to ensure that the changes are successfully committed.
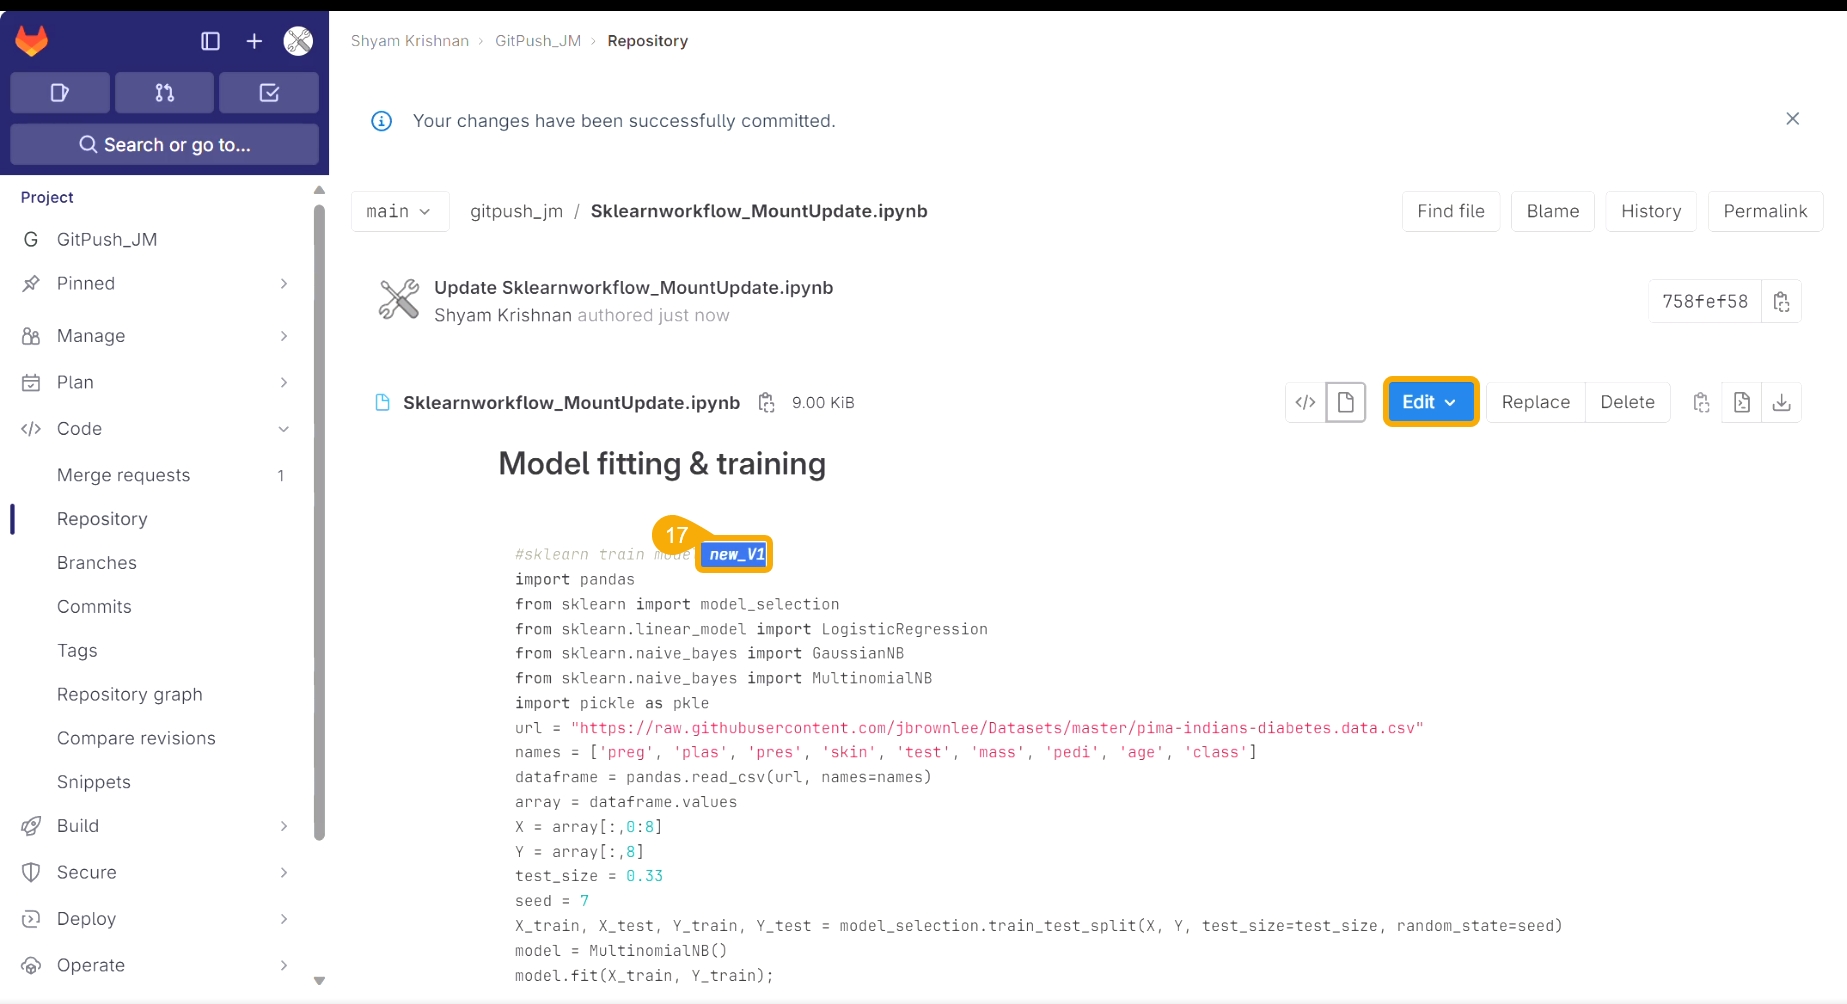
The modification committed in the script gets saved.
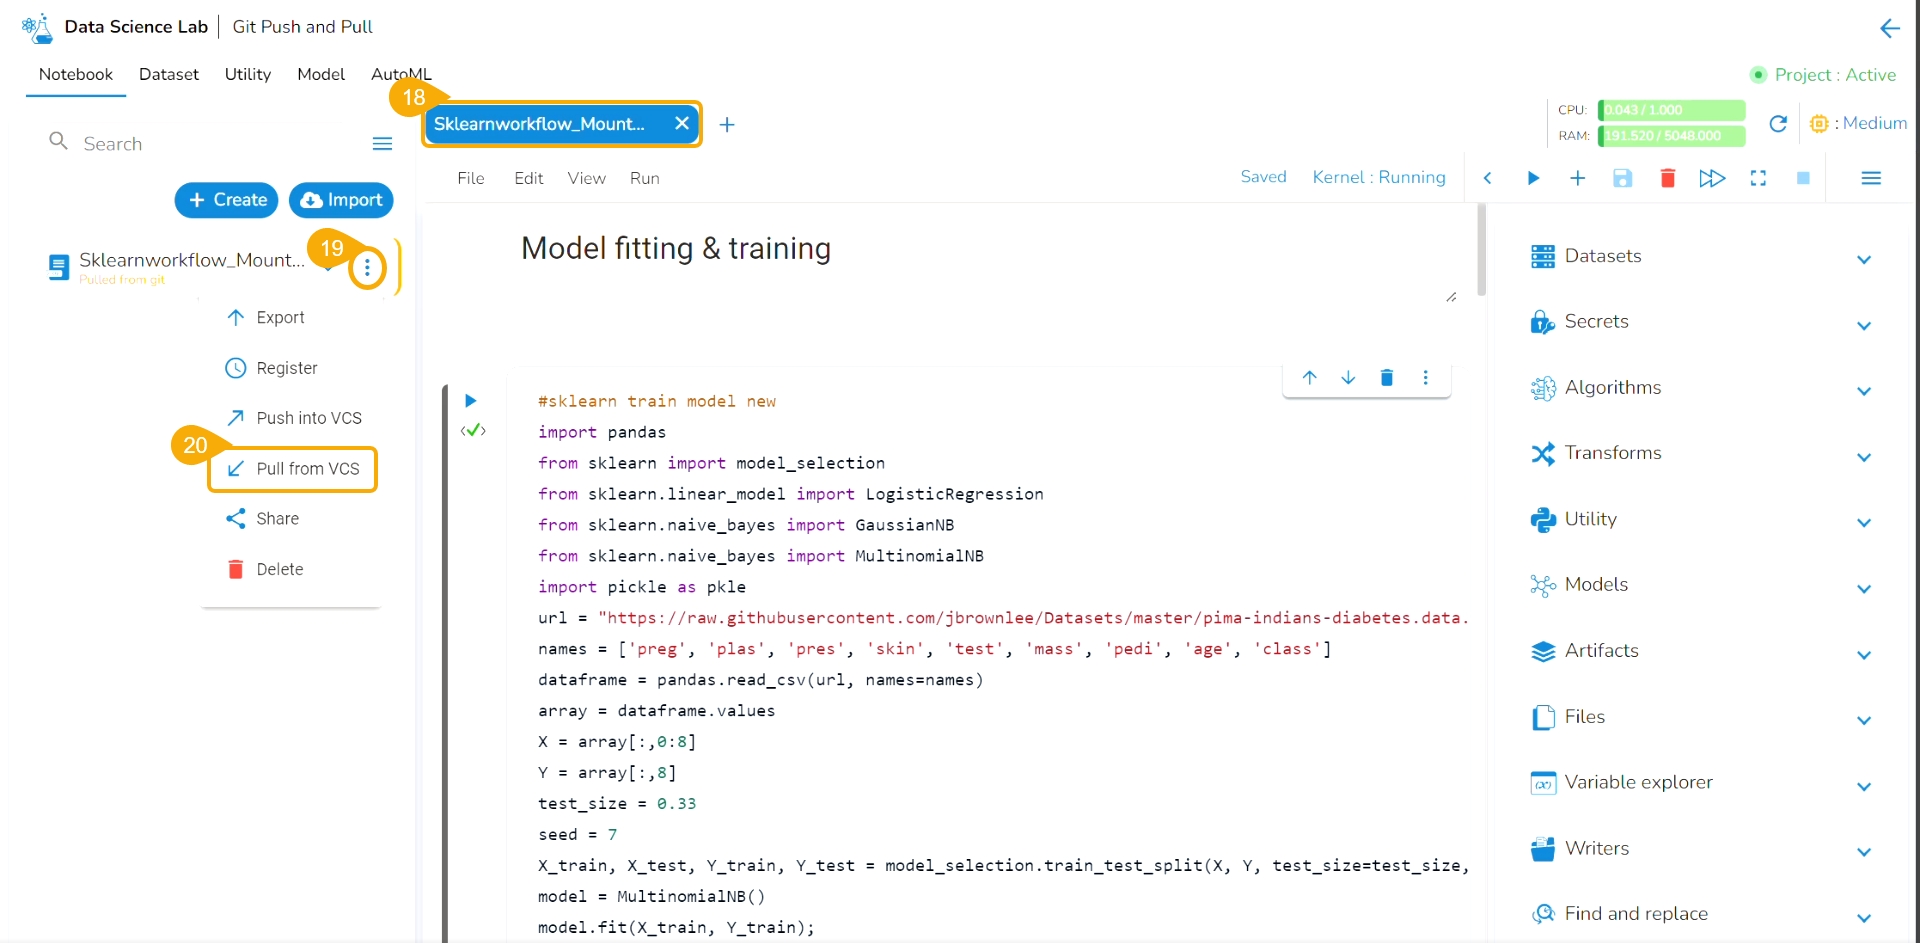
Navigate to the same Notebook.
Click the ellipsis icon to get the Notebook options.
Click the Pull from VCS option.
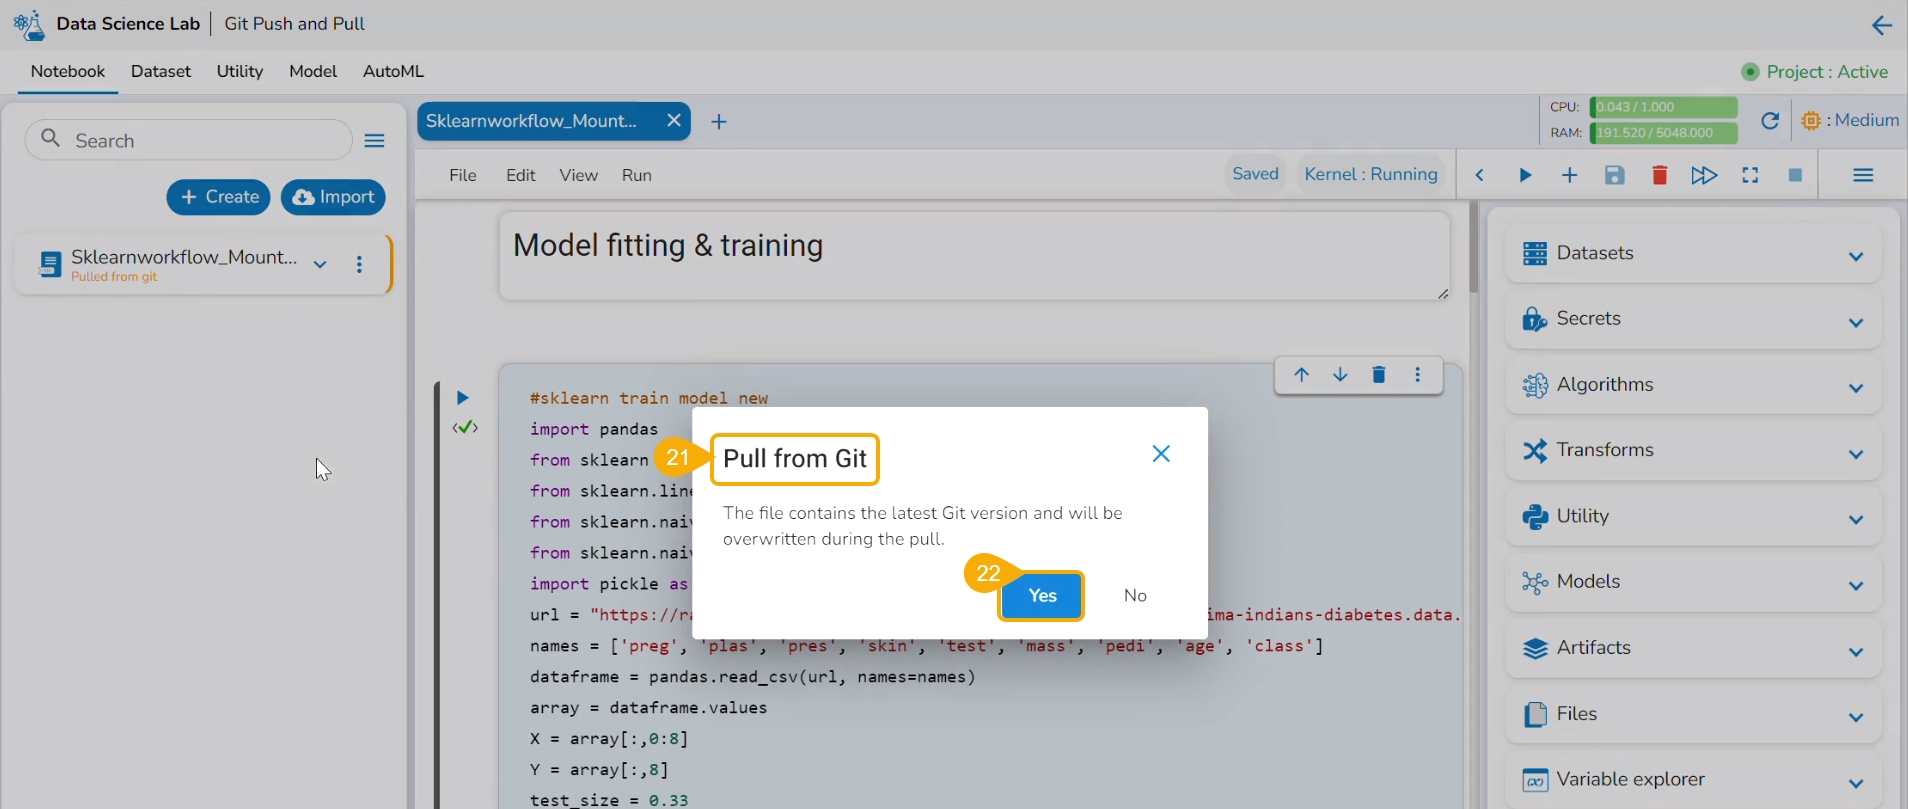
The Pull from Git dialog box opens.
Click the Yes option.
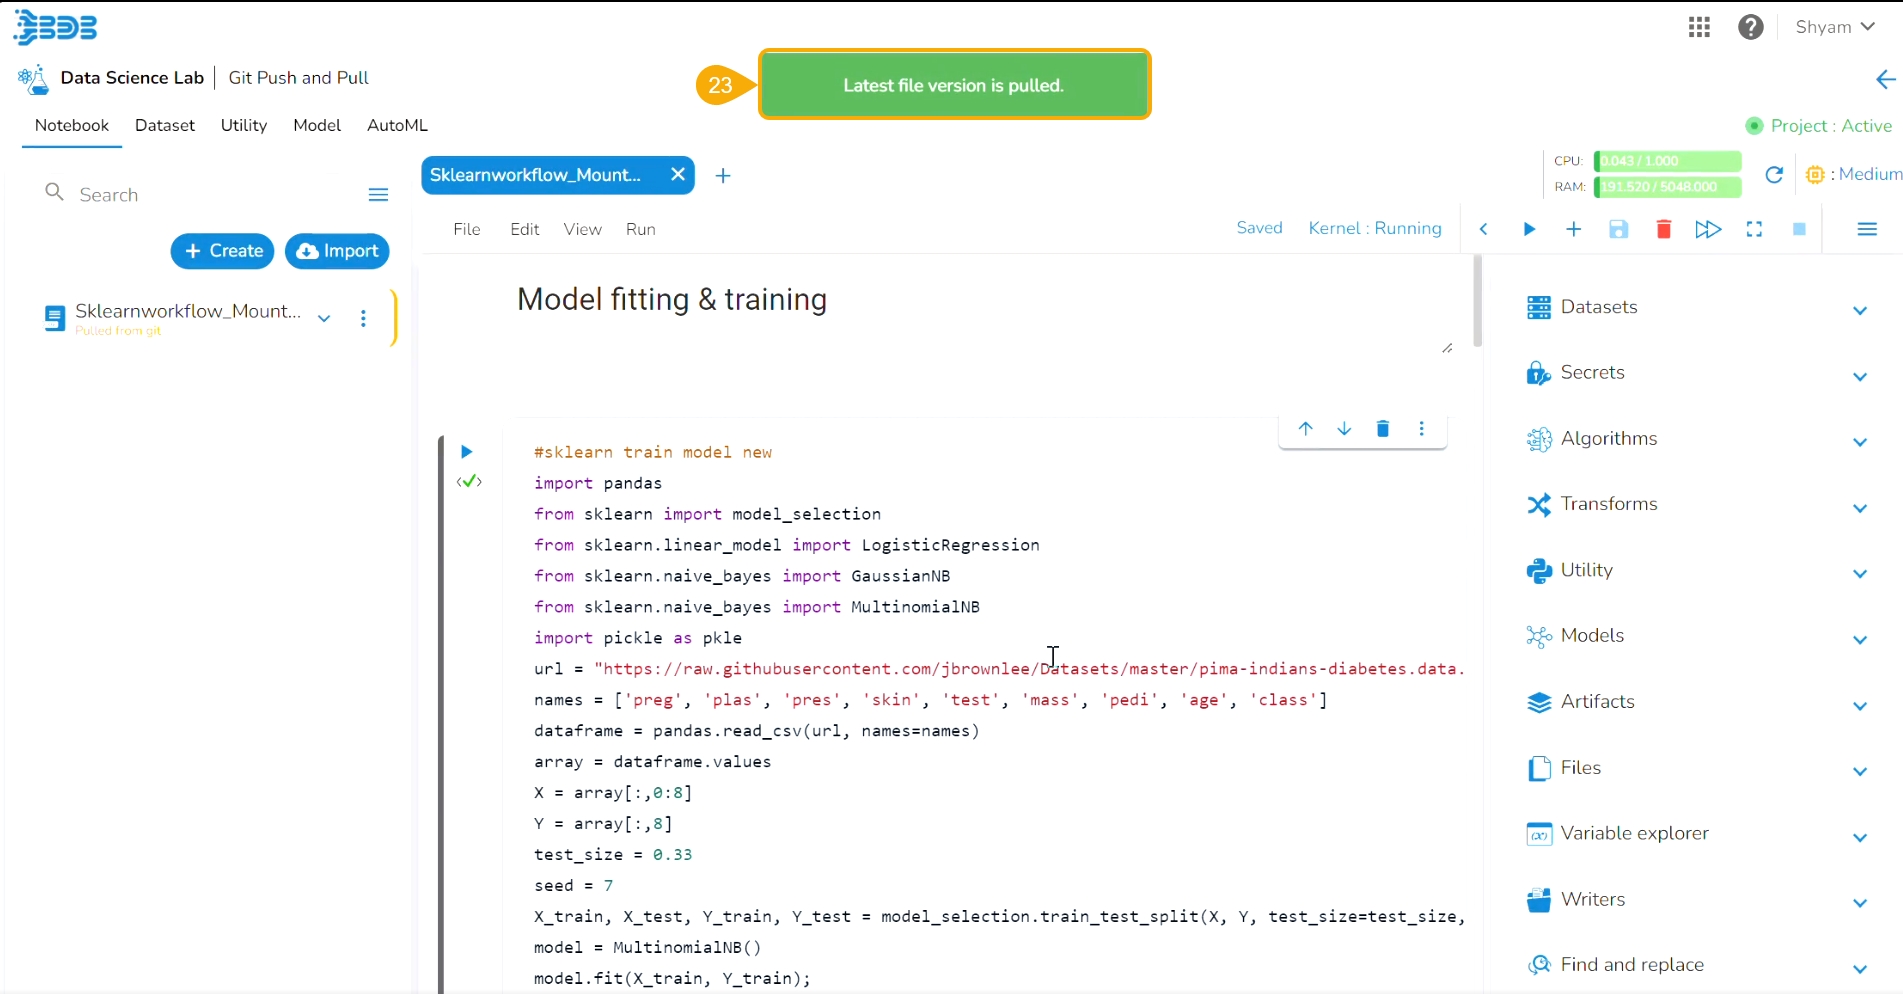
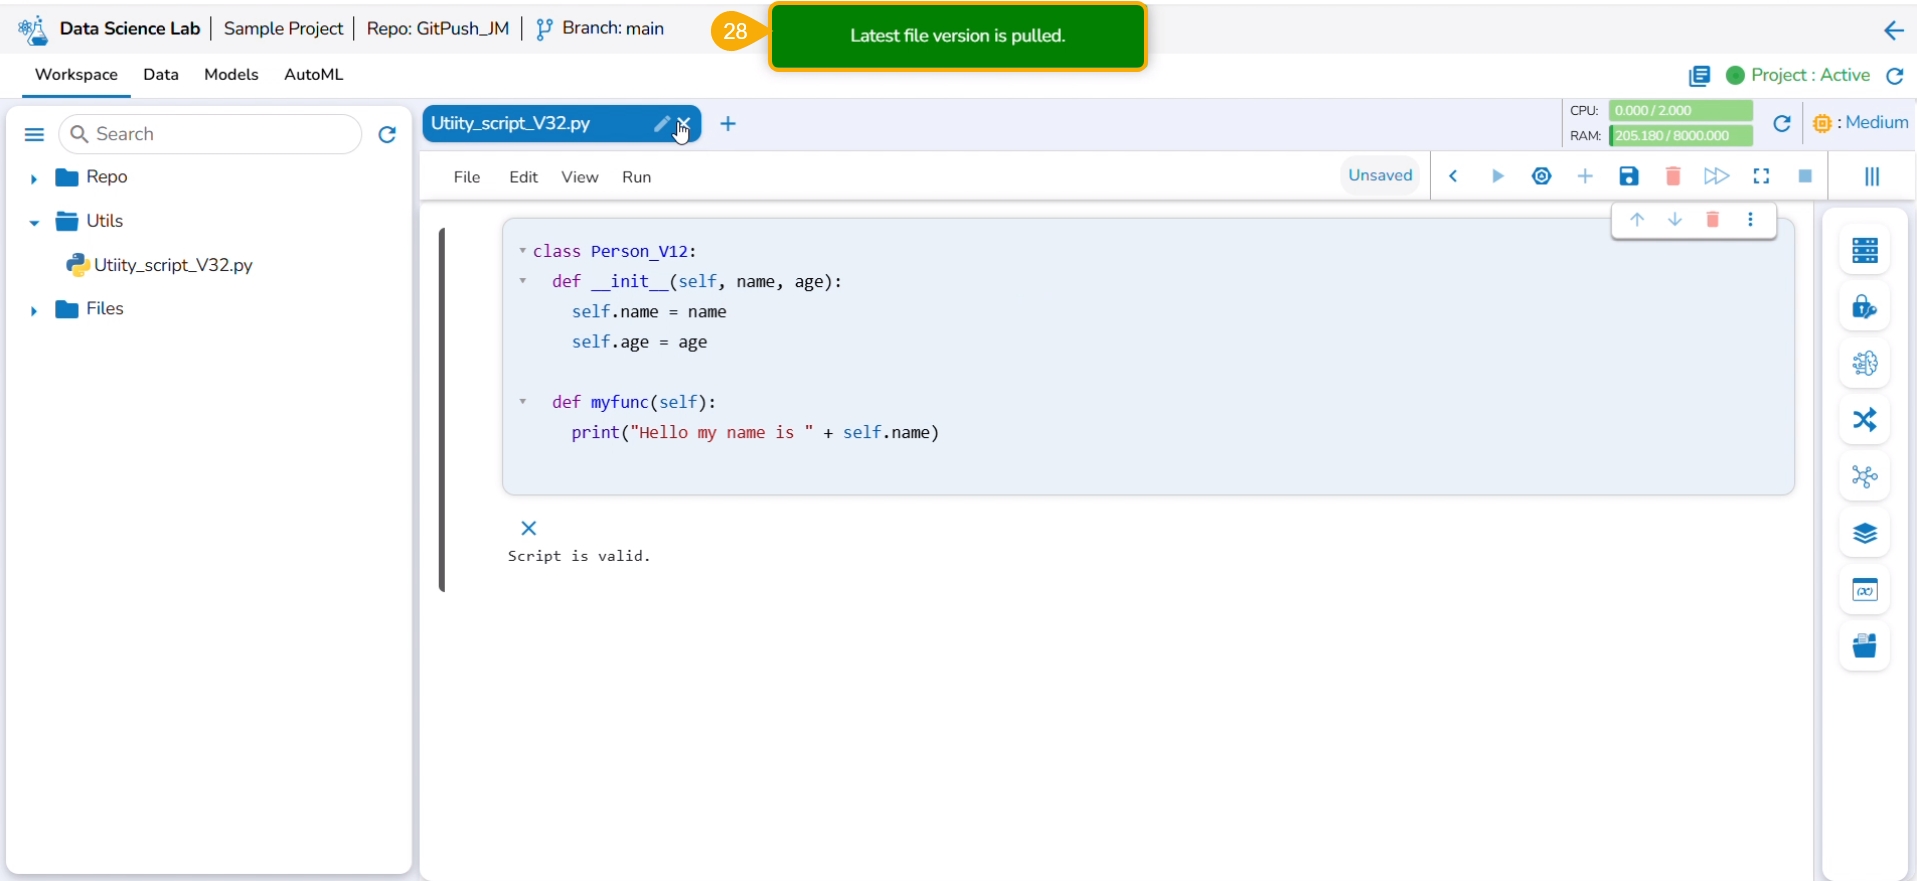
A notification informs the user that the latest file version is pulled.
Another notification message informs the user that the pulled Notebook is started.
The latest/ modified script gets updated.
Push pre-requisites:
The user branch should have Developers' and maintainers' permission to push the latest code into the Main branch.
The User token has to be set in the user profile using the Custom Fields setting available at the Admin level.
The user token key name has to be 'bdbvcstoken'.
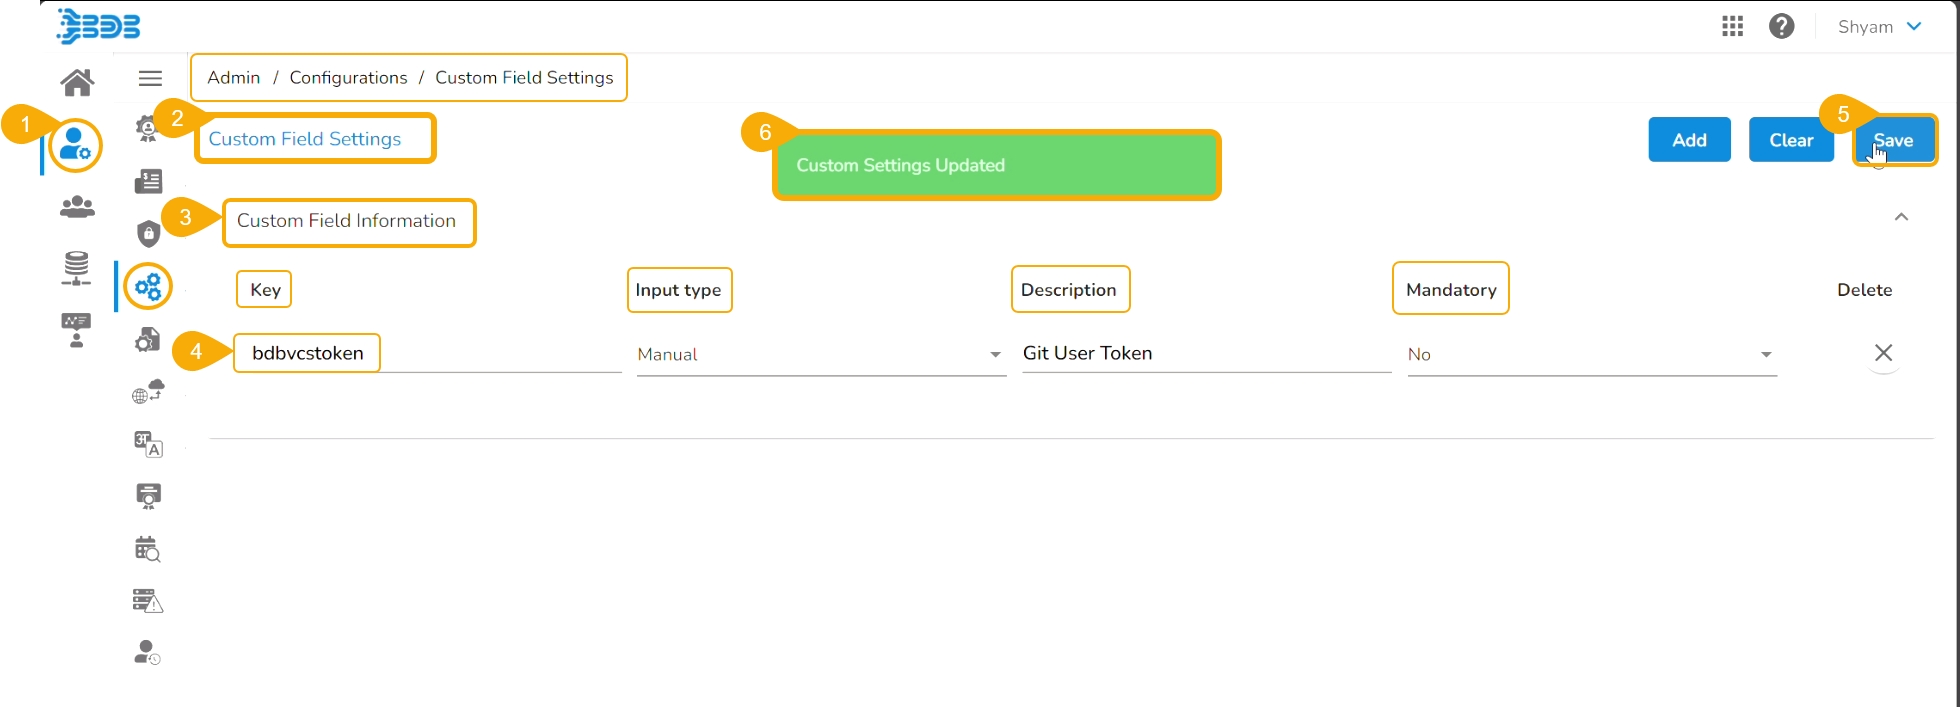
Navigate to the Admin module.
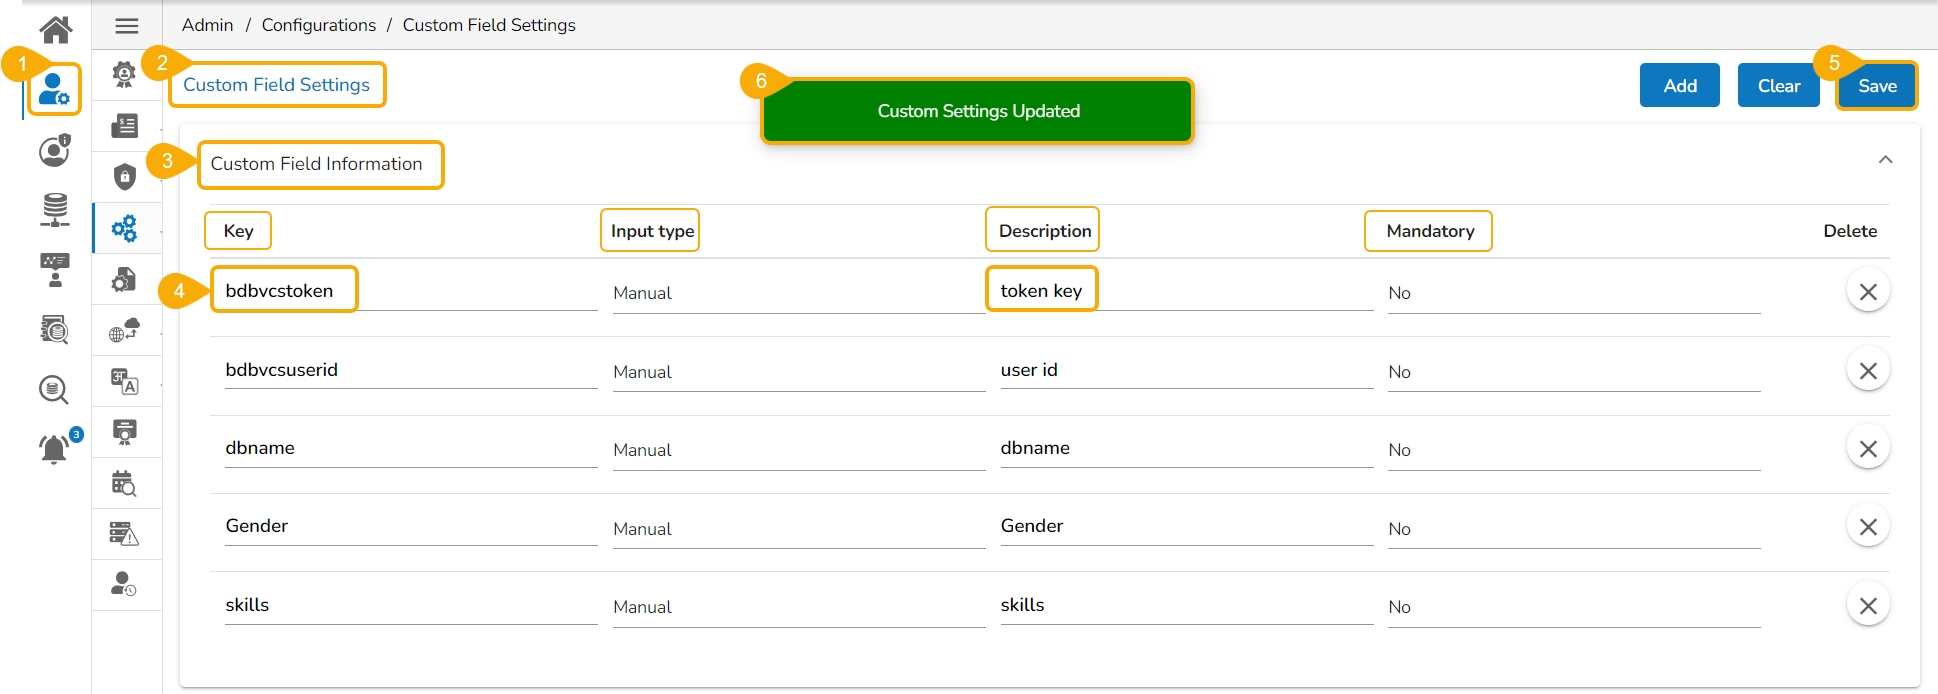
Open the Custom Field Settings under the Configurations option.
The Custom Field Information appears.
Provide the following information for the custom field:
Key- bdbvcstoken
Input type - Manual
Description - Git User Token
Mandatory - No
Click the Save option to save the modified Custom Field Settings.
A notification message appears to inform the user that the custom field settings are updated.
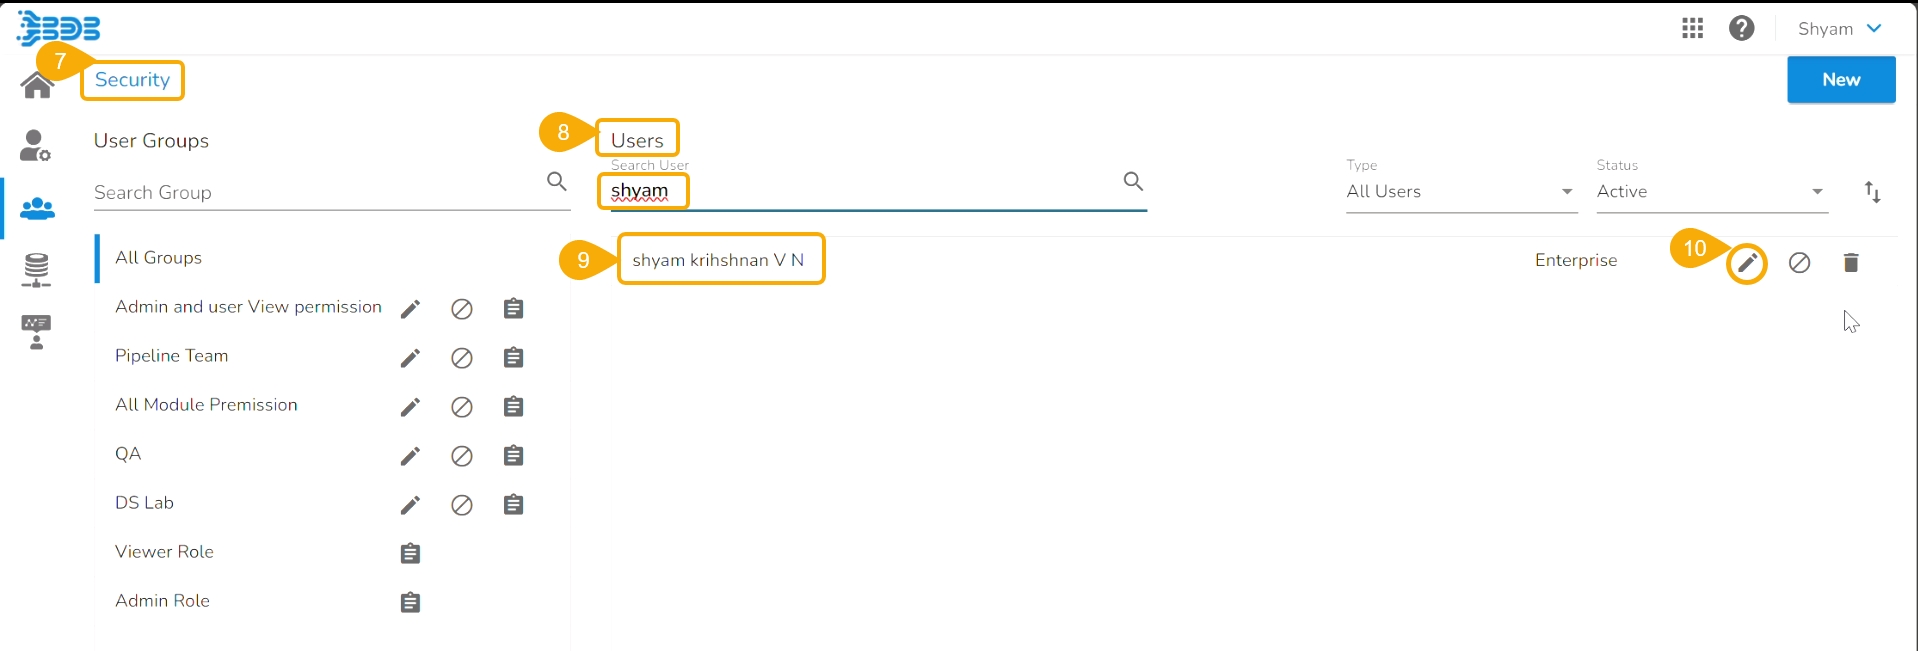
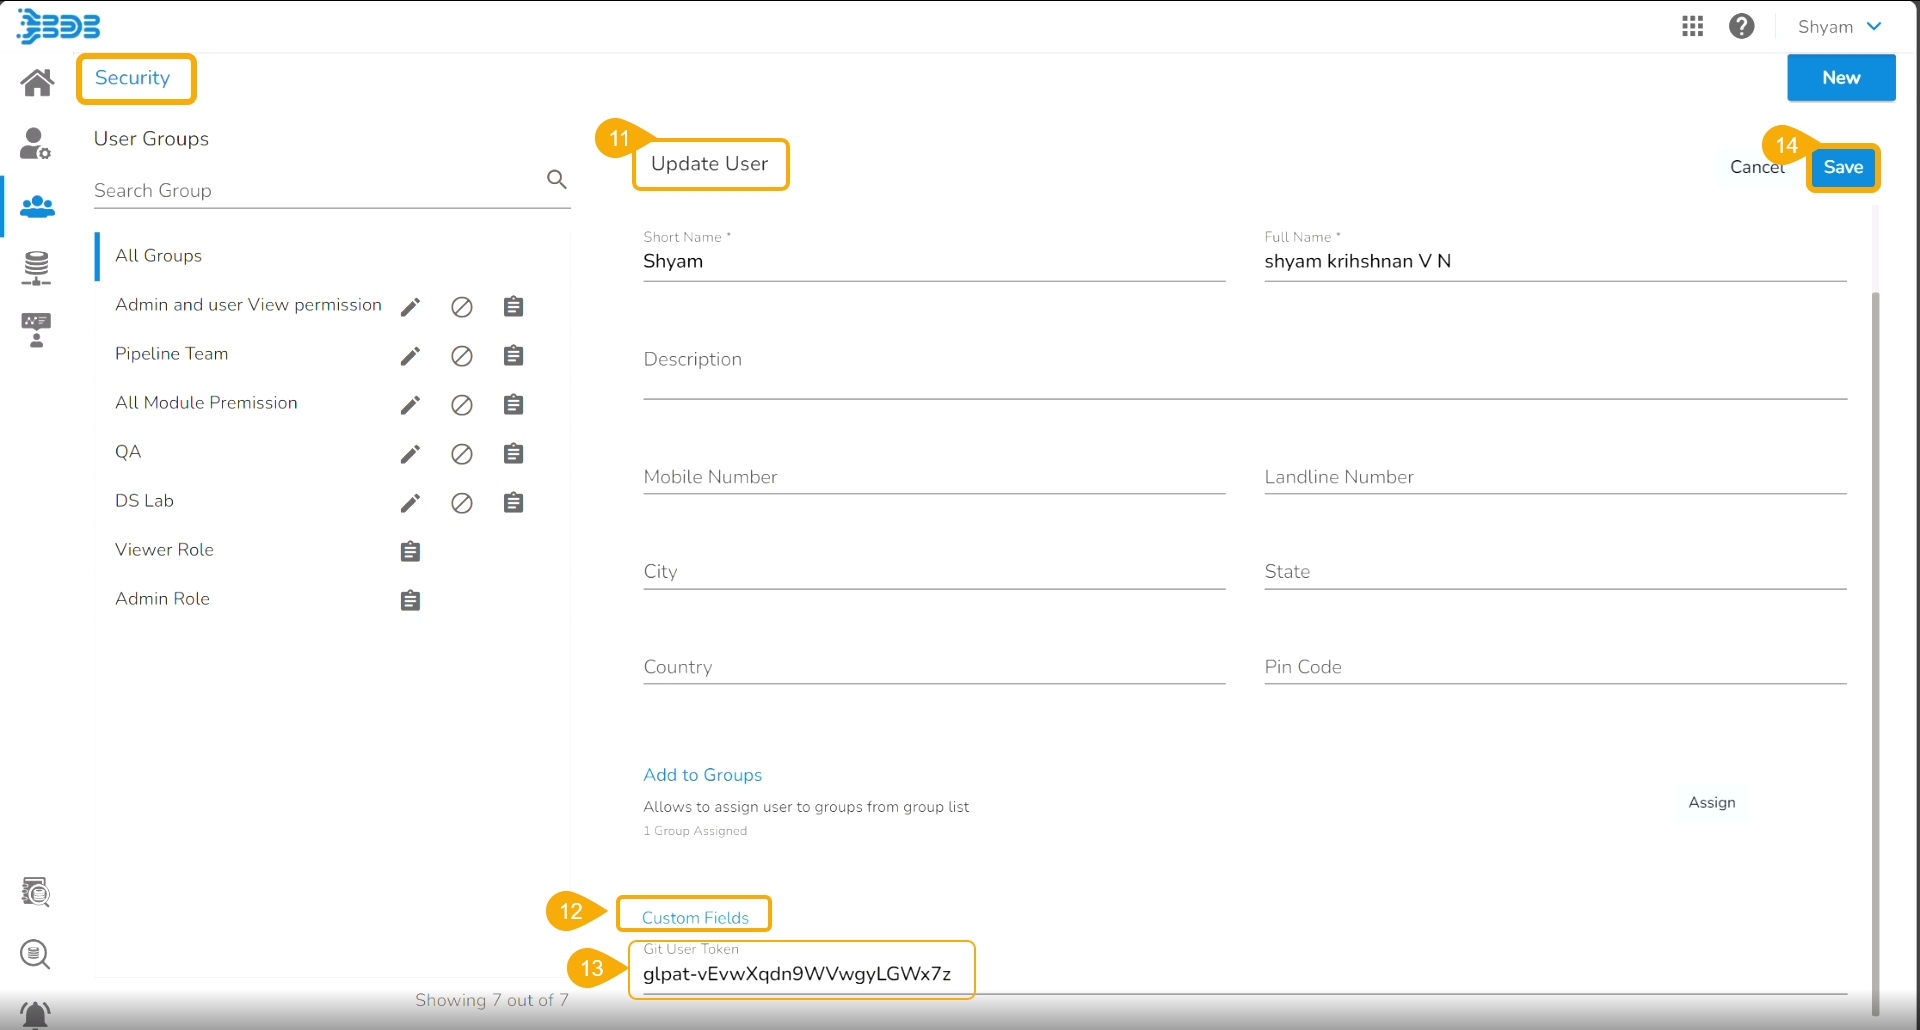
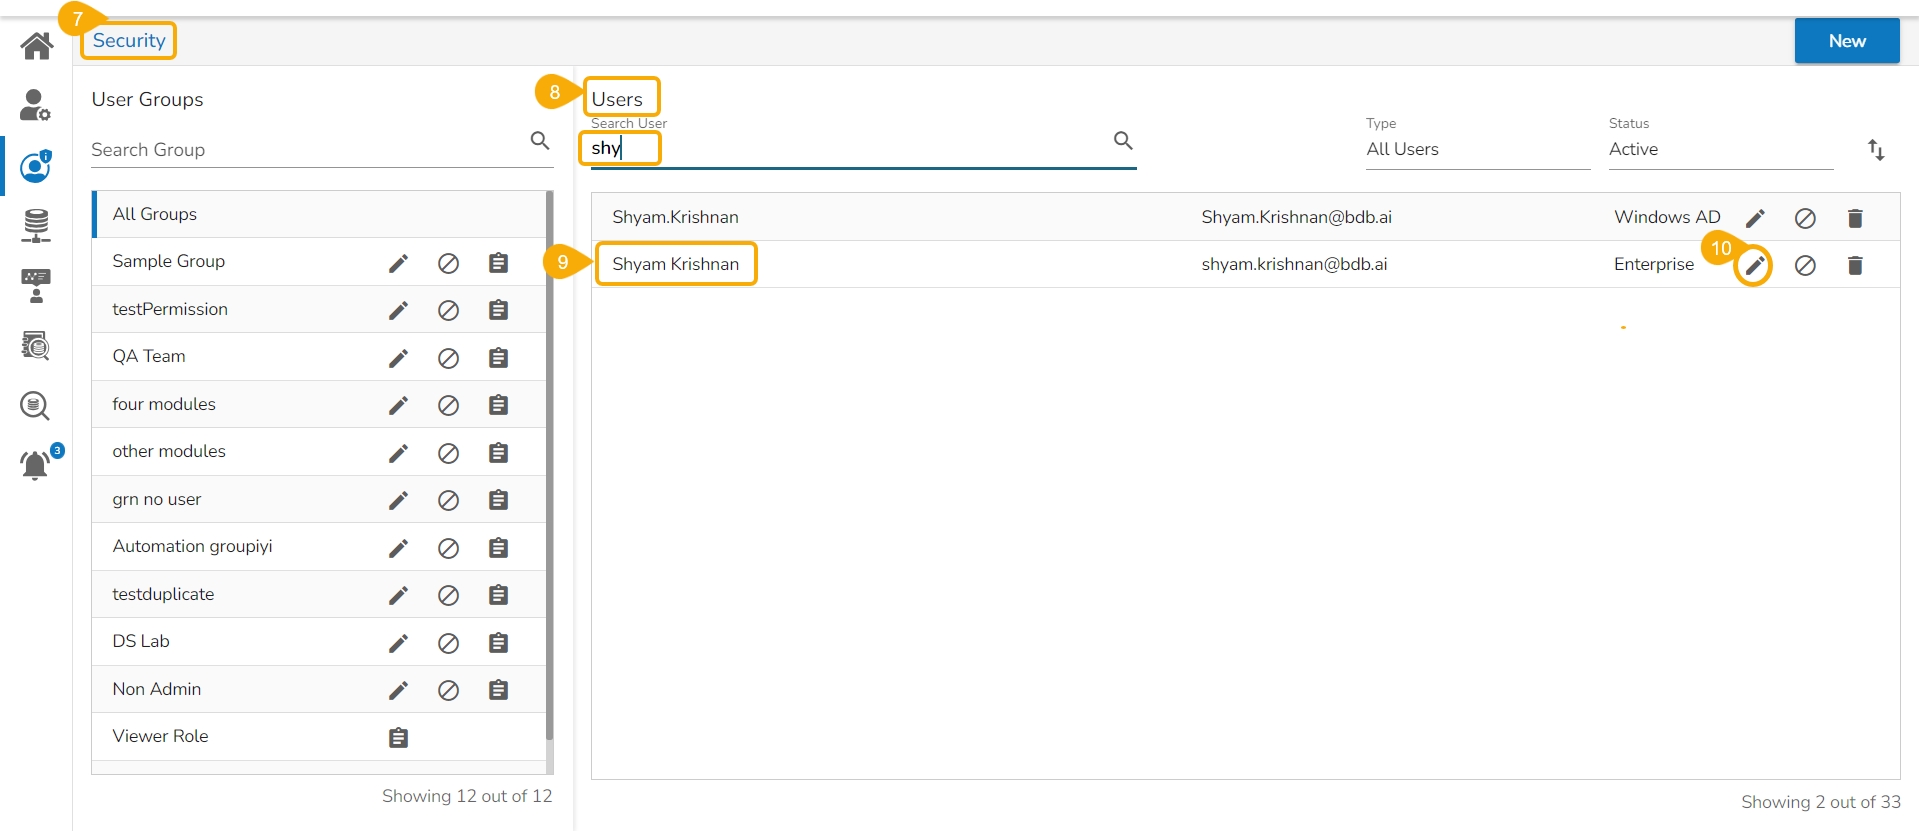
Navigate to the Security module.
Go to the Users list.
Select the user from the list.
Click the Edit icon.
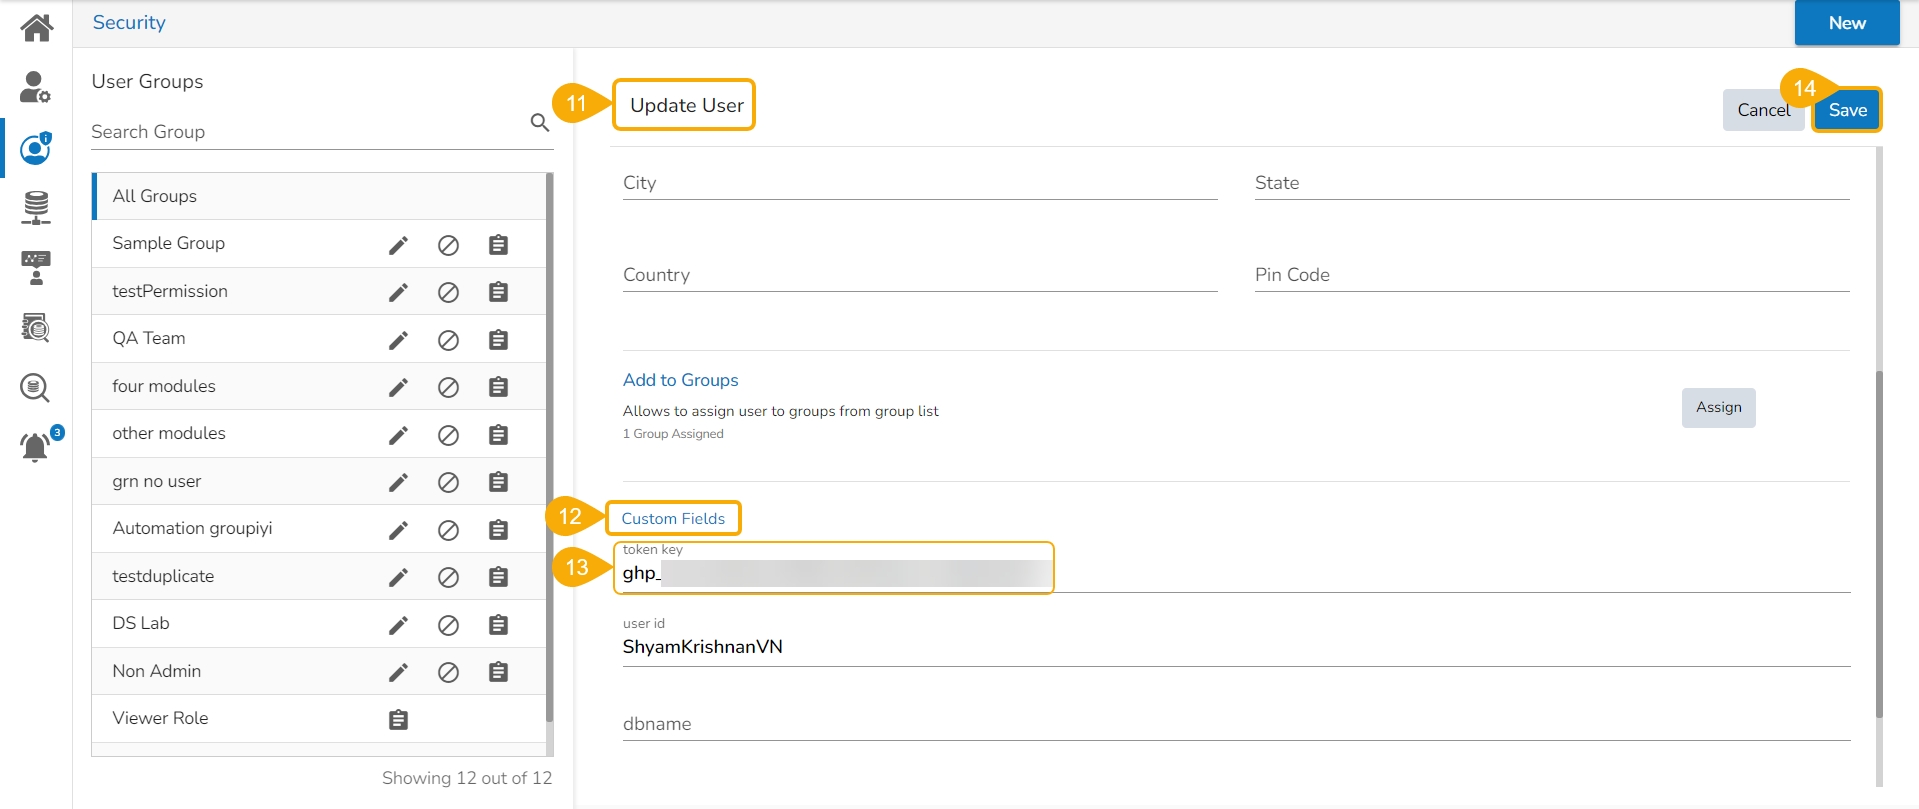
The Update User page opens.
Check out the Custom Fields section.
Validate whether the Git User Token is valid or not. If not provide the valid Git User Token.
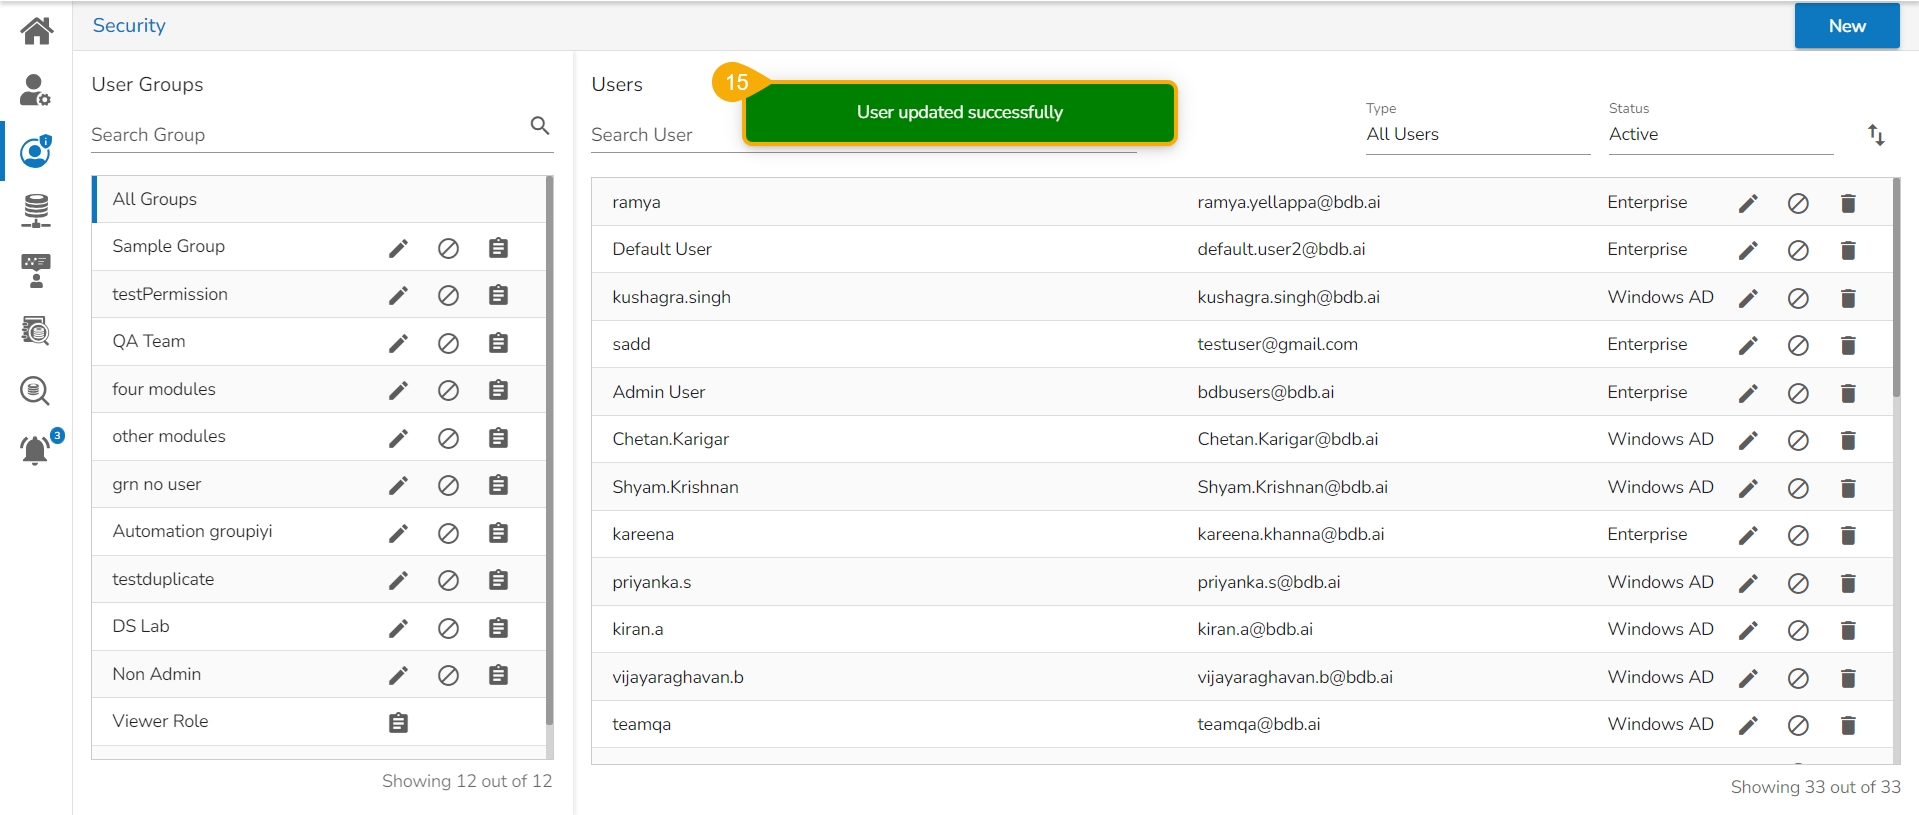
Click the Save option.
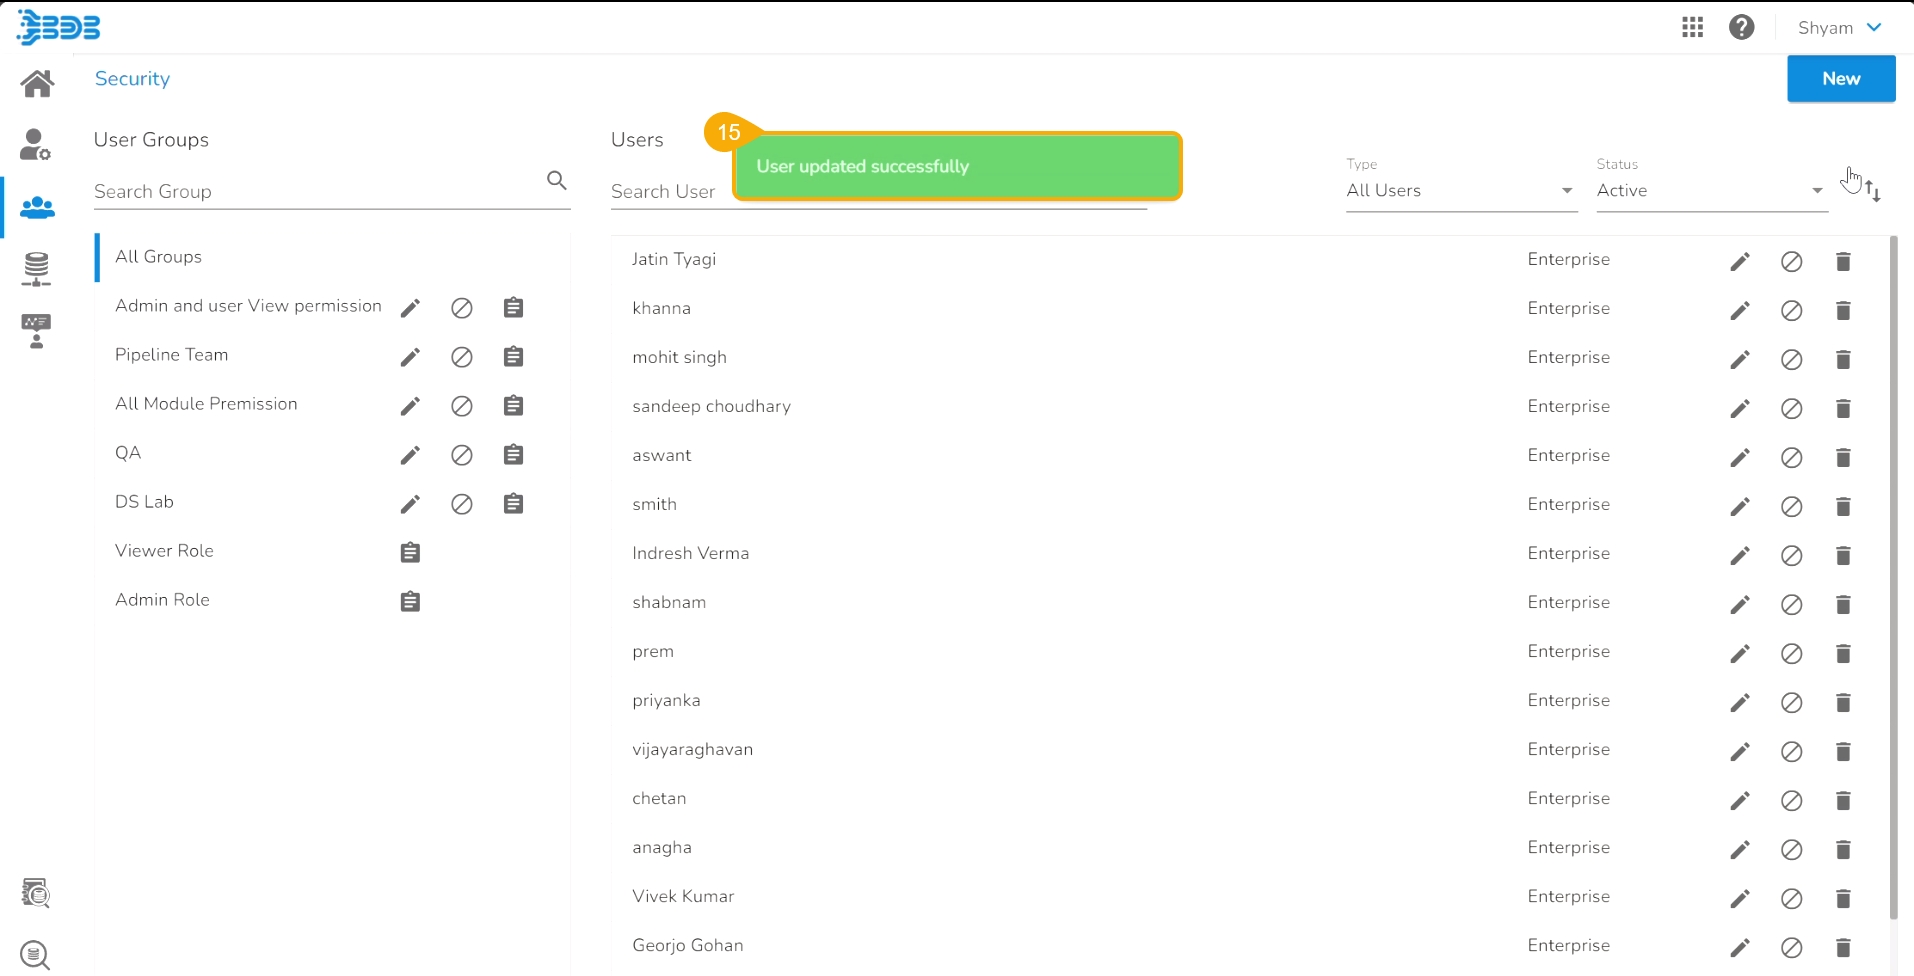
A notification message appears to inform that the user is updated successfully.
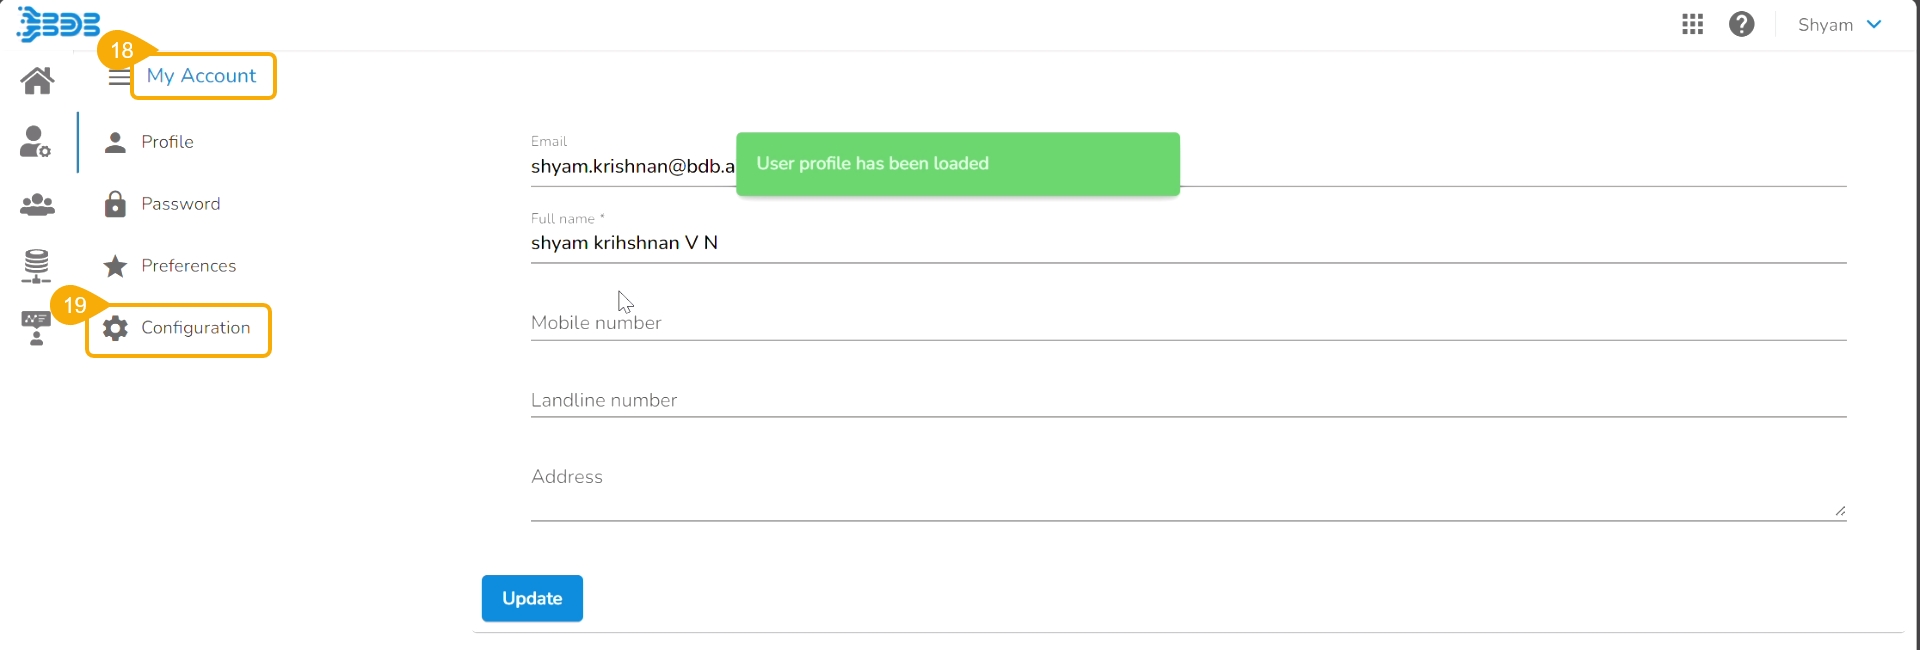
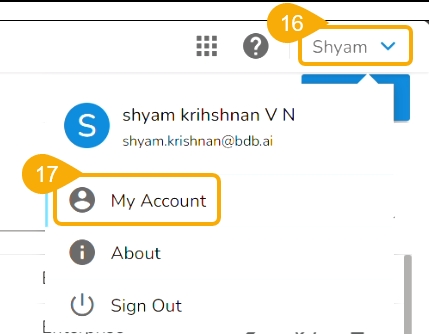
Open the User Profile.
Select the My Account option.
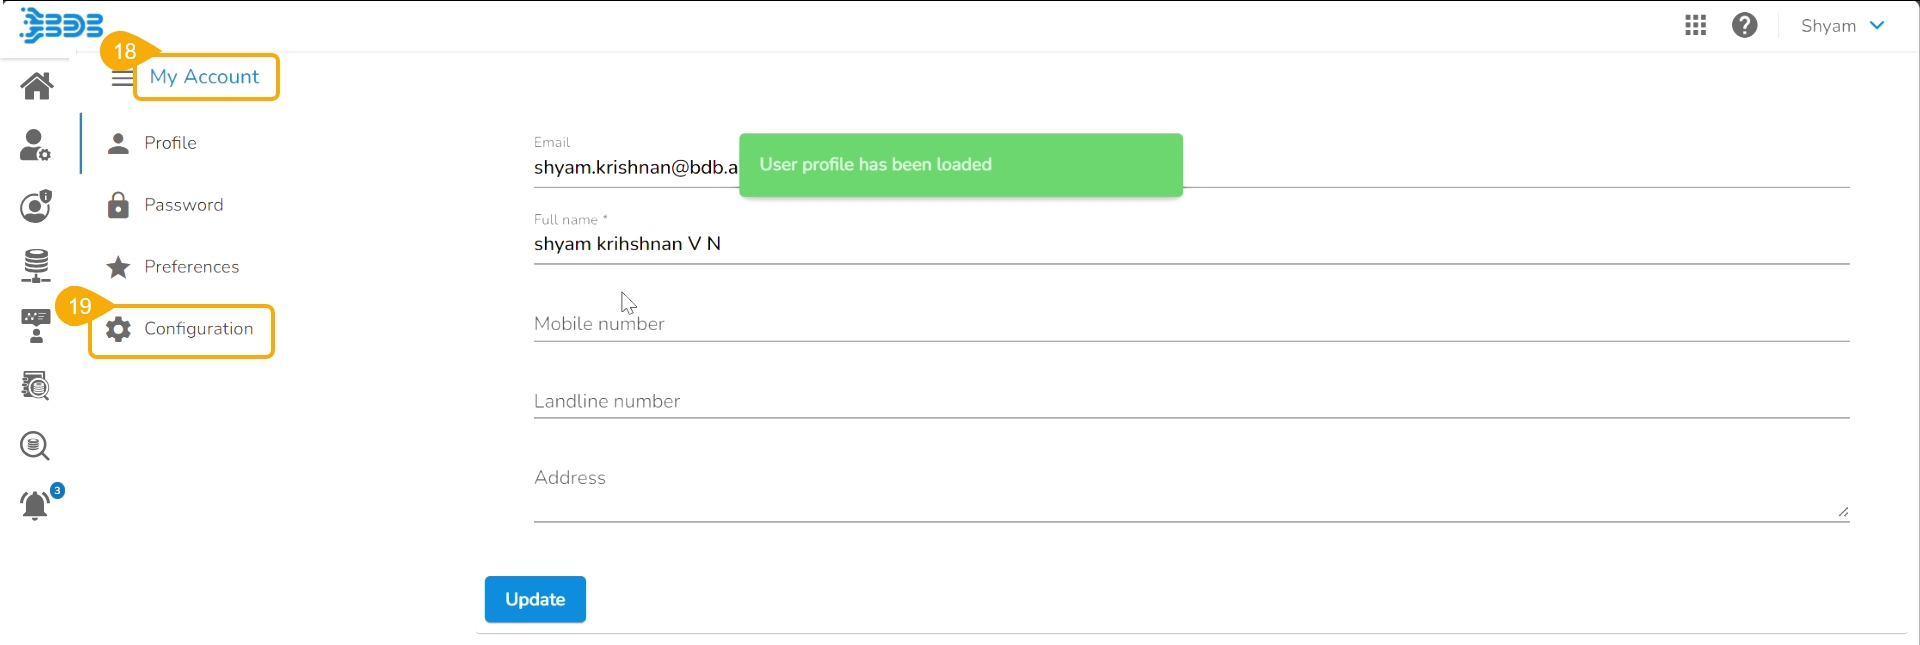
The My Account details are displayed.
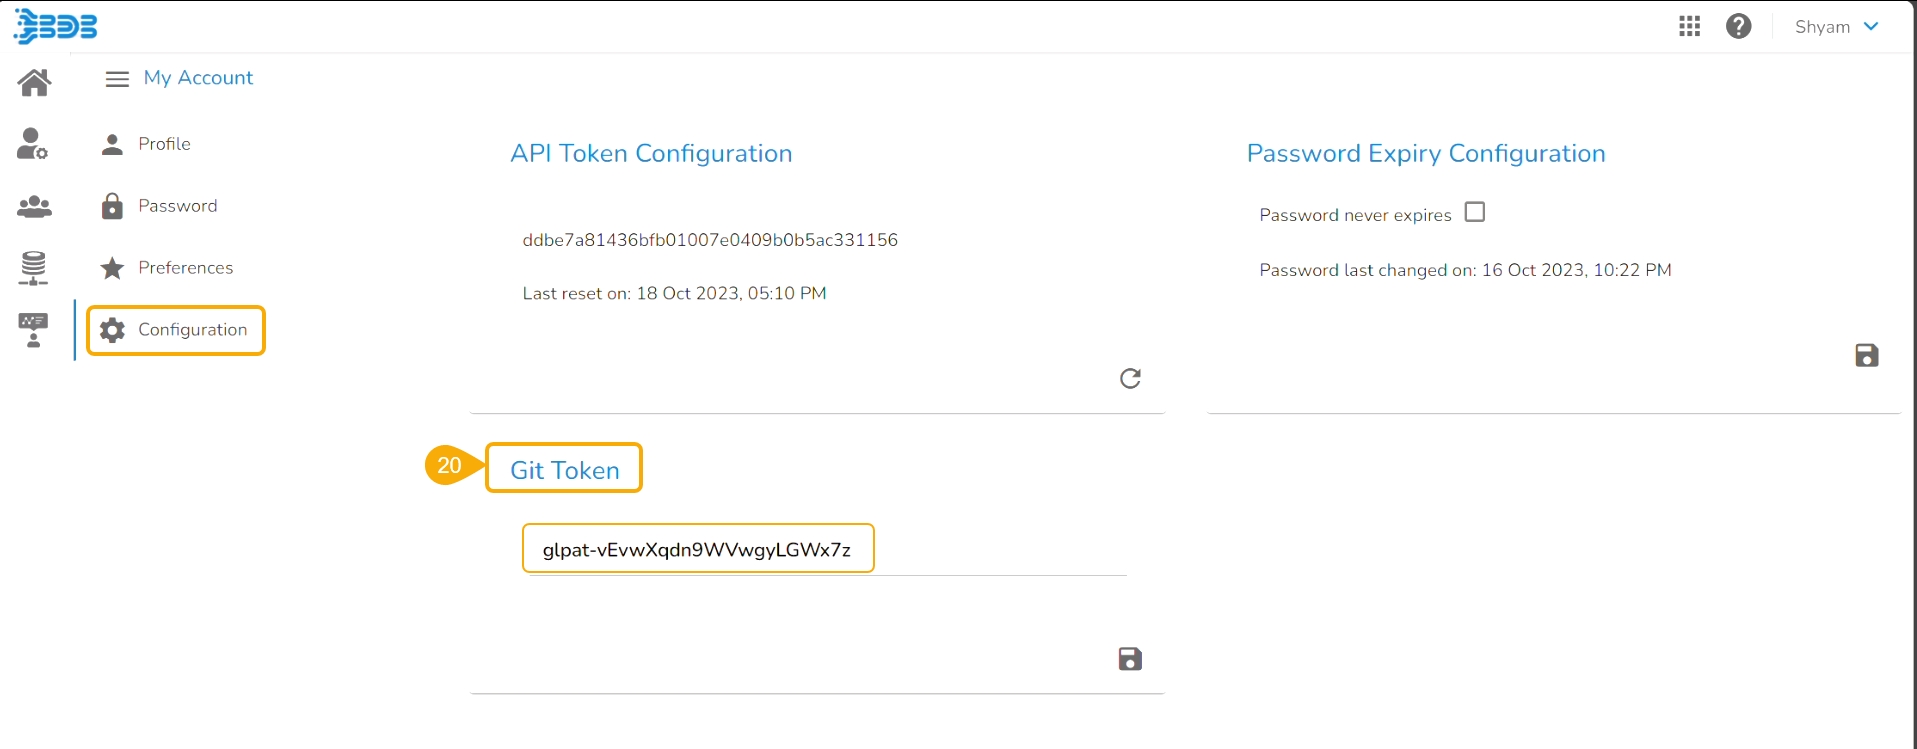
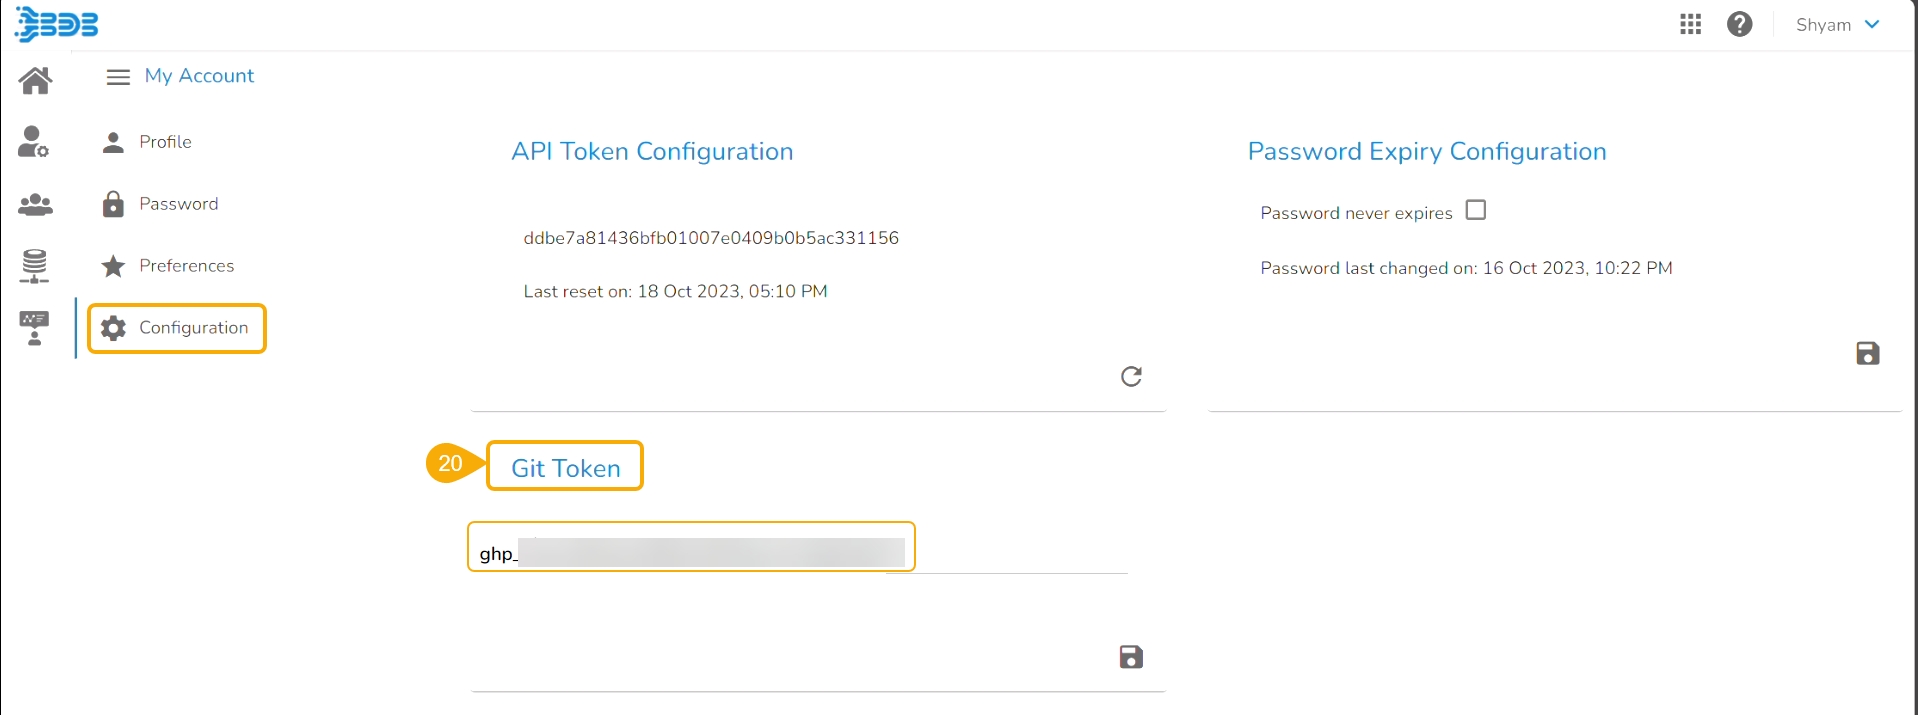
Open the Configuration option.
The same token gets updated under the Git Token section which was provided under the Configuration section.
Please Note: Before using the Push a file to Git functionality make sure that the following requirements are fulfilled:
The latest file is pulled into DS Lab before modifying and pushing back to the Git branch.
The user should have access to the Git branch for pushing a change.
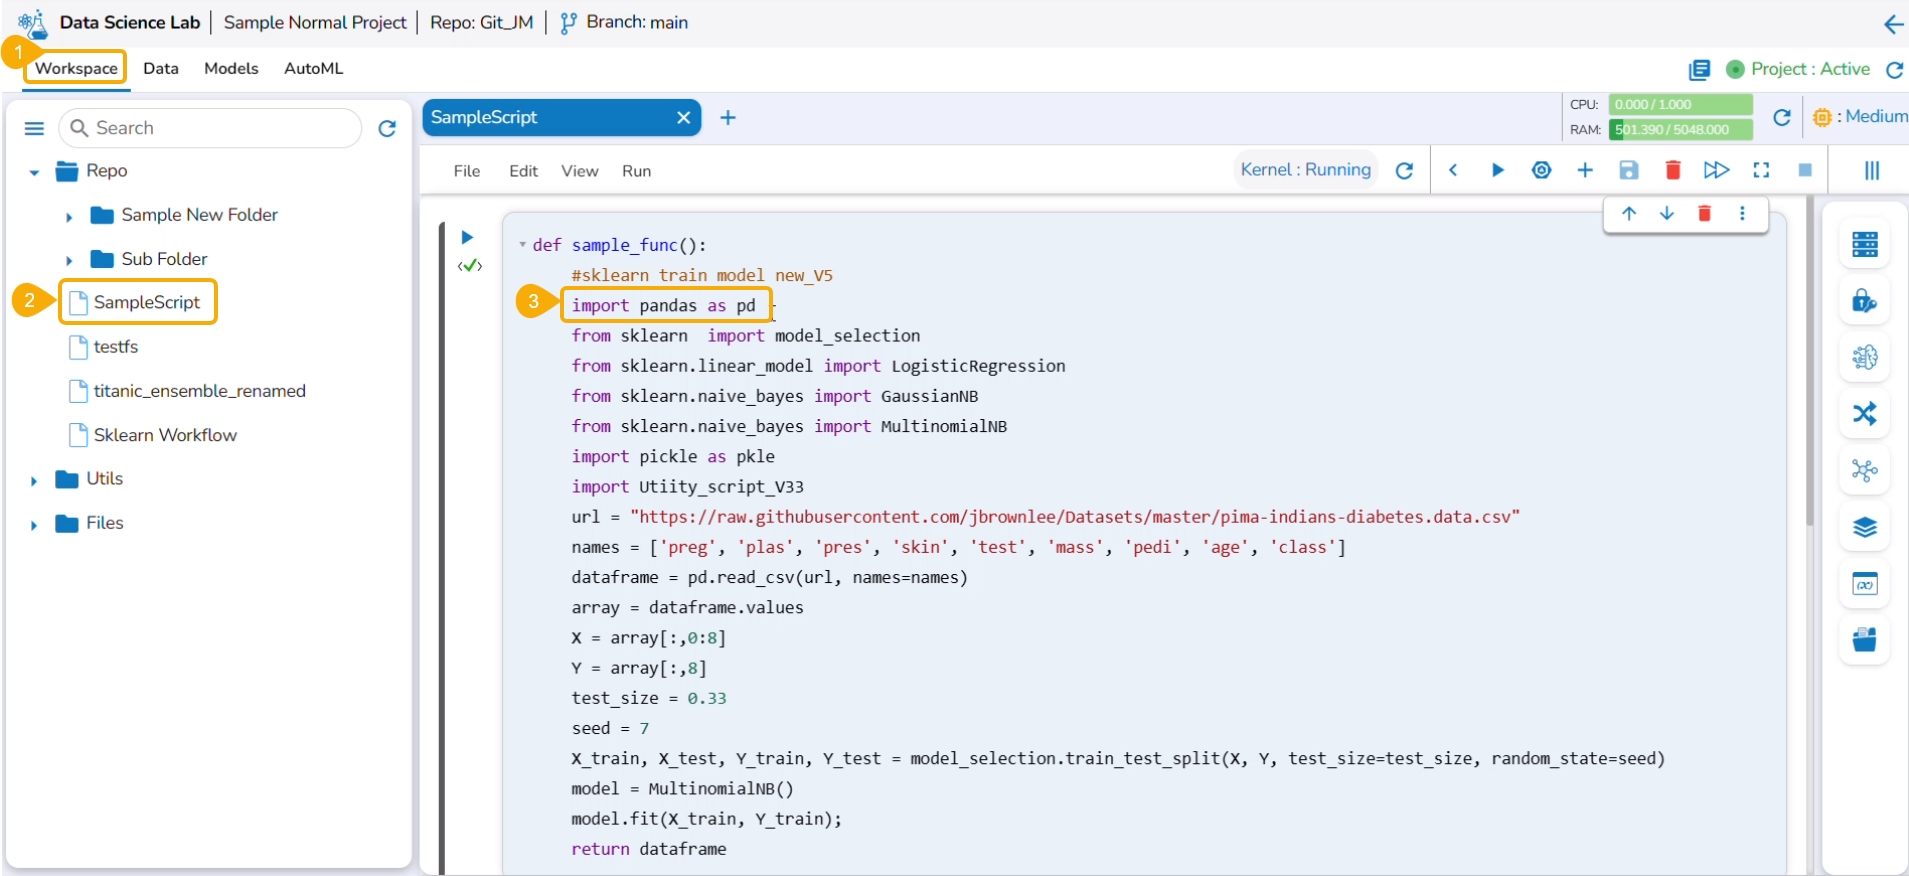
Navigate to the Workspace tab (it opens by default) for an activated project.
Select a Notebook from the displayed list to open the content/script.
The existing content gets displayed.
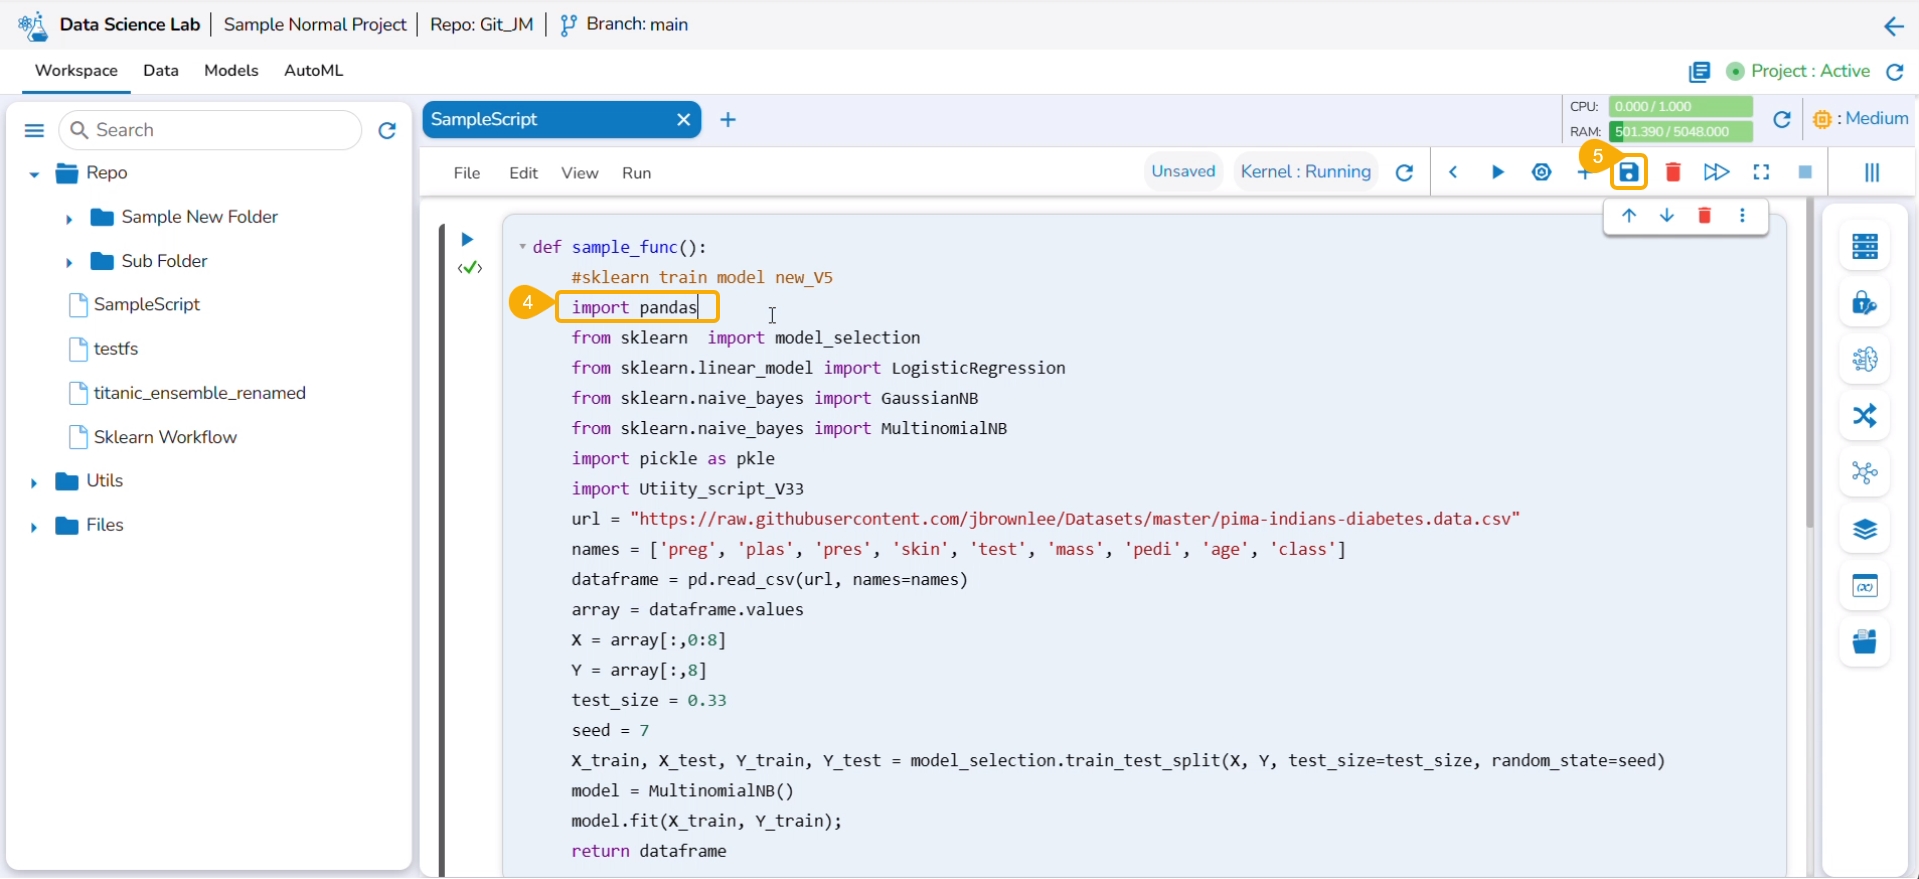
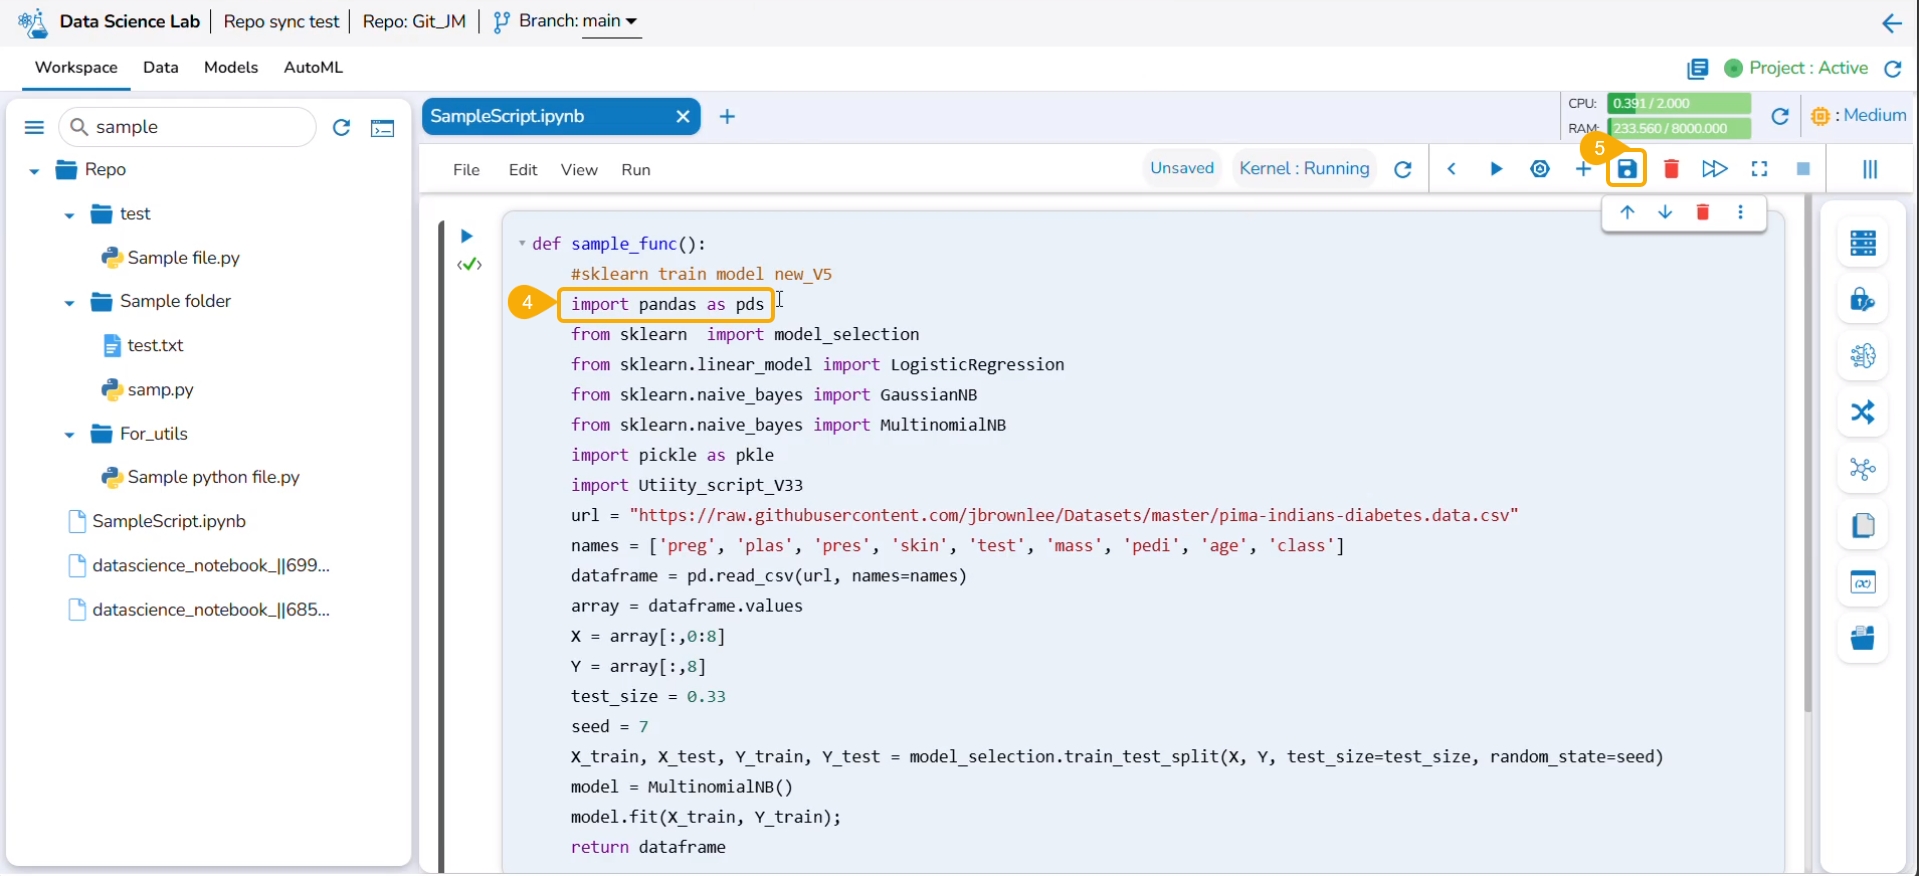
Modify the script to create a new version of the Notebook.
Click the Save icon to save the latest of the Notebook.
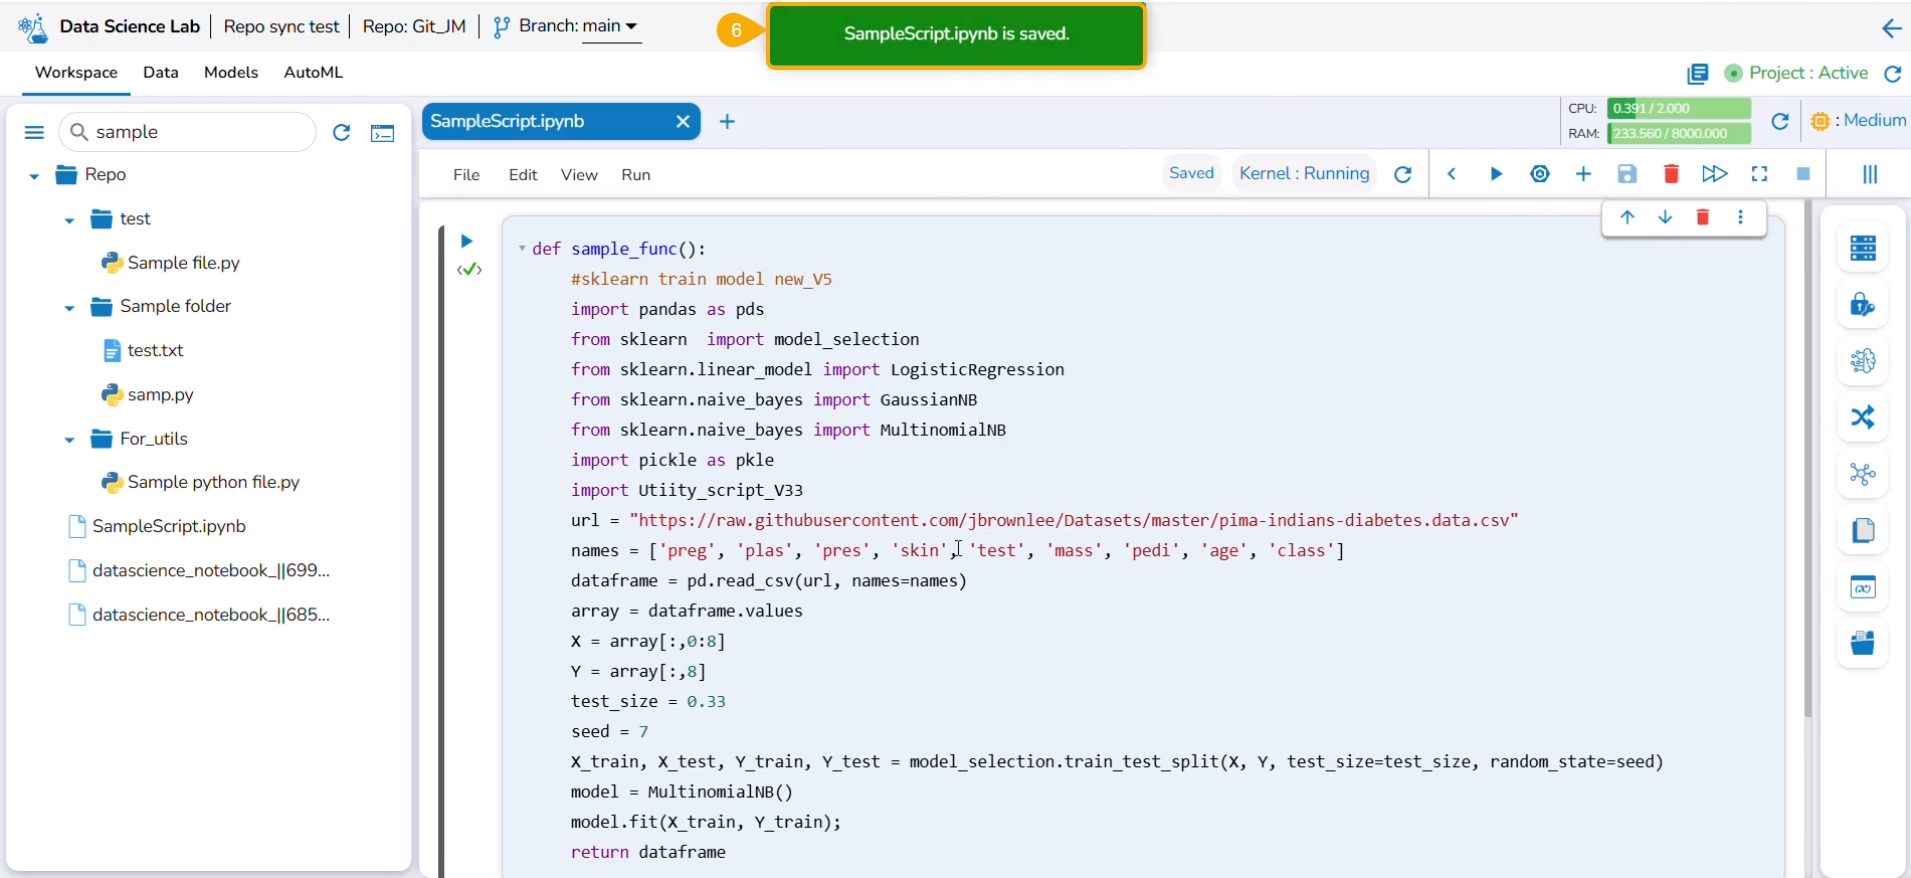
A notification ensures that the Notebook is saved.
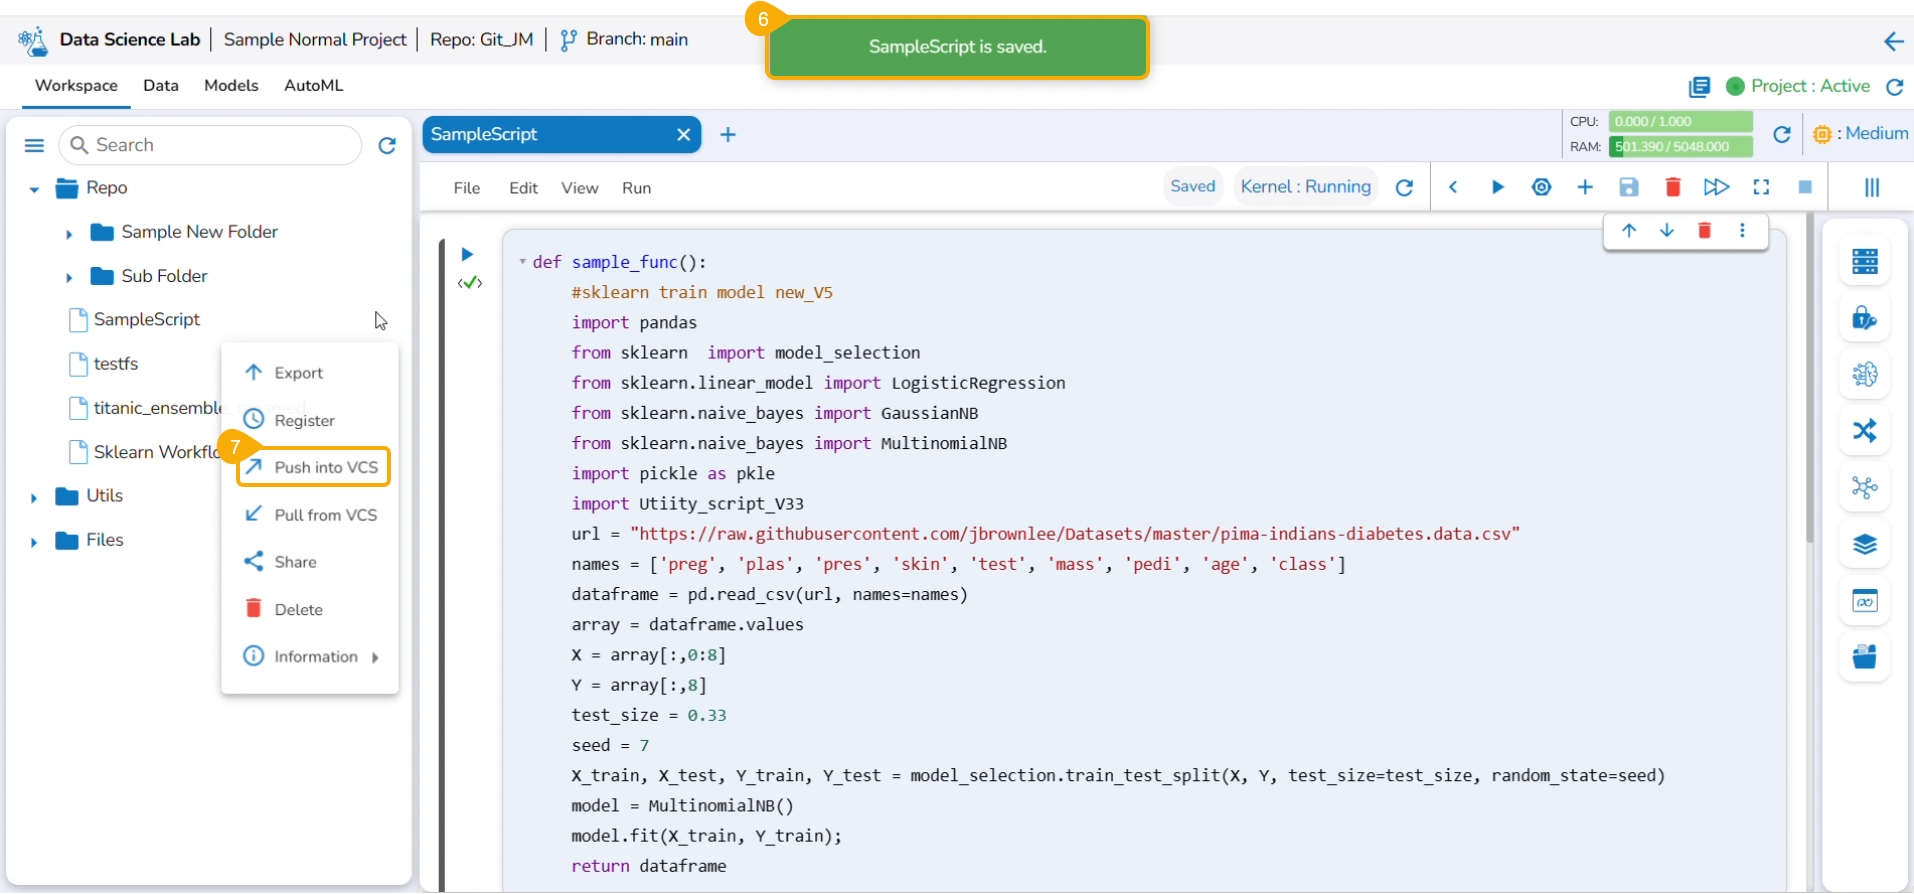
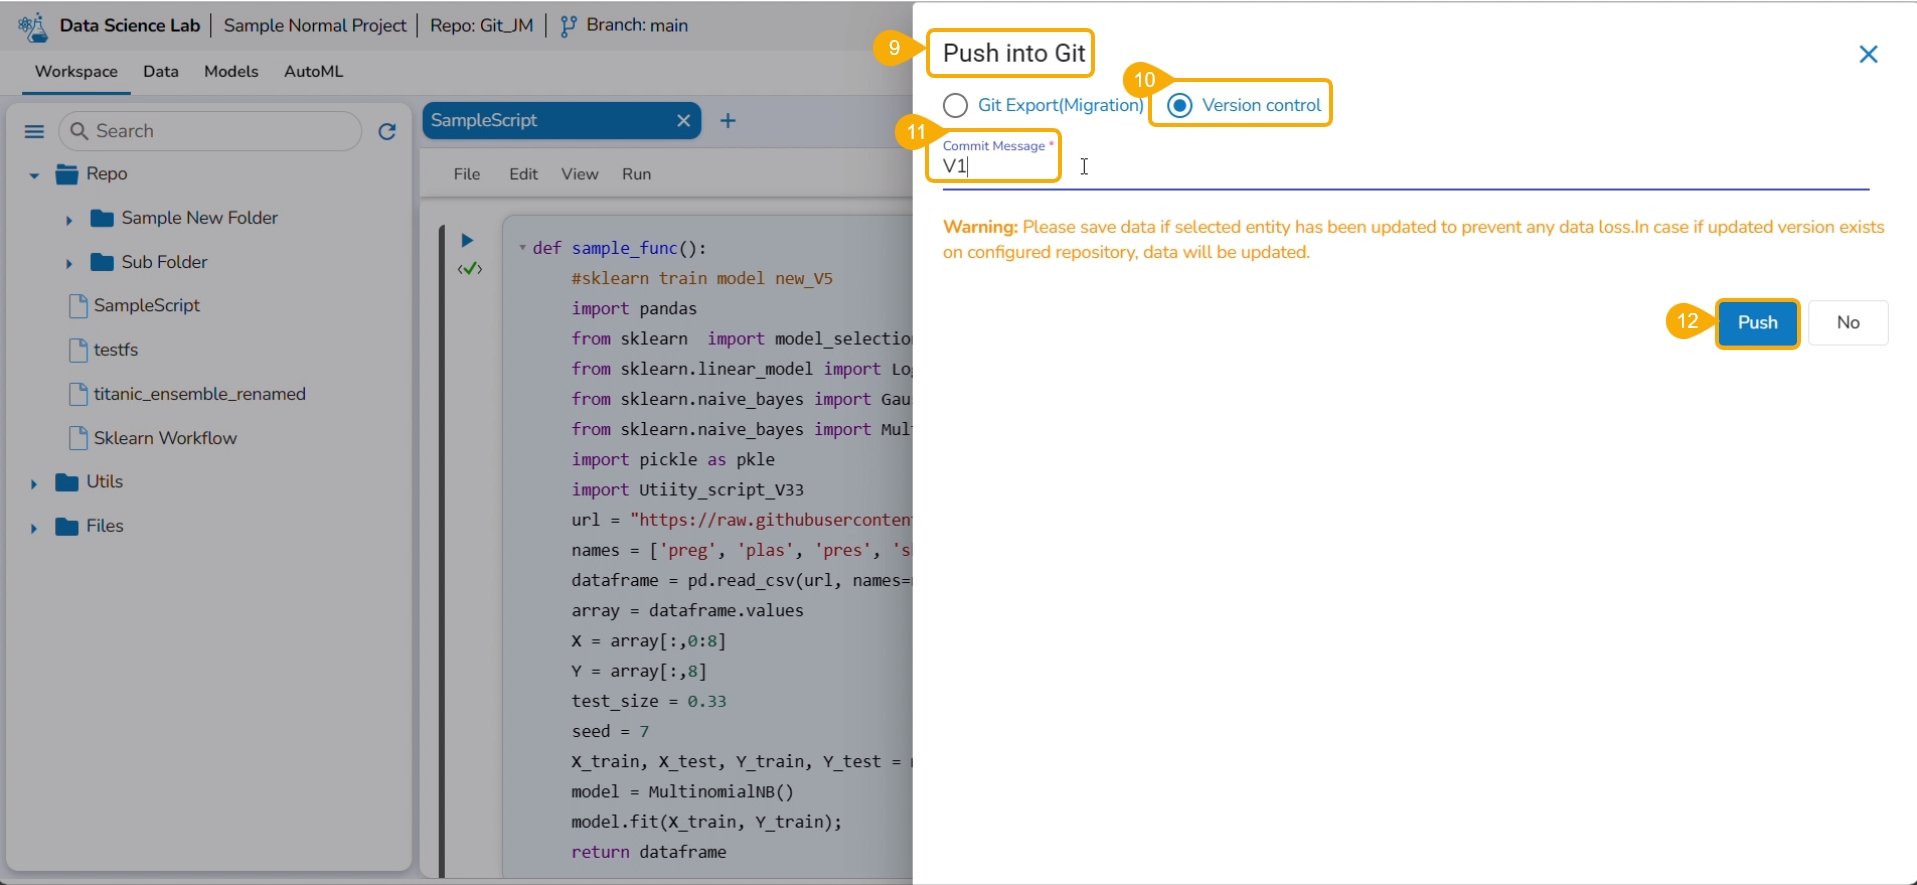
Click the Push into VCS option from the Notebook options.
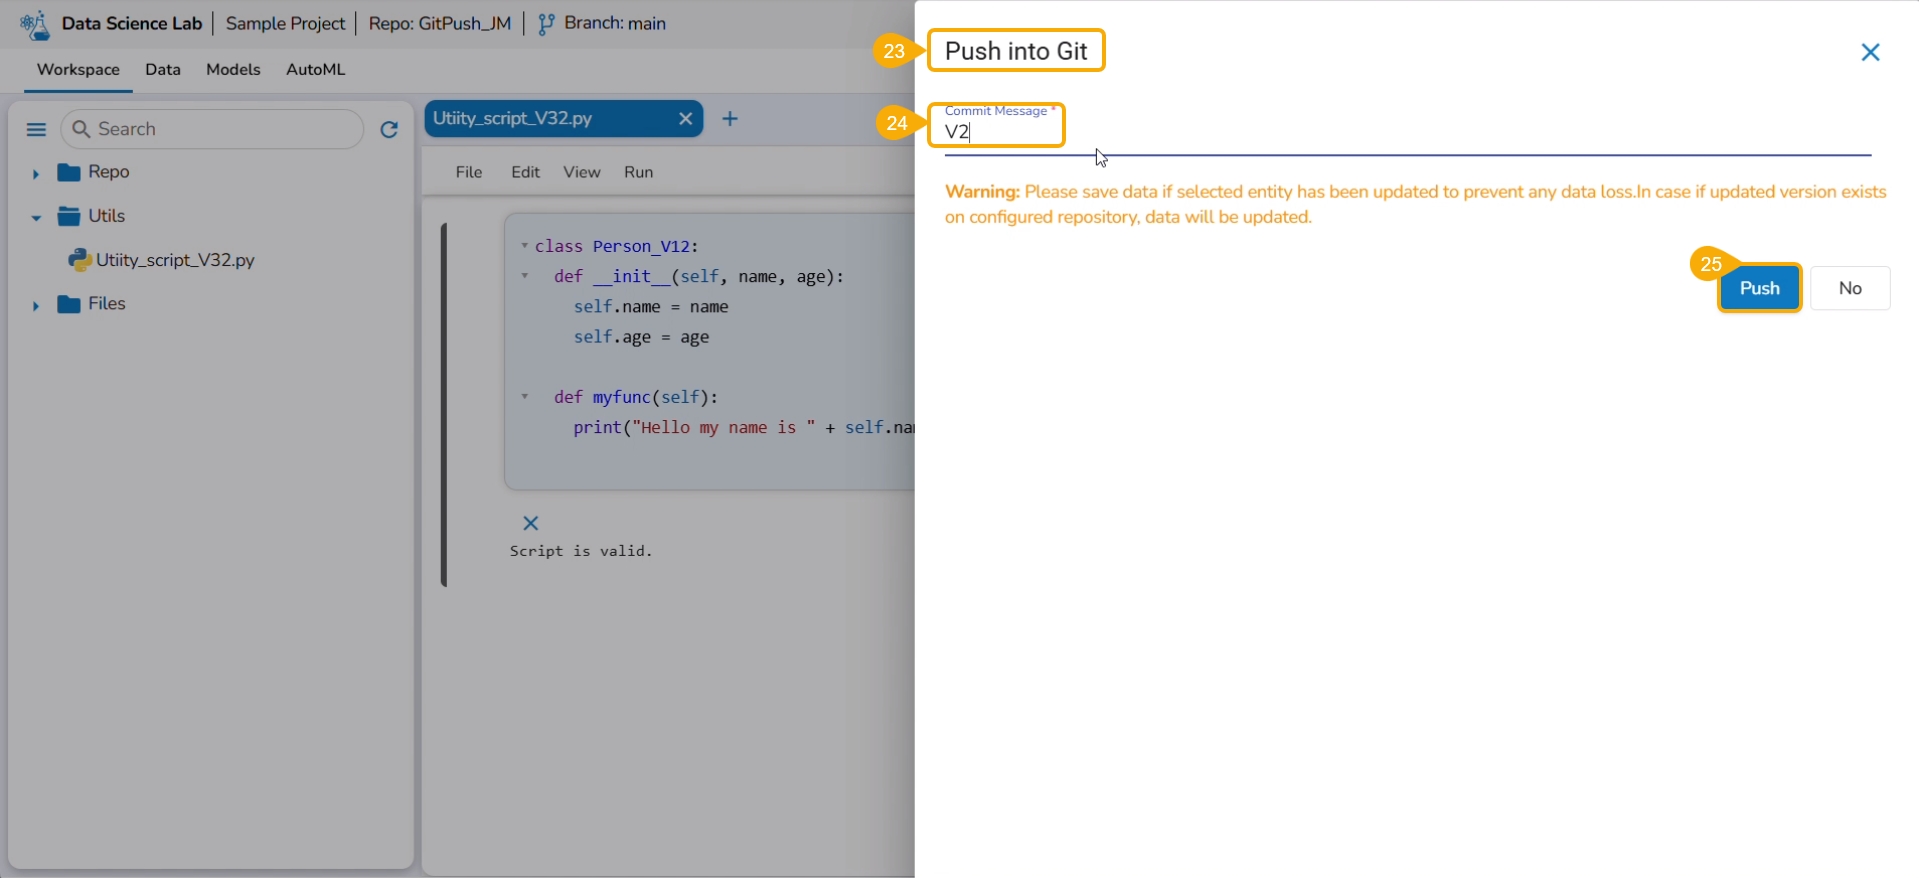
The Push into Git drawer opens.
Select the Version control option.
Provide a commit message.
Click the Push option.
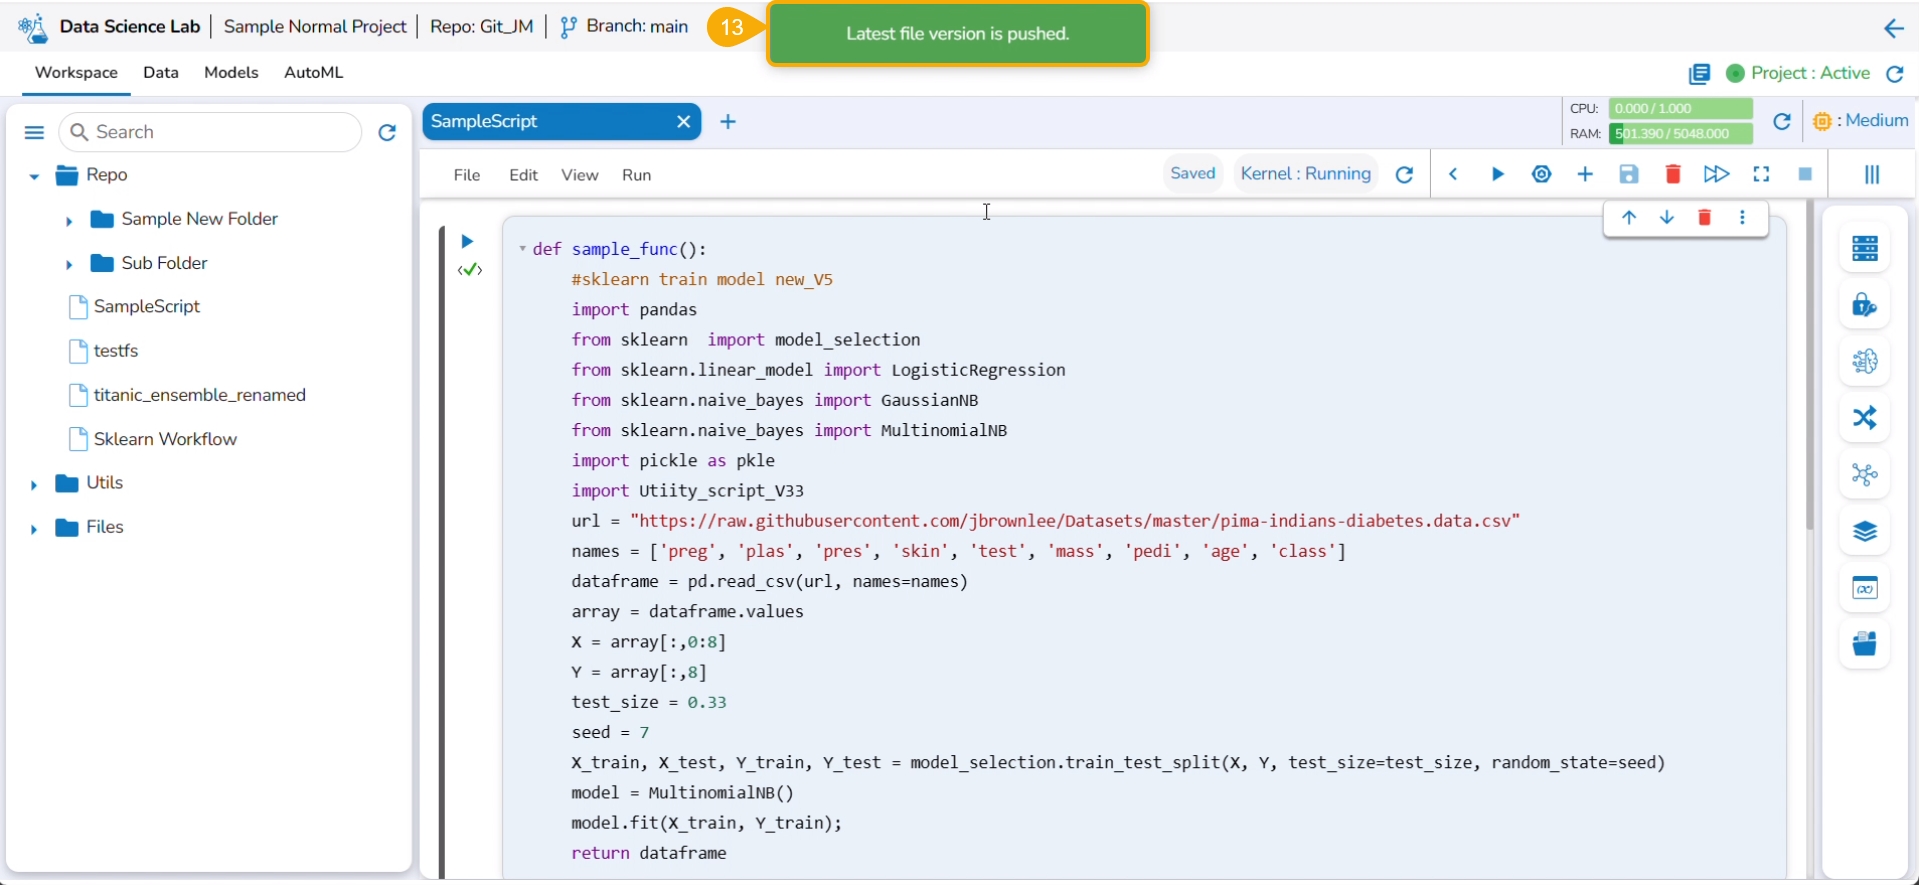
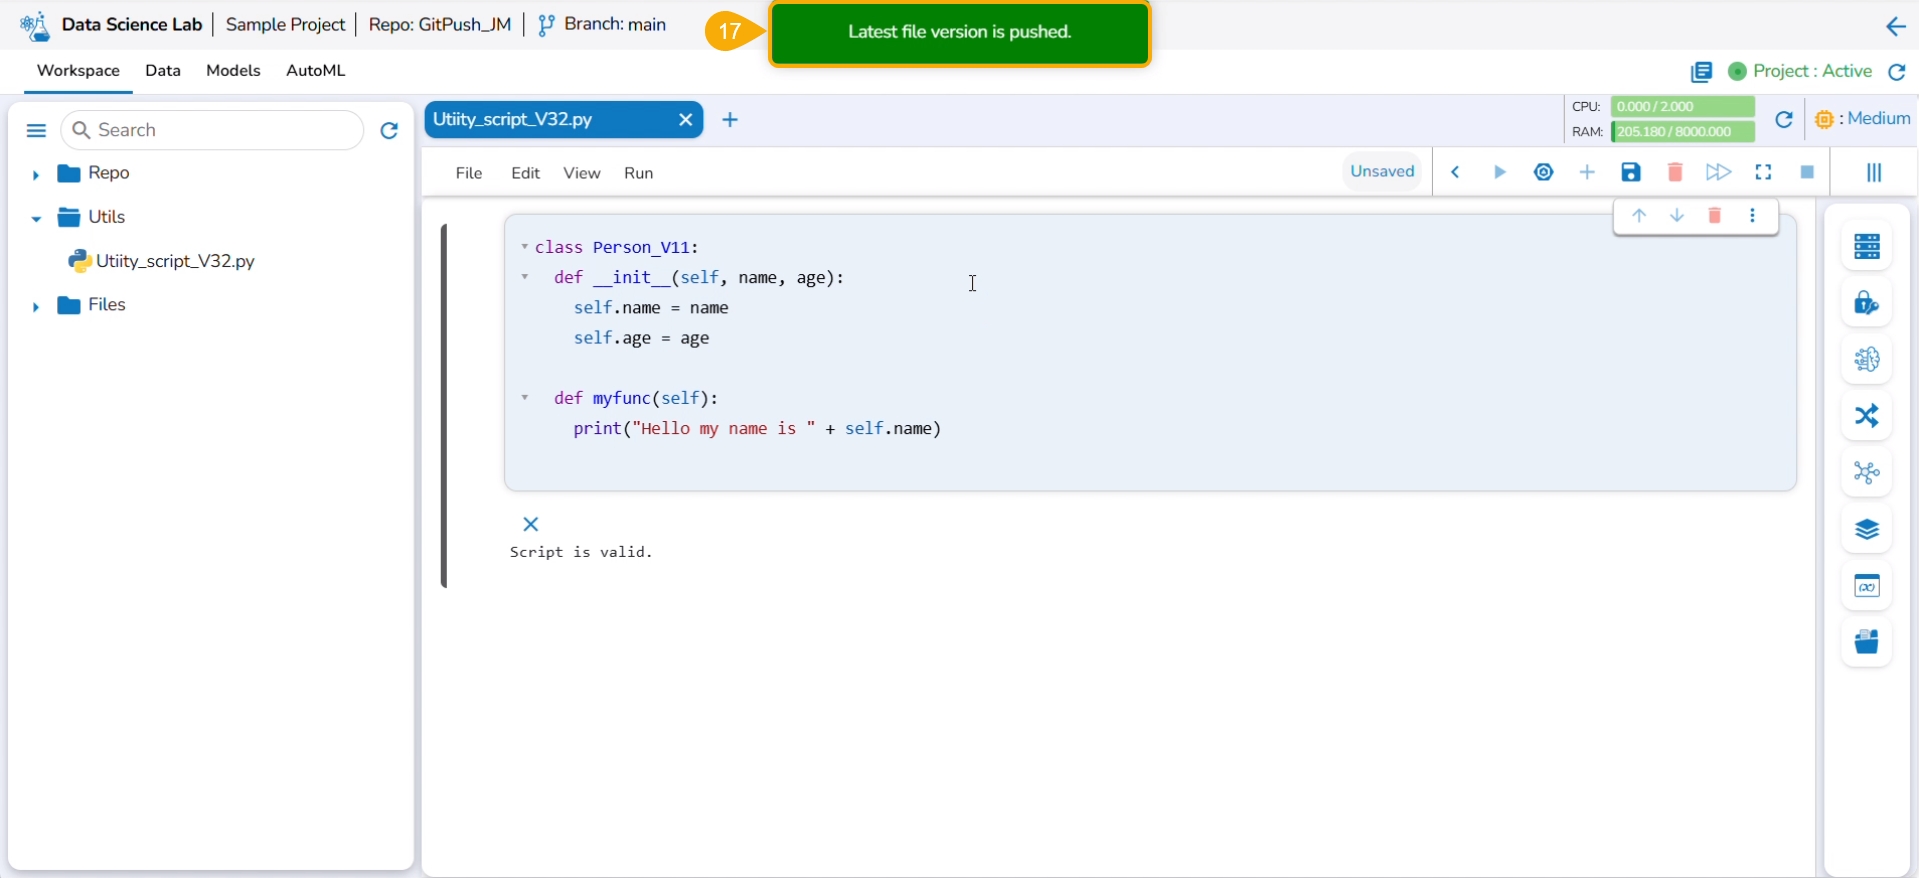
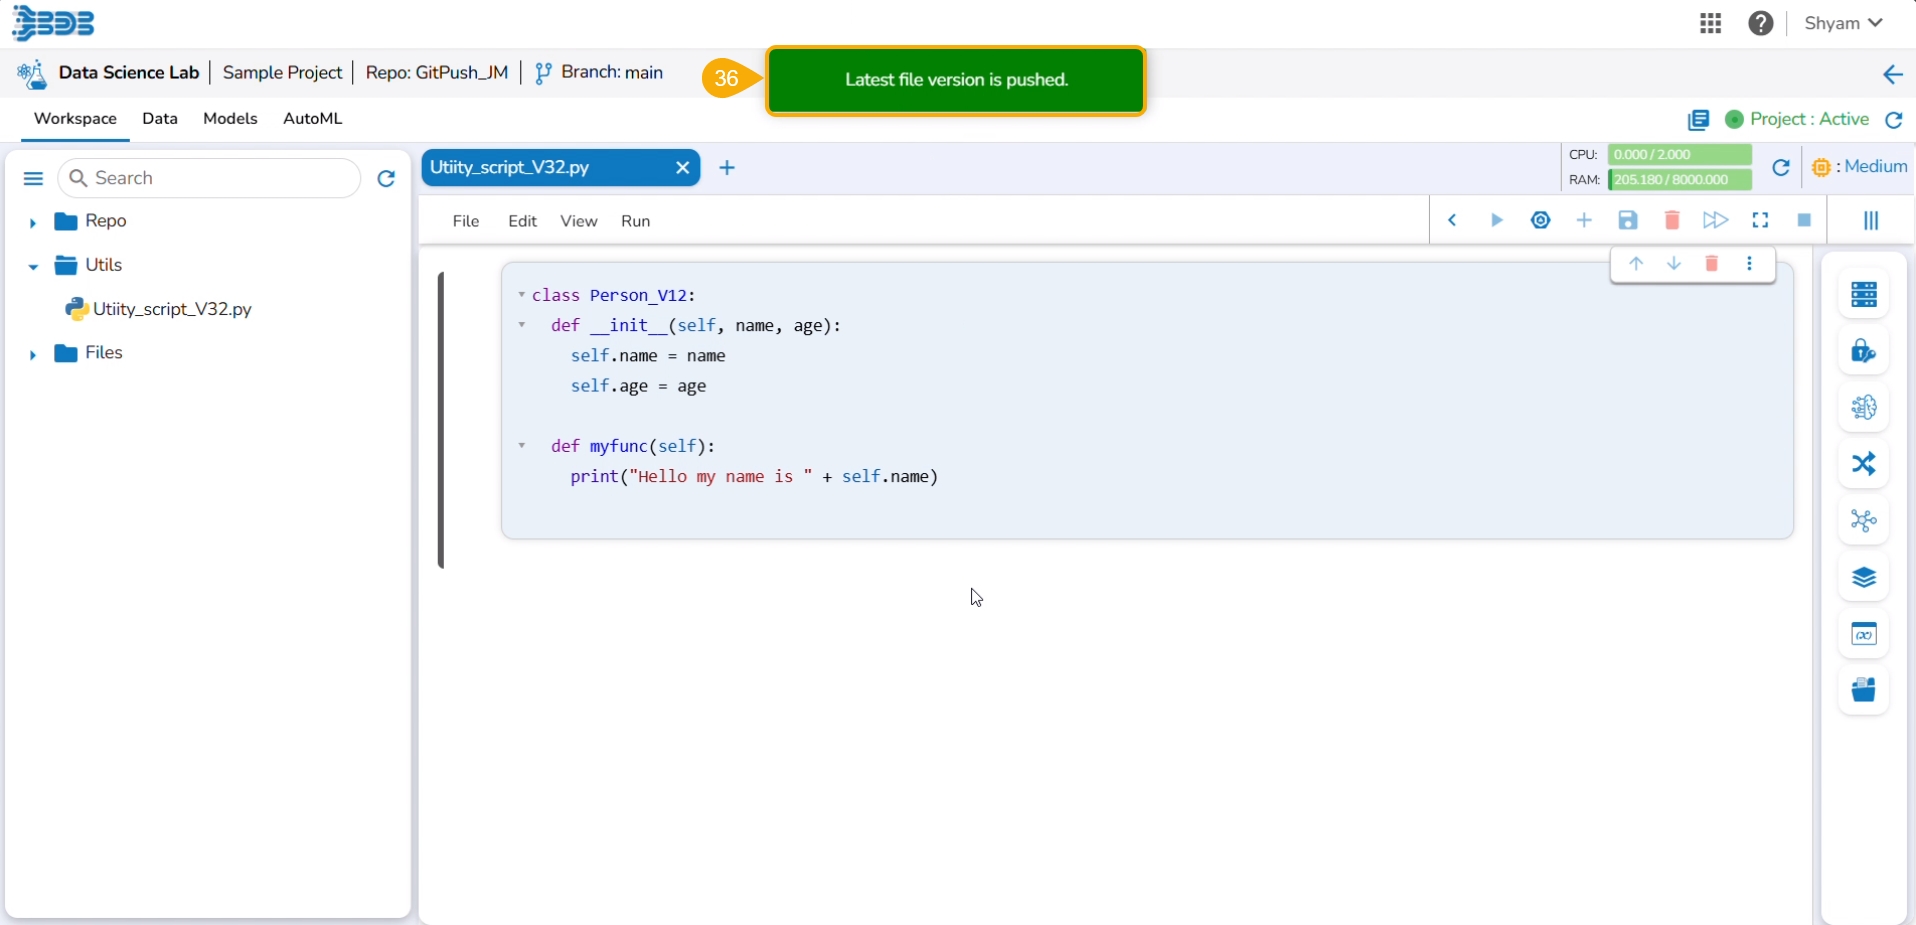
A notification message ensures that the latest file version is pushed (to Git).
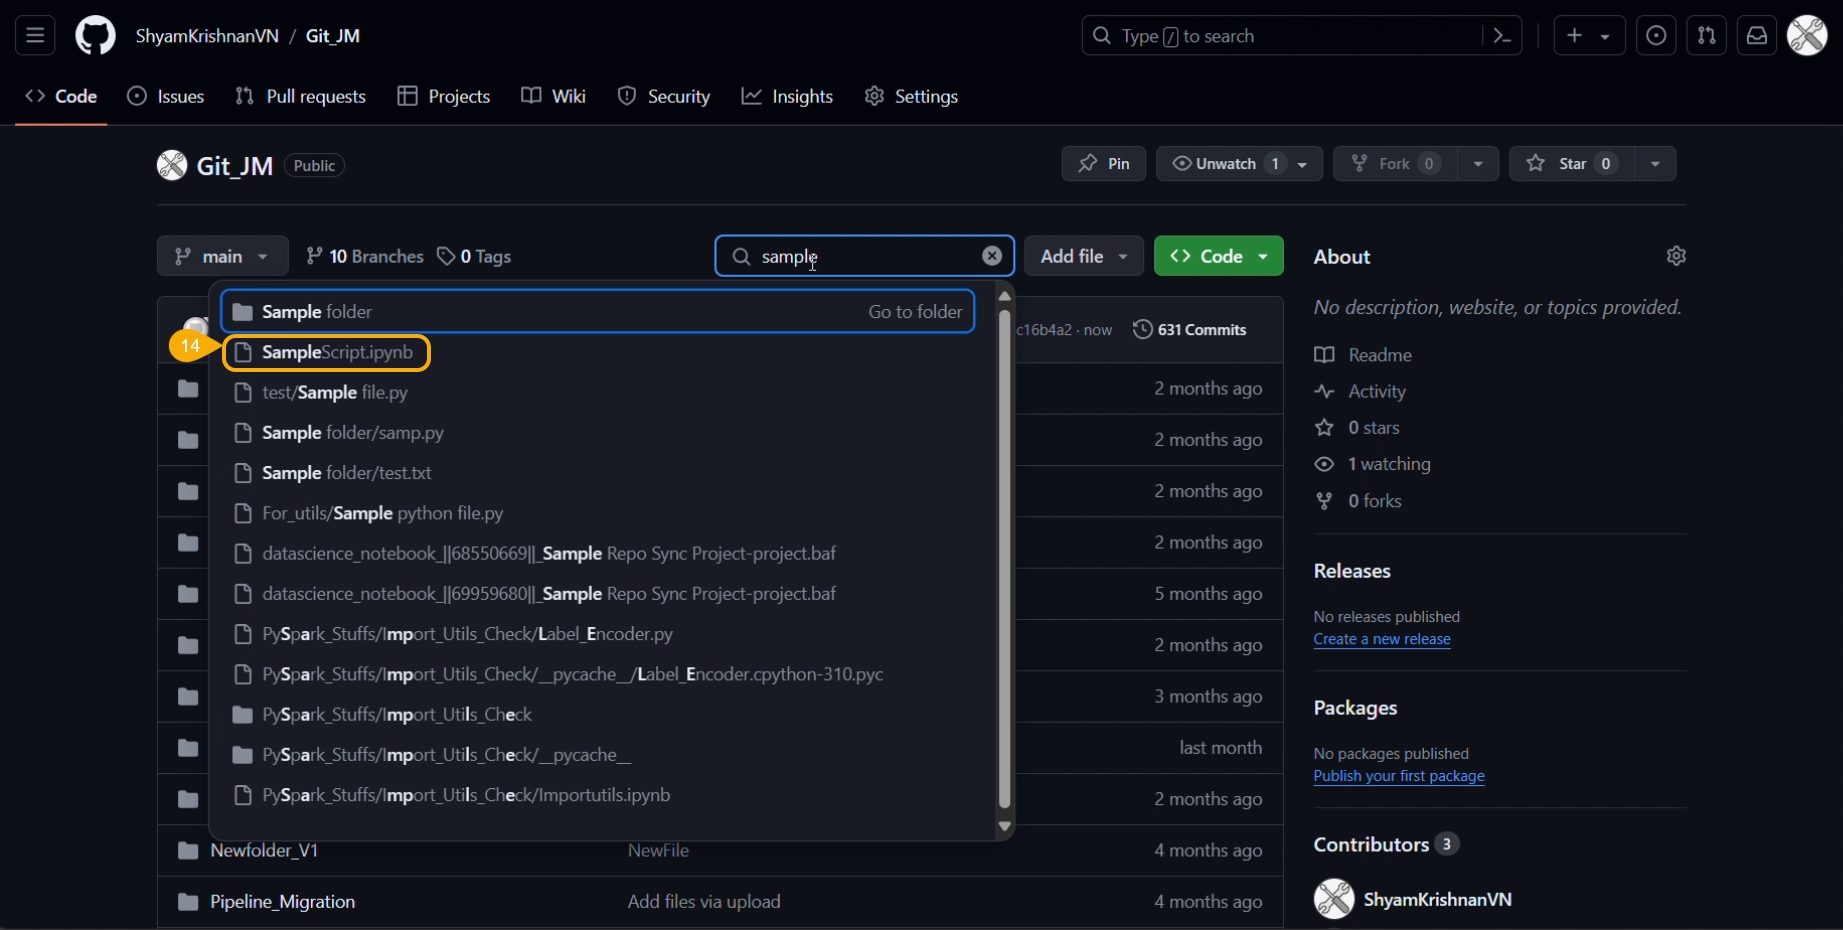
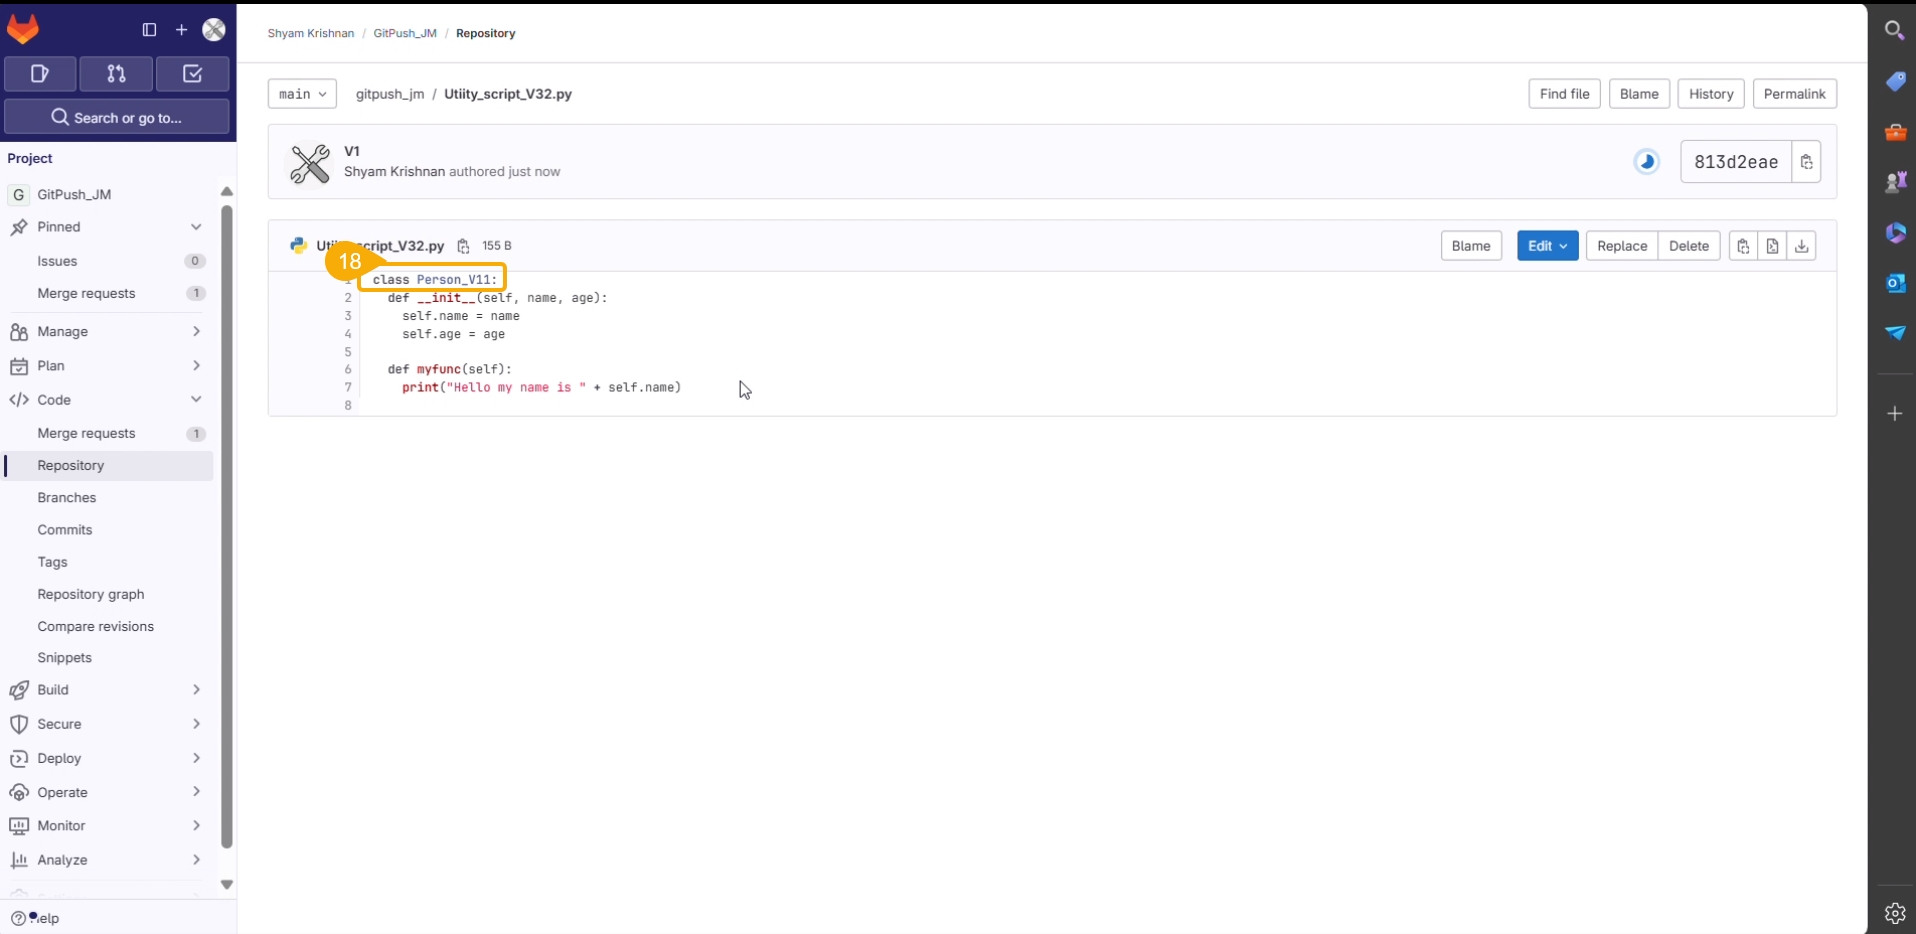
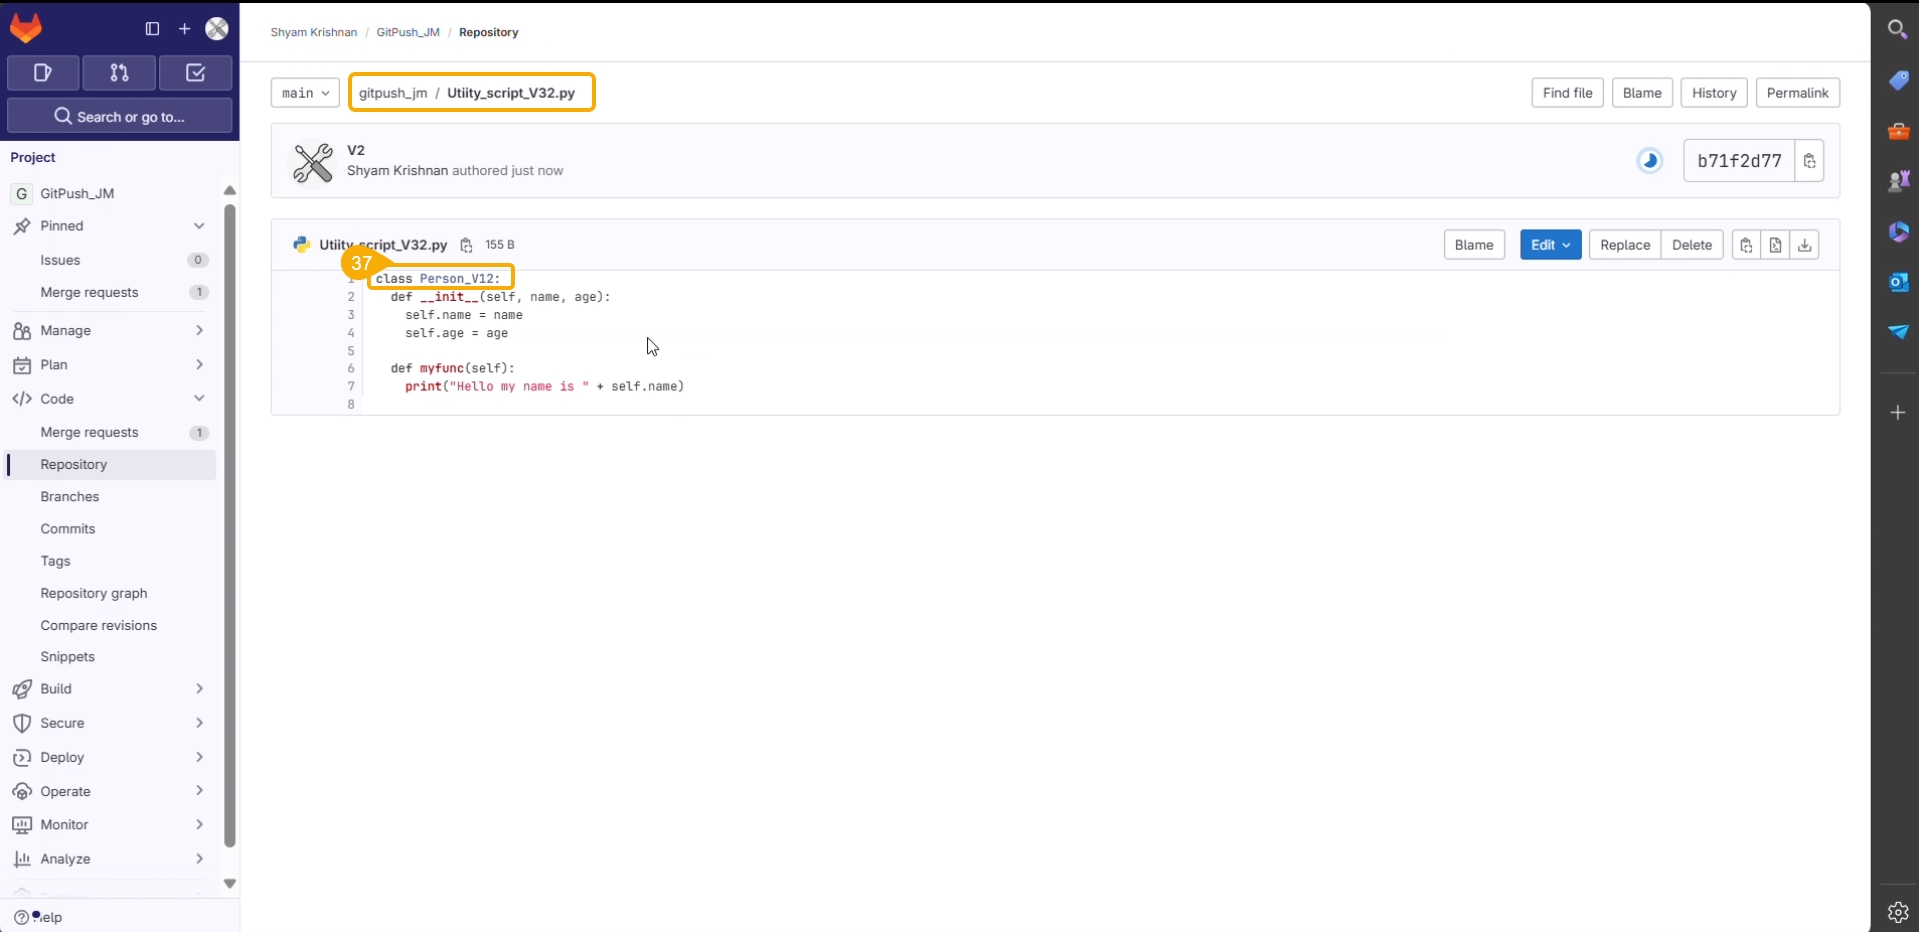
Navigate to the Git repository and access the pushed version of the Notebook script.
Open the script. The latest changes will be reflected in the script.
Please Note: The Pull from Git functionality supports Git Lab and Git Hub.
Check out the illustration explaining the Pull from Git functionality for a Repo Sync Project.
Check out the illustration explaining the Push into Git functionality for a Repo Sync Project.
These options are provided under the Workspace tab of a repo sync folder.
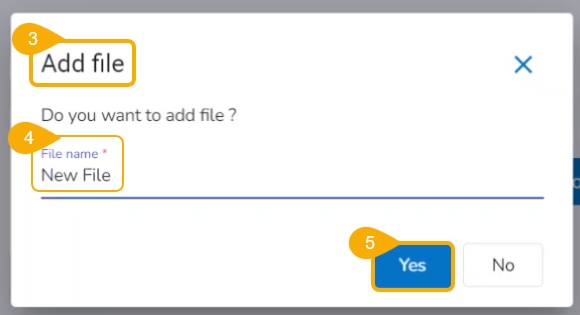
Check out the illustration on how to add a file inside a Repo Sync Project.
Navigate to the Workspace tab of an activated Repo Sync Project.
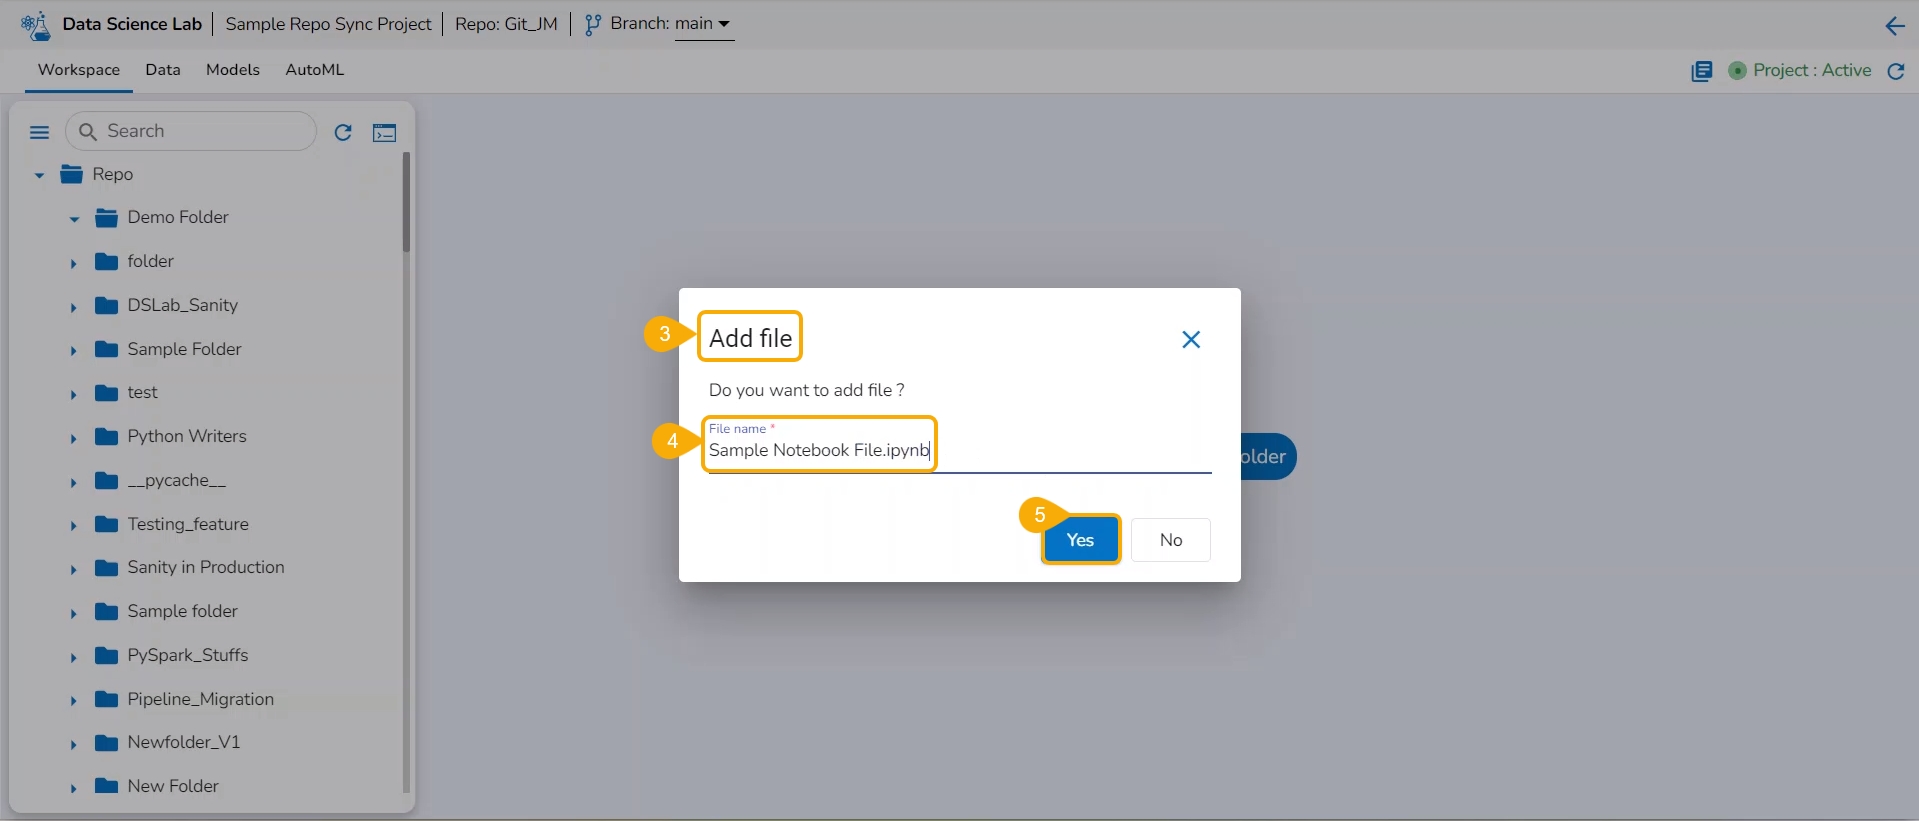
The Add file window opens.
Provide a File name.
Click the Yes option.
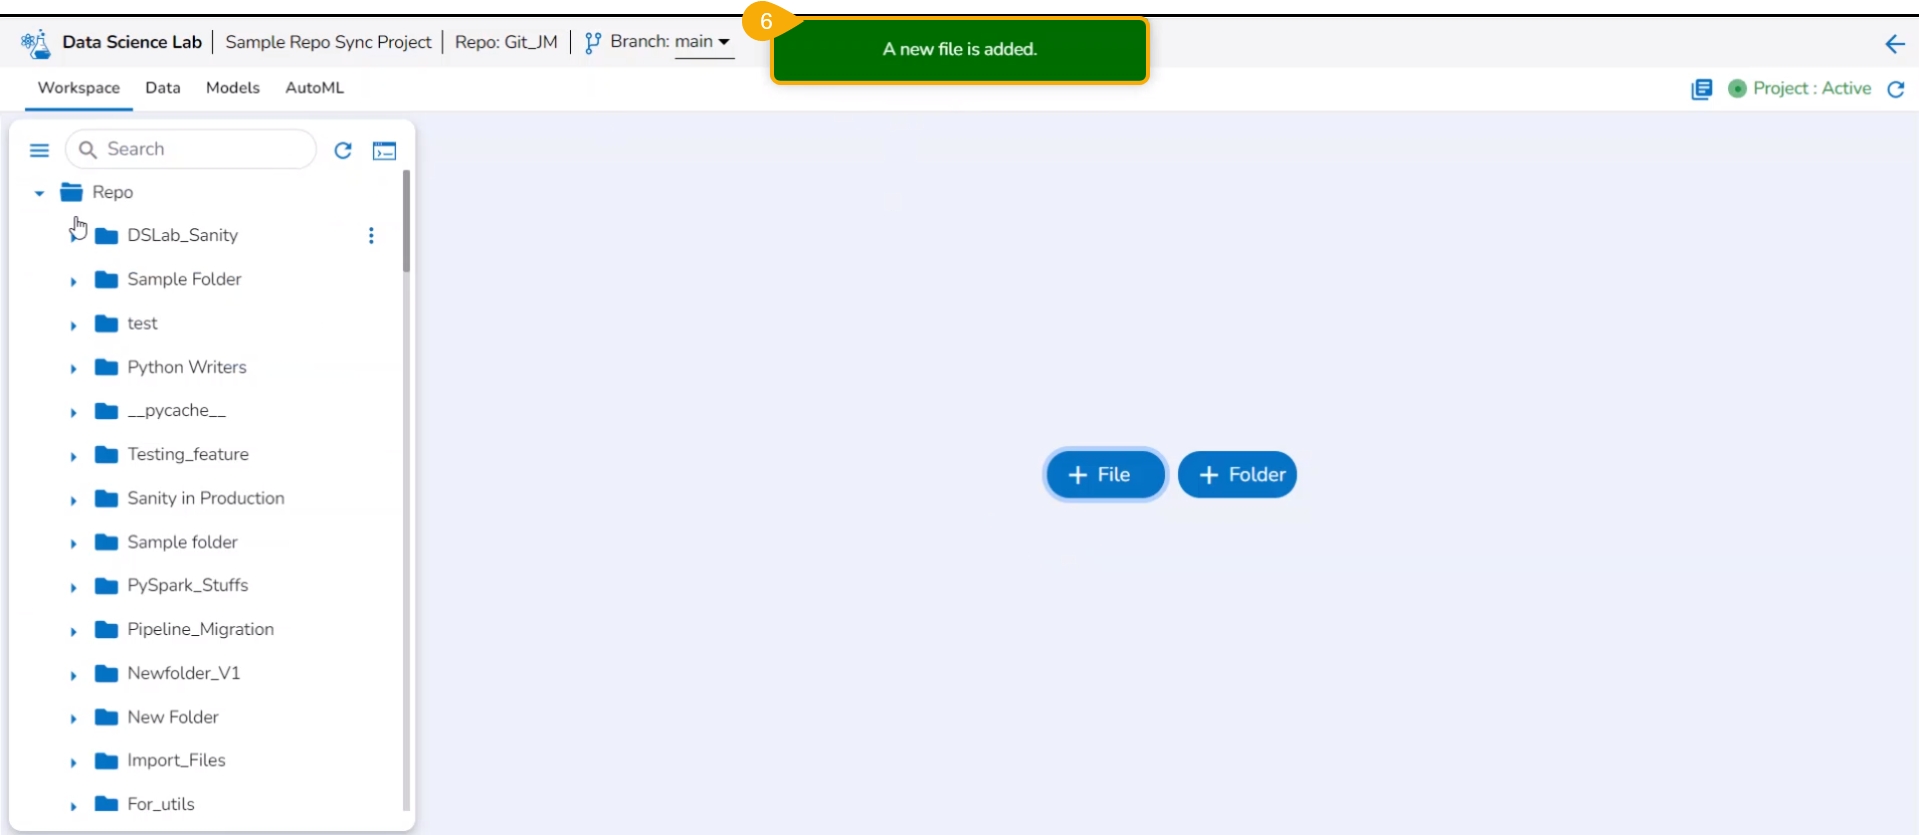
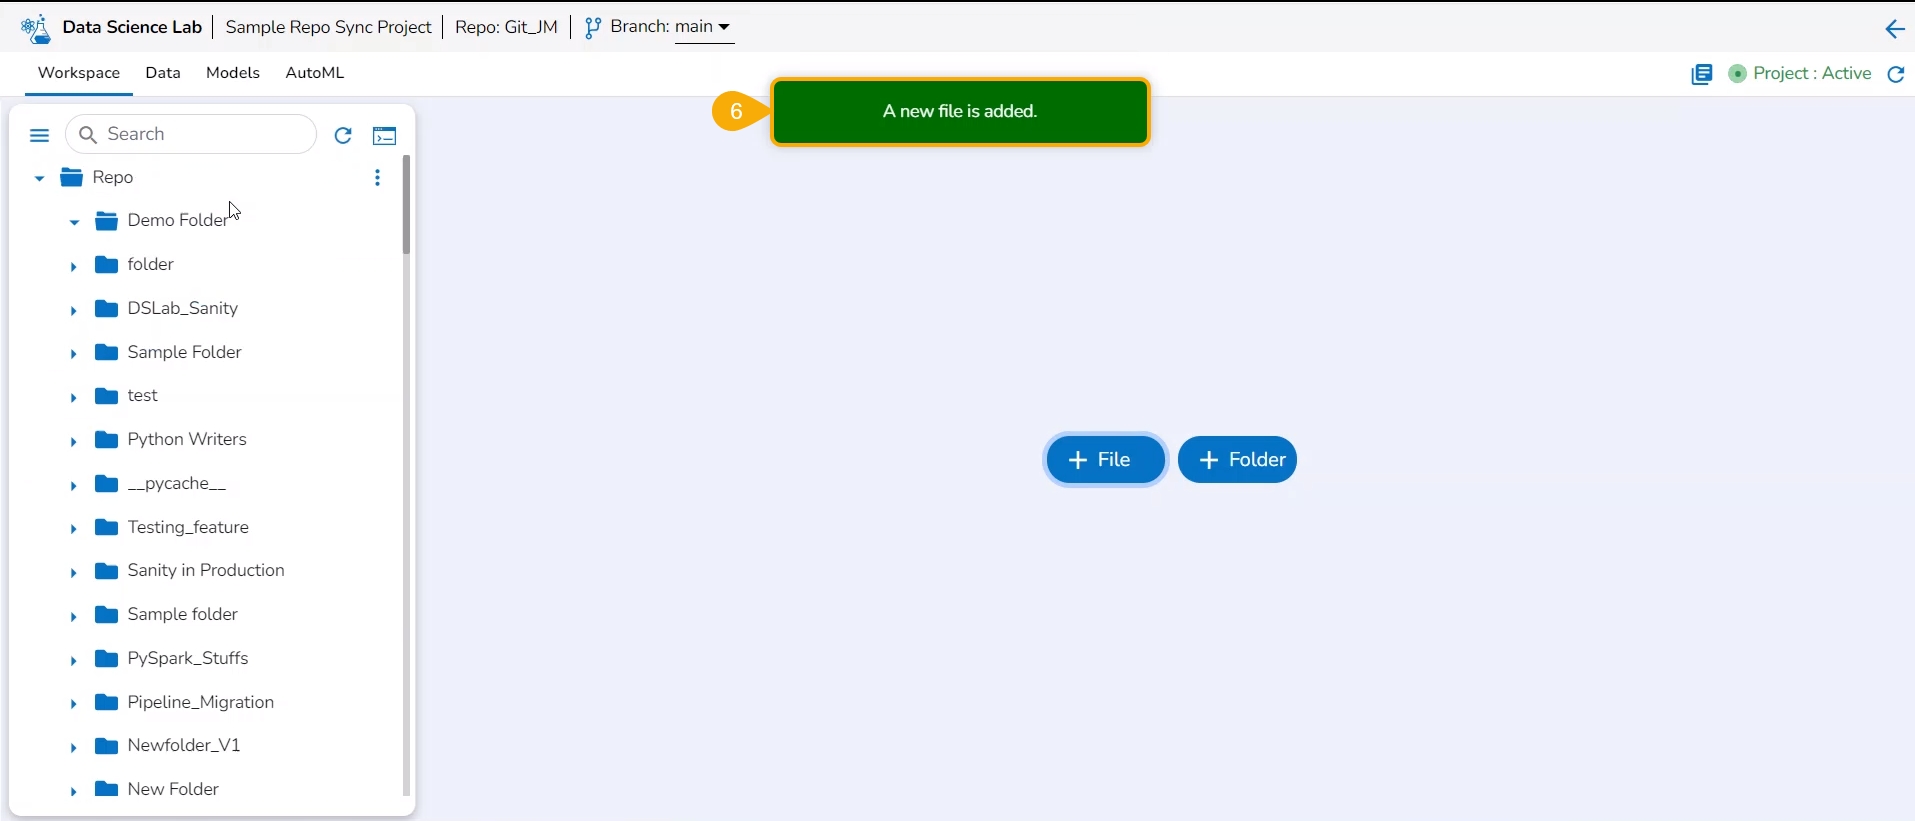
A notification message appears to ensure that the new file has been created.
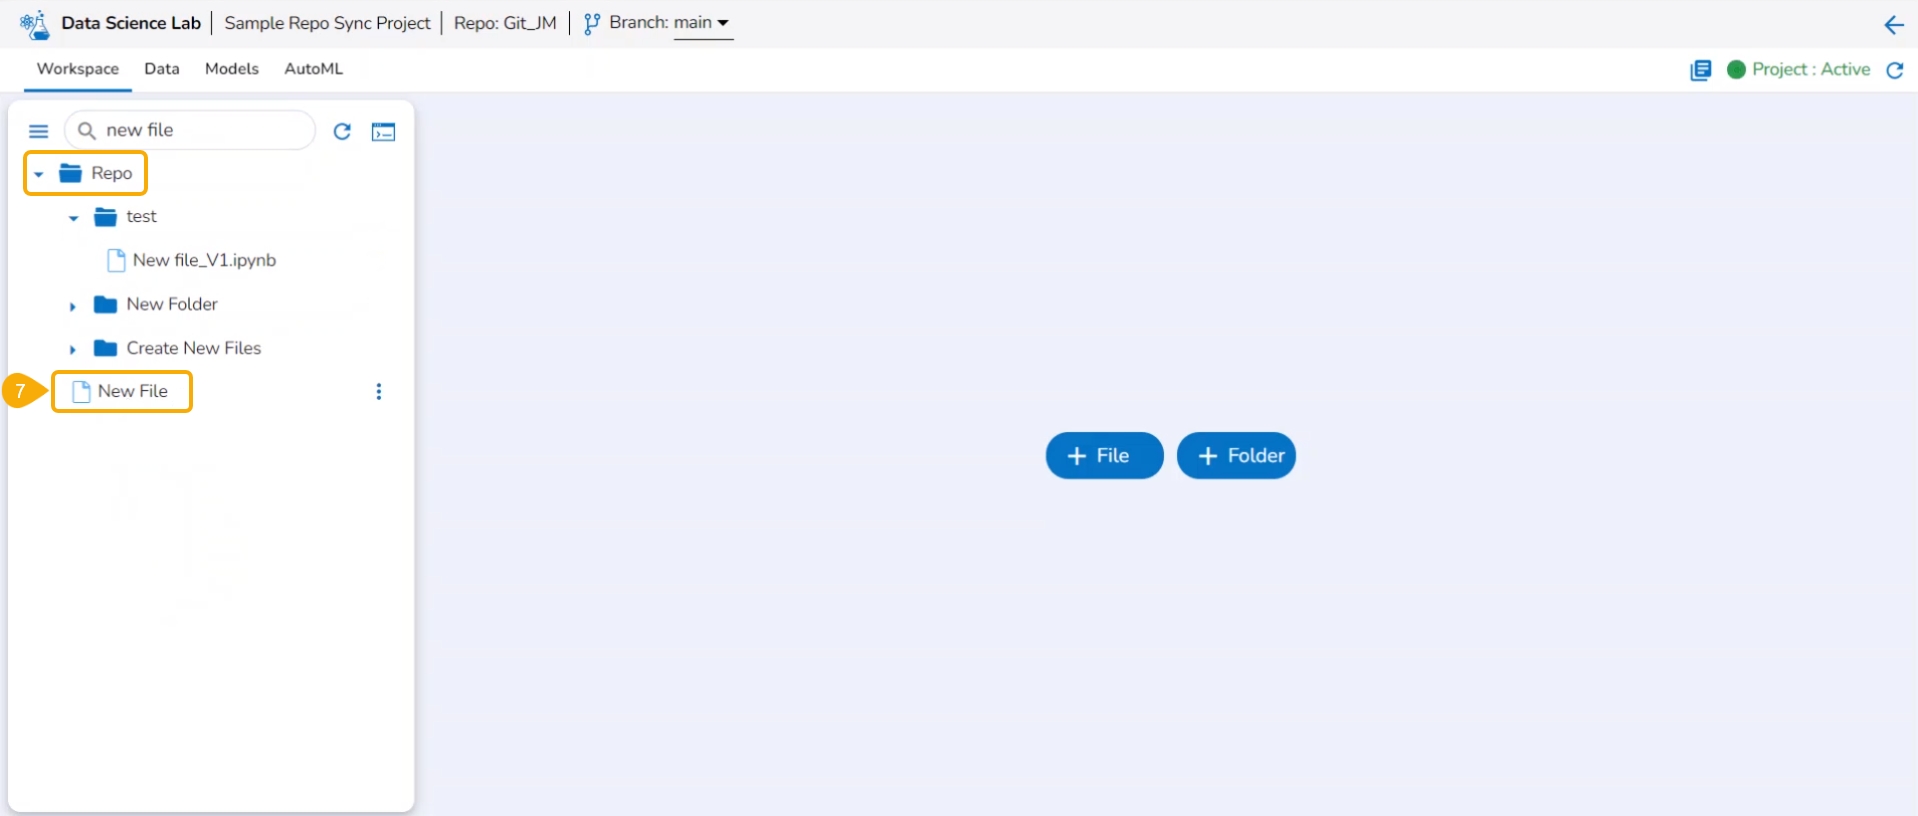
The newly created file gets added to the Repo Sync Project.
The user can insert the file type while adding a file to define the file type.
Check out the illustration on defining a file type while adding a file to the Repo Sync project.
Navigate to the Workspace tab for a repo sync project.
Click the Add File option.
The Add file window opens.
File name: Provide the file type extension while giving it a name.
Click the Yes option.
A notification message appears.
The new file gets added with the provided file extension.
Check out the illustration on how to add a folder inside a Repo Sync Project.
Navigate to the Notebook tab of the Repo Sync Project.
The Add folder window opens.
Provide a Folder name.
Click the Yes option.
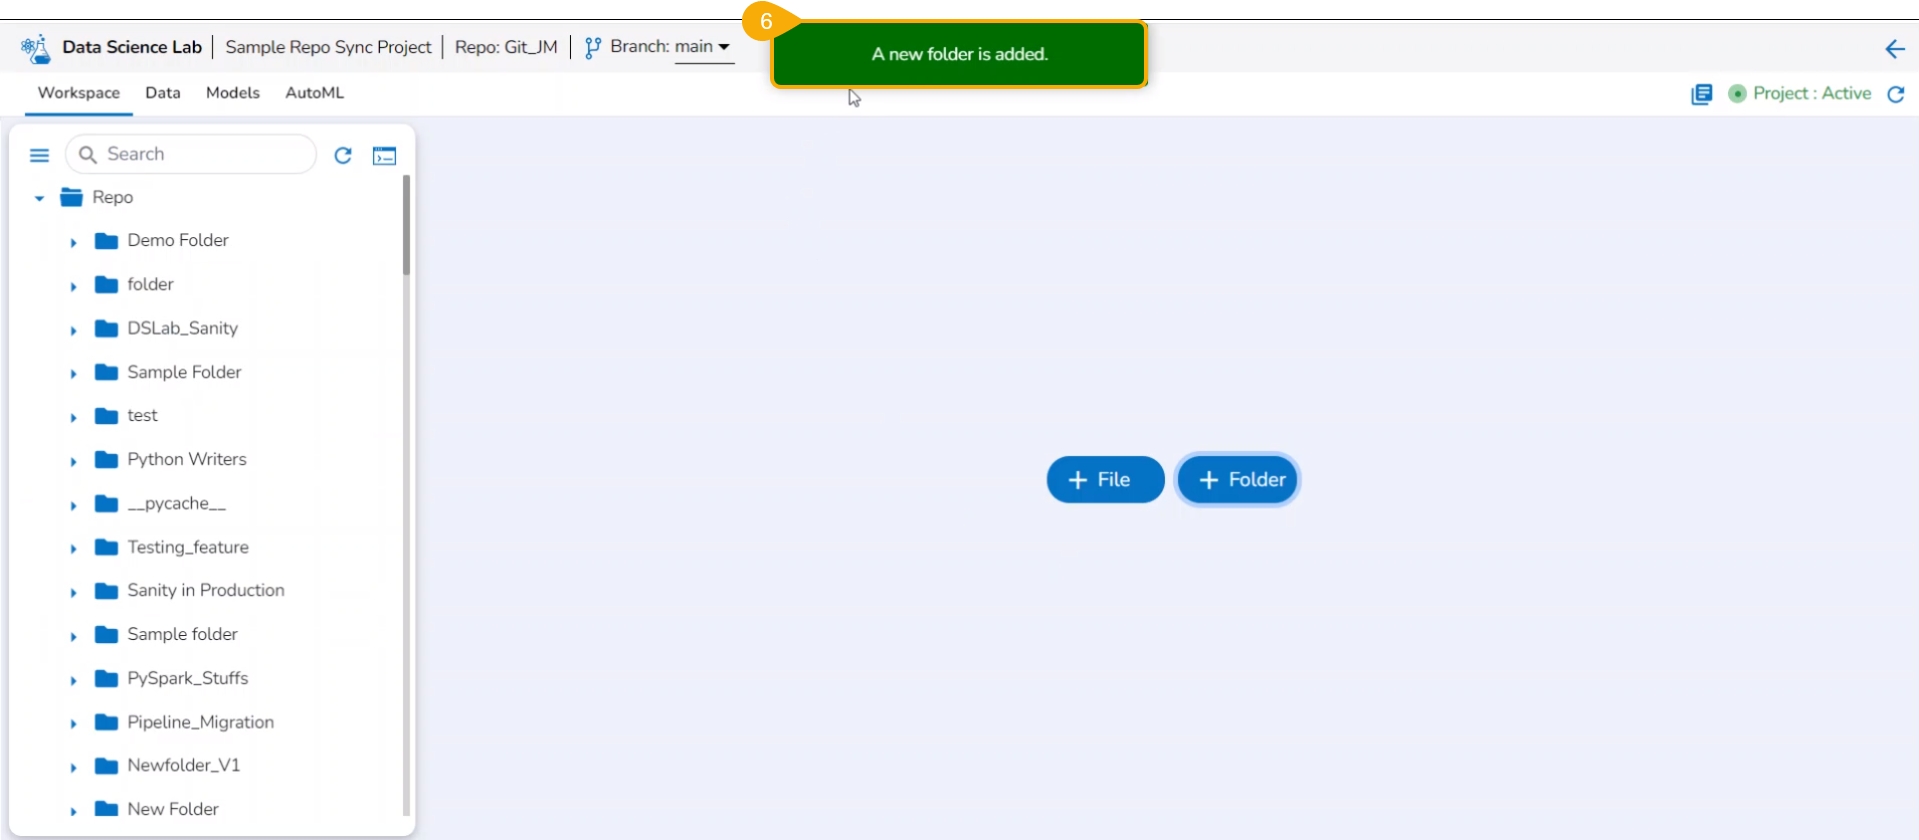
A notification message appears to ensure that the new folder has been created.
The newly created folder gets added to the Repo folder.
The Create option redirects the user to create a new Notebook under the selected Project.
Check out the illustration on creating a new Notebook inside a DSL Project.
Please Note: The Create option appears for the Repo folder that opens by default under the Workspace tab.
Navigate to the Workspace tab for a Data Science Lab project.
Click the Create option from the Notebook tab.
Please Note: The Create option gets enabled only if the Project status is Active as mentioned in the above-given image.
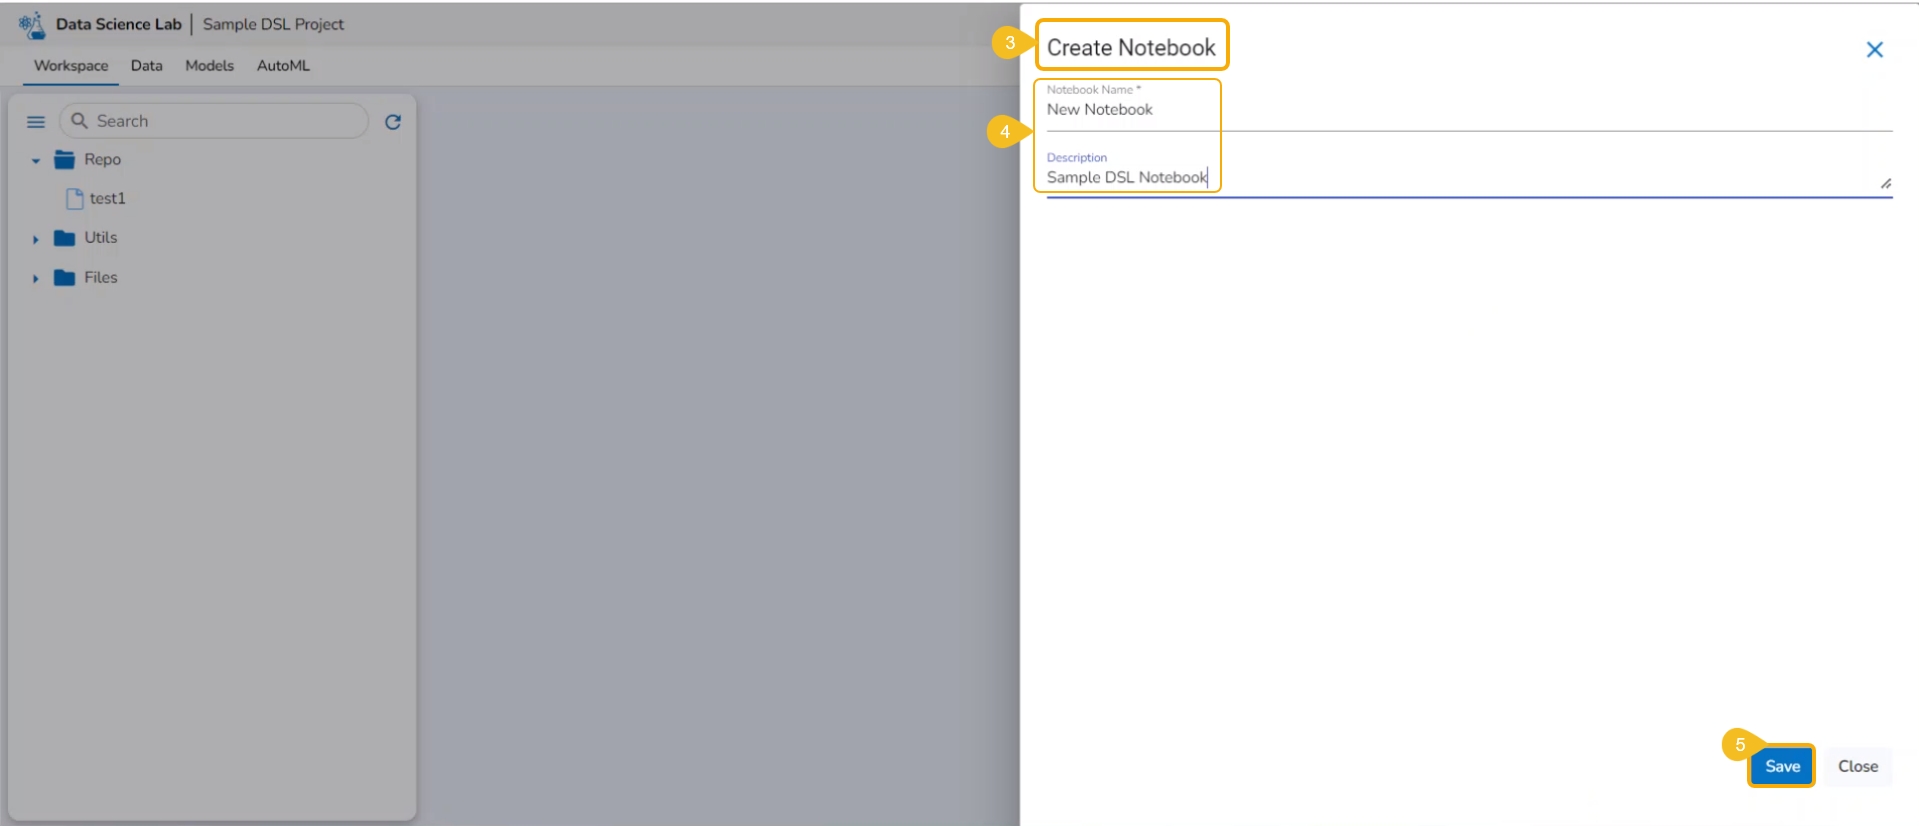
The Create Notebook page opens.
Provide the following information to create a new Notebook:
Notebook Name
Description
Click the Save option.
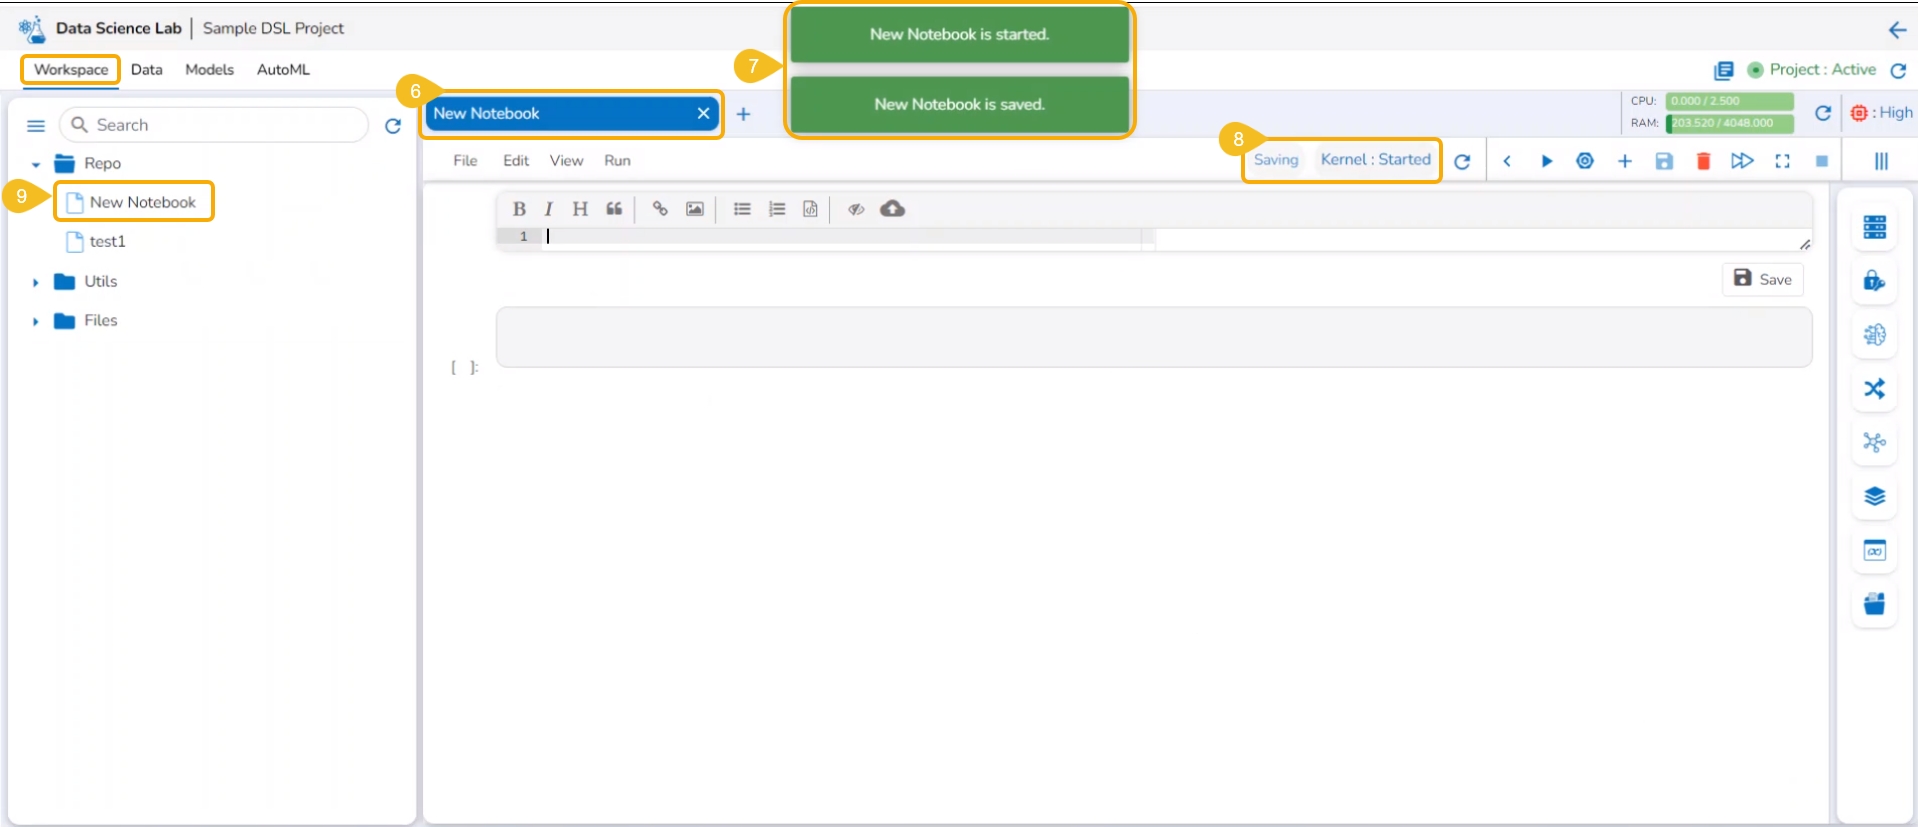
The Notebook gets created with the given name and the Notebook page opens. The Notebook may take a few seconds to save and start the Kernel.
The user will get notifications to ensure the new Notebook has been saved and started.
The same gets notified on the Notebook header (as highlighted in the image).
The newly created Notebook is ready now for the user to commence Data Science experiments. The newly created Notebook is listed on the left side of the Notebook page.
Check out the illustration on adding a new Notebook.
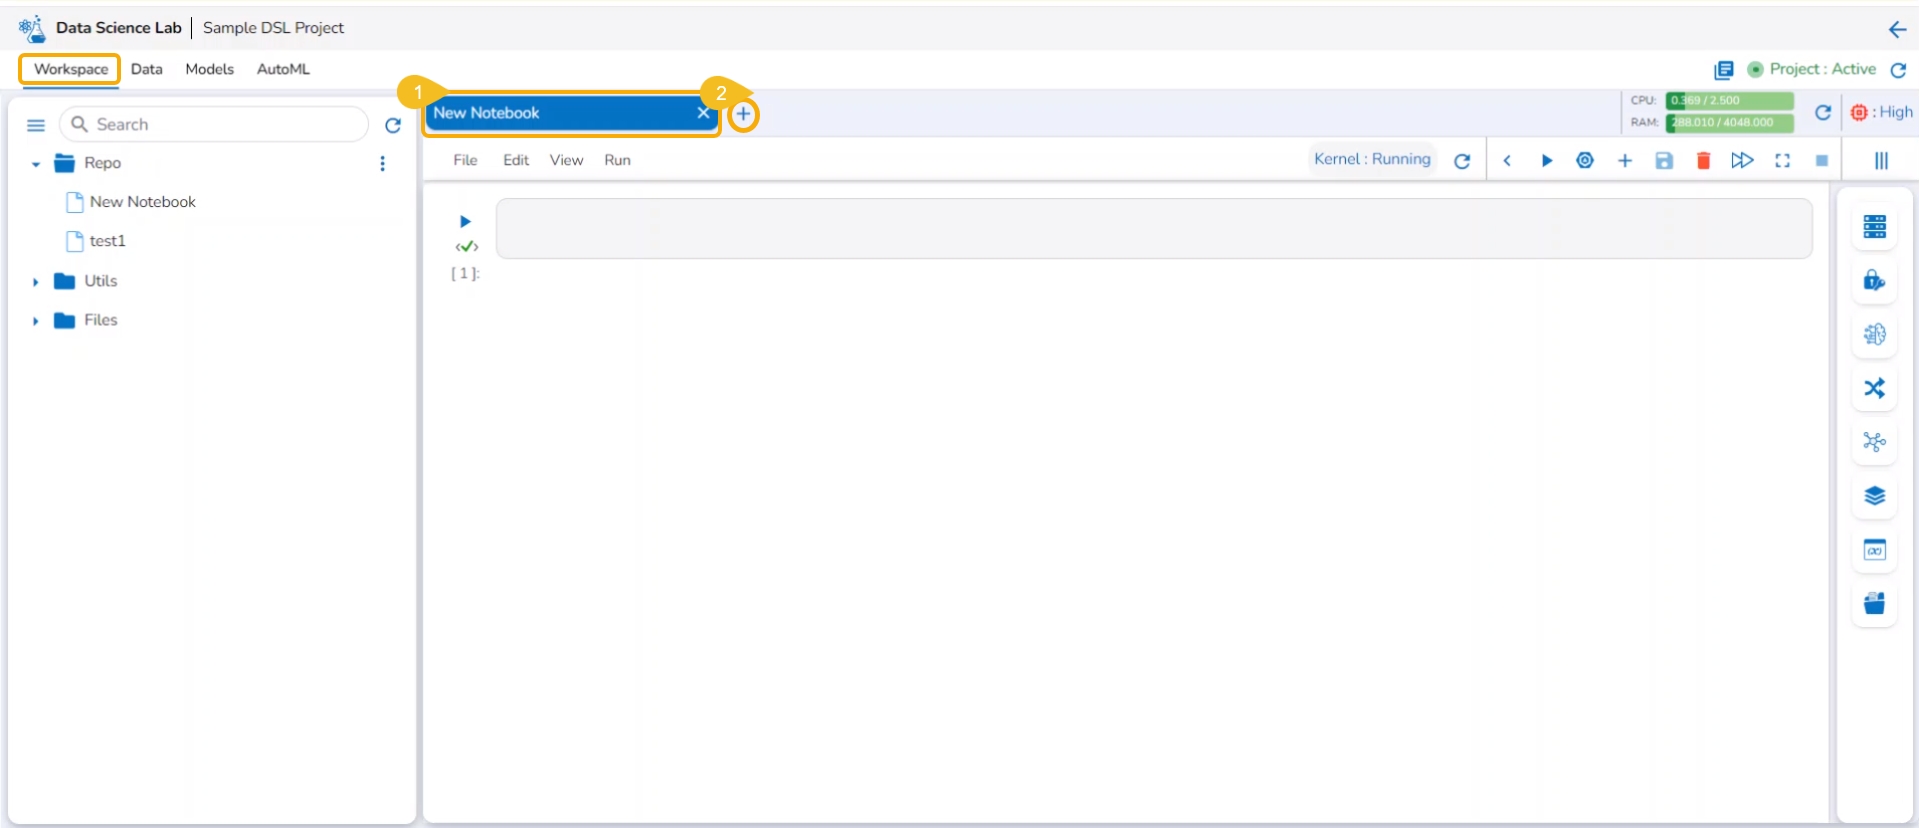
The users also get an Add option to create a new Notebook. This option becomes available to the users only after at least one Notebook is created using the Create option and open it.
Open an existing Notebook from a Project.
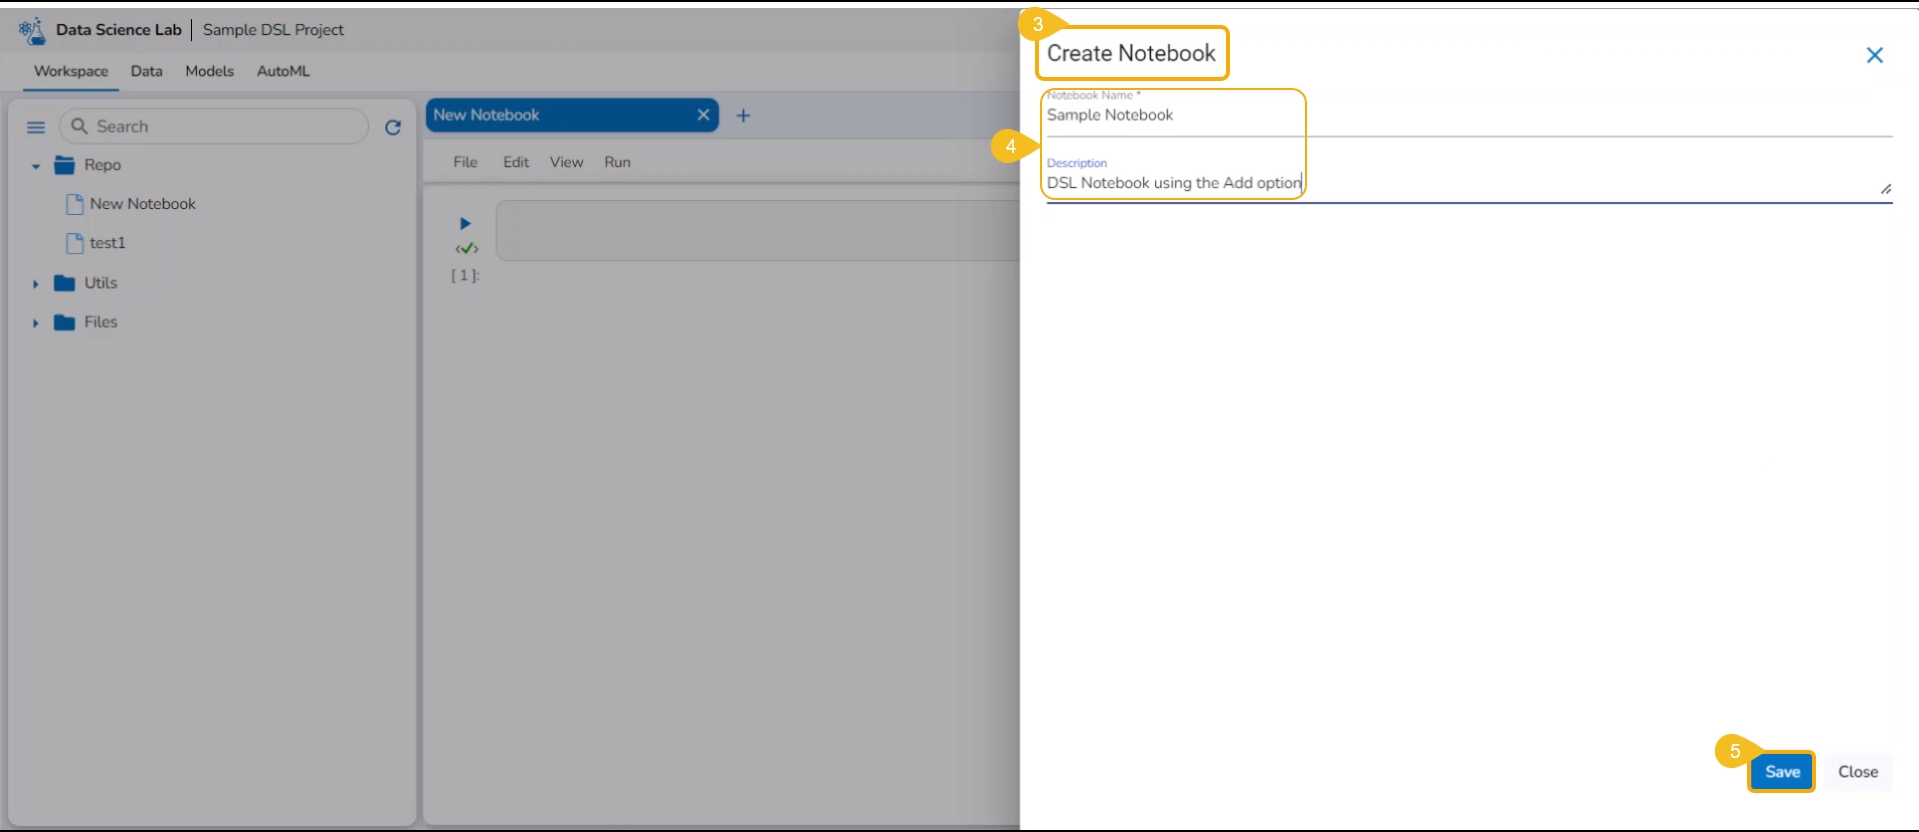
The Add icon appears on the header next to the opened Notebook name. Click the Add icon.
The Create Notebook window opens.
Provide the Notebook Name and Description.
Click the Save option.
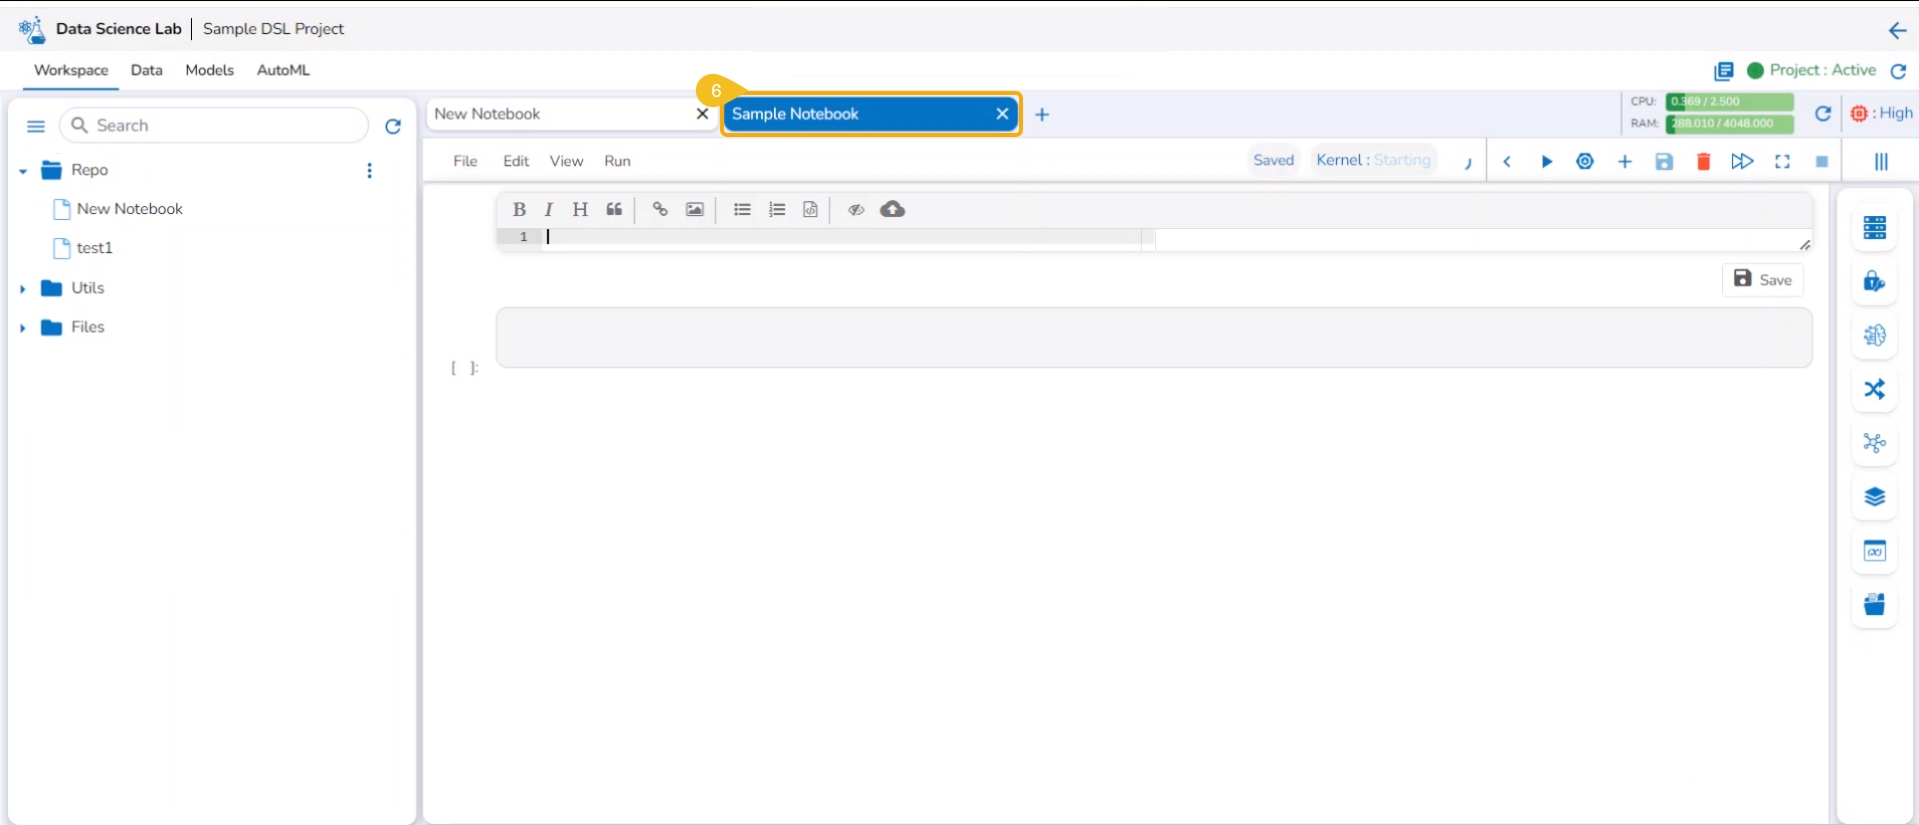
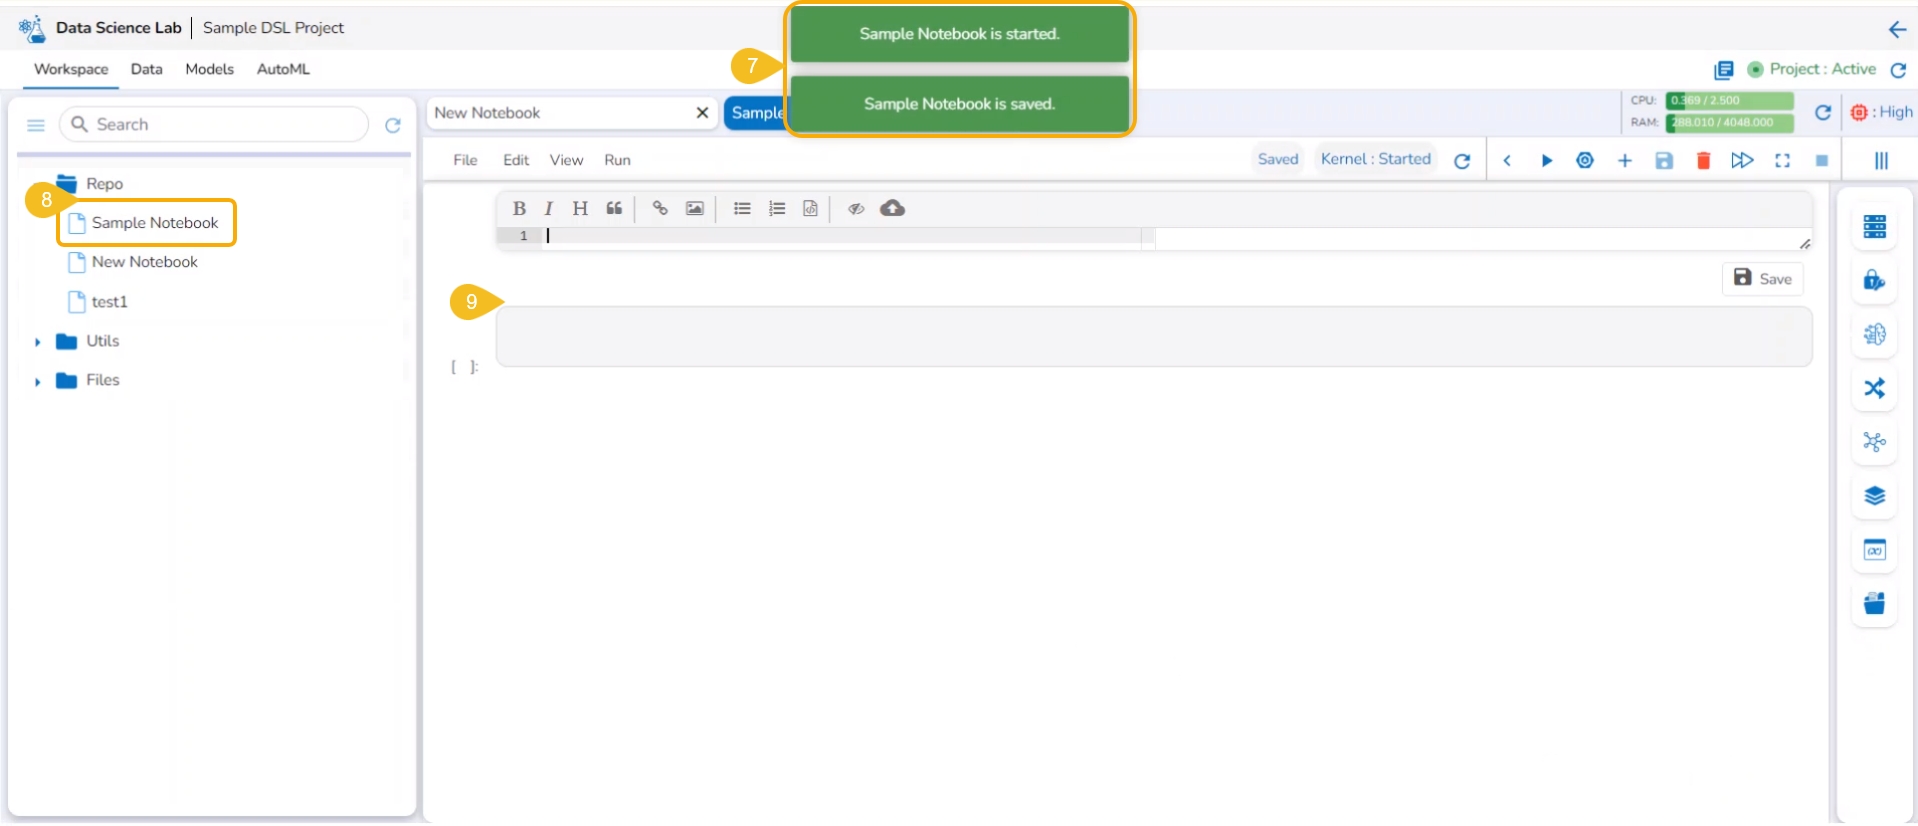
A new Notebook gets created and the user will be redirected to the interphase of the newly created Notebook.
Soon the notification messages assuring the user that the newly created Notebook has been saved and started appear on the screen.
The Notebook gets listed under the Notebook list provided on the left side of the screen.
A code cell gets added by default to the newly created Notebook for the user to begin the data science experiment.
Please Note:
The user can edit the Notebook name by using the Edit Notebook Name icon.
The accessible datasets, models, and artifacts will be listed under the Datasets, Models, and Artifacts menus.
The Find/Replace menu facilitates the user to find and replace a specific text in the notebook code.
You can bring your Python script to the Notebook framework to carry forward your Data Science experiment.
Please Note: The Import option appears for the Repo folder.
The Import functionality contains two ways to import a Notebook.
Import Notebook
The users can seamlessly import Notebooks created using other tools and saved in their systems.
Please Note: The downloaded files in the .ipynb format only are supported by the Upload Notebook option.
Check out the given illustration on how to import a Notebook.
Navigate to the Projects tab.
Click the View icon for an activated project.
The next page opens displaying all the related tabs.
The Workspace tab opens by default.
Click the Import option from the Workspace tab.
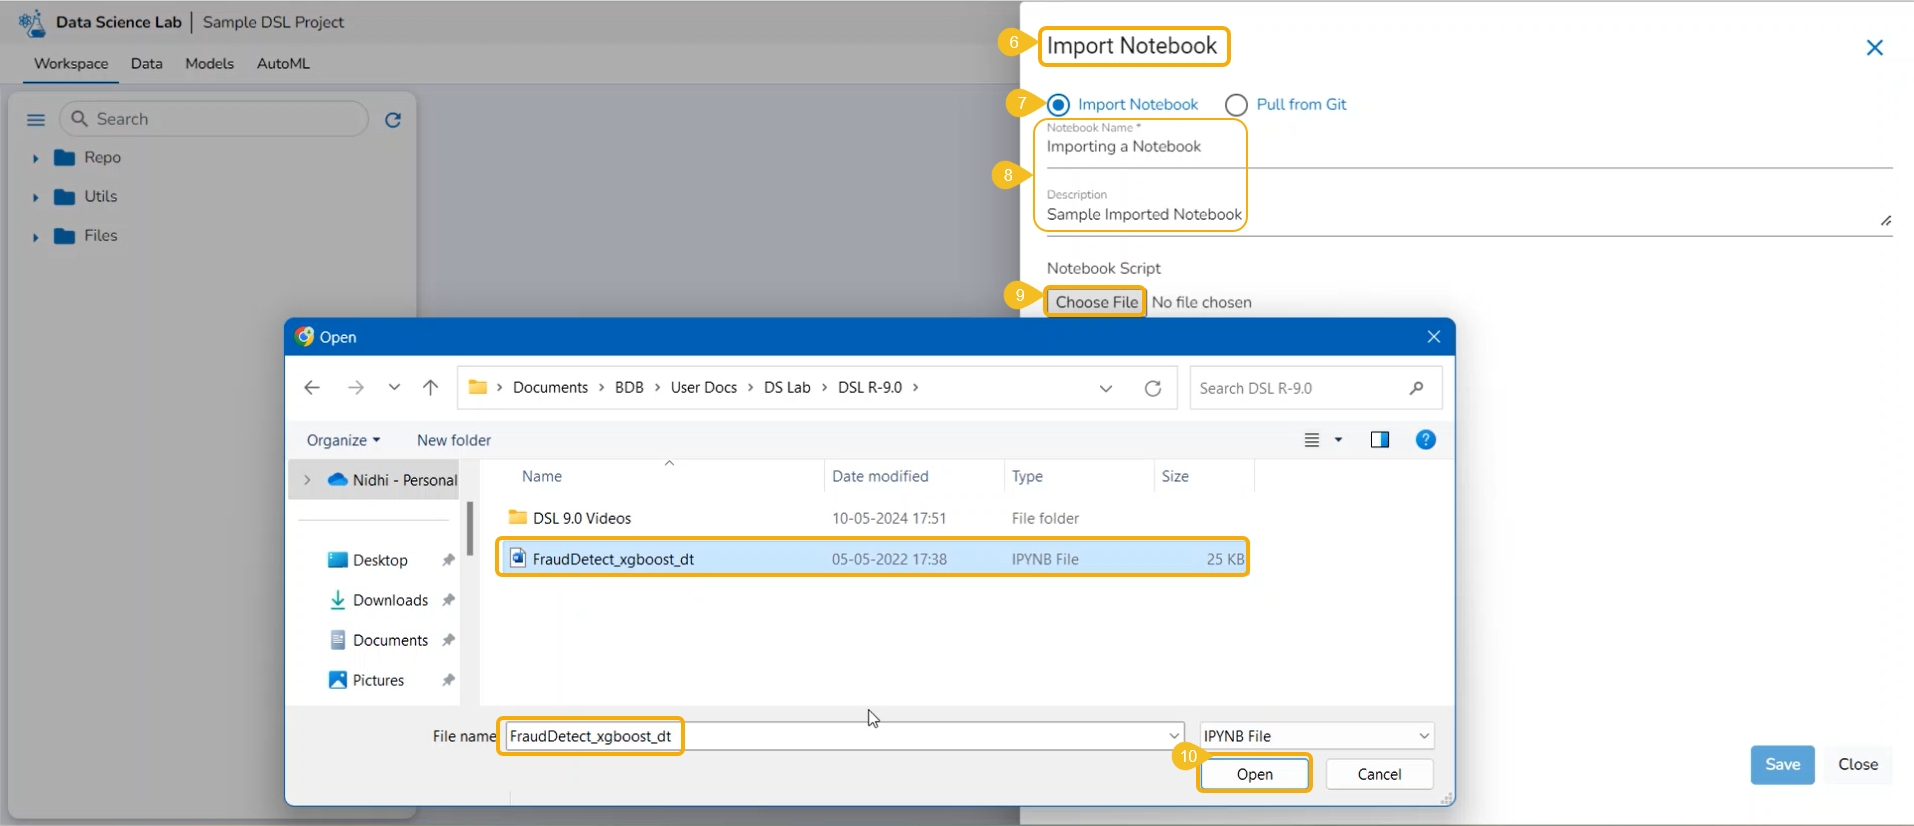
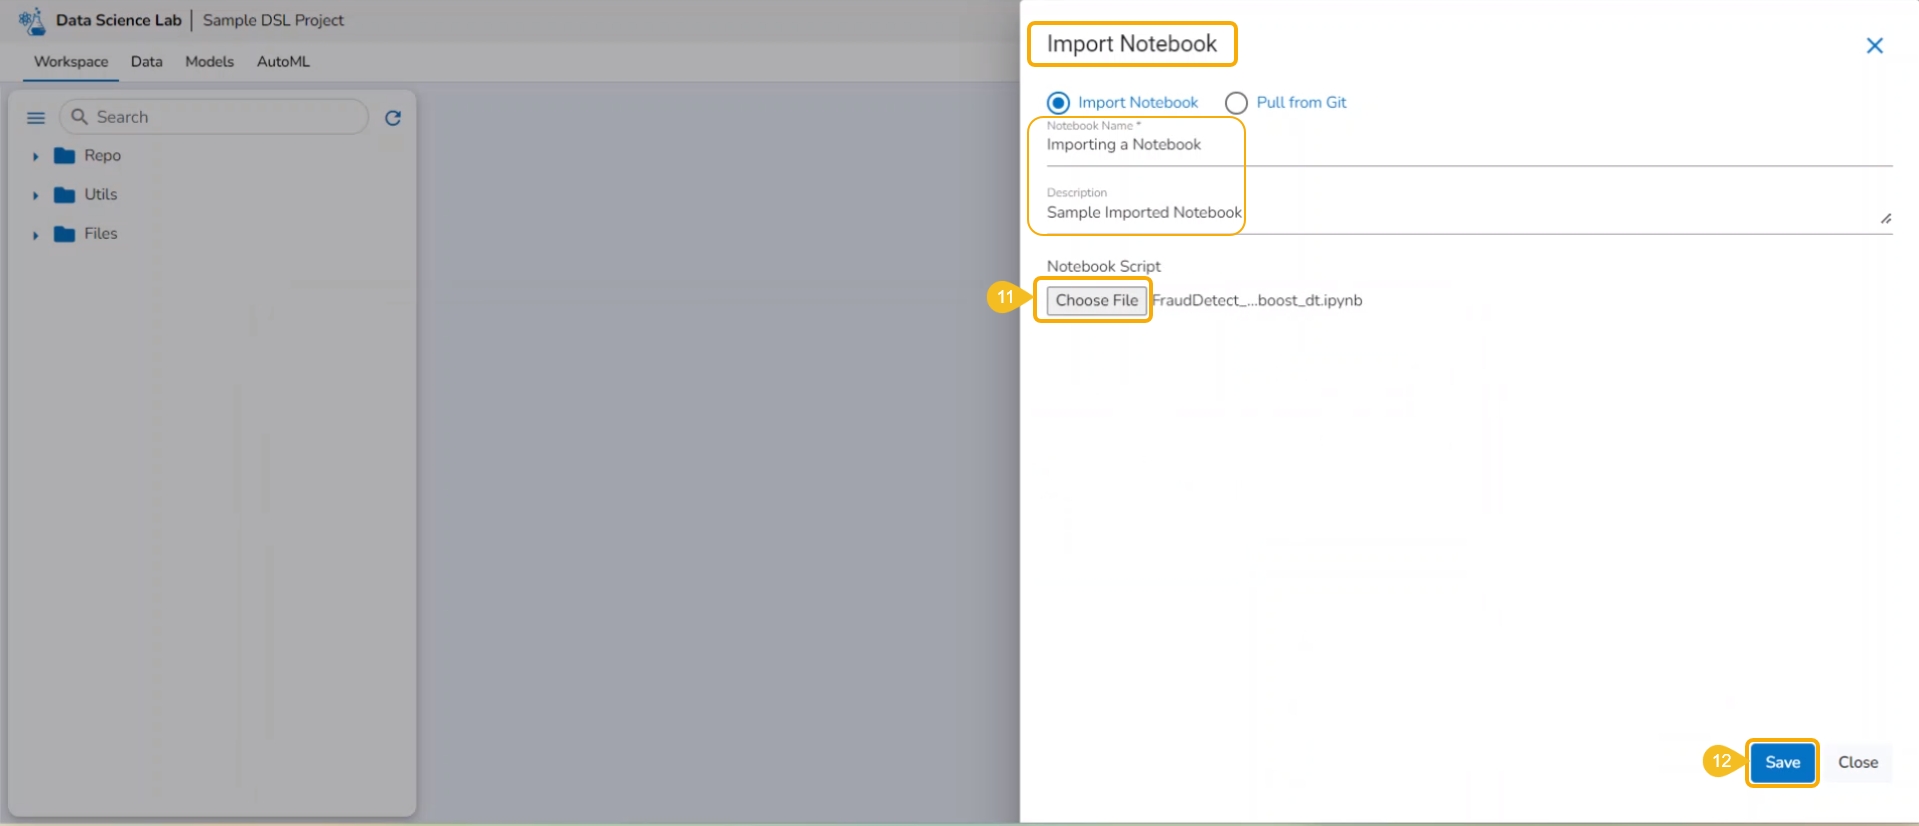
The Import Notebook page opens.
Select the Import Notebook option.
Provide the following information.
Notebook Name
Description (optional)
Click the Choose File option.
Select the IPYNB file from the system and upload it.
The selected file appears next to the Choose File option.
Click the Save option.
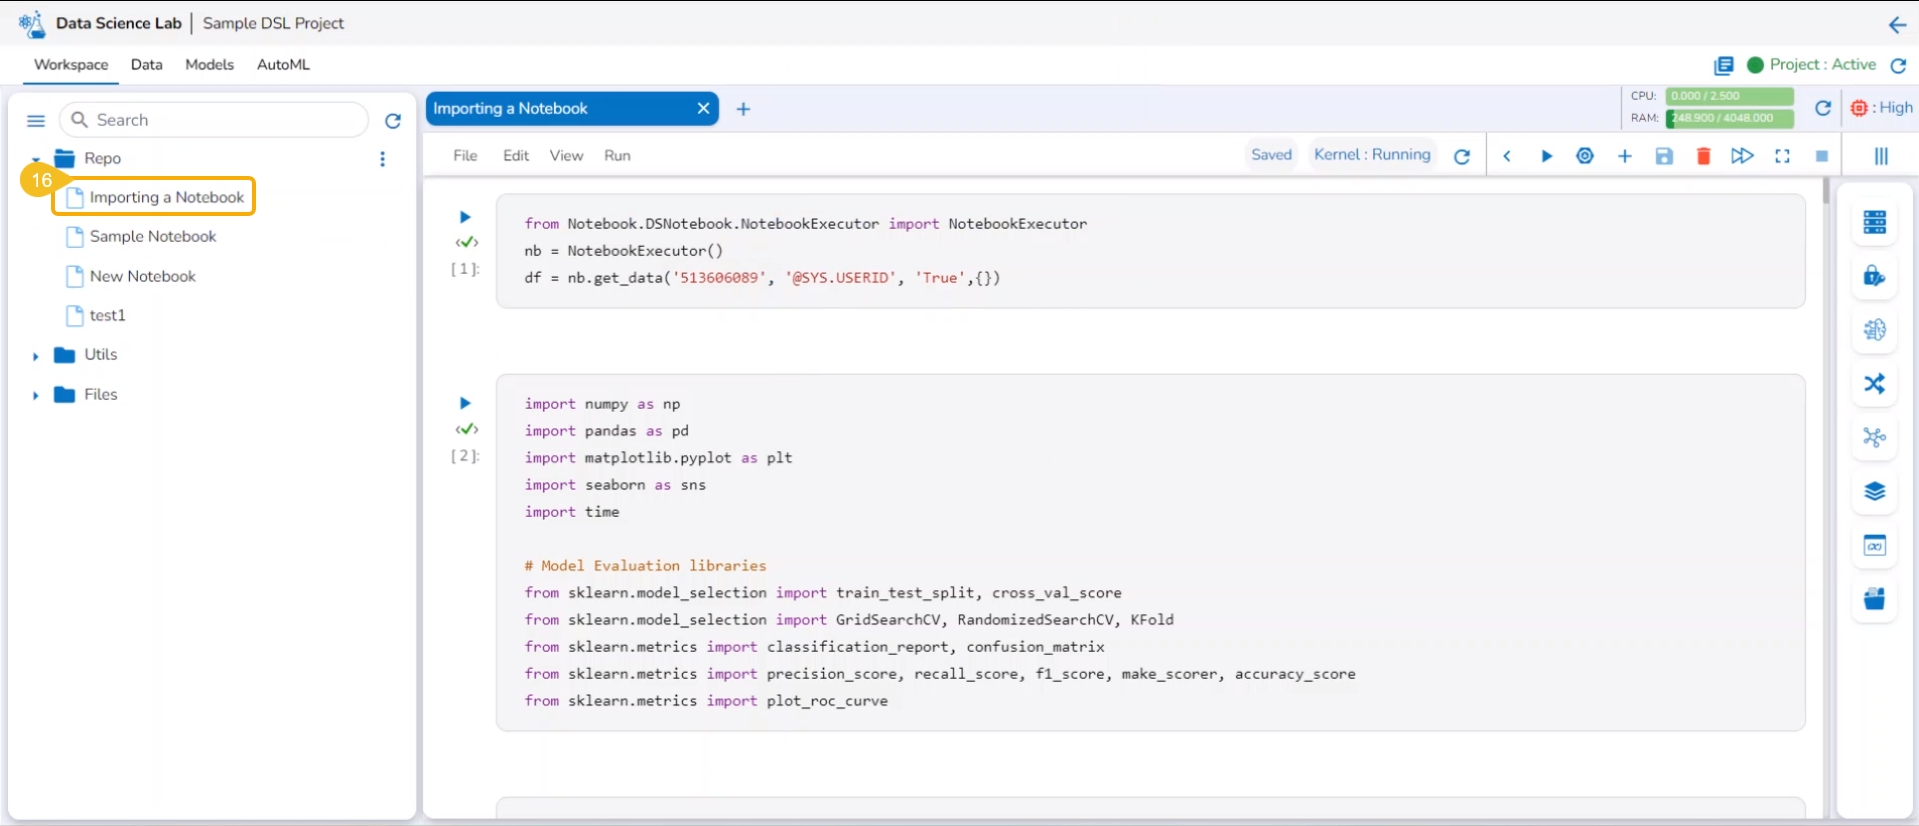
The Notebook infrastructure opens with the given name for the recently uploaded Notebook file. It may take a few seconds to save the uploaded Notebook and start Kernel for the same.
The following consecutive notification messages will appear to ensure the user that the Notebook is saved, uploaded, and started.
The same is mentioned by the status updates on the Notebook header (as highlighted in the given image).
The uploaded Notebook is listed on the left side of the page.
This release provides support from Linter to analyze source code and identify programming errors, bugs, and other potential issues.
The Linter functionality helps developers maintain high code quality by enforcing coding standards and best practices.
A linter helps in data science by:
Improving Code Quality: Enforces coding standards and best practices.
Detecting Errors Early: Identifies syntax errors, logical mistakes, and potential bugs before execution.
Enhancing Maintainability: Catches issues like unused variables, making code easier to maintain.
Facilitating Collaboration: Ensures consistent coding conventions across team members.
Optimizing Performance: Highlights inefficient code patterns for better performance in data processing and analysis.
Please Note: The Linter functionality is available for normal and Repo Sync projects. The Repo Sync Projects display the Git Console as well in the drawer that appears while using the Linter functionality.
Check out the illustration on how Linter functionality works.
Every imported utility script will be credited with some actions to be applied to it. This page aims to describe them all.
Navigate to the Workspace tab for an activated project. Open the Utils folder. Select a Utils file and click on the ellipsis icon to access the Actions context menu for the utility script.
Please Note:
The imported Utility files from the system will not support Push to VCS and Pull from VCS actions.
The same Actions functionality is available for a .py file under a Repo Sync project.
The user can modify the content of a utility script using the Edit option.
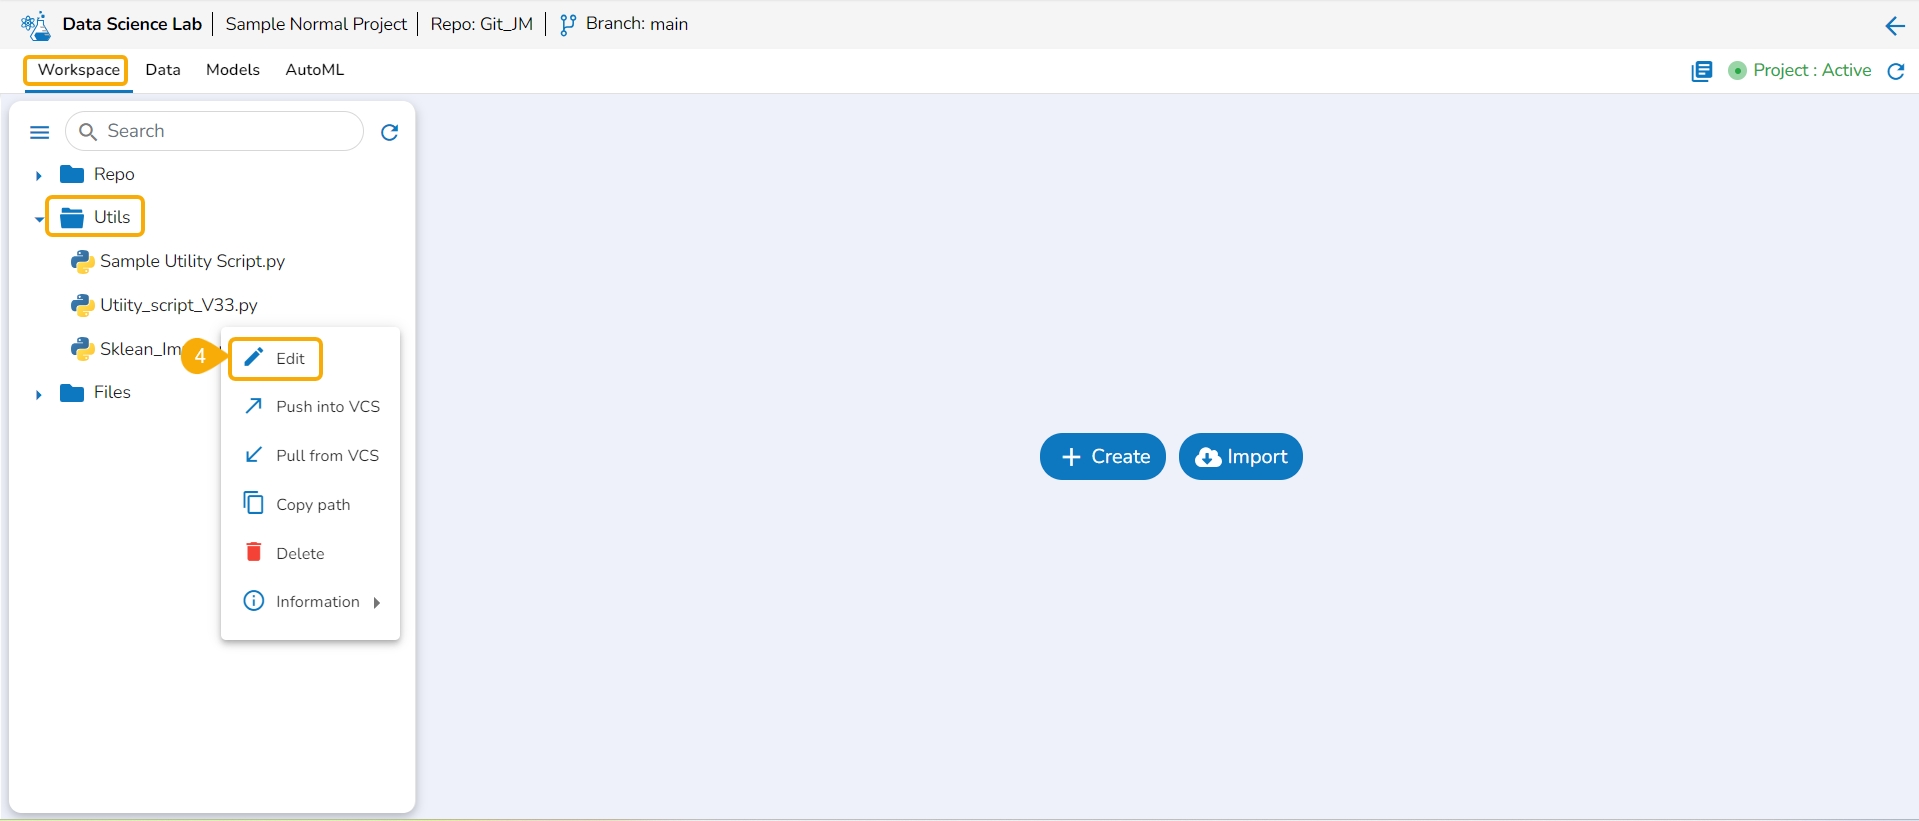
Navigate to the Workspace tab for a normal Data Science Lab project.
Click on the Utils folder.
Select the Ellipsis icon provided for a Utility file.
Select the Edit option from the context menu that opens for a Utility file.
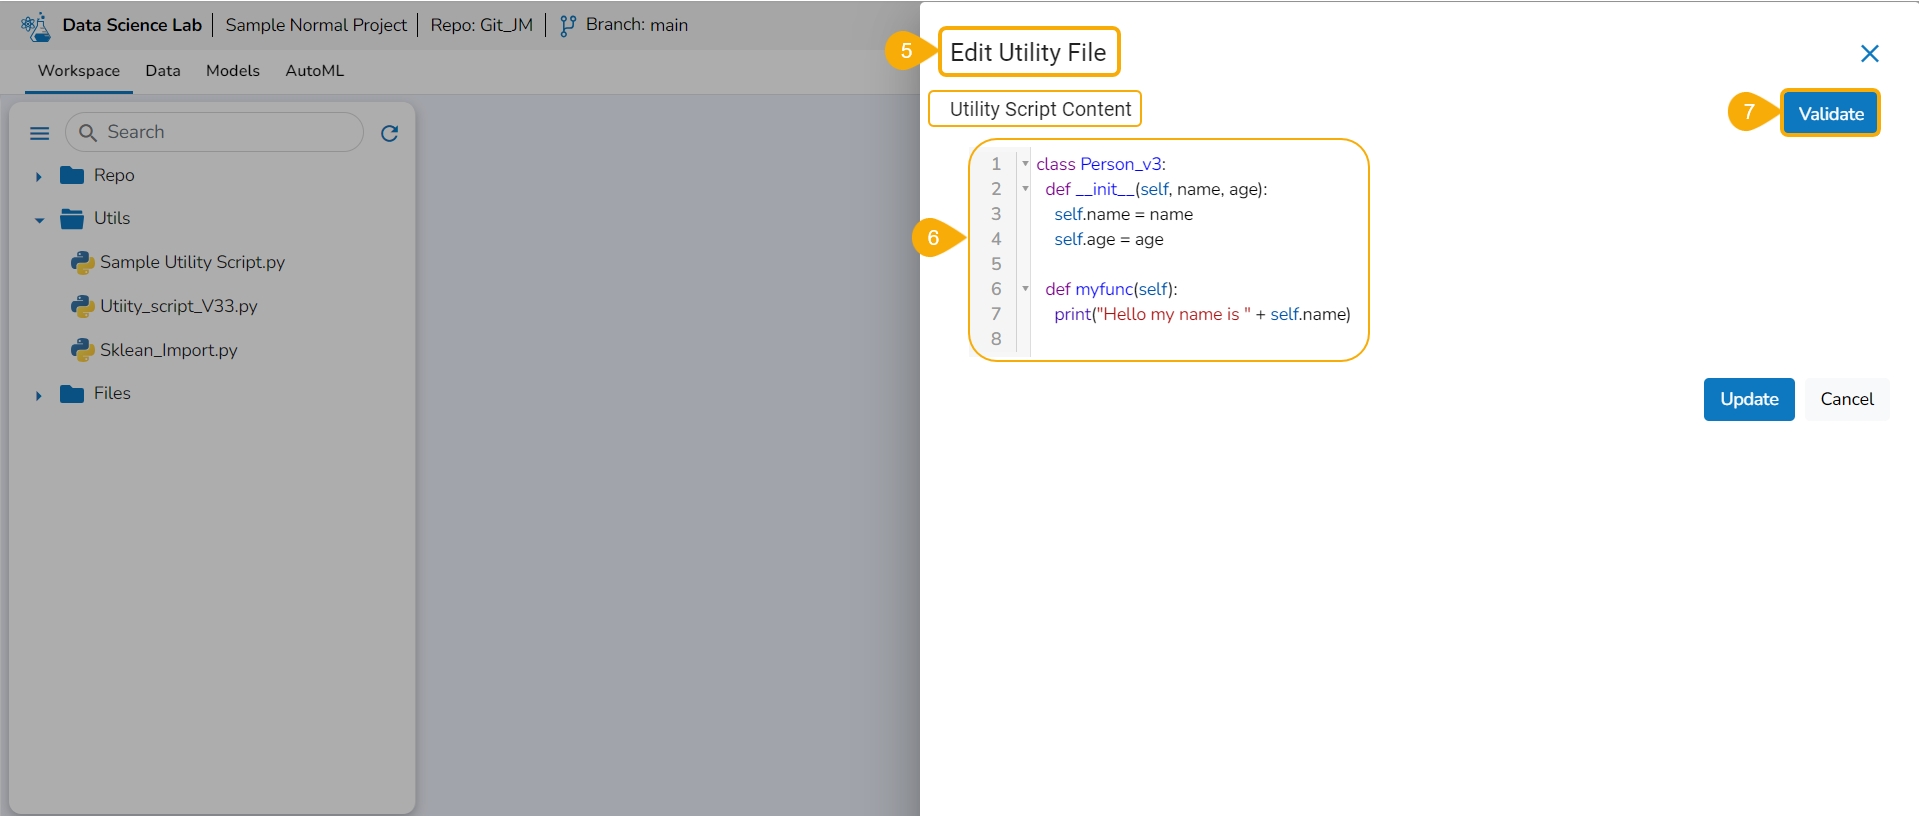
The Edit Utility File window opens displaying the Utility script content.
Modify the script content.
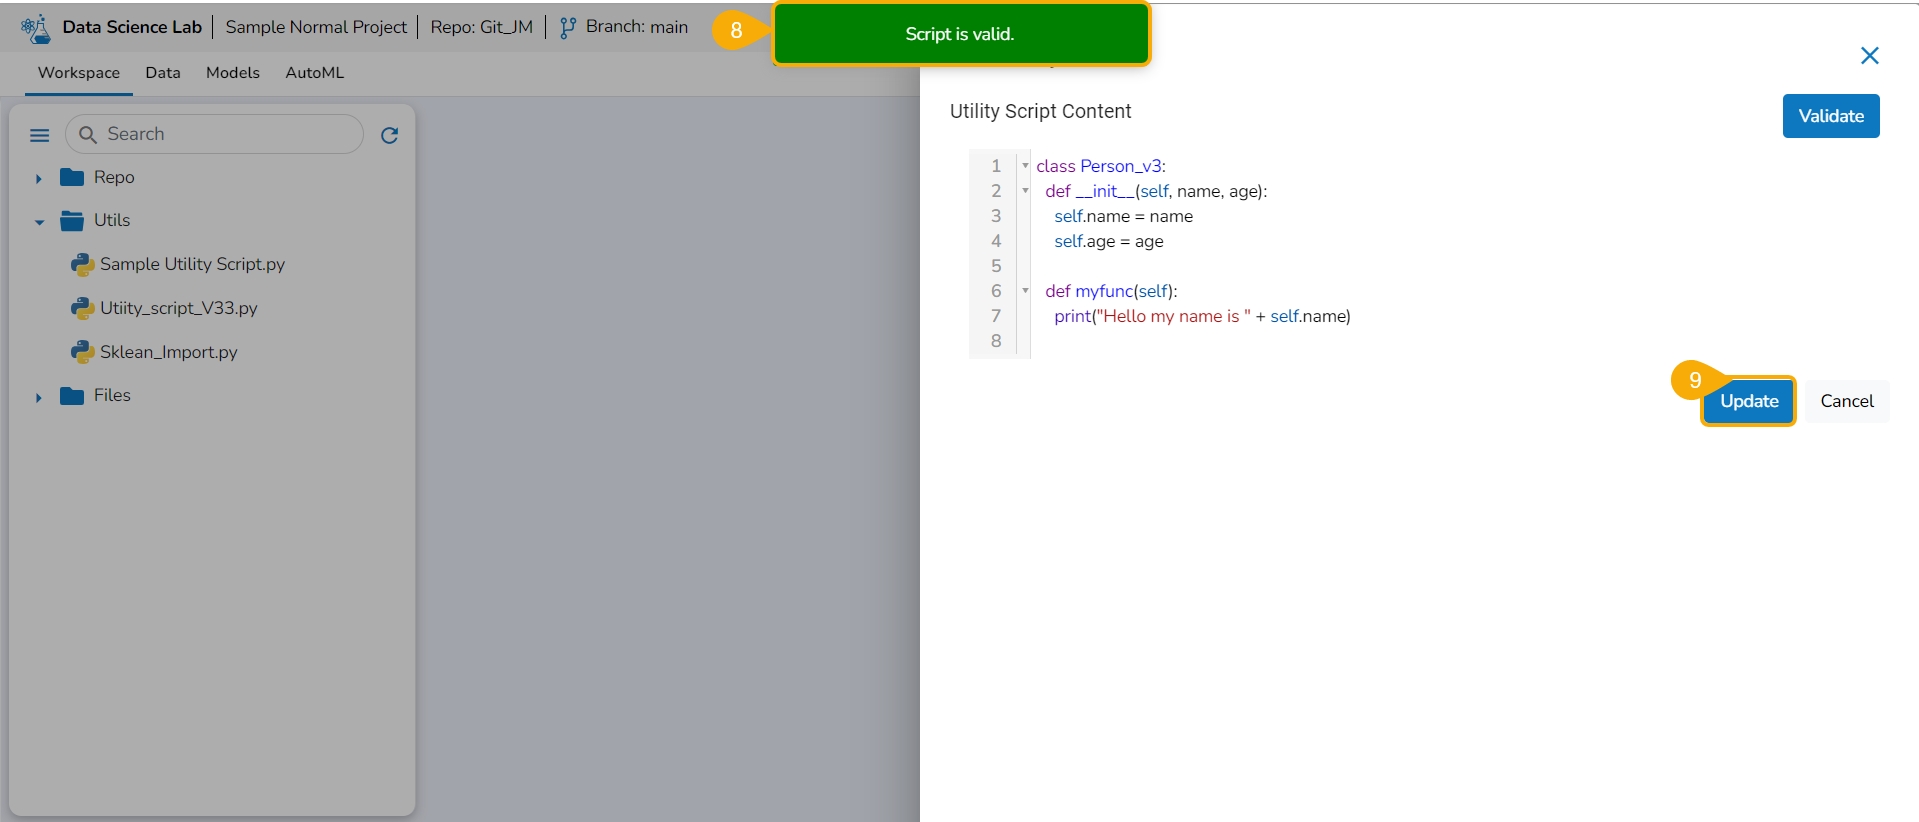
Click the Validate option.
A notification ensures the script is valid post modification in the script content.
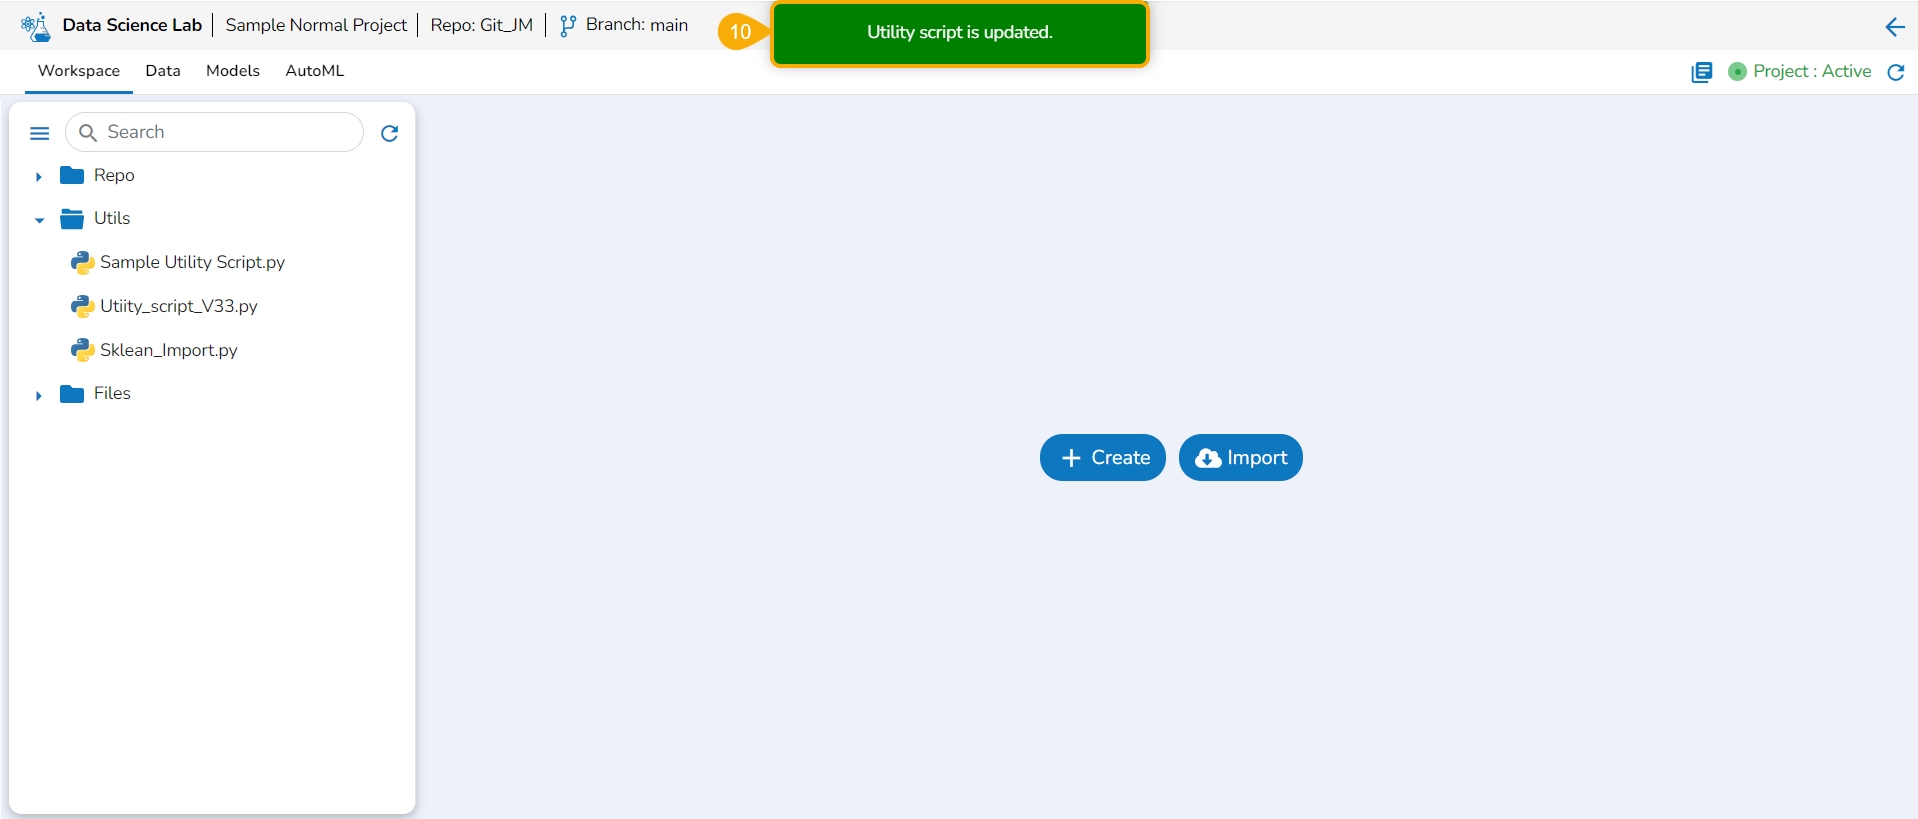
Click the Update option.
A notification ensures that the utility script is updated.
Pre-requisites:
The user branch should have Developers' + maintainers' permission to push the latest code into the Main branch.
The User token has to be set in the user profile using the Custom Fields setting available at the Admin level.
The user token key name has to be 'bdbvcstoken'.
Navigate to the Admin module.
Open the Custom Field Settings under the Configurations option.
The Custom Field Information appears.
Provide the following information for the custom field:
Key- bdbvcstoken
Input type - Manual
Description - Git User Token
Mandatory - No
Click the Save option to save the modified Custom Field Settings.
A notification message informs the user that the custom field settings are updated.
Navigate to the Security module.
Go to the Users list.
Select the user from the list.
Click the Edit icon.
The Update User page opens.
Check out the Custom Fields section.
Validate whether the Git User Token is valid or not. If not provide the valid Git User Token.
Click the Save option.
A notification message appears to inform that the user is updated successfully.
Open the User Profile.
Select the My Account option.
The My Account details are displayed.
Open the Configuration option.
The same token gets updated as the Git Token section provided under the Configuration section.
The user can also pull a utility script or an updated version of the utility script from the Git Repository.
Pre-requisite:
The user needs to do an Admin configuration with an authentication token.
The user needs to do the Project level- configuration of Git Project and Git branch.
Please Note:
The normal Data Science Project with the Git branch configured to it will support the Pull from Git import functionality for a utility file.
Users can generate an authentication token from their Git Lab or Hub repositories.
Navigate to the Admin module.
Open the Version Control from the Configuration options.
Select the Token type as a private token.
Provide the authentication token in the given space.
Click the Test option.
A notification message appears to inform the user that authentication has been established.
Click the Save option.
A notification message appears to inform that the version control has been updated.
A user can make the changes in the pulled Python file and Push it into Git using the user token set in the user profile.
Please Note: Before using the Push a utility file to Git functionality make sure that the following requirements are fulfilled:
The latest file is pulled into DS Lab before modifying and pushing back to the Git branch.
The user should have access to the Git branch to push a change.
Check out the illustration for a utility script to understand the Pull from VCS and Push into VCS functionalities. It displays how taking each time a pull from VCS is necessary for using the Push to VCS functionality.
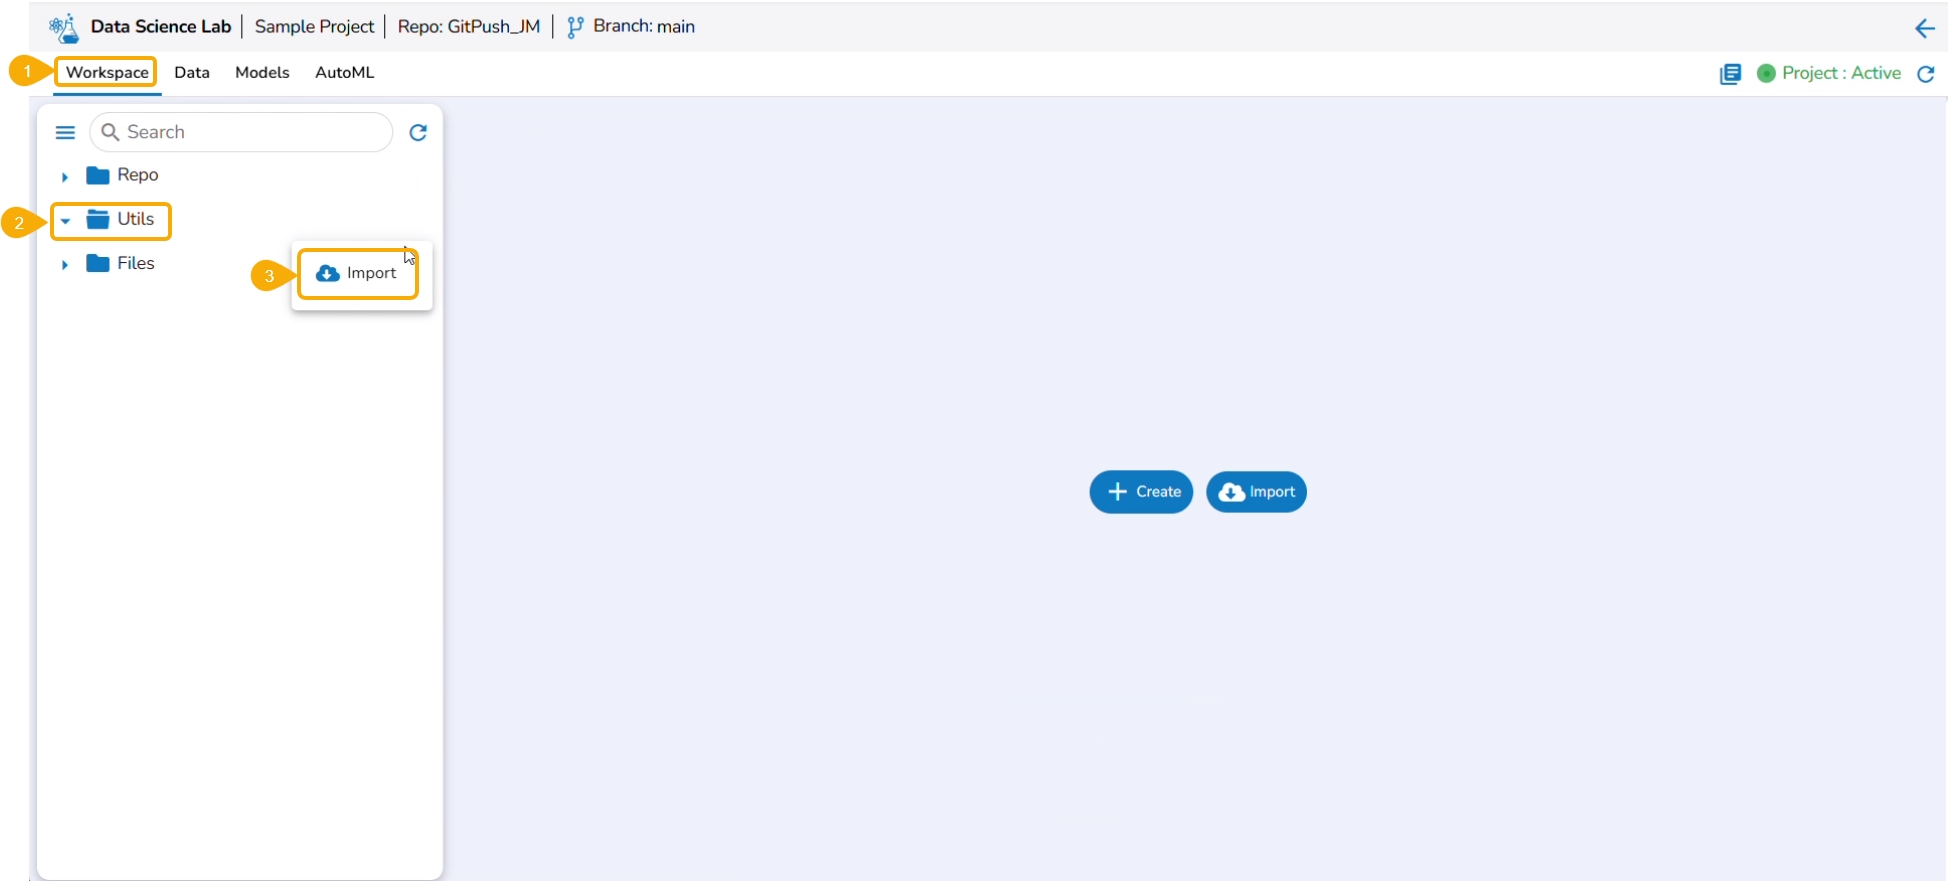
Navigate to the Workspace tab for an activated project that has a Git branch configured.
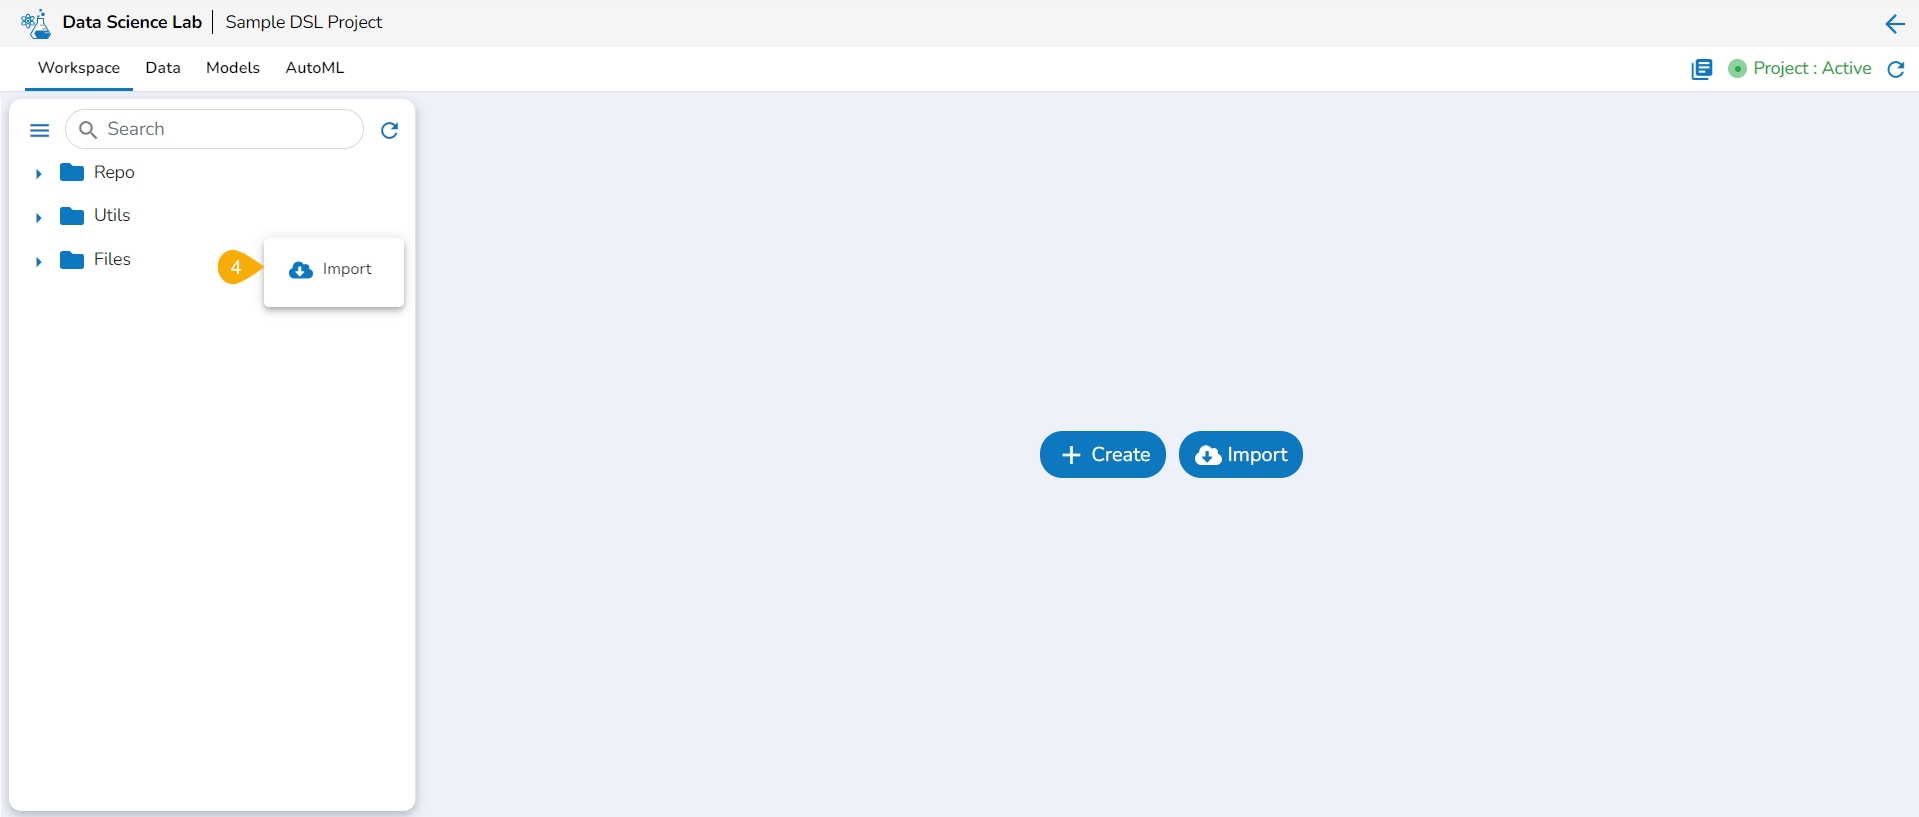
Click the Utils folder to get the Import option.
Click the Import option.
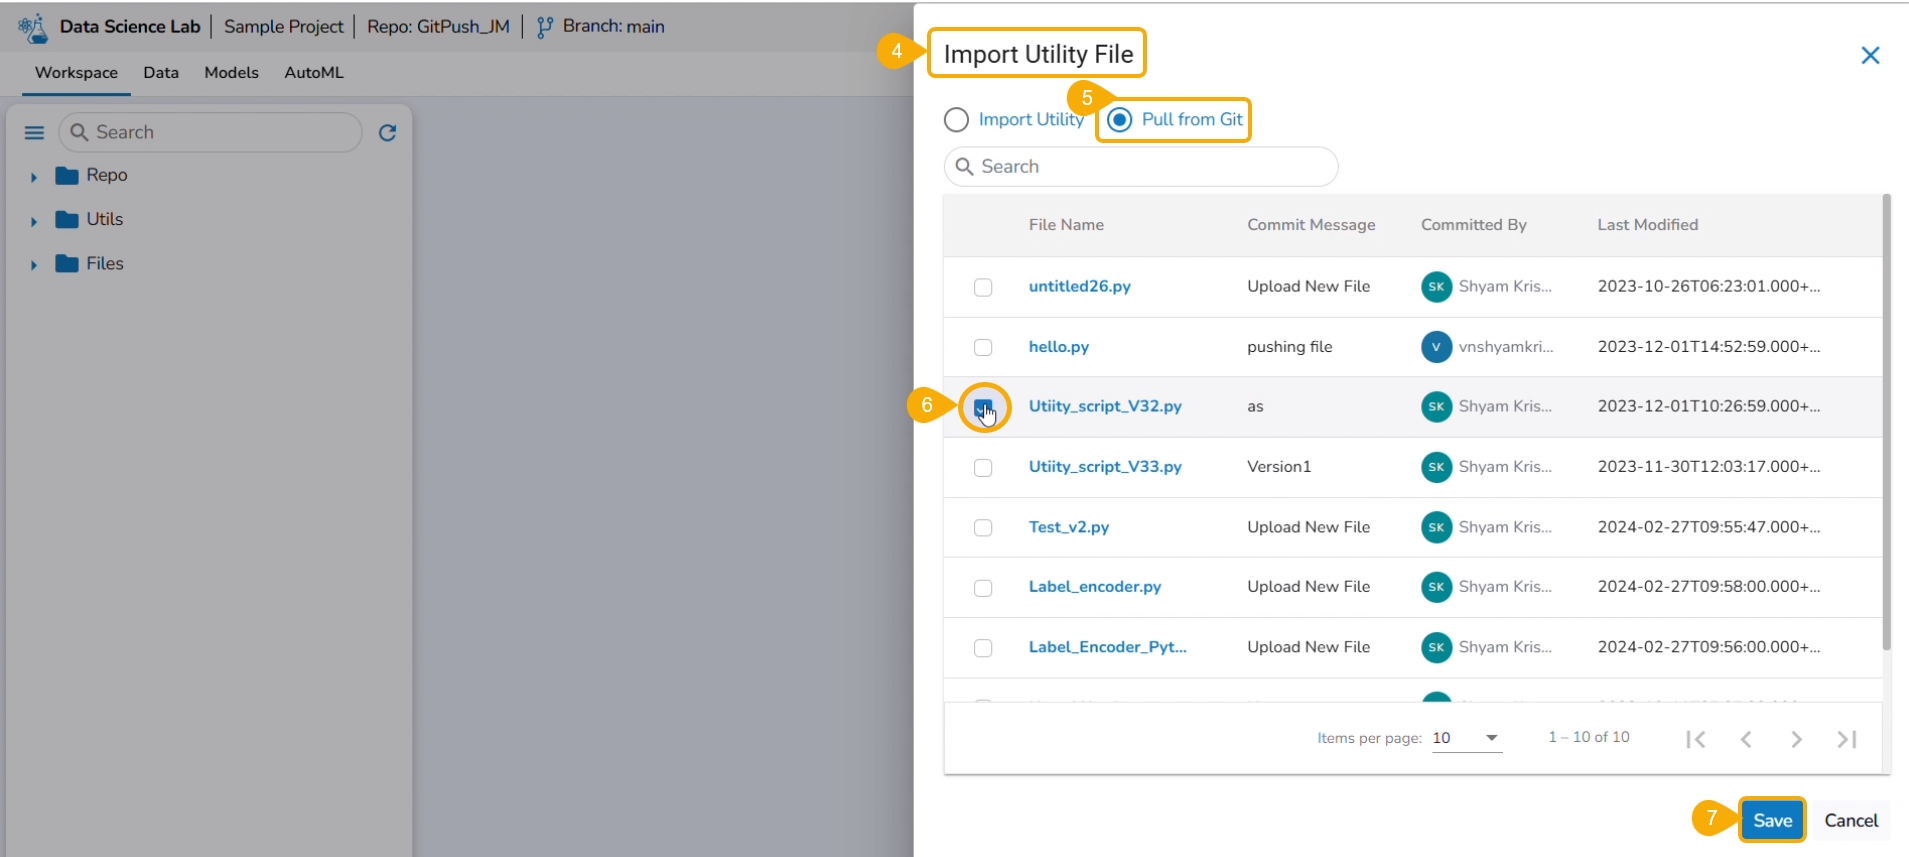
The Import Utility File drawer appears.
Select the Pull from Git option.
Select a file using the checkbox.
Click the Save option.
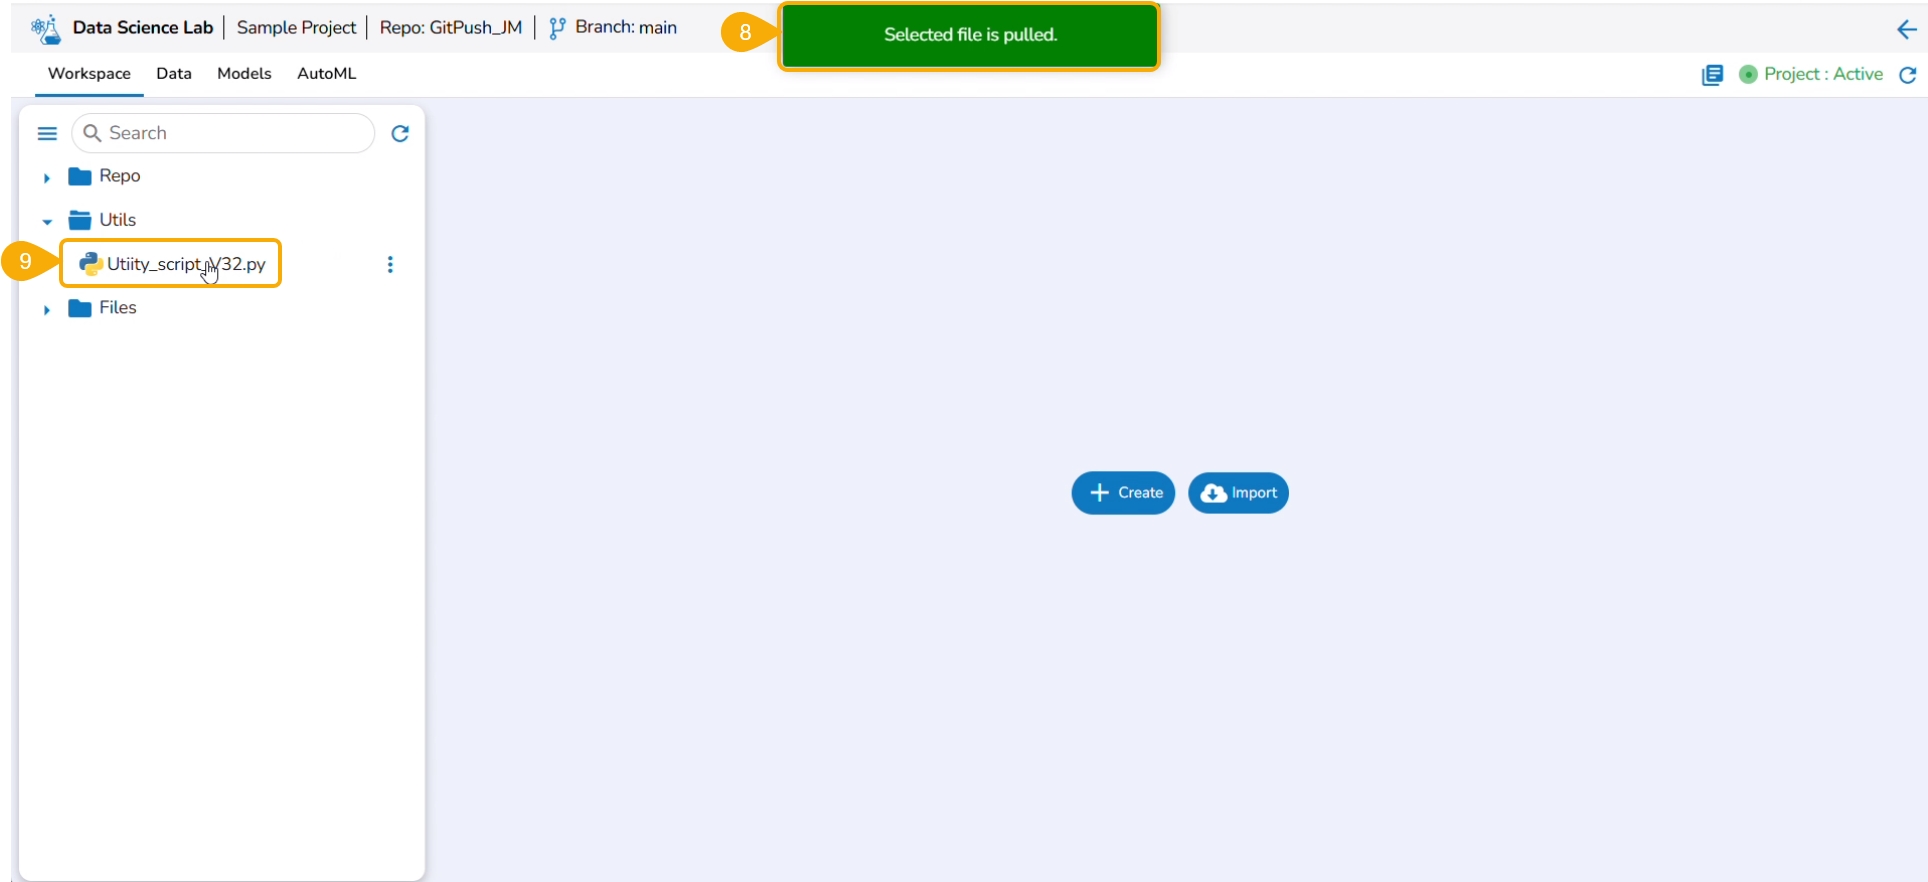
A notification message informs that the selected file is pulled.
The pulled file gets listed under the Utils folder.
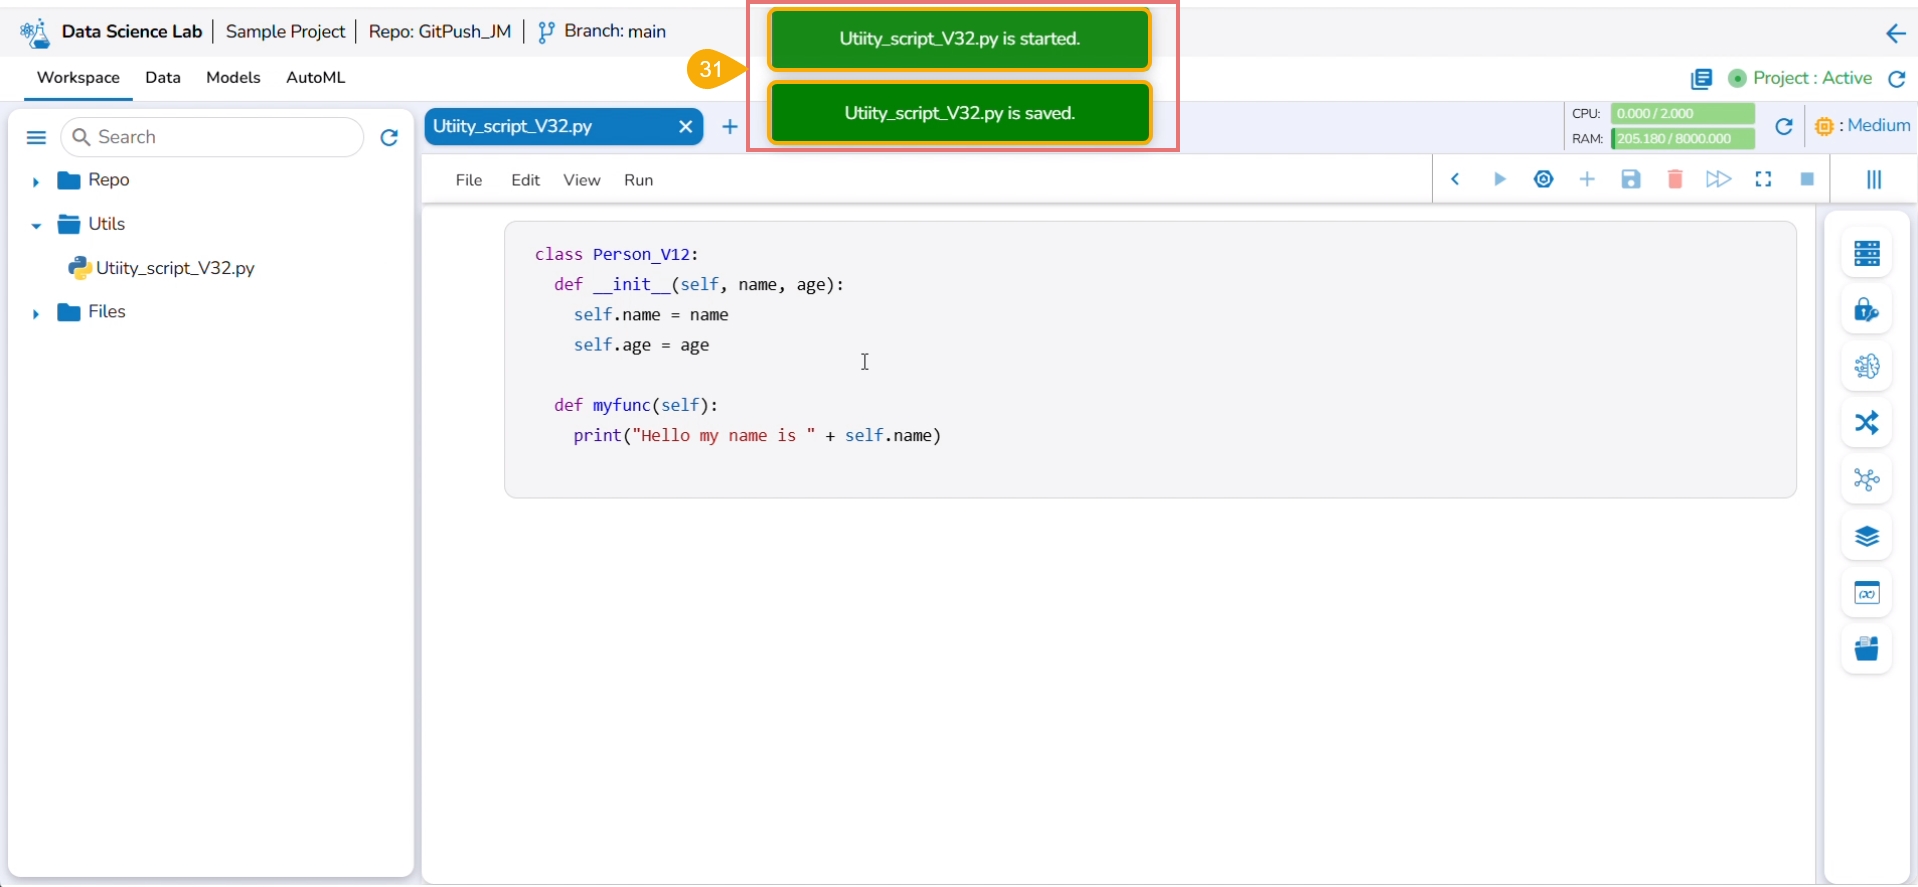
A notification message appears ensuring that the utility file is saved.
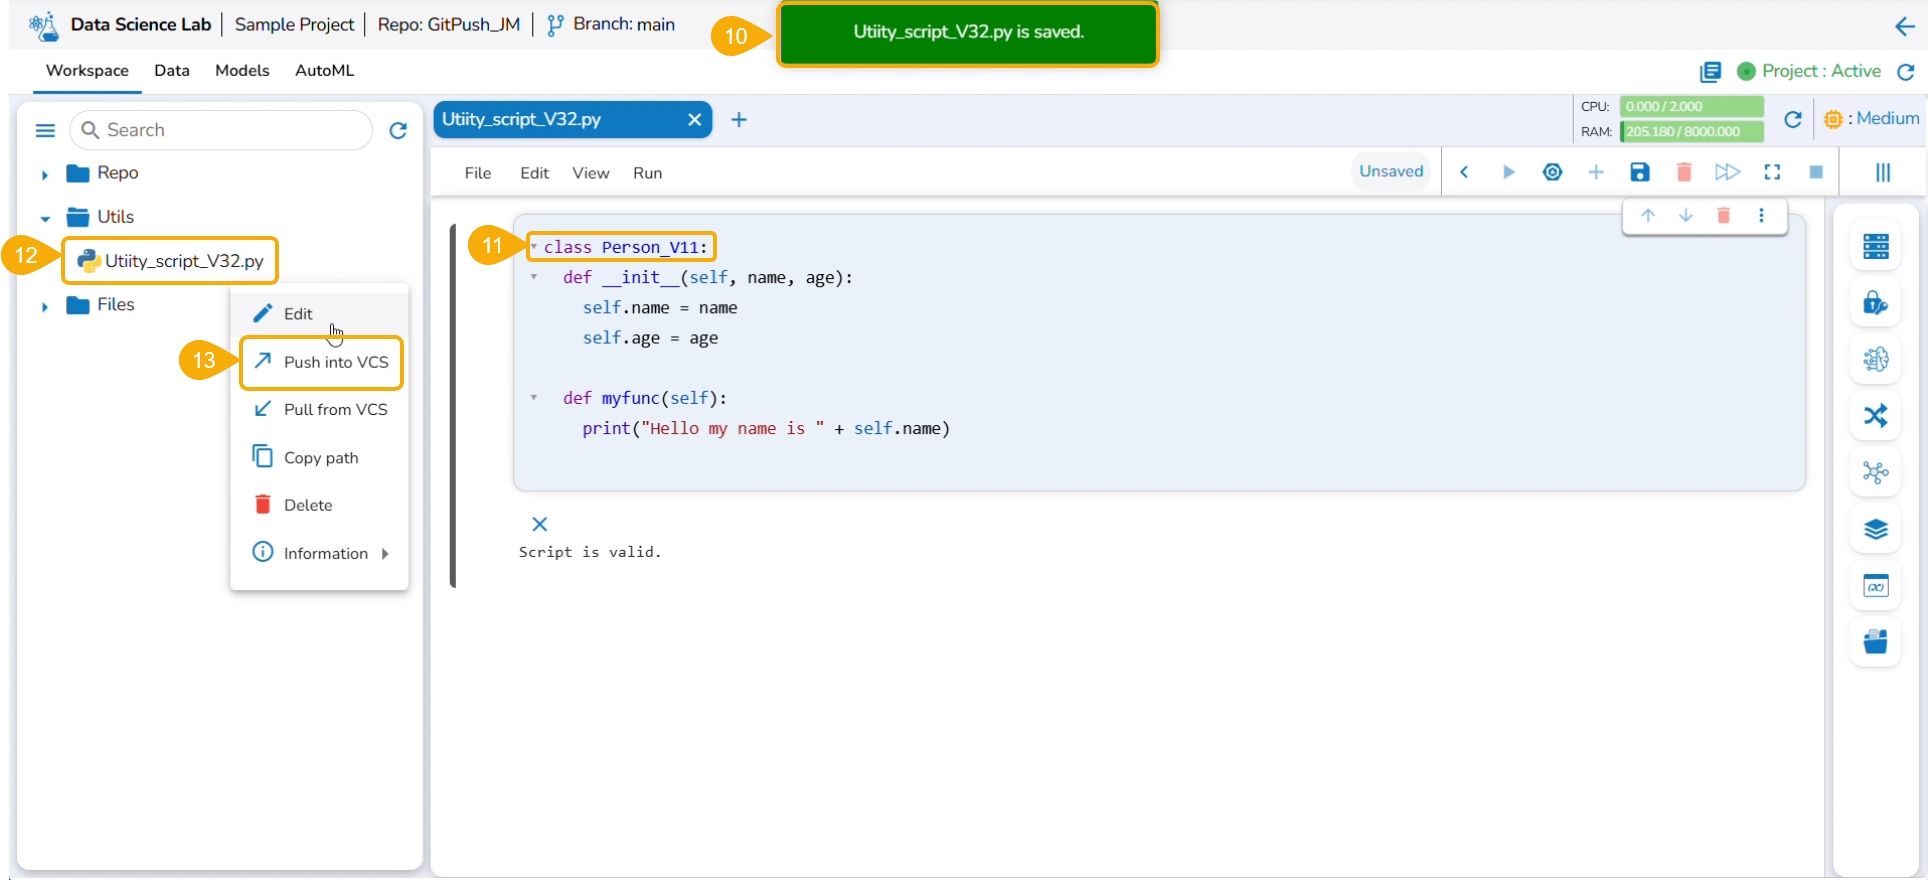
Modify the content of the saved Utility file.
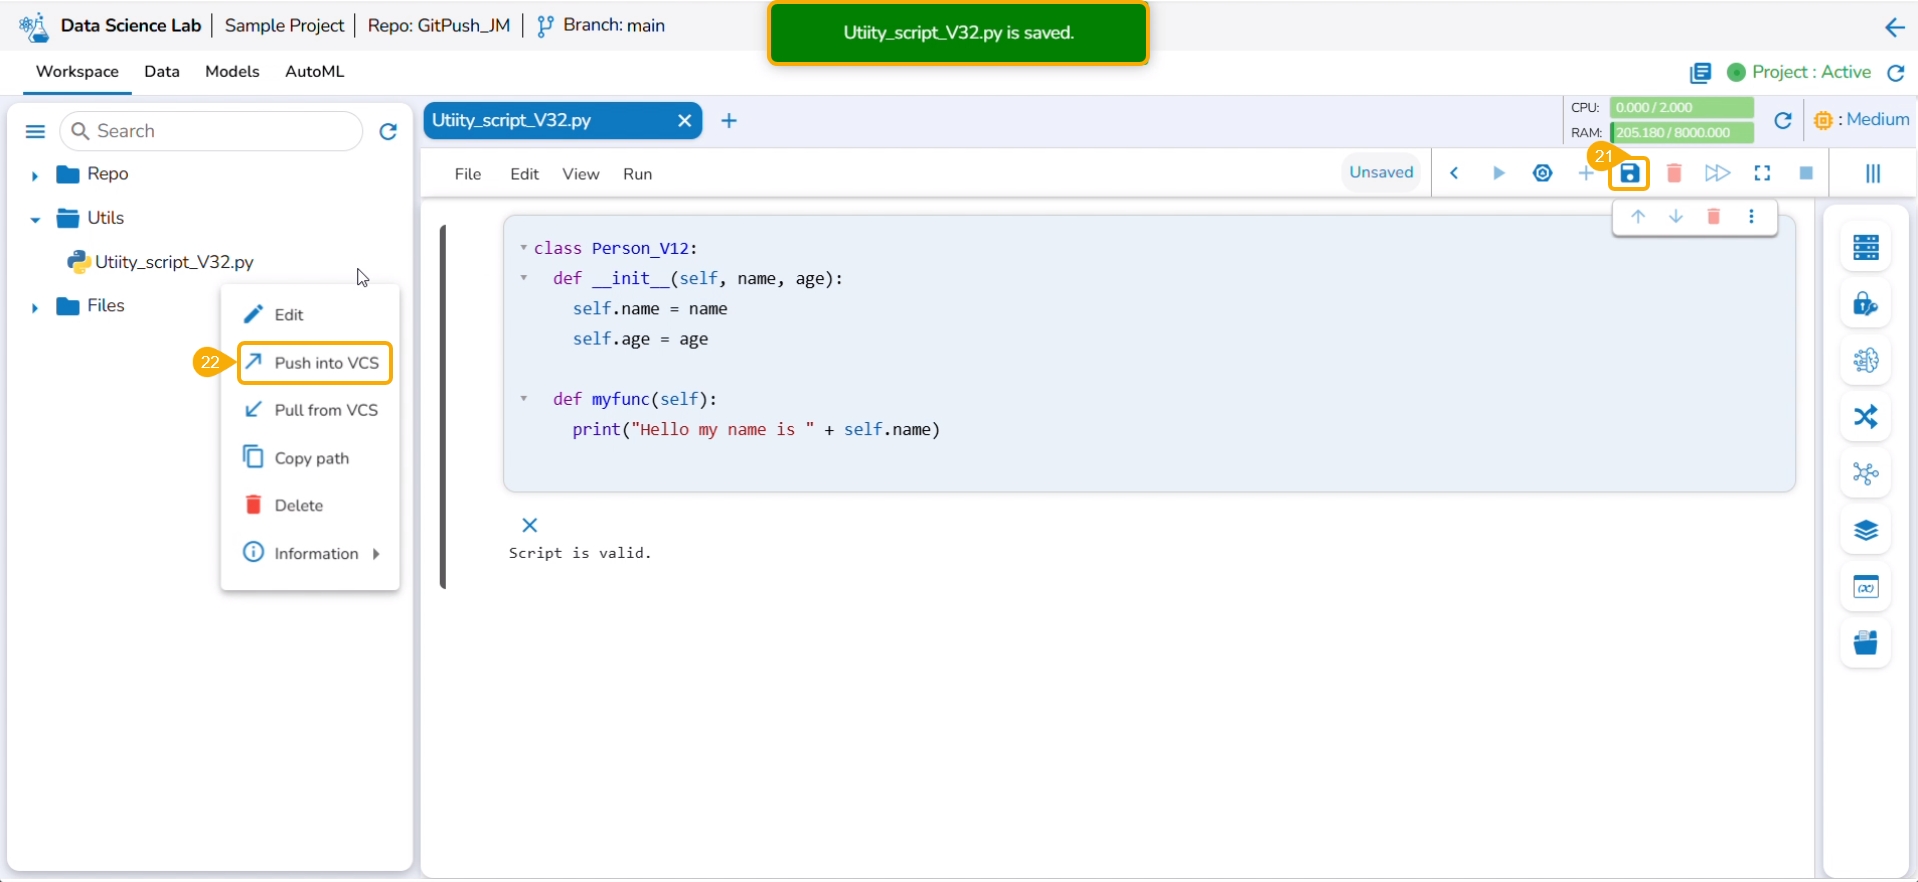
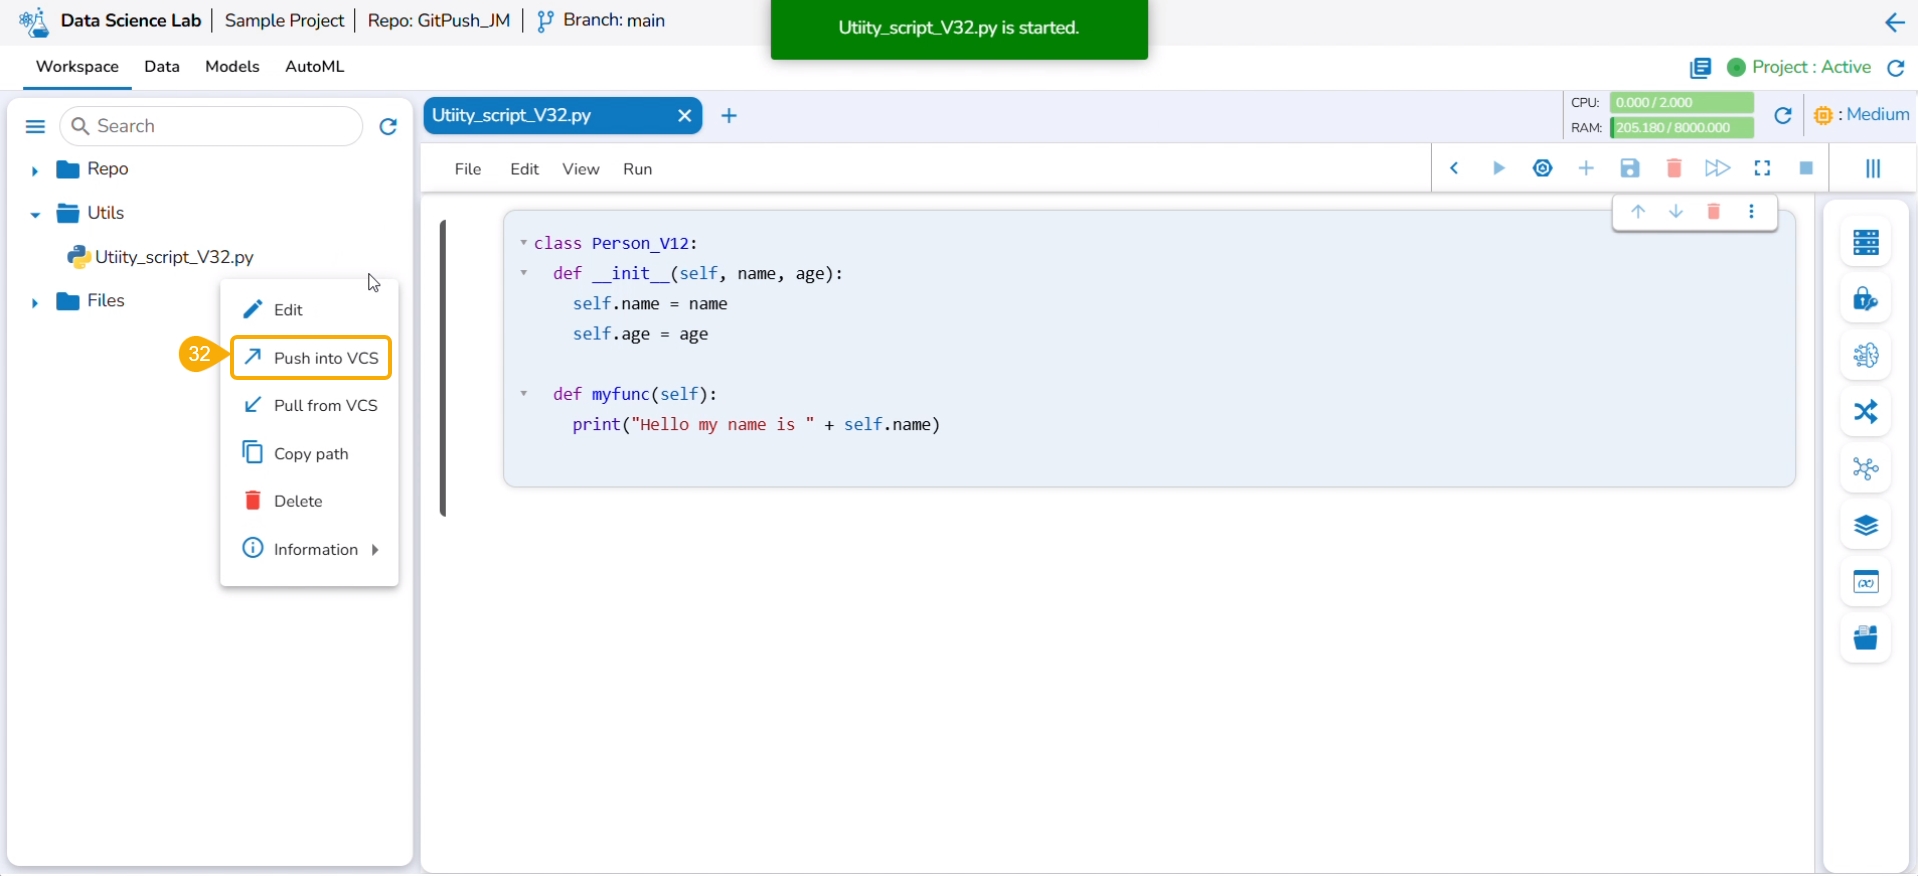
Click the pulled utility file from the Utils folder to open the context menu.
Select the Push into VCS option.
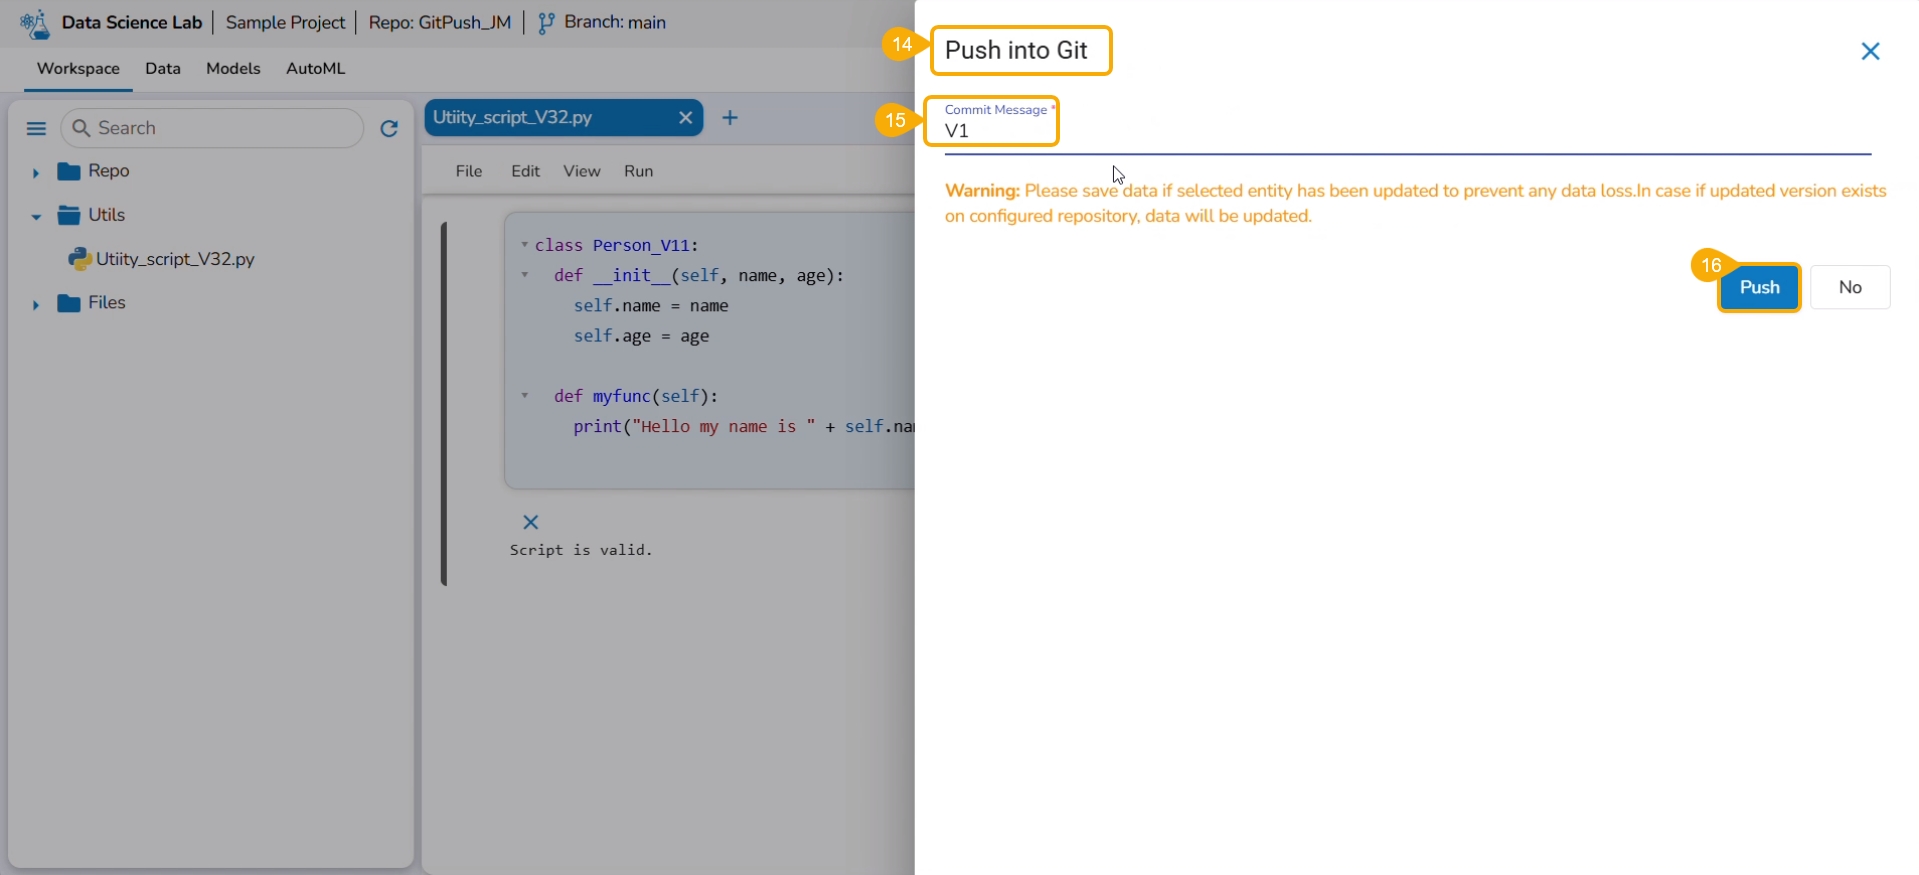
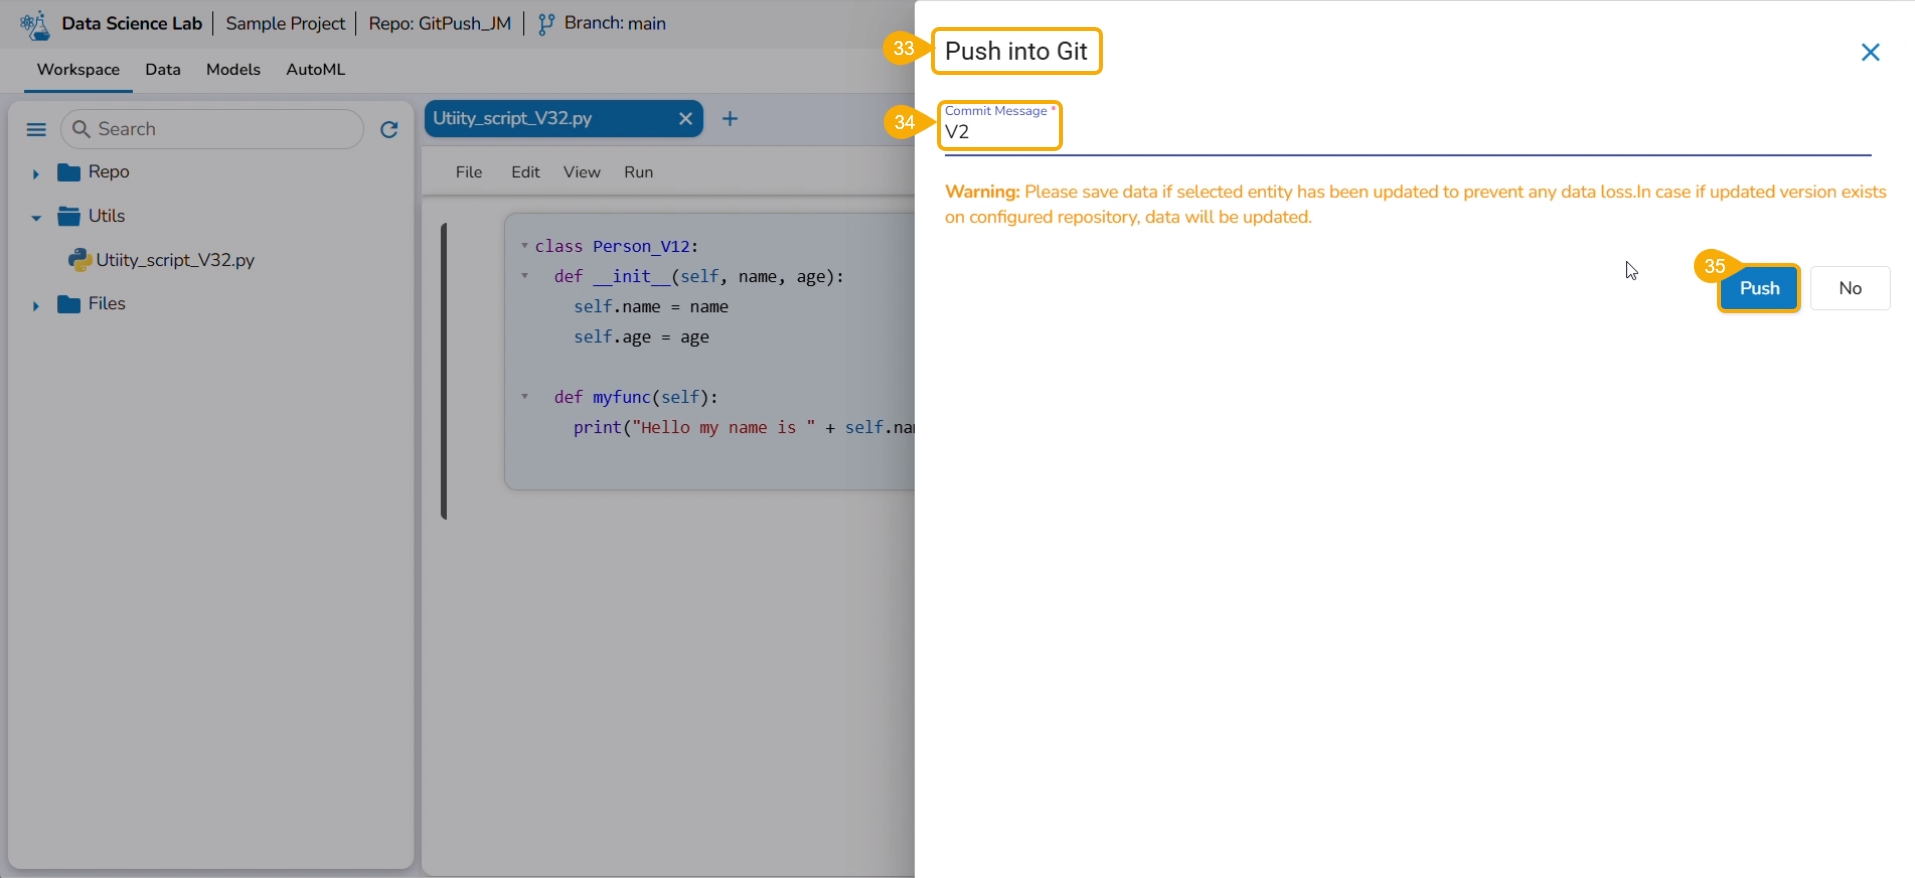
The Push into Git drawer opens.
Provide a commit message.
Click the Push option.
A notification ensures that the latest file version is pushed.
You can open the Git repository and verify the script version.
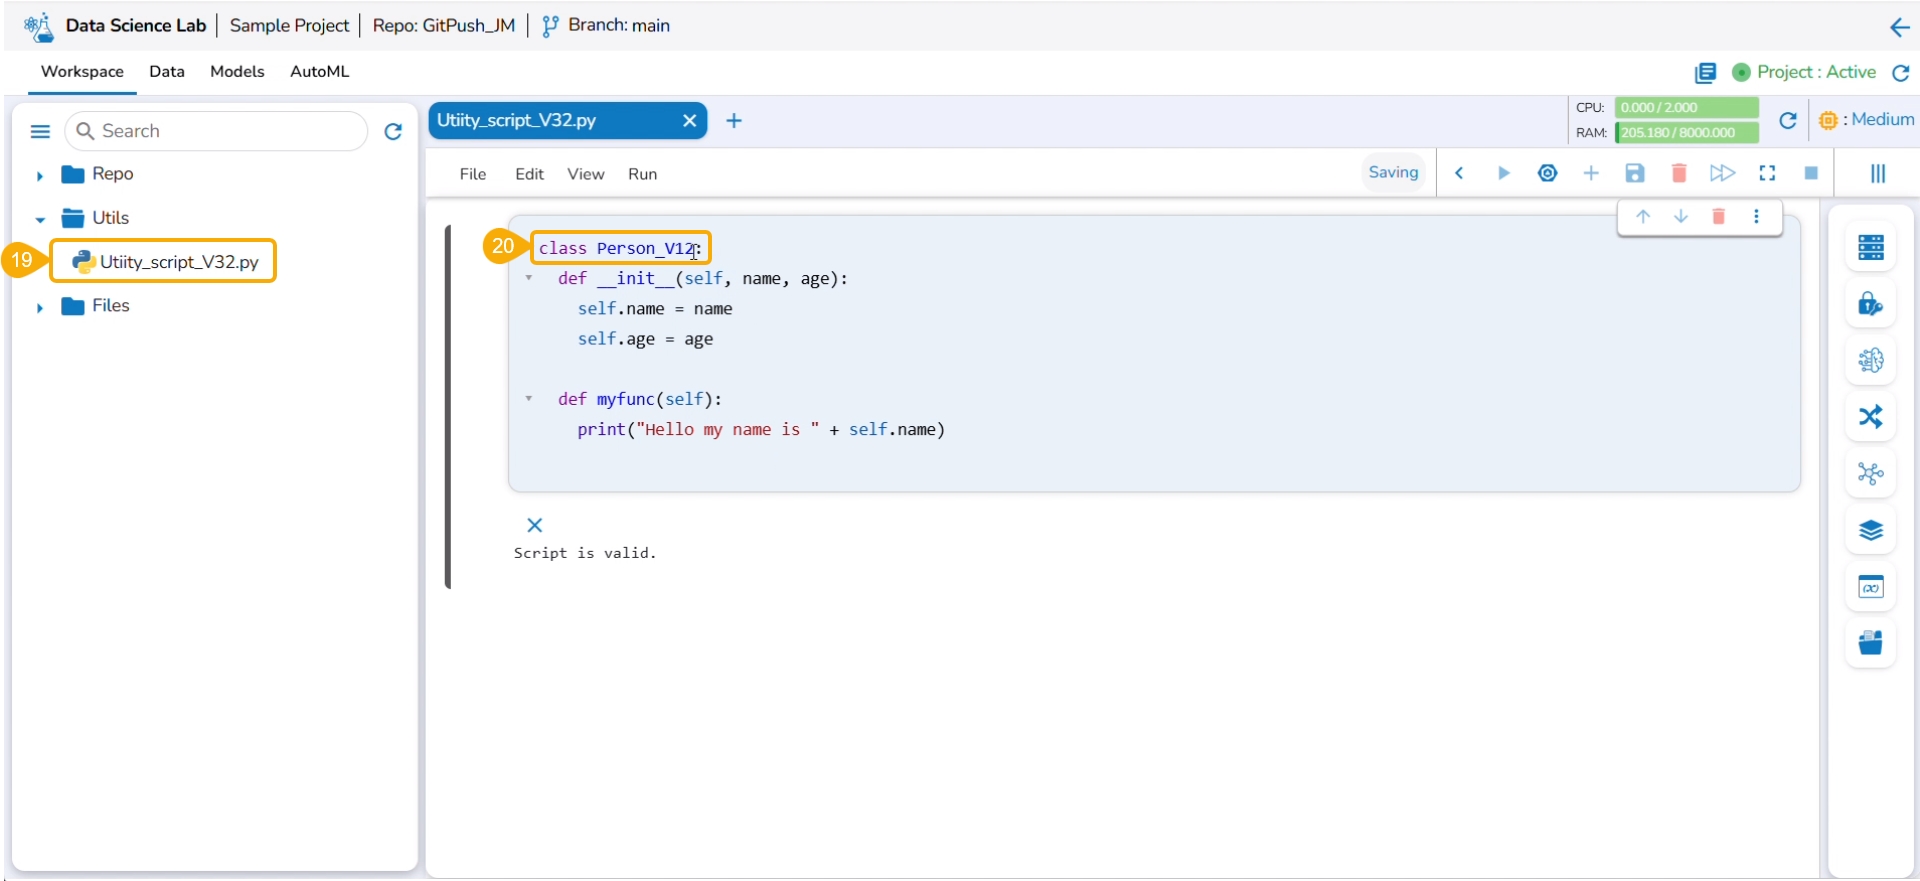
Navigate to the same Utility file.
Modify the script.
Save the script.
Select the Push into VCS option from the Utility action context menu.
The Push into Git drawer opens.
Provide a commit message.
Click the Push option.
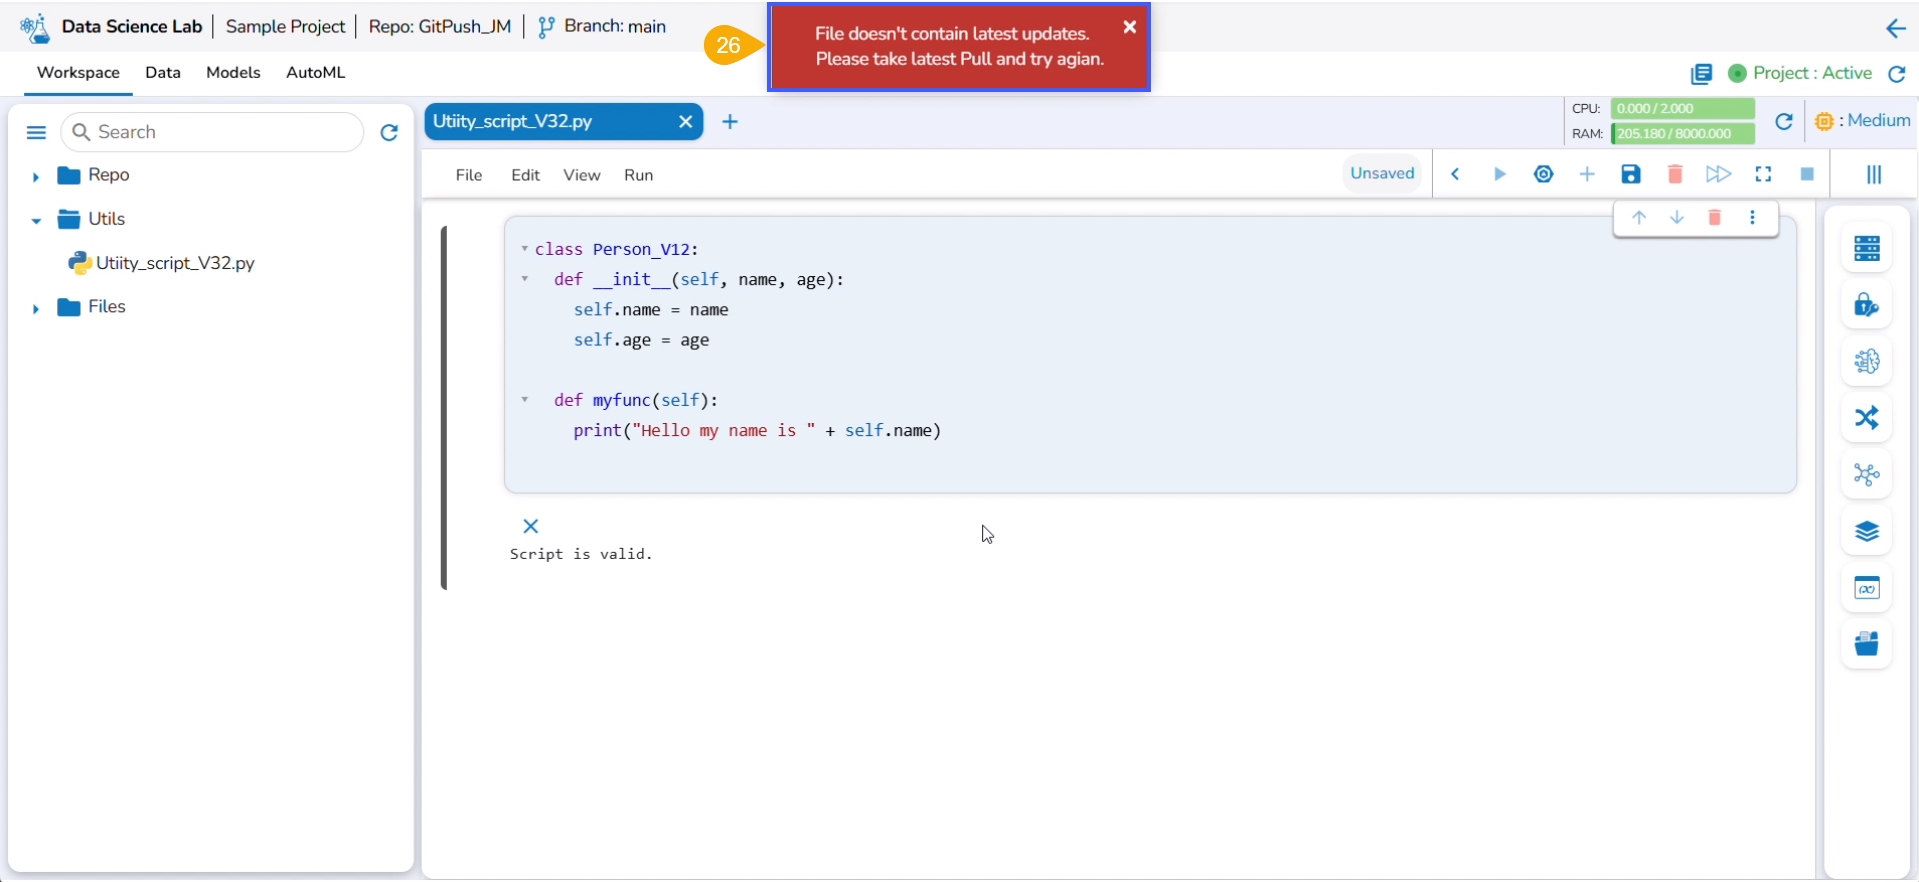
An error message states that the current file doesn't contain the latest version, and suggests taking the latest pull.
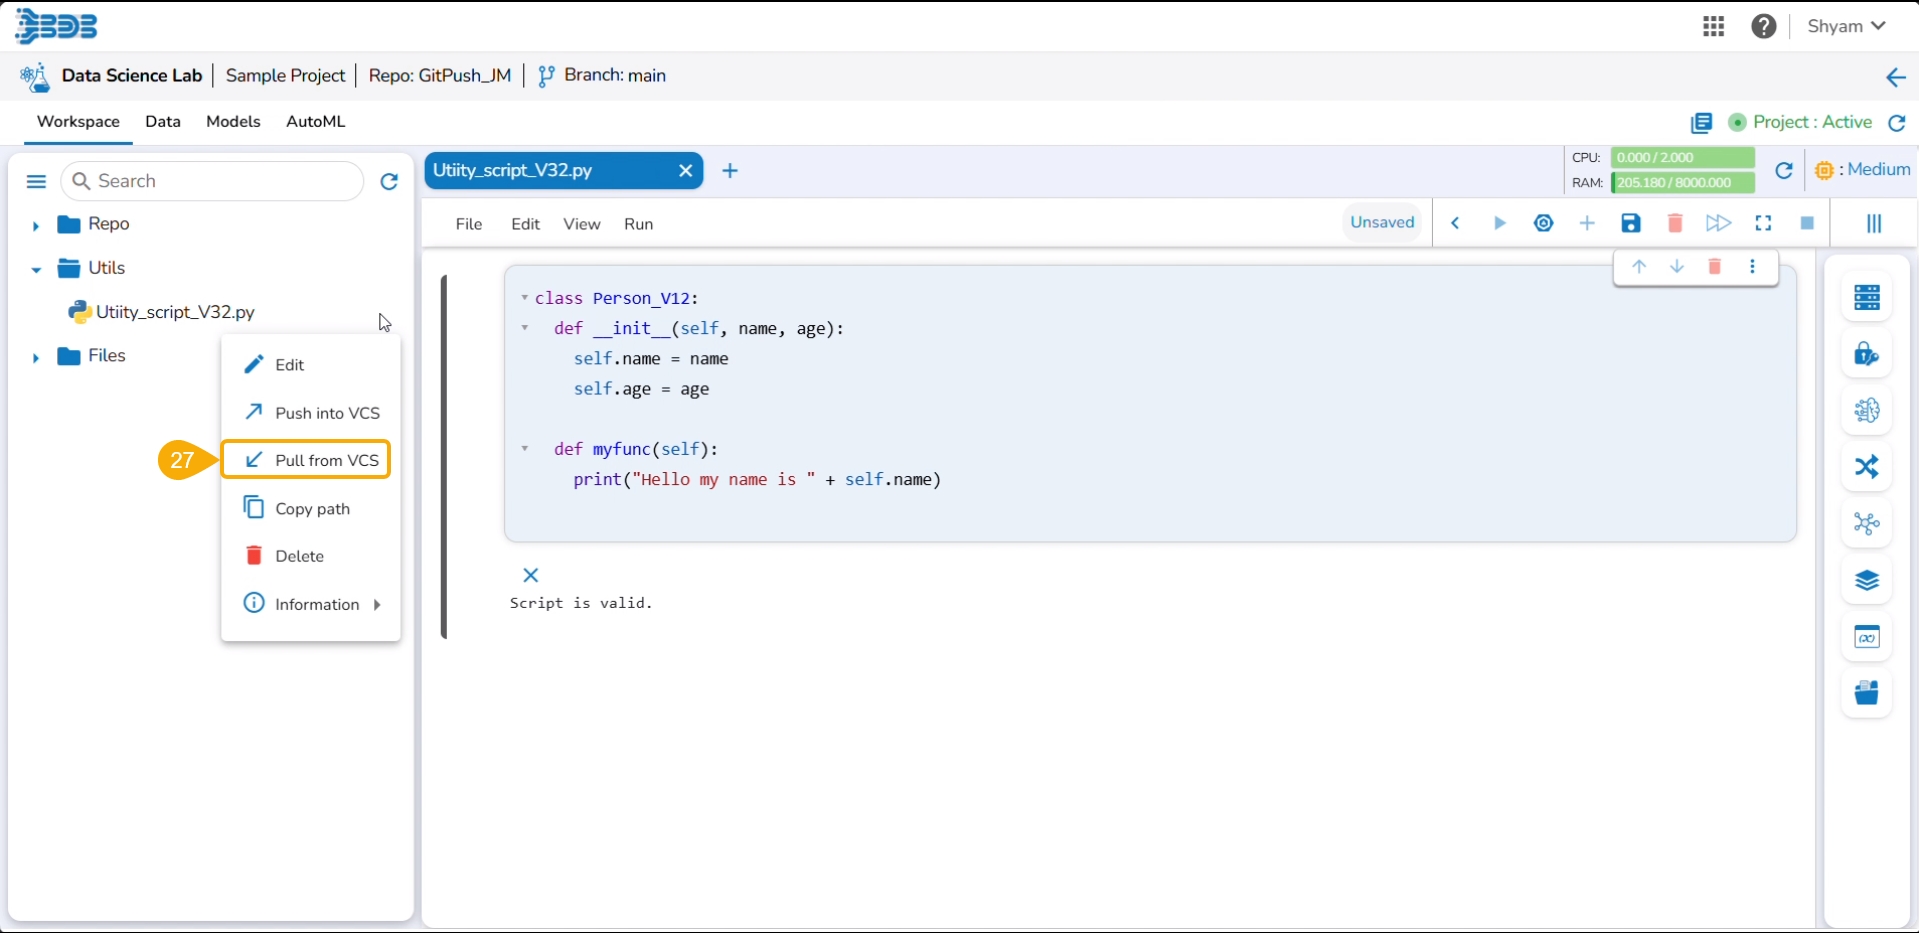
Click the Pull from VCS option for the same utility file.
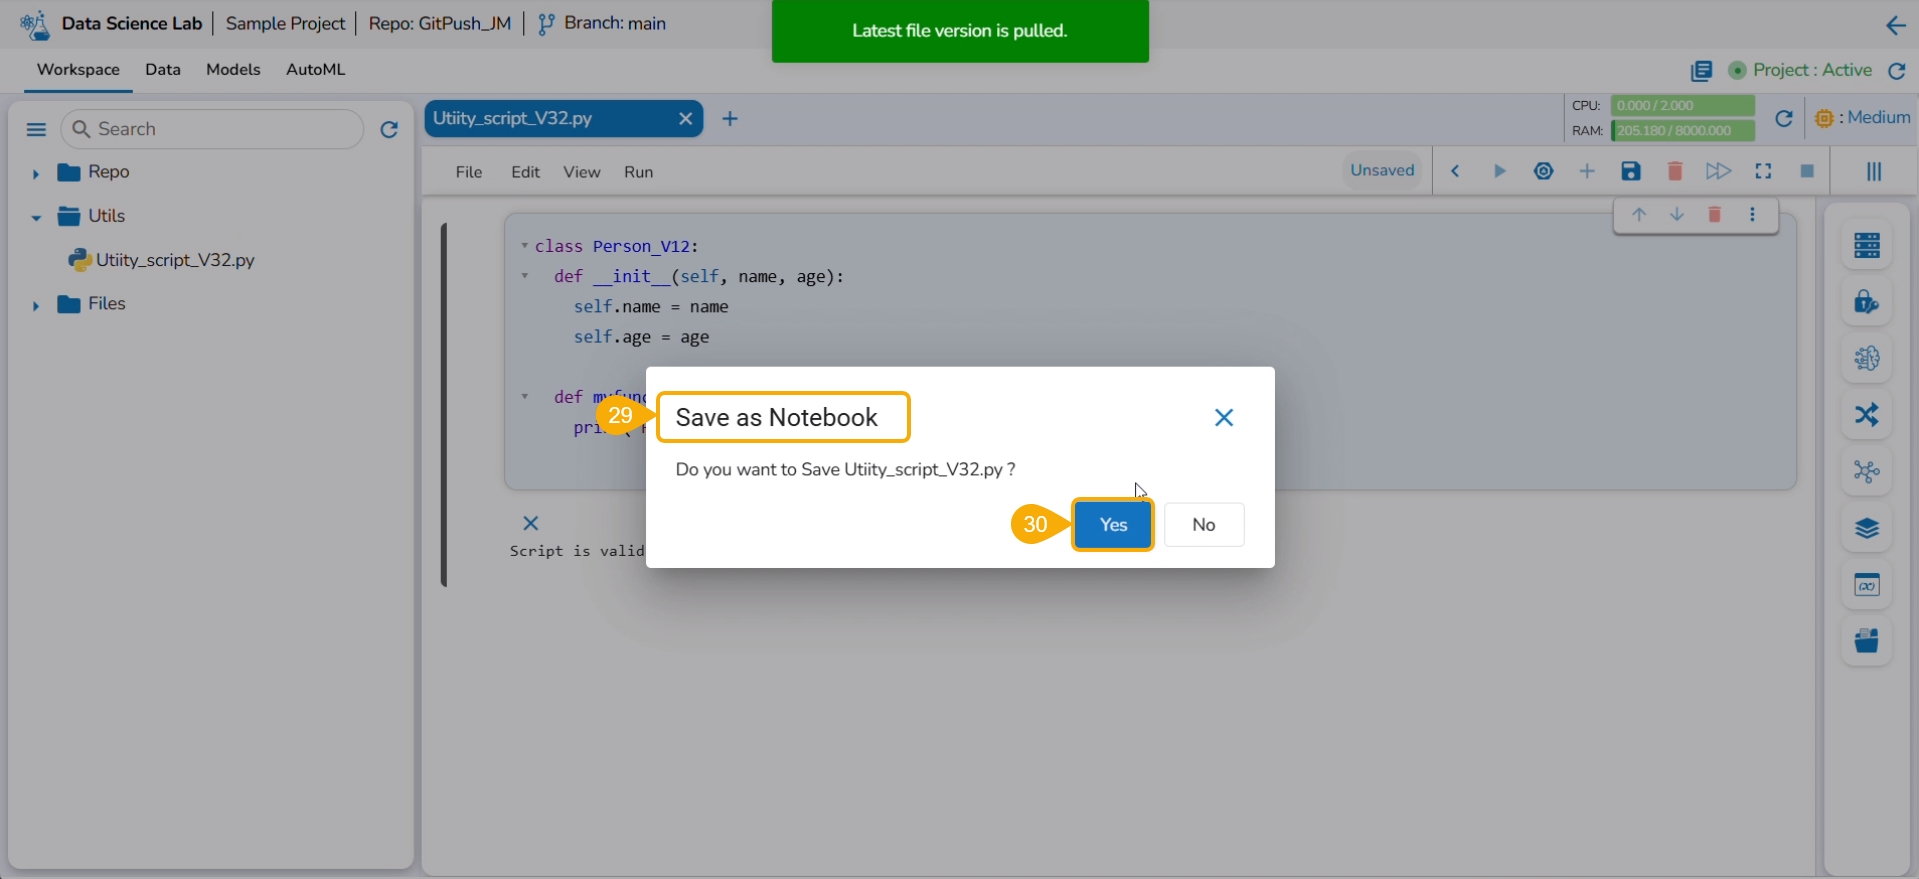
A notification ensures that the latest file is pulled.
Use the Save as Notebook option to save it.
Click the Yes option.
Consecutive success notifications appear to ensure that the file is started and saved.
Click the Push into VCS option for the same utility file.
The Push into Git drawer opens.
Provide the commit message.
Click the Push option.
A notification ensures that the latest file version is pushed.
The same can be verified in the Git repository.
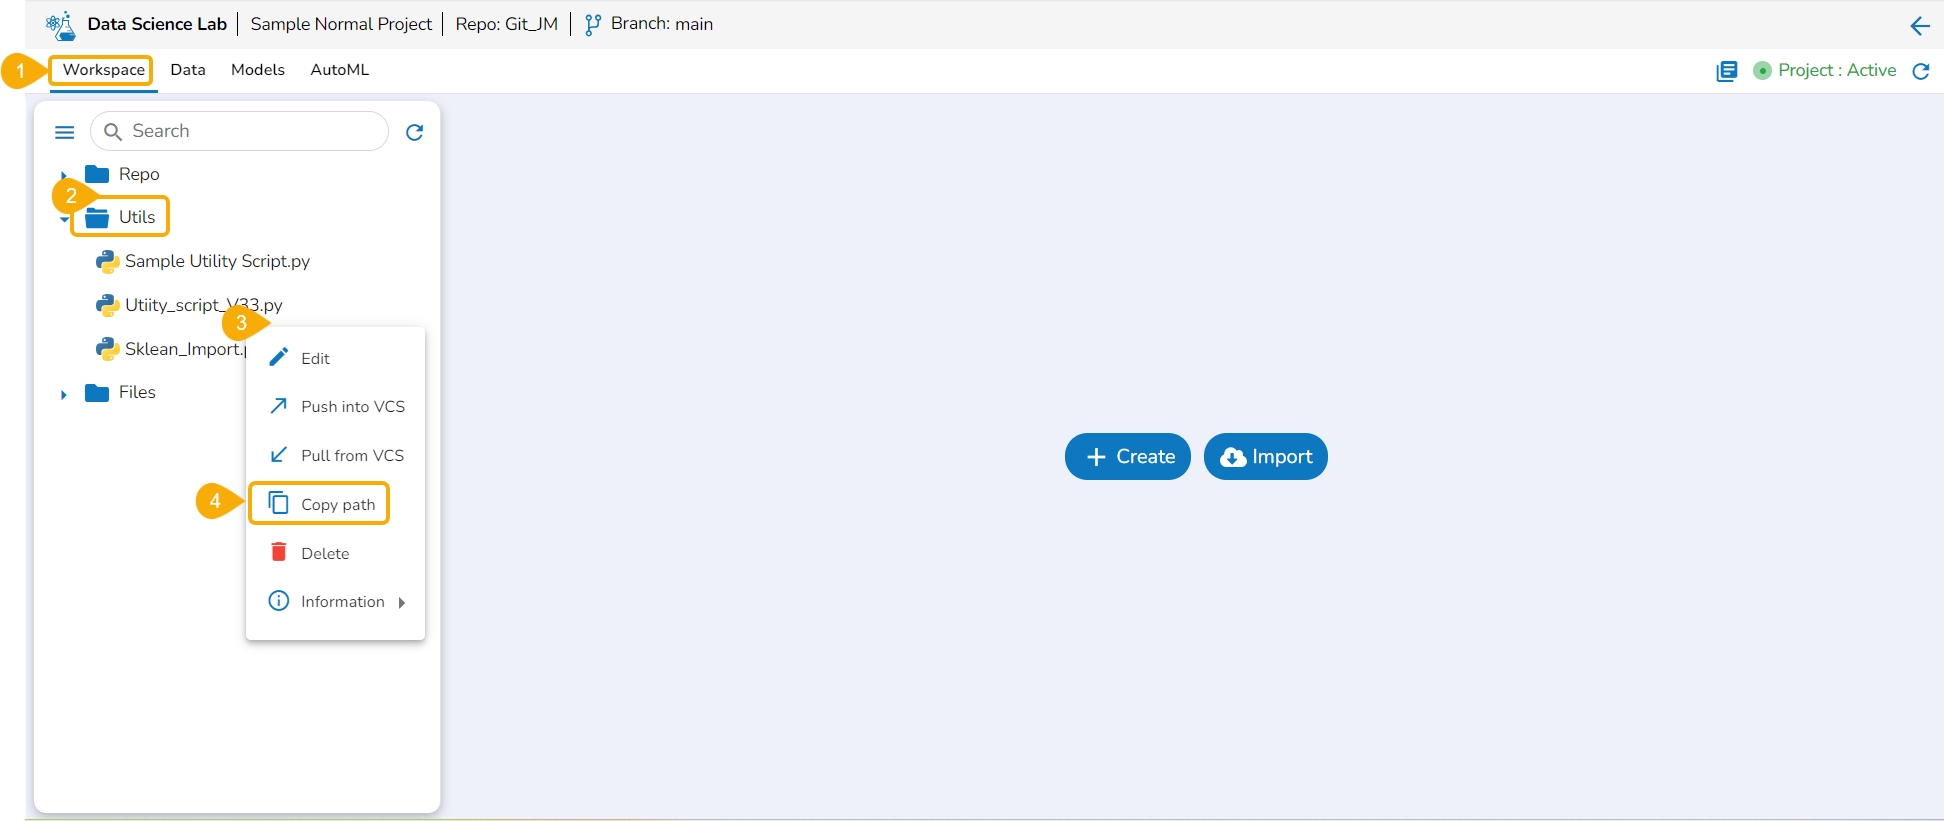
The user can copy the utility file path by using this action option.
Navigate to the Workspace tab for a normal Data Science Project.
Open the Utils folder to get the list of utility files.
Access the Utility Actions context menu.
Click the Copy path option from the Utility Actions context menu.
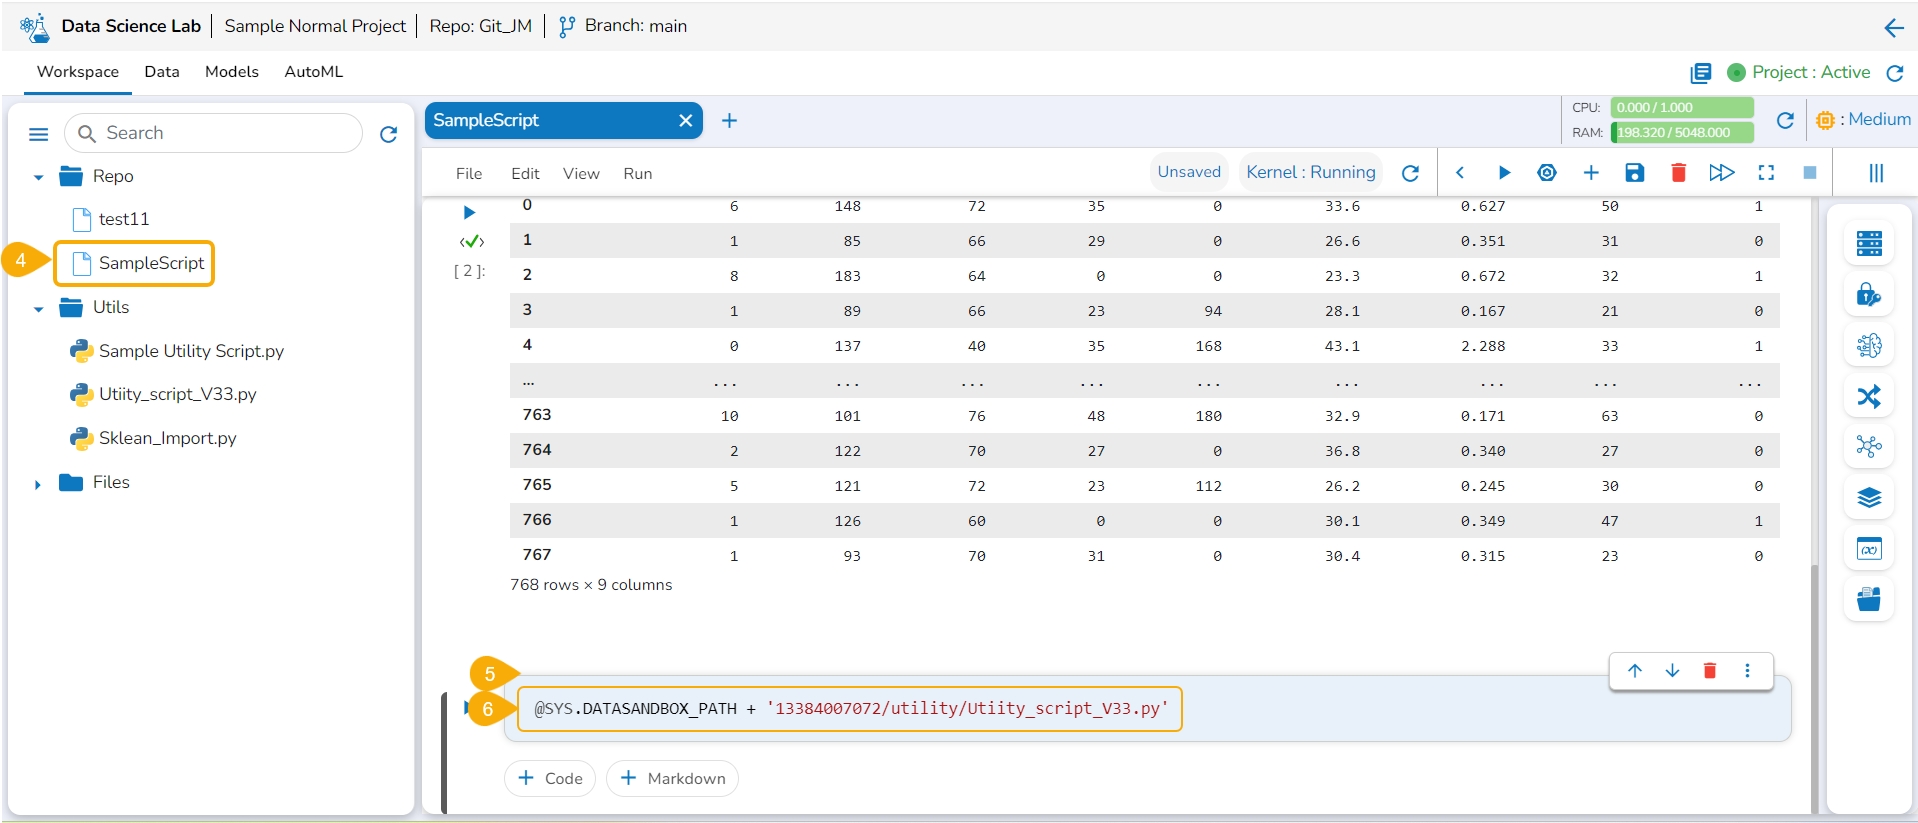
Open a .ipynb file using the Repo folder.
Add a new code cell.
Use the Ctrl+V action to paste the copied path of the utility file in the code cell.
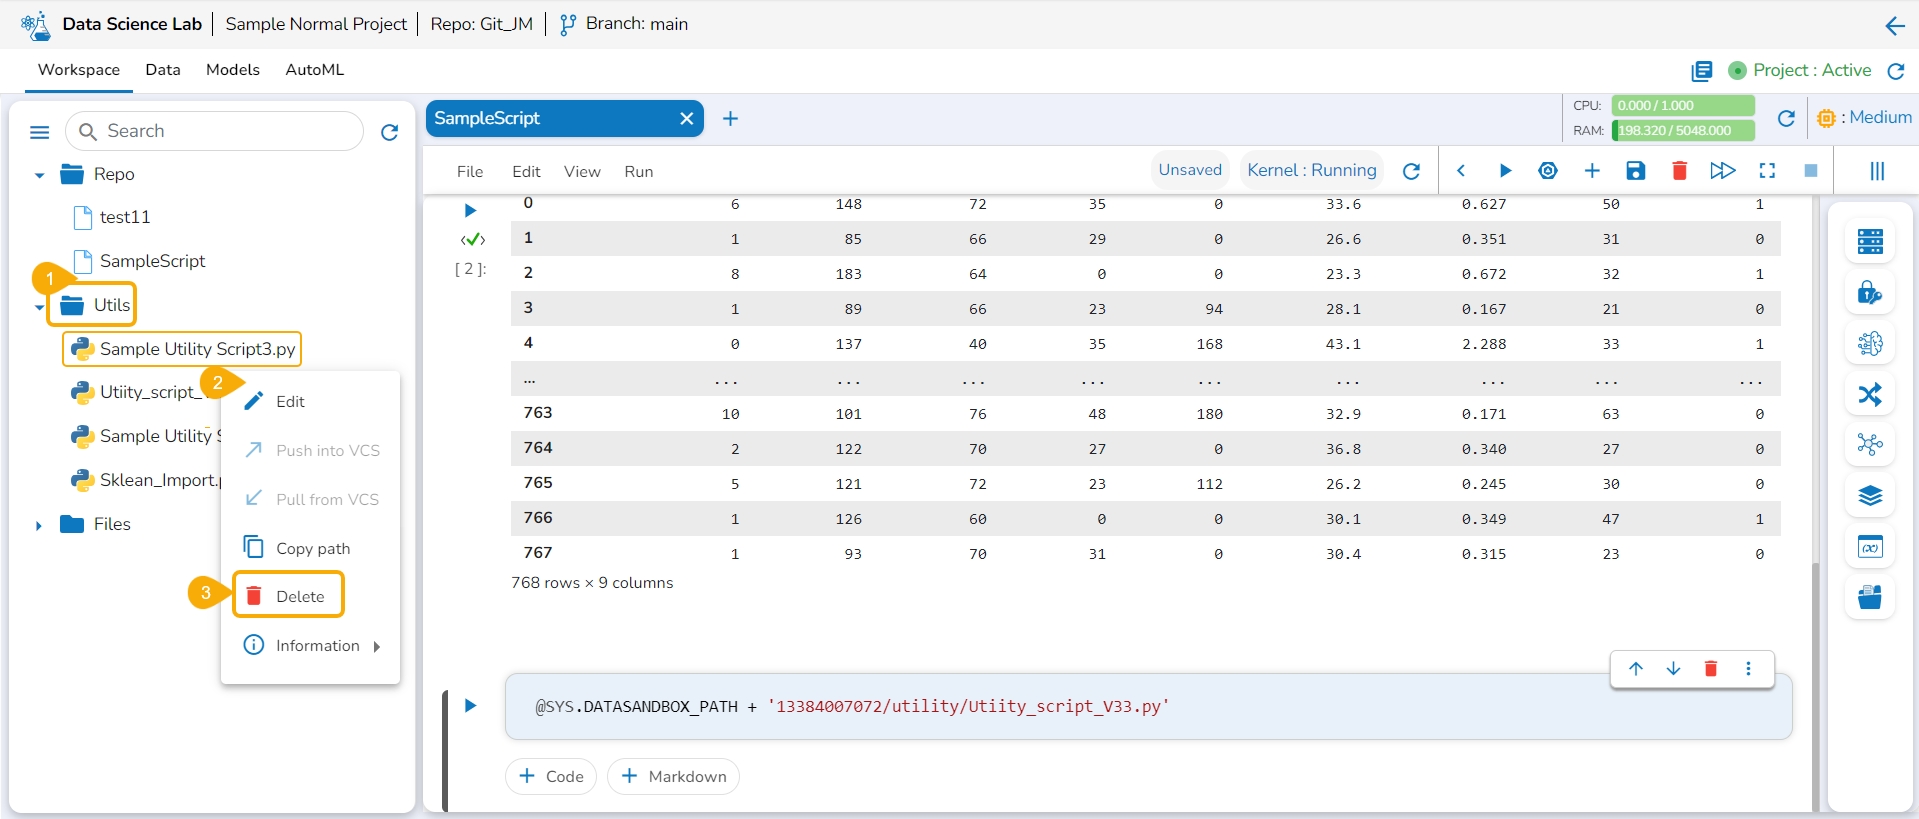
Navigate to the Utils folder for a normal DSL project.
Select a utility file and open the Actions context menu for the selected file.
Click the Delete option from the action context menu.
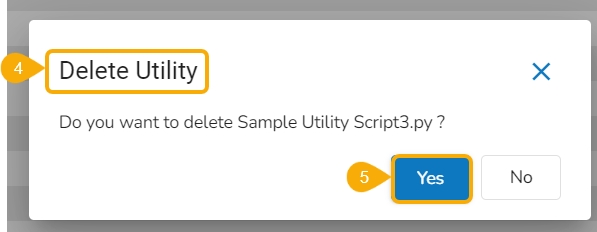
The Delete Utility dialog box appears to confirm the action.
Click the Yes option.
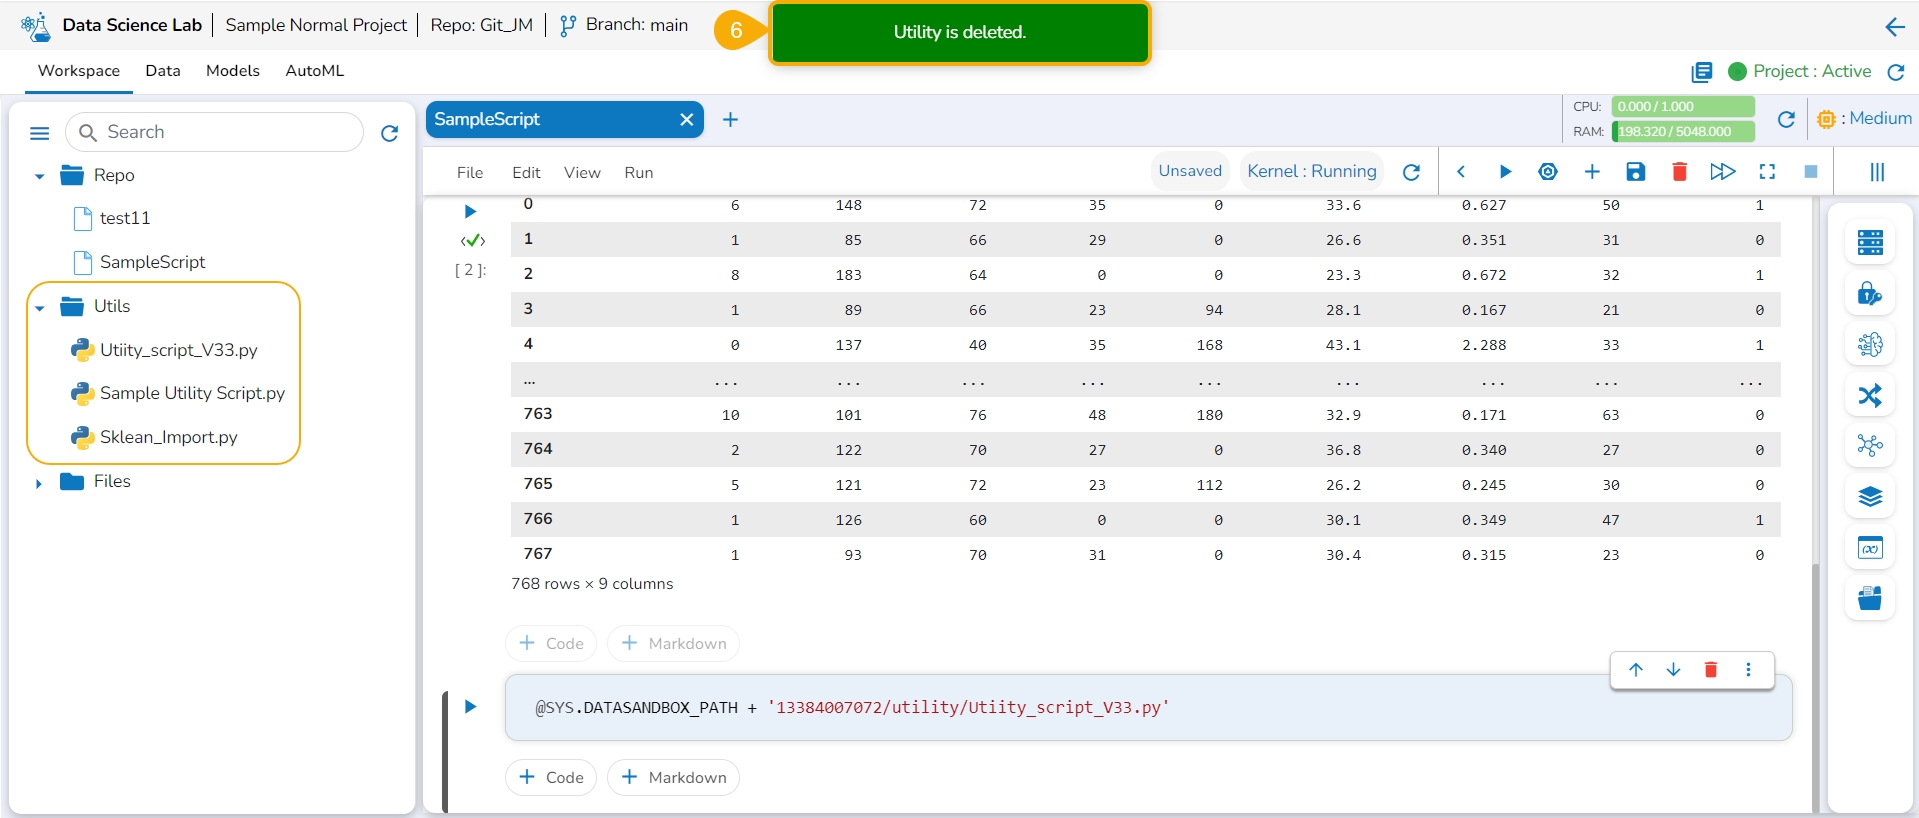
A notification appears to ensure that the selected Utility script is deleted. The utility script gets removed from the list.
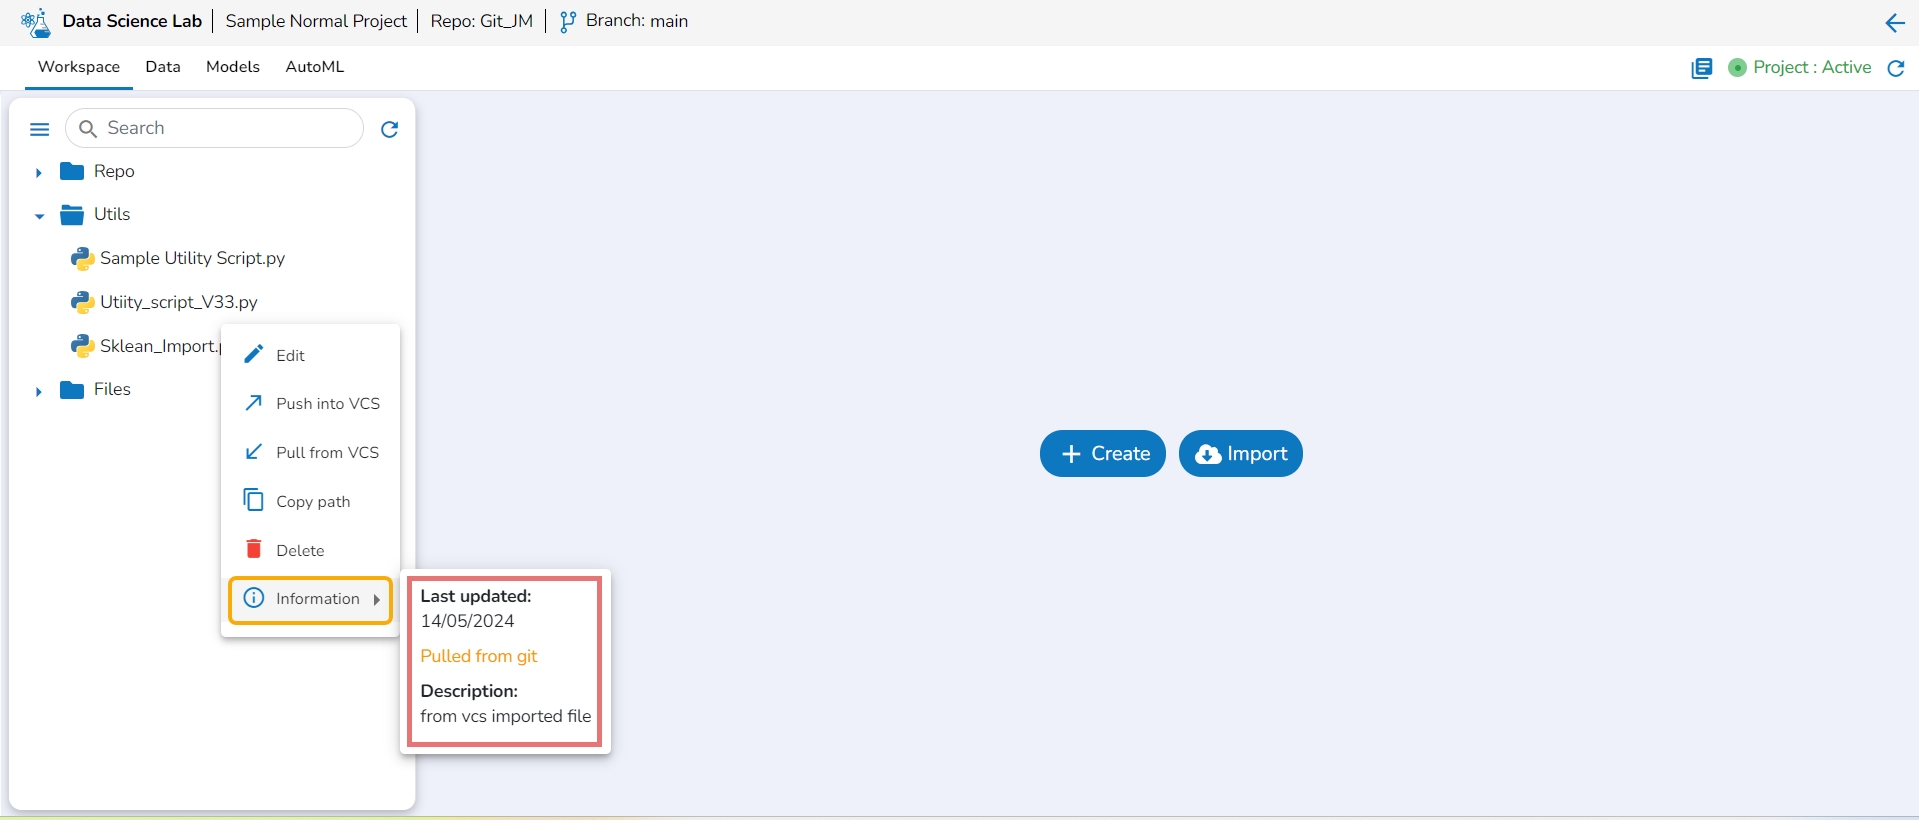
The information action option displays details for the Utility file whether it is imported from the Git of imported from the local system.
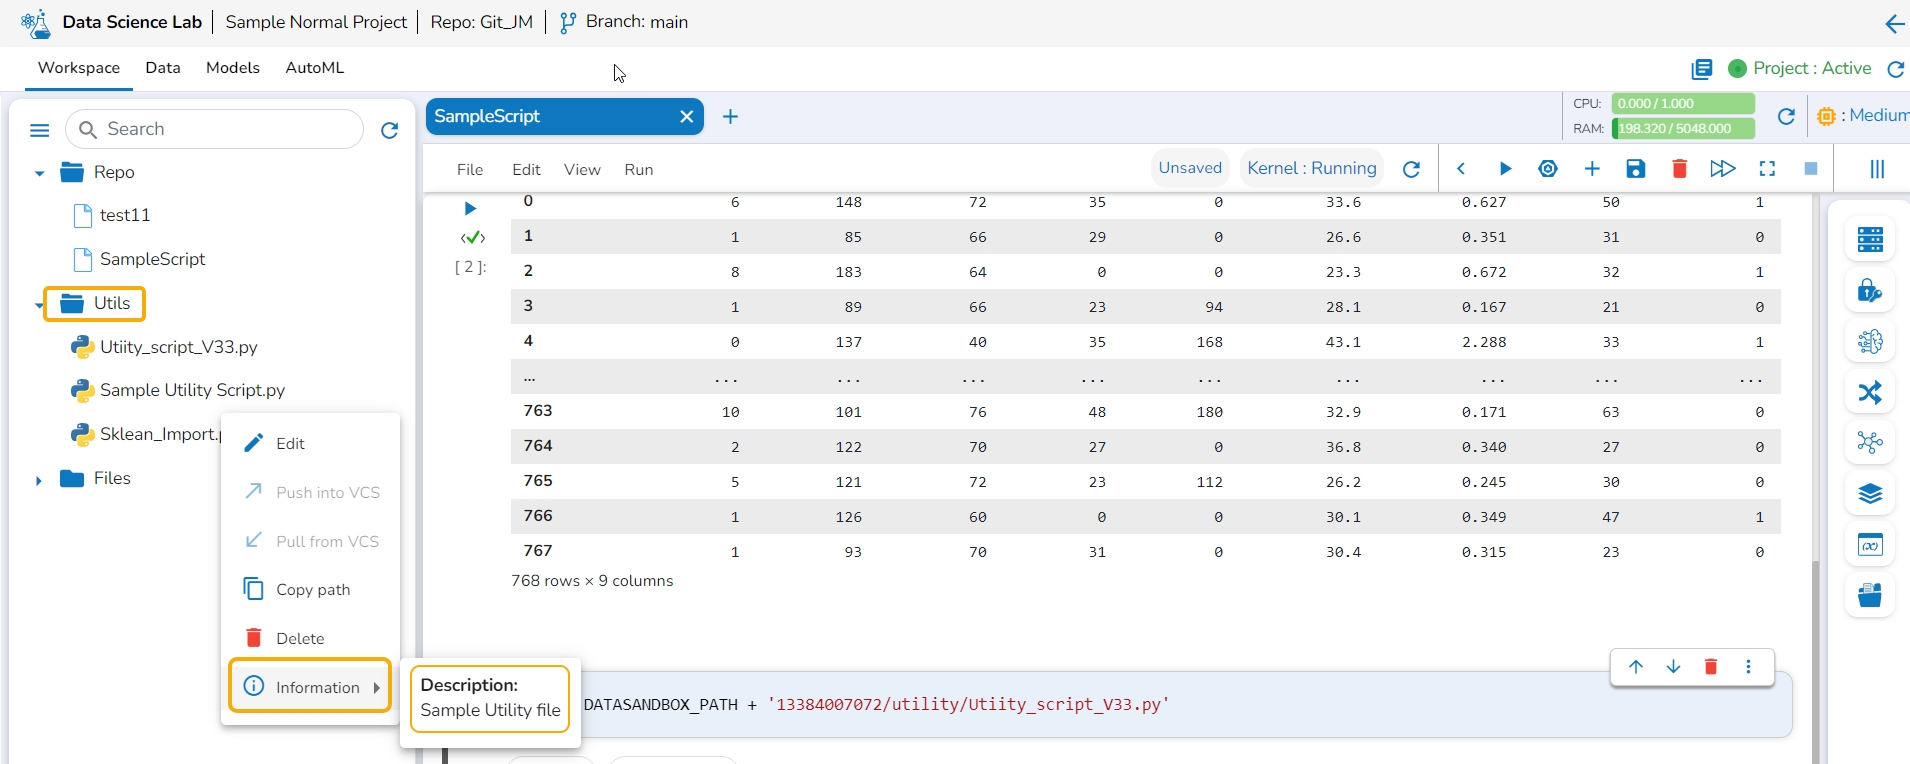
Navigate to the Utils folder for a normal DSL project.
Select a utility file and open the Actions context menu for the selected file.
Click the Information option from the action context menu.
Description: The inserted description for the utility file while importing the file gets displayed for the utility files imported from the system.
Last updated & Description: The last updated date and description are displayed for the utility scripts imported from Git.
Click the Add File option.
Click the Add Folder option.
The created Notebook (.ipynb file) gets added to the Repo folder. The Notebook Actions are provided to each created and saved Notebook. Refer to the page to get detailed information.
Please Note: The Imported Notebook will be credited with some actions. Refer to the page to know it in detail.
Users can manually adjust the width of the repository panel to sight multiple files and sub-folders.
Users can manually adjust the width of the repository panel in the Workspace tab, allowing for better visibility and organization of multiple sub-folders and files within a project.
Check out the illustration to understand how users can adjust the repository panel inside a DS Project.
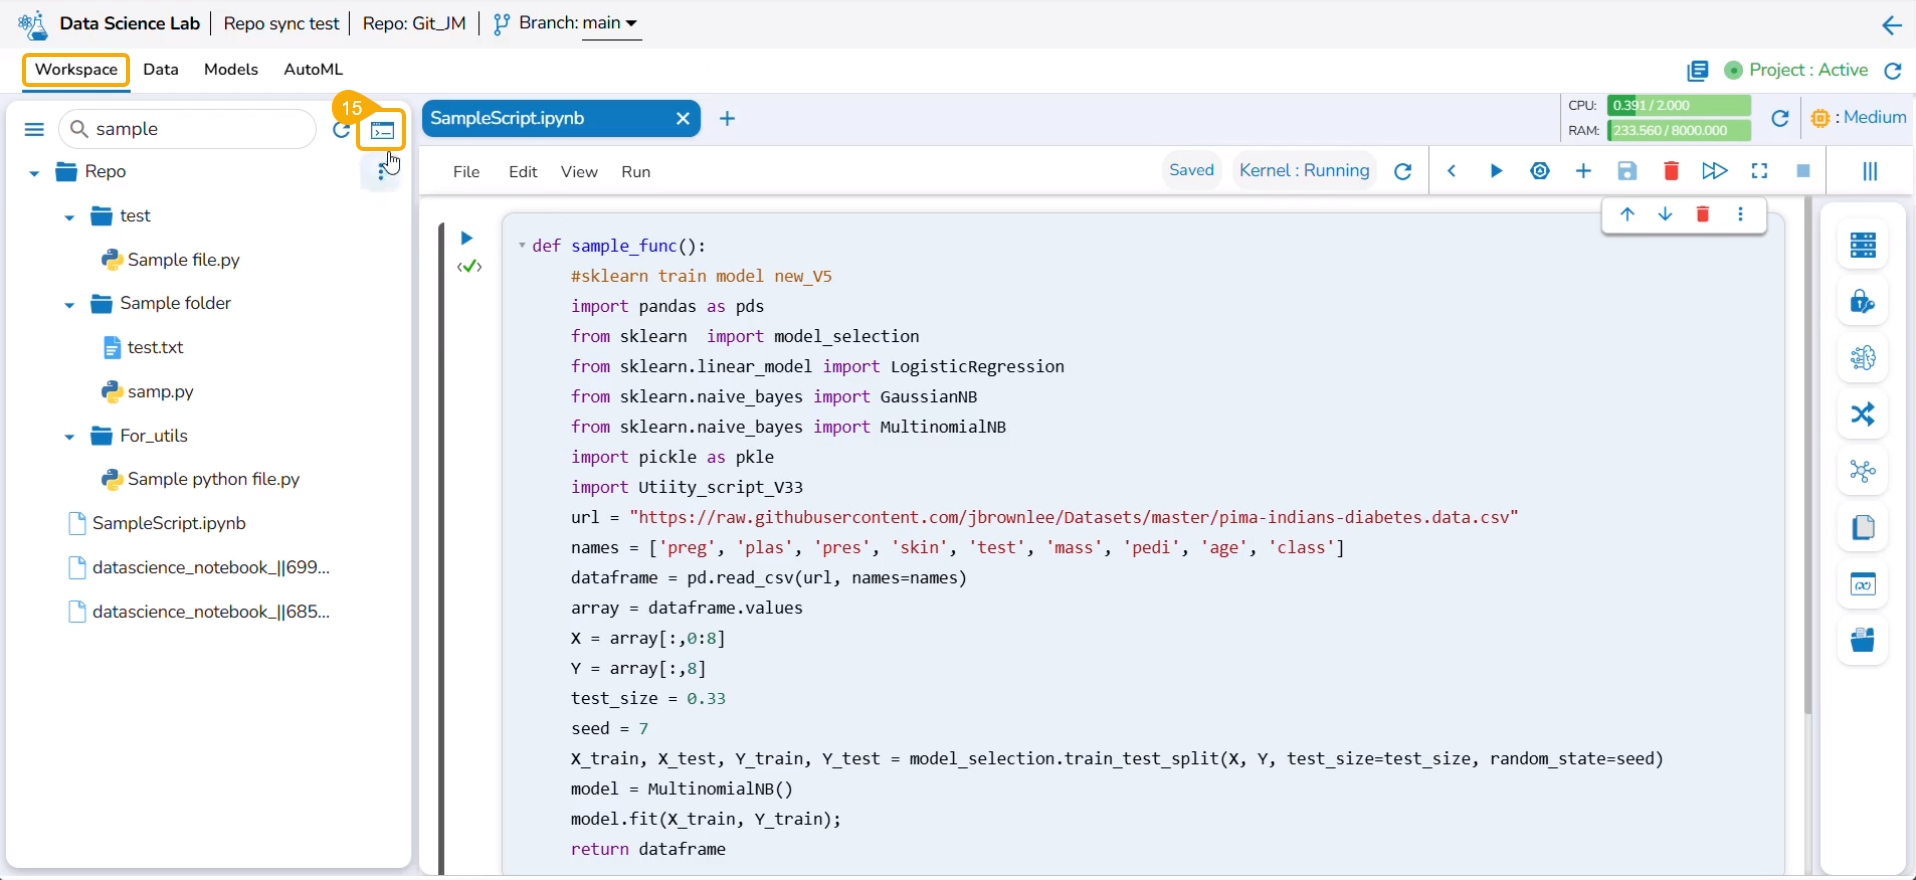
Git Console functionality helps the data scientists apply various Git commands to their Notebook scripts inside the Repo Sync projects.
Check out the illustration on using the Git Console option inside the Data Science Lab repo sync projects.
Navigate to the Workspace tab of an activated Repo Sync Project.
Select a .ipynb file from the Repo Sync Project.
The file content opens.
Edit the displayed script.
Click the Save icon.
A notification ensures that the script is saved with the recent changes.
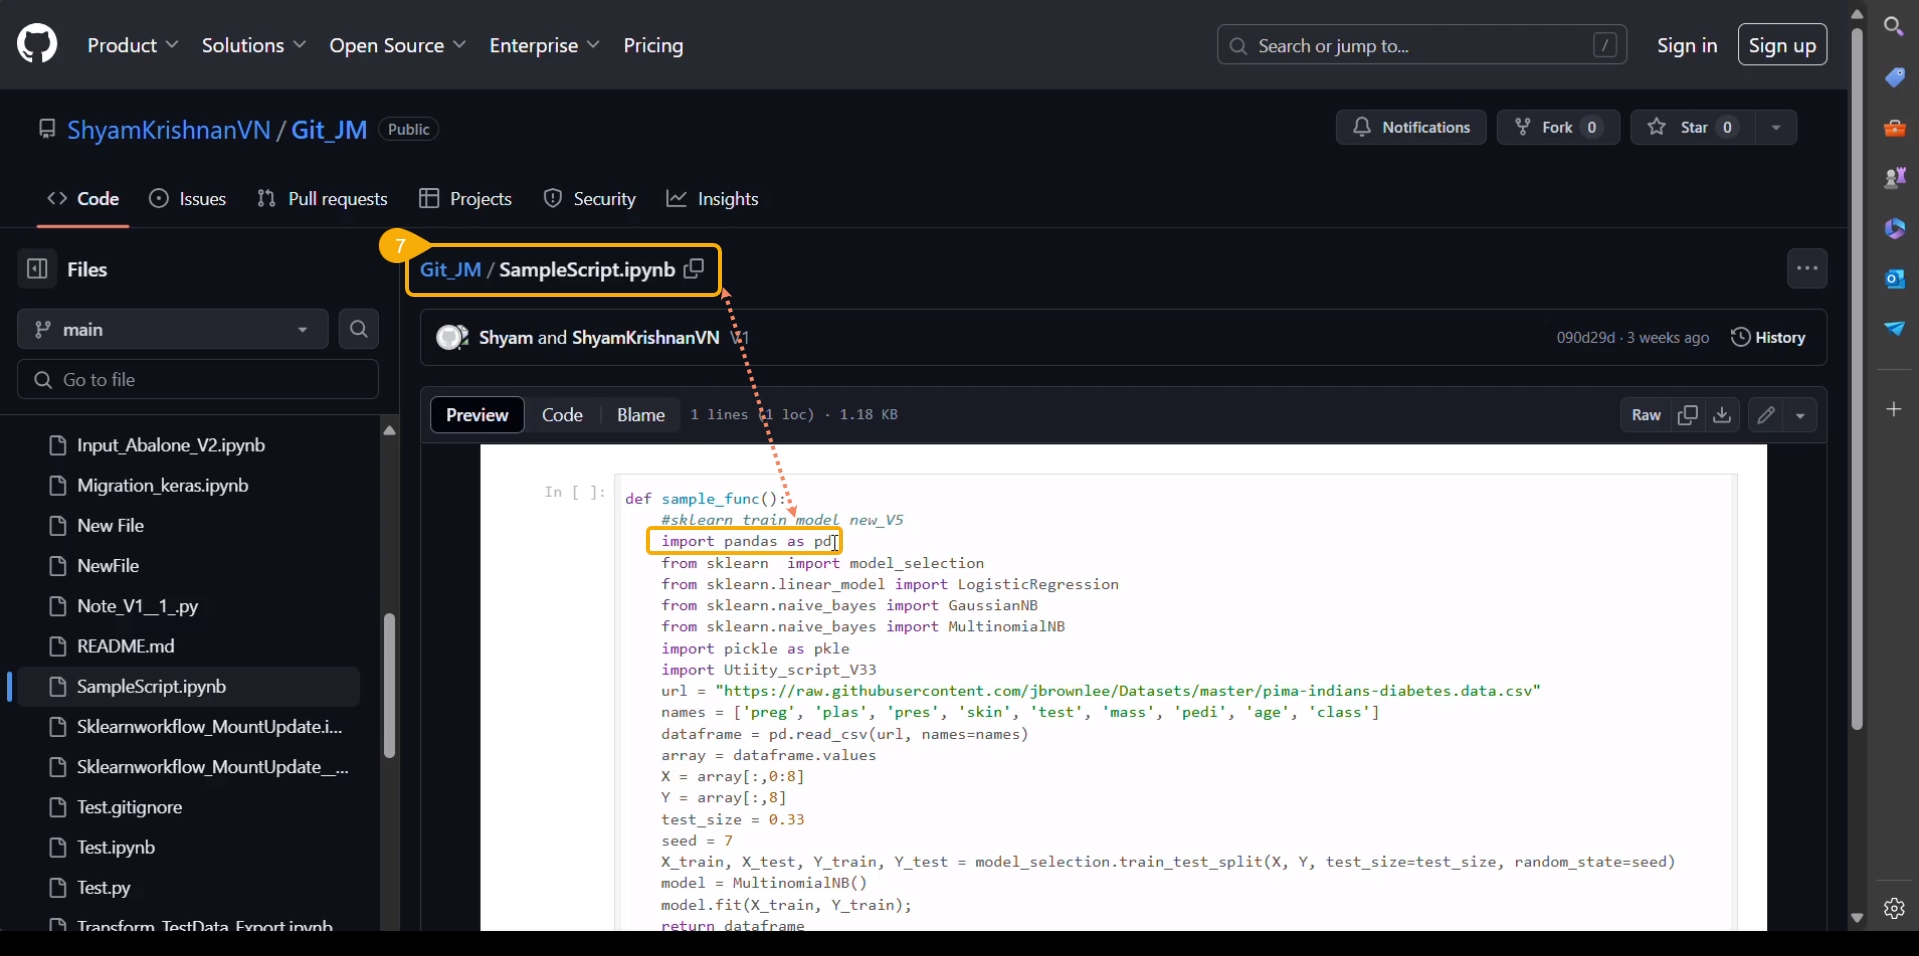
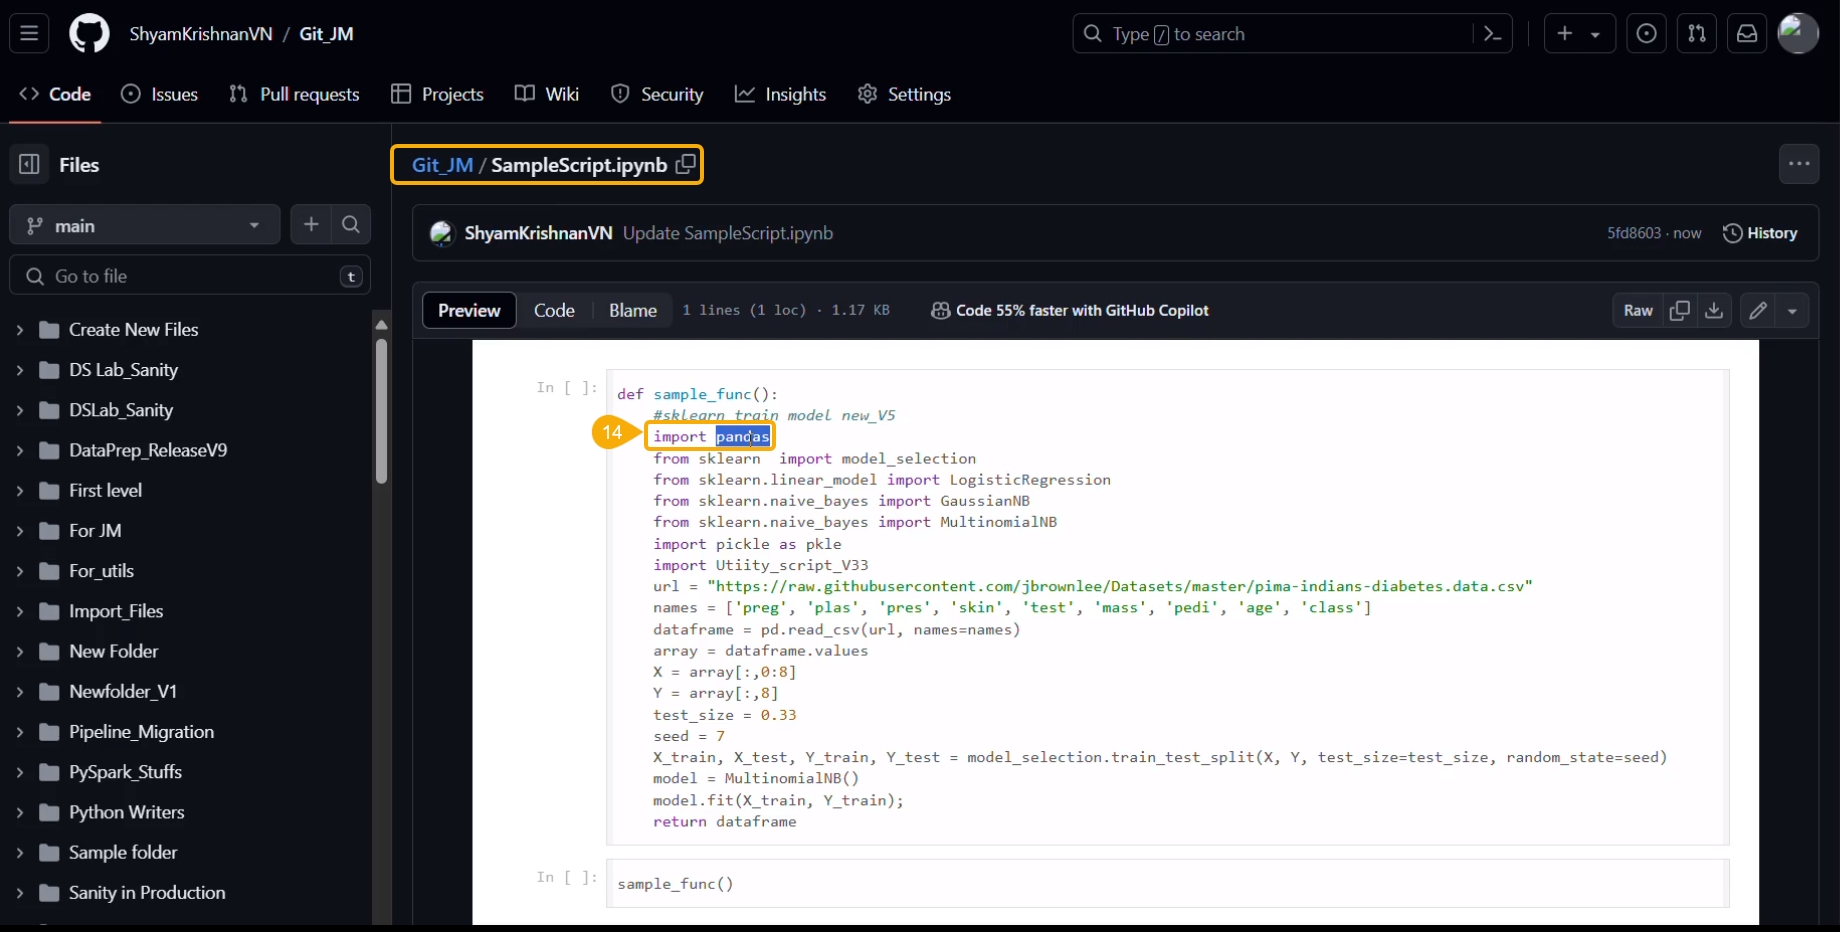
Open the same script in the Git repository.
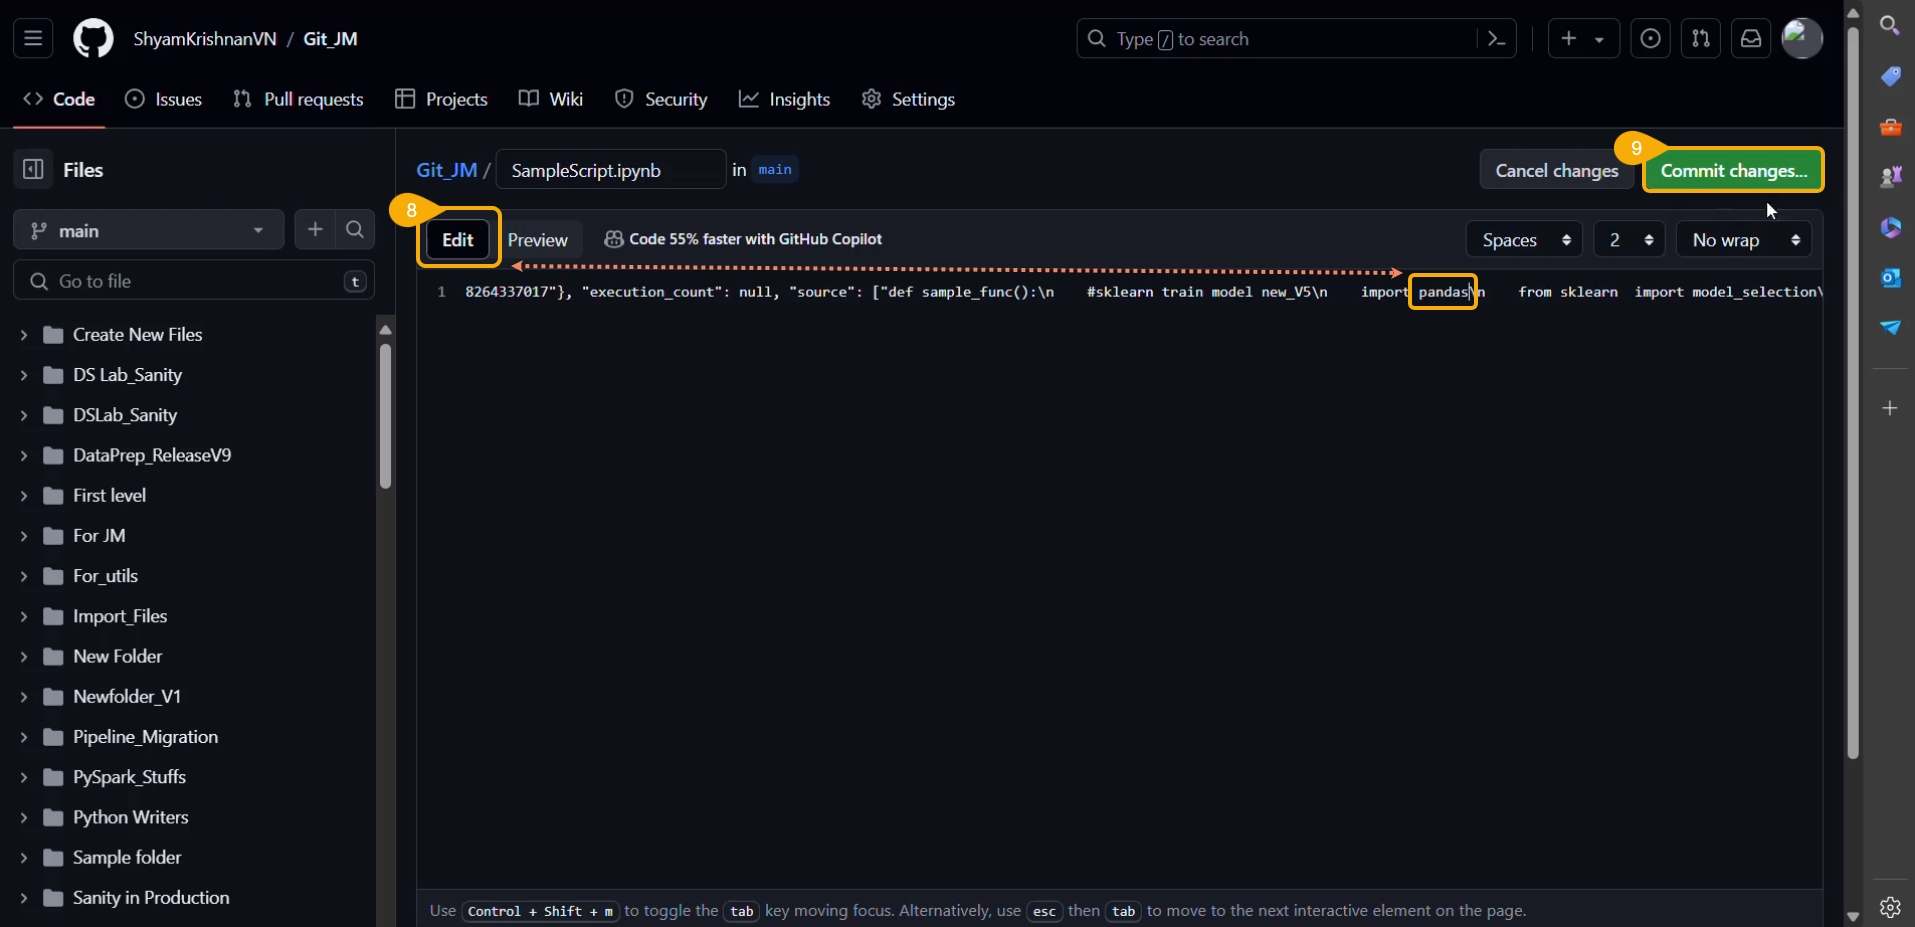
Click the Edit option and access the script in the editable format.
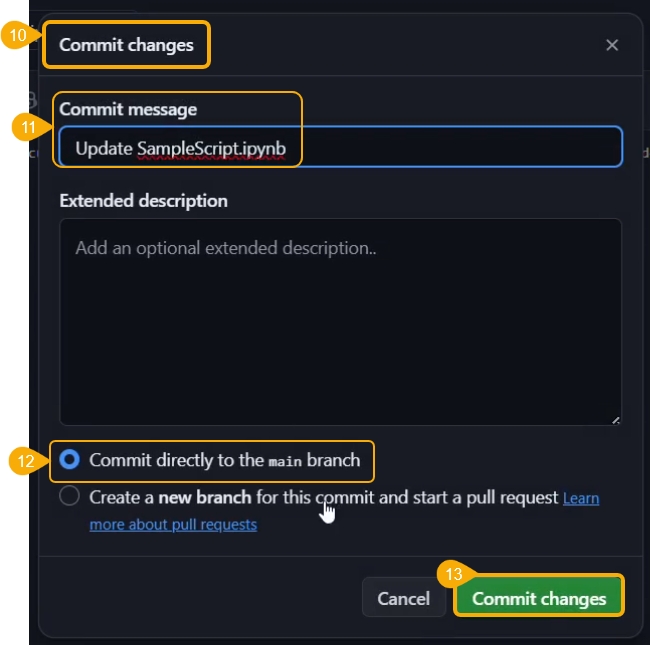
Click the Commit changes option.
The Commit changes dialog box opens.
Provide a commit message.
Choose a checkbox to select how the changes should be committed.
Click the Commit changes option.
The script in the Git repository will be modified.
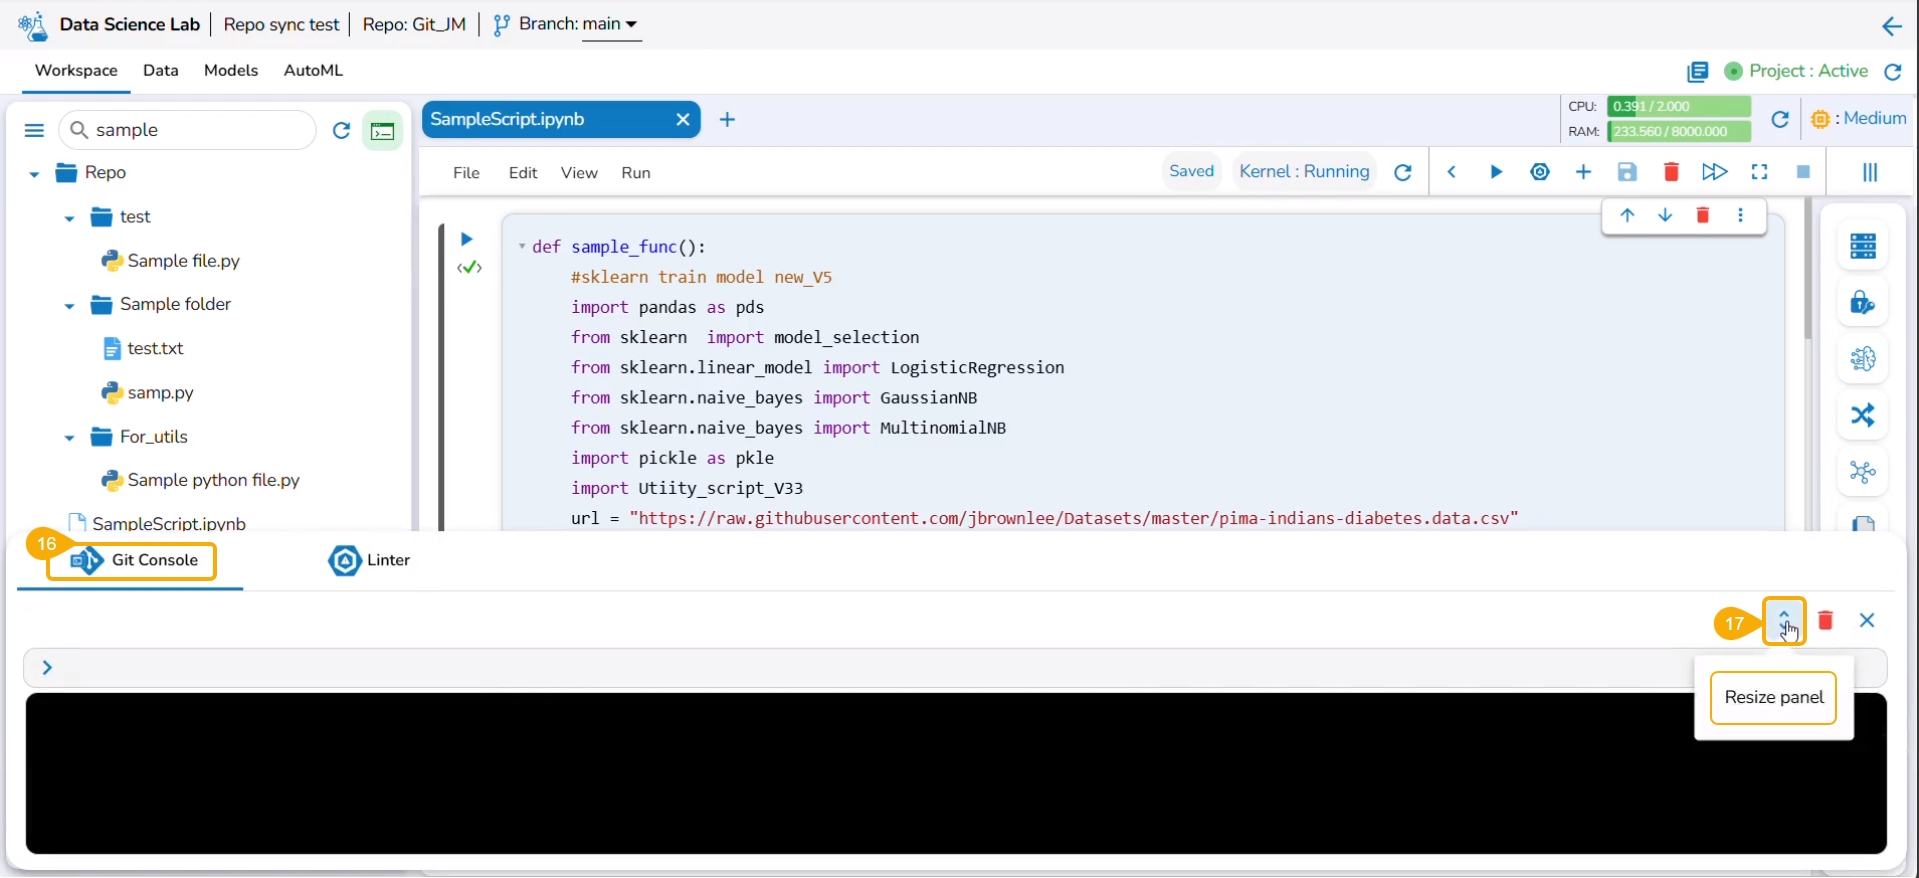
Navigate to the Workspace tab of the Notebook and click the Git Consol icon.
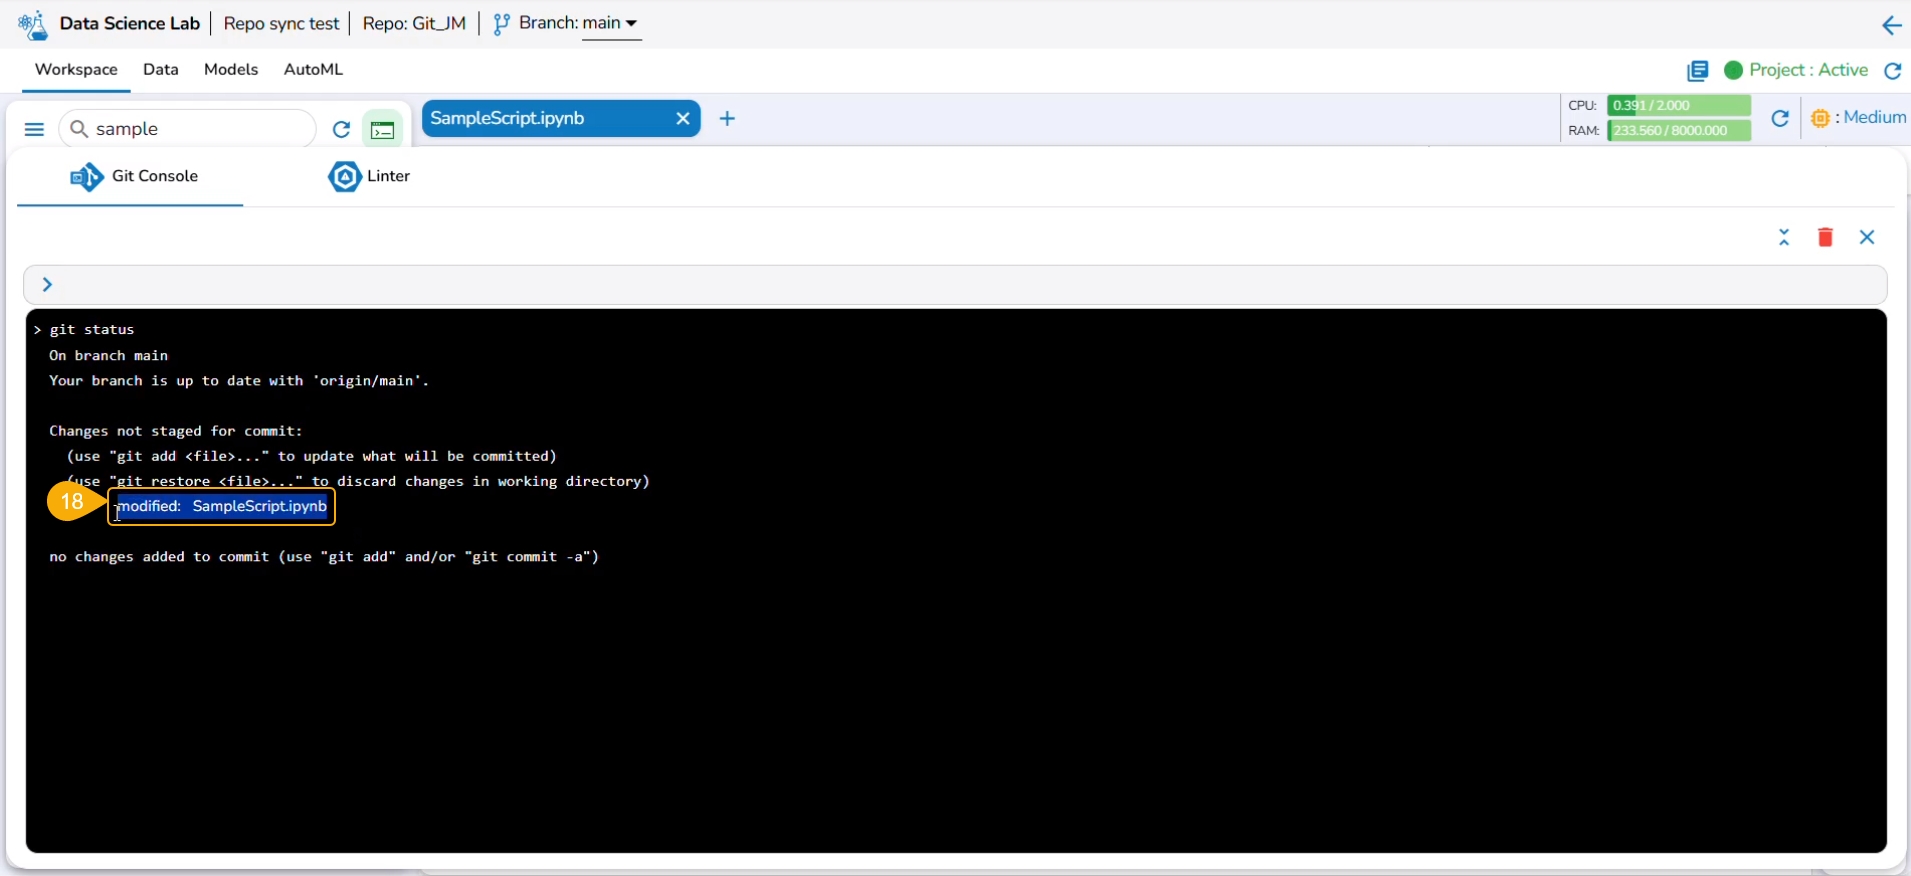
The Git Console panel opens where you can put the Git command to be performed on the selected script.
Use the Resize panel icon to resize the Git Console panel.
Use git status command to reflect the changes.
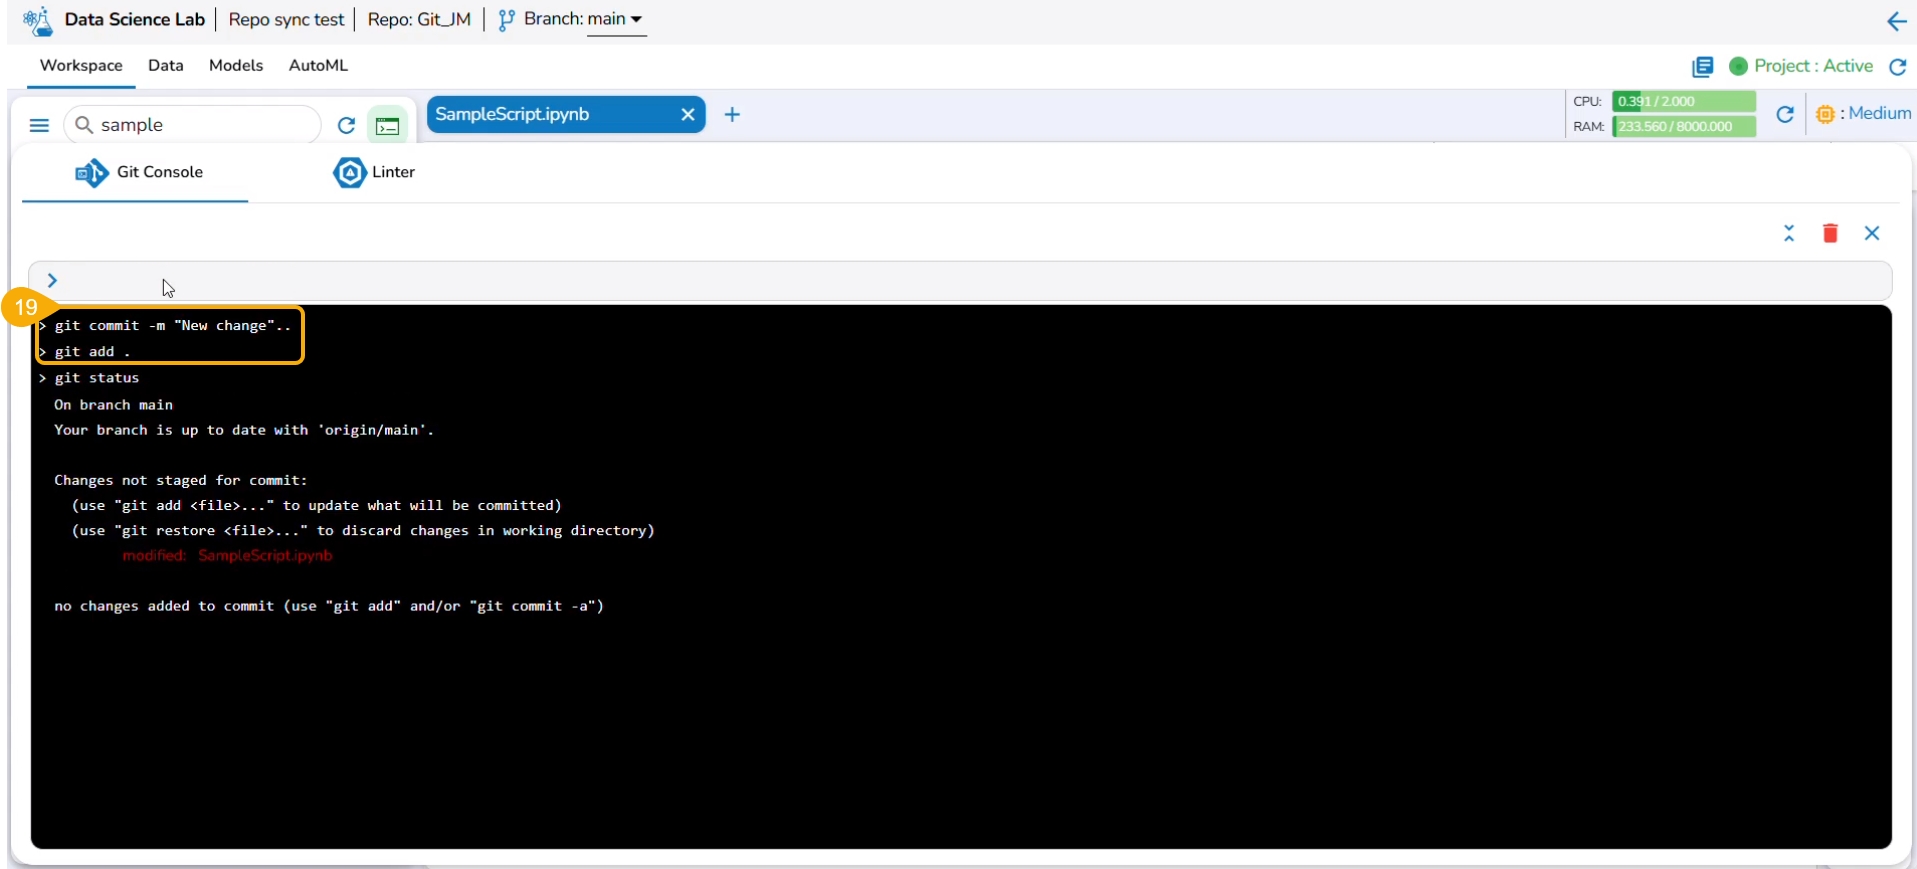
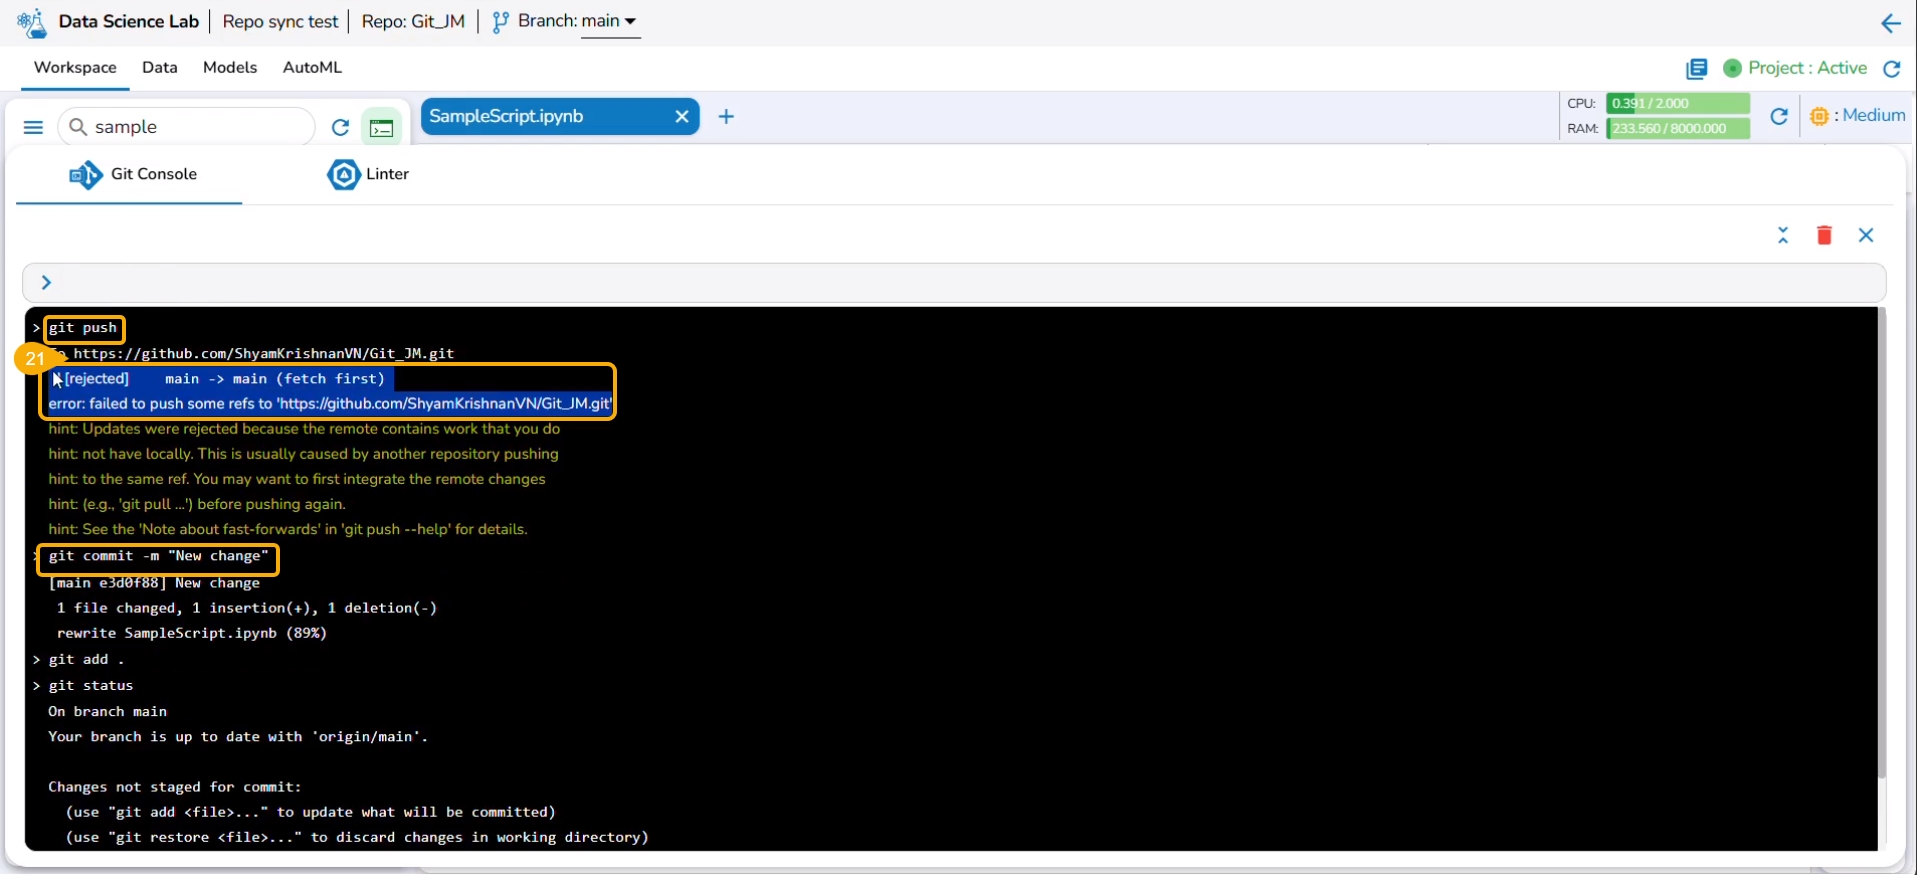
The next commands that can be used are git add and git commit to acknowledge new changes in the file.
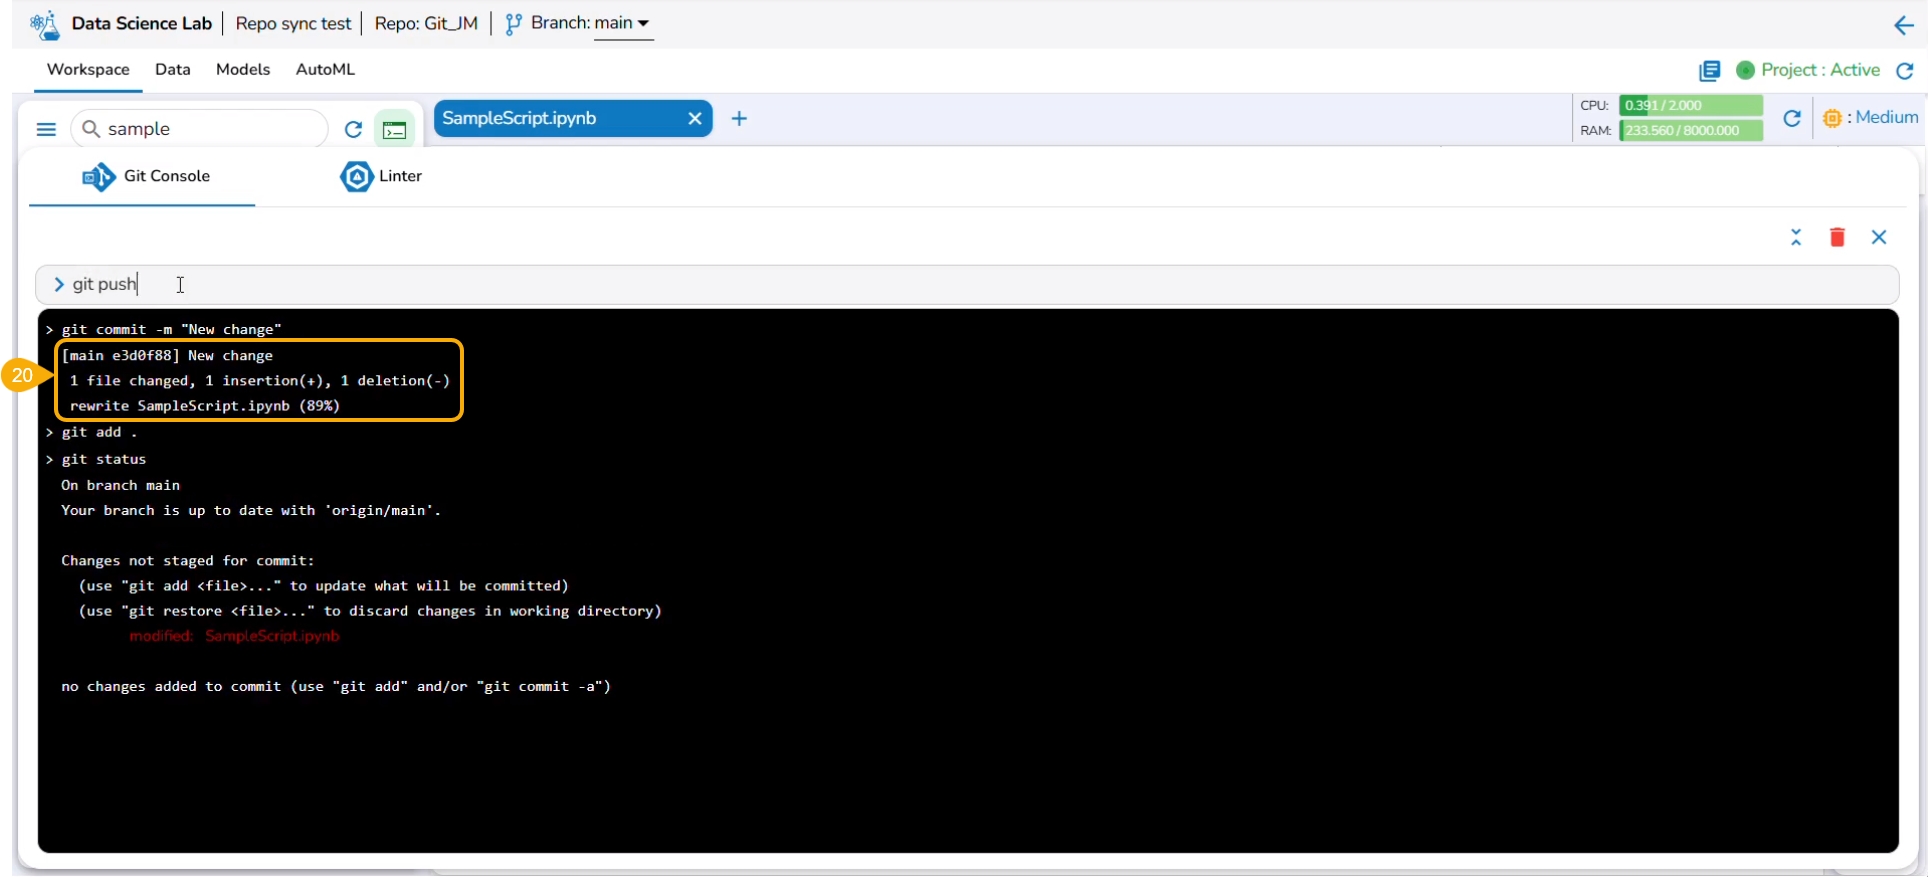
The git commit command generates the information inside the panel about the new changes.
The git push command is used to push the new changes to the Git Repository. The git push command has been rejected since there is a change in the repository version of the same file and the console suggests using the git pull command.
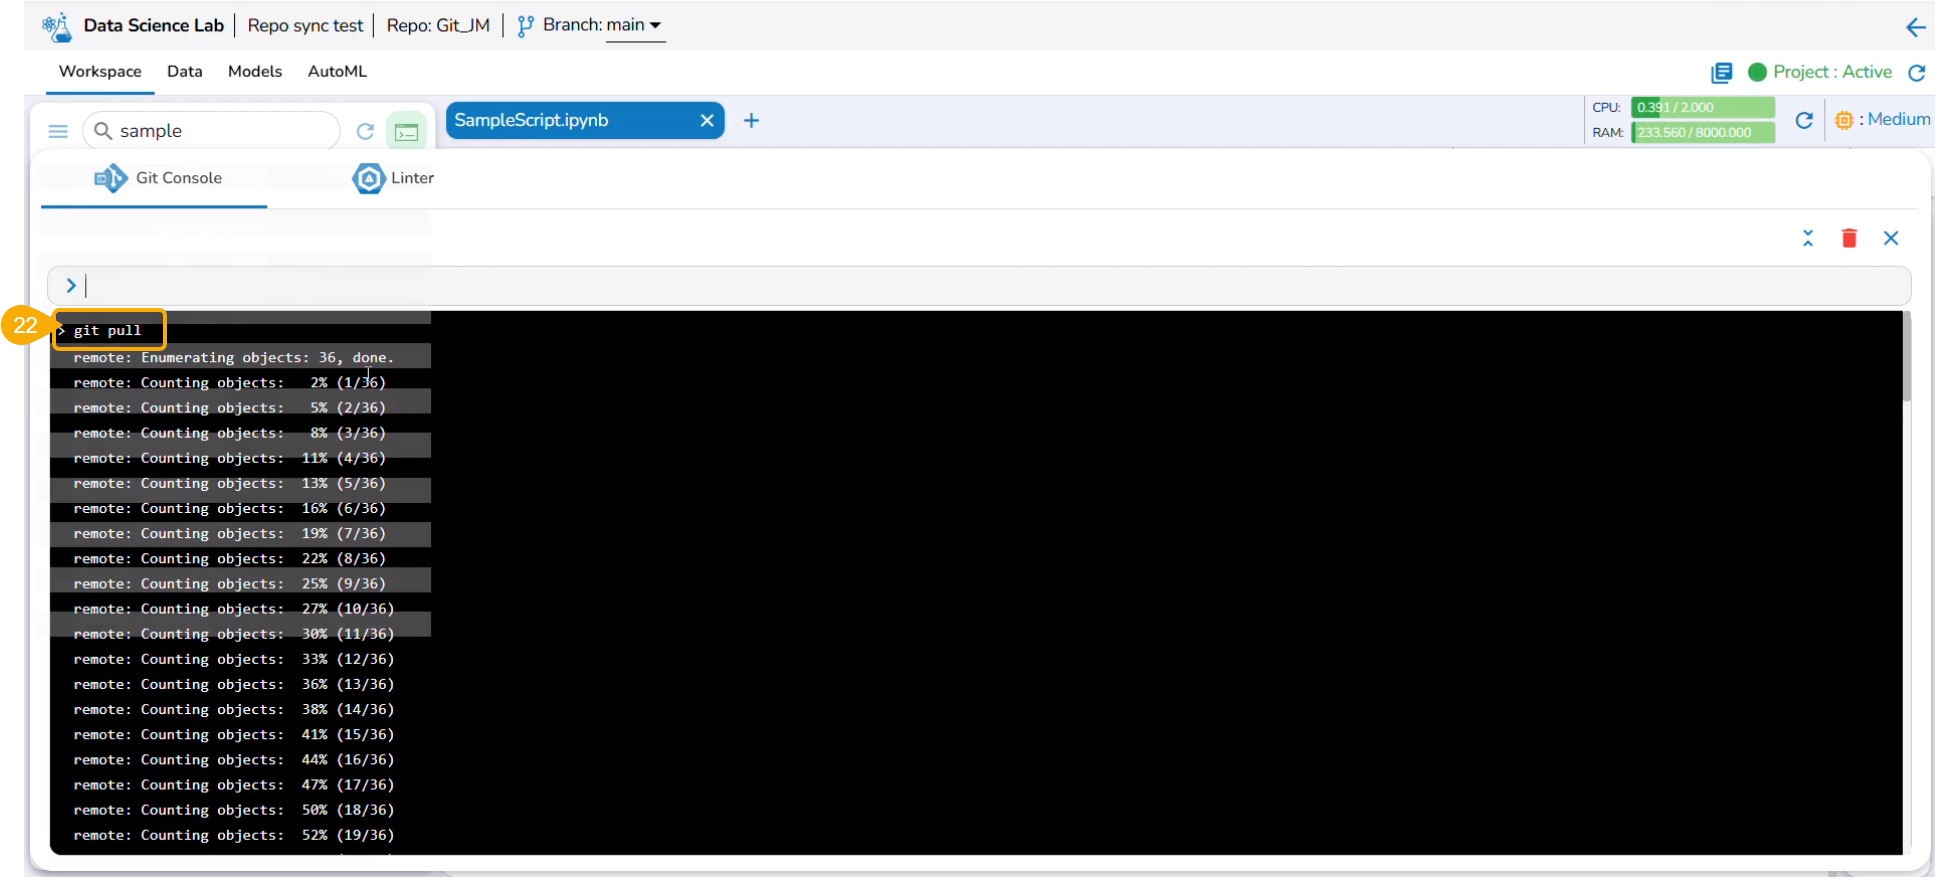
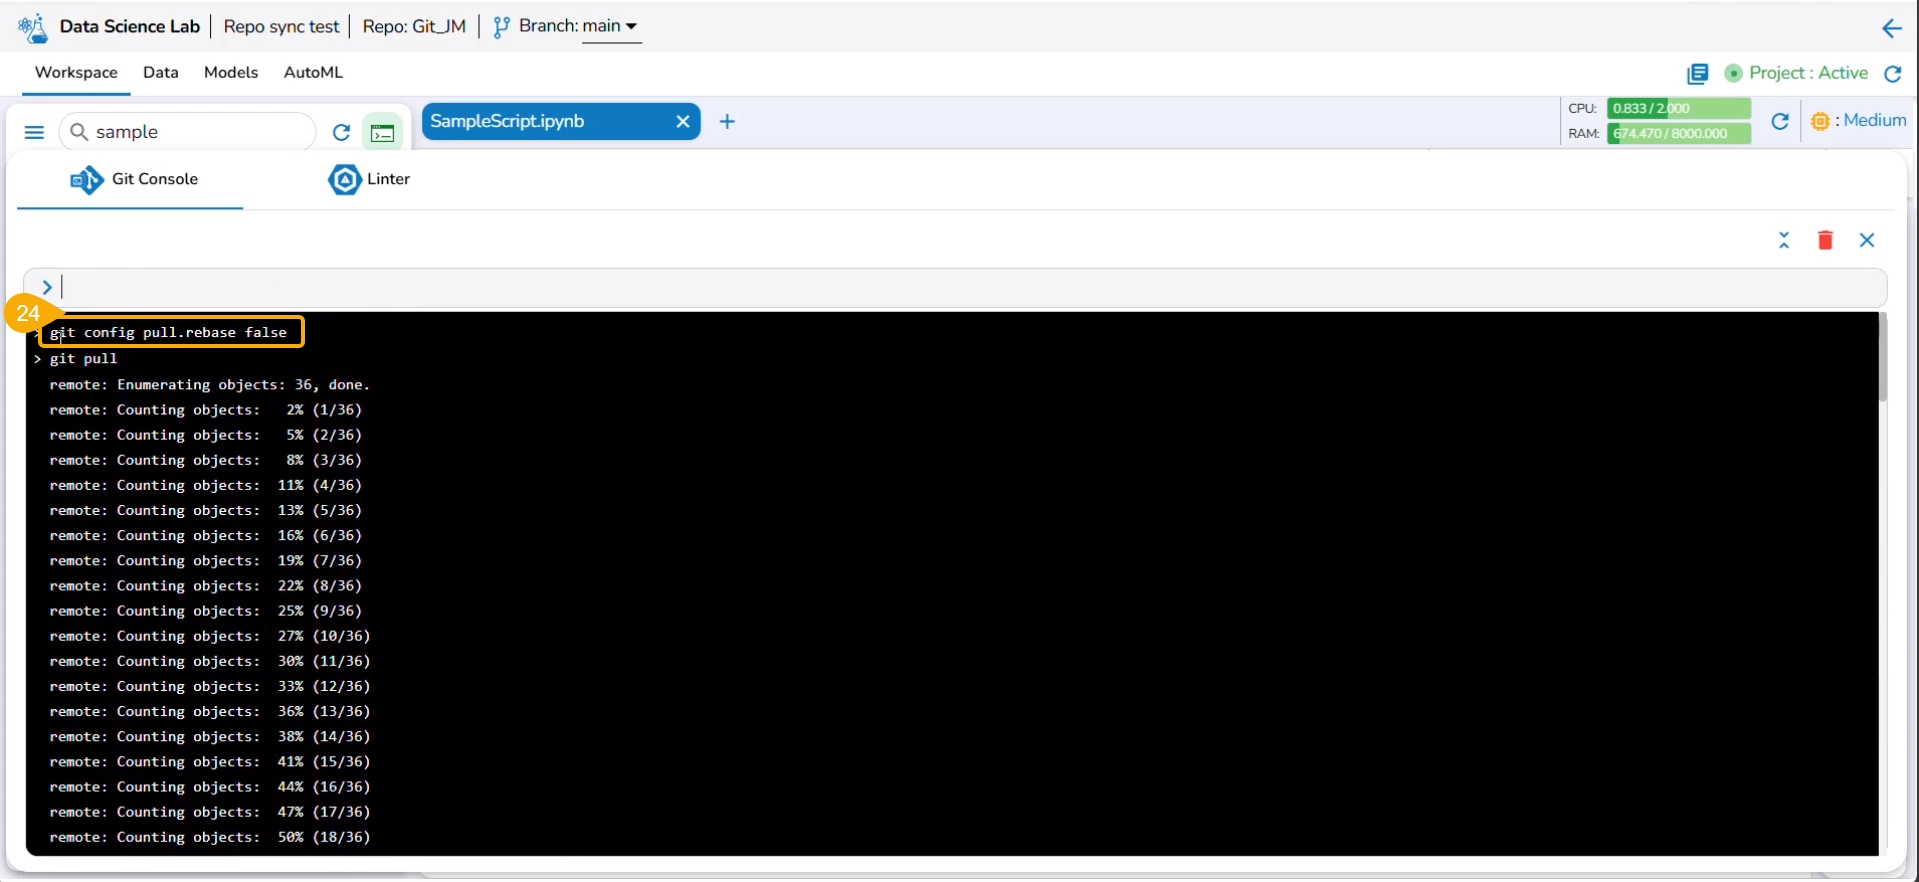
The git pull command has been used to pull the distant changes from the repository.
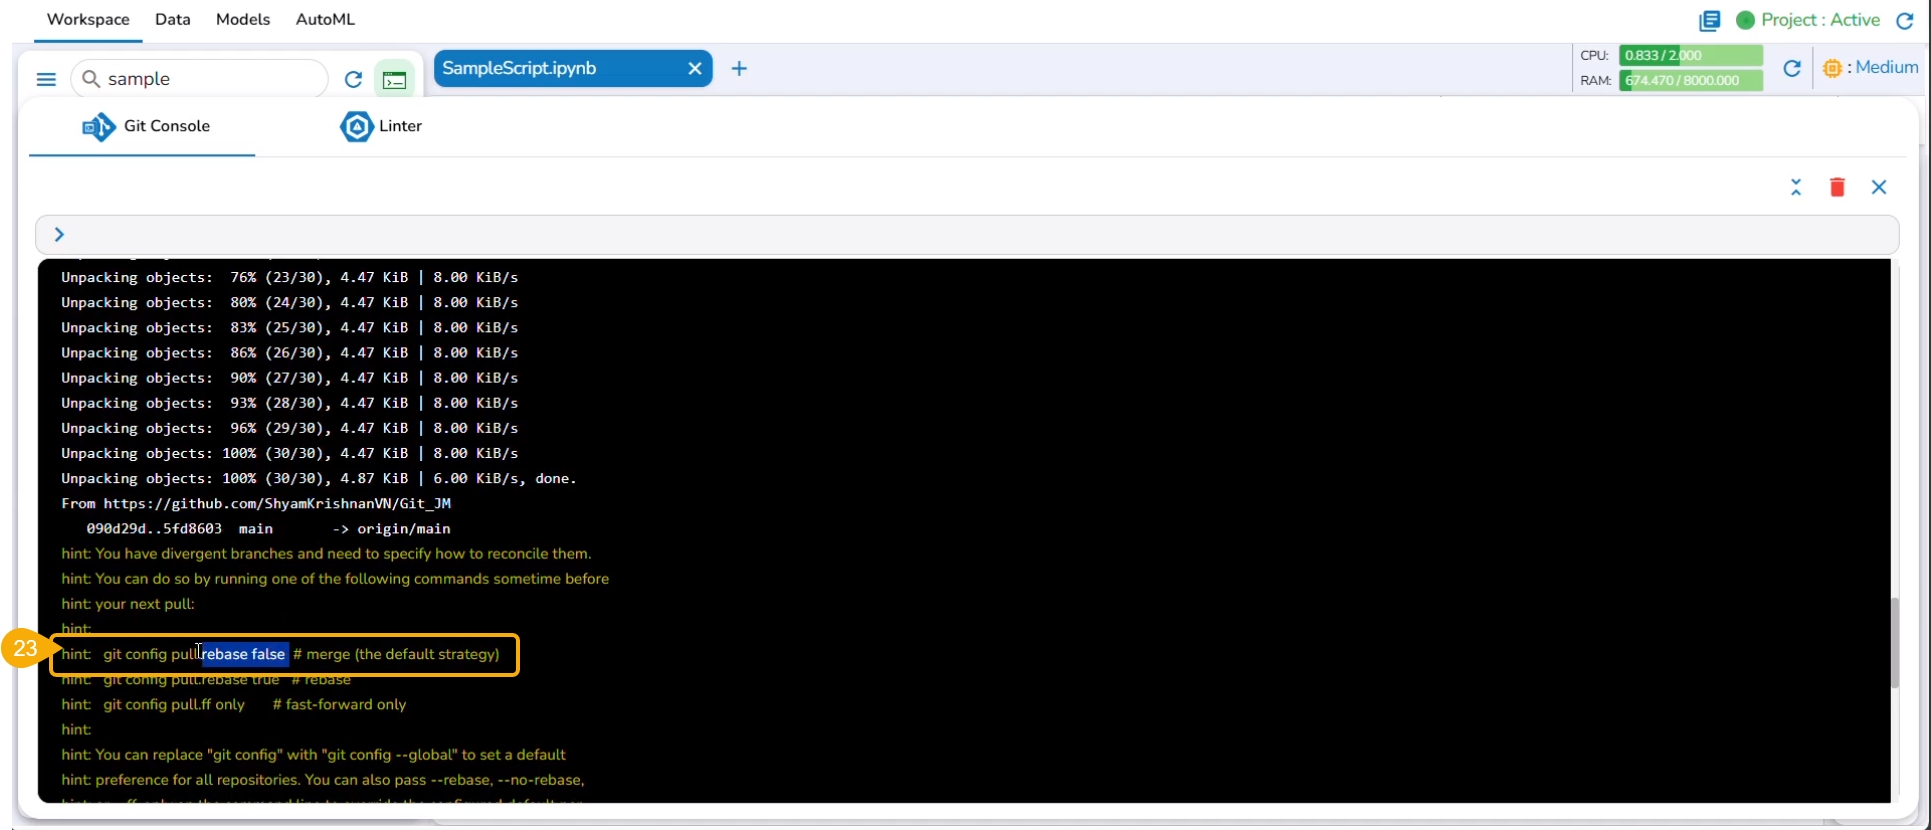
At the end of the git pull command, it is hinted to use git config pull rebase false as a default strategy.
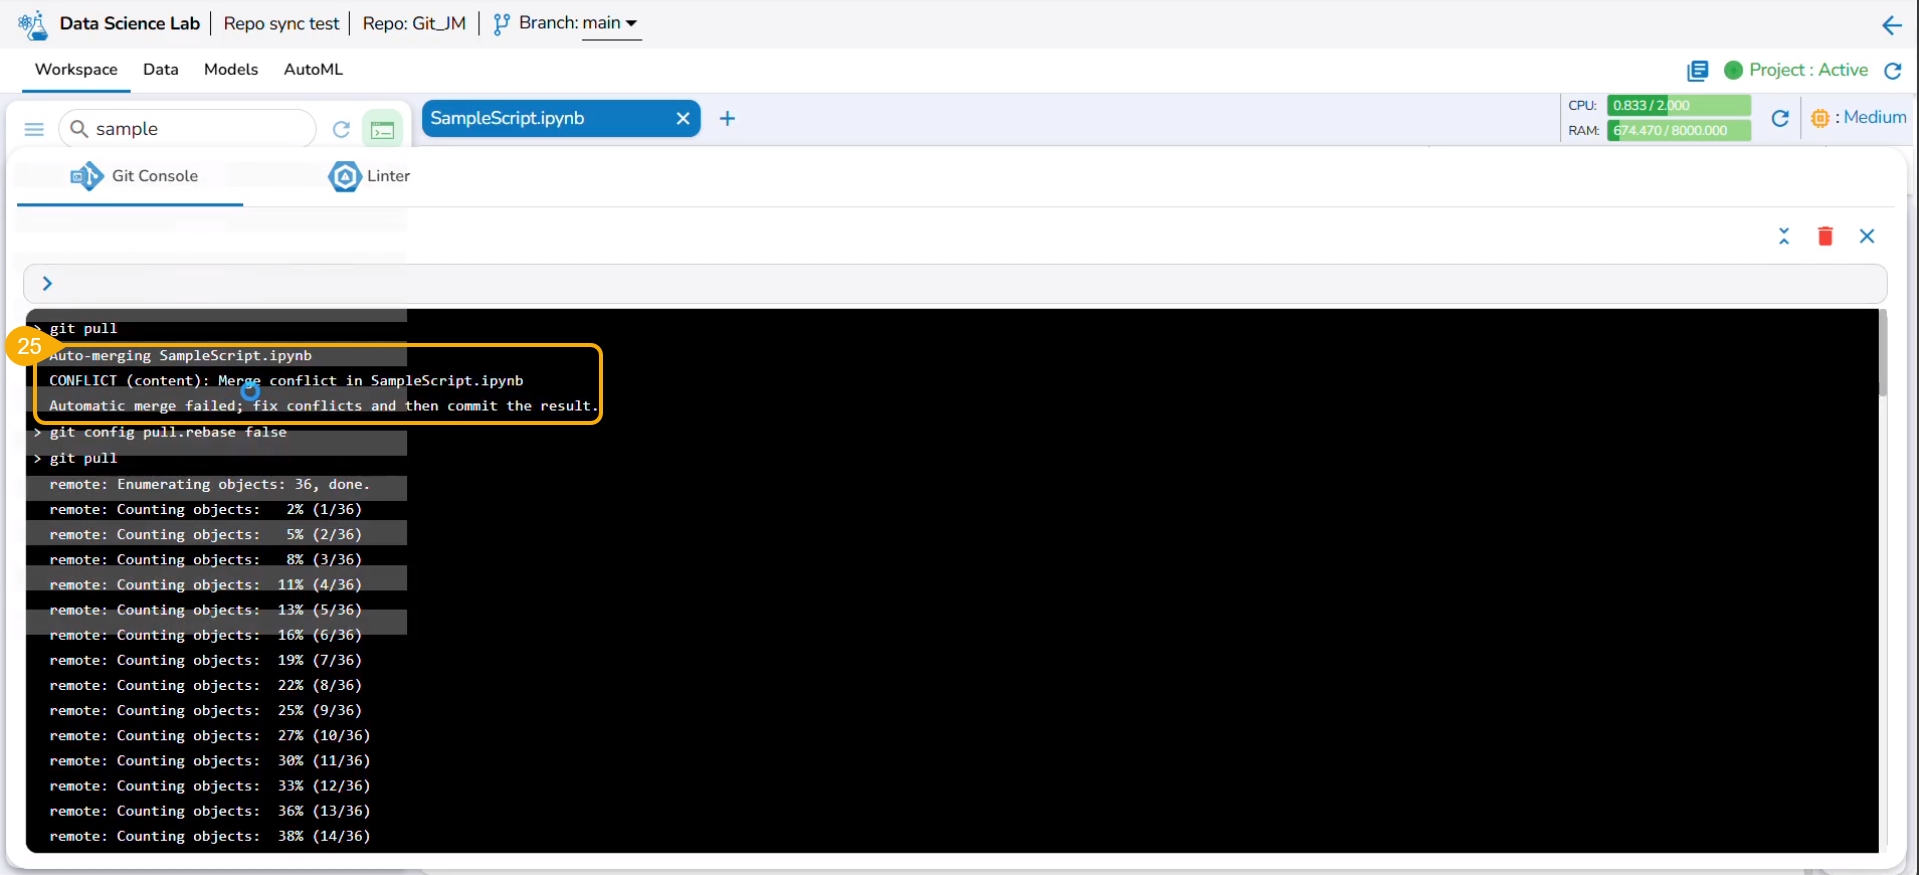
The git config pull rebase false command is committed.
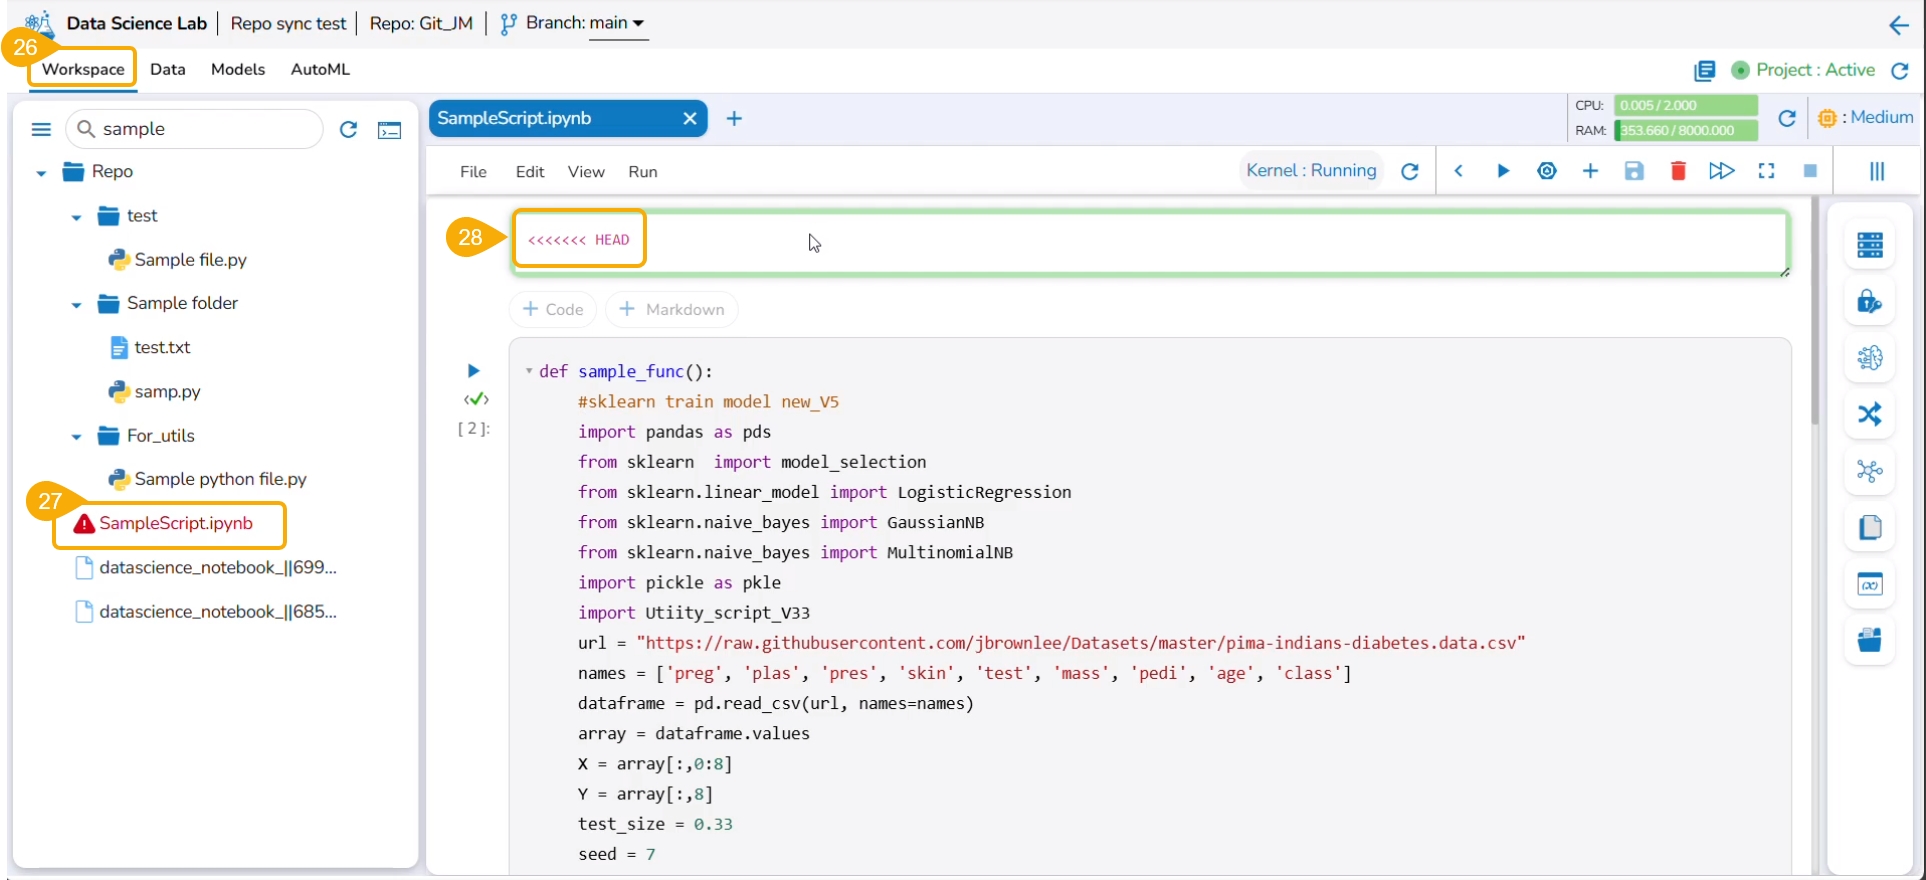
The auto merge failed due to the merge conflict in the selected file.
Navigate to the Workspace tab.
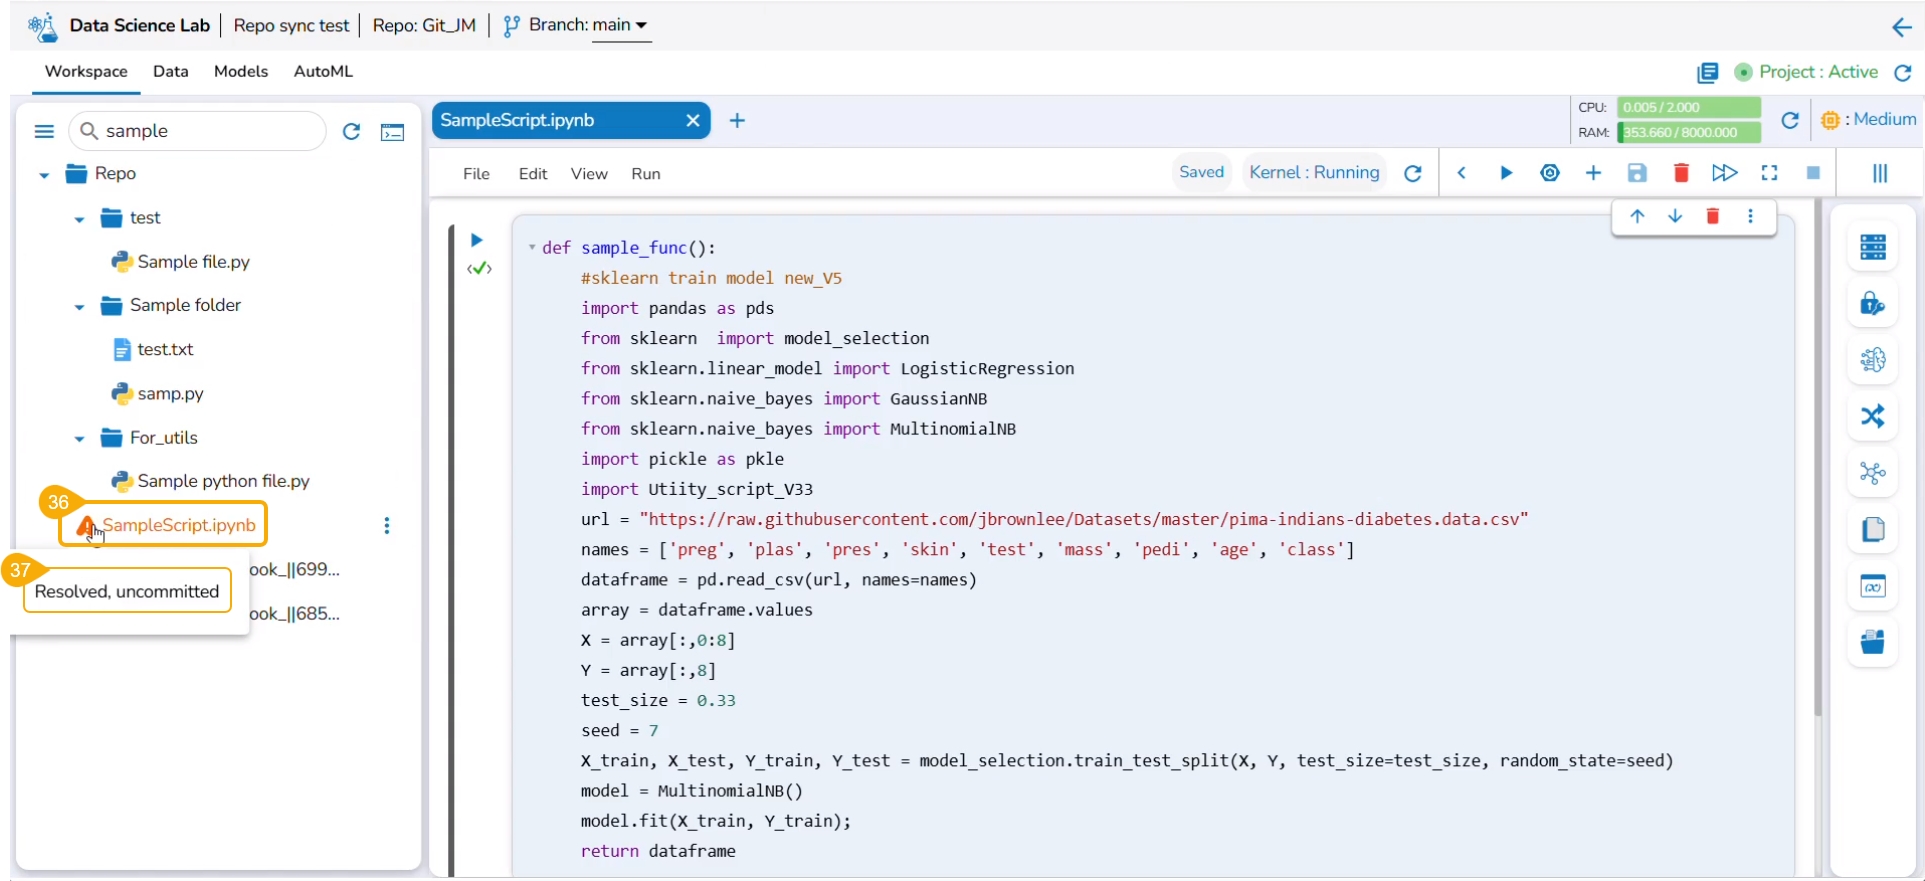
The file title appears in red to indicate the conflict.
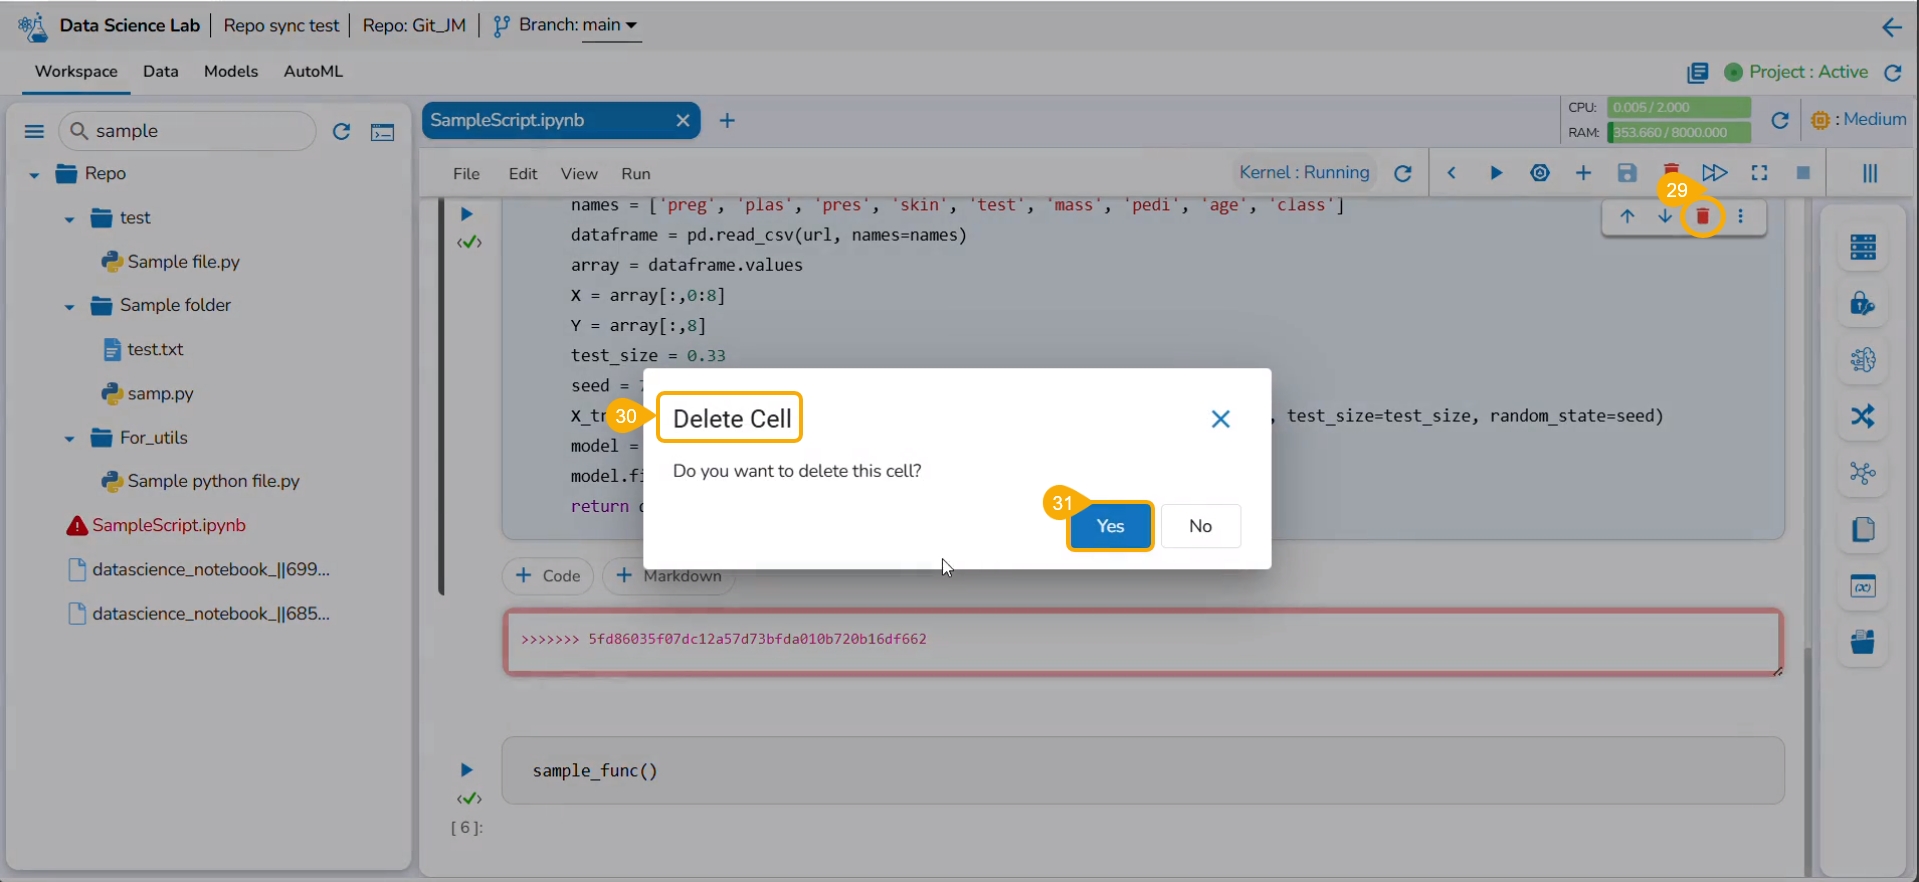
The cells containing conflicted content are highlighted in the script.
Click the Delete icon for the conflicted cells.
The Delete Cell window appears.
Click the Yes option.
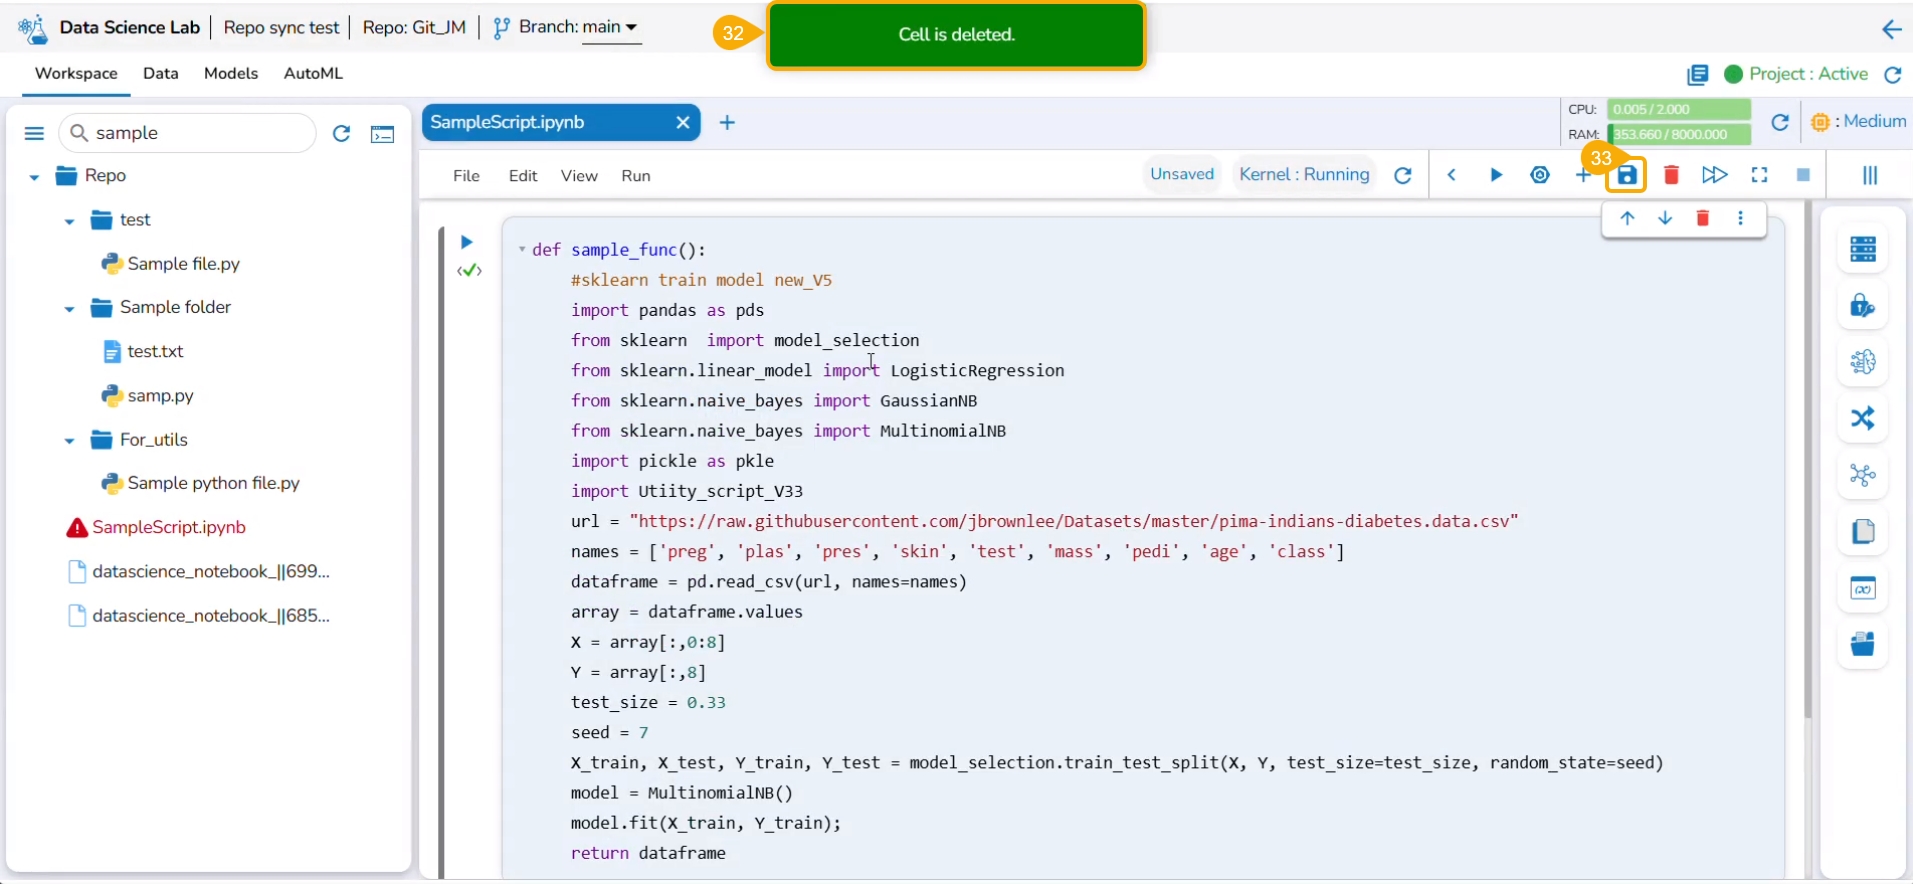
A notification message appears to ensure that the conflicted cell is removed from the script.
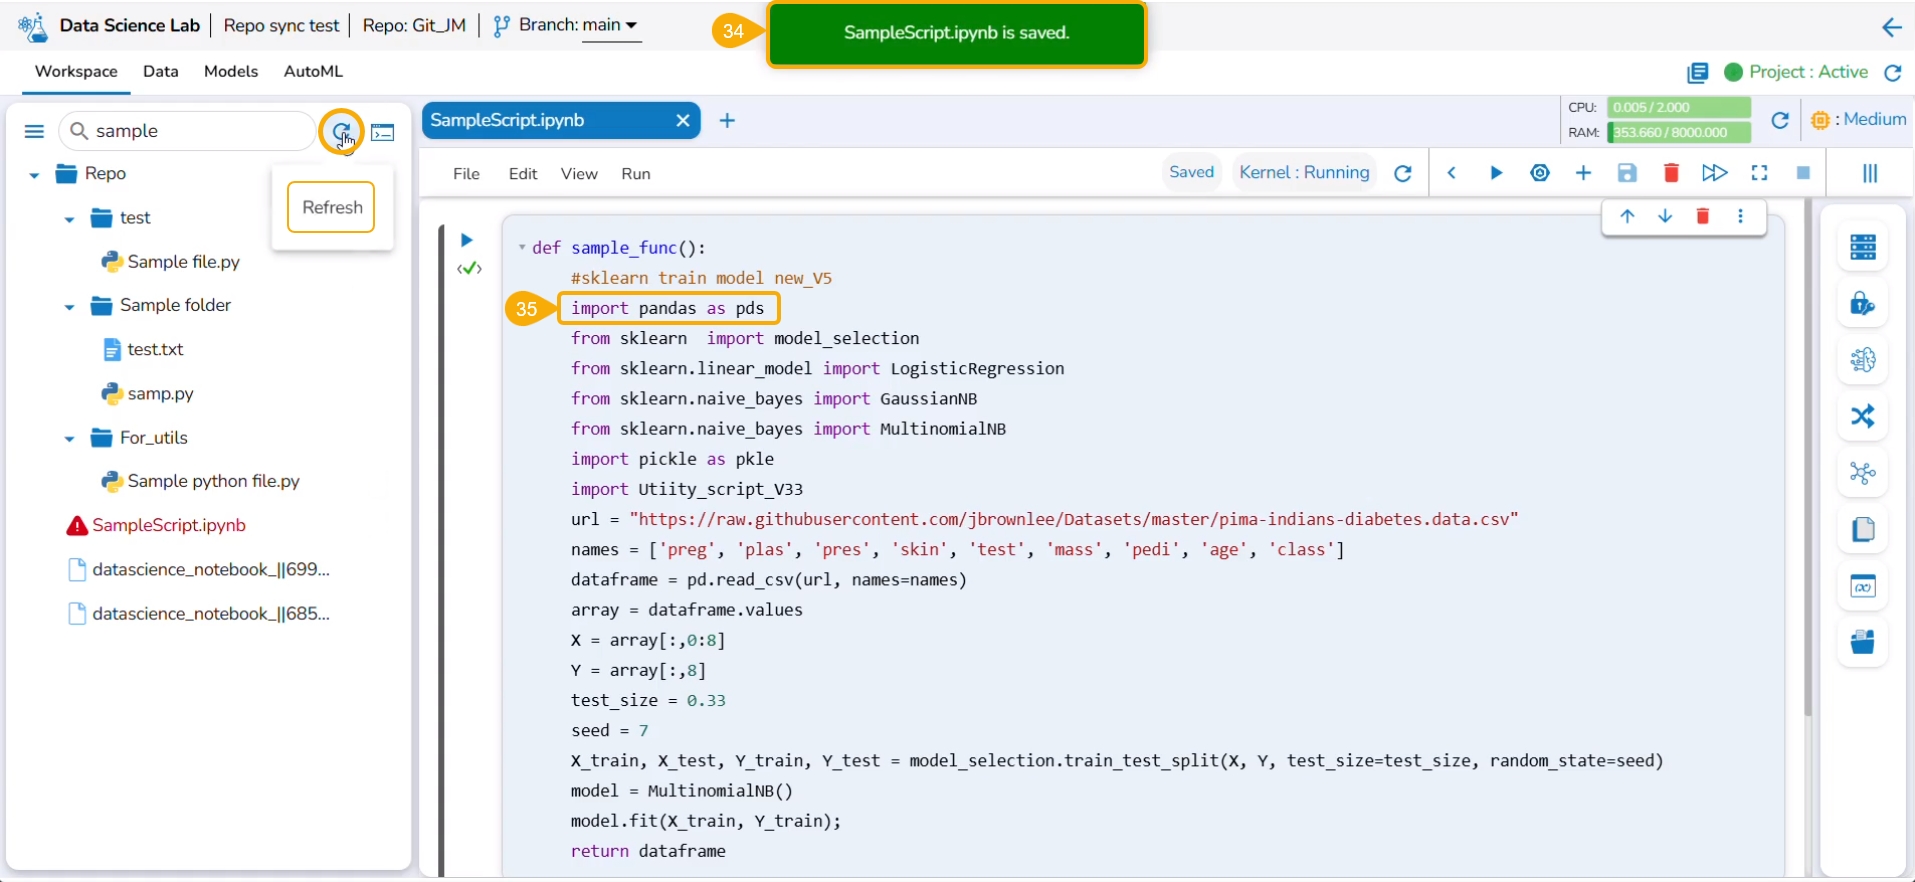
Click the Save icon for the script.
Please Note: The user must resolve all the conflicts in the selected file, before saving it.
A notification ensures that the script is saved.
The saved script reflects the remote changes.
The color of the selected file title also gets changed.
By hovering on the file name, it displays the current status of the file. For example, the given image shows that for the current file conflicts are resolved, but it is in uncommitted status.
Please Note: the user can click the Refresh icon to refresh the status of the file.
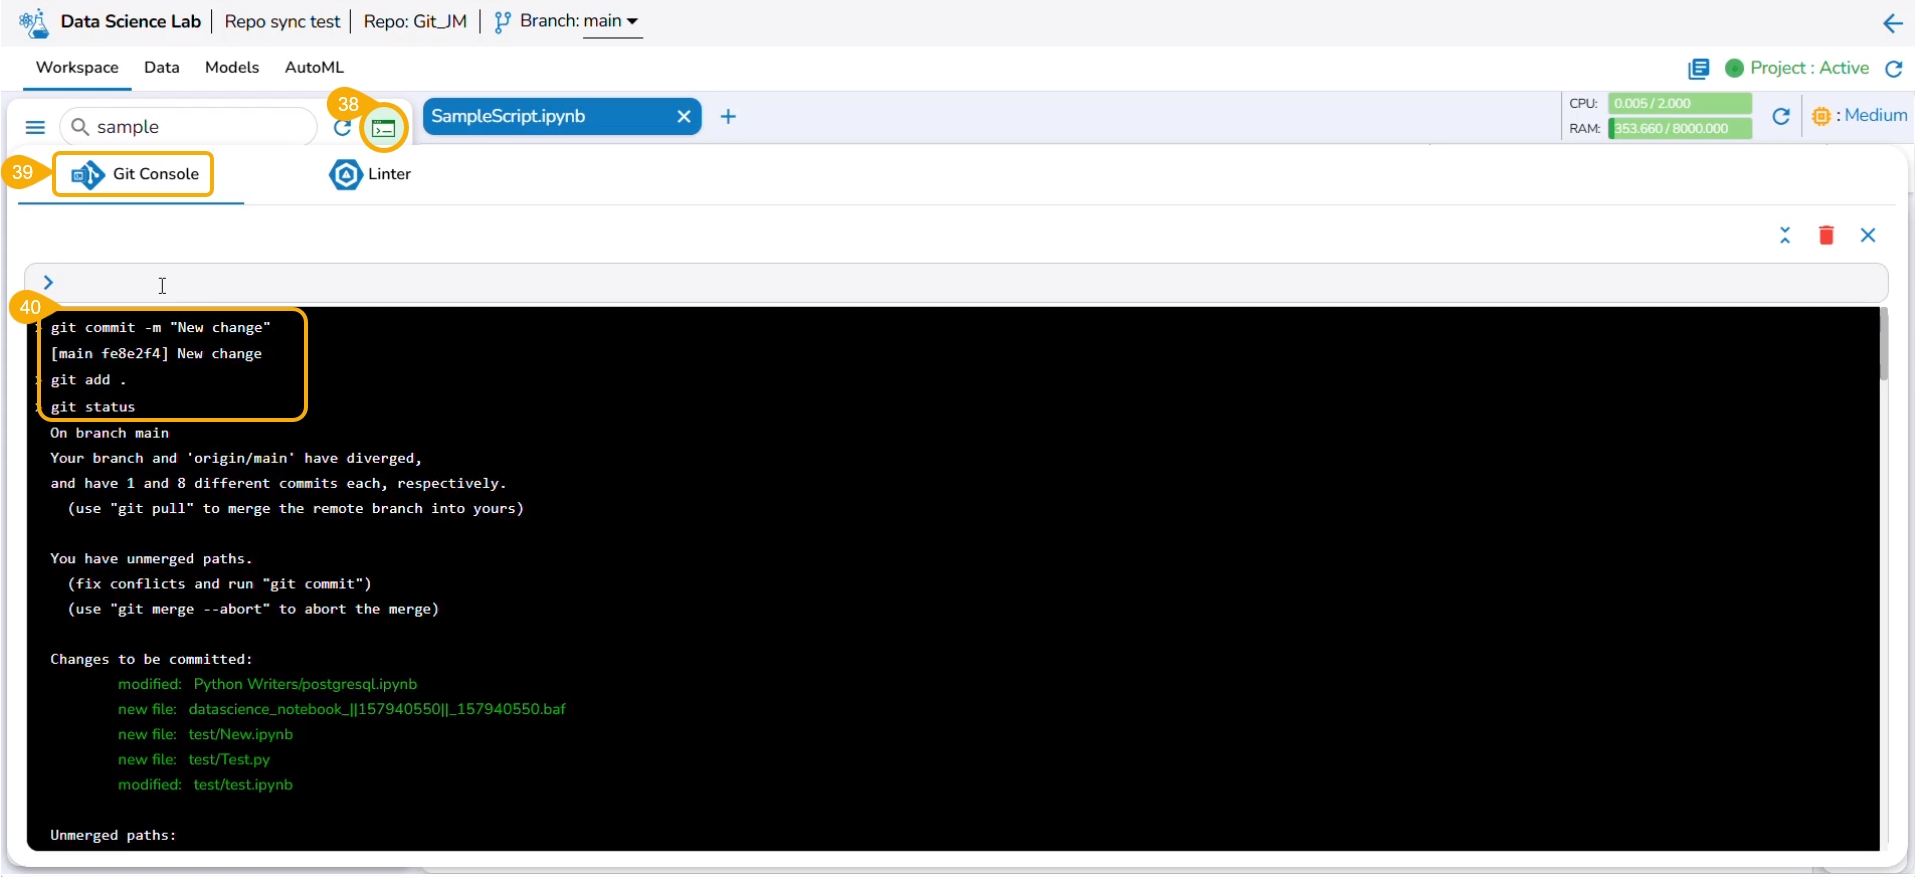
Click the Git Console icon.
The Git Console space gets displayed.
The Git commands used in the example are git add, git commit, and git push.
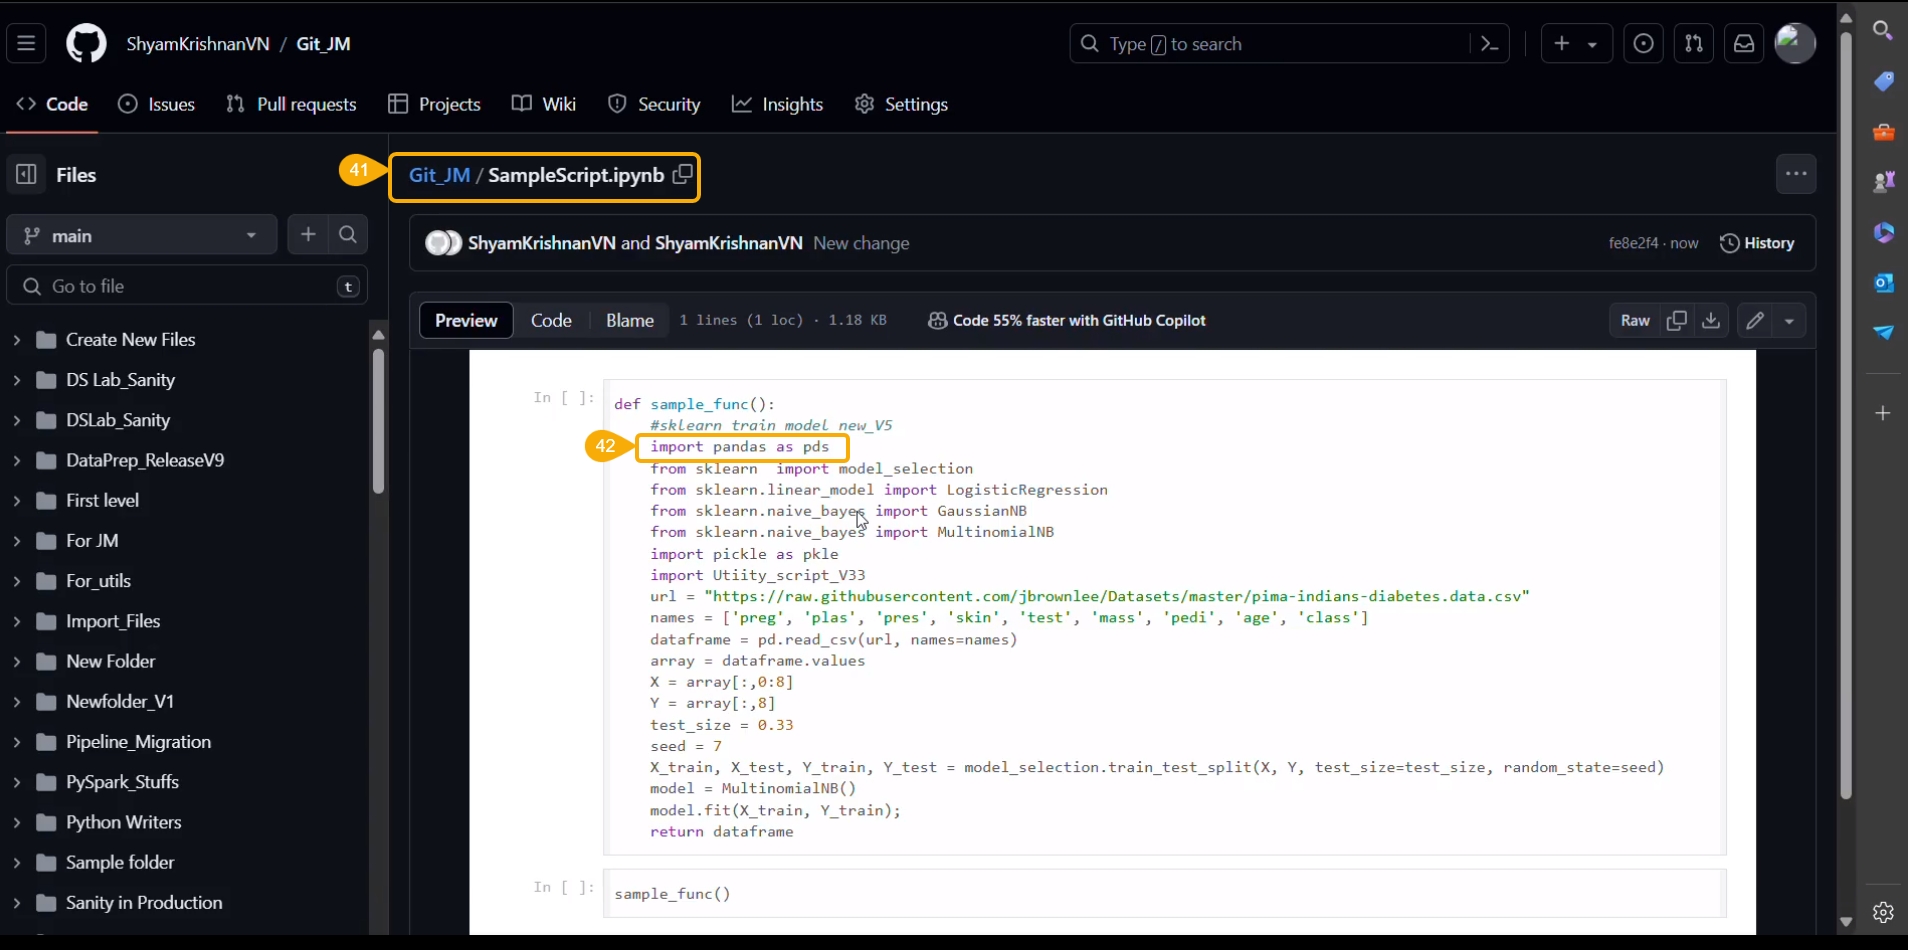
Navigate to the script saved remotely (in the Git repository).
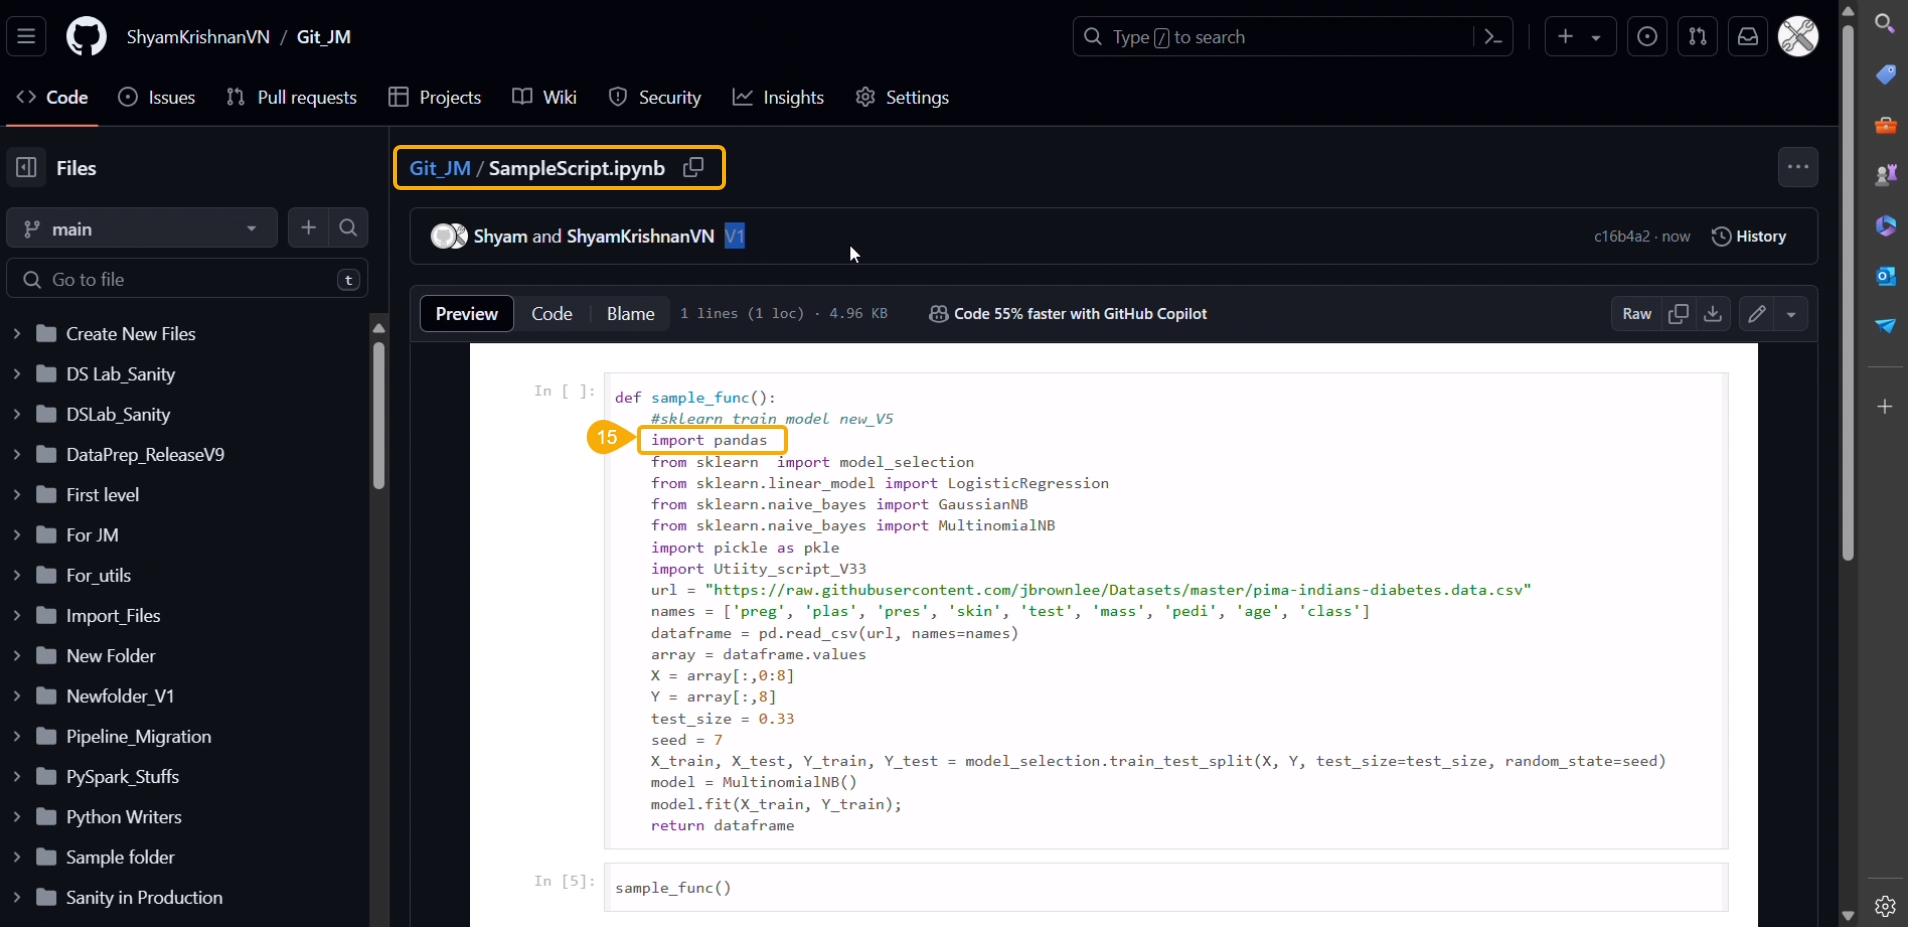
The script displays the recent changes committed using the Git Console space for a Repo Sync Project.
All the Git commands will be supported in the Git Console. Please find some of the commonly used Git commands listed below.


