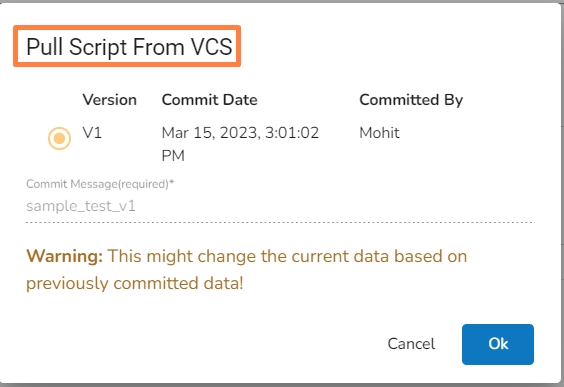
Check out the given walk-through on how to pull the committed Python script from the VCS.
Navigate to the Python Script component configuration section and click on the Pull Script from VCS icon.
The Pull Script from VCS dialog box opens.
Select a specific version that you wish to Pull.
Click the Ok option.
A notification message appears to inform the user that the available versions of the script are getting pulled from the VCS.
The user gets another notification regarding the script getting pulled from the selected version by the user.
The final success notification message appears informing the users about the completion of the Pull action and the selected version of the script gets pulled.
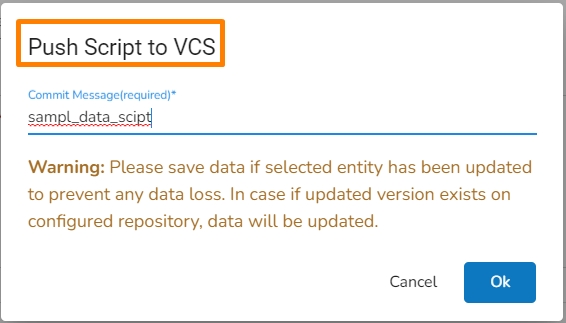
Check out the given walk-through on how to push the committed Python script to the VCS.
Navigate to the Python Script component configuration section and click on the Push Script to VCS icon.
The Push Script to VCS dialog box opens.
Provide a commit message for the Script that you wish to push.
Click the Ok option.
A notification message appears informing the user that the Push to VCS has been started.
A success notification message appears informing the user that the Push to VCS action has been completed.
Data Pipeline module provides two types of scripting components to facilitate the users.
This component can be used for connecting it to a remote server/machine and running script files present there based on some events.
All component configurations are classified broadly into the following sections:
Meta Information
Please follow the given steps in the demonstration to use the Script Runner component in a pipeline workflow.
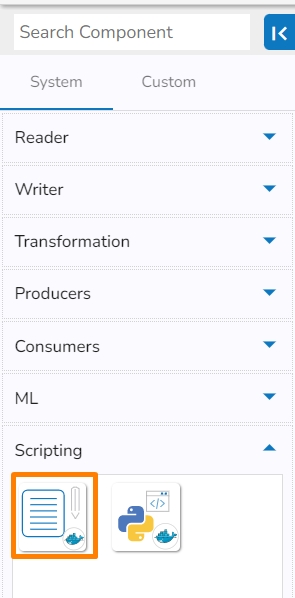
The Script Runner component is provided under the Scripting section of the Component pallet.
Drag and drop Script Runner Component to the Workflow Editor.
Open the dragged Script Runner component to open the component configuration tabs.
The Basic Information tab opens by default.
Invocation Type: Select an Invocation type from the drop-down menu to confirm the running mode of the script runner component. The supported invocation types are Real-Time and Batch.
Deployment Type: It displays the deployment type for the component. This field comes pre-selected.
Container Image Version: It displays the image version for the docker container. This field comes pre-selected.
Failover Event: Select a failover event from the drop-down menu.
Batch Size (min 10): Provide the maximum number of records to be processed in one execution cycle (Min limit for this field is 10).
Open the Meta Information tab and configure the required information.
Host: Host IP of the remote server/machine
Username: Username of the remote server/machine.
Port: Provide machine Port number.
Authentication: Select an authentication option from the drop-down menu.
Password: By selecting this option the user needs to pass the password.
PEM/PPK File: By selecting this option the user needs to pass the authentication file to connect to the server.
Script type: Choose the type of script file that You want to run out of SSH/ PERL/command options.
File path: Path of the file that is stored at the remote server.
File Name: The script file that you want to execute.
Event File Location: this is the location of the file sent through the file monitor (Non-mandatory).
Please Note: The displayed fields may vary based on the selected Authentication option.
Component Properties when the Authentication option is Password.
Component Properties when the Authentication option is PEM/PPK File.
Manual Arguments (Optional): These are the arguments to the parameter of the script that the user can provide manually.
Event Arguments (Optional): These are the arguments to the parameter coming from the previous event/Kafka topic.
Click the Save Component in Storage icon (A notification message appears to confirm the action completion).
The Script Runner component gets configured, and the notification message appears to inform the same.
Please Note: The component can connect to the remote machine using the details provided. It will pick the file from the location in that machine using the file name and file path respectively and finally execute the script after passing arguments (if any).
Limitations
a. It accepts only lists as input i.e. the in-event data should be a list.
b. It sends data on the out-event only when there is a print statement as output in the script if not there will be no data on the out-event.
c. The data produced from the script is of a list type.
The Python script component is designed to allow users to write their own custom Python scripts and run them in the pipeline. It also enables users to directly use scripts written in a DSLab notebook and run them in the pipeline.
Check out the given demonstrations to understand the configuration steps involved in the Python Script.
All component configurations are classified broadly into 3 section
Meta Information
Please Note: Do not provide 'test' as a component name or the component name should not start with 'test' in the component name field in the Meta information of the Python Script component. The word 'test' is used at the backend for some development processes.
Component Name: Provide a name to the component. Please note that the component name should be without space and special characters. Use the underscore symbol to show space in between words.
Start Function Name: It displays all the function names used in the python script in a drop-down menu. Select one function name with which you want to start.
In Event Data Type: The user will find two options here:
DataFrame
List of Dictionary
External Libraries: The user can provide some external python library in order to use them in the script. The user can enter multiple library names separated by commas.
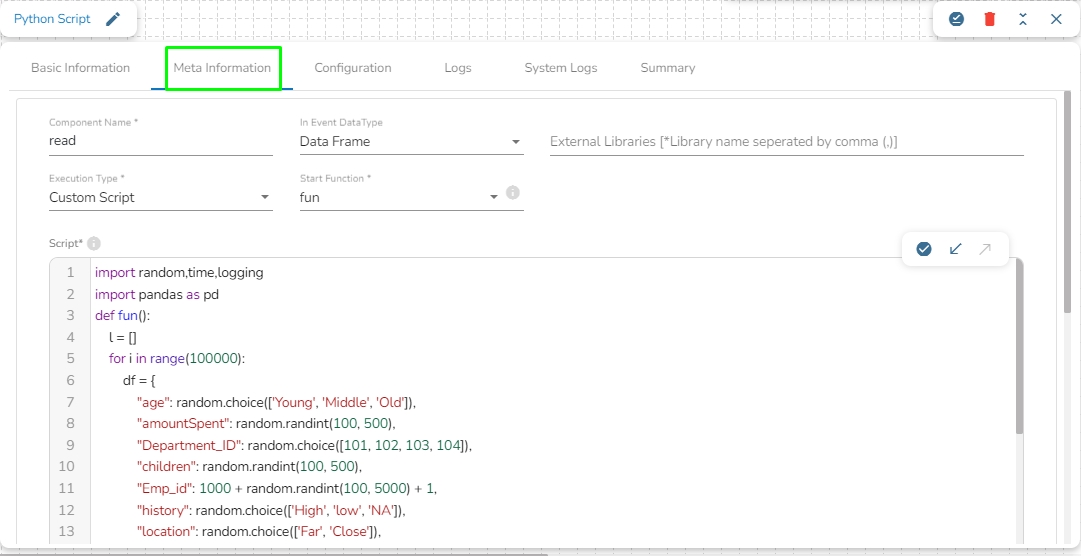
Execution Type: Select the Type of Execution from the drop-down. There are two execution types supported:
Custom Script: The user can write their own custom python script in the Script field.
Script: The user can write their own custom python script in this field. Make sure the start should contain at least one function. The user can also validate the script by Clicking on Validate Script option in this field.
Start Function: Here, all the function names used in the script will be listed. Select the start function name to execute the python script.
Input Data: If any parameter has been given in the function, then the name of the parameter is provided as Key, and value of the parameters has to be provided as value in this field.
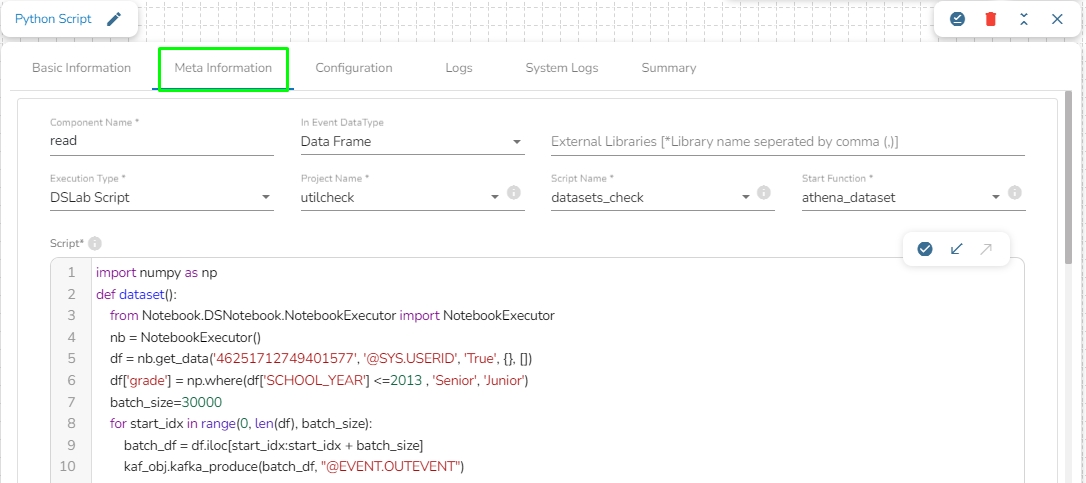
DSLab Script: In this execution type, the user can use the script which is exported from DSLab notebook. The user needs to provide the following information if selects this option as an Execution Type:
Project Name: Select the same Project using the drop-down menu where the Notebook has been created.
Script Name: This field will list the exported Notebook names which are exported from the Data Science Lab module to Data Pipeline.
Start Function: Here, all the function names used in the script will be listed. Select the start function name to execute the python script.
Input Data: If any parameter has been given in the function, then the name of the parameter is provided as Key, and value of the parameters has to be provided as value in this field.
Pull script from VCS: It allows the user to pull desired committed script from the VCS.
Push script to VCS: It allow the user to commit different versions of a script to the VCS.
Please Note: The below-given instructions should be followed while writing a Python script in the Data Pipeline:
If the script in the component is same as the committed script it won't commit again. You can push any number of different scripts by giving different commit message.
The version of the committed message will be listed as V1,V2, and so on.
The Python script needs to be written inside a valid Python function. E.g., The entire code body should be inside the proper indentation of the function (Use 4 spaces per indentation level).
The Python script should have at least one main function. Multiple functions are acceptable, and one function can call another function.
It should be written above the calling function body (if the called function is an outer function).
It should be written above the calling statement (if called function is an inner function)·
Spaces are the preferred indentation method.
Do not use 'type' as the function argument as it is a predefined keyword.
The code in the core Python distribution should always use UTF-8.
Single-quoted strings and double-quoted strings are considered the same in Python.
All the packages used in the function need to import explicitly before writing the function.
The Python script should return data in the form of a DataFrame or List only. The form of data should be defined while writing the function.
If the user needs to use some external library, the user needs to mention the library name in the external libraries field. If the user wants to use multiple external libraries, the library names should be separated by a comma.
If the user needs to pass some external input in your main function, then you can use the input data field. The key name should be the same according to the variable's name and value that is put as per the requirement.
This feature enables the user to send data directly to the Kafka Event or data sync event connected to the component. Below is the command to configure Custom Kafka Producer in the script:
Please Note:
If using @EVENT.OUTEVENT as an Event_name, the Python script component must be connected with the Kafka Event to send the data to the connected event.
If using a specific "Event_Name" in the custom Kafka producer, it is not mandatory to connect the Kafka event with the component. It will send data directly to that specified Kafka event.
The Python Script component must be used in real-time when using Custom Kafka Producer to send data to the Kafka topic. Using it in batch mode can result in improper functionality of the monitoring page and potential WebSocket issues.
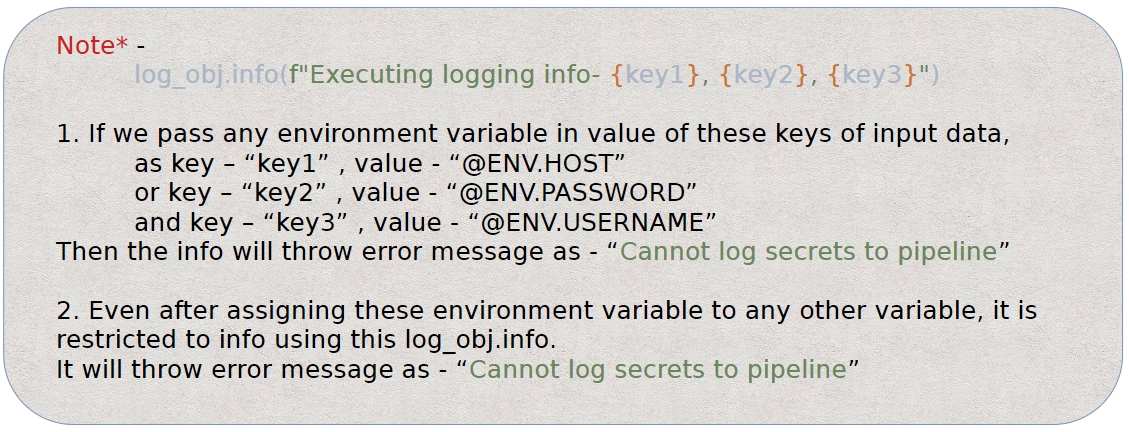
The Python Component has a custom logger feature that allows users to write their own custom logs, which will be displayed in the logs panel. Please refer to the code below for the custom logger:
Please Note: Using this feature, the user cannot get the logs which contain environment variables.
Sample Python code to produce data using custom producer and custom logger:
Here,
df: Previous event data in the form of List or DataFrame connected to the Python component.
key1, key2, key3: Any parameter passed to the function from the Input Data section of the metadata info of the Python script component.
log_obj.info(): It is for custom logging and takes a string message as input.
kaf_obj.kafka_produce(): It is for the custom Kafka producer and takes the following parameters:
df: Data to produce – pandas.DataFrame and List of Dict types are supported.
Event name: Any Kafka event name in string format. If @EVENT.OUTEVENT is given, it sends data to the connected out event. If @EVENT.FAILEVENT is given, it sends the data to the connected failover event with the Python script component.
Any Failed Message: A message in string format can be given to append to the output data. The same message will be appended to all rows of data (this field is optional).
Please Note: If the data is produced to a Failover Event using custom Kafka Producer then that data will not be considered as failed data and it will not be listed on the Failure Analysis page as failed data and it will be reflected in green color as processed records on the Data Metrics page.
The Custom Python Script transform component supports 3 types of scripts in the Data Pipeline.
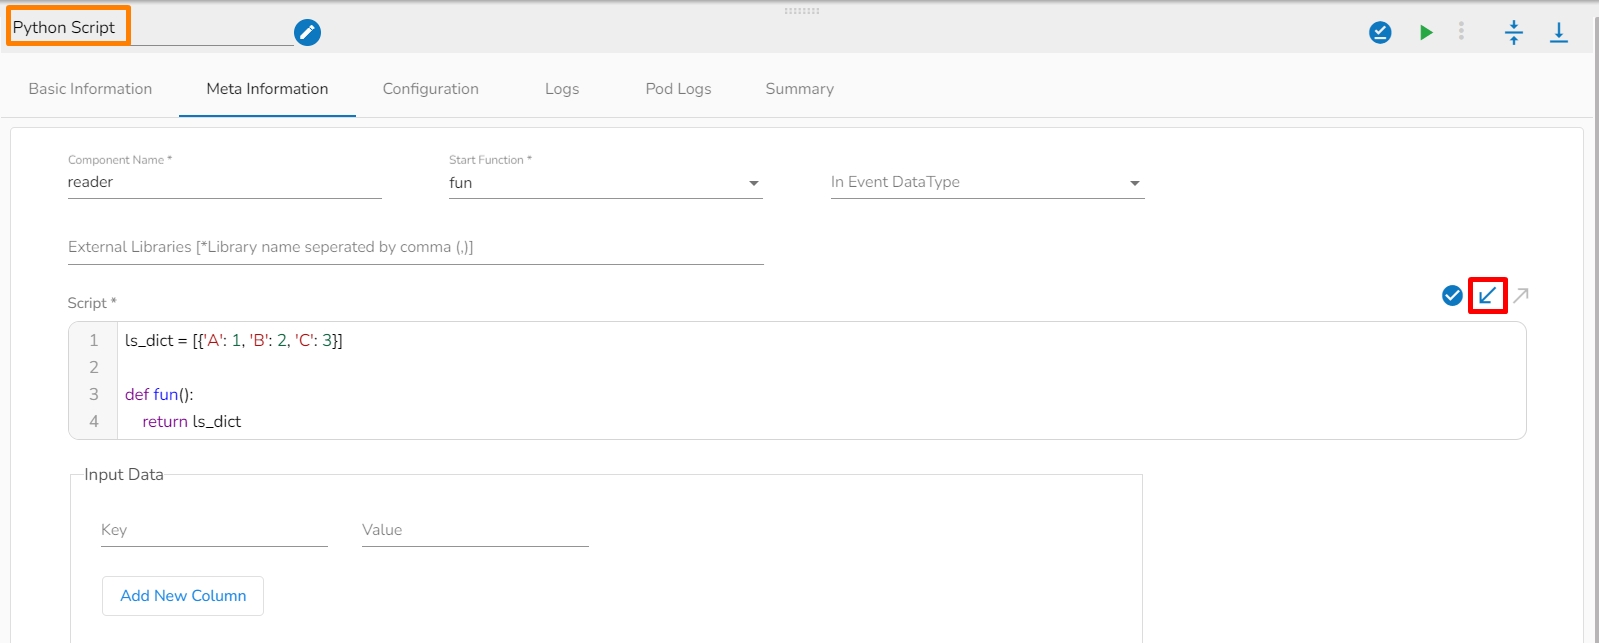
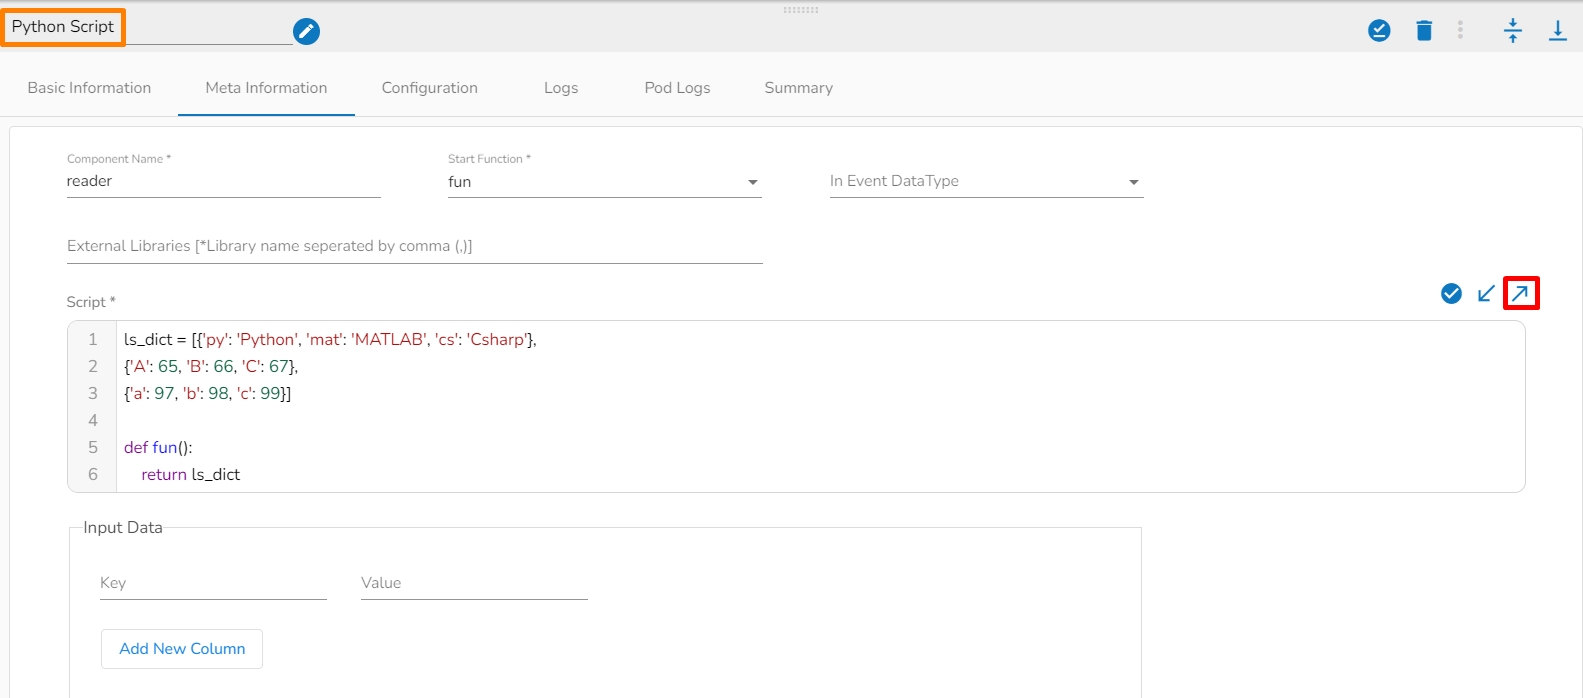
1. As Reader Component: If you don’t have any in Event then you can use no argument function. For Example,
2. As Transformation Component: If you have data to execute some operation, then use the first argument as data or a list of dictionaries. For Example,
Here the df holds the data coming from the previous event as argument to the pram of the method.
3. Custom Argument with Data: If there is a custom argument with the data-frame i.e. the data is coming from the previous event and we have passed the custom argument to the parameter of the function. here df will hold the data from the previous event and the second param: arg range can be given in the input data section of the component.
Please Note:
The Custom Kafka producer in batch mode will not trigger next component, if the actual Kafka event name is given in place of @EVENT.OUTEVENT/@EVENT.FAILEVENT
Check out the given demonstrations to understand the configuration steps involved in the PySpark Script.
Please Note: Do not provide 'test' as a component name or the component name should not start with 'test' in the component name field in the Meta information of the Python Script component. The word 'test' is used at the backend for some development processes.
Component Name: Provide a name to the component. Please note that the component name should be without space and special characters. Use the underscore symbol to show space between words.
Start Function Name: It displays all the function names used in the PySpark script in a drop-down menu. Select one function name with which you want to start.
In Event Data Type: The user will find two options here:
DataFrame
List of Dictionary
External Libraries: The user can provide external PySpark libraries in the script. The user can enter multiple library names separated by commas.
Execution Type: Select the Type of Execution from the drop-down. There are two execution types supported:
Custom Script: The users can write their custom PySpark script in the Script field.
Script: The user can write their custom PySpark script in this field. Make sure the start should contain at least one function. The user can also validate the script by clicking the Validate Script option in this field.
Start Function: Here, all the function names used in the script will be listed. Select the start function name to execute the PySpark script.
Input Data: If any parameter has been given in the function, then the parameter's name is provided as Key, and the value of the parameters has to be provided as a value in this field.
DSLab Script: In this execution type, the user can use the script exported from the DSLab notebook. The user needs to provide the following information if this option is selected as an Execution Type:
Project Name: Select the same Project using the drop-down menu where the Notebook has been created.
Script Name: This field will list the exported Notebook names from the Data Science Lab module to the Data Pipeline.
Start Function: All the function names used in the script will be listed here. Select the start function name to execute the PySpark script.
Input Data: If any parameter has been given in the function, then the parameter's name is provided as Key, and the value of the parameters has to be provided as a value in this field.
Pull script from VCS: It allows the user to pull the desired committed script from the VCS.
Push script to VCS: It allows the user to commit different versions of a script to the VCS.
Script: The Exported script appears under this space. The user can also validate the script by Clicking on Validate Script option in this field. For more information to export the script from DSLab module, please refer the following link: .
It is possible for a Data Pipeline user to . The user can Push a version of the Python script to VCS and Pull a version of the Python script from VCS.
Script: The Exported script appears under this space. The user can also validate the script by Clicking on the Validate Script option in this field. For more information about exporting the script from the DSLab module, please refer to the following link: .


