Loading...
Loading...
Loading...
Loading...
Loading...
Loading...
Loading...
Loading...
Loading...
Loading...
Loading...
Loading...
Loading...
Loading...
Loading...
Loading...
Loading...
Loading...
HDFS stands for Hadoop Distributed File System. It is a distributed file system designed to store and manage large data sets in a reliable, fault-tolerant, and scalable way. HDFS is a core component of the Apache Hadoop ecosystem and is used by many big data applications.
This component reads the file located in HDFS(Hadoop Distributed File System).
All component configurations are classified broadly into 3 section
Meta Information
Host IP Address: Enter the host IP address for HDFS.
Port: Enter the Port.
Zone: Enter the Zone for HDFS. Zone is a special directory whose contents will be transparently encrypted upon write and transparently decrypted upon read.
File Type: Select the File Type from the drop down. The supported file types are:
CSV: The Header and Infer Schema fields get displayed with CSV as the selected File Type. Enable Header option to get the Header of the reading file and enable Infer Schema option to get true schema of the column in the CSV file.
JSON: The Multiline and Charset fields get displayed with JSON as the selected File Type. Check-in the Multiline option if there is any multiline string in the file.
PARQUET: No extra field gets displayed with PARQUET as the selected File Type.
AVRO: This File Type provides two drop-down menus.
Compression: Select an option out of the Deflate and Snappy options.
Compression Level: This field appears for the Deflate compression option. It provides 0 to 9 levels via a drop-down menu.
XML: Select this option to read XML file. If this option is selected, the following fields will get displayed:
Infer schema: Enable this option to get true schema of the column.
Path: Provide the path of the file.
Root Tag: Provide the root tag from the XML files.
Row Tags: Provide the row tags from the XML files.
Join Row Tags: Enable this option to join multiple row tags.
ORC: Select this option to read ORC file. If this option is selected, the following fields will get displayed:
Push Down: In ORC (Optimized Row Columnar) file format, "push down" typically refers to the ability to push down predicate filters to the storage layer for processing. There will be two options in it:
True: When push down is set to True, it indicates that predicate filters can be pushed down to the ORC storage layer for filtering rows at the storage level. This can improve query performance by reducing the amount of data that needs to be read into memory for processing.
False: When push down is set to False, predicate filters are not pushed down to the ORC storage layer. Instead, filtering is performed after the data has been read into memory by the processing engine. This may result in more data being read and potentially slower query performance compared to when push down is enabled.
Path: Provide the path of the file.
Partition Columns: Provide a unique Key column name to partition data in Spark.
Readers are a group of components that can read data from different DB and cloud storages in both invocation types i.e., Real-Time and Batch.
Mongo DB reader component contains both the deployment-types: Spark & Docker
An Elasticsearch reader component is designed to read and access data stored in an Elasticsearch index. Elasticsearch readers typically authenticate with Elasticsearch using username and password credentials, which grant access to the Elasticsearch cluster and its indexes.
All component configurations are classified broadly into the following sections:
Meta Information
Please follow the given demonstration to configure the component.
Host IP Address: Enter the host IP Address for Elastic Search.
Port: Enter the port to connect with Elastic Search.
Index ID: Enter the Index ID to read a document in Elasticsearch. In Elasticsearch, an index is a collection of documents that share similar characteristics, and each document within an index has a unique identifier known as the index ID. The index ID is a unique string that is automatically generated by Elasticsearch and is used to identify and retrieve a specific document from the index.
Resource Type: Provide the resource type. In Elasticsearch, a resource type is a way to group related documents together within an index. Resource types are defined at the time of index creation, and they provide a way to logically separate different types of documents that may be stored within the same index.
Is Date Rich True: Enable this option if any fields in the reading file contain date or time information. The date rich feature in Elasticsearch allows for advanced querying and filtering of documents based on date or time ranges, as well as date arithmetic operations.
Username: Enter the username for elastic search.
Password: Enter the password for elastic search.
Query: Provide a spark SQL query.
The DB reader is a spark-based reader which gives you capability to read data from multiple database sources. All the database sources are listed below:
All component configurations are classified broadly into the following sections:
Meta Information
Please follow the steps given in the demonstration to configure the DB Reader component.
Please Note:
The ClickHouse driver in the Spark components will use HTTP Port and not the TCP port.
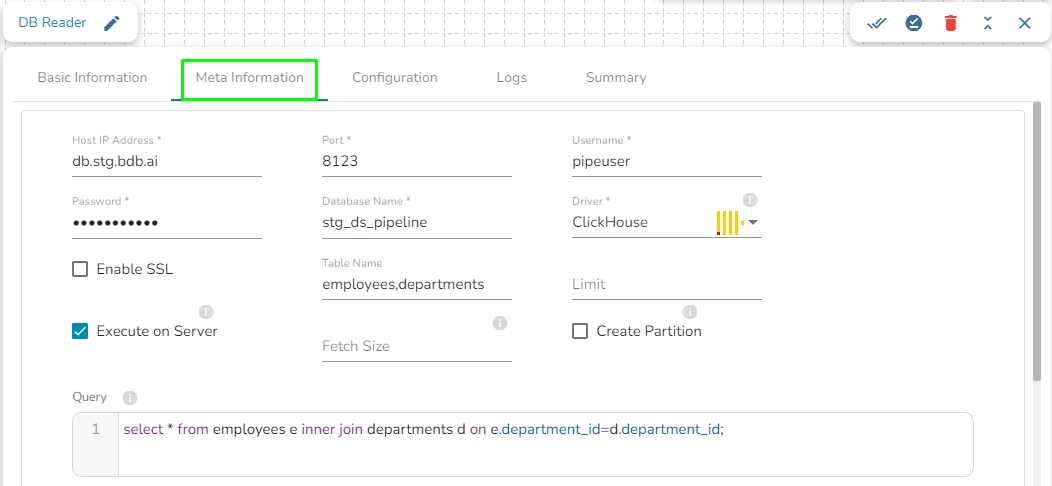
In the case of data from multiple tables (join queries), one can write the join query directly without specifying multiple tables, as only one among table and query fields is required.
Table name: Provide a single or multiple table names. If multiple table name has be given, then enter the table names separated by comma(,).
Fetch Size: Provide the maximum number of records to be processed in one execution cycle.
Create Partition: This is used for performance enhancement. It's going to create the sequence of indexing. Once this option is selected, the operation will not execute on server.
Partition By: This option will appear once create partition option is enabled. There are two options under it:
Auto Increment: The number of partitions will be incremented automatically.
Index: The number of partitions will be incremented based on the specified Partition column.
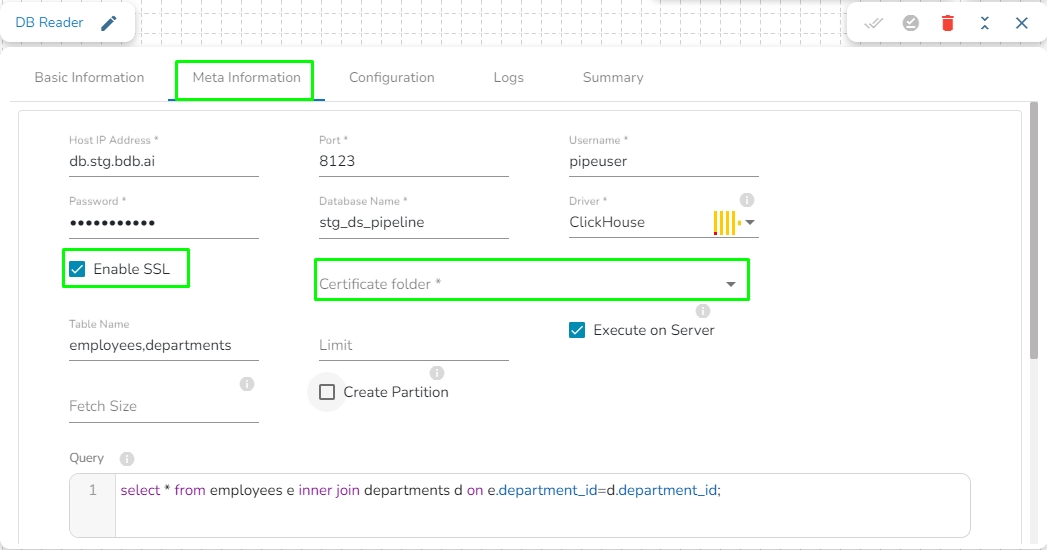
Query: Enter the spark SQL query in this field for the given table or table(s). It supports query containing a join statement as well. Please refer the below image for making query on multiple tables.
Enable SSL: Check this box to enable SSL for this components. Enable SSL feature in DB reader component will appear only for two(2) drivers: PostgreSQL and ClickHouse.
Certificate Folder: This option will appear when the Enable SSL field is checked-in. The user has to select the certificate folder from drop down which contains the files which has been uploaded to the admin settings. Please refer the below given images for the reference.
Sample Spark SQL query for DB Reader:
Please Note: To use DB reader component with SSL, the user needs to upload the following files on the certificate upload page:
Certificate file (.pem format)]
Key file (.key format)
SFTP stream reader is designed to read and access data from an SFTP server. SFTP stream readers typically authenticate with the SFTP server using username and password or SSH key-based authentication.
All component configurations are classified broadly into the following sections:
Meta Information
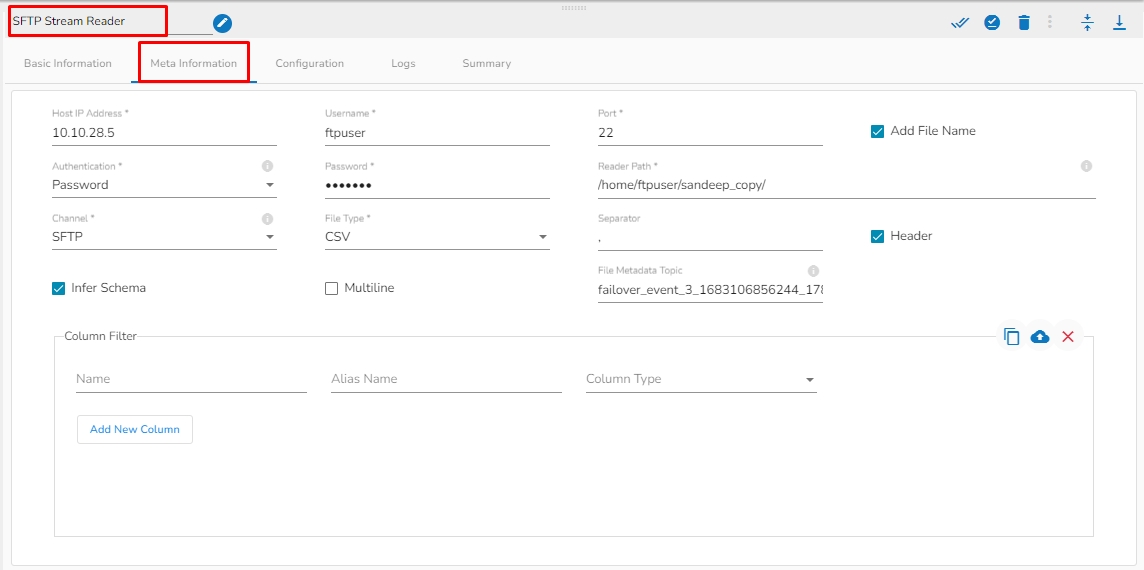
Please follow the demonstration to configure the component and its Meta Information.
Host: Enter the host.
Username: Enter username for SFTP stream reader.
Port: Provide the Port number.
Add File Name: Enable this option to get the file name along with the data.
Authentication: Select an authentication option using the drop-down list.
Password: Provide a password to authenticate the SFTP Stream reader component
PEM/PPK File: Choose a file to authenticate the SFTP Stream reader component. The user needs to upload a file if this authentication option has been selected.
Reader Path: Enter the path from where the file has to be read.
Channel: Select a channel option from the drop-down menu (the supported channel is SFTP).
File type: Select the file type from the drop-down:
CSV: The Header and Infer Schema fields get displayed with CSV as the selected File Type. Enable Header option to get the Header of the reading file and enable Infer Schema option to get true schema of the column in the CSV file. Schema: If CSV is selected as file type, then paste spark schema of CSV file in this field.
JSON: The Multiline and Charset fields get displayed with JSON as the selected File Type. Check-in the Multiline option if there is any multiline string in the file.
XML: Select this option to read XML file. If this option is selected, the following fields will get displayed:
Infer schema: Enable this option to get true schema of the column.
Path: Provide the path of the file.
Root Tag: Provide the root tag from the XML files.
Row Tags: Provide the row tags from the XML files.
Join Row Tags: Enable this option to join multiple row tags.
File Metadata Topic: Enter Kafka Event Name where the reading file metadata has to be sent.
Column filter: Select the columns which you want to read and if you want to change the name of the column, then put that name in the alias name section otherwise keep the alias name the same as of column name and then select a Column Type from the drop-down menu.
Use Download Data and Upload File options to select the desired columns.
Upload File: The user can upload the existing system files (CSV, JSON) using the Upload File icon.
Download Data (Schema): Users can download the schema structure in JSON format by using the Download Data icon.
SFTP Reader is designed to read and access files stored on an SFTP server. SFTP readers typically authenticate with the SFTP server using a username and password or SSH key pair, which grants access to the files stored on the server
All component configurations are classified broadly into the following sections:
Meta Information
Please follow the demonstration to configure the SFTP Reader and its meta information.
Please go through the below given steps to configure SFTP Reader component:
Host: Enter the host.
Username: Enter username for SFTP reader.
Port: Provide the Port number.
Dynamic Header: It can automatically detect the header row in a file and adjust the column names and number of columns as necessary.
Authentication: Select an authentication option using the drop-down list.
Password: Provide a password to authenticate the SFTP component
PEM/PPK File: Choose a file to authenticate the SFTP component. The user must upload a file if this authentication option is selected.
Reader Path: Enter the path from where the file has to be read.
Channel: Select a channel option from the drop-down menu (the supported channel is SFTP).
Column filter: Select the columns that you want to read and if you change the name of the column, then put that name in the alias name section otherwise keep the alias name the same as the column name and then select a Column Type from the drop-down menu.
Use the Download Data and Upload File options to select the desired columns.
Upload File: The user can upload the existing system files (CSV, JSON) using the Upload File icon.
Download Data (Schema): Users can download the schema structure in JSON format by using the Download Data icon.
This page covers configuration details for the MongoDB Reader component.
A MongoDB reader is designed to read and access data stored in a MongoDB database. Mongo readers typically authenticate with MongoDB using a username and password or other authentication mechanisms supported by MongoDB.
All component configurations are classified broadly into the following sections:
Meta Information
Please follow the demonstration to configure the component.
MongoDB Reader reads the data from the specified collection of Mongo Database. It has an option to filter data using spark SQL query.
Drag & Drop the MongoDB Reader on the Workflow Editor.
Click on the dragged reader component to open the component properties tabs below.
It is the default tab to open for the MongoDB reader while configuring the component.
Select an Invocation type from the drop-down menu to confirm the running mode of the reader component. Select the Real-Time or Batch option from the drop-down menu.
Deployment Type: It displays the deployment type for the component. This field comes pre-selected.
Container Image Version: It displays the image version for the docker container. This field comes pre-selected.
Failover Event: Select a failover Event from the drop-down menu.
Batch Size: Provide the maximum number of records to be processed in one execution cycle.
Please Note: The fields marked as (*) are mandatory fields.
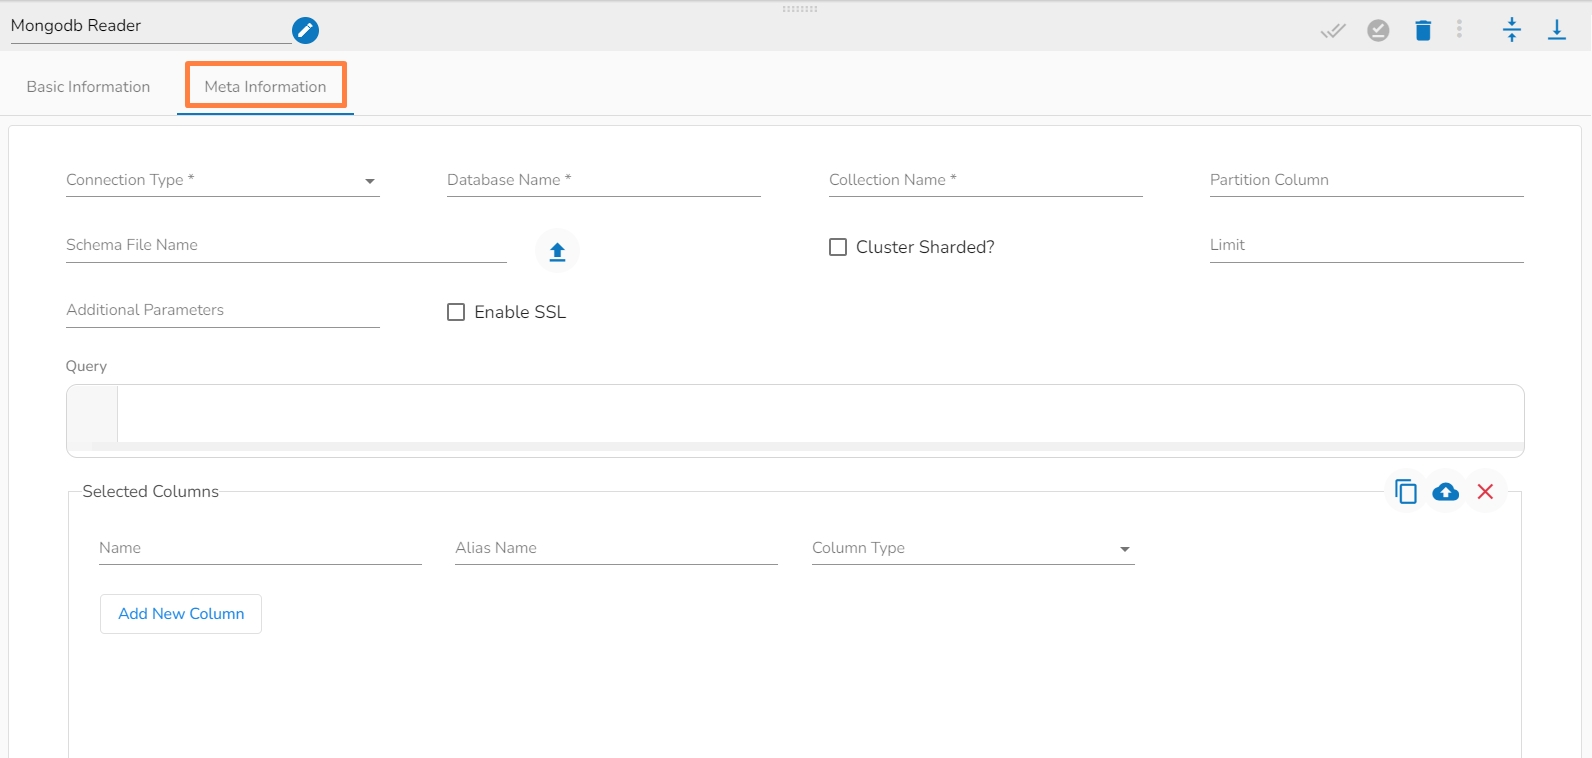
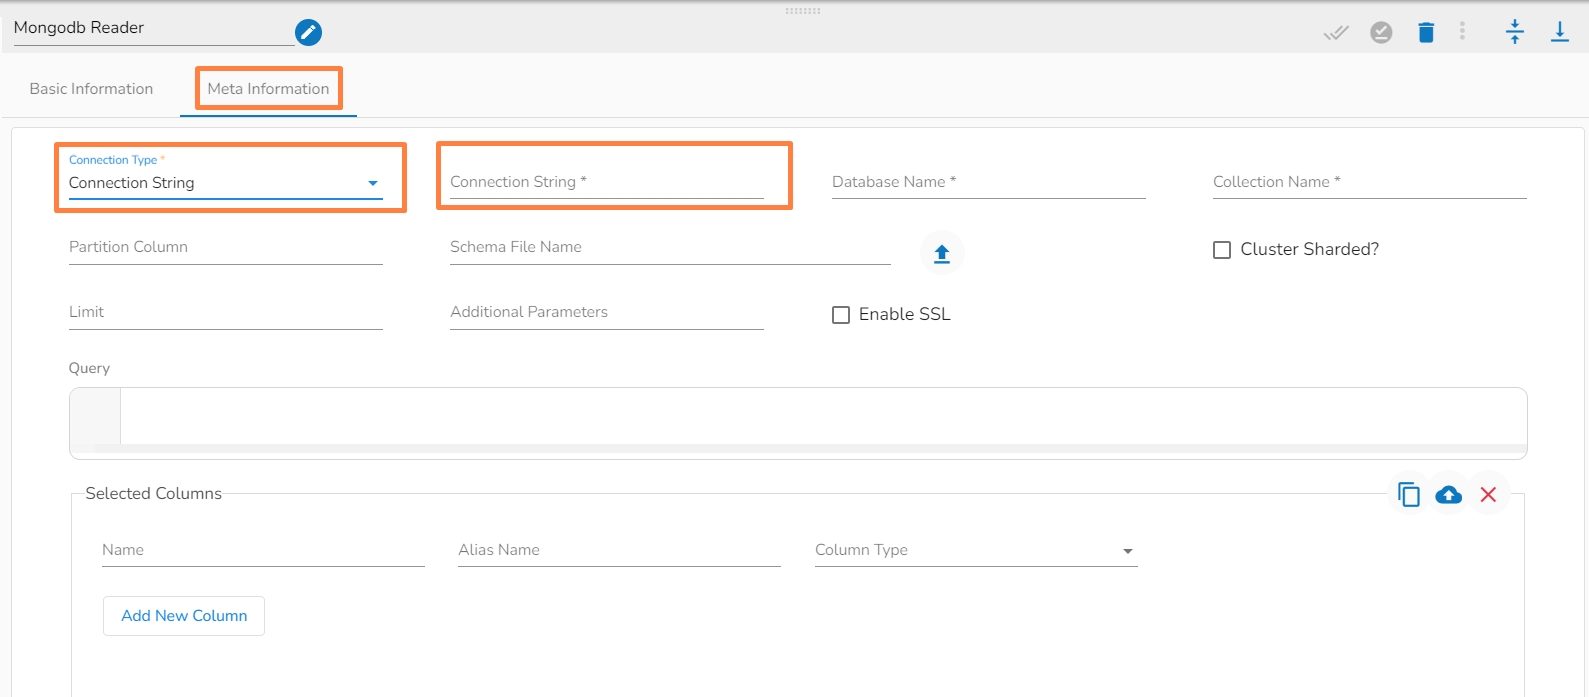
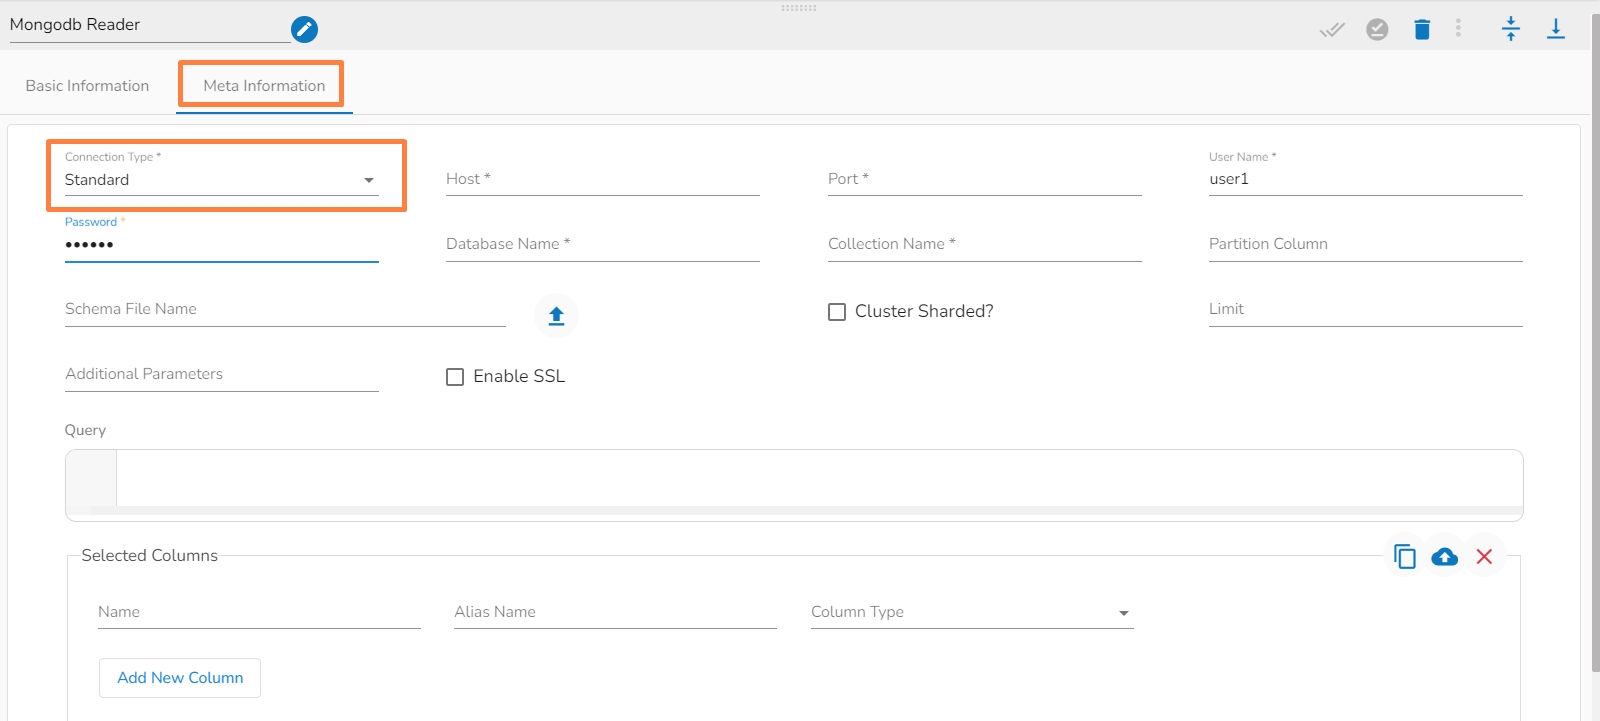
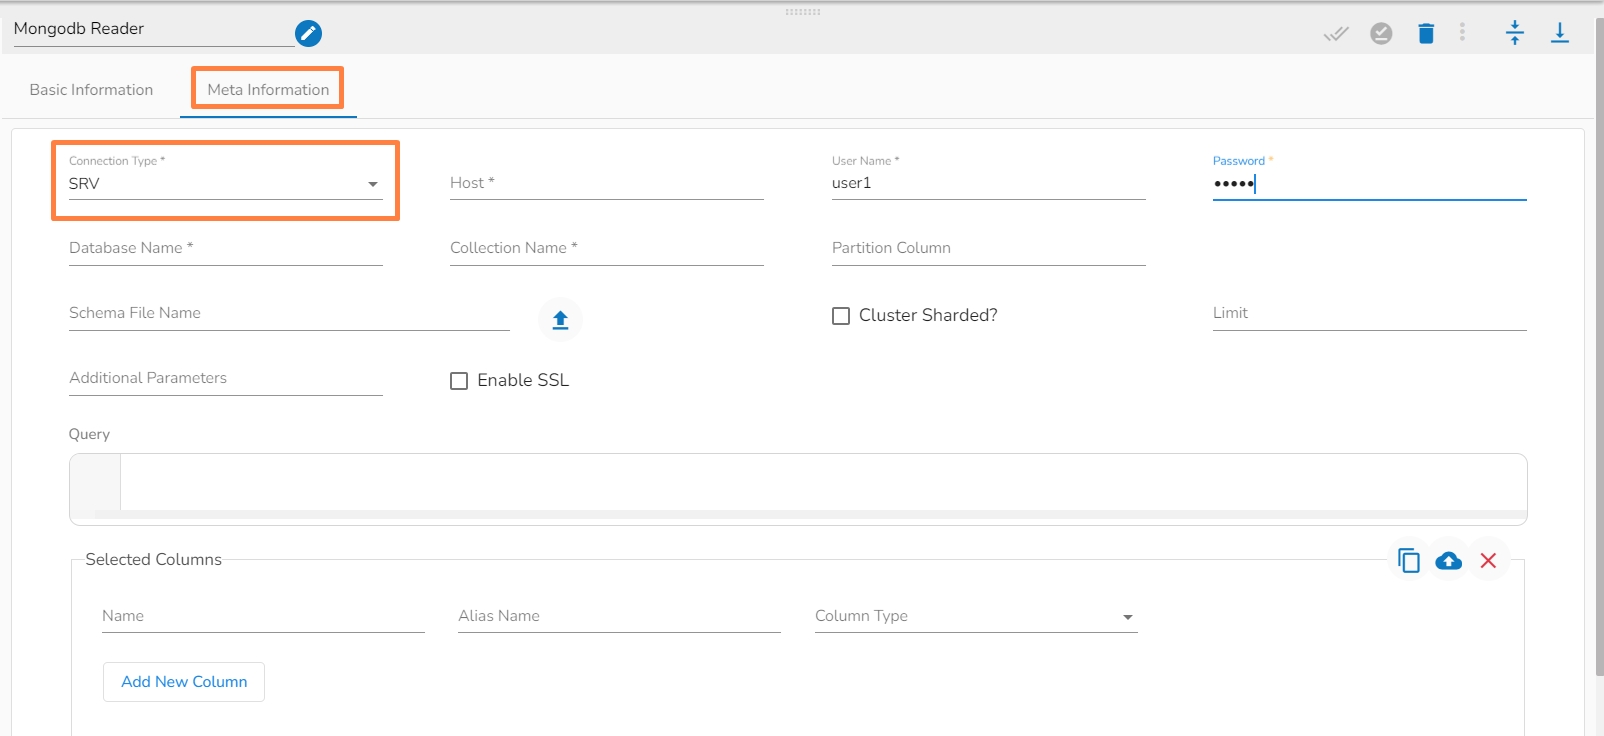
Connection Type: Select the connection type from the drop-down:
Standard
SRV
Connection String
Host IP Address (*): Hadoop IP address of the host.
Port(*): Port number (It appears only with the Standard Connection Type).
Username(*): Provide username.
Password(*): Provide a valid password to access the MongoDB.
Database Name(*): Provide the name of the database from where you wish to read data.
Collection Name(*): Provide the name of the collection.
Partition Column: specify a unique column name, whose value is a number .
Query: Enter a Spark SQL query. Take the mongo collection_name as the table name in Spark SQL query.
Limit: Set a limit for the number of records to be read from MongoDB collection.
Schema File Name: Upload Spark Schema file in JSON format.
Cluster Sharded: Enable this option if data has to be read from sharded clustered database. A sharded cluster in MongoDB is a distributed database architecture that allows for horizontal scaling and partitioning of data across multiple nodes or servers. The data is partitioned into smaller chunks, called shards, and distributed across multiple servers.
Additional Parameters: Provide the additional parameters to connect with MongoDB. This field is optional.
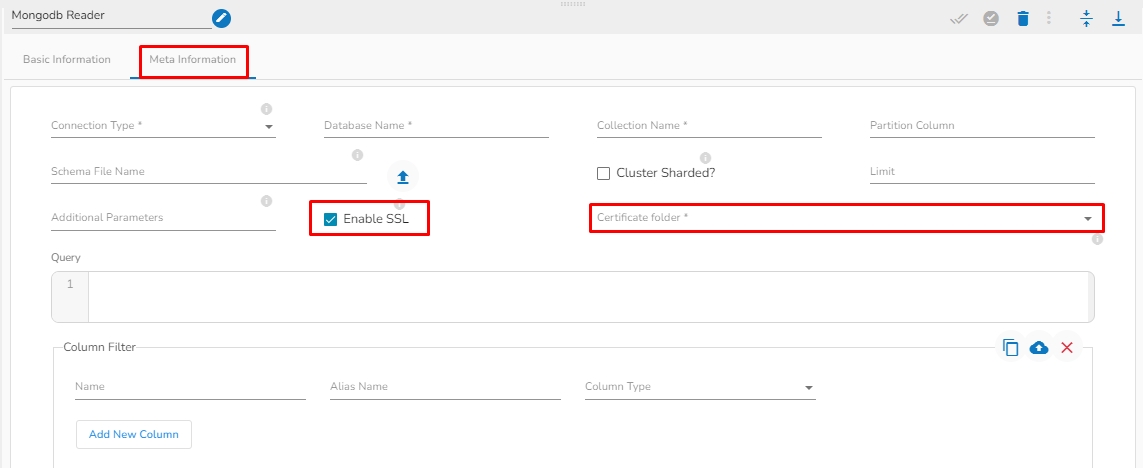
Enable SSL: Check this box to enable SSL for this components. MongoDB connection credentials will be different if this option is enabled.
Certificate Folder: This option will appear when the Enable SSL field is checked-in. The user has to select the certificate folder from drop down which contains the files which has been uploaded to the admin settings for connecting MongoDB with SSL. Please refer the below given images for the reference.
Sample Spark SQL query for MongoDB Reader:
Please Note: The Meta Information fields vary based on the selected Connection Type option.
The following images display the various possibilities of the Meta Information for the MongoDB Reader:
i. Meta Information Tab with Standard as Connection Type.
ii. Meta Information Tab with SRV as Connection Type.
iii. Meta Information Tab with Connection String as Connection Type.
Column Filter: The users can select some specific columns from the table to read data instead of selecting a complete table; this can be achieved via the Column Filter section. Select the columns which you want to read and if you want to change the name of the column, then put that name in the alias name section otherwise keep the alias name the same as of column name and then select a Column Type from the drop-down menu.
or
Use the Download Data and Upload File options to select the desired columns.
1. Upload File: The user can upload the existing system files (CSV, JSON) using the Upload File icon (file size must be less than 2 MB).
2. Download Data (Schema): Users can download the schema structure in JSON format by using the Download Data icon.
After doing all the configurations click the Save Component in Storage icon provided in the reader configuration panel to save the component.
A notification message appears to inform about the component configuration success.
A MongoDB reader component is designed to read and access data stored in a MongoDB database. Mongo readers typically authenticate with MongoDB using a username and password or other authentication mechanisms supported by MongoDB.
This page covers the configuration steps for the Mongo DB Reader.All component configurations are classified broadly into the following sections:
Meta Information
MongoDB Reader reads data from the specified database’s Collection. It also has an option to filter the data using Mongo Query Language(MQL), Which will run the MQL directly on the MongoDB Server, and push the data to the out event.
Check out the below-given walk through about the MongoDB Reader Lite.
Drag & drop the Mongo Reader component to the Workflow Editor.
Click on the dragged reader component.
The component properties tabs open below.
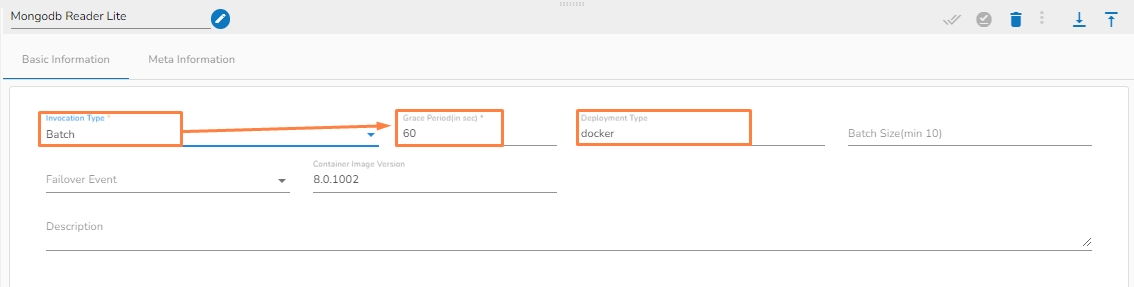
It is the default tab to open for the Mongodb Reader Lite while configuring the component.
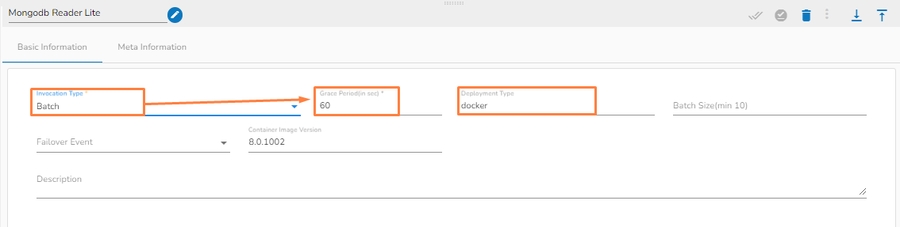
Select an Invocation Type from the drop-down menu to confirm the running mode of the reader component. Select Real-Time or Batch from the drop-down menu.
Deployment Type: It displays the deployment type for the component (This field comes pre-selected).
Container Image Version: It displays the image version for the docker container (This field comes pre-selected).
Failover Event: Select a failover Event from the drop-down menu.
Batch Size (min 10): Provide the maximum number of records to be processed in one execution cycle (Min limit for this field is 10).
Please Note: The Grace Period Field appears when the Batch is selected as the Invocation Type option in the Basic Information tab. You can now give a grace period for components to go down gracefully after that time by configuring this field.
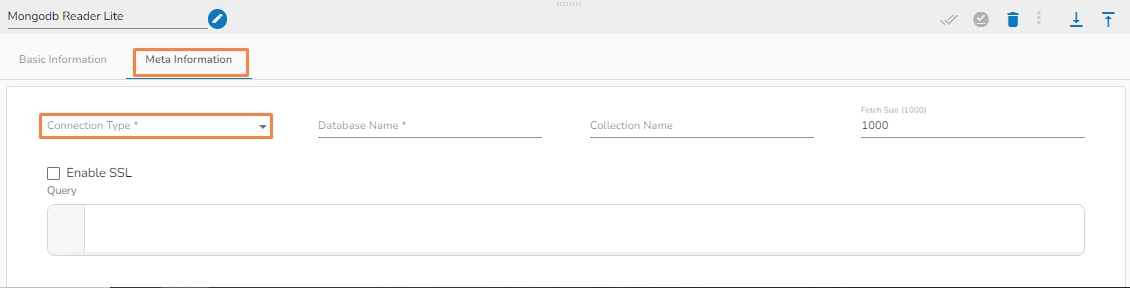
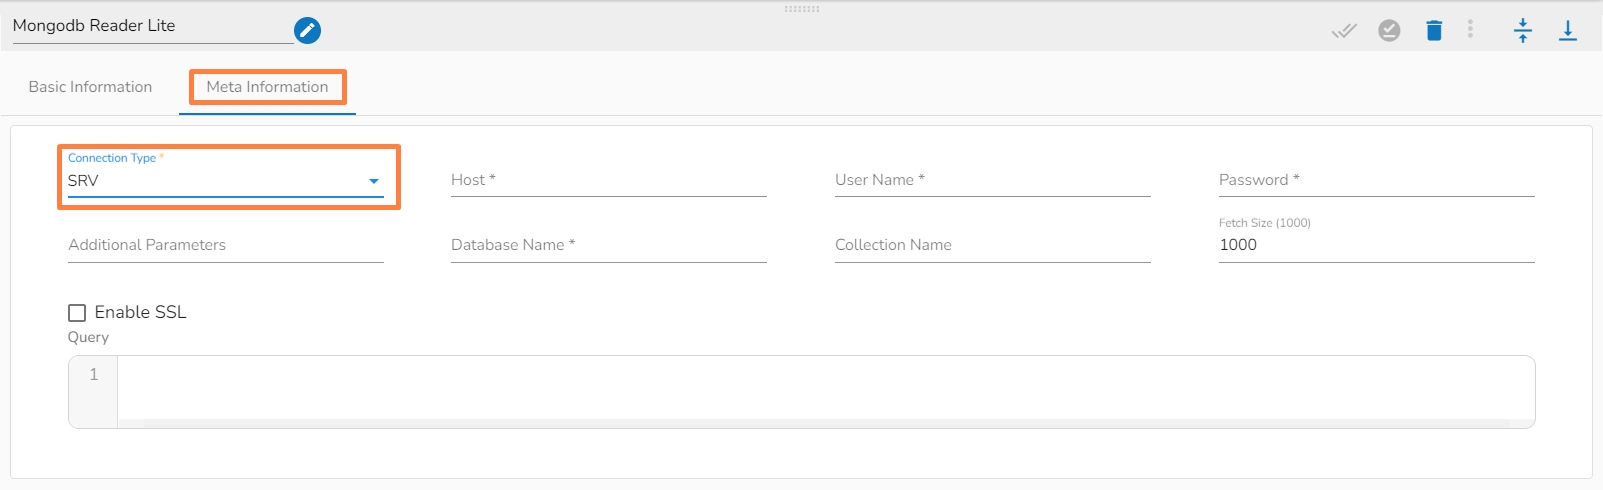
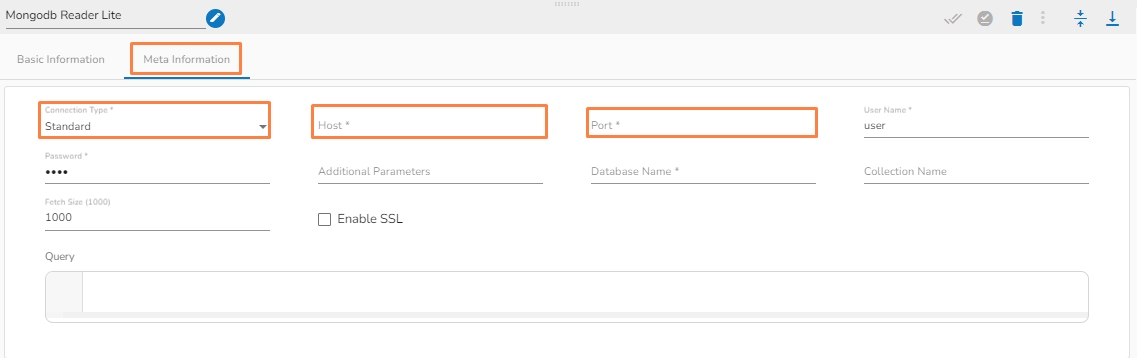
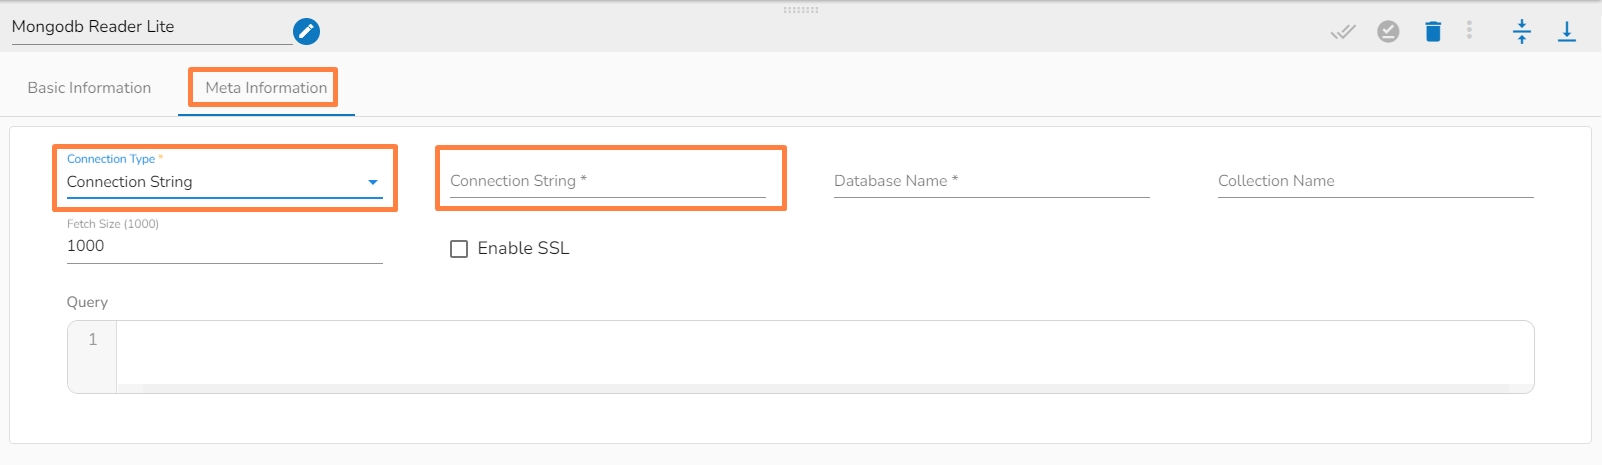
Open the Meta Information tab and fill in all the connection-specific details of MongoDB Reader Lite. The Meta Information tab opens with the below given fields:
Please Note: The Meta Information fields may vary based on the selected Connection Type option.
Please Note: The fields marked as (*) are mandatory fields.
Connection Type: Select either of the options out of Standard, SRV, and Connection String as connection types.
Port number (*): Provide the Port number (It appears only with the Standard connection type).
Host IP Address (*): The IP address of the host.
Username (*): Provide a username.
Password (*): Provide a valid password to access the MongoDB.
Database Name (*): Provide the name of the database where you wish to write data.
Collection Name (*): Provide the name of the collection.
Fetch size: Specifies the number of documents to return in each batch of the response from the MongoDB collection. For ex: If 1000 is given in the fetch size field. Then it will read the 1000 data at one execution and it will process it further.
Additional Parameters: Provide details of the additional parameters.
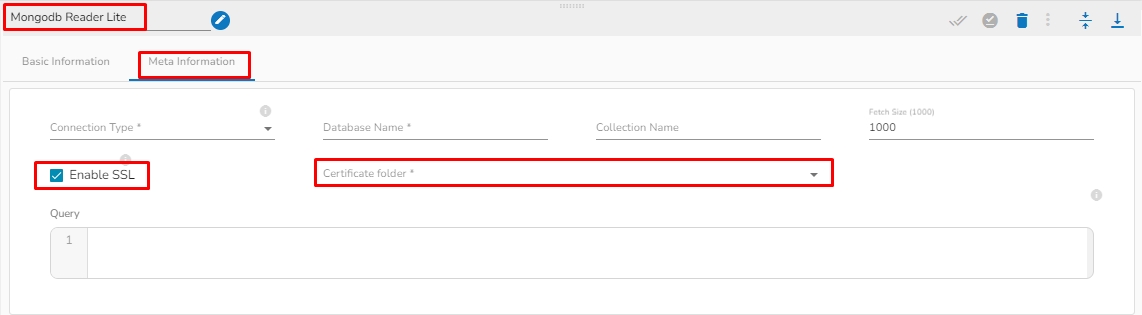
Enable SSL: Check this box to enable SSL for this components. MongoDB connection credentials will be different if this option is enabled.
The user needs to upload the following files on the certificate upload page:
Certificate file (.pem format)]
Key file (.key format)
Certificate Folder: This option will appear when the Enable SSL field is checked-in. The user has to select the certificate folder from drop down which contains the files which has been uploaded to the admin settings for connecting MongoDB with SSL. Please refer the below given images for the reference.
Connection String (*): Provide a connection string (It appears only with the Connection String connection type).
Query: Provide a relevant query service. We can write the Mongo queries in the following manner:
Meta Information Tab with enabled the "Enable SSL" field:
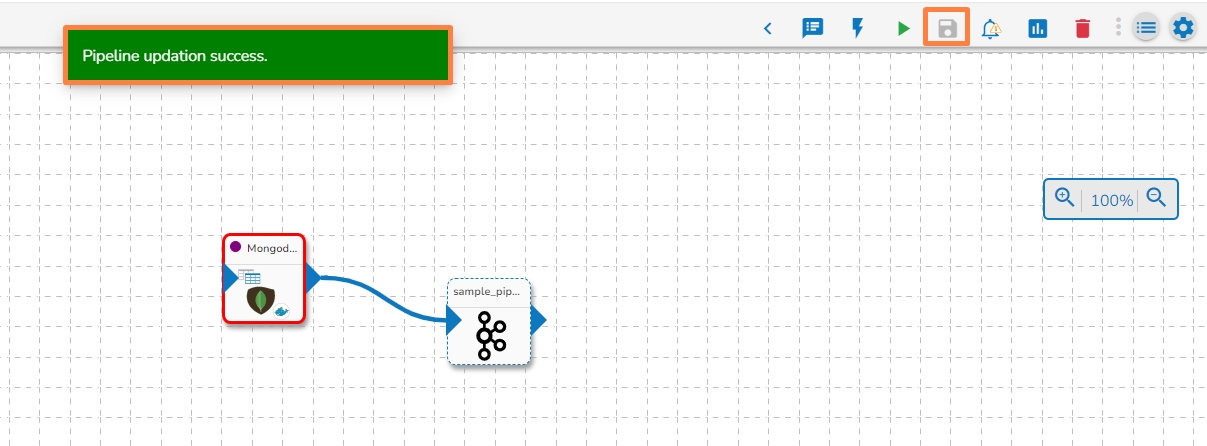
After configuring the required configuration fields, click the Save Component in Storage icon provided in the reader configuration panel to save the component.
A confirmation message appears to notify the component properties are saved.
Click on the Update Pipeline icon to update the pipeline.
A confirmation message appears to inform the user.
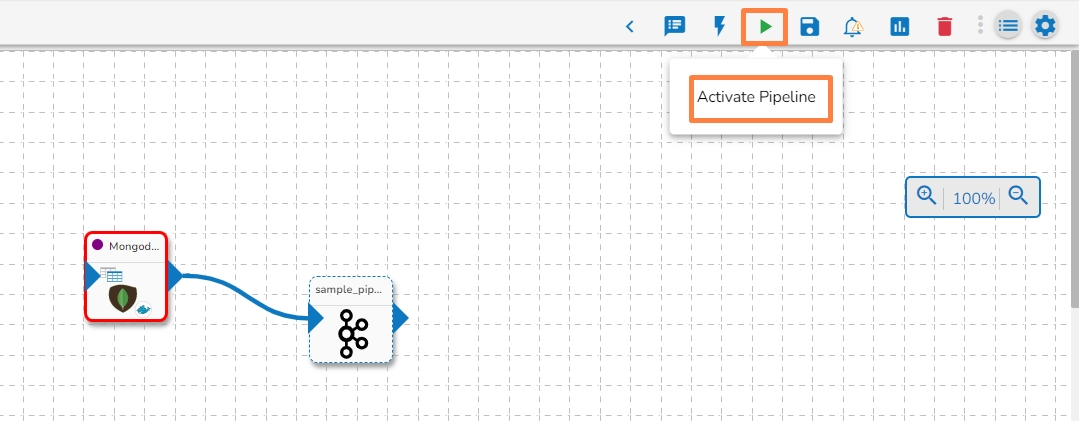
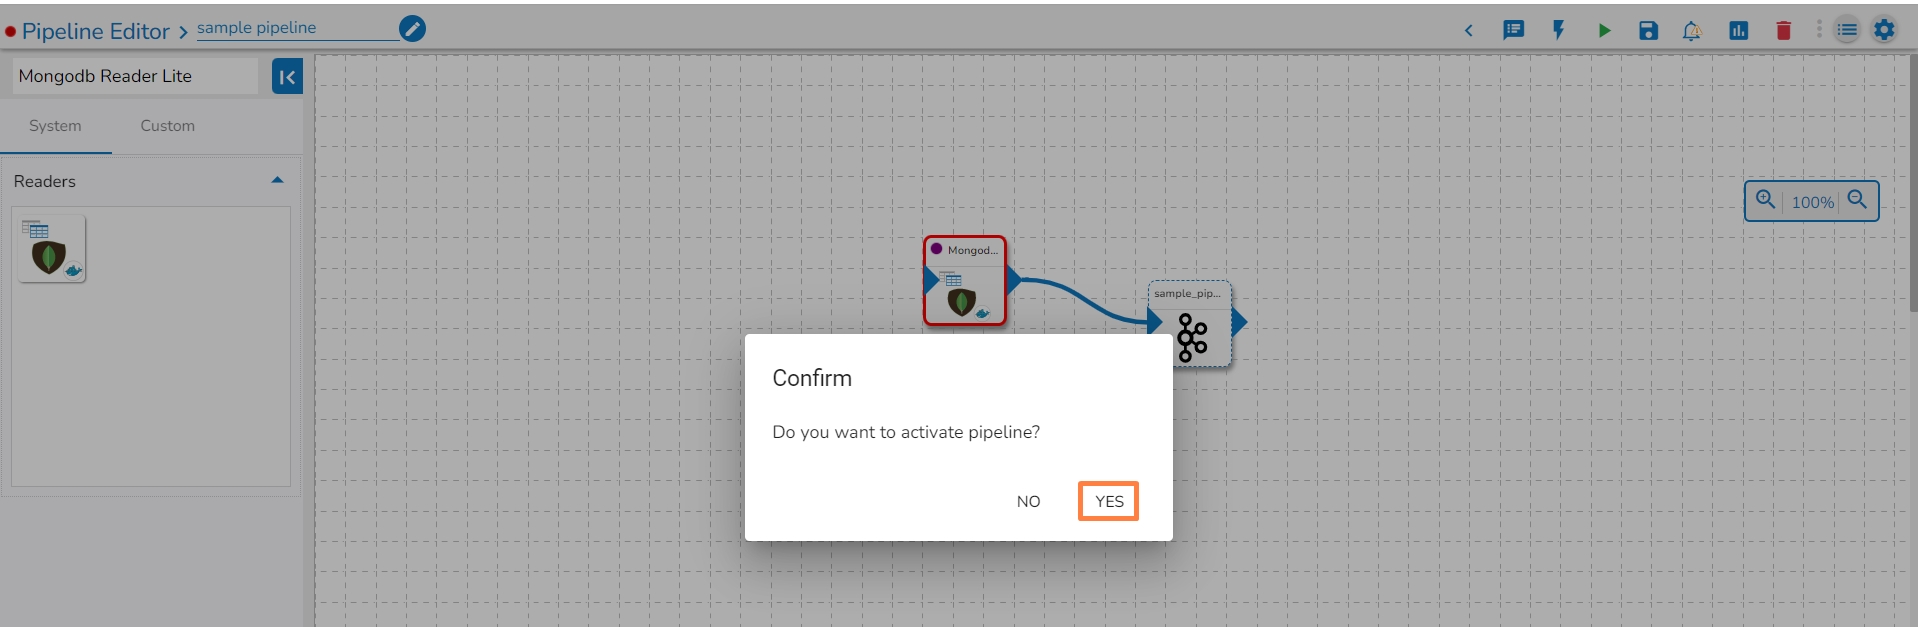
Click on the Activate Pipeline icon.
The Confirm dialog box appears to ask the user permission.
Click the YES option.
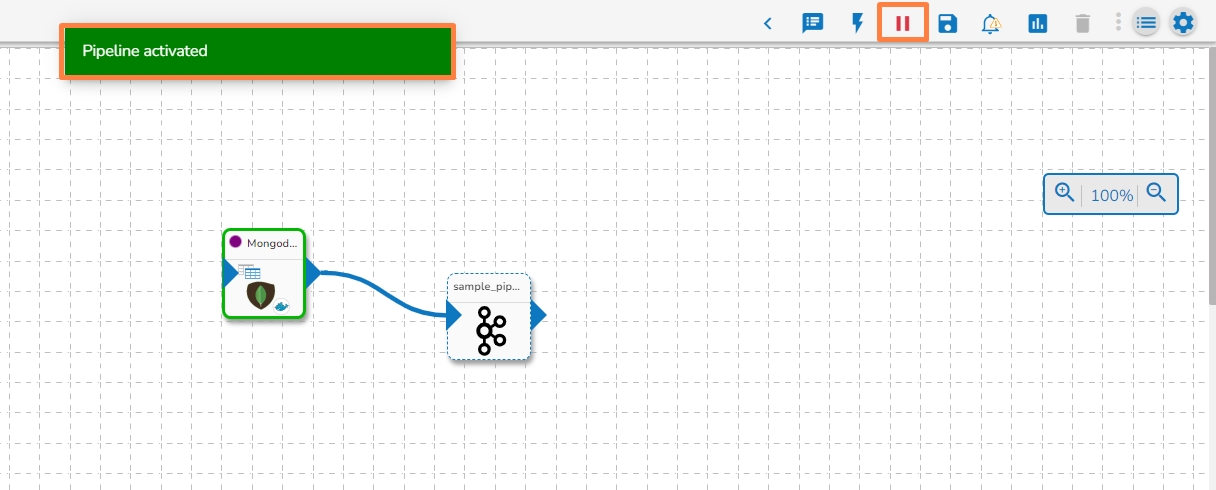
A confirmation message appears to inform that the pipeline has been activated.
Click on the Toggle Log Panel icon.
The Log Panel opens displaying the Logs and Advance Logs tabs.
Please Note:
The Pod logs for the components appear in the Advanced Logs tab.
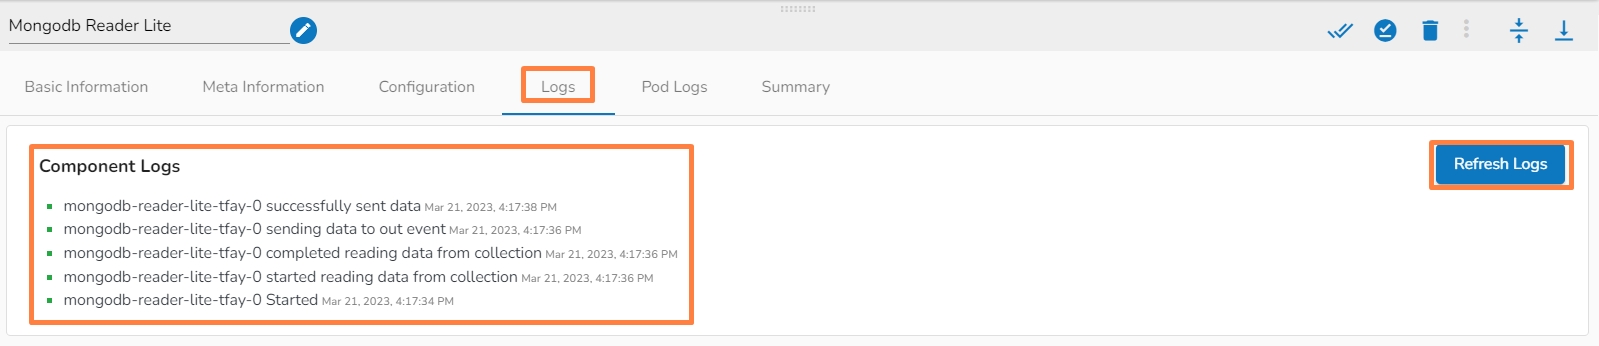
The overall component logs will be displayed in the Logs tab.
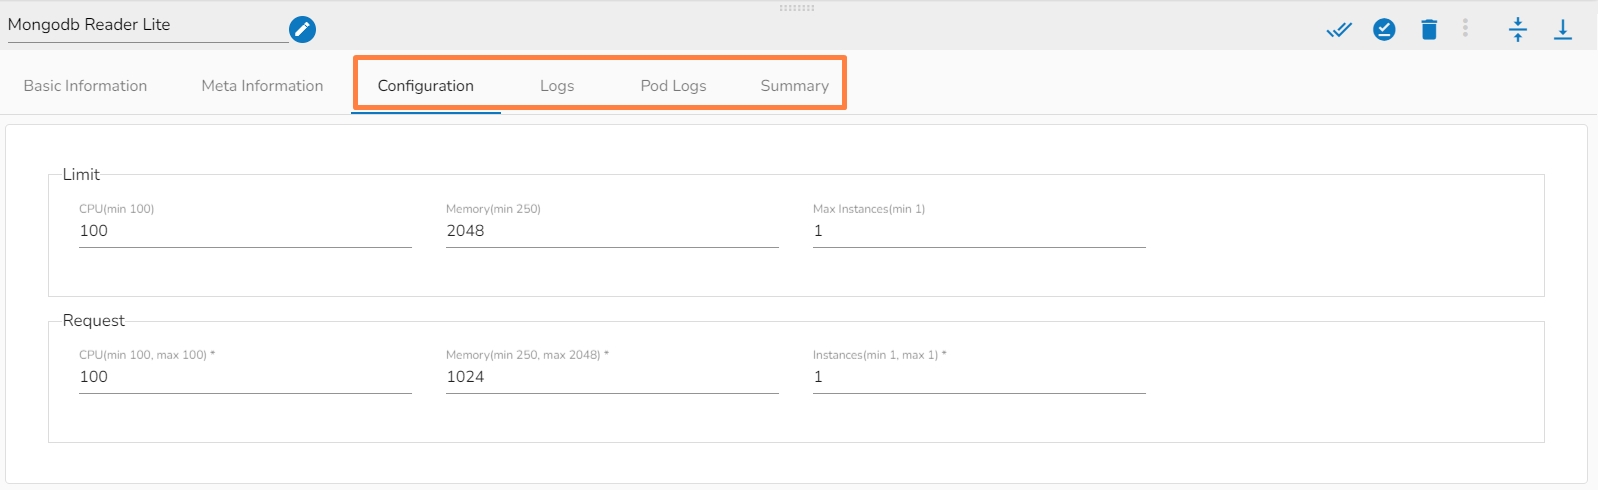
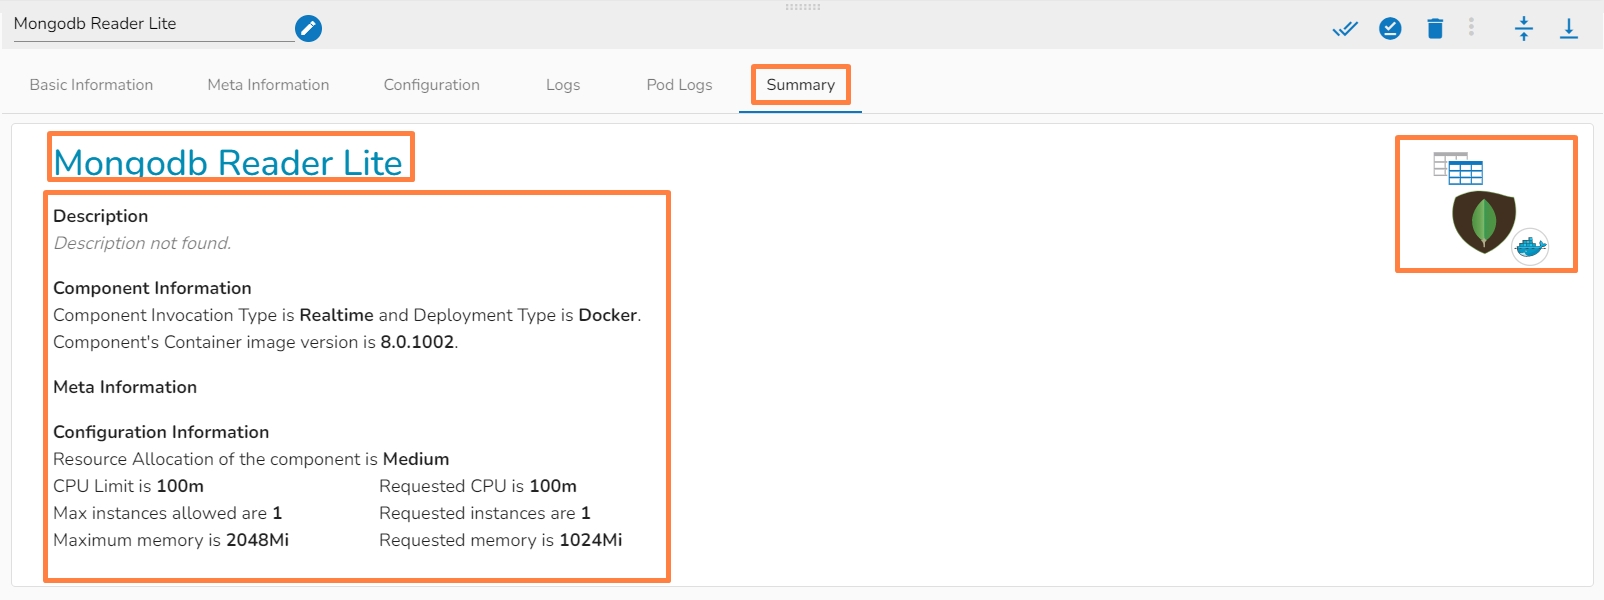
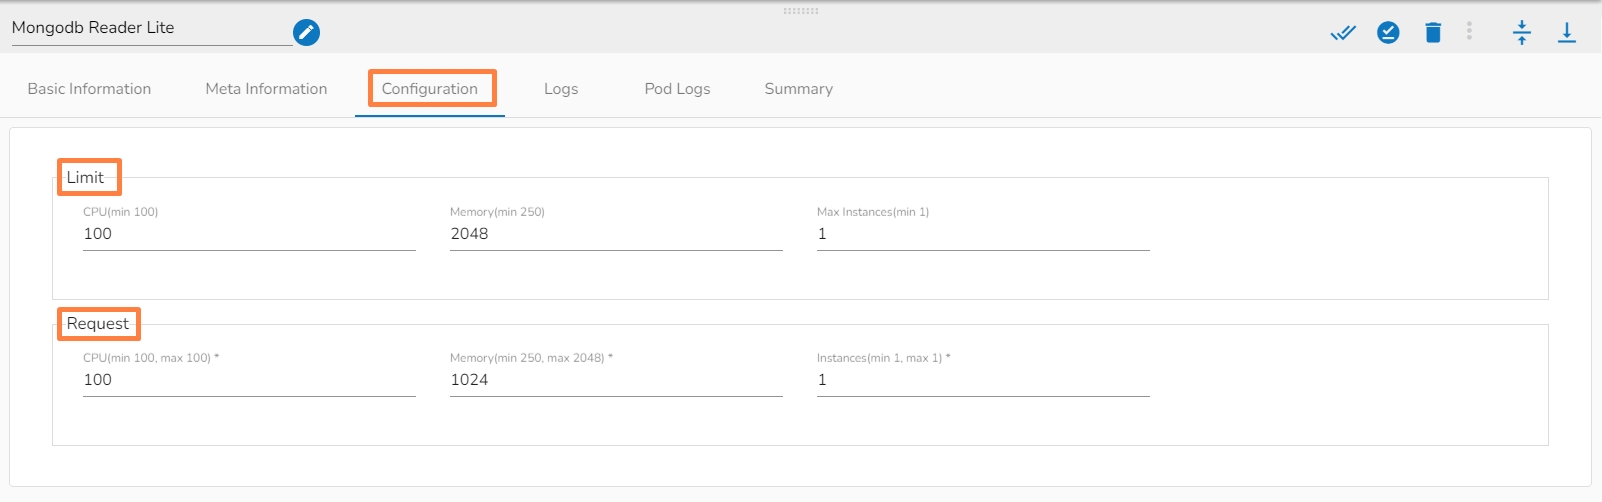
A configured component will display some more tabs such as the Configuration, Logs, and Pod Logs tabs (as displayed below for the Mongodb Reader Lite component).
This tab will show all the description about the component.
Azure Blob Reader is designed to read and access data stored in Azure Blob Storage. Azure Blob Readers typically authenticate with Azure Blob Storage using Azure Active Directory credentials or other authentication mechanisms supported by Azure. This is a spark based component.
All component configurations are classified broadly into the following sections:
Meta Information
Please Note: Please go through the below given demonstration to configure Azure Blob Reader in the pipeline.
Please Note: Before starting to use the Azure Reader component, please follow the steps below to obtain the Azure credentials from the Azure Portal:
Accessing Azure Blob Storage: Shared Access Signature (SAS), Secret Key, and Principal Secret
This document outlines three methods for accessing Azure Blob Storage: Shared Access Signatures (SAS), Secret Keys, and Principal Secrets.
Understanding Security Levels:
Shared Access Signature (SAS): This is the recommended approach due to its temporary nature and fine-grained control over access permissions. SAS tokens can be revoked, limiting potential damage if compromised.
Secret Key: Secret keys grant full control over your storage account. Use them with caution and only for programmatic access. Consider storing them securely in Azure Key Vault and avoid hardcoding them in scripts.
Principal Secret: This applies to Azure Active Directory (Azure AD) application access. Similar to secret keys, use them cautiously and store them securely (e.g., Azure Key Vault).
1. Shared Access Signature (SAS):
Benefits:
Secure: Temporary and revocable, minimizing risks.
Granular Control: Define specific permissions (read, write, list, etc.) for each SAS token.
Steps to Generate an SAS Token:
Access Blob Storage Account: Locate "Storage accounts" in the left menu and select your storage account.
Configure SAS Settings: Find and click on "Shared access signature" in the settings. Define the permissions, expiry date, and other parameters for your needs.
Generate SAS Token: Click on "Generate SAS and connection string" to create the SAS token.
Copy and Use SAS Token: Copy the generated SAS token. Use this token to securely access your Blob Storage resources in your code.
2. Secret Key:
Use with Caution:
High-Risk: Grants full control over your storage account.
Secure Storage: Store them securely in Azure Key Vault, never hardcode them in scripts.
Steps to Obtain Secret Key:
Navigate to Azure Portal: Open the Azure portal and log in.
Access Blob Storage Account: Locate and select your storage account.
View Secret Keys: Click on "Access keys" to view your storage account keys. Do not store these directly in code. Consider Azure Key Vault for secure storage.
3. Principal Secret (Azure AD Application):
Use for Application Access:
Grants access to your storage account through an Azure AD application.
Secure Storage: Store them securely in Azure Key Vault, never hardcode them in scripts.
Steps to Obtain Principal Secret:
Access App Registrations: Locate "App registrations" in the left menu.
Select Your Application: Find and click on the application for which you want to obtain the principal secret.
Access Certificates & Secrets: Inside your application, go to "Certificates & secrets" in the settings menu.
Generate New Client Secret (Principal Secret):
Under "Client secrets," click on "New client secret."
Enter a description, select the expiry duration, and click "Add" to generate the new client secret.
Copy the generated client secret immediately as it will be hidden afterward.
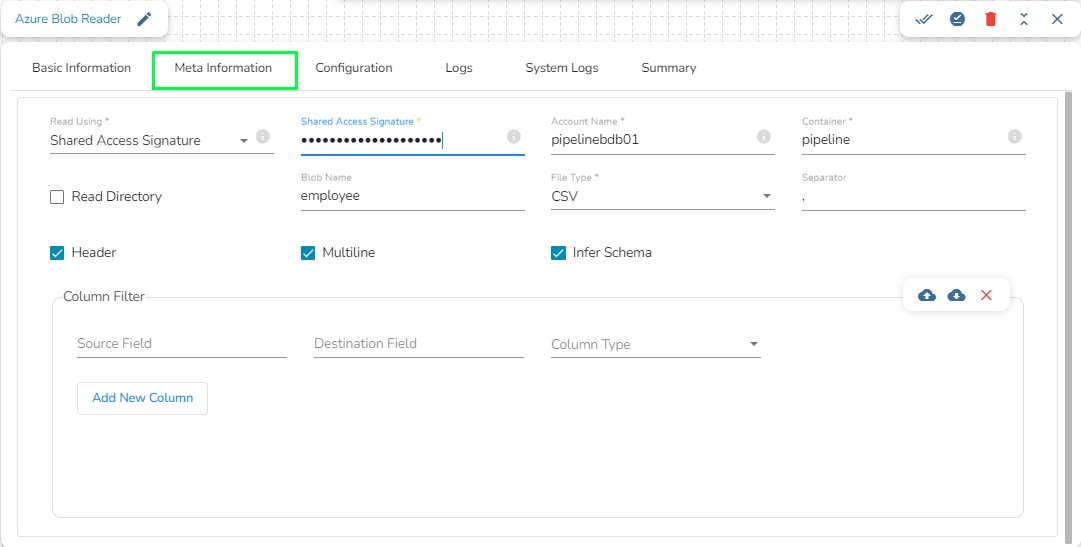
Read Using: There are three authentication methods available to connect with Azure in the Azure Blob Reader Component:
Shared Access Signature
Secret Key
Principal Secret
Provide the following details:
Shared Access Signature: This is a URI that grants restricted access rights to Azure Storage resources.
Account Name: Provide the Azure account name.
Container: Provide the container name from where the file is located and which has to be read.
File Type: There are five (5) types of file extensions available:
CSV
JSON
PARQUET
AVRO
XML
Read Directory: This field will be checked by default. If this option is enabled, the component will read data from all the blobs present in the container.
Blob Name: This field will display only if the Read Directory field is disabled. Enter the specific name of the blob whose data has to be read.
Limit: Enter a number to limit the number of records that has to be read by the component.
Column Filter: Enter the column names here. Only the specified columns will be fetched from Azure Blob. In this field, the user needs to fill in the following information:
Source Field: Enter the name of the column from the blob. The user can add multiple columns by clicking on the "Add New Column" option.
Destination Field: Enter the alias name for the source field.
Column Type: Enter the data type of the column.
Upload: This option allows the user to upload a data file in CSV, JSON, or EXCEL format. The column names will be automatically fetched from the uploaded data file and filled out in the Name, Alias, and Column Type fields.
Download Data: This option will download the data filled in the Column Filter field in JSON format.
Delete Data: This option will clear all the information filled in the Column Filter field.
Query: Enter a Spark SQL query in this field. Use inputDf as the table name.
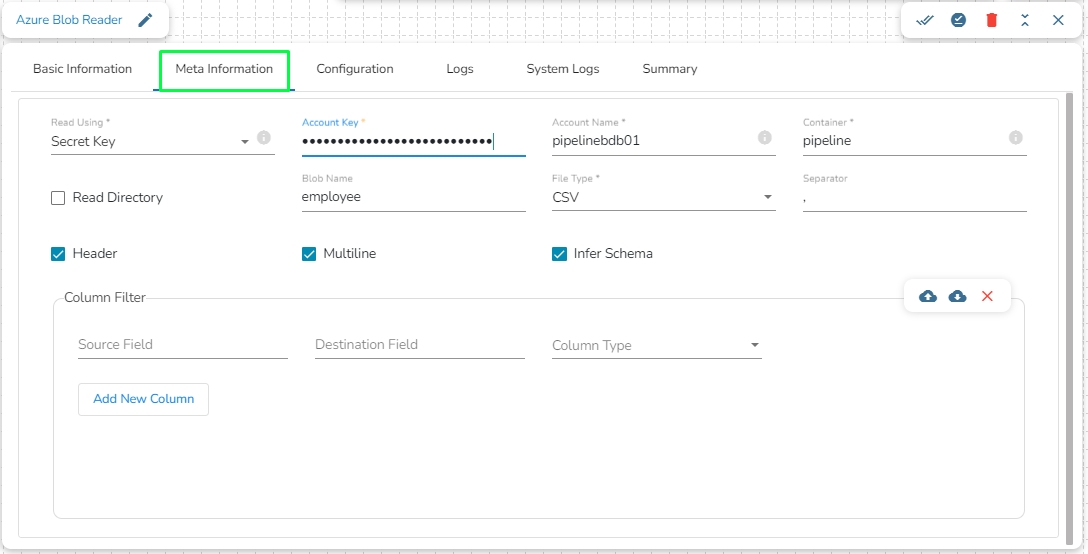
Provide the following details:
Account Key: Used to authorize access to data in your storage account via Shared Key authorization.
Account Name: Provide the Azure account name.
Container: Provide the container name from where the file is located and which has to be read.
File Type: There are five (5) types of file extensions available:
CSV
JSON
PARQUET
AVRO
XML
Read Directory: This field will be checked by default. If this option is enabled, the component will read data from all the blobs present in the container.
Blob Name: This field will display only if the Read Directory field is disabled. Enter the specific name of the blob whose data has to be read.
Limit: Enter a number to limit the number of records that has to be read by the component.
Column Filter: Enter the column names here. Only the specified columns will be fetched from Azure Blob. In this field, the user needs to fill in the following information:
Source Field: Enter the name of the column from the blob. The user can add multiple columns by clicking on the "Add New Column" option.
Destination Field: Enter the alias name for the source field.
Column Type: Enter the data type of the column.
Upload: This option allows the user to upload a data file in CSV, JSON, or EXCEL format. The column names will be automatically fetched from the uploaded data file and filled out in the Name, Alias, and Column Type fields.
Download Data: This option will download the data filled in the Column Filter field in JSON format.
Delete Data: This option will clear all the information filled in the Column Filter field.
Query: Enter a Spark SQL query in this field. Use inputDf as the table name.
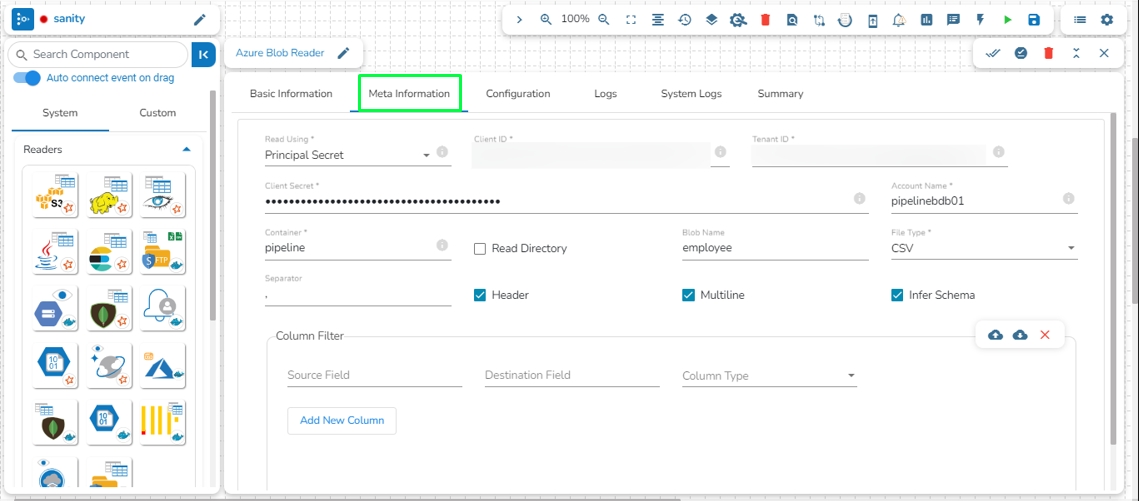
Provide the following details:
Client ID: The unique Application (client) ID assigned to your app by Azure AD when the app was registered.
Tenant ID: A globally unique identifier (GUID) that is different from your organization name or domain.
Client Secret: The password of the service principal.
Account Name: Provide the Azure account name.
File Type: There are five (5) types of file extensions available:
CSV
JSON
PARQUET
AVRO
XML
Read Directory: This field will be checked by default. If this option is enabled, the component will read data from all the blobs present in the container.
Blob Name: This field will display only if the Read Directory field is disabled. Enter the specific name of the blob whose data has to be read.
Limit: Enter a number to limit the number of records that has to be read by the component.
Column Filter: Enter the column names here. Only the specified columns will be fetched from Azure Blob. In this field, the user needs to fill in the following information:
Source Field: Enter the name of the column from the blob. The user can add multiple columns by clicking on the "Add New Column" option.
Destination Field: Enter the alias name for the source field.
Column Type: Enter the data type of the column.
Upload: This option allows the user to upload a data file in CSV, JSON, or EXCEL format. The column names will be automatically fetched from the uploaded data file and filled out in the Name, Alias, and Column Type fields.
Download Data: This option will download the data filled in the Column Filter field in JSON format.
Delete Data: This option will clear all the information filled in the Column Filter field.
Query: Enter a Spark SQL query in this field. Use inputDf as the table name.
Note: The following fields will be displayed after selecting the following file types:
CSV: The Header and Infer Schema fields get displayed with CSV as the selected File Type. Enable Header option to get the Header of the reading file and enable Infer Schema option to get true schema of the column in the CSV file.
JSON: The Multiline and Charset fields get displayed with JSON as the selected File Type.
Multiline: This option handles JSON files that contain records spanning multiple lines. Enabling this ensures the JSON parser reads multiline records correctly.
Charset: Specify the character set used in the JSON file. This defines the character encoding of the JSON file, such as UTF-8 or ISO-8859-1, ensuring correct interpretation of the file content.
PARQUET: No extra field gets displayed with PARQUET as the selected File Type.
AVRO: This File Type provides two drop-down menus.
Compression: Select an option out of the Deflate and Snappy options.
Deflate: A compression algorithm that balances between compression speed and compression ratio, often resulting in smaller file sizes.
Snappy: This compression type is select by default. A fast compression and decompression algorithm developed by Google, optimized for speed rather than maximum compression ratio.
Compression Level: This field appears if Deflate compression is selected. It provides a drop-down menu with levels ranging from 0 to 9, indicating the compression intensity.
S3 Reader component typically authenticate with S3 using AWS credentials, such as an access key ID and secret access key, to gain access to the S3 bucket and its contents. S3 Reader is designed to read and access data stored in an S3 bucket in AWS.
All component configurations are classified broadly into the following sections:
Meta Information
Check out the below-given demonstration to configure the S3 component and use it in a pipeline workflow.
Navigate to the Data Pipeline Editor.
Expand the Reader section provided under the Component Pallet.
Drag and drop the S3 Reader component to the Workflow Editor.
Click on the dragged S3 Reader to get the component properties tabs.
It is the default tab to open for the component while configuring it.
Invocation Type: Select an invocation mode out of ‘Real-Time’ or ‘Batch’ using the drop-down menu.
Deployment Type: It displays the deployment type for the reader component. This field comes pre-selected.
Container Image Version: It displays the image version for the docker container. This field comes pre-selected.
Failover Event: Select a failover Event from the drop-down menu.
Batch Size (min 10): Provide the maximum number of records to be processed in one execution cycle (Min limit for this field is 10).
Open the ‘Meta Information’ tab and fill in all the connection-specific details for the S3 Reader.·
Bucket Name (*): Enter AWS S3 Bucket Name.
Zone (*): Enter S3 Zone. (For eg: us-west-2)
Access Key (*): Provide Access Key ID shared by AWS.
Secret Key (*): Provide Secret Access Key shared by AWS.
Table (*): Mention the Table or file name from S3 location which is to be read.
File Type (*): Select a file type from the drop-down menu (CSV, JSON, PARQUET, AVRO, XML and ORC are the supported file types)
Limit: Set a limit for the number of records to be read.
Query: Enter a Spark SQL query. Take inputDf as table name.
Access Key (*): Provide Access Key ID shared by AWS.
Secret Key (*): Provide Secret Access Key shared by AWS.
Table (*): Mention the Table or file name from S3 location which is to be read.
File Type (*): Select a file type from the drop-down menu (CSV, JSON, PARQUET, AVRO are the supported file types).
Limit: Set a limit for the number of records to be read.
Query: Enter a Spark SQL query. Take inputDf as table name.
Sample Spark SQL query for S3 Reader:
There is also a section for the selected columns in the Meta Information tab if the user can select some specific columns from the table to read data instead of selecting a complete table so this can be achieved by using the ‘Selected Columns’ section. Select the columns which you want to read and if you want to change the name of the column, then put that name in the alias name section otherwise keep the alias name the same as of column name and then select a Column Type from the drop-down menu.
or
Use ‘Download Data’ and ‘Upload File’ options to select the desired columns.
Provide a unique Key column name on which the partition has been done and has to be read.
Click the Save Component in Storage icon after doing all the configurations to save the reader component.
A notification message appears to inform about the component configuration success.
Please Note:
(*) the symbol indicates that the field is mandatory.
Either table or query must be specified for the data readers except for SFTP Reader.
Selected Columns- There should not be a data type mismatch in the Column Type for all the Reader components.
The Meta Information fields may vary based on the selected File Type.
All the possibilities are mentioned below:
CSV: ‘Header’ and ‘Infer Schema’ fields get displayed with CSV as the selected File Type. Enable Header option to get the Header of the reading file and enable Infer Schema option to get true schema of the column in the CSV file.
JSON: ‘Multiline’ and ‘Charset’ fields get displayed with JSON as the selected File Type. Check-in the Multiline option if there is any multiline string in the file.
PARQUET: No extra field gets displayed with PARQUET as the selected File Type.
AVRO: This File Type provides two drop-down menus.
Compression: Select an option out of the ‘Deflate’ and ‘Snappy’ options.
Compression Level: This field appears for the Deflate compression option. It provides 0 to 9 levels via a drop-down menu.
XML: Select this option to read XML file. If this option is selected, the following fields will get displayed:
Infer schema: Enable this option to get true schema of the column.
Path: Provide the path of the file.
Root Tag: Provide the root tag from the XML files.
Row Tags: Provide the row tags from the XML files.
Join Row Tags: Enable this option to join multiple row tags.
ORC: Select this option to read ORC file. If this option is selected, the following fields will get displayed:
Push Down: In ORC (Optimized Row Columnar) file format, "push down" typically refers to the ability to push down predicate filters to the storage layer for processing. There will be two options in it:
True: When push down is set to True, it indicates that predicate filters can be pushed down to the ORC storage layer for filtering rows at the storage level. This can improve query performance by reducing the amount of data that needs to be read into memory for processing.
False: When push down is set to False, predicate filters are not pushed down to the ORC storage layer. Instead, filtering is performed after the data has been read into memory by the processing engine. This may result in more data being read and potentially slower query performance compared to when push down is enabled.
Navigate to Azure Portal: Open the Azure portal () and log in with your credentials.
Navigate to Azure AD Portal: Open the Azure AD portal () and log in with your credentials.
The Big Query Reader Component is designed for efficient data access and retrieval from Google Big Query, a robust data warehousing solution on Google Cloud. It enables applications to execute complex SQL queries and process large datasets seamlessly. This component simplifies data retrieval and processing, making it ideal for data analysis, reporting, and ETL workflows.
All component configurations are classified broadly into the following sections:
Navigate to the Data Pipeline Editor.
Expand the Reader section provided under the Component Pallet.
Drag and drop the Big Query Reader component to the Workflow Editor.
Click on the dragged Big Query Reader to get the component properties tabs.
It is the default tab to open for the component while configuring it.
Invocation Type: Select an invocation mode from the ‘Real-Time’ or ‘Batch’ using the drop-down menu.
Deployment Type: It displays the deployment type for the reader component. This field comes pre-selected.
Batch Size (min 1): Provide the maximum number of records to be processed in one execution cycle (Min limit for this field is 1).
Failover Event: Select a failover Event from the drop-down menu.
Container Image Version: It displays the image version for the docker container. This field comes pre-selected.
Open the Meta Information tab and fill in all the connection-specific details for the Big Query Reader.
Read using: The 'Service Account' option is available under this field, so select it.
Dataset Id: Mention the Dataset ID from Big Query which is to be read.
Table Id: Mention the Table ID from Big Query which is to be read.
Location (*): Mention the location according to your Project.
Limit: Set a limit for the number of records to be read.
Query: Enter an SQL Query.
A notification message appears to inform about the component configuration success.
GCS Reader component is typically designed to read data from Google Cloud Storage (GCS), a cloud-based object storage service provided by Google Cloud Platform. A GCS Reader can be a part of an application or system that needs to access data stored in GCS buckets. It allows you to retrieve, read, and process data from GCS, making it accessible for various use cases, such as data analysis, data processing, backups, and more.
GCS Reader pulls data from the GCS Monitor, so the first step is to implement GCS Monitor.
Note: The users can refer to the GCS Monitor section of this document for the details.
All component configurations are classified broadly into the following sections:
Meta Information
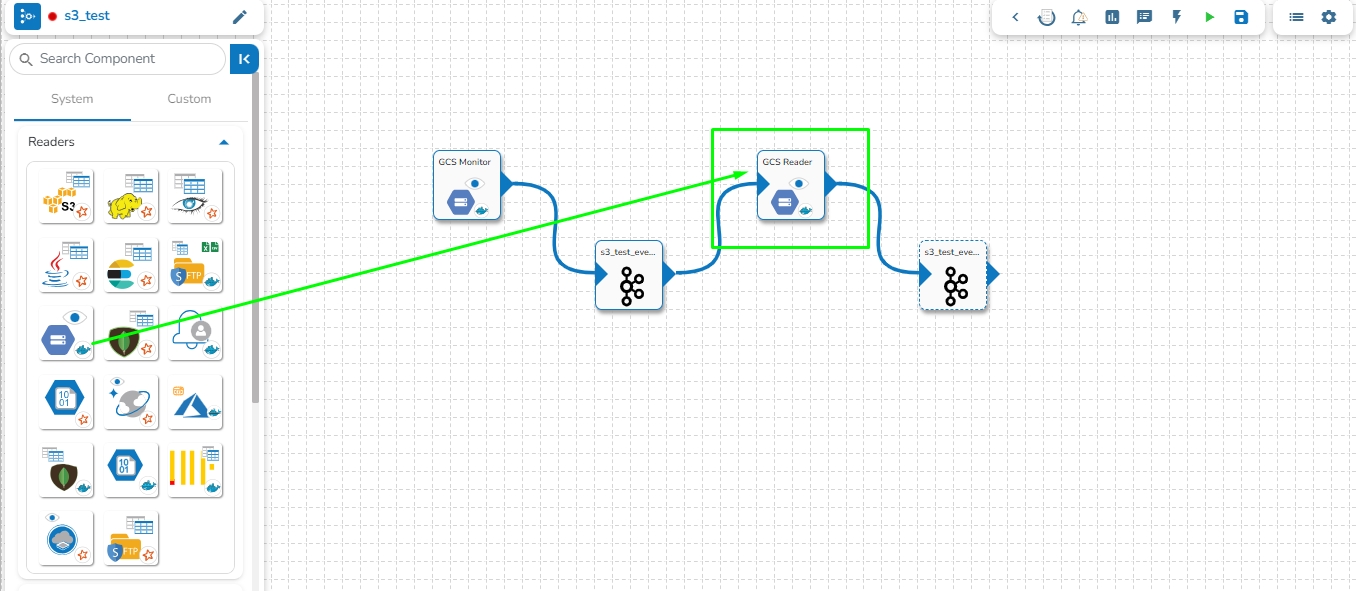
Navigate to the Pipeline Workflow Editor page for an existing pipeline workflow with GCS Monitor and Event component.
Open the Reader section of the Component Pallet.
Drag the GCS Reader to the Workflow Editor.
Click on the dragged GCS Reader component to get the component properties tabs below.
It is the default tab to open for the component while configuring it.
Invocation Type: Select an invocation mode from the ‘Real-Time’ or ‘Batch’ using the drop-down menu.
Deployment Type: It displays the deployment type for the reader component. This field comes pre-selected.
Container Image Version: It displays the image version for the docker container. This field comes pre-selected.
Failover Event: Select a failover Event from the drop-down menu.
Batch Size (min 10): Provide the maximum number of records to be processed in one execution cycle (the minimum limit for this field is 10).
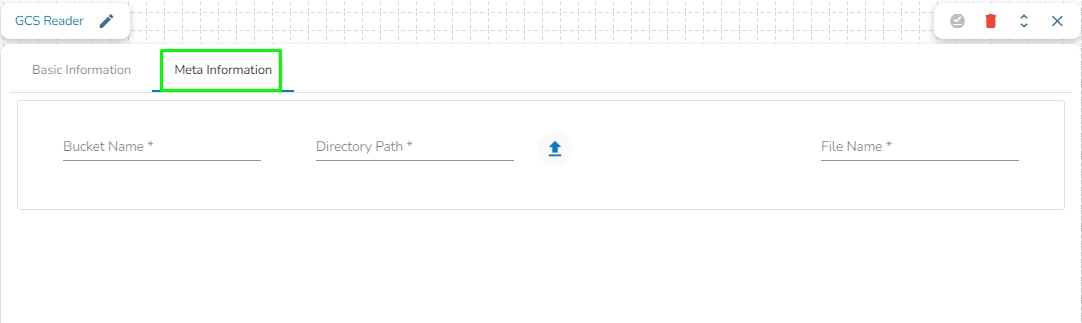
Bucket Name: Enter the Bucket name for GCS Reader. A bucket is a top-level container for storing objects in GCS.
Directory Path: Enter the path where the file is located, which needs to be read.
File Name: Enter the file name.
Navigate to the Pipeline Workflow Editor page for an existing pipeline workflow with the PySpark GCS Reader and Event component.
OR
You may create a new pipeline with the mentioned components.
Open the Reader section of the Component Pallet.
Drag the PySpark GCS Reader to the Workflow Editor.
Click the dragged GCS Reader component to get the component properties tabs below.
Invocation Type: Select an invocation mode from the ‘Real-Time’ or ‘Batch’ using the drop-down menu.
Deployment Type: It displays the deployment type for the reader component. This field comes pre-selected.
Container Image Version: It displays the image version for the docker container. This field comes pre-selected.
Failover Event: Select a failover Event from the drop-down menu.
Batch Size (min 10): Provide the maximum number of records to be processed in one execution cycle (the minimum limit for this field is 10).
Secret File (*): Upload the JSON from the Google Cloud Storage.
Bucket Name (*): Enter the Bucket name for GCS Reader. A bucket is a top-level container for storing objects in GCS.
Path: Enter the path where the file is located, which needs to be read.
Read Directory: Disable reading single files from the directory.
Limit: Set a limit for the number of records to be read.
File-Type: Select the File-Type from the drop-down.
File Type (*): Supported file formats are:
CSV: The Header, Multilibe, and Infer Schema fields will be displayed with CSV as the selected File Type. Enable the Header option to get the Header of the reading file and enable the Infer Schema option to get the true schema of the column in the CSV file. Check the Multiline option if there is any Multiline string in the file.
JSON: The Multiline and Charset fields are displayed with JSON as the selected File Type. Check in the Multiline option if there is any Multiline string in the file.
PARQUET: No extra field gets displayed with PARQUET as the selected File Type.
AVRO: This File Type provides two drop-down menus.
Compression: Select an option out of the Deflate and Snappy options.
Compression Level: This field appears for the Deflate compression option. It provides 0 to 9 levels via a drop-down menu.
XML: Select this option to read the XML file. If this option is selected, the following fields will be displayed:
Infer schema: Enable this option to get the true schema of the column.
Path: Provide the path of the file.
Root Tag: Provide the root tag from the XML files.
Row Tags: Provide the row tags from the XML files.
Join Row Tags: Enable this option to join multiple row tags.
Query: Enter the Spark SQL query.
Select the desired columns using the Download Data and Upload File options.
Or
The user can also use the Column Filter section to select columns.
Click the Save Component in Storage icon after doing all the configurations to save the reader component.
A notification message appears to inform about the component configuration success.
ClickHouse reader is designed to read and access data stored in a ClickHouse database. ClickHouse readers typically authenticate with ClickHouse using a username and password or other authentication mechanisms supported by ClickHouse.
Along with the Spark Driver in RDBMS reader we have Docker Reader that supports TCP port All component configurations are classified broadly into the following sections:
All component configurations are classified broadly into the following sections:
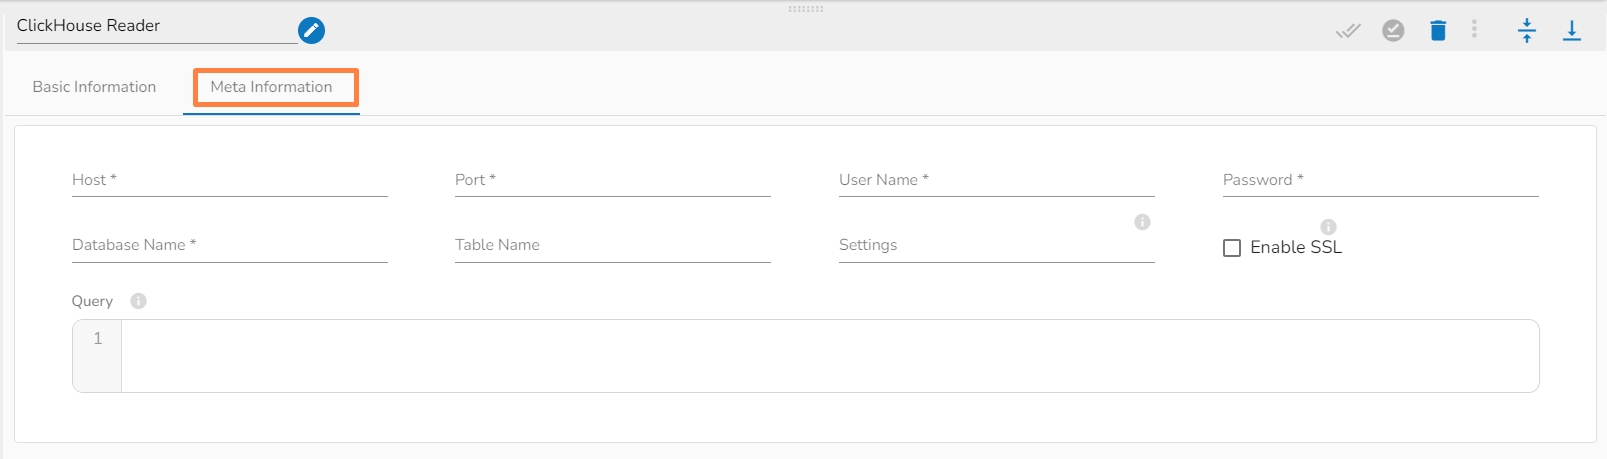
Meta Information
Check out the given illustration to understand the configuration steps for the ClickHouse Reader component.
Host IP Address: Enter the Host IP Address.
Port: Enter the port for the given IP Address.
User name: Enter the user name for the provided database.
Password: Enter the password for the provided database.
Database name: Enter the Database name.
Table name: Provide a single or multiple table names. If multiple table name has be given, then enter the table names separated by comma(,). Settings: Option that allows you to customize various configuration settings for a specific query.
Enable SSL: Enabling SSL with ClickHouse Reader involves configuring the reader to use the Secure Sockets Layer (SSL) protocol for secure communication between the reader and the ClickHouse server.
Query: Write SQL query to filter out desired data from ClickHouse Database.
Please Note:
The Meta Information tab has got an SSL field for the ClickHouse Reader component. The user needs to configure the SSL.
ClickHouse reader docker component supports only TCP port.
Azure Blob Reader is designed to read and access data stored in Azure Blob Storage. Azure Blob Readers typically authenticate with Azure Blob Storage using Azure Active Directory credentials or other authentication mechanisms supported by Azure.
This is a docker based component.
All component configurations are classified broadly into the following sections:
Meta Information
Please Note: Please go through the below given demonstration to configure Azure Blob Reader in the pipeline.
Please Note: Before starting to use the Azure Reader component, please follow the steps below to obtain the Azure credentials from the Azure Portal:
Accessing Azure Blob Storage: Shared Access Signature (SAS), Secret Key, and Principal Secret
This document outlines three methods for accessing Azure Blob Storage: Shared Access Signatures (SAS), Secret Keys, and Principal Secrets.
Understanding Security Levels:
Shared Access Signature (SAS): This is the recommended approach due to its temporary nature and fine-grained control over access permissions. SAS tokens can be revoked, limiting potential damage if compromised.
Secret Key: Secret keys grant full control over your storage account. Use them with caution and only for programmatic access. Consider storing them securely in Azure Key Vault and avoid hardcoding them in scripts.
Principal Secret: This applies to Azure Active Directory (Azure AD) application access. Similar to secret keys, use them cautiously and store them securely (e.g., Azure Key Vault).
1. Shared Access Signature (SAS):
Benefits:
Secure: Temporary and revocable, minimizing risks.
Granular Control: Define specific permissions (read, write, list, etc.) for each SAS token.
Steps to Generate an SAS Token:
Navigate to Azure Portal: Open the Azure portal (https://azure.microsoft.com/en-us/get-started/azure-portal) and log in with your credentials.
Access Blob Storage Account: Locate "Storage accounts" in the left menu and select your storage account.
Configure SAS Settings: Find and click on "Shared access signature" in the settings. Define the permissions, expiry date, and other parameters for your needs.
Generate SAS Token: Click on "Generate SAS and connection string" to create the SAS token.
Copy and Use SAS Token: Copy the generated SAS token. Use this token to securely access your Blob Storage resources in your code.
2. Secret Key:
Use with Caution:
High-Risk: Grants full control over your storage account.
Secure Storage: Store them securely in Azure Key Vault, never hardcode them in scripts.
Steps to Obtain Secret Key:
Navigate to Azure Portal: Open the Azure portal and log in.
Access Blob Storage Account: Locate and select your storage account.
View Secret Keys: Click on "Access keys" to view your storage account keys. Do not store these directly in code. Consider Azure Key Vault for secure storage.
3. Principal Secret (Azure AD Application):
Use for Application Access:
Grants access to your storage account through an Azure AD application.
Secure Storage: Store them securely in Azure Key Vault, never hardcode them in scripts.
Steps to Obtain Principal Secret:
Navigate to Azure AD Portal: Open the Azure AD portal (https://azure.microsoft.com/en-us/get-started/azure-portal) and log in with your credentials.
Access App Registrations: Locate "App registrations" in the left menu.
Select Your Application: Find and click on the application for which you want to obtain the principal secret.
Access Certificates & Secrets: Inside your application, go to "Certificates & secrets" in the settings menu.
Generate New Client Secret (Principal Secret):
Under "Client secrets," click on "New client secret."
Enter a description, select the expiry duration, and click "Add" to generate the new client secret.
Copy the generated client secret immediately as it will be hidden afterward.
Read Using: There are three authentication methods available to connect with Azure in the Azure Blob Reader Component:
Shared Access Signature
Secret Key
Principal Secret
Provide the following details:
Shared Access Signature: This is a URI that grants restricted access rights to Azure Storage resources.
Account Name: Provide the Azure account name.
Container: Provide the container name from where the file is located and which has to be read.
File Type: There are five (5) types of file extensions available:
CSV
JSON
PARQUET
AVRO
XML
Read Directory: This field will be checked by default. If this option is enabled, the component will read data from all the blobs present in the container.
Blob Name: This field will display only if the Read Directory field is disabled. Enter the specific name of the blob whose data has to be read.
Column Filter: Enter the column names here. Only the specified columns will be fetched from Azure Blob. In this field, the user needs to fill in the following information:
Source Field: Enter the name of the column from the blob. The user can add multiple columns by clicking on the "Add New Column" option.
Destination Field: Enter the alias name for the source field.
Column Type: Enter the data type of the column.
Upload: This option allows the user to upload a data file in CSV, JSON, or EXCEL format. The column names will be automatically fetched from the uploaded data file and filled out in the Name, Alias, and Column Type fields.
Download Data: This option will download the data filled in the Column Filter field in JSON format.
Delete Data: This option will clear all the information filled in the Column Filter field.
Provide the following details:
Account Key: Used to authorize access to data in your storage account via Shared Key authorization.
Account Name: Provide the Azure account name.
Container: Provide the container name from where the file is located and which has to be read.
File Type: There are five (5) types of file extensions available:
CSV
JSON
PARQUET
AVRO
Read Directory: This field will be checked by default. If this option is enabled, the component will read data from all the blobs present in the container.
Blob Name: This field will display only if the Read Directory field is disabled. Enter the specific name of the blob whose data has to be read.
Column Filter: Enter the column names here. Only the specified columns will be fetched from Azure Blob. In this field, the user needs to fill in the following information:
Source Field: Enter the name of the column from the blob. The user can add multiple columns by clicking on the "Add New Column" option.
Destination Field: Enter the alias name for the source field.
Column Type: Enter the data type of the column.
Upload: This option allows the user to upload a data file in CSV, JSON, or EXCEL format. The column names will be automatically fetched from the uploaded data file and filled out in the Name, Alias, and Column Type fields.
Download Data: This option will download the data filled in the Column Filter field in JSON format.
Delete Data: This option will clear all the information filled in the Column Filter field.
Provide the following details:
Client ID: The unique Application (client) ID assigned to your app by Azure AD when the app was registered.
Tenant ID: A globally unique identifier (GUID) that is different from your organization name or domain.
Client Secret: The password of the service principal.
Account Name: Provide the Azure account name.
File Type: There are five (5) types of file extensions available:
CSV
JSON
PARQUET
AVRO
Read Directory: This field will be checked by default. If this option is enabled, the component will read data from all the blobs present in the container.
Blob Name: This field will display only if the Read Directory field is disabled. Enter the specific name of the blob whose data has to be read.
Column Filter: Enter the column names here. Only the specified columns will be fetched from Azure Blob. In this field, the user needs to fill in the following information:
Source Field: Enter the name of the column from the blob. The user can add multiple columns by clicking on the "Add New Column" option.
Destination Field: Enter the alias name for the source field.
Column Type: Enter the data type of the column.
Upload: This option allows the user to upload a data file in CSV, JSON, or EXCEL format. The column names will be automatically fetched from the uploaded data file and filled out in the Name, Alias, and Column Type fields.
Download Data: This option will download the data filled in the Column Filter field in JSON format.
Delete Data: This option will clear all the information filled in the Column Filter field.
Note: The following fields will be displayed after selecting the following file types:
CSV: The Header and Infer Schema fields get displayed with CSV as the selected File Type. Enable Header option to get the Header of the reading file and enable Infer Schema option to get true schema of the column in the CSV file.
JSON: The Multiline and Charset fields get displayed with JSON as the selected File Type.
Multiline: This option handles JSON files that contain records spanning multiple lines. Enabling this ensures the JSON parser reads multiline records correctly.
Charset: Specify the character set used in the JSON file. This defines the character encoding of the JSON file, such as UTF-8 or ISO-8859-1, ensuring correct interpretation of the file content.
PARQUET: No extra field gets displayed with PARQUET as the selected File Type.
AVRO: This File Type provides two drop-down menus.
Compression: Select an option out of the Deflate and Snappy options.
Deflate: A compression algorithm that balances between compression speed and compression ratio, often resulting in smaller file sizes.
Snappy: This compression type is select by default. A fast compression and decompression algorithm developed by Google, optimized for speed rather than maximum compression ratio.
Compression Level: This field appears if Deflate compression is selected. It provides a drop-down menu with levels ranging from 0 to 9, indicating the compression intensity.
A Sandbox reader is used to read and access data within a configured sandbox environment.
All component configurations are classified broadly into the following sections:
Meta Information
Before using the Sandbox Reader component for reading a file, the user needs to upload a file in Data Sandbox under the Data Center module.
Please go through the given walk-through for uploading the file in the Data Sandbox under the Data Center module.
Check out the given video on how to configure a Sandbox Reader component.
Navigate to the Data Pipeline Editor.
Expand the Readers section provided under the Component Pallet.
Drag and drop the Sandbox Reader component to the Workflow Editor.
Click on the dragged Sandbox Reader to get the component properties tabs.
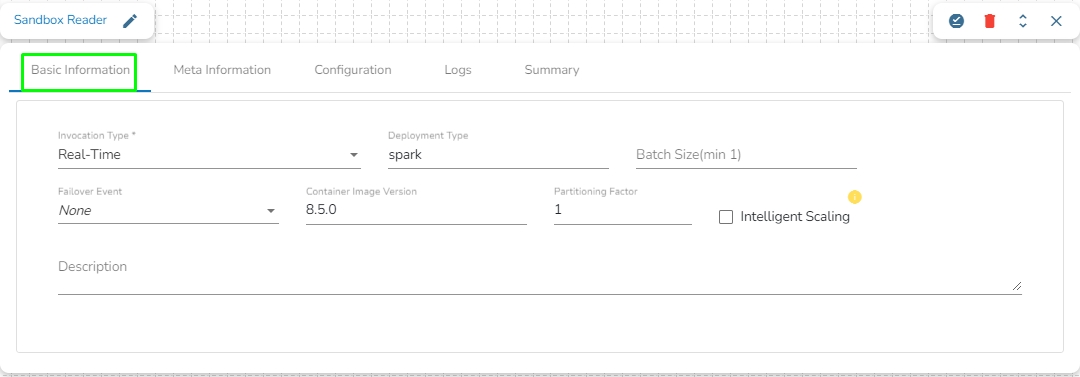
It is the default tab to open for the component while configuring it.
Invocation Type: Select an invocation mode from the Real-Time or Batch options by using the drop-down menu.
Deployment Type: It displays the deployment type for the reader component. This field comes pre-selected.
Container Image Version: It displays the image version for the docker container. This field comes pre-selected.
Failover Event: Select a failover Event from the drop-down menu.
Batch Size (min 10): Provide the maximum number of records to be processed in one execution cycle (Minimum limit for this field is 10).
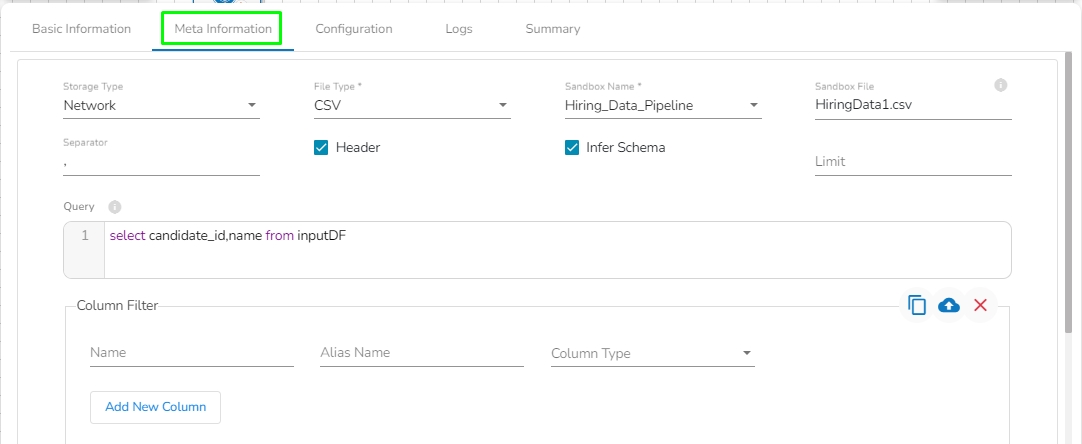
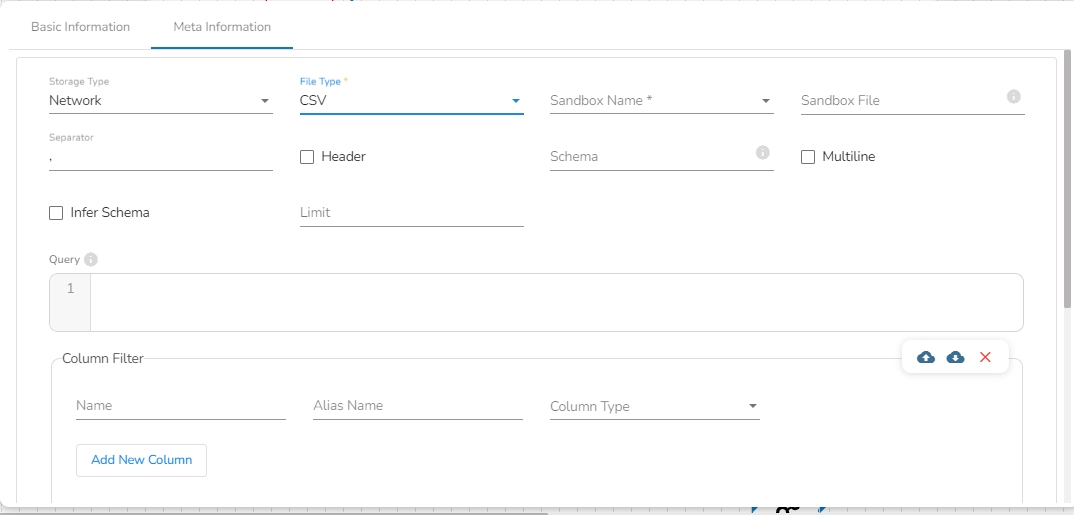
Storage Type: The user will find two options here:
Network: This option will be selected by default. In this option, the following fields will be displayed:
File Type: Select the type of the file to be read. Supported file types include CSV, JSON, PARQUET, AVRO, XML, and ORC.
Schema: Enter the Spark schema of the file in JSON format.
Sandbox Folder Path: Enter the Sandbox folder name where the data is stored in part files.
Limit: Enter the number of records to be read.
Platform: In this option, the following fields will be displayed:
File Type: Select the type of the file to be read. The supported file types are CSV, JSON, PARQUET, AVRO, XML, and ORC.
Sandbox Name: This field will display once the user selects the file type. It will show all the Sandbox names for the selected file type, and the user has to select the Sandbox name from the drop-down.
Sandbox File: This field displays the name of the sandbox file to be read. It will automatically fill when the user selects the sandbox name.
Limit: Enter the number of records to be read.
Query: Enter a spark SQL query. Take inputDf as a table name.
Column Filter: There is also a section for the selected columns in the Meta Information tab if the user can select some specific columns from the table to read data instead of selecting a complete table so this can be achieved by using the Column Filter section. Select the columns that you want to read and if you want to change the name of the column, then put that name in the alias name section otherwise keep the alias name the same as of column name and then select a Column Type from the drop-down menu.
Use the Download Data and Upload File options to select the desired columns.
Upload File: The user can upload the existing system files (CSV, JSON) using the Upload File icon (file size must be less than 2 MB).
Download Data (Schema): Users can download the schema structure in JSON format by using the Download Data icon.
or
Use the Download Data and Upload File options to select the desired columns.
Partition Columns: To read a specific partition, enter the name of the partitioned column.
Sample Query for Sandbox Reader:
Please Note:
(*) the symbol indicates that the field is mandatory.
Either table or query must be specified for the data readers except for SFTP Reader.
Column Filter- There should not be a data type mismatch in the Column Type for all the Reader components.
Fields in the Meta Information tab may vary based on the selected File Type. All the possibilities are mentioned below:
CSV: The following fields will display when CSV is selected as File Type:
Header: Enable the Header option to retrieve the header of the reading file.
Infer Schema: Enable the Infer Schema option to obtain the true schema of the columns in the CSV file.
Multiline: Enable the Multiline option to read multiline strings in the data.
Schema: This field will be visible only when the Header option is enabled. Enter the Spark schema in JSON format in the schema field to filter out the bad records. To filter the bad records, the user needs to map the failover Kafka event in the Failover Event field in the Basic Information tab.
JSON: The Multiline and Charset fields are displayed with JSON as the selected File Type. Check in the Multiline option to see, if there is any multiline string in the file.
PARQUET: No extra field gets displayed with PARQUET as the selected File Type.
AVRO: This File Type provides two drop-down menus.
Compression: Select an option out of the Deflate and Snappy options.
Compression Level: This field appears for the Deflate compression option. It provides 0 to 9 levels via a drop-down menu.
XML: Select this option to read the XML file. If this option is selected, the following fields will be displayed:
Infer schema: Enable this option to get the true schema of the column.
Path: Provide the path of the file.
Root Tag: Provide the root tag from the XML files.
Row Tags: Provide the row tags from the XML files.
Join Row Tags: Enable this option to join multiple row tags.
ORC: Select this option to read the ORC file. If this option is selected, the following fields will be displayed:
Push Down: In ORC (Optimized Row Columnar) file format, "push down" typically refers to the ability to push down predicate filters to the storage layer for processing. There will be two options in it:
True: When push-down is set to True, it indicates predicate filters can be pushed down to the ORC storage layer for filtering rows at the storage level. This can improve query performance by reducing the amount of data that needs to be read into memory for processing.
False: When push down is set to False, predicate filters are not pushed down to the ORC storage layer. Instead, filtering is performed after the data has been read into memory by the processing engine. This may result in more data being read and potentially slower query performance compared to when push-down is enabled.
Azure Metadata Reader is designed to read and access metadata associated with Azure resources. Azure Metadata Readers typically authenticate with Azure using Azure Active Directory credentials or other authentication mechanisms supported by Azure.
All component configurations are classified broadly into the following sections:
Meta Information
Please Note: Please go through the below given demonstration to configure Azure Metadata Reader in the pipeline.
Please Note: Before starting to use the Azure Reader component, please follow the steps below to obtain the Azure credentials from the Azure Portal:
Accessing Azure Blob Storage: Shared Access Signature (SAS), Secret Key, and Principal Secret
This document outlines three methods for accessing Azure Blob Storage: Shared Access Signatures (SAS), Secret Keys, and Principal Secrets.
Understanding Security Levels:
Shared Access Signature (SAS): This is the recommended approach due to its temporary nature and fine-grained control over access permissions. SAS tokens can be revoked, limiting potential damage if compromised.
Secret Key: Secret keys grant full control over your storage account. Use them with caution and only for programmatic access. Consider storing them securely in Azure Key Vault and avoid hardcoding them in scripts.
Principal Secret: This applies to Azure Active Directory (Azure AD) application access. Similar to secret keys, use them cautiously and store them securely (e.g., Azure Key Vault).
1. Shared Access Signature (SAS):
Benefits:
Secure: Temporary and revocable, minimizing risks.
Granular Control: Define specific permissions (read, write, list, etc.) for each SAS token.
Steps to Generate an SAS Token:
Navigate to Azure Portal: Open the Azure portal (https://azure.microsoft.com/en-us/get-started/azure-portal) and log in with your credentials.
Access Blob Storage Account: Locate "Storage accounts" in the left menu and select your storage account.
Configure SAS Settings: Find and click on "Shared access signature" in the settings. Define the permissions, expiry date, and other parameters for your needs.
Generate SAS Token: Click on "Generate SAS and connection string" to create the SAS token.
Copy and Use SAS Token: Copy the generated SAS token. Use this token to securely access your Blob Storage resources in your code.
2. Secret Key:
Use with Caution:
High-Risk: Grants full control over your storage account.
Secure Storage: Store them securely in Azure Key Vault, never hardcode them in scripts.
Steps to Obtain Secret Key:
Navigate to Azure Portal: Open the Azure portal and log in.
Access Blob Storage Account: Locate and select your storage account.
View Secret Keys: Click on "Access keys" to view your storage account keys. Do not store these directly in code. Consider Azure Key Vault for secure storage.
3. Principal Secret (Azure AD Application):
Use for Application Access:
Grants access to your storage account through an Azure AD application.
Secure Storage: Store them securely in Azure Key Vault, never hardcode them in scripts.
Steps to Obtain Principal Secret:
Navigate to Azure AD Portal: Open the Azure AD portal (https://azure.microsoft.com/en-us/get-started/azure-portal) and log in with your credentials.
Access App Registrations: Locate "App registrations" in the left menu.
Select Your Application: Find and click on the application for which you want to obtain the principal secret.
Access Certificates & Secrets: Inside your application, go to "Certificates & secrets" in the settings menu.
Generate New Client Secret (Principal Secret):
Under "Client secrets," click on "New client secret."
Enter a description, select the expiry duration, and click "Add" to generate the new client secret.
Copy the generated client secret immediately as it will be hidden afterward.
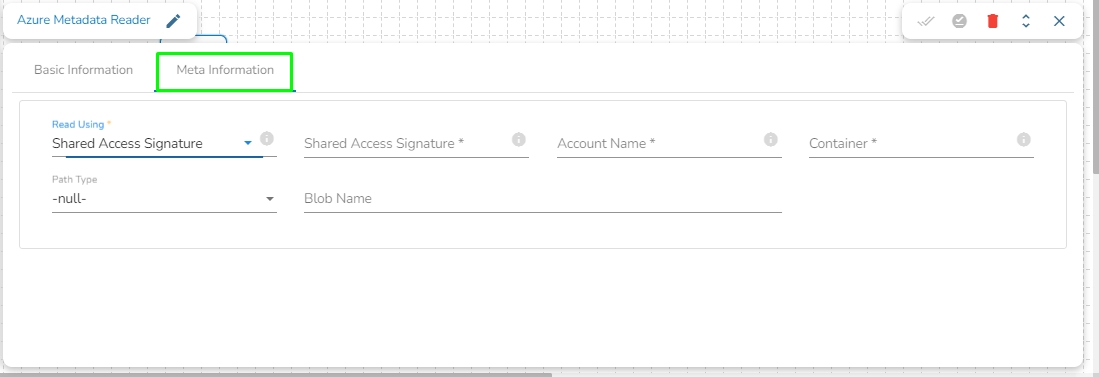
Read Using: There are three authentication methods available to connect with Azure in the Azure Blob Reader Component:
Shared Access Signature
Secret Key
Principal Secret
Provide the following details:
Shared Access Signature: This is a URI that grants restricted access rights to Azure Storage resources.
Account Name: Provide the Azure account name.
Container: Provide the container name from where the file is located and which has to be read.
Path type: There are options available under it:
Null: If Null is selected as the Path Type, the component will read the metadata of all the blobs from the given container. The user does not need to fill the Blob Name field in this option.
Directory Path: Enter the directory path to read the metadata of files located in the specified directory. For example: employee/joining_year=2010/department=BI/designation=Analyst/.
Blob Name: Specify the blob name to read the metadata from that particular blob.
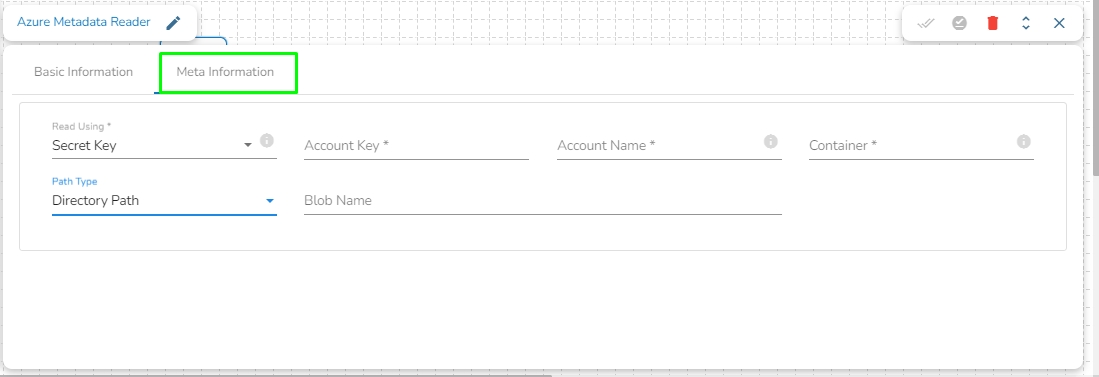
Provide the following details:
Account Key: It is be used to authorize access to data in your storage account via Shared Key authorization.
Account Name: Provide the Azure account name.
Container: Provide the container name from where the file is located and which has to be read.
Path type: There are options available under it:
Null: If Null is selected as the Path Type, the component will read the metadata of all the blobs from the given container. The user does not need to fill the Blob Name field in this option.
Directory Path: Enter the directory to read the metadata of files located in the specified directory. For example: employee/joining_year=2010/department=BI/designation=Analyst/.
Blob Name: Specify the blob name to read the metadata from that particular blob.
Provide the following details:
Client ID: The client ID is the unique Application (client) ID assigned to your app by Azure AD when the app was registered.
Tenant ID: It is a globally unique identifier (GUID) that is different than your organization name or domain.
Client Secret: The client secret is the password of the service principal.
Account Name: Provide the Azure account name.
Container: Provide the container name from where the file is located and which has to be read.
Path type: There are options available under it:
Null: If Null is selected as the Path Type, the component will read the metadata of all the blobs from the given container. The user does not need to fill the Blob Name field in this option.
Directory Path: Enter the directory to read the metadata of files located in the specified directory. For example: employee/joining_year=2010/department=BI/designation=Analyst/.
Blob Name: Specify the blob name to read the metadata from that particular blob.
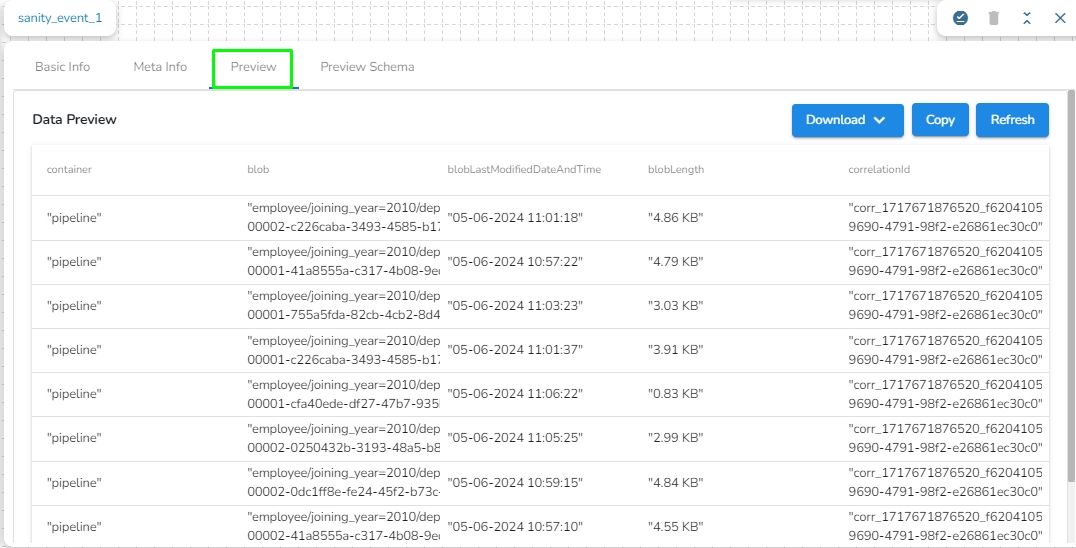
Once the component runs successfully, it will send the following metadata to the output event:
Container: Name of the container where the blob is present.
Blob: Name of the blob present in the specified path.
blobLastModifiedDateAndTime: Date and time when the blob was last modified.
blobLength: Size of the blob.
Amazon Athena is an interactive query service that makes it easy to analyze data directly in Amazon Simple Storage Service (Amazon S3) using standard SQL. With a few actions in the AWS Management Console, you can point Athena at your data stored in Amazon S3 and begin using standard SQL to run ad-hoc queries and get results in seconds.
Athena Query Executer component enables users to read data directly from the external table created in AWS Athena.
Please Note: Please go through the below given demonstration to configure Athena Query component in the pipeline.
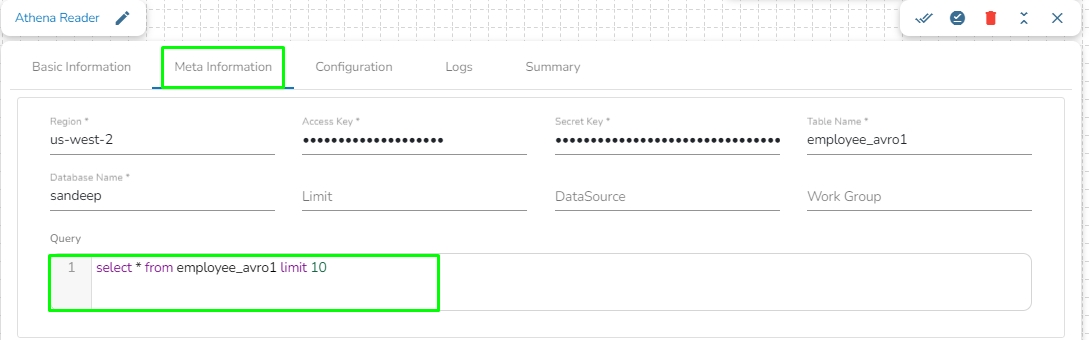
Region: Enter the region name where the bucket is located.
Access Key: Enter the AWS Access Key of the AWS account which has to be used.
Secret Key: Enter the AWS Secret Key of the AWS account which has to be used.
Table Name: Enter the name of the external table created in Athena.
Database Name: Name of the database in Athena in which the table has been created.
Limit: Enter the number of records to be read from the table.
Data Source: Enter the Data Source name configured in Athena. Data Source in Athena refers to the location where your data resides, typically an S3 bucket.
Workgroup: Enter the Workgroup name configured in Athena. The Workgroup in Athena is a resource type used to separate query execution and query history between Users, Teams, or Applications running under the same AWS account.
Query location: Enter the path where the results of queries done in the Athena query editor are saved in CSV format. You can find this path under the "Settings" tab in the Athena query editor in the AWS console, labeled as "Query Result Location".
Query: Enter the Spark SQL query.
Sample Spark SQL query that can be used in Athena Query Executer:
Upload JSON(*): Upload credential file downloaded from Google Big Query using the Upload icon. You may need to download a JSON from Big Query to upload it here.
Click the Save Component in Storage icon after doing all the configurations to save the reader component.