Loading...
Loading...
Loading...
Loading...
Loading...
Loading...
Loading...
Loading...
Loading...
Loading...
Loading...
Loading...
Data writers specifically focus on the final stage of the pipeline, where the processed or transformed data is written to the target destination. This section explains all the supported Data Writers.
We have given two different writers for writing data to MongoDB. The available deployment types for the same are: Spark and Docker.
An S3 Writer is designed to write data to an S3 bucket in AWS. S3 Writer typically authenticate with S3 using AWS credentials, such as an access key ID and secret access key, to gain access to the S3 bucket and its contents.
All component configurations are classified broadly into the following sections:
Meta Information
Check out the steps given in the demonstration to configure the S3 Writer component.
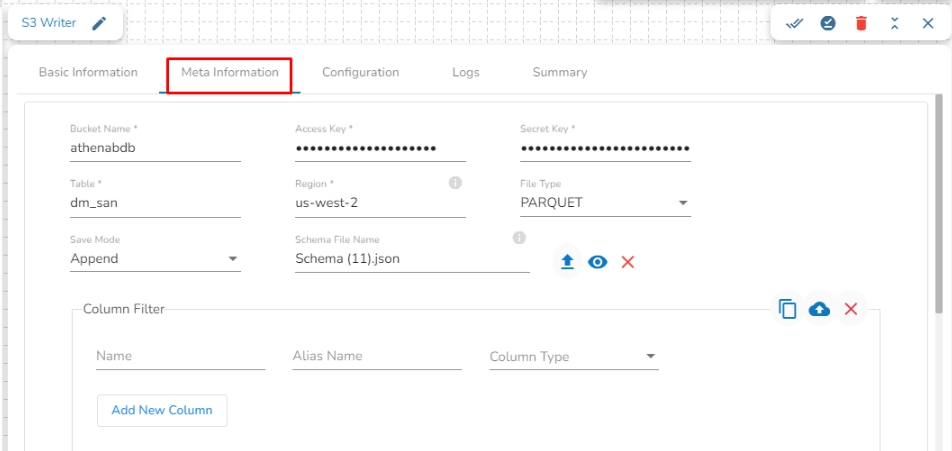
Bucket Name: Enter the S3 Bucket name.
Access Key: Access key shared by AWS to login.
Secret Key: Secret key shared by AWS to login.
Table: Mention the Table or object name where the data has to be written in the S3 location.
An Elasticsearch writer component is designed to write the data stored in an Elasticsearch index. Elasticsearch writers typically authenticate with Elasticsearch using username and password credentials, which grant access to the Elasticsearch cluster and its indexes.
All component configurations are classified broadly into the following sections:
Meta Information
Follow the given steps in the demonstration to configure the ES Writer component.
Please follow the below mentioned steps to configure the meta information of ES writer:
Host IP Address: Enter the host IP Address for Elastic Search.
Port: Enter the port to connect with Elastic Search.
Index ID: Enter the Index ID to read a document in elastic search. In Elasticsearch, an index is a collection of documents that share similar characteristics, and each document within an index has a unique identifier known as the index ID. The index ID is a unique string that is automatically generated by Elasticsearch and is used to identify and retrieve a specific document from the index.
HDFS stands for Hadoop Distributed File System. It is a distributed file system designed to store and manage large data sets in a reliable, fault-tolerant, and scalable way. HDFS is a core component of the Apache Hadoop ecosystem and is used by many big data applications.
This component writes the data in HDFS(Hadoop Distributed File System).
All component configurations are classified broadly into 3 sections
Meta Information
Region: Provide the S3 region where the Bucket is created.
File Type: Select a file type from the drop-down menu (CSV, JSON, PARQUET, AVRO, ORC are the supported file types).
Save Mode: Select the save mode from the drop-down menu:
Append: It will append the data in the blob.
Overwrite: It will overwrite the data in the blob.
Schema File Name: Upload a Spark schema file of the data which has to be written in JSON format.
Column Filter: Enter the column names here. Only the specified columns will be fetched from the data from the previous connected event to the S3 Writer. In this field, the user needs to fill in the following information:
Name: Enter the name of the column which has to be written from the previous event. The user can add multiple columns by clicking on the "Add New Column" option.
Alias: Enter the alias name for the selected column name.
Column Type: Enter the data type of the column.
Upload: This option allows the user to upload a data file in CSV, JSON, or EXCEL format. The column names will be automatically fetched from the uploaded data file and filled out in the Name, Alias, and Column Type fields.
Download Data: This option will download the data filled in the Column Filter field in JSON format.
Delete Data: This option will clear all the information filled in the Column Filter field.
Partition Columns: This feature enables users to partition the data when writing to Azure Blob. Users can specify multiple columns for partitioning by clicking the "Add Column Name" option. For example, If data is partitioned by a date column, a separate folder will be created for each unique date in an Amazon S3 bucket. The data storage might look like this:
Mapping ID: Provide the Mapping ID. In Elasticsearch, a mapping ID is a unique identifier for a mapping definition that defines the schema of the documents in an index. It is used to differentiate between different types of data within an index and to control how Elasticsearch indexes and searches data.
Resource Type: Provide the resource type. In Elasticsearch, a resource type is a way to group related documents together within an index. Resource types are defined at the time of index creation, and they provide a way to logically separate different types of documents that may be stored within the same index.
Username: Enter the username for elastic search.
Password: Enter the password for elastic search.
Schema File Name: Upload spark schema file in JSON format.
Save Mode: Select the Save mode from the drop down.
Append
Selected columns: The user can select the specific column, provide some alias name and select the desired data type of that column.
Follow the given steps in the demonstration to configure the HDFS Writer component.
Host IP Address: Enter the host IP address for HDFS.
Port: Enter the Port.
Table: Enter the table name where the data has to be written.
Zone: Enter the Zone for HDFS in which the data has to be written. Zone is a special directory whose contents will be transparently encrypted upon write and transparently decrypted upon read.
File Format: Select a file format in which the data has to be written.
CSV
JSON
Save Mode: Select a Save Mode.
Schema file name: Upload Spark schema file in JSON format.
Partition Columns: Provide a unique Key column name to partition data in Spark.
The MongoDB writer component is designed to write the data in the MongoDB collection.
All component configurations are classified broadly into the following sections:
Meta Information
Follow the given steps in the demonstration to configure the Mongo (Spark) Writer component.
Connection Type: Select the connection type from the drop-down:
Standard
SRV
The DB writer is a spark-based writer component which gives you capability to write data to multiple database sources.
All component configurations are classified broadly into the following sections:
Meta Information
Please check out the given demonstration to configure the component.
Please Note:
The ClickHouse driver in the Spark components will use the HTTP Port and not the TCP port.
Database name: Enter the Database name.
Table name: Provide a table name where the data has to be written.
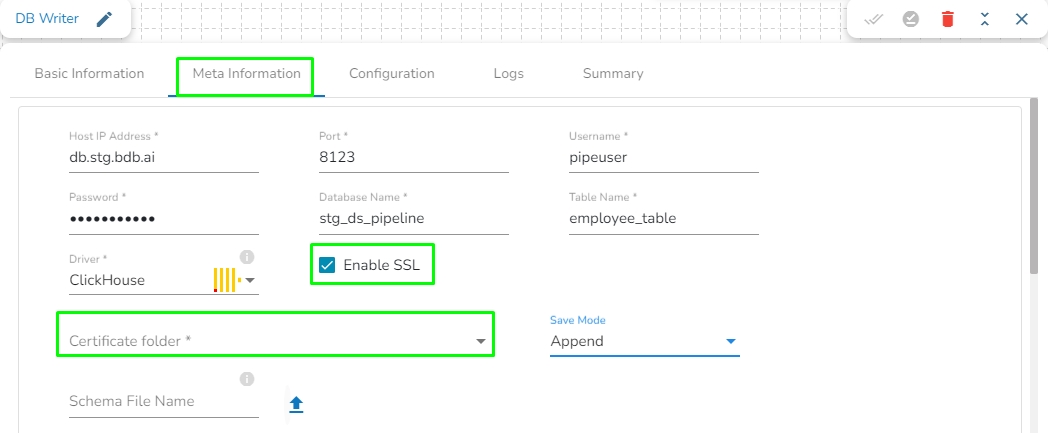
Enable SSL: Check this box to enable SSL for this components. Enable SSL feature in DB reader component will appear only for three(3) drivers: MongoDB, PostgreSQL and ClickHouse.
Please Note:
In DB Writer component, the Save Mode for ClickHouse driver is as follows:
The video writer component is designed to write .mp4 format video to a SFTP location by combining the frames that can be consumed using the video consumer component.
All component configurations are classified broadly into the following sections:
Meta Information
Along with the Spark Driver in RDBMS Writer we have Docker writer that supports TCP port.
ClickHouse writer component is designed to write or store data in a ClickHouse database. ClickHouse writers typically authenticate with ClickHouse using a username and password or other authentication mechanisms supported by ClickHouse.
All component configurations are classified broadly into the following sections:
Meta Information
    s3://my-bucket/my_table/partition_column=2023-01-01/
    s3://my-bucket/my_table/partition_column=2023-01-02/
s3://my-bucket/my_table/partition_column=2023-01-03/AVRO
ORC
Host IP Address (*): Hadoop IP address of the host.
Port(*): Port number (It appears only with the Standard Connection Type).
Username(*): Provide username.
Password(*): Provide a valid password to access the MongoDB.
Database Name(*): Provide the name of the database from where you wish to read data.
Collection Name(*): Provide the name of the collection.
Schema File Name: Upload Spark Schema file in JSON format.
Additional Parameters: Provide the additional parameters to connect with MongoDB. This field is optional.
Enable SSL: Check this box to enable SSL for this components. MongoDB connection credentials will be different if this option is enabled.
Certificate Folder: This option will appear when the Enable SSL field is checked-in. The user has to select the certificate folder from drop down which contains the files which has been uploaded to the admin settings for connecting MongoDB with SSL. Please refer the below given images for the reference.
Save Mode: Select the Save mode from the drop down.
Append: This operation adds the data to the collection.
Ignore: "Ignore" is an operation that skips the insertion of a record if a duplicate record already exists in the database. This means that the new record will not be added, and the database will remain unchanged. "Ignore" is useful when you want to prevent duplicate entries in a database.
Upsert: It is a combination of update and insert options. It is an operation that updates a record if it already exists in the database or inserts a new record if it does not exist. This means that "upsert" updates an existing record with new data or creates a new record if the record does not exist in the database.
MS-SQL
ClickHouse
Snowflake
Redshift
It is always recommended to create the table before activating the pipeline to avoid errors as RDBMS has a strict schema and can result in errors.
When using the Redshift driver with a Boolean datatype in JDBC, the table is not created unless you pass the create table query. Alternatively, you can use a column filter to convert a Boolean value to a String for the desired operation.
Schema File Name: Upload a Spark schema file of the data which has to be written in JSON format.
Save Mode: Select the save mode from the drop-down menu:
Append: It will append the data in the table.
Overwrite: It will overwrite the data in the table.
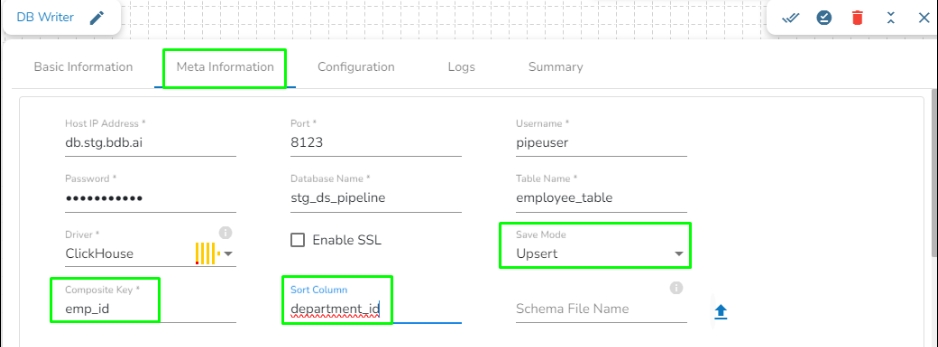
Upsert: This operation allows the users to insert a new record or update existing data into a table. For configuring this, we need to provide the Composite Key.
Sort Column: This field will appear only when Upsert is selected as Save mode. If there are multiple records with the same composite key but different values in the batch, the system identifies the record with the latest value based on the Sort column. The Sort column defines the ordering of records, and the record with the highest value in the sort column is considered the latest.
Column Filter: Enter the column names here. Only the specified columns will be fetched from the data from the previous connected event to the DB Writer. In this field, the user needs to fill in the following information:
Name: Enter the name of the column which has to be written from the previous event. The user can add multiple columns by clicking on the "Add New Column" option.
Alias: Enter the alias name for the selected column name.
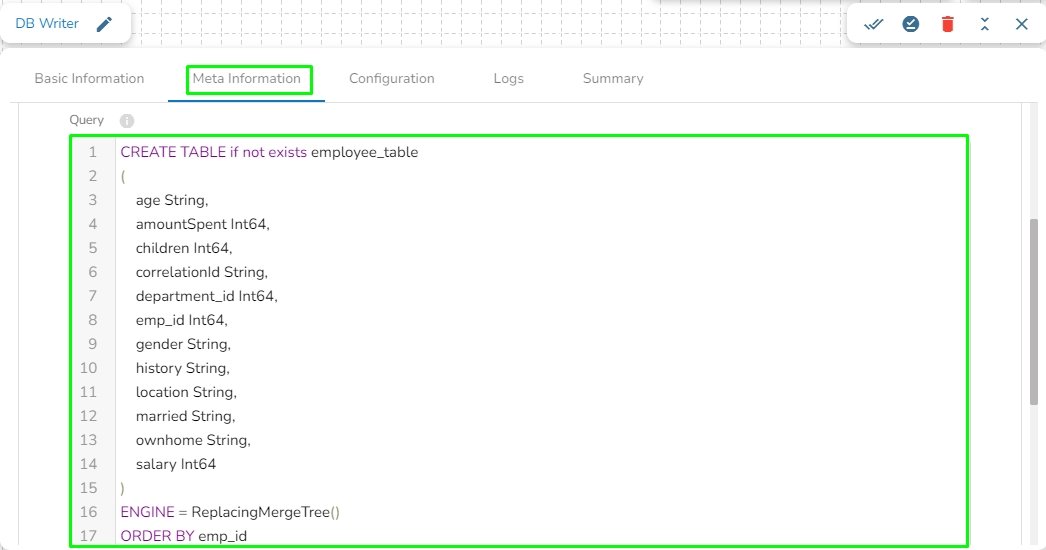
Query: In this field, we can write a DDL for creating the table in database where the in-event data has to be written. For example, please refer the below image:
Upsert: It will create a table in ClickHouse database with a table engine ReplacingMergeTree.
If the user is using Append as the Save mode in ClickHouse Writer (Docker component) and Data Sync (ClickHouse driver), it will create a table in the ClickHouse database with a table engine Memory.
Currently, the Sort column field is only available for the following drivers in the DB Writer: MSSQL, PostgreSQL, Oracle, Snowflake, and ClickHouse.
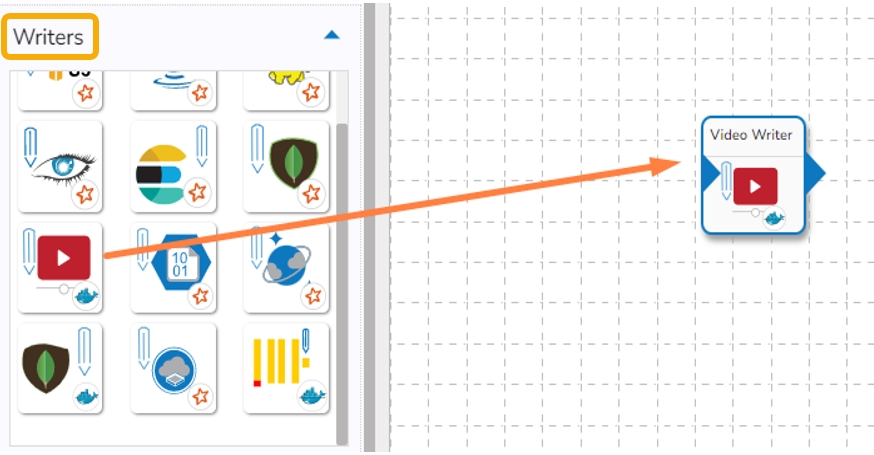
Please follow the given demonstration to configure the Video Writer component.
Drag & drop the Video Stream Consumer component to the Workflow Editor.
Click the dragged Video Stream Consumer component to open the component properties tabs.
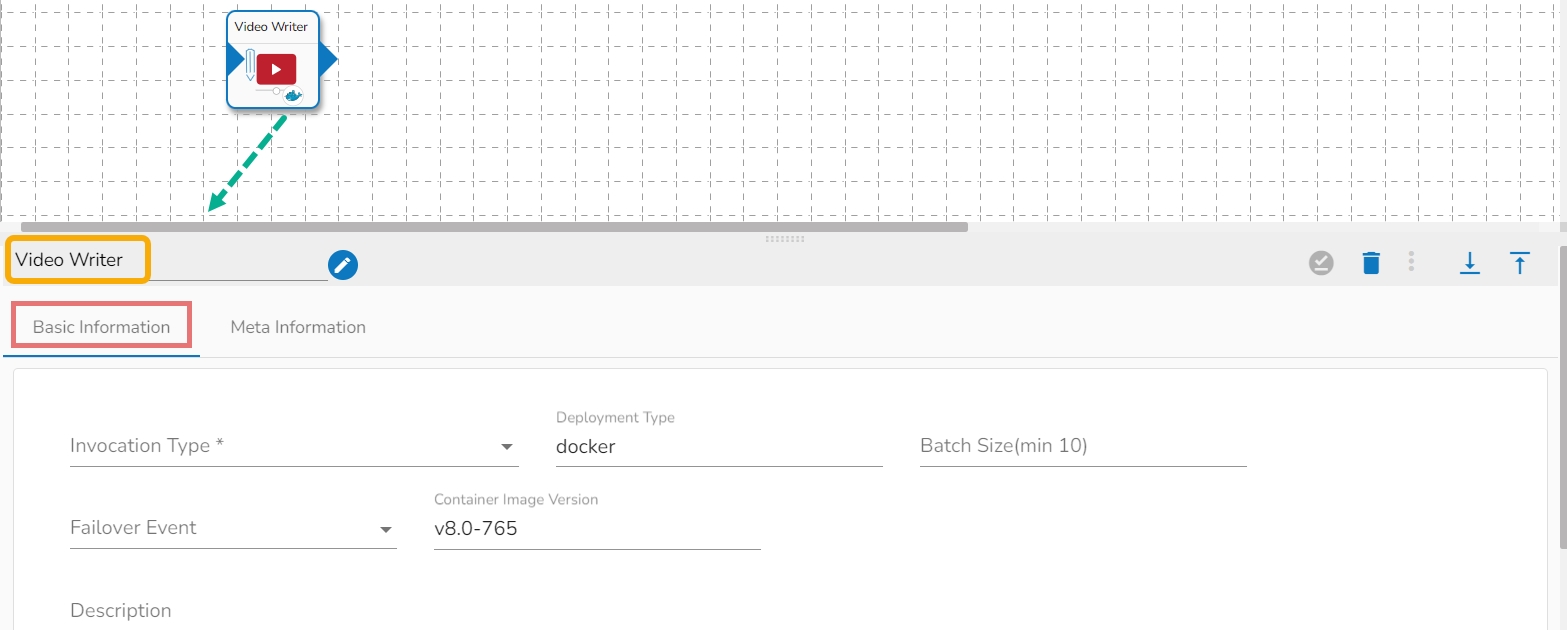
It is the default tab to open for the component.
Invocation Type: Select an Invocation type from the drop-down menu to confirm the running mode of the reader component. Select ‘Real-Time’ or ‘Batch’ from the drop-down menu.
Deployment Type: It displays the deployment type for the component. This field comes pre-selected.
Batch Size (min 10): Provide the maximum number of records to be processed in one execution cycle (Min limit for this field is 10).
Failover Event: Select a failover Event from the drop-down menu.
Container Image Version: It displays the image version for the docker container. This field comes pre-selected.
Description: Description of the component. It is optional.
Select the Meta Information tab and provide the mandatory fields to configure the dragged Video Stream Consumer component.
Host IP Address (*)- Provide IP or URL
The input in Host IP Address in the Meta Information tab changes based on the selection of the Channel. There are two options available:
Live: This allows writing the data to the desired location when live data is coming continuously.
Media File: It will read only stored video file and writes them to desired SFTP location.
Username (*)- Provide username
Port (*)- Provide the Port number
Authentication- Select any one authentication option out of Password or PEM PPK File
Stream(*)- The supported streaming methods are Live and Media files.
Partition Time(*)- It defines the length of video the component will consume at once in seconds. This field will appear only if the LIVE option is selected in Stream field.
Writer Path (*)- Provide the desired path in SFTP location where the video has to be written.
File Name(*)- Give any filename with a format mp4(sample_filename.mp4).
Frame Rate – Provide the rate of frames to be consumed.
While using the authentication option as a Password it adds a password field in the Meta information.
While choosing the PEM/PPK File authentication option, the user needs to select a file using the Choose File option.
Click the Save Component in Storage icon for the Video Writer component.
The message appears to notify that the component properties are saved.
The Video Writer component gets configured to pass the data in the Pipeline Workflow.
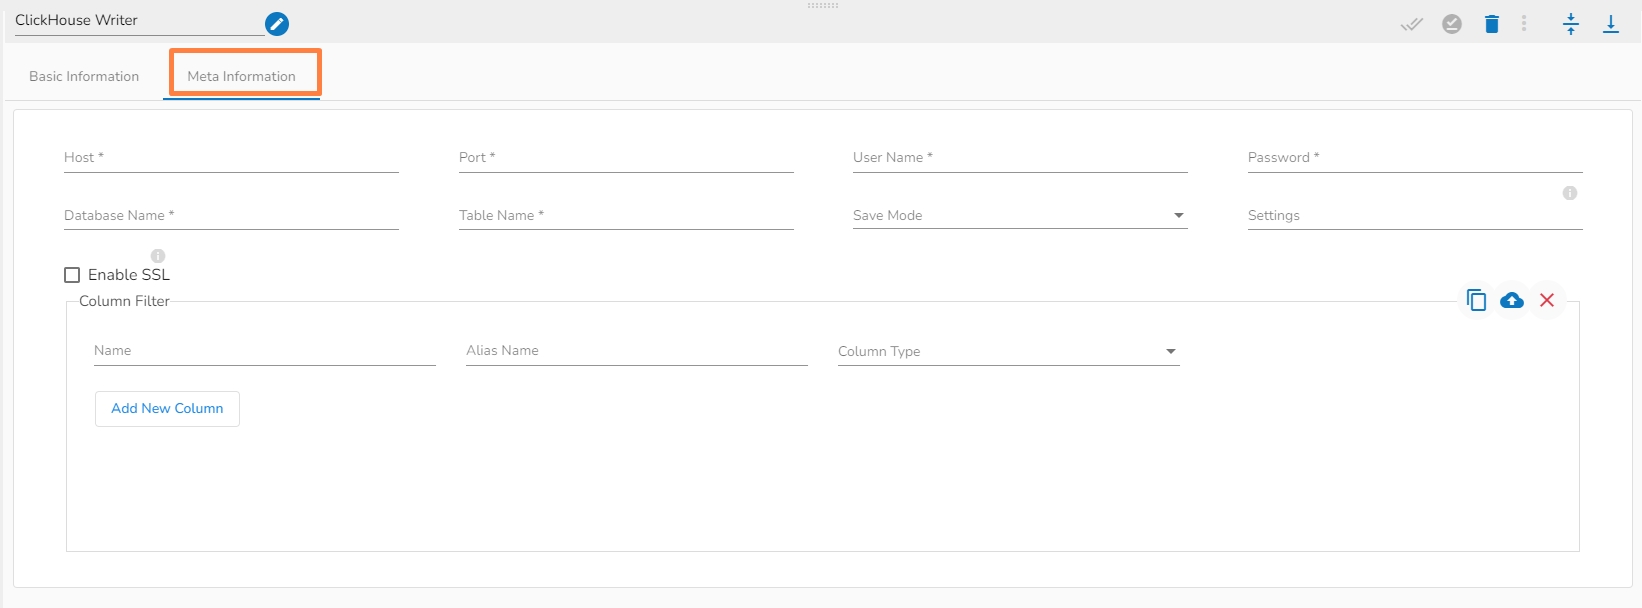
Please go through the given walk-through to understand the configuration steps for the ClickHouse Writer pipeline component.
Host IP Address: Enter the Host IP Address.
Port: Enter the port for the given IP Address.
User name: Enter the user name for the provided database.
Password: Enter the password for the provided database.
Database name: Enter the Database name.
Table name: Provide a single or multiple table names. If multiple table name has be given, then enter the table names separated by comma(,). Settings: Option that allows you to customize various configuration settings for a specific query.
Enable SSL: Enabling SSL with ClickHouse writer involves configuring the writer to use the Secure Sockets Layer (SSL) protocol for secure communication between the writer and the ClickHouse server.
Save Mode: Select the Save mode from the drop down.
Column Filter: There is also a section for the selected columns in the Meta Information tab if the user can select some specific columns from the table to read data instead of selecting a complete table so this can be achieved by using the Column Filter section. Select the columns which you want to read and if you want to change the name of the column, then put that name in the alias name section otherwise keep the alias name the same as of column name and then select a Column Type from the drop-down menu.
Use Download Data and Upload File options to select the desired columns.
Upload File:
A Sandbox writer is used to write the data within a configured sandbox environment.
All component configurations are classified broadly into the following sections:
Meta Information
Check out the given Walk-through on the Sandbox Writer component.
Please follow the below mentioned steps to configure the Meta Information Tab of Sandbox Writer:
Storage Type: The user will find two options here:
Network: This option will be selected by default. In this mode, a folder corresponding to the Sandbox file name provided by the user will be created at the Sandbox location. Data will be written into part files within this folder, with each part file containing data based on the specified batch size.
Platform: If the user selects the "Platform" option, a single file containing the entire dataset will be created at the Sandbox location, using the Sandbox file name provided by the user.
Azure Writer component is designed to write or store data in Microsoft Azure's storage services, such as Azure Blob Storage. Azure Writers typically authenticate with Azure using Azure Active Directory credentials or other authentication mechanisms supported by Azure.
All component configurations are classified broadly into the following sections:
Meta Information
Upload: This option allows the user to upload a data file in CSV, JSON, or EXCEL format. The column names will be automatically fetched from the uploaded data file and filled out in the Name, Alias, and Column Type fields.
Download Data: This option will download the data filled in the Column Filter field in JSON format.
Delete Data: This option will clear all the information filled in the Column Filter field.
Download Data: Users can download the schema structure in JSON format by using the Download Data icon.
Sandbox File: Enter the file name.
File Type: Select the file type in which the data has to be written. There are 4 files types supported here:
CSV
JSON
Text
ORC
Save Mode: Select the save mode from the drop-down menu:
Append: It will append the data in the blob.
Overwrite: It will overwrite the data in the blob.
Schema File Name: Upload a Spark schema file of the data which has to be written in JSON format.
Column Filter: Enter the column names here. Only the specified columns will be fetched from the data from the previous connected event to the Sandbox Writer. In this field, the user needs to fill in the following information:
Name: Enter the name of the column which has to be written from the previous event. The user can add multiple columns by clicking on the "Add New Column" option.
Alias: Enter the alias name for the selected column name. The column name given here will be written in the Sandbox file.
Column Type: Enter the data type of the column.
Upload: This option allows the user to upload a data file in CSV, JSON, or EXCEL format. The column names will be automatically fetched from the uploaded data file and filled out in the Name, Alias, and Column Type fields.
Download Data: This option will download the data filled in the Column Filter field in JSON format.
Delete Data: This option will clear all the information filled in the Column Filter field.
Please go through the demonstration to configure Azure Writer in the pipeline.
Write Using: There are three authentication methods available to connect with Azure in the Azure Writer Component:
Shared Access Signature
Secret Key
Principal Secret
Provide the following details:
Shared Access Signature: This is a URI that grants restricted access rights to Azure Storage resources.
Account Name: Provide the Azure account name.
Container: Provide the container name from where the blob is located. A container is a logical unit of storage in Azure Blob Storage that can hold blobs. It is similar to a directory or folder in a file system, and it can be used to organize and manage blobs.
Blob Name: Enter the blob name. A blob is a type of object storage used to store unstructured data, such as text or binary data, like images or videos.
File Format: Four (4) types of file types are available. Select the file format in which the data has to be written:
CSV
JSON
PARQUET
Save Mode: Select the save mode from the drop-down menu:
Append: It will append the data in the blob.
Overwrite: It will overwrite the data in the blob.
Schema File Name: Upload a Spark schema file of the data that has to be written in JSON format.
Column Filter: Enter the column names here. Only the specified columns will be fetched from the data from the previous connected event to the Azure Writer. In this field, the user needs to fill in the following information:
Name: Enter the name of the column that has to be written from the previous event. The user can add multiple columns by clicking on the "Add New Column" option.
Alias: Enter the alias name for the selected column name.
Partition Column: This feature enables users to partition the data when writing to Azure Blob. Users can specify multiple columns for partitioning by clicking the "Add Column Name" option.
Provide the following details:
Account Key: Enter the Azure account key. In Azure, an account key is a security credential that is used to authenticate access to storage resources, such as blobs, files, queues, or tables, in an Azure storage account.
Account Name: Provide the Azure account name.
Container: Provide the container name from where the blob is located. A container is a logical unit of storage in Azure Blob Storage that can hold blobs. It is similar to a directory or folder in a file system, and it can be used to organize and manage blobs.
Blob Name: Enter the Blob name. A blob is a type of object storage that is used to store unstructured data, such as text or binary data, like images or videos.
File Format: There are four (4) types of file extensions available:
CSV
JSON
PARQUET
Save Mode: Select the save mode from the drop-down menu:
Append: It will append the data in the blob.
Overwrite: It will overwrite the data in the blob.
Schema File Name: Upload a Spark schema file of the data which has to be written in JSON format.
Column Filter: Enter the column names here. Only the specified columns will be fetched from the data from the previous connected event to the Azure Writer. In this field, the user needs to fill in the following information:
Name: Enter the name of the column which has to be written from the previous event. The user can add multiple columns by clicking on the "Add New Column" option.
Alias: Enter the alias name for the selected column name. The column name given here will be written in the container.
Partition Column: This feature enables users to partition the data when writing to Azure Blob. Users can specify multiple columns for partitioning by clicking the "Add Column Name" option.
Provide the following details:
Client ID: Provide Azure Client ID. The client ID is the unique Application (client) ID assigned to your app by Azure AD when the app was registered.
Tenant ID: Provide the Azure Tenant ID. Tenant ID (also known as Directory ID) is a unique identifier that is assigned to an Azure AD tenant and represents an organization or a developer account. It is used to identify the organization or developer account that the application is associated with.
Client Secret: Enter the Azure Client Secret. Client Secret (also known as Application Secret or App Secret) is a secure password or key that is used to authenticate an application to Azure AD.
Account Name: Provide the Azure account name.
Container: Provide the container name from where the blob is located. A container is a logical unit of storage in Azure Blob Storage that can hold blobs. It is similar to a directory or folder in a file system, and it can be used to organize and manage blobs.
Blob Name: Enter the Blob name. A blob is a type of object storage that is used to store unstructured data, such as text or binary data, like images or videos.
File Format: There are four (4) types of file extensions available under it:
CSV
JSON
PARQUET
Save Mode: Select the save mode from the drop-down menu:
Append: It will append the data in the blob.
Overwrite: It will overwrite the data in the blob.
Schema File Name: Upload a Spark schema file of the data which has to be written in JSON format.
Column Filter: Enter the column names here. Only the specified columns will be fetched from the data from the previous connected event to the Azure Writer. In this field, the user needs to fill in the following information:
Name: Enter the column name that must be written from the previous event. The user can add multiple columns by clicking the Add New Column option.
Alias: Enter the alias name for the selected column name. The column name given here will be written in the container.
Partition Column: This feature enables users to partition the data when writing to Azure Blob. Users can specify multiple columns for partitioning by clicking the "Add Column Name" option.

The PyMongo writer component is designed to write the data in the Mongo collection. It is a docker based component.
All component configurations are classified broadly into the following sections:
Meta Information

Copy and Use SAS Token: Copy the generated SAS token. Use this token to access your Blob Storage resources in your code securely.
Generate New Client Secret (Principal Secret):
Click on the New client secret option under the Client secrets section.
Enter a description, select the expiry duration, and click the Add option to generate the new client secret.
Copy the generated client secret immediately as it will be hidden afterward.
AVRO
Upload: This option allows the user to upload a data file in CSV, JSON, or EXCEL format. The column names will be automatically fetched from the uploaded data file and filled out in the Name, Alias, and Column Type fields.
Download Data: This option will download the data filled in the Column Filter field in the JSON format.
Delete Data: This option will clear all the information filled in the Column Filter field.
AVRO
Upload: This option allows users to upload a data file in CSV, JSON, or EXCEL format. The column names will be automatically fetched from the uploaded data file and filled out in the Name, Alias, and Column Type fields.
Download Data: This option will download the data filled in the Column Filter field in the JSON format.
Delete Data: This option will clear all the information filled in the Column Filter field.
AVRO
Upload: This option allows the user to upload a data file in CSV, JSON, or EXCEL format. The column names will be automatically fetched from the uploaded data file and filled out in the Name, Alias, and Column Type fields.
Download Data: This option will download the data filled in the Column Filter field in JSON format.
Delete Data: This option will clear all the information filled in the Column Filter field.
Please follow the demonstration to configure the component.
The PyMongo Writer writes the data to the Mongo Database.
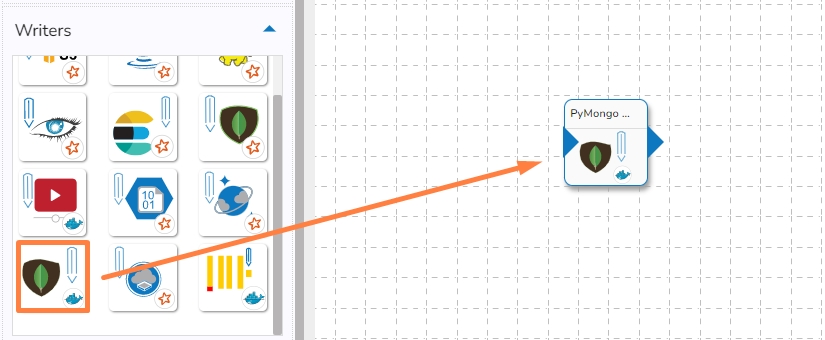
Drag & drop the PyMongo Writer component to the Pipeline Workflow Editor.
Click the dragged PyMongo Writer component to open the component properties tabs below.
It is the default tab to open for the PyMongo Writer while configuring the component.
Select an Invocation type from the drop-down menu to confirm the running mode of the reader component. Select ‘Real-Time’ or ‘Batch’ from the drop-down menu.
Deployment Type: It displays the deployment type for the component. This field comes preselected.
Container Image Version: It displays the image version for the docker container. This field comes pre-selected.
Failover Event: Select a failover Event from the drop-down menu.
Batch Size: Provide the maximum number of records to be processed in one execution cycle.
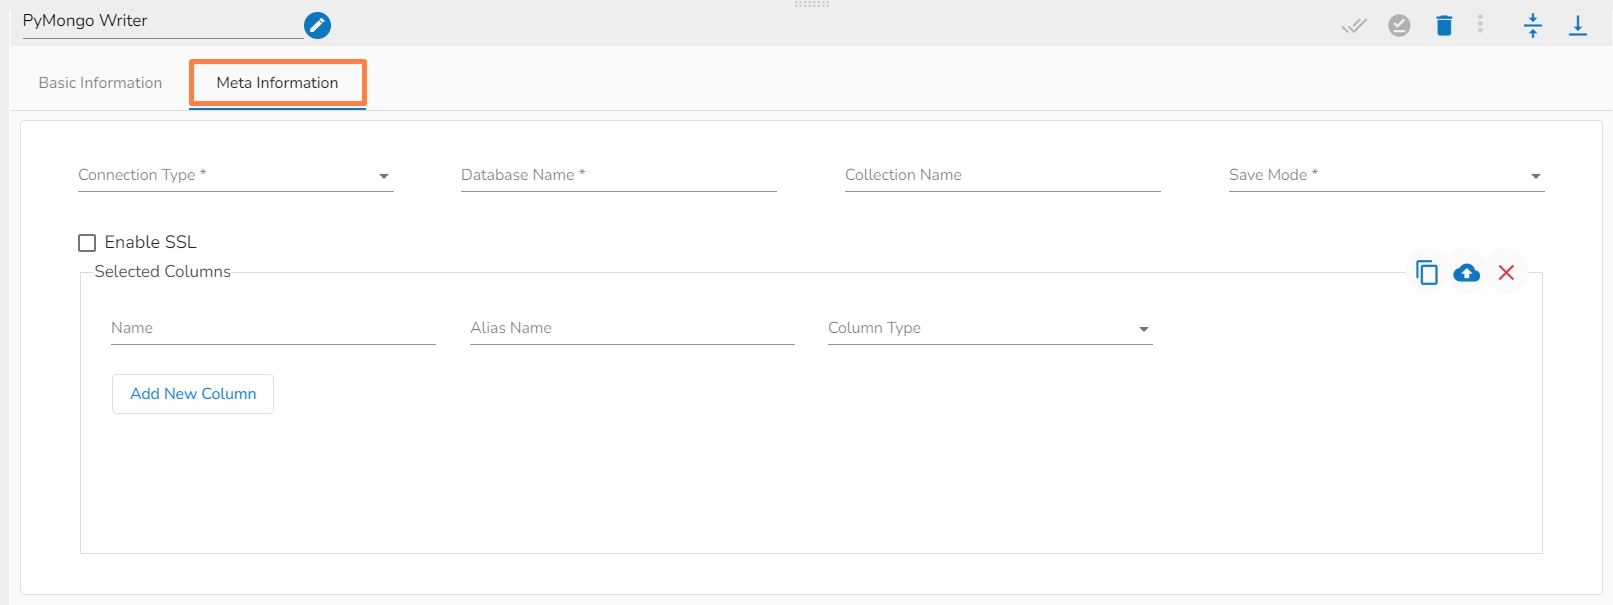
Open the Meta Information tab and configure all the connection-specific details for the PyMongo Writer.
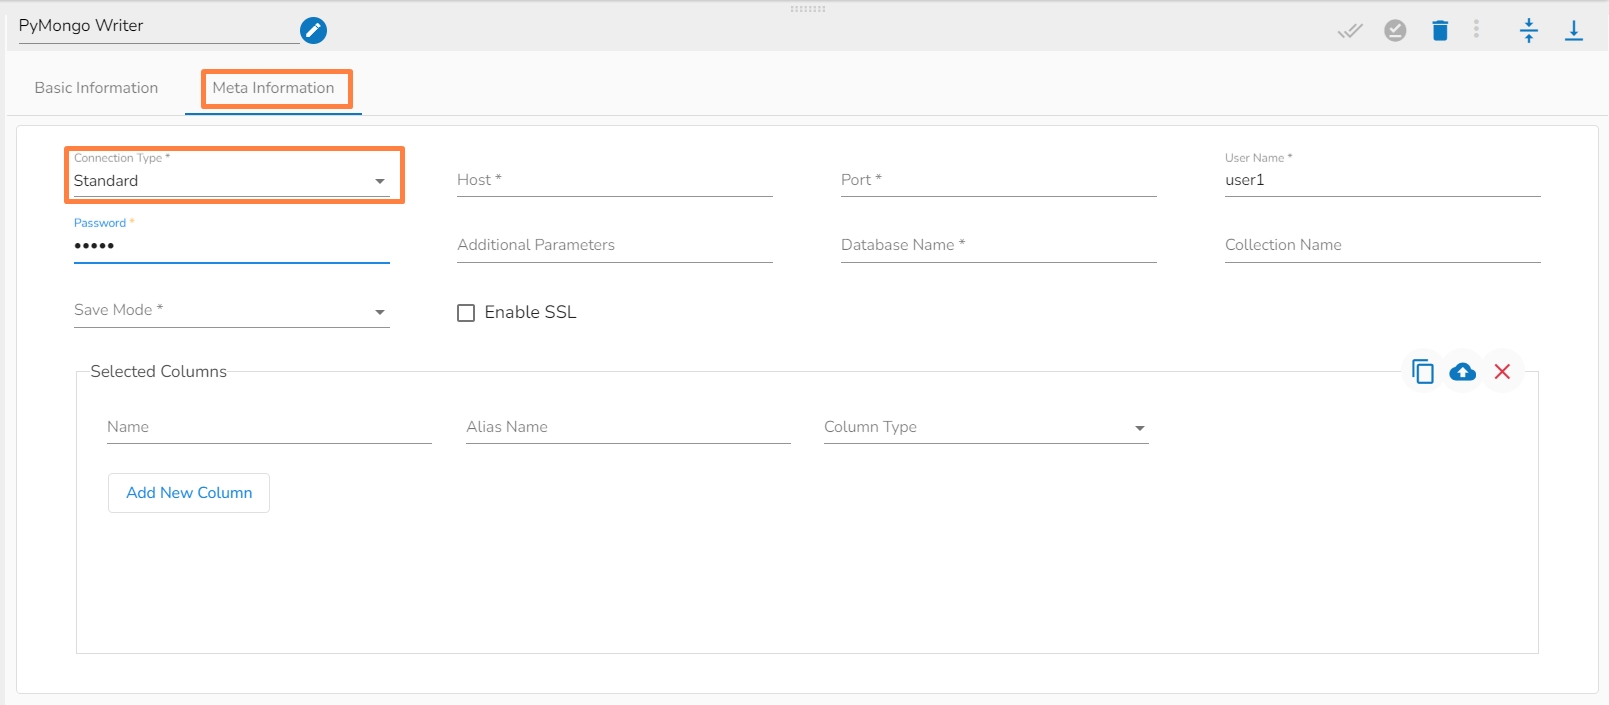
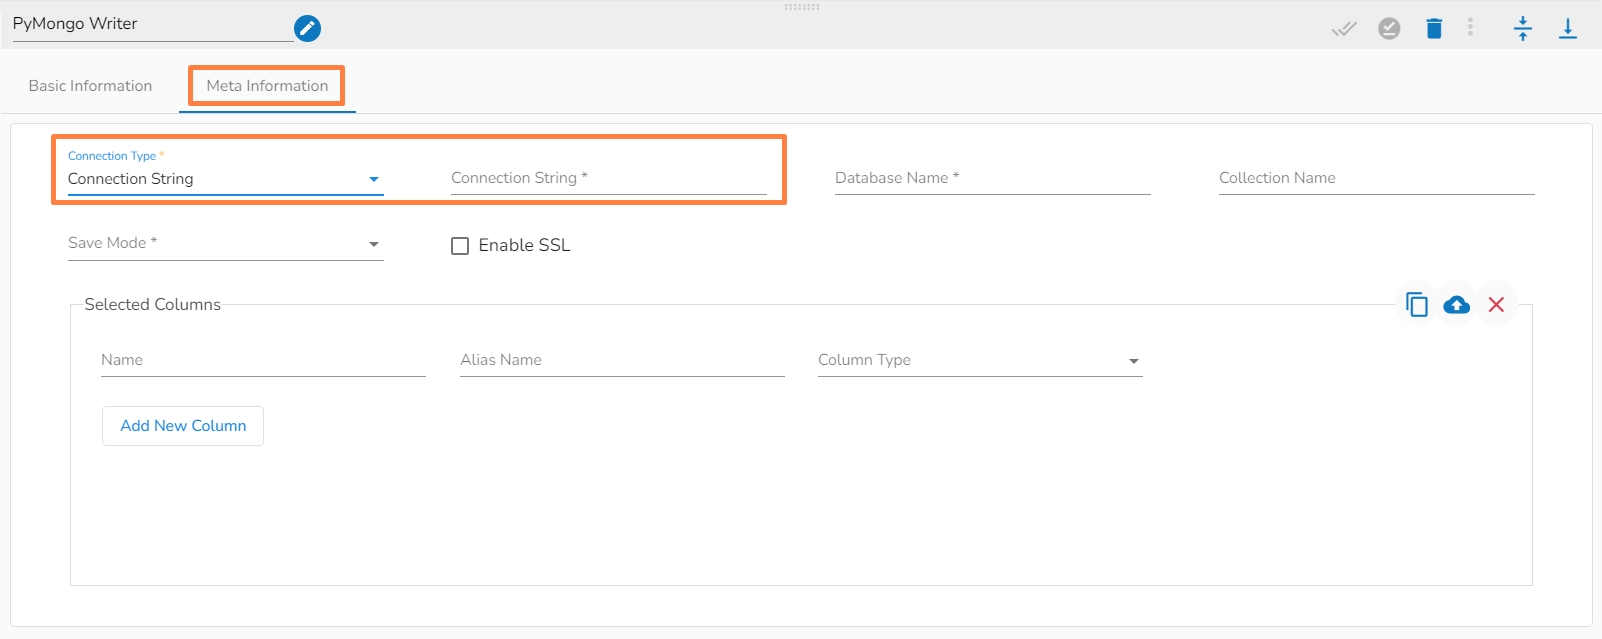
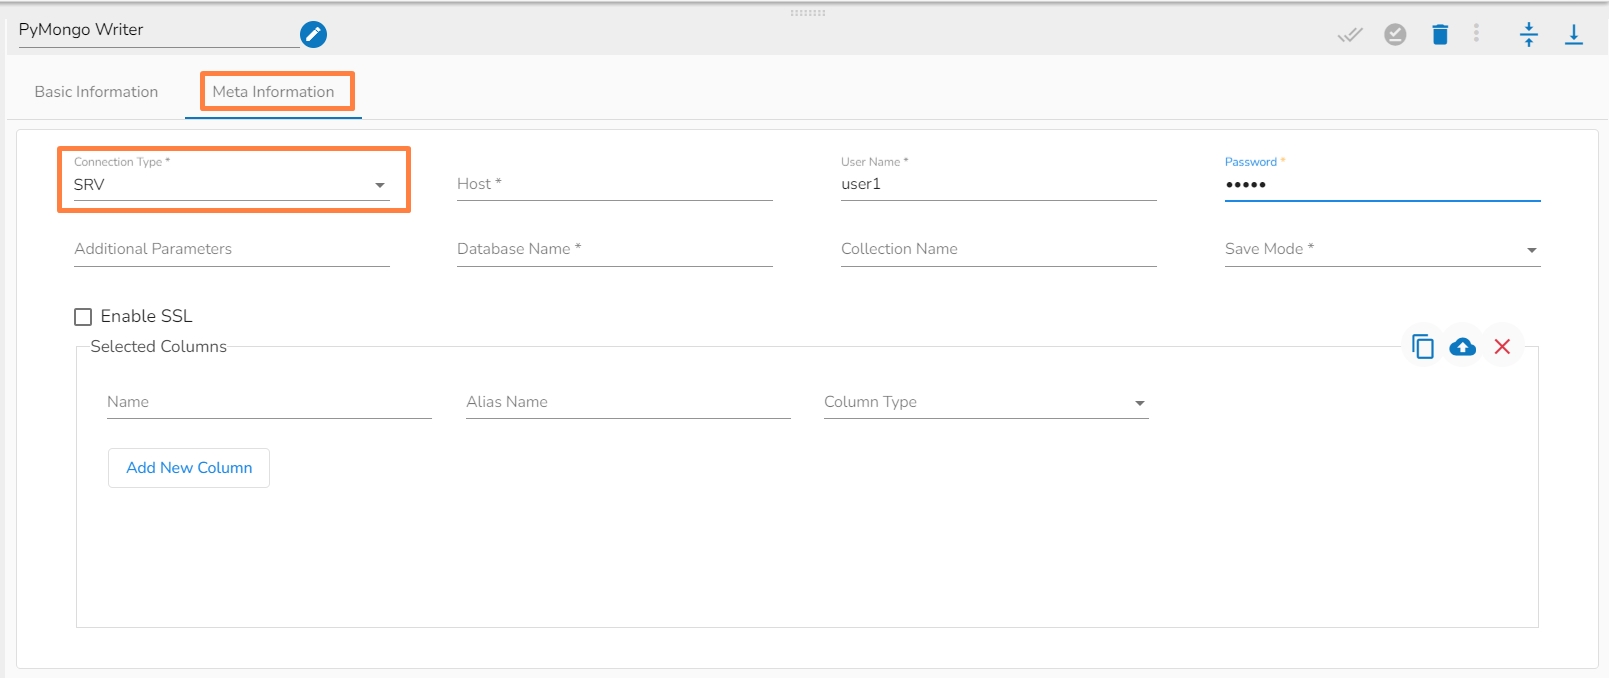
Connection Type: Select either of the options out of ‘Standard’, ‘SRV’, and ‘Connection String’ connection types.
Port number(*): Provide the Port number (It appears only with the ‘Standard’ connection type).
Host IP Address(*): IP address of the host.
Username(*): Provide username.
Password(*): Provide a valid password to access the MongoDB.
Database Name(*): Provide the name of the database where you wish to write data.
Collection Name (*): Provide the name of the collection.
Save Mode: Select an option from the drop-down menu (the supported options are Upsert and Append).
Enable SSL: Check-in this box to enable SSL feature for PyMongo writer.
Composite Keys (*): This field appears only when the selected save mode is ‘Upsert’. The user can enter multiple composite keys separated by commas on which the 'Upsert' operation has to be done.
Additional Parameters: Provide details of the additional parameters.
Connection String (*): Provide a connection string.
The Meta Information fields vary based on the selected Connection Type option.
The users can select some specific columns to change the column name or data type while writing it to the collection. Users have to type the name of the column in the name field that has to be modified. If you went to change the name of the column, then put the name of your choice in the alias name section otherwise keep it the same as of column name. Then select the Column Type from the drop-down menu into which you want to change the datatype of that particular column. Once this is done, while writing the selected column data type and column name will be converted to your given choice.
or
Use the Download Data and Upload File options to select the desired columns.
Upload File: The user can upload the existing system files (CSV, JSON) using the Upload File icon (file size must be less than 2 MB).
Download Data (Schema): Users can download the schema structure in JSON format by using the Download Data icon.
Click the Save Component in Storage icon for the PyMongo Writer component.
A message appears to notify the successful update of the component.
Click on the Activate Pipeline icon.
The pipeline will be activated and the PyMongo writer component will write the in-event data to the given MongoDB collection.
