Alerts
Alert component is designed to send alerts to Microsoft Teams and Slack channels based on incoming records from an event source.
All component configurations are classified broadly into 3 section.
Meta Information
Please go through the below given walk through to configure alert component.
Configuring Meta information of Alert Component

Webhook URL: Provide the Webhook URL of the selected channel group where the Alert message needs to be sent.
Threshold: This field specifies the number of records required from in-event to send an alert to the selected channel group. The component will send an alert to the channel group only after reaching this threshold value. For example, if the threshold value is 100, it will send an alert to the selected channel group once it receives 100 records from the in-event.
Time Interval: This is the time gap in seconds between sending alerts. It is calculated as the difference between the current time and the time when the last alert was sent.
Channel: Select the channel from the drop-down. There are two channels available:
Teams
Slack
Configuring Alerts component when 'Teams' is selected as Channel
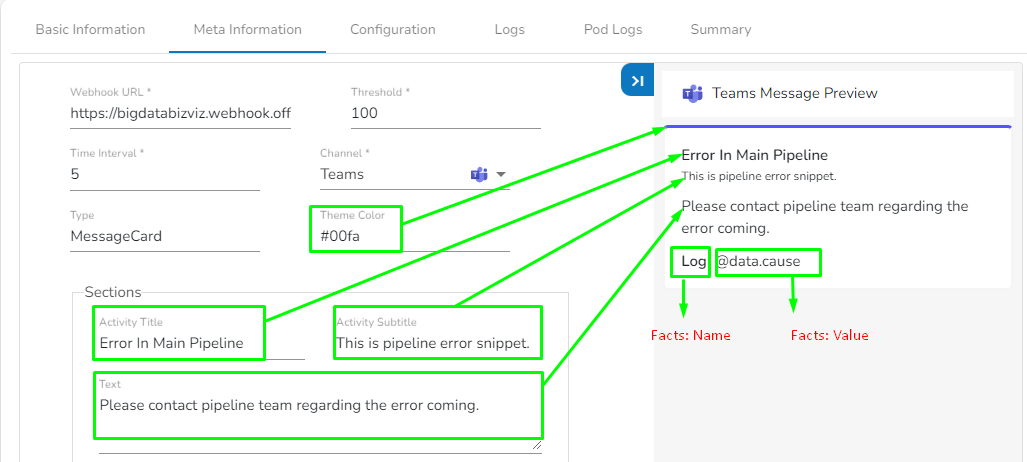
Type: Message Card. (This field will be Pre-filled)
Theme Color: Enter the Hexadecimal color code for ribbon color in the selected channel. Please refer the image given at the bottom of this page for the reference.
Sections: In this tab, the following fields are there:
Activity Title: This is the title of the alert which has to be to sent on the Teams channel. Enter the Activity Title as per the requirement.
Activity Subtitle: Enter the Activity Subtitle. Please refer the image given at the bottom of this page for the reference.
Text: Enter the text message which should be sent along with Alert.
In this section, provide the Name (as per your choice) and the Value. The Value can be either '@data.column_name,' where 'column_name' is the name of the column in the in-event data whose value will be sent along with the alert message, or a custom message of your own. Please refer to the image at the bottom of this page for reference.
Add New Facts: The user can add more facts by clicking on this option.
Add New Section: The user can add more Sections by clicking on this option.
Sample Hexadecimal Color code which can be used in Alerts Component
Configuring Alerts component when 'Slack' is selected as Channel
Webhook URL: Provide the Webhook URL of the selected channel group where the Alert message needs to be sent.
Threshold: This field specifies the number of records required from in-event to send an alert to the selected channel group. The component will send an alert to the channel group only after reaching this threshold value. For example, if the threshold value is 100, it will send an alert to the selected channel group once it receives 100 records from the in-event.
Time Interval: This is the time gap in seconds between sending alerts. It is calculated as the difference between the current time and the time when the last alert was sent.
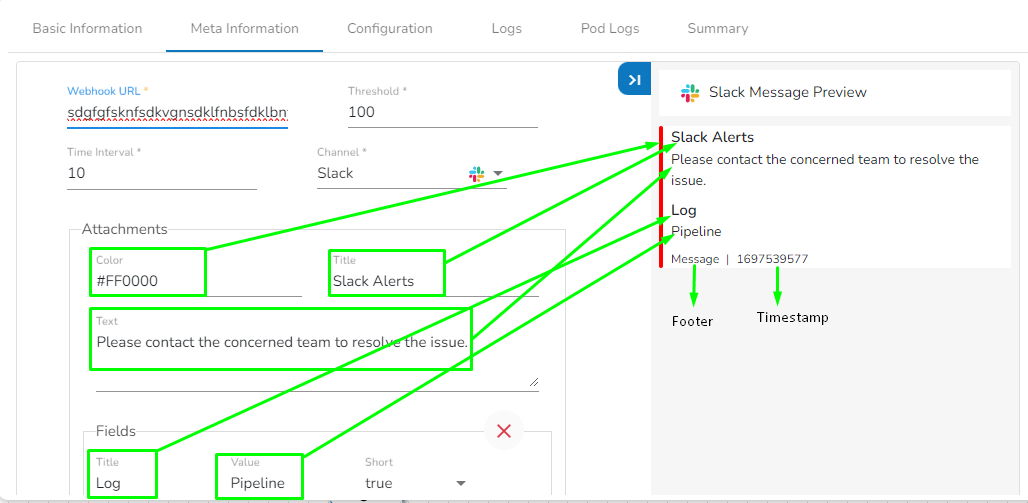
Attachments: In this tab, the following fields are there:
Title: This is the title of the alert which has to be to sent on the selected channel. Enter the Activity Title as per the requirement.
Color: Enter the Hexadecimal color code for ribbon color in the Slack channel. Please refer the image given at the bottom of this page for the reference.
Text: Enter the text message which should be sent along with Alert.
Fields: In this tab, the following fields are there:
Title: The "Title" is a bold, prominent text that serves as the header for a section or block of content within an attachment. It is used to provide context or a brief summary of the information presented in that section. Titles are usually displayed at the top of an attachment.
Value: The "Value" is the main content of a section or block in an attachment. It contains the detailed information related to the title. Values can include text, numbers, links, or other types of data. They are often displayed below the title and provide the core information for a given section.
Short: The "Short" parameter is a Boolean value (typically "true" or "false") that determines whether the title and value should be displayed in a compact or short format. When set to "true," the title and value are displayed side by side, making the content more concise and readable. When set to "false," the title and value are typically displayed in separate lines, providing a more detailed view.
Footer: The "Footer" typically refers to additional information or content appended at the end of a message in a Slack channel. This can include details like a signature, contact information, or any other supplementary information that you want to include with your message. Footers are often used to provide context or additional context to the message content.
Timestamp: The "Timestamp" in a Slack channel usually represents the date and time when a message was posted. It helps users understand when a message was sent. Enter the Timestamp value in seconds. For example. the timestamp value for October 17, 2023 will be 1697540874.
Footer Icon: In Slack, the footer icon refers to an icon or image that is displayed at the bottom of a message or attachment. The footer icon can be a company logo, an application icon, or any other image that represents the entity responsible for the message. Enter image URL as the value of Footer icon.
To set the Footer icon in Slack, follow these steps:
Go to the desired image that has to be used as the footer icon.
Right-click on the image.
Select 'Copy image address' to get the image URL.
Now, the obtained image URL can be used as the value for the footer icon in Slack.
Sample image URL for Footer icon:
Please Note: The second alert will be sent only if it satisfies both the threshold value and the time interval value. The Time Interval value is calculated as the difference between the current time and the time when the last sent alert.