Loading...
Loading...
Loading...
Loading...
Loading...
Loading...
Loading...
Loading...
Loading...
Loading...
Loading...
Loading...
Loading...
Loading...
Loading...
This section includes steps to create various RDBMS Data Connectors.
Check out the illustration provided below on how to create an MySQL data connector.
Please Note: Consider the above illustration as a sample video. The similar steps can be followed to create other connectors under the Database category.
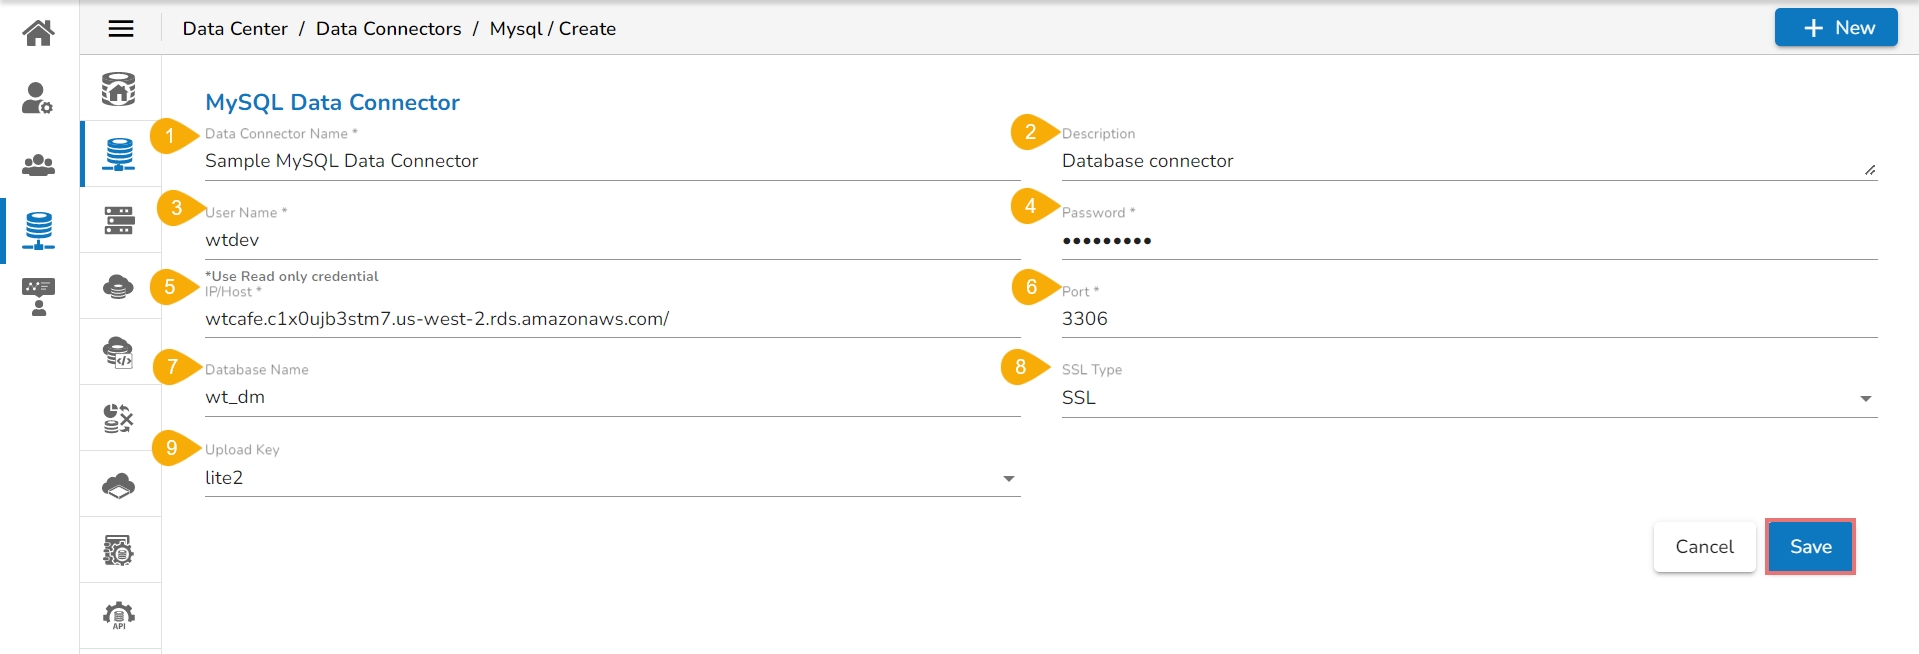
Provide the following information to create a MySQL Data Connector:
Data Connector Name: Provide a user-defined name to identify the data connector.
Description: Describe about the Data Connector.
Username: Enter a Username (It should be the same as given in the connection server).
Password: Enter the Password (It should be the same as provided in the connection server).
IP/Host: Enter database server details (from where the user wants to fetch data).
Port: Provide the server port number.
Database Name: Name of the database where you wish to store data.
SSL Type: Select SSL or Non SSL as choices.
Upload Key: Select a upload key using the drop-down menu.
Click the Save option.
Please Note:
The MySQL Data Connector supports multiple IP/ Host separated by commas.
The MySQL Data Connector supports single Port number.
The Upload Key field appears only if the SSL option is selected for the SSL Type.
A success message appears confirming the connection.
Another success message appears confirming the creation of the Data Connector.
The newly created MySQL data connector gets added to the Data Connectors list.
Please Note: The user can use the following Environment Variables instead of the actual Username and Password to create the MySQL Data Connectors.
Username: @ENV.MYSQLUSERNAME
Password: @ENV.MYSQLPASSWORD
Check out the given walk-through to understand the configuration steps for the Elastic Data Connector.
Navigate to the Data Center homepage.
Click the New menu option.
Click on the Data Connector option from the New menu.
Click on the Elastic connector icon.
The Elastic Connector configuration page opens.
Provide the following information to create an Elastic Data Connector:
Data Connector Name: Provide a user-defined name to identify the data connector.
Description: Provide connection details (Optional).
Authentication Type: Select either Required or Not Required.
Please Note: Based on the selected Authentication Type the rest of the configuration fields appear.
Required: This authentication type suggests secured elastic connection with Username and Password.
Username: Enter a Username (it should be the same as given in the connection server.)
Password: Enter the Password (it should be the same as provided in the connection server.)
IP/HOST: Enter server details (from where the user wants to fetch data).
Port: Provide the server port number. (HTTP port)
Index Id (optional): Enter the Index.
Click the Save option.
A success message appears confirming the connection.
Another success message appears confirming the creation of the Data Connector.
The newly created Elastic data connector gets added to the Data Connectors list.
Please Note: The user can use the following Environment Variables instead of the actual Username and Password to create the Elastic data connector.
Username: @ENV.ELASTICUSERNAME
Password: @ENV.ELASTICPASSWORD
Provide the following information to create an MSSQL Data Connector:
Data Connector Name: Provide a user-defined name to identify the data connector.
Description: Provide connection details (Optional)
Username: Enter a Username (It should be the same as given in the connection server).
Password: Enter the Password (It should be the same as provided in the connection server).
IP/Host: Enter database server details (from where the user wants to fetch data).
Port: Provide the server port number.
Database Name: Name of the database where you wish to store data.
Click the ‘Save’ option.
A success message appears to confirm the connection.
Another success message appears to assure the creation of the new MSSQL Data Connector.
The newly created MSSQL data connector gets added to the Data Connectors list.
Please Note: The user can use the following Environment Variables instead of the actual Username and Password to create the MSSQL Data Connectors.
Username: @ENV.MSSQLUSERNAME
Password: @ENV.MSSQLPASSWORD
Navigate to the page with all the Data Connector icons and search for Oracle Data connector. Click on the Oracle icon.
A form opens to create Oracle Data Connector. Provide the following information to create an Oracle Data Connector:
Data Connector Name: Provide a user-defined name to identify the data connector.
Description: Provide the connection details (optional).
Username: Enter a Username (It should be the same as given in the connection server).
Password: Enter the Password (It should be the same as provided in the connection server).
IP/Host: Enter database server details (from where the user wants to fetch data).
Port: Provide the server port number.
SID Service Name: Provide the unique alias used for the database (when connecting).
Click the ‘Save’ option.
The success messages appear to confirm the connection and creation of the new Oracle data connector.
The newly created Oracle data connector gets added to the Data Connectors list.
Please Note: The user can use the following Environment Variables instead of the actual Username and Password to create the Oracle Data Connectors.
Username: ENV.ORACLEUSERNAME
Password: ENV.ORACLEPASSWORD
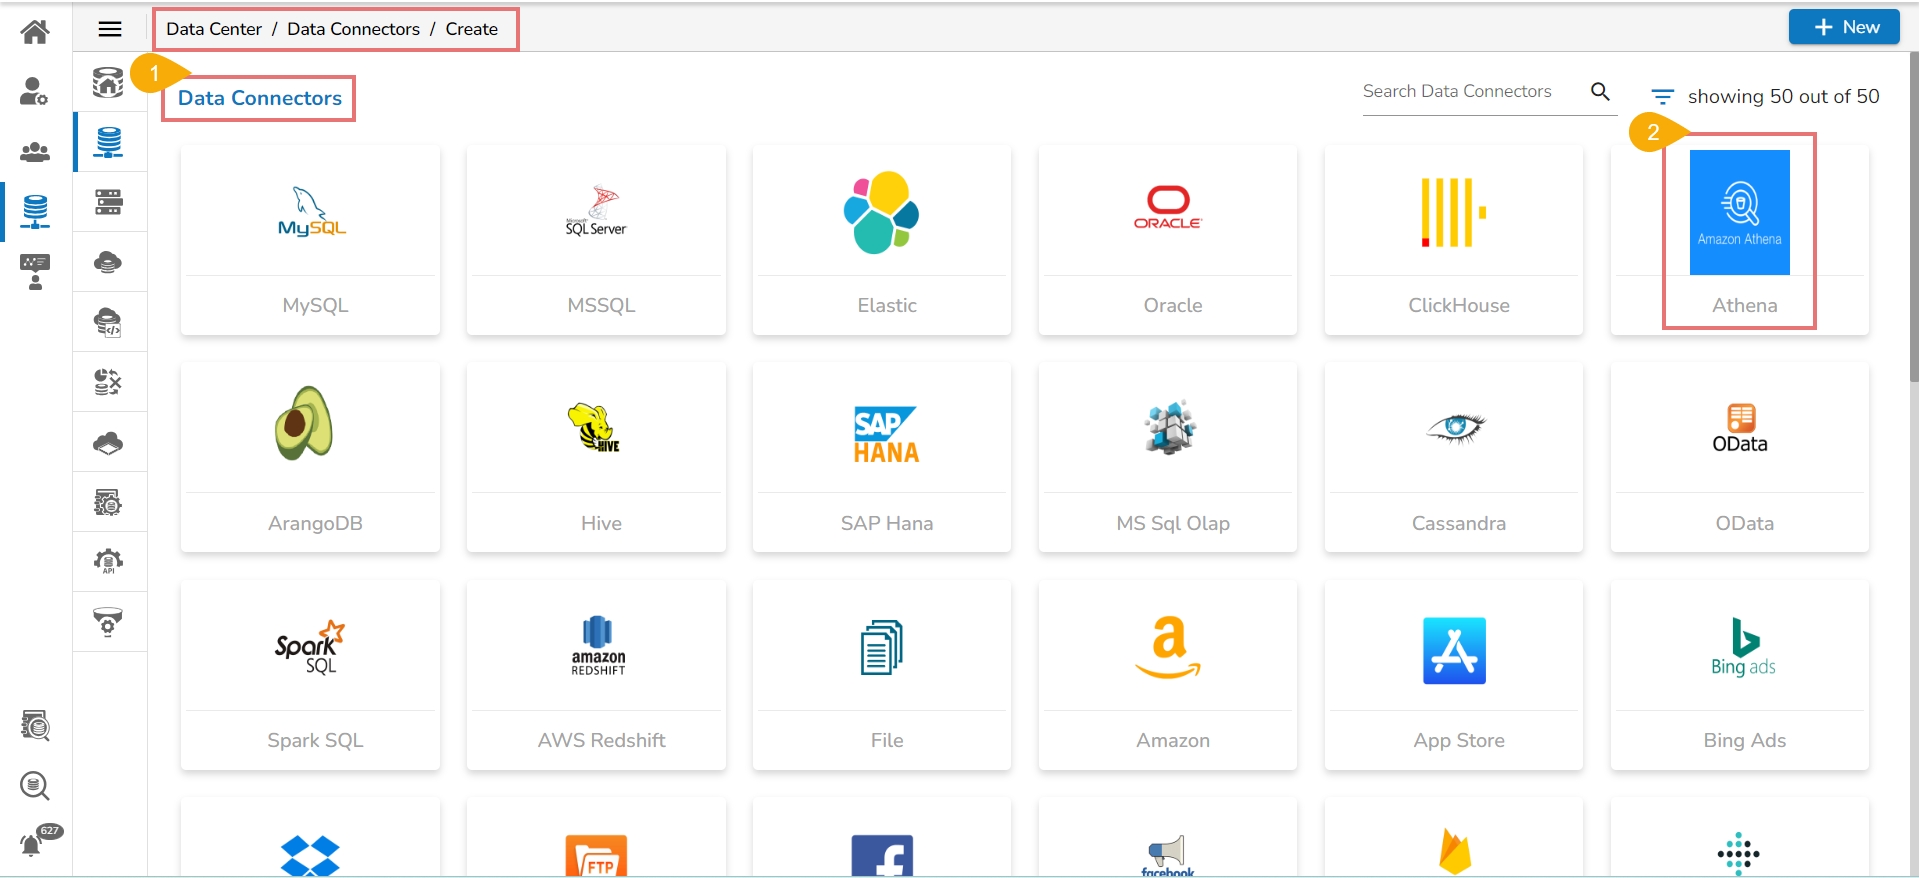
Navigate to the page with all the Data Connector icons and search for Athena Data connector.
Click on the Athena icon.
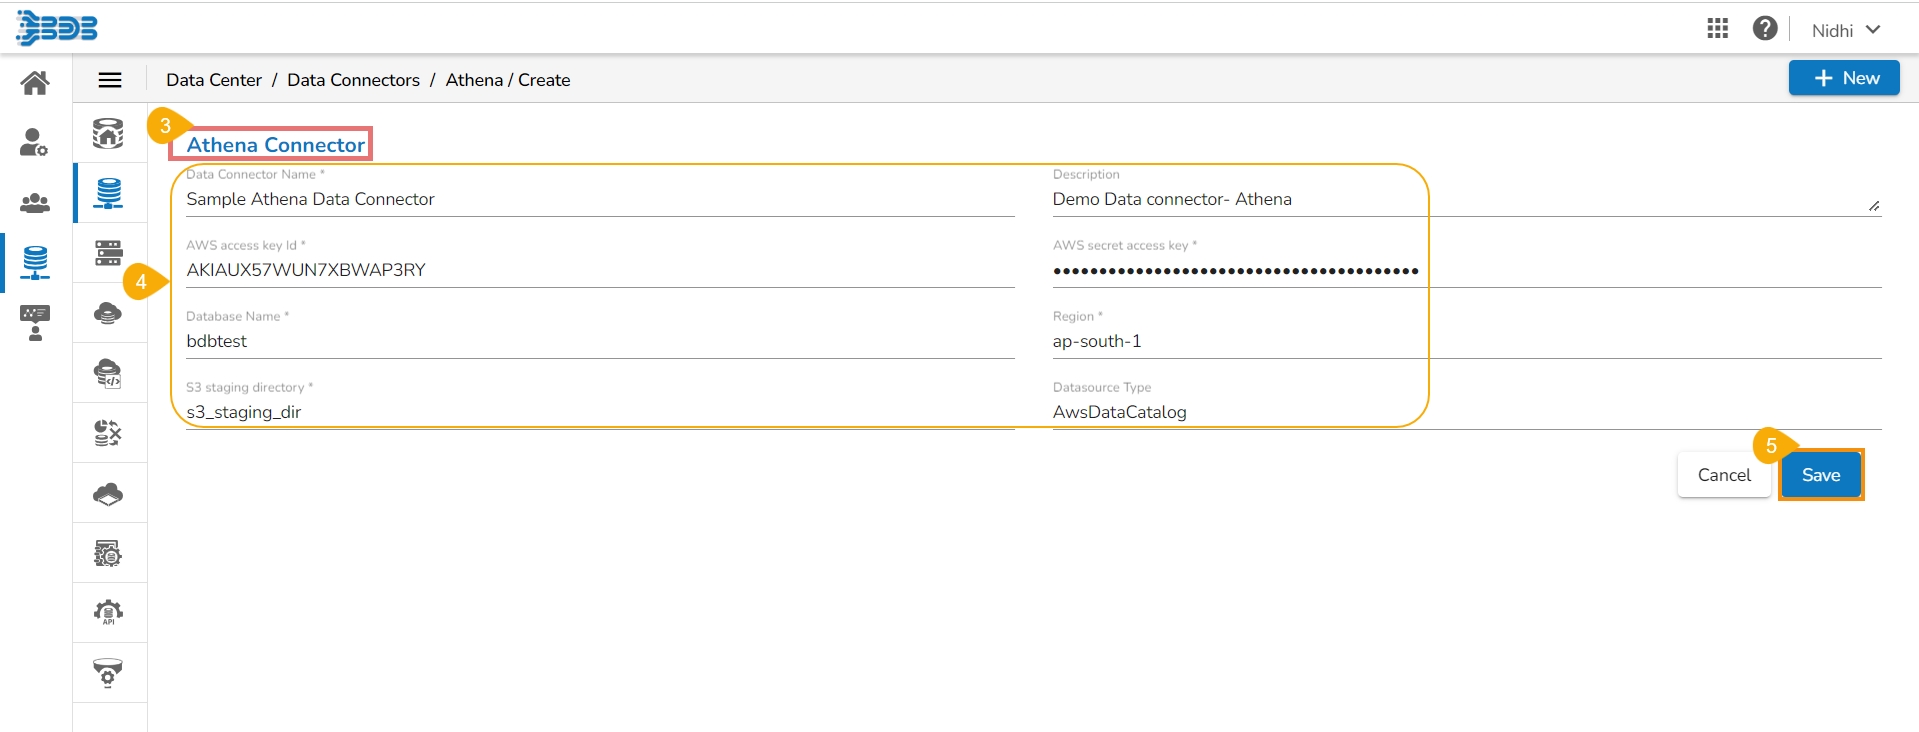
The Create page for the Athena Connector opens.
Provide the following information:
Data Connector Name
Description
AWS Access Key Id
AWS Secret Access Key
Database Name
Region
S3 Staging Directory
Data source Type
Click the Save option.
A success notification appears to ensure the connection establishment.
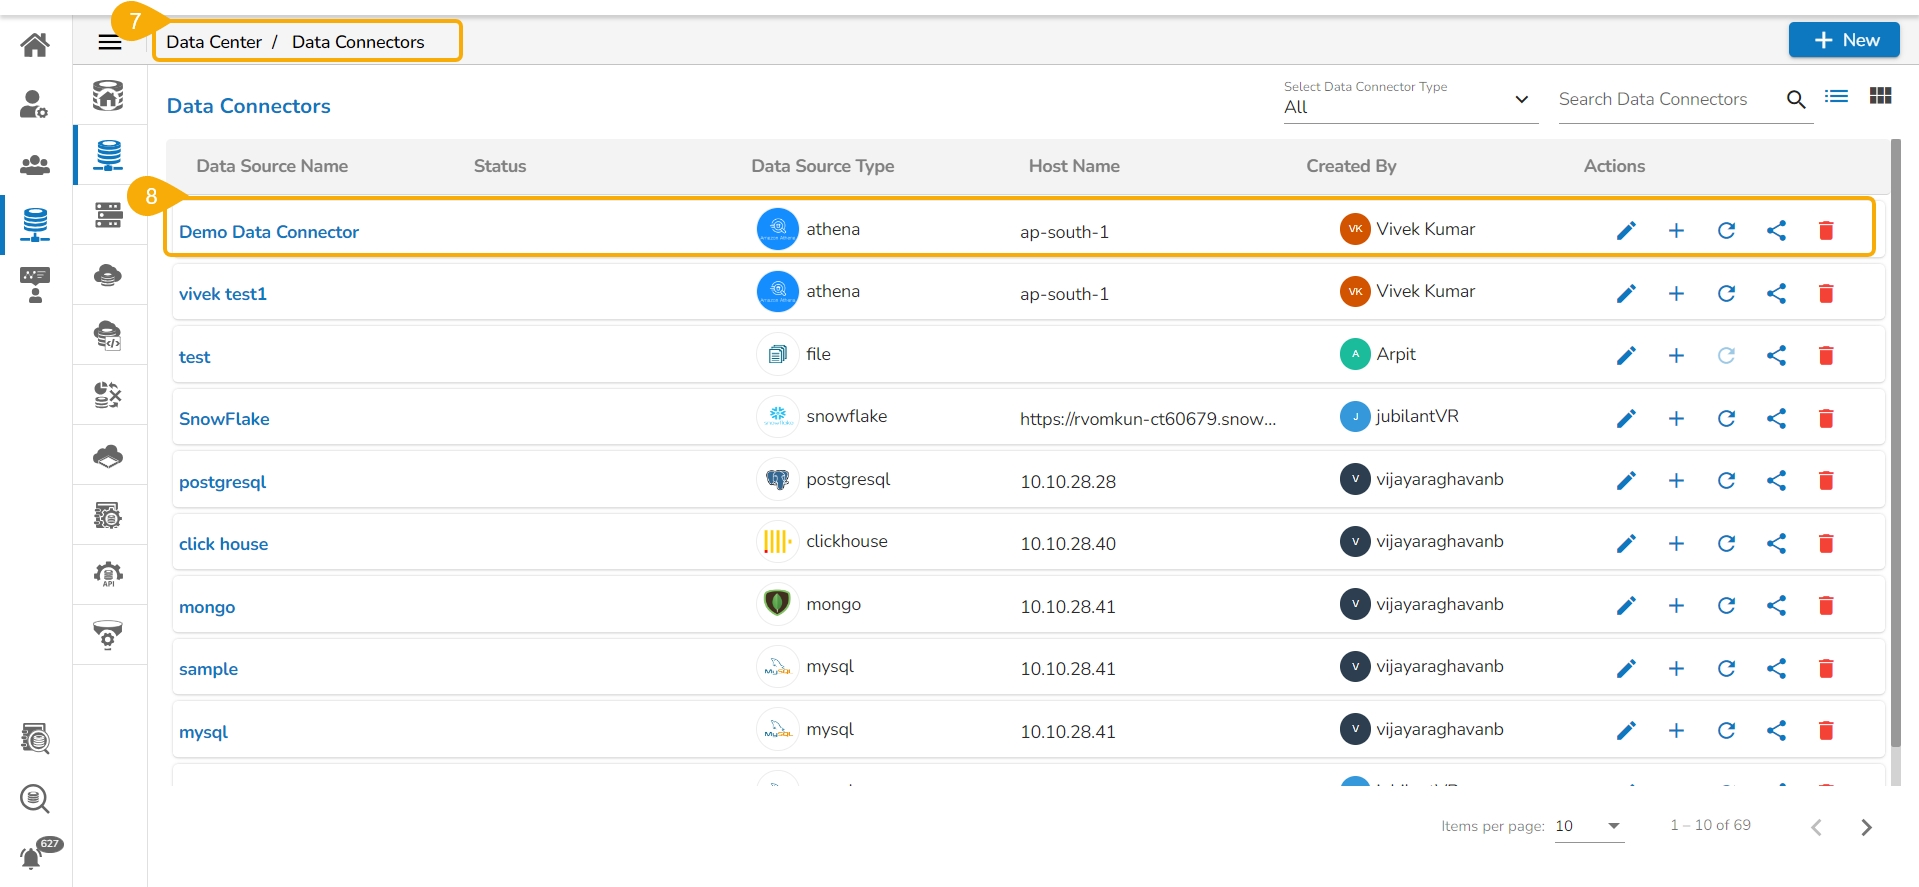
The user gets redirected to the Data Connectors page.
The newly created Athena Data Connector gets added at the top of the list.
Provide the following information to create a Hive Data Connector:
Data Connector Name: Provide a user-defined name to identify the data connector.
Description: Provide the connection details (optional).
Username: Enter a Username (It should be the same as given in the connection server).
Password: Enter the Password (It should be the same as provided in the connection server).
IP/Host: Enter database server details (from where the user wants to fetch data).
Port: Provide the server port number.
Database Name: Provide name of the database from where the connection needs to be established.
Click the Save option.
The notification message appears to confirm the connection.
Another notification message appears to inform about the data connector creation.
The newly created Hive data connector gets added to the Data Connectors list.
This page explains the steps to create a new Arango DB Data Connector and a Data Set based on that Data Connector.
Steps to create a new Arango DB Data Connector:
Navigate to the Data Center homepage.
Click the New option.
Select the Data Connector option from the context menu.
The Data Connectors page opens.
You can use the Search bar to search for a specific connector (In this case, Arango).
Click the Arango connector option.
The Arango DB Data Connector page opens.
Provide the following information to create an Arango DB Data Connector:
Data Connector Name: Provide a user-defined name to identify the data connector.
Description: Provide connection details (Optional).
Username: Enter a Username (It should be the same as given in the connection server).
Password: Enter the Password (It should be the same as provided in the connection server).
IP/Host: Enter database server details (from where the user wants to fetch data).
Port: Provide the server port number.
Database Name: Name of the database where you wish to store data.
Click the Save option.
A success message appears confirming the connection.
Another success message appears confirming the creation of the Data Connector.
The newly created Arango DB data connector gets added to the Data Connectors list.
Navigate to the Data Center homepage.
Click the New option.
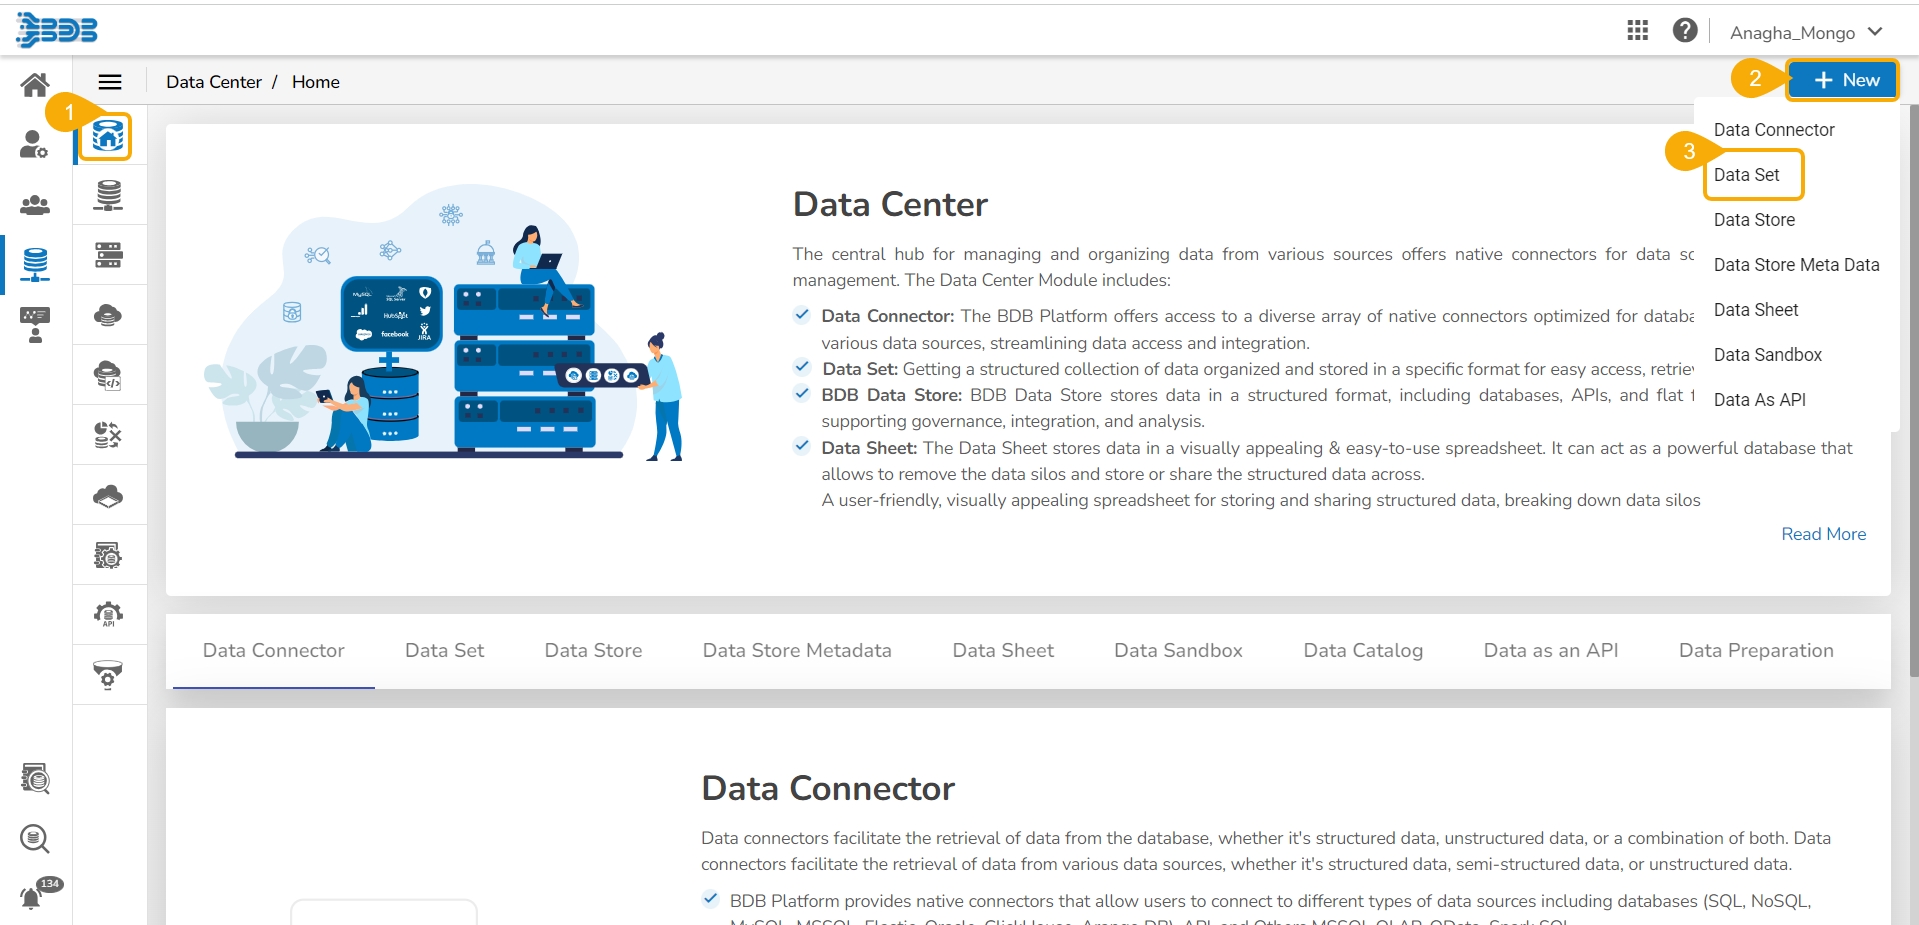
Select the Data Set option from the context menu.
The Data Connectors list gets displayed with the Create Data Set Action icon (+) for all the available data connectors.
Select a Data Connector and click on the Create Data Set icon (E.g., the arangoDB Connector is selected in the given image).
Please Note: You may also follow the below-given steps.
You can select the Arango DB Connector from the Data Source filter.
Search and select a data connector from the displayed list of Data Connectors.
Click the Action/ Create Data Set (+) icon provided in the same row of the selected data connector.
The Data Set page opens with the following Configuration fields:
Service Name: Enter any user-defined name for the new data set.
Description: Provide a brief description of the Data Set (optional).
Data Connector Name: This is a pre-defined field based on the selected data connector.
Database Name: This is a pre-defined field based on the data connector chosen earlier.
Query: Write a valid query service in the given space.
Table Information: On the right side of the page Table information is displayed and that will contain all the tables in the Database and the Column name in the table. Double click in the Table or Column will auto-generate a sample query so that the user can validate and get data.
Click the Validate option to execute the new Data Set.
If the query contains filters, then the right-side filter column will appear.
Click on the Continue button then the query will execute.
A message appears to inform the successful execution.
The data preview appears at the bottom of the page.
The Save option gets enabled.
A notification message appears to assure completion of the action.
The newly created Data Set gets added to the Data Sets List.
Provide the following information to create a Cassandra Native Data Connector:
Data Connector Name: Provide a user-defined name to identify the data connector.
Description: Provide the connection details (optional).
Username: Enter a Username (It should be the same as given in the connection server).
Password: Enter the Password (It should be the same as provided in the connection server).
IP/Host: Enter database server details (from where the user wants to fetch data).
Port: Provide the server port number.
Default Key-Space Name: Enter the default keyspace name.
Consistency: Select a consistency option from the drop-down list (One/ Two/ Three/ Quorum).
Click the ‘Save’ option.
The success messages appear to confirm the connection and creation of the new data connector.
The newly created Cassandra Native Data Connector gets added to the Data Connectors list.
The following set of steps displays how to create a Mongo DB Data Connector:
Select the MongoDB connector icon from the Data Connector page.
The MongoDB Connector page opens.
Provide a name for the data connector.
Add Data Connector Description.
Provide the following information:
Connector Type: Select an option out of Standard or SRV
Username
Password
IP/Host address
Port number
Database Name
SSL Type: Select either of the choice out of SSL or NON SSL
Click the Save icon.
Please Note:
MongoDB supports the Authsource in Database field to authenticate the user.
The MongoDB Data Connector supports multiple IP/ Host separated by commas.
The MongoDB Data Connector supports multiple Port numbers.
Check out the following images to get an idea of the required fields while choosing the SRV Connection Type option:
A success message appears, and the newly created Mongo DB Connector gets added to the Data Connectors list.
Navigate to the page with all the Data Connector icons and search for Oracle Data connector. Click on the ClickHouse icon.
Provide the following information to create a ClickHouse Data Connector:
Data Connector Name: Provide a user-defined name to identify the data connector.
Description: Provide connection details (Optional).
Username: Enter a Username (It should be the same as given in the connection server).
Password: Enter the Password (It should be the same as provided in the connection server).
IP/Host: Enter database server details (from where the user wants to fetch data).
Port: Provide the server port number. (TCP port)
Database Name: Name of the database where you wish to store data.
Http Port: (For Datastore purpose)
SSL Type: Select SSL or Non SSL as choices.
Upload Key: Select a upload key using the drop-down menu (This field appears only if the SSL option has been selected for the SSL Type field.
Click the Save option.
A success message appears confirming the connection.
Another success message appears confirming the creation of the Data Connector.
The newly created ClickHouse data connector gets added to the Data Connectors list.
Please Note:
The user can use the Environment Variables instead of the actual Username and Password to create the ClickHouse Data Connectors.
The user needs to pass two Port numbers as listed below:
TCP Port Number
Http Port Number


The following set of steps displays how to create a PostgreSQL Data Connector:
Click the ‘PostgreSQL’ Data Connector icon from the Data Connector page.
The PostgreSQL Data Connector page opens.
Provide a name for the data connector.
Describe the data connection.
Provide the following information:
Username
Password
IP/Host
Port
Database Name
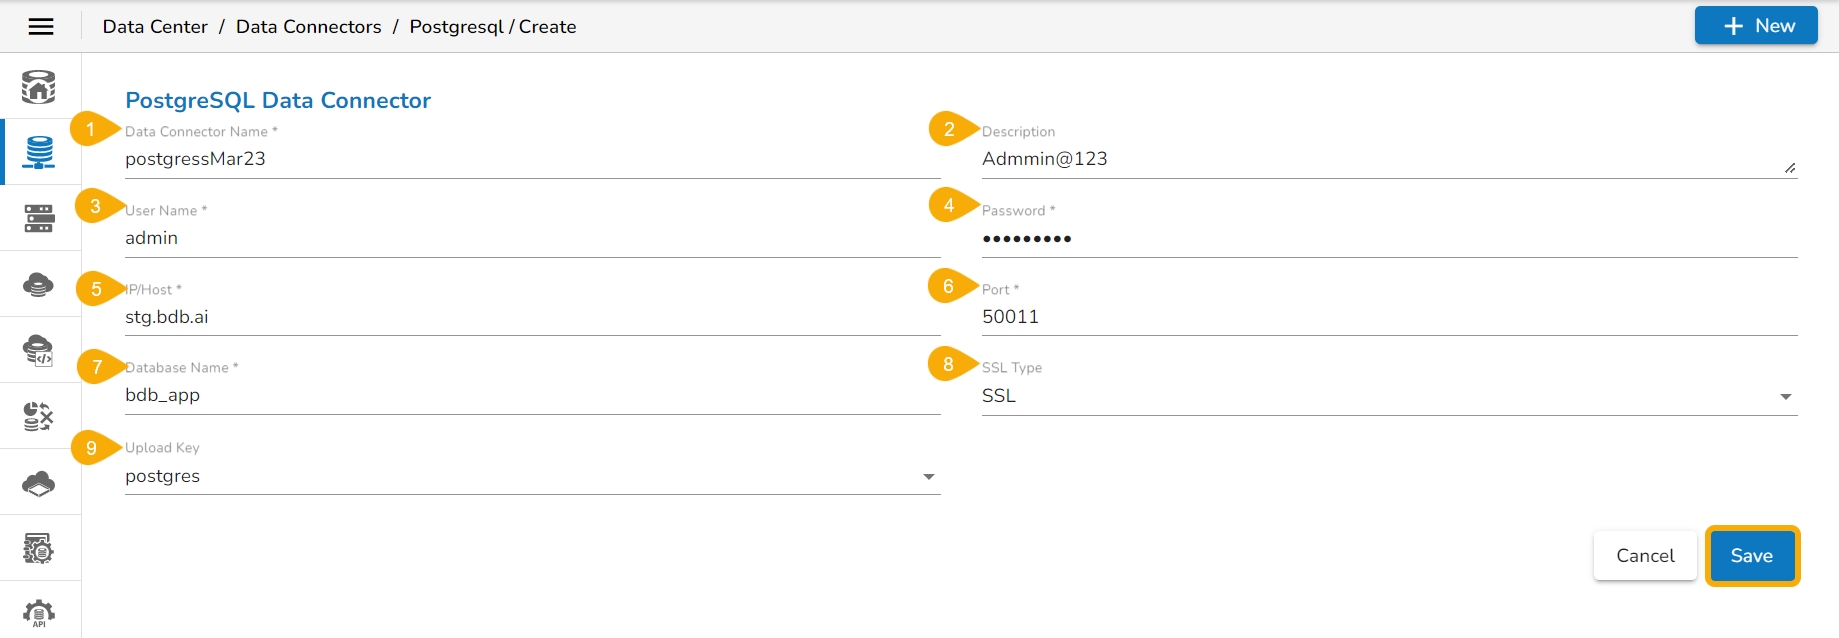
Data Connector Name: Provide a user-defined name to identify the data connector.
Description: Provide connection details (Optional).
Username: Enter a Username (It should be the same as given in the connection server).
Password: Enter the Password (It should be the same as provided in the connection server).
IP/Host: Enter database server details (from where the user wants to fetch data).
Port: Provide the server port number.
Database Name: Name of the database where you wish to store data.
SSL Type: Select SSL or Non SSL as choices.
Upload Key: Select a upload key using the drop-down menu (This field appears only if the SSL option has been selected for the SSL Type field).
Click the Save option.
A success message appears confirming the connection.
A success message appears, and the newly created PostgreSQL data connector gets added to the Data Connectors list..
Please Note:
The PostgreSQL Data Connector supports multiple IP/ Host separated by commas.
The PostgreSQL Data Connector supports single Port number.
The Upload Key field appears only if the selected SSL Type option is SSL.
This page explains steps to create a Pinot Data connector using the Data Center module.
Users can create a Pinot data connector to bring data from the PInot database. The following set of steps displays how to create a Pinot Data Connector:
Click the Pinot Data Connector icon from the Create Data Connector page.
The Pinot Data Connector page opens.
Provide the following information:
Provide the Data Connector name.
Describe the data connection (optional).
Enter the valid username.
Enter the correct password for the selected account.
Provide the IP address or host.
Provide the Port number.
Provide the Database name.
Select an SSL type from using the drop-down menu.
Click the Save option.
The newly created Pinot data connector gets added to the Data Connectors list.
The following set of steps displays how to create a Snowflake Data Connector:
Click the Snowflake Data Connector icon from the Data Connector page.
The Snowflake Connector page opens.
Provide the Data Connector name.
Describe the data connection (optional).
Enter the valid username.
Enter the correct password for the selected account.
Select a type by using the drop-down menu.
Provide the account name.
Provide the Database name.
Provide the Warehouse name.
Click the Save option.
The user gets a notification message appears if the connection gets successfully verified.
Another success message appears to inform you that the Data connector has been created successfully.
The newly created Snowflake Data Connector gets added to the Data Connectors list.
The following set of steps displays how to create a MongoDB for BI data connector:
Select the ‘MongoDB for BI’ connector icon from the Data Connector page.
The ‘MongoDB Connector for BI’ connector page opens.
Provide a name for the data connector.
Provide the following information:
Username
Password
IP/Host address
Port number
Databased Name
Click the ‘Save’ icon.
A success message appears, and the newly created Mongo DB Connector gets added to the Data Connectors list.
A success message appears confirming the connection.
Another success message appears confirming the creation of the Data Connector.


