Loading...
Loading...
Loading...
Loading...
Loading...
Loading...
Loading...
Loading...
Loading...
Loading...
Loading...
Loading...
Loading...
Loading...
Loading...
Loading...
Loading...
Loading...
Loading...
Loading...
Loading...
Loading...
Loading...
Loading...
Loading...
Loading...
Loading...
Loading...
Loading...
Loading...
Loading...
Loading...
Loading...
Loading...
Loading...
Loading...
Loading...
Loading...
Loading...
Loading...
Loading...
Loading...
Loading...
Loading...
Loading...
Loading...
Loading...
Loading...
Loading...
Loading...
Loading...
Loading...
Loading...
Loading...
Loading...
Loading...
Loading...
Loading...
Loading...
Loading...
Loading...
Loading...
Loading...
Loading...
Loading...
Loading...
Loading...
Loading...
Loading...
Loading...
Loading...
Loading...
Loading...
Loading...
Loading...
Loading...
Loading...
Loading...
Loading...
Loading...
Loading...
Loading...
Loading...
Loading...
Loading...
Loading...
Loading...
Loading...
Loading...
Loading...
Loading...
Loading...
Loading...
Loading...
Loading...
Loading...
Loading...
Loading...
Loading...
Loading...
Access native connectors that are built and optimized for various types of data sources. You can use these native connectors to connect to their data sources.
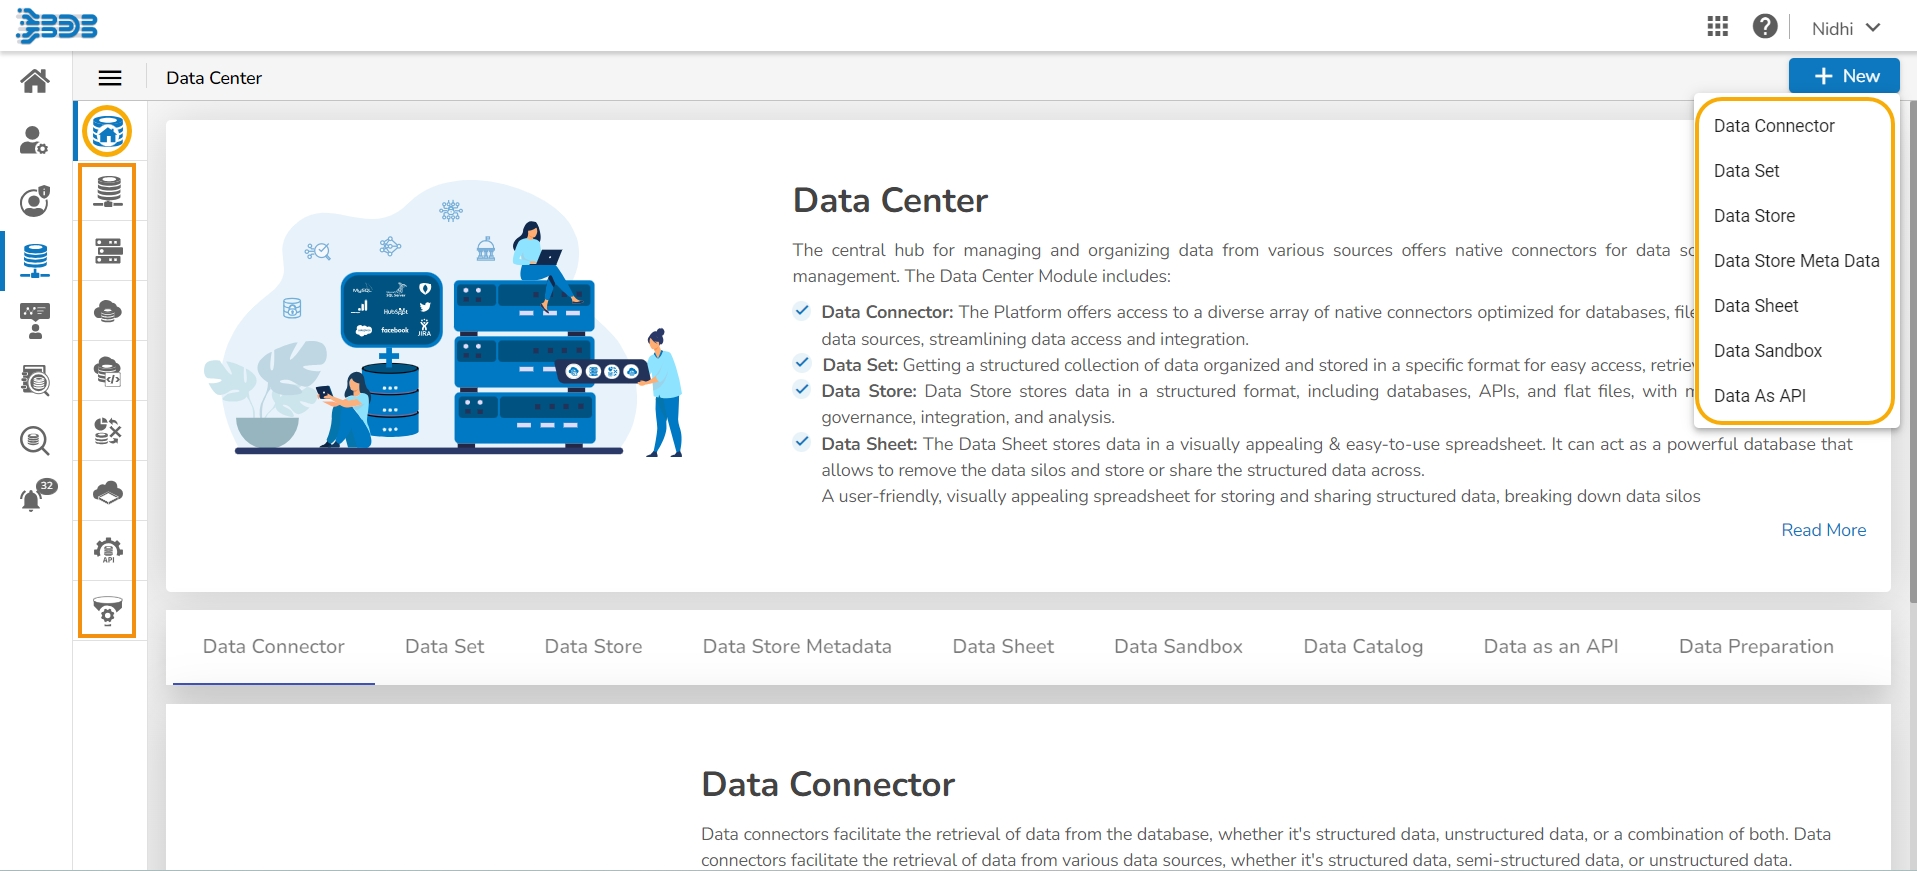
The Data Center module is the heart of the Platform for managing and organizing data from multiple sources.
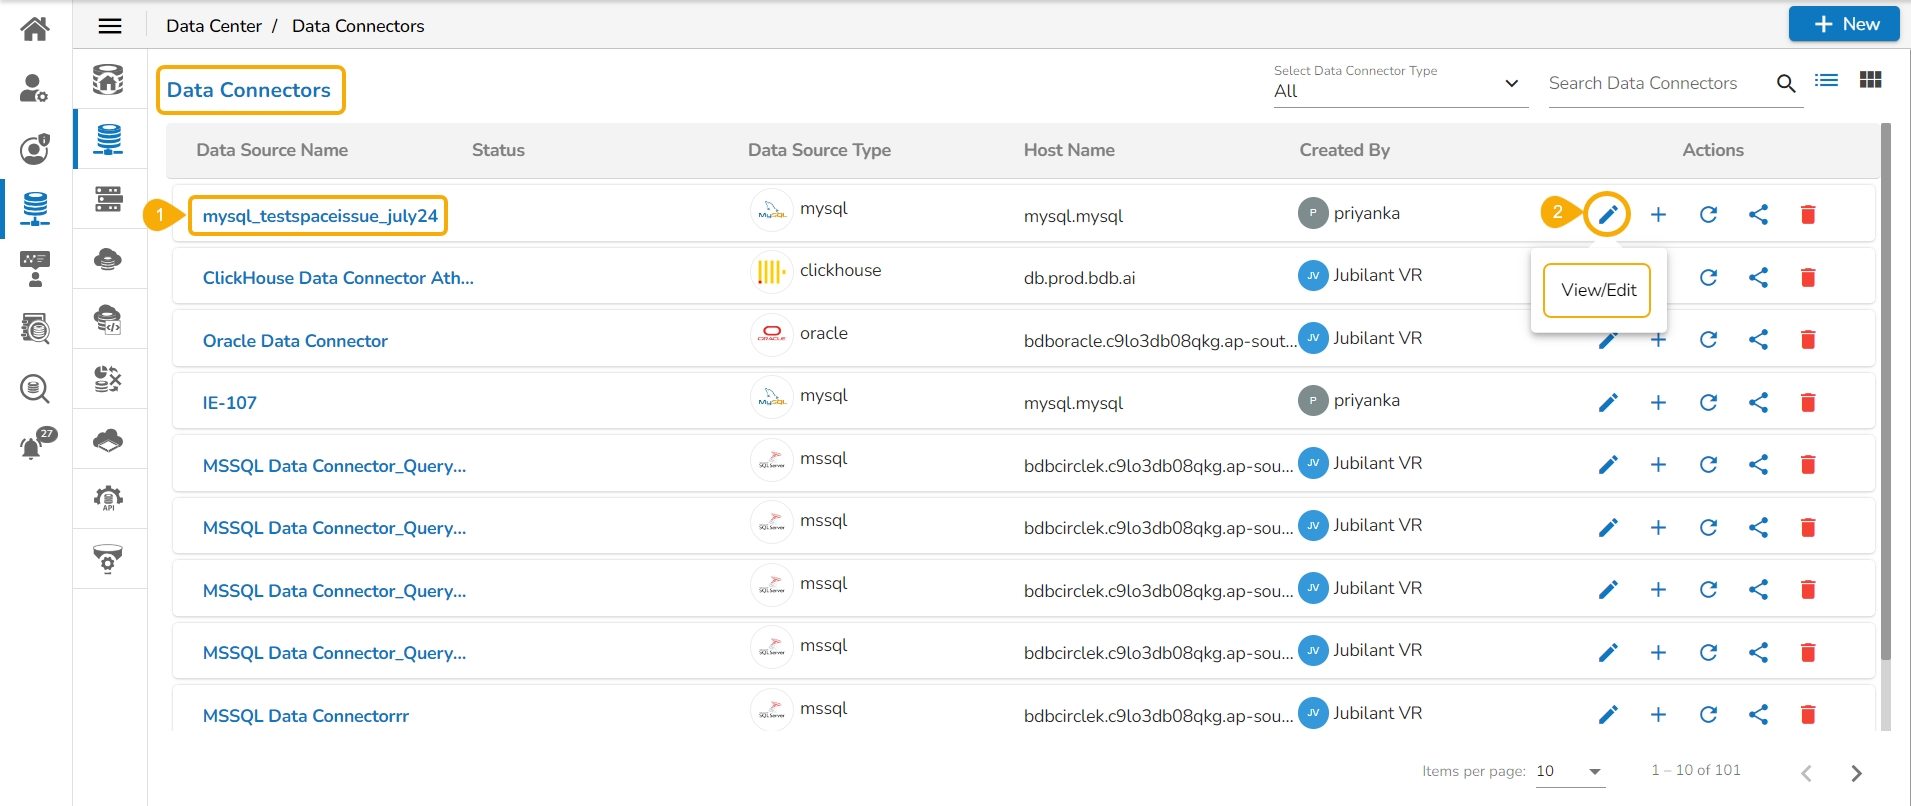
This page aims to explain all the options that are credited to a Data Connector on the List of Data Connectors.
This section aims to explain the steps on how to create API Data connectors.
Get a structured collection of data that is organized and stored in a specific format for easy access, retrieval, and analysis.
The Homepage under the Data Center module provides an overview of all the ongoing data-related processes under the platform.
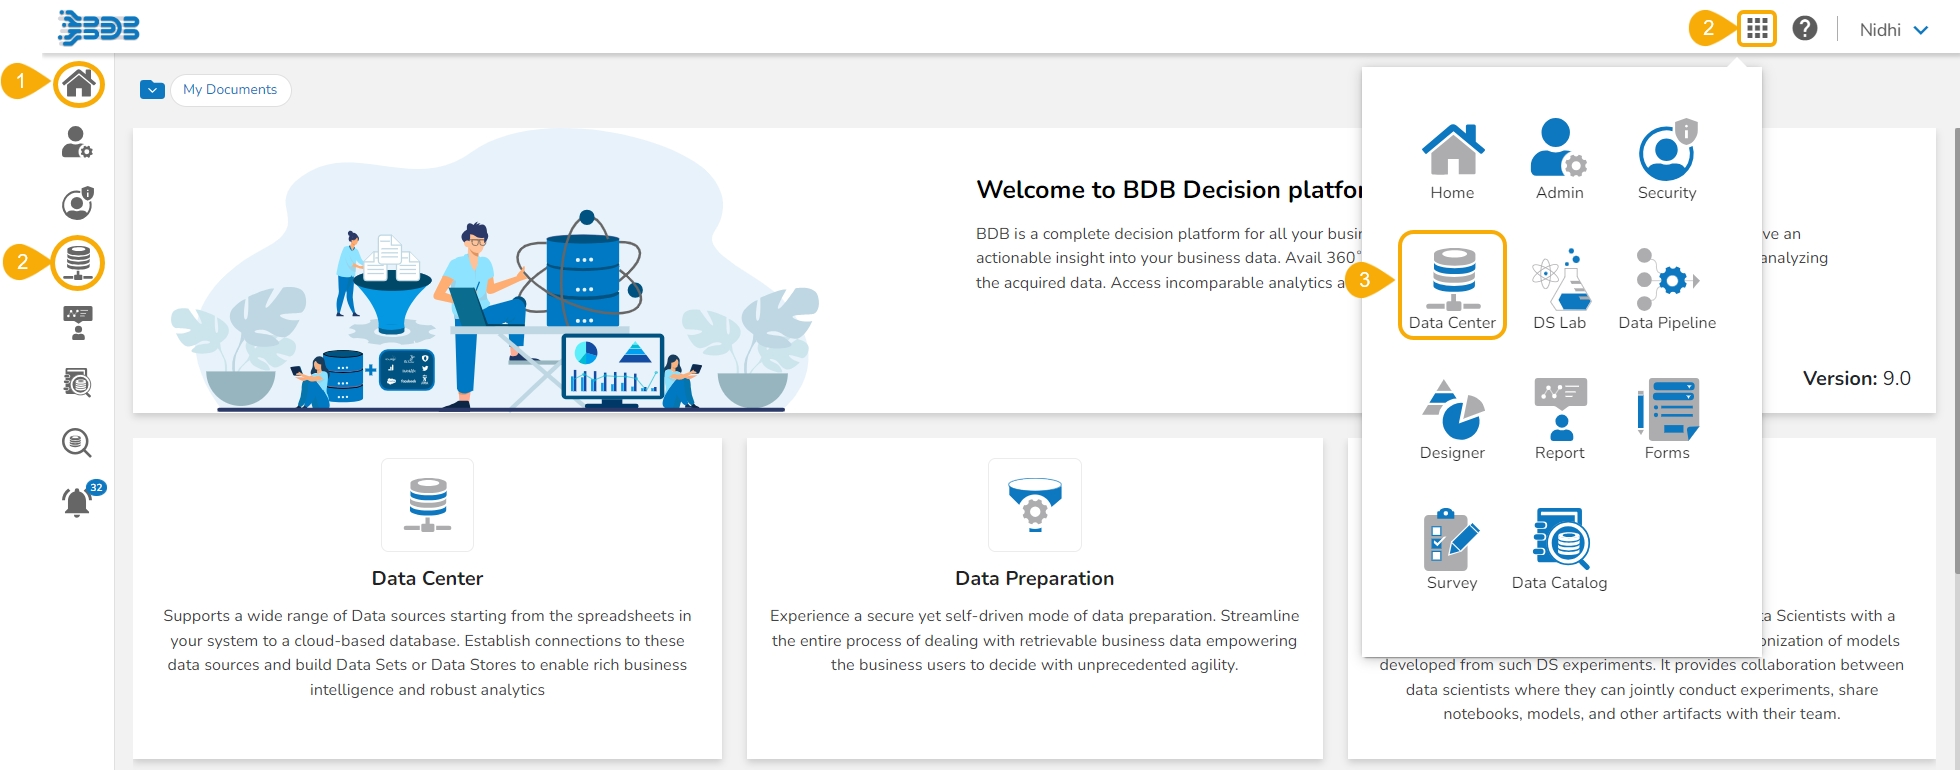
The user can access the Data Center module from the Platform homepage in two ways:
On the Left side Panel of the Platform Homepage.
From the Apps Menu.
Navigate to the Platform homepage.
Click the Data Center icon provided on the left side panel of the Platform homepage.
OR
Open the Apps Menu from the Platform Homepage.
The Homepage of the Data Center module opens by default.
The user can see the New option to create a new Data Connector, Data Set, Data Store, Data Store Meta Data, Data Sheet, Data Sandbox, and Data as API (The list of available options is displayed by clicking the New option).
Select a Data Connector from the Data Connectors list.
Click the View/Edit icon for that Data Connector.
The selected Data Connector opens in the editable format.
Navigate to the Data Connectors list page.
Select a Data Connector from the list.
Click the Delete icon for the selected Data Connector.
This section includes steps to create various RDBMS Data Connectors.
Check out the illustration provided below on how to create an MySQL data connector.
BDB Data Store is a data source for persistently storing collections of data which include repositories like databases, APIs, and Flat files.
Data store metadata plays a crucial role in data governance, data integration, and data analysis processes. It allows users to quickly discover, understand, and utilize the data effectively.
Select the Data Center module from the Apps menu.
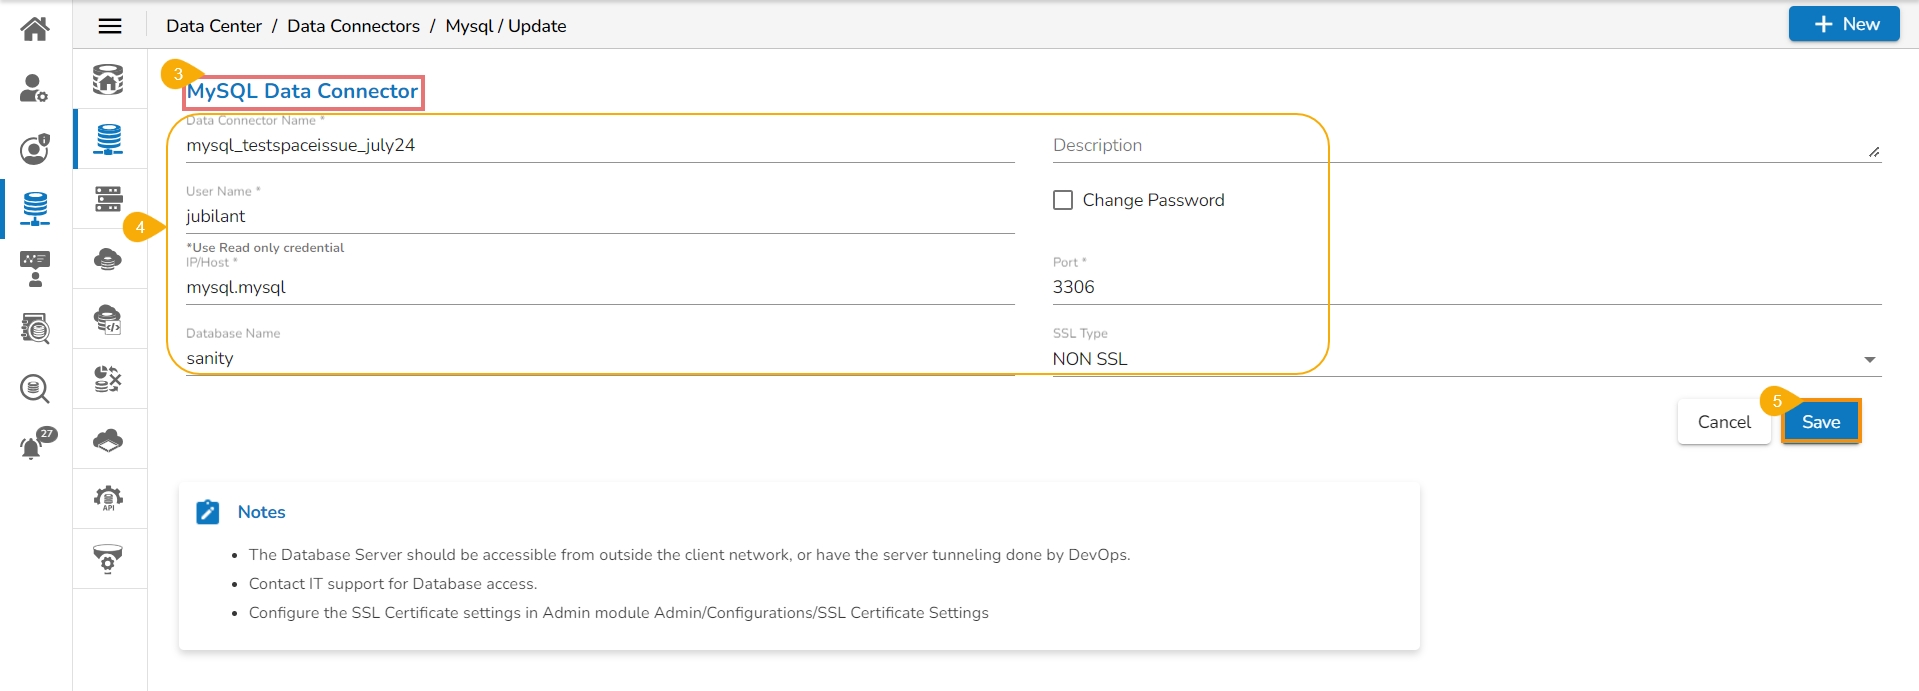
You can edit the permitted information from the Data Connector form. (The editable information may vary based on the categories of the Data Connector).
Click the Save option.
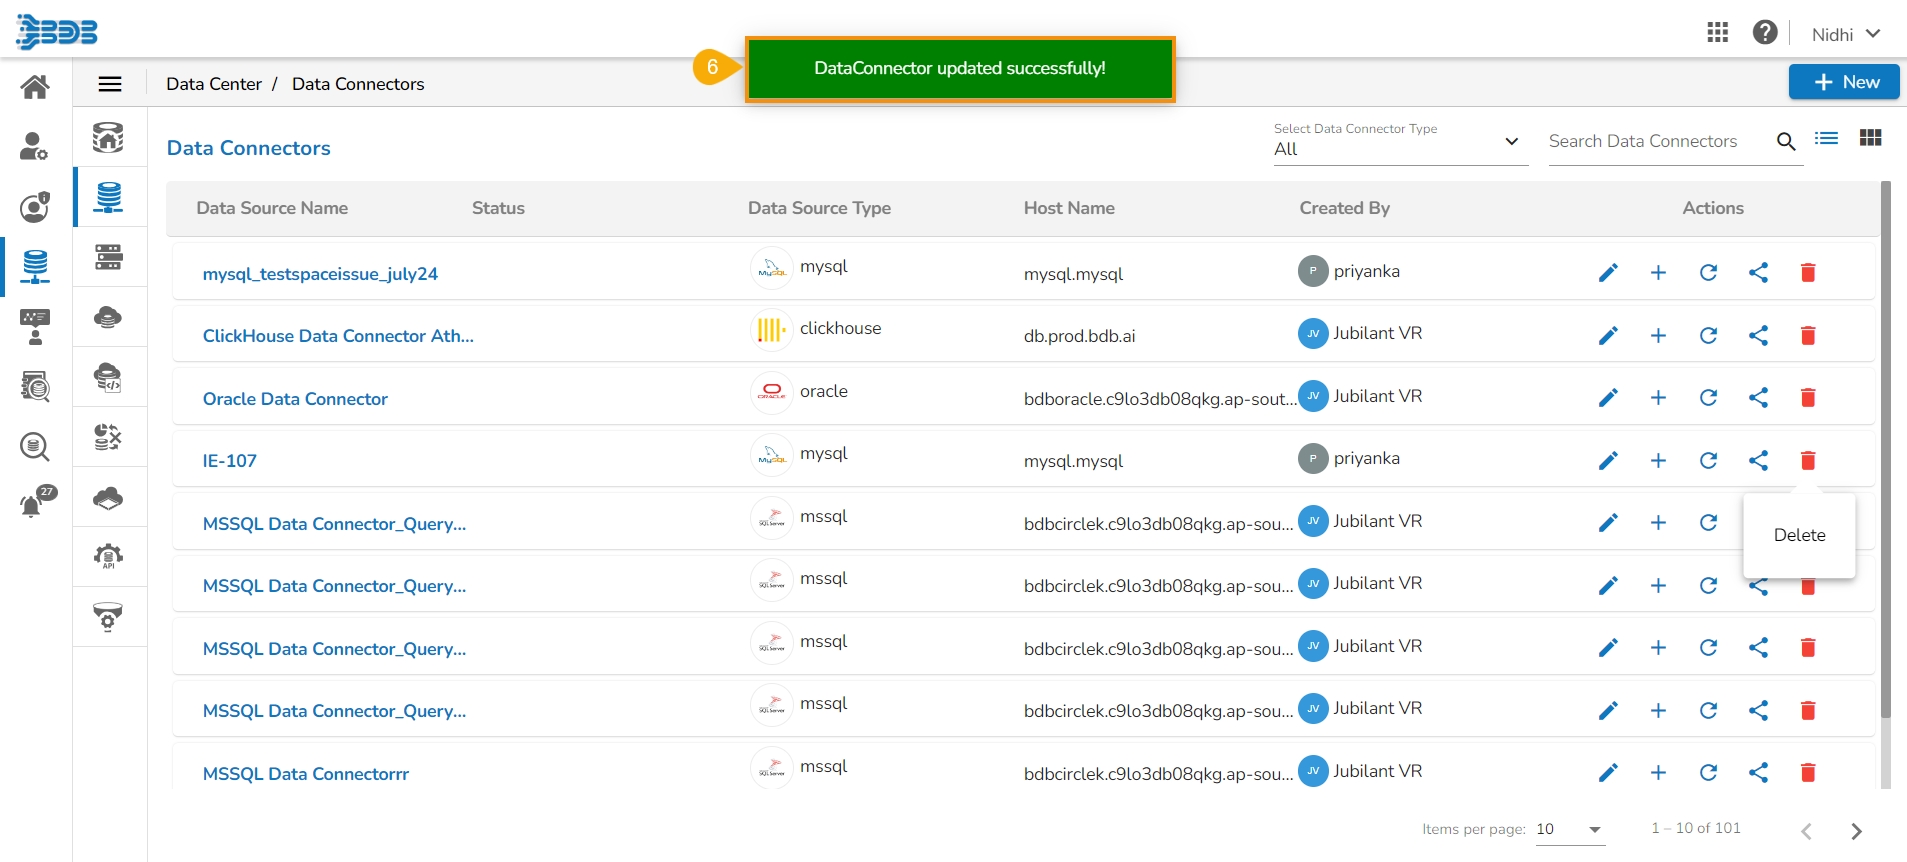
A confirmation message appears, and the selected Data Connector gets updated.
The Remove Connector dialog box opens to confirm the deletion.
Click the Yes option.
A confirmation message appears, and the selected Data Connector gets removed from the Data Connectors list.
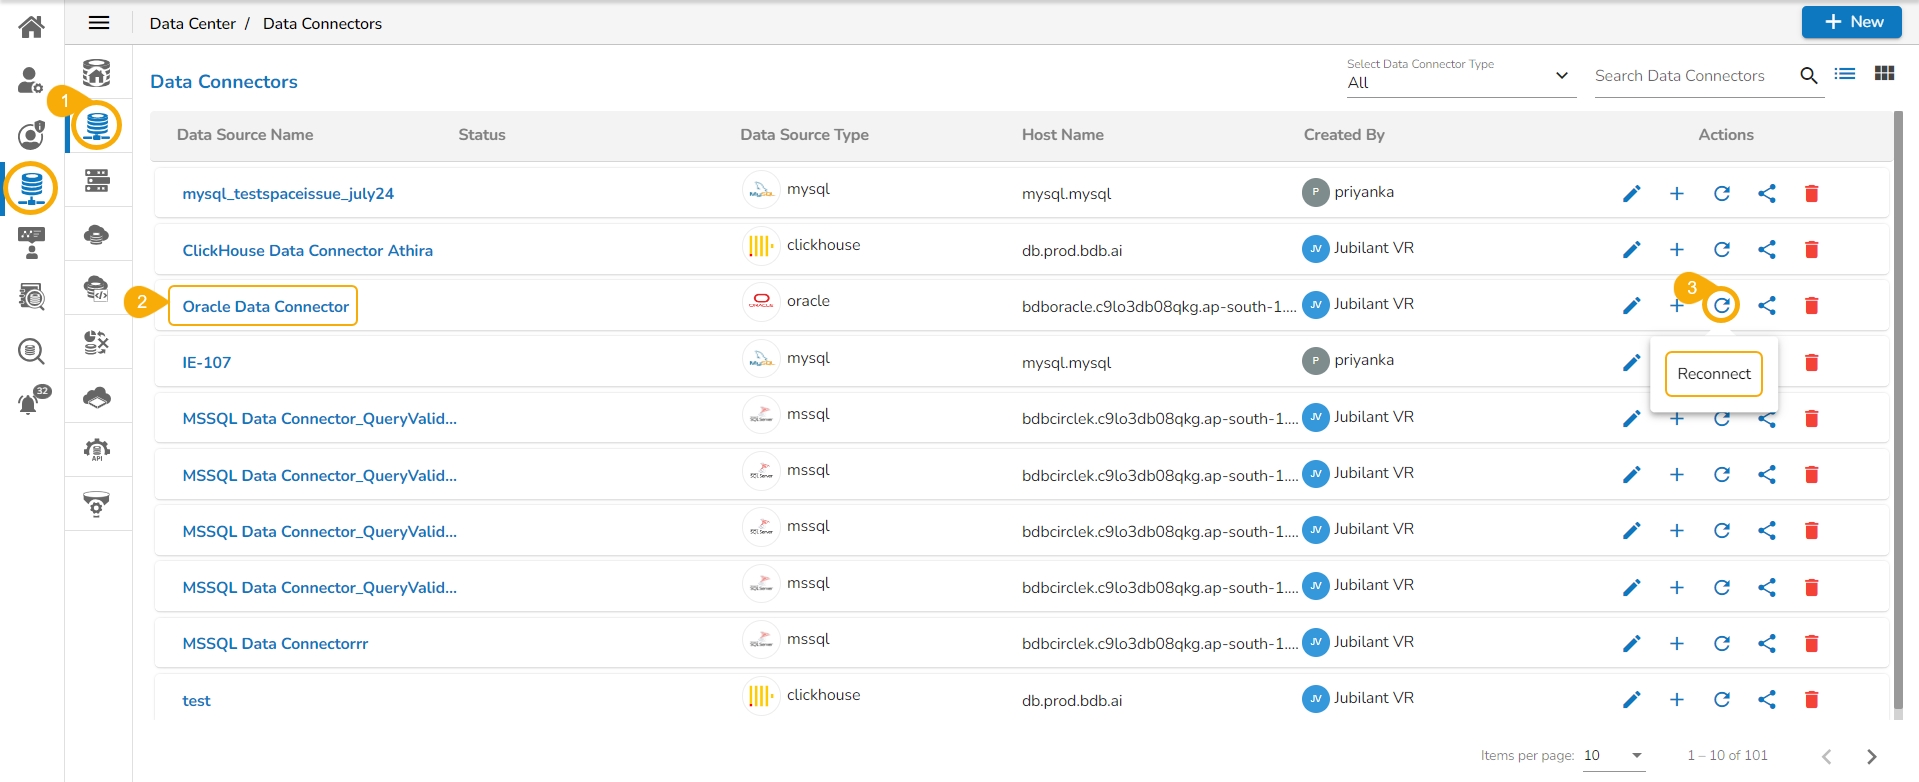
Navigate to the Data Connectors list page.
Select a Data Connector from the list.
Click the Reconnect icon for the selected Data Connector.
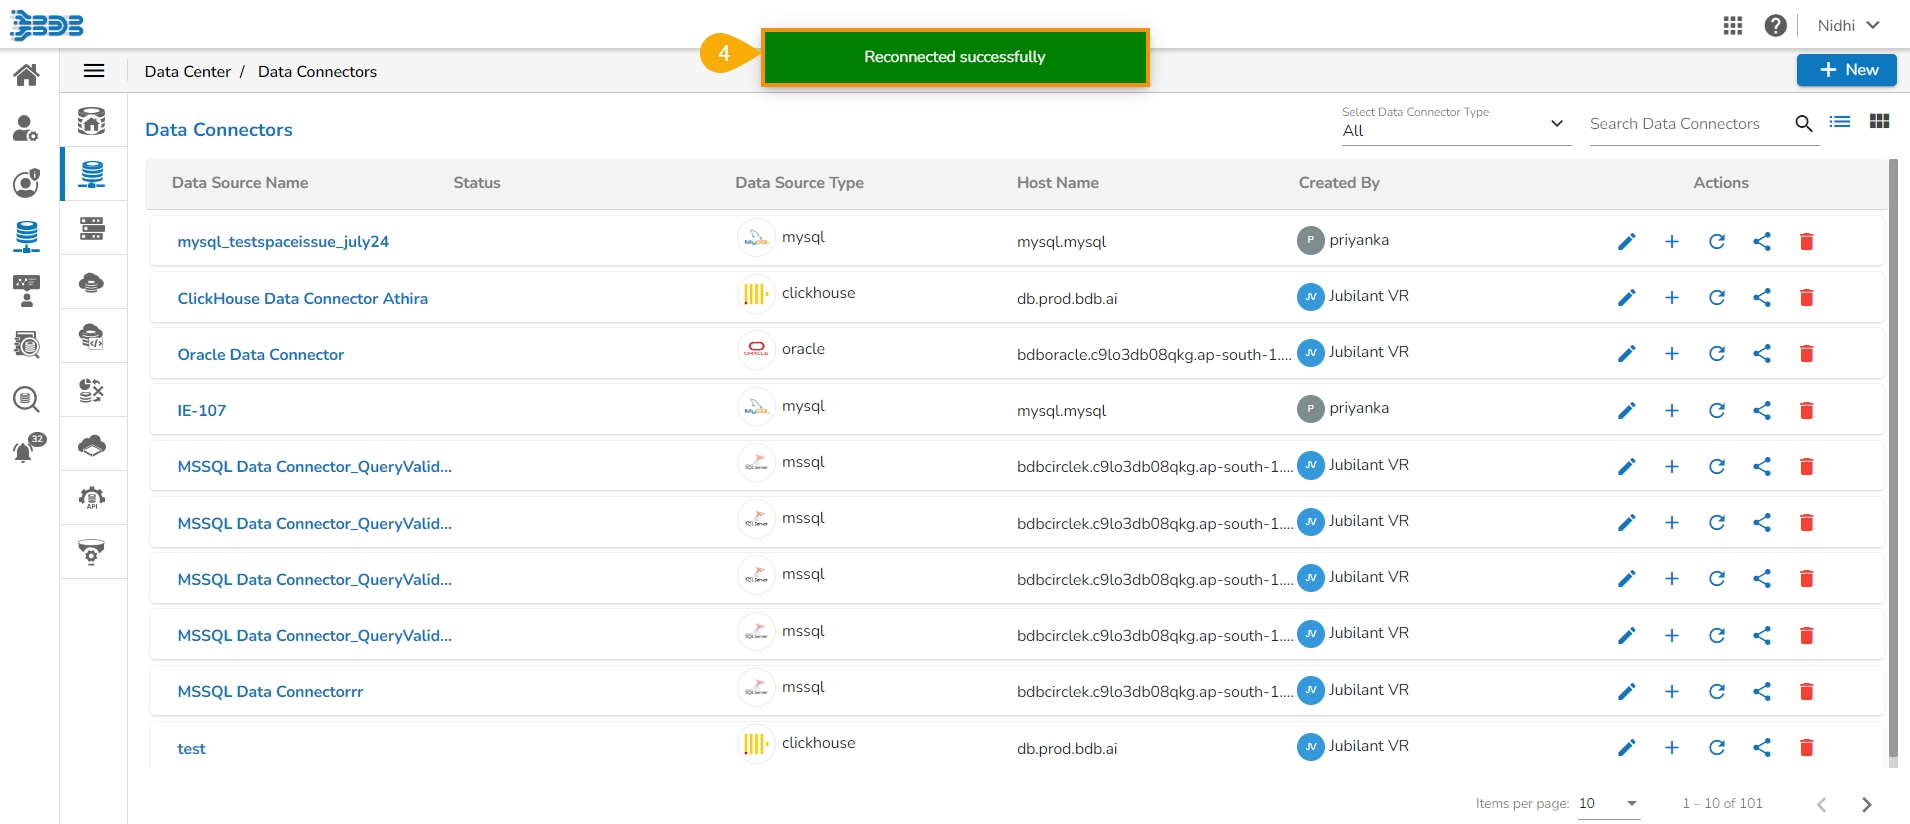
A confirmation message appears, the selected Data Connector gets reconnected.
Navigate to the page with all the Data Connector icons and search for Athena Data connector.
Click on the Athena icon.
The Create page for the Athena Connector opens.
Provide the following information:
Data Connector Name
Description
AWS Access Key Id
Click the Save option.
A success notification appears to ensure the connection establishment.
The user gets redirected to the Data Connectors page.
The newly created Athena Data Connector gets added at the top of the list.
The following set of steps displays how to create a MongoDB for BI data connector:
Select the ‘MongoDB for BI’ connector icon from the Data Connector page.
The ‘MongoDB Connector for BI’ connector page opens.
Provide a name for the data connector.
Provide the following information:
Username
Password
IP/Host address
Click the ‘Save’ icon.
A success message appears, and the newly created Mongo DB Connector gets added to the Data Connectors list.
This page explains steps to create a Pinot Data connector using the Data Center module.
Users can create a Pinot data connector to bring data from the PInot database. The following set of steps displays how to create a Pinot Data Connector:
Click the Pinot Data Connector icon from the Create Data Connector page.
The Pinot Data Connector page opens.
Provide the following information:
Provide the Data Connector name.
Describe the data connection (optional).
Enter the valid username.
Enter the correct password for the selected account.
Click the Save option.
A success message appears confirming the connection.
Another success message appears confirming the creation of the Data Connector.
The newly created Pinot data connector gets added to the Data Connectors list.
Check out the given illustration on how to create a file data connector under the Data Center module.
Provide the following information to create a File Data Connector:
Data Connector Name: Provide a user-defined name to identify the data source.
Description: Describe the Connection details (optional).
Click the Save option.
A success message appears to assure the connection.
The newly created file connector gets added to the data connector list.
The user can get data from the Bing Ads server using the Bing Ads Data Connector.
Provide the following information to create a Bing Ads Data Connector:
Log in to a Bing Ads account by clicking on the Select Account option.
A new page appears asking to sign in for the chosen Microsoft account.
The Bing Ads connector page opens with a notification that the user has been logged in to the selected Microsoft account.
Provide a name for the Bing Ads Data Connector for identification.
Click the Save option to save the inserted information.
A success message appears the newly created Bing Ads Data Connector gets added to the Data Connectors list.
The following set of steps displays how to create Flipkart Data Connector:
Click the Select Account option from the Flipkart Connector page.
Enter the credentials to get Flipkart Permission Registration for the selected Flipkart account.
Click the Sign In option.
The Flipkart Connector page opens again with the connected Flipkart account, after the user has logged in to a Flipkart account.
Provide a title for the Data Connector.
Provide description for the Data Connector (It is an optional field).
Click the Save
A success message appears, and the newly created Flipkart Connector gets added to the data connector list.
The following set of steps displays how to create a Google Form Data Connector:
Click the Google Big Query connector type icon from the Data Connector page.
The Google Big Query Connector page opens.
Select the Add New Account option to add a new Google account or select an added Google account from the Select Account drop-down menu.
The user gets redirected to select a Google account.
Provide valid credentials to select a Google Account.
A new page opens, asking the user to share the information from the selected Google account.
Click the ‘Allow’ option.
The Google Forms Connector page opens again with the selected Google account.
Provide a name for the Google Big Query Connector.
Click the ‘Save’ option.
A success message appears to confirm the creation of the Google Form Connector. The newly created Google Form Connector gets added to the Data Connectors list.
The following set of steps displays how to create a Google Form Data Connector.
Click the Google Forms connector type icon from the Data Connector page.
The Google Form Connector page opens.
Click the Select Account option from the Google Form Connector page.
The user gets redirected to select a Google account.
Provide valid credentials to select a Google Account.
A new page opens, asking the user to share the information from the selected Google account with BDB.
Click the Allow option.
The Google Forms Connector page opens again with the Change Account option.
Provide a name for the Google Forms Connector.
Click the Save option.
A success message appears to confirm the creation of the Google Form Connector. The newly created Google Form Connector gets added to the Data Connectors list.
The following set of steps displays how to create a Google Sheet Data Connector:
Click on the Google Sheet connector type from the Data Connector page.
The Google Sheet Connector page opens.
Click the Select Account option from the Google Sheet Connector page to use an existing Google Sheet account.
Enter the credentials of a Google Account to sign in with your Google account.
A new page opens, asking the user to share their information with BizViz.
Click the Allow option to share the same.
The Google Sheet Connector page opens with the Change Account option indicating that a Google account has been selected.
Provide a name for the Data Connector.
Click the Save option.
A success message appears, and the newly created Google Sheet data connector gets added to the Data Connectors list.
Provide the following information to create a JIRA Data Connector:
Click the JIRA connector type icon from the Data Connector page.
The JIRA Data Connector page opens.
Data Connector Name: Provide a user-defined name to identify the data connector.
Description: Describe the data connection.
Username: Enter a Username (It should be the same as given in the connection server).
Password: Enter the password (It should be the same as provided in the connection server).
Server URL: Enter the server URL link.
Click the Save option to verify the connection and save the new connector.
A success message appears, and the newly created JIRA data connector gets added to the Data Connector list.
The following set of steps displays how to create an MS Dynamics Data Connector.
Click the Microsoft Dynamics Data Connector icon from the Data Connector page.
The Microsoft Dynamics Data Connector page opens.
Provide the following information:
Tenant ID/Directory ID
Resource URL
Client ID/ Application ID
Client Secret/ Keys
A new page opens asking to log in to the Microsoft Dynamics CRM account by using the Select Account option.
Provide the Data Connector Name.
Describe the Data Connection (optional).
Click the Save option.
A success message appears, and the newly created Microsoft Dynamics Data Connector gets added to the Data Connectors list.
The following set of steps displays how to create a MailChimp data connector.
Select the MailChimp connector from the Data Connector page.
The MailChimp Connector page opens.
Provide the following information:
Data Connector Name
Description
Username
API Key
Click the Save option.
A success message appears, and the newly created MailChimp Data Connector gets added to the Data Connectors list.
Provide the following information to create an MSSQL OLAP Data Connector:
Data Connector Name: Provide a user-defined name to identify the data connector.
Description: Provide connection details (Optional).
Username: Enter a Username (It should be the same as given in the connection server).
Password: Enter the Password (It should be the same as provided in the connection server).
Address Type (IP/Host): As per the selected Address type, a field appears below. The user needs to enter database server details (from where the user wants to fetch data).
Port: Provide the server port number.
Database Name: Name of the database where you wish to store data.
Click the ‘Save’ option.
The success messages appear to confirm the connection and creation of a new connector.
The newly created MSSQL OLAP data connector gets added to the Data Connectors page.
This section describes steps to configure the remaining Data Connectors.
Check out the given walk-through on how to create an API Data Connector under the Data Center module.
The Data Connectors list displays the Create option to Create a Data Set and Data Store.
Navigate to the Data Connectors list.
Select a Data Connector from the Data Connectors list.
Click the Create icon for that Data Connector.
Provide the following information to create a MySQL Data Connector:
Data Connector Name: Provide a user-defined name to identify the data connector.
Description: Describe about the Data Connector.
Username: Enter a Username (It should be the same as given in the connection server).
Provide the following information to create an MSSQL Data Connector:
Data Connector Name: Provide a user-defined name to identify the data connector.
Description: Provide connection details (Optional)
The following set of steps displays how to create a PostgreSQL Data Connector:
Click the ‘PostgreSQL’ Data Connector icon from the Data Connector page.
The PostgreSQL Data Connector page opens.
The following set of steps displays how to create a Snowflake Data Connector:
Click the Snowflake Data Connector icon from the Data Connector page.
The Snowflake Connector page opens.
The user can get data from the App Store server using the App Store Data Connector.
Provide the following information to create an App Store Data Connector using the App Store Connector page:
Provide a name for the App Store Data Connector.
Describe the connection details (optional).
The user can get data from the Facebook Ads using the Facebook Ads Data Connector.
The following set of steps displays how to create a new Facebook Ads data connector.
Select the Add New Account option from the Select Account drop-down list add a new Facebook account.
The Facebook login page opens.
The following set of steps displays how to create a Google AdWords Data connector.
Click the Select Account option from the Google AdWords Connector page.
The user gets a Google page instructing them to enter a valid email id or contact number.
Provide the following information to create an OData Data Connector:
Data Connector Name: Provide a user-defined name to identify the data source.
Description: Provide connection details.
Check out the illustration on creating a Pinot Data Set based on a Pinot Data Connector.
Navigate to the Data Center homepage.
Click the New
The following set of steps displays how to create a Lead Squared data connector:
Click the Lead Squared Data Connector type icon from the Data Connector page.
The Lead Squared Data Connector page opens.
The user can get data from the FTP server using the FTP Server Data Connector.
Provide the following information to create an FTP Data Connector:
Data Connector Name: Provide a user-defined name to identify the data source.
Description: Describe the connector details (Optional).
Provide the following information to create an SAP Hana Data Connector:
Data Connector Name: Provide a user-defined name to identify the data connector.
Description: Provide connection details (Optional).
Username: Enter a Username (It should be the same as given in the connection server).
The following set of steps displays how to create a ZOHO Books data connector:
Select the ZOHO Books connector from the Data Connector page.
The ZOHO Books Data Connector page opens.
This page displays steps to access Data Preparation interface using the Data Set list.
Check out the illustration describing the steps to access the Data Preparation interface from the Data Set list page.
Select a Data Set from the Data Set list.
Select a Data Store from the Data Stores list.
Click the Refresh Data icon for that Data Store.
The Data Store Refresh
Provide the following information to create a Data Store Data Connector.
Data Connector Name: Provide a user-defined name to identify the data connector.
Data Store Service: Select a data store service from the drop-down list.
Click the ‘Save’ option.
This page focuses on the steps to pull a data set version from the VCS.
Check out the illustration on pulling a data set from VCS.
Select a Data Set of which some version is available in the VCS using the Data Sets list.
This section describes steps to publish a Data Set.
Check out the illustration on steps to publish a Data Set.
Navigate to the Data Sets list page.
Select a Data Set from the list.
The following set of steps displays how to create a LinkedIn Data Connector.
Select the LinkedIn connector type icon from the Data Connector page.
The LinkedIn Connector page opens.
The Refresh Synonyms option helps to refresh data store tables to reflect the later changes in the data store synonyms directory.
Navigate to the Data Stores list.
Select a Data Store from the list.
Click the Refresh Synonyms icon.
Provide the IP address or host.
Provide the Port number.
Provide the Database name.
Select an SSL type from using the drop-down menu.


AWS Secret Access Key
Database Name
Region
S3 Staging Directory
Data source Type
Port number
Databased Name
Add the given URL link to register your Azure app. Follow the below-given steps:
Login to your Azure Account as Admin
Click Azure Active Directory
Click App Registration
Select Your App
Click the Settings option.
Click reply URL
Add the given URL ()
Click the Data Connector option from the New Context menu (as displayed below).
A page opens with all the available data connector types.
Click on a Connector type.
The Connector-specific page opens.
You need to configure the required details for the selected connector.
Click the Save option.
A notification message appears to ensure that the connection has been successfully updated.
Another success message ensures the user that the data connector has been created successfully.
The newly created data connector gets added to the data connector list.
Click the Filter by Category icon to get various categories of data connectors.
Select a category from the displayed menu.
The Data Connectors page gets customized based on the selected category (E.g., the following image displays all the available data connectors from the Database category).
Access the Search bar from the Create Data Connector page and type the Connector name that you wish to search for.
As you start typing based on searched text the Data Connector icons will change. E.g., By typing the letter 'M', all the Data Connector types containing the alphabet 'M' are displayed on the screen.
Two options to create appears:
New Data Set
New Data Store
Password: Enter the Password (It should be the same as provided in the connection server).
IP/Host: Enter database server details (from where the user wants to fetch data).
Port: Provide the server port number.
Database Name: Name of the database where you wish to store data.
SSL Type: Select SSL or Non SSL as choices.
Upload Key: Select a upload key using the drop-down menu.
Click the Save option.
A success message appears confirming the connection.
Another success message appears confirming the creation of the Data Connector.
The newly created MySQL data connector gets added to the Data Connectors list.
Password: Enter the Password (It should be the same as provided in the connection server).
IP/Host: Enter database server details (from where the user wants to fetch data).
Port: Provide the server port number.
Database Name: Name of the database where you wish to store data.
Click the ‘Save’ option.
A success message appears to confirm the connection.
Another success message appears to assure the creation of the new MSSQL Data Connector.
The newly created MSSQL data connector gets added to the Data Connectors list.
Description: Provide the connection details (optional).
Username: Enter a Username (It should be the same as given in the connection server).
Password: Enter the Password (It should be the same as provided in the connection server).
IP/Host: Enter database server details (from where the user wants to fetch data).
Port: Provide the server port number.
Default Key-Space Name: Enter the default keyspace name.
Consistency: Select a consistency option from the drop-down list (One/ Two/ Three/ Quorum).
Click the ‘Save’ option.
The success messages appear to confirm the connection and creation of the new data connector.
The newly created Cassandra Native Data Connector gets added to the Data Connectors list.
The MongoDB Connector page opens.
Provide a name for the data connector.
Add Data Connector Description.
Provide the following information:
Connector Type: Select an option out of Standard or SRV
Username
Password
IP/Host address
Port number
Database Name
SSL Type: Select either of the choice out of SSL or NON SSL
Click the Save icon.
Check out the following images to get an idea of the required fields while choosing the SRV Connection Type option:
A success message appears, and the newly created Mongo DB Connector gets added to the Data Connectors list.
Describe the data connection.
Provide the following information:
Username
Password
IP/Host
Port
Database Name
Data Connector Name: Provide a user-defined name to identify the data connector.
Description: Provide connection details (Optional).
Username: Enter a Username (It should be the same as given in the connection server).
Password: Enter the Password (It should be the same as provided in the connection server).
IP/Host: Enter database server details (from where the user wants to fetch data).
Port: Provide the server port number.
Database Name: Name of the database where you wish to store data.
SSL Type: Select SSL or Non SSL as choices.
Upload Key: Select a upload key using the drop-down menu (This field appears only if the SSL option has been selected for the SSL Type field).
Click the Save option.
A success message appears confirming the connection.
A success message appears, and the newly created PostgreSQL data connector gets added to the Data Connectors list..
Describe the data connection (optional).
Enter the valid username.
Enter the correct password for the selected account.
Select a type by using the drop-down menu.
Provide the account name.
Provide the Database name.
Provide the Warehouse name.
Click the Save option.
The user gets a notification message appears if the connection gets successfully verified.
Another success message appears to inform you that the Data connector has been created successfully.
The newly created Snowflake Data Connector gets added to the Data Connectors list.
Provide the Following information to create an App Store Data Connector.
Email ID
Key ID
Issuer ID
Private Key
Click the Save option.
A success message appears, and the newly created App Store data connector gets added to the Data Connectors list.
Provide a relevant email address or phone number
Provide the correct password for the selected account
Click the Log In option.
A new page appears to confirm whether the user wants to continue as the displayed name or wants to edit it.
A new window opens informing that BizViz would like to manage the ads, access your Facebook ads, and related states, and display a list of the pages you manage.
Click the OK option to give permission.
The Facebook Ads Connector page reopens with the notification that the user has logged in to the selected Facebook account.
Provide a Data Connector name.
Describe the data connection (optional).
Click the Save option.
A success message appears, and the newly created Facebook Ads Data Connector gets added to the Data Connectors list.
Provide the correct password for the selected Google account.
The user gets a page asking permission to allow BDB data access from their selected Google AdWords account.
Click the Allow option to permit data access.
The Google AdWords connector page opens with a notification that the user has logged in to the selected Google account.
Provide a data connector name.
Describe the data connector (optional).
Click the Save option.
A success message appears, and the newly created Data Connector gets added to the Data Connectors list.
Username: Enter a Username (It should be the same as given in the connection server).
Password: Enter the Password (It should be the same as provided in the connection server).
Base Url: Enter Service Root URL or Base URL.
Click the ‘Save’ option.
The success messages appear to assure the new OData connection.
The newly created OData Data Connector gets added to the Data Connectors list.
Select the Data Set option from the context menu.
A list of available Data Connectors appears entitled as Data Source Name.
Select a Data Connector with the Pinot database.
Click the Create Data Set icon.
The Data Set page opens.
Configure the following fields:
Service Name: Enter any user-defined name for the new data set.
Description: Provide a brief description of the Data Set (optional).
Data Connector Name: This is a pre-defined field based on the selected data connector.
Database Name: This is a pre-defined field based on the data connector chosen earlier.
Query: Write a valid query service in the given space.
Table Information: On the right side of the page Table information is displayed. It will contain all the tables in the Database and the Column name in the table. Double click on the Table or Column will auto-generate a sample query for the user to validate and get data.
Click the Validate option to execute the new Data Set.
A message appears to inform the successful execution.
The data preview appears at the bottom of the page.
The Save option gets enabled.
A notification message appears to ensure the completion of the action.
The newly created Data Set gets added to the Data Sets List.
Data Connector name
Description
Access Key
Secret Key
Region Type
Database Name
Click the Save option.
A message appears to assure successful authentication.
Another success message appears, and the newly created Leadsquared data connector gets added to the Data Connectors list.
Host: Enter database server details (from where the user wants to fetch data).
Port: Provide the server port number.
Username: Enter a Username (It should be the same as given in the connection server).
Password: Enter the Password (It should be the same as provided in the connection server).
Start Path: Give a defined path to start.
Click the Save option.
A success message appears, and the newly created FTP Server data connector gets added to the Data Connectors list.
The Fitbit Data Connector page opens.
Log in to a Fitbit account by clicking on the Select Account option.
A new page opens, asking for the credentials for your Fitbit account.
A new page appears asking permission to get the data from the chosen Fitbit account.
Allow BDB to access data from the selected Fitbit account by clicking the Allow option.
The Fitbit Ads connector page opens with a notification that the user has been logged in to the selected Instagram account.
Provide a title to the newly created Data Connector.
Describe the data connection (optional)
Click the Save option to save the inserted information.
A success message appears, and the newly created Fitbit Data Connector gets added to the Data Connectors list.
Password: Enter the Password (It should be the same as provided in the connection server).
IP/Host: Enter database server details (from where the user wants to fetch data).
Port: Provide the server port number.
Click the ‘Save’ option.
The newly created SAP Hana data connector gets added to the Data Connectors list.
Provide Username.
Give a valid Password for the account.
Click the Save option after the data connection gets verified.
A success message appears to assure the connection.
Another success message appears, and the newly created ZOHO Books Connector gets added to the Data Connectors list.
Data from the selected Data Set gets displayed in the Data Preparation framework.
Click the Yes option.
A notification message appears stating that the Refresh process has been started and status notification will be provided to the user through the notification icon.
A message appears to confirm the creation of the new data connector.
The newly created Data Store data connector gets added to the Data Connectors list.
The Pull from Version Controlling System dialog box appears.
The multiple uploaded versions of the Data Set with committed message for each version get listed.
Select: To select the version you want to pull.
Version: Version number only will list as V1, V2, etc.
Commit: This is to Identify the data set version Pulling from VCS.
Commit time – The date and time that the data set is committed.
Committed By- The User name who committed the data set.
Select a version by using the checkbox provided next to the version number.
Click the Pull option.
A confirmation message appears once the selected Data Set version is pulled from the VCS.
Click the Publish icon for the selected Data Set.
The Publish Data Set dialog box opens to confirm the action.
Click the Yes option.
A confirmation message appears, and the selected Data Set gets published.
The published Data Set is indicated by the Publish icon in the Data Sets list.
The user gets redirected to a new window to access a valid LinkedIn account.
Insert the credentials of the LinkedIn account to log in.
Click the Allow access option to provide permission to BDB for accessing data from the selected LinkedIn account.
The LinkedIn Connector page reopens with the Change Account option indicating that a LinkedIn account is selected (Click the ‘Change Account’ option if you wish to change the selected account).
Provide a name for the LinkedIn Data Connector (E.g., In this case, it is defined as Sample LinkedIn Data Connector).
Click the Save option.
A success message appears, and the newly created data connector gets added to the Data Connectors list.
A confirmation message appears to inform the users that the Synonyms are updated.
Navigate to the page with all the Data Connector icons and search for Oracle Data connector. Click on the Oracle icon.
A form opens to create Oracle Data Connector. Provide the following information to create an Oracle Data Connector:
Data Connector Name: Provide a user-defined name to identify the data connector.
Description: Provide the connection details (optional).
Username: Enter a Username (It should be the same as given in the connection server).
Password: Enter the Password (It should be the same as provided in the connection server).
IP/Host: Enter database server details (from where the user wants to fetch data).
Port: Provide the server port number.
SID Service Name: Provide the unique alias used for the database (when connecting).
Click the ‘Save’ option.
The success messages appear to confirm the connection and creation of the new Oracle data connector.
The newly created Oracle data connector gets added to the Data Connectors list.
Navigate to the page with all the Data Connector icons and search for Oracle Data connector. Click on the ClickHouse icon.
Provide the following information to create a ClickHouse Data Connector:
Data Connector Name: Provide a user-defined name to identify the data connector.
Description: Provide connection details (Optional).
Username: Enter a Username (It should be the same as given in the connection server).
Password: Enter the Password (It should be the same as provided in the connection server).
IP/Host: Enter database server details (from where the user wants to fetch data).
Port: Provide the server port number. (TCP port)
Database Name: Name of the database where you wish to store data.
Http Port: (For Datastore purpose)
SSL Type: Select SSL or Non SSL as choices.
Upload Key: Select a upload key using the drop-down menu (This field appears only if the SSL option has been selected for the SSL Type field.
Click the Save option.
A success message appears confirming the connection.
Another success message appears confirming the creation of the Data Connector.
The newly created ClickHouse data connector gets added to the Data Connectors list.
Provide the following information to create a Hive Data Connector:
Data Connector Name: Provide a user-defined name to identify the data connector.
Description: Provide the connection details (optional).
Username: Enter a Username (It should be the same as given in the connection server).
Password: Enter the Password (It should be the same as provided in the connection server).
IP/Host: Enter database server details (from where the user wants to fetch data).
Port: Provide the server port number.
Database Name: Provide name of the database from where the connection needs to be established.
Click the Save option.
The notification message appears to confirm the connection.
Another notification message appears to inform about the data connector creation.
The newly created Hive data connector gets added to the Data Connectors list.
The user can call data from the API services using the API Connector.
Provide the following information to create an API Data Connector:
Click the New button
Click the API Connector icon from the Data Connector page.
The API Connector page opens.
API Name: Provide a name for the API connector.
The API Connector page opens.
API Name: Provide a name for the API connector.
Description: Describe the API connector.
Base URL: Provide URL of the API from where you want to fetch the data.
Click the Save option.
A notification message appears, and the new API Connector gets saved under the Data Connector list.
The user can get data from the Amazon server using the Amazon Connector.
Provide the following information to create an Amazon Data Connector:
Select a link using the drop-down menu.
Provide the Seller id (The user can select the seller id from the drop-down list if already added before).
Provide the MWS Auth Token to authenticate the account.
Click the Verify Account option.
A success message appears to confirm that the account has been successfully verified.
The Amazon Marketplace connector page reopens with the ACCOUNT VERIFIED notification.
Provide a title for the Data Connector.
Click the Save option
A success message appears, and the newly created Amazon Marketplace Connector gets added to the Data Connectors list.
The user can get data from the Dropbox server using the Dropbox Data Connector.
Provide the following information to create a Dropbox Data Connector:
Click the Select Account option to log in to a Dropbox account.
The ‘Sign in’ page of Dropbox opens.
Enter the credentials to Sign in.
A message appears asking to allow the selected Dropbox account access to BDB.
Click the ‘Allow’ option to provide access to the selected Dropbox account.
The Dropbox connector page opens with the ‘Change Account’ option indicating that the selected account is connected.
Enter a Data Connector Name.
Click the ‘Save’ option.
A success message appears, and the newly created Dropbox Data Connector gets added to the Data Connectors list.
The user can get data from the Facebook server for the mapped Facebook account using the Facebook Data Connector.
The following steps display how to create a new Facebook Data Connector:
Select the Add New Account option from the Select Account drop-down menu to add a new Facebook account.
Enter the credentials of a Facebook account to log in.
A new page opens, allowing BizViz to access the information from the logged-in Facebook account.
Click the ‘Continue as… The profile owner’s name’ if you wish to map the same account or use the Edit This option to edit the information.
Select the OK option to link BizViz with the selected Facebook account (it may ask for a few additional steps if there is no page created from the selected Facebook account).
By selecting the continuation option, the user gets notified as logged in to the selected Facebook account and the Facebook Connector page reopens.
Provide a title for the Data Connector.
Describe the Data Connection (Optional).
Click the Save option.
A success message appears, and the newly created Facebook Connector gets added to the Data Connectors list.
The following set of steps displays how to create a QuickBooks Data Connector.
Select the QuickBooks icon from the Data Connector page.
The QuickBooks Connector page opens.
Click the Select Account option for login to a QuickBooks account.
The Sign in page of the QuickBooks opens.
Enter the credentials to Sign in.
The user receives a code to assure the authenticity of the selected account. The users get a verification code through the registered email or mobile.
After verifying the authenticity code, the user gets a new window asking to authorize BDBizViz.
Click the Connect option.
The QuickBooks connector page reopens with the ‘Change Account’ option indicating that a QuickBooks account has been selected.
Enter a Data Connector Name.
Click the Save option.
A success message appears, and the newly created QuickBooks Connector gets added to the Data Connectors list.
The following set of steps displays how to create a ServiceNow Data Connector:
Select the ServiceNow icon from the Data Connector page.
The Service Now Connector form opens.
Navigate to the link.
Provide valid credentials.
A new page appears with the instance link.
Refresh the instance.
Copy the instance link and use it in the Developer Instance URL provided in the Service Now connector form.
Fill in the following information:
Data Connector Name: A user-defined name to identify the data source.
Description: Describe the connector details.
Instance Username: Enter the Instance username.
Click the Save option to verify and save the new data connector details.
A success message appears, and the newly created ServiceNow data connector gets added to the Data Connectors list.
The following set of steps displays how to create a Twitter Data Connector:
Select the Twitter connector type icon from the Data Connector page.
The Twitter Connector page opens.
Either select a Twitter account listed in the drop-down menu or add a new Twitter account (The steps displayed over here guide the user to add a new Twitter account).
An authorization page opens.
Enter the credentials to Sign in.
Click the Authorize app option to authorize the Twitter BDB production to use data from your account.
Another page opens, asking permission to authorize Twitter BDB Production to use your account.
The Twitter Connector page reopens with a notification that you are logged in to the selected account.
Enter a Data Connector Name.
Describe the Data Connection.
Click the Save option.
A success message appears, and the newly created Twitter Connector gets added to the Data Connectors list.
Provide the following information to create an AWS Redshift Data Connector:
Data Connector Name: Provide a user-defined name to identify the data source.
Description: Provide the Connection Details.
Username: Enter a Username (It should be the same as given in the connection server).
Password: Enter the password (It should be the same as provided in the connection server).
IP/Host: Enter database server details (from where the user wants to fetch data).
Port: Provide the server port number.
Database Name: Name of the database where you wish to store the data.
Click the ‘Save’ option.
The success messages appear to assure the data connection, and the newly created AWS Redshift data connector gets added to the Data Connectors list.
The following set of steps displays how to create a Firebase DB Data Connector:
Click the Firebase Data Connector icon from the Data Connector page.
The Firebase Data Connector page opens.
Click the Select Account option.
A new page opens asking for valid credentials of a Google account.
Allow to access data from the selected Google Account by clicking the Allow option.
The Firebase Data Connector page opens with a notification that the user has successfully logged in to the selected account
Provide the Data Connector name.
Describe the Data connection (optional).
A success message appears, and the newly created Firebase data connector gets added to the Data Connectors list.
Provide the following information to create a Spark SQL Data Connector:
Data Connector Name: Provide a user-defined name to identify the data source.
Description: Provide the connection details (optional).
Username: Enter a Username (It should be the same as given in the connection server).
Password: Enter the password (It should be the same as provided in the connection server).
IP/Host: Enter database server details (from where the user wants to fetch data).
Port: Provide the server port number.
Click the ‘Save’ option.
The newly created Spark SQL Data Connector gets added to the Data Connectors list.
This page explains the Reset filter functionality for the Data Sets List page.
The Platform allows users to retain their applied filters on the Data Set List page, eliminating the need to reapply filters when returning to the list. This functionality improves efficiency by streamlining dataset searches and enhancing user experience.
Users can save specific parameters such as Connector Type, Connector, or Publish Status, ensuring quick access to their previously filtered datasets.
Even after navigating away to other parts of the module or editing a dataset, users will be seamlessly redirected back to the filtered Data Set List page, making it easier to continue their work without losing context. E.g., the following image displays the application of the Edit option on the same Data Set as the Update page is displayed for the Data Set.
Click the Reset Filter icon to clear the applied filters.
The selected filters will be cleaned and the entire Data Set List will be displayed.
The following set of steps displays how to create a Yelp Data Connector.
Click the ‘Yelp’ Data Connector icon from the Data Connector page.
The Yelp Data Connector page opens.
Provide the following information to create the Data Connector:
Data Connector Name
Description
Access Key
Click the Test option
A message appears to confirm the success of the connection authentication.
The Save option gets enabled.
Click the Save option.
A success message appears.
The newly created Yelp Data Connector gets added to the Data Connectors List.
The following set of steps displays how to create a HubSpot Data Connector:
Click the HubSpot Data Connector icon from the Data Connector page.
The HubSpot Data Connector page opens.
The user needs to Sign in to a Hub Spot account by clicking on the Select Account option.
A new page opens asking the credentials to log in to a HubSpot account. Since we are using Google credentials, so need to choose the Sign in with Google option.
Choose a Google Account from the listed accounts.
Enter the password for the selected account.
Click the Next option.
Choose an option from the given choices under the PRODUCTS option.
The HubSpot Data Connector page opens with the Change Account option and a notification indicating that the user has successfully logged in to the selected account.
Provide a name for the HubSpot Data Connector.
Click the Save option.
A success message appears, and the newly created HubSpot Data Connector gets added to the Data Connectors list.
The following set of steps displays how to create a Salesforce data connector:
Select the Salesforce icon from the Data Connector page.
The user gets directed to the Salesforce Connector page.
Select an option using the drop-down list (Salesforce/Sandbox).
Click the Select Account option to select an account.
The Salesforce login page opens.
Provide valid credentials (Username and Password).
Click the Log In option.
The Salesforce Connector page reopens with the Change Account option indicating that a Salesforce account is selected.
Provide the Data Connector name.
Describe the data connection (optional).
Click the
A success message appears, and the newly created data connector gets added to the Data Connectors list.
The following set of steps displays how to create a Twitter Ads data connector.
Click the ‘Twitter Ads’ Data Connector icon from the Data Connector page.
The user gets directed to the Twitter Ads Data Connector page.
Select an account or Add a new account using the drop-down menu (the steps given below guide the user to add a new Twitter account).
An Authorization page opens.
Provide the credentials to log in to the Twitter account.
Click the Authorise app option.
Another window opens to confirm the authorization process.
Click the Authorise app option.
The Twitter Ads Data Connector page opens with a notification that the user is successfully logged in to the selected account.
Provide the data connector name.
Describe the data connector.
Click the Save
A success message appears, and the newly created Twitter Ads data connector gets added to the Data Connector List.
Navigate to the Data Center homepage.
Click the New option.
Select the Data Set option from the context menu.
The Data Connectors list gets displayed with the Create Data Set Action icon (+) for all the available data connectors.
Select a Data Connector and click on the Create Data Set icon (E.g., the Elastic Connector is selected in the given image).
The Data Set page opens with the following Configuration fields:
Service Name: Enter any user-defined name for the new data set.
Description: Provide a brief description of the Data Set (optional).
The data preview appears at the bottom of the page.
The Save option gets enabled. Click the Save option.
A notification message appears to ensure the completion of the action.
The newly created Data Set gets added to the Data Sets List.
This option provides the Data Store details for the selected Data Store.
Select a Data Store from the Data stores list.
Click the Store Info icon for that Data Store.
The Data Store Info drawer opens displaying the following details:
Datastore Name: Name of the Datastore.
Data Loaded From: Source database from where the data is loaded.
Total Records: Total no. of records.
This page displays steps to edit a data set.
Check out the illustration on editing a dataset.
Select a Data Set from the Data Set list.
Click the View/Edit icon for that Data Set.
The selected Data Set opens in the editable format.
Edit the Data Set name.
Edit or modify the Description.
Modify the provided query either by clicking the table Info or writing a query.
Click the Validate option after modifying the data set.
The Preview Result is displayed with the RESULT and DATA PROTECTION tabs.
The Save option gets enabled, click the Save option.
A confirmation message appears, and the selected Data Set gets updated.
This section explains steps to delete a Data Set.
Check out the illustration to delete a data set.
Navigate to the Data Sets list page.
Select a Data Set from the list.
Click the Delete icon for the selected Data Set.
The Remove Data Set dialog box opens to confirm the deletion.
Click the Yes option.
A confirmation message appears.
The selected Data Set gets removed from the Data Sets list.
This page focuses on the steps to Push a version to VCS.
This is the mechanism for versioning the Data set and storing the latest versions in Git. While pulling the Data set user can see the committed message of each version, so the user will get more info about the committed data set.
Check out the illustration on pushing a Data Set to VCS.
Select a Data Set from the Data Sets list.
Click on the Push to VCS icon.
The Push into Version Controlling System dialog box appears.
Provide a Commit message – this message is saved as a label in the Version Controlling System.
Click the Push option.
A confirmation message appears, and the selected Data Set version gets pushed to the VCS.
This page describes the Pull from VCS functionality for Data Store.
Check out the illustration to understand the Pull from VCS functionality for a Data Store.
Select a Data Store from the Data Stores list (The Data Store should be Pushed at least once to the GIT repository).
Click the Pull from VCS icon for the selected Data Store.
The Pull from VCS dialog box appears.
The multiple uploaded versions of a Data Store with the committed message for each version are listed as shown below:
Select: To select the version you want to pull.
A confirmation message appears once the selected version of the Data Store is pulled from the VCS.
This page focuses on the Push to VCS functionality for Data Stores.
This is the mechanism for versioning the Data Store and storing the latest versions in Git. While pulling the Data Store, the user can see each version's committed message. The user will get more info about the committed data set.
Check out the illustration to push a version of a Data Store.
Select a Data Store from the Data Stores list.
Click on the Push to VCS icon.
The Push into Version Controlling System dialog box appears.
Commit message – this message is saved as a label in GIT.
Click the Push option.
A confirmation message appears and the Data Store version gets pushed to the VCS.
Navigate to the Data Stores list page.
Select a Data Store from the Data stores list.
Click the View/Edit icon for that Data Store.
The selected Data Store opens in the editable format.
You can edit the permitted information from the Data Store form.
Select the Next option.
The user can edit the required details under the various steps of the Data Store till the last step gets configured.
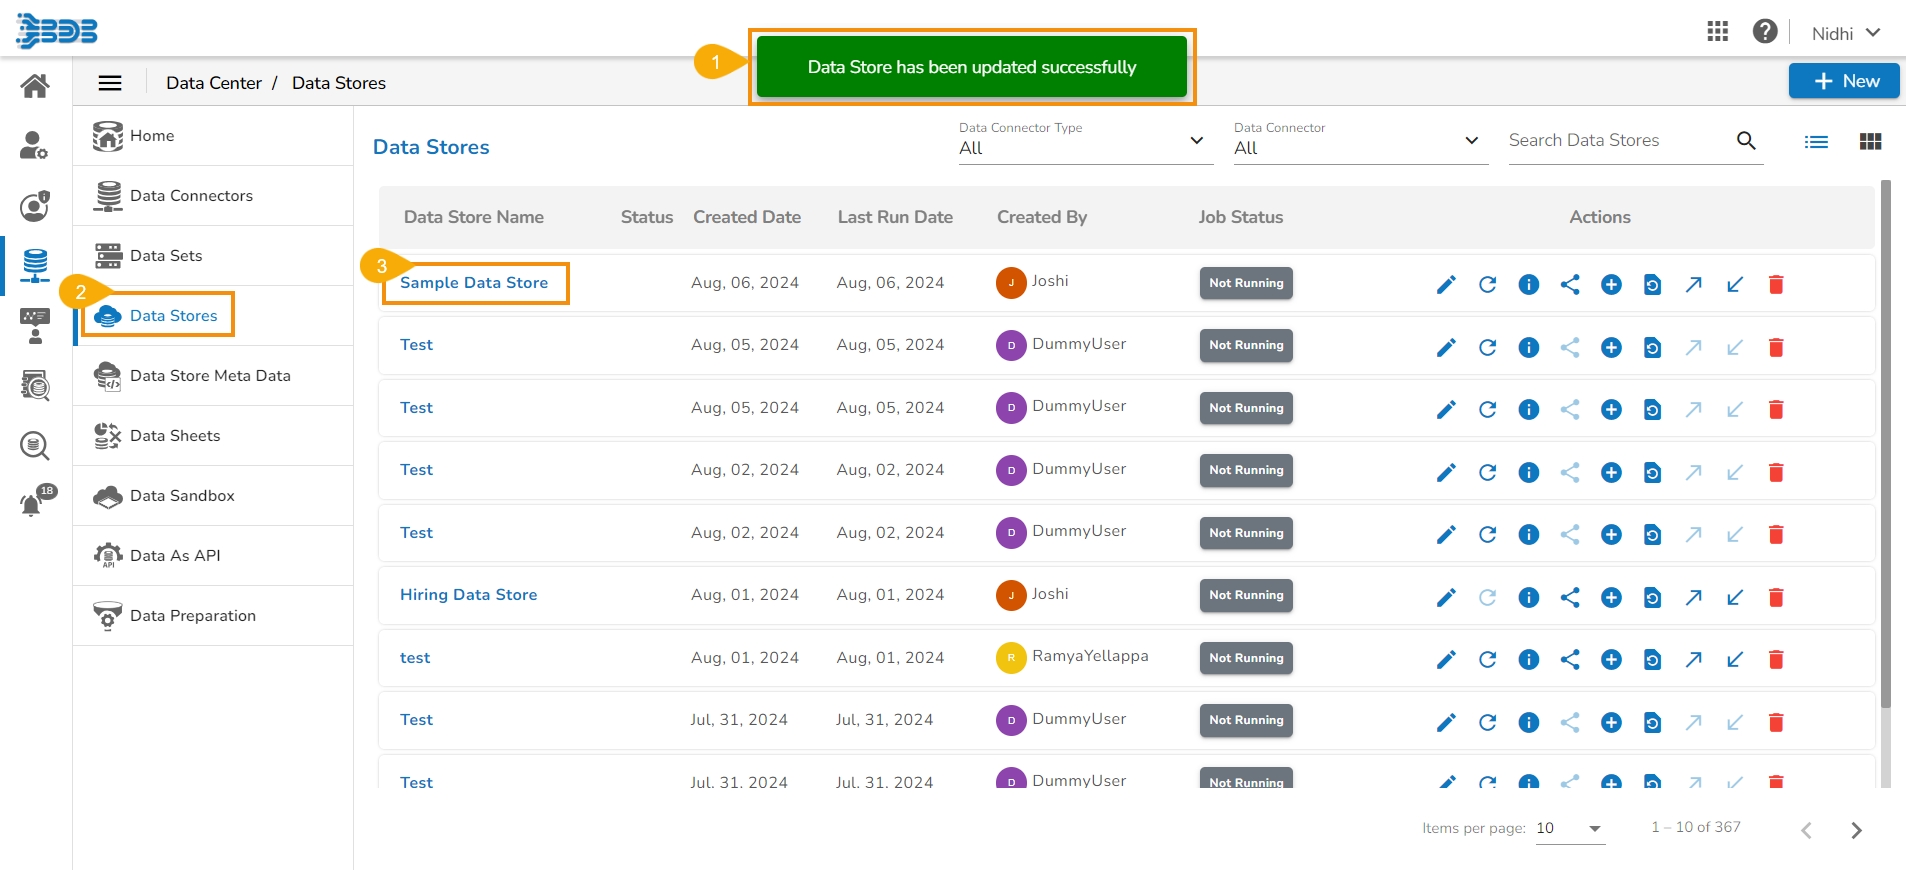
Click the Finish option.
A confirmation message appears, and the selected Data Store gets updated.
Navigate to the Data Center homepage.
Navigate to the Data Center homepage.
Click the New option.
Select the Data Set option from the context menu.
The following set of steps displays how to create a YouTube data connector:
Click the YouTube Data Connector icon from the Data Connector page.
The YouTube Data Connector page opens.
The user can create Data Stores based on various available Data Connectors from the Data Connectors list page or the Data Source page.
Navigate to the Data Center homepage.
Click the New option to open the context menu.
Select the Data Store option from the
The following set of steps displays how to create a LinkedIn Ads data connector:
Click the LinkedIn Ads Data Connector type icon from the Data Connector page.
The user gets directed to the LinkedIn Ads Data Connector page.
Click the New menu from the Data Center page.
Select the Data Set from the context menu.
The
Check-out the given walk-through on how to create a Data Connector using the Google Analytics as data source.
The following set of steps displays how to create a Google Analytics Data Connector.
This page describes steps to delete a data store from the Data Store List.
Check out the illustration on deleting a Data Store.
Select a Data Store from the Data Stores list page.


TCP Port Number
Http Port Number
Select Open Id: Select an open id using the drop-down menu.
Password: Enter the password for the selected user.
Developer Instance URL: Provide the developer’s Instance URL.
Index Id: This is a pre-defined field based on the data connector chosen earlier.
Query: Write a valid query service in the given space.
Click the Validate option to execute the new Data Set.
A message appears to inform the successful execution.
Default Synonyms: Enabling this option allows recreation of the synonyms.
Global Search: Enabling this option allows the user to access the concerned Data Store while using the Global Search.
Status: It indicates the status of the job that runs while refreshing the Data Store data.
Commits: This is to Identify the Data Store version Pulling from VCS (This is the message given while committing the data store push).
Commit Time – The date and time that the Data Store is committed.
Committed By- The Username who committed the Data Store versioning.
Click the Pull option.
Click on the Data Connector option from the New menu.
Click on the Elastic connector icon.
The Elastic Connector configuration page opens.
Provide the following information to create an Elastic Data Connector:
Data Connector Name: Provide a user-defined name to identify the data connector.
Description: Provide connection details (Optional).
Authentication Type: Select either Required or Not Required.
Required: This authentication type suggests secured elastic connection with Username and Password.
Username: Enter a Username (it should be the same as given in the connection server.)
Password: Enter the Password (it should be the same as provided in the connection server.)
IP/HOST: Enter server details (from where the user wants to fetch data).
Port: Provide the server port number. (HTTP port)
Index Id (optional): Enter the Index.
Click the Save option.
A success message appears confirming the connection.
Another success message appears confirming the creation of the Data Connector.
The newly created Elastic data connector gets added to the Data Connectors list.
The Data Connectors list is displayed with the Create Data Set Action icon (+) for all the available data connectors.
Select a Data Connector and click the Create Data Set icon (E.g., the Pinot Data Connector is selected in the given image).
You can select the Arango DB Connector from the Data Source filter.
Search and select a data connector from the displayed list of Data Connectors.
Click the Action/ Create Data Set (+) icon provided in the same row of the selected data connector.
The Data Set page opens with the following Configuration fields:
Service Name: Enter any user-defined name for the new data set.
Description: Provide a brief description of the Data Set (optional).
Data Connector Name: This is a pre-defined field based on the selected data connector.
Table Information: On the right side of the page Table information is displayed and that will contain all the tables in the Database and the Column name in the table. Double click in the Table or Column will auto-generate a sample query so that the user can validate and get data.
Click the Validate option to execute the new Data Set.
If the query contains filters, then the right-side filter column will appear.
Click on the Continue button then the query will execute.
A message appears to inform the successful execution.
The data preview appears at the bottom of the page.
The Save option gets enabled.
A notification message appears to ensure the completion of the action.
The newly created Data Set gets added to the Data Sets List.
Click the Select Account option.
A new page appears asking the credentials to log in to a Google account.
After logging in to a Google account, the user needs to choose from the multiple Google accounts (if multiple Google accounts are added).
E.g., the ‘nividhondemand’ account has been selected in the below-given image:
Click the Allow option to permit BDB to access YouTube data from the attached Google account.
The YouTube connector page opens with a notification that the user has been logged in to the selected Google account.
Provide a title for the YouTube Data Connector.
Click the Save option to save the inserted information.
A success message appears, and the newly created YouTube Data Connector gets added to the Data Connectors list.
The user gets redirected to the Data Source page.
Use the Search bar to search for a data source.
Select a Data Source from the list.
Click the Create Data Store icon for the selected Data source.
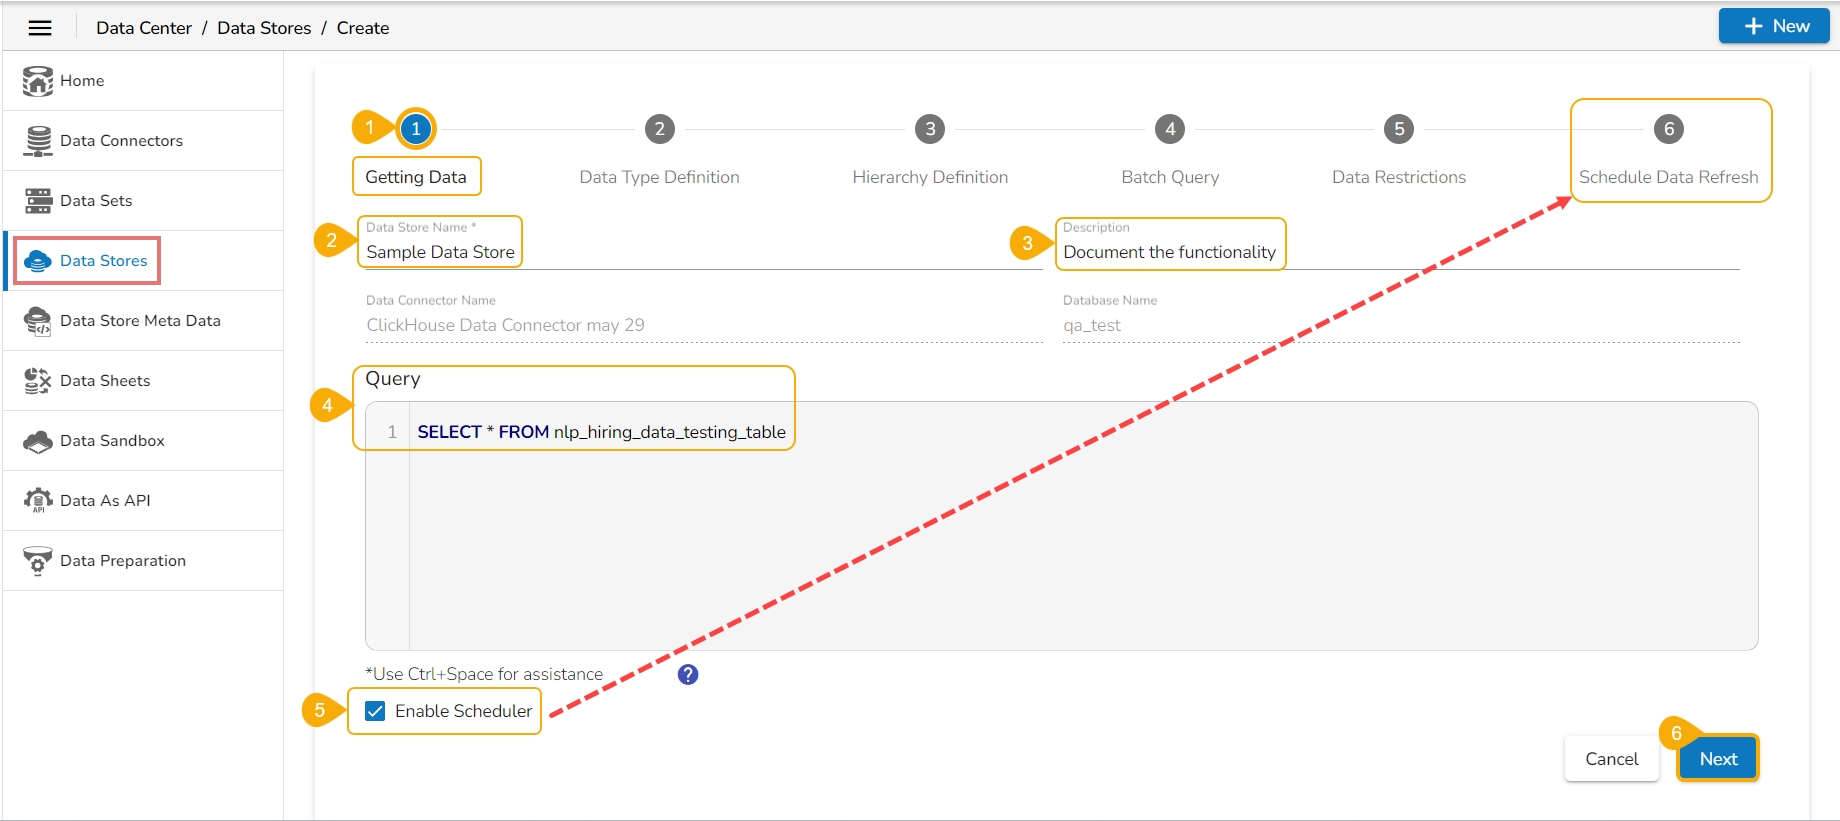
The user can enable the scheduler by using the given checkbox, in this case, the Create page of a Data Store will display 6 steps to follow to complete a Data Store creation.
The user gets redirected to the Create Data Store page including the following steps:
Getting Data
Data Type Definition
Hierarchy Definition
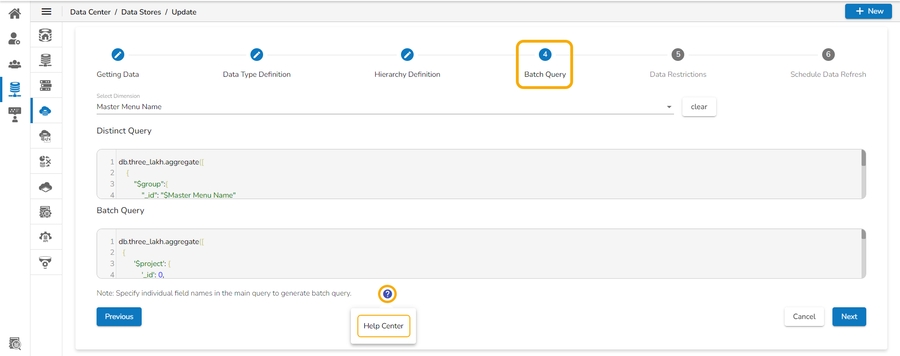
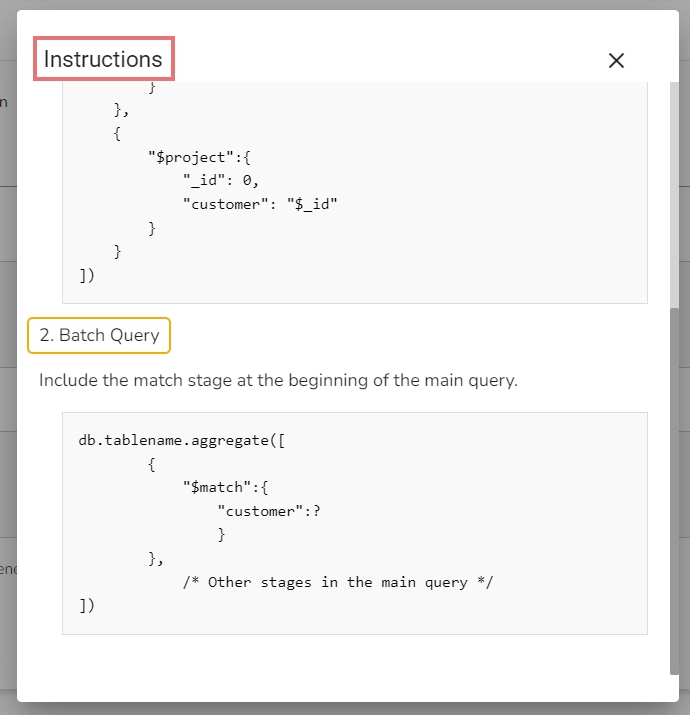
Batch Query
Data Restrictions
Schedule Data Refresh
The Create page for a new Data Store may display 5 stages to create a new Data Store if the Scheduler is not enabled.
The user can create a Data Store based on various data connectors using the Data Center module of the Platform. The major categories of the Data Store creation available on the platform are as follows:
Data Store using an RDBMS Data Connector
Data Store using an API Data Connector
Select an account or add a new account using the drop-down menu.
The LinkedIn Login page opens for signing into the account.
A new page opens, asking permission for BDB to access data from the selected LinkedIn account.
Click the Allow option to give data access permission.
The LinkedIn Ads Data Connector page opens with a notification that the users are successfully logged in to the selected account.
Provide a name for the Data Connector.
Describe the Data connection (optional).
Click the Save option.
A success message appears, and the newly created LinkedIn Ads data connector gets added to the Data Connectors List.
Select an FTP Server using the data source filter.
Search an FTP Data Connector from the Search Data Connectors list.
Select a Data Connector from the list.
Click the Create Data Set option for the selected Data Connector.
A new Data Set creation form opens for the FTP Data Set.
Provide a name for the Data Set.
Describe the Data Set (Optional).
The pre-selected Data Connector name appears.
Click the Get All Data option.
Select a file from the displayed list (Use double-click on a file to select it.)
After selecting a specific file, click the Get Sheets option.
Choose a Data Sheet using the Select Report Type drop-down menu.
Click the Save option after getting the data preview.
A success message appears to assure the creation of a new dataset.
The newly created FTP Data Set gets added to the Data Sets list.
The user gets redirected to log in to a Google account, if the Add New Account is selected.
Give access to the analytics data by clicking the Allow option.
The user gets redirected to the data connector form with an authorization code in the URL, after getting the access permission. The form mentions that the user has been logged in to the selected Google account.
Data Connector Name: Enter a user-defined name to identify the data connector.
Description: Describe the data connector (optional).
Click the Save option.
A success message appears, and the newly created Google Analytics data connector gets added to the Data Connectors list.
The Remove Data Store dialog box opens to confirm the deletion.
Click the Yes option.
A confirmation message appears.
The selected Data Store gets removed from the Data Stores list.


Check out the illustration on creating a Data Set using an API Connector.
Click the New menu from the Data Center homepage.
Select the Data Set option from the context menu.
The Data Source page containing all the data connectors opens.
Use the Data Source filter or the Search Data Connectors space to access a specific data connector by its name or is selected).
Select a Data Source from the displayed list.
The Google Analytics Dataset form opens.
Fill in the following information:
Dataset Name: Enter any user-defined name for the new dataset.
The Data Preview opens below.
The Save option gets enabled. Click the Save option.
A success message appears to ensure the user about the completion of the Data Set creation task.
The newly created dataset gets added to the Data Sets list.
There are two kinds of View options are available on the Data Sets list page:
List View
Grid View
In the list view, five columns contain data set information and action buttons as follows:
Data Set Name
Status
Data source Type
Created Date
Click on the List View icon to view all the Data set details in a list format. It is the default view for the Data Sets list.
Items per page display the number of data sets listed on the page.
The Next and Previous buttons are provided to go to the next and previous page respectively.
Click on the Card view icon on the top right corner, once the option is selected then the icon color will change to blue. The Card View will contain the following data set information:
Name
Created Date
Last run Date
Created User
The Action items mentioned under the Cards are:
View/ Edit
Publish
Share
Data Prep
This page displays step-by-step process on how to create an API Data Connector based Data Store.
Check out the given walk-through on how to create a Data Store based on an API Data Connector.
Access the Data Source List page (Click the Data Store option from the New context menu, to access the Data Source List page).
Choose an API connector type from the filter panel.
Click on the Create Data Store icon to create the Data Store.
The Getting Data tab opens.
Provide a name for the Data Store.
The name of the selected Data Connector gets displayed by default.
Select a data set using the Data Set List
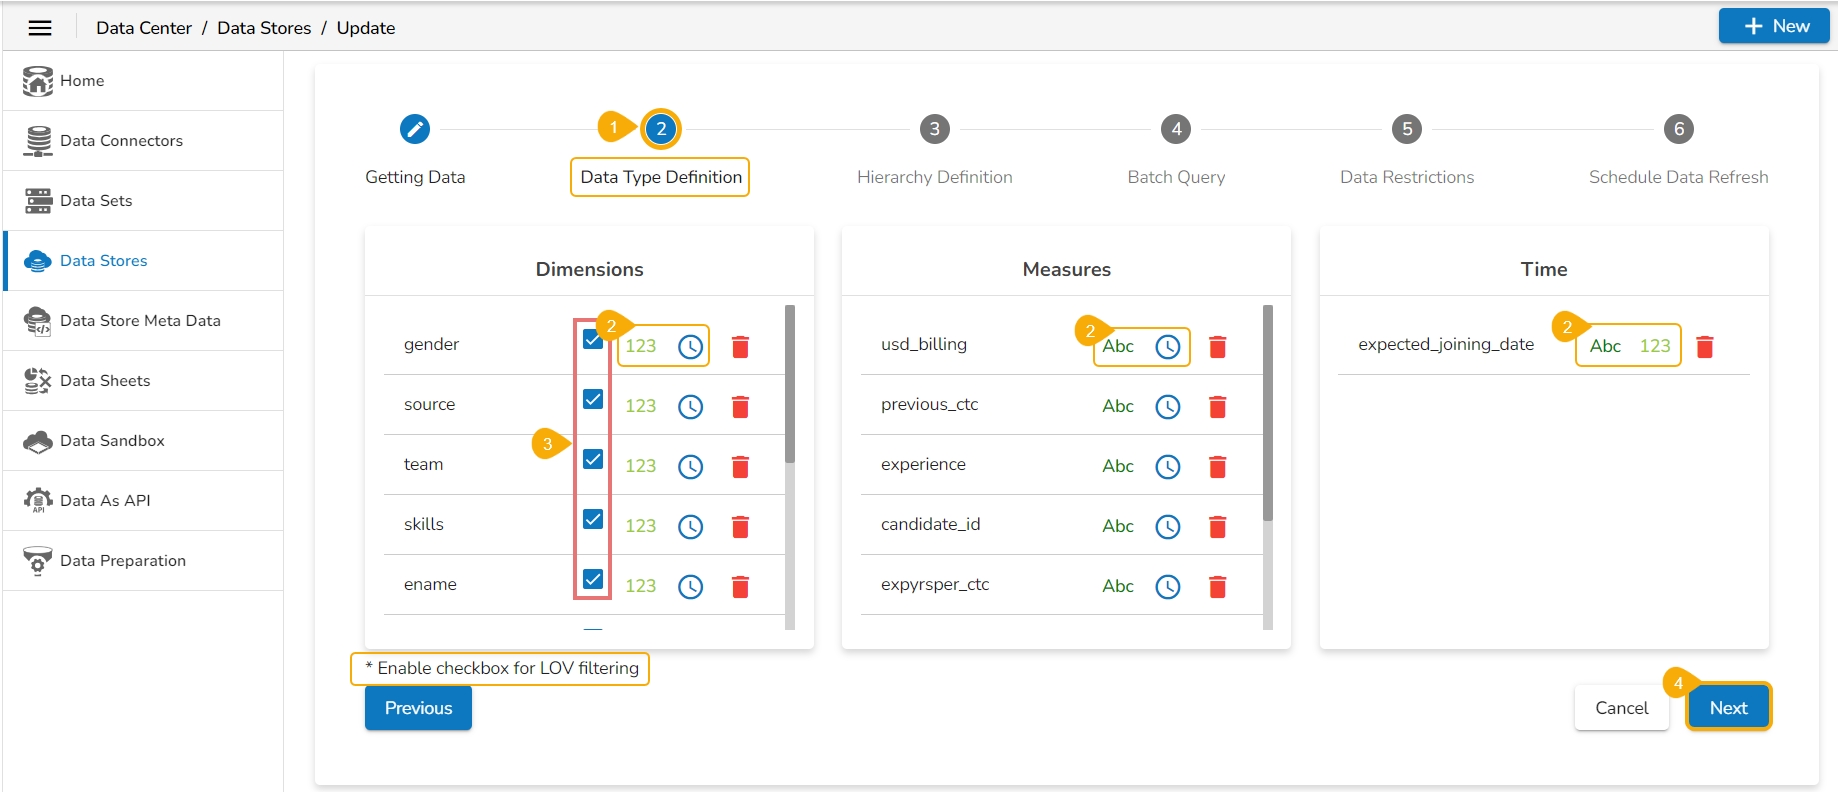
The Data Type Definition tab opens.
The user can interchange the available Dimensions, Measures, and Time fields to define data.
Enable dimension fields with a checkmark to get in the LOV of the Filter pane of the Self-service BI Report.
Click the
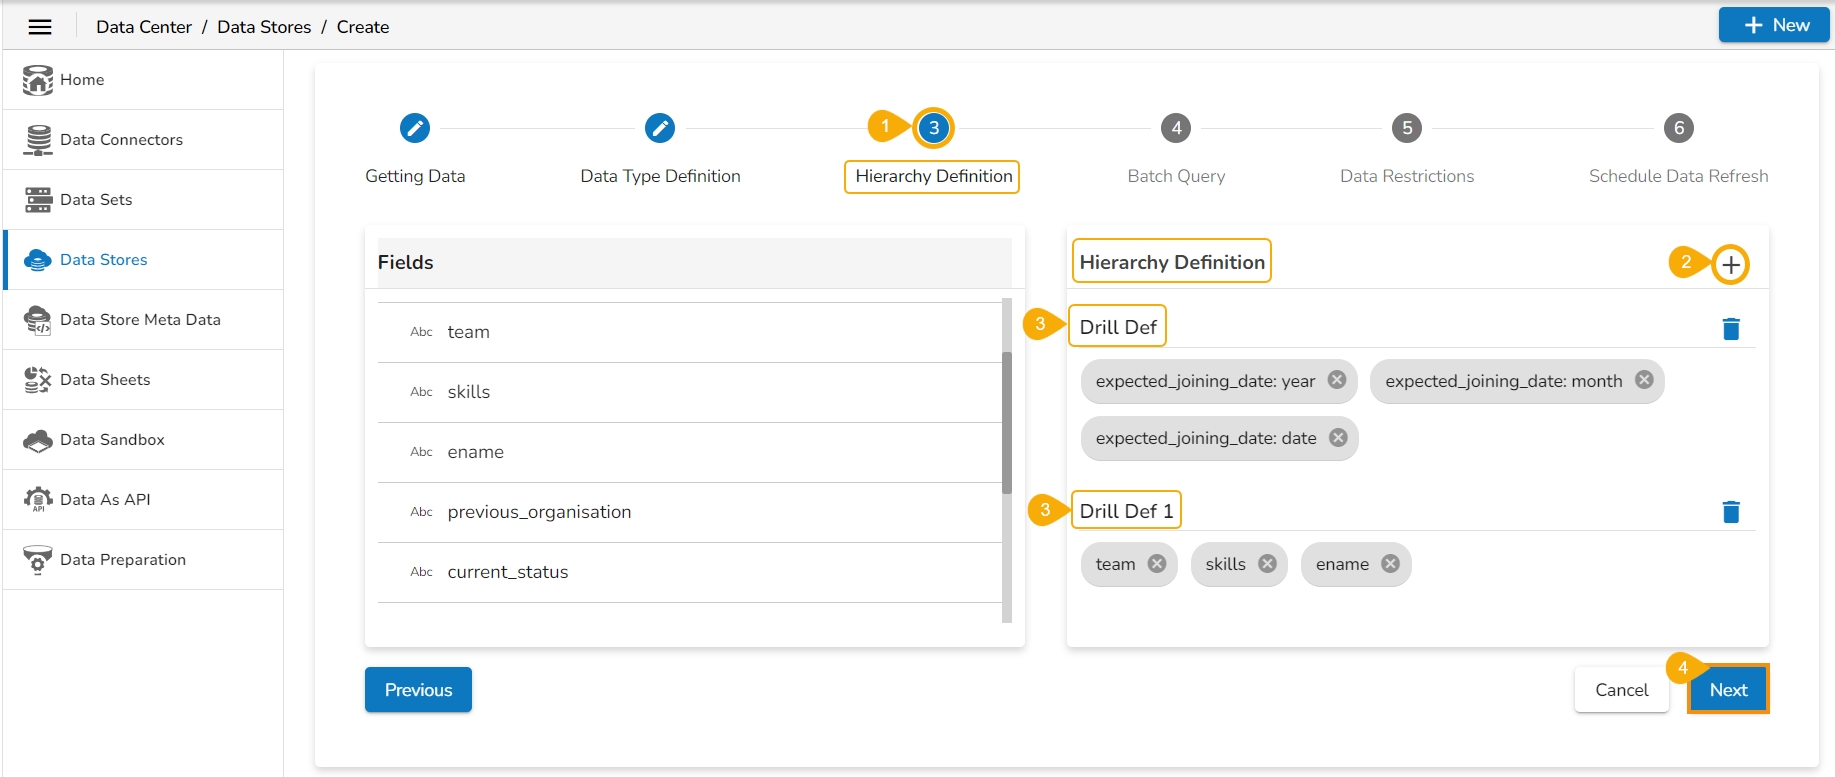
The Hierarchy Definition tab opens.
Add a new Drill Def box by clicking the Add icon.
Drag and drop Dimension or Time fields to create a hierarchy (The dragged and dropped Time fields get divided into three level granularities, E.g., Year>Month>Date).
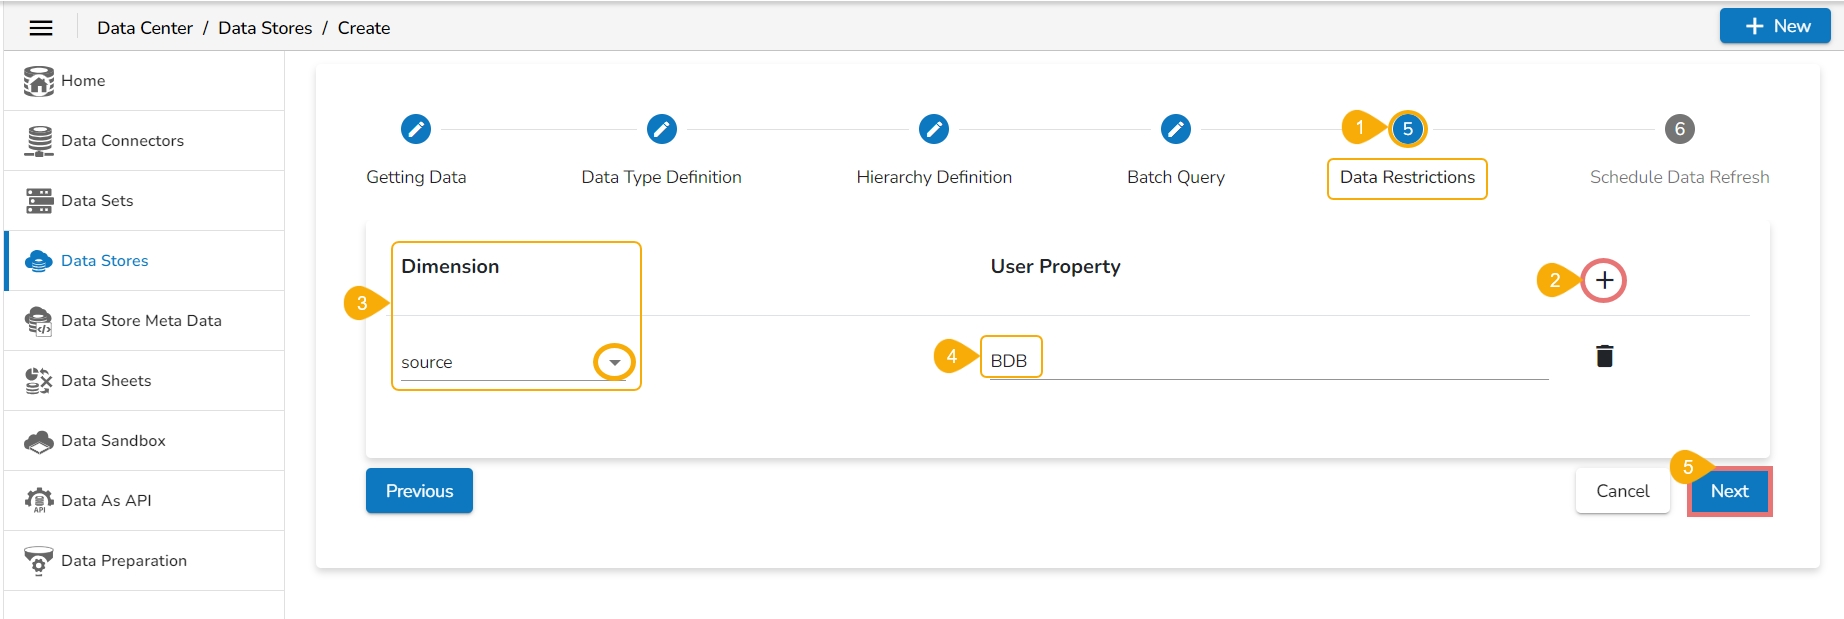
The Data Restrictions tab opens.
Click the Add icon.
Select a Dimension from the drop-down menu.
Enter a User Property
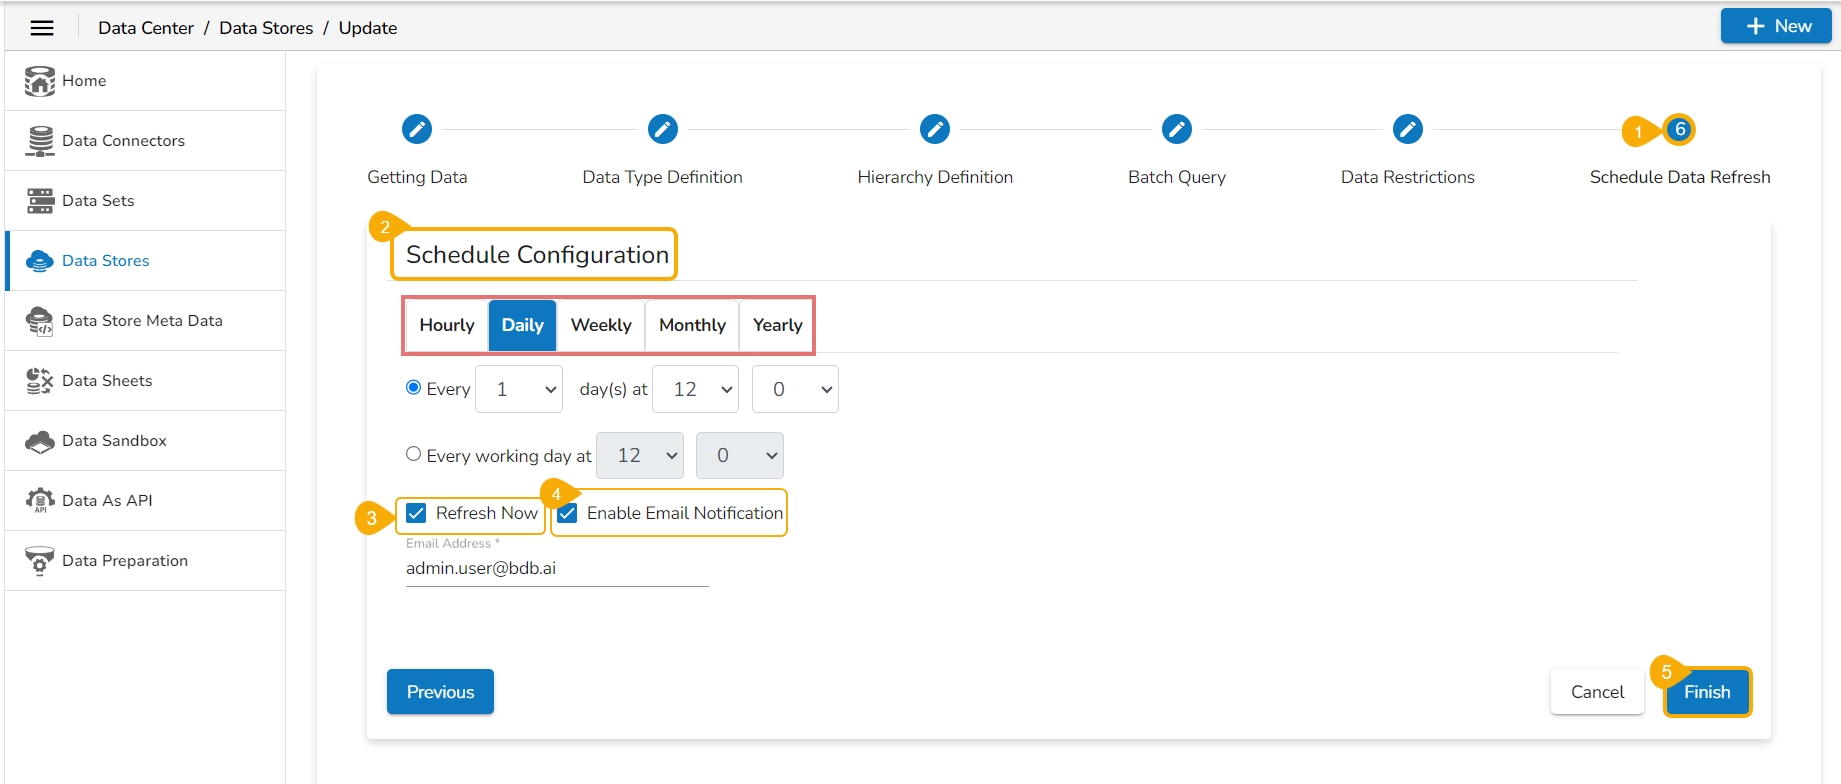
The Schedule Data Refresh tab opens.
The following options are provided to Schedule refresh the data:
Hourly
A success message appears to inform about the creation of a new data store.
The newly created Data Store gets added to the Data Stores list.
This option helps the user to share a Data Connector with other user(s) or user group(s). The user can also exclude a user(s) or user group(s) from the rights to access a Data Connector using the Exclude User option provided under the Share Data Connector dialog box.
Check out the illustration on sharing a Data Connector functionality.

Database Name: This is a pre-defined field based on the data connector chosen earlier.
Query: Write a valid query service in the given space.
Data Connector Name: This option is pre-defined as per the selected data connector.
Report Selection:
Select Report Type: Select a report type from the drop-down menu.
Columns: Select the required columns using the checkmarks next to the displayed columns.
Click the Preview data option.
If the selected Report Type option has a sub-report type, then one more field appears to Select Sub-report Type before selecting the columns to preview the selected data.
Created By
Actions
Visualize
More Options
Push to VCS
Pull From VCS
Delete
Use a checkmark in the given box to Enable Scheduler
Click the Next option.
Click the Next option to proceed.
Weekly
Monthly
Yearly
Select any option from the above-given list and configure the required information to set the data refresh interval.
Select the Refresh Now option by enabling the box to refresh the Data Store immediately after creation.
Enable Email Notification by enabling the option.
Provide the Email Address to get notified by mail.
Click the Finish option.
Navigate to the Data Connectors list.
Select a Data Connector from the Data Connectors list.
Click the Share icon for the selected Data Connector.
The Manage Access window opens for the selected data connector.
Choose an option to Grant Permissions out of View and Edit options.
Select a tab out of User, User group, and Exclude User options.
Search the specific user or user group using the search bar.
Select a single or multiple User/ User group from the chosen list. If a user is selected using the Exclude User tab, it will allow the selected user to be excluded from the access of the data connector.
Click the Save option.
A confirmation message appears and the Data Connector gets shared with the selected user(s)/ user group(s).
The Granted Permissions will be listed.
The shared data connector appears with the shared status notification (as displayed in the image) in the receiver's user account.
Check out the illustration on Excluding users from sharing a connector.
Navigate to the Manage Access window.
Select permissions using the Grant Permissions.
Open the User Groups tab.
Select user groups by using checkboxes.
Navigate to the Exclude Users tab.
Select the user(s) using the checkboxes.
Click the Save option.
A notification message appears.
The excluded users are listed under the Excluded Users section.
Check out the illustration on Including users in sharing a connector.
Navigate to the Manage Access window for a shared connector.
The Excluded Users section will list the excluded users if some users are excluded.
Select a user from the Excluded Users list.
Click the Include User icon.
A notification message ensures the data connector is shared with the included user.
The included user gets removed from the Excluded Users list.
Check out the illustration on revoking permissions.
Open the Manage Access window for a shared data connector.
Navigate to the Granted Permissions section.
Select a user/ user group from the granted permissions list of users.
Click the Revoke Privileges icon.
A notification message ensures that privileges are revoked.
The selected user/ user group gets removed from the Granted Permissions section.
This option helps the user to share a Data Set with other user(s) or user group(s). The user can also exclude a user(s) or user group(s) from the rights to access a Data Set using the Exclude User option provided under the Share Data Set dialog box.
Check out the illustration on sharing a data set functionality.
Navigate to the Data Sets list.
Select a Data Set from the Data Sets list.
Click the Share icon for the selected Data Set.
A confirmation message appears and the Data Set gets shared with the selected user(s)/ user group(s).
The selected user(s) / group(s) will be listed under the Granted Permissions section.
Navigate to the user account with whom the Dataset has been shared.
Open the Data Set List page, the shared Data Set gets marked with a specific icon under the Status column.
The receiver user will have limited permission of Actions on the Shared Data Set.
Check out the illustration on excluding users from sharing a Data Set.
Navigate to the Manage Access window for a Data Set.
Grant Permissions using the checkboxes provided under the Grant Permissions option.
Open the User Groups tab.
select user group(s) using the checkboxes.
Navigate to the Exclude Users tab.
Select the user(s) using the checkboxes.
Click the Save option.
A notification message ensures the selected data set is shared with the selected group.
The excluded users will be listed under the Excluded Users section.
Check out the illustration on including the excluded users for a shared Data Set.
Open the Manage Access window for a shared data set.
Navigate to the Excluded Users list.
Select a user from the list.
Click the Include User icon.
Check out the illustration on revoking the privileges for the shared user.
Navigate to the Manage Access window.
The Granted Permissions section will list the selected user(s) or user group(s).
Select a user or user group from the displayed list.
Click the Revoke Privileges icon.
Check out the illustration on adding synonyms to a Datastore.
Select a Data Store from the Data Stores list.
Click the Add Synonym to Data Store option.
All the Attributes are displayed in a list form.
You can search for a field from the displayed list using the Search space.
Select a field name.
Click the Add Synonyms
A new window opens to add synonyms.
Insert new synonyms in the specified space.
The added synonym(s) appear below with the remove option.
Click the Save option.
A success message appears to ensure that the synonym dictionary is updated with the newly added synonym.
Check out the video on adding synonyms for a Dimension Value.
Select a Data Store from the Data Store List.
Click the Add Synonym to Data Store icon.
The NLP Synonyms window opens for a data store.
You can search for a Dimension from the displayed list using the Search space.
Select a Dimension.
Select the Add Values option for the selected Dimension.
The selected Dimension appears on the top. (E.g., skills in the below image).
Use the search bar to find specific dimension values.
A list of Values appears.
Select a Value from the displayed list.
The selected dimension value appears to add synonyms.
Add synonyms by inserting new synonyms in the specific space, and clicking the Enter key.
The Value gets added to the selected dimension value.
Click the Save option to save the added synonyms.
A success message appears to ensure that the Synonyms dictionary is updated.
Check out the illustration on providing the Units for Measure values.
Select a Data Store from the Data Store list.
Click the Add Synonyms to Data Store icon.
The NLP Synonyms window opens for a data store.
You can search for a Measure from the displayed list using the Search space.
Select a Measure from the displayed list.
A notification message appears to inform the recent update the user, and the user gets redirected to the Data Stores List page.
This page explains the steps to create a new Arango DB Data Connector and a Data Set based on that Data Connector.
Steps to create a new Arango DB Data Connector:
Navigate to the Data Center homepage.
Click the New option.



This page aims to describe the various options provided on the Data Stores List.
Select permissions using the checkboxes from the Select Permissions option.
Select one tab from the Users/ User Groups tabs.
Search a specific user or user group.
Select a user(s)/ user group(s) from the selected tab.
Click the Save option.
A notification ensures that the privileges are shared with the recently included user from the group.
The Excluded Users list gets modified.
A notification message ensures that the granted permissions are revoked for the selected user(s)/ user group(s).
The granted permissions list gets modified.
The Exclude User tab helps to exclude the user(s) from the rights to access a Data Set, if it is already shared. Only the users part of the selected user group to which the Data Set has been shared will be listed under the Exclude User tab.
The Action permissions for a shared Data Set may vary based on the granted privileges while sharing the Data Set.


Click the Add Synonyms option for the selected value.
Select a unit for the Measure.
The Data Connectors page opens.
You can use the Search bar to search for a specific connector (In this case, Arango).
Click the Arango connector option.
The Arango DB Data Connector page opens.
Provide the following information to create an Arango DB Data Connector:
Data Connector Name: Provide a user-defined name to identify the data connector.
Description: Provide connection details (Optional).
Username: Enter a Username (It should be the same as given in the connection server).
Password: Enter the Password (It should be the same as provided in the connection server).
IP/Host: Enter database server details (from where the user wants to fetch data).
Port: Provide the server port number.
Database Name: Name of the database where you wish to store data.
Click the Save option.
A success message appears confirming the connection.
Another success message appears confirming the creation of the Data Connector.
The newly created Arango DB data connector gets added to the Data Connectors list.
Navigate to the Data Center homepage.
Click the New option.
Select the Data Set option from the context menu.
The Data Connectors list gets displayed with the Create Data Set Action icon (+) for all the available data connectors.
Select a Data Connector and click on the Create Data Set icon (E.g., the arangoDB Connector is selected in the given image).
You can select the Arango DB Connector from the Data Source filter.
Search and select a data connector from the displayed list of Data Connectors.
Click the Action/ Create Data Set (+) icon provided in the same row of the selected data connector.
The Data Set page opens with the following Configuration fields:
Service Name: Enter any user-defined name for the new data set.
Description: Provide a brief description of the Data Set (optional).
Data Connector Name: This is a pre-defined field based on the selected data connector.
Table Information: On the right side of the page Table information is displayed and that will contain all the tables in the Database and the Column name in the table. Double click in the Table or Column will auto-generate a sample query so that the user can validate and get data.
Click the Validate option to execute the new Data Set.
If the query contains filters, then the right-side filter column will appear.
Click on the Continue button then the query will execute.
A message appears to inform the successful execution.
The data preview appears at the bottom of the page.
The Save option gets enabled.
A notification message appears to assure completion of the action.
The newly created Data Set gets added to the Data Sets List.


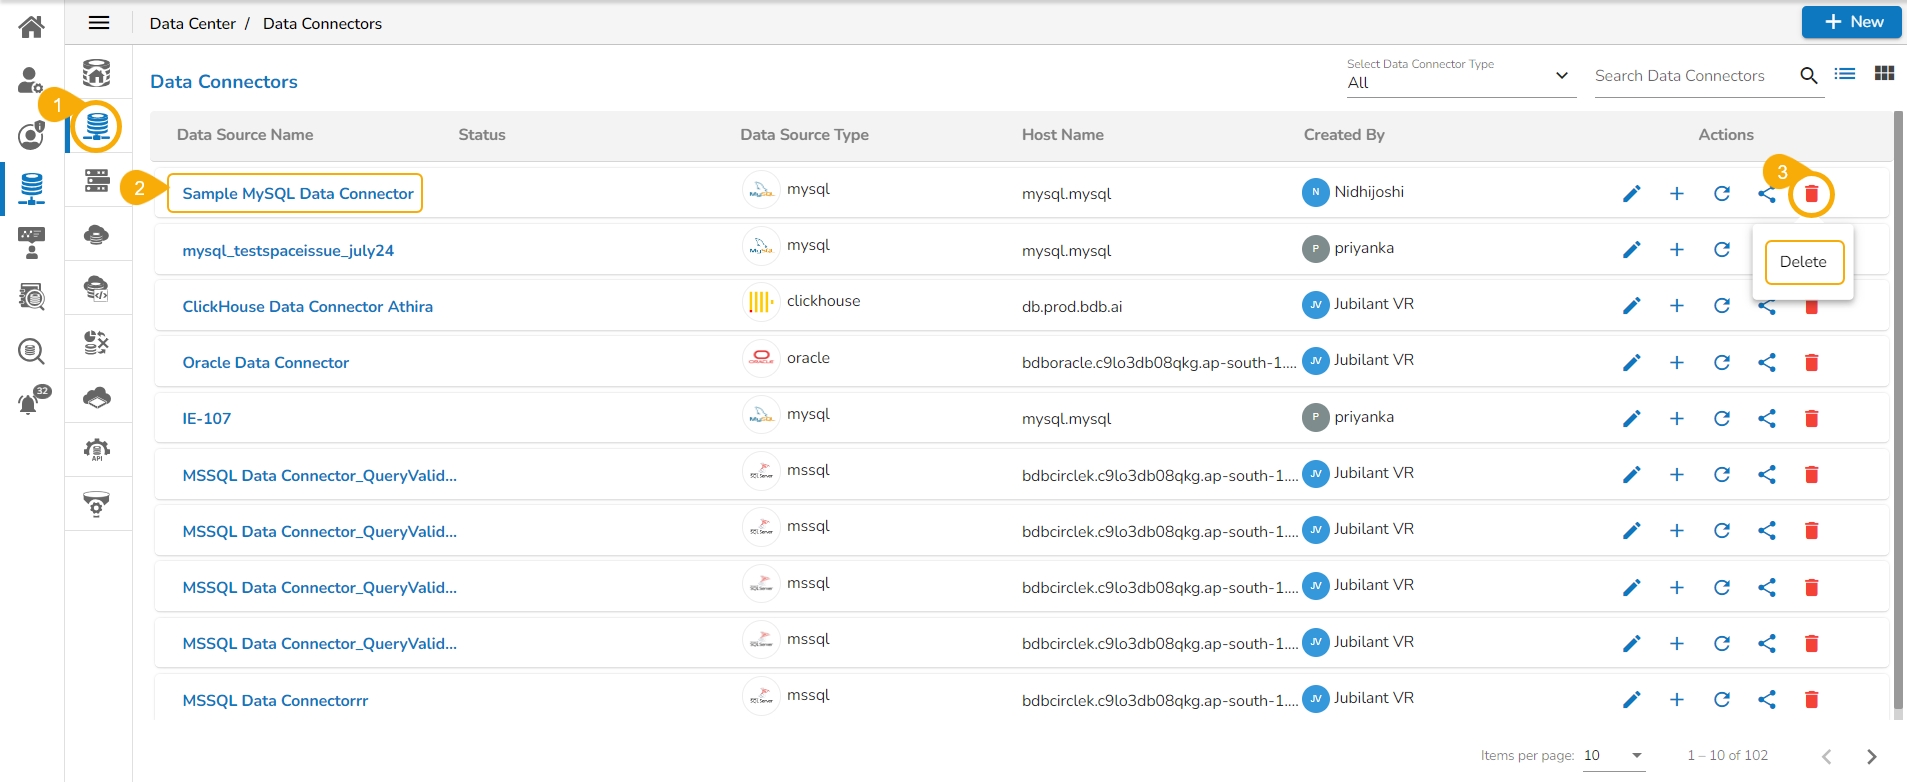

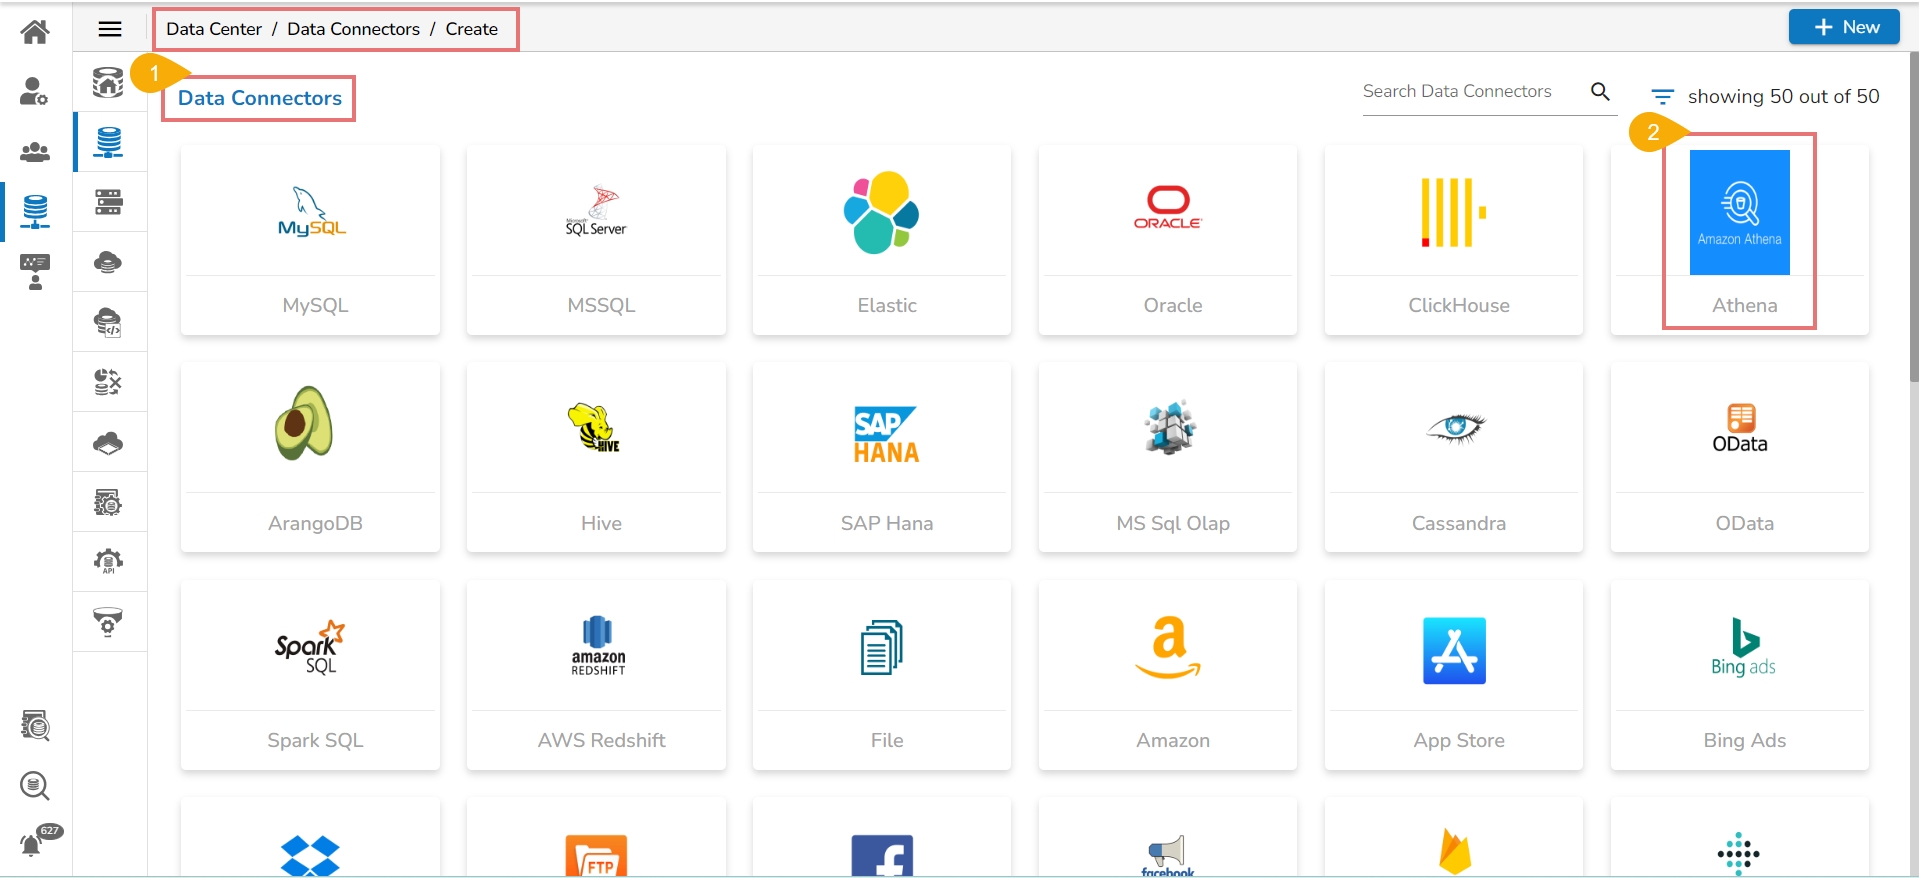
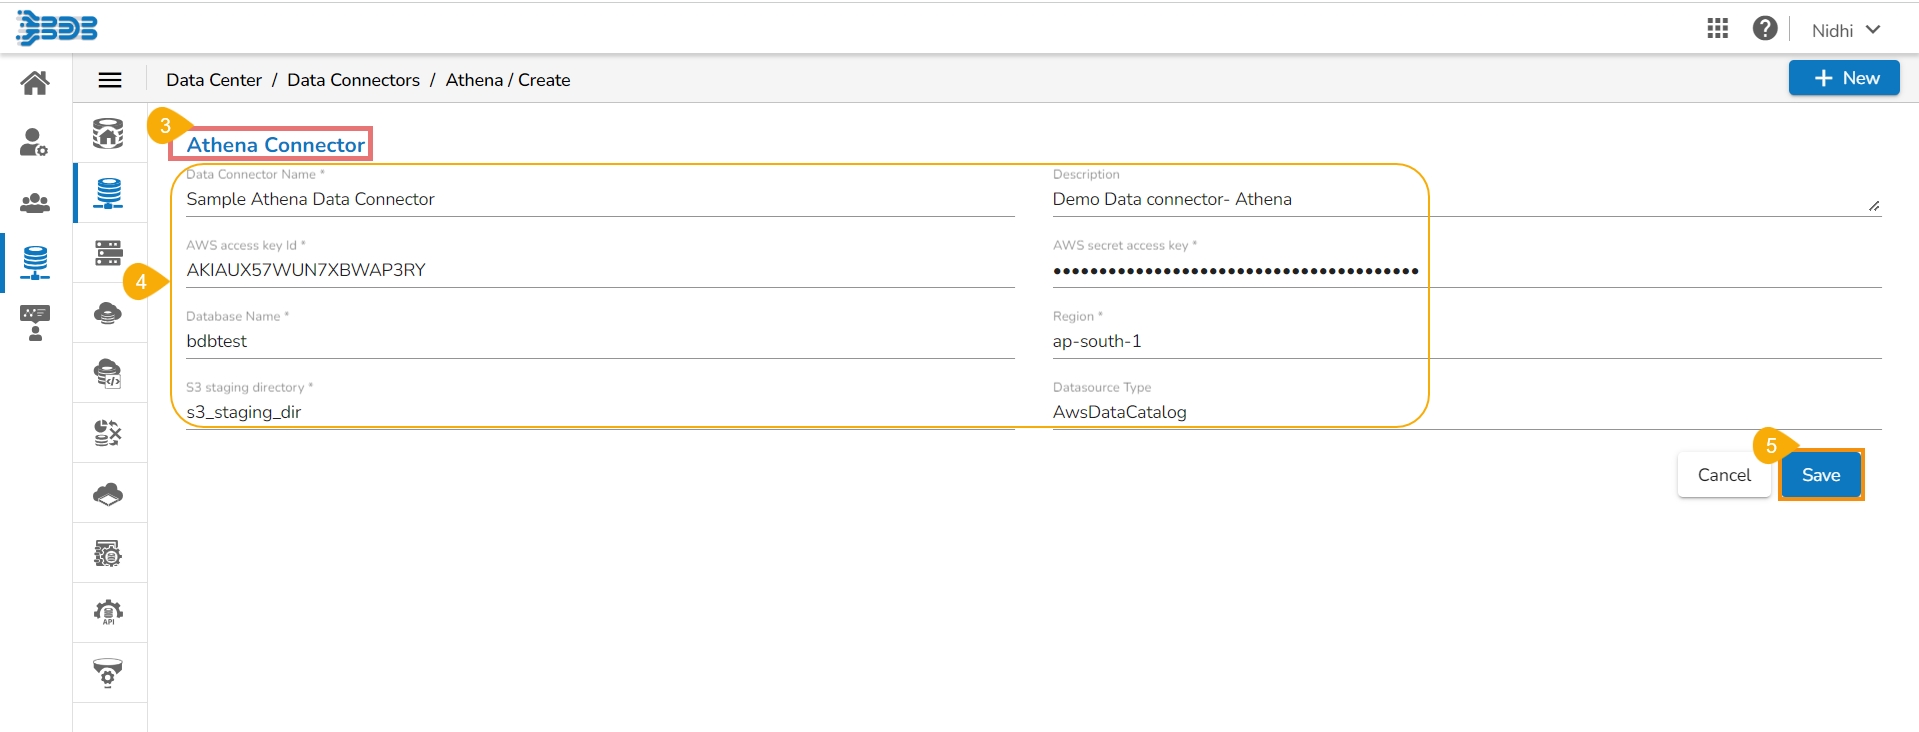


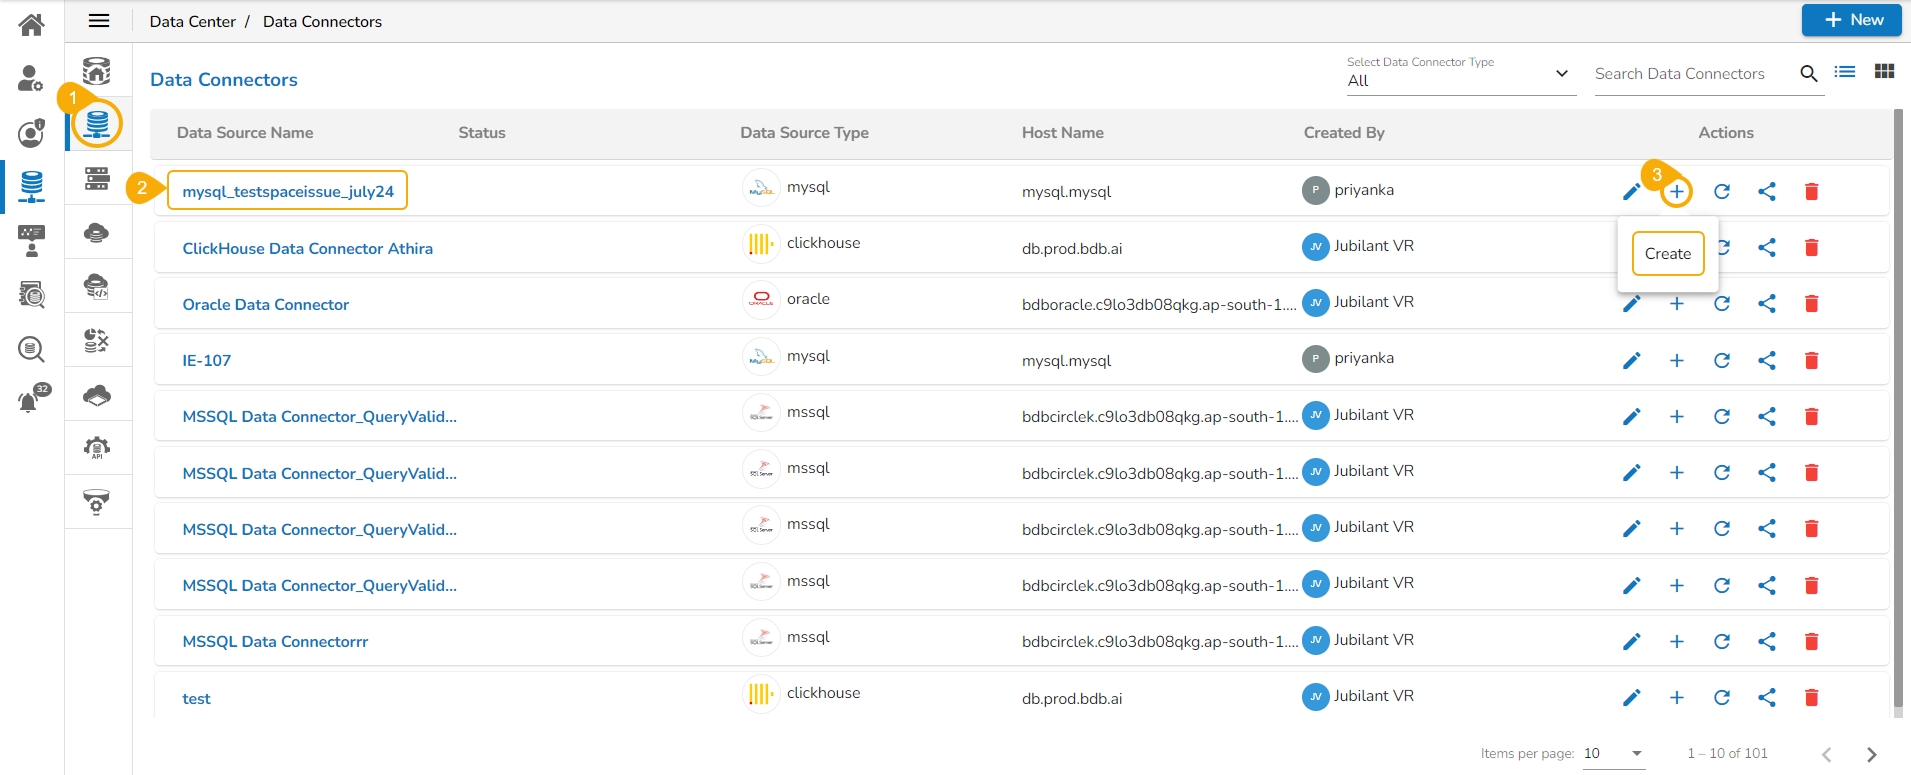

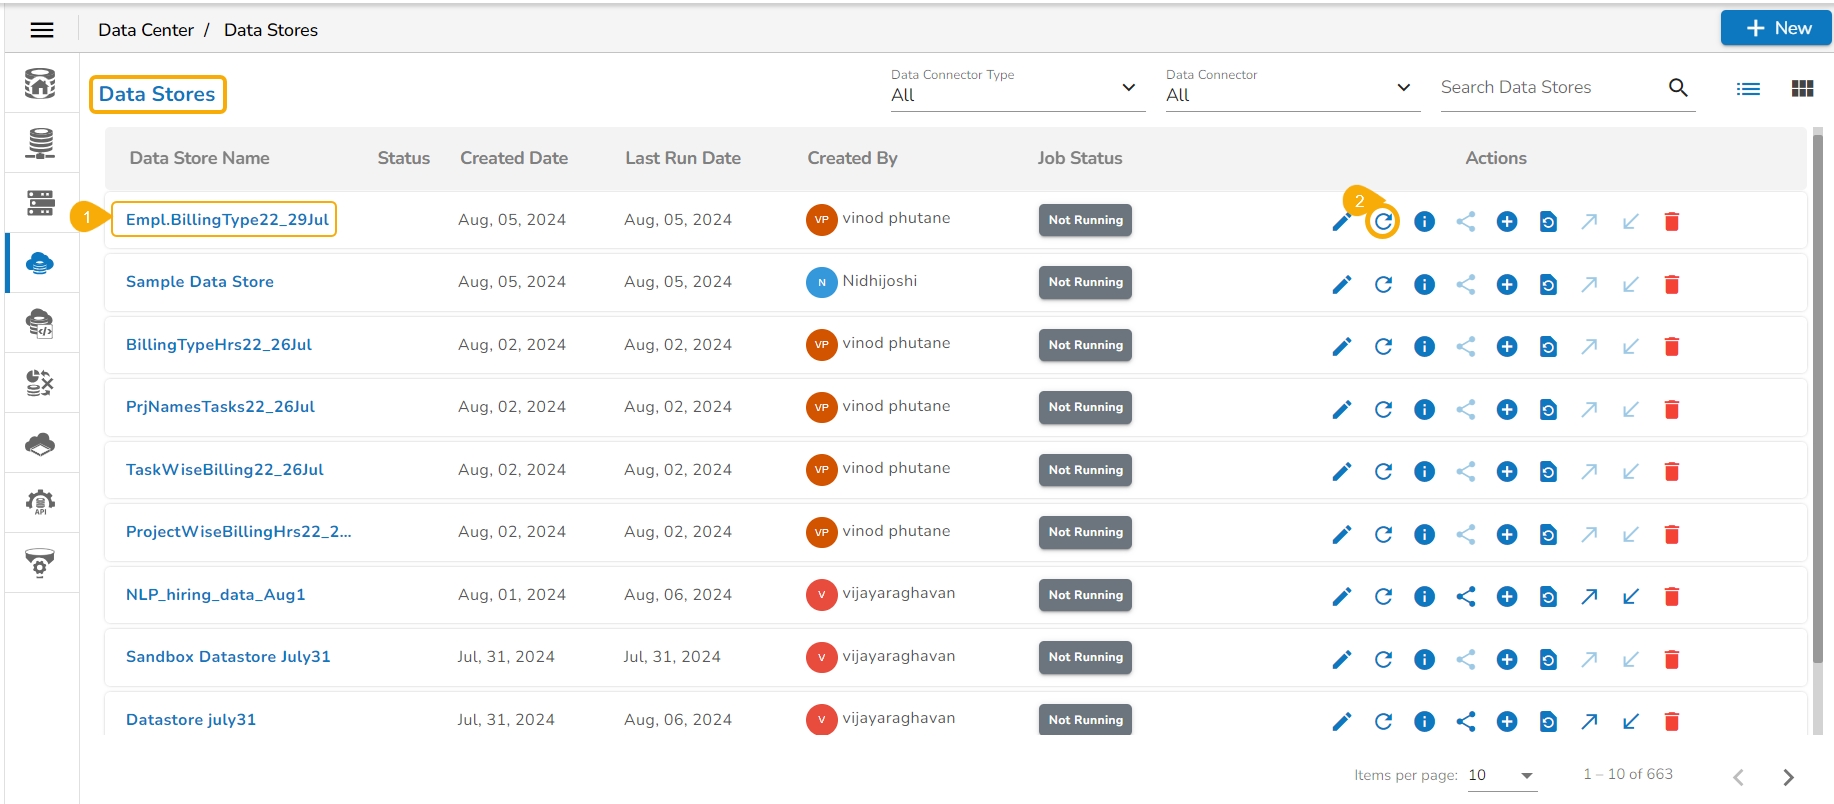


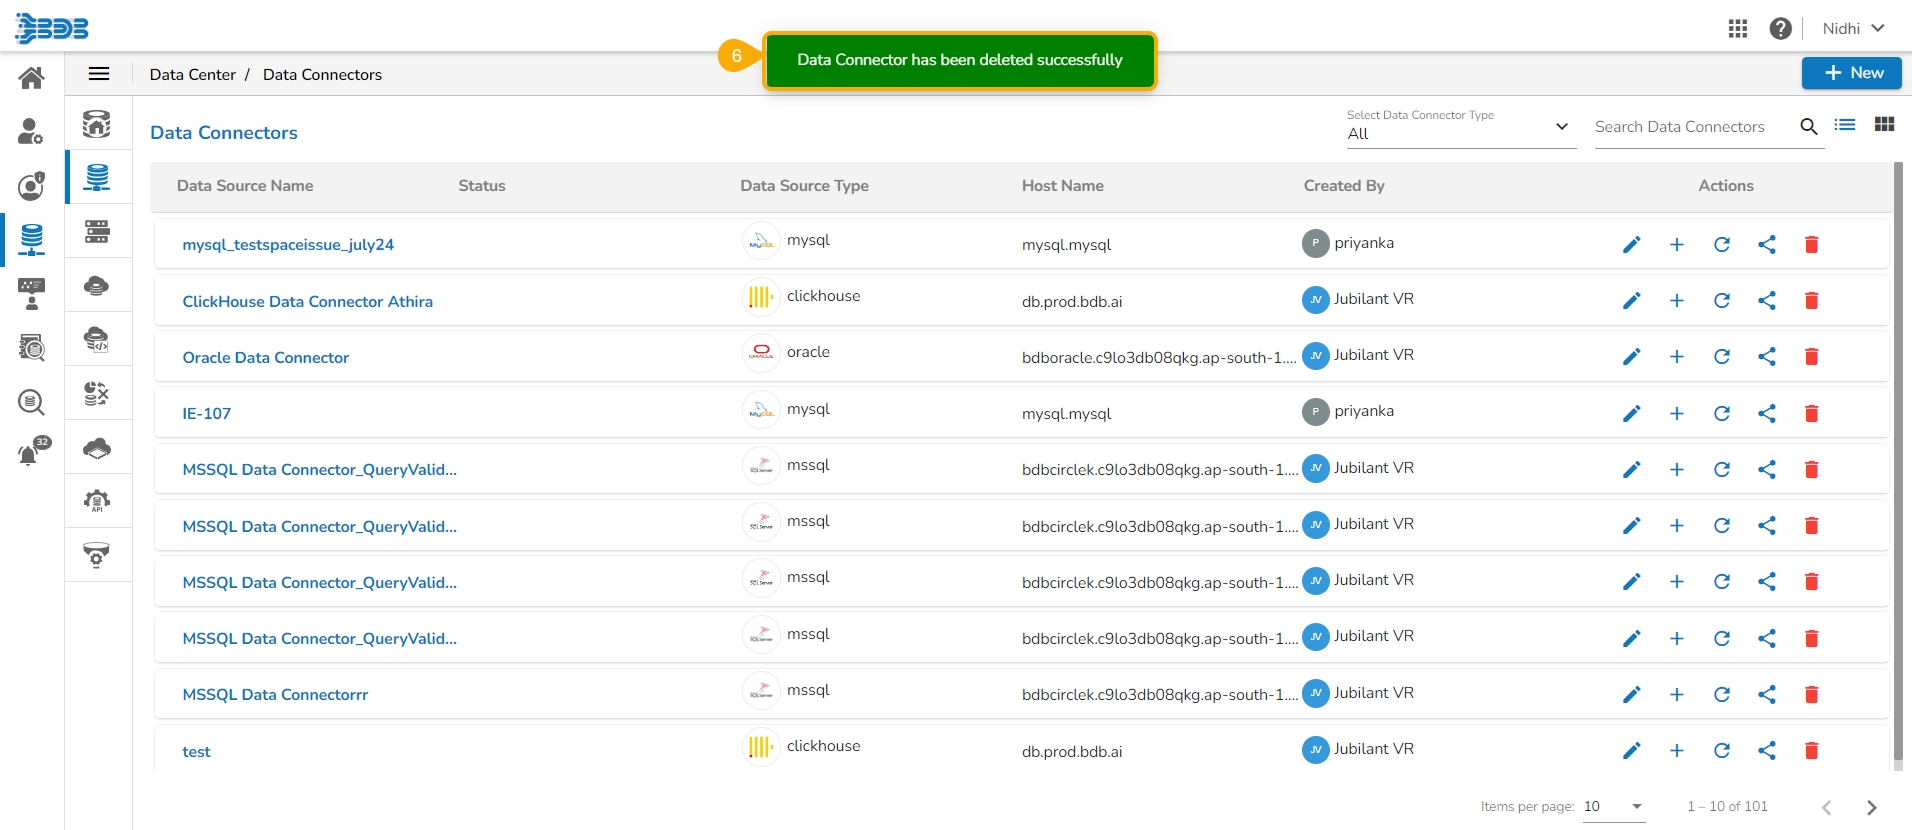
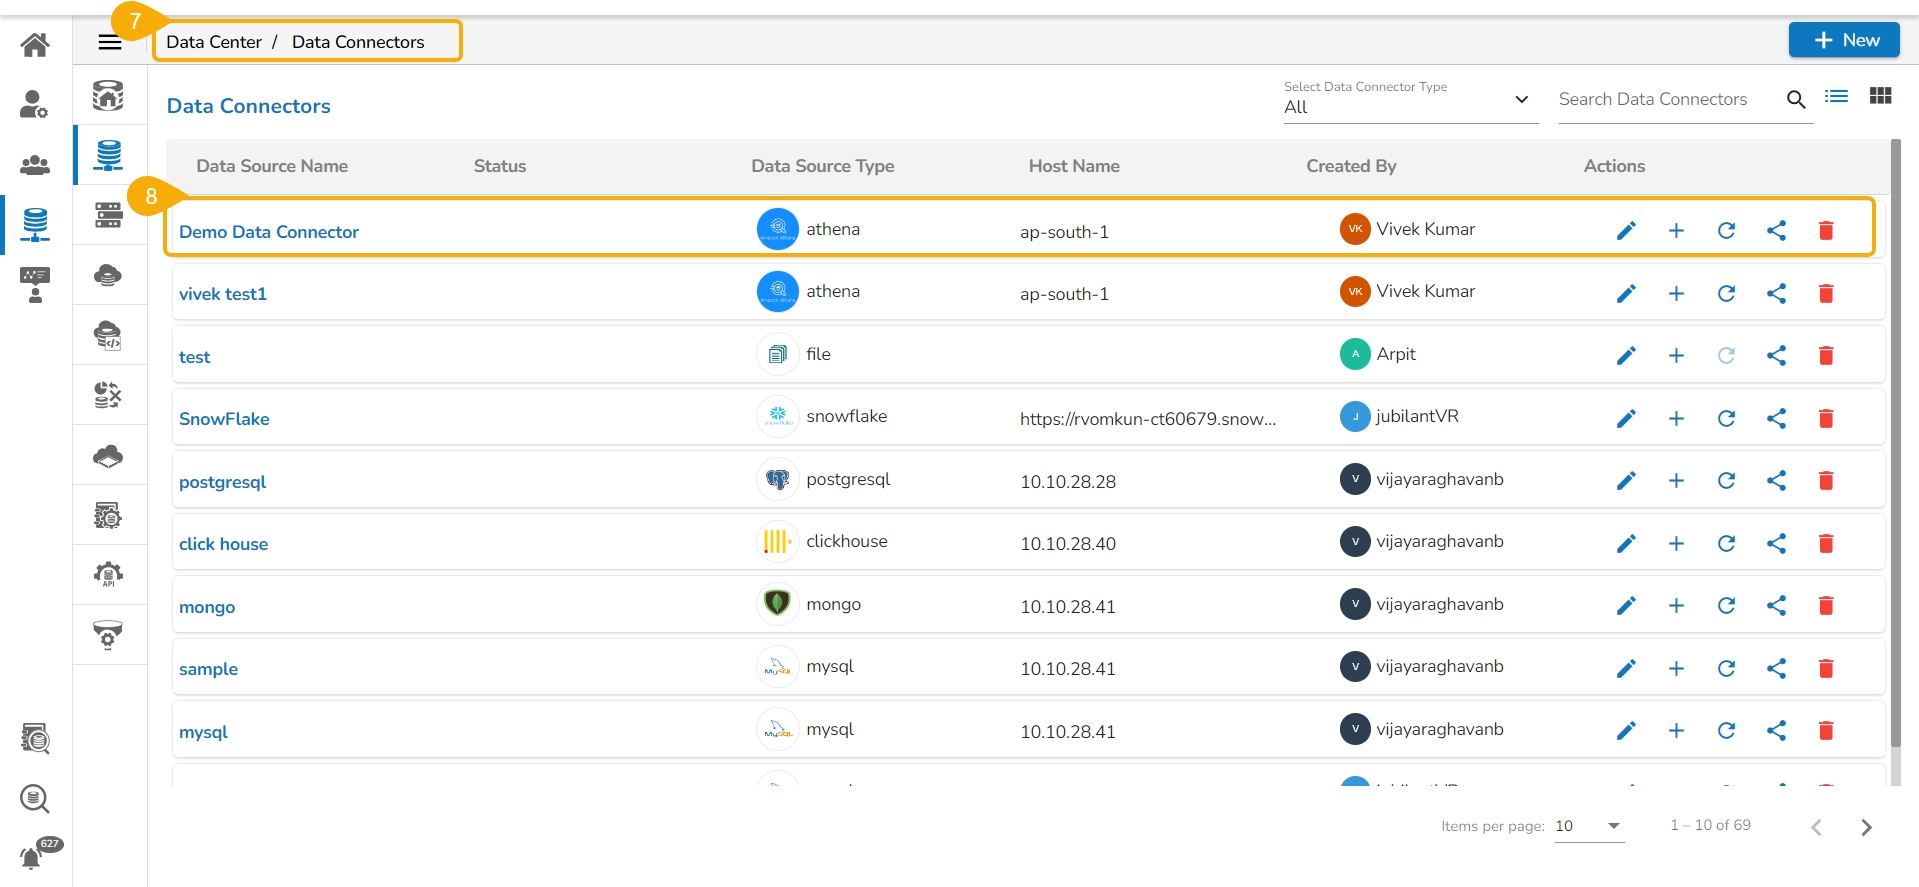


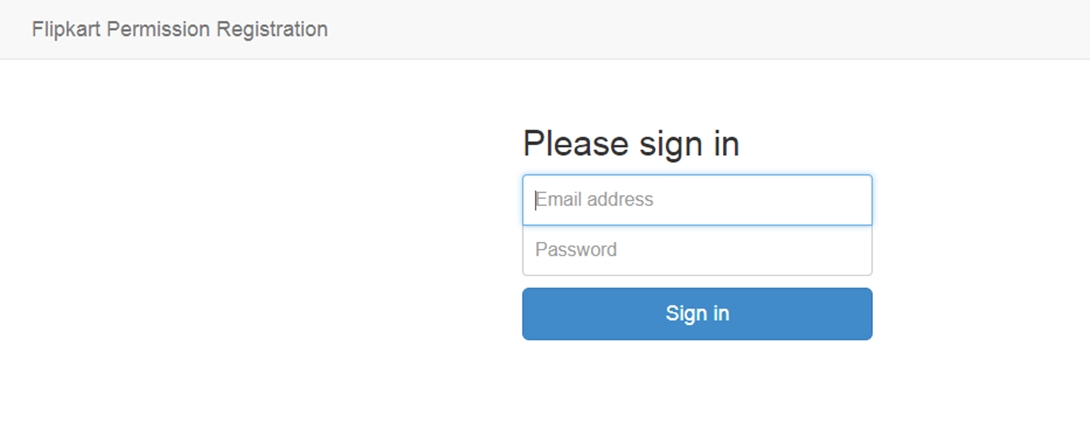


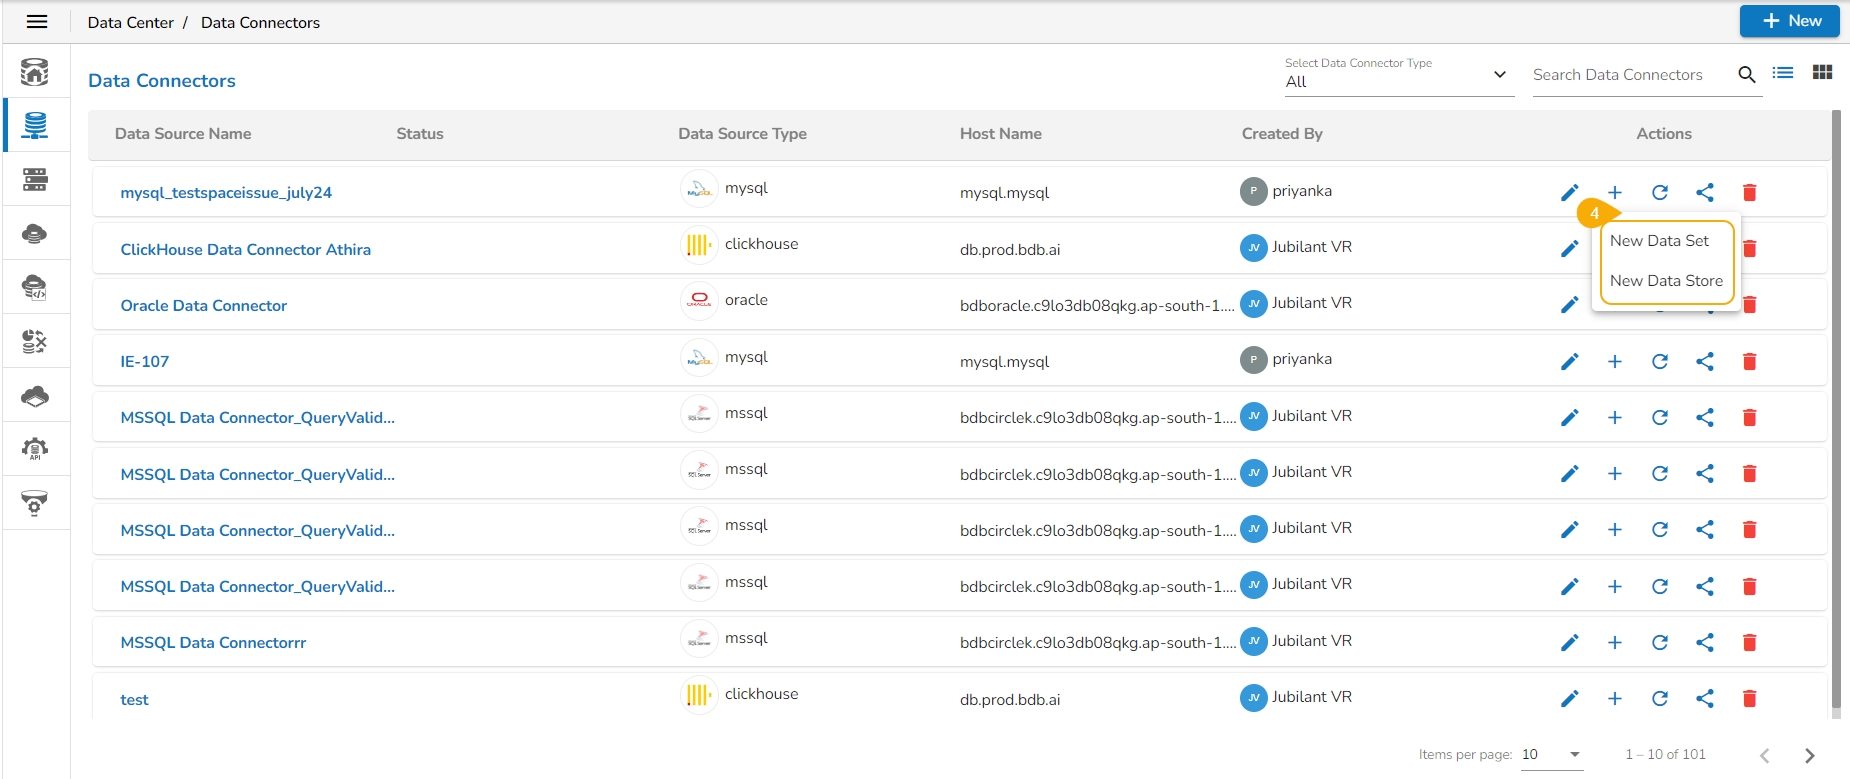



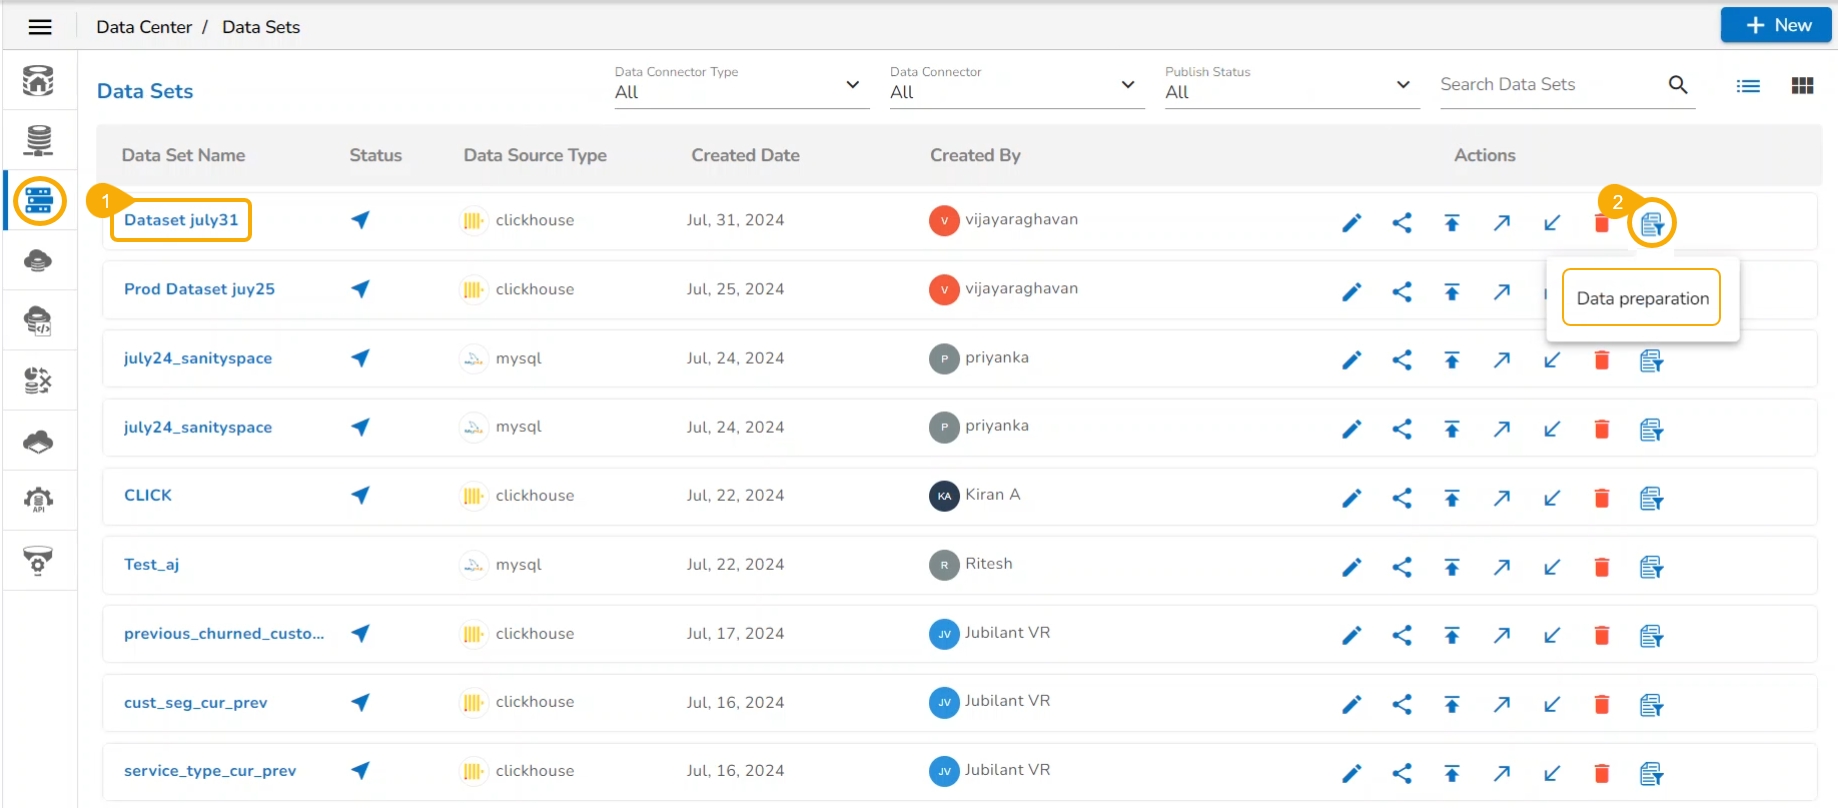
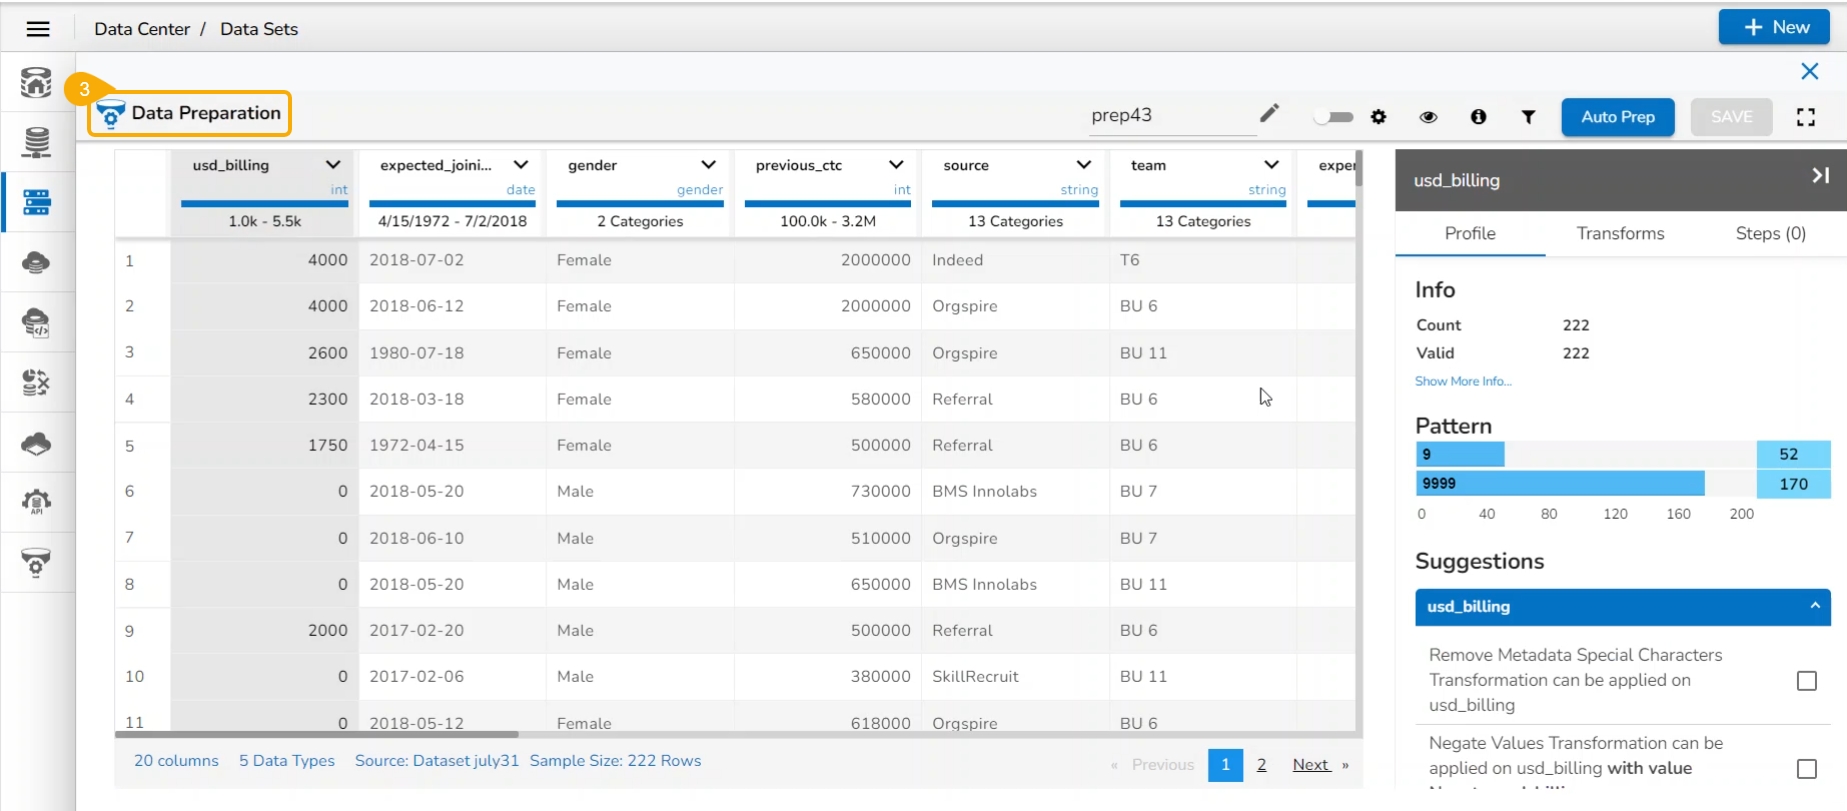


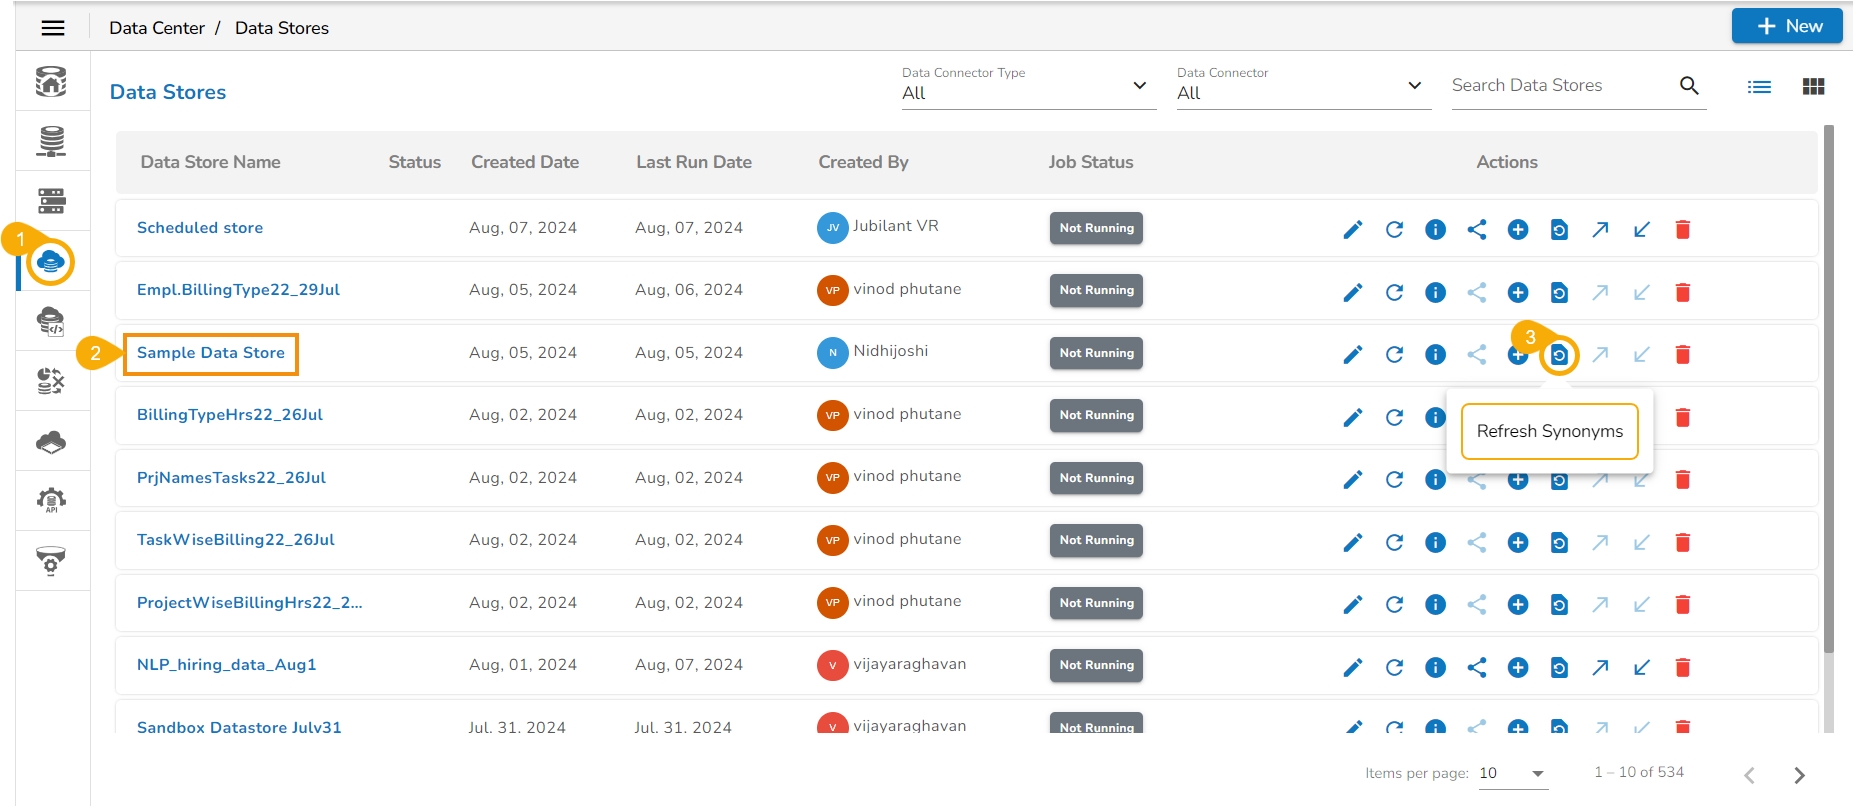
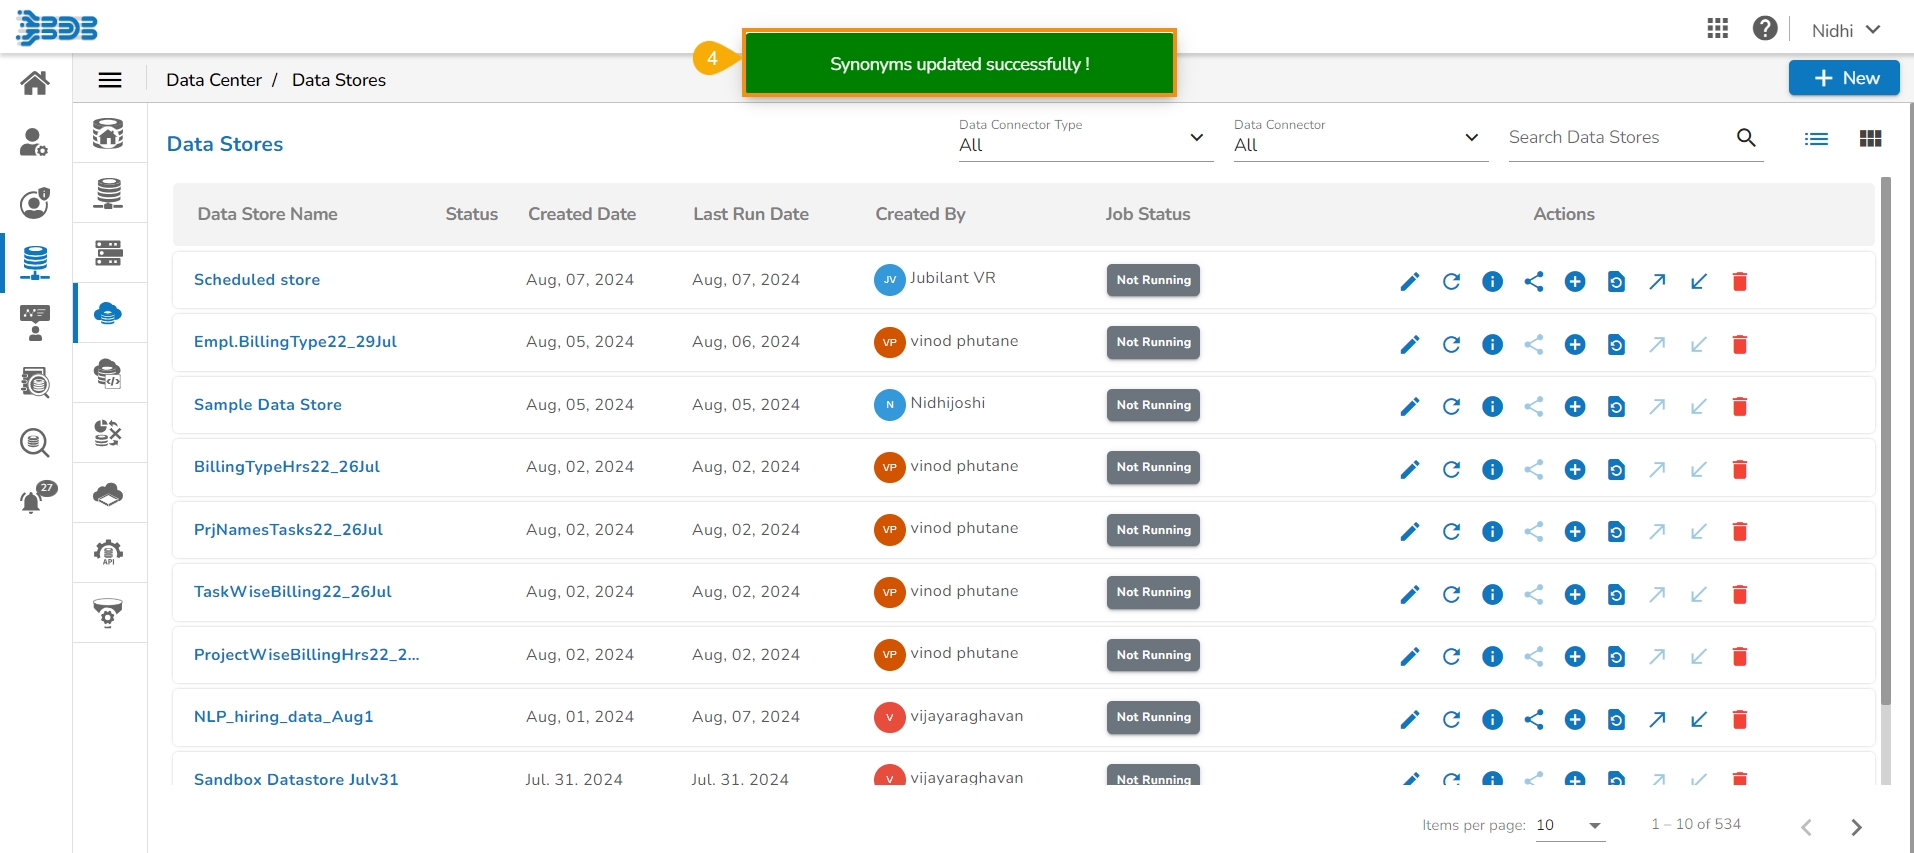
Database Name: This is a pre-defined field based on the data connector chosen earlier.
Query: Write a valid query service in the given space.


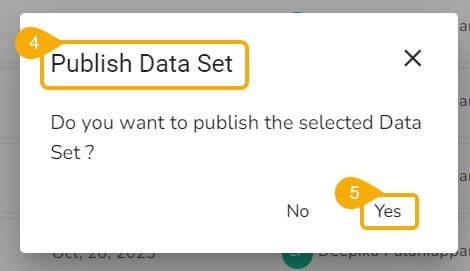
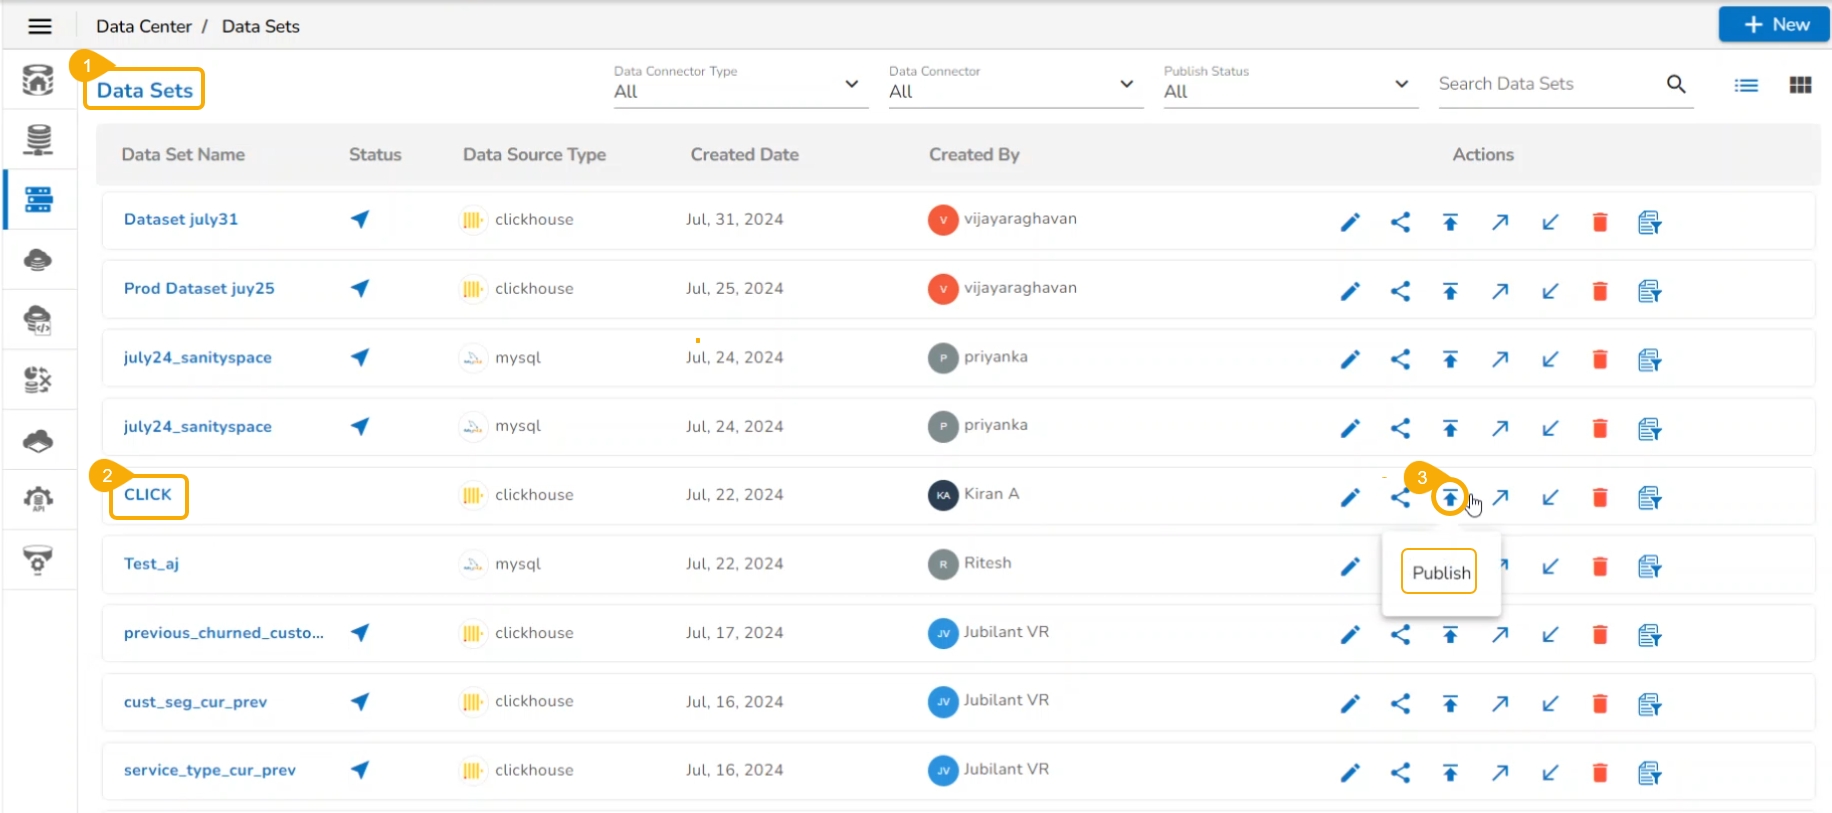








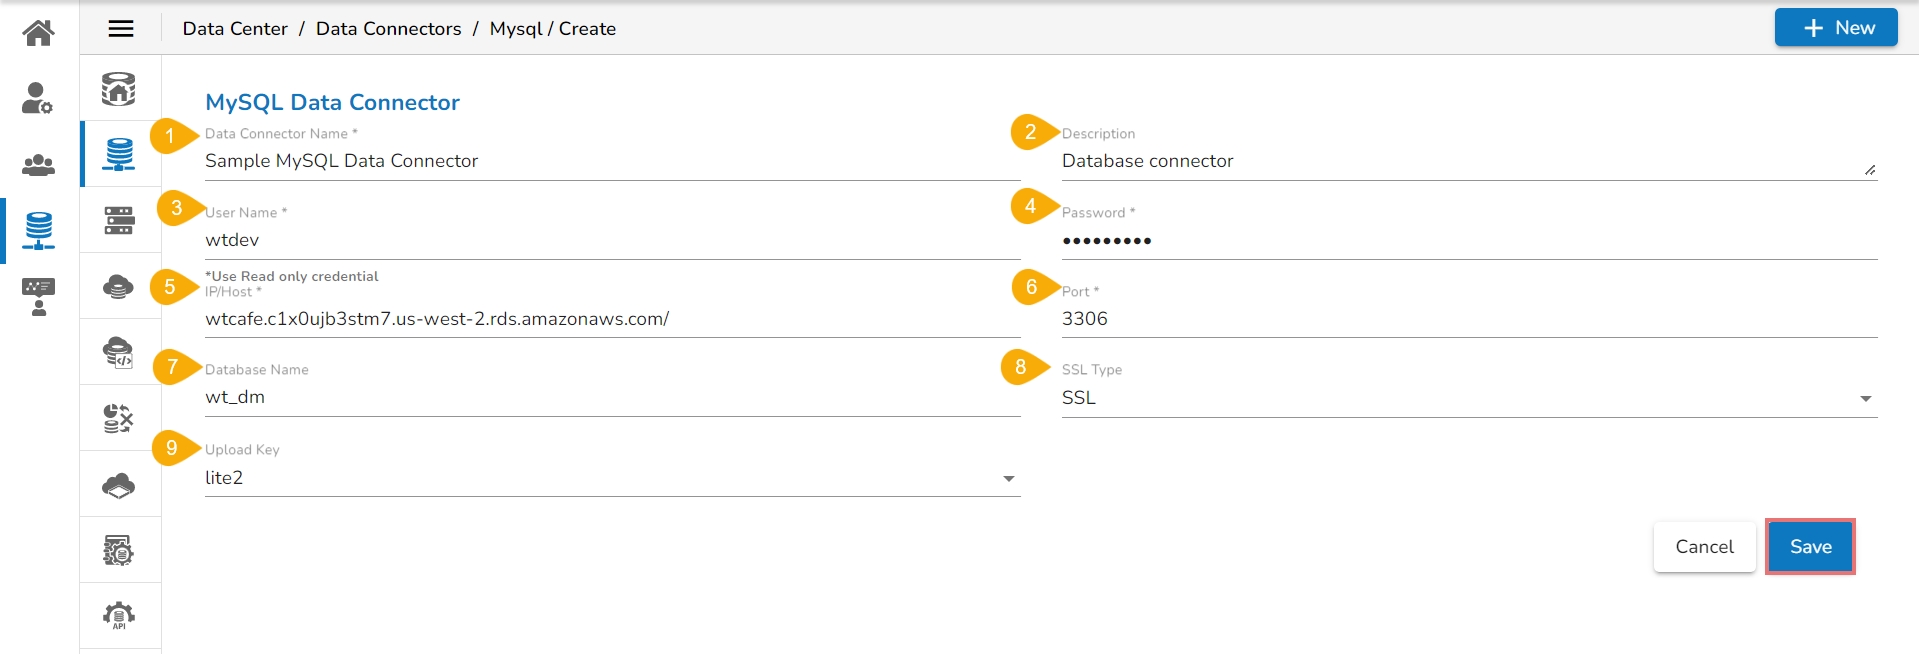

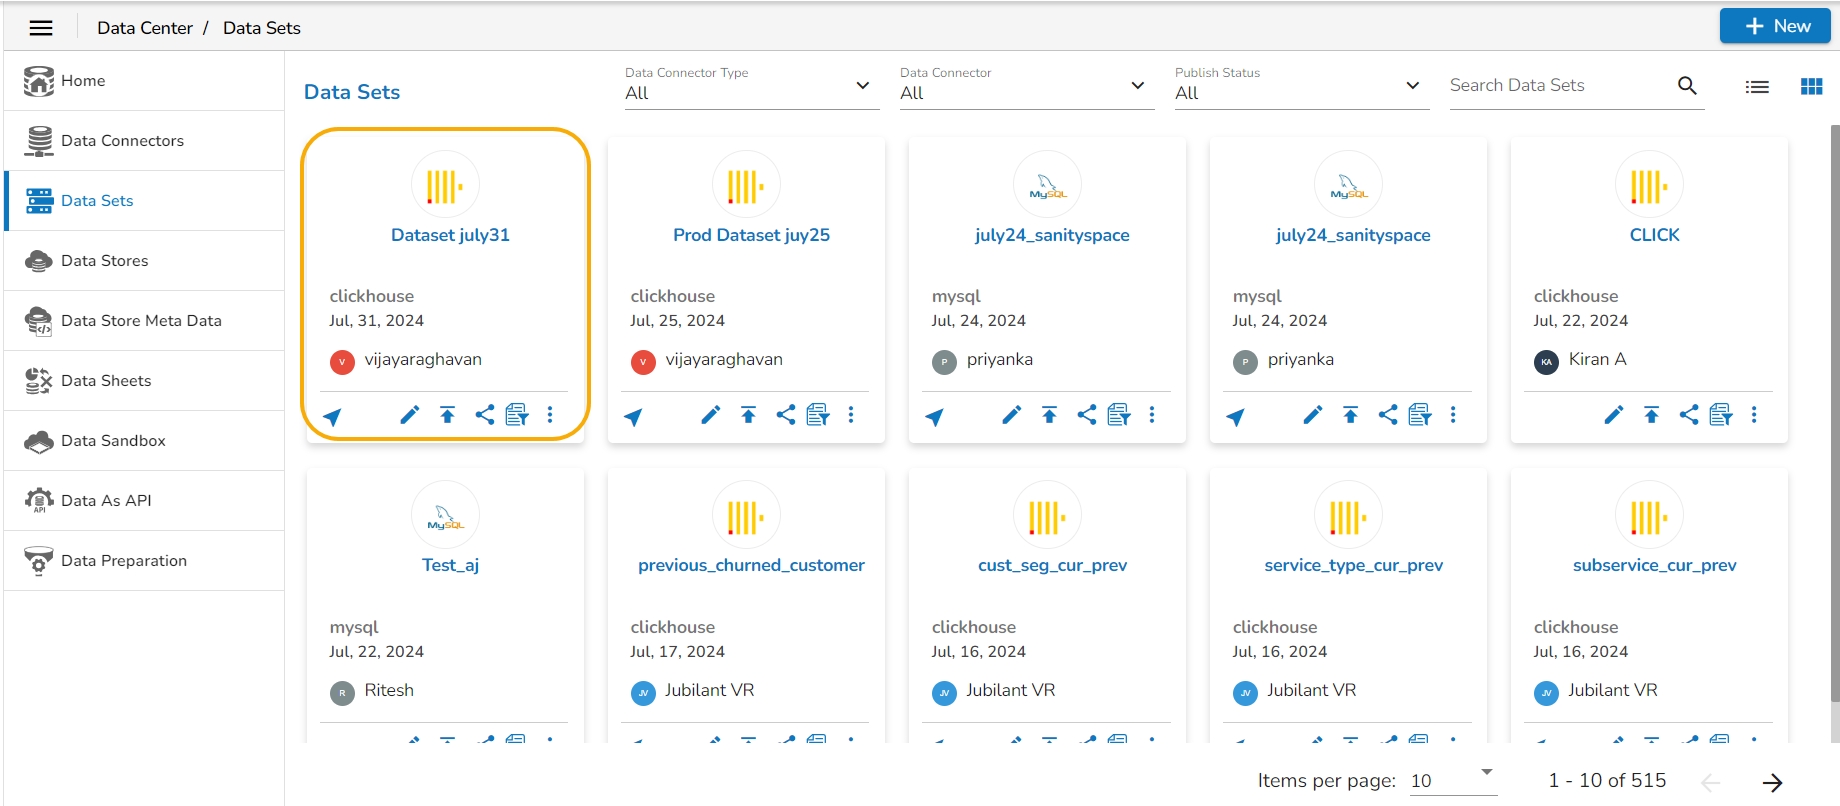


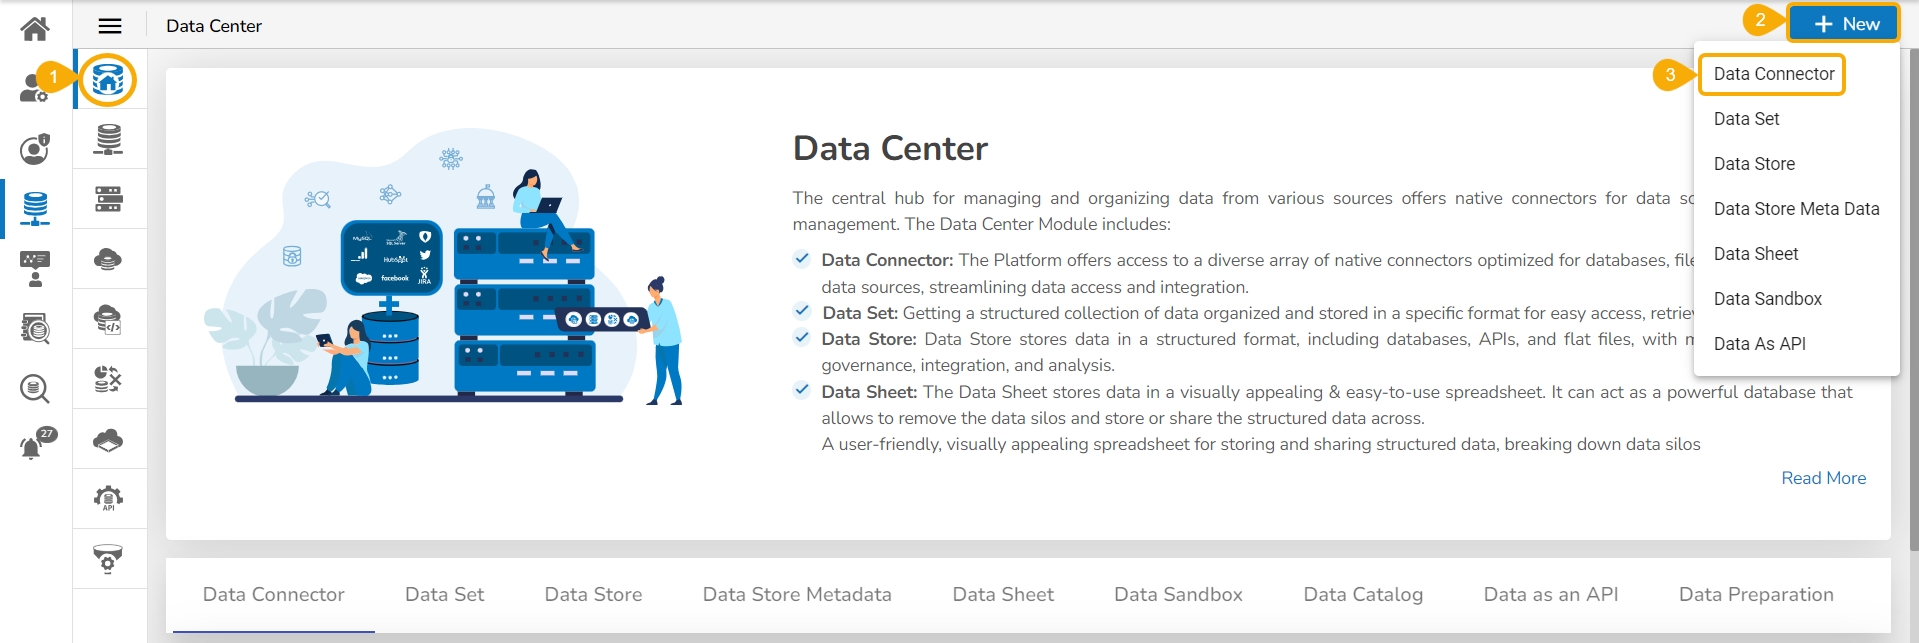
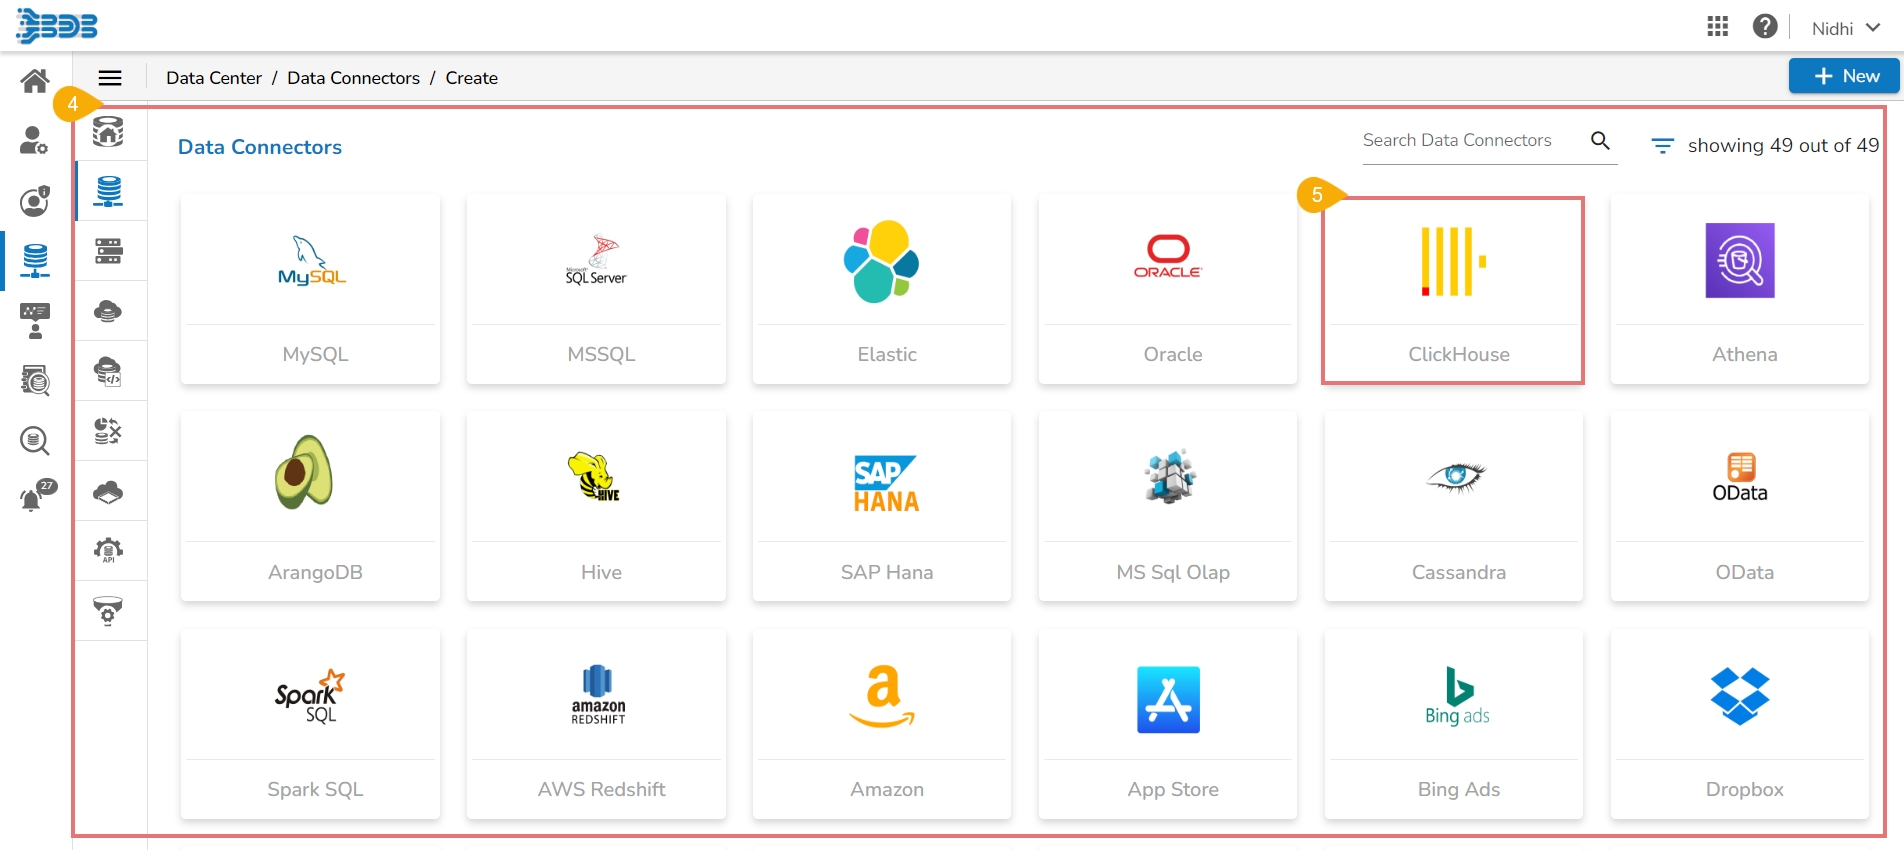
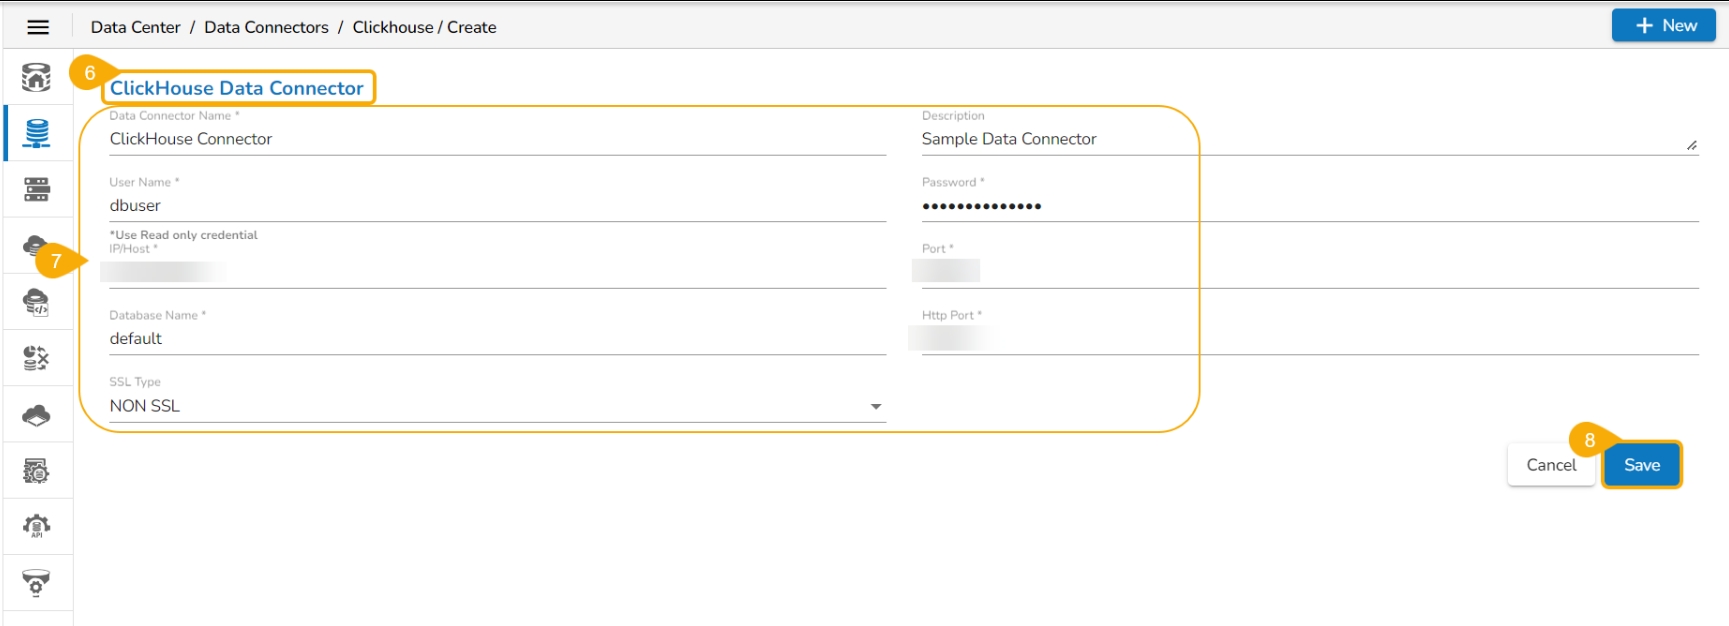
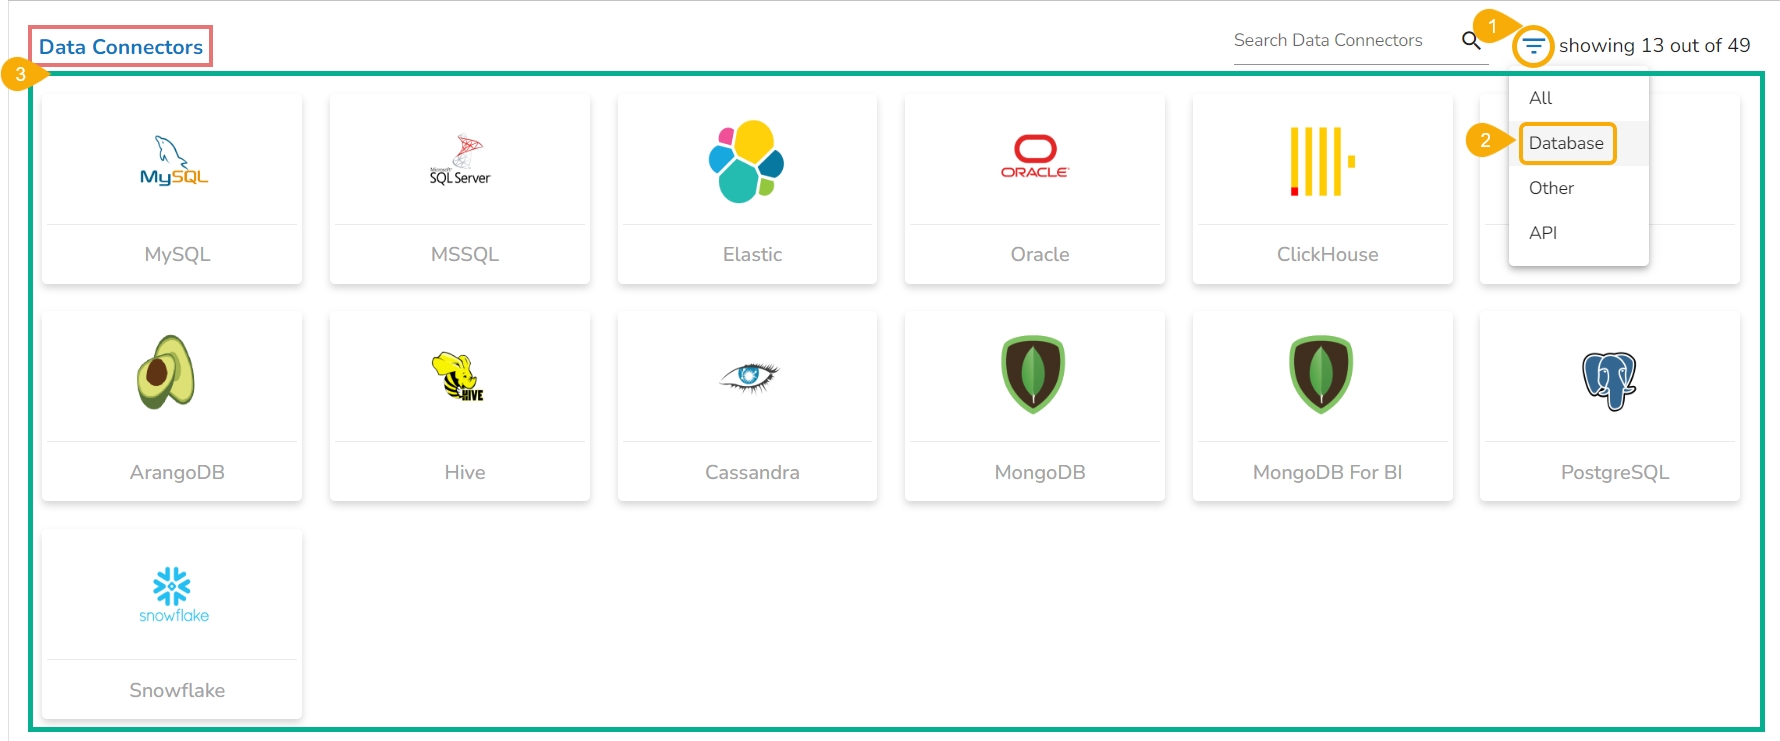
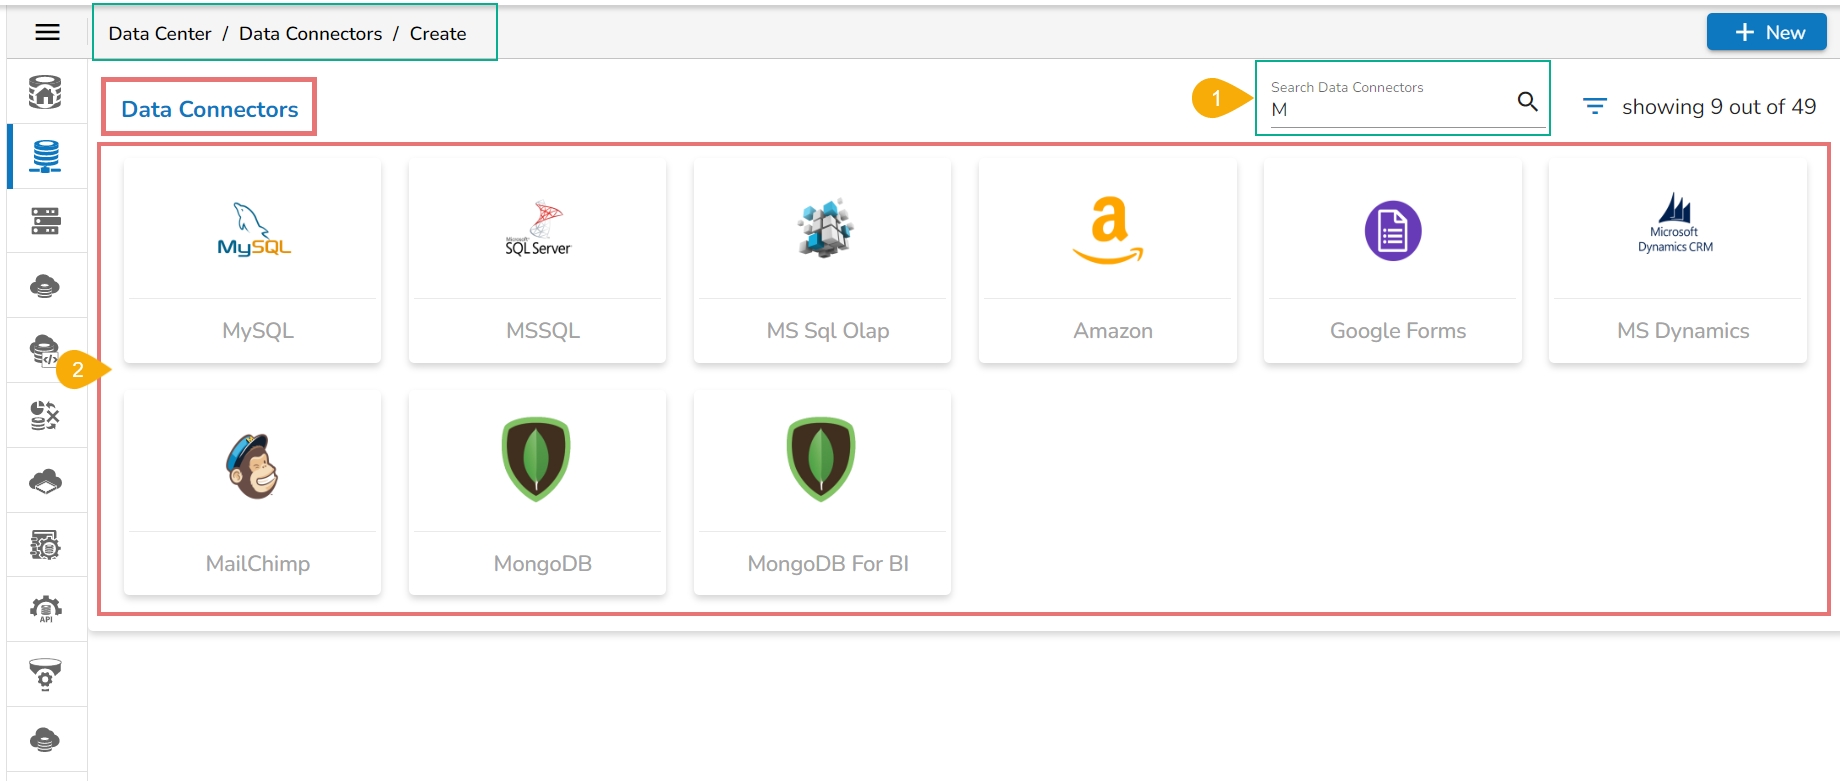


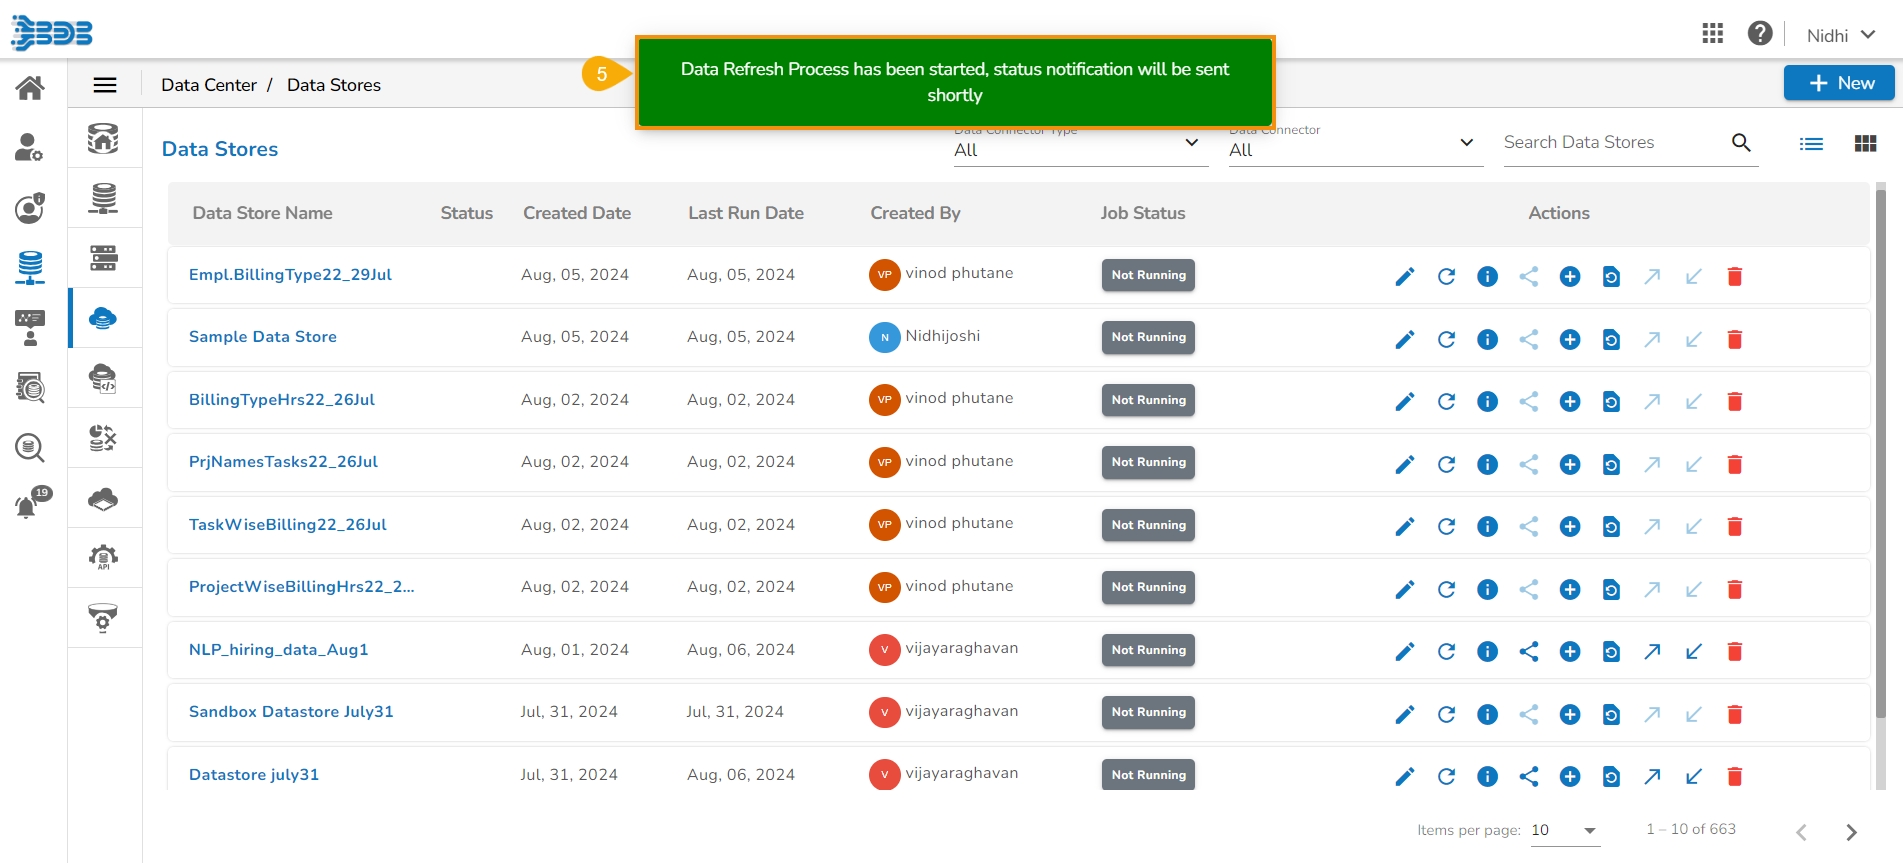
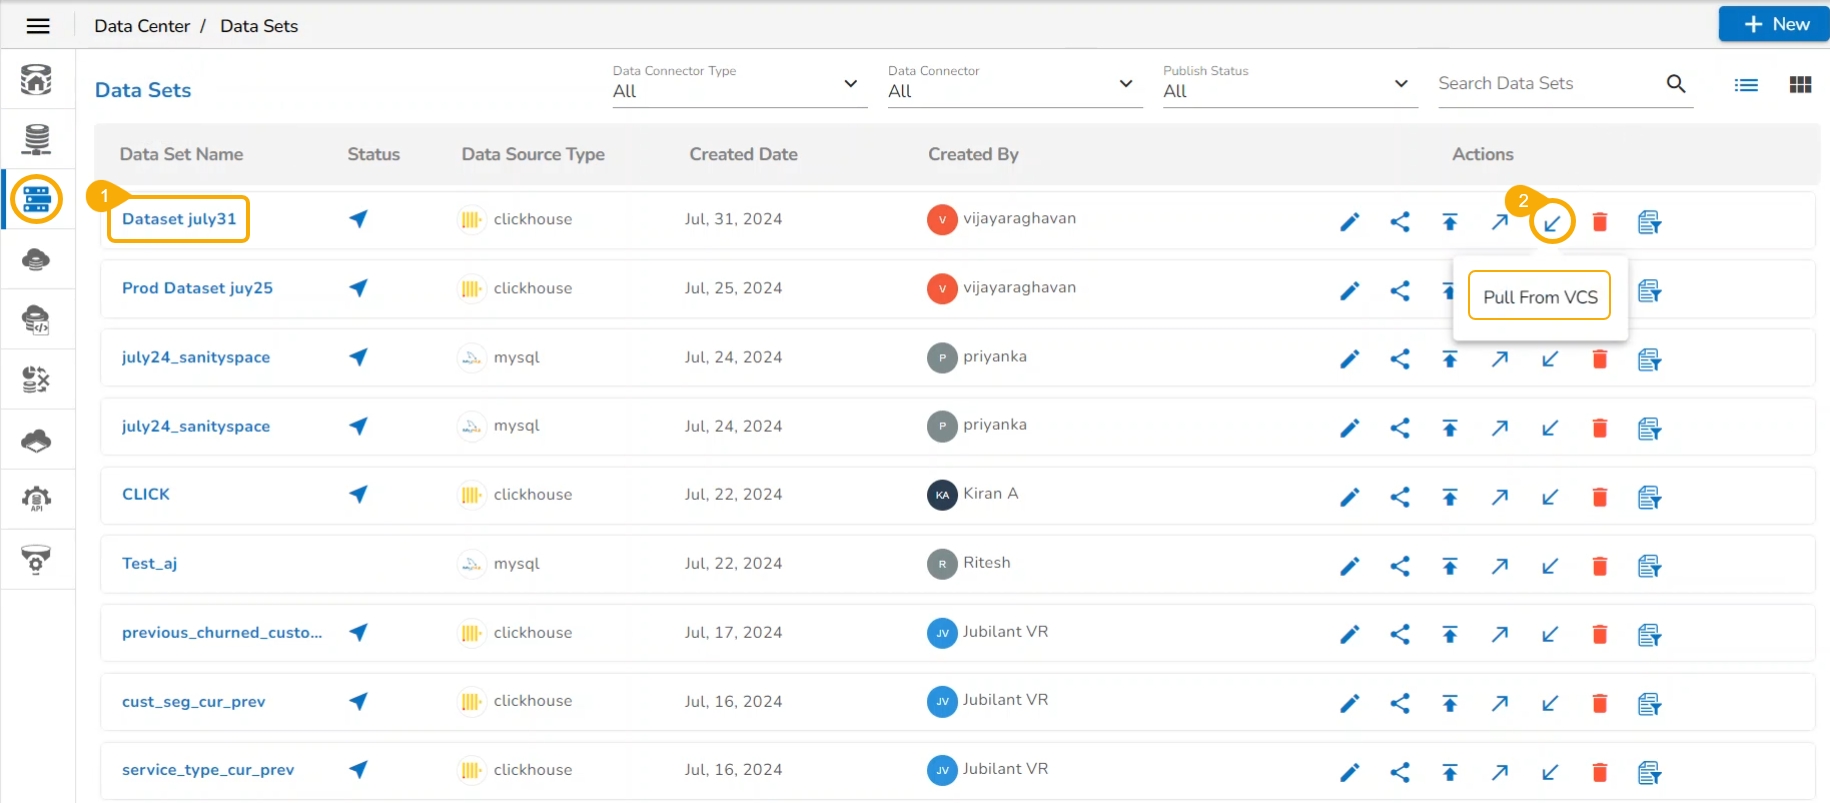


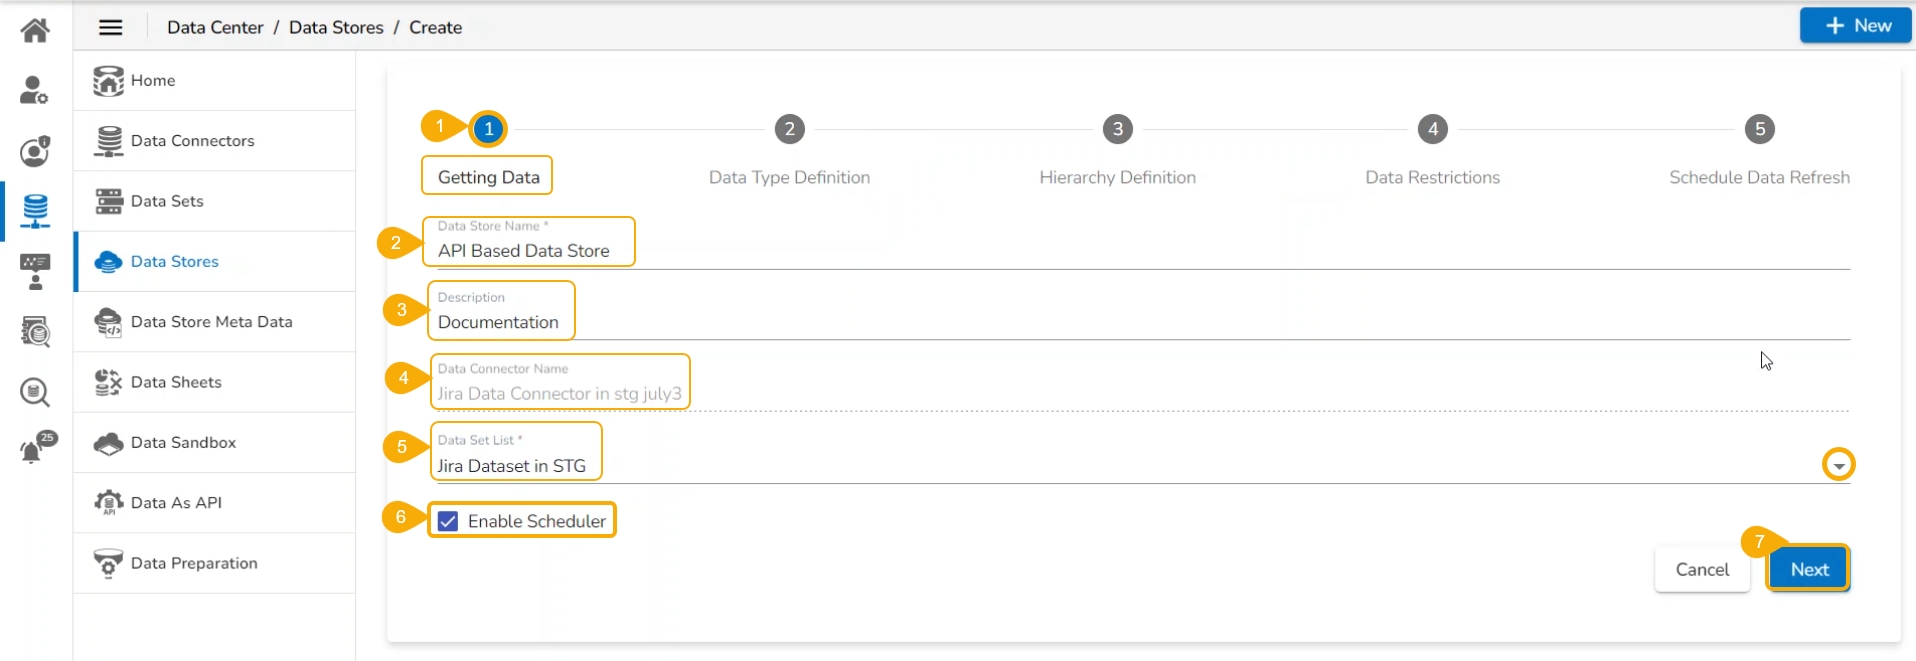

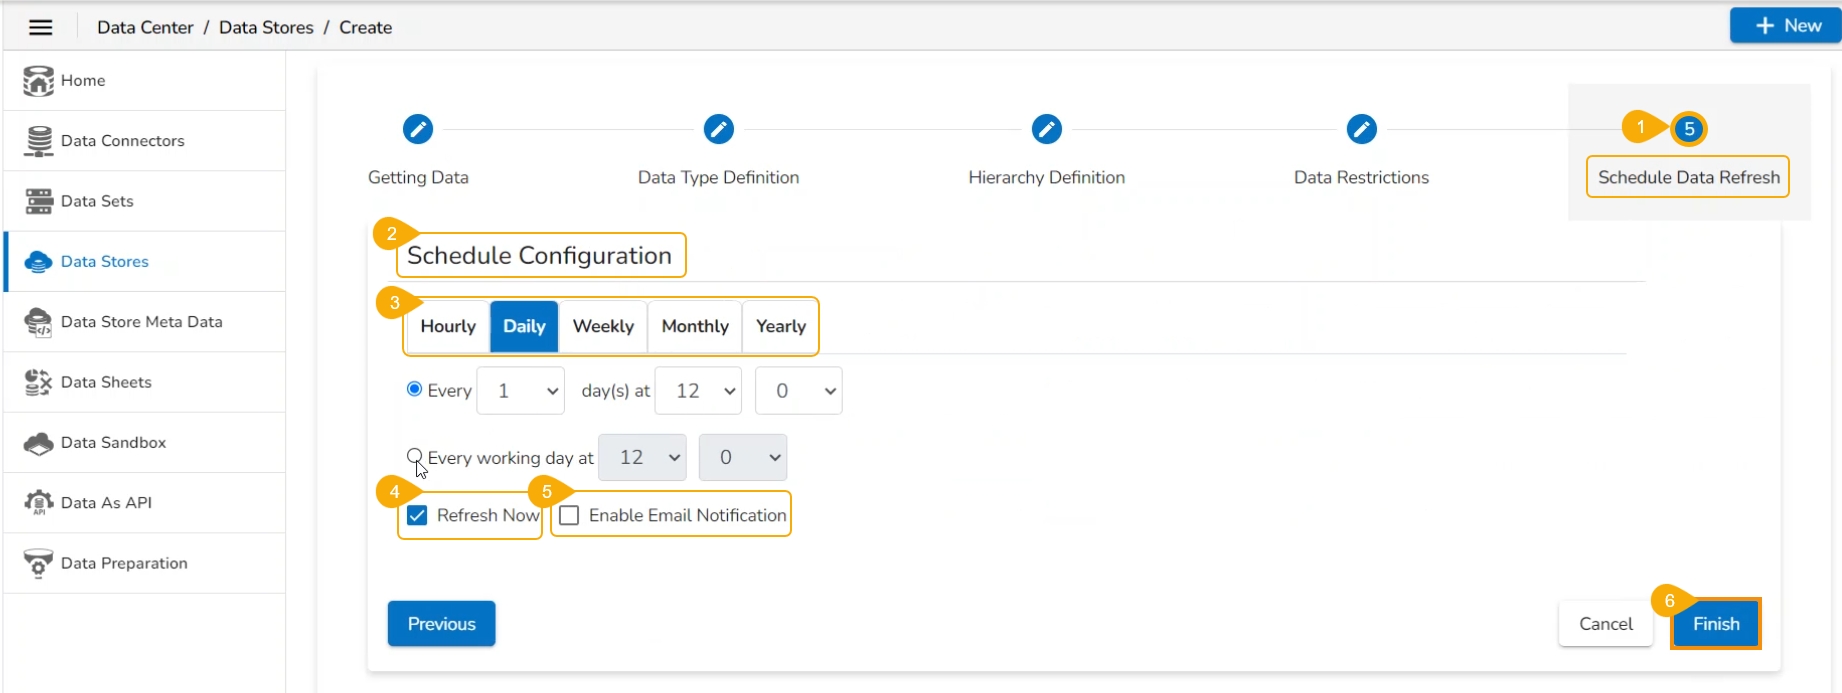
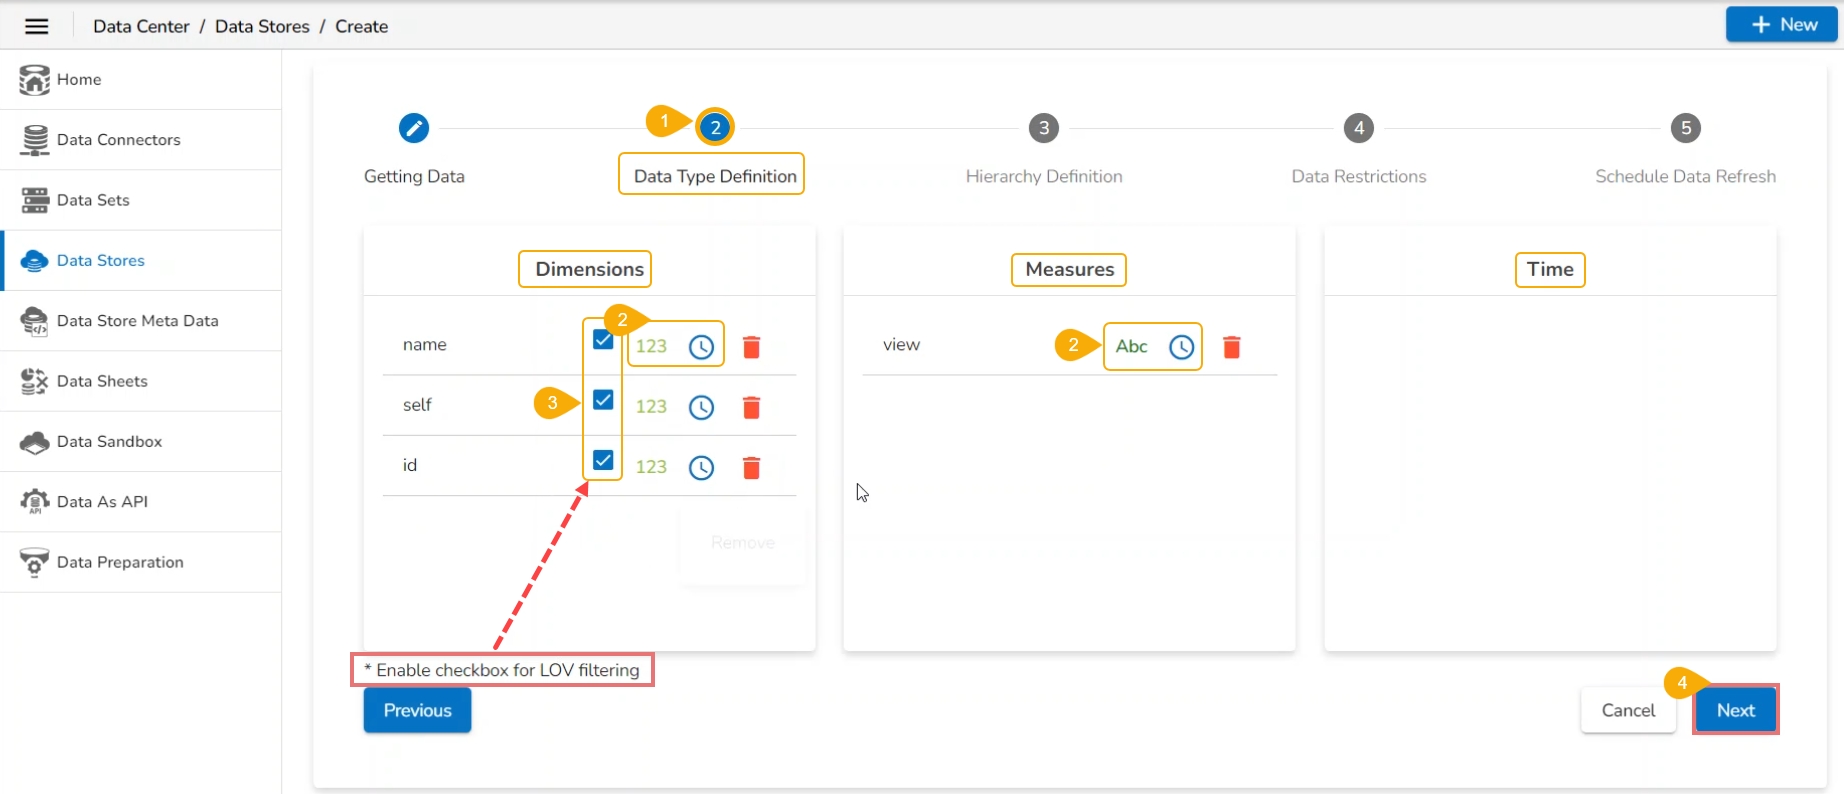


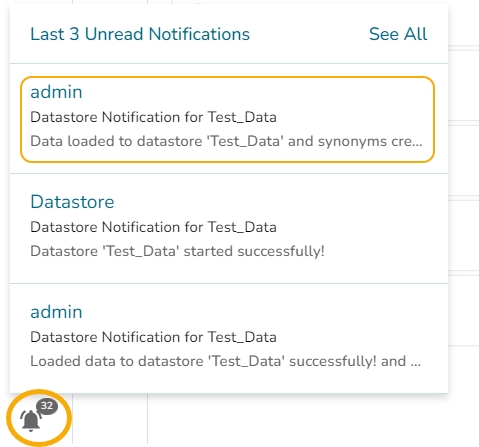
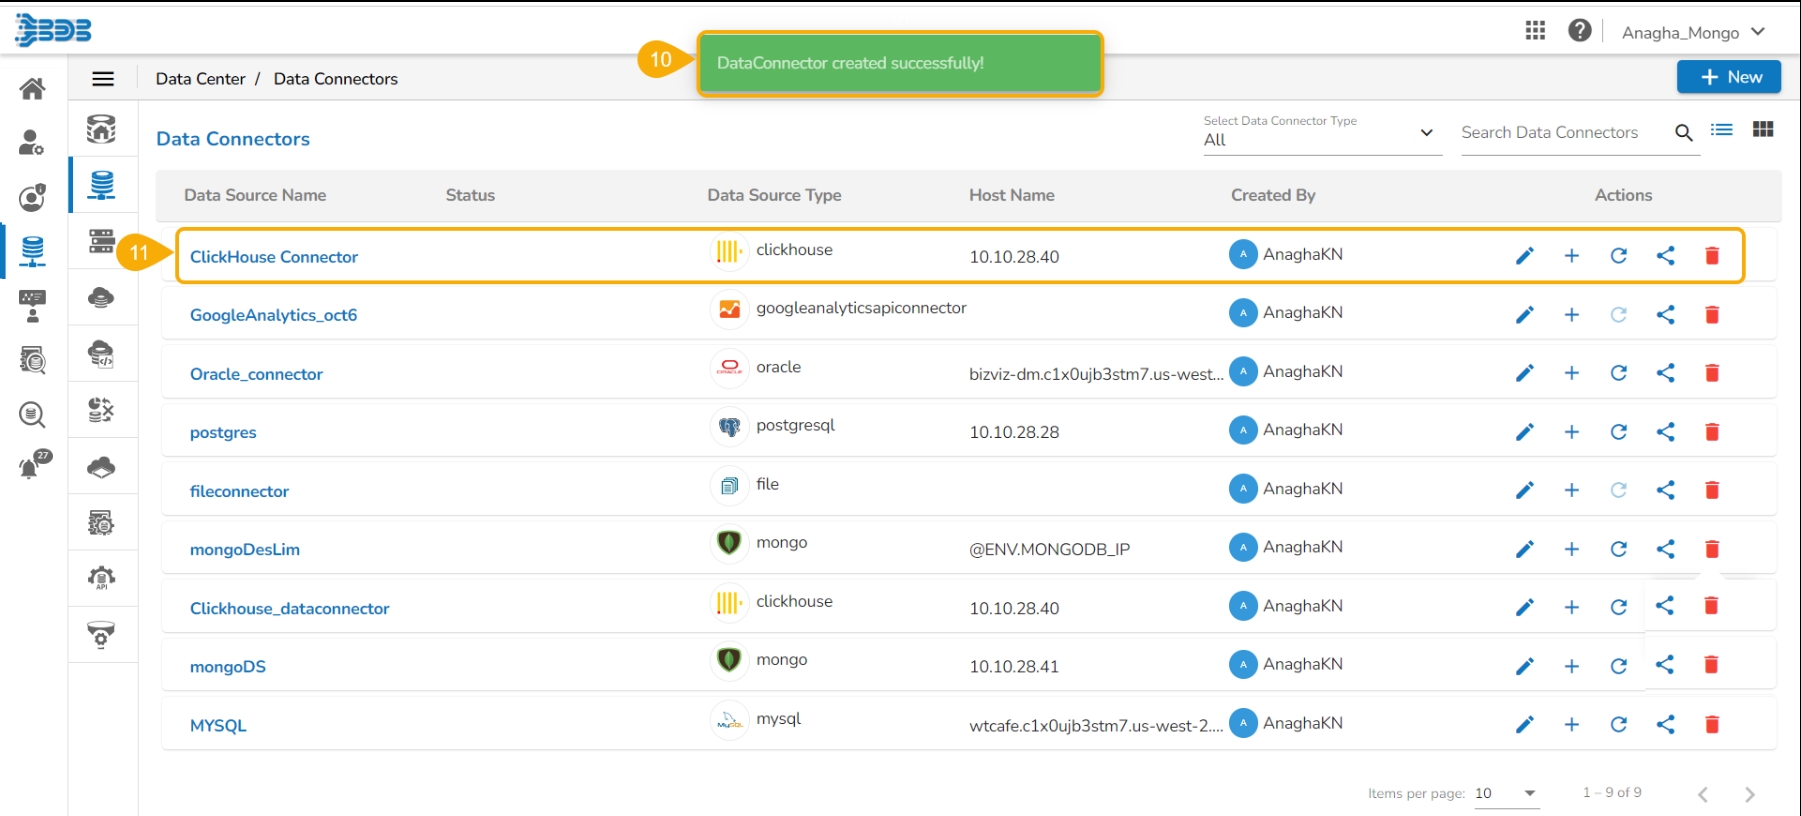
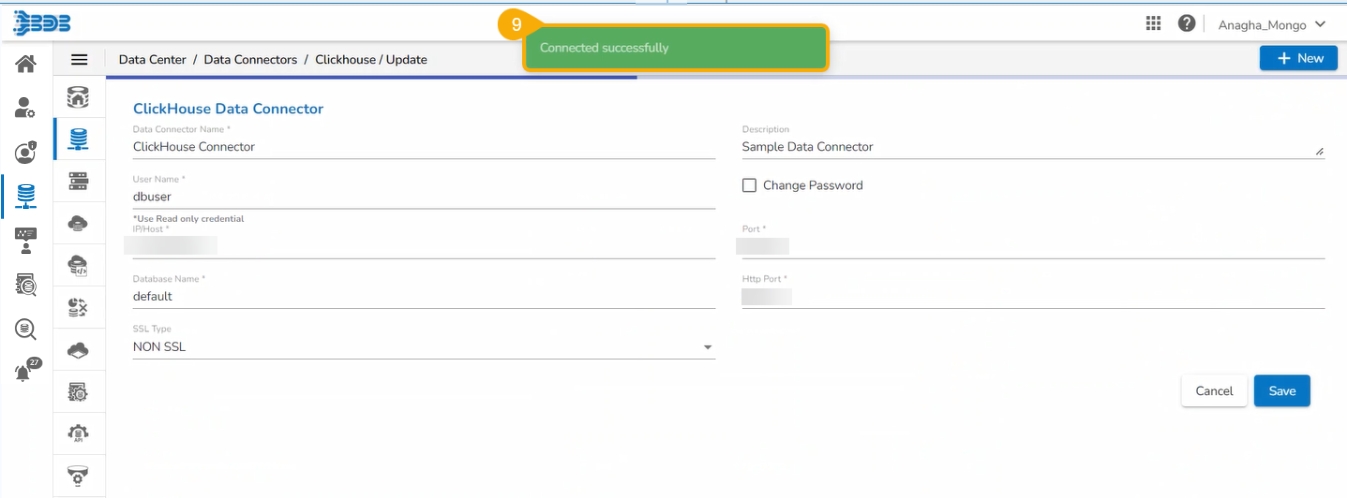


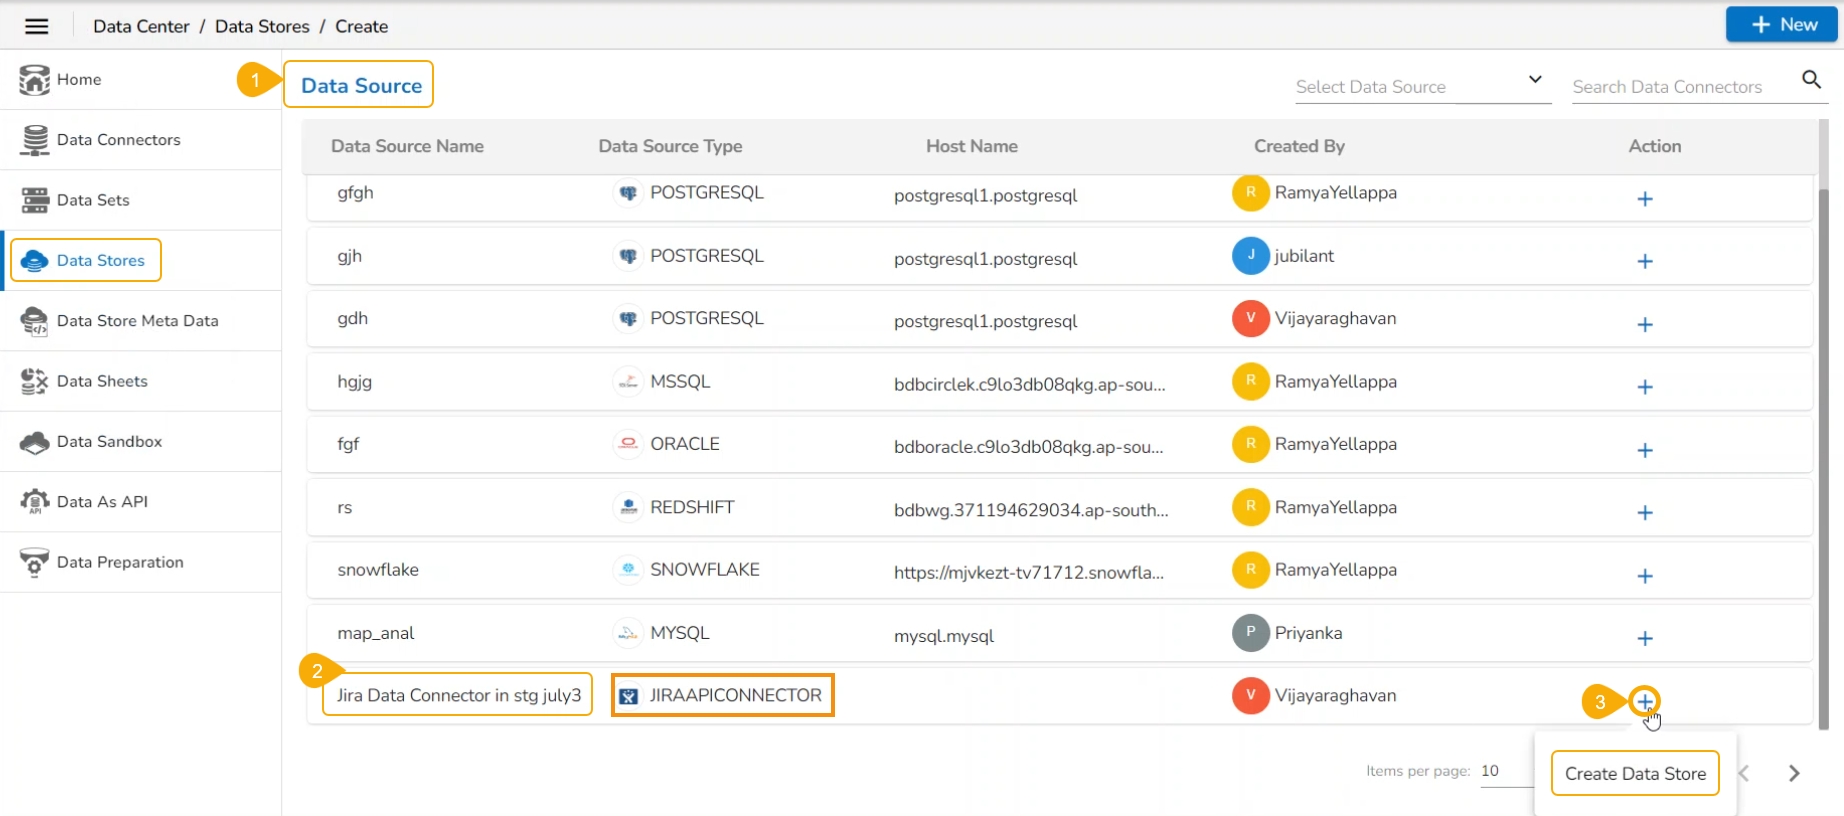
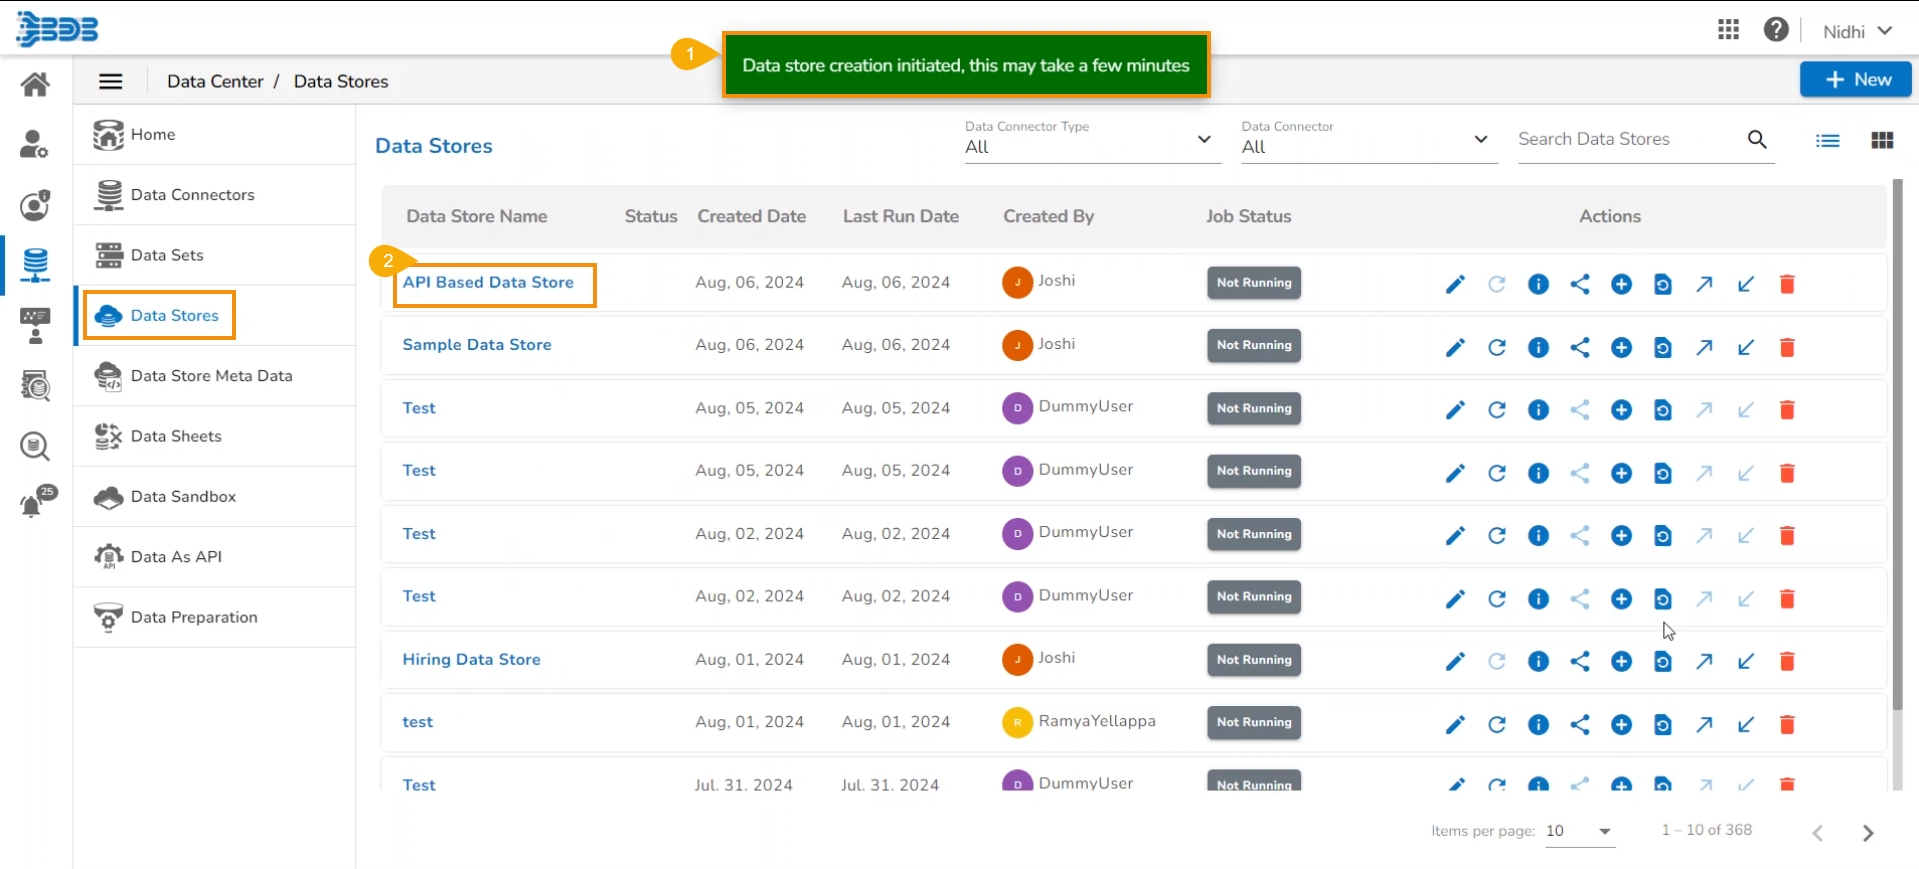
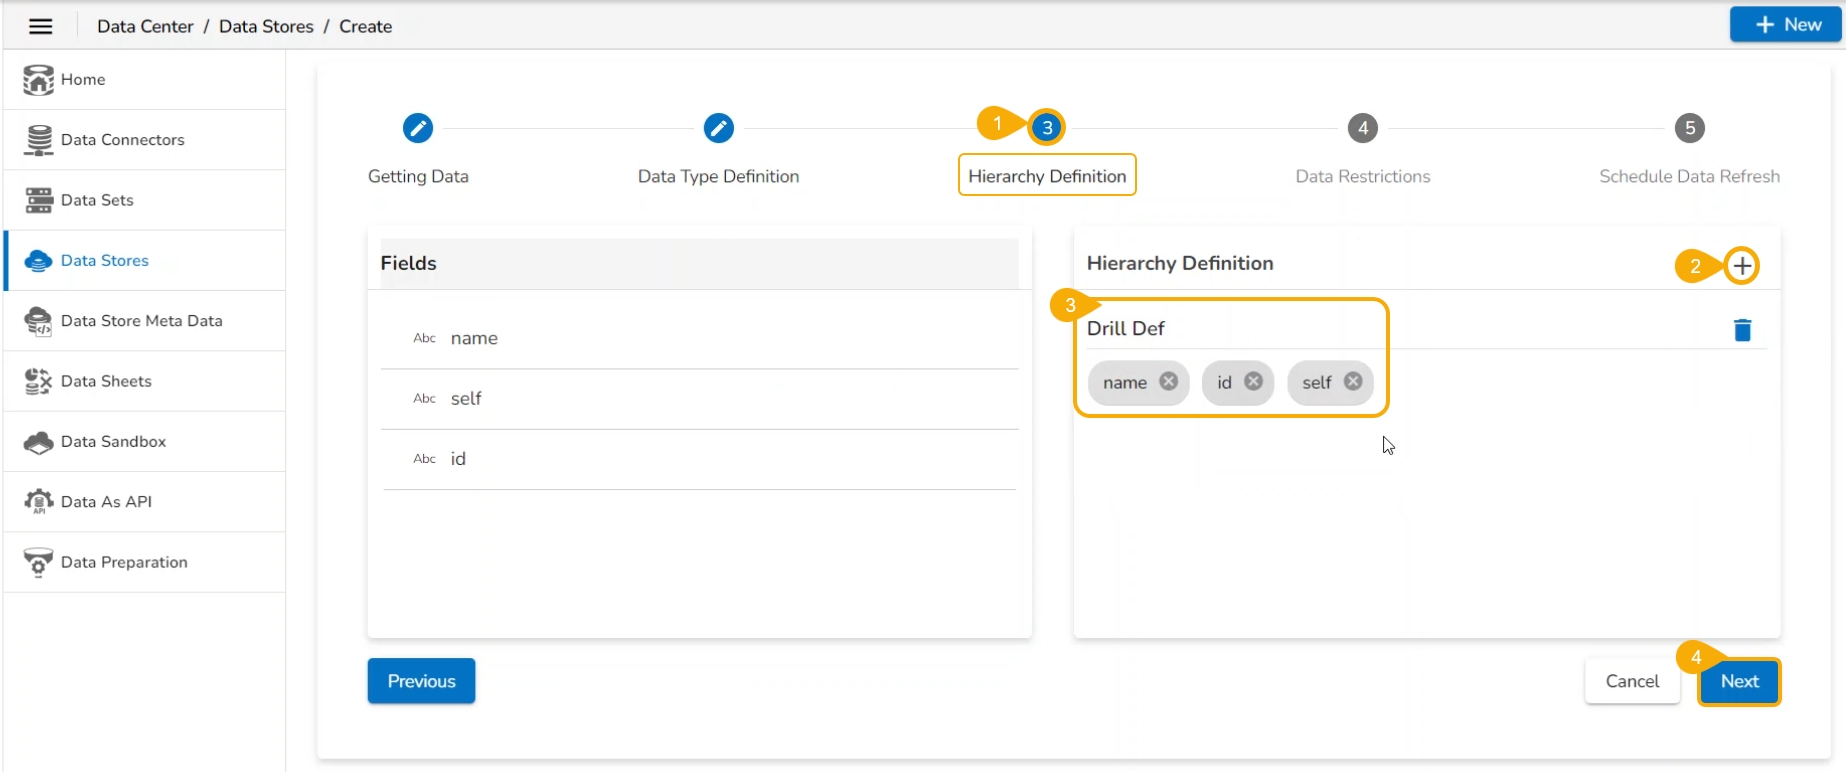


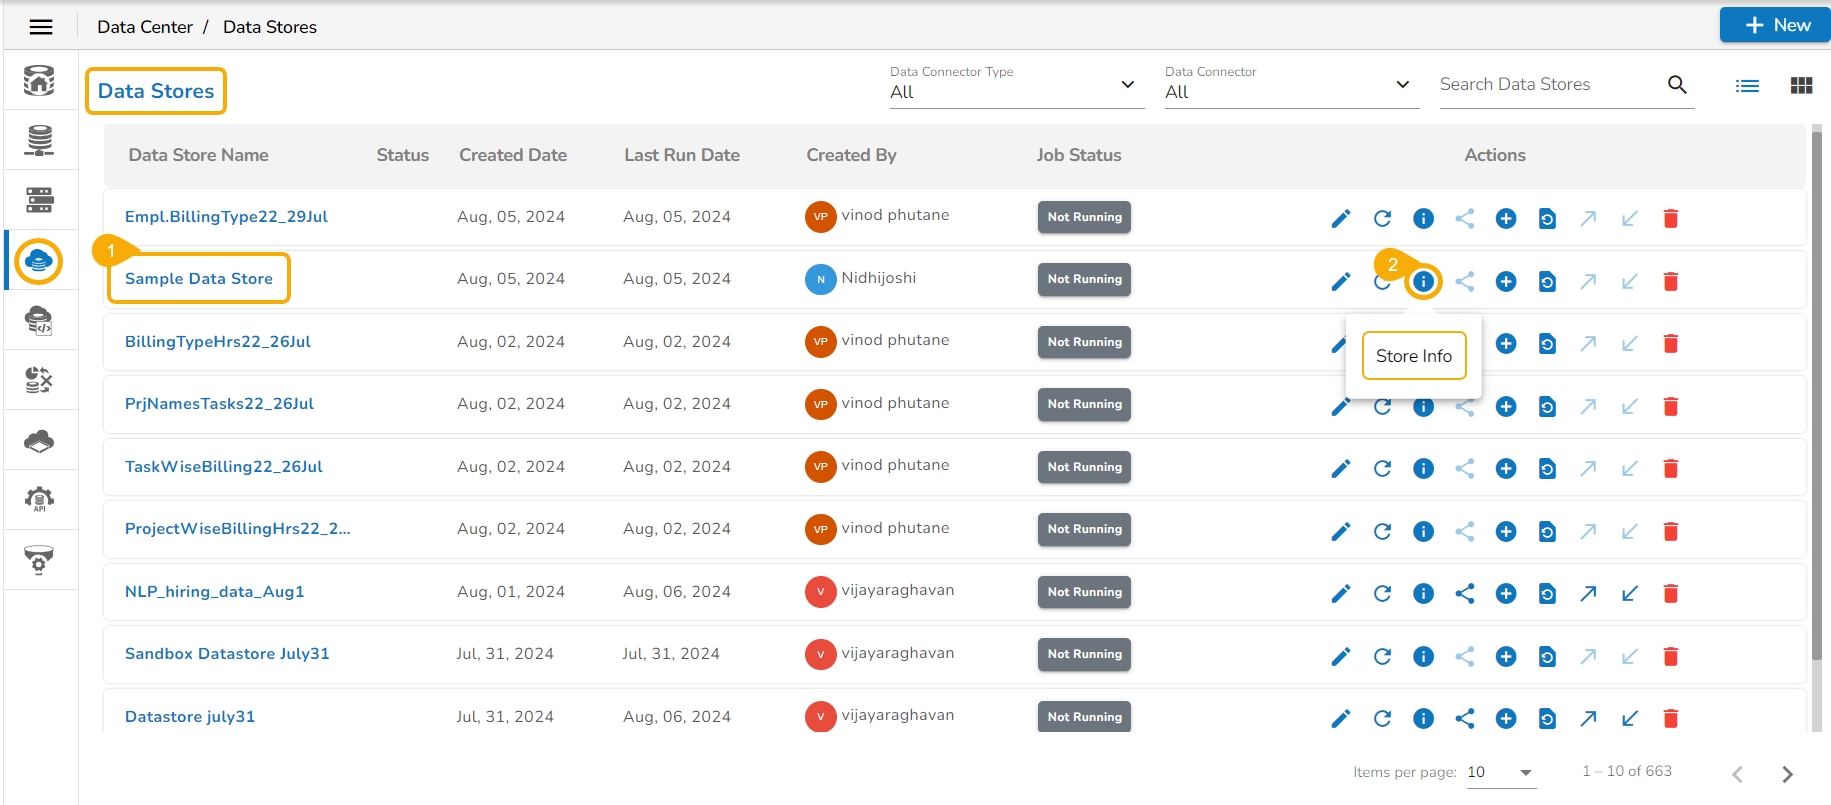
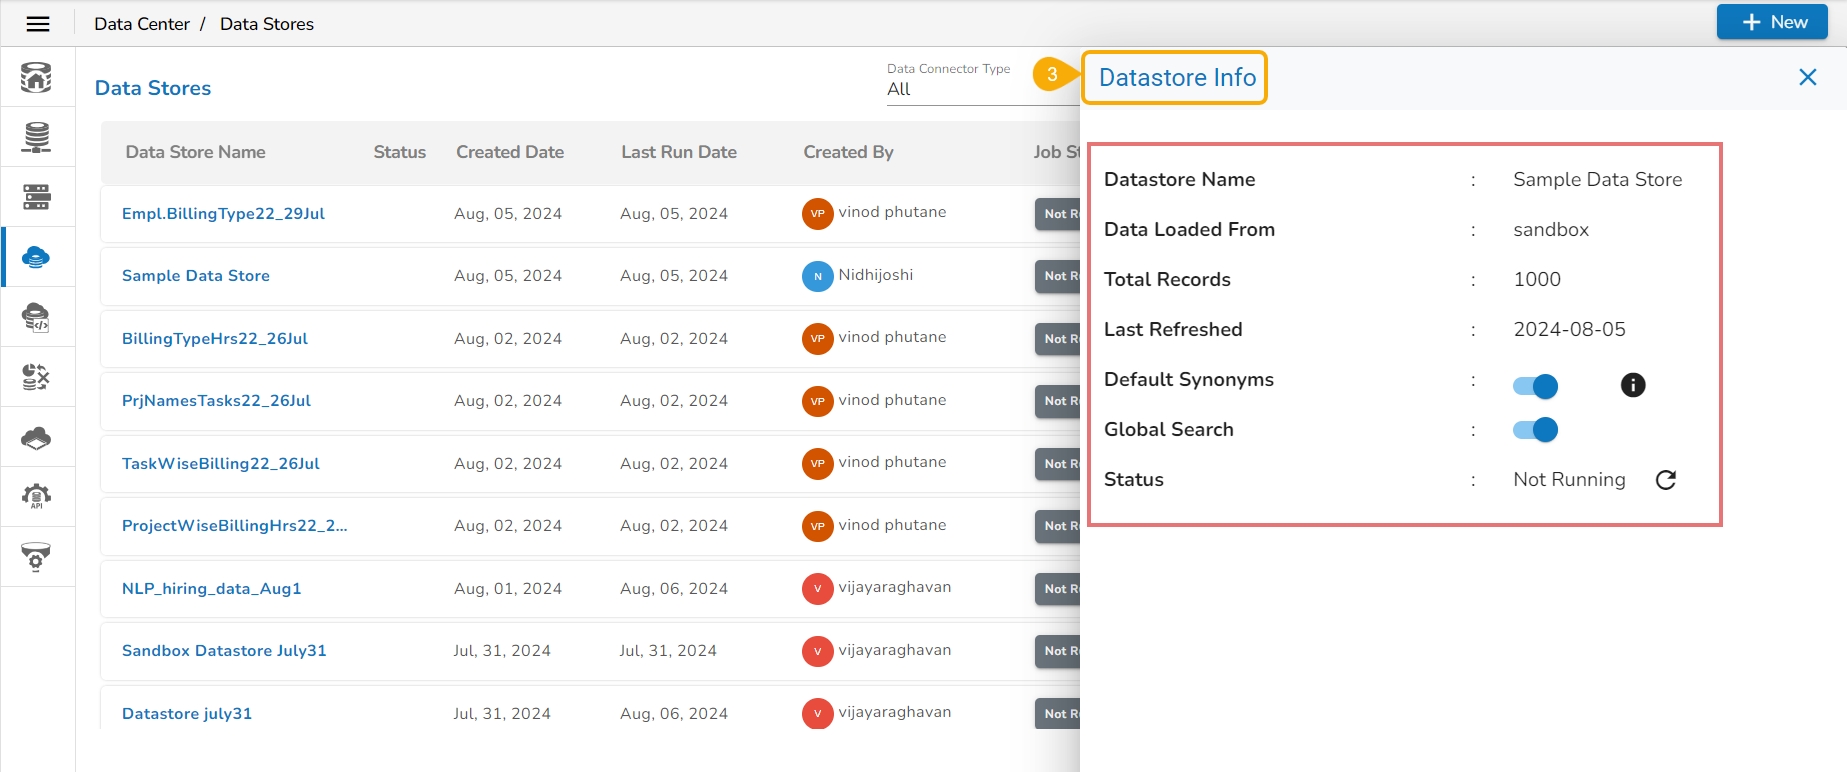
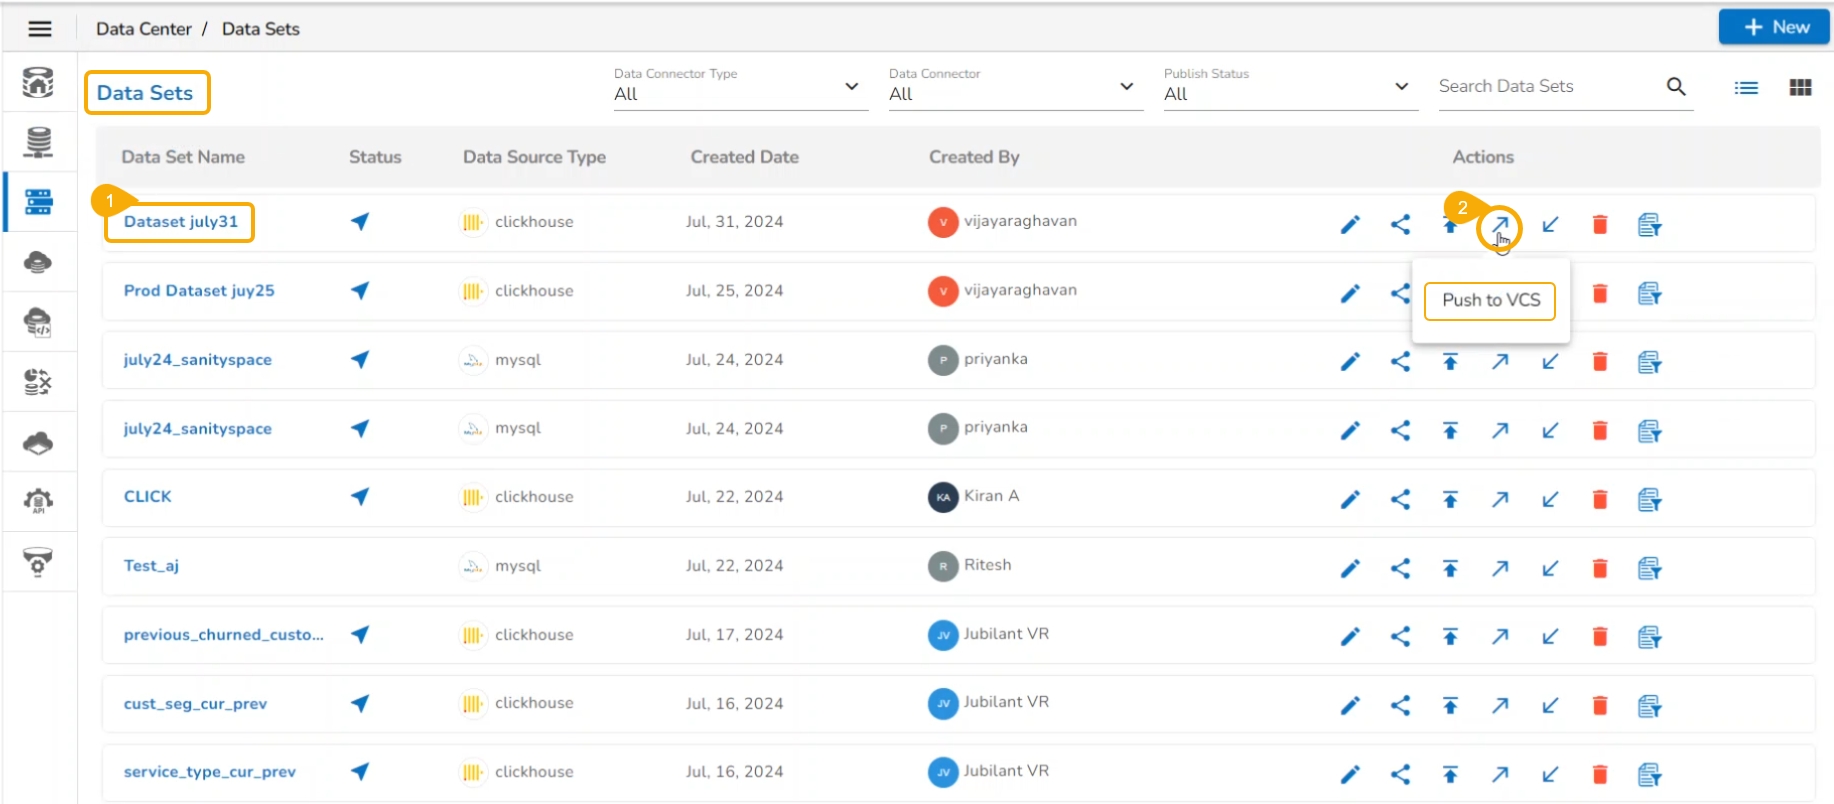
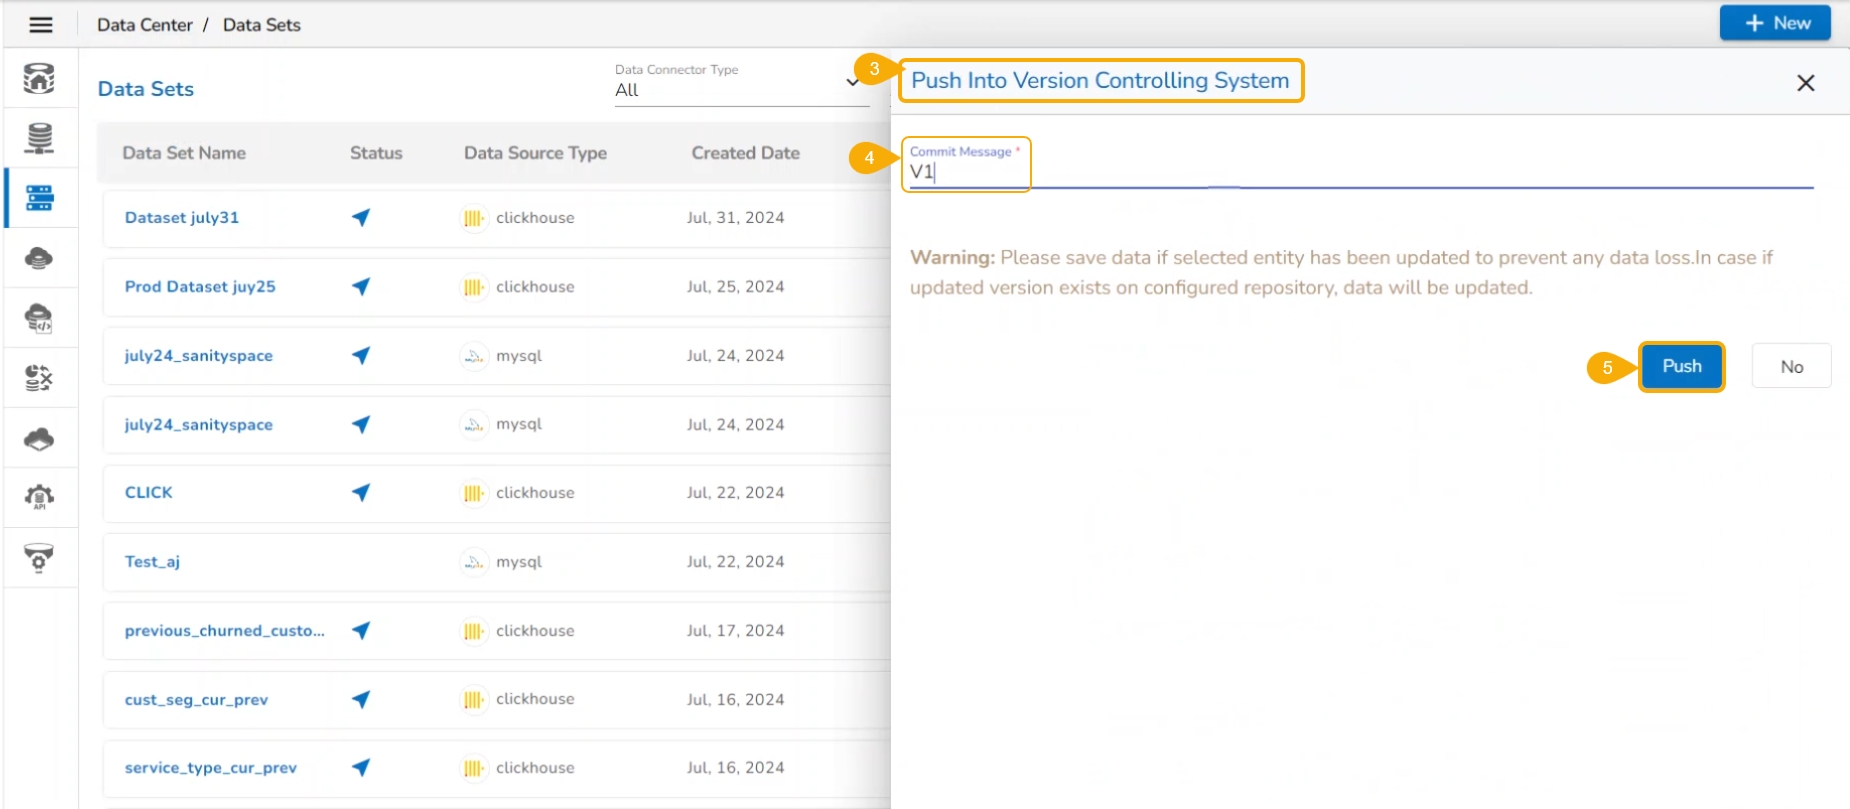
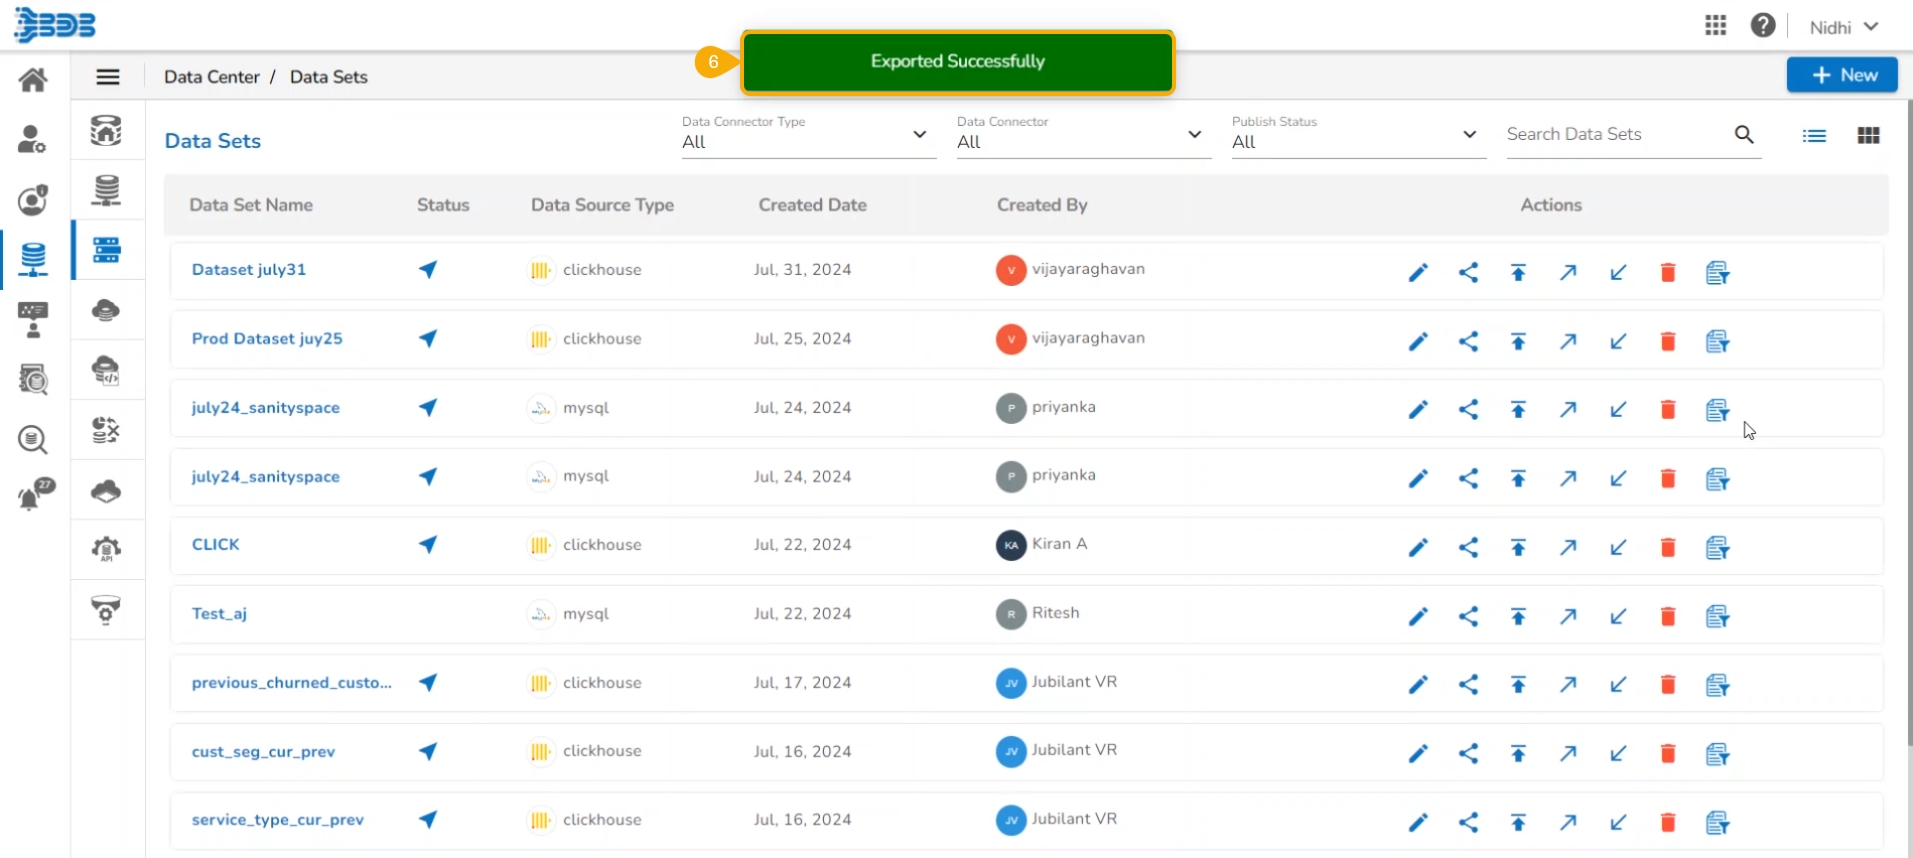




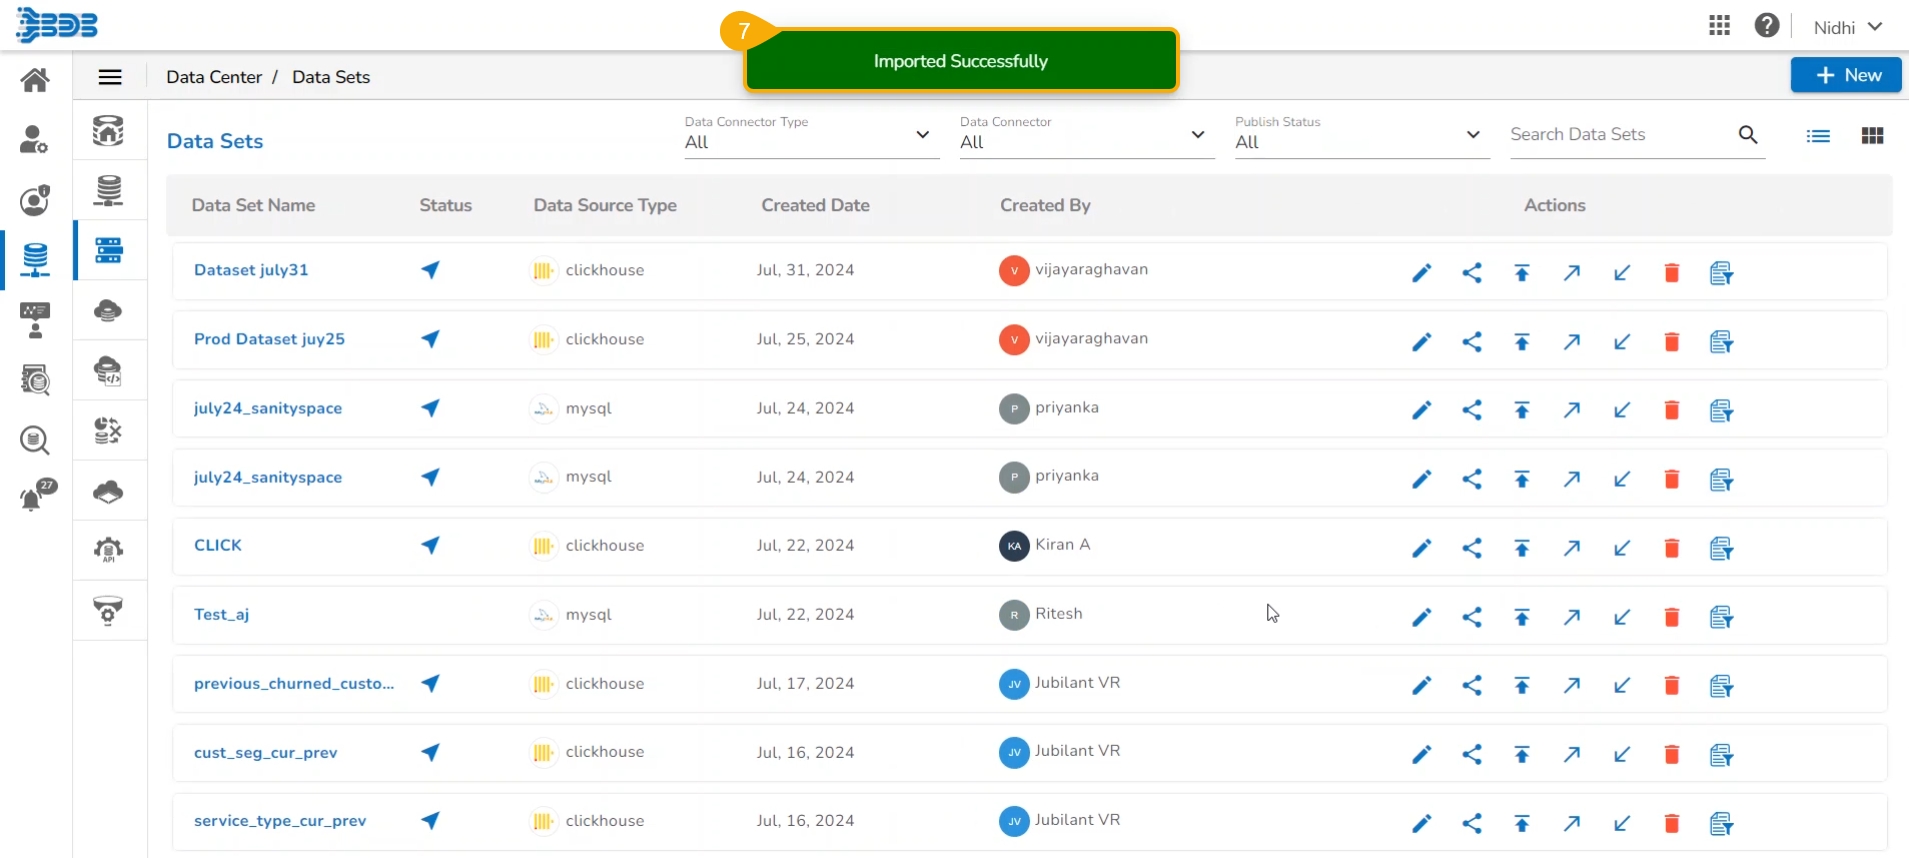
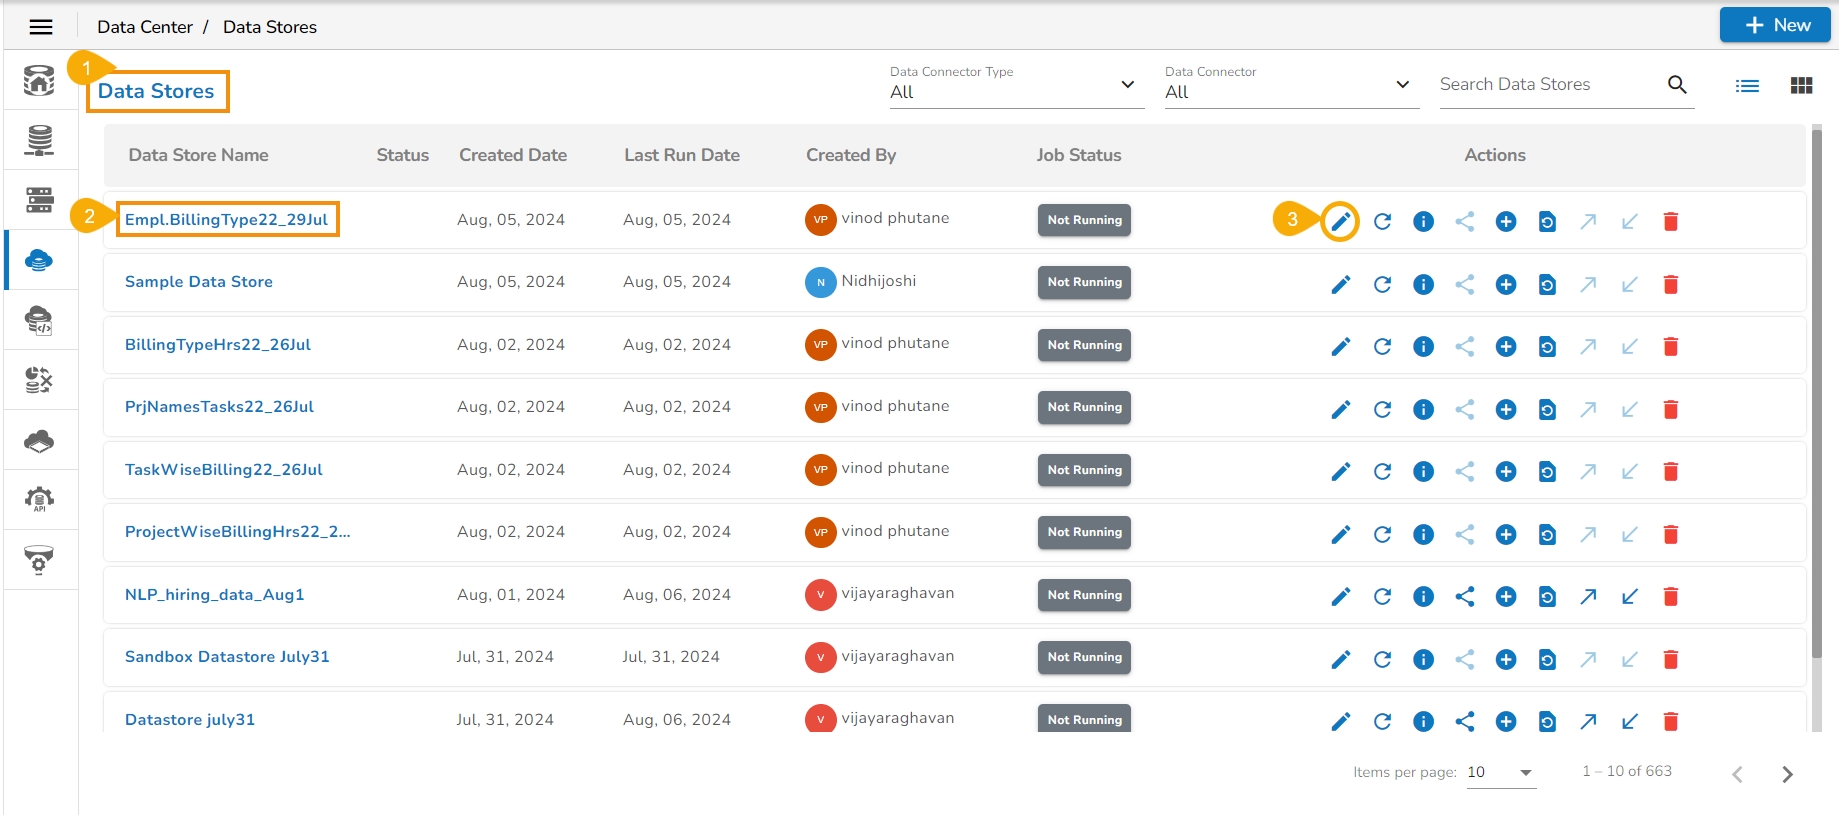
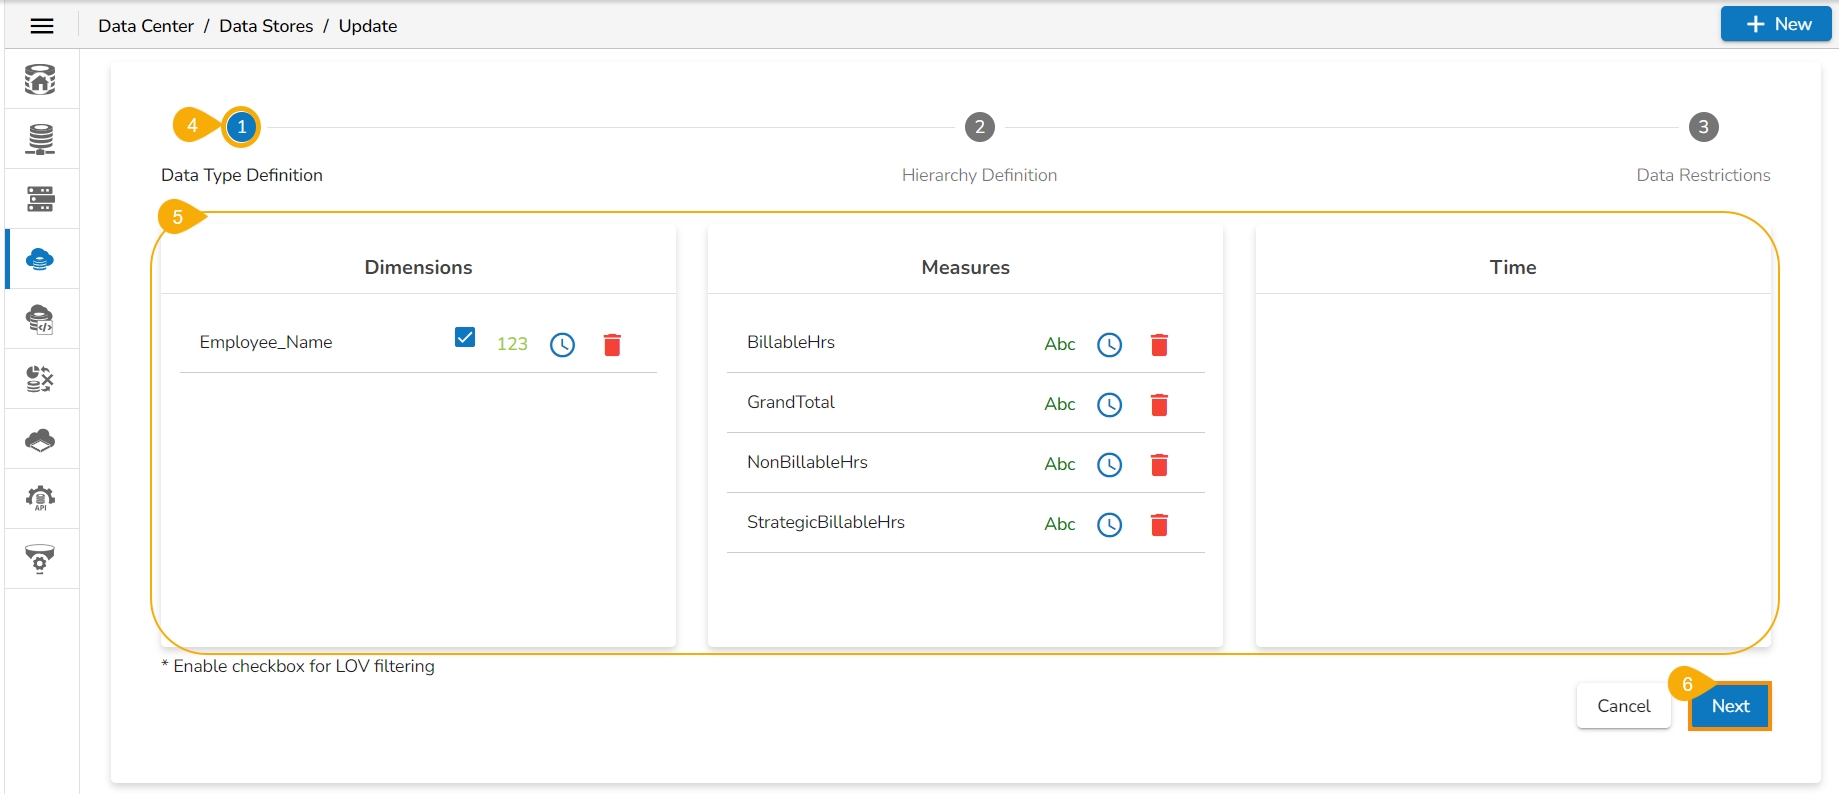
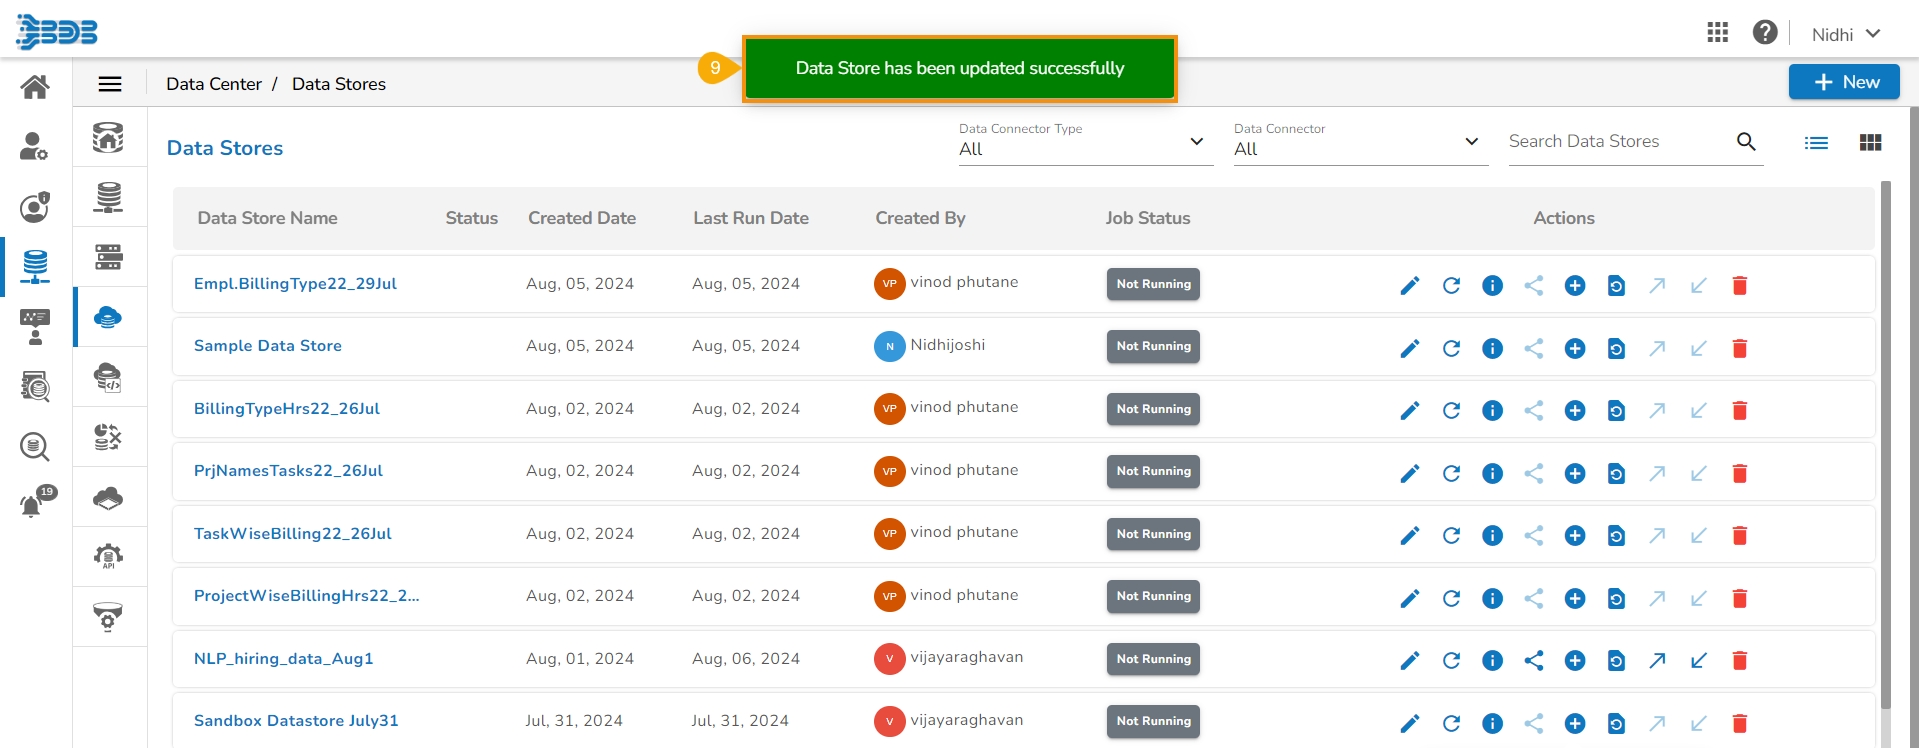


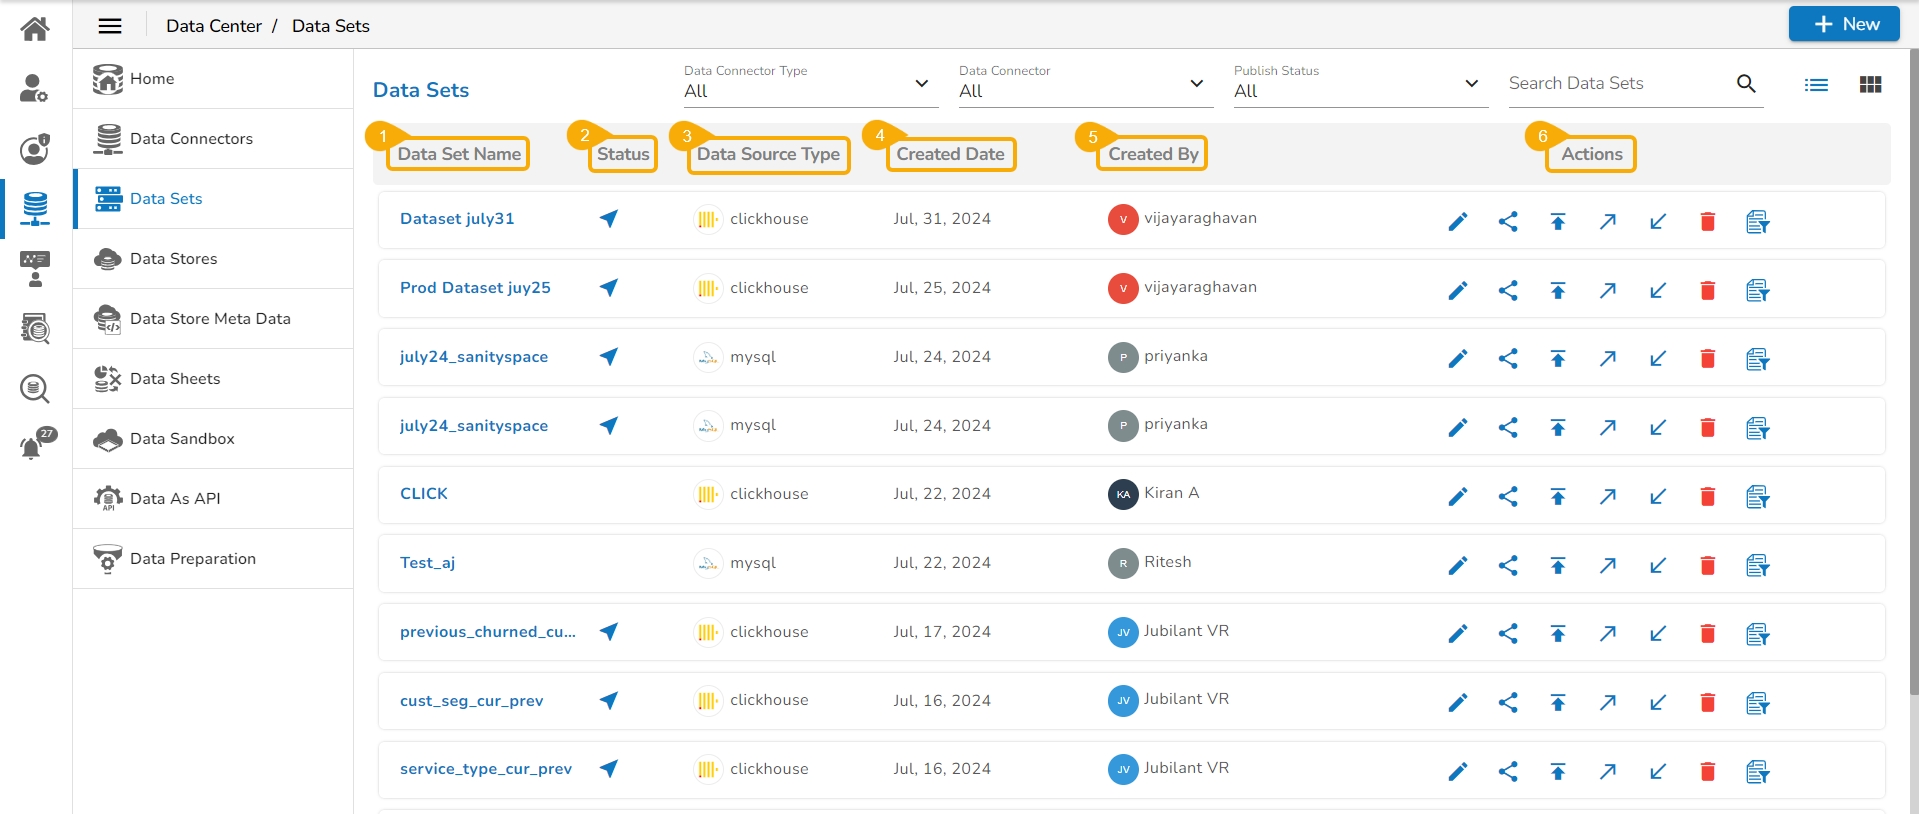
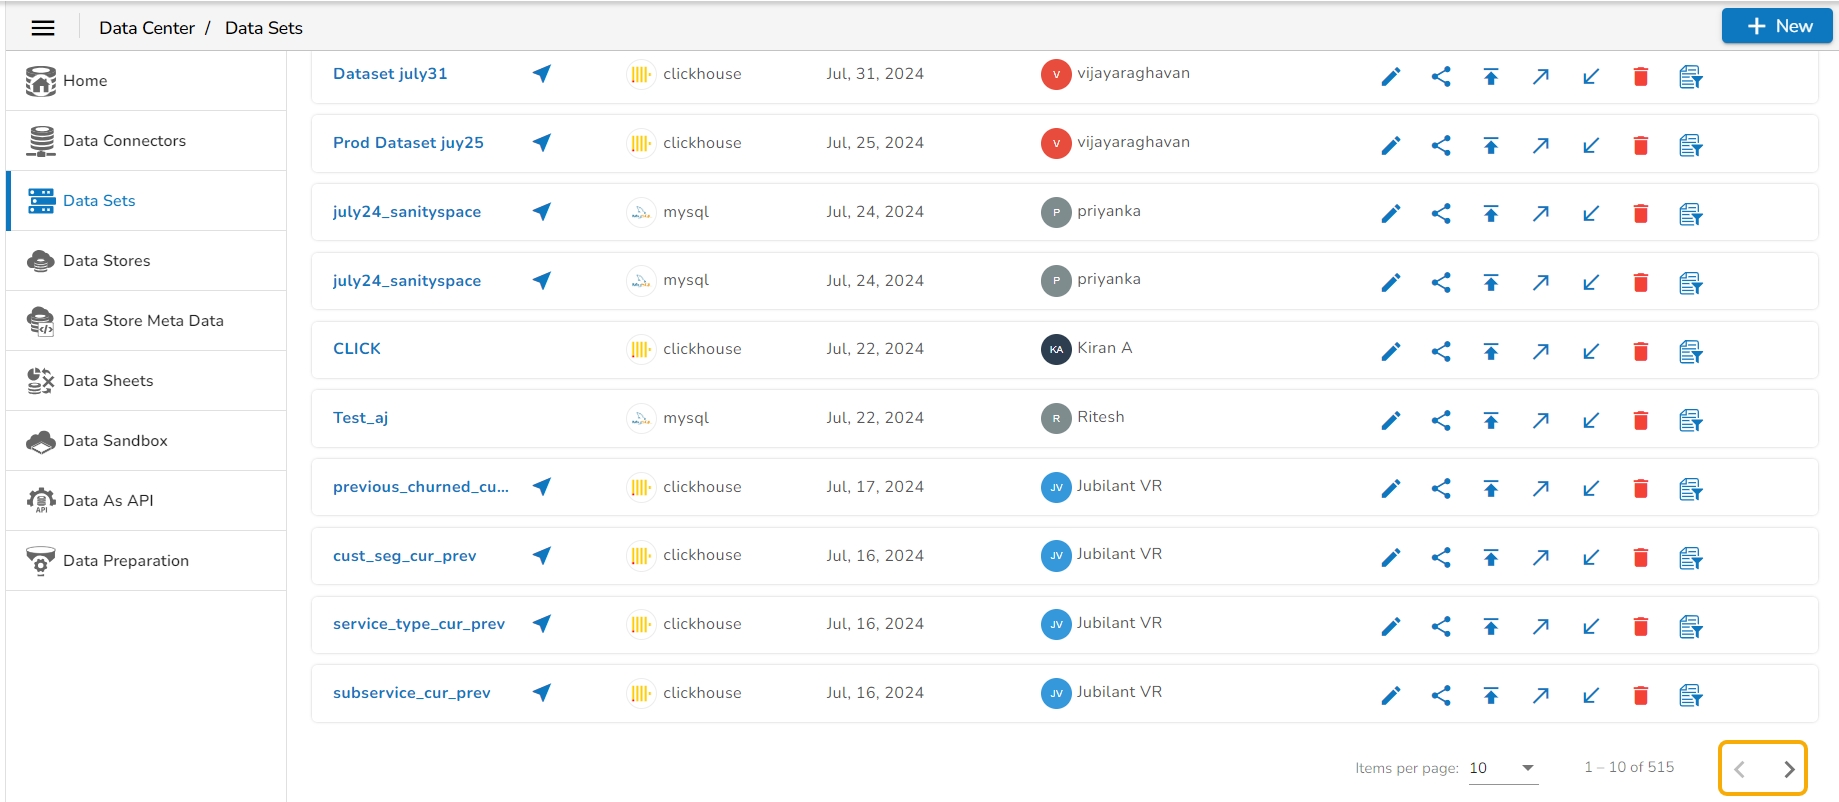
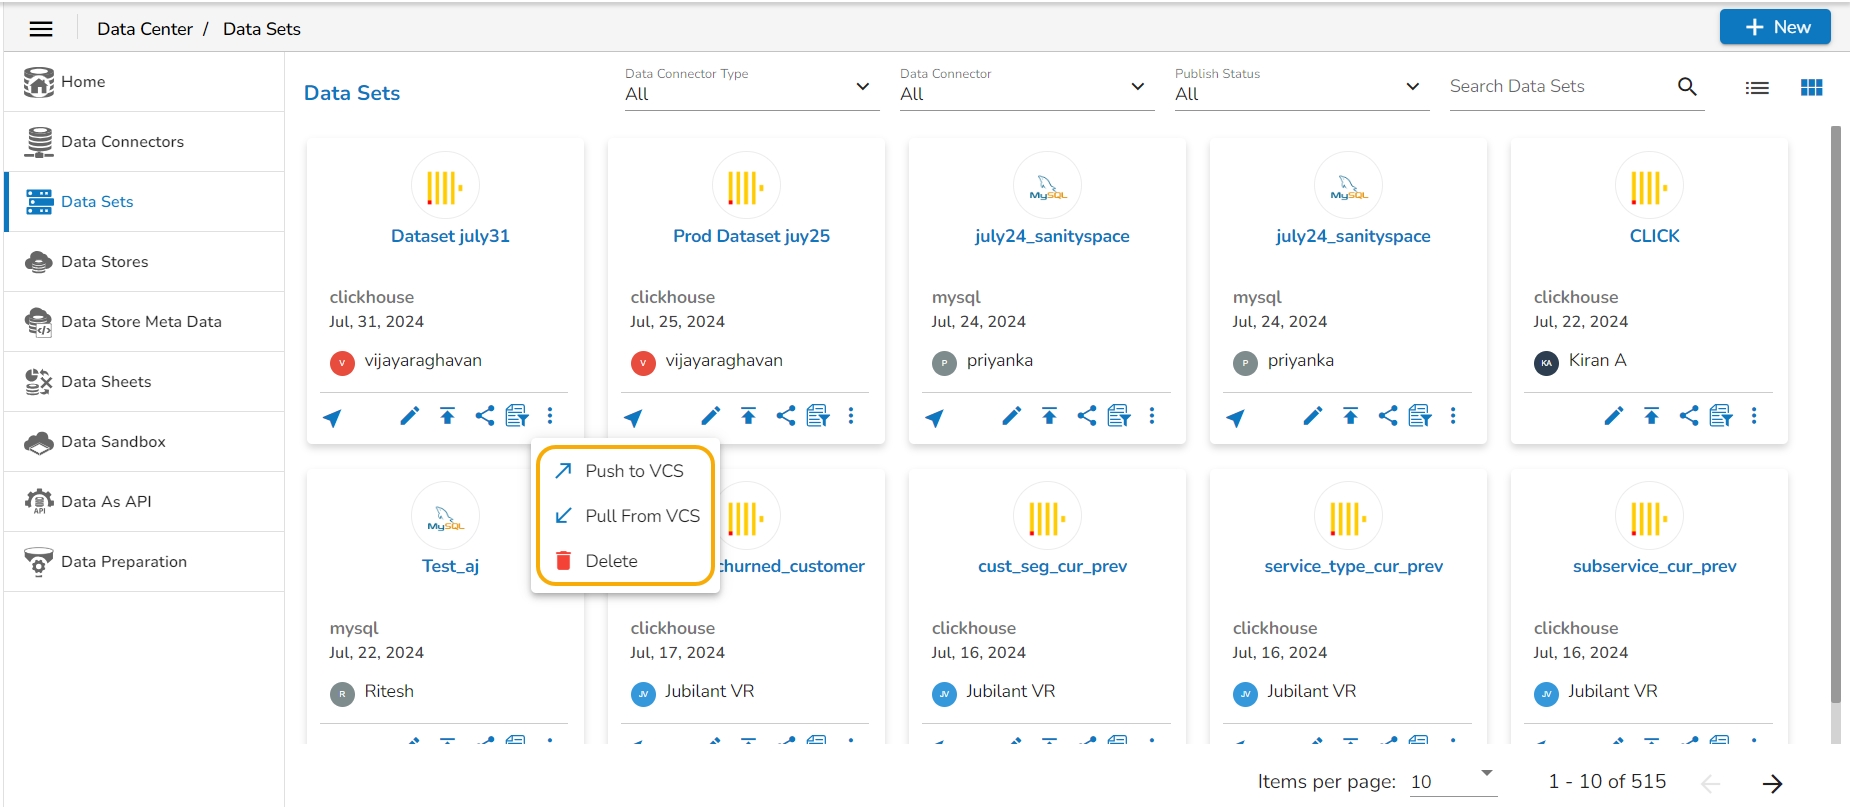


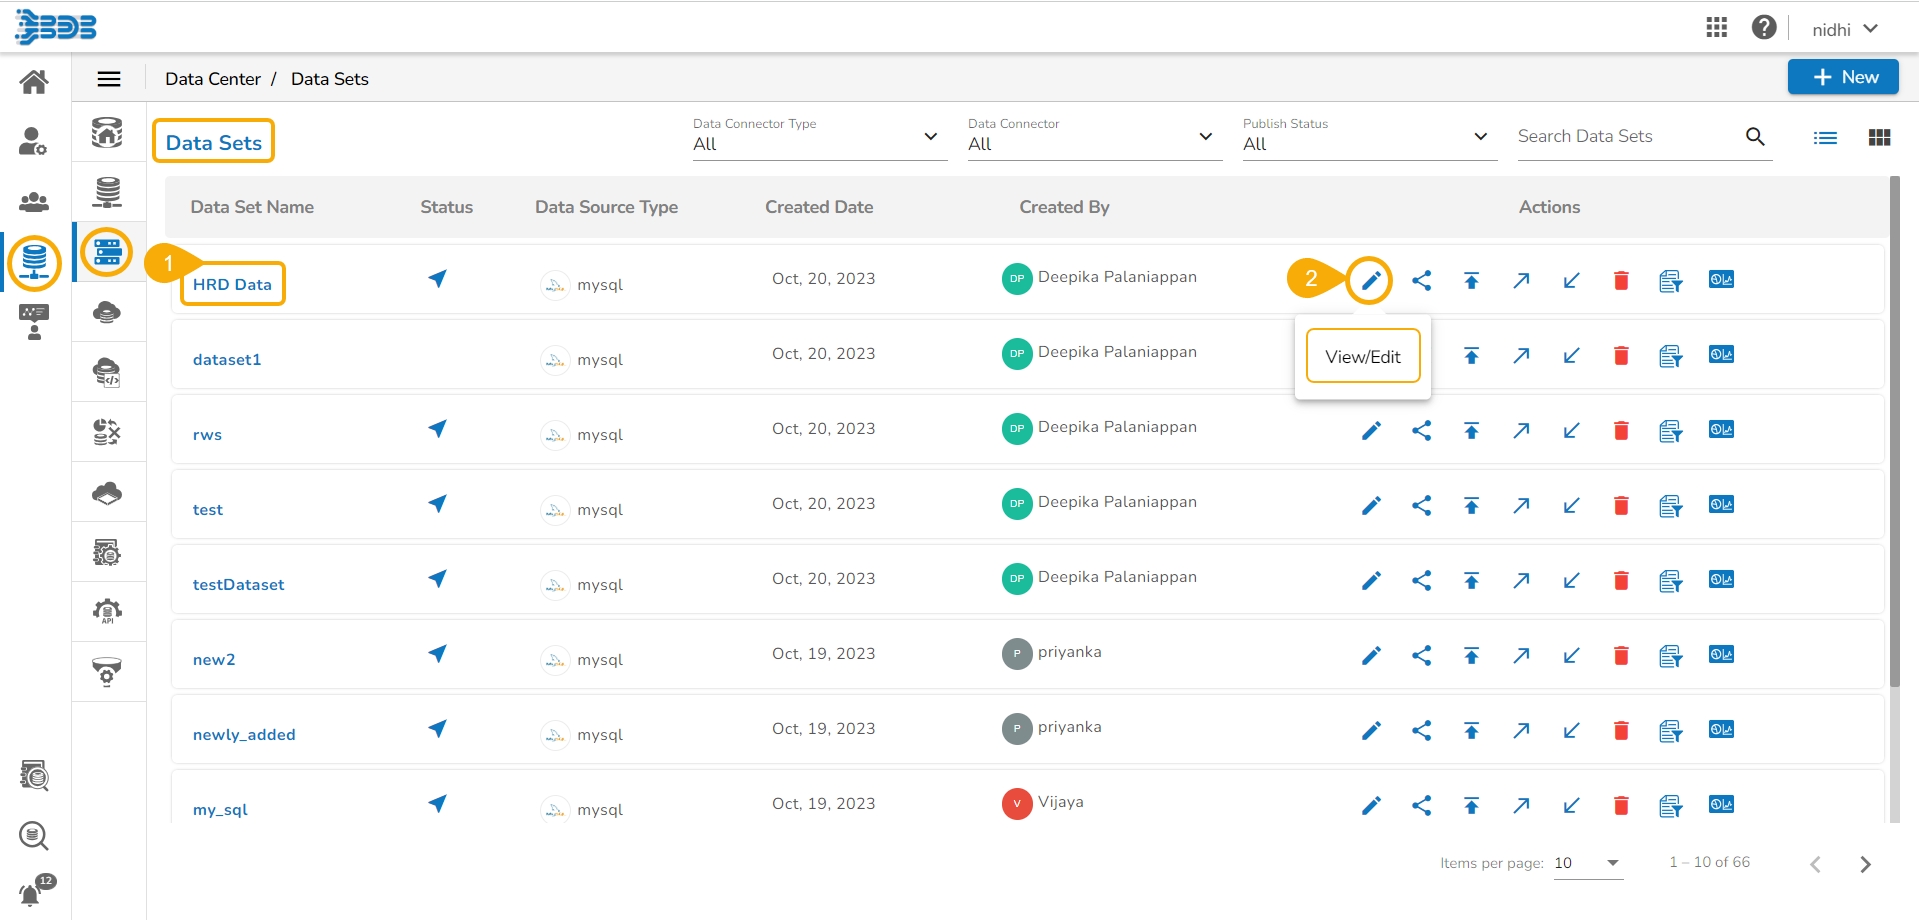
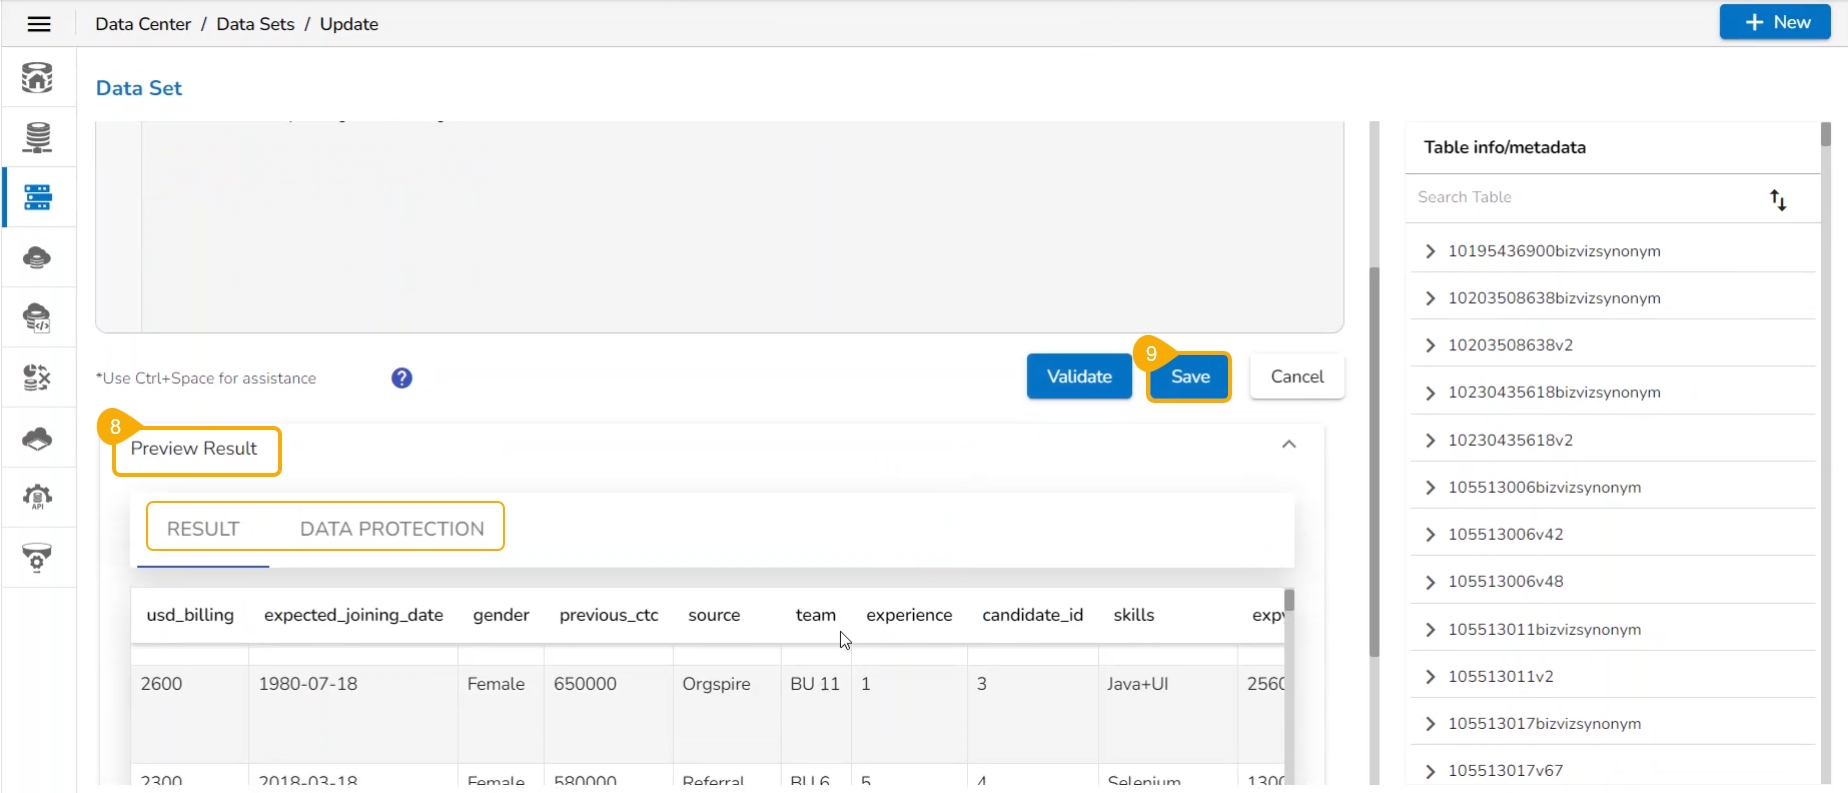
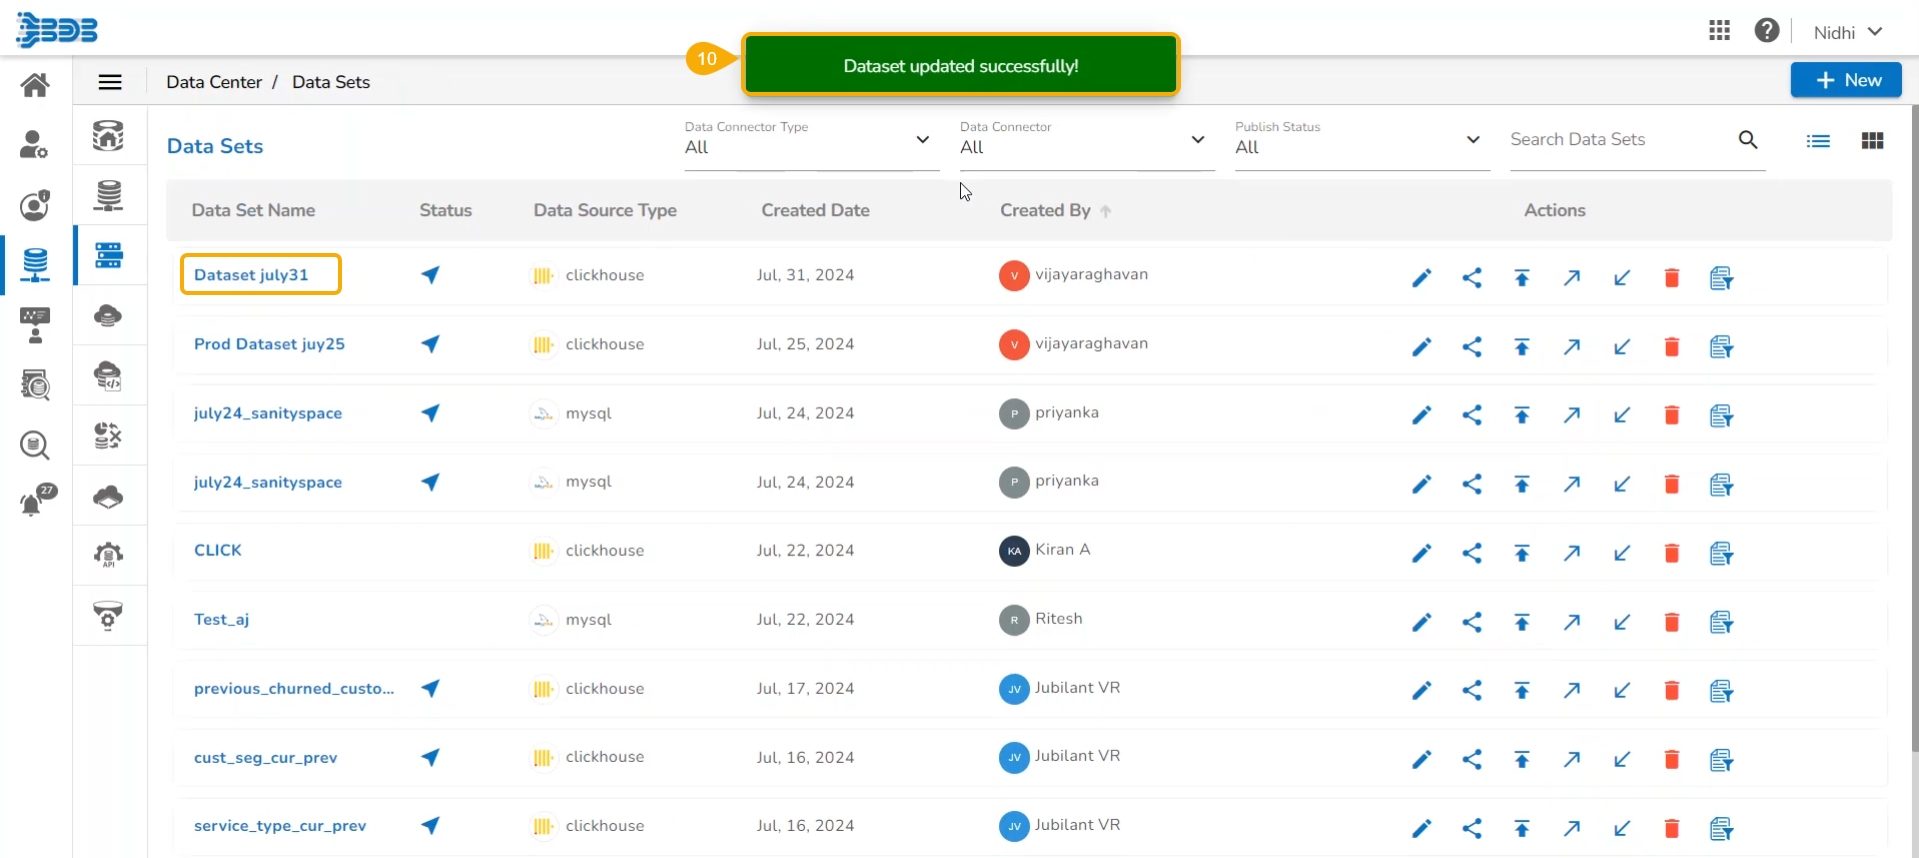
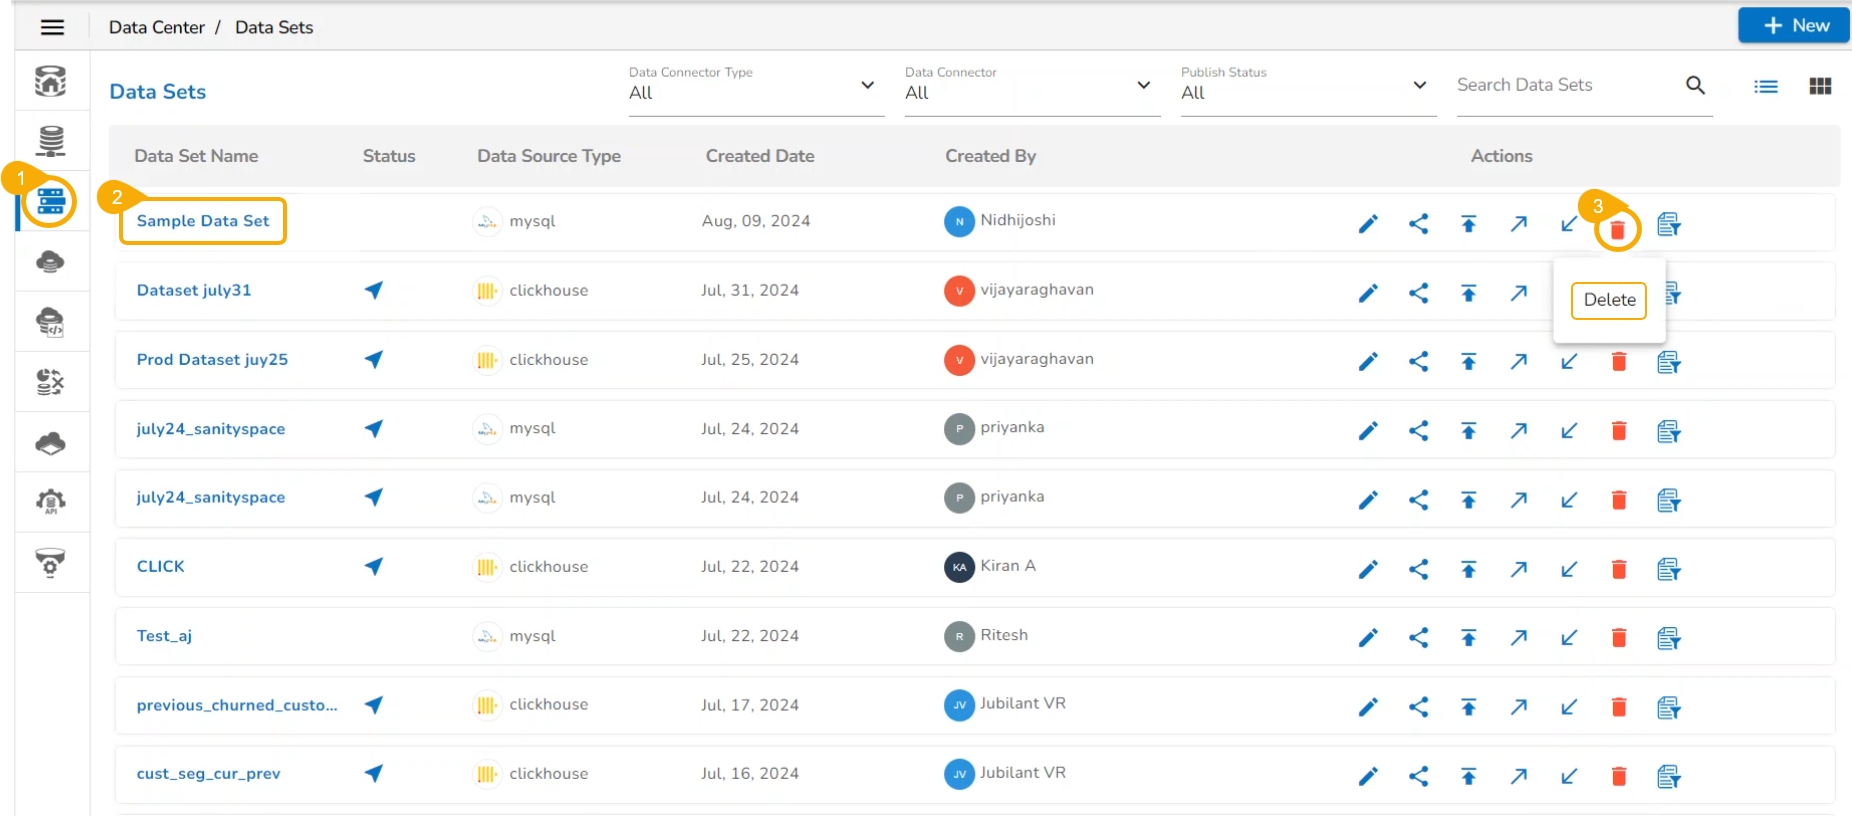

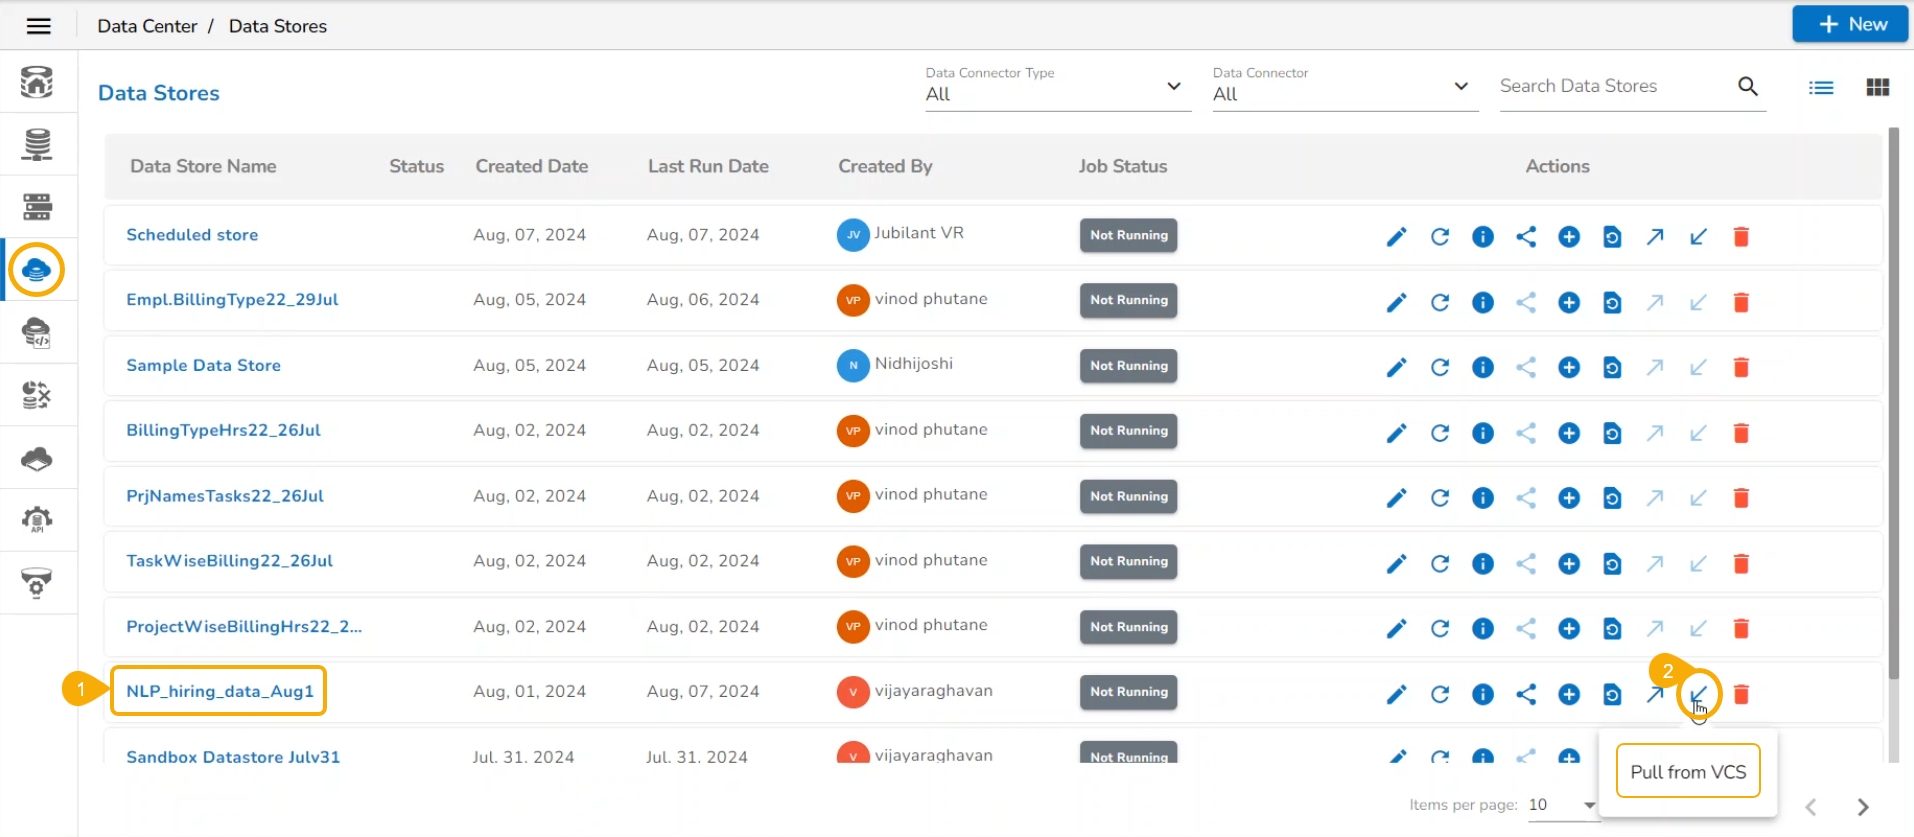
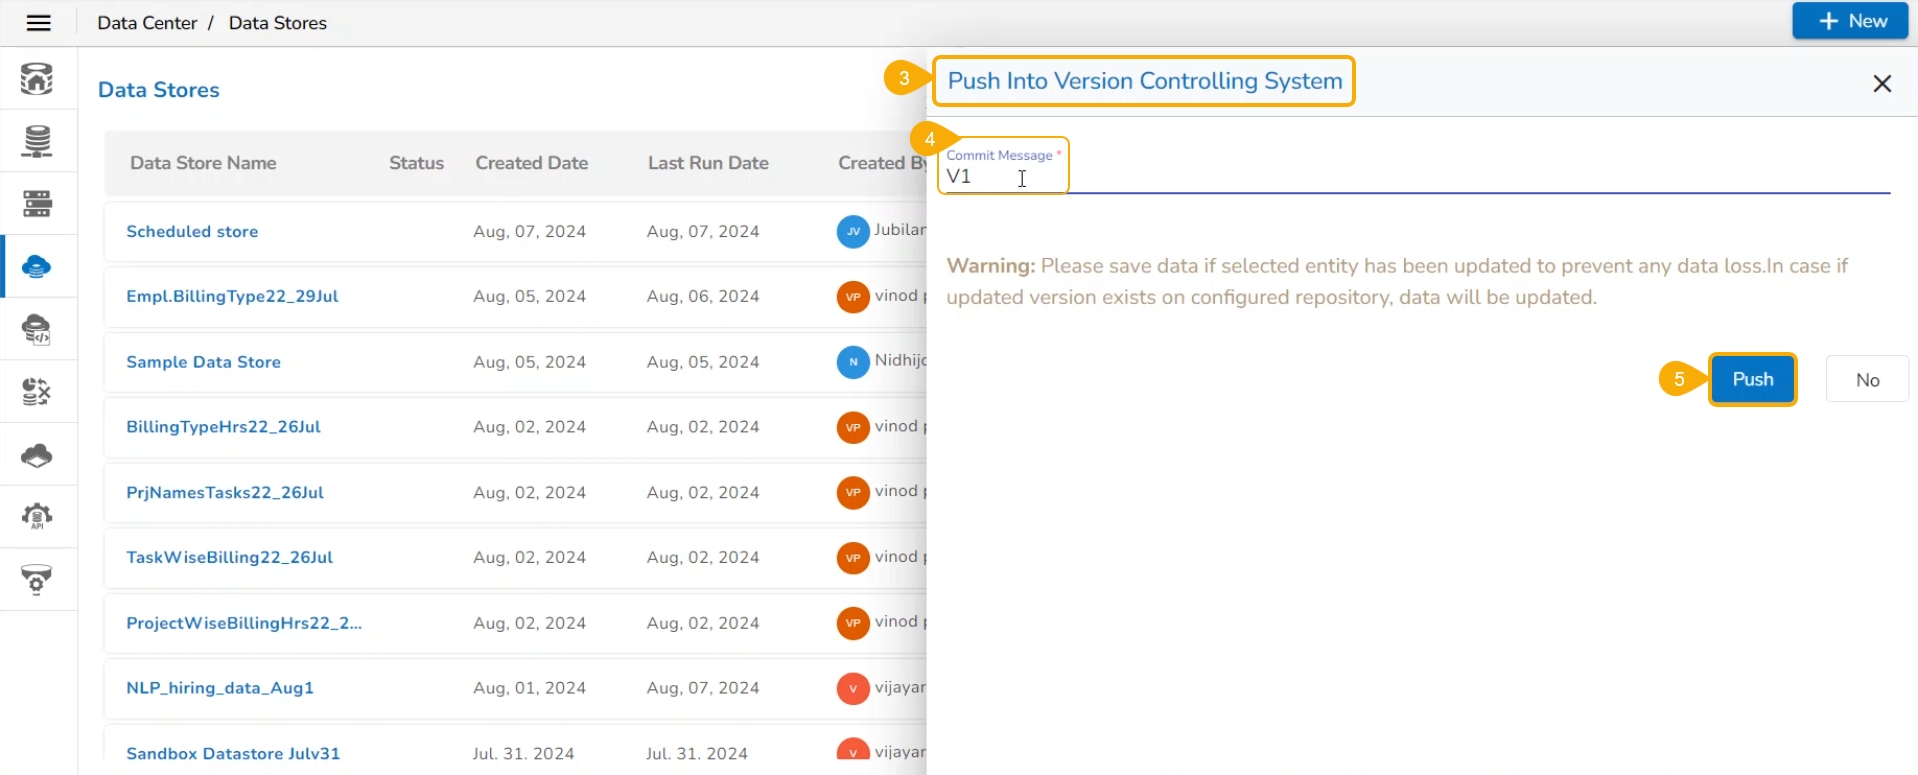

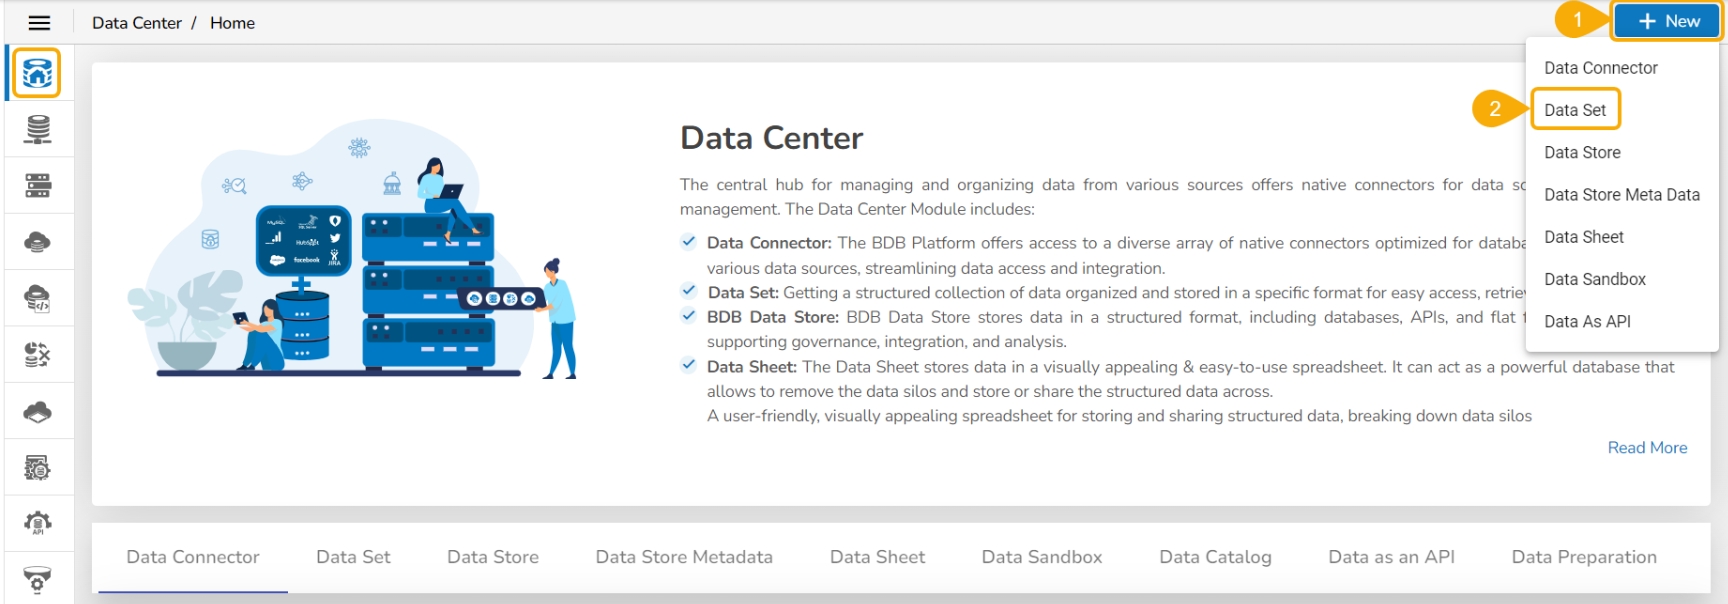


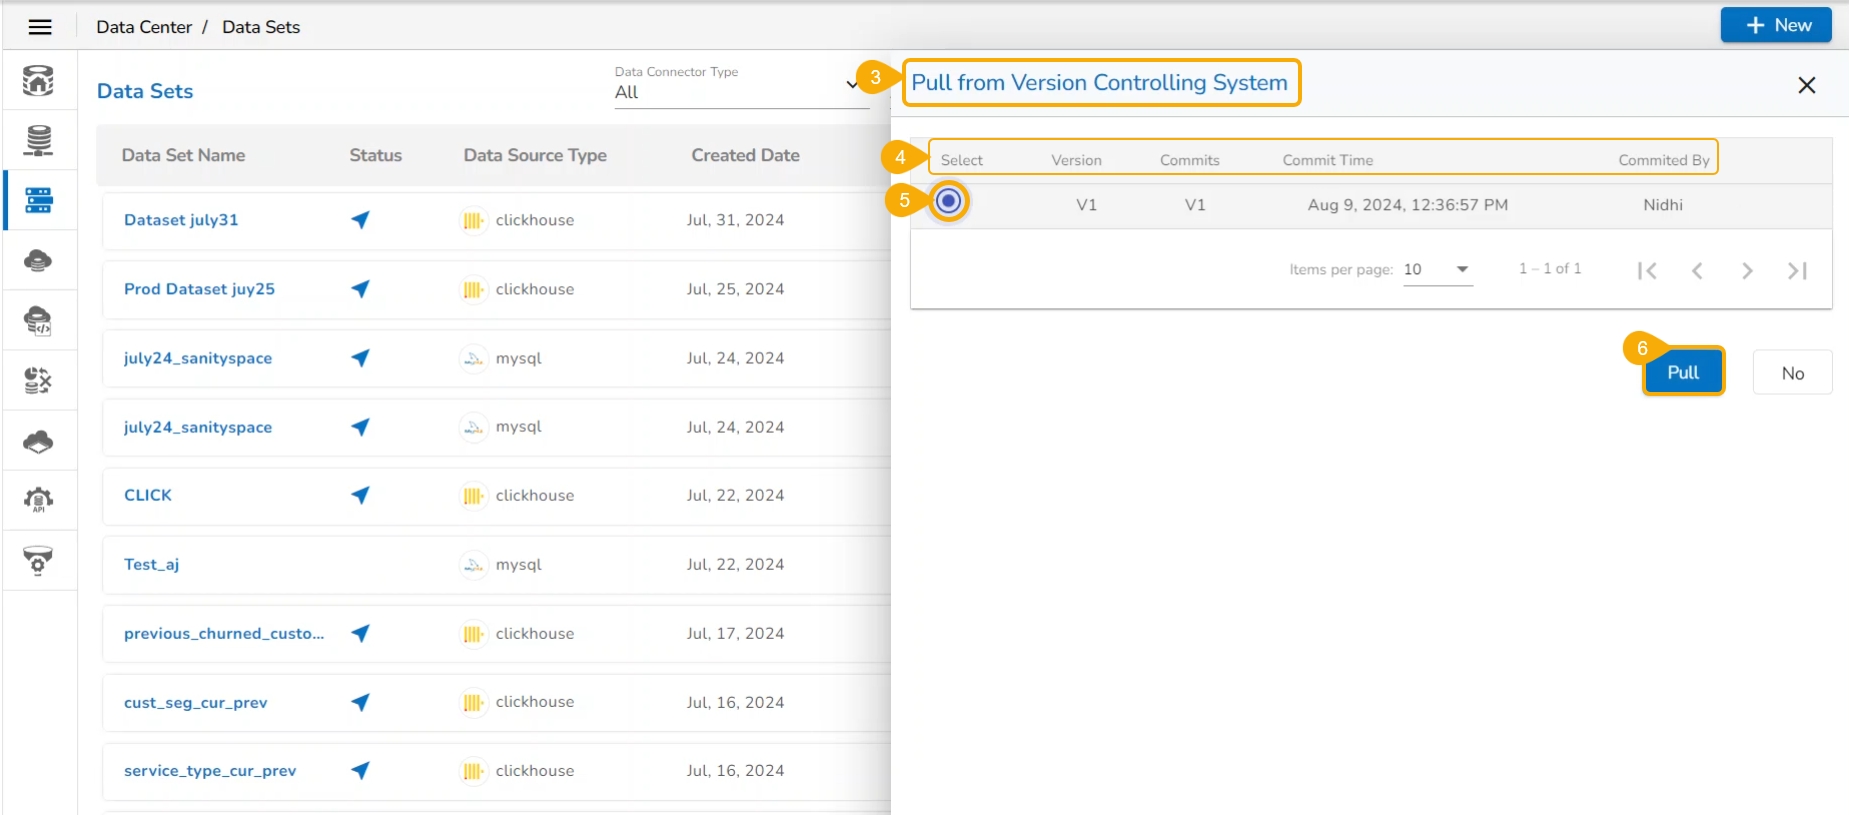


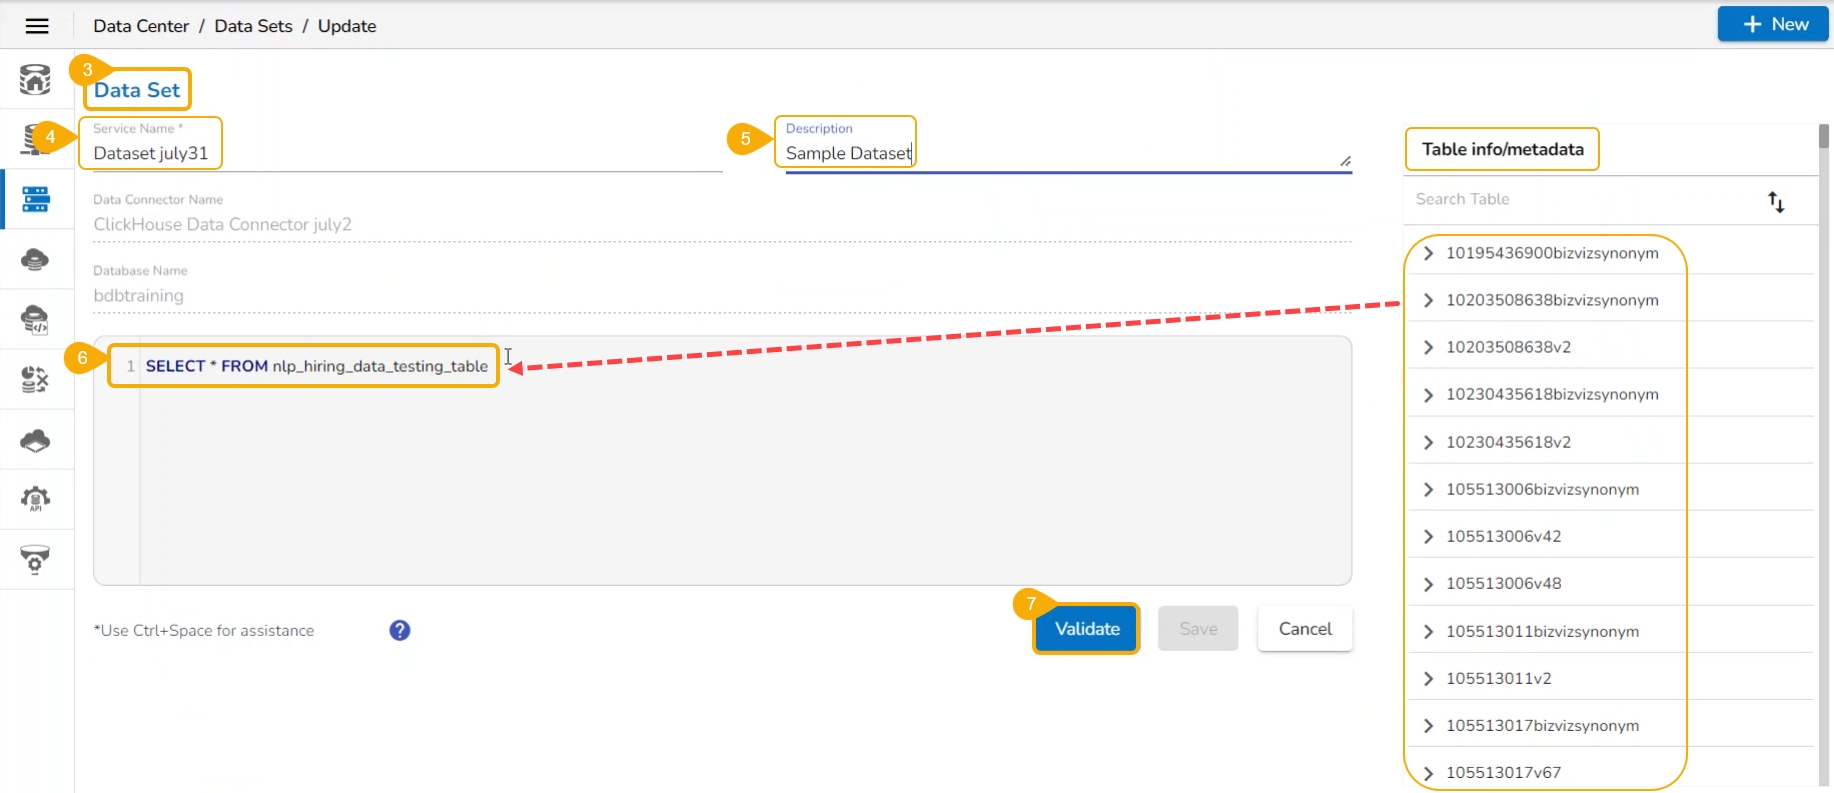
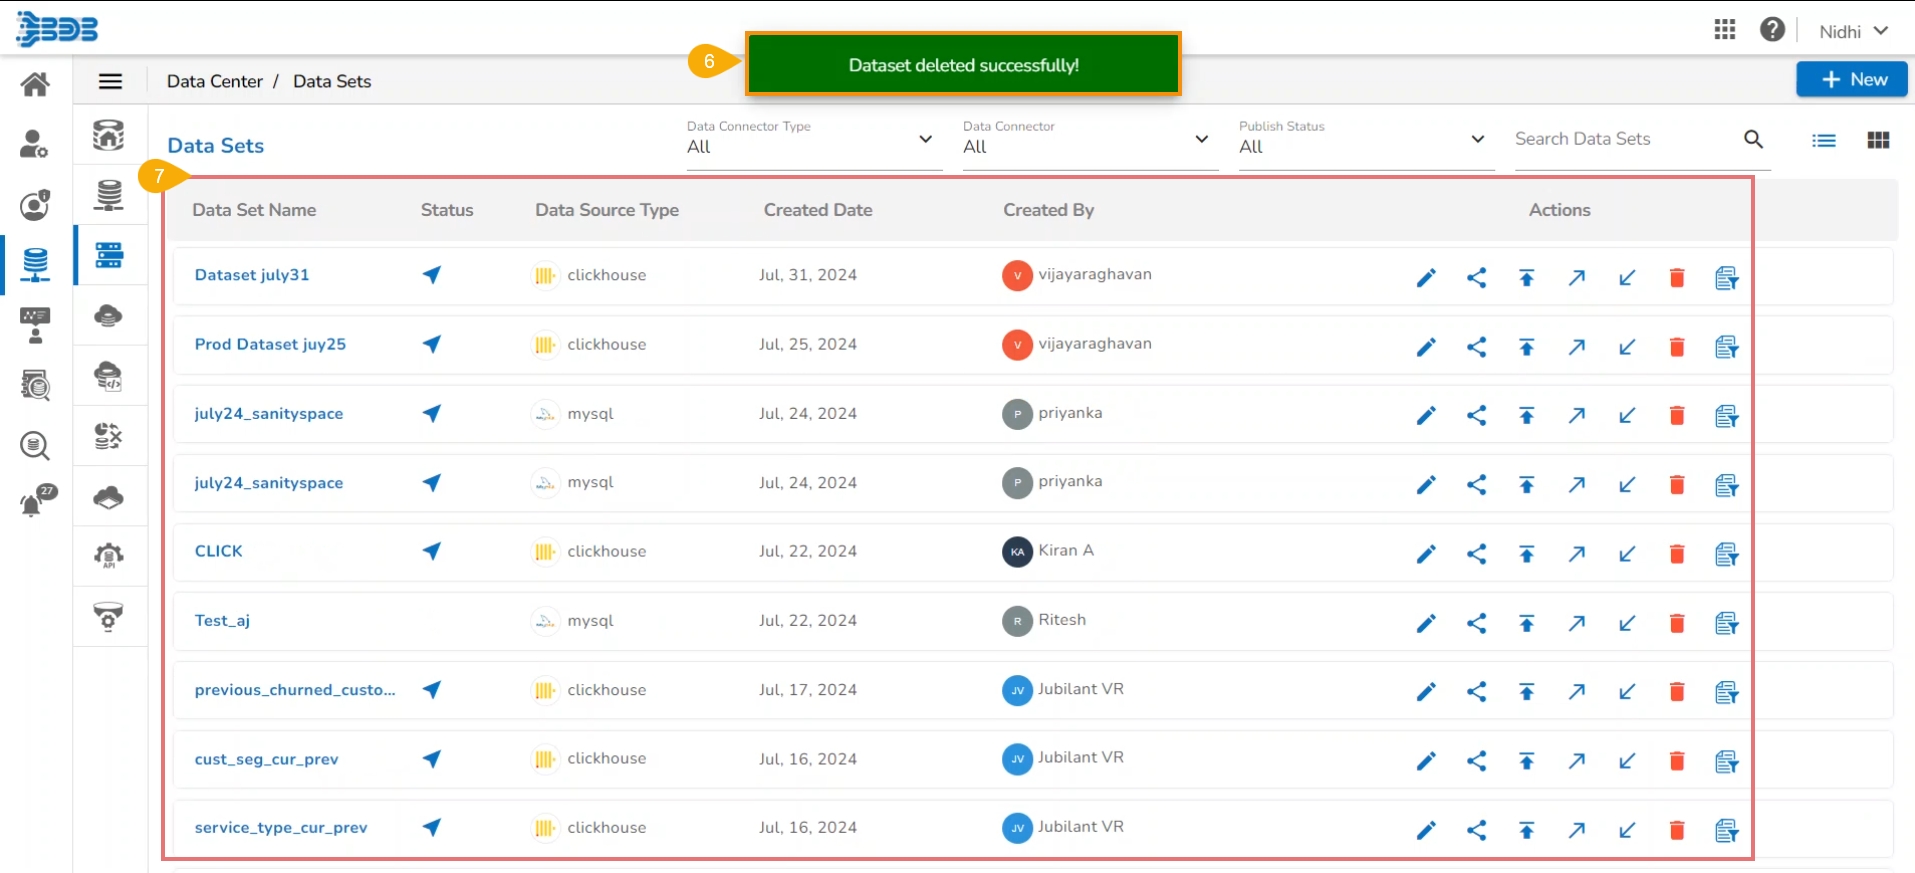
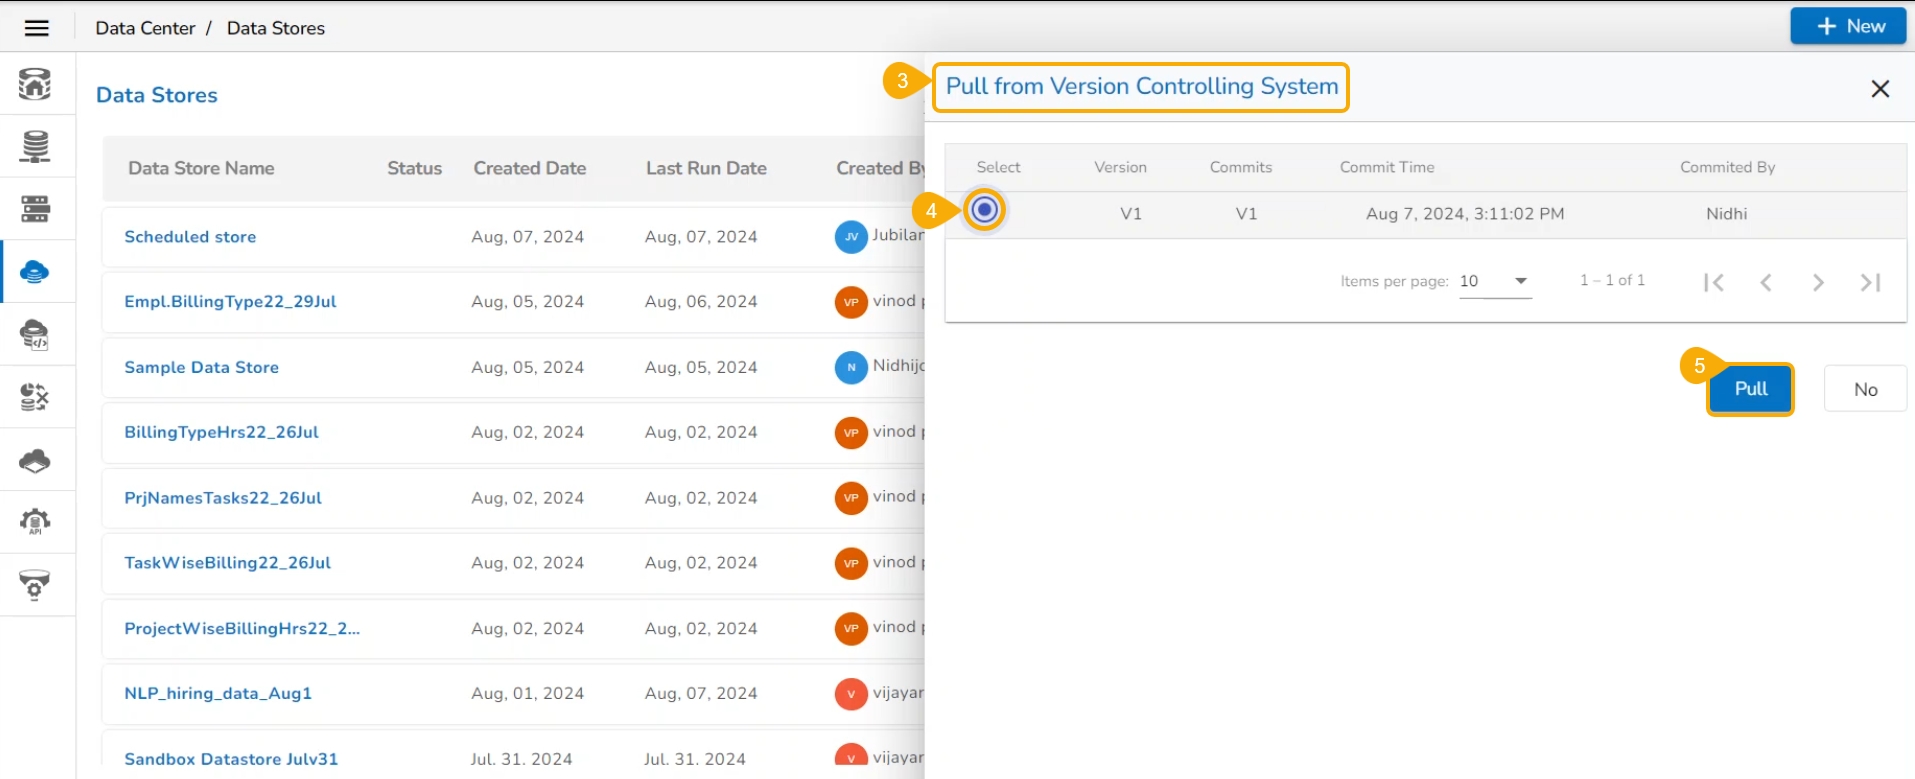
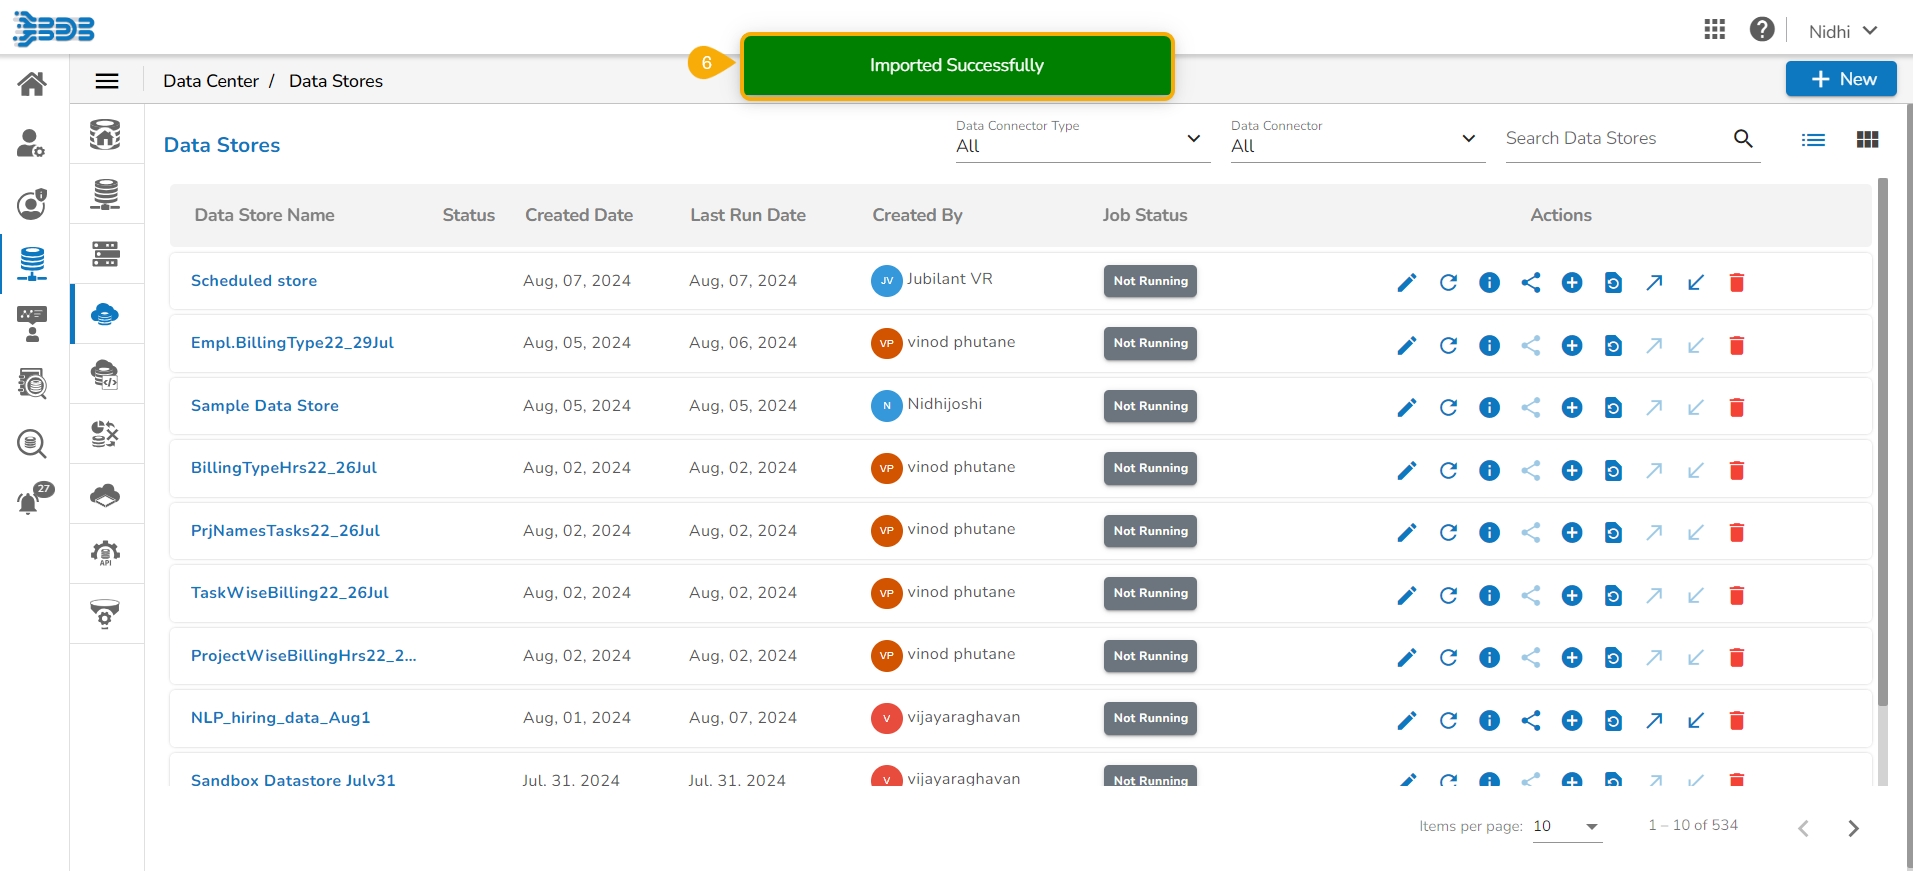
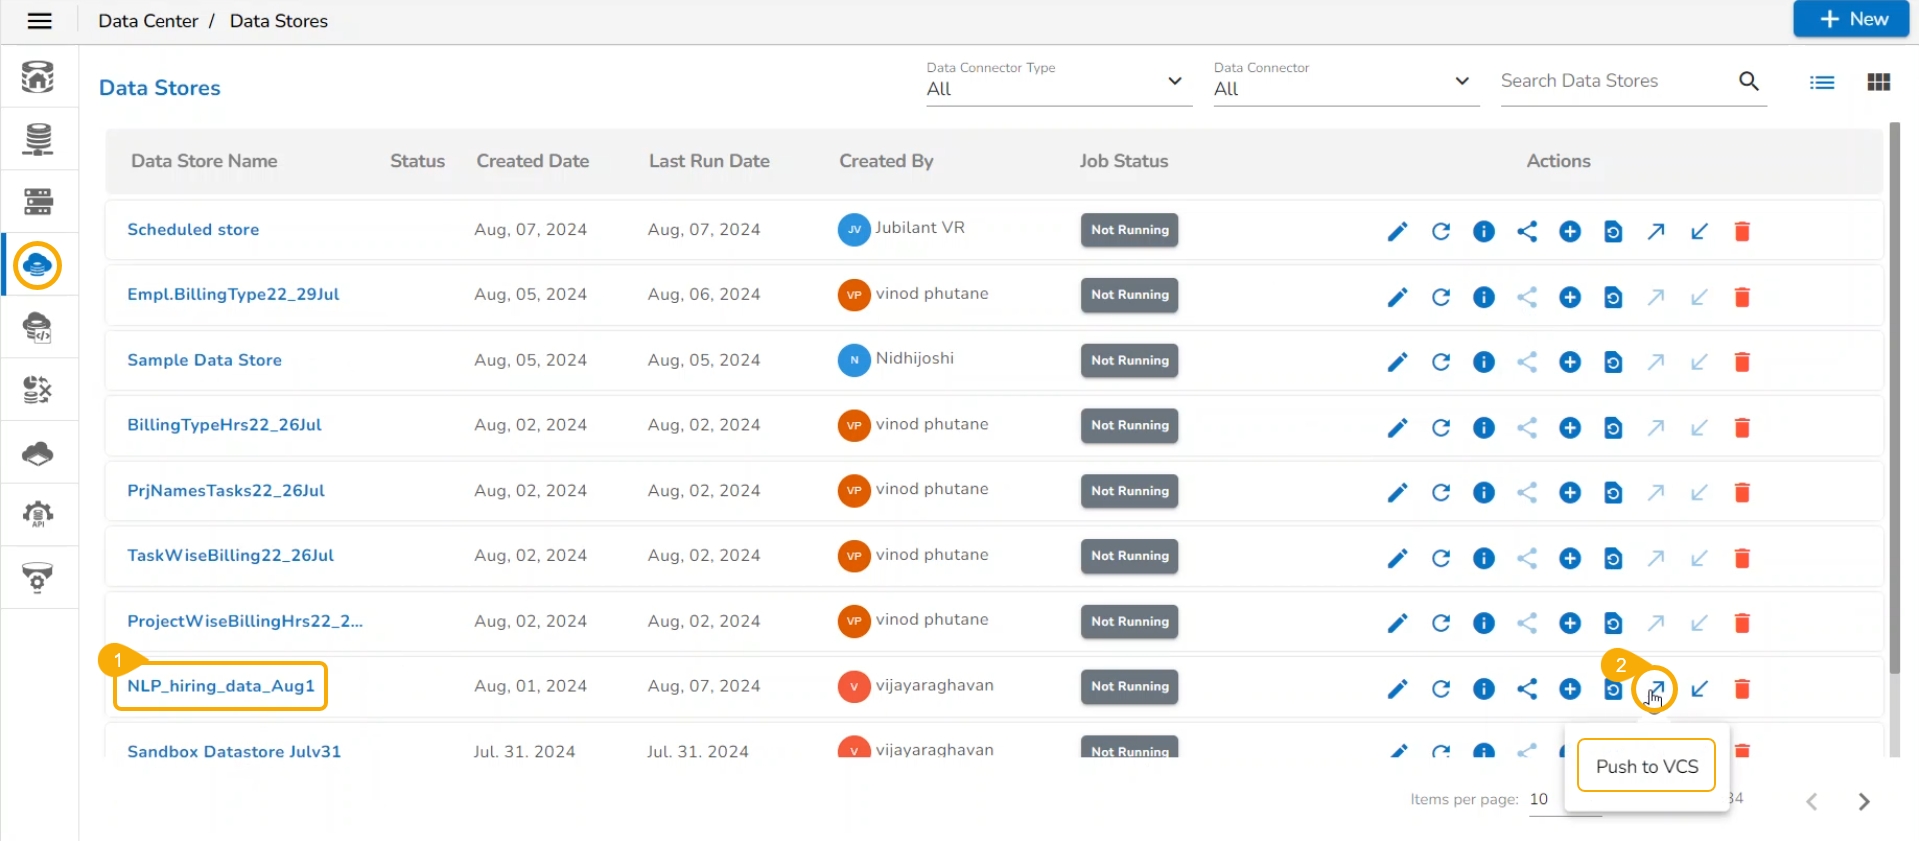
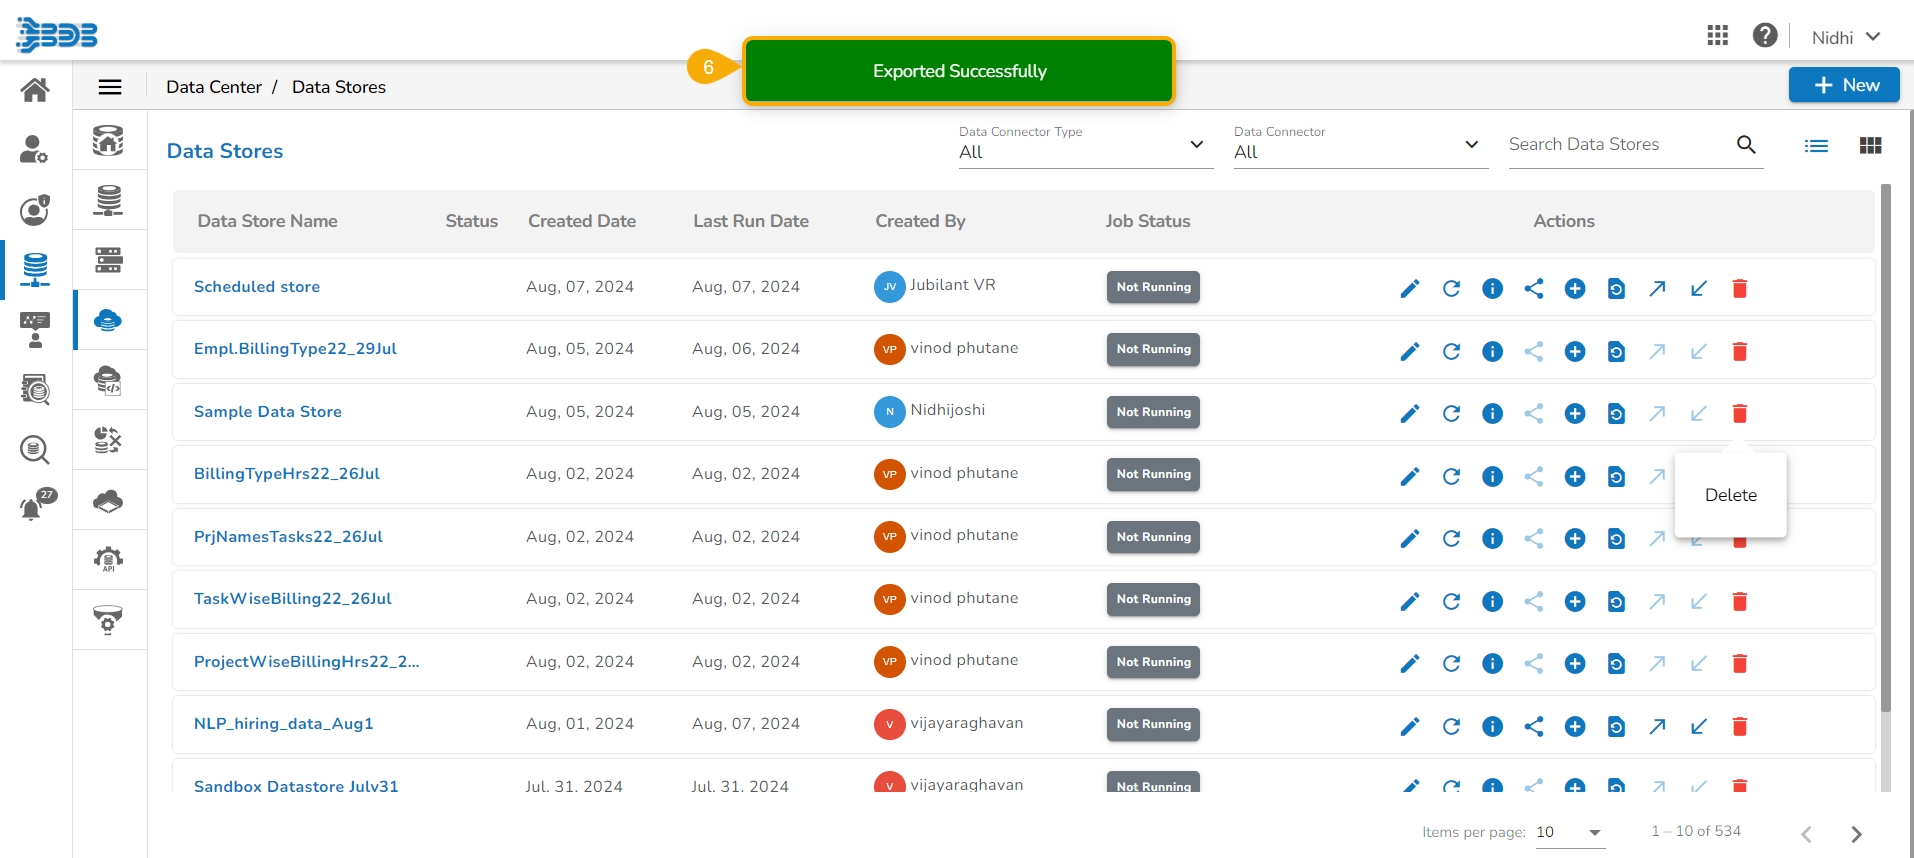


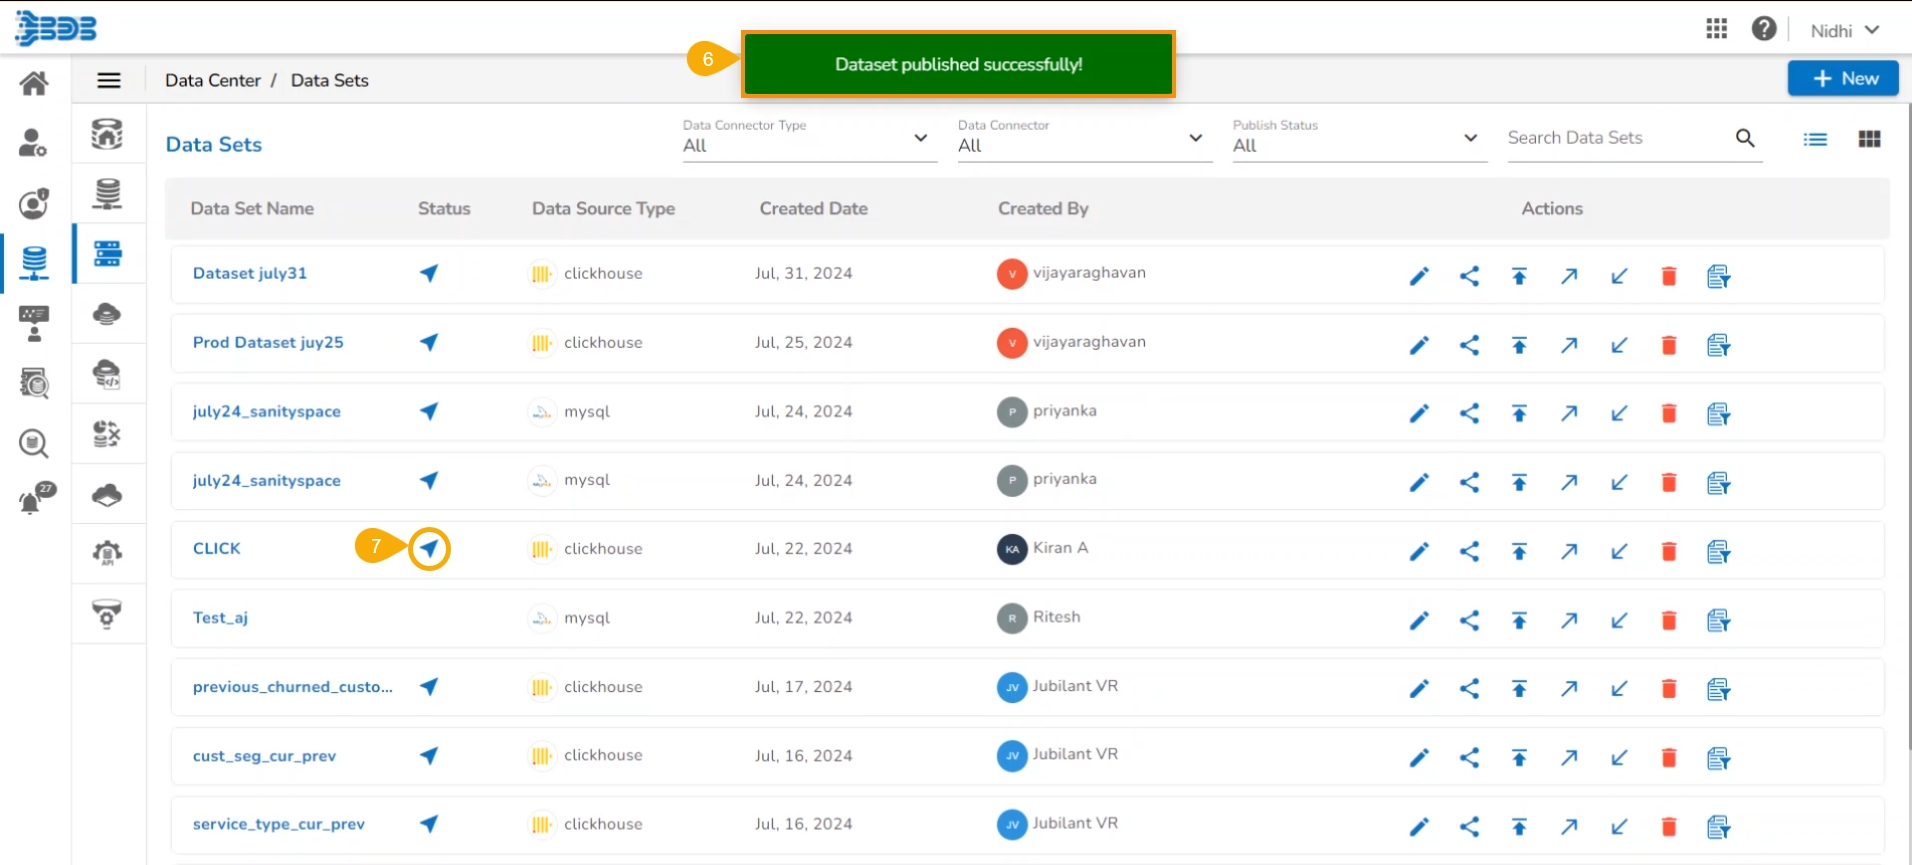
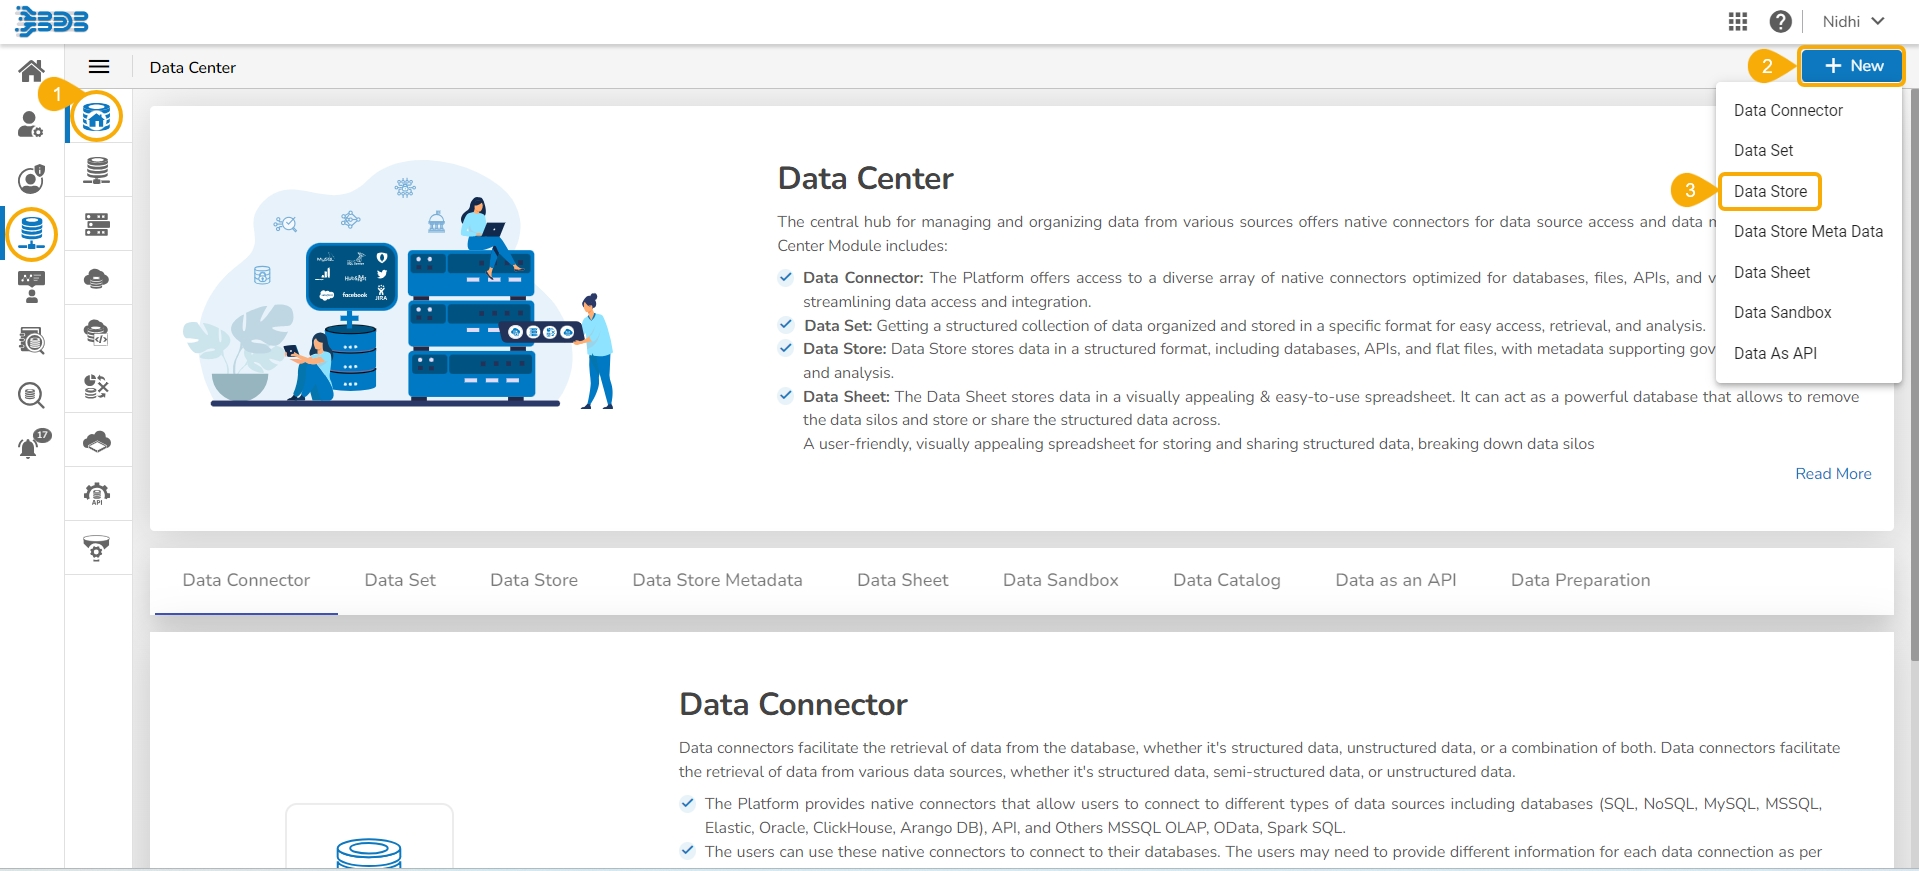
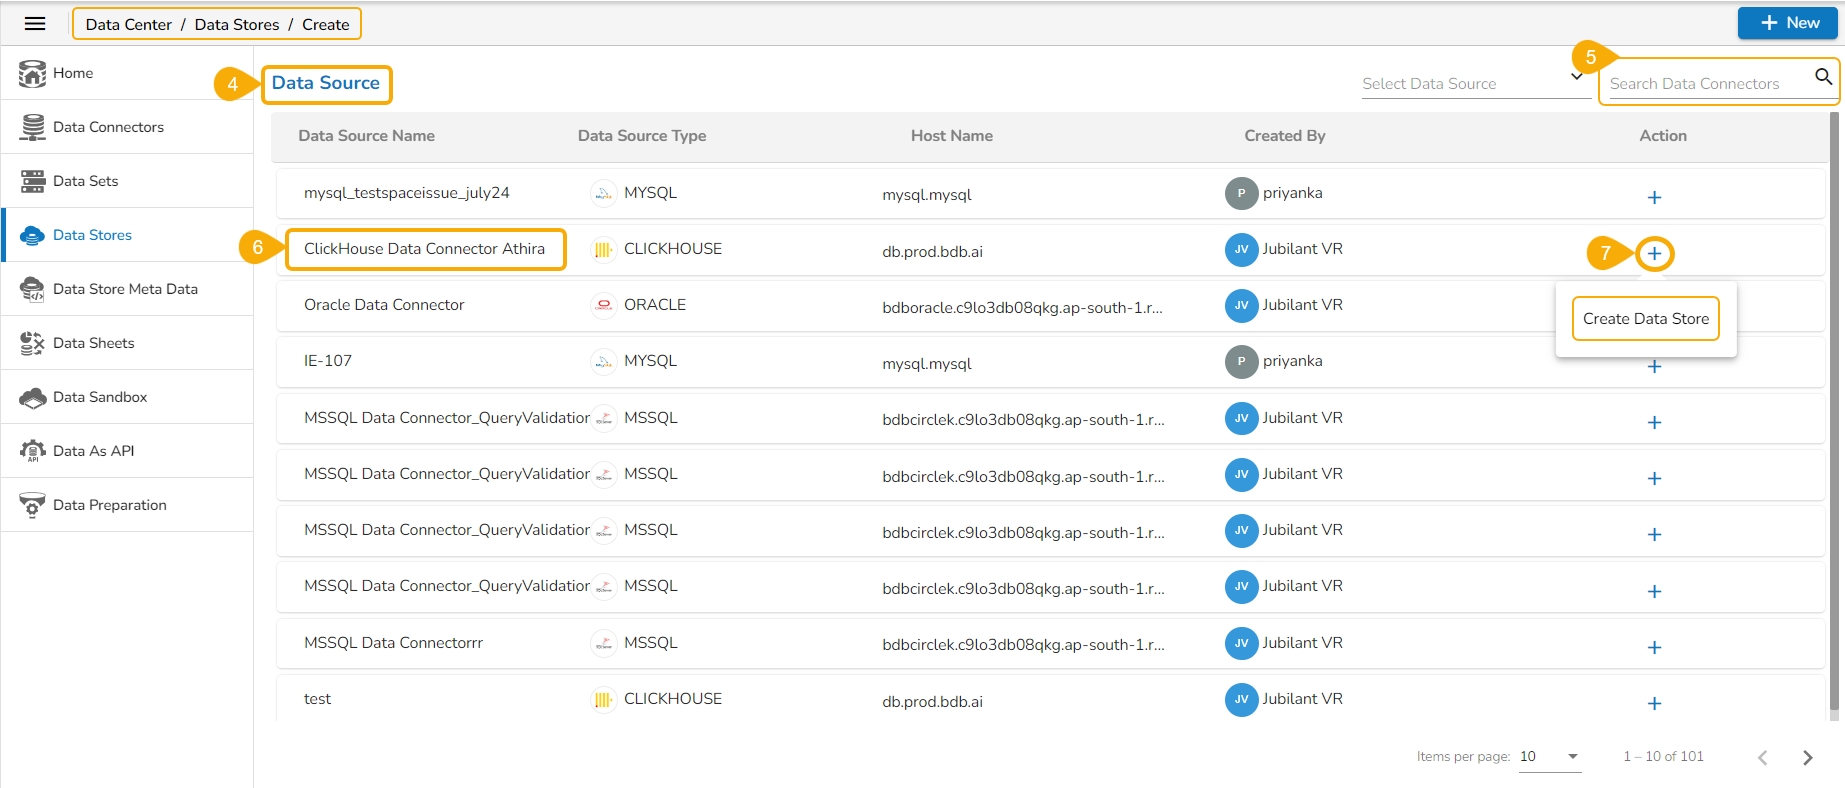


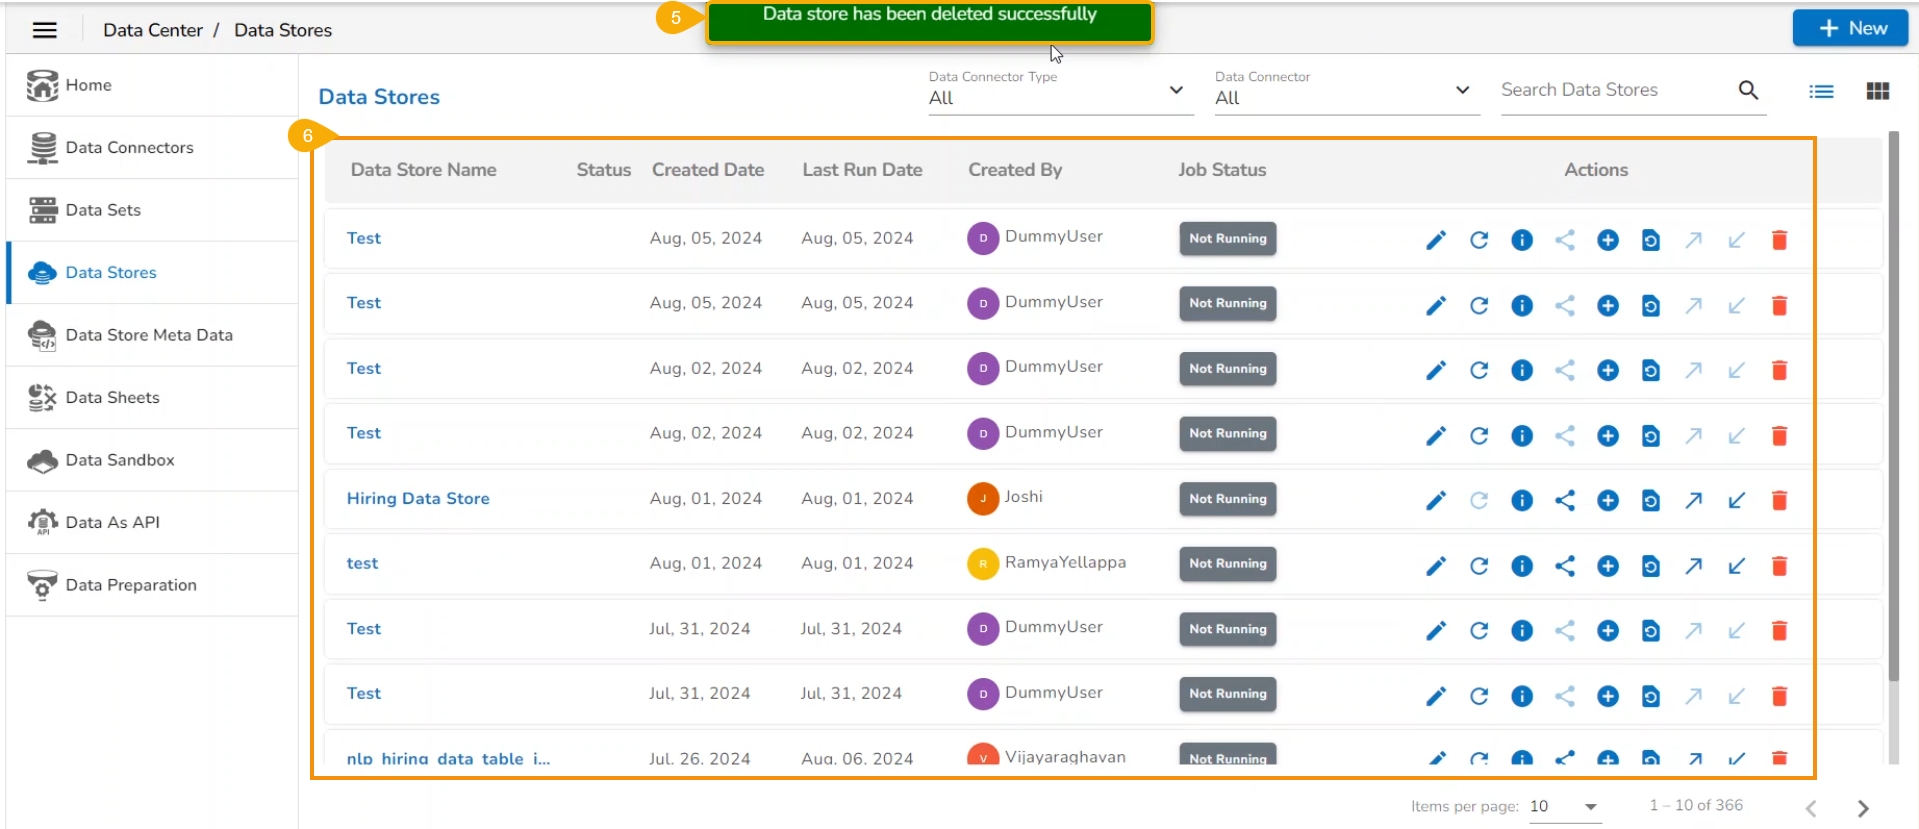
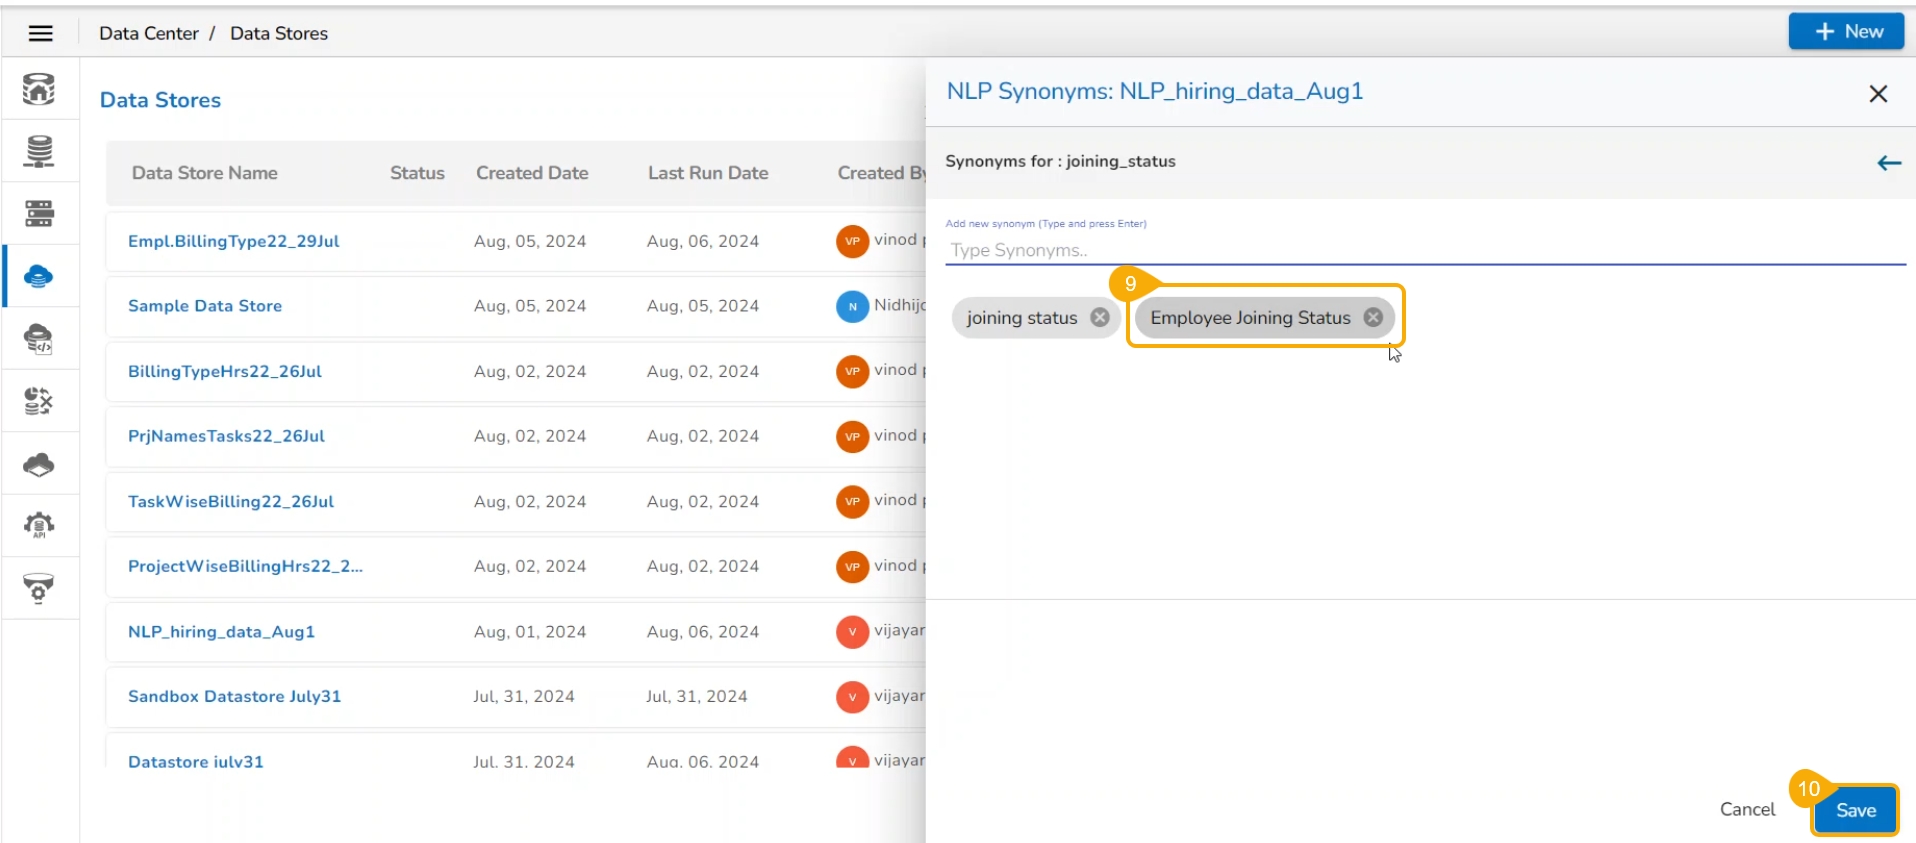
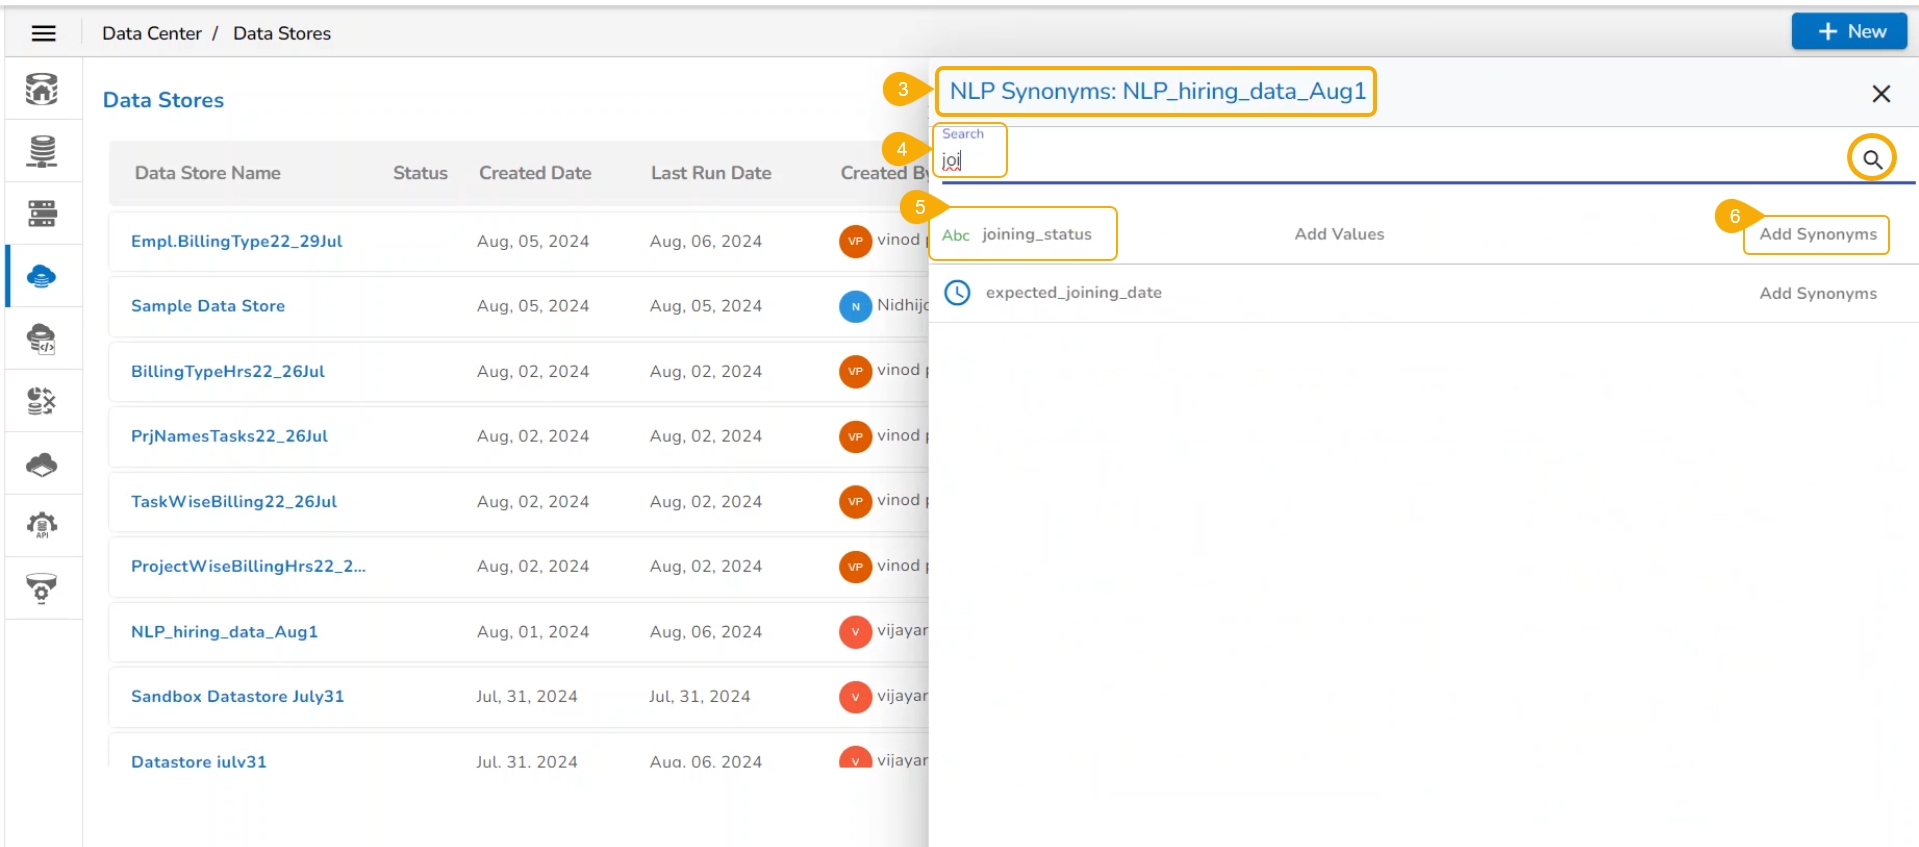
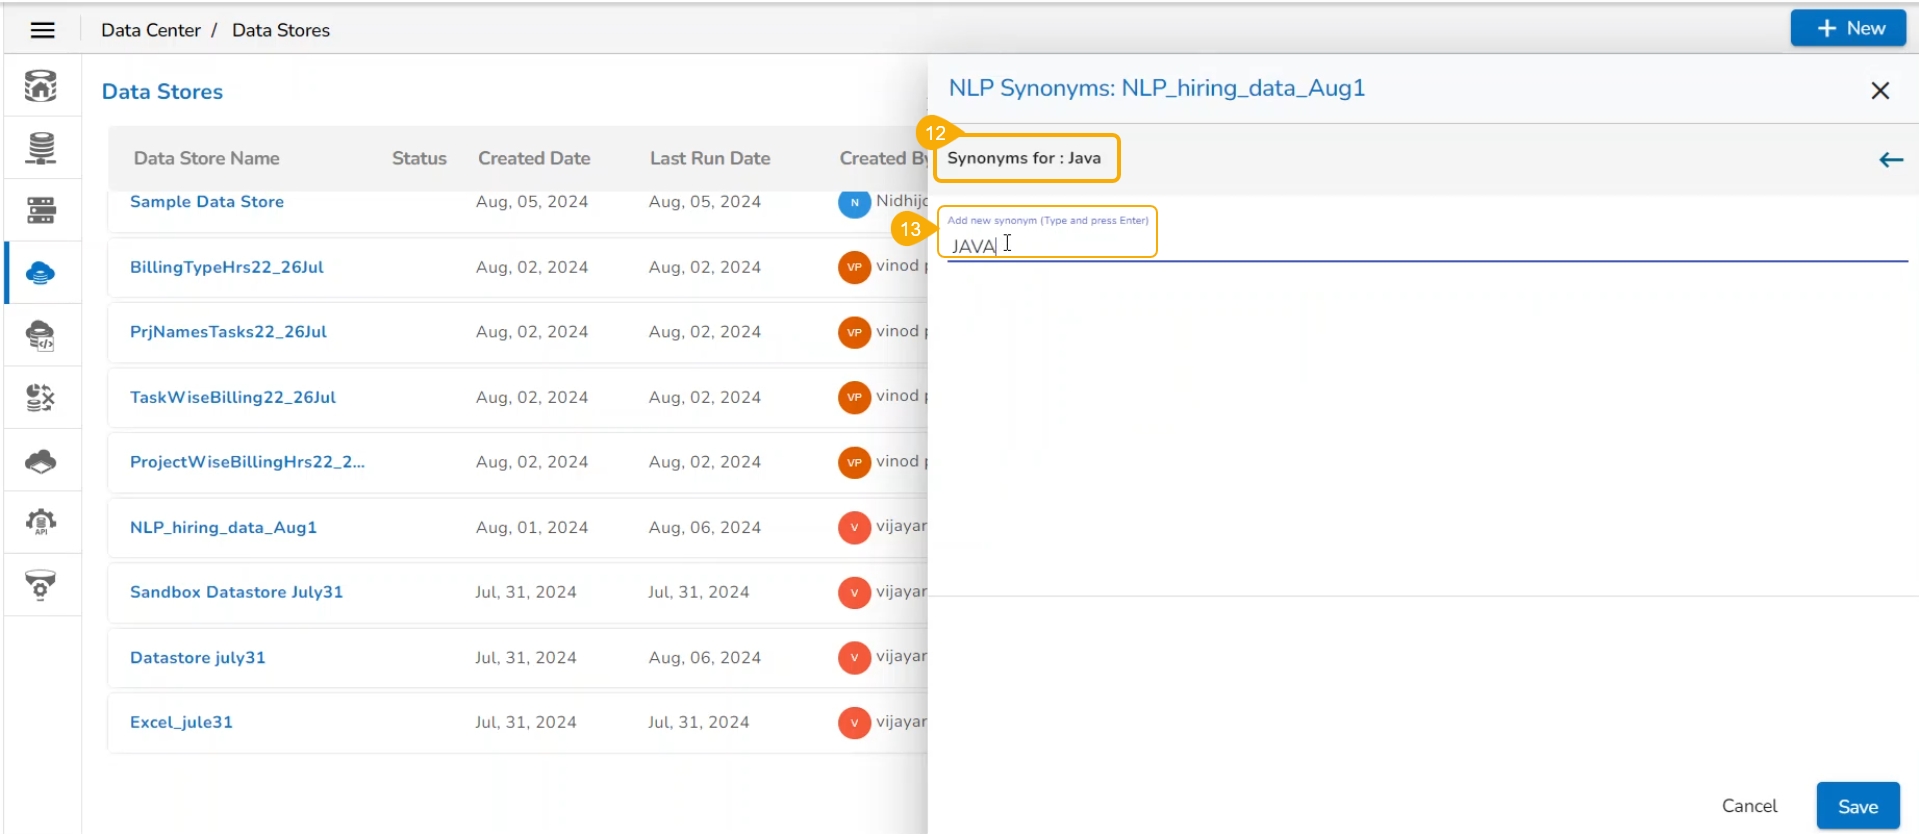
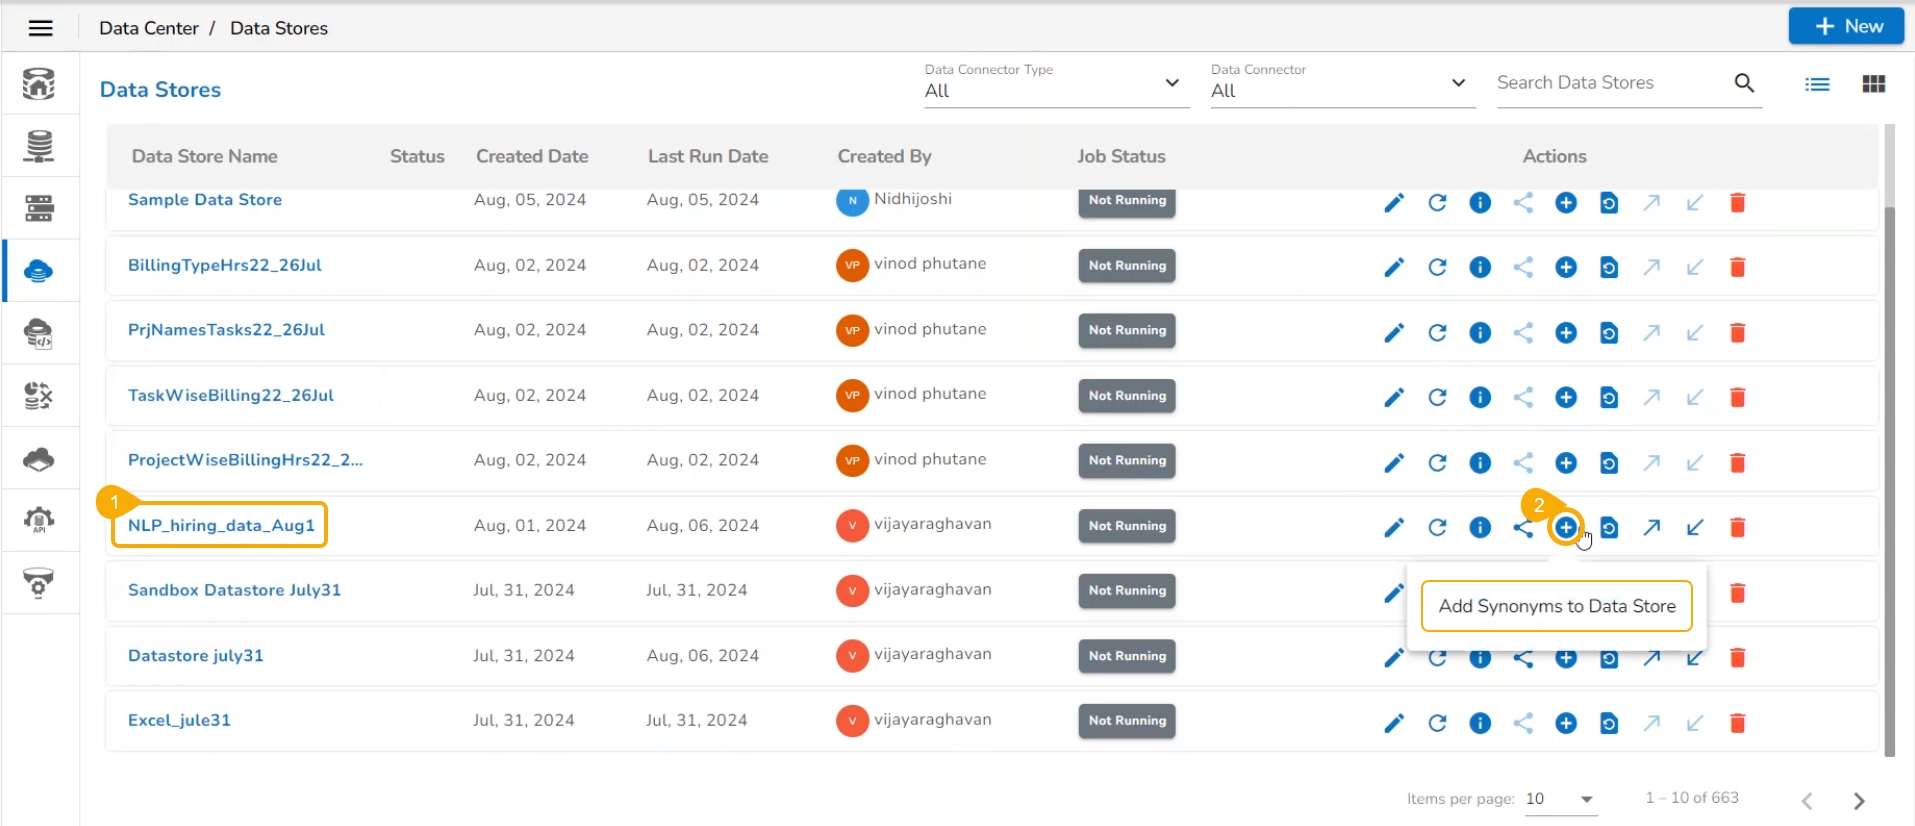
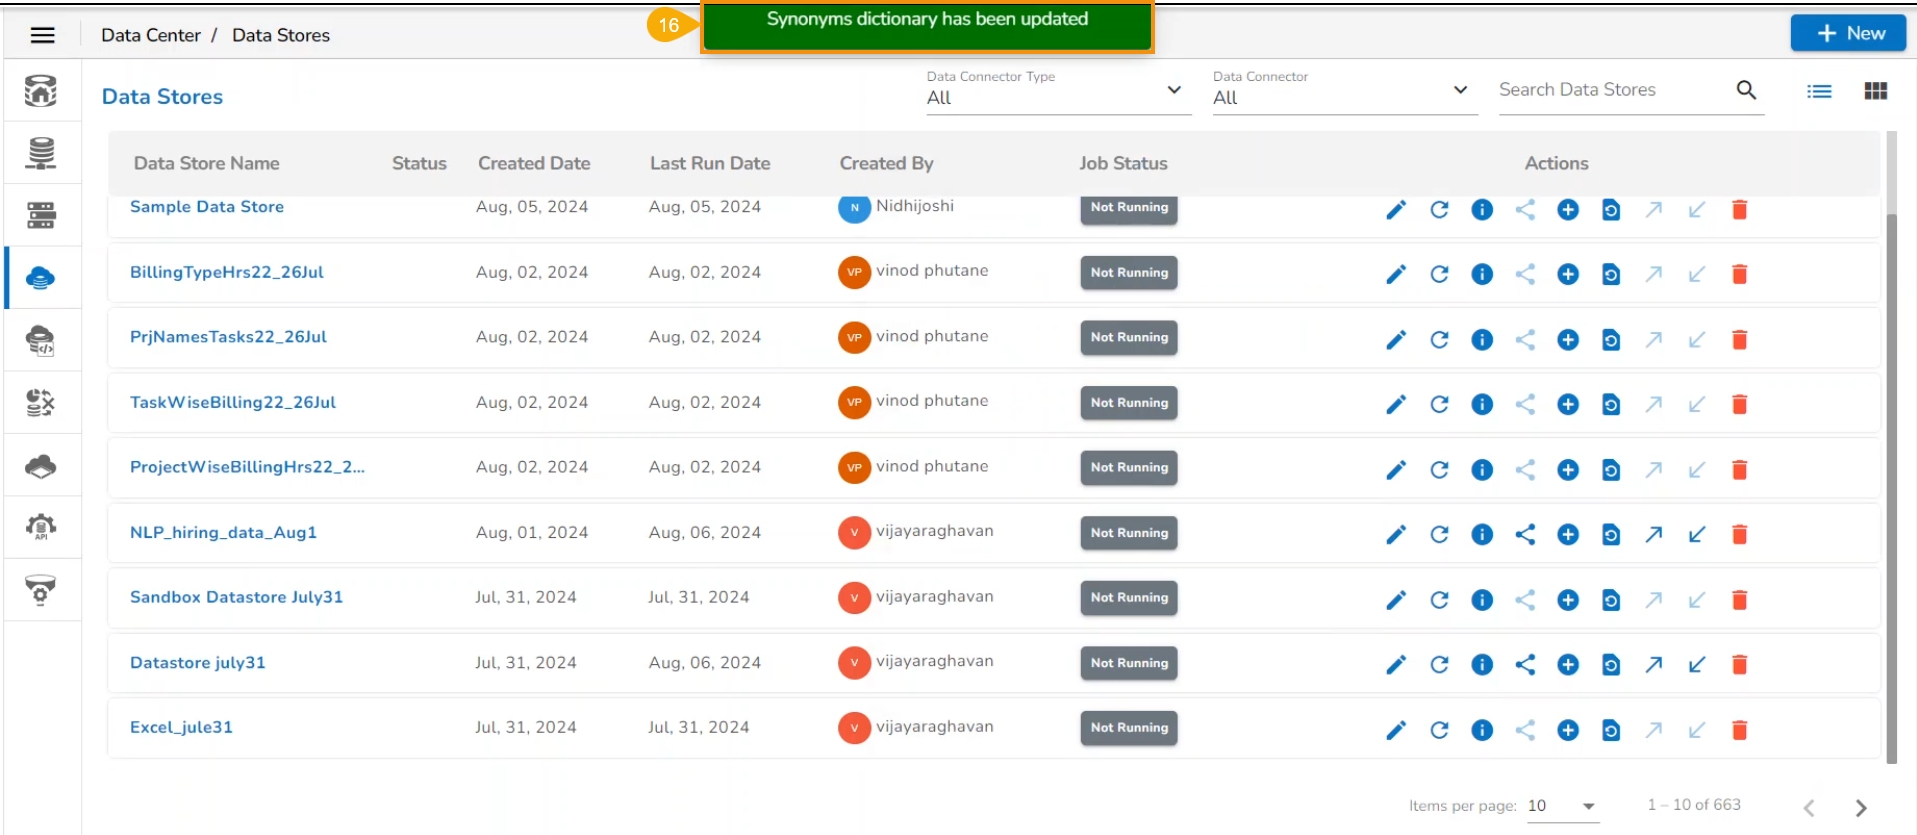
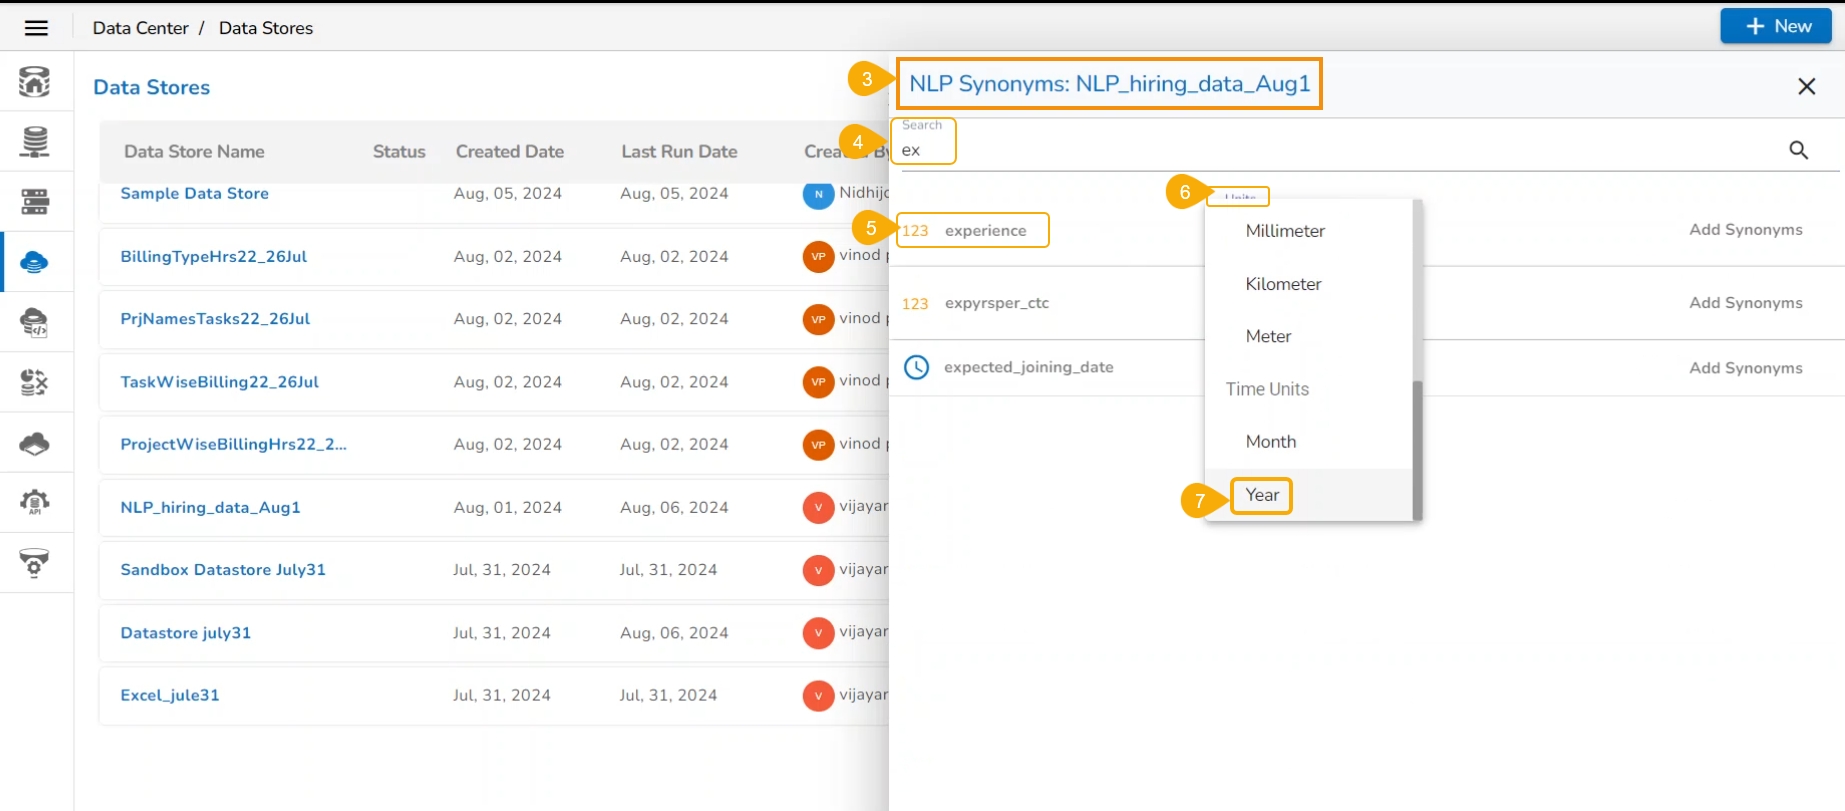
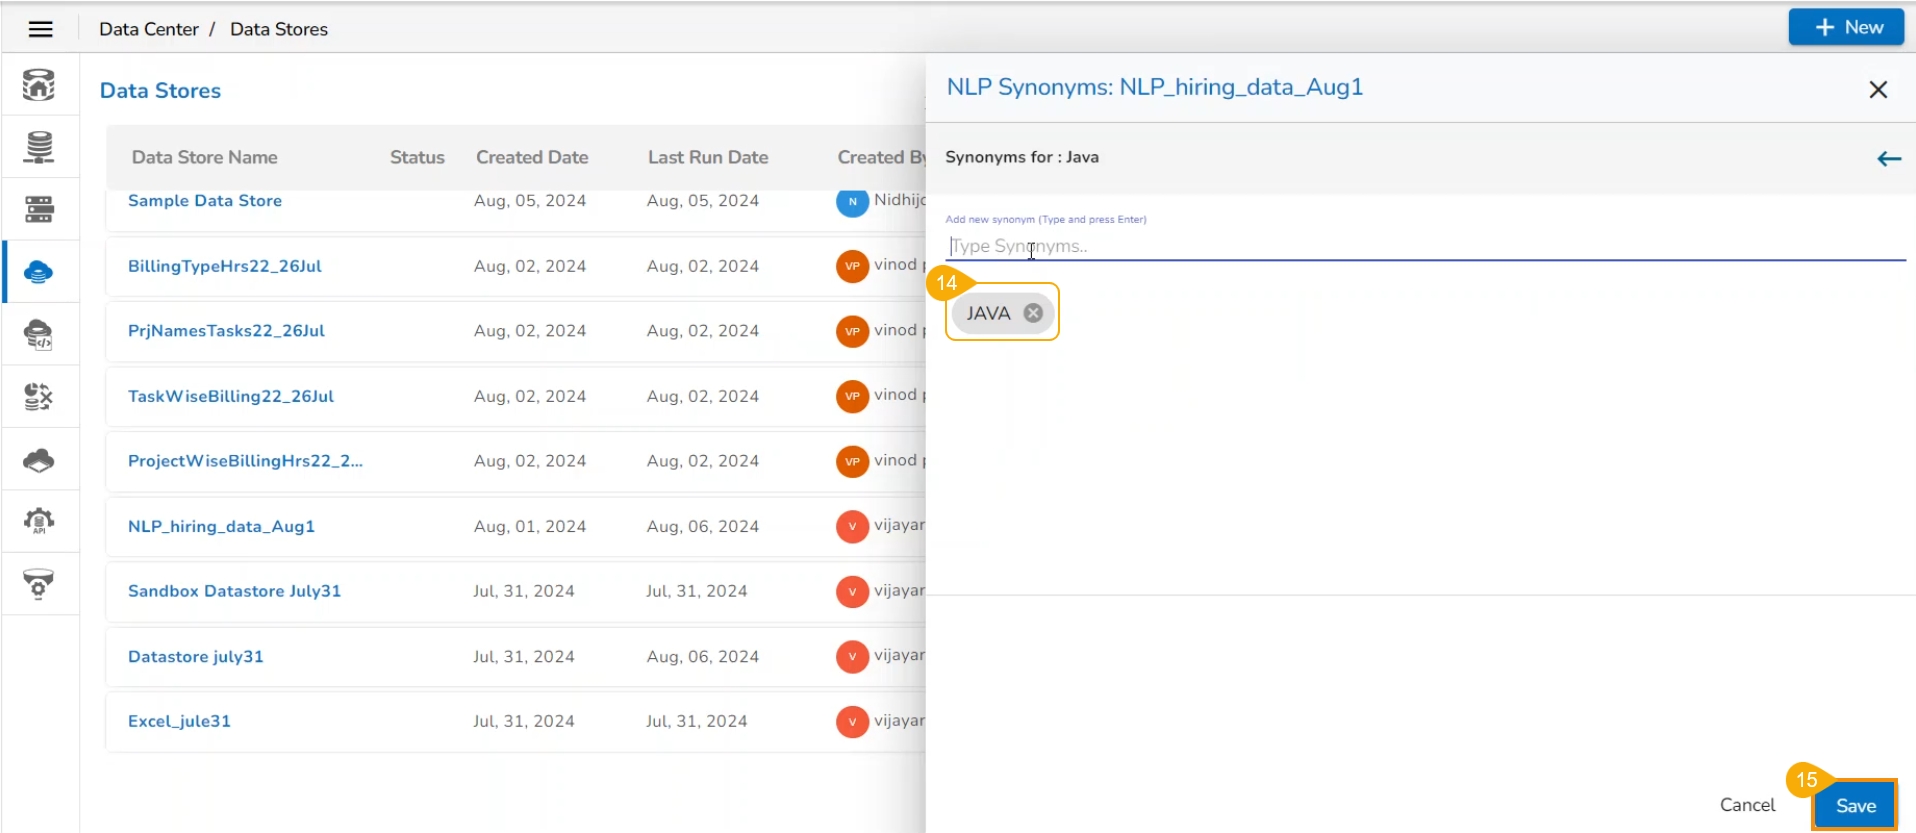
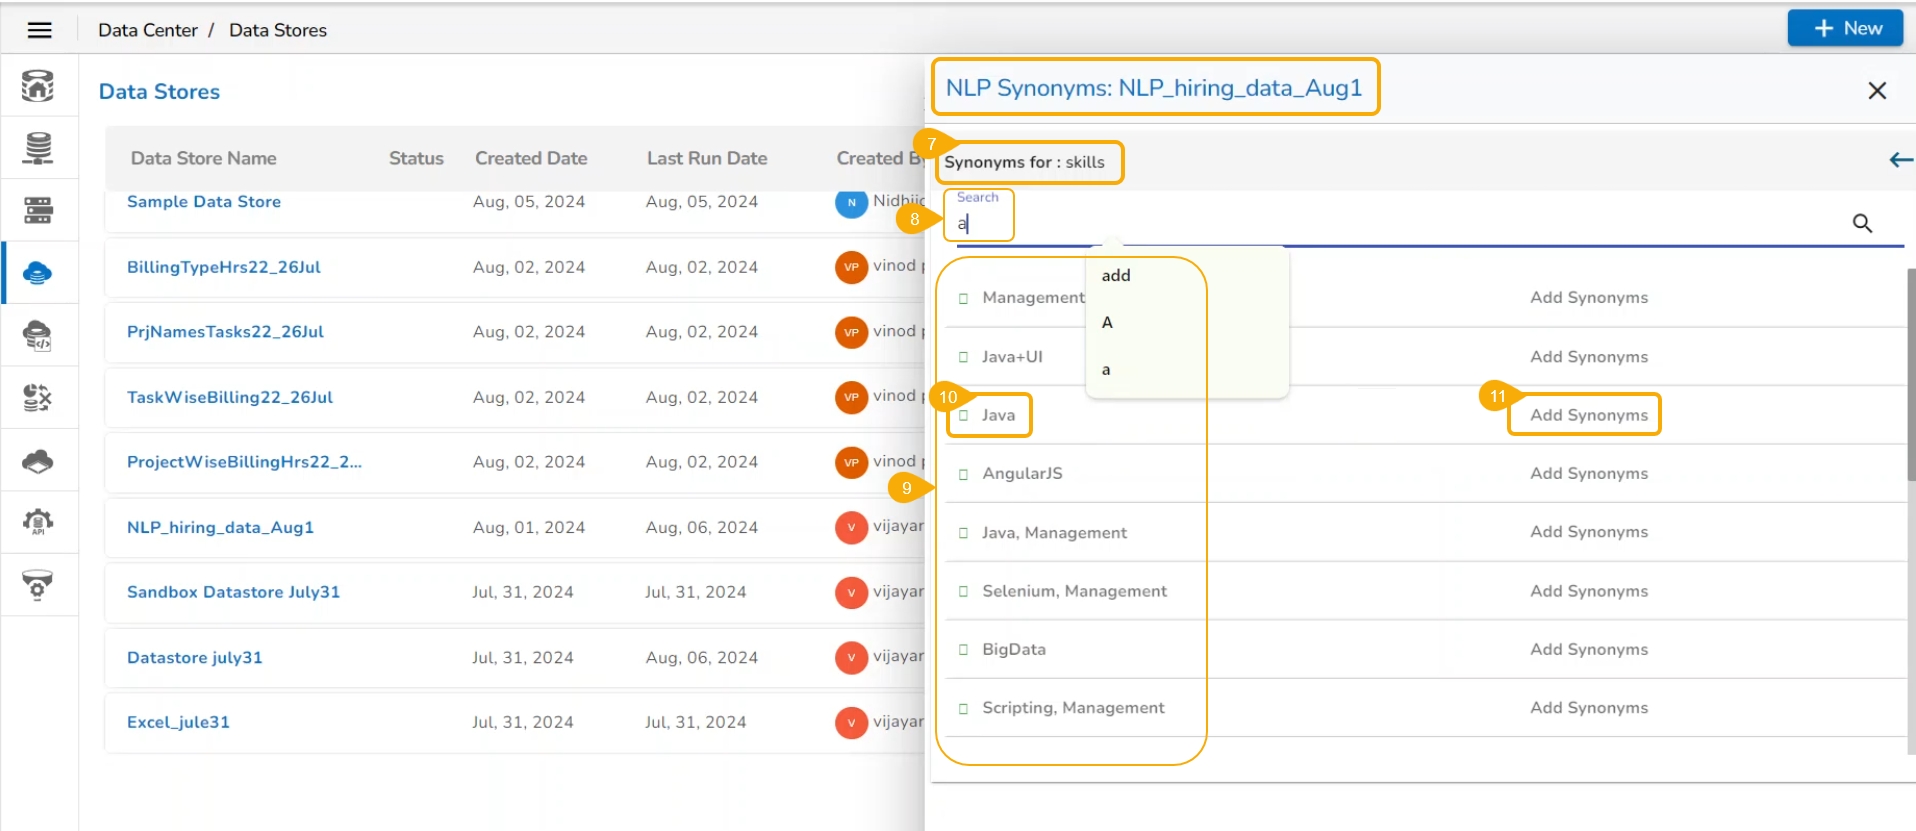
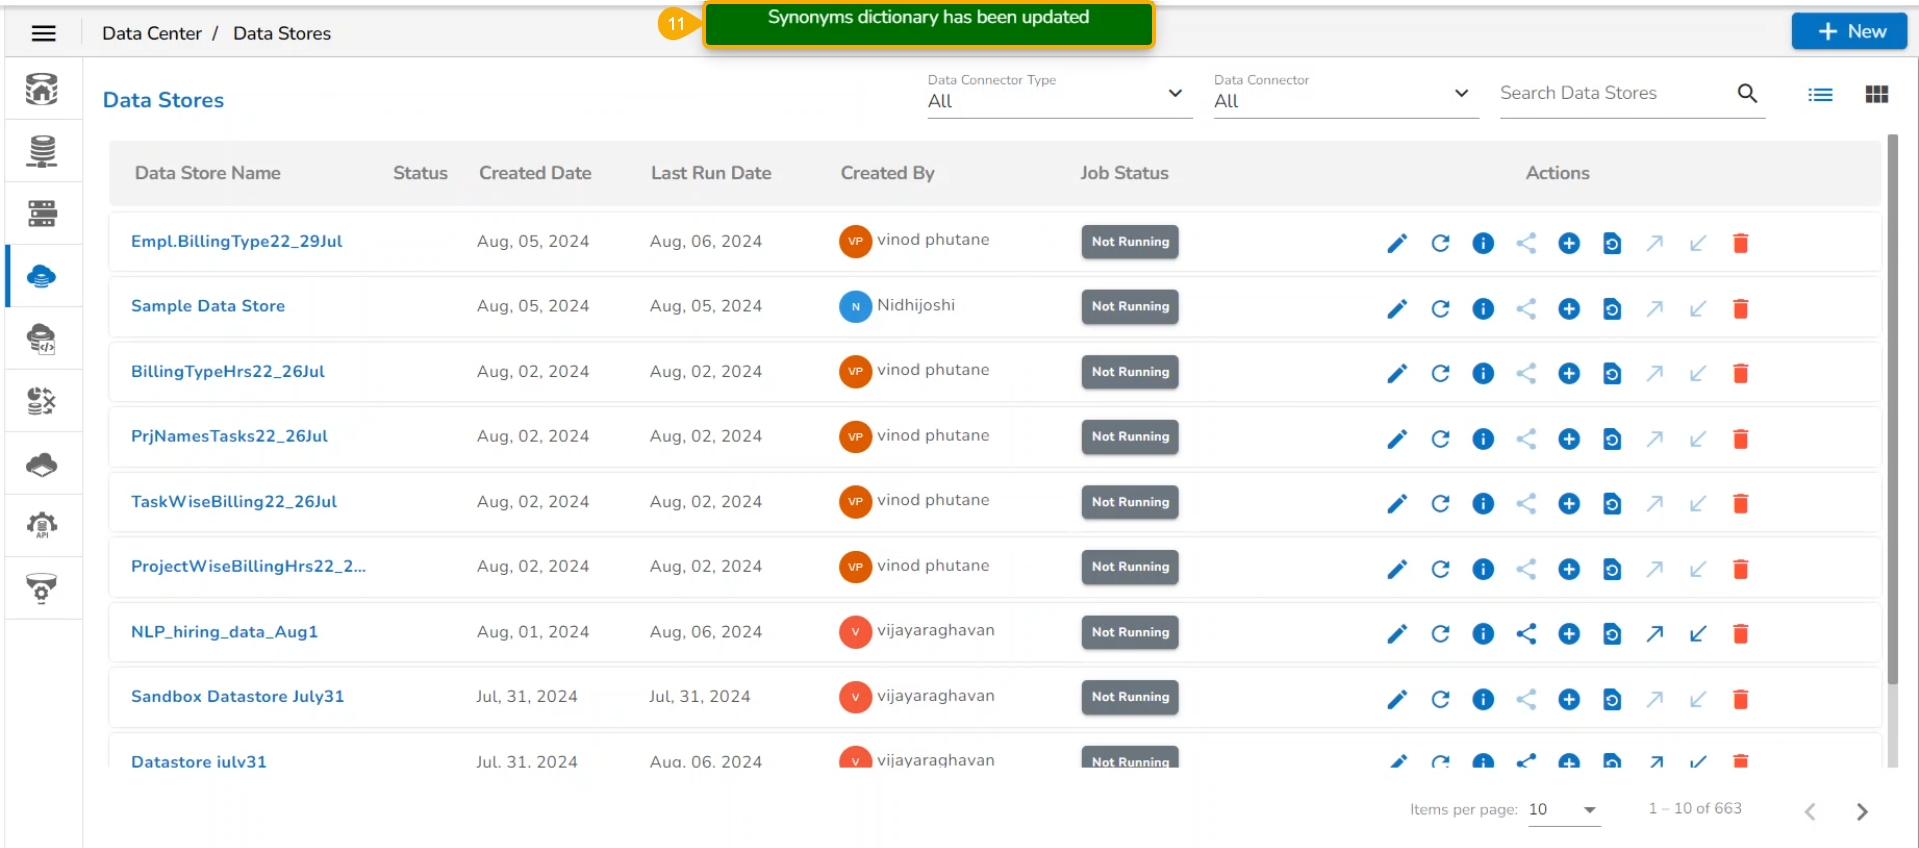


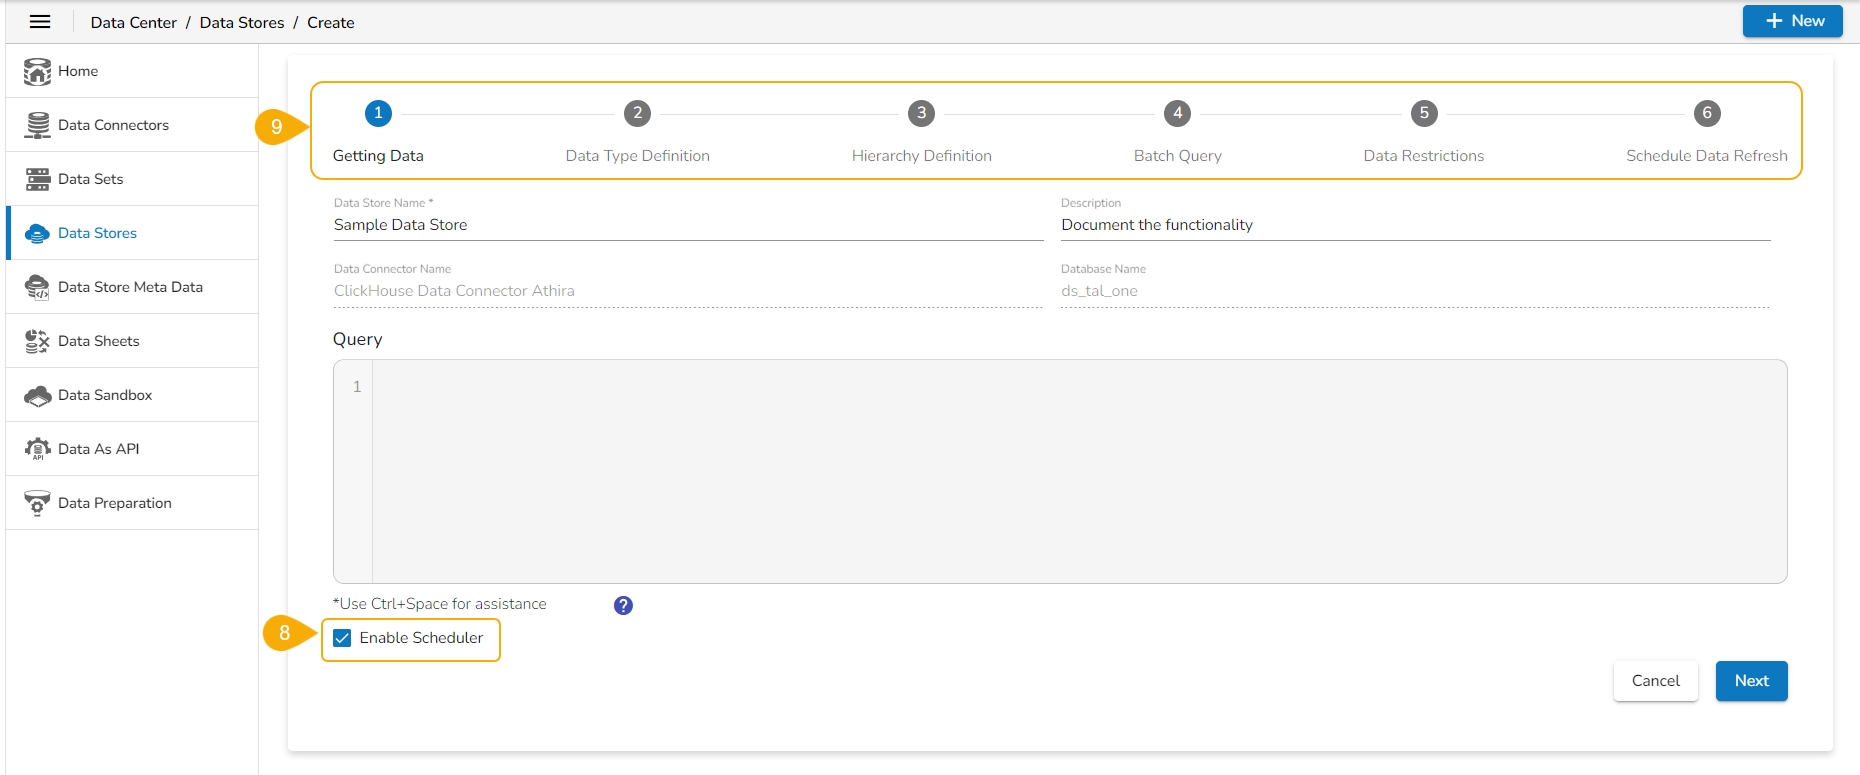
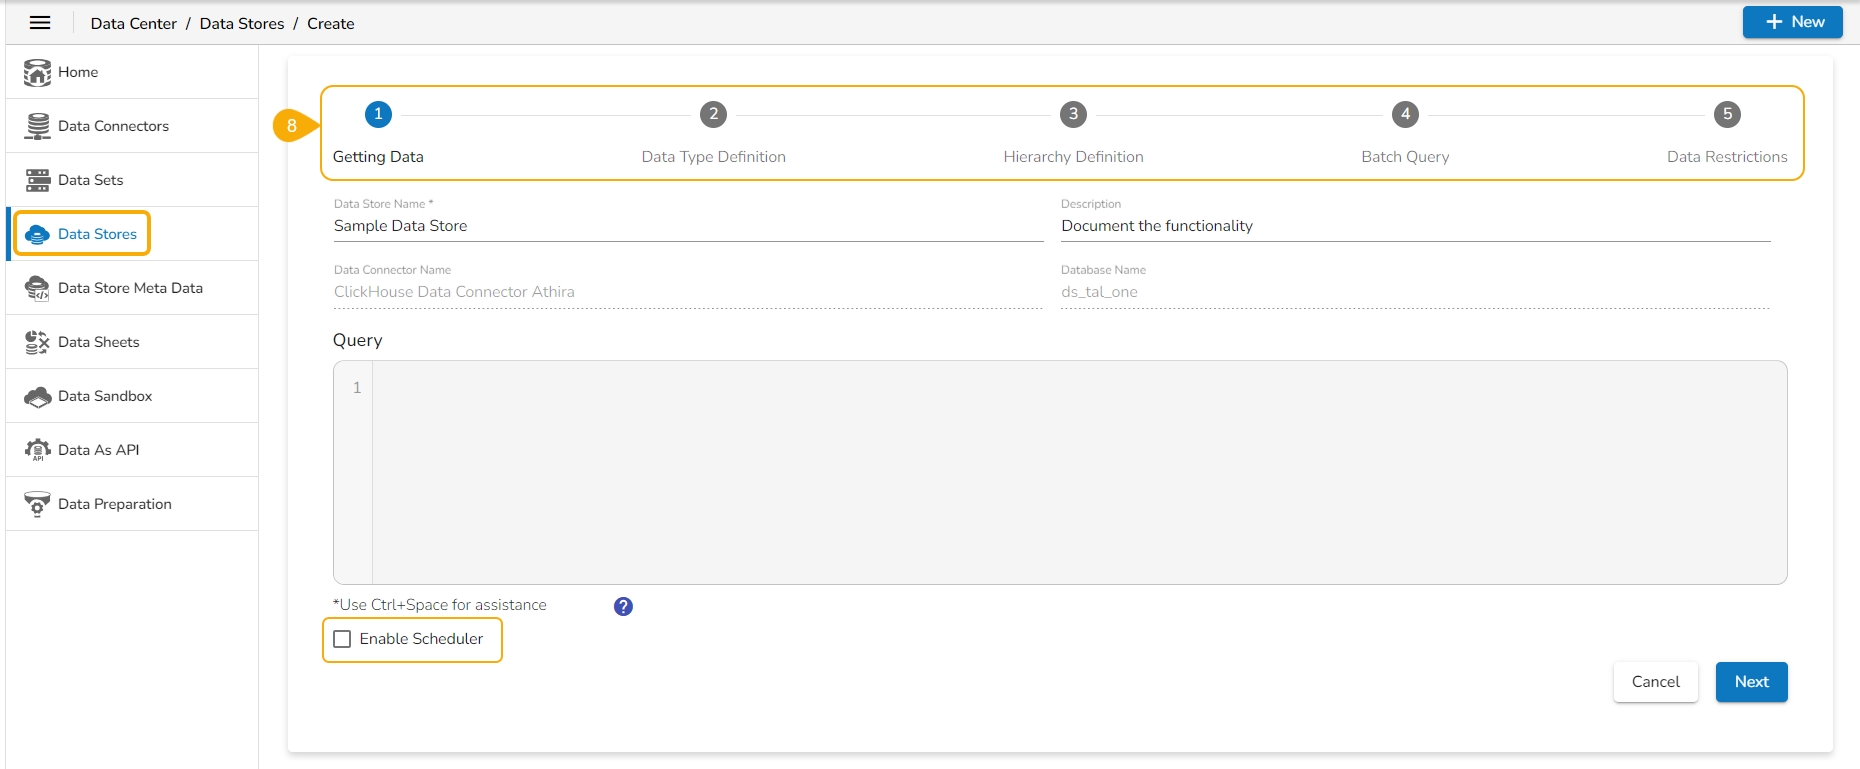


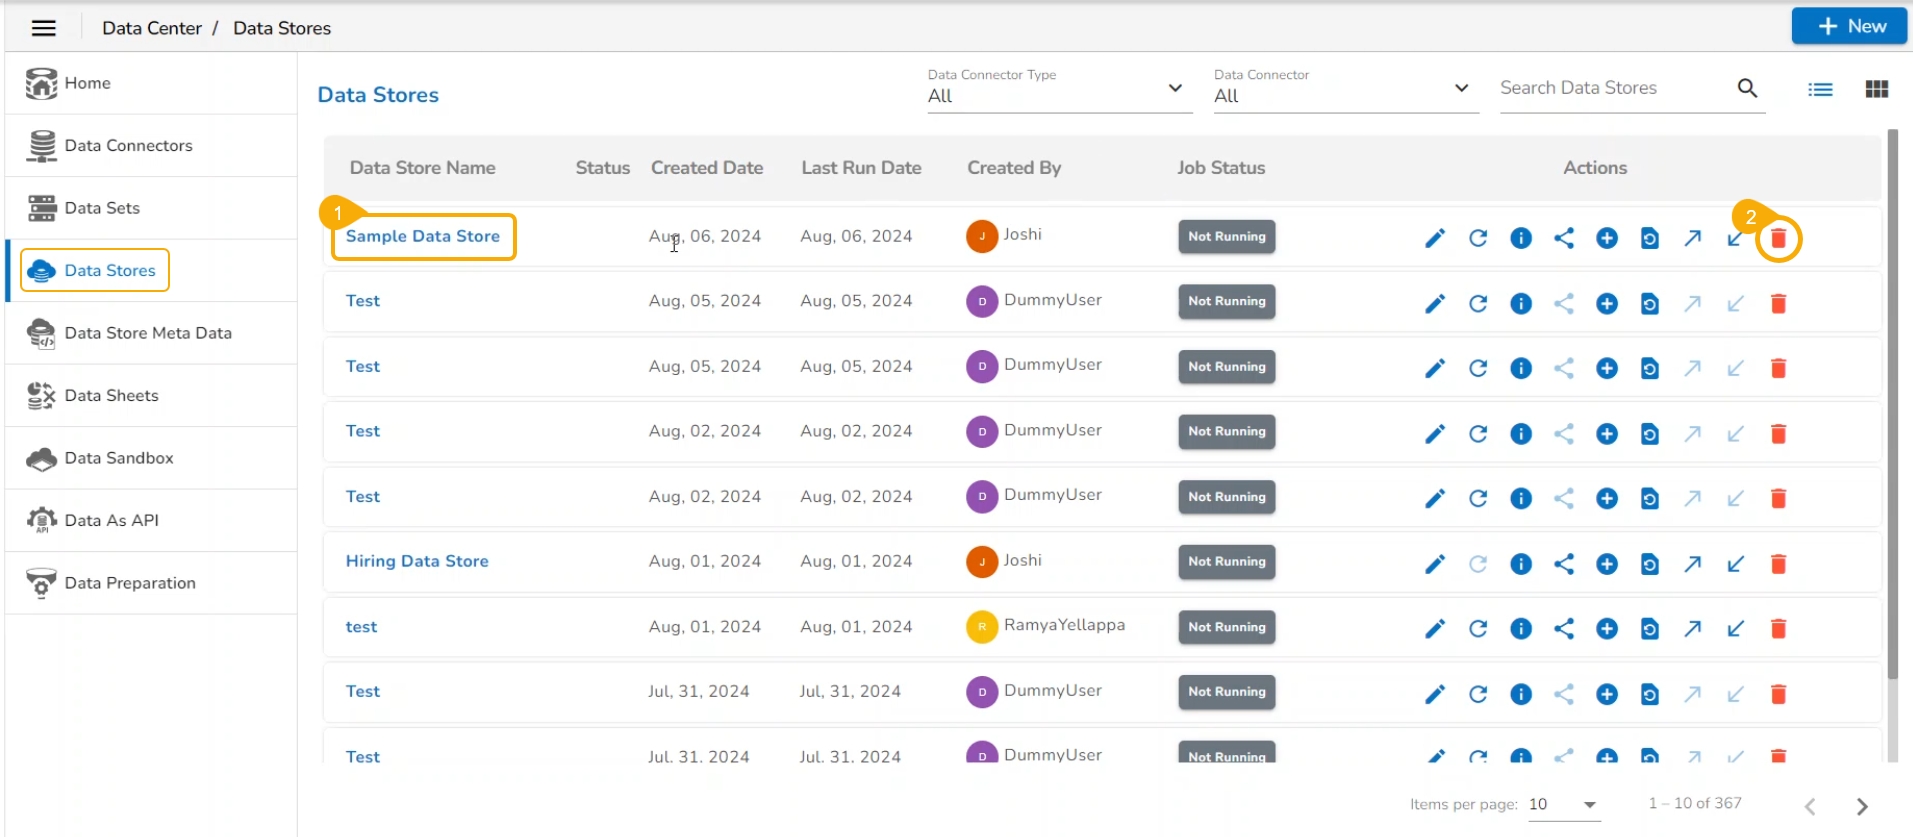

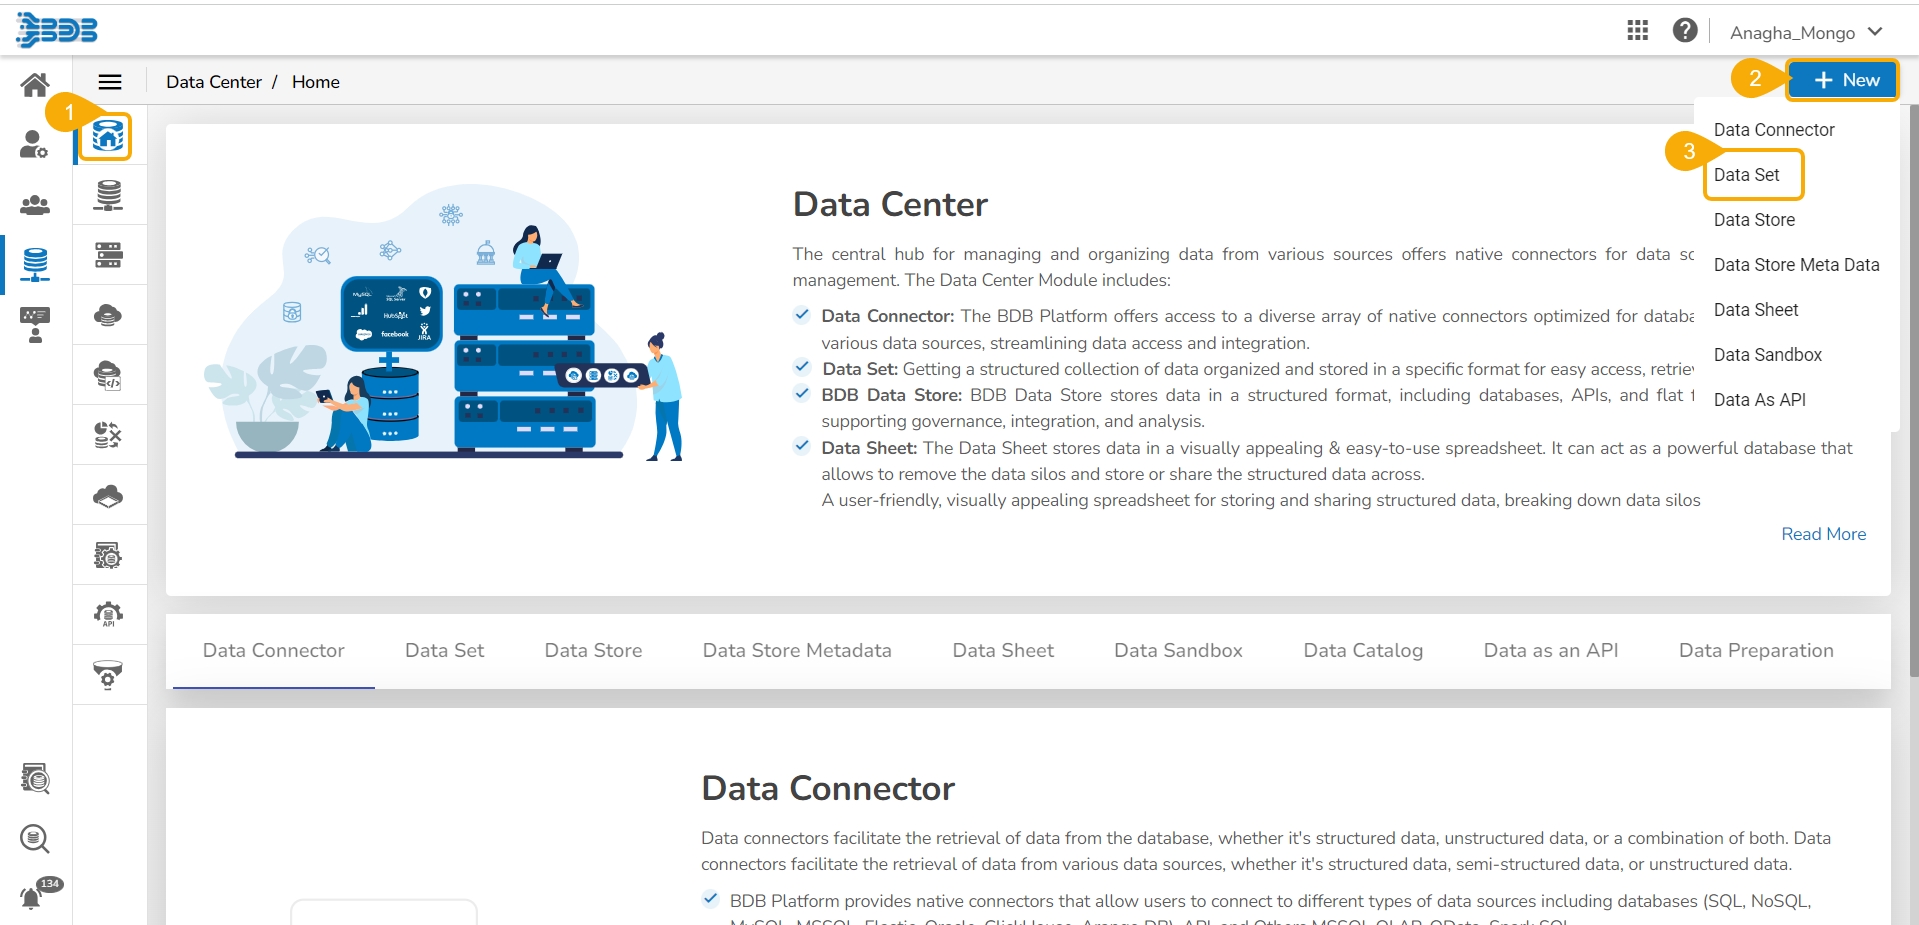


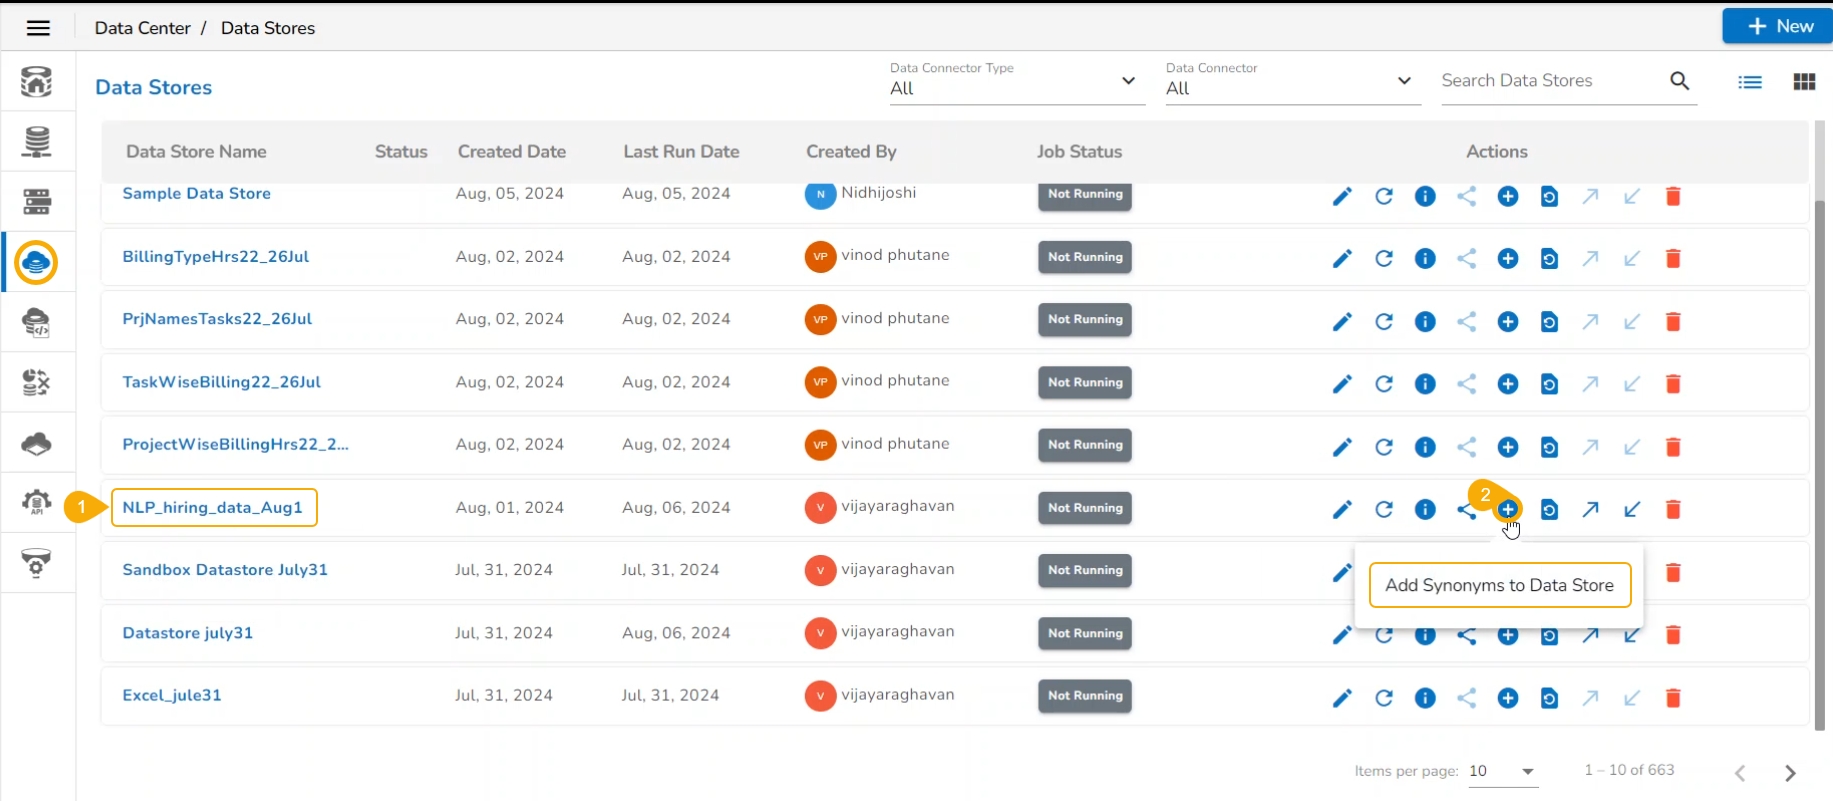
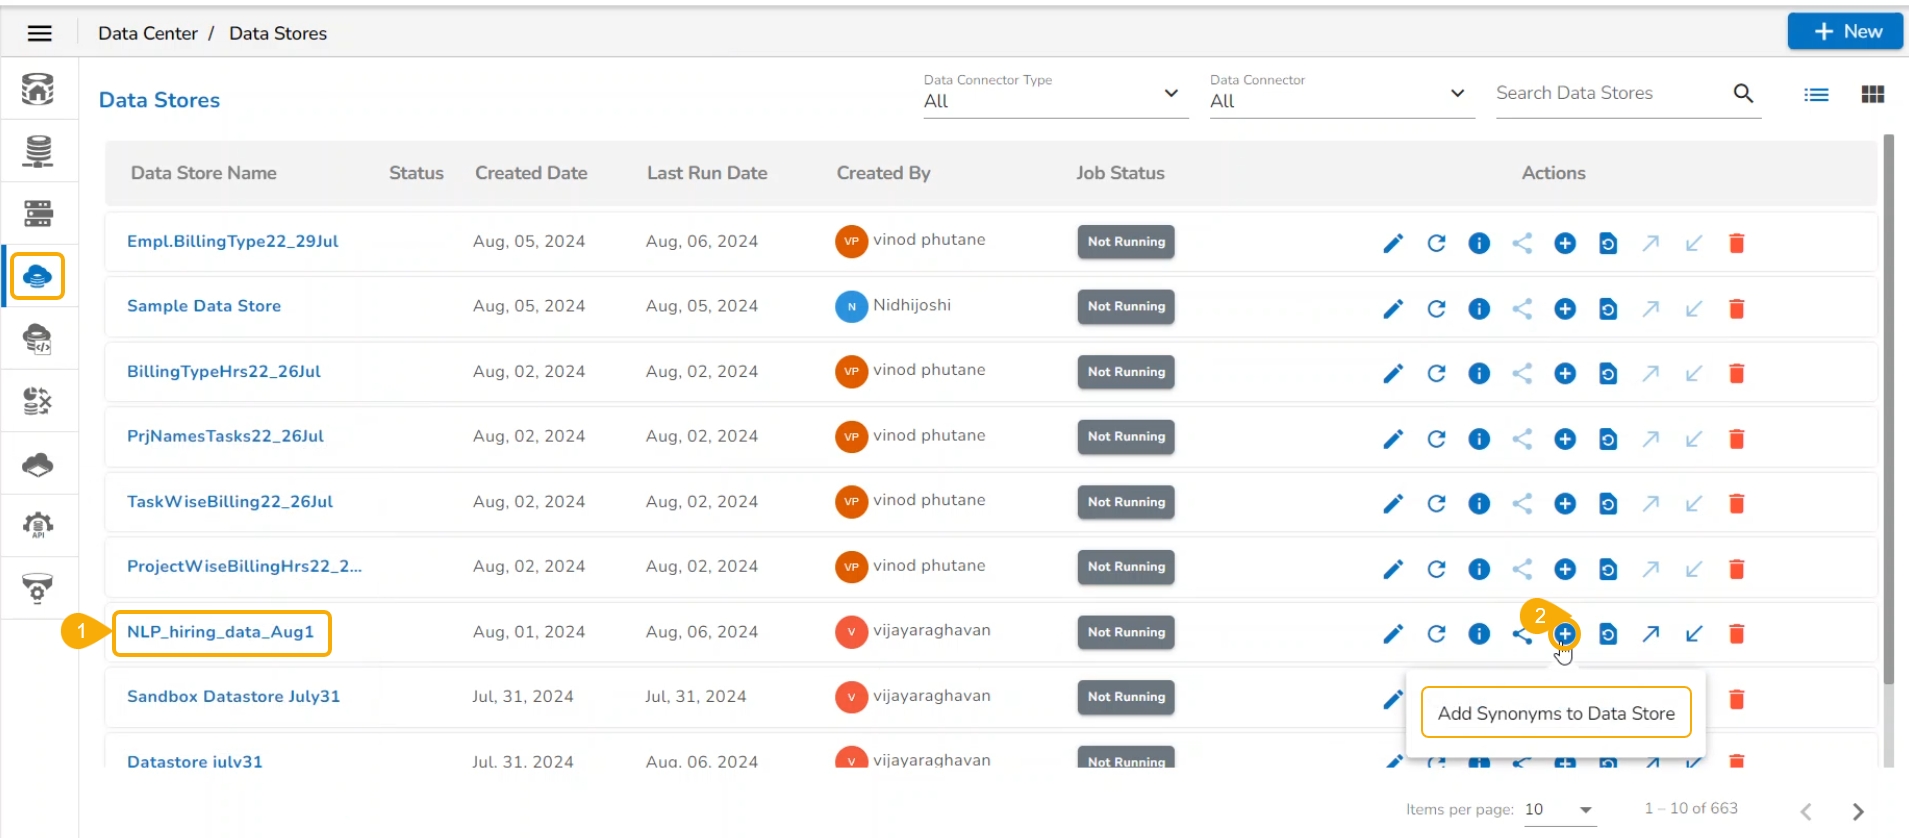
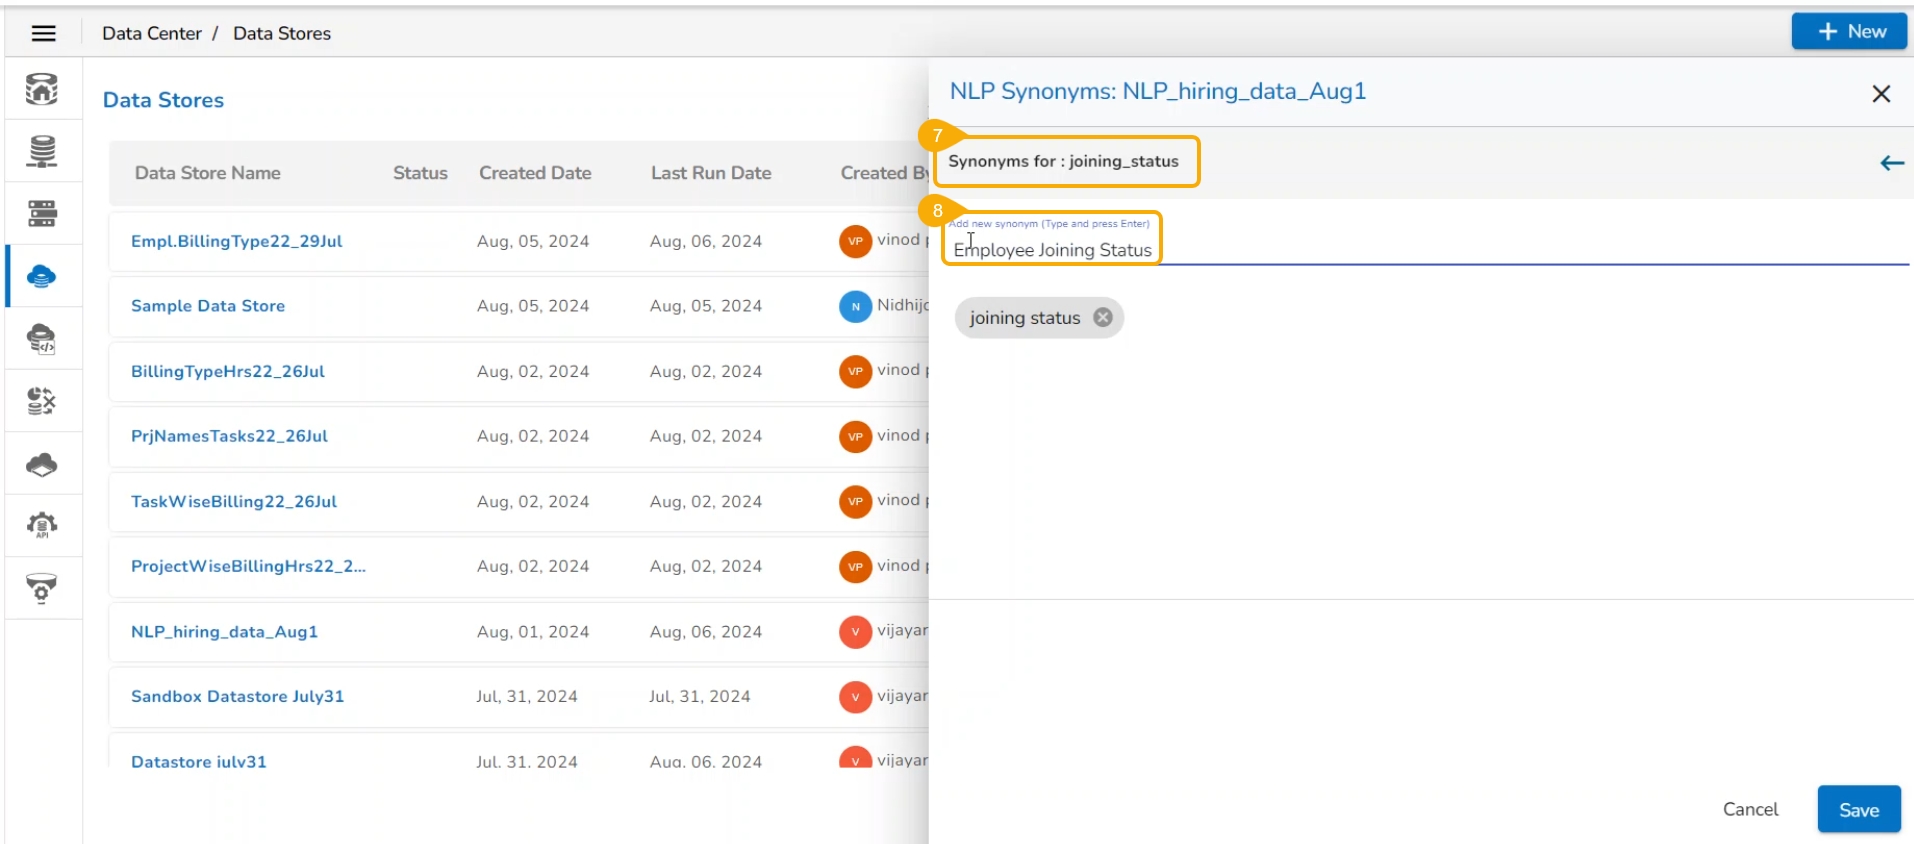
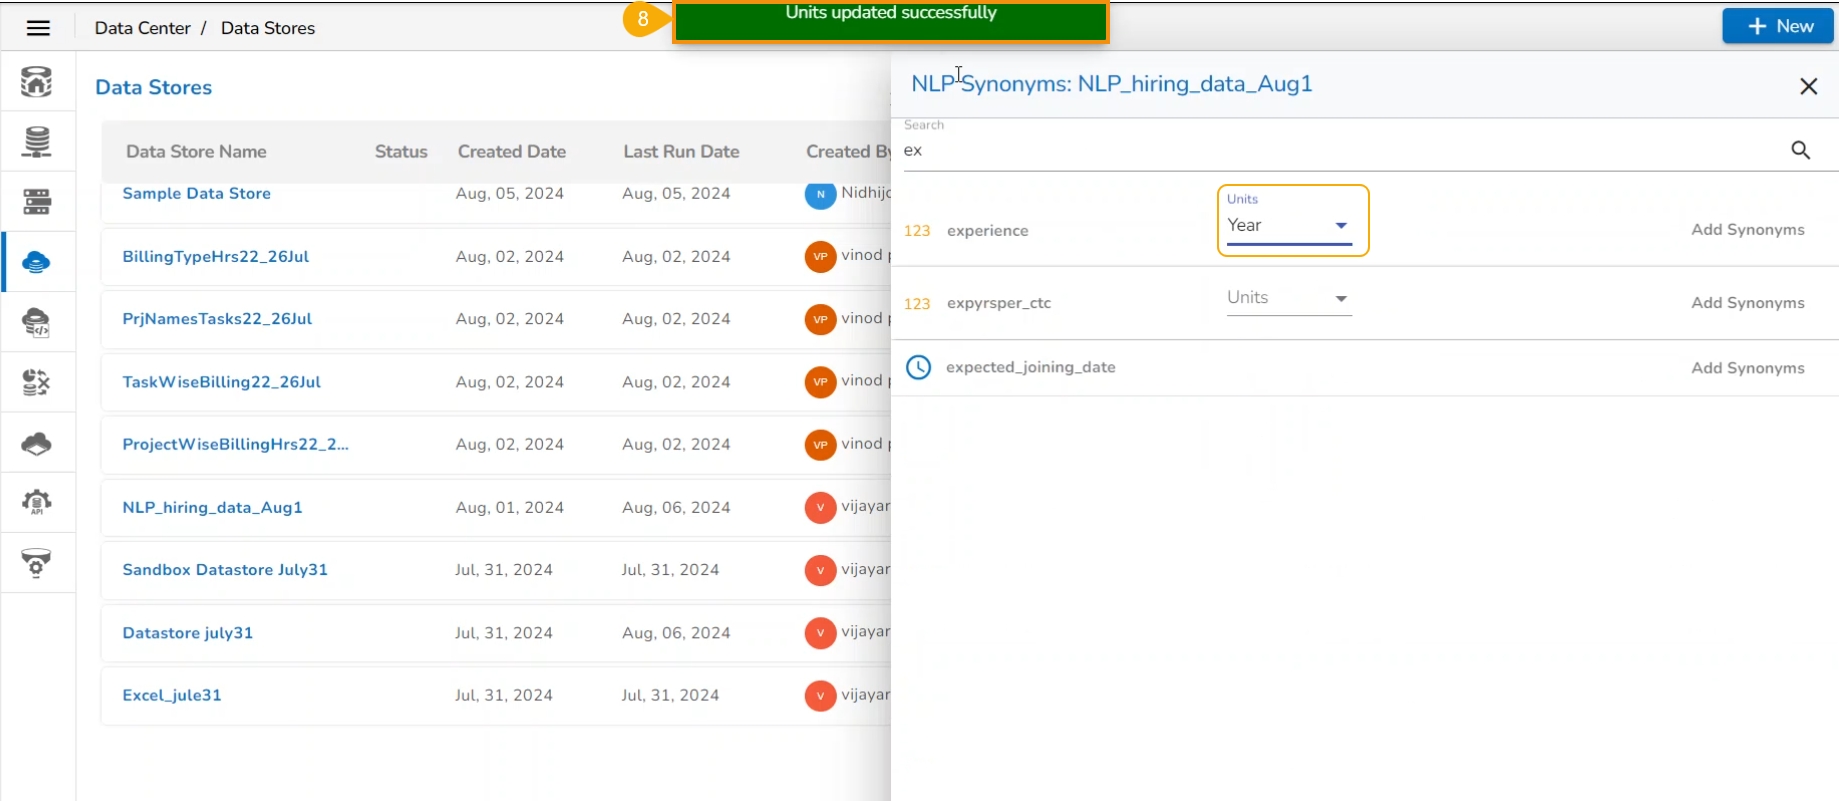

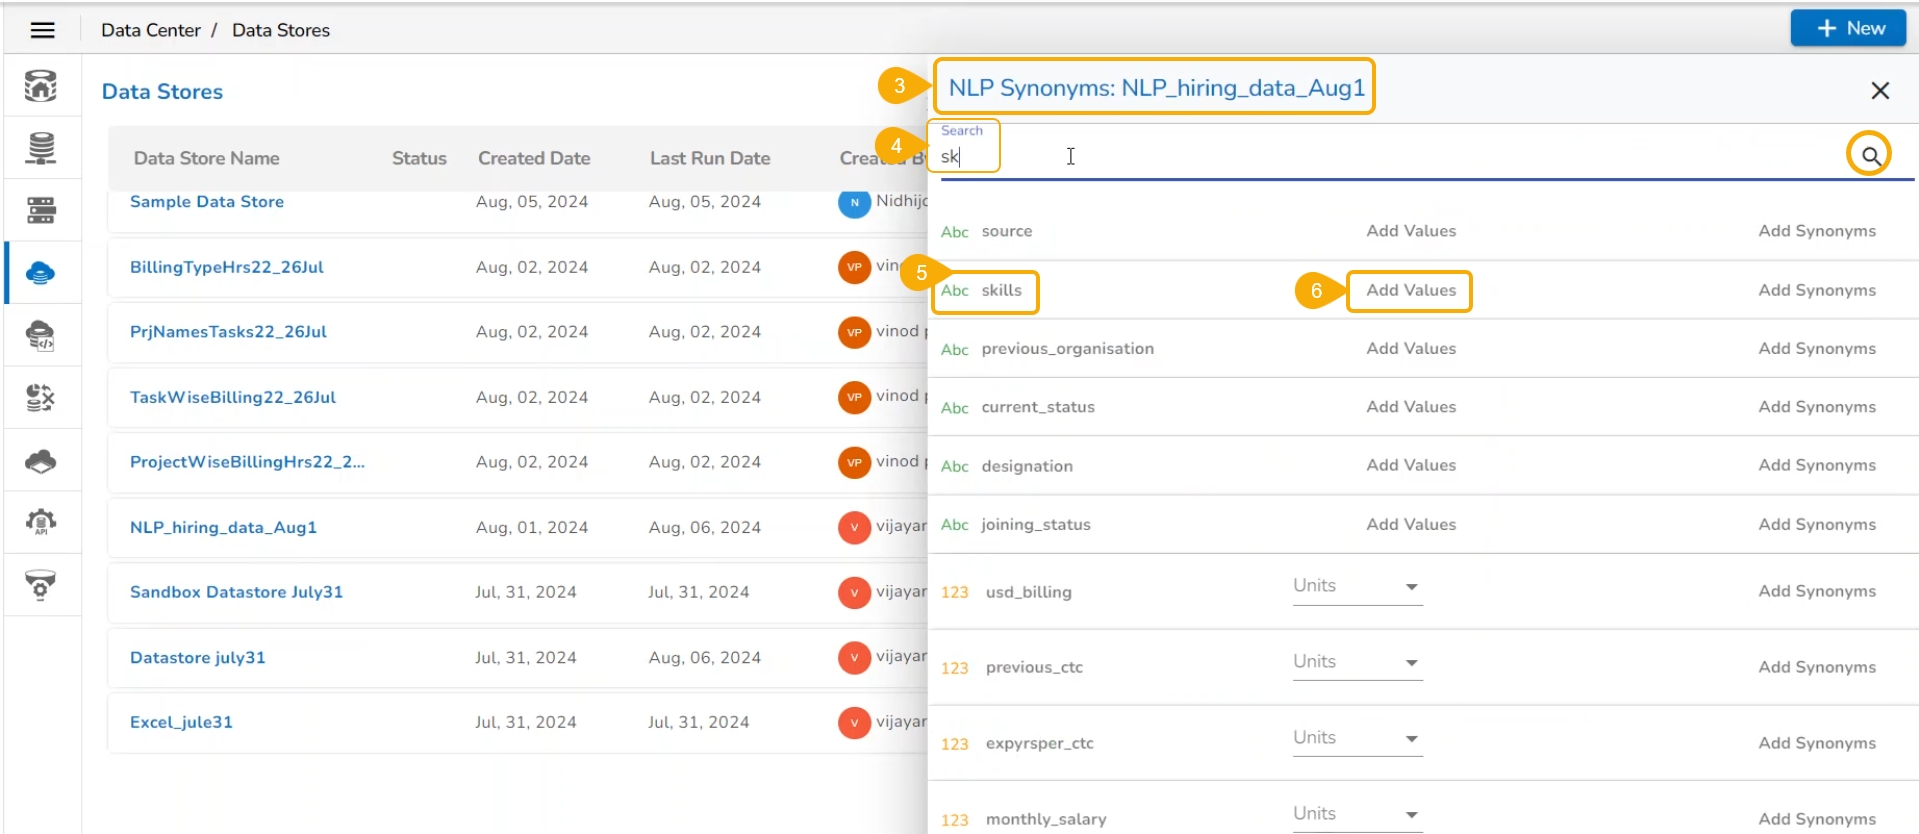


Check out the given walk-through on how to create a Data Set using the RDBMS Data Connector.
Navigate to the Data Center homepage.
Click the New option.
Select the Data Set option from the context menu.
The Data Source page opens.
The Data Connectors list is displayed.
Search for a Data Connector using the Search Data Connectors bar.
with the Create Data Set
The Data Set page opens.
Service Name: Enter any user-defined name for the new data set.
Description: Provide a brief description of the Data Set (optional).
A notification message appears to inform the successful execution.
The Preview appears under the RESULT tab at the bottom of the page.
The DATA PROTECTION tab allows users to protect the data by entering some Rule type.
The Save option gets enabled. Click it.
A notification message appears to ensure the completion of the action.
The newly created Data Set gets added to the Data Sets List.
The user can insert dynamic filter conditions via the query service to an RDBMS Data Set.
Navigate to the Data Set form for any RDBMS connector.
Enter the filter condition in the Query section. Use the @text@ syntax inside the query to define the filter.
Click the Validate option.
A notification message appears.
The data preview of the filter data is displayed at the bottom of the page.
Click the Save option to save the Data Set form.
A notification message informs the users that the Dataset has been created.
The newly created dataset gets saved with the filter value under the Data Sets list.
In the data set validation page, there is one more option available for Data protection, This will provide different types of security for the Data we are providing.
Redaction
Full/ Partial reduction is available
Redaction Type/Mask Type partial option user can decide the length and the starting point
Masking
Users can apply the masking and decide the length and starting point for masking
The Masking character can be decided.
Hashing
Three types of Hashing are available.
SHA 25
Date Generalization
Year, Month, Quarter, and Week Options are available for data generalization.
Apply the Data protection fields.
BDB Platform provides an option to control data display for the Dashboard end-users.
Create a Custom Field using the Configuration and Settings admin section.
Create a Data Set using the ENV with the selected Custom Field Key.
Create a Dashboard using the Data Set.
Publish the Dashboard to the portal.
Open the Dashboard (it opens in preview mode by default as displayed below).
Create a new user (using the Security module) and pass the Custom Field Value/ Update an existing user passing the Custom Field Value.
Share the dashboard with the newly created or updated Platform user (to whom the custom field value is passed) via the Share with User option.
Access the dashboard from the updated user’s account to whom it was shared.
Open the shared dashboard; the dashboard displays only permitted data by the admin.
Database Name: This is a pre-defined field based on the data connector chosen earlier.
Query: Write a valid query service in the given space (Use Ctrl+ Space keys for assistance in writing a query).
Table Information: On the right side of the page Table information is displayed and will contain all the tables in the Database and the Column name in the table. Double-clicking on the Table or Column will auto-generate a sample query so the user can validate and get data.
Click the Validate option to execute the new Data Set.
This is to pull a specific version of the Data Set from the version control system.
Delete
Removes the selected Data Set from the list
Data Preparation
Opens the data from the selected Data Set in the Data Preparation framework.
Visualize
Redirects the user to create a Widget
Enter a filter value.
Click the Continue option.
Users can customize the Data Sets list by Data Connector Type, Data Connector, and Publish Status. These customization options are provided at the top of the Data Sets List page.
SHA 512
Edit/View
Opens the Data Set form in the editable mode for the user to edit or view the Data Set fields.
Share
Shares the Data Set to the selected user(s) or group(s) or to exclude the selected user(s)/user group(s) from the rights to see a Data Set.
Publish
Publishes the selected Data Set.
Push to VCS
User can push different versions of the same data set, this can be downloaded and replaced with the existing Data Set for the future use, if required.
Pull from VCS
This option helps the user to share a Data Store with other user(s) or user group(s). The user can also exclude a user(s) or user group(s) from the rights to access a Data Store using the Exclude User option provided under the Share Data Store dialog box.
Check out the illustration on the Share Data Store functionality.
Select a Data Store from the Data Stores list.
Click the Share Datastore icon for the selected Data Store.
The Manage Access window opens.
Select permission using the Grant Permissions section.
The Users, User Groups, and Exclude Users tabs appear.
A confirmation message ensures that the selected Data Store is shared successfully.
The selected user(s)/ user group(s) will be listed under the Granted Permissions.
Navigate to the user account where the Data Store is shared.
The shared Data Store lists the Status mentioned with a Share icon for the user(s) to whom it has been shared. The Actions may vary based on the selected granted permission for the Data Store.
The shared Data Store will have limited Action permissions.
Check out the illustration on excluding user(s) while sharing a Data Store with the selected user group(s).
Navigate to the Manage Access window for a Data Store.
Select privileges using the checkboxes provided for the Grant Privileges.
Navigate to the User Groups tab.
Select user group(s) using the checkbox.
Navigate to the Exclude Users tab.
Select the users to be excluded from the selected group(s) to access the data store using the checkboxes.
Click the Save option.
A notification message appears, and the selected user group(s) name will be added under the Granted Permissions section.
The excluded users will be listed under the Excluded Users section.
Check out the illustration on including an excluded user.
Open the Manage Access window for a shared data Store.
Navigate to the Excluded Users list.
Select a user from the list.
Click the Include User icon.
Check out the illustration on revoking a user's access to a shared Data Store.
Navigate to the Manage Access window.
The Granted Permissions will be listed.
Select a user or user group from the displayed list.
Click the Revoke Privileges icon.
Select user(s) or user group(s) using the Users or User Groups tabs.
Click the Save option.
A notification ensures that the privileges are shared with the recently included user from the group.
The Excluded Users list gets modified.
A notification message appears, and the granted permissions list gets modified as the targeted user/ user group gets removed from the list.


The Getting Data tab opens by default while clicking the Create Data Store option.
Enter a name for the Data Store. The Data Connector and Database names are displayed based on the selection of the data connector.
Provide Description for the Data Store.
Write the SQL query in the given space (Use the Ctrl+ Space keys for assistance in writing a query.
Put a checkmark in the given box to use the Enable Scheduler option.
Click the Next option to proceed.
Users can define the data type using the selected data store. They can interchange the Dimensions, Measures, and Time fields by selecting the respective icons provided for these fields.
Navigate to the Data Type Definition tab.
Define the required Dimensions, Measures, and Time by interchanging the categories.
Enable the Dimensions by using a checkmark to avail List of Values (LOV) lookup in the filter panel of the Report.
Click the Next option to proceed.
The user can change the categories of a dimension, measure, and time values by clicking the following options:
Icons
Name
Description
Move to Dimensions
Moves the selected ?Measure or Time element to Dimension category.
Move to Measures
Moves the selected Dimension or Time element to Measure category.
Move to Time
Moves the selected Dimension or Measure to Time category/
Define the hierarchy using various dimensions and time options.
Navigate to the Hierarchy Definition tab.
Click the Add option provided on the Hierarchy Definition page.
A new Drill Def box gets added.
Drag and drop the dimensions or time options to define a hierarchy.
The Time fields get separated in the 3-level granularity by dragging one time. By default, the Time dimensions can be split into Year>Month>Date hierarchy.
The Dimension fields must be dragged separately each time to create the hierarchy in the Drill Def box.
Click the Next tab to proceed.
Split the data fetching process into different batches by generating a batch query.
Navigate to the Batch Query tab.
Select a Dimension using the drop-down menu.
Click the Generate option.
Based on the selected dimension, a distinct query gets generated (in the below-given box). The user can edit the distinct query as per their requirement.
Click the Generate option provided for the Batch Query option.
The original query generates the distinct query specifications to fetch data.
Proceed to the next tab by clicking the Next tab.
Configure the Data Restrictions settings to restrict a user-level view of the data store.
Navigate to the Data Restriction tab.
Click the Add icon to add a new box for inserting the data restriction parameter.
Select a dimension from the drop-down menu.
Enter the user/group-specific custom field to restrict the data.
Click the Next option to proceed.
The user can schedule a data refresh interval via the Schedule Data Refresh tab.
Navigate to the Schedule Data Refresh tab. (This tab only appears for the Data Stores where the scheduler has been enabled using the Getting Data tab).
Define a time range to refresh data using the following options:
Hourly
Daily (default option)
Weekly
Monthly
Yearly
(Select any one option from the above-given list to set the data refresh interval)
Enable the Refresh Now option by using a checkmark in the given box.
Enable the Email Notification option by providing a checkmark in the box.
Provide a valid email address to receive the notification email regarding the Data Store.
Click the Finish option to complete the Data Store creation process.
A message appears to confirm that the data store configuration has been saved.
The Data Stores List opens.
A new Data Store gets created and added to the displayed list.
Icon
Name
Task
View/Edit
Opens the Data Store in editable format the datastore fields.
Refresh Data
Refreshes data for a datastore.
Latest Scheduled Status
Displays the latest scheduler status via a pop-up window.
db.table.aggregate([
{
'$group': {
'_id': '$transmissionType'
}
}, {
'$project': {
'_id': 0,
'transmissionType': '$_id'
}
}
])db.testdata.aggregate(db.testdata.aggregate([
{
'$project': {
'_id': 0
}
},{"$match":{"transmissionType":?}}
]))db.testdata.aggregate([
{
"$project": {
"_id": 0
}
}
])Share Data
Shares a datastore to/for the selected user(s) or group(s).
Add Synonyms to Data Store
Adds more synonyms to a Data Store.
Refresh Synonyms
Refreshes Synonyms for the selected Data Store.
Push to VCS
Pushes the Data Store to the GIT repository.
Pull From VCS
Pulls the Data Store to the GIT repository.
Delete
Deletes the selected Data Store.
Visualize
Redirects the user to Widget Visualizer page.


