Loading...
Loading...
Loading...
Loading...
Loading...
Loading...
Loading...
Loading...
Loading...
This page describes all the options/actions attributed to a Data Store Meta Data.
Data store metadata plays a crucial role in data governance, data integration, and data analysis processes. It allows users to quickly discover, understand, and utilize the data effectively.
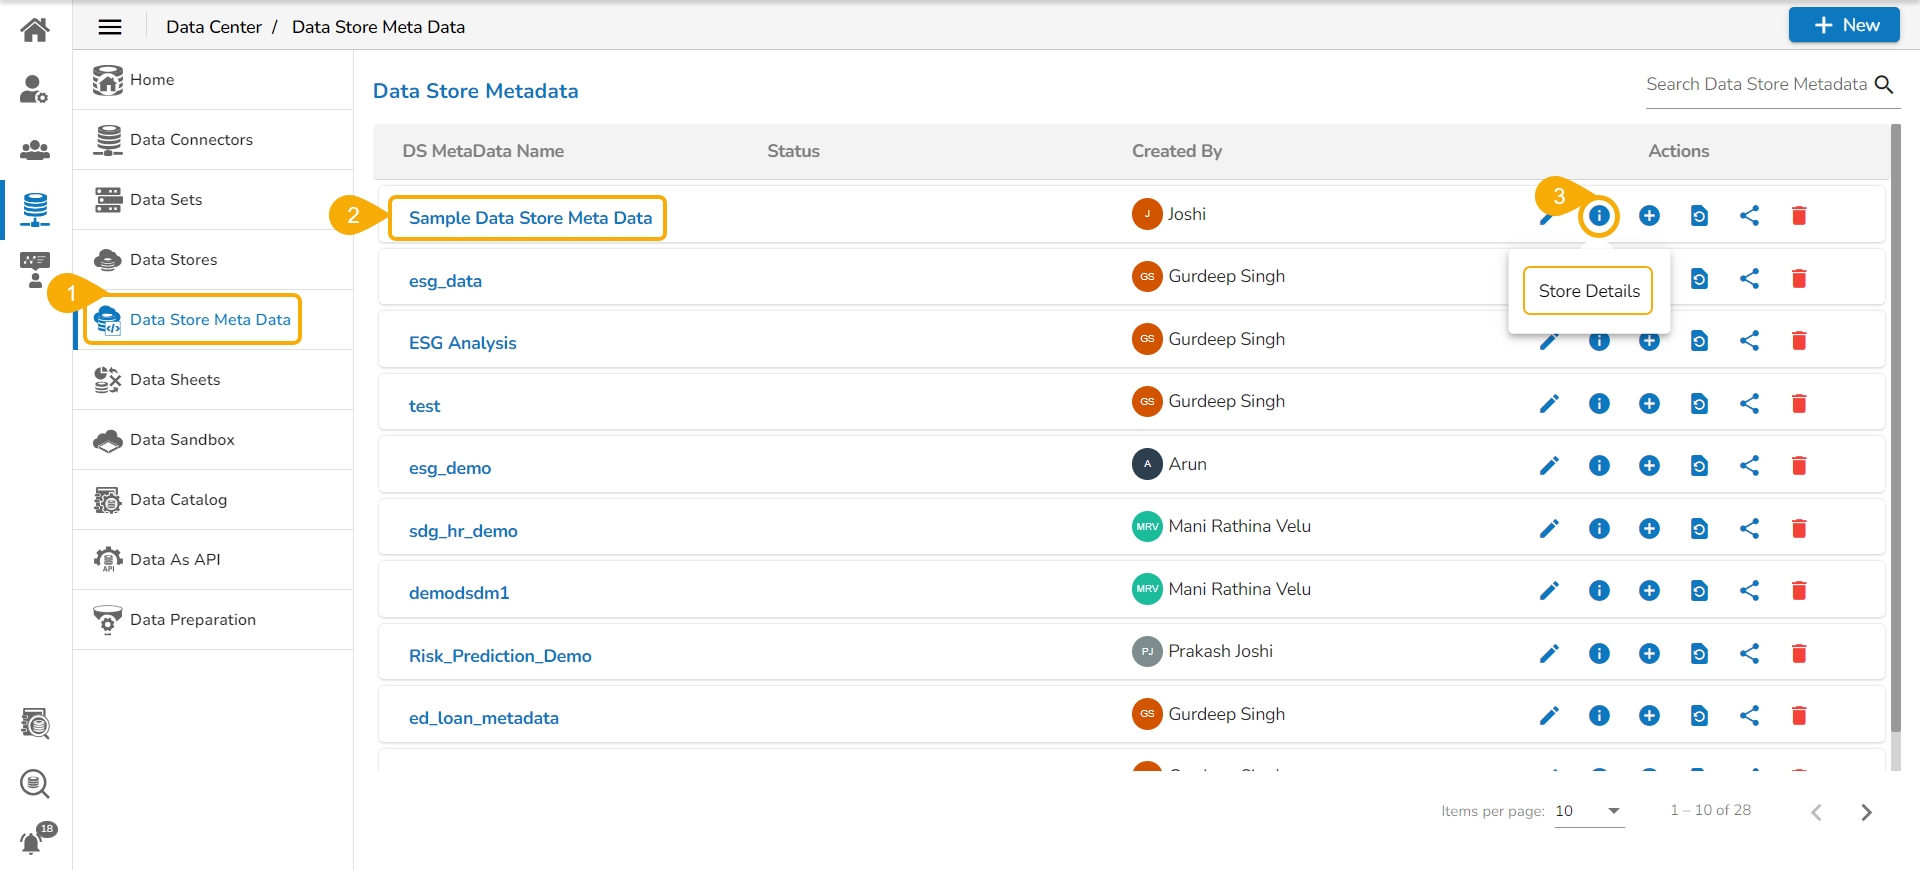
Navigate to the Data Store Meta Data list.
Select a Metadata Store from the list.
Click the Store Details icon.
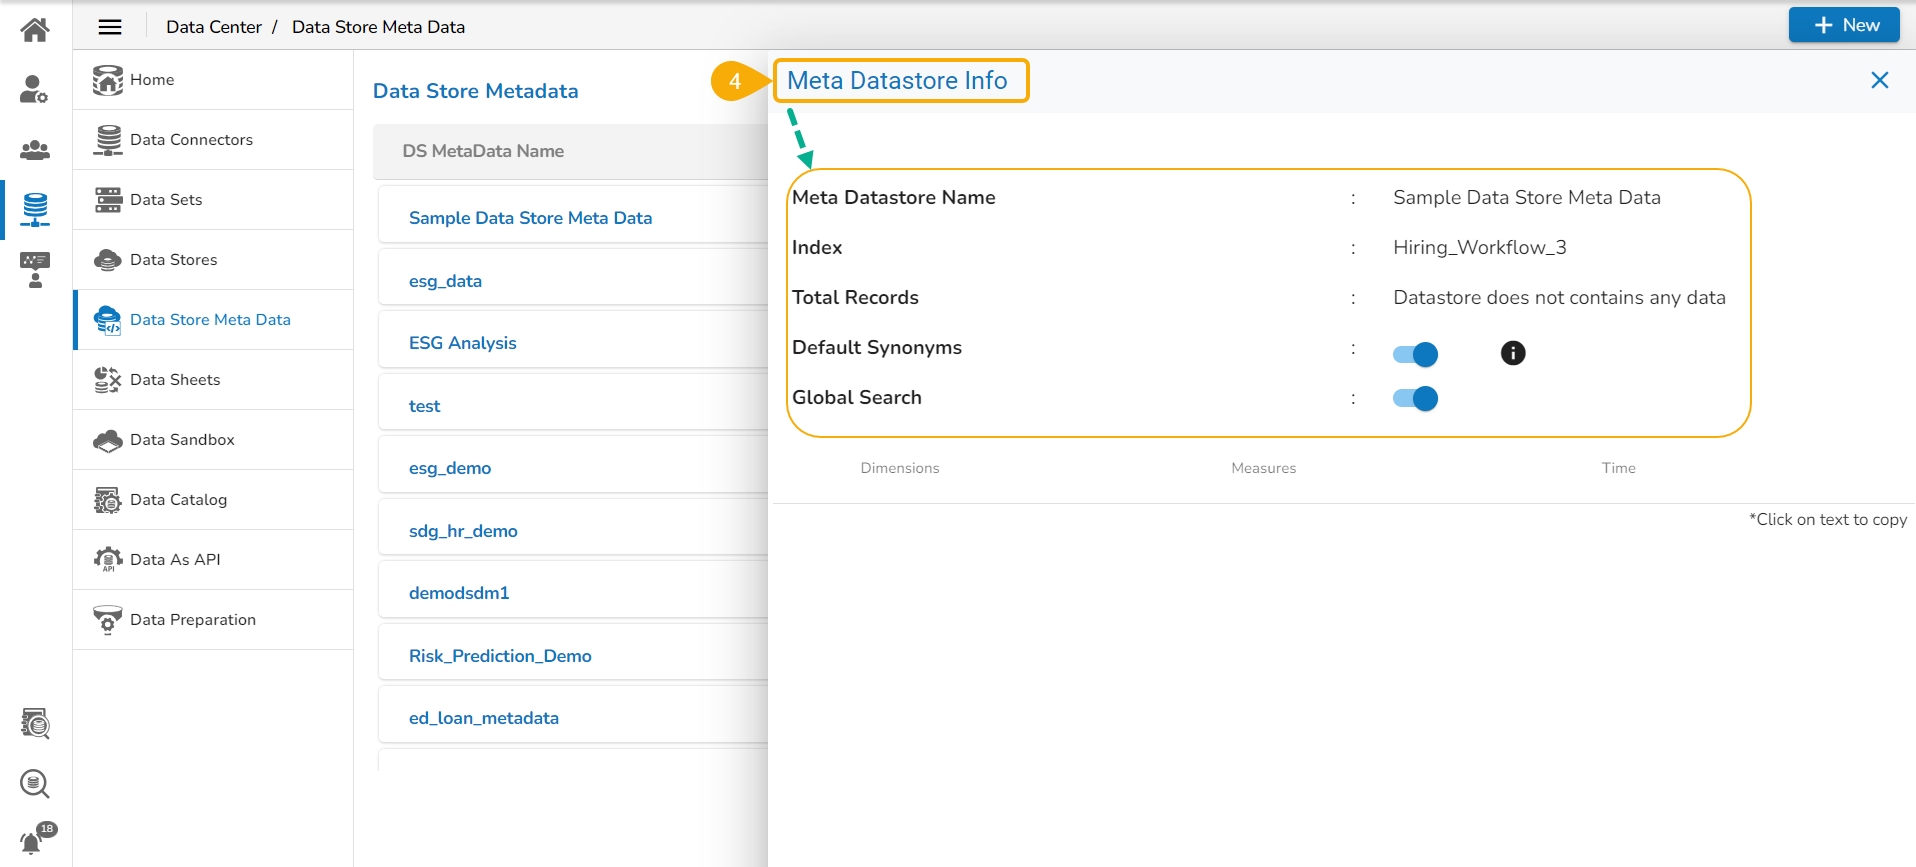
The Meta Datastore Info drawer opens displaying the following details for the selected Metadata Store:
Meta Datastore Name: Name of the Datastore.
Index: Source data base from where the data is loaded.
Total Records: Total no. of records.
Default Synonyms: Enabling this option allows recreation of the synonyms.
Global Search: Enabling this option allows the user to access the concerned Data Store while using the Global Search.
The Datastore Info drawer also displays data broadly segregated as Dimensions, Measures, and Time values.
This sections described the steps to edit a Data Store Meta Data.
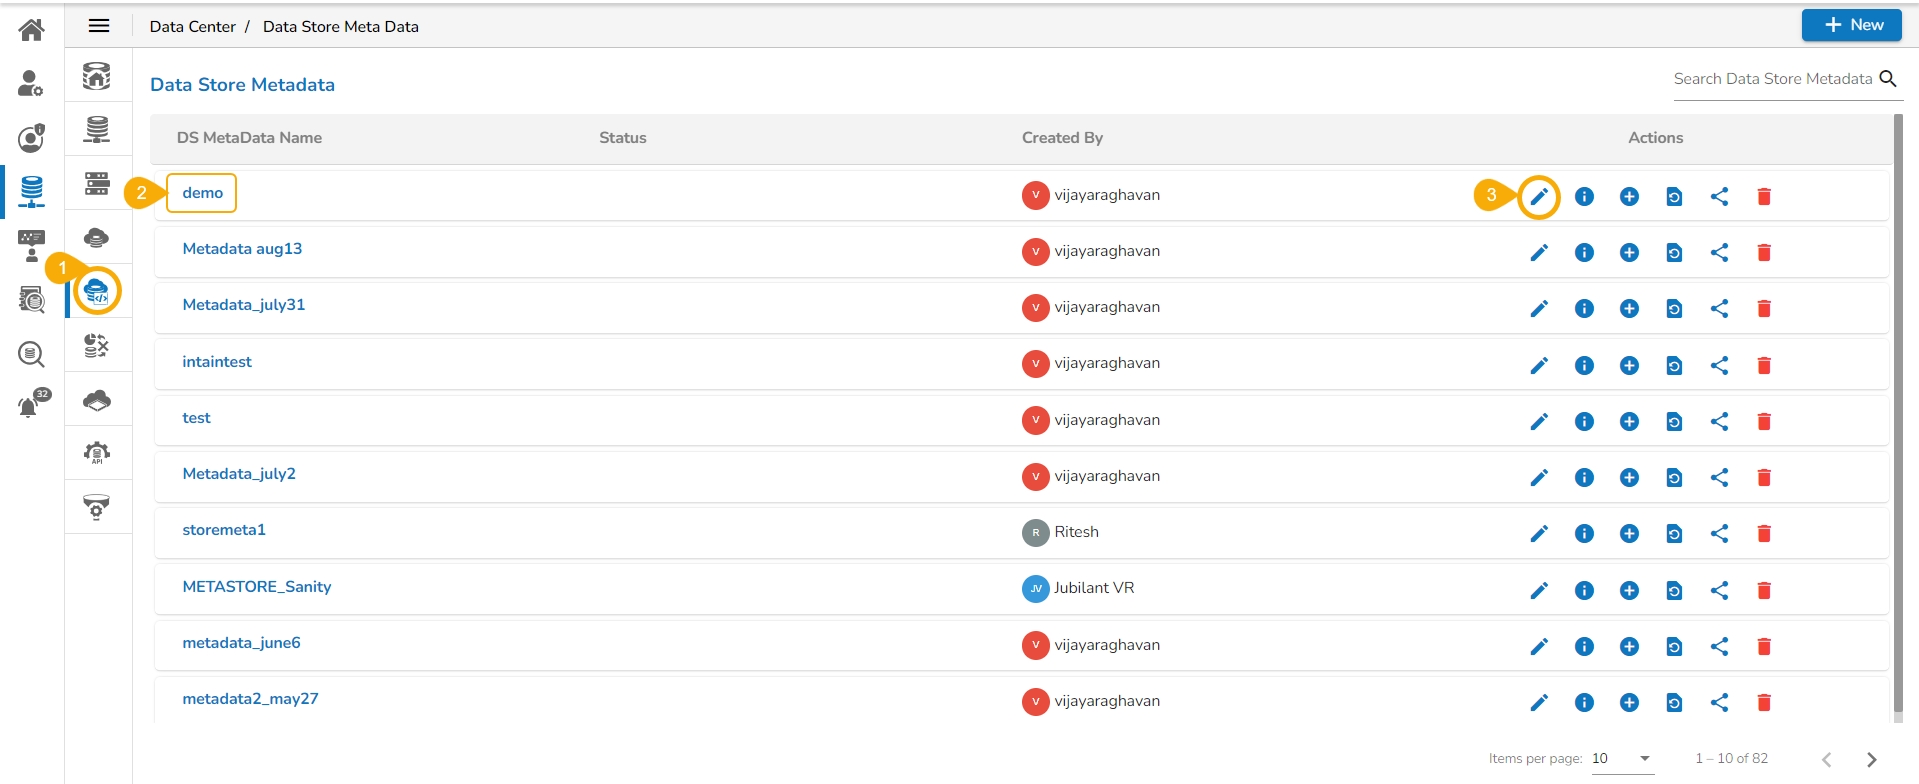
Navigate to the Data Store Meta Data list page.
Select a Meta Data Store from the list.
Click the Edit icon for the selected Meta Data Store.
The Meta Store Details tab opens for the selected Meta Data Store.
Use the Next option to move on the next tabs.
Make sure you have edited the required information using all the tabs provided for the Data Store Meta Data.
Click the Finish option to save the update.
Please Note: The Finish option is provided on the Data Restriction tab of the Data Store Meta Data.
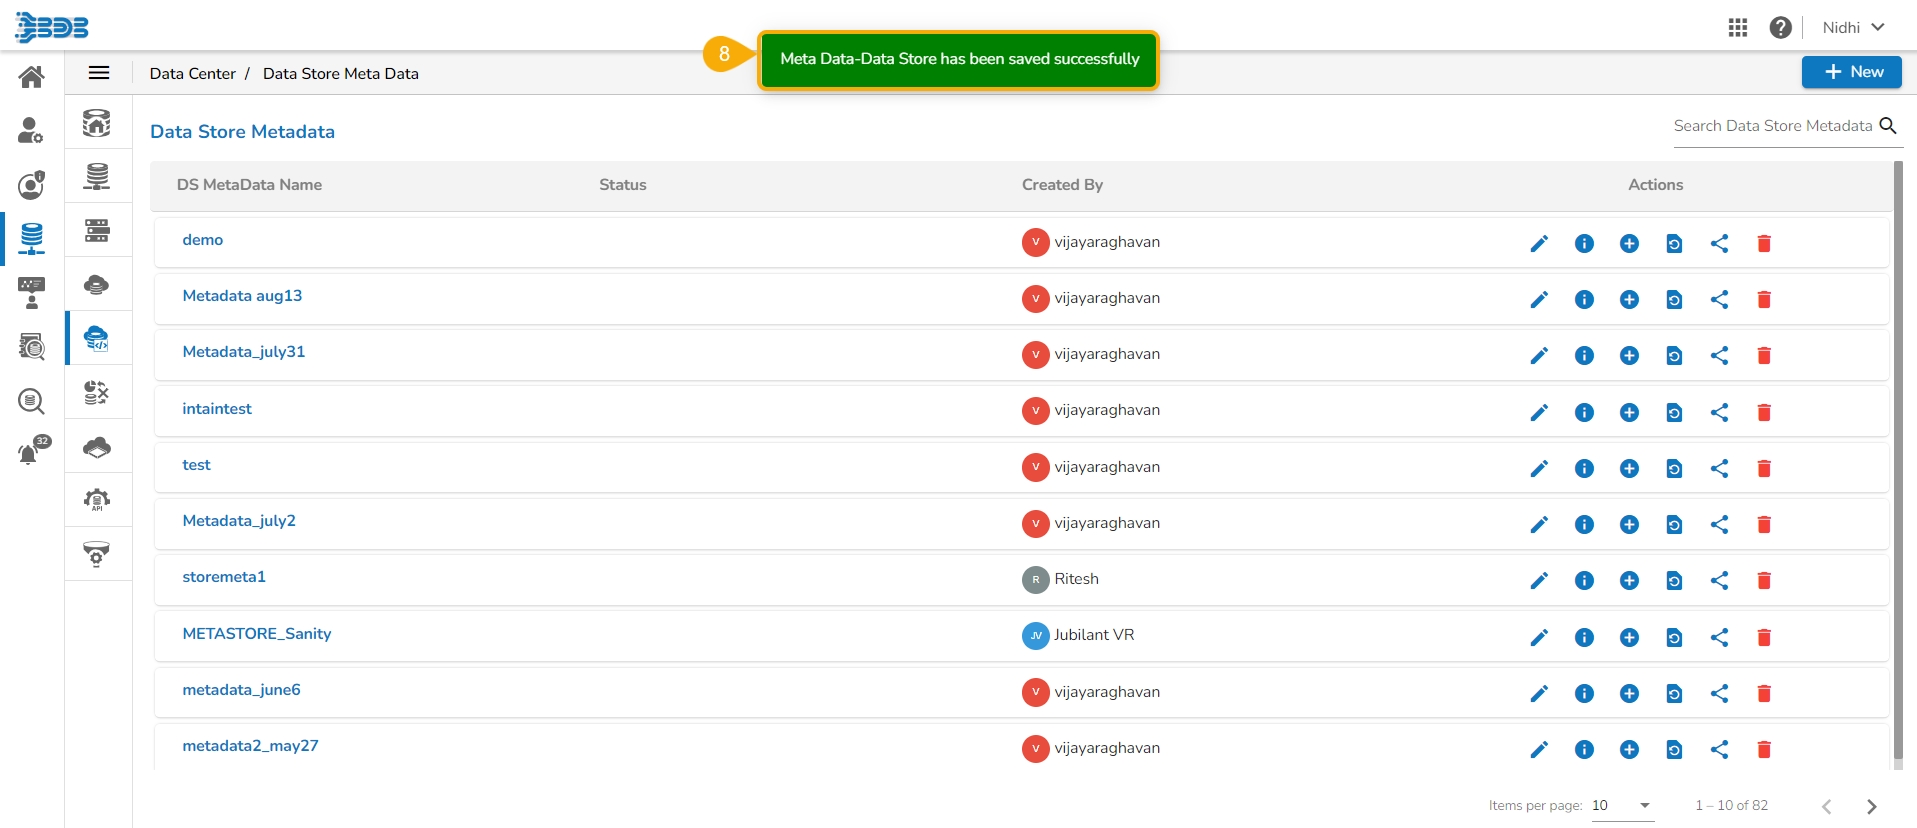
A confirmation message appears informing the successful user about the update of the selected Data Store Meta Data.
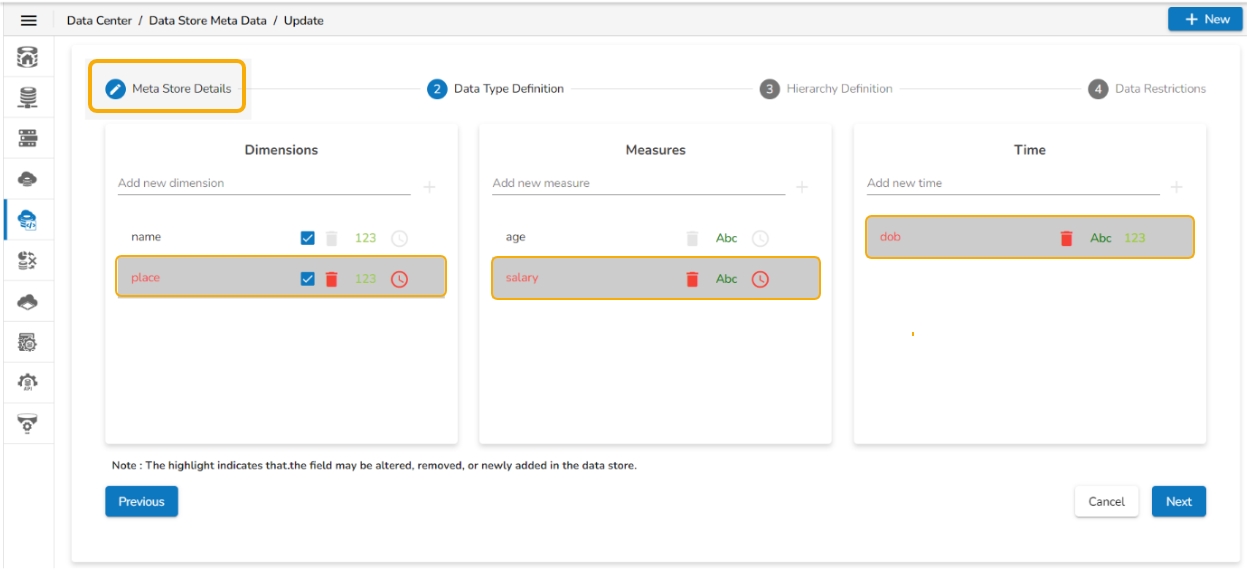
Users can edit a Meta Data Store using the Data Type Definition if there is any change in the mapped table.
Please Note: The user won't be able to perform any edit action using the Data Type Definition page, if there are no changes in the mapped table.
Editing the Data Type Definition is possible only in the following instances:
Addition of New Fields: When new fields are introduced into the mapped table from the database, these changes will be reflected on the Data Type Definition page. The newly added fields will be highlighted for user attention.
Removal of Existing Fields: Should a field be removed from the database, the associated field in the Data Type Definition page will be highlighted allowing users to decide whether to include it or remove it entirely.
Column Name Changes: Modifications in column names within the database will be highlighted on the Data Type Definition page for user acknowledgment and necessary action.
Please Note:
If any of these changes take place in the mapped table, then that field or field(s) will get highlighted in the Data Type Definition section of the Data Store Meta Data.
In the above-given scenarios, while using the Edit option for the Data Store Meta Data, the user can include the field(s), or change the data type of the concerned fields, or remove the field(s) from the Data Store Meta Data using the Data Type Definition section.
Once the newly mapped or deleted field is updated in the Data Store Meta Data, the user won’t be able to change the data type in the Data Store Meta Data.
The deleted field will be enabled for editing on the Data Type Definition page, only if the field does not exist in the mapped table.
Make sure the user finishes editing the required information using all the tabs provided for the Data Store Meta Data and click the Finish option to save the update.
Please Note: The Finish option is provided on the Data Restriction tab of the Data Store Meta Data.
There are two ways to create Data Store Meta Data:
By mapping to an existing Collection
Without mapping to any existing Collection
The Data Store Metadata can be created by mapping it with an existing collection. In this case, it will display the data of the mapped collection.
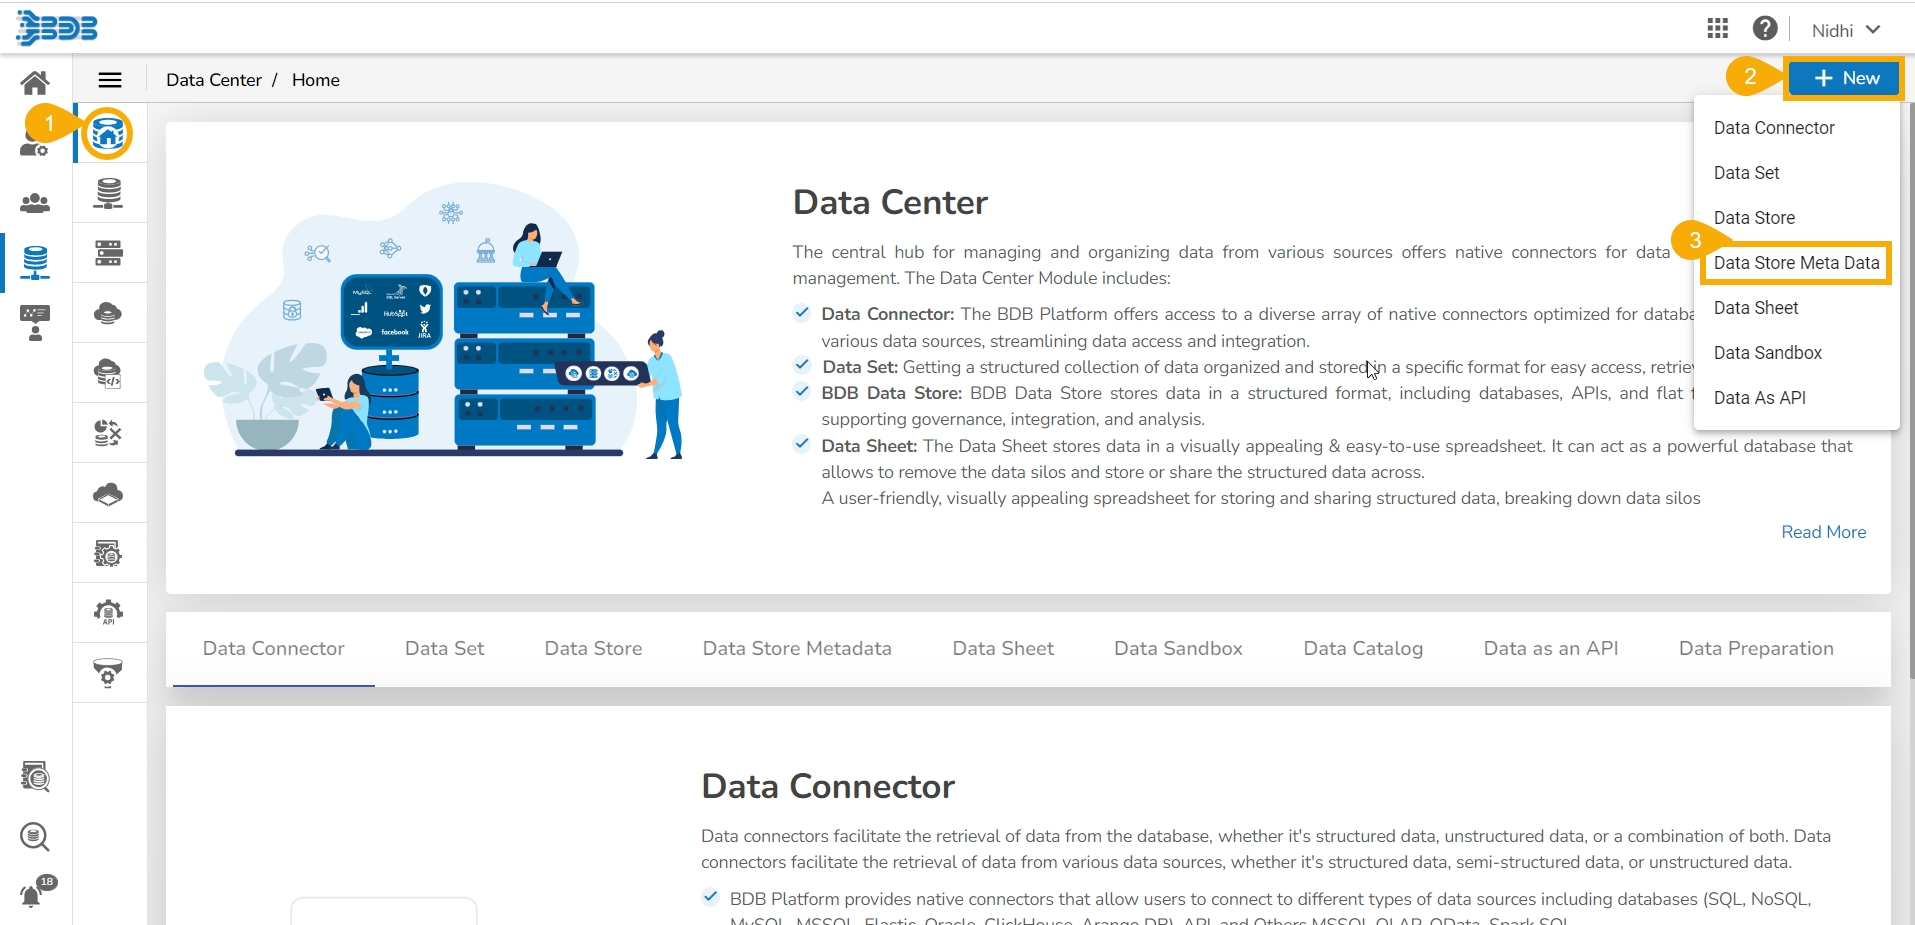
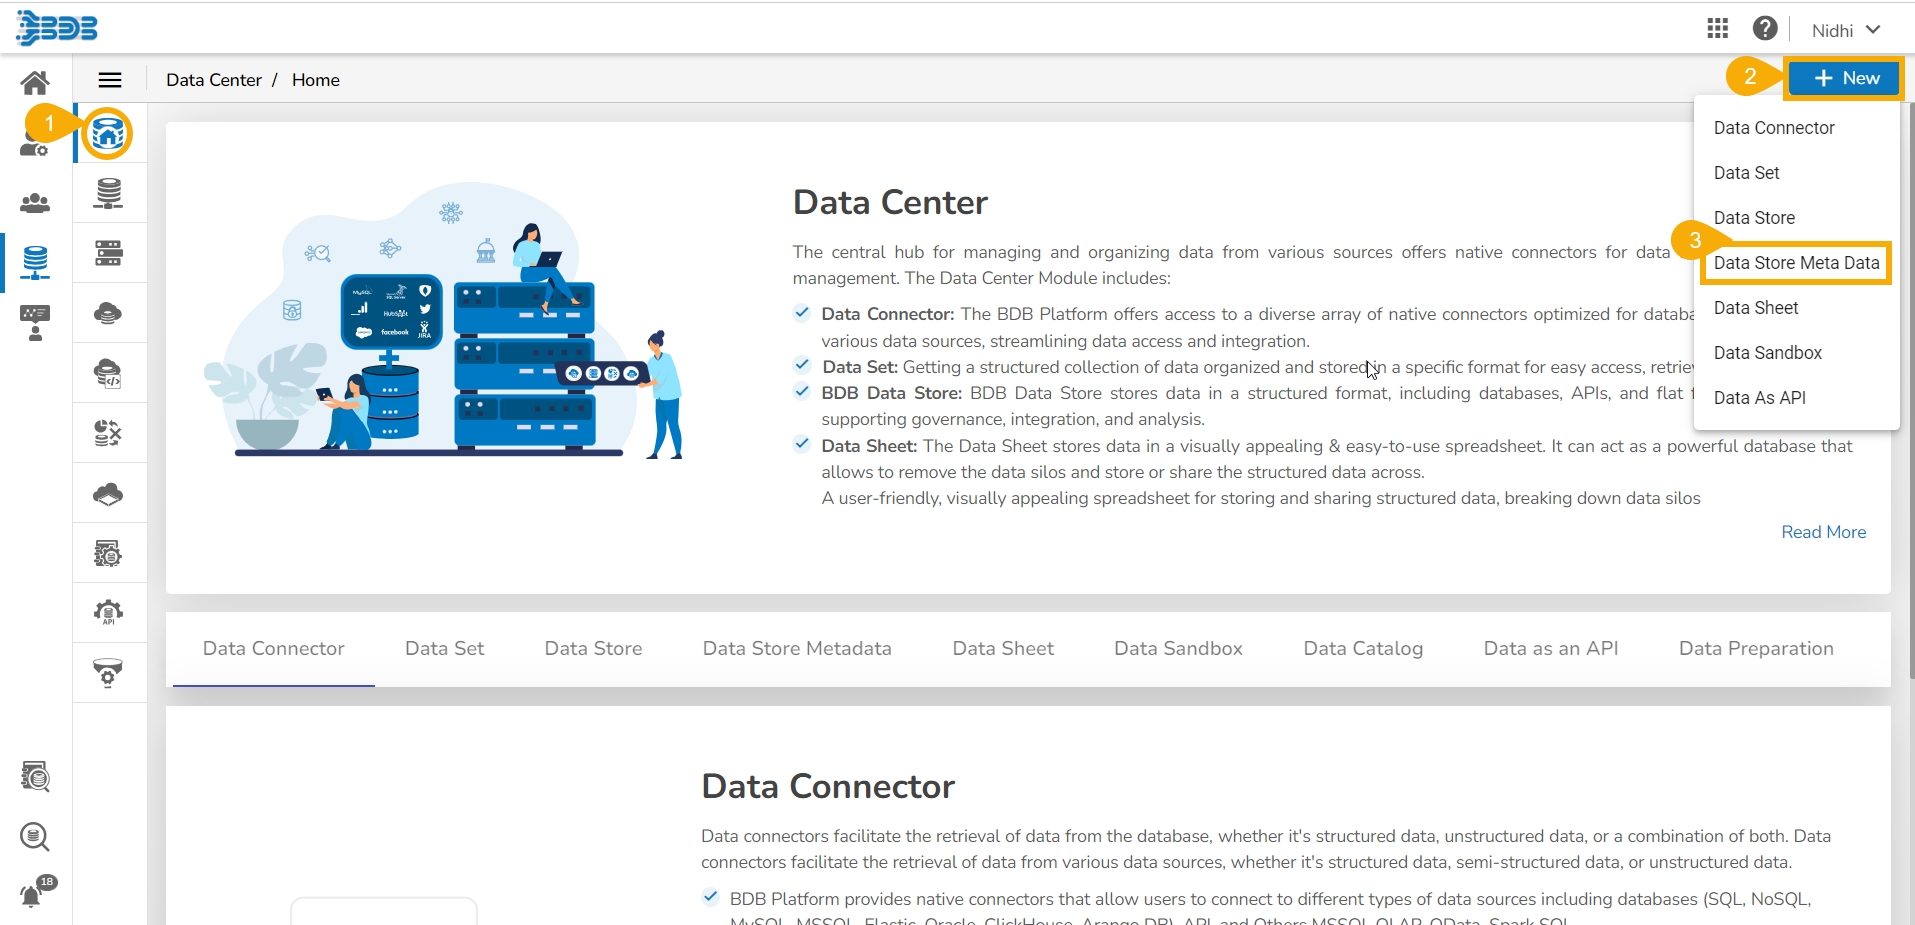
Navigate to the Data Center Homepage.
Click the New menu.
Select the Data Store Meta Data option from the New context menu.
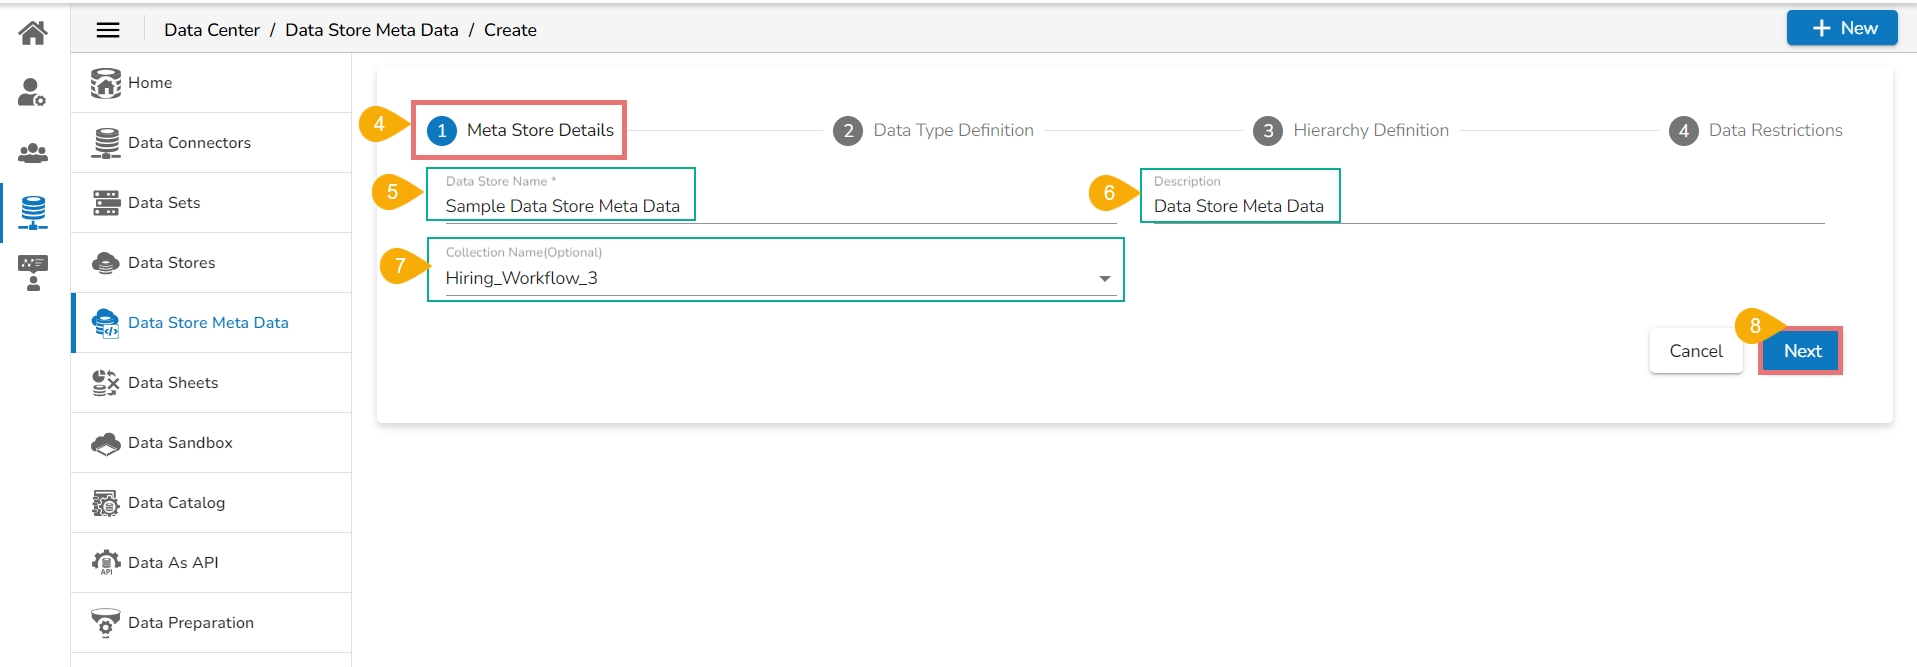
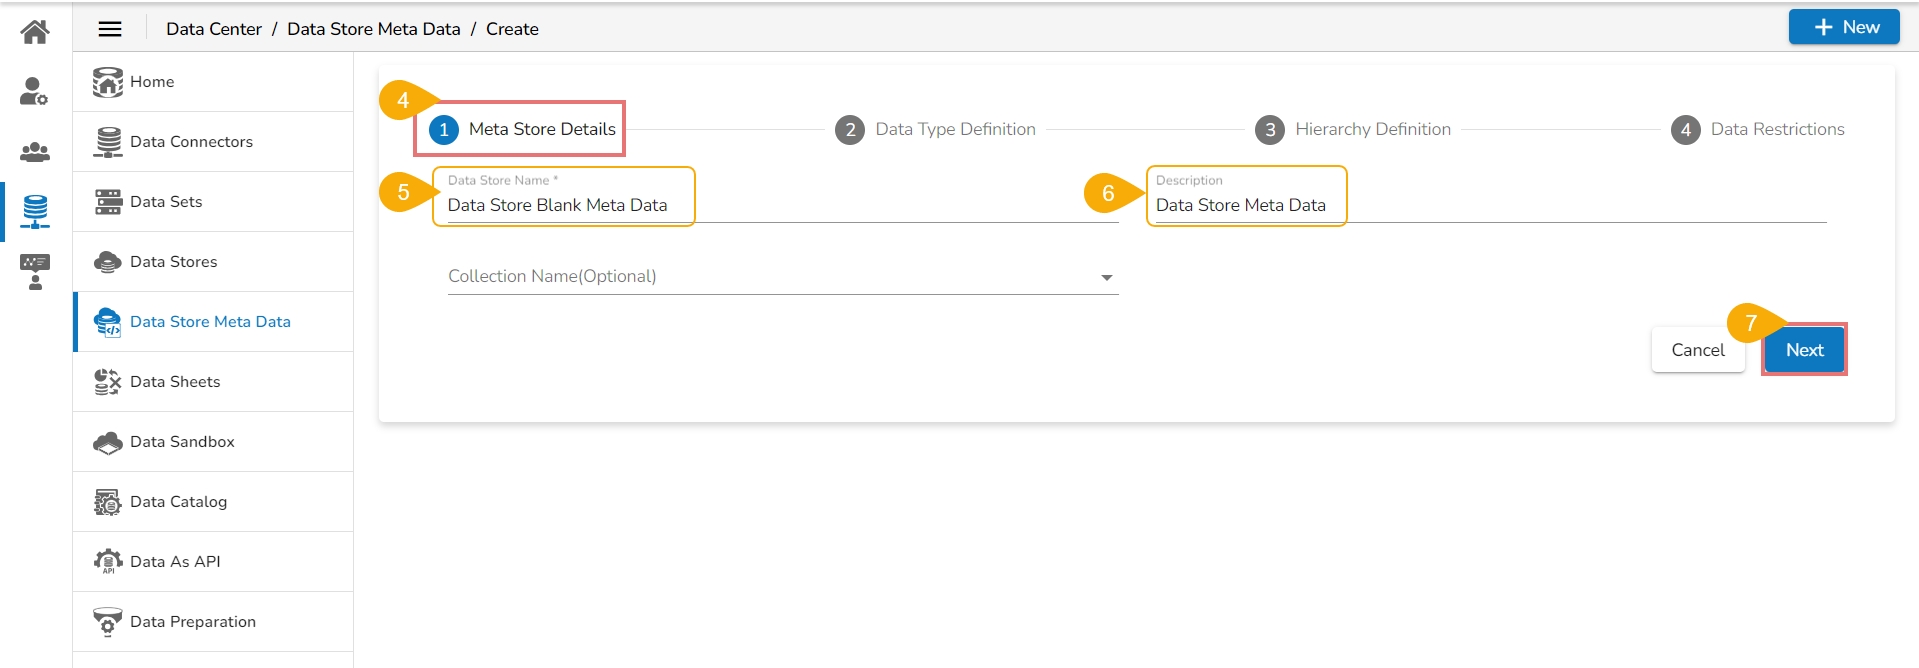
A new page asking for the Meta Store details opens.
Enter a Data Store Name.
Provide the Description of the Data Store Meta Data.
Choose a Collection Name from the drop-down list (optional). In this case, a collection has been selected.
Click the Next option.
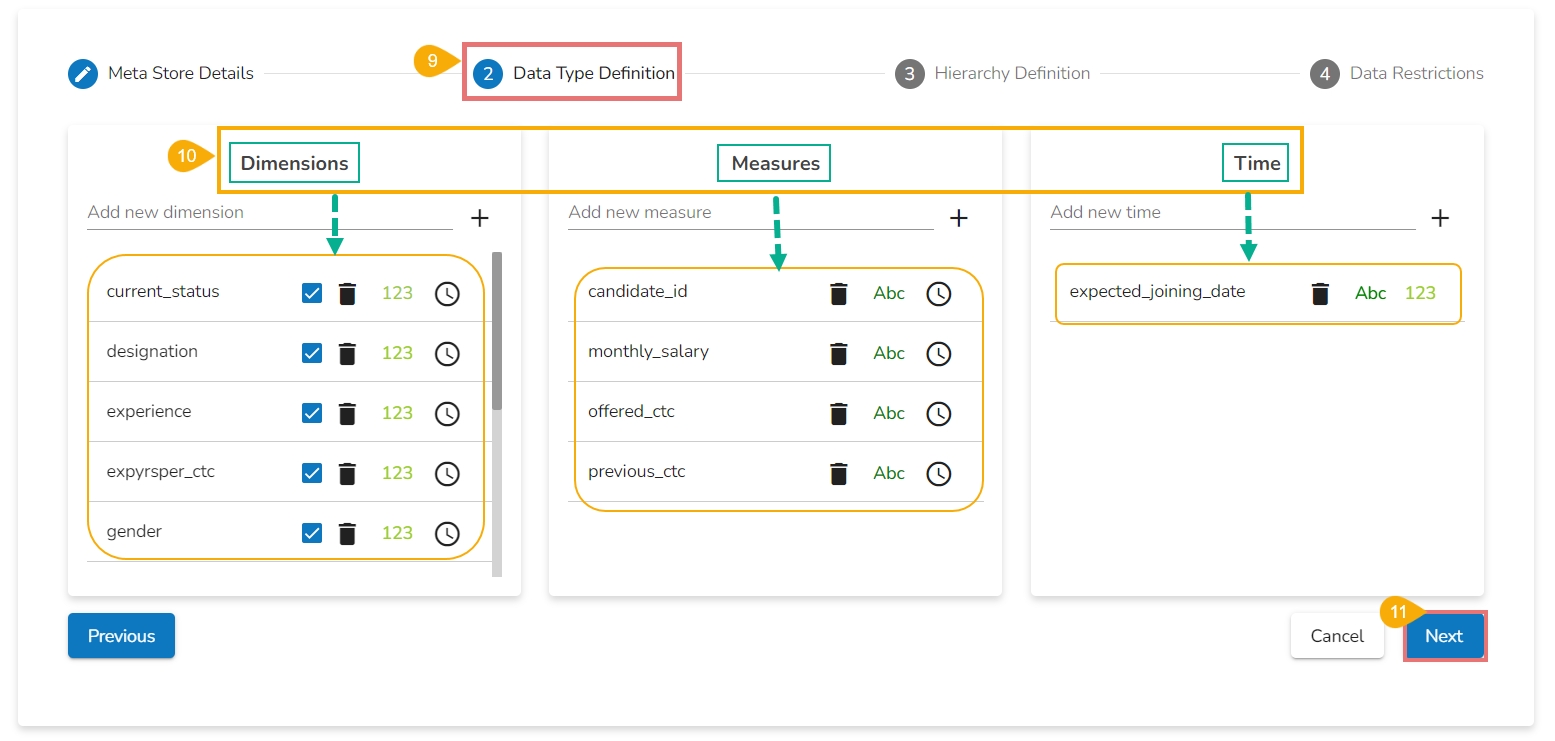
The names of the fields get selected from the chosen Collection.
The user also gets the data for the Dimensions, Measures, and Time categories. The user can interchange the data categories of dimension, measure, and time value by using the below-given options:
Click the Next option.
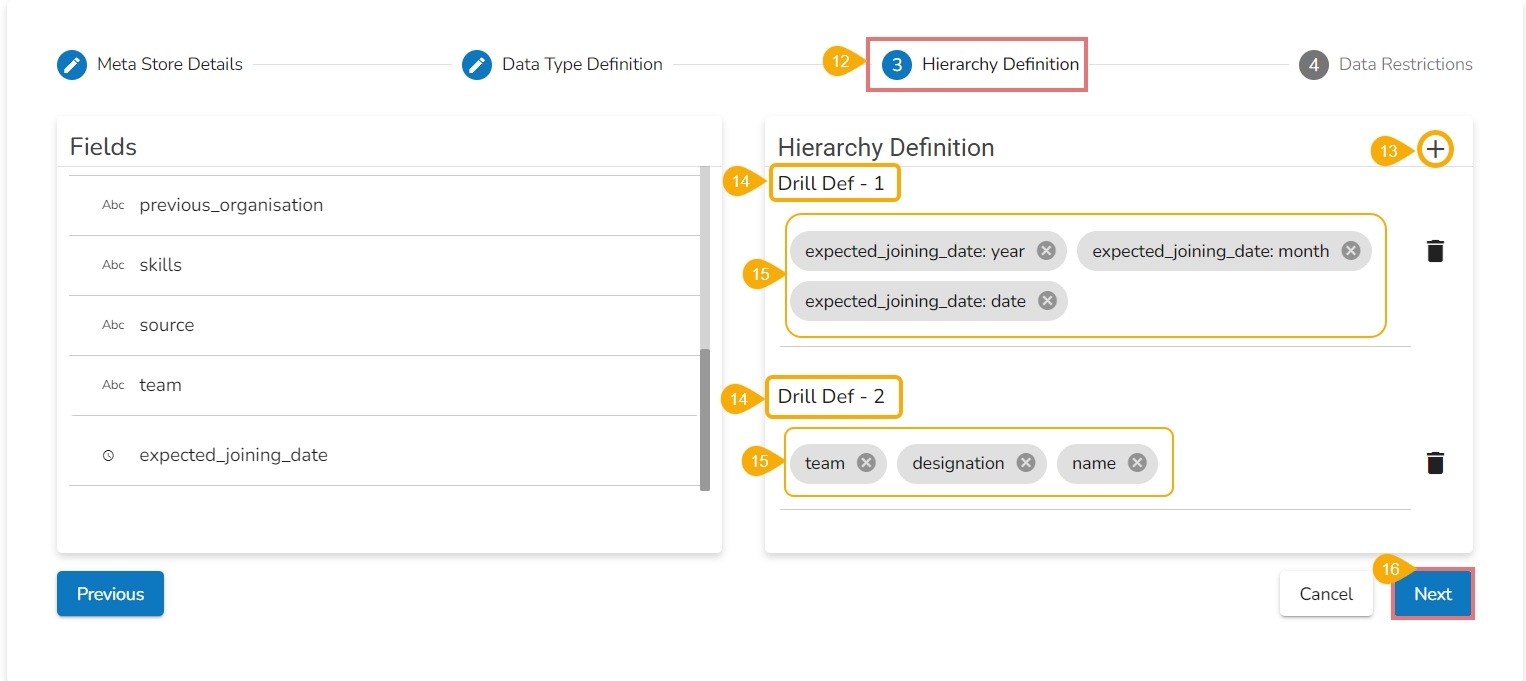
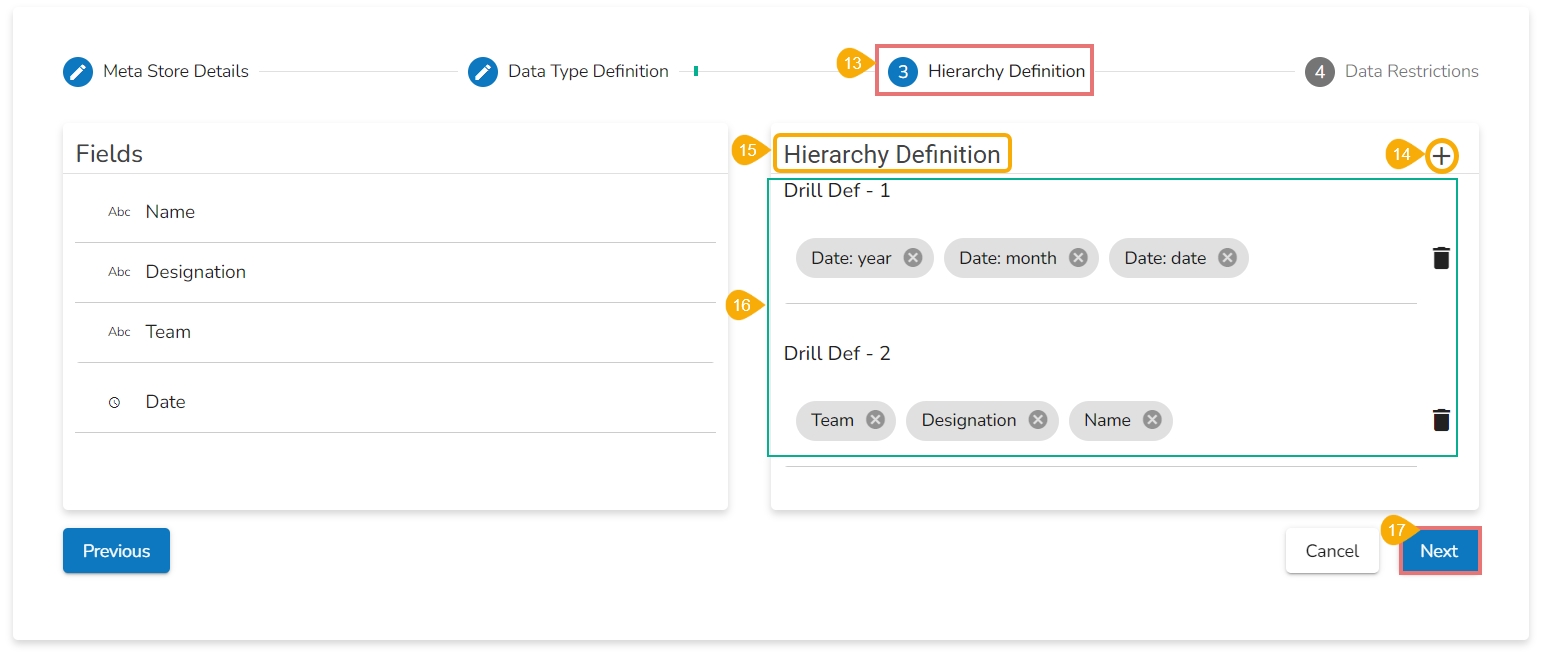
The Hierarchy Definition tab opens.
Click the Add icon provided in the Hierarchy Definition window.
A new Drill Def box gets added to the page.
Drag and drop the dimensions or time options to define a hierarchy.
The time dimension creates a hierarchical sequence from the higher to lower time values by default. E.g., year->month->date by pulling it once in the Drill Def boxes.
Dimensions have to be manually pulled to create a hierarchy.
Click the Next option.
The Data Restrictions tab opens. The Data Restriction tab allows the user/user group to access data as per the selected User Property options.
Click the Add icon to insert new fields for Dimension and User Property.
Select a dimension from the drop-down menu to apply filter values to the data store.
Enter a User Property to create a filter parameter based on the user.
Click the Finish option.
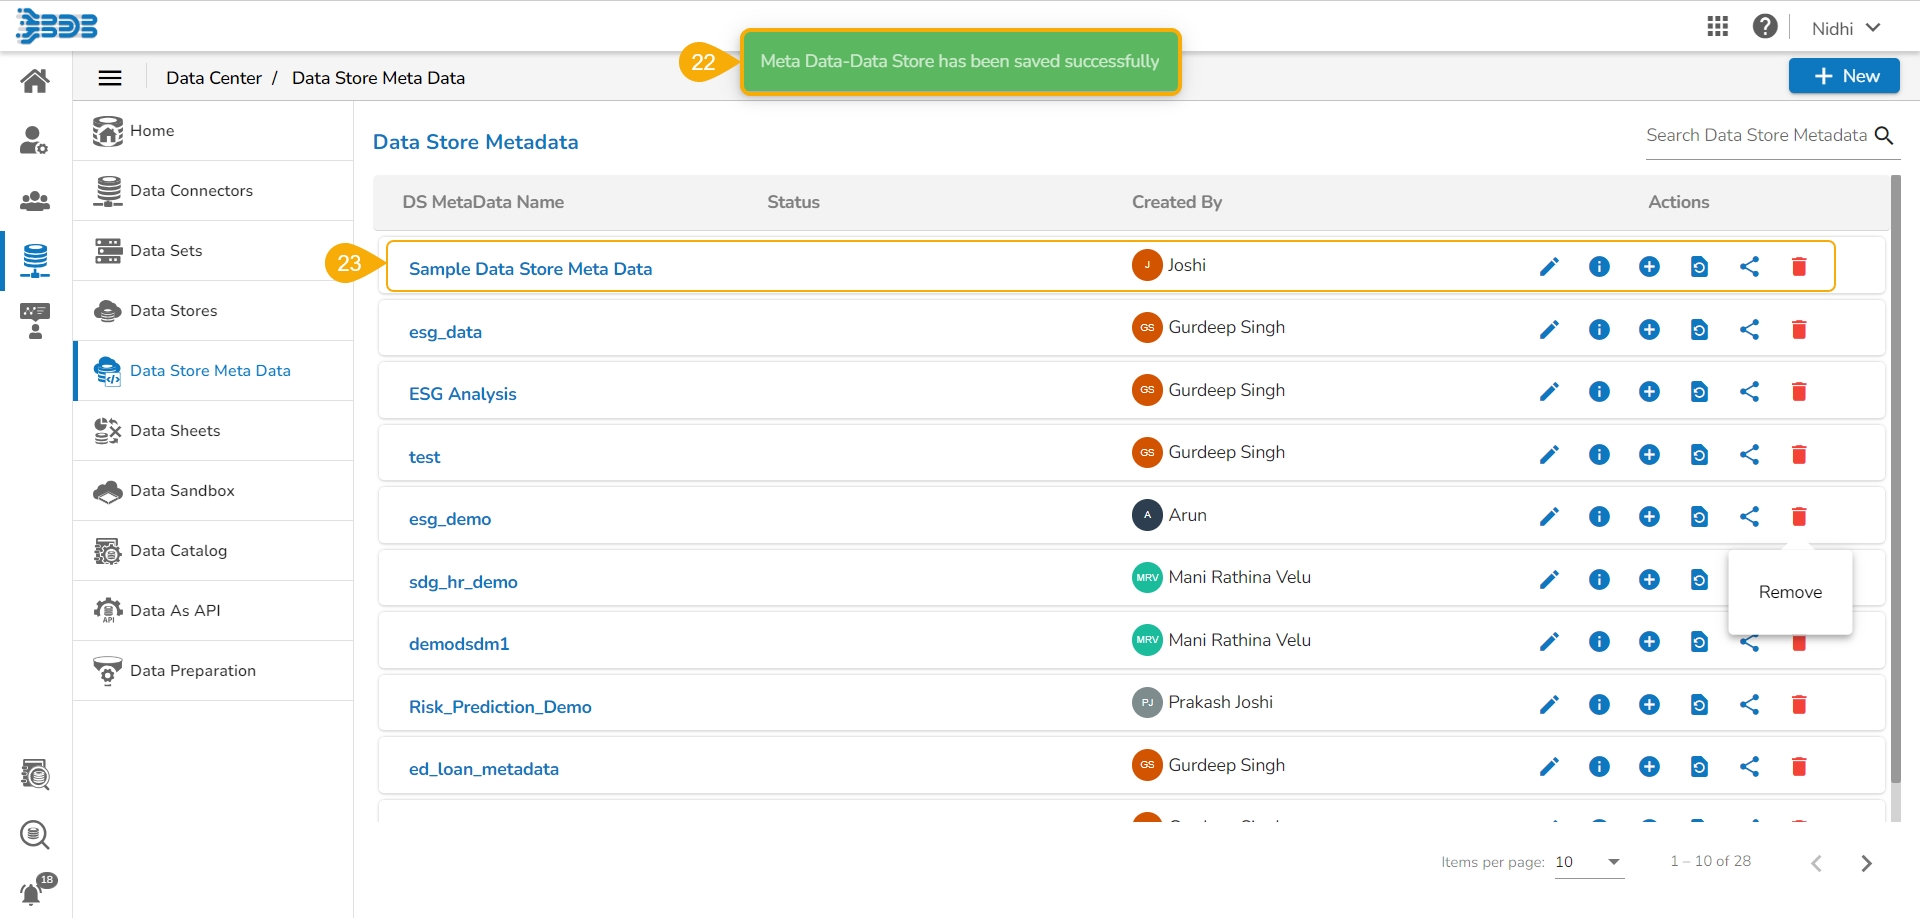
A notification message appears to confirm the configuration of the new Meta Data.
The newly created Meta Data gets added to the list displayed on the left pane of the page.
The Data Store Metadata can be a structure/index in which the actual data can be stored/written using an application such as Data Pipeline. In this case, there will be user defined structure without actual data in it.
Navigate to the Data Center Homepage.
Click the New menu.
Select the Data Store Metadata option from the New context menu.
A new page asking for the Meta Store details opens.
Enter a Data Store Name.
Choose no Collection Name from the drop-down list.
Click the Next option.
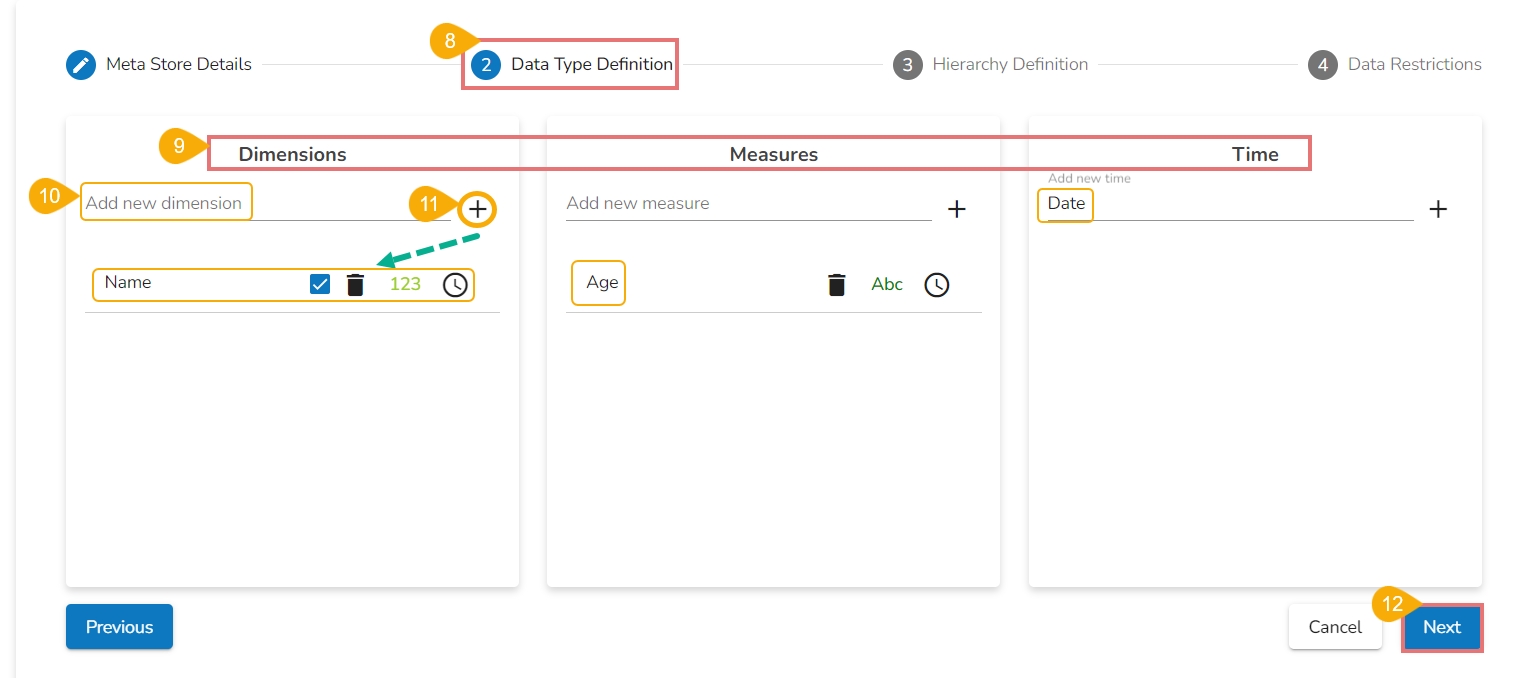
Define the data type to insert the field name manually since the Collection Name is not chosen.
The users can define the data for the Dimensions, Measures, and Time categories. The user can even interchange the data categories of dimension, measure, and time value by using the below-given options:
Provide a title for Dimensions, Measures, or Time entities.
Use the Add icon to add the defined Dimension, Measure and Time values.
Click the Next option.
The Hierarchy Definition tab opens.
Click the Add icon provided in the Hierarchy Definition window.
A new Drill Def box gets added to the page.
Drag and drop the dimensions or time options to define a hierarchy.
The time dimension creates a hierarchical sequence from the higher to lower time values by default. E.g., year->month->date by pulling it once in the Drill Def boxes.
Dimensions have to be manually pulled to create a hierarchy.
Click the Next option.
The Data Restrictions tab opens. The Data Restriction tab allows the user/user group to access data as per the selected User Property options.
Click the Add icon to insert a new field to provide Dimension and User Property.
Select a dimension from the drop-down menu to apply filter values to the data store.
Enter a User Property to create a filter parameter based on the user.
Click the Finish option.
A notification message appears to confirm the configuration of the new Meta Data.
The newly created Meta Data gets added to the list displayed on the left pane of the page.
Please Note:
The user can configure the option whether to choose the MongoDB, ClickHouse, or Elastic Search using the Datastore Settings configuration section under the Admin module.
A created Data Store Meta Data lists under the Existing Data Store list while creating a Story selecting which a user can quickly map to the data and start the Story creation.
If the user creates a Data Store Meta Data without mapping it with an existing collection, the Data Store Metadata will not contain any data. In this circumstances, the user needs to insert the data using a data pipeline or add the data manually in the table (in DB) before going for Story creation with the same Data Store Meta Data.
The DB used to map or write a new table while creating Data Store Meta Data will always be the DB configured by the user in the Admin section.
Option
Name
Task
Edit
Redirects the user to edit the Metadata Store fields.
Store Details
Displays the Store information via a pop-up window.
Add Synonyms to Metadata Store
Redirects the user to add synonyms to the selected Metadata store.
Refresh Synonyms
Refreshes the Synonyms
Share Metadata Store
Redirects the user to share the selected Metadata Store to users or user groups.
Remove
Removes the data store metadata from the list
Need to create this content.
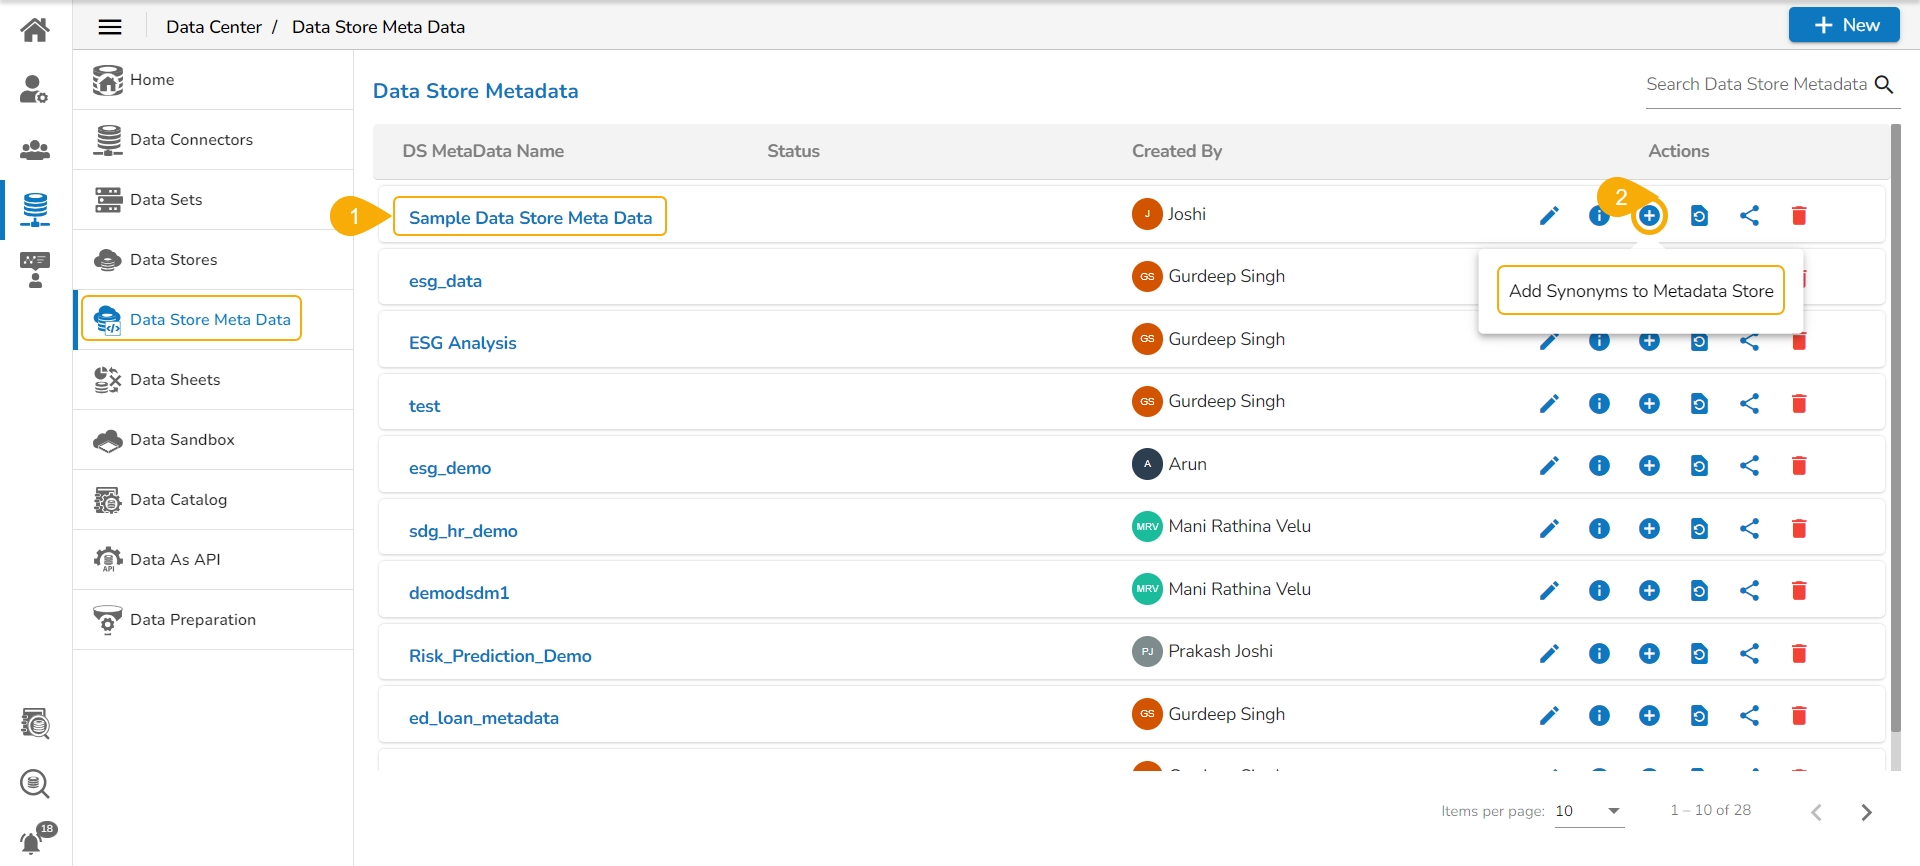
Select a Metadata Store from the Data Store Meta Data list.
Click the Add Synonym to Data Store Meta Data option.
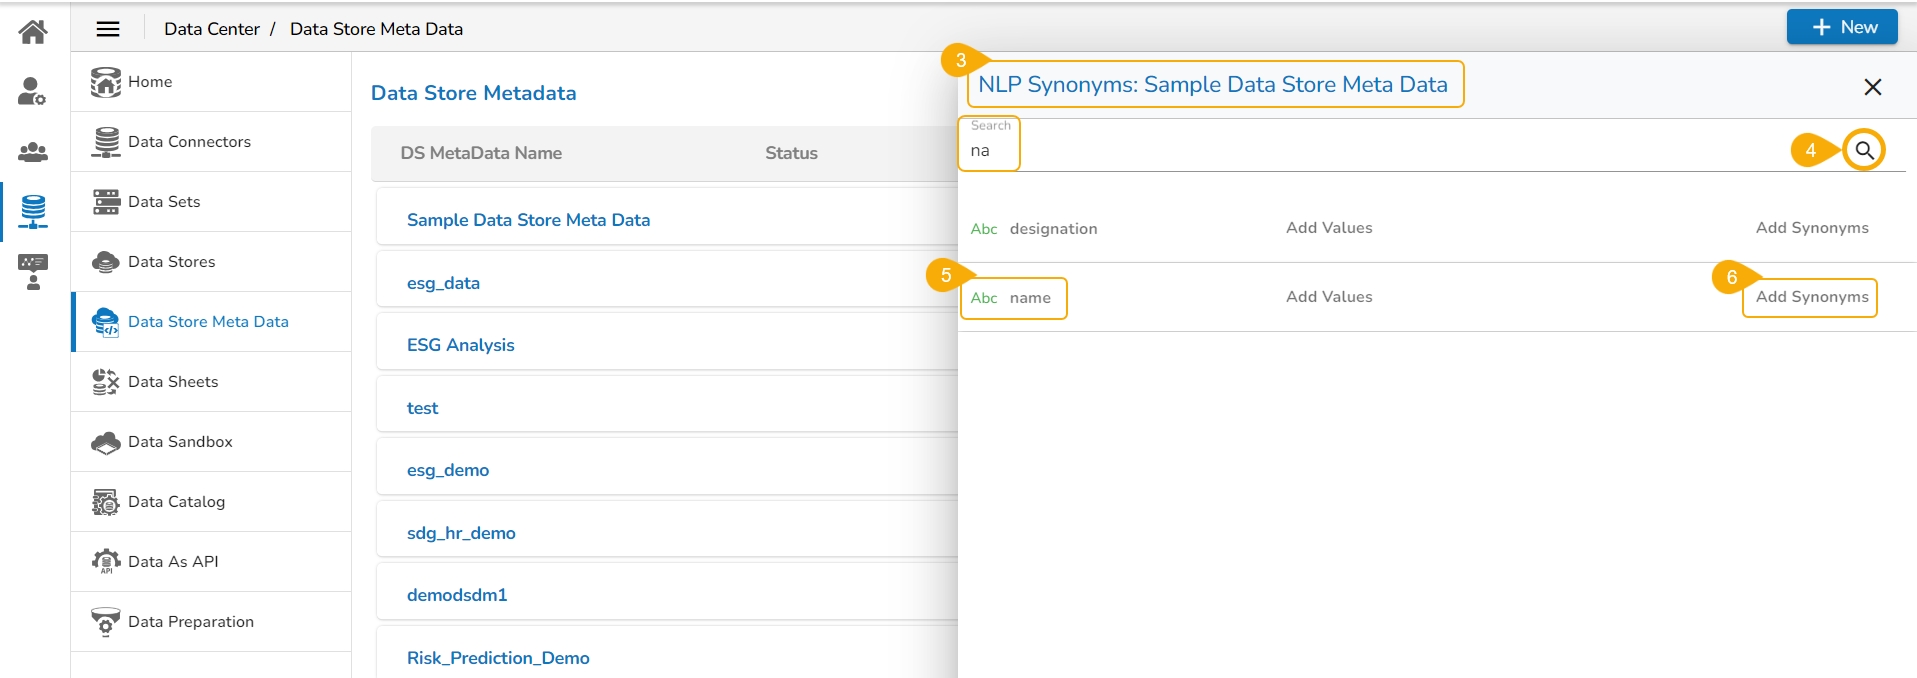
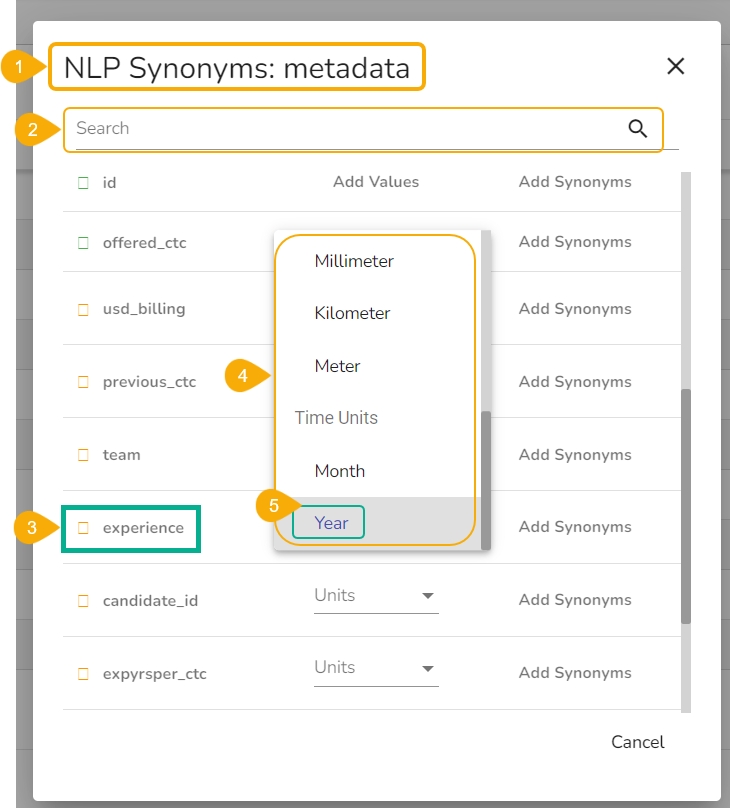
The NLP Synonyms drawer opens listing all the attributes in a list form.
Search for a field from the displayed list using the Search space.
Select a field.
Click the Add Synonyms option.
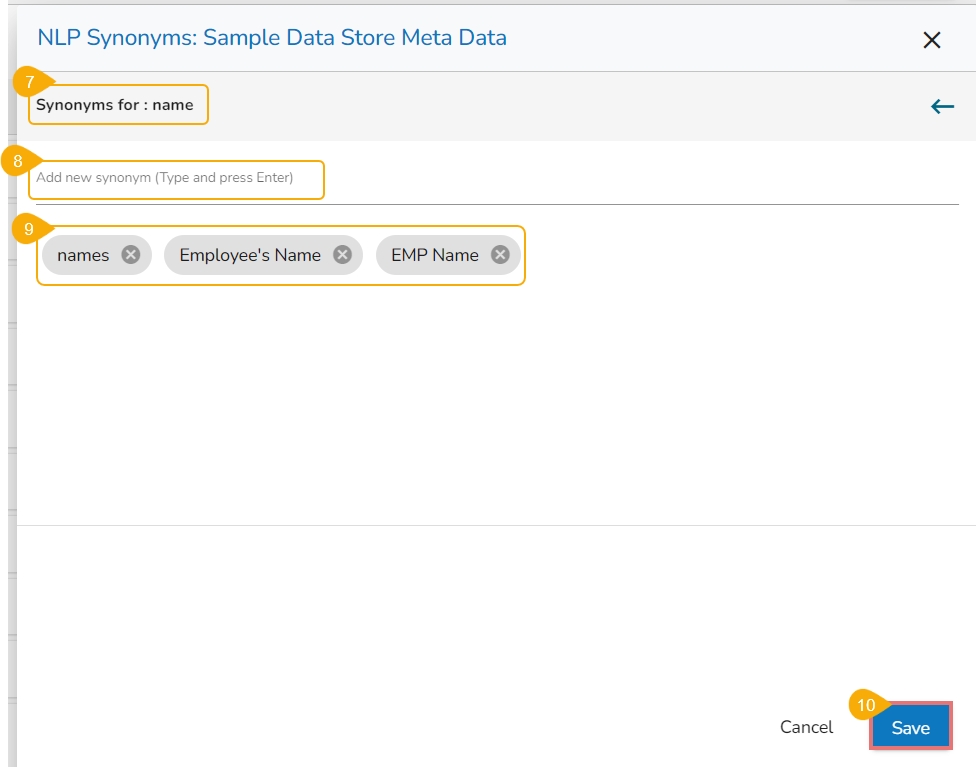
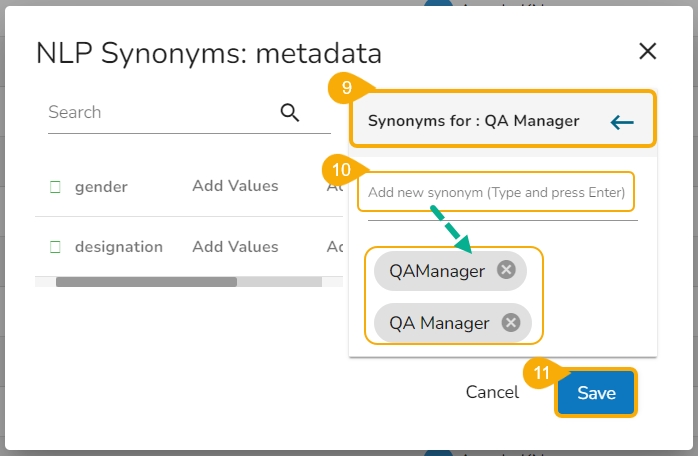
A new window opens to add synonyms.
Insert new synonyms in the specified space.
The added names appear below the specified place.
Click the Save option.
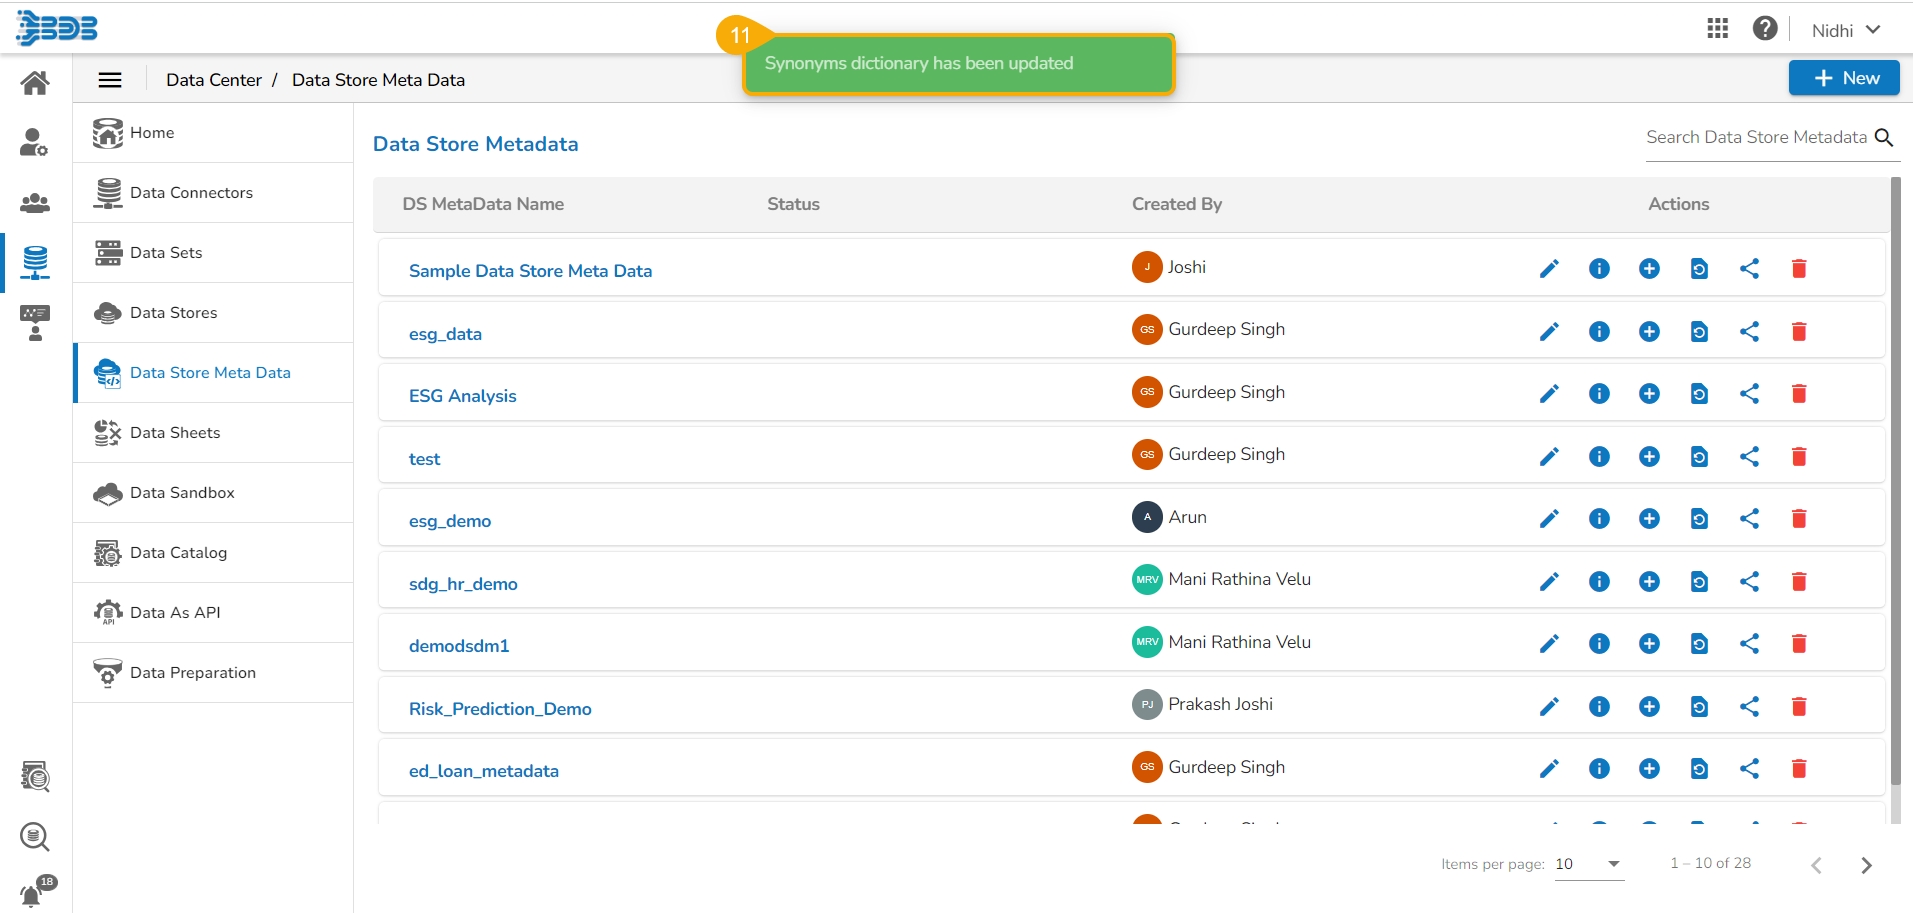
A success message appears to assure that the synonym dictionary is updated with the newly added synonym.
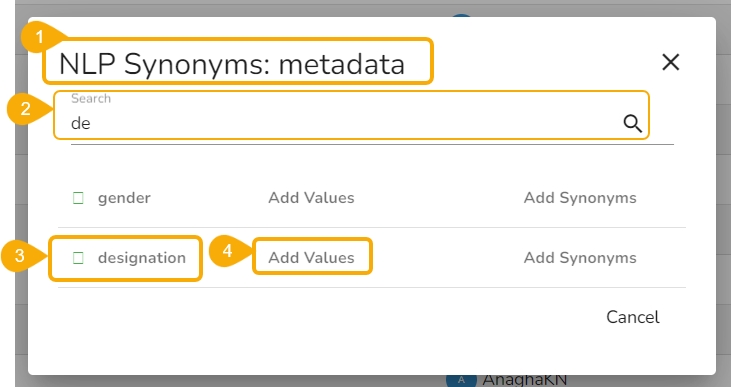
Navigate to the NLP Synonyms window for a Data Store Metadata.
You can search for a Dimension from the displayed list using the Search space.
Select a Dimension.
Click the Add Values option for a dimension from the displayed list of the data fields.
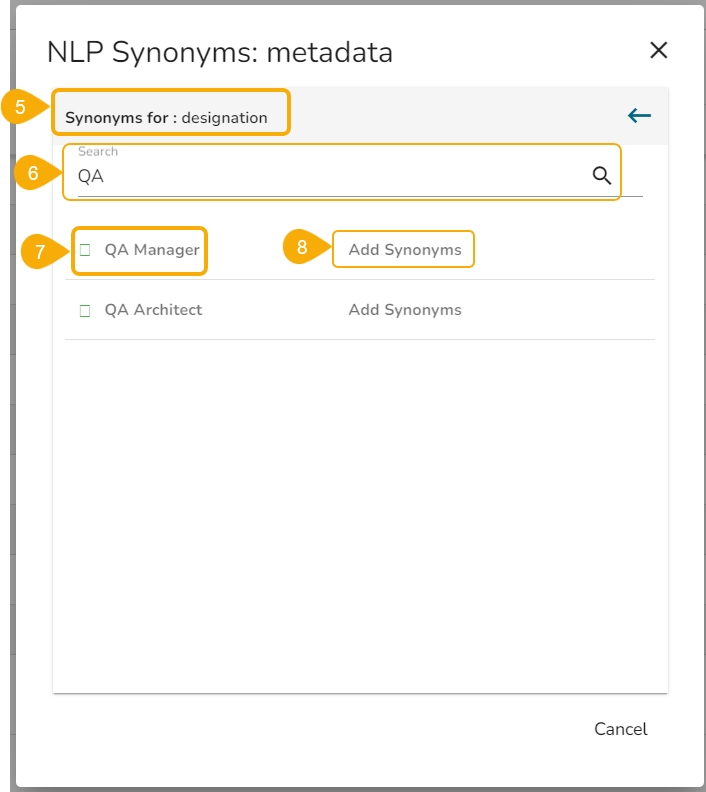
A new window opens to search values for the selected Dimension (E.g., Designation in the below image).
Use the search bar to find specific dimensions.
Select a Value from the displayed choices.
Click the Add Synonyms option for the selected value.
The selected sub-dimension gets added to the right pane of the window.
Add synonyms by inserting new synonyms in the specific space.
Click the Save option to save the added synonyms.
A success message appears to assure that the Synonyms dictionary is updated.
Navigate to the NLP Synonyms window for a data store metadata.
You can search for a Measure from the displayed list using the Search space.
Select a Measure and open the Units drop-down menu.
The Drop-down menu contains various units.
Select a Unit from the Units drop-down for the selected Measure.
A confirmation message appears to inform the recent update the user.


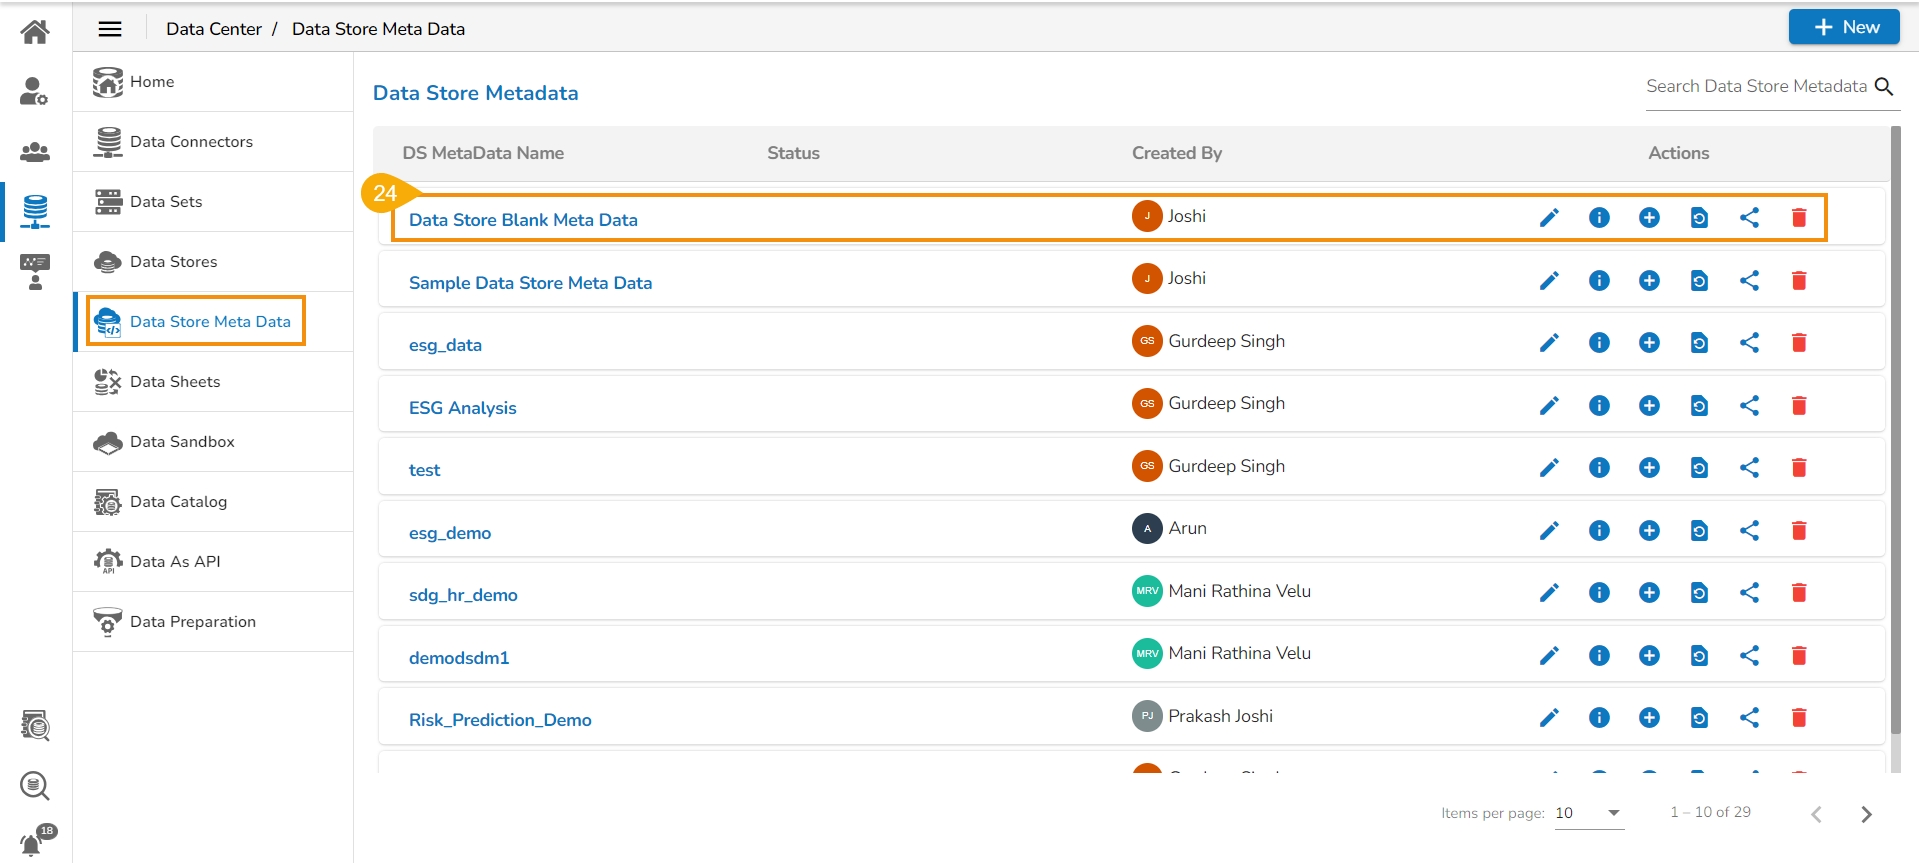
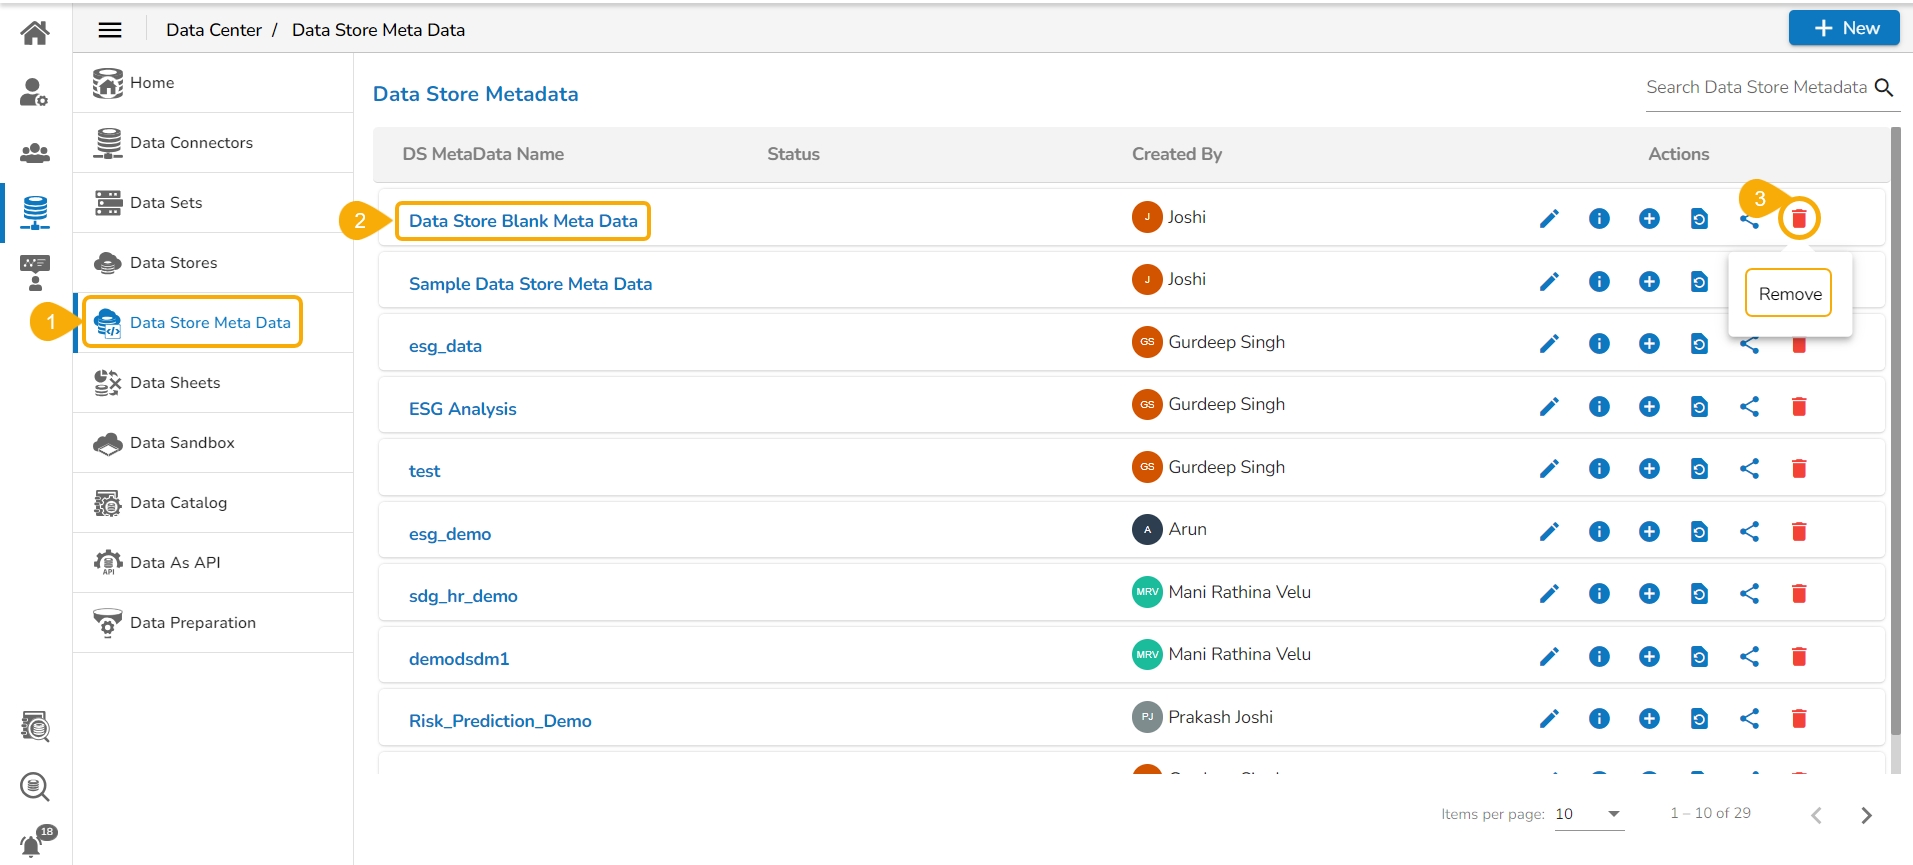
Navigate to the Data Store Meta Data list.
Select a Meta Data Store from the Data Store Meta Data list.
Click the Delete icon.
The Remove Data Store dialog box appears to confirm the deletion.
Click the Yes option.
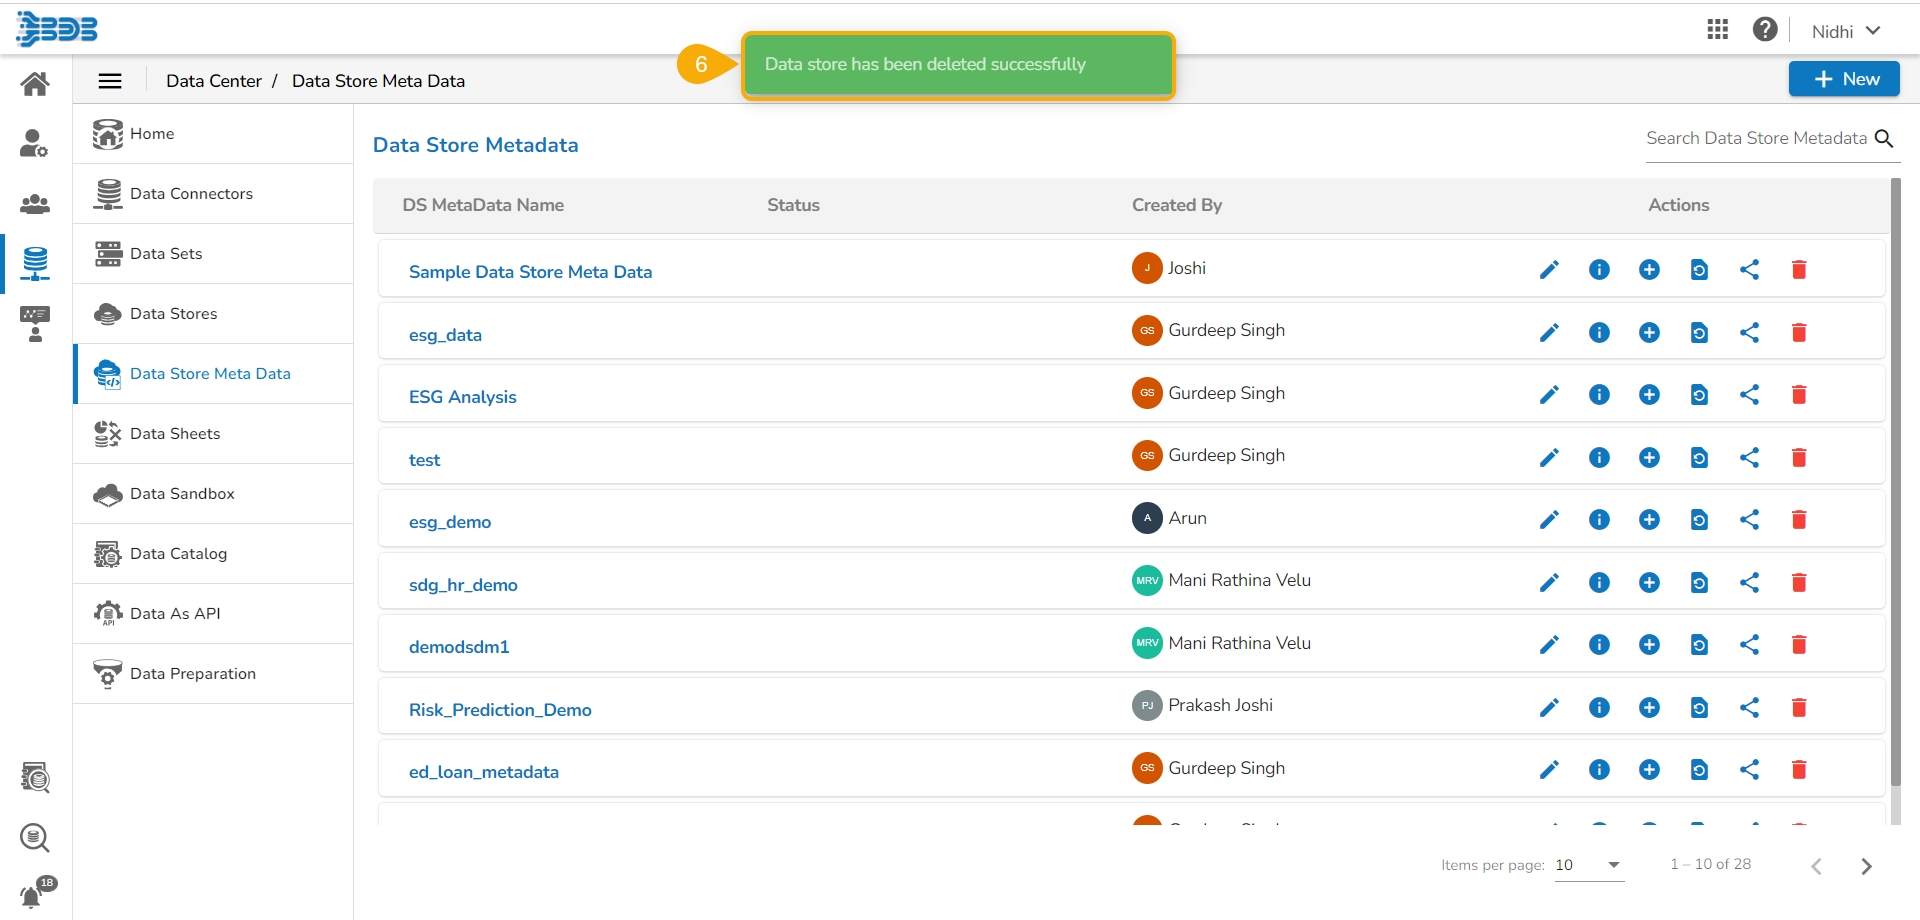
A notification message appears, and the selected Metadata Store gets deleted.
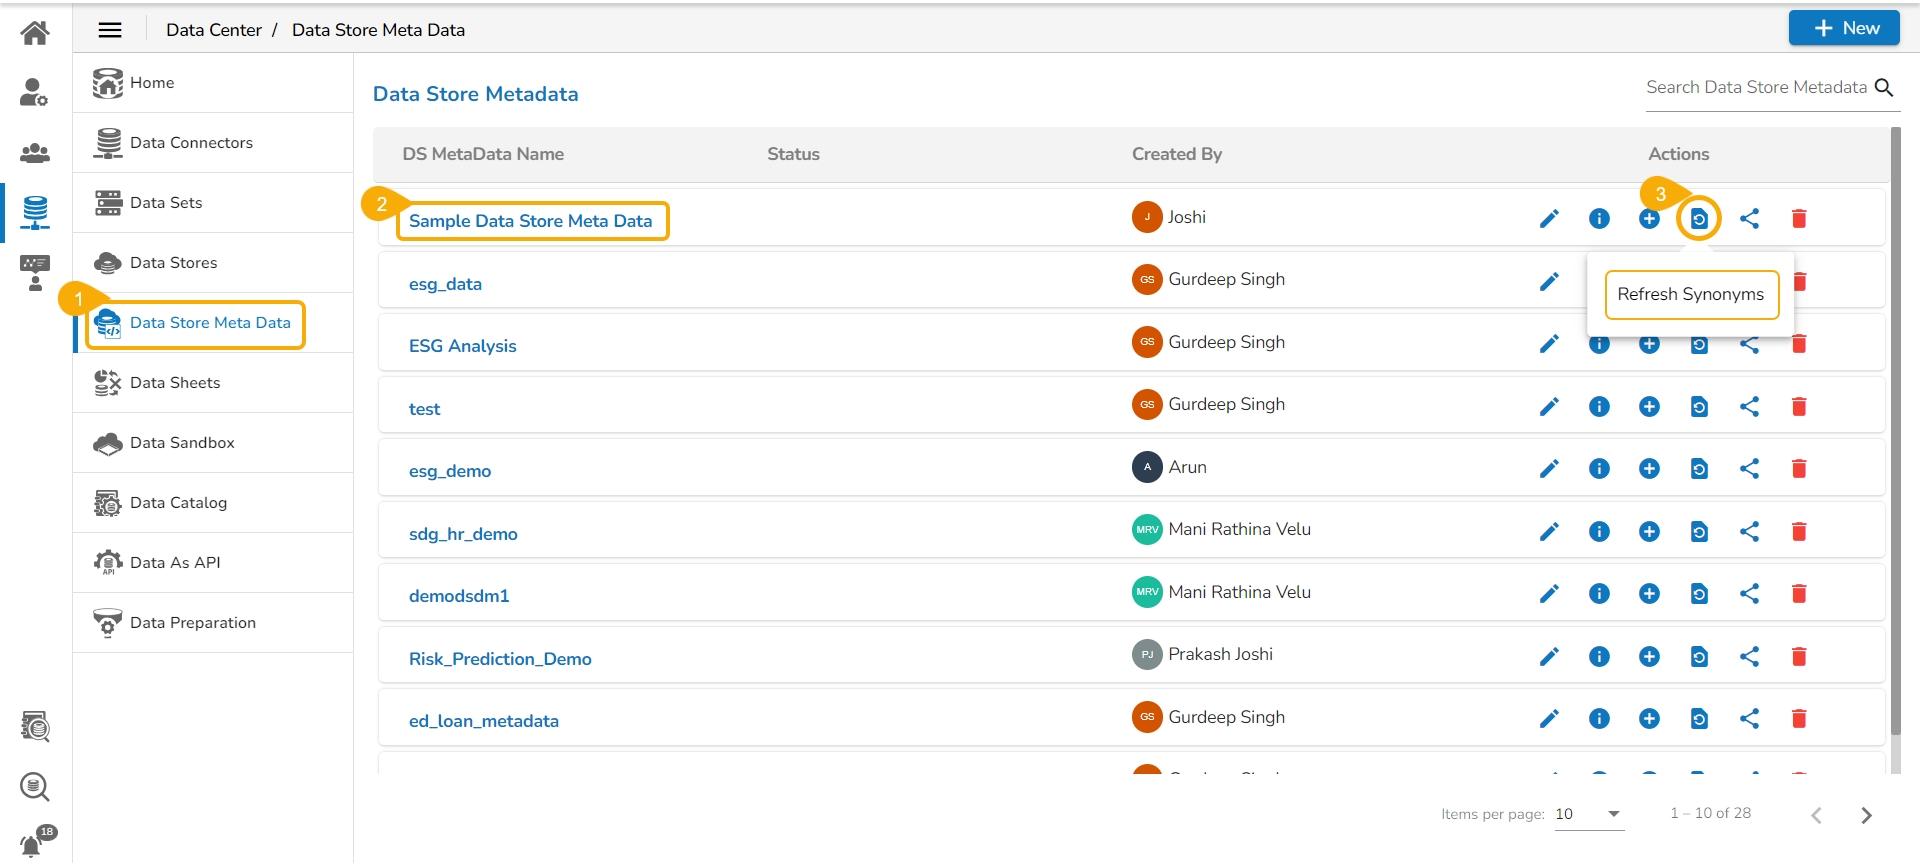
The Refresh Synonyms option helps to refresh metadata tables to reflect the later changes in the metadata.
Navigate to the Data Store Metadata list.
Select a Metadata Store from the list.
Click the Refresh Synonyms icon.
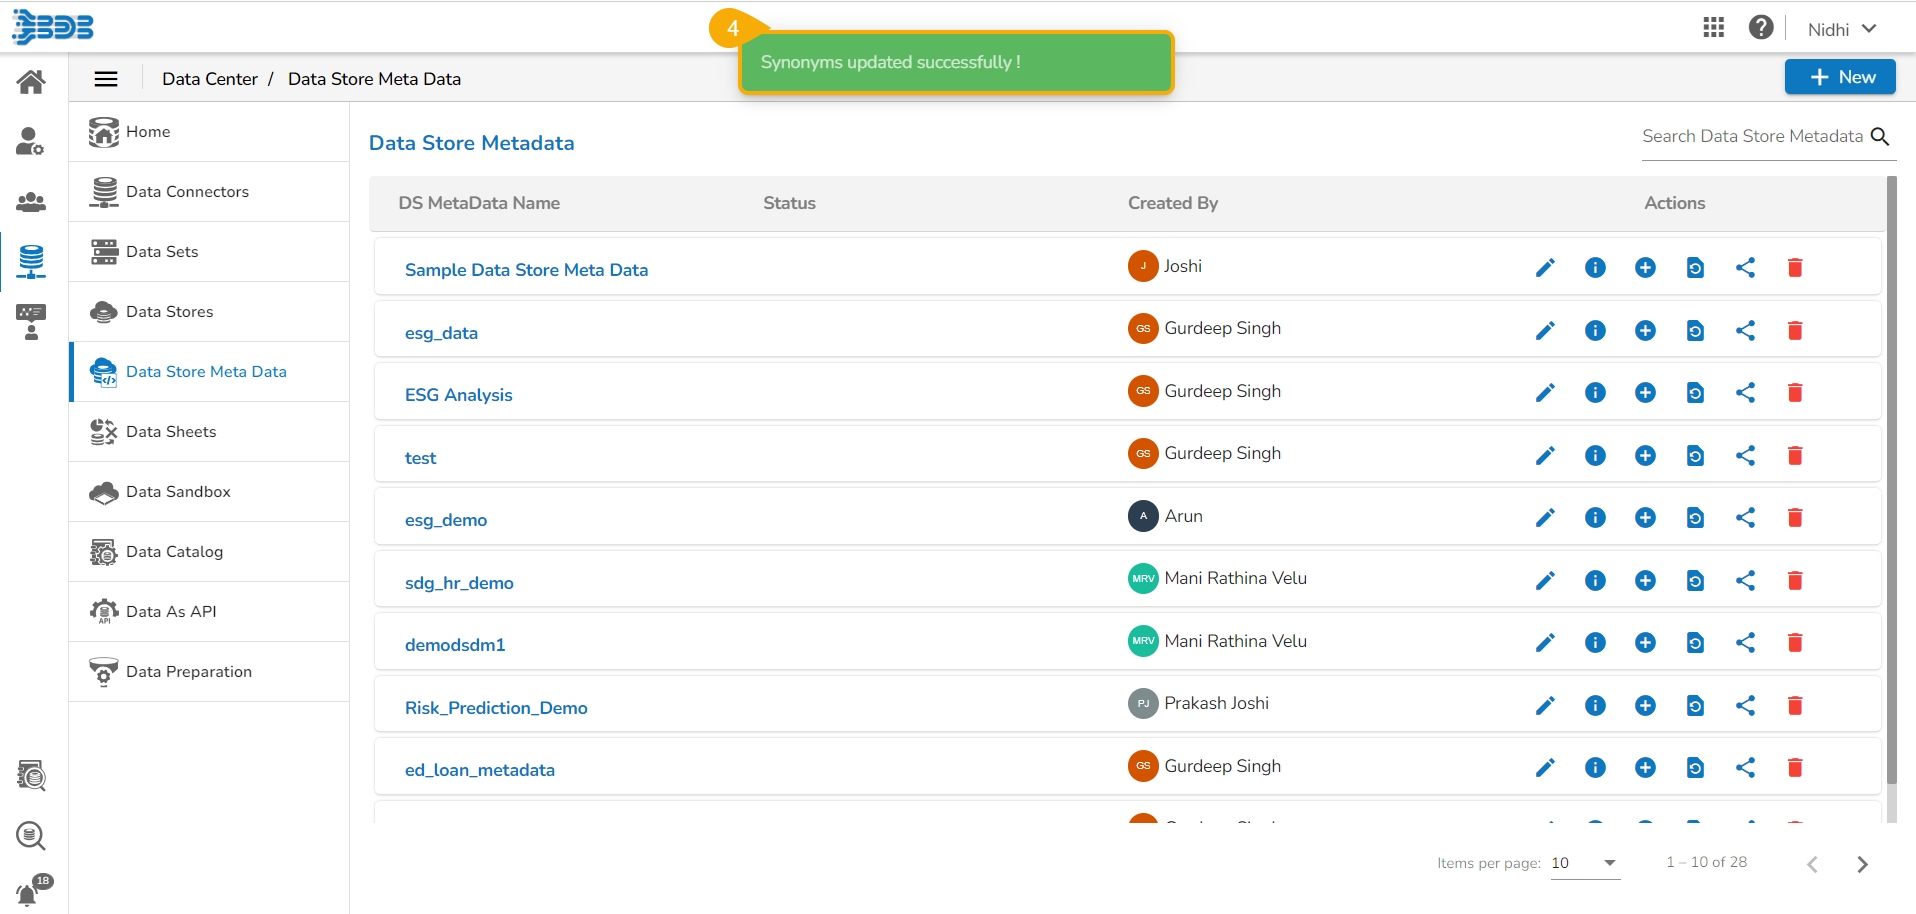
A confirmation message appears to inform the users that the Synonyms are updated.
Please Note: While using the Refresh Synonyms option, all the previously added Synonyms get cleared. The user needs to use the Add Synonyms option to insert synonyms in the same Metadata Store.
This option allows the user to share the specific Metadata Store from the available list of the Data Store Metadata with other users or user groups.
Check out the illustration on sharing a Data Store Metadata.
Navigate to the Data Store Metadata list.
Select a Data Store Metadata from the list.
Click the Share Metadata Store icon.
The Manage Access window opens for the selected Data Store Metadata.
Select grant permission options using the checkboxes.
The Users, User Groups, and Exclude Users tab appears.
Use the Search bar to search for a specific user.
Select a user or user group using the checkboxes from the displayed list of users/user groups based on the selected tab.
Click the Save option.
A notification message appears.
The selected user(s)/ user group(s) will be added to the Granted Permissions list.
Navigate to the user account where the Data Store Meta Data is shared.
The shared Data Store Meta Data lists the Status mentioned with a Share icon for the user(s) to whom it has been shared. The Actions may vary based on the selected granted permission for the Data Store.
The shared Data Store Meta Data will have limited Action permissions.
Please Note: A targeted share user cannot re-share or delete a shared Data Store Metadata, regardless of the permission level (View or Edit).
Check out the illustration on excluding user(s) while sharing a Data Store Metadata with the selected user group(s). This video also displays the steps to include an excluded user.
Navigate to the Manage Access window for a Data Store Metadata.
Select privileges using the checkboxes provided for the Grant Privileges.
Navigate to the User Groups tab.
Select user group(s) using the checkbox.
Navigate to the Exclude Users tab.
Select the users to be excluded from the selected group(s) to access the data store metadata using the checkboxes.
Click the Save option.
A notification message appears, and the selected user group(s) name will be added under the Granted Permissions section.
The excluded users will be listed under the Excluded Users section.
Check out the illustration on including an excluded user.
Open the Manage Access window for a shared Data Store Metadata.
Navigate to the Excluded Users list.
Select a user from the list.
Click the Include User icon.
A notification ensures that the privileges are shared with the recently included user from the group.
The Excluded Users list gets modified.
Check out the illustration on revoking a user's access to a shared Data Store Metadata.
Navigate to the Manage Access window for a shared Data Store Metadata.
The Granted Permissions will be listed.
Select a user or user group from the displayed list.
Click the Revoke Privileges icon.
A notification message appears, and the granted permissions list gets modified as the targeted user/ user group gets removed from the list.
Please Note:
Users can share the Data Store Metadata with a Single group or Multiple Groups using the user group tab. The steps to share a Data Store Metadata with User Group(s) are similar to those mentioned above for sharing a Data Store with User(s).
The Exclude User tab helps to exclude the user(s) from the rights to access a Data Store, if it is already shared. Only the users of the selected user group with whom it has been shared will be listed under the Exclude User tab.


