Data Connectors
Access native connectors that are built and optimized for various types of data sources. You can use these native connectors to connect to their data sources.
Create Data Connector
This page explains the step by step process to create a model connector under the BDB platform.
Creating a Data Connector
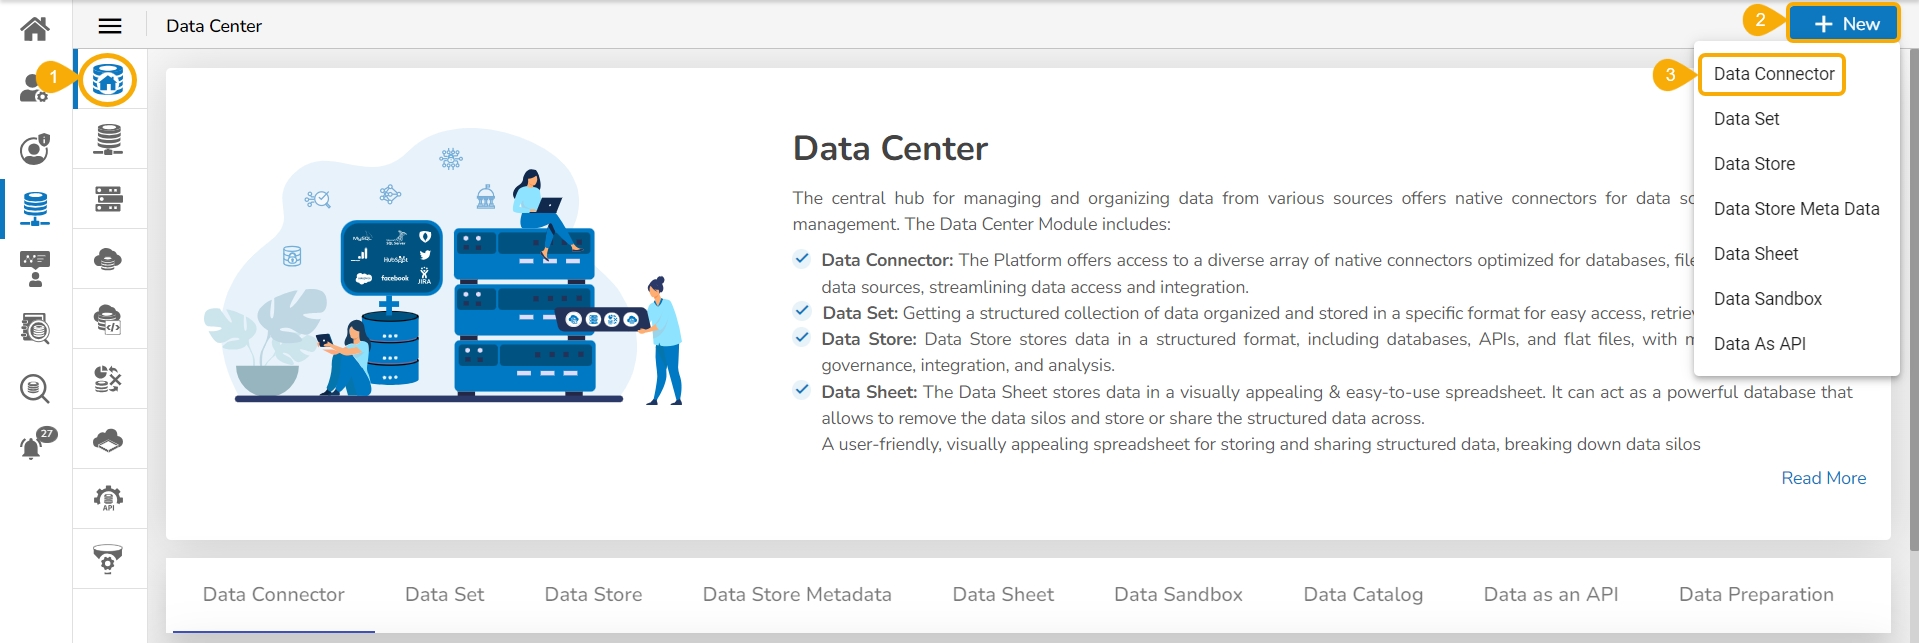
Navigate to the Data Center Homepage.
Click the New option.
Click the Data Connector option from the New Context menu (as displayed below).
A page opens with all the available data connector types.
Click on a Connector type.
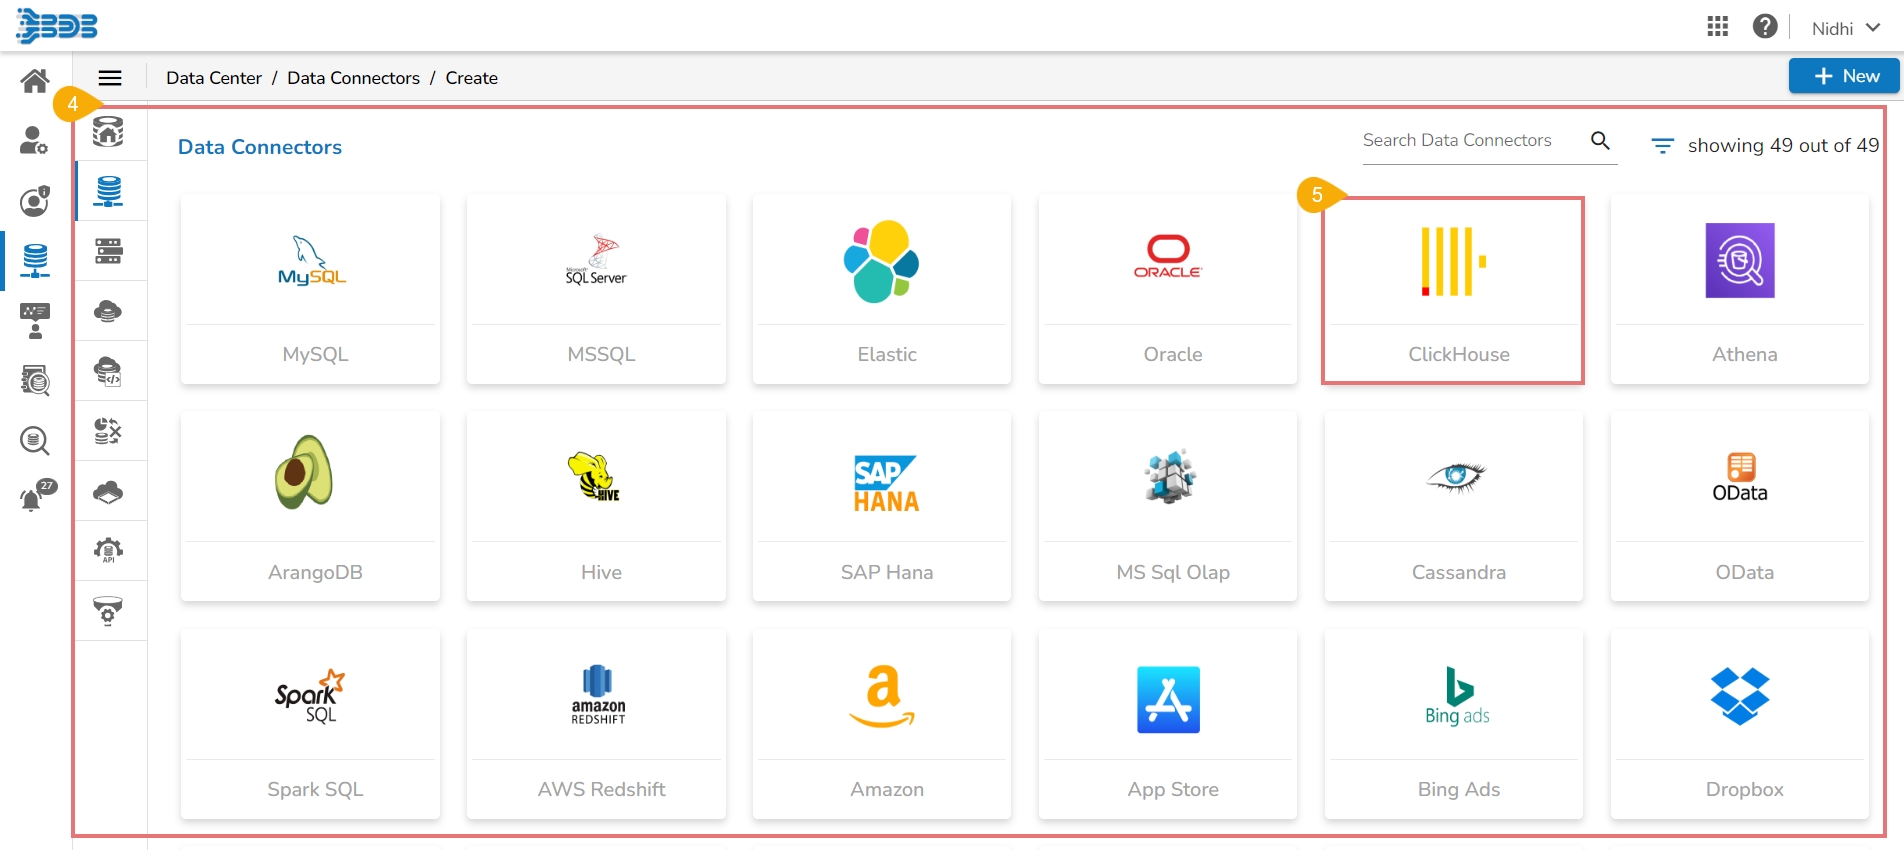
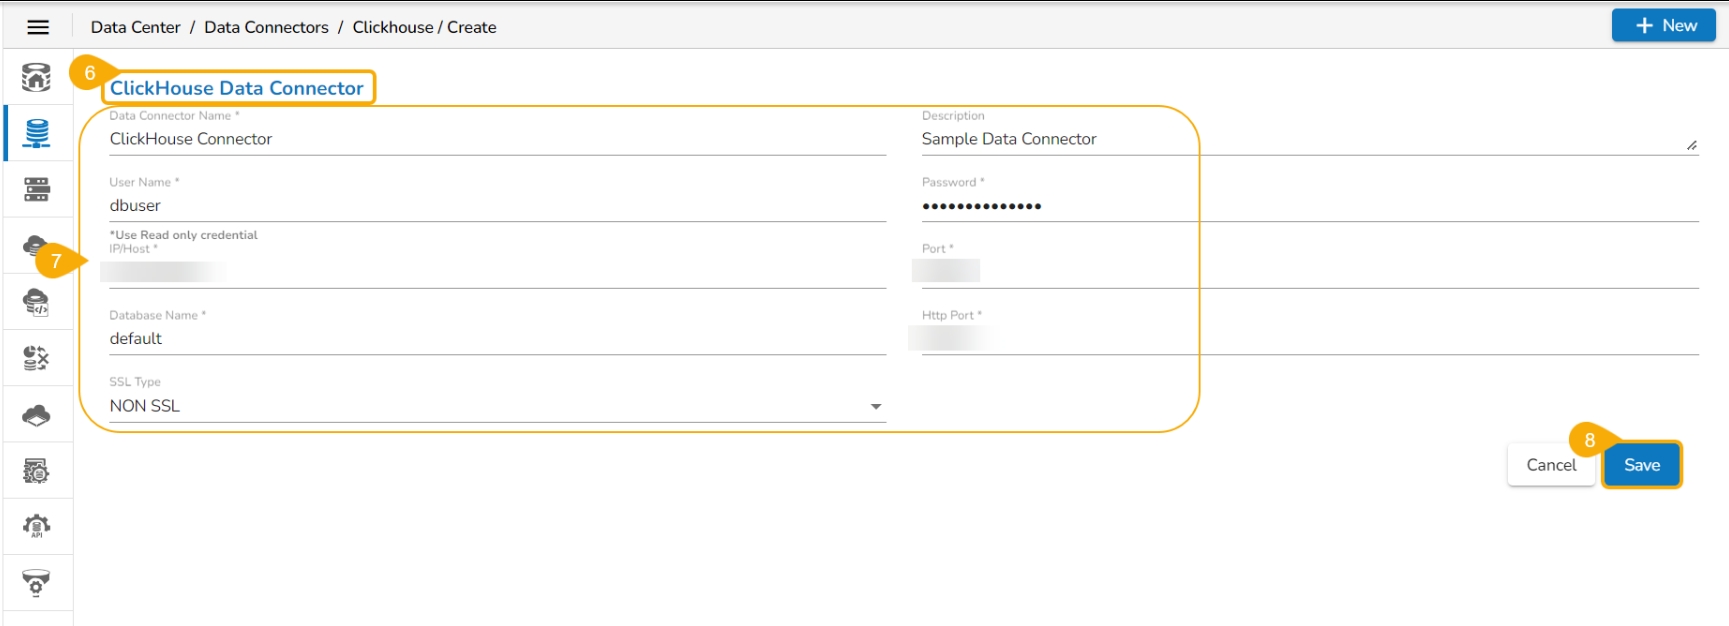
The Connector-specific page opens.
You need to configure the required details for the selected connector.
Click the Save option.
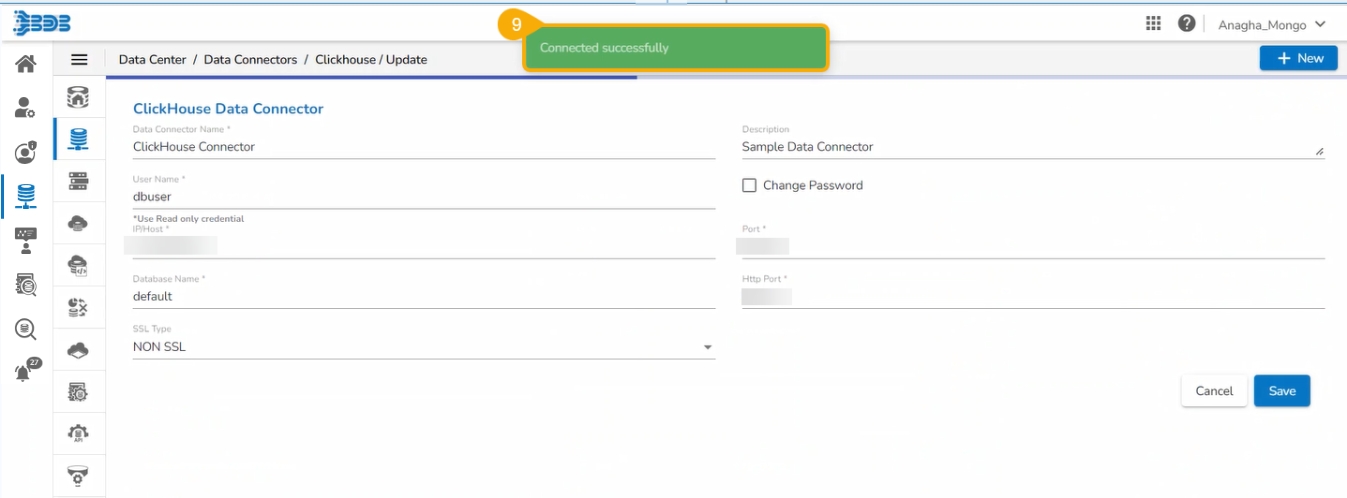
A notification message appears to ensure that the connection has been successfully updated.
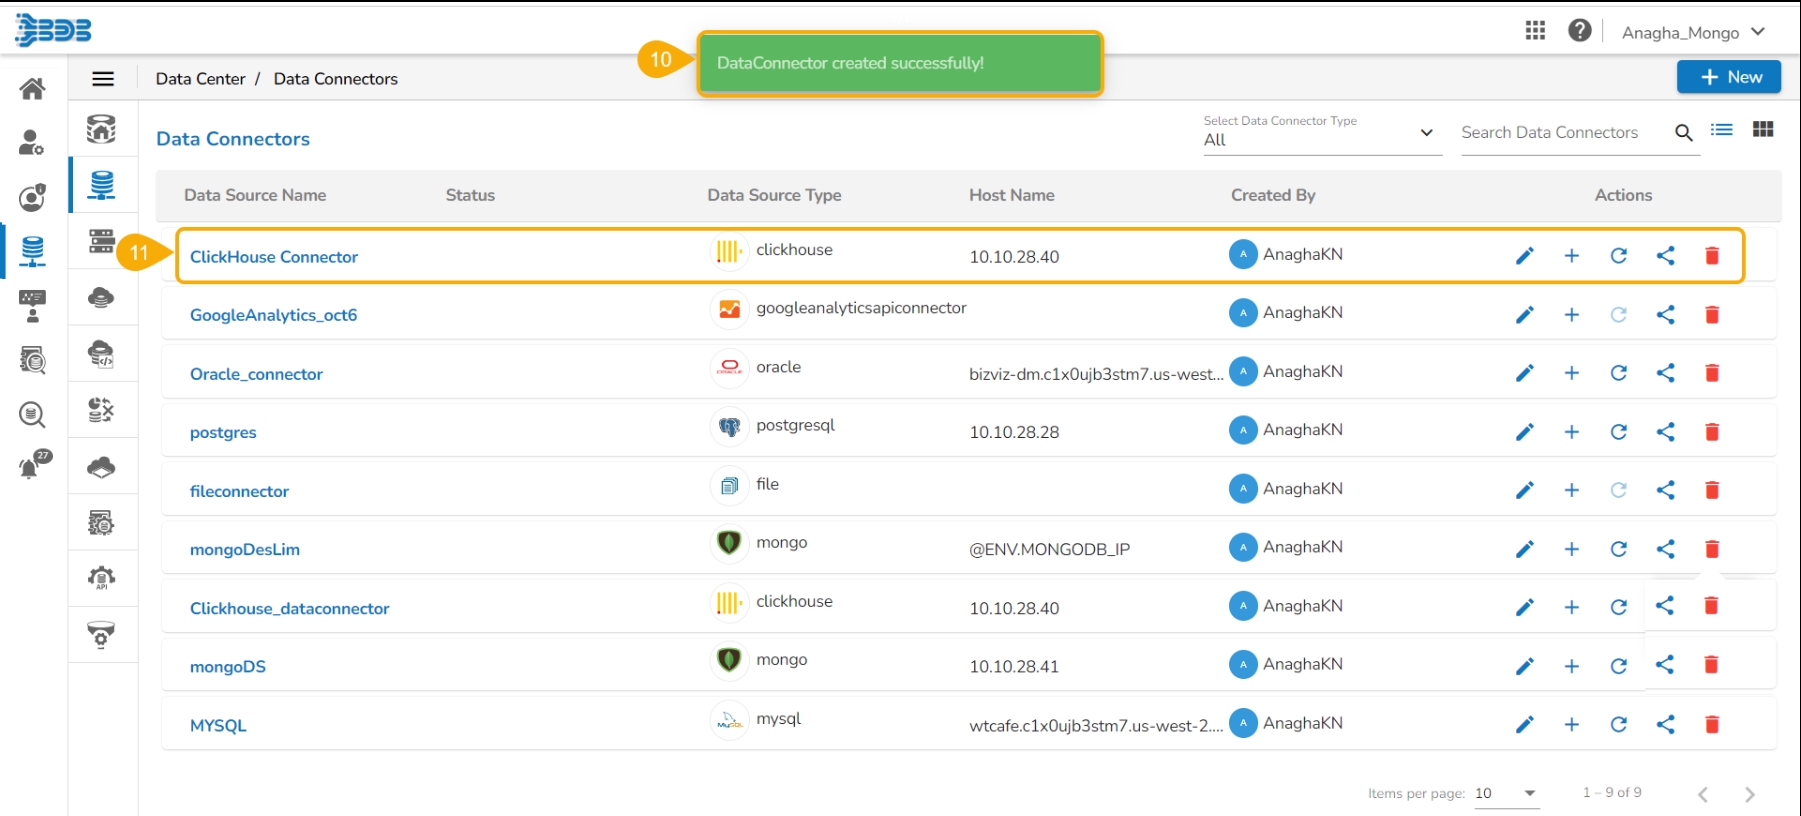
Another success message ensures the user that the data connector has been created successfully.
The newly created data connector gets added to the data connector list.
Filter by Category
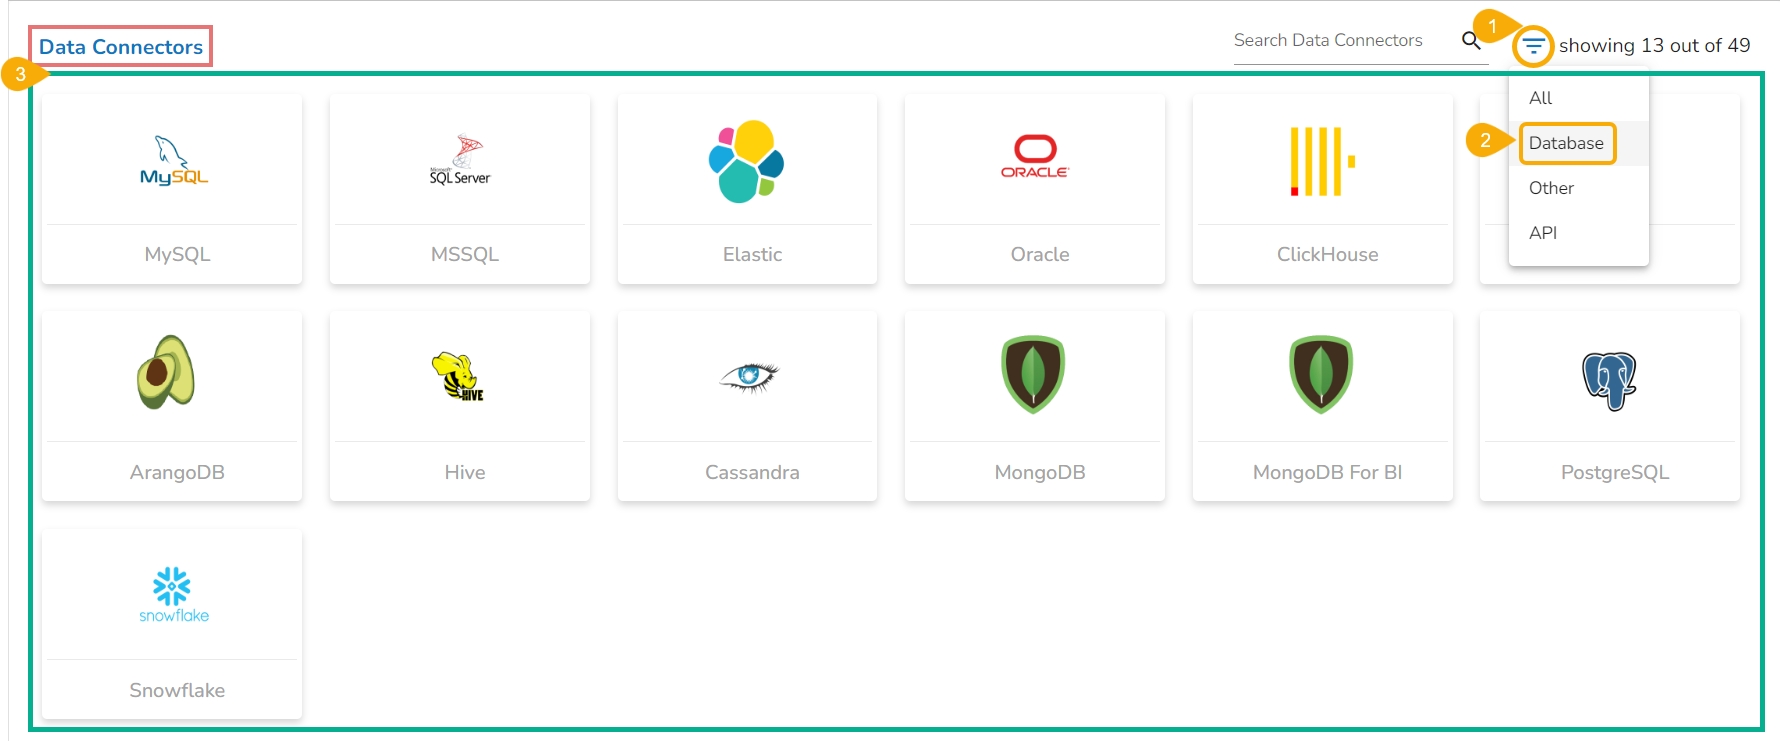
Click the Filter by Category icon to get various categories of data connectors.
Select a category from the displayed menu.
The Data Connectors page gets customized based on the selected category (E.g., the following image displays all the available data connectors from the Database category).
Search across the Data Connector Options
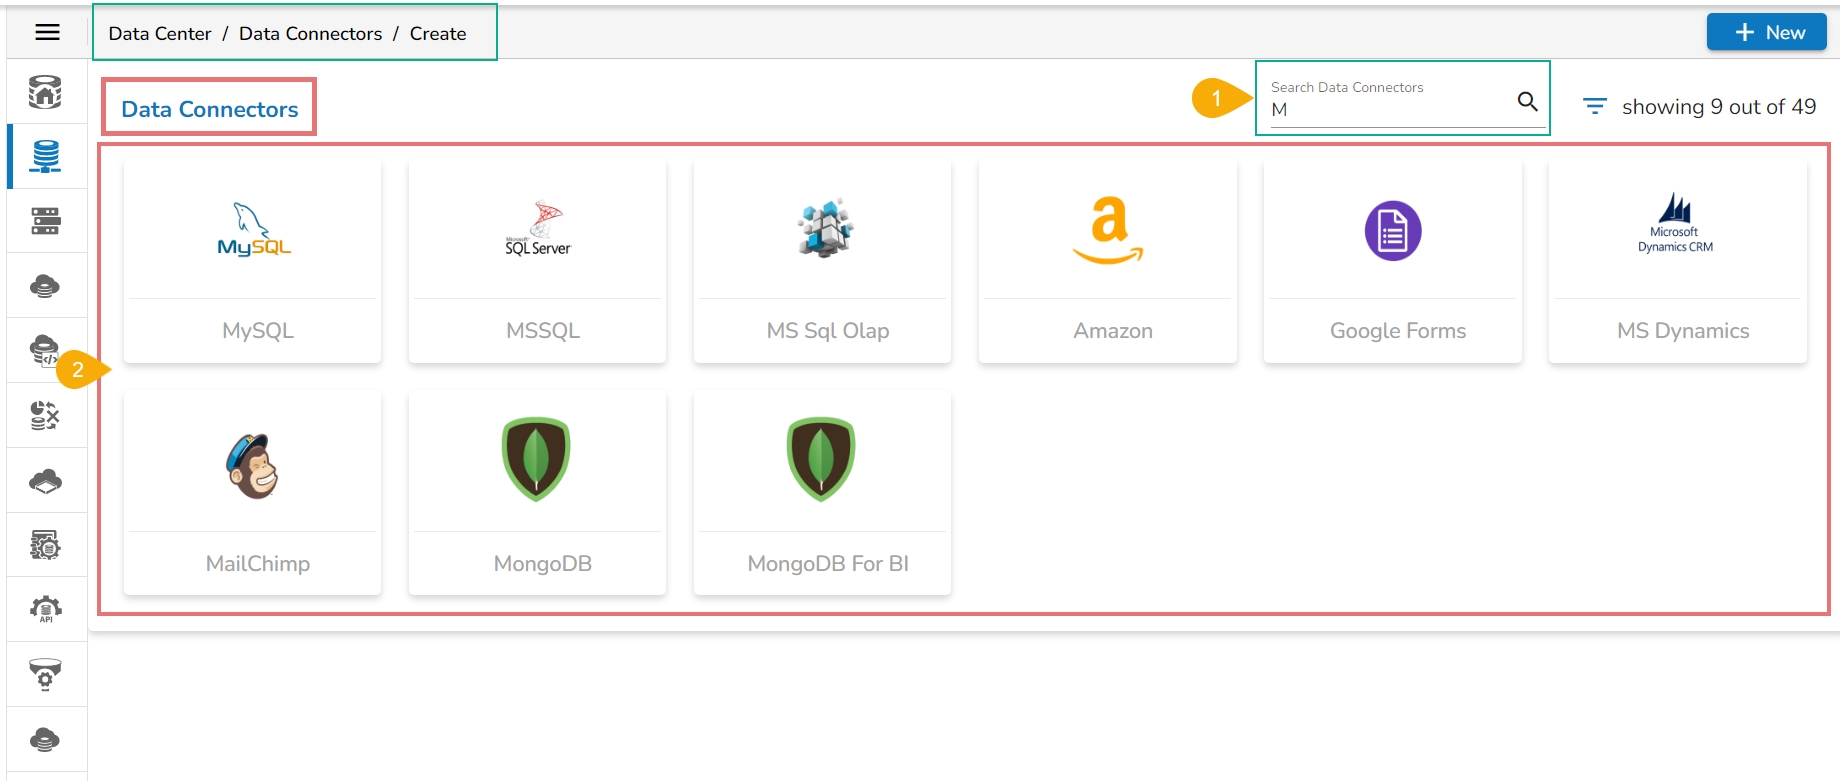
Access the Search bar from the Create Data Connector page and type the Connector name that you wish to search for.
As you start typing based on searched text the Data Connector icons will change. E.g., By typing the letter 'M', all the Data Connector types containing the alphabet 'M' are displayed on the screen.
Data Connector List
This page aims to explain all the options that are credited to a Data Connector on the List of Data Connectors.
Edit Data Connectors
Select a Data Connector from the Data Connectors list.
Click the View/Edit icon for that Data Connector.
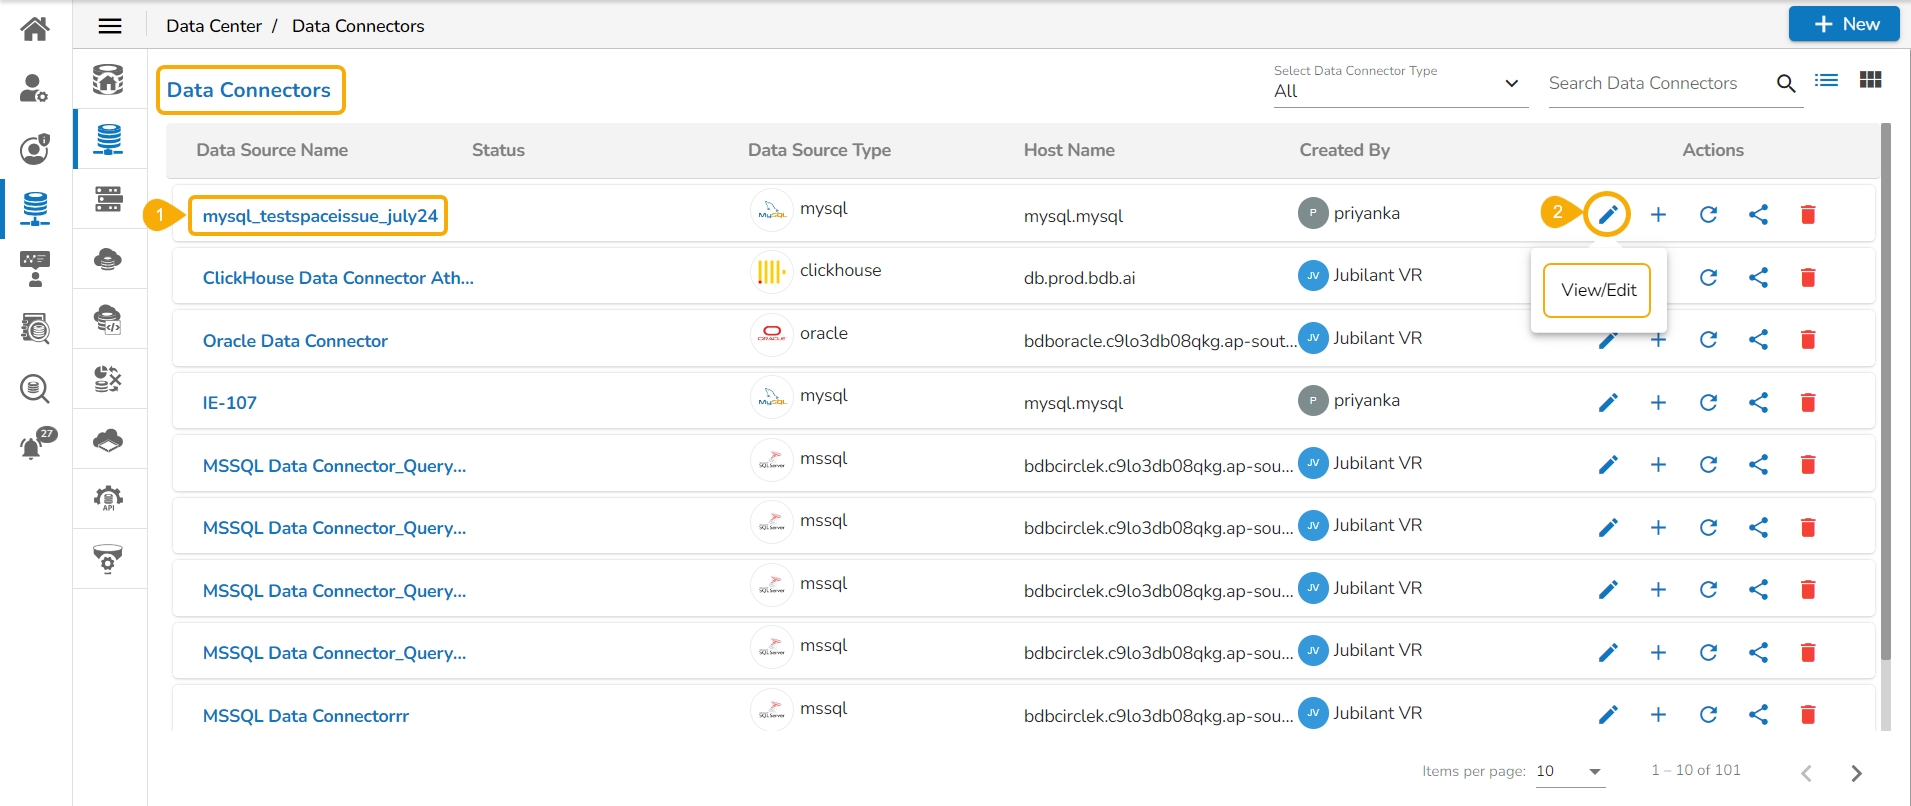
The selected Data Connector opens in the editable format.
You can edit the permitted information from the Data Connector form. (The editable information may vary based on the categories of the Data Connector).
Click the Save option.
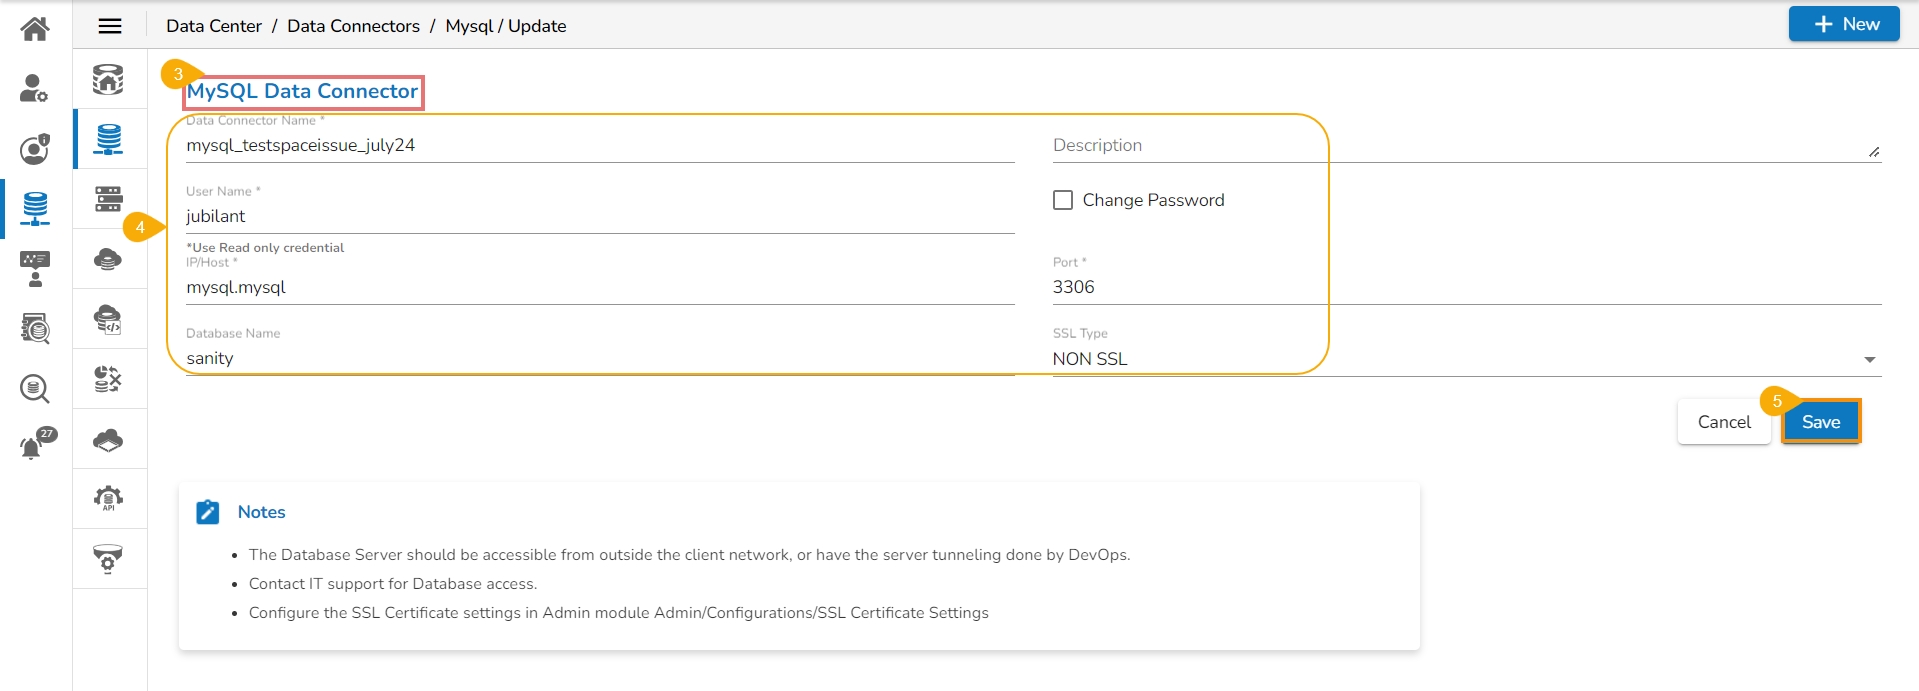
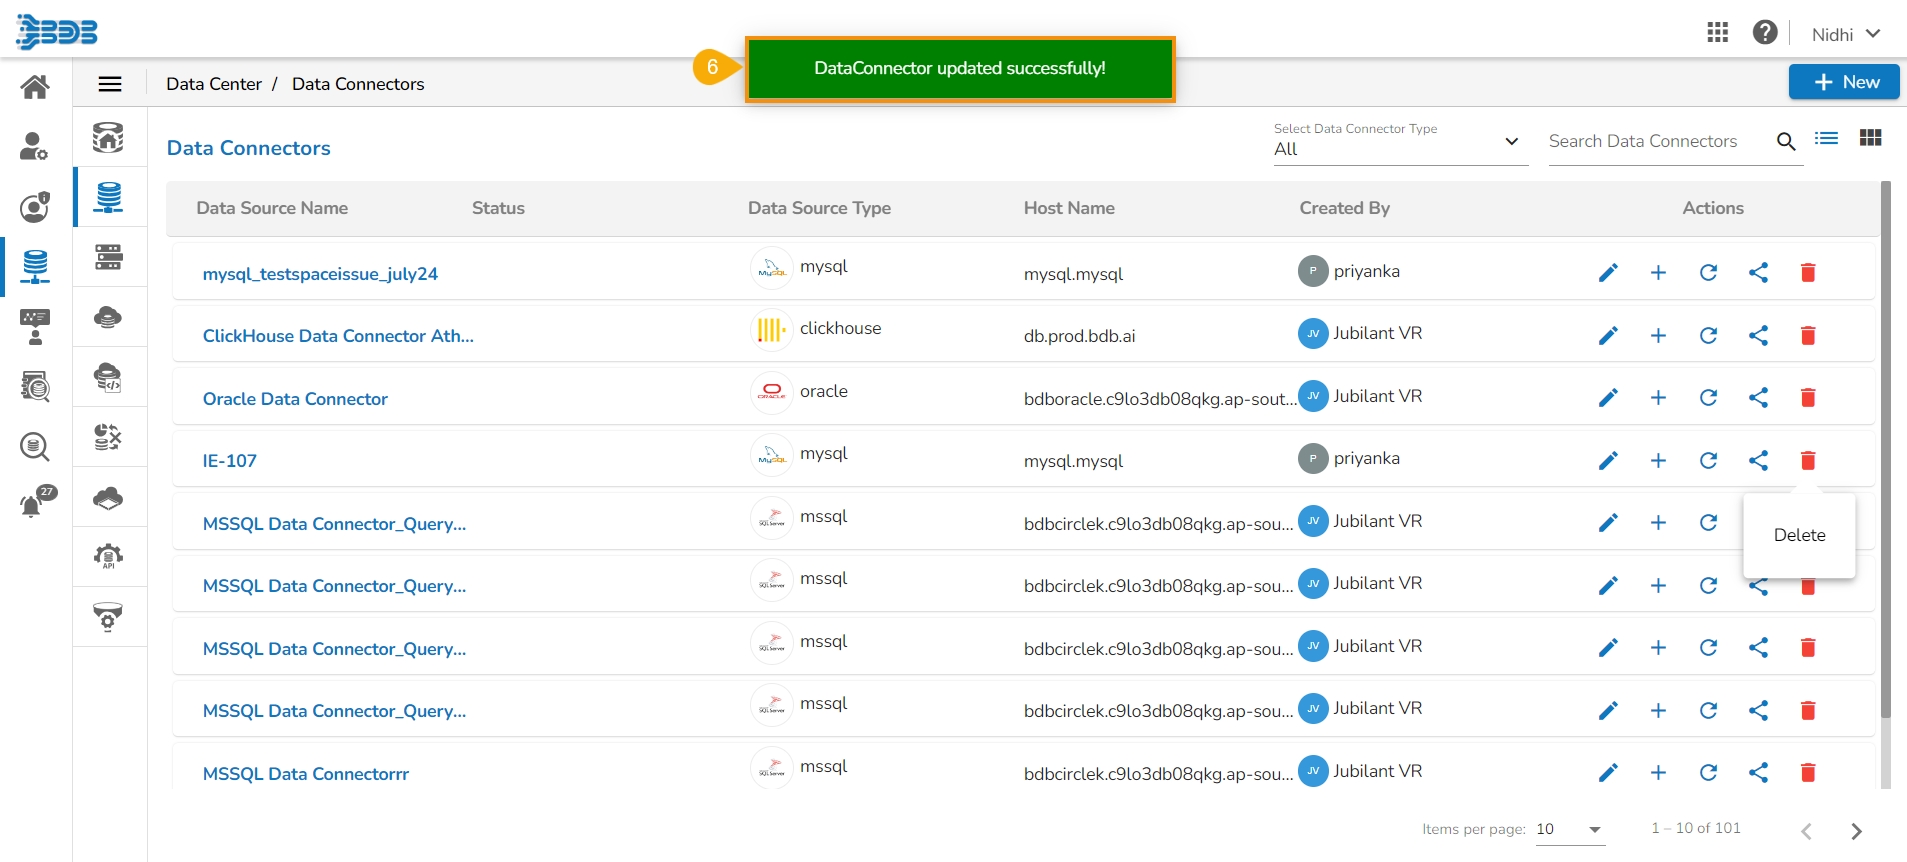
A confirmation message appears, and the selected Data Connector gets updated.
Create Option
The Data Connectors list displays the Create option to Create a Data Set and Data Store.
Navigate to the Data Connectors list.
Select a Data Connector from the Data Connectors list.
Click the Create icon for that Data Connector.
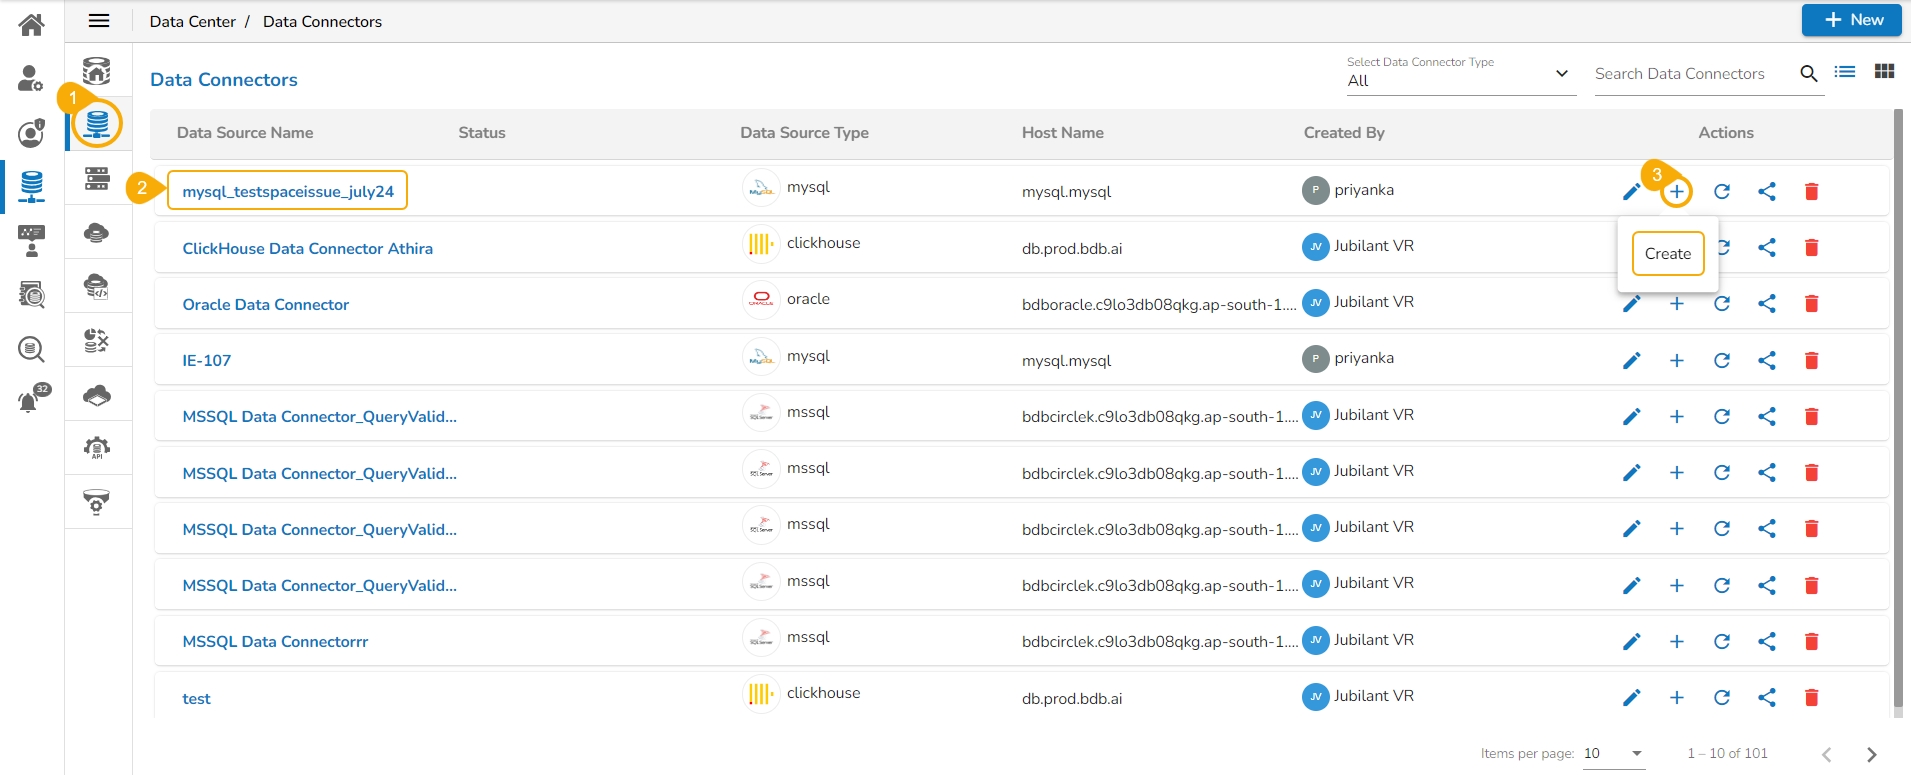
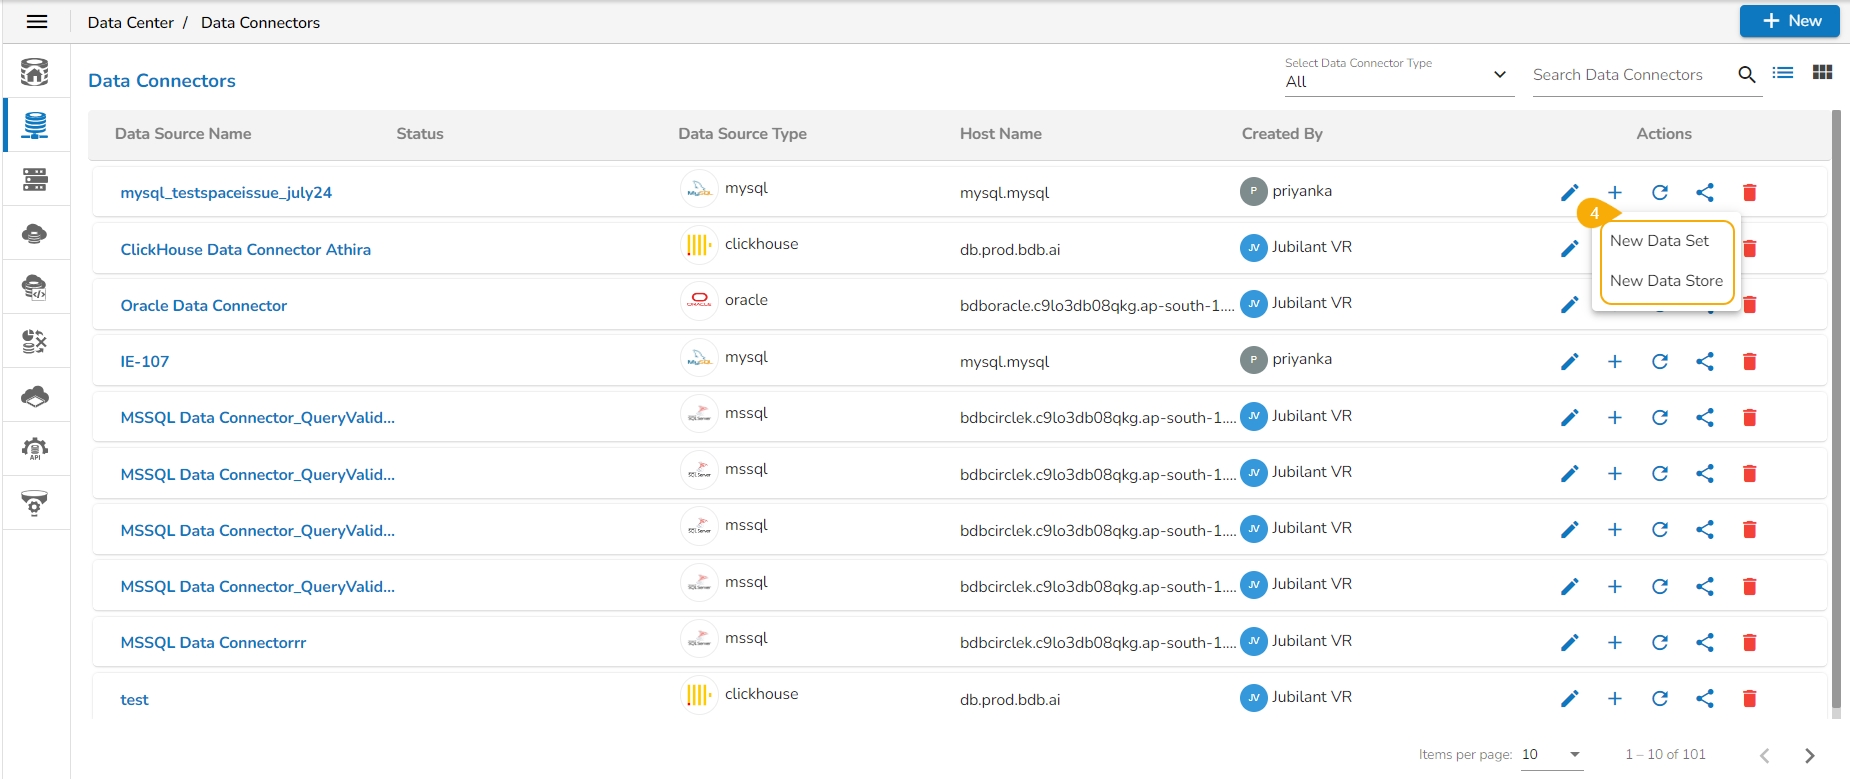
Two options to create appears:
New Data Set
New Data Store
Reconnecting to a Data Connector
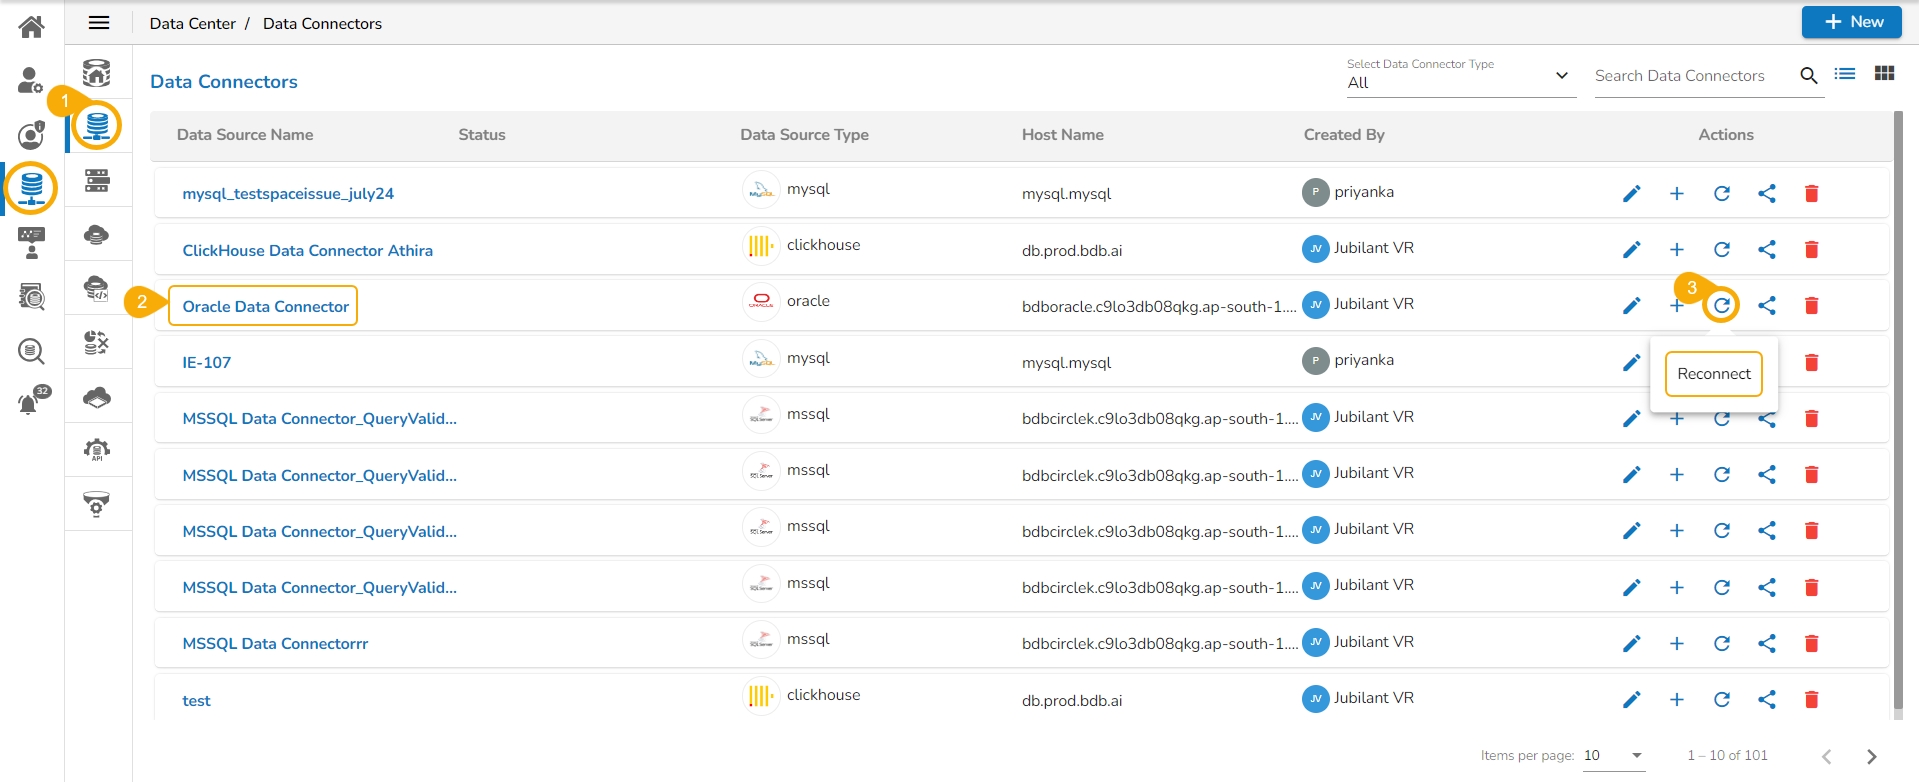
Navigate to the Data Connectors list page.
Select a Data Connector from the list.
Click the Reconnect icon for the selected Data Connector.
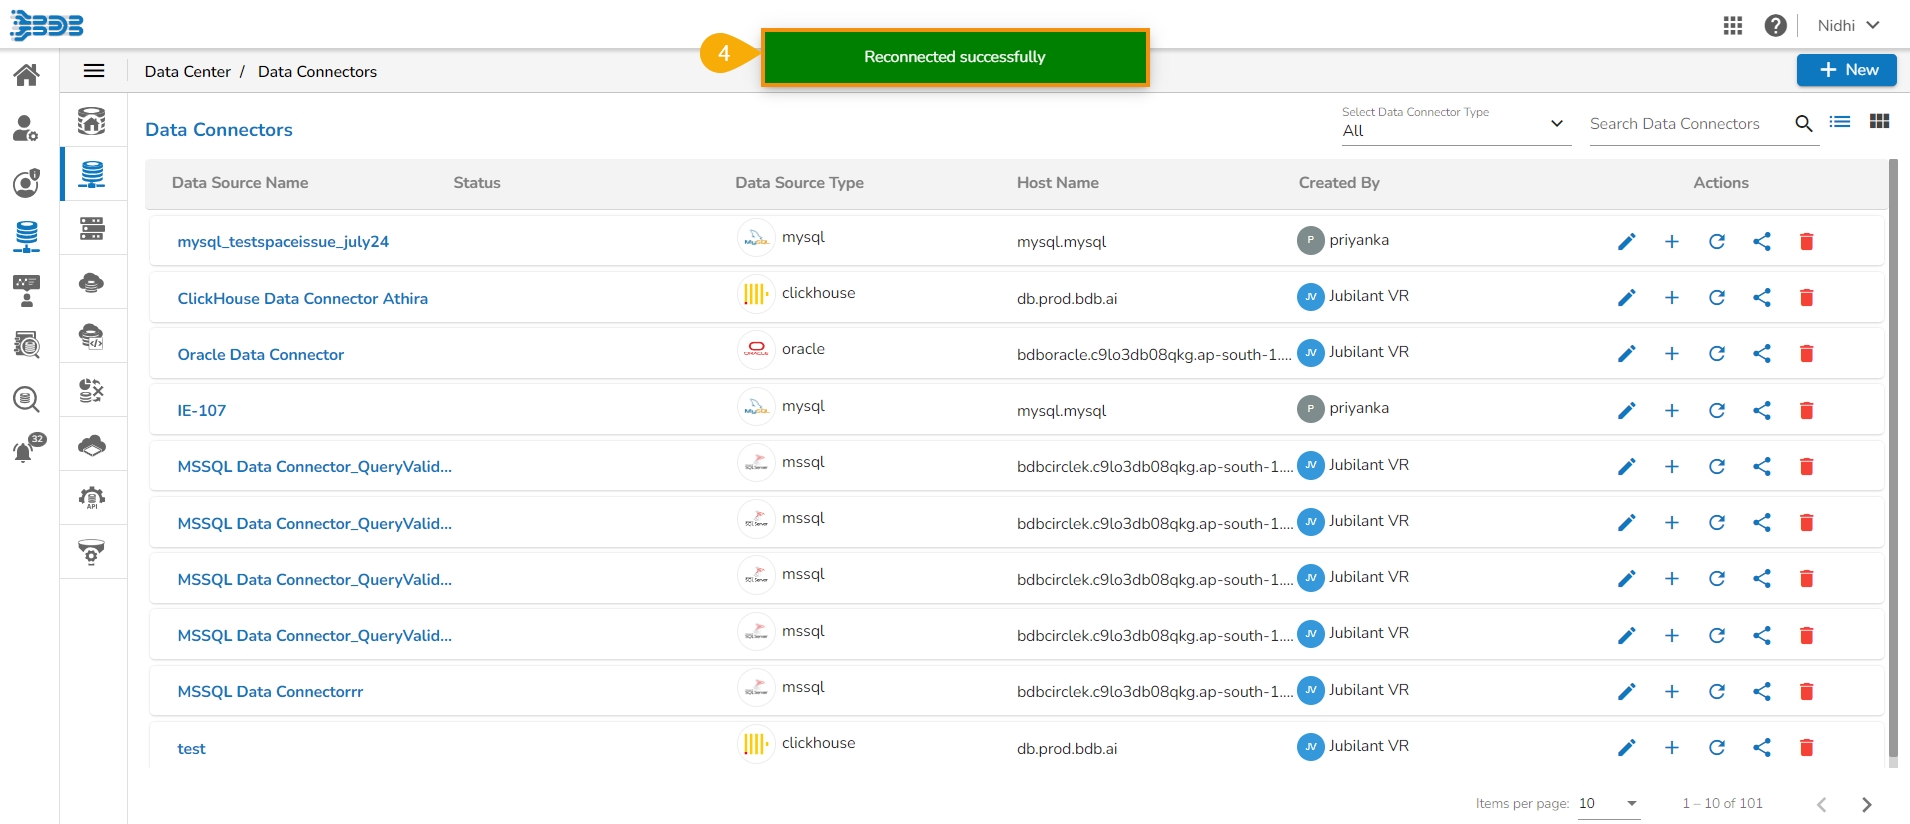
A confirmation message appears, the selected Data Connector gets reconnected.
Sharing a Data Connector
This option helps the user to share a Data Connector with other user(s) or user group(s). The user can also exclude a user(s) or user group(s) from the rights to access a Data Connector using the Exclude User option provided under the Share Data Connector dialog box.
Sharing a Data Connector
Check out the illustration on sharing a Data Connector functionality.
Navigate to the Data Connectors list.
Select a Data Connector from the Data Connectors list.
Click the Share icon for the selected Data Connector.

The Manage Access window opens for the selected data connector.
Choose an option to Grant Permissions out of View and Edit options.
Select a tab out of User, User group, and Exclude User options.
Search the specific user or user group using the search bar.
Select a single or multiple User/ User group from the chosen list. If a user is selected using the Exclude User tab, it will allow the selected user to be excluded from the access of the data connector.
Click the Save option.

A confirmation message appears and the Data Connector gets shared with the selected user(s)/ user group(s).
The Granted Permissions will be listed.

The shared data connector appears with the shared status notification (as displayed in the image) in the receiver's user account.

Excluding Users
Check out the illustration on Excluding users from sharing a connector.
Navigate to the Manage Access window.
Select permissions using the Grant Permissions.
Open the User Groups tab.
Select user groups by using checkboxes.

Navigate to the Exclude Users tab.
Select the user(s) using the checkboxes.
Click the Save option.

A notification message appears.
The excluded users are listed under the Excluded Users section.

Including the Excluded Users
Check out the illustration on Including users in sharing a connector.
Navigate to the Manage Access window for a shared connector.
The Excluded Users section will list the excluded users if some users are excluded.
Select a user from the Excluded Users list.
Click the Include User icon.

A notification message ensures the data connector is shared with the included user.
The included user gets removed from the Excluded Users list.

Revoking Permissions
Check out the illustration on revoking permissions.
Open the Manage Access window for a shared data connector.
Navigate to the Granted Permissions section.
Select a user/ user group from the granted permissions list of users.
Click the Revoke Privileges icon.

A notification message ensures that privileges are revoked.
The selected user/ user group gets removed from the Granted Permissions section.

Delete a Data Connector
Navigate to the Data Connectors list page.
Select a Data Connector from the list.
Click the Delete icon for the selected Data Connector.
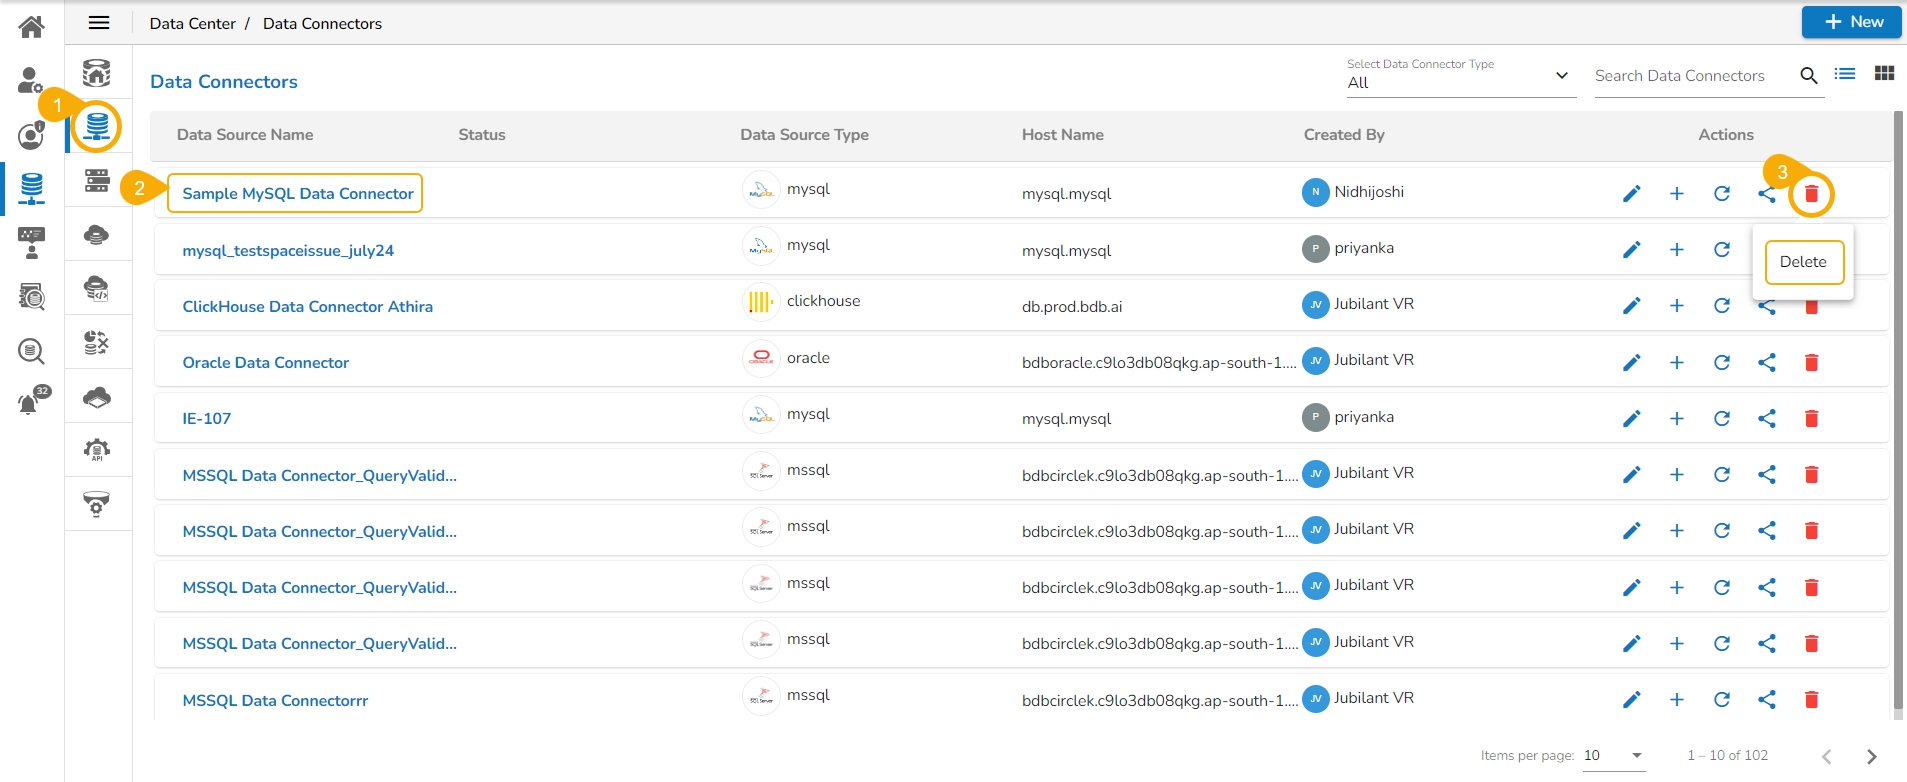
The Remove Connector dialog box opens to confirm the deletion.
Click the Yes option.

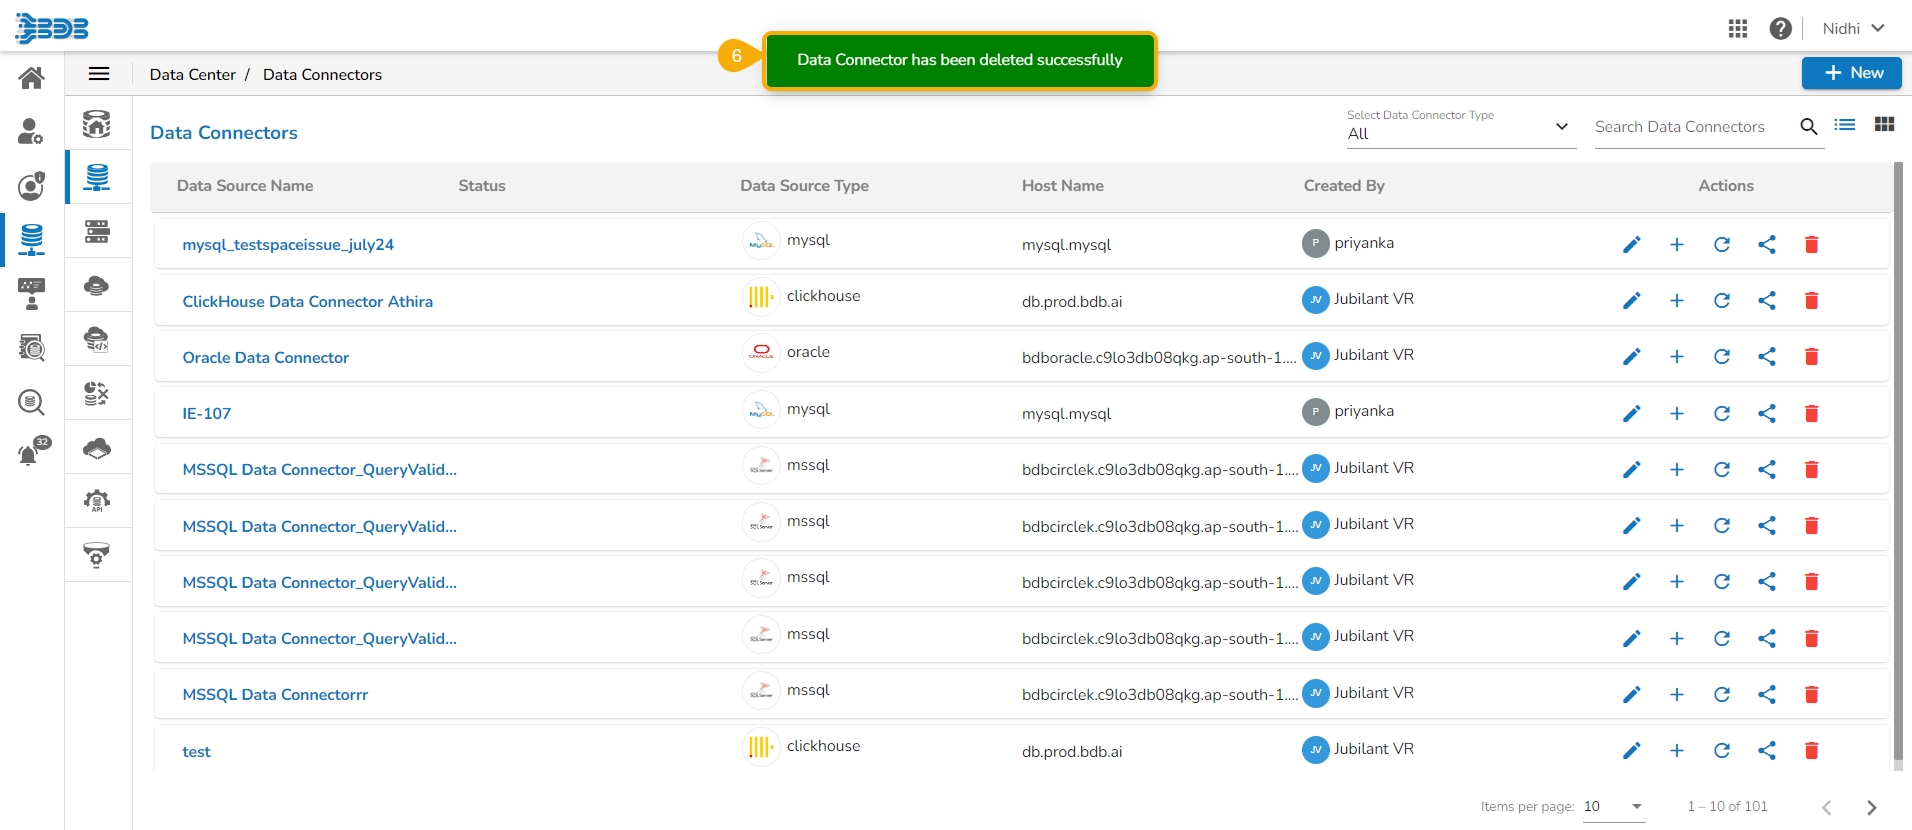
A confirmation message appears, and the selected Data Connector gets removed from the Data Connectors list.
Supported Data Connectors
Database Connectors
This section includes steps to create various RDBMS Data Connectors.
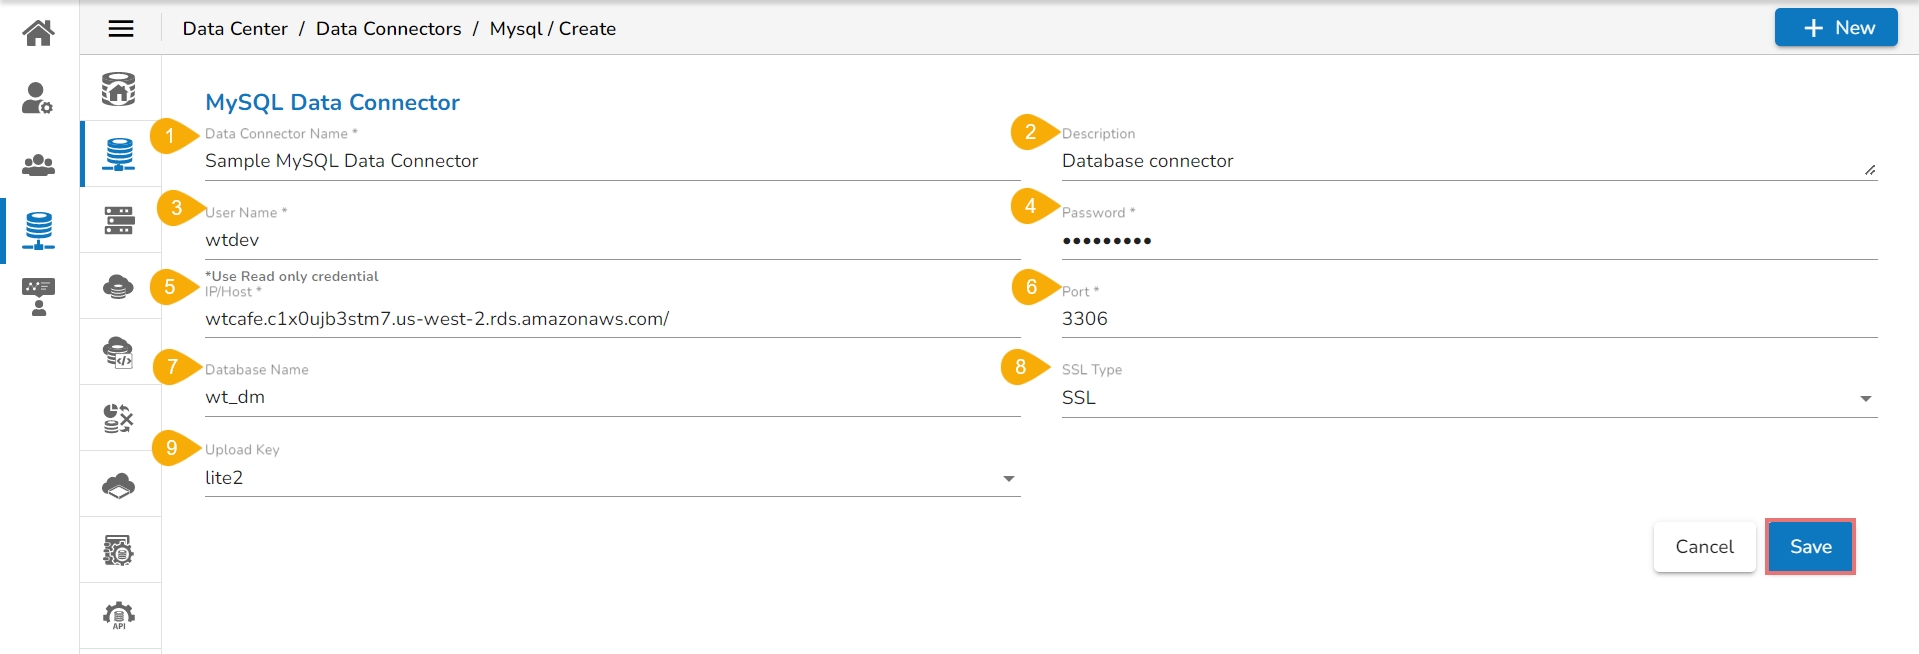
Check out the illustration provided below on how to create an MySQL data connector.

MySQL
Provide the following information to create a MySQL Data Connector:
Data Connector Name: Provide a user-defined name to identify the data connector.
Description: Describe about the Data Connector.
Username: Enter a Username (It should be the same as given in the connection server).
Password: Enter the Password (It should be the same as provided in the connection server).
IP/Host: Enter database server details (from where the user wants to fetch data).
Port: Provide the server port number.
Database Name: Name of the database where you wish to store data.
SSL Type: Select SSL or Non SSL as choices.
Upload Key: Select a upload key using the drop-down menu.
Click the Save option.
A success message appears confirming the connection.

Another success message appears confirming the creation of the Data Connector.

The newly created MySQL data connector gets added to the Data Connectors list.
MSSQL
Provide the following information to create an MSSQL Data Connector:

Data Connector Name: Provide a user-defined name to identify the data connector.
Description: Provide connection details (Optional)
Username: Enter a Username (It should be the same as given in the connection server).
Password: Enter the Password (It should be the same as provided in the connection server).
IP/Host: Enter database server details (from where the user wants to fetch data).
Port: Provide the server port number.
Database Name: Name of the database where you wish to store data.
Click the ‘Save’ option.

A success message appears to confirm the connection.

Another success message appears to assure the creation of the new MSSQL Data Connector.

The newly created MSSQL data connector gets added to the Data Connectors list.
Elastic (Beta Release)

Navigate to the Data Center homepage.
Click the New menu option.
Click on the Data Connector option from the New menu.
Click on the Elastic connector icon.

The Elastic Connector configuration page opens.
Provide the following information to create an Elastic Data Connector:
Data Connector Name: Provide a user-defined name to identify the data connector.
Description: Provide connection details (Optional).
Authentication Type: Select either Required or Not Required.

Required: This authentication type suggests secured elastic connection with Username and Password.
Username: Enter a Username (it should be the same as given in the connection server.)
Password: Enter the Password (it should be the same as provided in the connection server.)
IP/HOST: Enter server details (from where the user wants to fetch data).
Port: Provide the server port number. (HTTP port)
Index Id (optional): Enter the Index.
Click the Save option.


A success message appears confirming the connection.

Another success message appears confirming the creation of the Data Connector.

The newly created Elastic data connector gets added to the Data Connectors list.
Oracle
Navigate to the page with all the Data Connector icons and search for Oracle Data connector. Click on the Oracle icon.

A form opens to create Oracle Data Connector. Provide the following information to create an Oracle Data Connector:
Data Connector Name: Provide a user-defined name to identify the data connector.
Description: Provide the connection details (optional).
Username: Enter a Username (It should be the same as given in the connection server).
Password: Enter the Password (It should be the same as provided in the connection server).
IP/Host: Enter database server details (from where the user wants to fetch data).
Port: Provide the server port number.
SID Service Name: Provide the unique alias used for the database (when connecting).
Click the ‘Save’ option.

The success messages appear to confirm the connection and creation of the new Oracle data connector.
The newly created Oracle data connector gets added to the Data Connectors list.
ClickHouse
Navigate to the page with all the Data Connector icons and search for Oracle Data connector. Click on the ClickHouse icon.

Provide the following information to create a ClickHouse Data Connector:
Data Connector Name: Provide a user-defined name to identify the data connector.
Description: Provide connection details (Optional).
Username: Enter a Username (It should be the same as given in the connection server).
Password: Enter the Password (It should be the same as provided in the connection server).
IP/Host: Enter database server details (from where the user wants to fetch data).
Port: Provide the server port number. (TCP port)
Database Name: Name of the database where you wish to store data.
Http Port: (For Datastore purpose)
SSL Type: Select SSL or Non SSL as choices.
Upload Key: Select a upload key using the drop-down menu (This field appears only if the SSL option has been selected for the SSL Type field.
Click the Save option.

A success message appears confirming the connection.

Another success message appears confirming the creation of the Data Connector.

The newly created ClickHouse data connector gets added to the Data Connectors list.
Athena
Navigate to the page with all the Data Connector icons and search for Athena Data connector.
Click on the Athena icon.
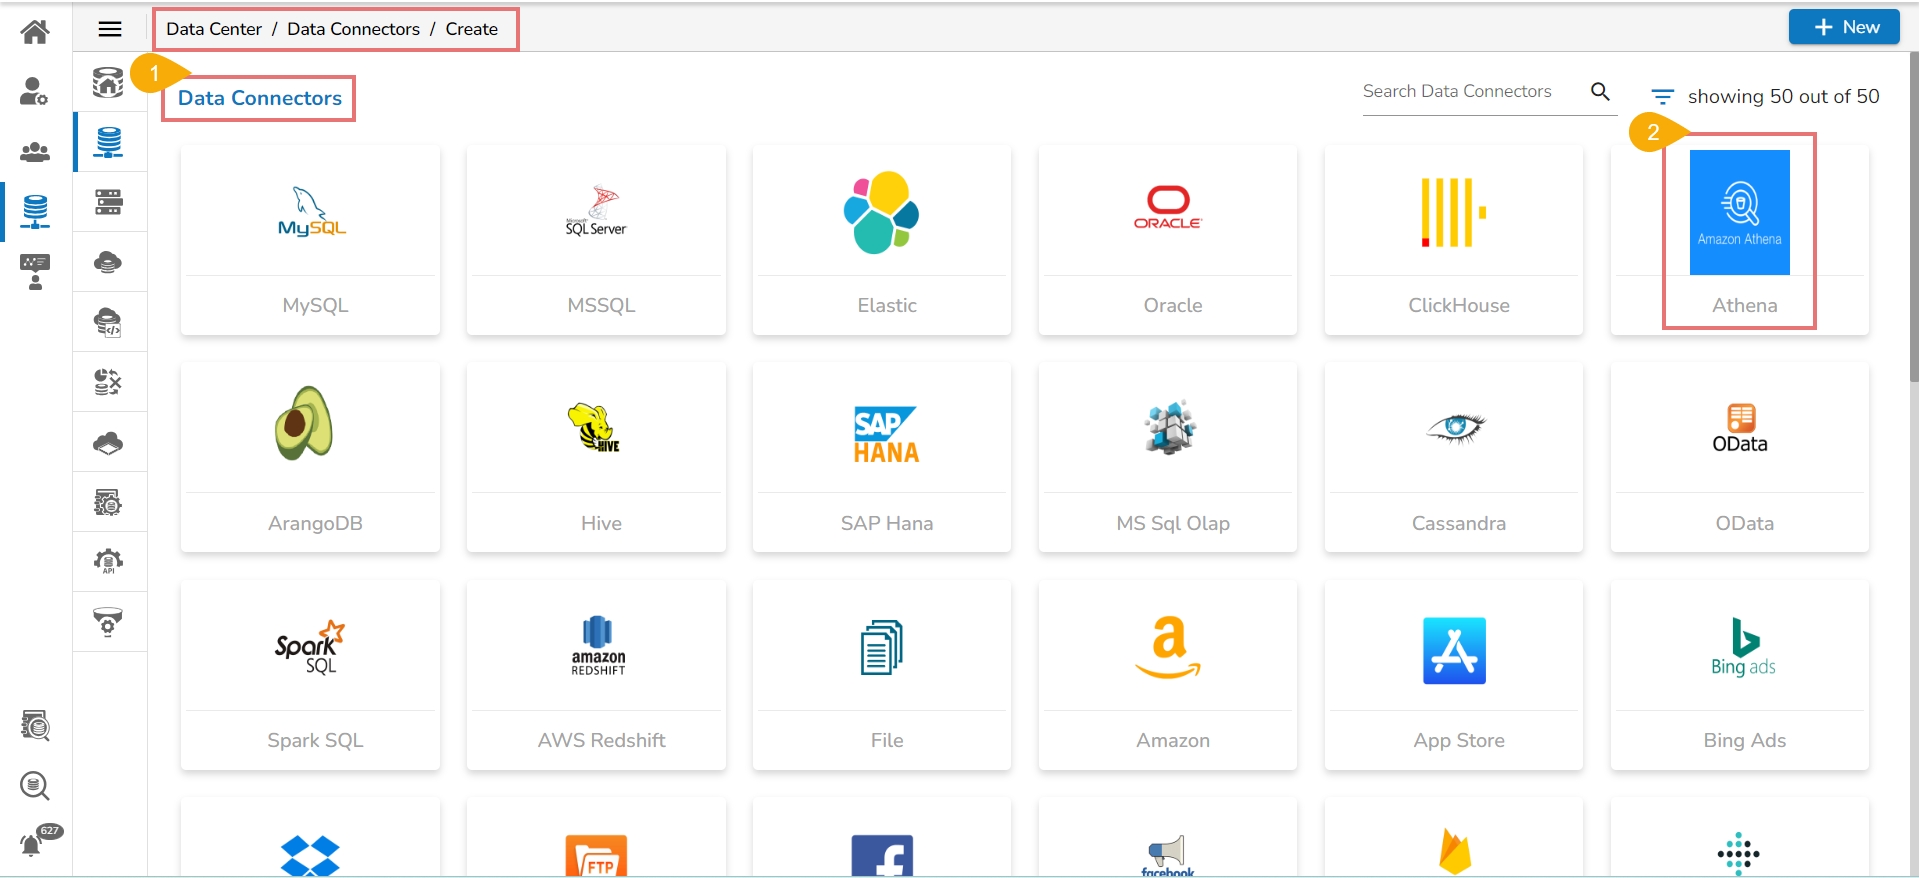
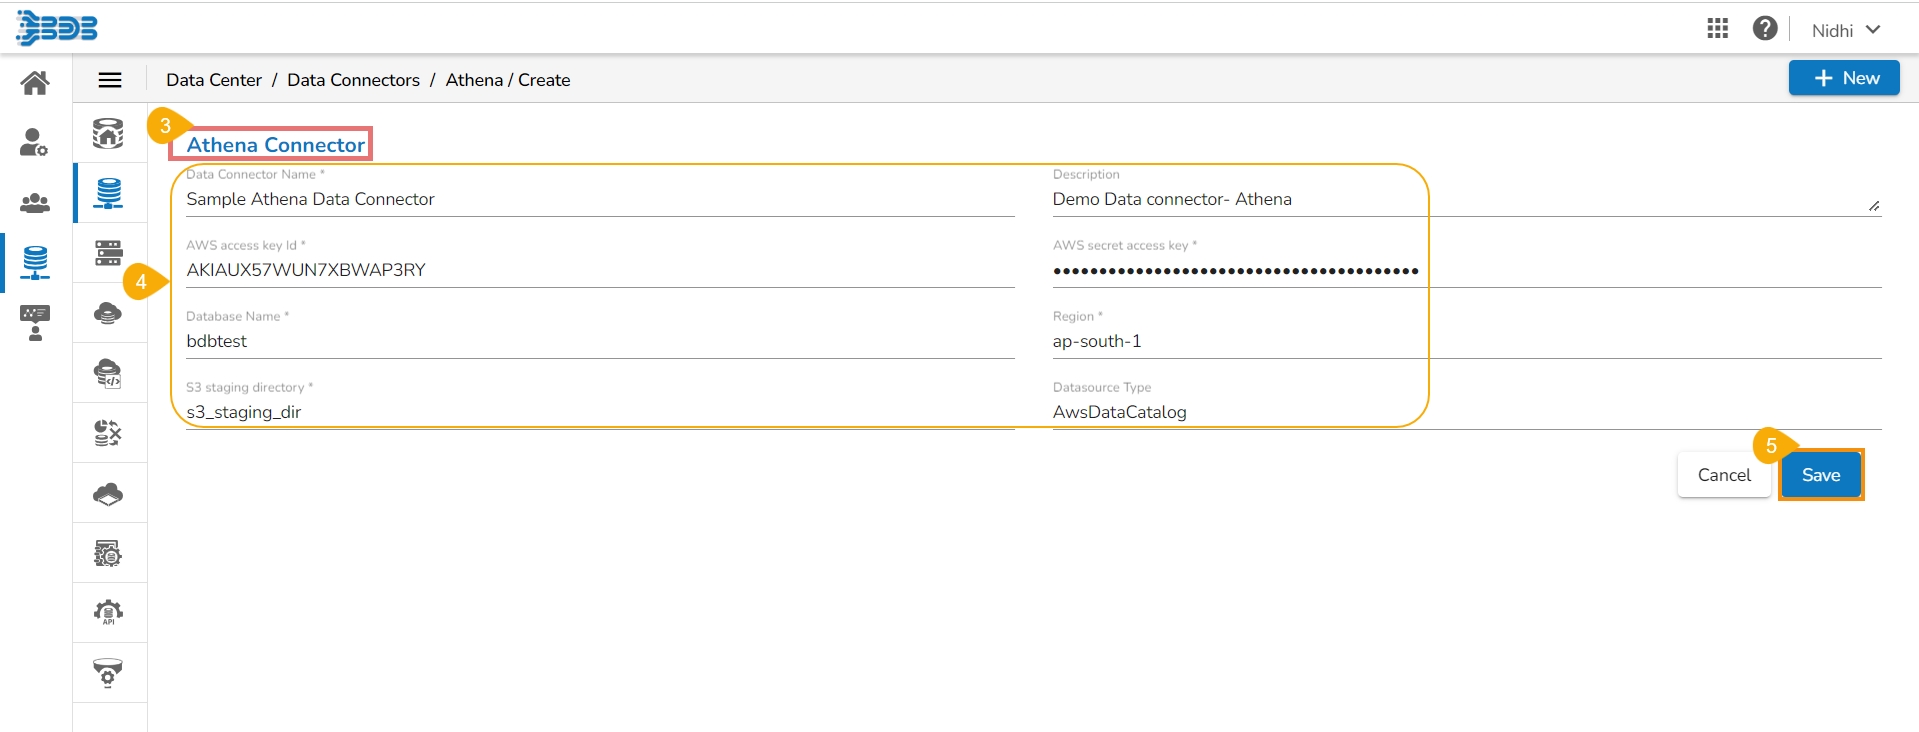
The Create page for the Athena Connector opens.
Provide the following information:
Data Connector Name
Description
AWS Access Key Id
AWS Secret Access Key
Database Name
Region
S3 Staging Directory
Data source Type
Click the Save option.
A success notification appears to ensure the connection establishment.

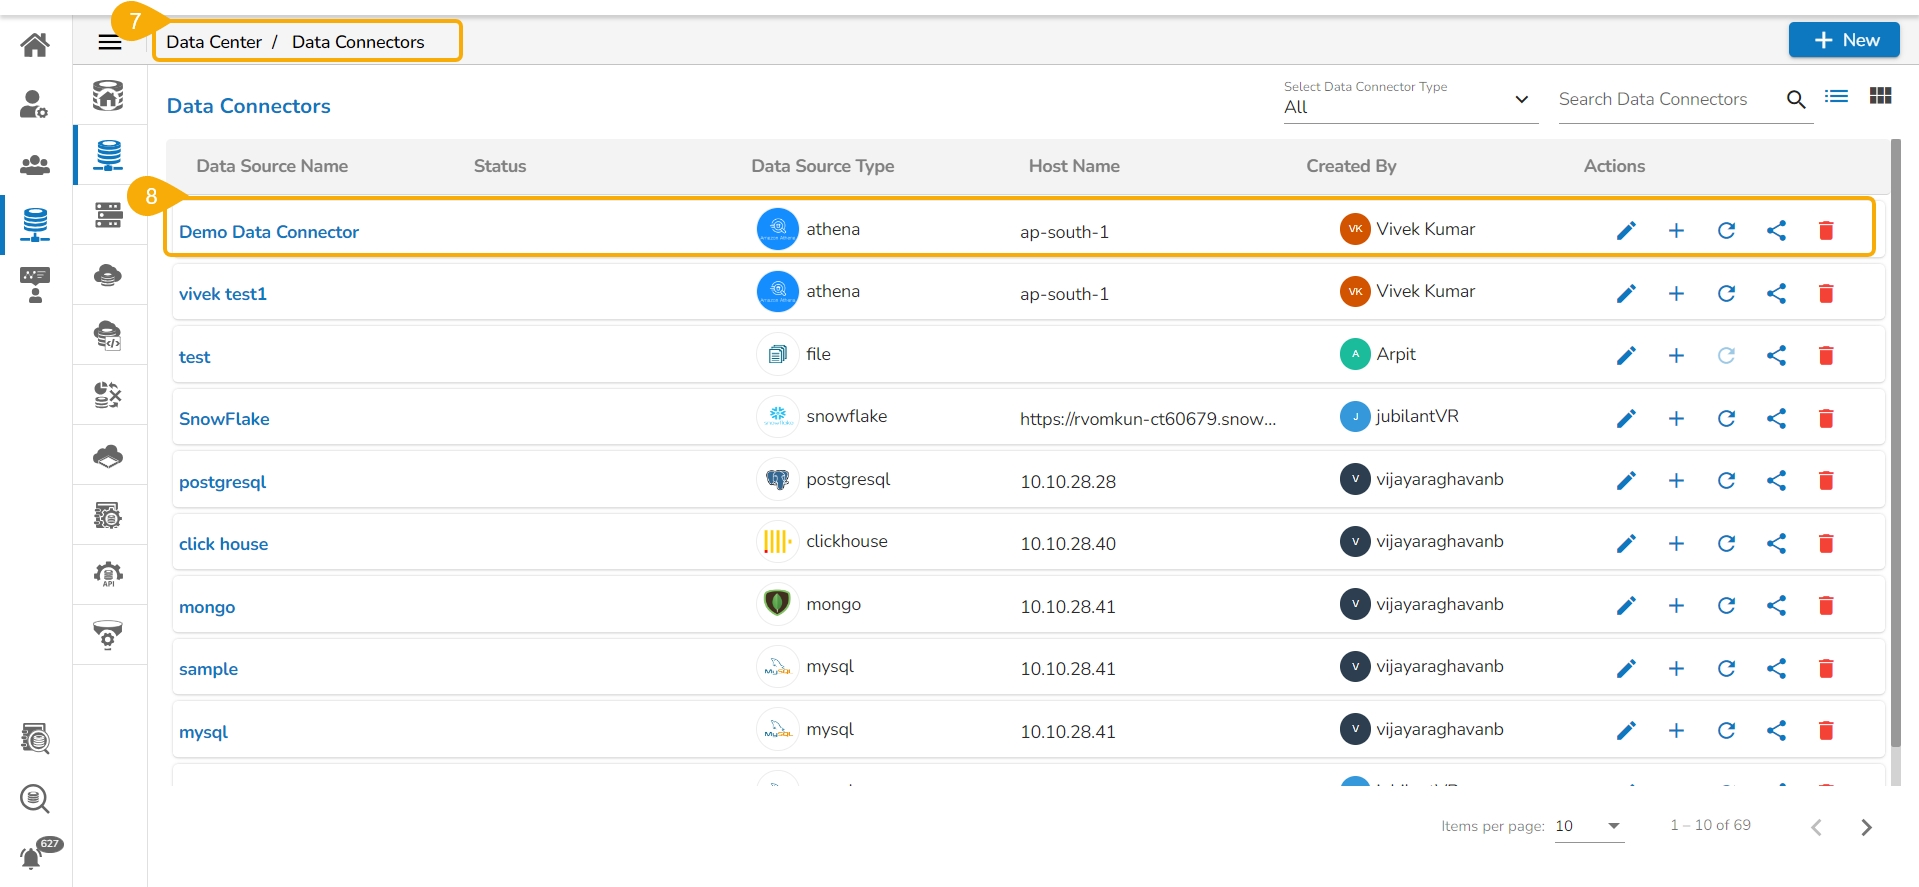
The user gets redirected to the Data Connectors page.
The newly created Athena Data Connector gets added at the top of the list.
Arango DB
This page explains the steps to create a new Arango DB Data Connector and a Data Set based on that Data Connector.
Steps to create a new Arango DB Data Connector:
Navigate to the Data Center homepage.
Click the New option.
Select the Data Connector option from the context menu.

The Data Connectors page opens.
You can use the Search bar to search for a specific connector (In this case, Arango).
Click the Arango connector option.

The Arango DB Data Connector page opens.
Provide the following information to create an Arango DB Data Connector:
Data Connector Name: Provide a user-defined name to identify the data connector.
Description: Provide connection details (Optional).
Username: Enter a Username (It should be the same as given in the connection server).
Password: Enter the Password (It should be the same as provided in the connection server).
IP/Host: Enter database server details (from where the user wants to fetch data).
Port: Provide the server port number.
Database Name: Name of the database where you wish to store data.
Click the Save option.

A success message appears confirming the connection.

Another success message appears confirming the creation of the Data Connector.

The newly created Arango DB data connector gets added to the Data Connectors list.
Steps to create a new Data Set based on the Arango DB:
Navigate to the Data Center homepage.
Click the New option.
Select the Data Set option from the context menu.
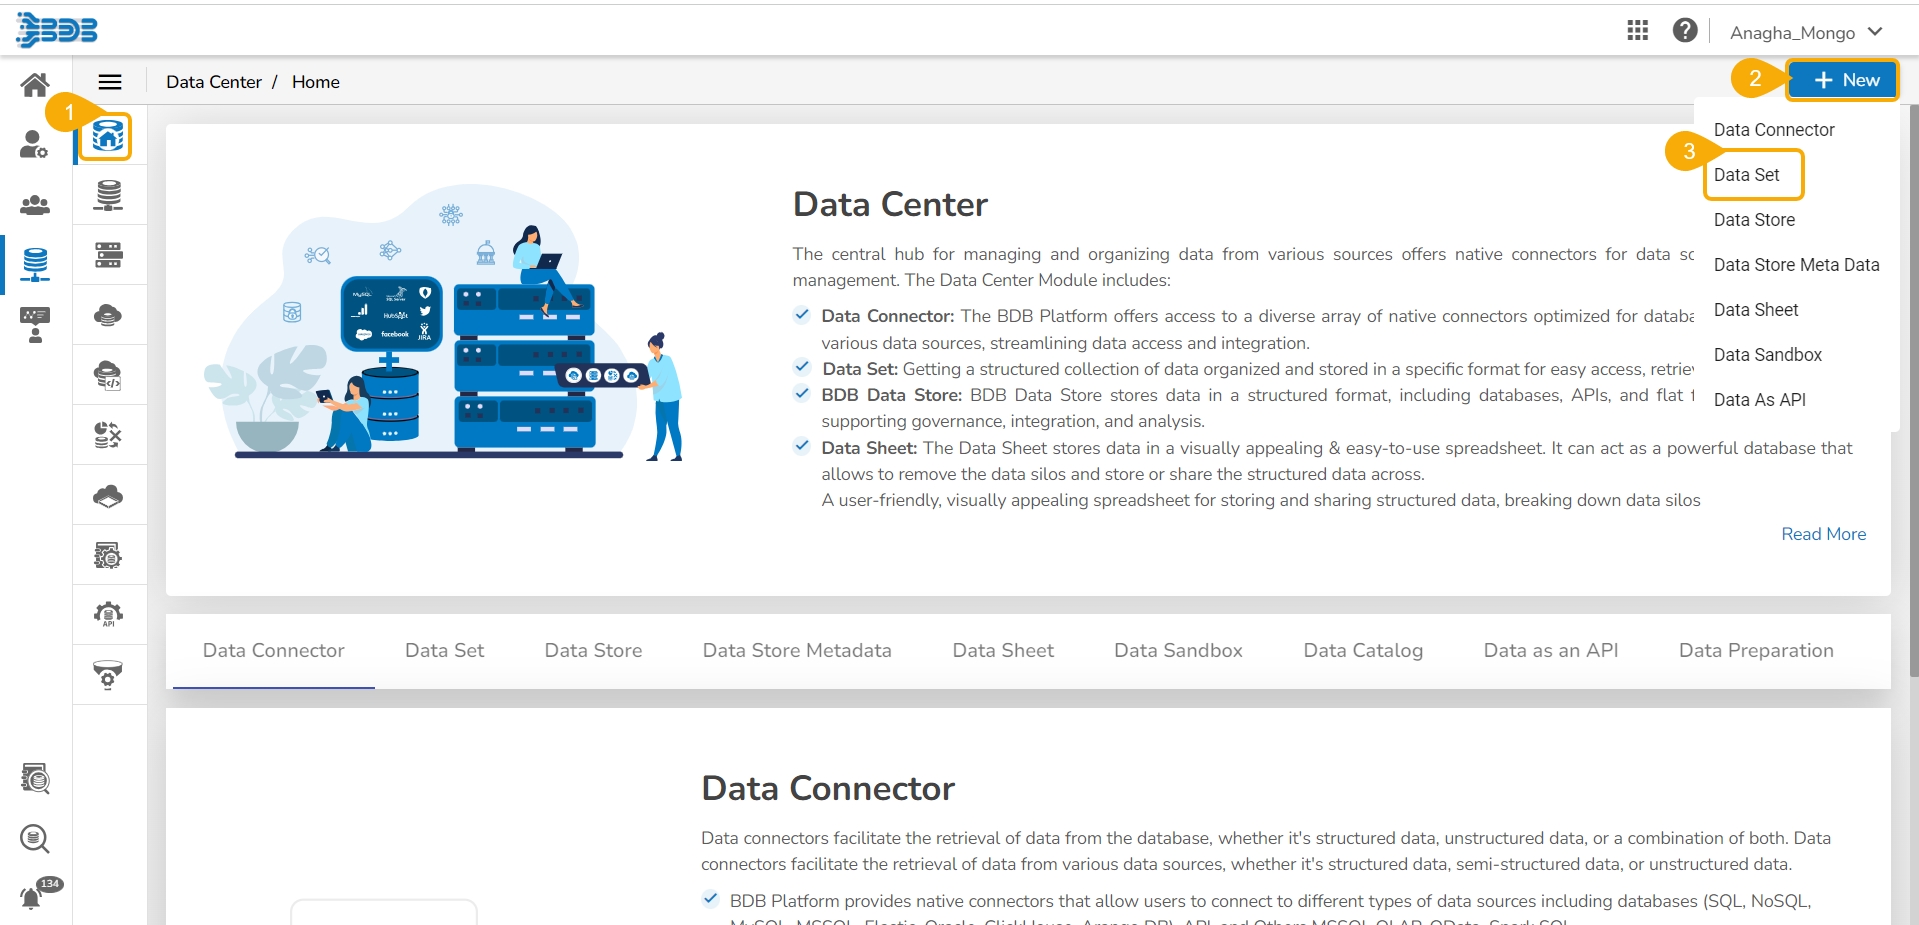
The Data Connectors list gets displayed with the Create Data Set Action icon (+) for all the available data connectors.
Select a Data Connector and click on the Create Data Set icon (E.g., the arangoDB Connector is selected in the given image).

You can select the Arango DB Connector from the Data Source filter.
Search and select a data connector from the displayed list of Data Connectors.
Click the Action/ Create Data Set (+) icon provided in the same row of the selected data connector.
The Data Set page opens with the following Configuration fields:
Service Name: Enter any user-defined name for the new data set.
Description: Provide a brief description of the Data Set (optional).
Data Connector Name: This is a pre-defined field based on the selected data connector.
Database Name: This is a pre-defined field based on the data connector chosen earlier.
Query: Write a valid query service in the given space.
Table Information: On the right side of the page Table information is displayed and that will contain all the tables in the Database and the Column name in the table. Double click in the Table or Column will auto-generate a sample query so that the user can validate and get data.
Click the Validate option to execute the new Data Set.
If the query contains filters, then the right-side filter column will appear.
Click on the Continue button then the query will execute.

A message appears to inform the successful execution.

The data preview appears at the bottom of the page.
The Save option gets enabled.

A notification message appears to assure completion of the action.

The newly created Data Set gets added to the Data Sets List.
Hive
Provide the following information to create a Hive Data Connector:

Data Connector Name: Provide a user-defined name to identify the data connector.
Description: Provide the connection details (optional).
Username: Enter a Username (It should be the same as given in the connection server).
Password: Enter the Password (It should be the same as provided in the connection server).
IP/Host: Enter database server details (from where the user wants to fetch data).
Port: Provide the server port number.
Database Name: Provide name of the database from where the connection needs to be established.
Click the Save option.

The notification message appears to confirm the connection.

Another notification message appears to inform about the data connector creation.

The newly created Hive data connector gets added to the Data Connectors list.
Cassandra

Provide the following information to create a Cassandra Native Data Connector:
Data Connector Name: Provide a user-defined name to identify the data connector.
Description: Provide the connection details (optional).
Username: Enter a Username (It should be the same as given in the connection server).
Password: Enter the Password (It should be the same as provided in the connection server).
IP/Host: Enter database server details (from where the user wants to fetch data).
Port: Provide the server port number.
Default Key-Space Name: Enter the default keyspace name.
Consistency: Select a consistency option from the drop-down list (One/ Two/ Three/ Quorum).
Click the ‘Save’ option.

The success messages appear to confirm the connection and creation of the new data connector.
The newly created Cassandra Native Data Connector gets added to the Data Connectors list.
MongoDB

The following set of steps displays how to create a Mongo DB Data Connector:
Select the MongoDB connector icon from the Data Connector page.
The MongoDB Connector page opens.
Provide a name for the data connector.
Add Data Connector Description.
Provide the following information:
Connector Type: Select an option out of Standard or SRV
Username
Password
IP/Host address
Port number
Database Name
SSL Type: Select either of the choice out of SSL or NON SSL
Click the Save icon.


Check out the following images to get an idea of the required fields while choosing the SRV Connection Type option:


A success message appears, and the newly created Mongo DB Connector gets added to the Data Connectors list.
MongoDB for BI

The following set of steps displays how to create a MongoDB for BI data connector:
Select the ‘MongoDB for BI’ connector icon from the Data Connector page.
The ‘MongoDB Connector for BI’ connector page opens.
Provide a name for the data connector.
Provide the following information:
Username
Password
IP/Host address
Port number
Databased Name
Click the ‘Save’ icon.

A success message appears, and the newly created Mongo DB Connector gets added to the Data Connectors list.
PostgreSQL

The following set of steps displays how to create a PostgreSQL Data Connector:
Click the ‘PostgreSQL’ Data Connector icon from the Data Connector page.
The PostgreSQL Data Connector page opens.
Provide a name for the data connector.
Describe the data connection.
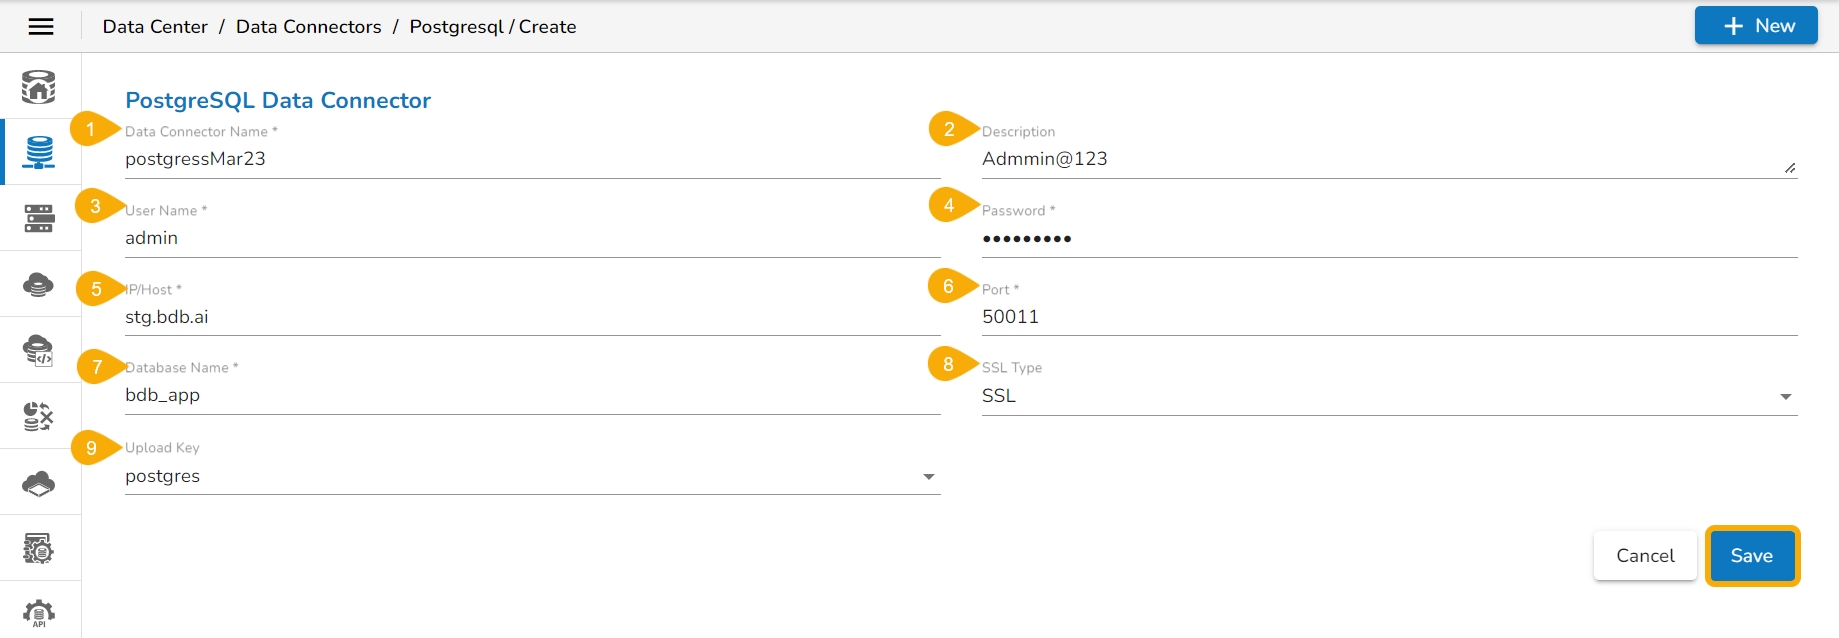
Provide the following information:
Username
Password
IP/Host
Port
Database Name
Data Connector Name: Provide a user-defined name to identify the data connector.
Description: Provide connection details (Optional).
Username: Enter a Username (It should be the same as given in the connection server).
Password: Enter the Password (It should be the same as provided in the connection server).
IP/Host: Enter database server details (from where the user wants to fetch data).
Port: Provide the server port number.
Database Name: Name of the database where you wish to store data.
SSL Type: Select SSL or Non SSL as choices.
Upload Key: Select a upload key using the drop-down menu (This field appears only if the SSL option has been selected for the SSL Type field).
Click the Save option.
A success message appears confirming the connection.

A success message appears, and the newly created PostgreSQL data connector gets added to the Data Connectors list..

Snowflake

The following set of steps displays how to create a Snowflake Data Connector:
Click the Snowflake Data Connector icon from the Data Connector page.
The Snowflake Connector page opens.
Provide the Data Connector name.
Describe the data connection (optional).
Enter the valid username.
Enter the correct password for the selected account.
Select a type by using the drop-down menu.
Provide the account name.
Provide the Database name.
Provide the Warehouse name.
Click the Save option.

The user gets a notification message appears if the connection gets successfully verified.

Another success message appears to inform you that the Data connector has been created successfully.

The newly created Snowflake Data Connector gets added to the Data Connectors list.
Pinot
This page explains steps to create a Pinot Data connector using the Data Center module.
Users can create a Pinot data connector to bring data from the PInot database. The following set of steps displays how to create a Pinot Data Connector:
Click the Pinot Data Connector icon from the Create Data Connector page.

The Pinot Data Connector page opens.
Provide the following information:
Provide the Data Connector name.
Describe the data connection (optional).
Enter the valid username.
Enter the correct password for the selected account.
Provide the IP address or host.
Provide the Port number.
Provide the Database name.
Select an SSL type from using the drop-down menu.
Click the Save option.

A success message appears confirming the connection.

Another success message appears confirming the creation of the Data Connector.

The newly created Pinot data connector gets added to the Data Connectors list.

File Data Connector
Check out the given illustration on how to create a file data connector under the Data Center module.
Provide the following information to create a File Data Connector:
Data Connector Name: Provide a user-defined name to identify the data source.
Description: Describe the Connection details (optional).
Click the Save option.

A success message appears to assure the connection.

The newly created file connector gets added to the data connector list.

API Connectors
This section aims to explain the steps on how to create API Data connectors.
API Connector
The user can call data from the API services using the API Connector.
Provide the following information to create an API Data Connector:
Click the New button
Click the API Connector icon from the Data Connector page.
The API Connector page opens.
API Name: Provide a name for the API connector.
The API Connector page opens.
API Name: Provide a name for the API connector.
Description: Describe the API connector.
Base URL: Provide URL of the API from where you want to fetch the data.
Select Open Id: Select an open id using the drop-down menu.
Click the Save option.

A notification message appears, and the new API Connector gets saved under the Data Connector list.

Amazon
The user can get data from the Amazon server using the Amazon Connector.

Provide the following information to create an Amazon Data Connector:
Select a link using the drop-down menu.
Provide the Seller id (The user can select the seller id from the drop-down list if already added before).
Provide the MWS Auth Token to authenticate the account.
Click the Verify Account option.

A success message appears to confirm that the account has been successfully verified.

The Amazon Marketplace connector page reopens with the ACCOUNT VERIFIED notification.
Provide a title for the Data Connector.
Click the Save option

A success message appears, and the newly created Amazon Marketplace Connector gets added to the Data Connectors list.

App Store
The user can get data from the App Store server using the App Store Data Connector.

Provide the following information to create an App Store Data Connector using the App Store Connector page:
Provide a name for the App Store Data Connector.
Describe the connection details (optional).
Provide the Following information to create an App Store Data Connector.
Email ID
Key ID
Issuer ID
Private Key
Click the Save option.

A success message appears, and the newly created App Store data connector gets added to the Data Connectors list.

Bing Ads
The user can get data from the Bing Ads server using the Bing Ads Data Connector.

Provide the following information to create a Bing Ads Data Connector:
Log in to a Bing Ads account by clicking on the Select Account option.

A new page appears asking to sign in for the chosen Microsoft account.

The Bing Ads connector page opens with a notification that the user has been logged in to the selected Microsoft account.
Provide a name for the Bing Ads Data Connector for identification.
Click the Save option to save the inserted information.

A success message appears the newly created Bing Ads Data Connector gets added to the Data Connectors list.
Dropbox
The user can get data from the Dropbox server using the Dropbox Data Connector.

Provide the following information to create a Dropbox Data Connector:
Click the Select Account option to log in to a Dropbox account.

The ‘Sign in’ page of Dropbox opens.
Enter the credentials to Sign in.

A message appears asking to allow the selected Dropbox account access to BDB.
Click the ‘Allow’ option to provide access to the selected Dropbox account.

The Dropbox connector page opens with the ‘Change Account’ option indicating that the selected account is connected.
Enter a Data Connector Name.
Click the ‘Save’ option.

A success message appears, and the newly created Dropbox Data Connector gets added to the Data Connectors list.

FTP Server
The user can get data from the FTP server using the FTP Server Data Connector.

Provide the following information to create an FTP Data Connector:
Data Connector Name: Provide a user-defined name to identify the data source.
Description: Describe the connector details (Optional).
Host: Enter database server details (from where the user wants to fetch data).
Port: Provide the server port number.
Username: Enter a Username (It should be the same as given in the connection server).
Password: Enter the Password (It should be the same as provided in the connection server).
Start Path: Give a defined path to start.
Click the Save option.

A success message appears, and the newly created FTP Server data connector gets added to the Data Connectors list.

The user can get data from the Facebook server for the mapped Facebook account using the Facebook Data Connector.

The following steps display how to create a new Facebook Data Connector:
Select the Add New Account option from the Select Account drop-down menu to add a new Facebook account.
Enter the credentials of a Facebook account to log in.

A new page opens, allowing BizViz to access the information from the logged-in Facebook account.
Click the ‘Continue as… The profile owner’s name’ if you wish to map the same account or use the Edit This option to edit the information.

Select the OK option to link BizViz with the selected Facebook account (it may ask for a few additional steps if there is no page created from the selected Facebook account).

By selecting the continuation option, the user gets notified as logged in to the selected Facebook account and the Facebook Connector page reopens.
Provide a title for the Data Connector.
Describe the Data Connection (Optional).
Click the Save option.

A success message appears, and the newly created Facebook Connector gets added to the Data Connectors list.

Facebook Ads
The user can get data from the Facebook Ads using the Facebook Ads Data Connector.

The following set of steps displays how to create a new Facebook Ads data connector.
Select the Add New Account option from the Select Account drop-down list add a new Facebook account.
The Facebook login page opens.
Provide a relevant email address or phone number
Provide the correct password for the selected account
Click the Log In option.

A new page appears to confirm whether the user wants to continue as the displayed name or wants to edit it.

A new window opens informing that BizViz would like to manage the ads, access your Facebook ads, and related states, and display a list of the pages you manage.
Click the OK option to give permission.

The Facebook Ads Connector page reopens with the notification that the user has logged in to the selected Facebook account.
Provide a Data Connector name.
Describe the data connection (optional).
Click the Save option.

A success message appears, and the newly created Facebook Ads Data Connector gets added to the Data Connectors list.

Firebase DB

The following set of steps displays how to create a Firebase DB Data Connector:
Click the Firebase Data Connector icon from the Data Connector page.
The Firebase Data Connector page opens.
Click the Select Account option.
A new page opens asking for valid credentials of a Google account.

Allow to access data from the selected Google Account by clicking the Allow option.

The Firebase Data Connector page opens with a notification that the user has successfully logged in to the selected account
Provide the Data Connector name.
Describe the Data connection (optional).
Click the Save option.

A success message appears, and the newly created Firebase data connector gets added to the Data Connectors list.
Fitbit

The following set of steps displays how to create a new Fitbit Data Connector.
Click the Fitbit Data Connector icon from the Data Connector page.
The Fitbit Data Connector page opens.
Log in to a Fitbit account by clicking on the Select Account option.
A new page opens, asking for the credentials for your Fitbit account.

A new page appears asking permission to get the data from the chosen Fitbit account.
Allow BDB to access data from the selected Fitbit account by clicking the Allow option.
The Fitbit Ads connector page opens with a notification that the user has been logged in to the selected Instagram account.
Provide a title to the newly created Data Connector.
Describe the data connection (optional)
Click the Save option to save the inserted information.

A success message appears, and the newly created Fitbit Data Connector gets added to the Data Connectors list.
Flipkart

The following set of steps displays how to create Flipkart Data Connector:
Click the Select Account option from the Flipkart Connector page.

Enter the credentials to get Flipkart Permission Registration for the selected Flipkart account.
Click the Sign In option.
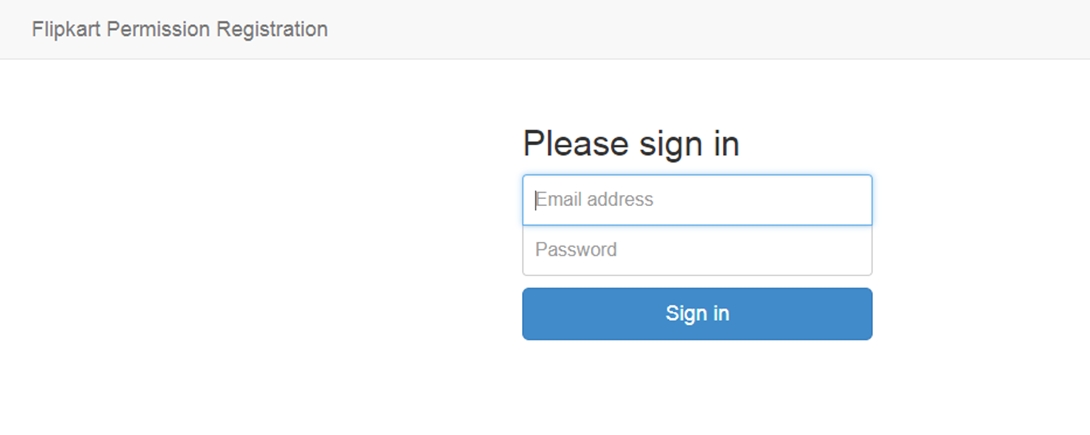
The Flipkart Connector page opens again with the connected Flipkart account, after the user has logged in to a Flipkart account.
Provide a title for the Data Connector.
Provide description for the Data Connector (It is an optional field).
Click the Save option.

A success message appears, and the newly created Flipkart Connector gets added to the data connector list.
Google AdWords

The following set of steps displays how to create a Google AdWords Data connector.
Click the Select Account option from the Google AdWords Connector page.
The user gets a Google page instructing them to enter a valid email id or contact number.

Provide the correct password for the selected Google account.

The user gets a page asking permission to allow BDB data access from their selected Google AdWords account.
Click the Allow option to permit data access.
The Google AdWords connector page opens with a notification that the user has logged in to the selected Google account.
Provide a data connector name.
Describe the data connector (optional).
Click the Save option.

A success message appears, and the newly created Data Connector gets added to the Data Connectors list.
Google Analytics
Check-out the given walk-through on how to create a Data Connector using the Google Analytics as data source.


The following set of steps displays how to create a Google Analytics Data Connector.
Select the Add New Account option to add a new Google account or select an added Google account from the Select Account drop-down menu.
The user gets redirected to log in to a Google account, if the Add New Account is selected.

Give access to the analytics data by clicking the Allow option.

The user gets redirected to the data connector form with an authorization code in the URL, after getting the access permission. The form mentions that the user has been logged in to the selected Google account.
Data Connector Name: Enter a user-defined name to identify the data connector.
Description: Describe the data connector (optional).
Click the Save option.

A success message appears, and the newly created Google Analytics data connector gets added to the Data Connectors list.
Google Big Query

The following set of steps displays how to create a Google Form Data Connector:
Click the Google Big Query connector type icon from the Data Connector page.
The Google Big Query Connector page opens.
Select the Add New Account option to add a new Google account or select an added Google account from the Select Account drop-down menu.
The user gets redirected to select a Google account.
Provide valid credentials to select a Google Account.

A new page opens, asking the user to share the information from the selected Google account.
Click the ‘Allow’ option.

The Google Forms Connector page opens again with the selected Google account.
Provide a name for the Google Big Query Connector.
Click the ‘Save’ option.

A success message appears to confirm the creation of the Google Form Connector. The newly created Google Form Connector gets added to the Data Connectors list.
Google Forms

The following set of steps displays how to create a Google Form Data Connector.
Click the Google Forms connector type icon from the Data Connector page.
The Google Form Connector page opens.
Click the Select Account option from the Google Form Connector page.
The user gets redirected to select a Google account.
Provide valid credentials to select a Google Account.
A new page opens, asking the user to share the information from the selected Google account with BDB.
Click the Allow option.

The Google Forms Connector page opens again with the Change Account option.
Provide a name for the Google Forms Connector.
Click the Save option.

A success message appears to confirm the creation of the Google Form Connector. The newly created Google Form Connector gets added to the Data Connectors list.
Google Sheet

The following set of steps displays how to create a Google Sheet Data Connector:
Click on the Google Sheet connector type from the Data Connector page.
The Google Sheet Connector page opens.
Click the Select Account option from the Google Sheet Connector page to use an existing Google Sheet account.
Enter the credentials of a Google Account to sign in with your Google account.

A new page opens, asking the user to share their information with BizViz.
Click the Allow option to share the same.

The Google Sheet Connector page opens with the Change Account option indicating that a Google account has been selected.
Provide a name for the Data Connector.
Click the Save option.

A success message appears, and the newly created Google Sheet data connector gets added to the Data Connectors list.
HubSpot

The following set of steps displays how to create a HubSpot Data Connector:
Click the HubSpot Data Connector icon from the Data Connector page.
The HubSpot Data Connector page opens.
The user needs to Sign in to a Hub Spot account by clicking on the Select Account option.
A new page opens asking the credentials to log in to a HubSpot account. Since we are using Google credentials, so need to choose the Sign in with Google option.
Choose a Google Account from the listed accounts.
Enter the password for the selected account.
Click the Next option.
Choose an option from the given choices under the PRODUCTS option.
The HubSpot Data Connector page opens with the Change Account option and a notification indicating that the user has successfully logged in to the selected account.
Provide a name for the HubSpot Data Connector.
Click the Save option.

A success message appears, and the newly created HubSpot Data Connector gets added to the Data Connectors list.
Jira

Provide the following information to create a JIRA Data Connector:
Click the JIRA connector type icon from the Data Connector page.
The JIRA Data Connector page opens.
Data Connector Name: Provide a user-defined name to identify the data connector.
Description: Describe the data connection.
Username: Enter a Username (It should be the same as given in the connection server).
Password: Enter the password (It should be the same as provided in the connection server).
Server URL: Enter the server URL link.
Click the Save option to verify the connection and save the new connector.

A success message appears, and the newly created JIRA data connector gets added to the Data Connector list.

Lead Squared

The following set of steps displays how to create a Lead Squared data connector:
Click the Lead Squared Data Connector type icon from the Data Connector page.
The Lead Squared Data Connector page opens.
Provide the following information:
Data Connector name
Description
Access Key
Secret Key
Region Type
Database Name
Click the Save option.

A message appears to assure successful authentication.

Another success message appears, and the newly created Leadsquared data connector gets added to the Data Connectors list.


The following set of steps displays how to create a LinkedIn Data Connector.
Select the LinkedIn connector type icon from the Data Connector page.
The LinkedIn Connector page opens.
Click the Select Account option.

The user gets redirected to a new window to access a valid LinkedIn account.
Insert the credentials of the LinkedIn account to log in.
Click the Allow access option to provide permission to BDB for accessing data from the selected LinkedIn account.

The LinkedIn Connector page reopens with the Change Account option indicating that a LinkedIn account is selected (Click the ‘Change Account’ option if you wish to change the selected account).
Provide a name for the LinkedIn Data Connector (E.g., In this case, it is defined as Sample LinkedIn Data Connector).
Click the Save option.

A success message appears, and the newly created data connector gets added to the Data Connectors list.
Linkedin Ads
The following set of steps displays how to create a LinkedIn Ads data connector:
Click the LinkedIn Ads Data Connector type icon from the Data Connector page.

The user gets directed to the LinkedIn Ads Data Connector page.
Select an account or add a new account using the drop-down menu.
The LinkedIn Login page opens for signing into the account.

A new page opens, asking permission for BDB to access data from the selected LinkedIn account.
Click the Allow option to give data access permission.

The LinkedIn Ads Data Connector page opens with a notification that the users are successfully logged in to the selected account.
Provide a name for the Data Connector.
Describe the Data connection (optional).
Click the Save option.

A success message appears, and the newly created LinkedIn Ads data connector gets added to the Data Connectors List.
MS Dynamics
The following set of steps displays how to create an MS Dynamics Data Connector.
Click the Microsoft Dynamics Data Connector icon from the Data Connector page.
The Microsoft Dynamics Data Connector page opens.
Provide the following information:
Tenant ID/Directory ID
Resource URL
Client ID/ Application ID
Client Secret/ Keys
Add the given URL link to register your Azure app. Follow the below-given steps:
Login to your Azure Account as Admin
Click Azure Active Directory
Click App Registration
Select Your App
Click the Settings option.
Click reply URL
Add the given URL (https://app.bdb.ai/datacenter/oauth-redirect.html)
A new page opens asking to log in to the Microsoft Dynamics CRM account by using the Select Account option.
Provide the Data Connector Name.
Describe the Data Connection (optional).
Click the Save option.

A success message appears, and the newly created Microsoft Dynamics Data Connector gets added to the Data Connectors list.
Mailchimp
The following set of steps displays how to create a MailChimp data connector.
Select the MailChimp connector from the Data Connector page.
The MailChimp Connector page opens.
Provide the following information:
Data Connector Name
Description
Username
API Key
Click the Save option.

A success message appears, and the newly created MailChimp Data Connector gets added to the Data Connectors list.

QuickBooks
The following set of steps displays how to create a QuickBooks Data Connector.
Select the QuickBooks icon from the Data Connector page.
The QuickBooks Connector page opens.
Click the Select Account option for login to a QuickBooks account.

The Sign in page of the QuickBooks opens.
Enter the credentials to Sign in.

The user receives a code to assure the authenticity of the selected account. The users get a verification code through the registered email or mobile.

After verifying the authenticity code, the user gets a new window asking to authorize BDBizViz.
Click the Connect option.

The QuickBooks connector page reopens with the ‘Change Account’ option indicating that a QuickBooks account has been selected.
Enter a Data Connector Name.
Click the Save option.

A success message appears, and the newly created QuickBooks Connector gets added to the Data Connectors list.
SalesForce

The following set of steps displays how to create a Salesforce data connector:
Select the Salesforce icon from the Data Connector page.
The user gets directed to the Salesforce Connector page.
Select an option using the drop-down list (Salesforce/Sandbox).
Click the Select Account option to select an account.
The Salesforce login page opens.
Provide valid credentials (Username and Password).
Click the Log In option.

The Salesforce Connector page reopens with the Change Account option indicating that a Salesforce account is selected.
Provide the Data Connector name.
Describe the data connection (optional).
Click the Save option.

A success message appears, and the newly created data connector gets added to the Data Connectors list.

ServiceNow
The following set of steps displays how to create a ServiceNow Data Connector:
Select the ServiceNow icon from the Data Connector page.
The Service Now Connector form opens.
Navigate to the https://developer.servicenow.com/app.do#!/instance link.
Provide valid credentials.
A new page appears with the instance link.
Refresh the instance.
Copy the instance link and use it in the Developer Instance URL provided in the Service Now connector form.
Fill in the following information:
Data Connector Name: A user-defined name to identify the data source.
Description: Describe the connector details.
Instance Username: Enter the Instance username.
Password: Enter the password for the selected user.
Developer Instance URL: Provide the developer’s Instance URL.
Click the Save option to verify and save the new data connector details.

A success message appears, and the newly created ServiceNow data connector gets added to the Data Connectors list.

The following set of steps displays how to create a Twitter Data Connector:
Select the Twitter connector type icon from the Data Connector page.
The Twitter Connector page opens.
Either select a Twitter account listed in the drop-down menu or add a new Twitter account (The steps displayed over here guide the user to add a new Twitter account).

An authorization page opens.
Enter the credentials to Sign in.
Click the Authorize app option to authorize the Twitter BDB production to use data from your account.

Another page opens, asking permission to authorize Twitter BDB Production to use your account.

The Twitter Connector page reopens with a notification that you are logged in to the selected account.
Enter a Data Connector Name.
Describe the Data Connection.
Click the Save option.

A success message appears, and the newly created Twitter Connector gets added to the Data Connectors list.
Twitter Ads
The following set of steps displays how to create a Twitter Ads data connector.
Click the ‘Twitter Ads’ Data Connector icon from the Data Connector page.
The user gets directed to the Twitter Ads Data Connector page.
Select an account or Add a new account using the drop-down menu (the steps given below guide the user to add a new Twitter account).

An Authorization page opens.
Provide the credentials to log in to the Twitter account.
Click the Authorise app option.

Another window opens to confirm the authorization process.
Click the Authorise app option.

The Twitter Ads Data Connector page opens with a notification that the user is successfully logged in to the selected account.
Provide the data connector name.
Describe the data connector.
Click the Save option.

A success message appears, and the newly created Twitter Ads data connector gets added to the Data Connector List.
Yelp
The following set of steps displays how to create a Yelp Data Connector.
Click the ‘Yelp’ Data Connector icon from the Data Connector page.
The Yelp Data Connector page opens.
Provide the following information to create the Data Connector:
Data Connector Name
Description
Access Key
Click the Test option
A message appears to confirm the success of the connection authentication.
The Save option gets enabled.

Click the Save option.
A success message appears.

The newly created Yelp Data Connector gets added to the Data Connectors List.
YouTube
The following set of steps displays how to create a YouTube data connector:
Click the YouTube Data Connector icon from the Data Connector page.
The YouTube Data Connector page opens.
Click the Select Account option.

A new page appears asking the credentials to log in to a Google account.

After logging in to a Google account, the user needs to choose from the multiple Google accounts (if multiple Google accounts are added).
E.g., the ‘nividhondemand’ account has been selected in the below-given image:

Click the Allow option to permit BDB to access YouTube data from the attached Google account.

The YouTube connector page opens with a notification that the user has been logged in to the selected Google account.
Provide a title for the YouTube Data Connector.
Click the Save option to save the inserted information.

A success message appears, and the newly created YouTube Data Connector gets added to the Data Connectors list.
ZOHO Books
The following set of steps displays how to create a ZOHO Books data connector:
Select the ZOHO Books connector from the Data Connector page.
The ZOHO Books Data Connector page opens.
Provide Username.
Give a valid Password for the account.
Click the Save option after the data connection gets verified.

A success message appears to assure the connection.
Another success message appears, and the newly created ZOHO Books Connector gets added to the Data Connectors list.
Others
This section describes steps to configure the remaining Data Connectors.
Check out the given walk-through on how to create an API Data Connector under the Data Center module.

MS Sql Olap
Provide the following information to create an MSSQL OLAP Data Connector:
Data Connector Name: Provide a user-defined name to identify the data connector.
Description: Provide connection details (Optional).
Username: Enter a Username (It should be the same as given in the connection server).
Password: Enter the Password (It should be the same as provided in the connection server).
Address Type (IP/Host): As per the selected Address type, a field appears below. The user needs to enter database server details (from where the user wants to fetch data).
Port: Provide the server port number.
Database Name: Name of the database where you wish to store data.
Click the ‘Save’ option.

The success messages appear to confirm the connection and creation of a new connector.
The newly created MSSQL OLAP data connector gets added to the Data Connectors page.
Data Store
Provide the following information to create a Data Store Data Connector.
Data Connector Name: Provide a user-defined name to identify the data connector.
Data Store Service: Select a data store service from the drop-down list.
Click the ‘Save’ option.

A message appears to confirm the creation of the new data connector.

The newly created Data Store data connector gets added to the Data Connectors list.
OData

Provide the following information to create an OData Data Connector:
Data Connector Name: Provide a user-defined name to identify the data source.
Description: Provide connection details.
Database Type: Select the Database type using the drop-down menu in which you wish to store the data(OData V1-V2/OData V3-V4).
Username: Enter a Username (It should be the same as given in the connection server).
Password: Enter the Password (It should be the same as provided in the connection server).
Base Url: Enter Service Root URL or Base URL.
Click the ‘Save’ option.

The success messages appear to assure the new OData connection.
The newly created OData Data Connector gets added to the Data Connectors list.
Spark SQL

Provide the following information to create a Spark SQL Data Connector:
Data Connector Name: Provide a user-defined name to identify the data source.
Description: Provide the connection details (optional).
Username: Enter a Username (It should be the same as given in the connection server).
Password: Enter the password (It should be the same as provided in the connection server).
IP/Host: Enter database server details (from where the user wants to fetch data).
Port: Provide the server port number.
Click the ‘Save’ option.

The newly created Spark SQL Data Connector gets added to the Data Connectors list.

AWS Redshift

Provide the following information to create an AWS Redshift Data Connector:
Data Connector Name: Provide a user-defined name to identify the data source.
Description: Provide the Connection Details.
Username: Enter a Username (It should be the same as given in the connection server).
Password: Enter the password (It should be the same as provided in the connection server).
IP/Host: Enter database server details (from where the user wants to fetch data).
Port: Provide the server port number.
Database Name: Name of the database where you wish to store the data.
Click the ‘Save’ option.

The success messages appear to assure the data connection, and the newly created AWS Redshift data connector gets added to the Data Connectors list.

SAP HANA
Provide the following information to create an SAP Hana Data Connector:
Data Connector Name: Provide a user-defined name to identify the data connector.
Description: Provide connection details (Optional).
Username: Enter a Username (It should be the same as given in the connection server).
Password: Enter the Password (It should be the same as provided in the connection server).
IP/Host: Enter database server details (from where the user wants to fetch data).
Port: Provide the server port number.
Click the ‘Save’ option.

The newly created SAP Hana data connector gets added to the Data Connectors list.