> For the complete documentation index, see [llms.txt](https://docs.bdb.ai/data-center-2/llms.txt). Markdown versions of documentation pages are available by appending `.md` to page URLs; this page is available as [Markdown](https://docs.bdb.ai/data-center-2/data-center/data-stores/creating-a-new-data-store/data-store-using-an-api-data-connector.md).

# Data Store using an API Data Connector

This page displays step-by-step process on how to create an API Data Connector based Data Store.

{% hint style="success" %}
*Check out the given walk-through on how to create a Data Store based on an API Data Connector.*
{% endhint %}

<figure><img src="https://859511478-files.gitbook.io/~/files/v0/b/gitbook-x-prod.appspot.com/o/spaces%2FGDmsjfjJBNqow7Fo97cO%2Fuploads%2FpGbmRrIuOThllQZx16is%2FAPI%20Data%20store%20creation.gif?alt=media&#x26;token=f1525d9e-ae1f-40b3-8a15-213d7c97a001" alt=""><figcaption></figcaption></figure>

* Navigate to the Data Center homepage.
* Click the ***New*** option.
* Select the ***Data Stores*** option from the context menu.

<figure><img src="https://859511478-files.gitbook.io/~/files/v0/b/gitbook-x-prod.appspot.com/o/spaces%2FGDmsjfjJBNqow7Fo97cO%2Fuploads%2FaOV59oxTCHAdNhrKAFjN%2Fimage.png?alt=media&#x26;token=1d3261a8-0db6-4b0b-bd6e-93eead6c3b6c" alt=""><figcaption></figcaption></figure>

* Choose an API connector type from the filter panel.
* Select a data connector from the displayed list.
* Click on the ***Plus symbol*** option to create the Data Store.

<figure><img src="https://859511478-files.gitbook.io/~/files/v0/b/gitbook-x-prod.appspot.com/o/spaces%2FGDmsjfjJBNqow7Fo97cO%2Fuploads%2FjbBQGr4hv8iZozYUO7Dm%2Fimage.png?alt=media&#x26;token=8d527c92-b7f9-4e48-b5bb-8807ab9a8ed5" alt=""><figcaption></figcaption></figure>

## **Getting Data**  <a href="#getting-data" id="getting-data"></a>

* The ***Getting Data*** tab opens.
* Provide a name for the Data Store.
* The name of the selected Data Connector gets displayed by default.
* Select a data set using the ***Data Set List*** drop-down menu.
* Use a checkmark in the given box to ***Enable Scheduler***
* Click the ***Next*** option.

<figure><img src="https://859511478-files.gitbook.io/~/files/v0/b/gitbook-x-prod.appspot.com/o/spaces%2FGDmsjfjJBNqow7Fo97cO%2Fuploads%2FdnxaD64c4whBP6CCs2cM%2Fimage.png?alt=media&#x26;token=f4db6865-14a5-4a06-a2b7-2dbff784ac39" alt=""><figcaption><p>Configuring the <em><strong>Getting Data</strong></em> tab</p></figcaption></figure>

## **Data Type Definition** <a href="#data-type-definition" id="data-type-definition"></a>

* The ***Data Type Definition*** tab opens.
* The user can interchange the available Dimensions, Measures, and Time fields to define data.
* Enable dimension fields with a checkmark to get in the LOV of the Filter pane of the Self-service BI Report.
* Click the ***Next*** option to proceed.

<figure><img src="https://859511478-files.gitbook.io/~/files/v0/b/gitbook-x-prod.appspot.com/o/spaces%2FGDmsjfjJBNqow7Fo97cO%2Fuploads%2F61UWKAQAJ95KkuRLvemL%2Fimage.png?alt=media&#x26;token=d38362db-fa1c-4812-9ced-4a29aed49423" alt=""><figcaption><p>Configuring the <em><strong>Data Type Definition</strong></em></p></figcaption></figure>

## Hierarchy Definition <a href="#hierarchy-definition" id="hierarchy-definition"></a>

* The ***Hierarchy Definition*** tab opens.
* Add a new Drill Def box by clicking the ***Add*** icon.
* Drag and drop Dimension fields or Time field to create a hierarchy (The dragged and dropped ***Time*** fields gets divided into three level granularities, E.g., Year>Month>Date).
* Click the ***Next*** tab to proceed.

<figure><img src="https://859511478-files.gitbook.io/~/files/v0/b/gitbook-x-prod.appspot.com/o/spaces%2FGDmsjfjJBNqow7Fo97cO%2Fuploads%2FrLq6rDVpSdvPZuHkZmX4%2Fimage.png?alt=media&#x26;token=2f389440-68e3-4ca9-8d66-333a310c3541" alt=""><figcaption><p>Configuring the <em><strong>Hierarchy Definition</strong></em> tab</p></figcaption></figure>

## Data Restrictions <a href="#data-restrictions" id="data-restrictions"></a>

* The ***Data Restrictions*** tab opens.
* Click the ***Add*** icon.
* Select a Dimension from the drop-down menu.
* Enter a User Property based on the inserted custom fields of a specific user(s) or user group(s).
* Click the ***Next*** option to proceed.

<figure><img src="https://859511478-files.gitbook.io/~/files/v0/b/gitbook-x-prod.appspot.com/o/spaces%2FGDmsjfjJBNqow7Fo97cO%2Fuploads%2FfWmuNNLz2u5Mg3dqD8hY%2Fimage.png?alt=media&#x26;token=ffcd0027-1a8f-4ba1-9a34-514240916e47" alt=""><figcaption><p>The <em><strong>Data Restriction</strong></em> tab</p></figcaption></figure>

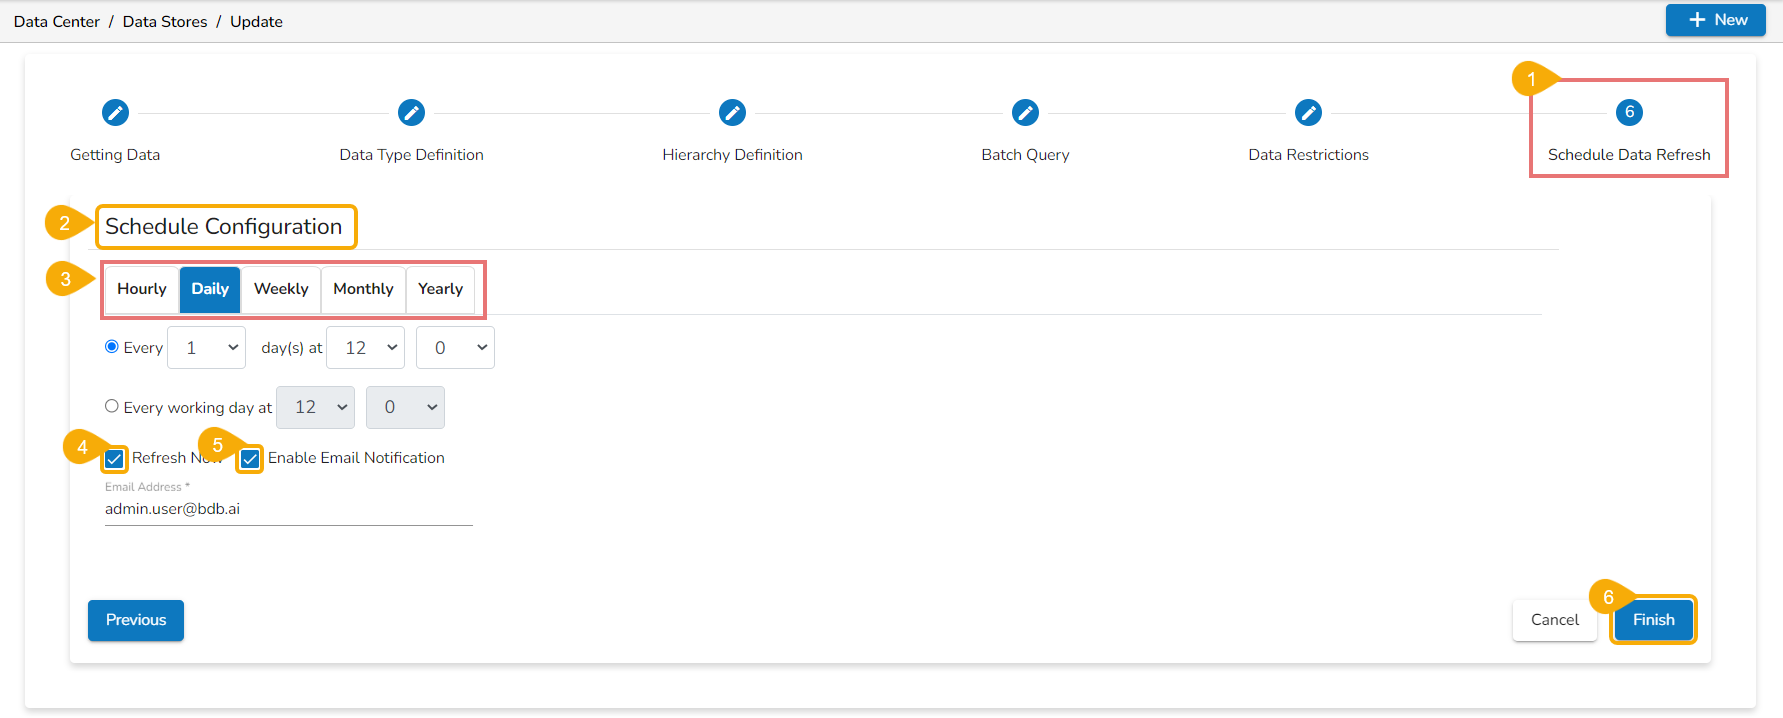
## Schedule Data Refresh <a href="#schedule-data-refresh" id="schedule-data-refresh"></a>

* The ***Schedule Data Refresh*** tab opens.
* The following options are provided to Schedule refresh the data:
  * Hourly&#x20;
  * Daily (default option)
  * Weekly
  * Monthly
  * Yearly
* Select any one option from the above-given list and configure the required information to set the data refresh interval.
* Select the ***Refresh Now*** option by enabling the box to refresh the Data Store immediately after its creation.
* Enable Email Notification by enabling the option.
  * Provide the Email Address on which you want the notification email to be sent.
* Click the ***Finish*** option.

<figure><img src="https://content.gitbook.com/content/j2SqA9Ec9HkYsyrU85qy/blobs/wTeZUe2TIX0igBbEXi9g/image.png" alt=""><figcaption><p>Configuring the <em><strong>Schedule Data Refresh</strong></em> tab</p></figcaption></figure>

* A success message appears to inform about the creation of a new data store.
* The newly created Data Store gets added to the Data Stores list.

<figure><img src="https://859511478-files.gitbook.io/~/files/v0/b/gitbook-x-prod.appspot.com/o/spaces%2FGDmsjfjJBNqow7Fo97cO%2Fuploads%2FUzOgVcXaNPU6TdTz24fV%2Fimage.png?alt=media&#x26;token=54ffb305-2be3-4dce-85de-17283561f185" alt=""><figcaption><p>A new Data Store based on an API connector gets added at the top of the Data Stores list</p></figcaption></figure>